Hi. How are you? Does Your Age Define You? Does how old you feel match how old you are? In my head I will always be 22 years old – even though I’m in my mid forties. I’m determined that however old I become, my age will never define me. My body may limit me, but I will always search for ways to to live my life at its fullest.
Be inspired to not let your age define you.
Why should we limit ourselves, just because Society demands that once we reach a certain our hair should be cut to a certain length, permed and then have a blue rinse!!! I know that that is becoming less so these days, but do we /should we limit, or change the way we behave, dress, challenge ourselves just because we reach a certain age??
My mum is a huge inspiration to me. She recently passed her driving test – first time around, after taking lessons in her mid 60’s. She certainly didn’t let her age determine her ability to learn a new skill. I am so proud of her. Firstly for taking on the challenge of learning to drive and secondly, her determination to succeed and pass her test.
Anything is possible if you set your mind to succeed.
Our eldest daughter is sitting her GCSE’s this summer and there is huge pressure from her school, teachers, peers and society to ‘do well’. Whilst encouragement is good, the sheer amount of pressure ‘to do well as the results will affect her choices for the rest of her life’– is rubbish!!
I have friends who have trained to be social workers, teachers and counsellors in their 40’s and 50’s. They worked, married, had children and decided to embark on a new career. I applaud and respect them so much. They truly are evidence that their age did not define them.
Make the most of ever opportunity, it may not pass by you again.
There are some amazingly talented children who master playing a musical instrument at a very young age. Beethoven wrote his first symphony age 5. He didn’t allow others to define his ability, nor should you! I started this blog in my mid 40’s knowing nothing AT ALL about how to go about setting up a website, widgets, thumbnails, plugins, code (half of which I still don’t understand, but I’m learning). I follow all different kinds of bloggers, including – beauty and fashion, lifestyle, photography, food and drink!!!
I quite often wear my hair up, sometimes in a ponytail. I was once asked “At what age do you think a ponytail would be unsuitable?”. I was astounded. Partly because it had never occurred to me that it might become ‘unsuitable’ and partly because I was surprised that someone would even think that way (I am kinda naive!!).
Do you feel confined or restricted by your age? Do you think it’s appropriate, as people grow older that they dress and present themselves at the age they are? Do you prefer to live outside of the box, seeing age as no hindrance to the life you intend to live? Have you accomplished something later in life, that you never dared to believe you could in your younger days?
How does this make you feel? Does Your Age Define You?
Hello there, thank you for stopping by. Do you mind me asking you a question? Am I being Silly about using Silicone???
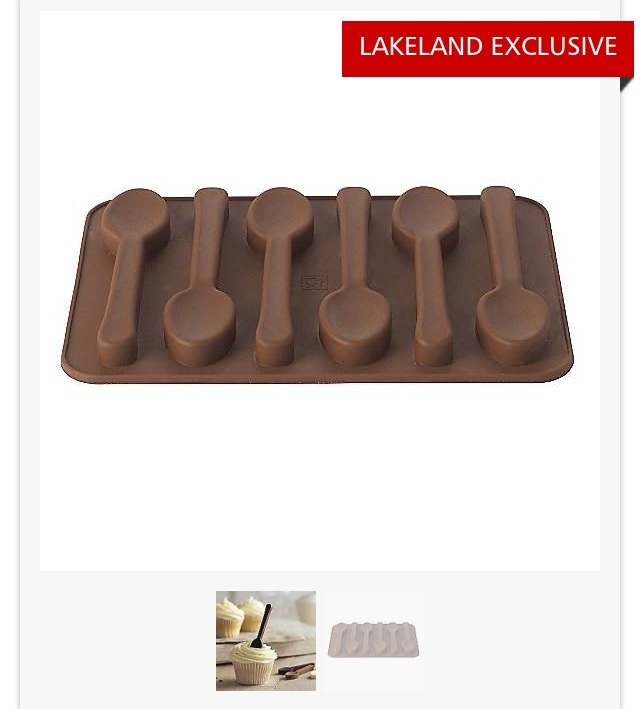
Cute little chocolate spoons made in a Silicone mould.
The photo above shows gorgeous little chocolate spoons, made in a Silicone mould.
Silicone chocolate spoon mould, available from Lakeland.
The little choccie spoons are made in this lovely, flexible, Silicone mould. I’m pretty ok with that. It’s a mould! It doesn’t go in the oven, so I have faith that it’s ok to do the job of setting chocolate that’s poured into the little spoon shapes.
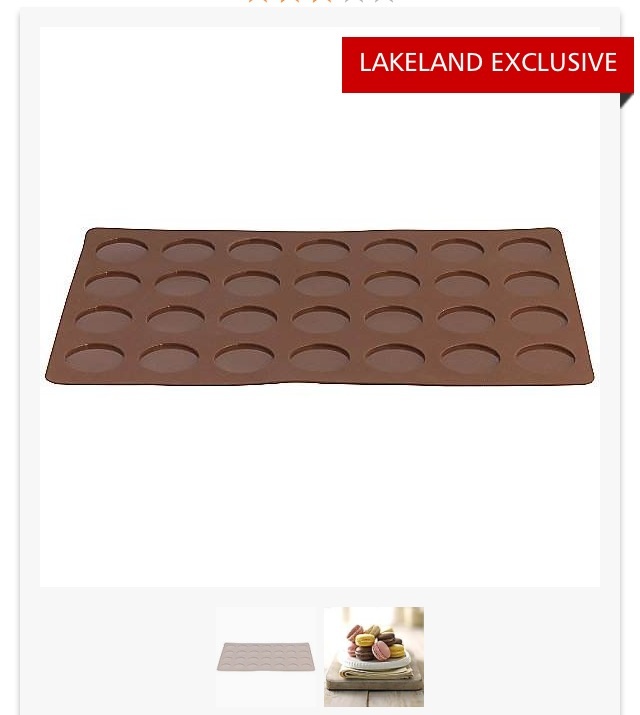
So all good so far. Now here comes the bit I struggle with. Baking, in the oven, using Silicone as cupcake cases, cake tins (Silicones???) and finally, as well as all the other shapes and sizes that Silicone bakeware comes in, this……..
A Silicone macaroon mould/template.
I just can’t get my head around using something ‘plastic’ in the oven, in heat, where it’s hot, to cook something in.
I know it must be fine for use as baking equipment. I’ve seen chefs and cooks (including Nigella – she wouldn’t steer me wrong – would she???!) use Silicone for baking on the TV and they seem fine. It’s just, well, it’s not metal. Cake tins are metal (the clue is in the name!!)! They are sturdy and strong and don’t, for one moment look like they are going to MELT in the oven (don’t even get me started on whether they are safe, or if they are going to leach poisonous, plastic, chemicals into my food????).
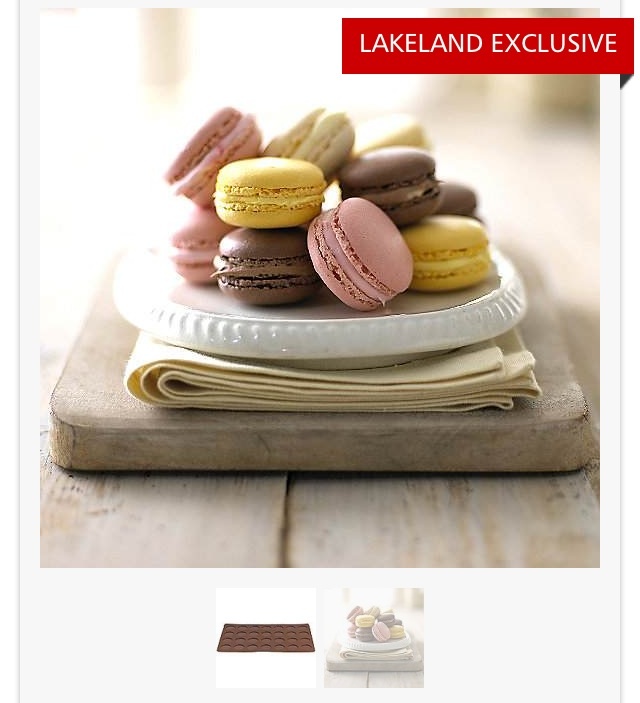
Am I alone??? Are they really safe?? Is Silicone better than metal??? You see I’m just not convinced. I’ve been wanting to make Macaroons for ages. Every time I get a new Lakeland catalogue through the post, the Macaroon mould speaks to me – not literally!!! I want to make these…….
Perfect, precise, pretty Macaroons – cooked on a Silicone sheet – help???!!!
Please help me? Have you cooked/baked with Silicone. Does it work? Did you get poisoned – I’m serious here people. Is it fiddly to work with – the Macaroon mat looks very floppy and not sturdy, if I have to put it on a baking sheet doesn’t that defeat the object of using Silicone in the first place? Does it make food taste odd??
I really need your help to decide if I should invest in Silicone bakeware or stick with my solid metal (very reassuring that solid and metal bit!) bakeware???
Please share your thoughts and experiences with me? I really would appreciate your help with this.
Thank you. Sammie x
Note : All pictures taken from the current Lakeland catalogue.
Hi, there. How are you today? I woke up and felt the need to bake – it’s been too long. As soon as I checked my blog posts I realised it’s been ages since I have posted a cookie recipe. So, today I bring you my Cranberry Oat Cookies.
Although I haven’t posted a new recipe since my last Cookie post, that doesn’t mean I have abstained from baking cookies. Rather it means I’ve baked Cookies I’ve already posted. Confused yet? So I baked a batch of Cranberry Oat Cookies. I think these may be my favourite Cookies today!
Since I really fancied Cranberries, Oats and Almonds I made these new cookies, throwing in all the ingredients hoping they would turn out ok. Oooh they are so much more than ok they are scrumptious.
Preheat the oven to 180C/160C fan oven, has mark 4, 350F
Making And Shaping The Cookies:
First of all, unless using non stick, line 2 baking trays with baking parchment.
Into a large bowl add the butter, sugar and salt. Beat together until pale and fluffy – I used an electric whisk, a stand mixer with the paddle attachment fixed is fine.
Add the egg yolk and vanilla/almond extracts and thoroughly mix in.
Next add the flour, oats, cranberries and flaked almonds. Mix until just combined.
Take about a heaped tablespoon of the Cookie dough and roll into a ball using your hands.
Place the Cranberry OatCookie dough balls onto the baking tray.
Cranberry Oat Cookie Dough Balls
Using your fingers gently press down to lightly flatten them.
Baking The Cookies
Place the cookies into the middle and lower part of the oven.
Bake for 25-30 minutes until golden brown.
As soon as the cookies are golden, remove from oven and allow to fully cool on the baking sheets. This allows the Cranberry Oat Cookies to firm up.
Cranberry Oat Cookies
Store the cold cookies in an airtight container and eat within a week.
If You Have Enjoyed This Recipe For Cranberry Oat Cookies You May Also Like These:
Since one of my best friends has been unwell recently, a fresh delivery of Cookies will be just the boost she needs. As a dear friend, who also has a sweet tooth I know she will enjoy these. So I can stop by for a cuppa and chat while sharing these cookies. Because food always tastes better when it’s shared! Who will you share your Cookies with?
So, whatever you are making, baking and creating in your kitchens, have fun preparing and sharing your feast.
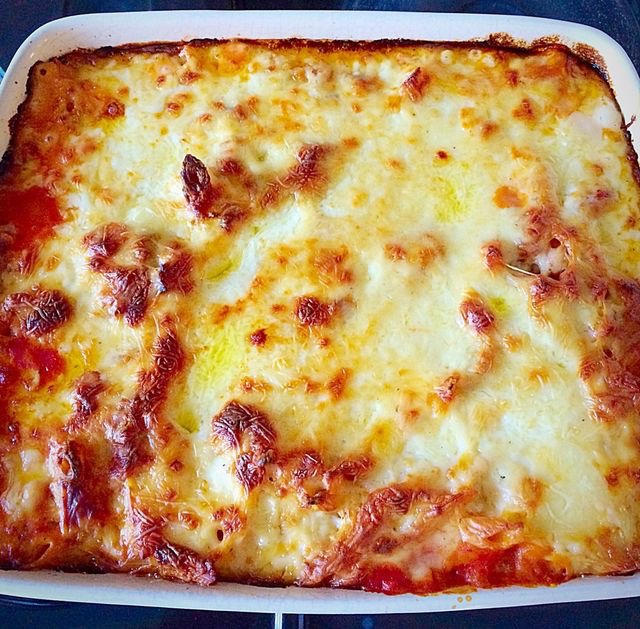
Hi, roadway I’m sharimg my recipe for Chicken Four Cheese Lasagne. It is a tasty twist on a classic dish. While there are a few steps to follow, each part of the recipe is easy to follow. And there is no need to precook the lasagne sheets. Making this recipe using minced chicken is a tasty twist on an Italian classic.
Delicious, cheese sauce topped, chicken lasagne.
As a busy household, make ahead meals are a life, or should I say a sanity saver.
A perfect, portable meal for sharing with others.
By substituting beef with minced chicken, the resulting baked lasagne becomes a lighter dish. Not lighter in calories, with the delicious four cheese sauce. Rather, not as heavy on the stomach. And the four cheese sauce was the result of me raiding the fridge for leftover Christmas cheese.
The Four Cheese Sauce tops of this lasagne perfectly!!
Since minced chicken may not be available everywhere, minced turkey is a great substitute. Alternatively, processing skinless chicken breasts, thighs or a combination in a food processor would be another way to make your own chicken mince. Another option, finely chopped chicken using a sharp knife would work and give the lasagne added texture.
Recipe : Chicken Four Cheese Lasagne Serves 6-8 portions.
1 Green Pepper – washed, deseeded and finely diced
2-3 Carrots – peeled and finely diced
3 Garlic Cloves – minced or crushed (using a garlic press)
3 x 400g Chopped Tinned Tomatoes
2tbsp Tomato Puree
1tsp Dried Mixed Herbs – or fresh basil, oregano, parsley and thyme – to taste
1tsp Sugar
Salt and Ground Black Pepper – to taste
Cheese Sauce :
3tbsp Butter
3tbsp Plain White Flour
750-800ml/Approx 26fl oz Whole Milk
6oz Hard Cheese – I used a 50/50 mixture of Mature Cheddar and Swiss Cheese cut into small cubes or grated
4.5oz/125g Riccota Cheese
250g/8.5oz Mozzarella Cheese
1 tsp Nutmeg – freshly grated if possible
Salt and Freshly Ground Black Pepper to taste.
Butter – For Greasing the Lasagne Dish
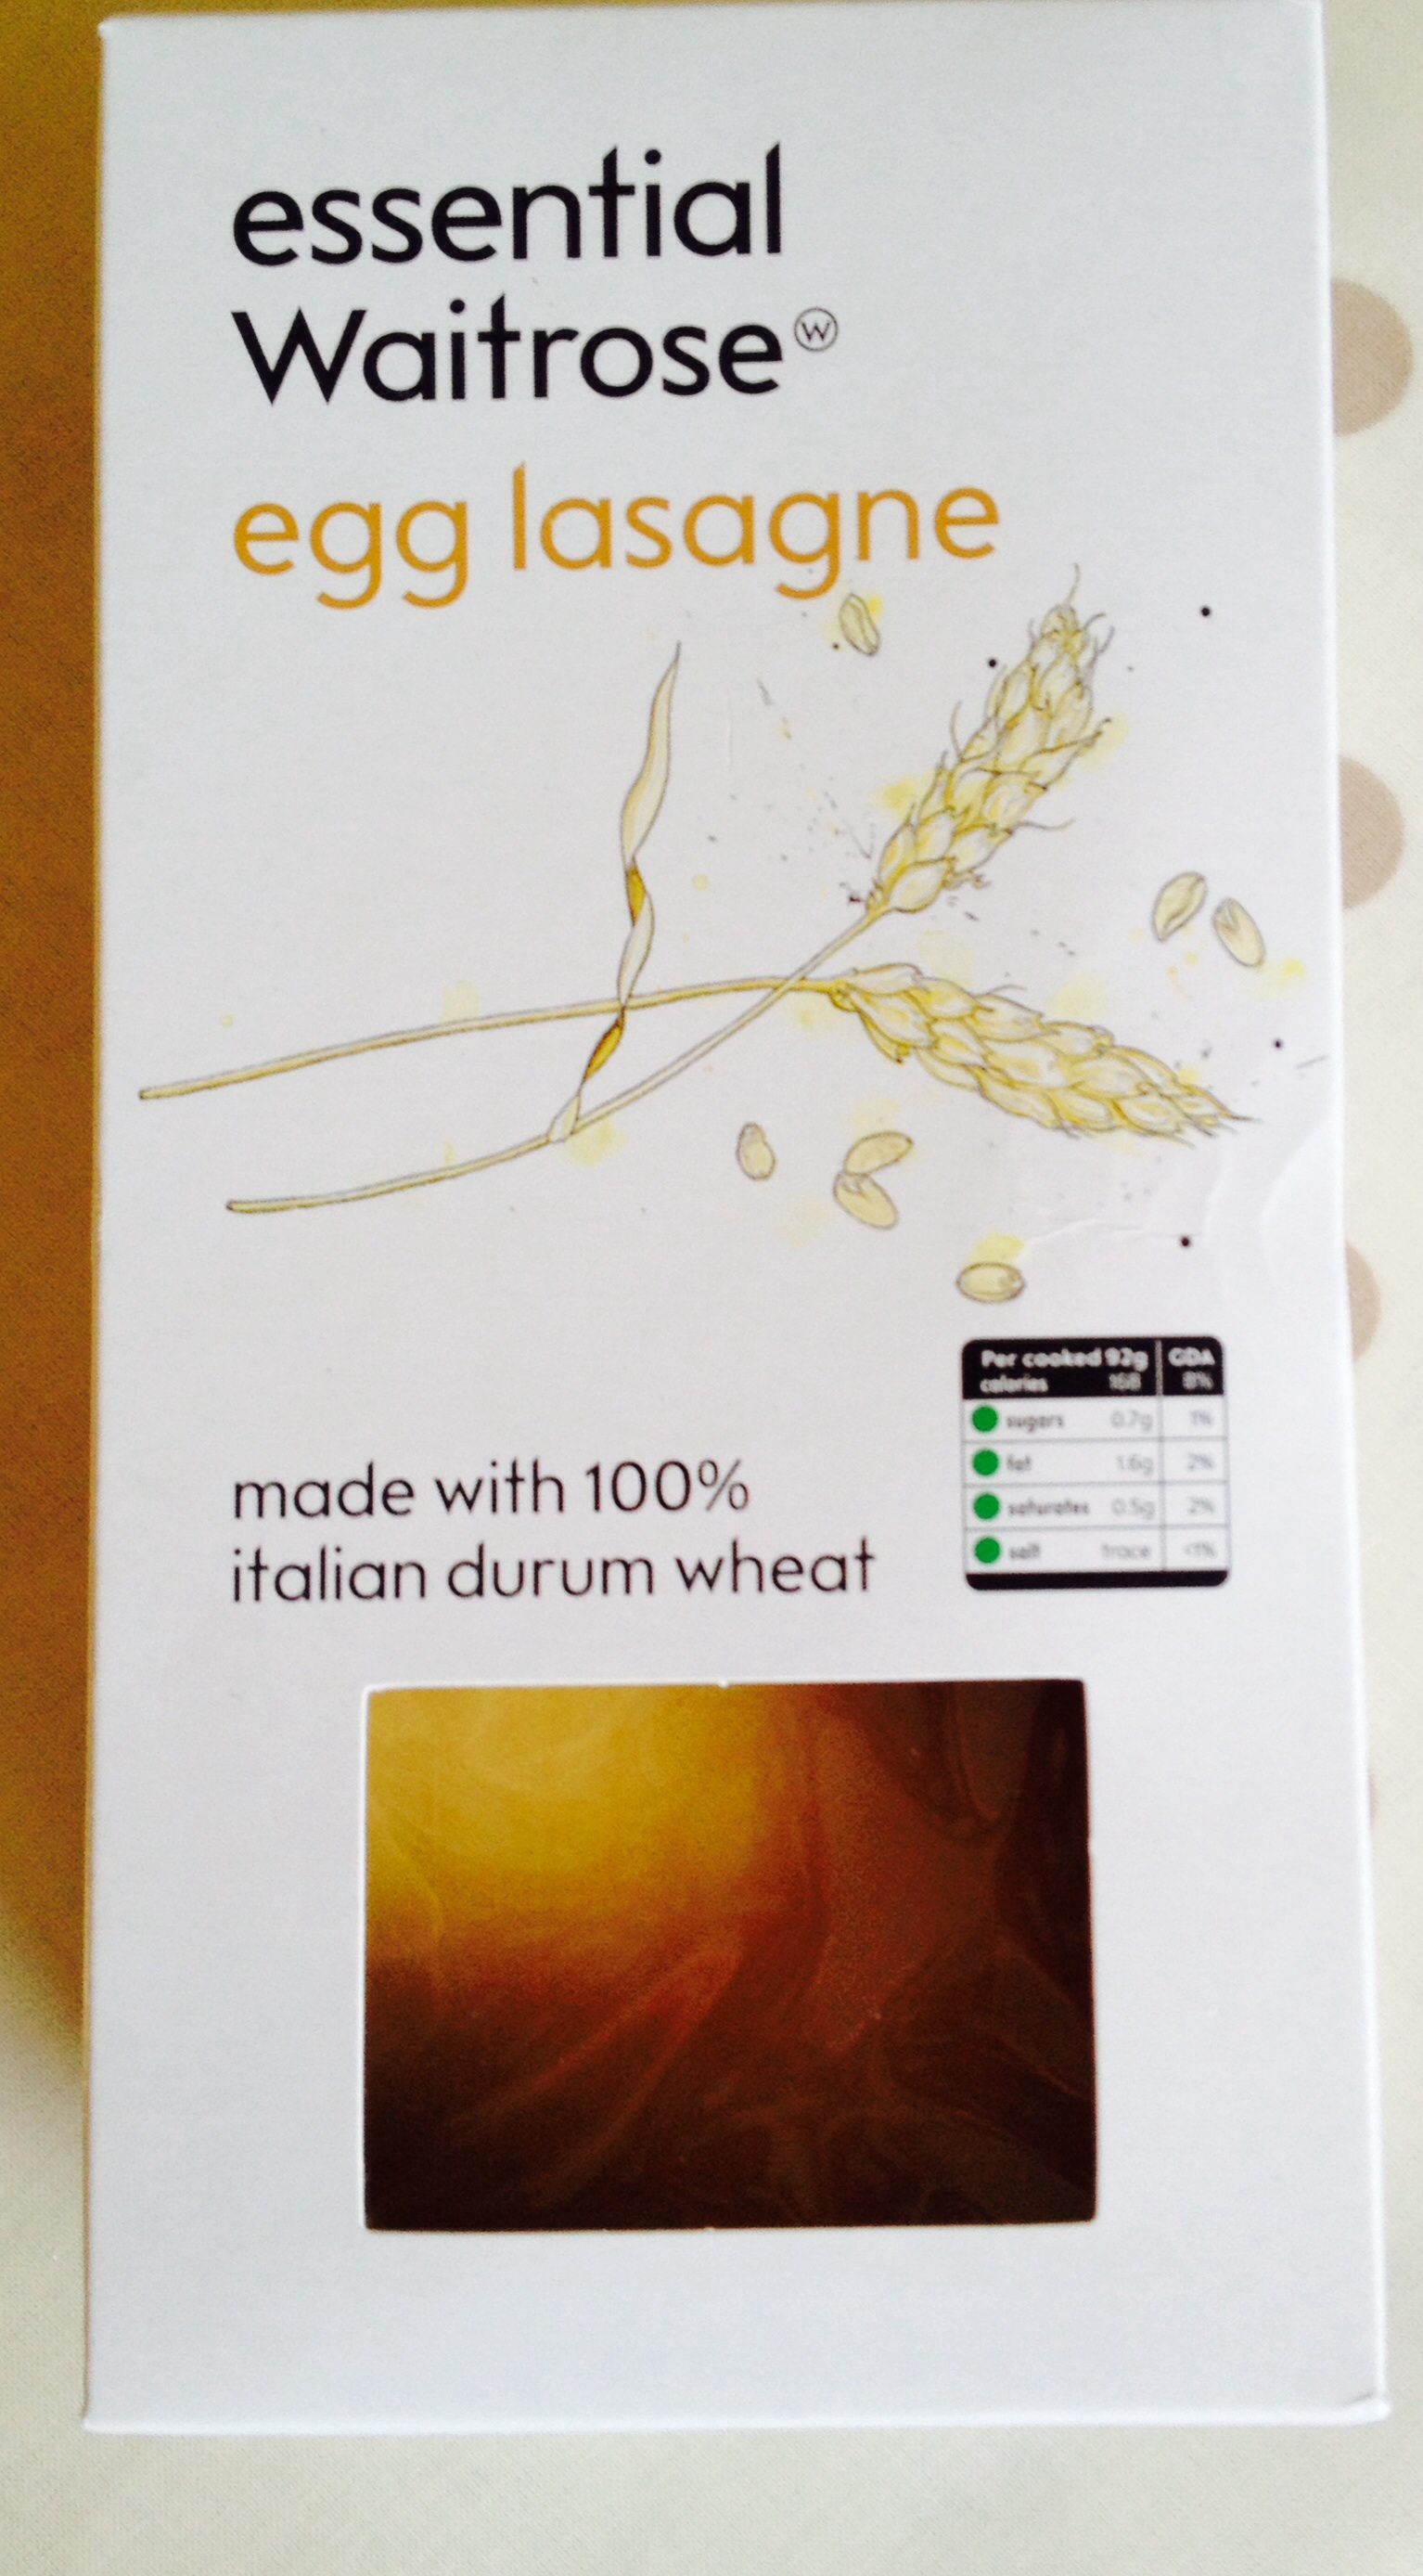
1 packet Dried Egg Lasagne Sheets 375g/13-14oz – dont worry if the packet requires pre-cooking you won’t need to.
Method:
A rectangular, ovenproof dish approximately 30cm x 20cm x 9cm (12in x 8in x 3.5in) is needed to make this lasagne.
Making The Chicken Lasagne Sauce
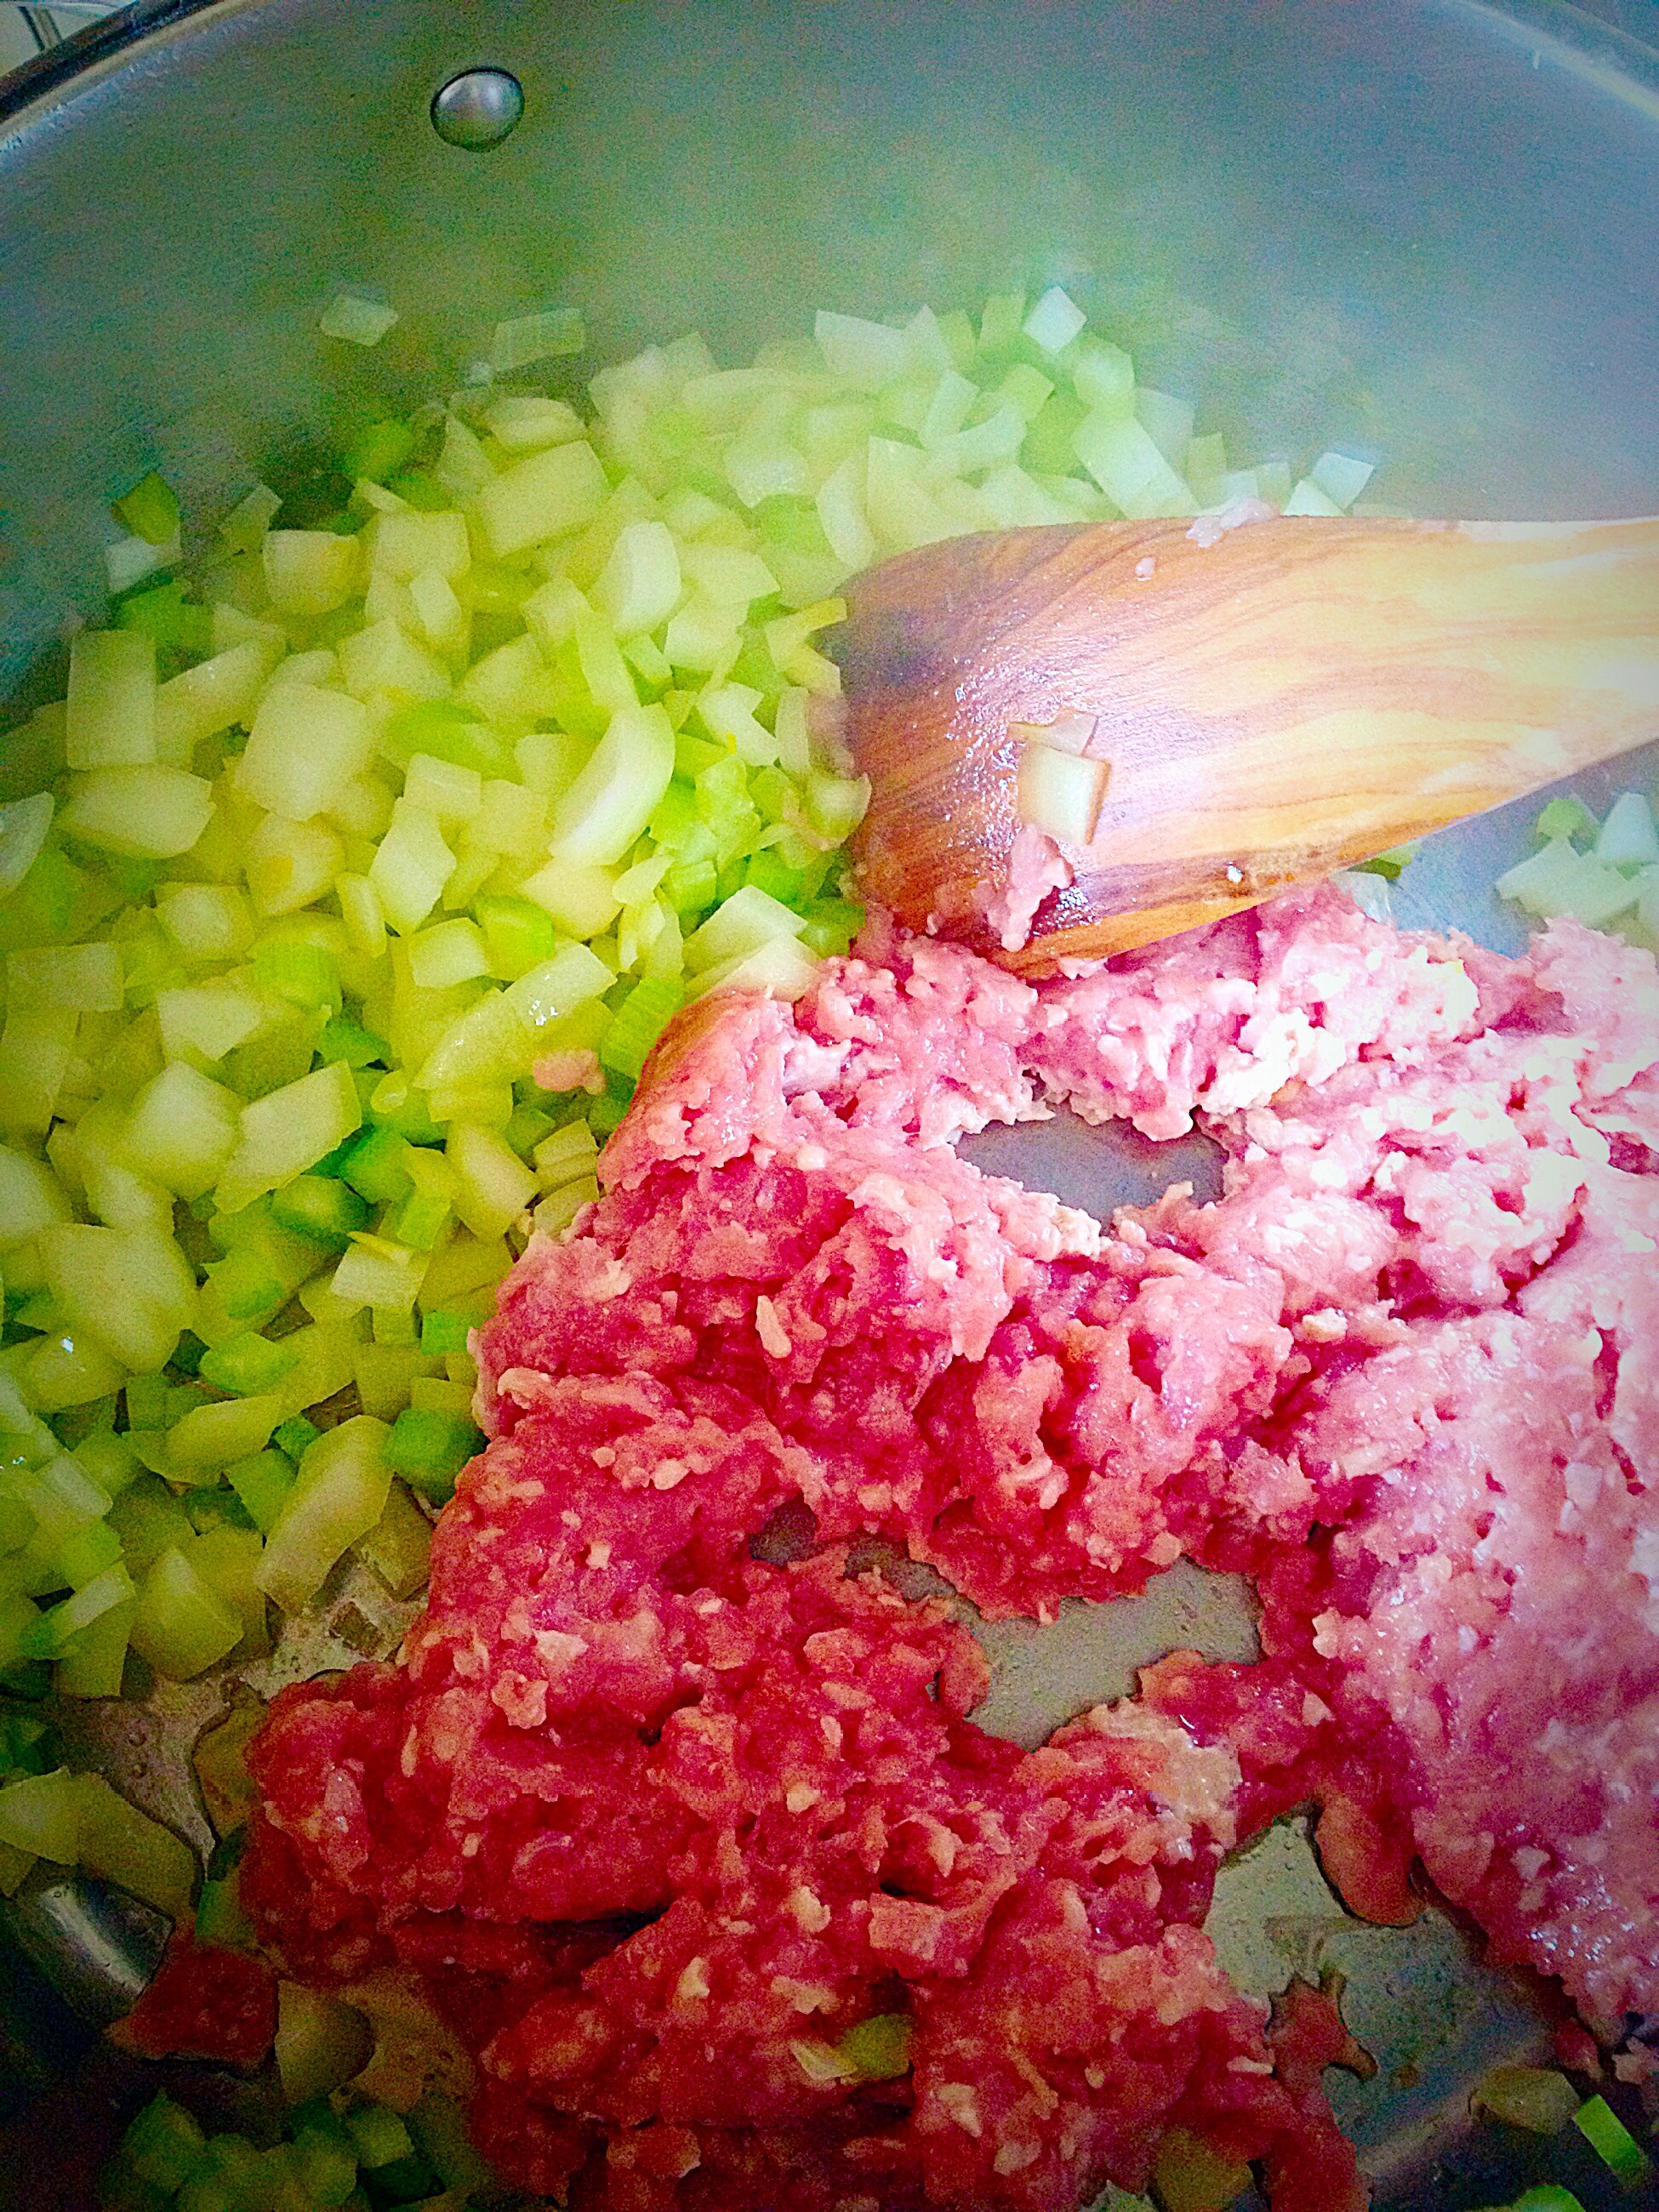
First of all finely chop the onion, celery, green pepper and carrots.
Heat the olive oil in a large sauté pan.
Add the diced onion and sauté for 5 minutes over a medium heat until the onions start to turn translucent.
Next add the diced celery to the pan and continue to sauté for a couple more minutes until the celery starts to soften.
Push the onions and celery to one side of the pan and add the Chicken mince to the other side. Alternatively if you don’t have a large sauté pan, remove the onions and celery, into a separate dish and then add the Chicken to the pan.
Cook the chicken, using a wooden spatula to break up the mince so large clumps of meat don’t form.
Having a large sauté pan means you can cook all the ingredients in one go!!!
Unlike beef mince, the chicken mince will get lighter as it cooks.
Cook the chicken turns opaque but not browned.
Now add the carrots, green pepper and the minced garlic.
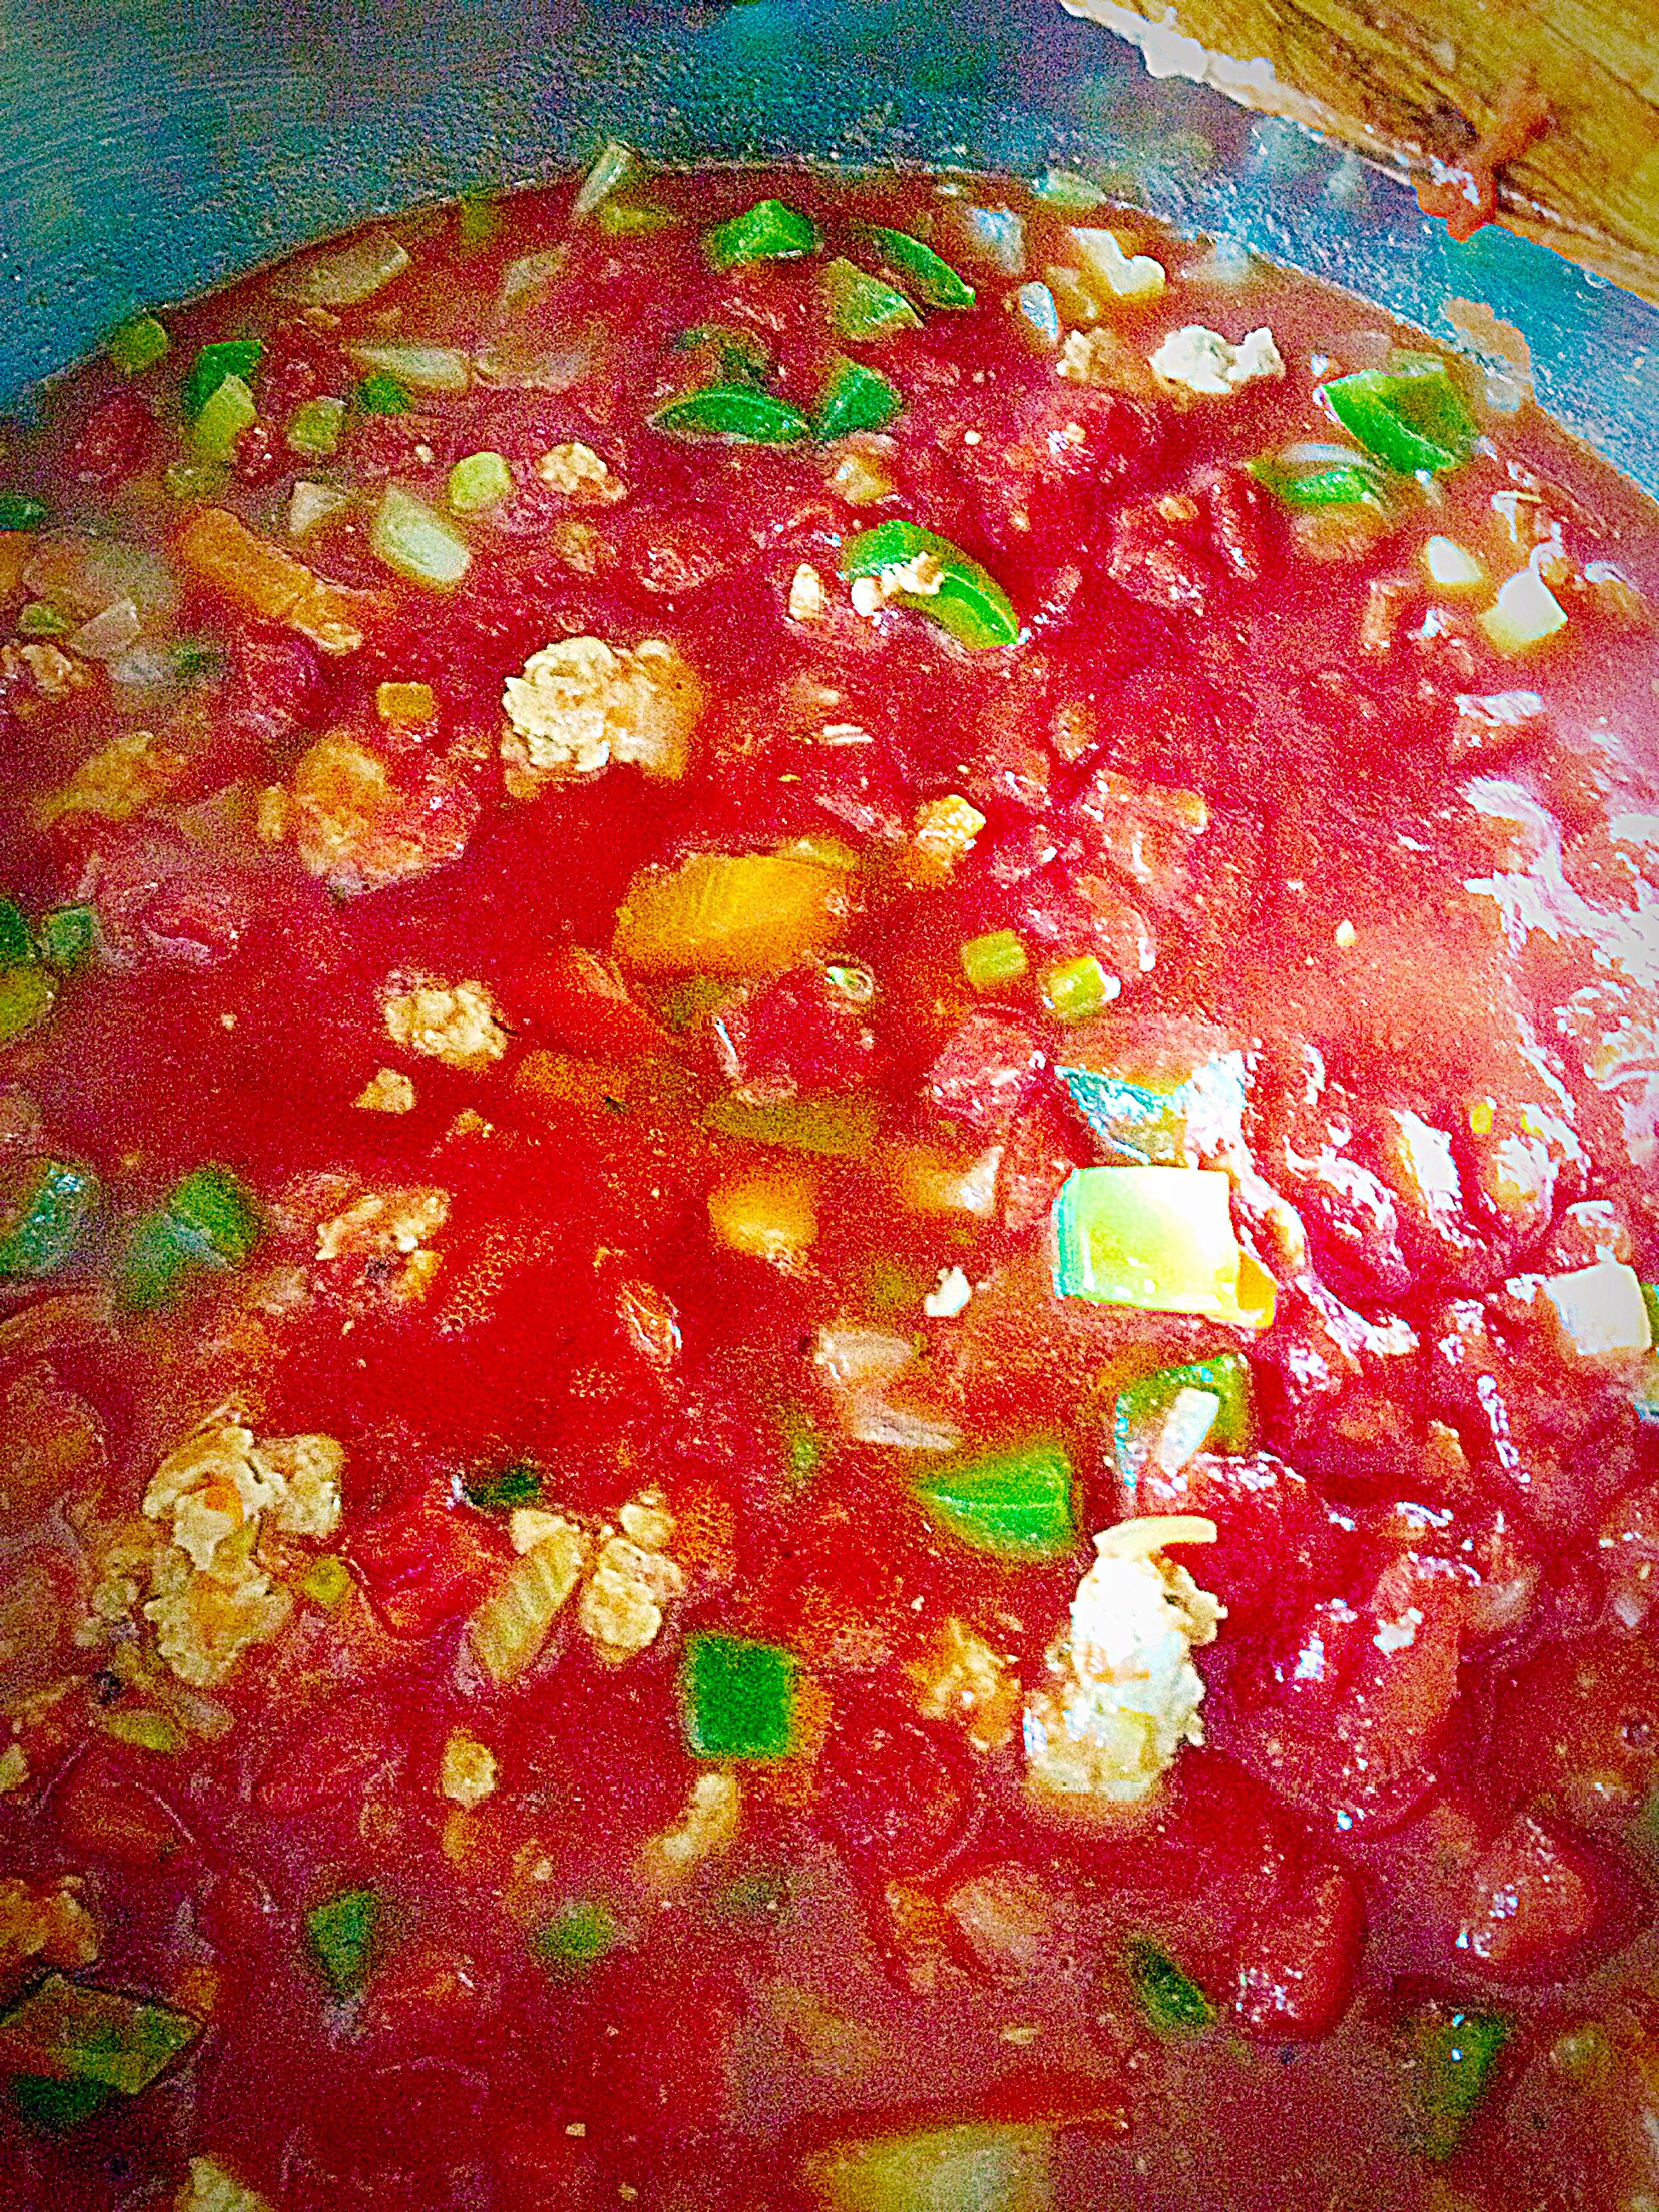
As soon as everything is mixed together add the tomatoes. Also fill each empty can almost to the top with water and add that to the pan.
Add the tomato purée, dried or fresh chopped herbs.
Give everything a good stir then add the sugar, half a teaspoon of salt and a good grinding of black pepper.
Turn the heat to medium-low and leave to gently bubble away on the stove for an hour, stirring occasionally.
Making Four Cheese Sauce Lasagne Topping
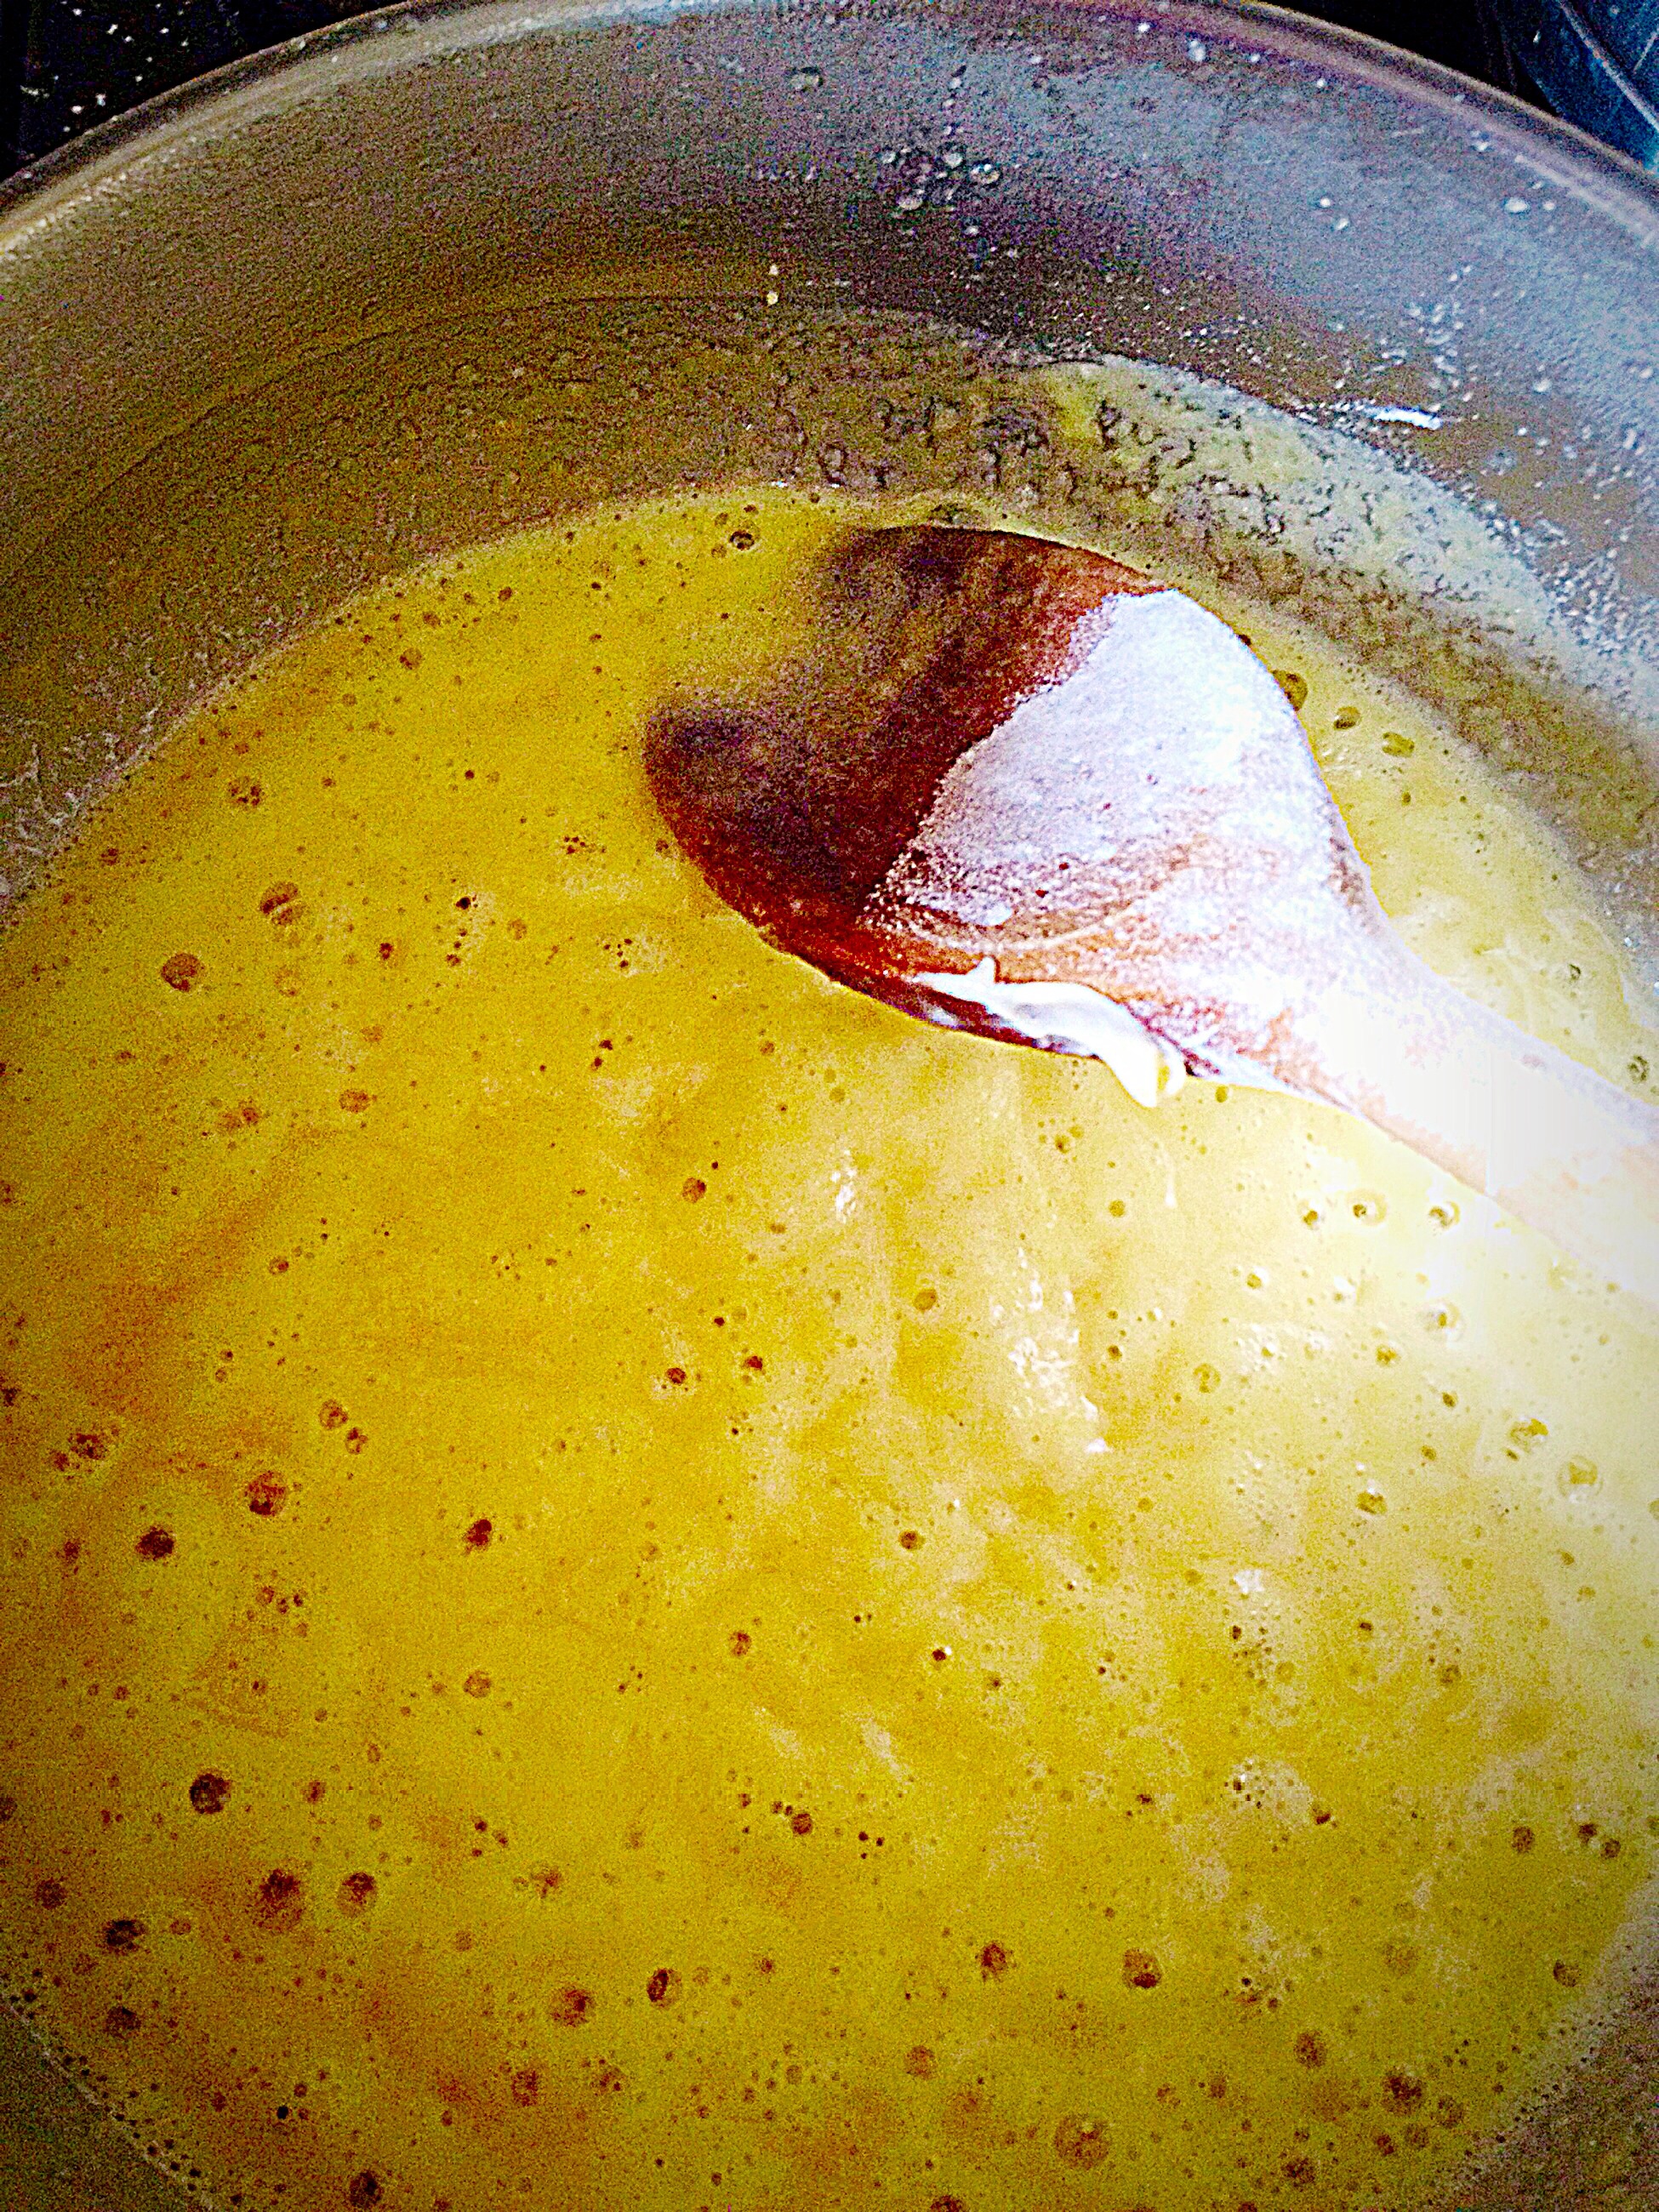
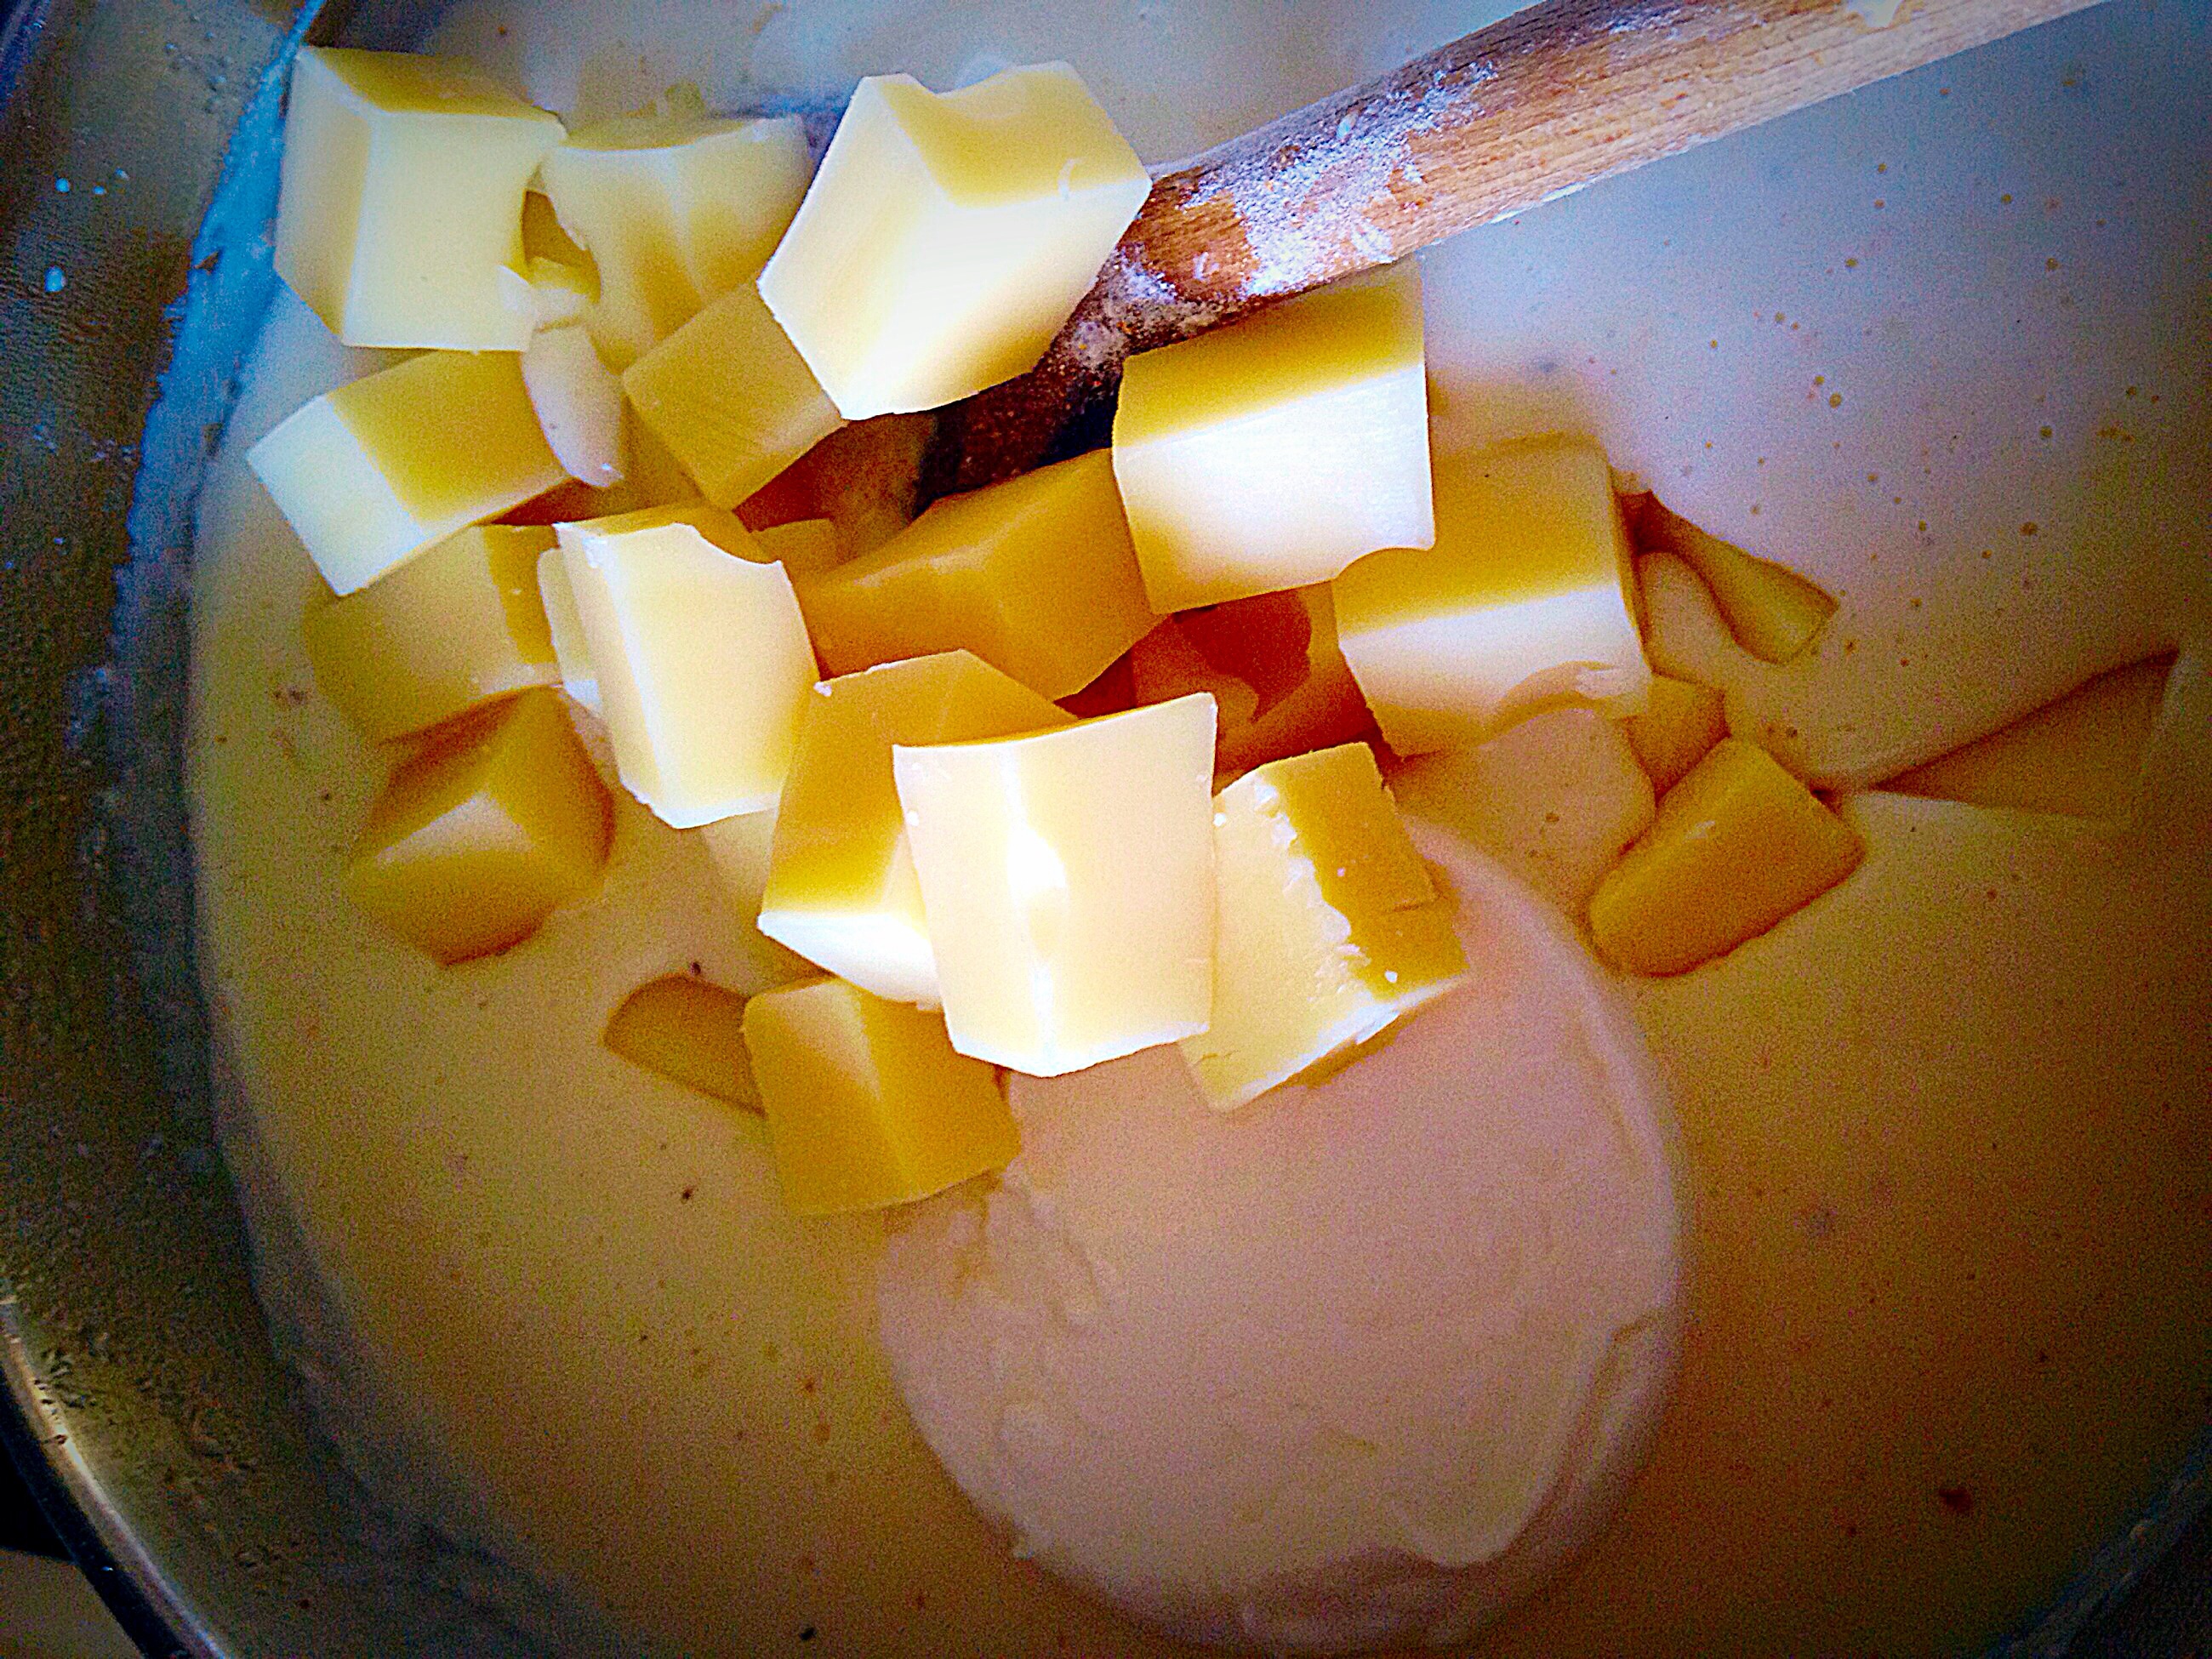
Place a medium sized pan over a gentle heat. Add the butter and cook until melted and starting to sizzle.
Next tip the flour on to the melted butter stirring constantly until combined and smooth.
Continue to cook for a couple of minutes.
This is what the butter and flour should look like.
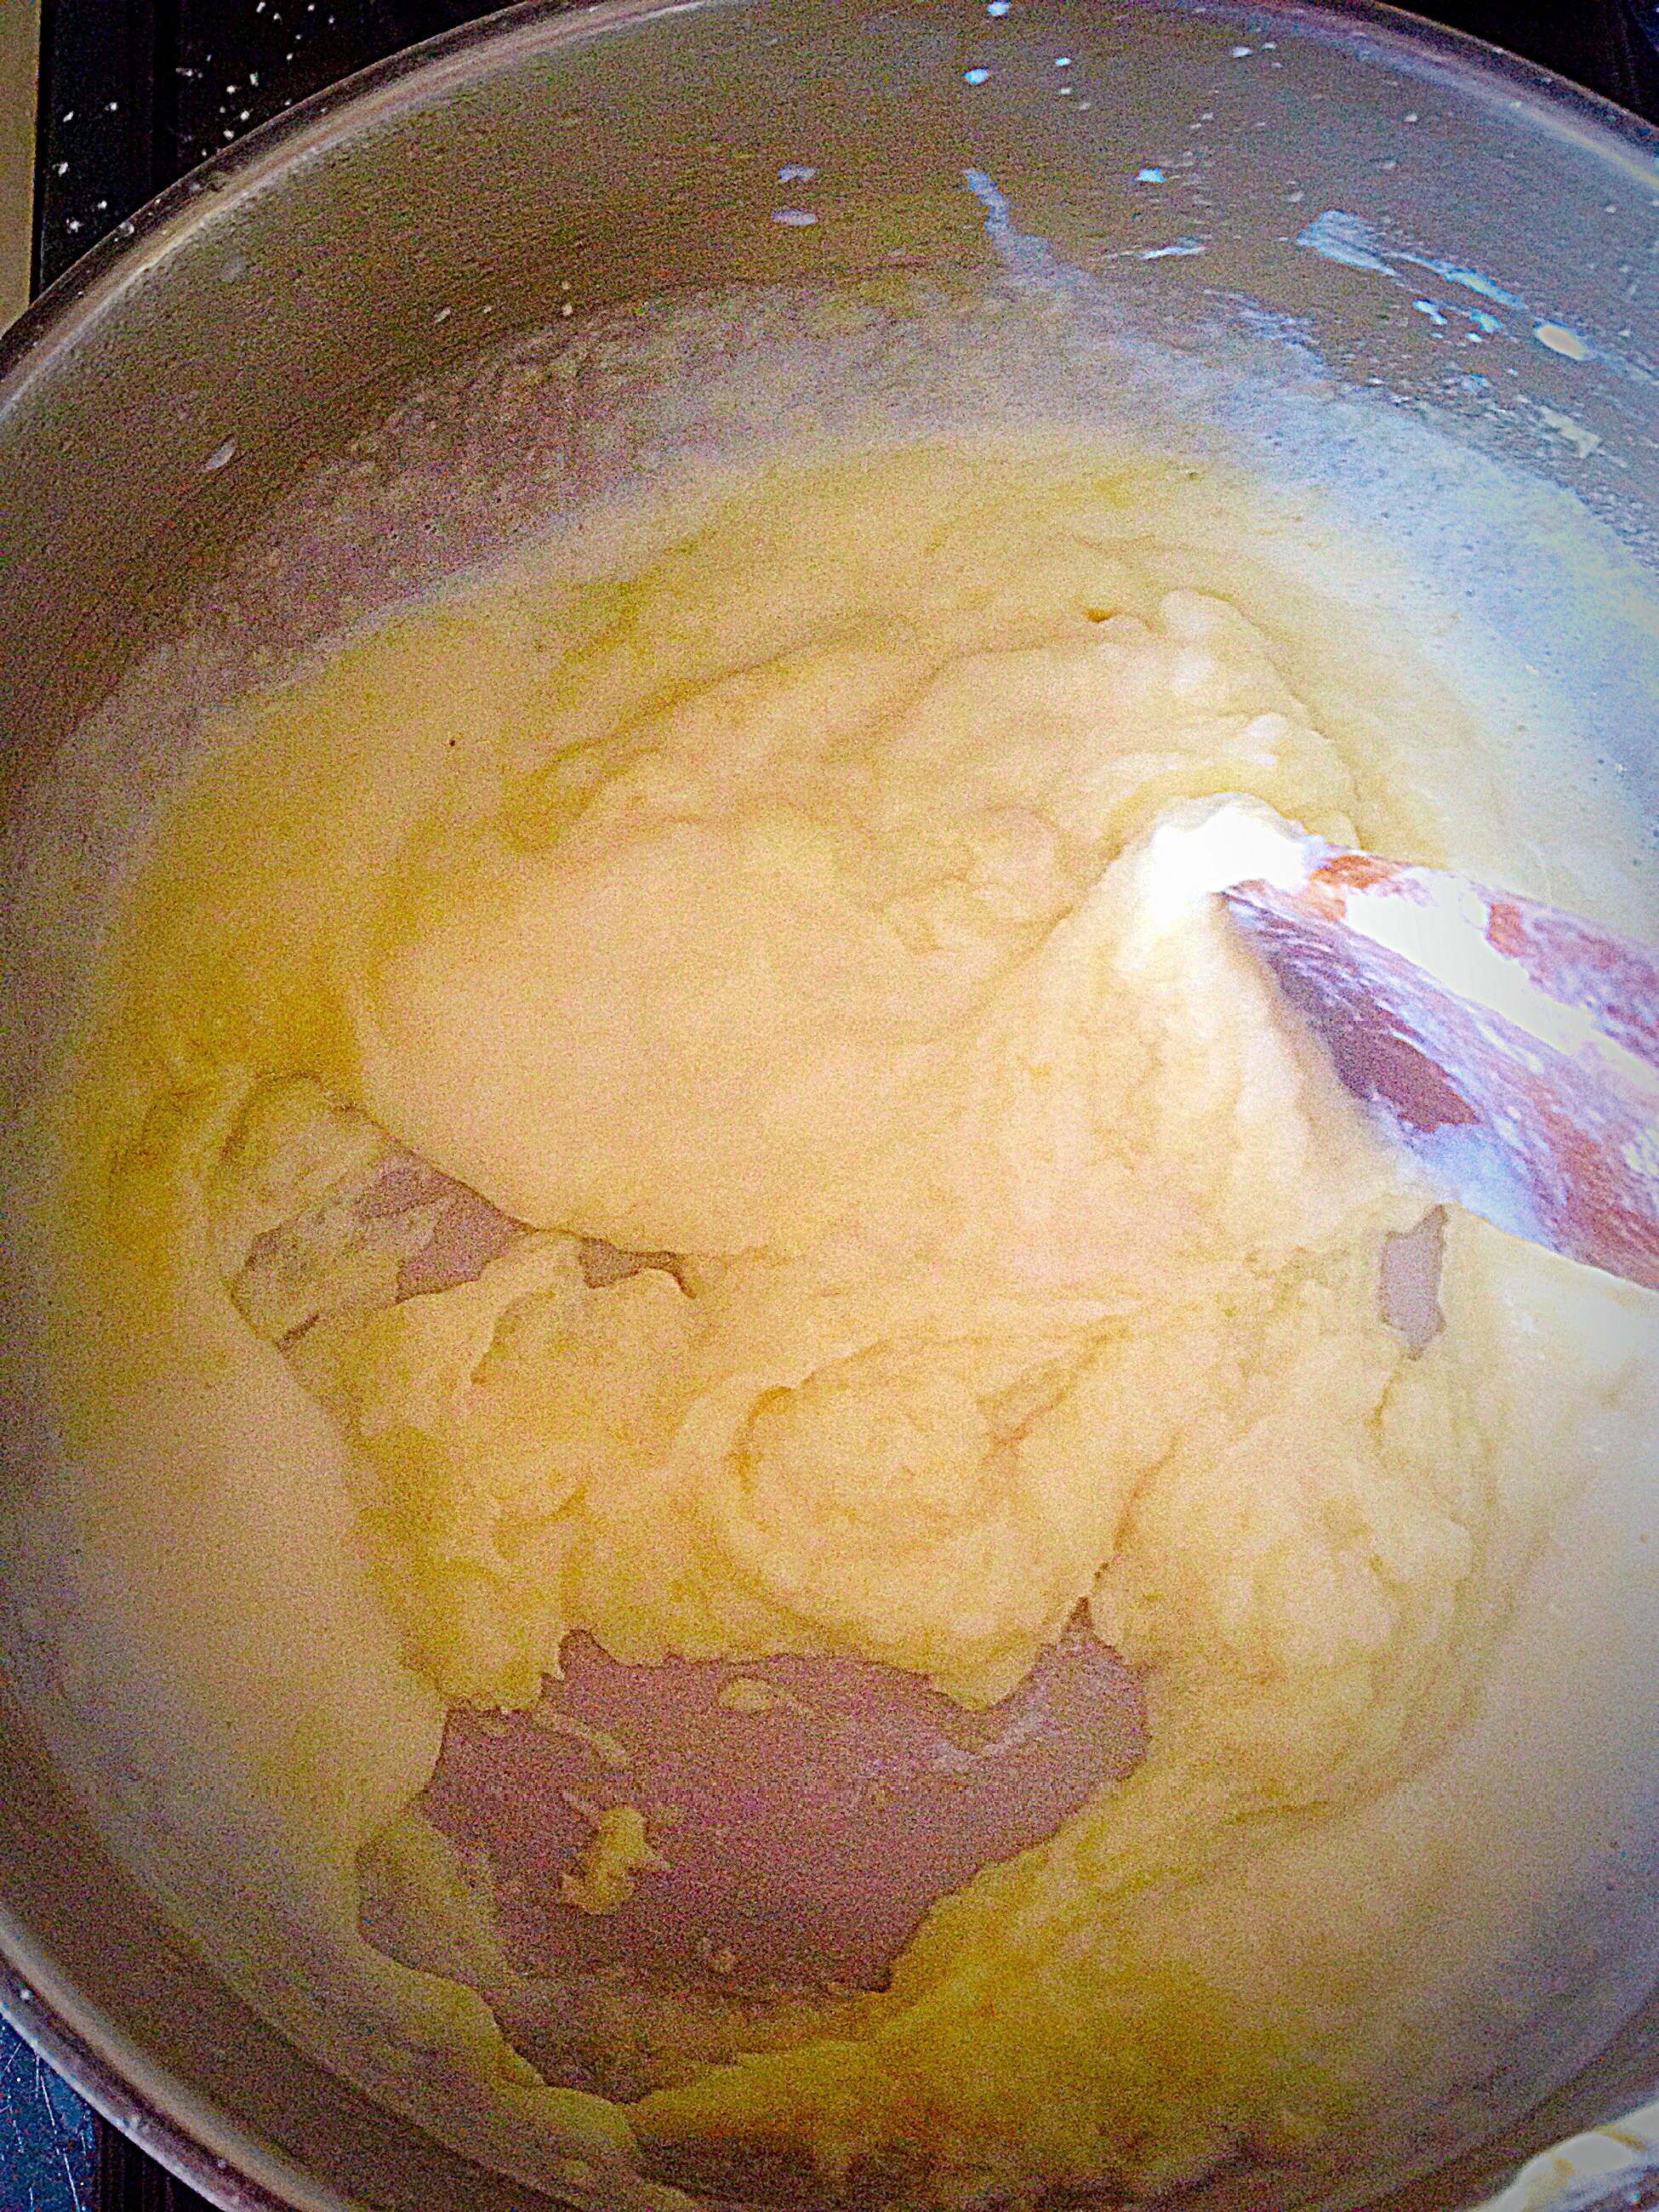
Start slowly adding the milk, stirring vigorously as the paste thickens. Continue stirring while adding small amounts of milk.
The sauce will become very thick.
As more milk is added lumps may form, switch to a balloonwhisk at this stage.
Continue until all the milk has been added and absorbed.
The sauce will be thick enough to cover the back of a spoon.
No lumps here – if you squint!!!!!!
Remove the pan from the heat and add the ricotta and the other cheeses (except the mozzarella), stir vigorously.
The Ricotta gets dumped in and then add the hard cheeses.
Add the nutmeg and season with salt and pepper to taste.
Ricotta cheese will give the Four Cheese Sauce a slightly grainy texture, that’s normal. While grated cheese will melt into the sauce easily, cubed cheese will almost never become completely smooth, that’s ok as it will when it’s baked in the oven later. Also the addition of freshly ground nutmeg elevates the flavour above and beyond, but please, if you can, grate your own nutmeg.
Set to one side to cool.
Assembling The Lasagne Layers
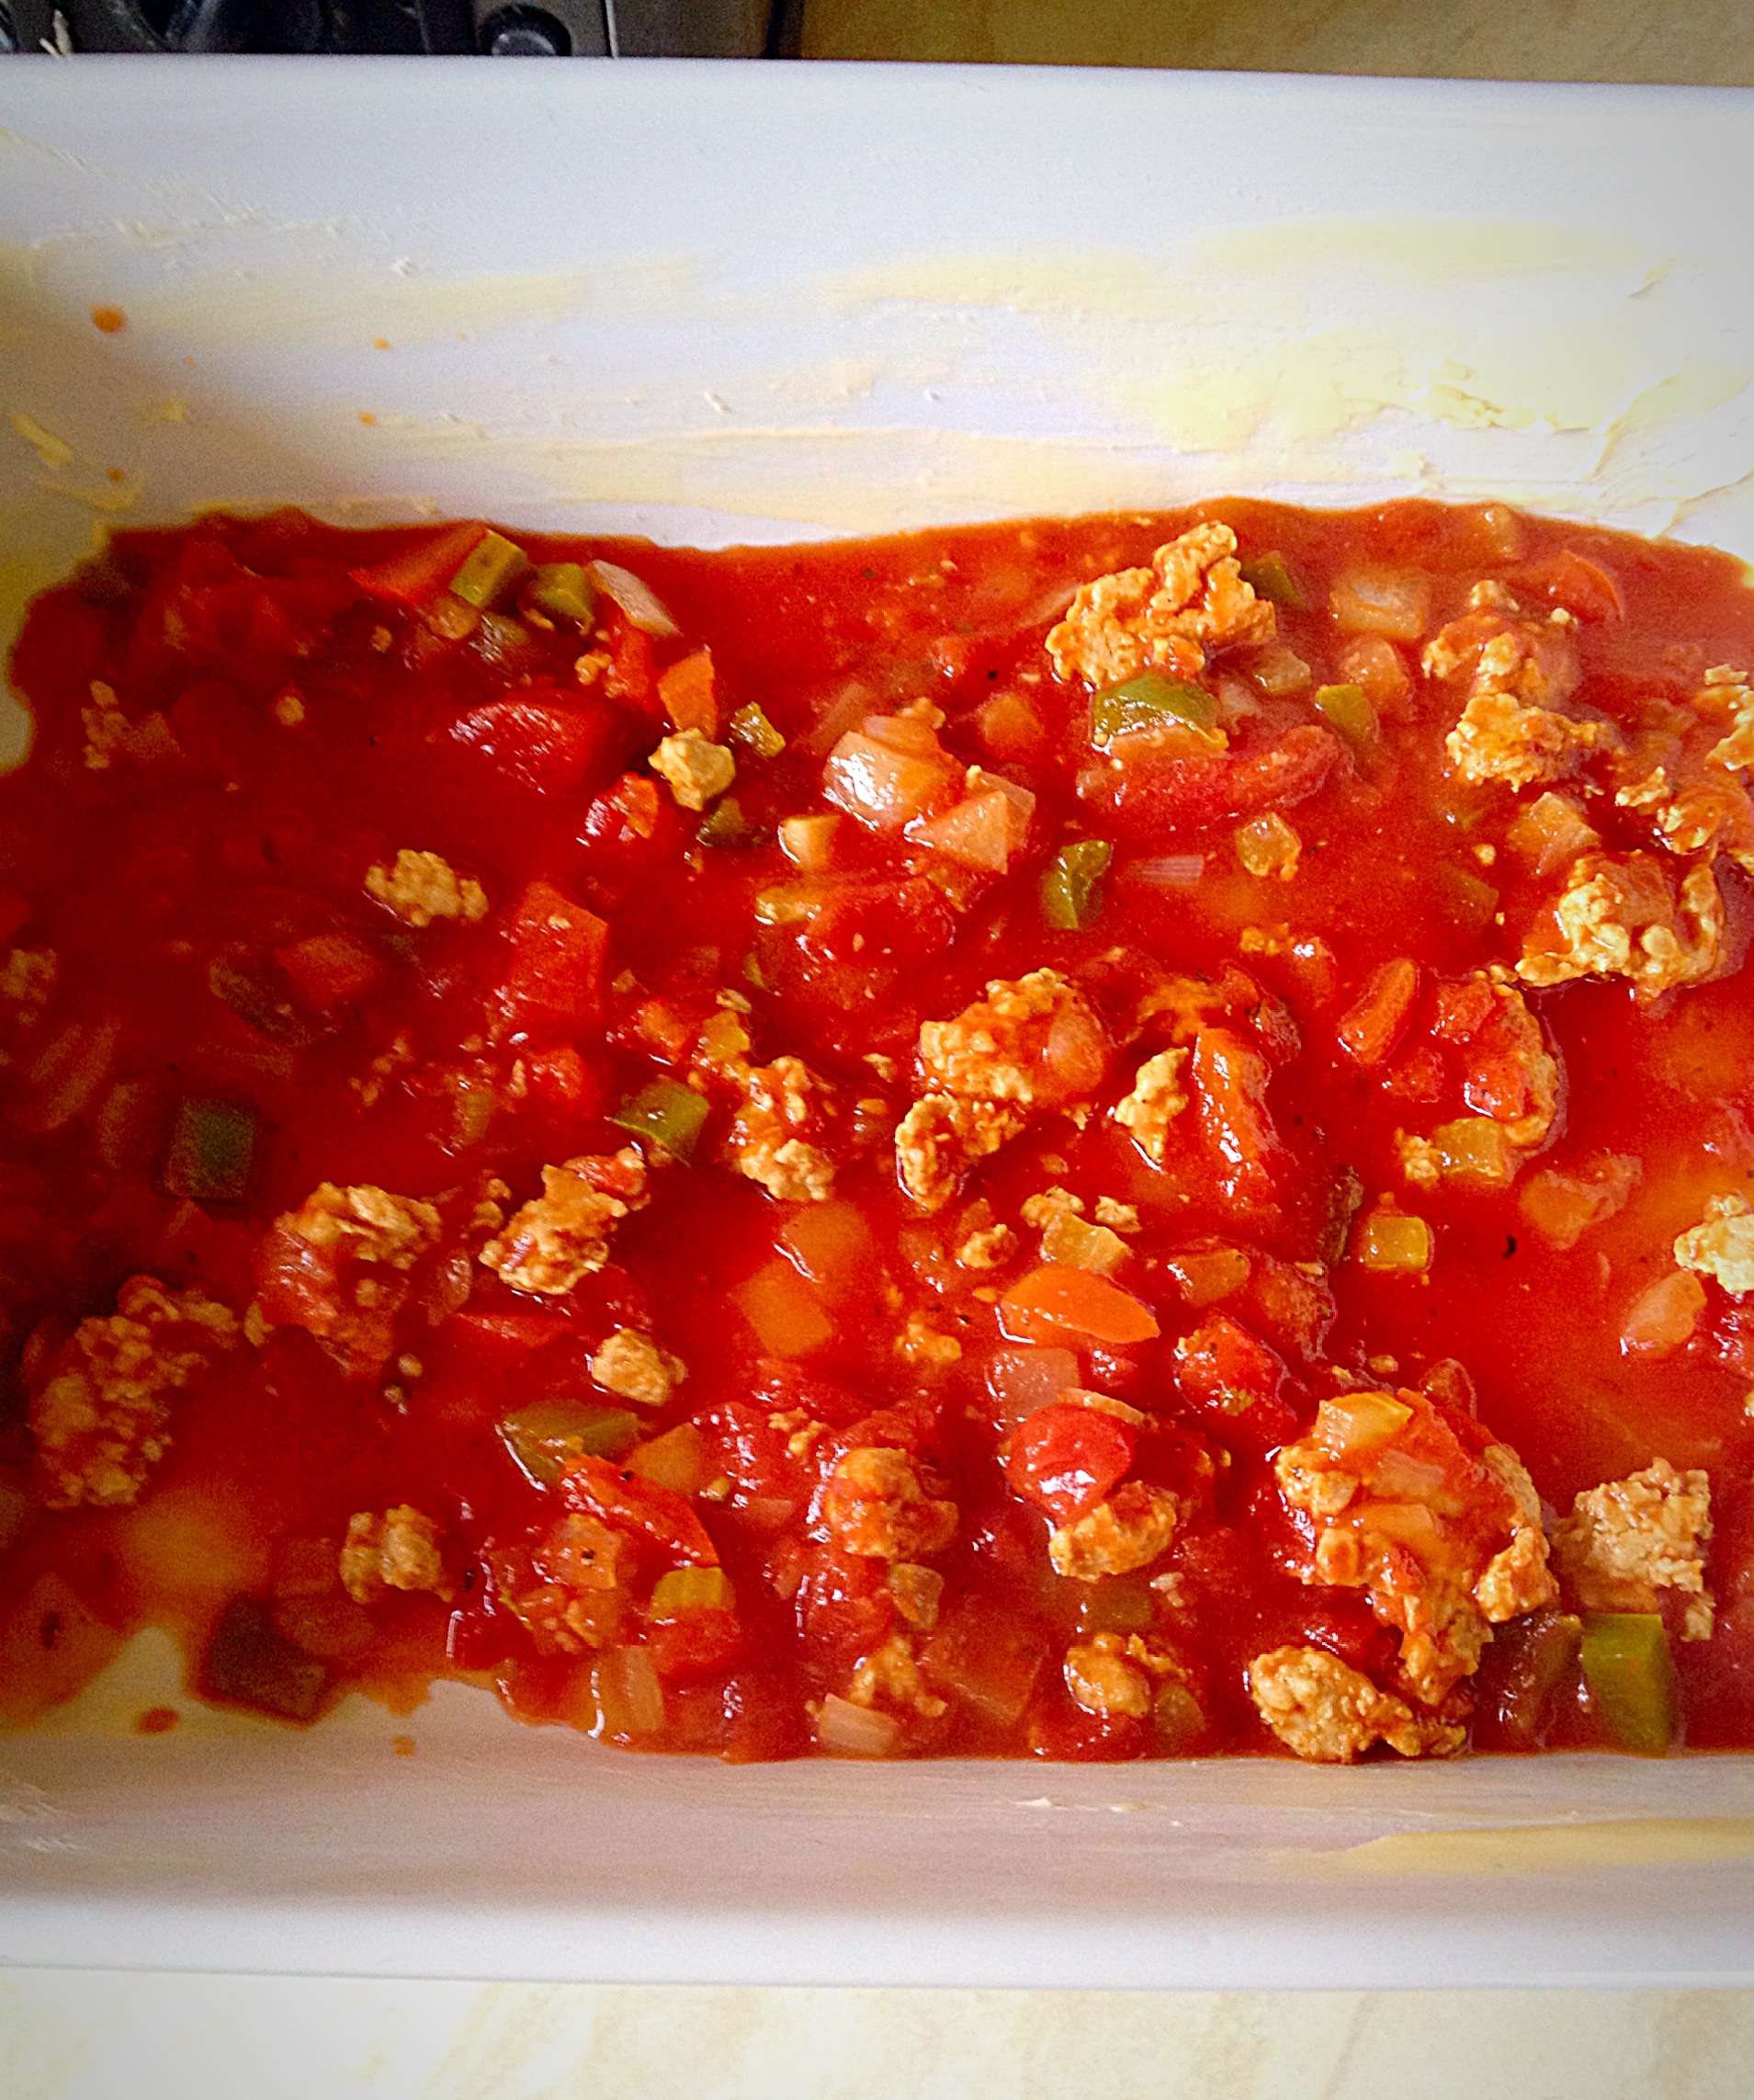
First of all liberally butter the ovenproof dish. Since I’ve made a LOT of lasagne buttering the dish before hand not only helps when serving, it also doesn’t require 3 days soaking to remove baked on lasagne.
I wasn’t joking when I said that you don’t have to precook the lasagne sheets. Since I’ve used lots of different makes, some with ruffled edges, green spinach lasagne sheets, egg versus plain AND this recipe works with all types.
These are dried lasagne sheets. Any brand will do!
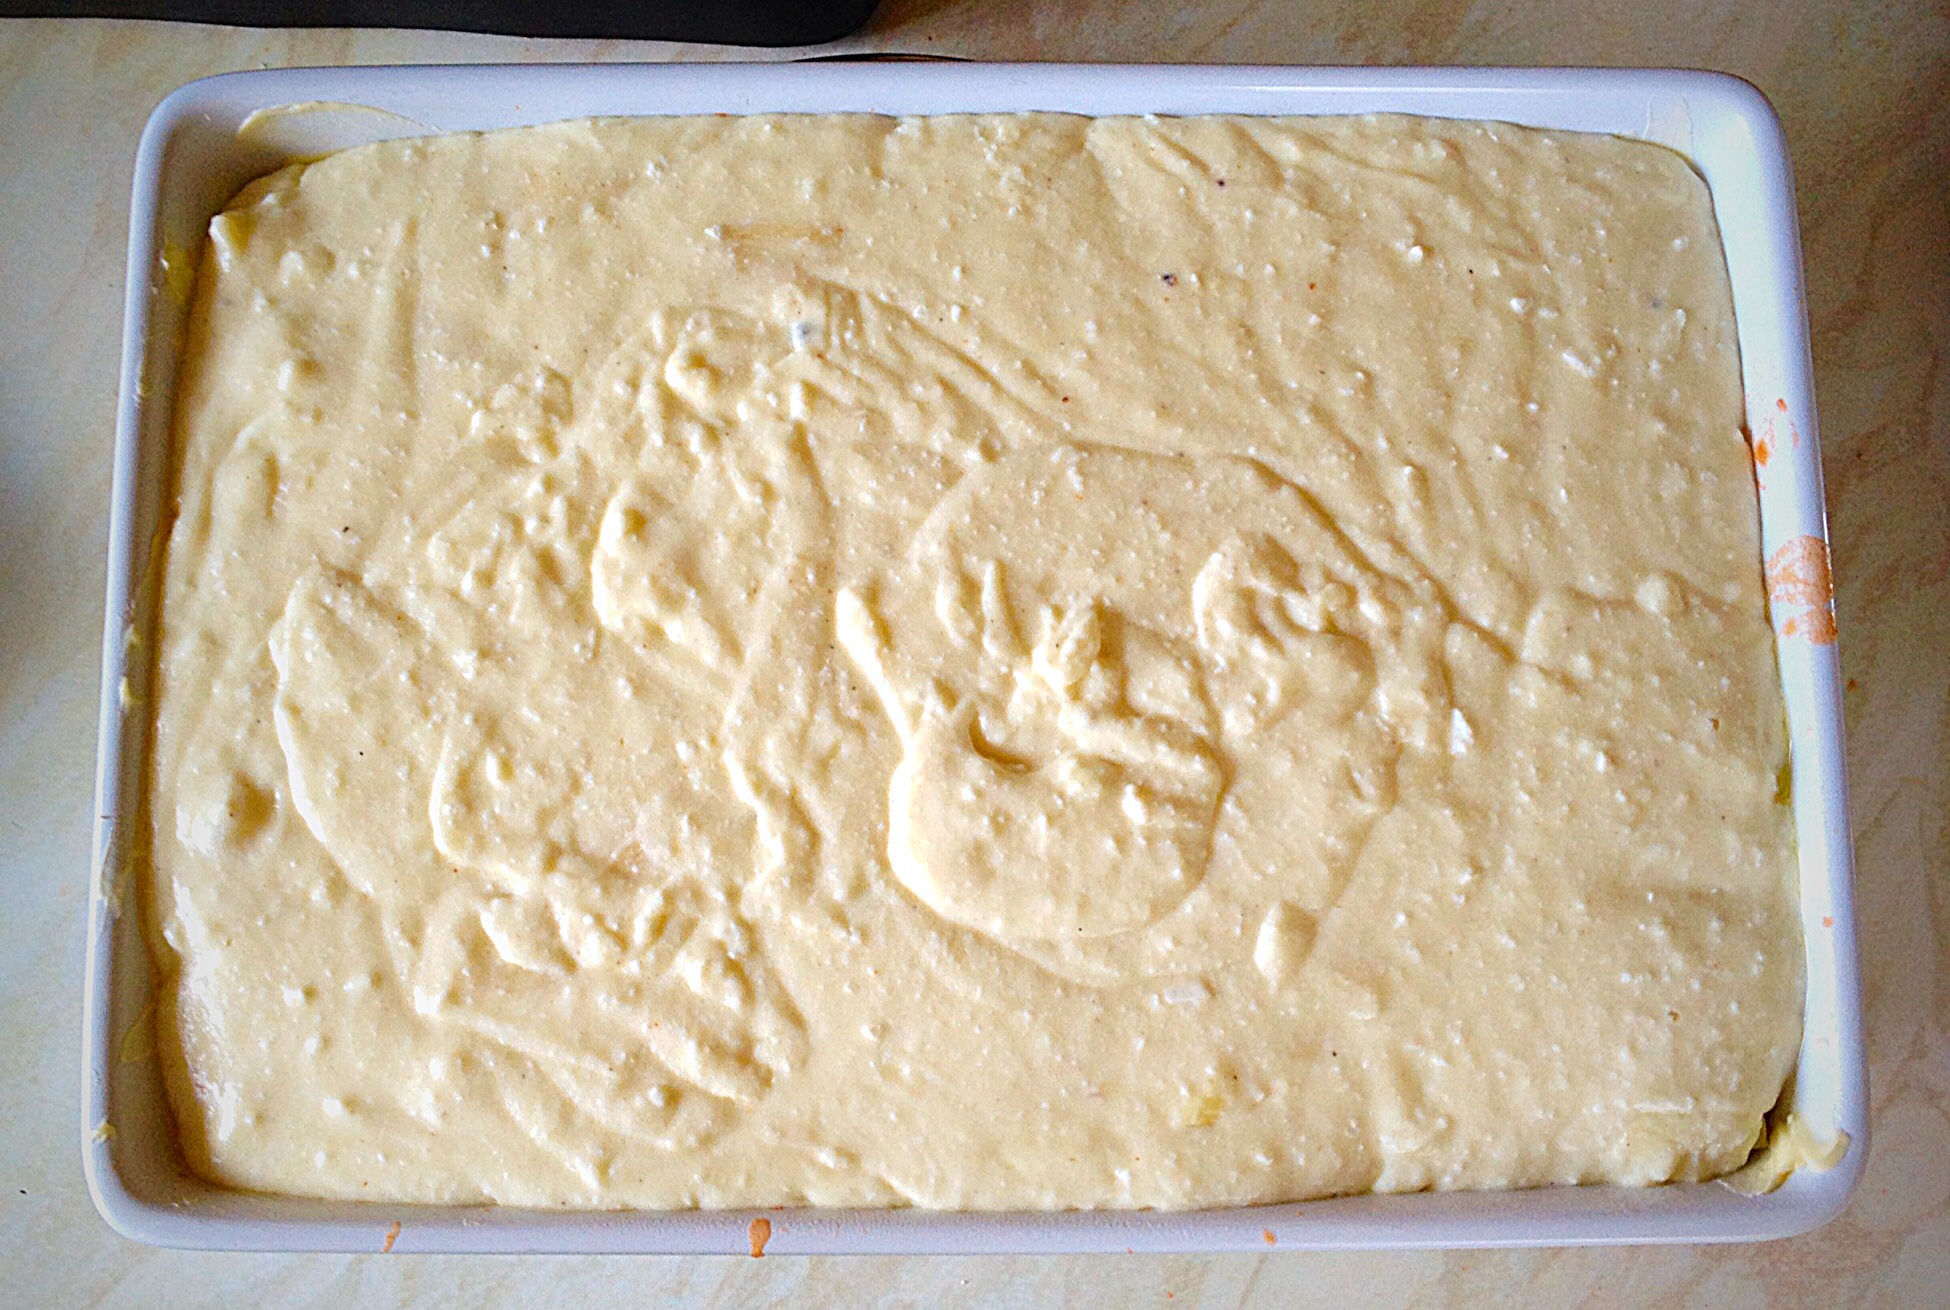
As soon as you have buttered the dish place a layer of hot chicken lasagne sauce into the bottom of the dish, so that it is completely covered.
The first layer is down, time to start building!
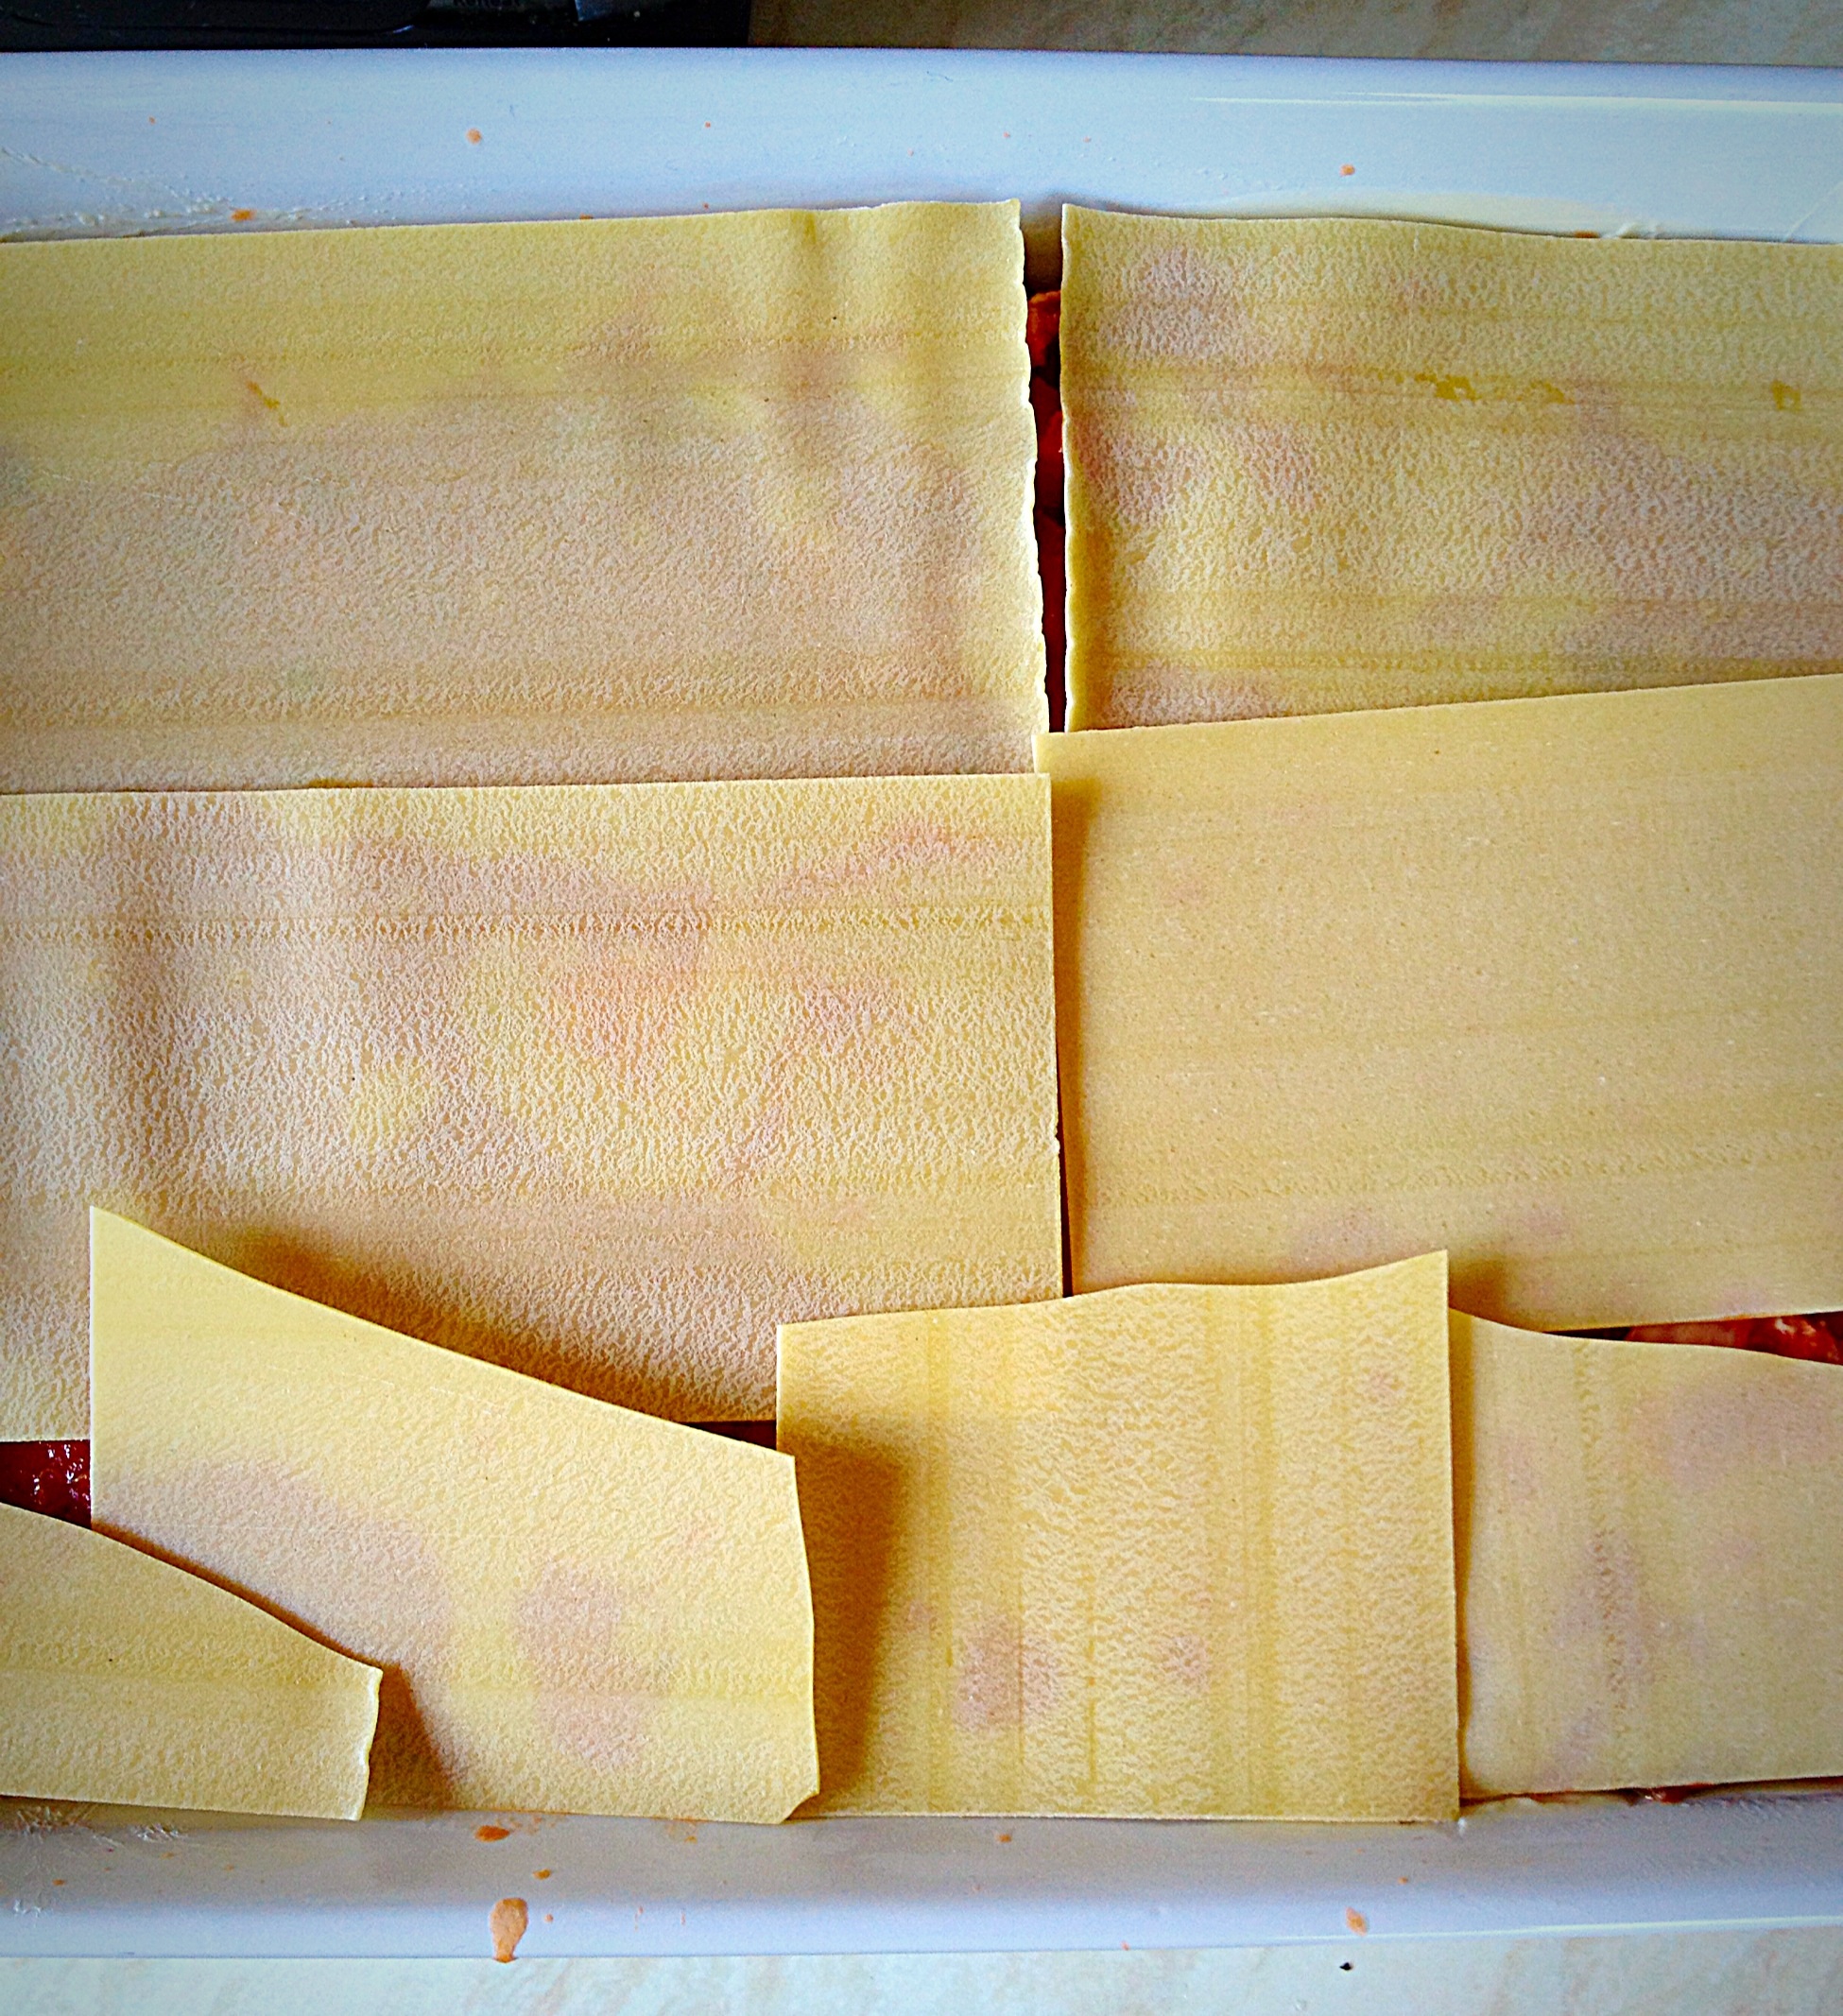
Next place enough lasagne sheets to cover the bottom layer. The layers should meet or very slightly overlap.
If your lasagne sheets don’t fit exactly, just snap bits off to adjust them.
Repeat the sauce/lasagne sheet layering twice more finishing with a sheet layer.
All the bits and pieces of the lasagne sheets will be covered by the Four Cheese Sauce.
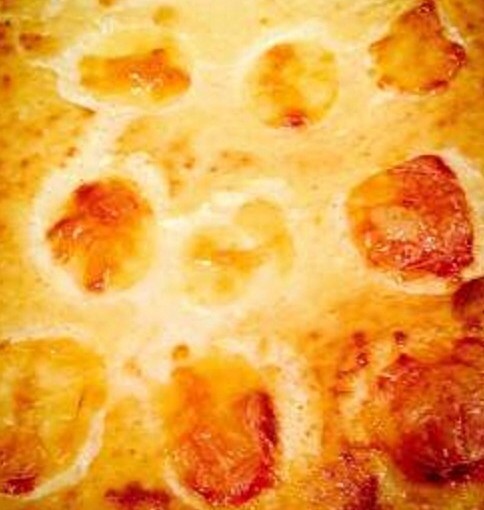
Pour the cooled cheese sauce all over the top of the lasagne sheets.
Ooh this is going to be sooooo good – look at that yummy cheese sauce layer!
Finishing The Lasagne
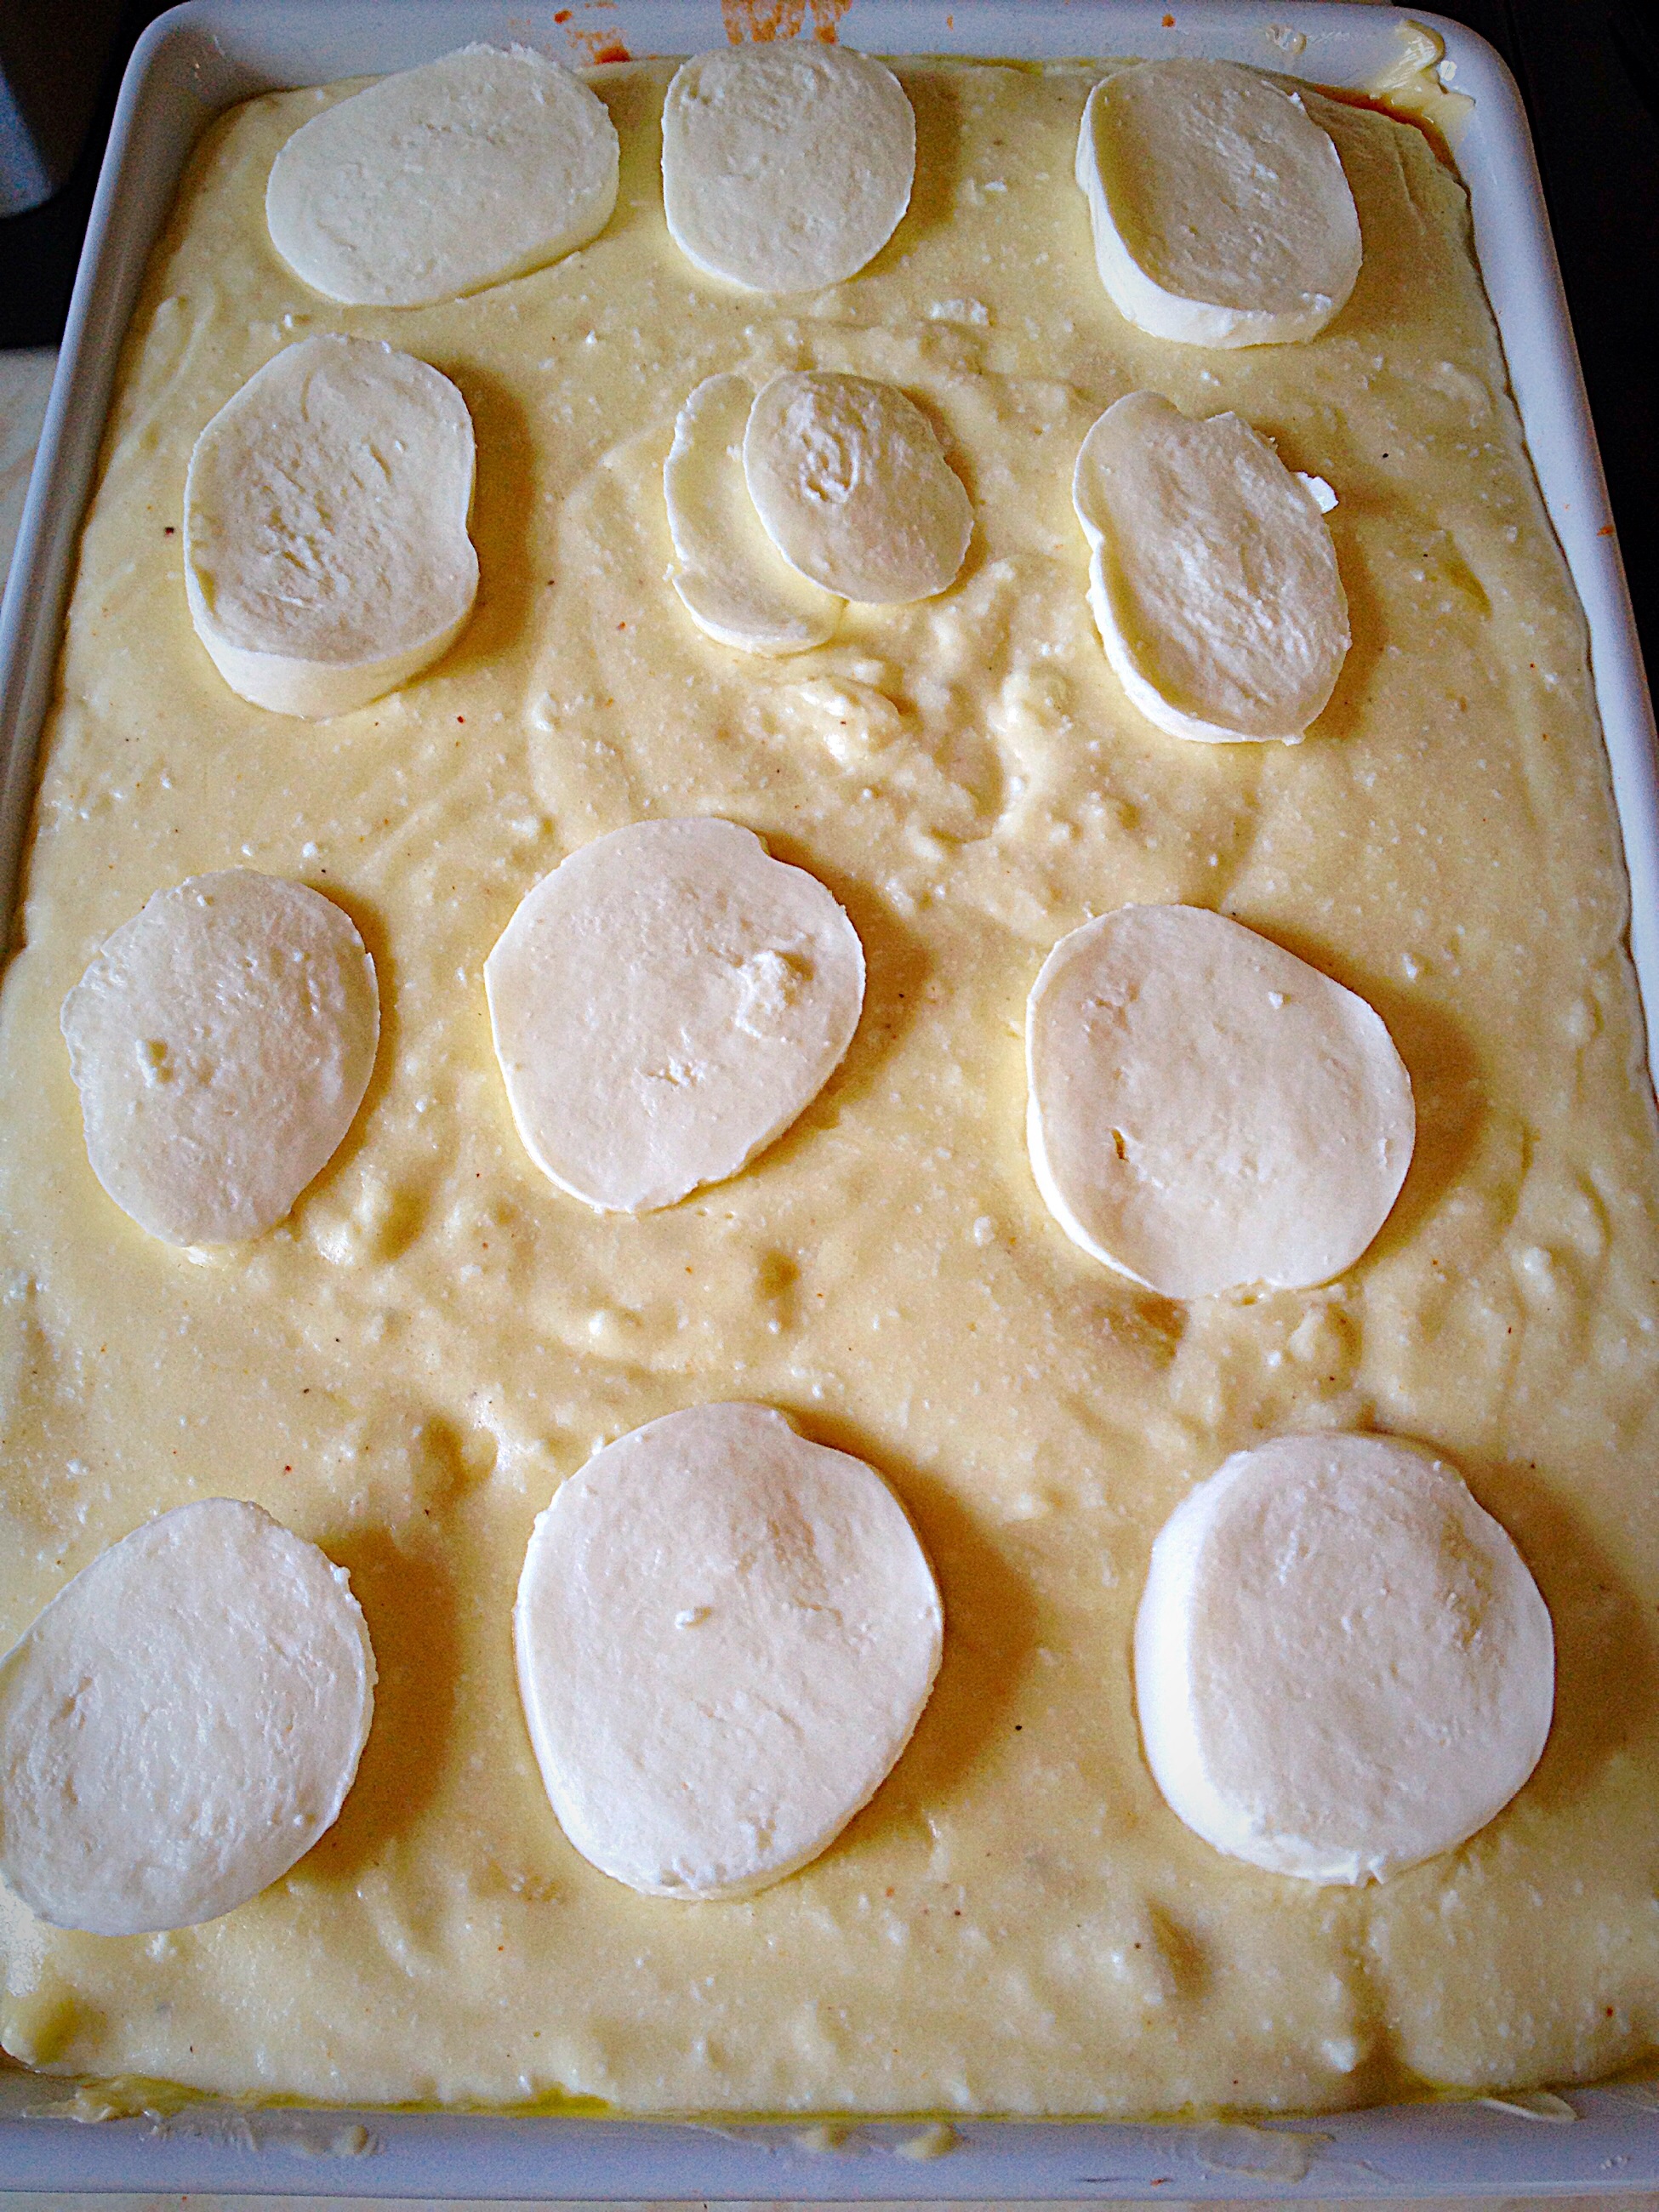
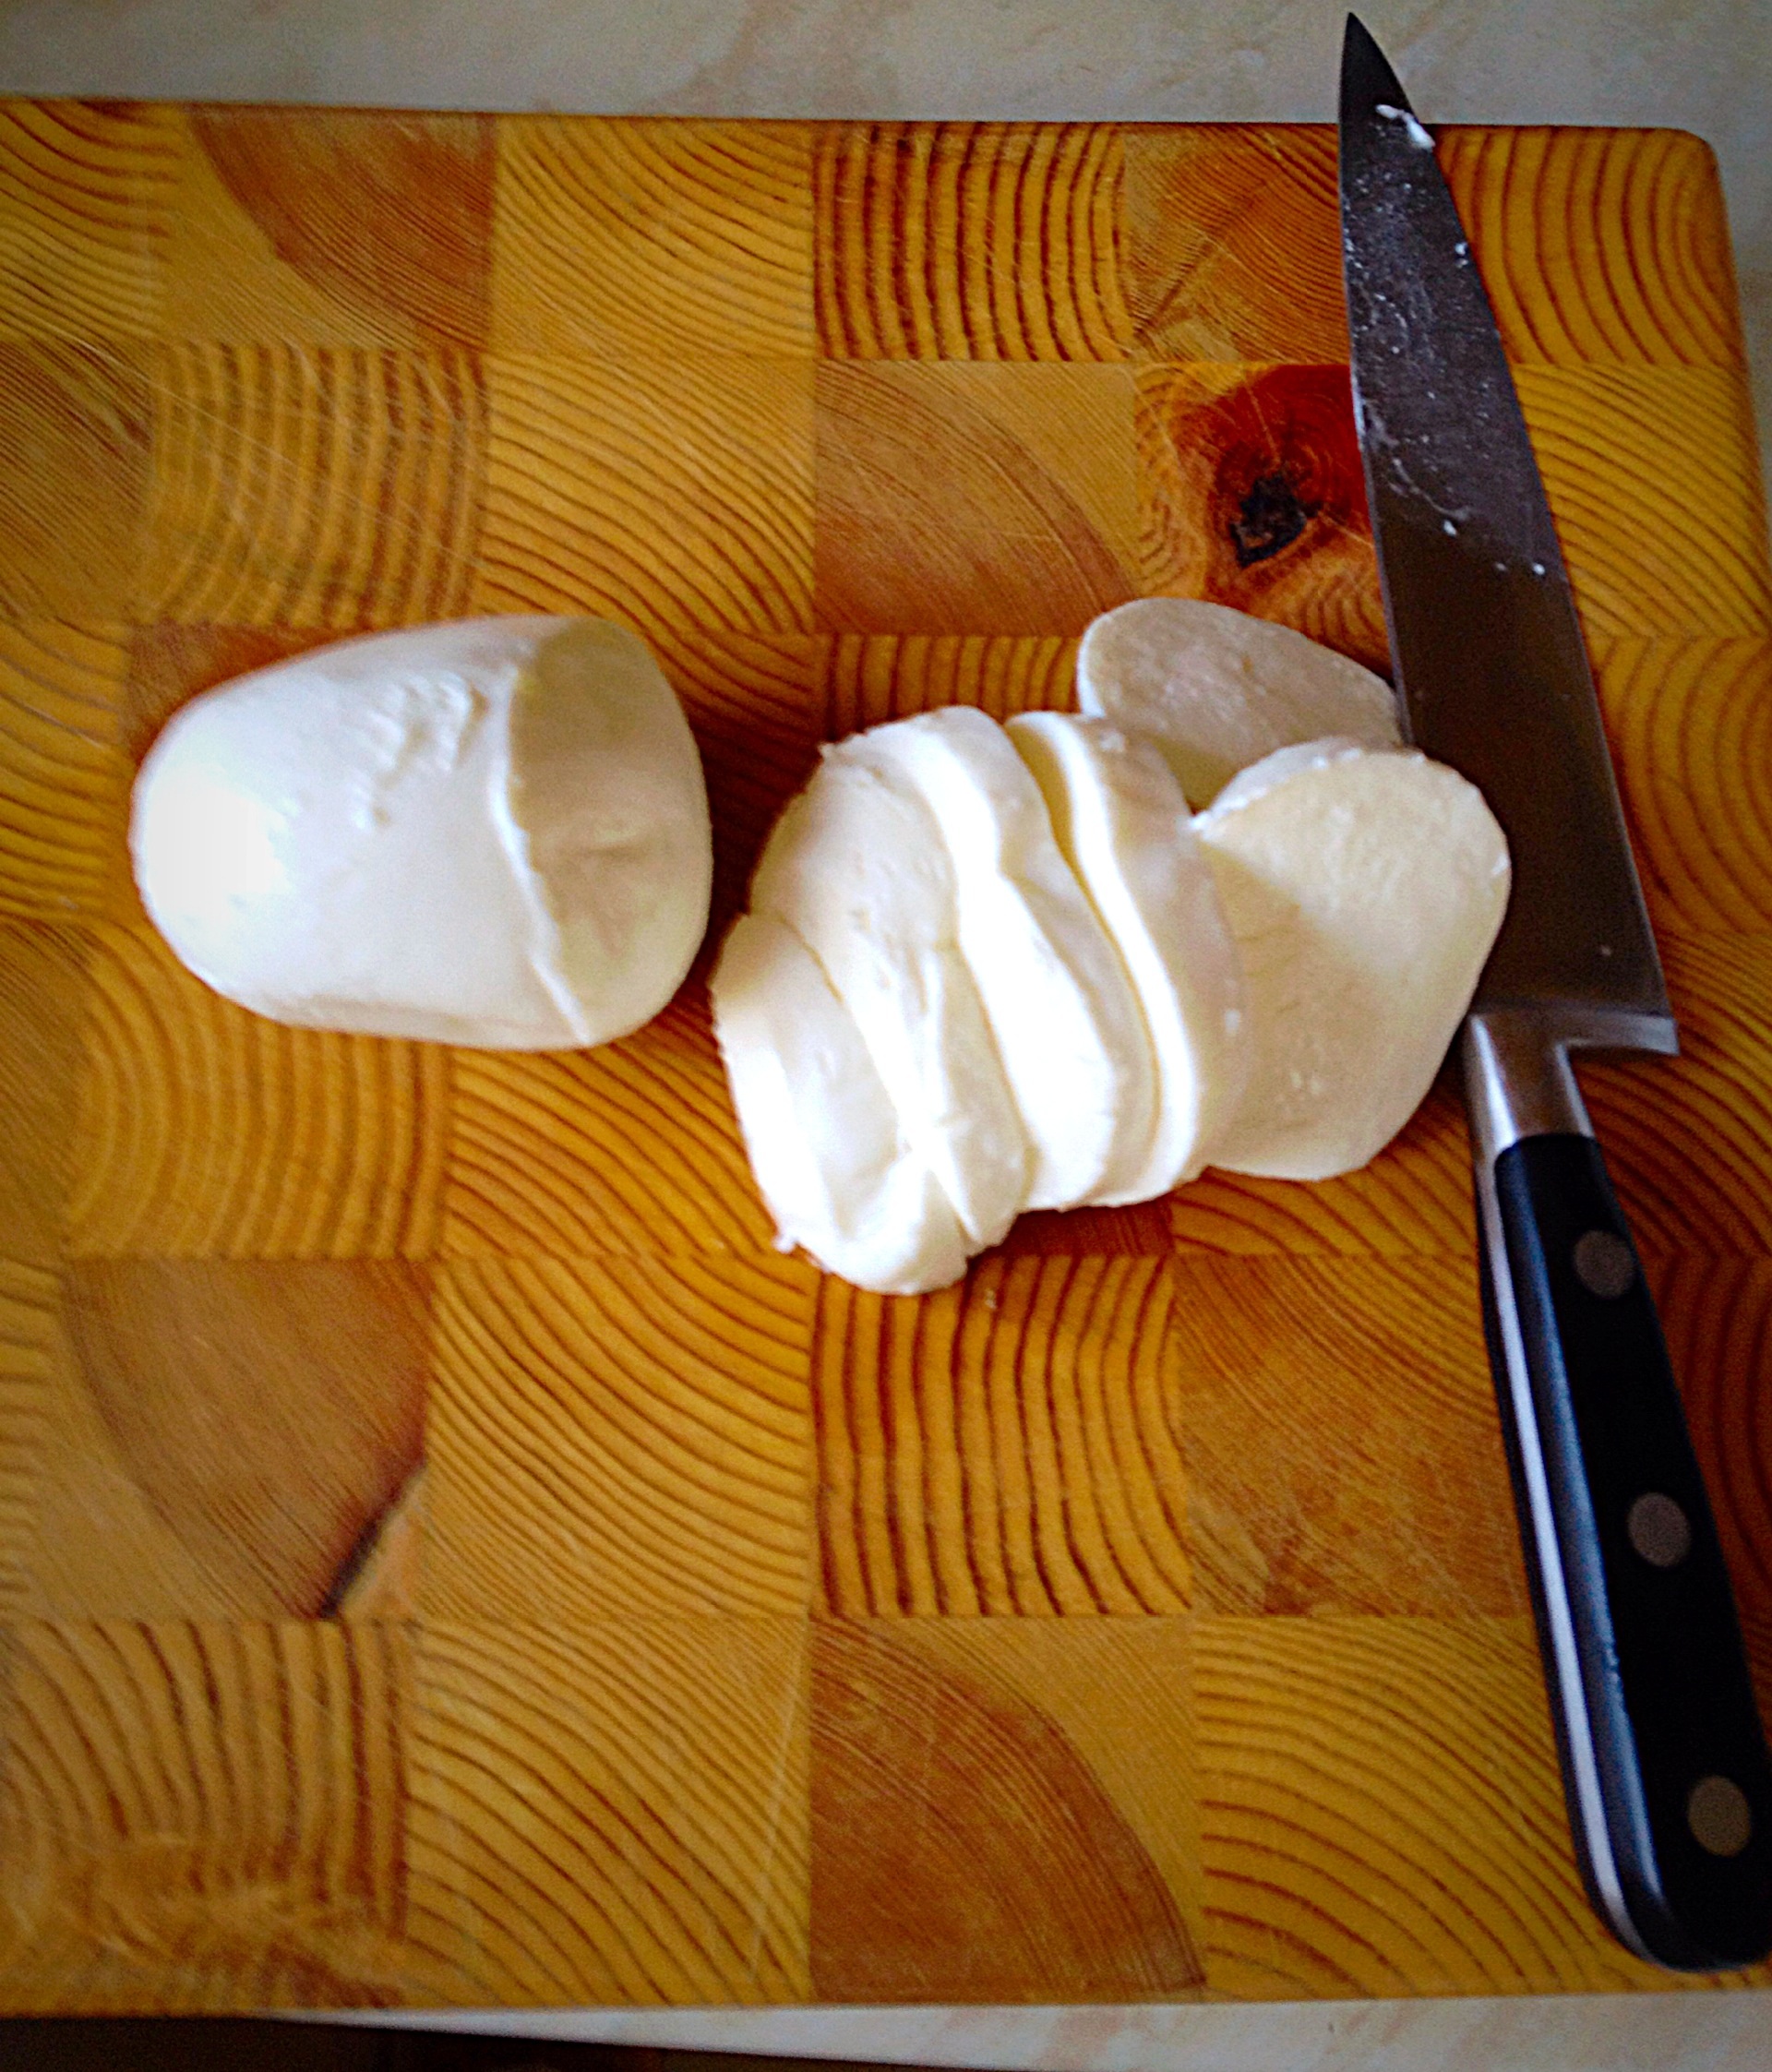
Drain and slice the mozzarella cheese.
The final gooey, stringy, adornment for this fab lasagne dish!
And now arrange the mozzarella slices on top of the cheese sauce.
The Four Cheese Sauce tops off this lasagne perfectly.
Finally leave the lasagne for at least 4 hours or ideally overnight. So that the dried lasagne slices have time to absorb moisture from both sauces. Also this dish can be made 1-2 days in advance, wrapped in cling film and left in the fridge.
Baking The Lasagne
As soon as the lasagne is ready to bake preheat the oven to 180C/160C fan oven, 350F, gas mark 4.
Place the lasagne dish on to a slightly larger baking tray; this dish can bubble up and over.
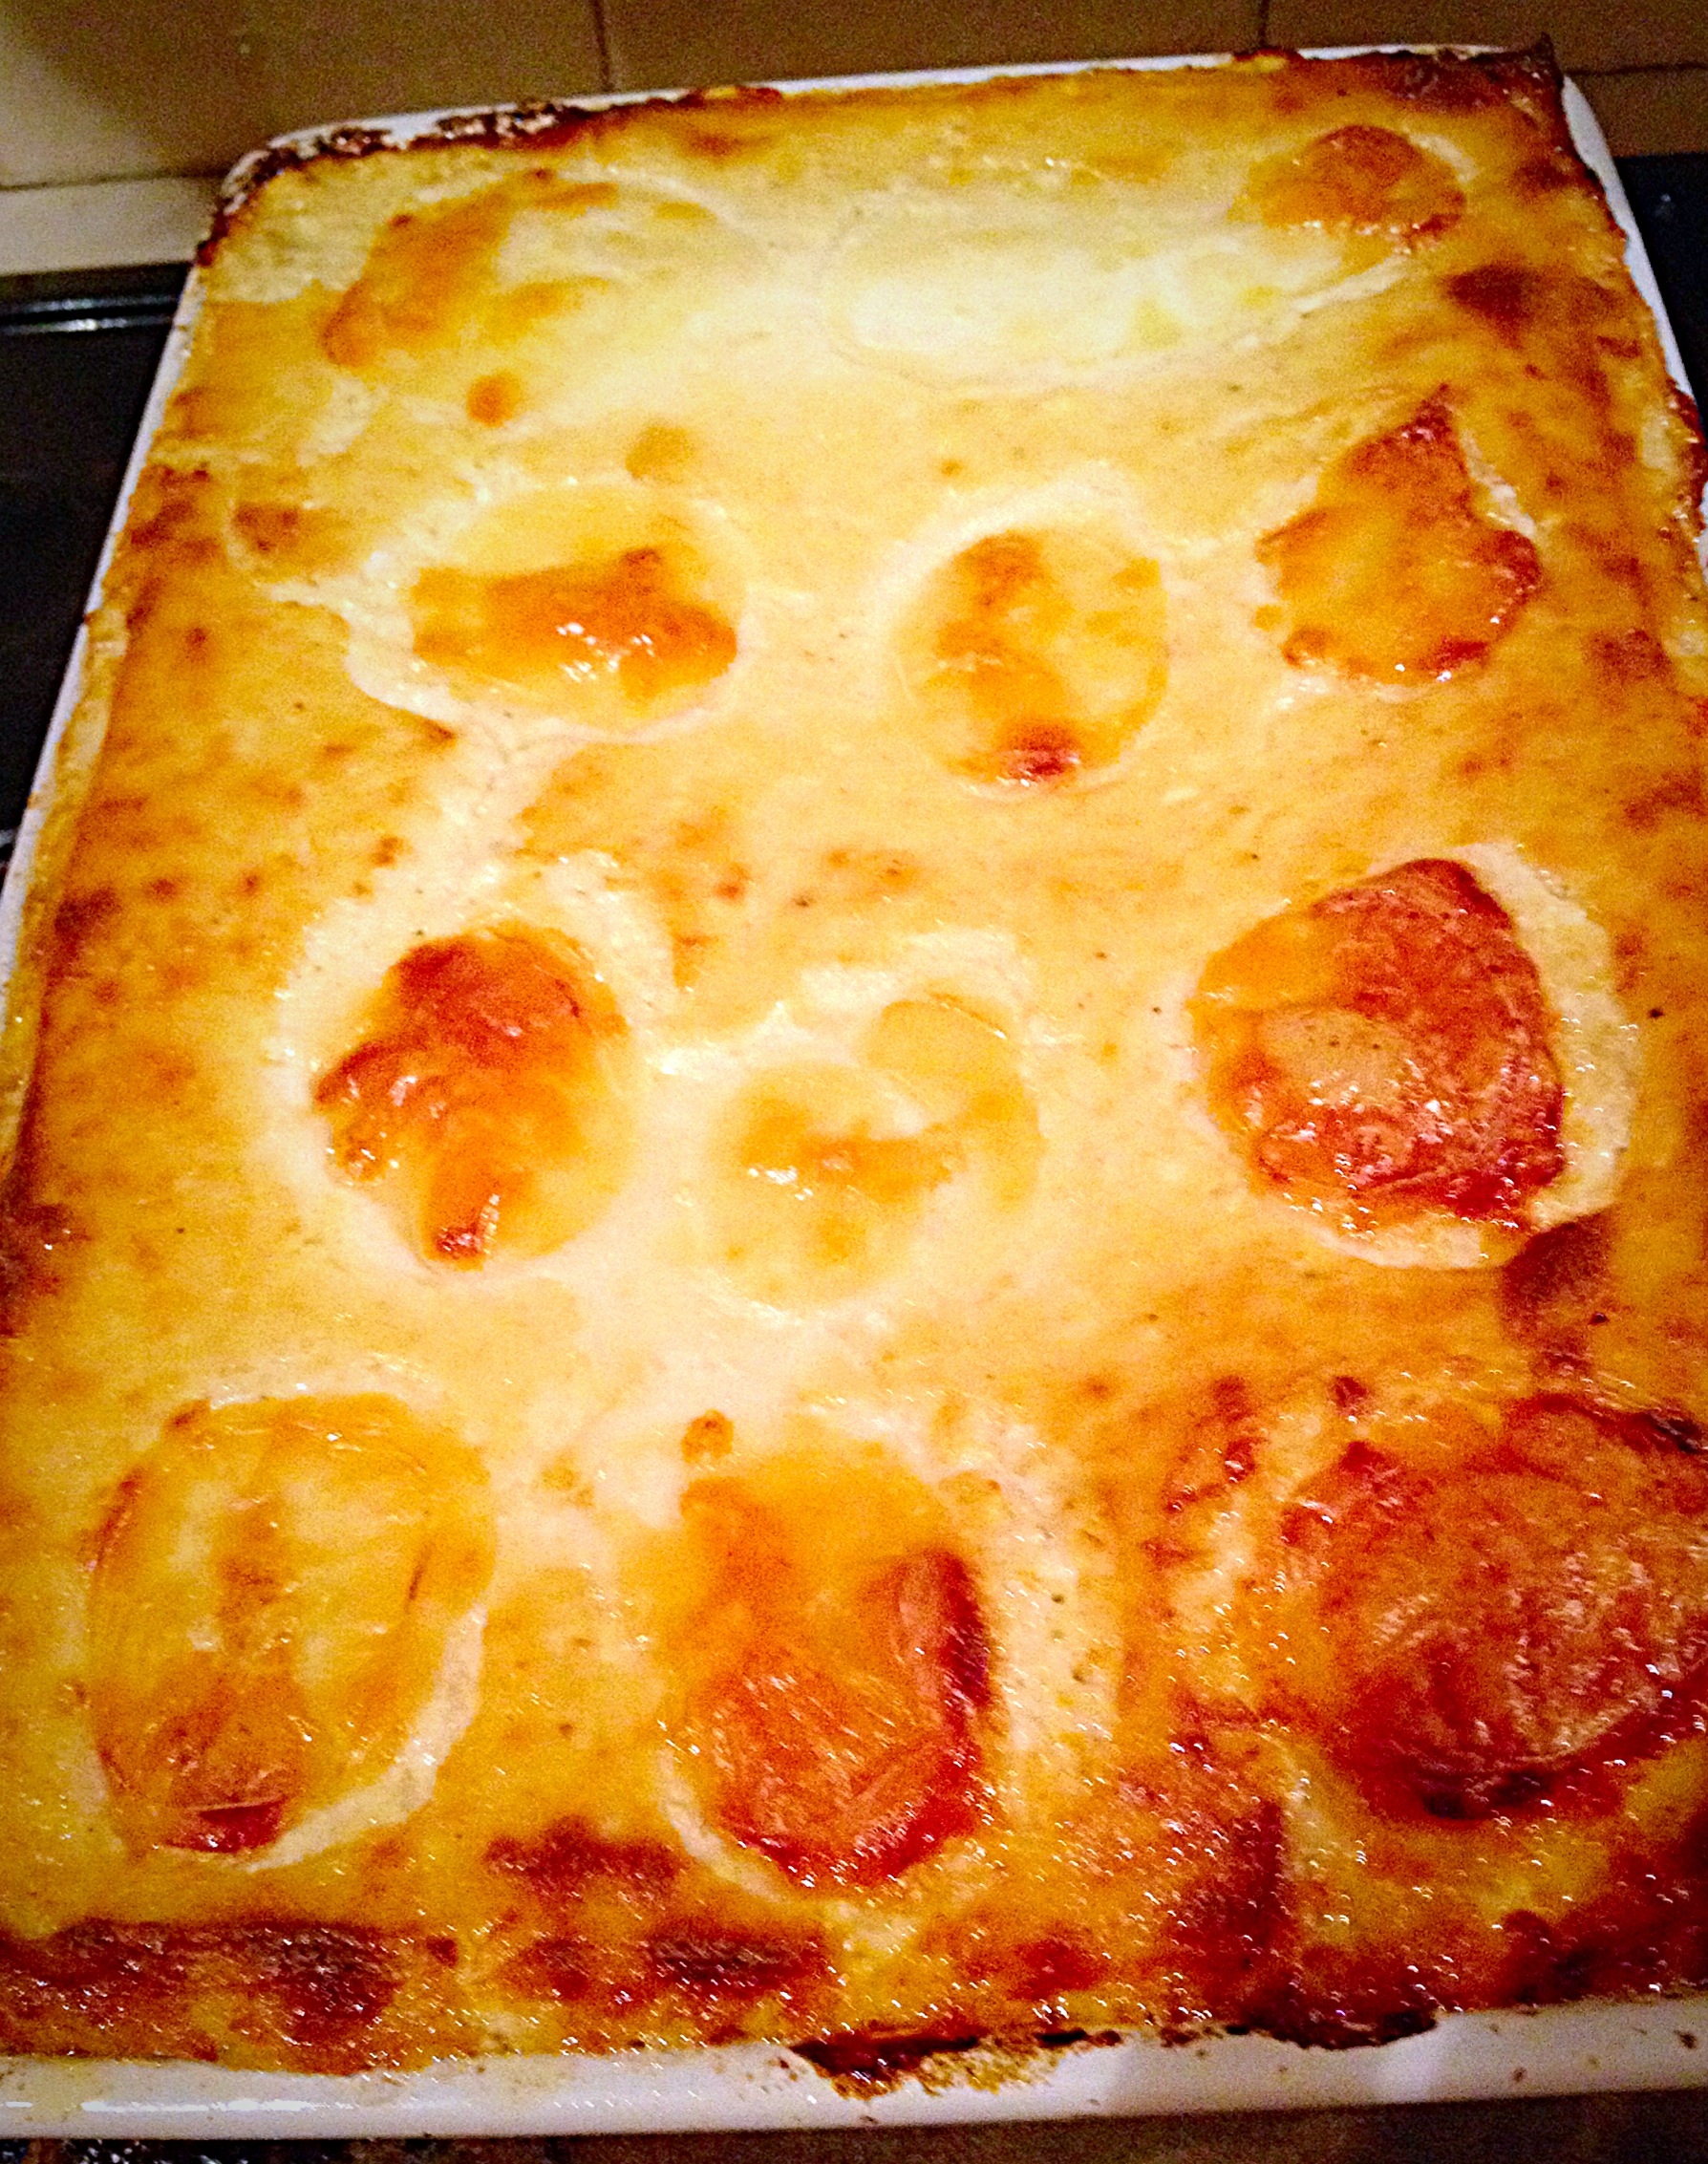
Bake the lasagne for 1 1/2 hours until piping hot all the way through and golden brown.
Remove from the oven 10-15 minutes before serving. Doing so allows the lasagne to cool slightly and more importantly, hold it’s shape when served.
This Chicken and Four Cheese Lasagne is delicious on it’s own, served with a salad and freshly baked Garlic Rosemary Focaccia Bead. Also it can be frozen at the pre-bake stage or in individual portions, wrapped tightly in foil and popped into the freezer. Or why not double the quantities and make an extra meal for the freezer?
If you have enjoyed this recipe for Chicken Four Cheese Lasagne you may also like these:
While traditional recipes will stand the test of time, importantly it’s fun to change things up. And sharing those changes is especially important as is sharing the food we make. Most of all if you know a new mum, or someone who has been ill for a while, or just a very busy family that you would like to bless, then this is THE perfect, portable, all in one meal for sharing!
Hello there eveyone. How you doing? No really – How – Are – You? I really want to know. I thought I’d veer off my normal recipe/uplifting thought inspiring post for today and be honest. It’s not that I’m dishonest on my blog, but I fully understand that whenever you portray yourself via a blog, or on social media, you get to choose which parts of you the world sees. Which is why I’m addressing why Migraine Not Always Sunshine And Roses.
Now I love Sunshine and I adore Roses, but in my real, everyday life sometimes the Sunshine hurts and the Roses are thorny and those thorns can dig in and take a while to come out – I’ll explain:
Actually, this is really hard to put into words.
Migraine
I struggle. I’ve just been up (I literally mean out of bed and dressed) for 2 days. The previous 4 days were spent laying in my bed, blackout curtains drawn, burying my head into piles of pillows trying to stop the pain. I had a Migraine and yes it lasted 4 whole days.
The slightest sniff of even the blandest food can set off nausea and vomiting. A shard of sunlight, streaming through a gap in the curtains, feel like a dagger to my eye. My head literally feels like it is going to explode; like someone is blowing a balloon up inside my head and the pressure keeps building and building.
A Migraine is not a headache, although blinding pain in your head can be part of the Migraine. My head throbs with every beat of my heart, the pressure increasing with every beat until eventually I vomit and the pressure is temporarily released, only to build again as the cycle repeats itself.
At the onset of a Migraine I begin to lose the sight in my left eye (a relatively new development), my sense of smell goes into overdrive, I crave fresh, cold air, yawn incessantly. My one and only desire is to head straight to bed, briefly halted by the need to get Indomethacin in me ASAP – there’s no dignity in having a Migraine, it’s a suppository.
Once cocooned in my blacked out room I have to decide whether to use my Triptan injection. You’d think it’d be a straightforward decision, but hang on – my ability to think, let alone think clearly goes right out of the much needed open window as soon as a Migraine begins. Firstly the injection hurts – a lot! I also have Migraines so frequently (it’s not uncommon for me to spend more than half of the week in bed) that I have to limit how much Triptan I use.
Sumitriptan is one of a group of drugs, called Triptans, that can halt, or shorten the length of a Migraine. However, in me, overuse can lead to tolerance and so the injection has little or no effect. Long term overuse can also lead to ‘Medication Misuse’ triggered Migraines and/or headaches.
Writing this blog is upsetting because it forces me to focus on the reality of the world and body I live in. A natural optimist, I always focus on the good rather than the bad. And that sucks. I hate that I am in pain. Also, I hate that my back and neck go into spasm and my body aches like I’ve got the Flu. Being sick is something else I hate, except for the few minutes after vomiting, when the pressure in my head is relieved. I hate that the Migraine plays tricks on my body, I feel a bit better, move and the throbbing in my head comes back with a vengeance. I hate having my words come out all jumbled up, when I try to speak.
But mostly I hate the impact it has on my hubby and our 3 children. Is there a mother out there who delights in being cared for, dependant on their children??? I don’t. I’m their mum, I should be doing the looking after. The added stress to my amazing hubby, who I forever wonder why he choose me?
On a practical side, me being ‘out of action’ is a nightmare, that is soothed only by help from the BEST family (both of ours), friends I don’t deserve and my Faith (see ‘Important Stuff’).
To all of you I say Thank you from the bottom of my heart – I love you.
I have always had Migraines, even when I was a toddler. Then I was involved in a car accident 25 years ago and the Migraines changed. Before they would build during the day, culminating in a vicious cycle of intense pain, vomiting, sleep, pain building etc. I learned what foods to avoid and overtime narrowed down some of my other triggers; such as tiredness, excitement, not eating regularly.
Since the car accident I wake in the early hours of the morning (between 3-5am) with a full blown, excruciatingly painful Migraine. Dr’s don’t know why – I suspect it could be due to the neck/back injury I sustained in the accident. Who knows?? It is what it is and it sucks.
The waste of being unable to ‘do’ anything, just stuck in bed. Praying hard that this Migraine will pass quickly. All I’ve ever wanted to be is normal. To blend in (hard I’m 6 foot tall). While giving our children a great childhood and being the best wife I can be. And to help others. So frustrating and disappointing. My belief in and love for Jesus gets me through, always, even when I think I can’t face another day He carries me through.
I’m not looking for sympathy, just a little understanding. Finally, I started this blog so that I could not only share my recipes but have something positive to do when I’m recovering from a Migraine?
If this post Migraine Not Always Sunshine And Roses has helped you, these posts may be of interest to:
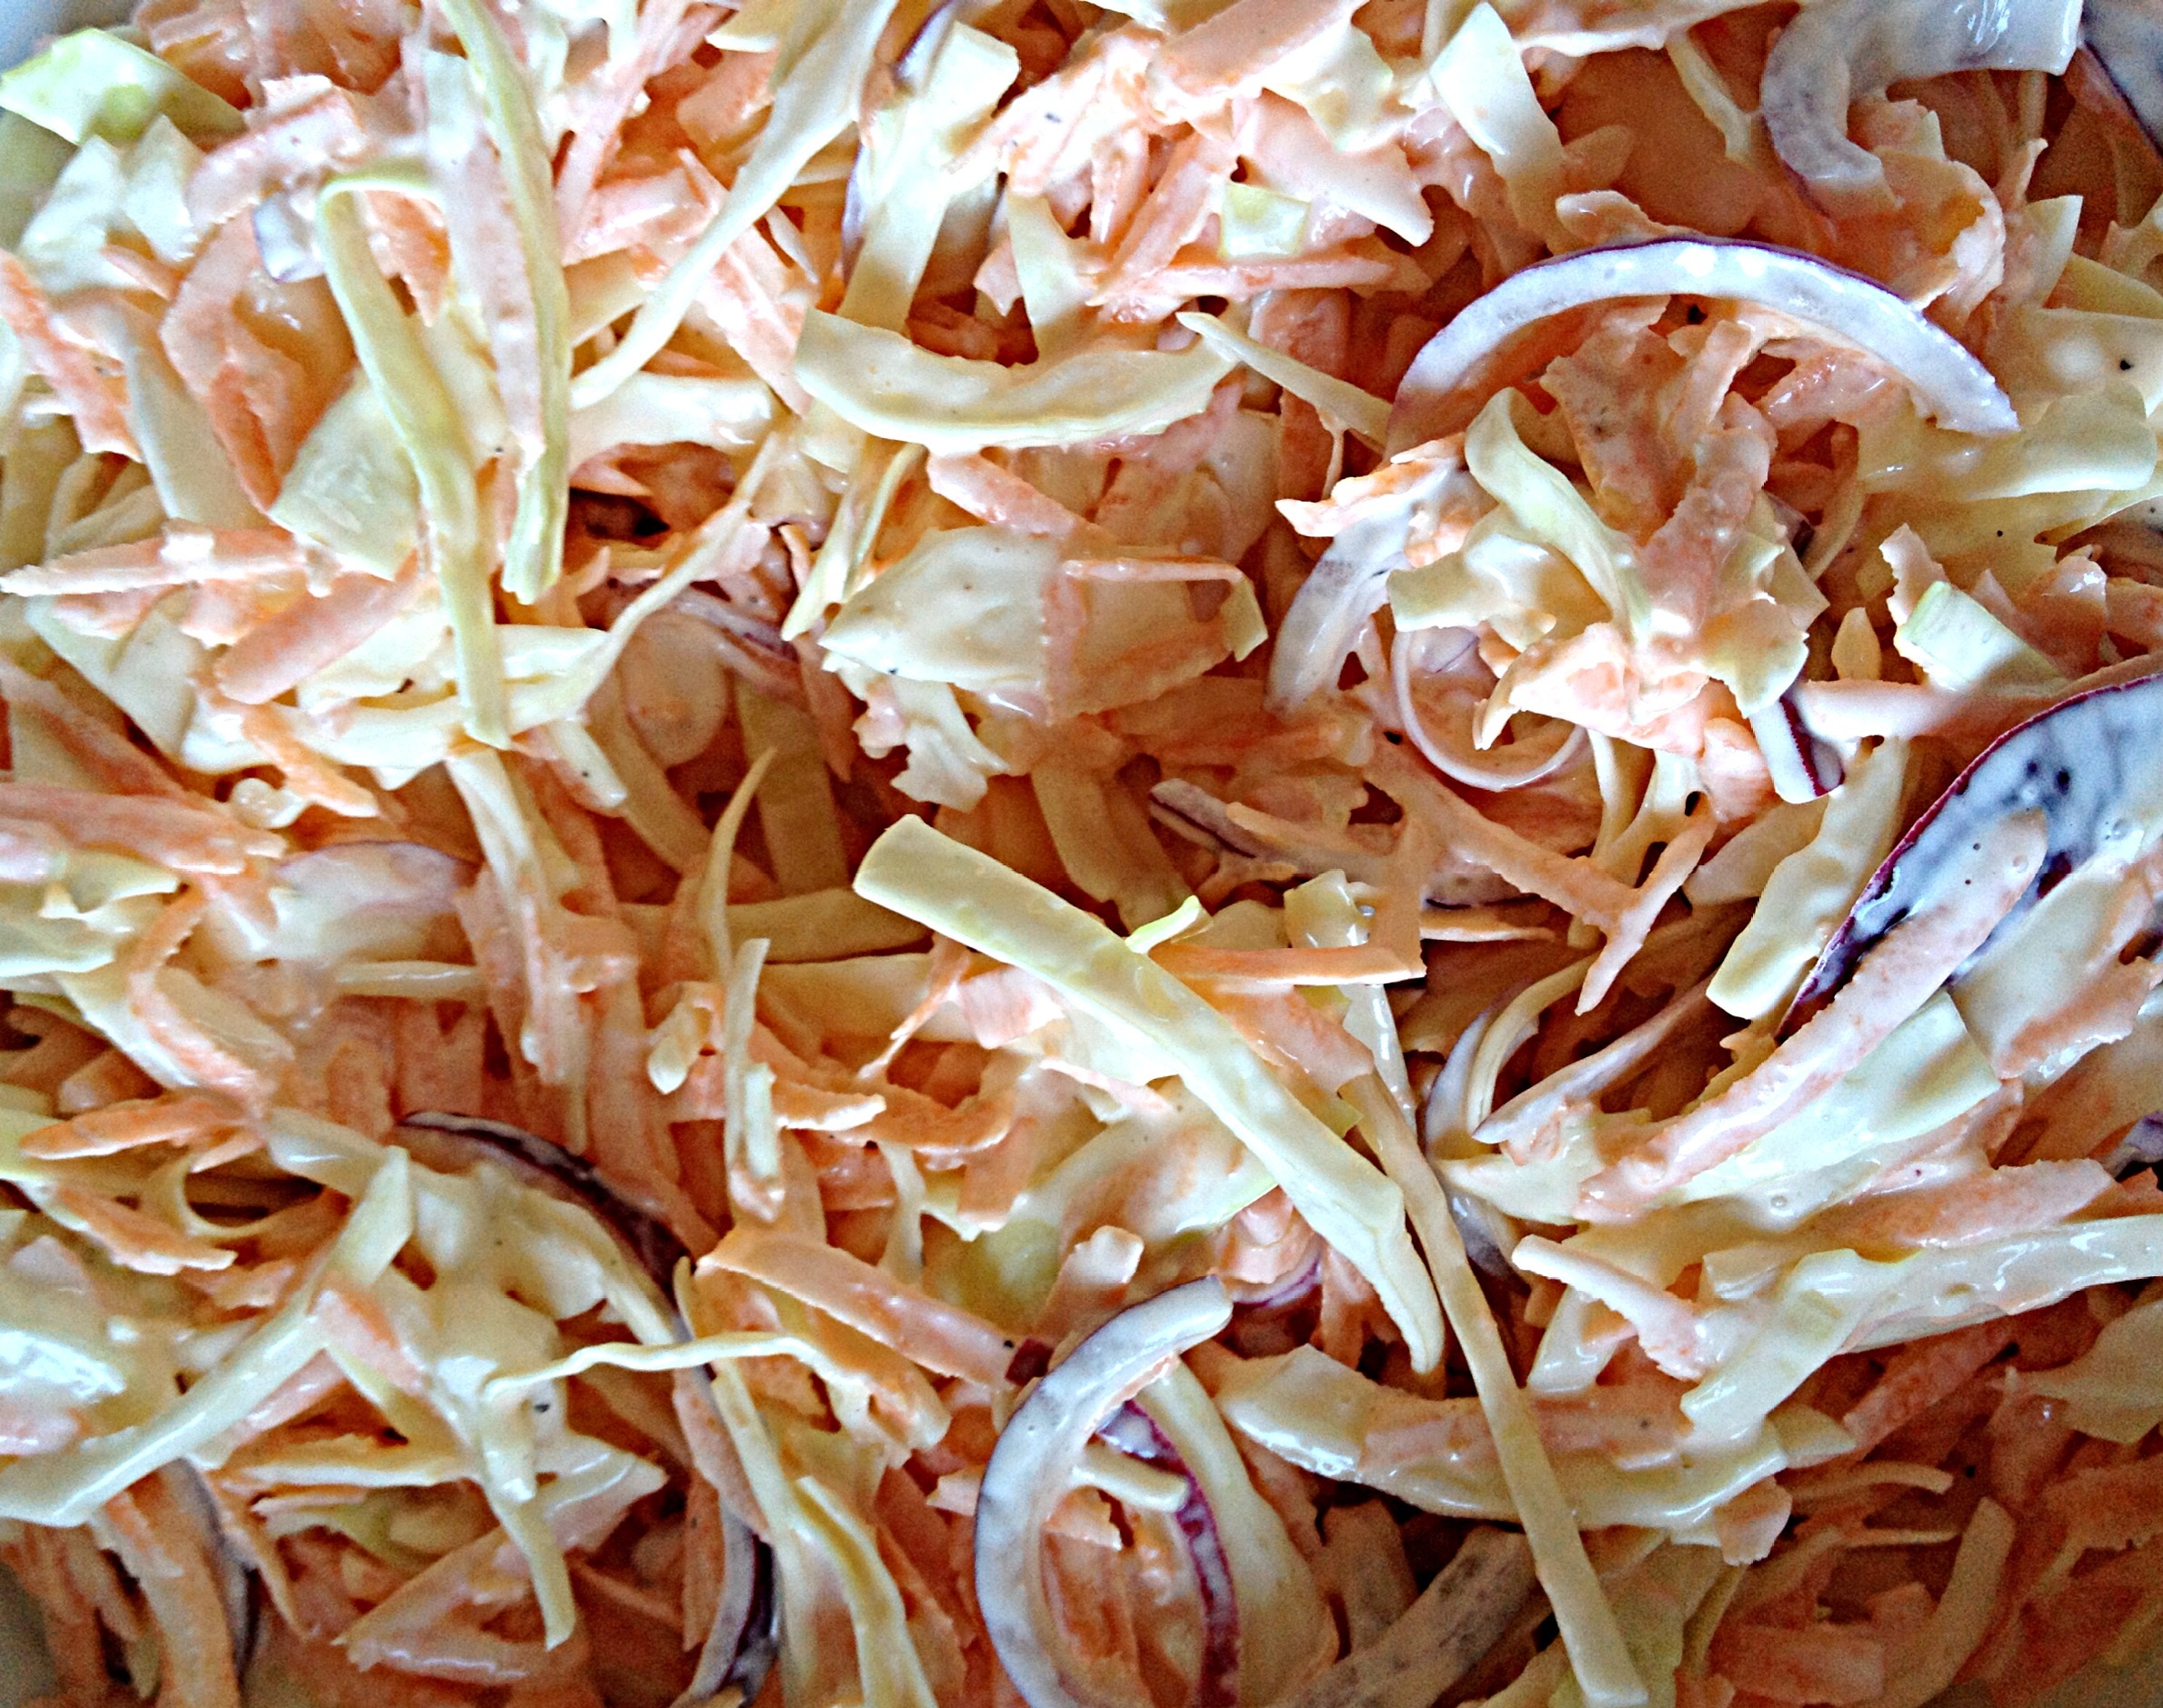
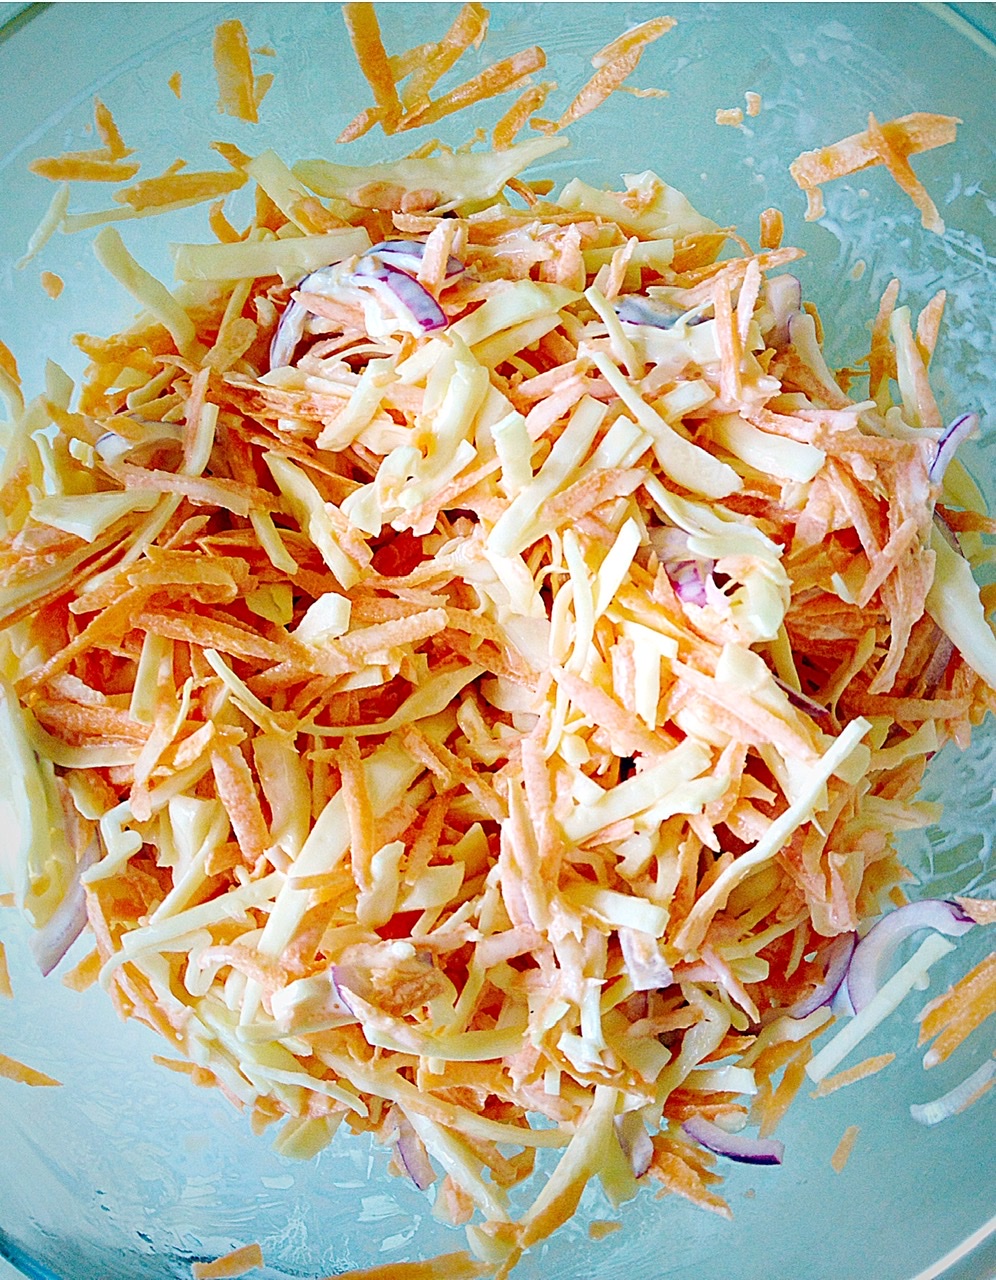
Hello everyone. A big shout out to all the Mums and Dads on half-term duty. So, I have created a deliciously CrunchyHomemade Coleslaw, that all my children and us adults love. Most importantly, it’s a really good way of getting fresh vegetables onto the dinner plate and goodness into us all. Also, I should mention that this Crunchy HomemadeColeslaw tastes seriously good!
While some may argue, “Why should I make my own Coleslaw, when it’s easily available and isn’t that expensive?” Which, if you think about it, is a fair point. On occasion, I used to buy Coleslaw from the shops and each time I did I regretted it, so I stopped! Either I find ready made Coleslaw is gloopy and smothered in creamy sauce, or it seems to contain only cabbage and onion, the latter having a strong, onion, overbearing taste. Truthfully, I really don’t enjoy shop bought Coleslaw. Finally, I’ve said it!
Crunchy Homemade Coleslaw
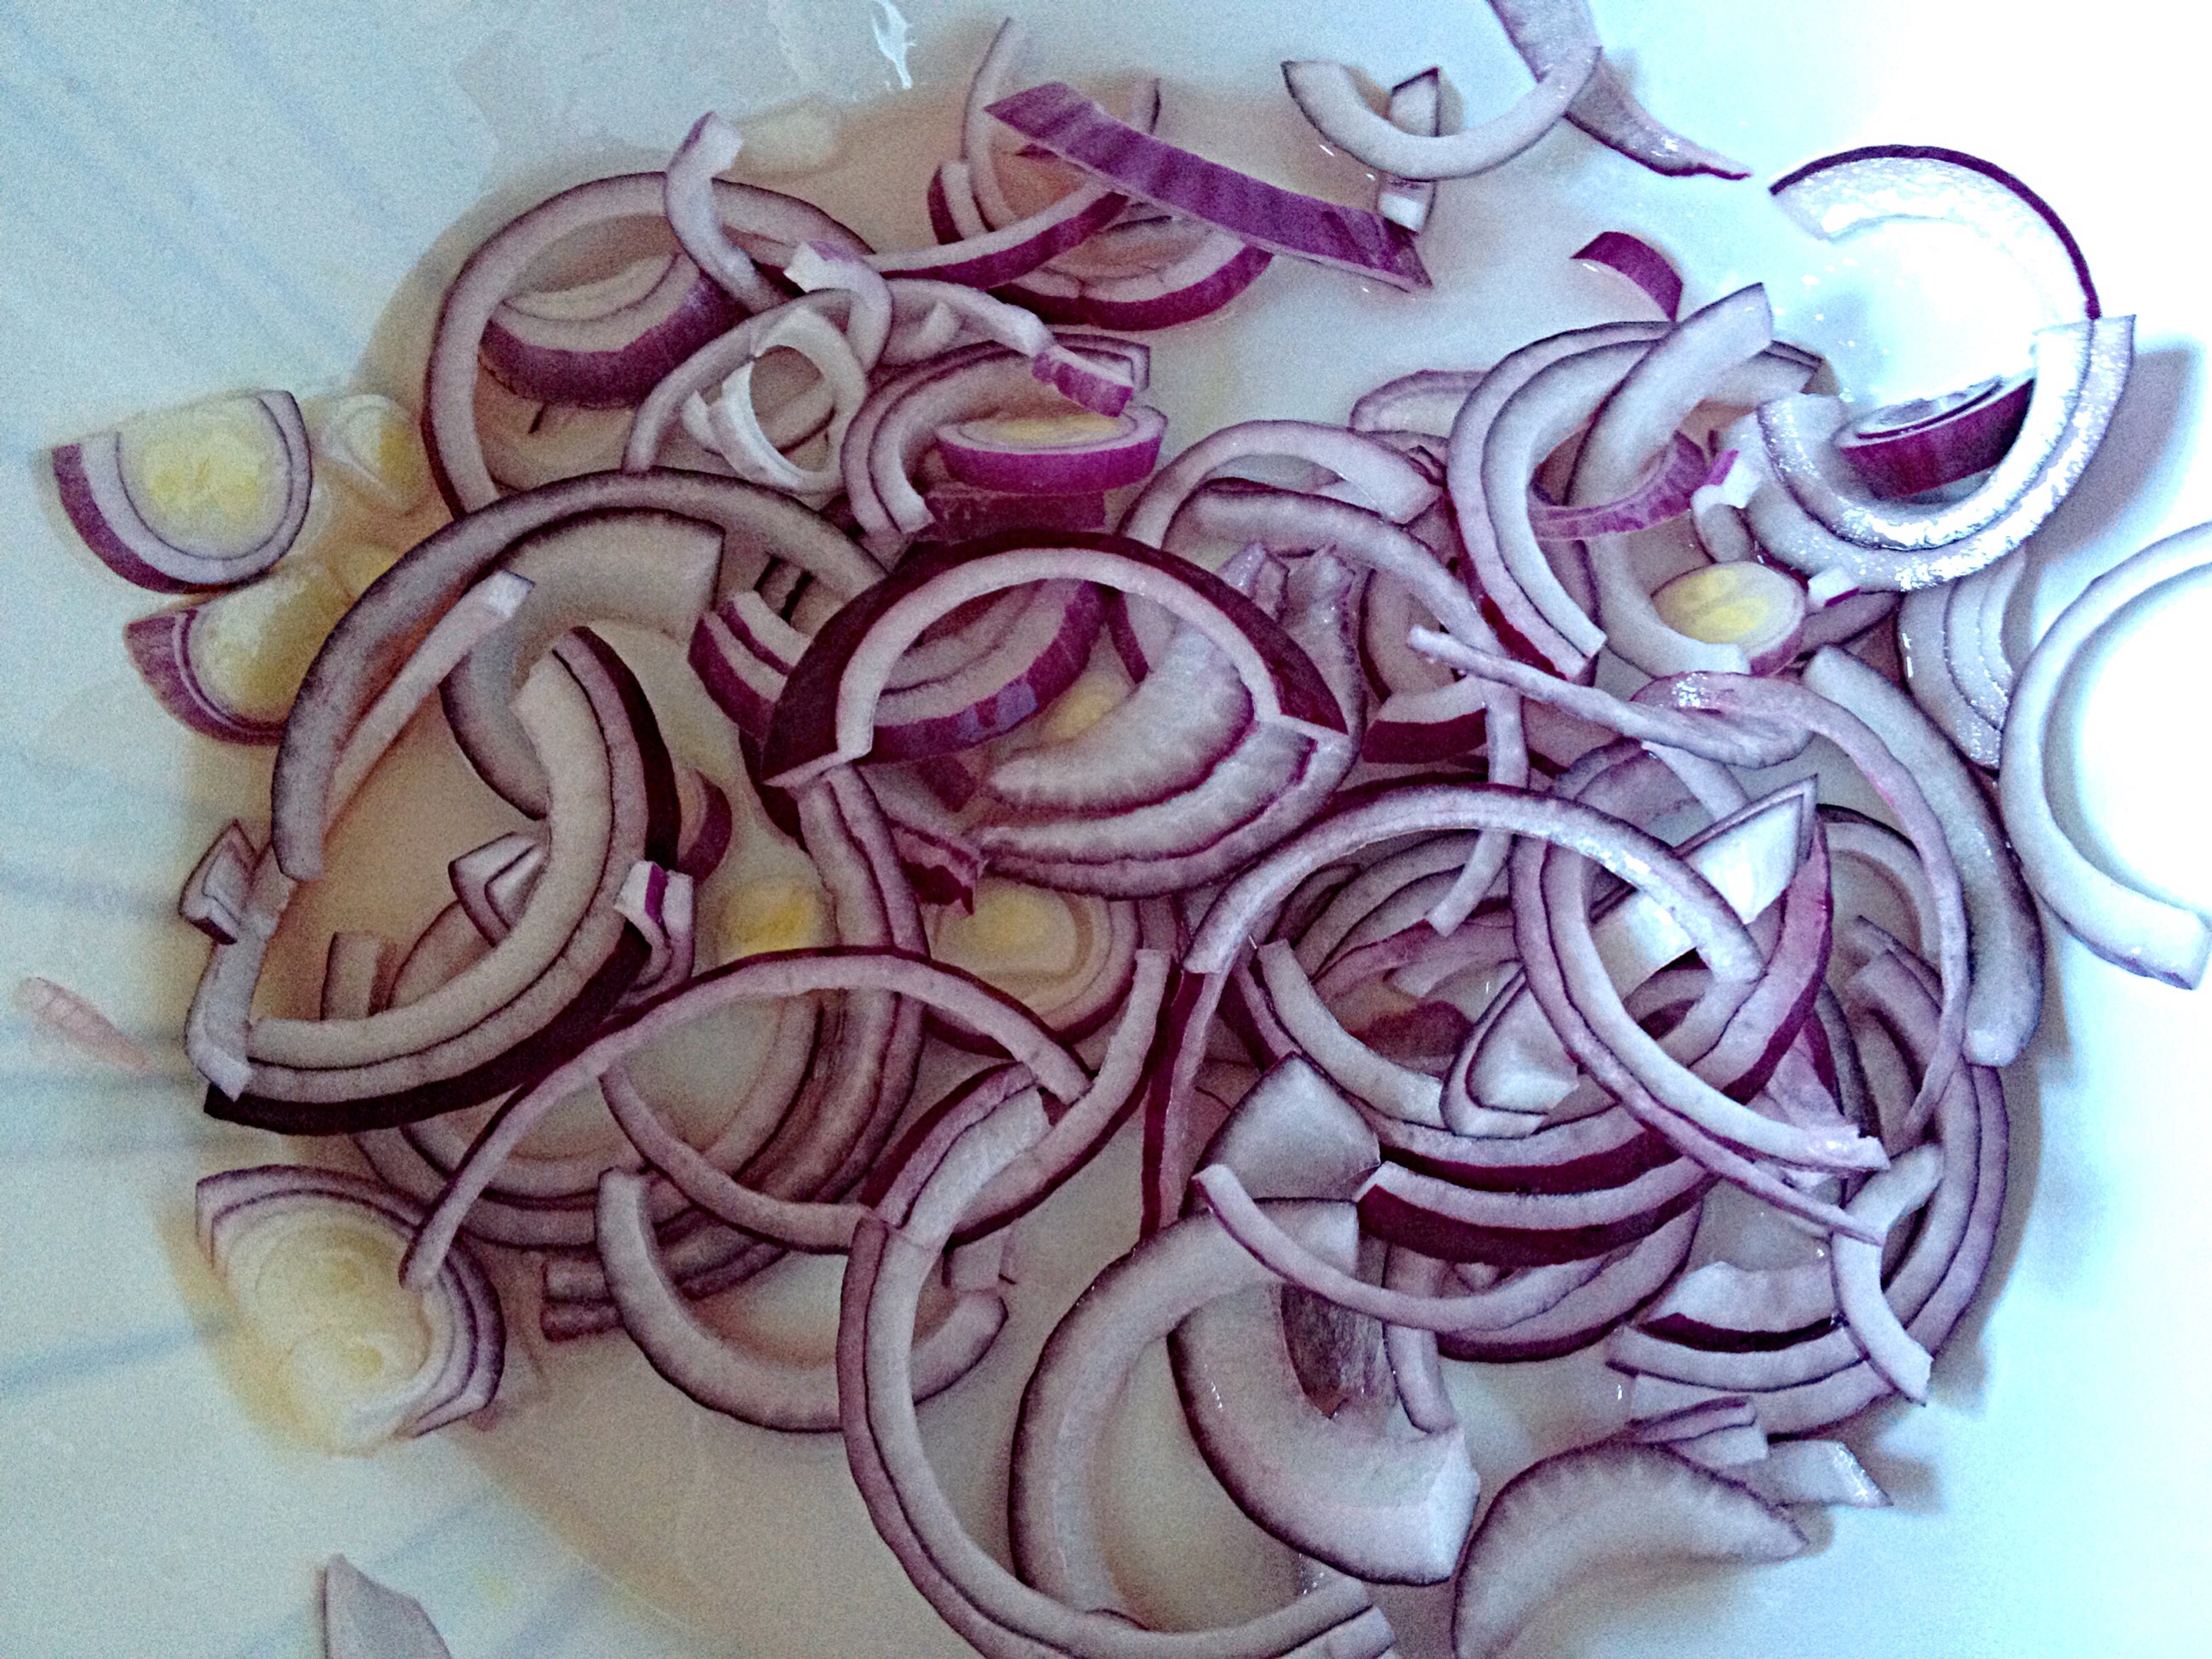
While I like onion in my Coleslaw, I don’t like it to have a nasal clearing, strong, over powering taste. So, I’ve come up with a solution. First of all, I use red onions, which are generally sweeter than white onions, then I slice them thinly and soak them in lemon juice with a sprinkle of salt. And the acidity of the lemon juice draws out all the acridness from the onions, leaving them sweet and crunchy. Resulting in a balance of flavours.
Pretty red onions add a super sweetness to this Coleslaw!
Because we enjoy this coleslaw so much, I always make a big bowl. Since it’s great to eat alongside fish and potato wedges, fabulous with my Better Than Takeout Pizza, burgers, or in place of salad with any meal.
Recipe : Crunchy Homemade Coleslaw serves 6 as side dish.
Approximately 5 Heaped Tablespoons of Mayonnaise (I use full fat mayo)
1/2 tsp Freshly Ground Black Pepper
Making The Lemon Mayonnaise For The Coleslaw
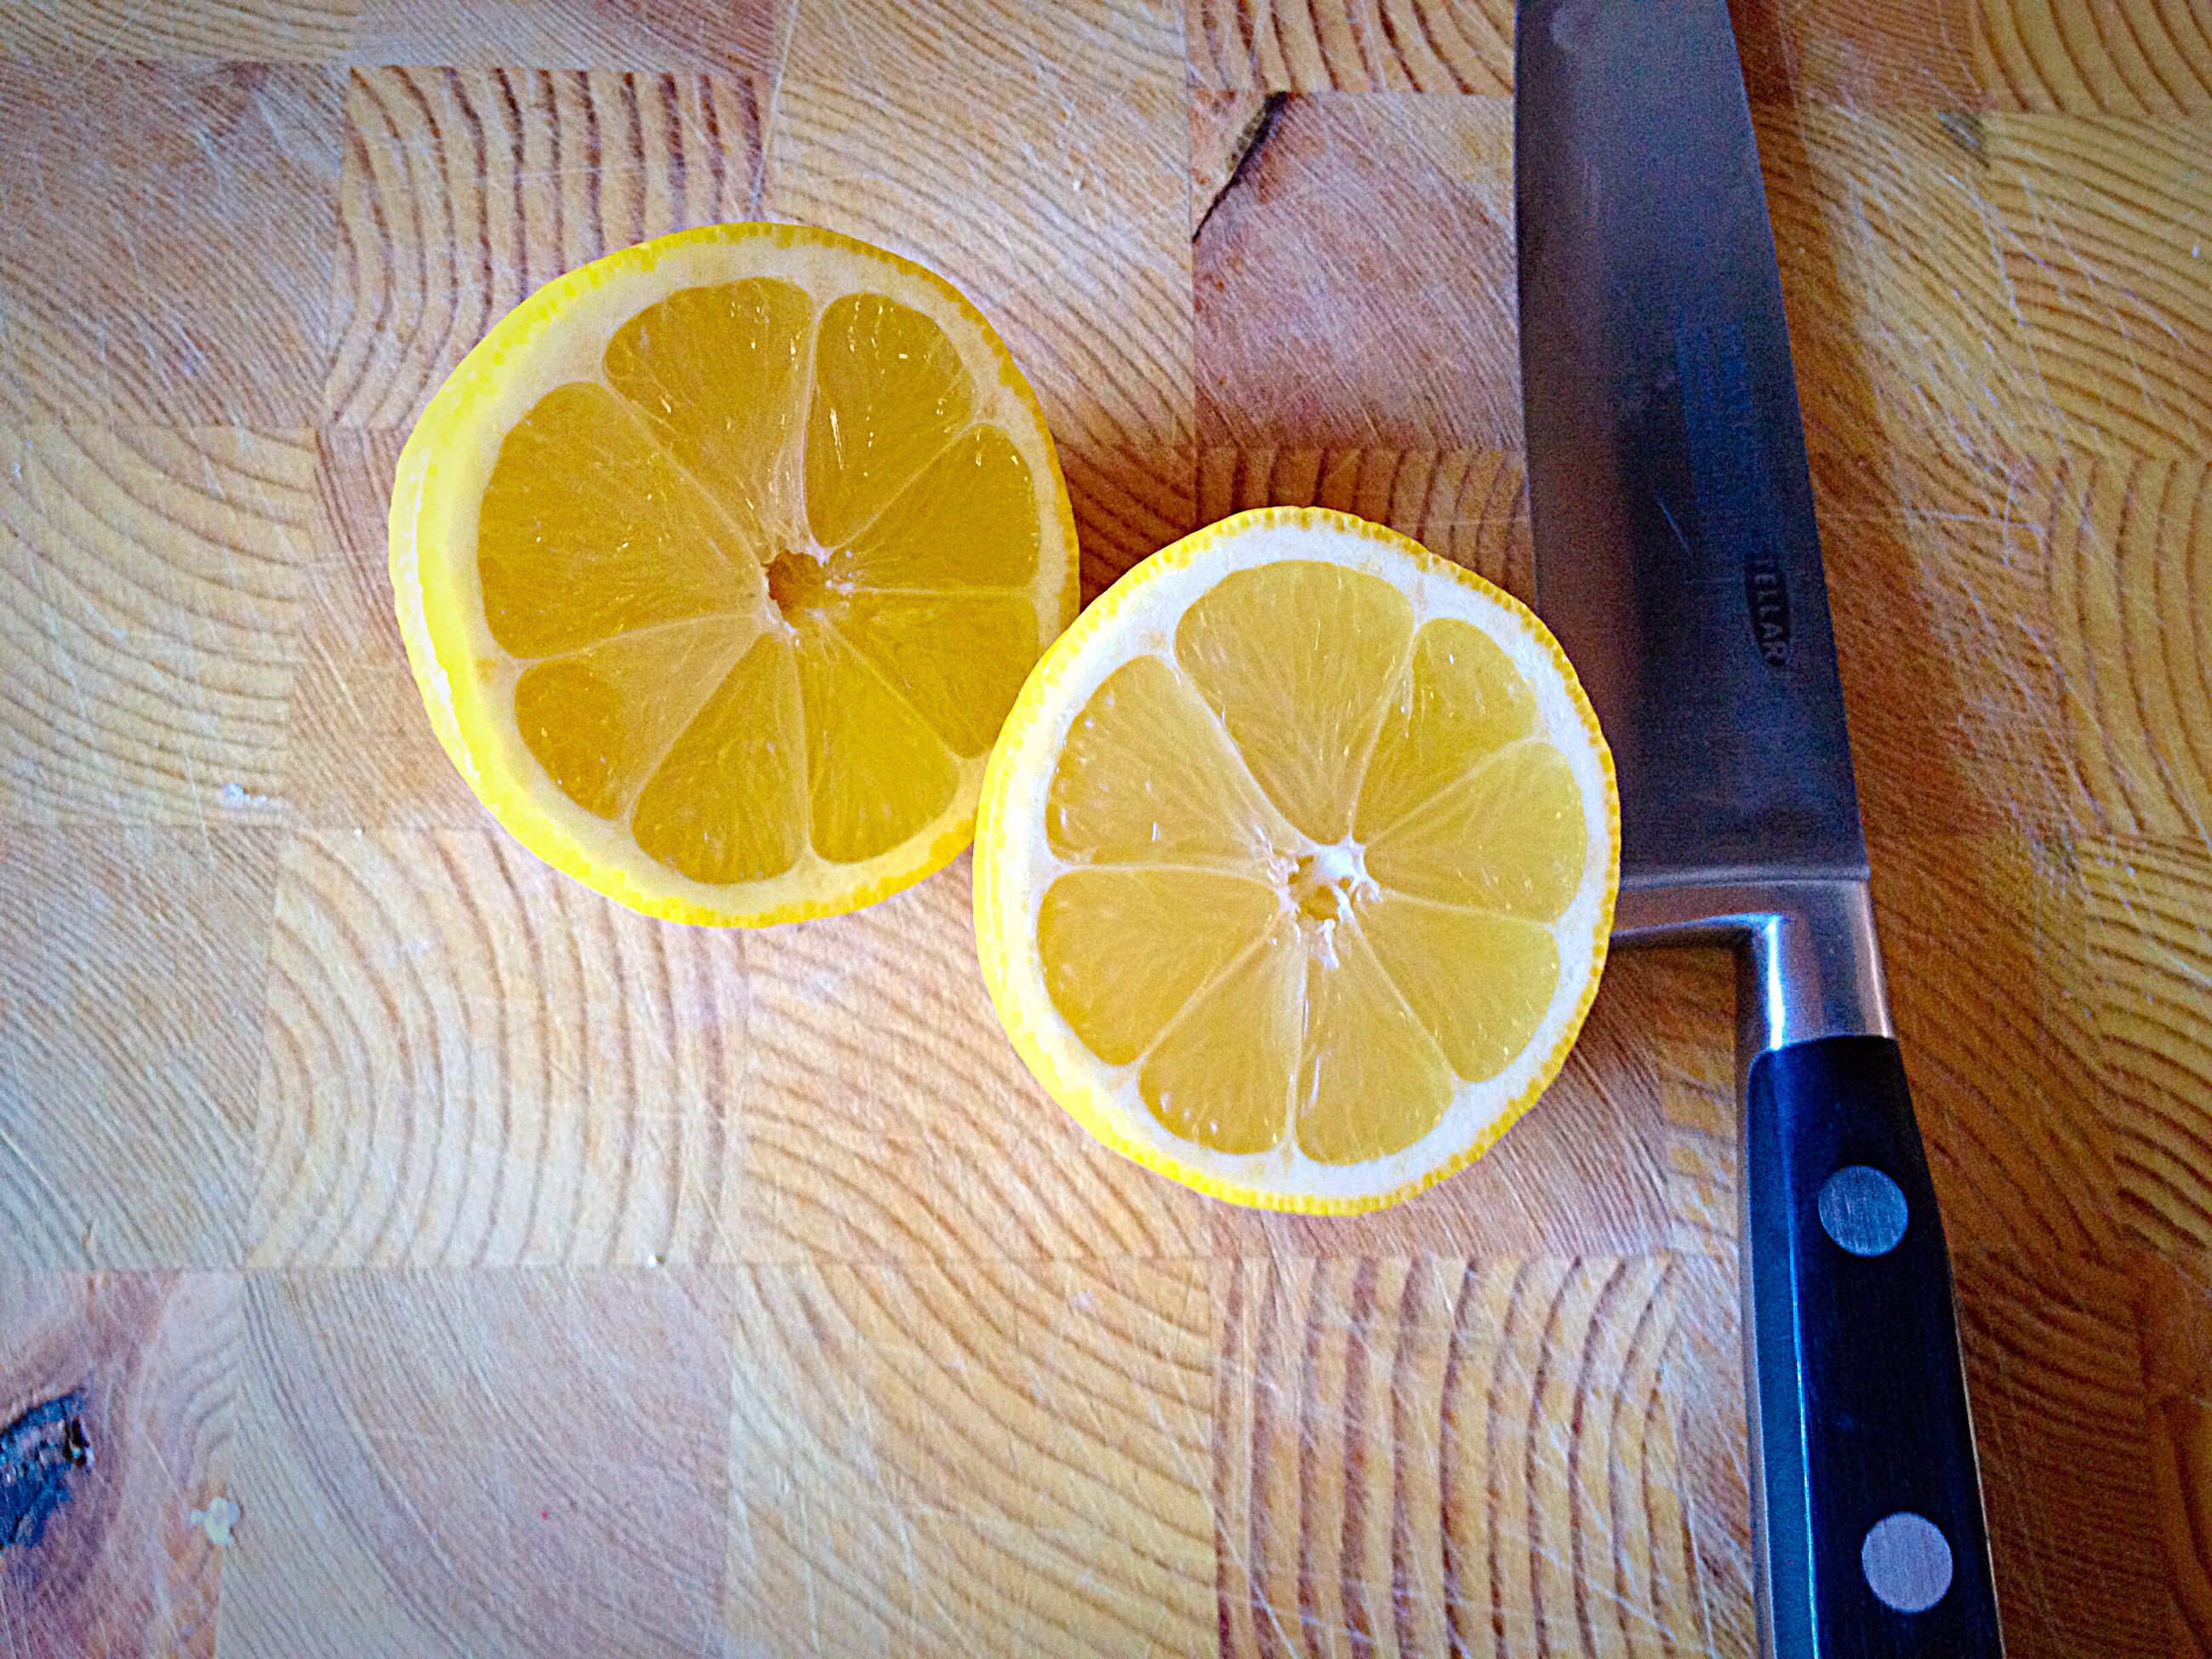
First of all, take the lemon, cut in half and squeeze it into a large bowl, feel free to use your favourite citrus juicer!
Watch out for any pips!
Now cut the red onion in half and slice as thinly as possible into half moons. Break up the onion and add to the lemon juice in the bowl. Sprinkle over the sea salt and using your fingers mix the onion half moons, breaking them apart as you go, into the lemon juice.
Set aside for 10 minutes whilst you prep the cabbage.
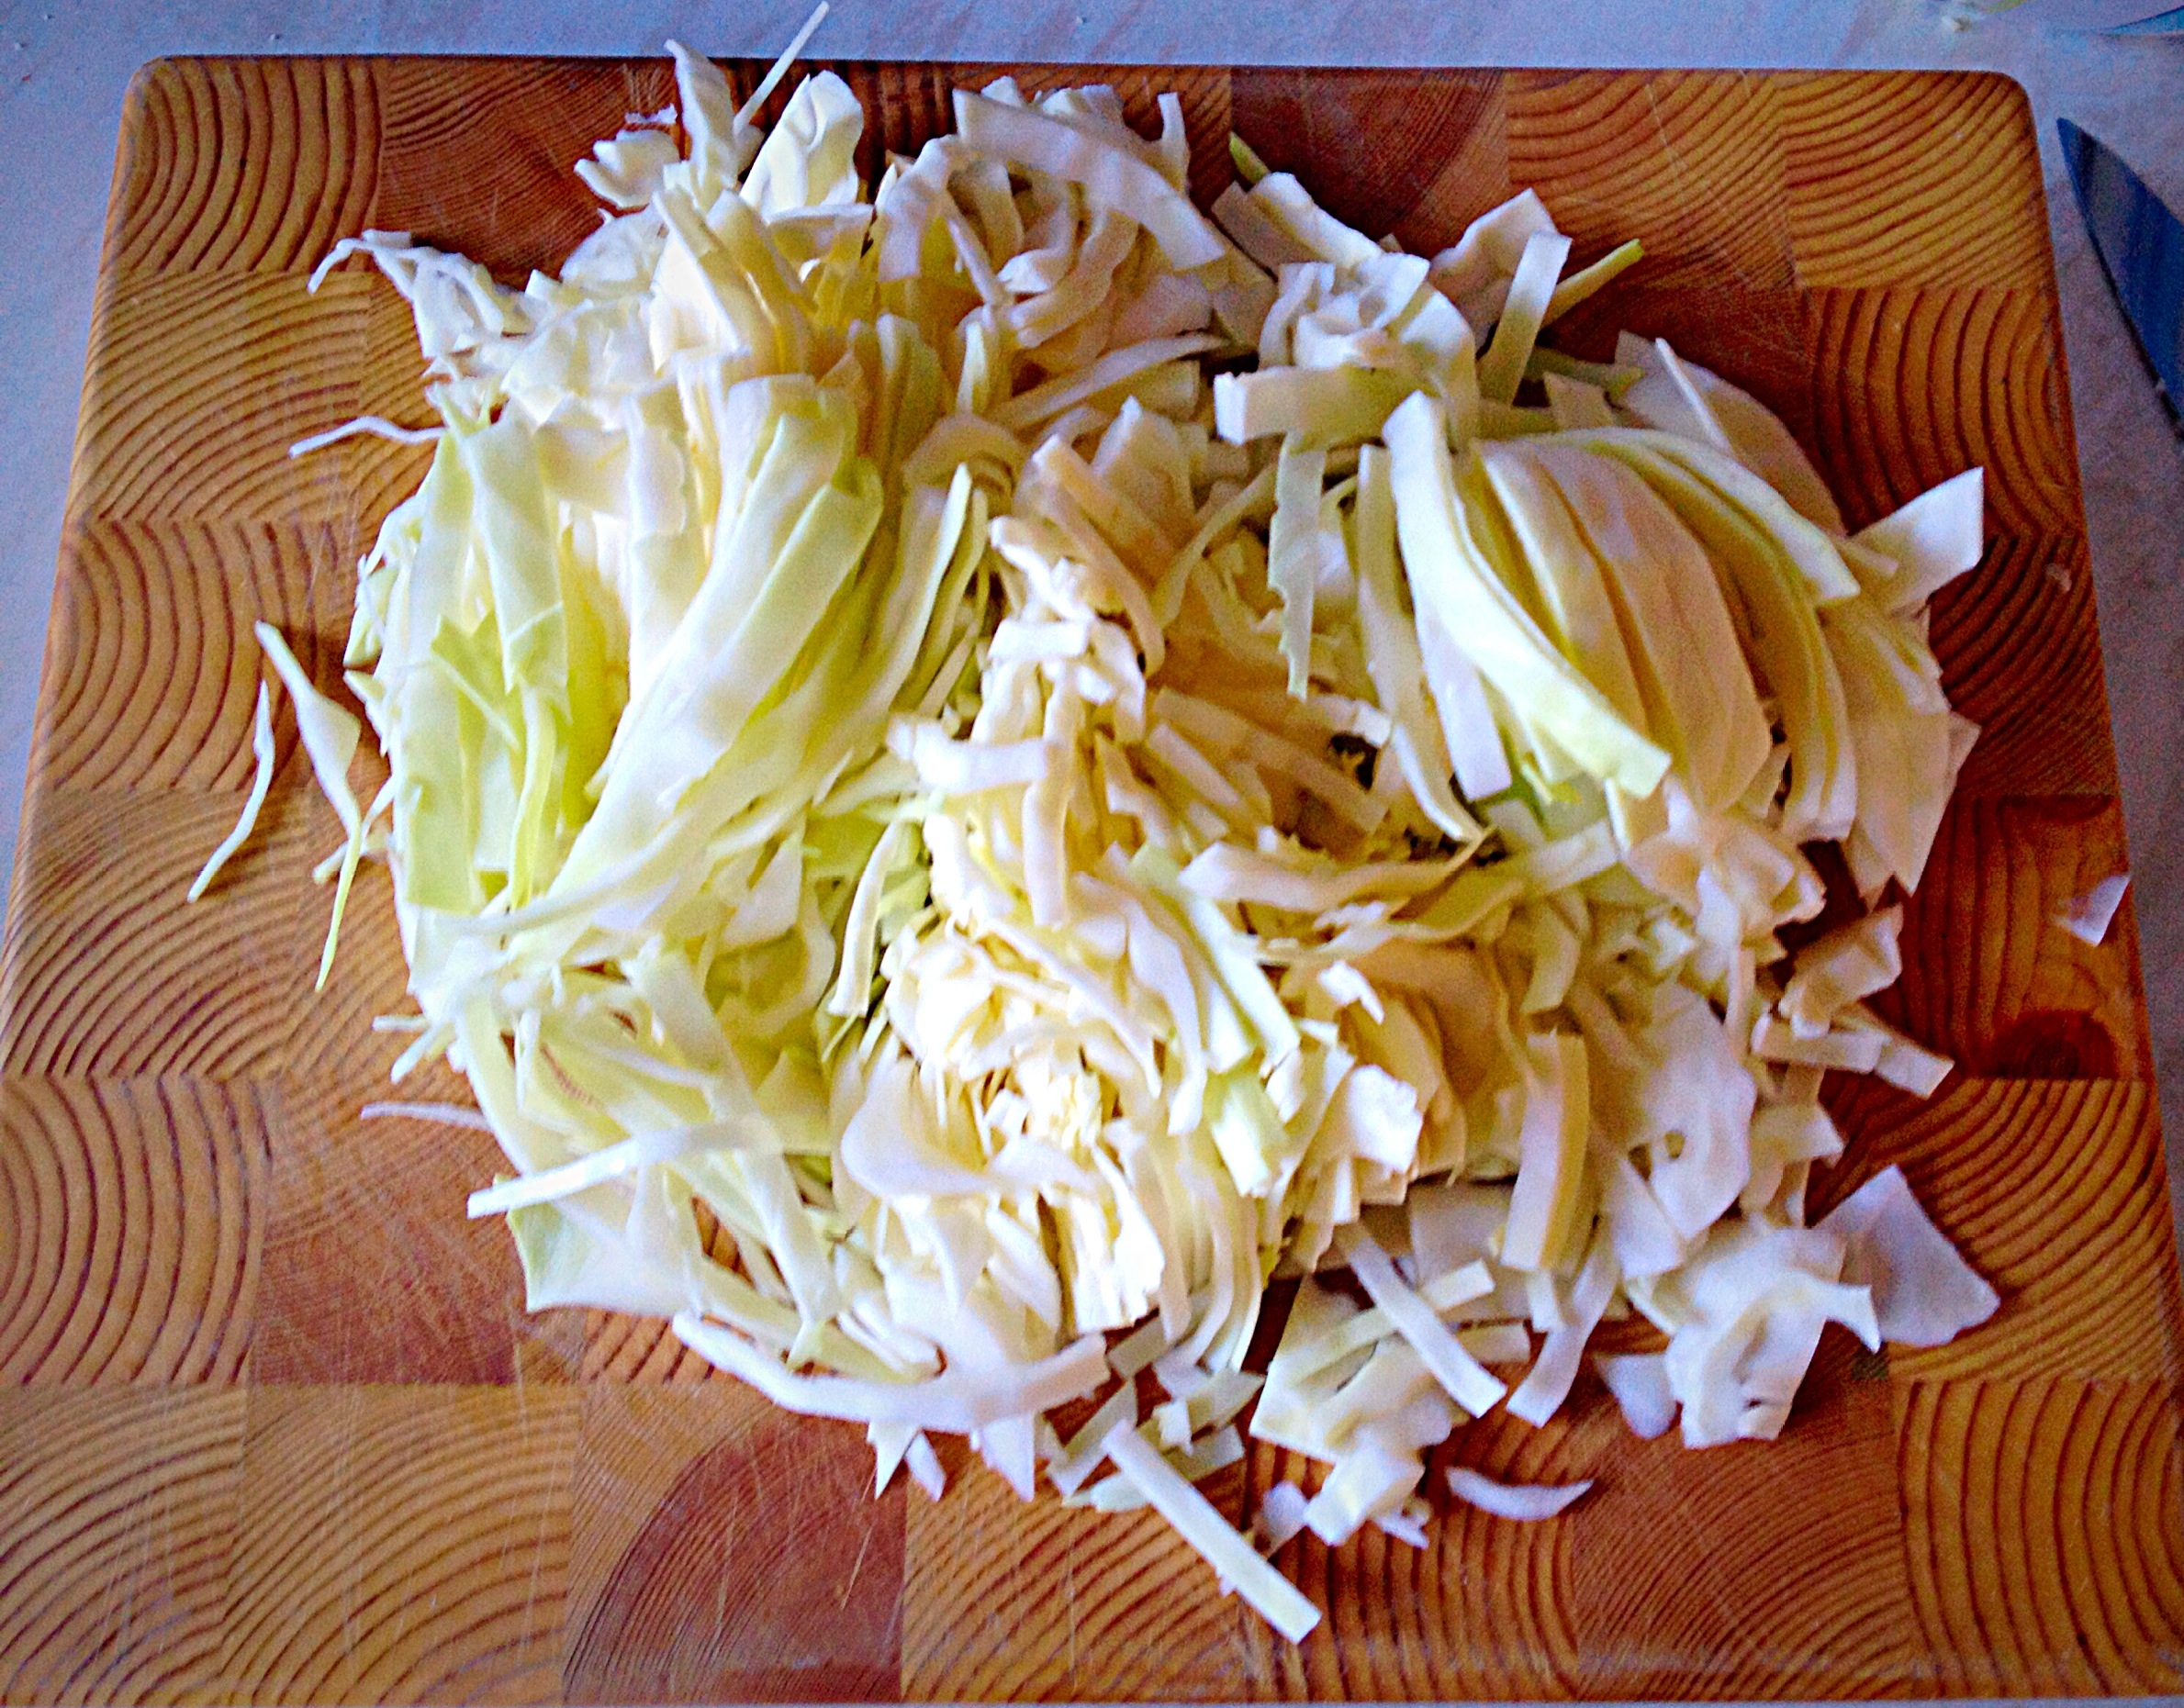
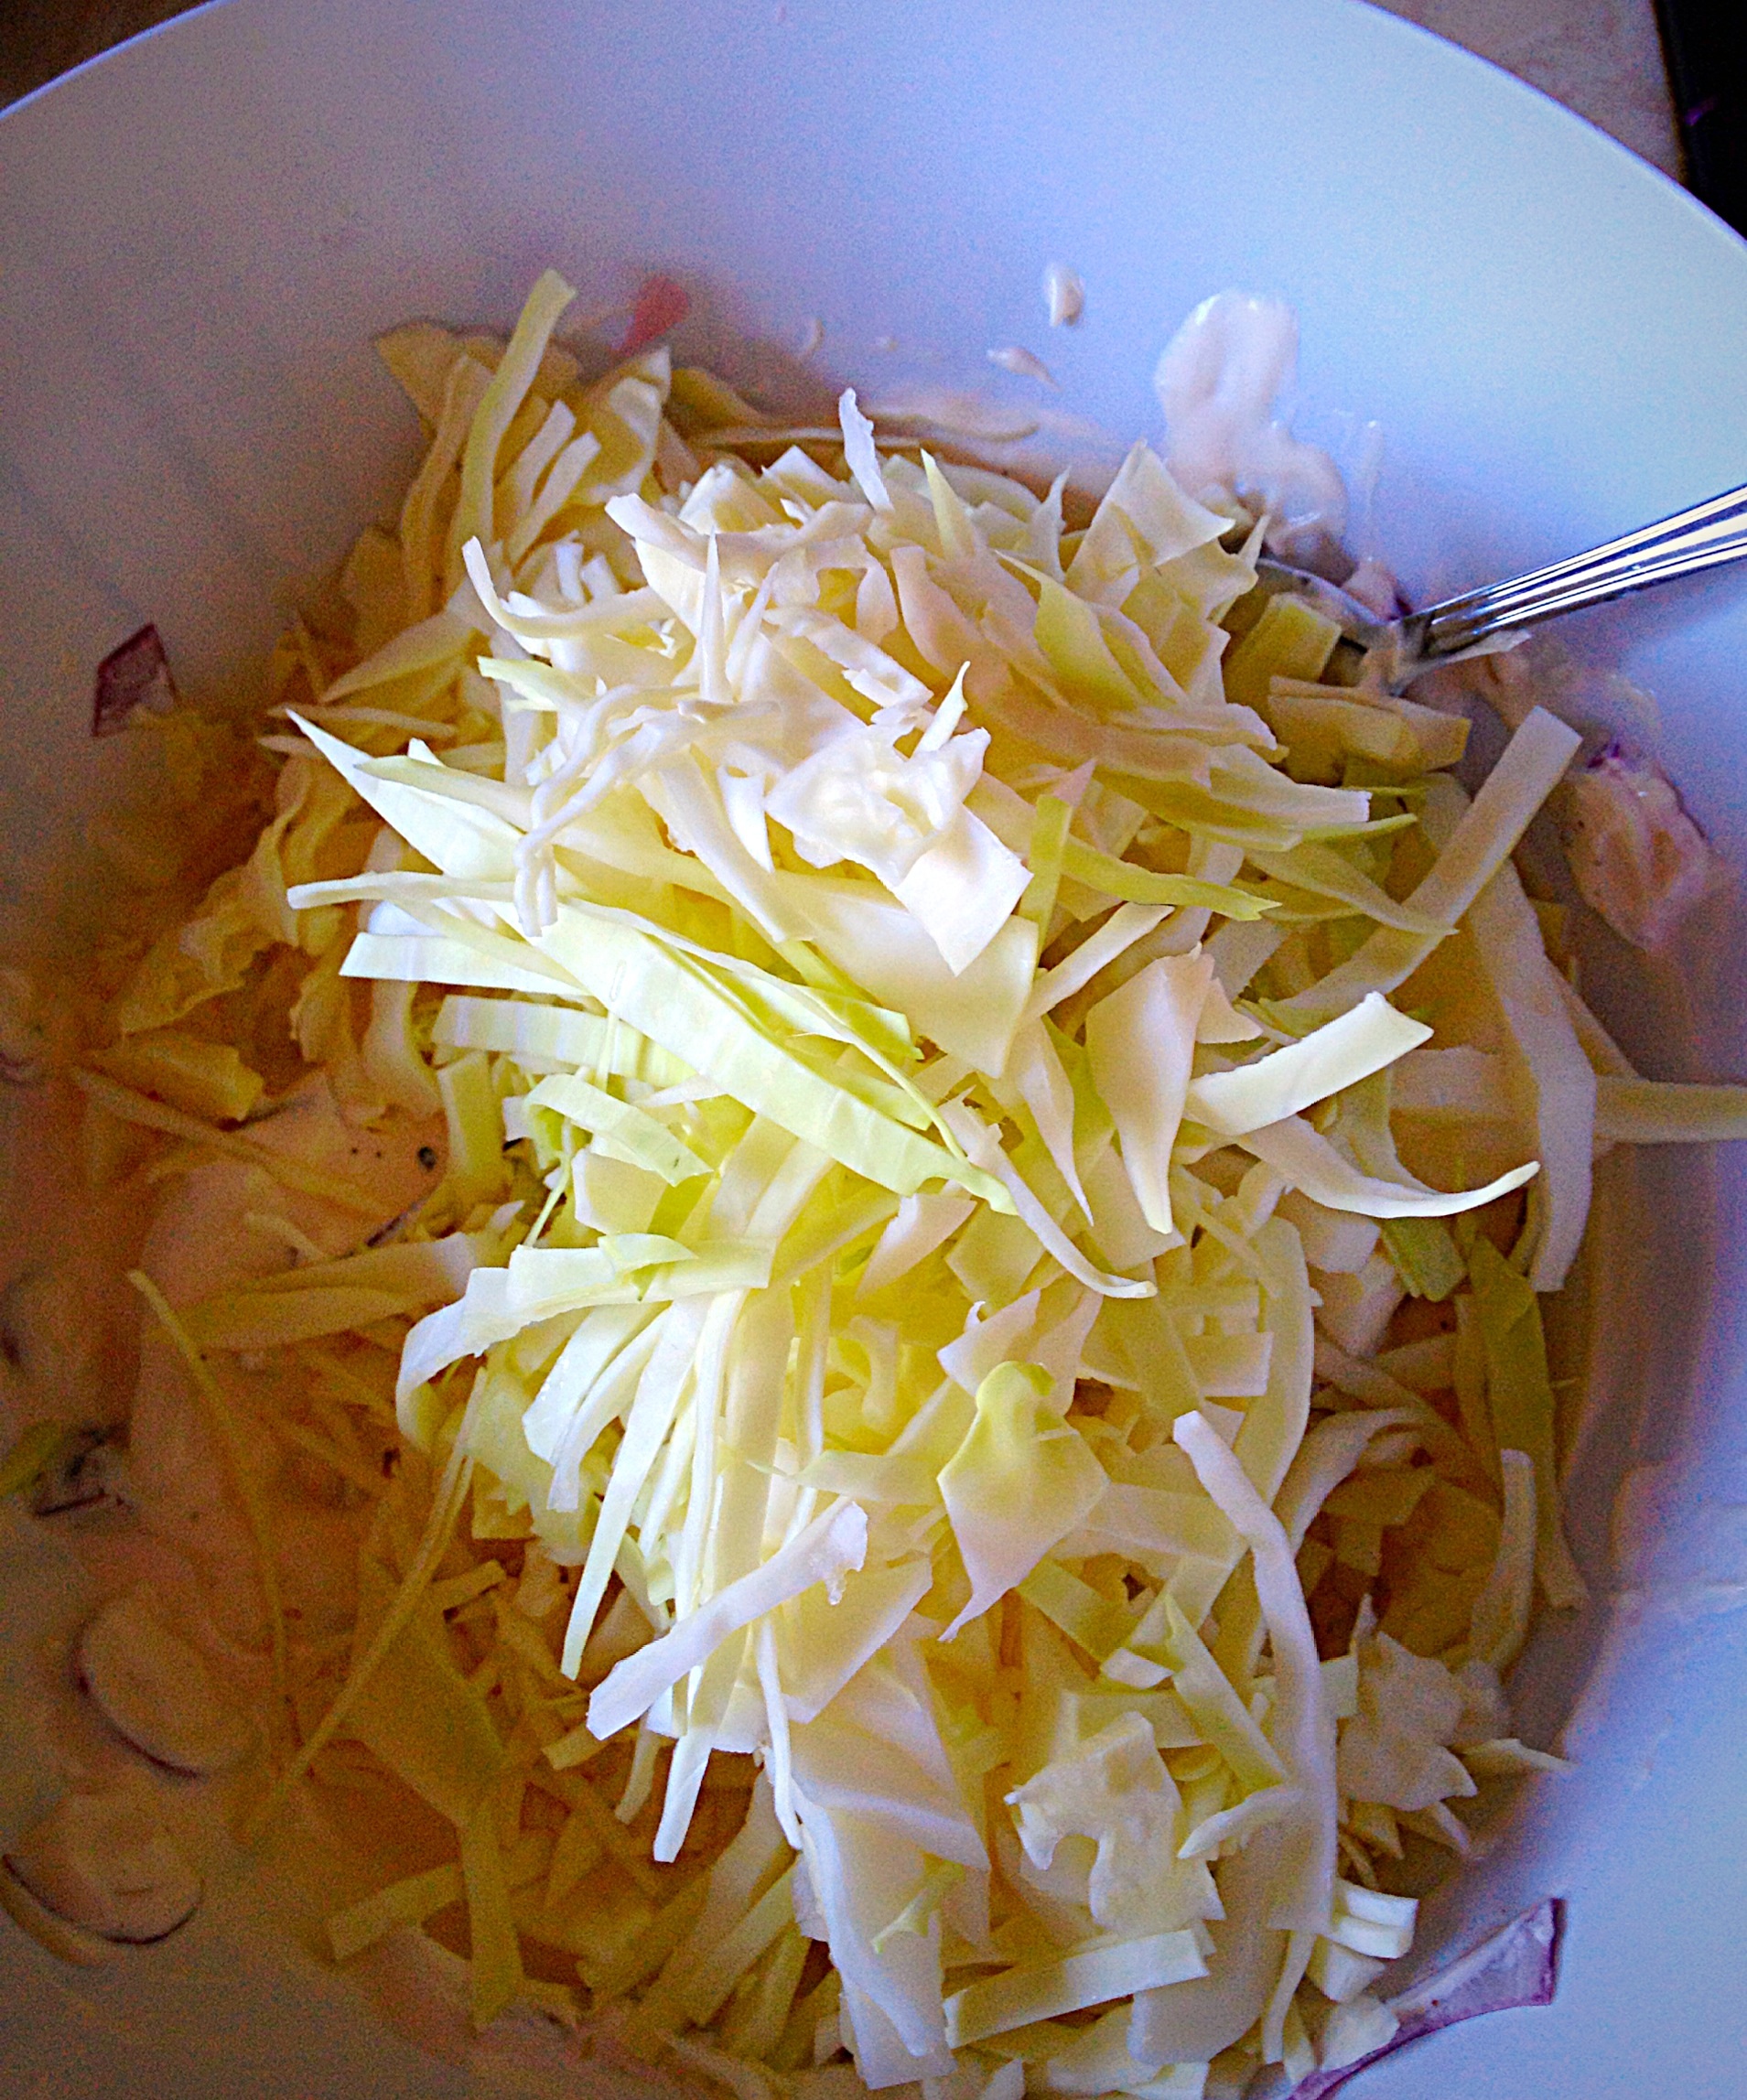
Take half a medium white cabbage and remove the tough core. Cut the cabbage into 3 sections and finely shred them with a sharp knife.
Shredded, Crunchy, White Cabbage.
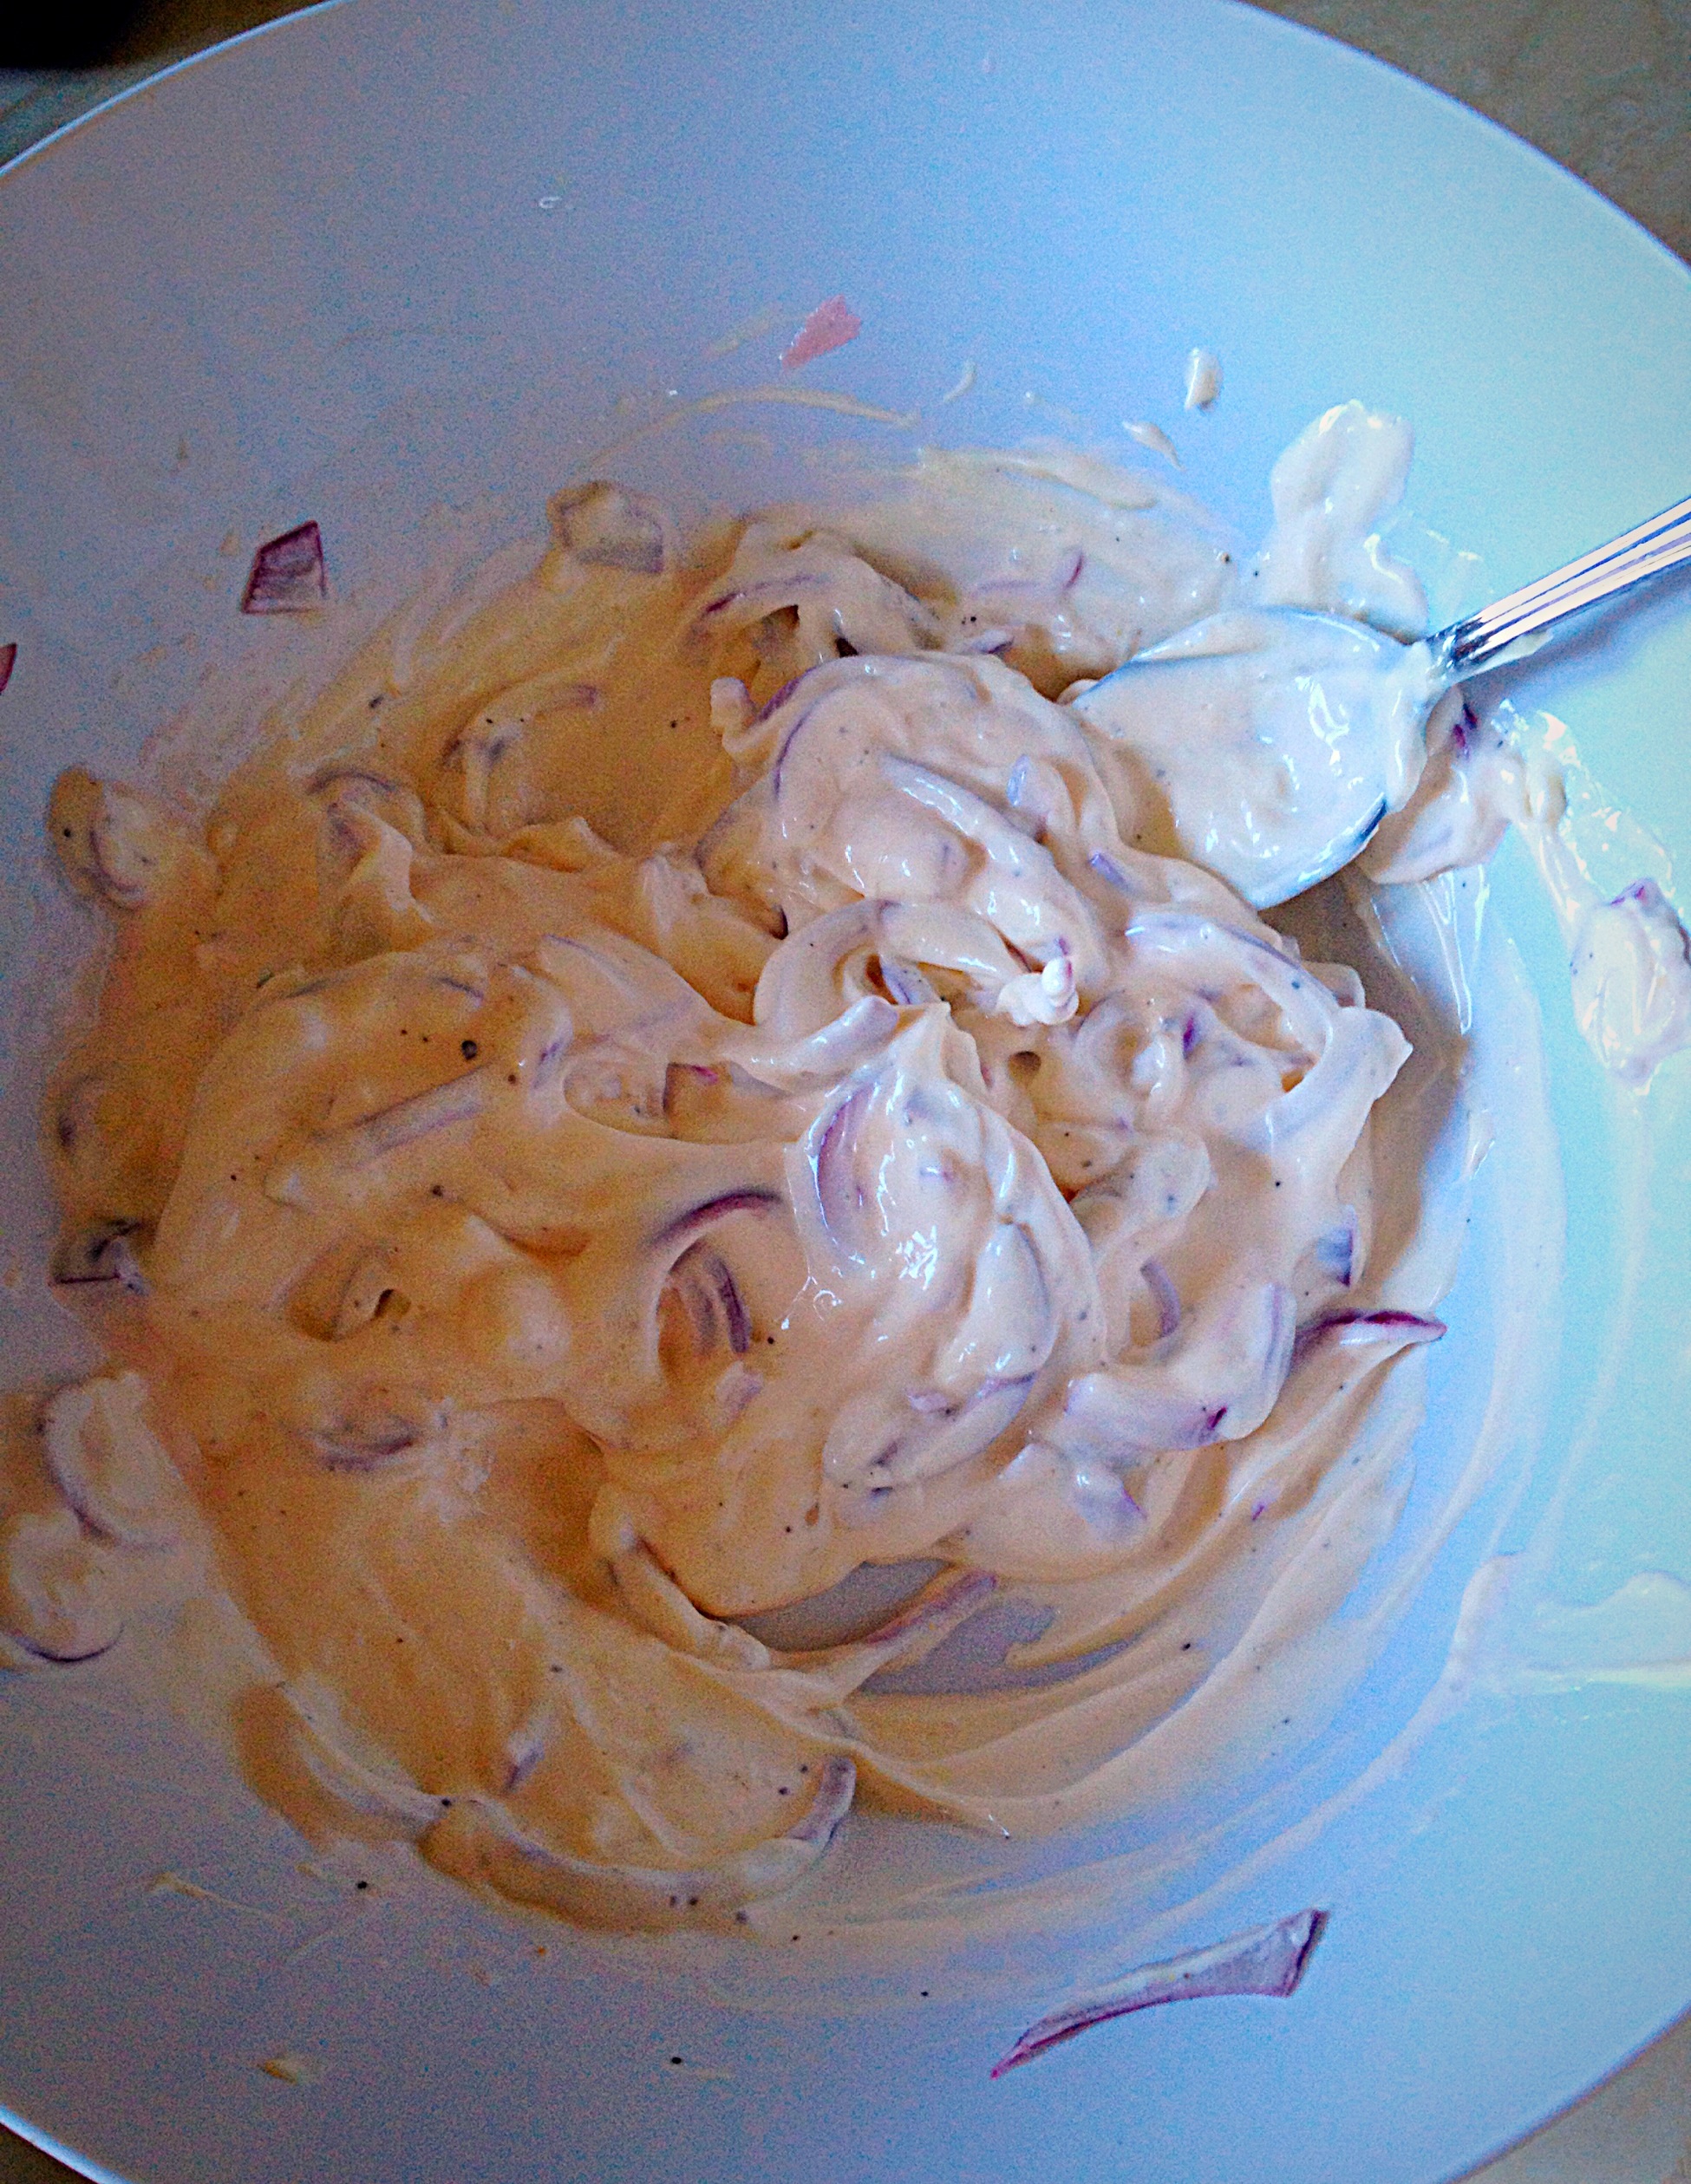
In the bowl with the onions and lemon juice add 4-5 heaped tablespoons of your favourite mayonnaise. Mix thoroughly so that the lemon juice becomes incorporated into the mayonnaise. Add 1/2tsp of freshly ground black pepper.
The onions should now be in a thickish, lump free sauce.
Adding The Cabbage And Carrots To The Marinating Onions
The lemon juice thins out the mayonnaise, so the resulting sauce is smooth and creamy, but not gloopy, thick and claggy like some ready made coleslaw. Add the shredded cabbage on top of the onions and sauce in the bowl.
All we need now are the carrots!
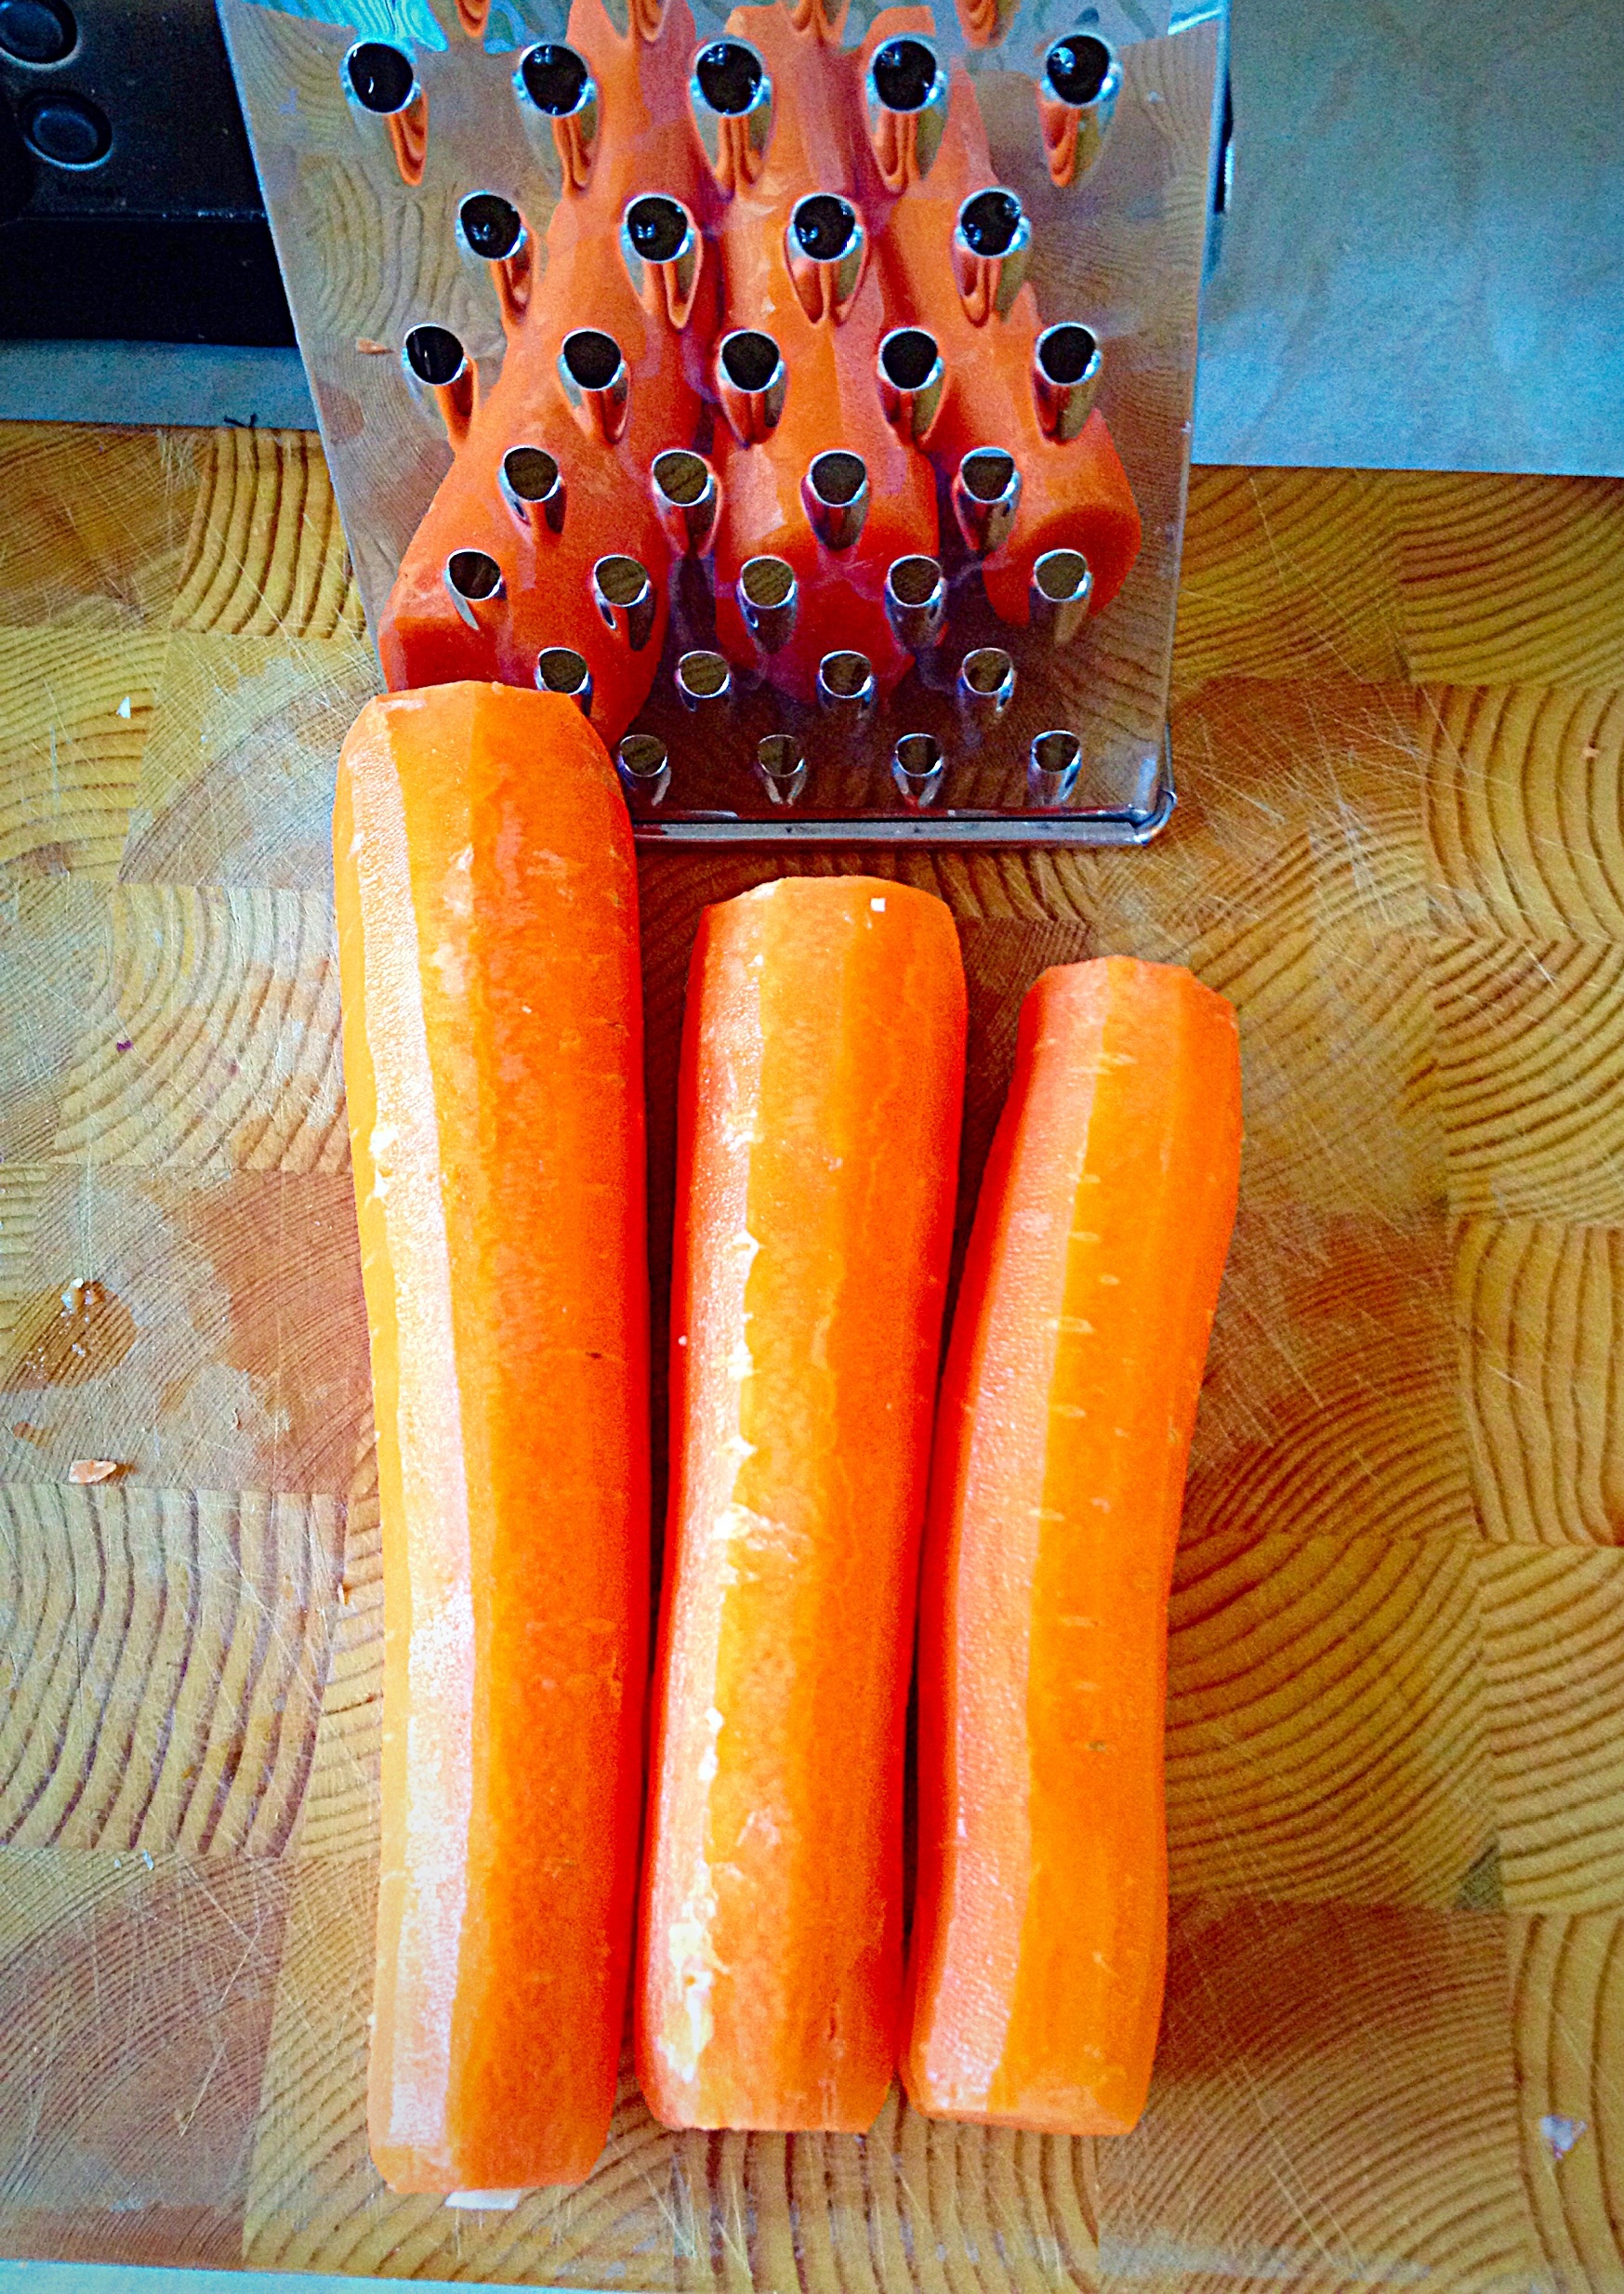
Trim off the tops and bottoms of the carrots, peel and then grate using the coarse side of a box grater.
This is gonna be grate!!!!!!!
Place the grated carrot in the bowl.
“Hi there – you’ve been Tango-ed!!!”
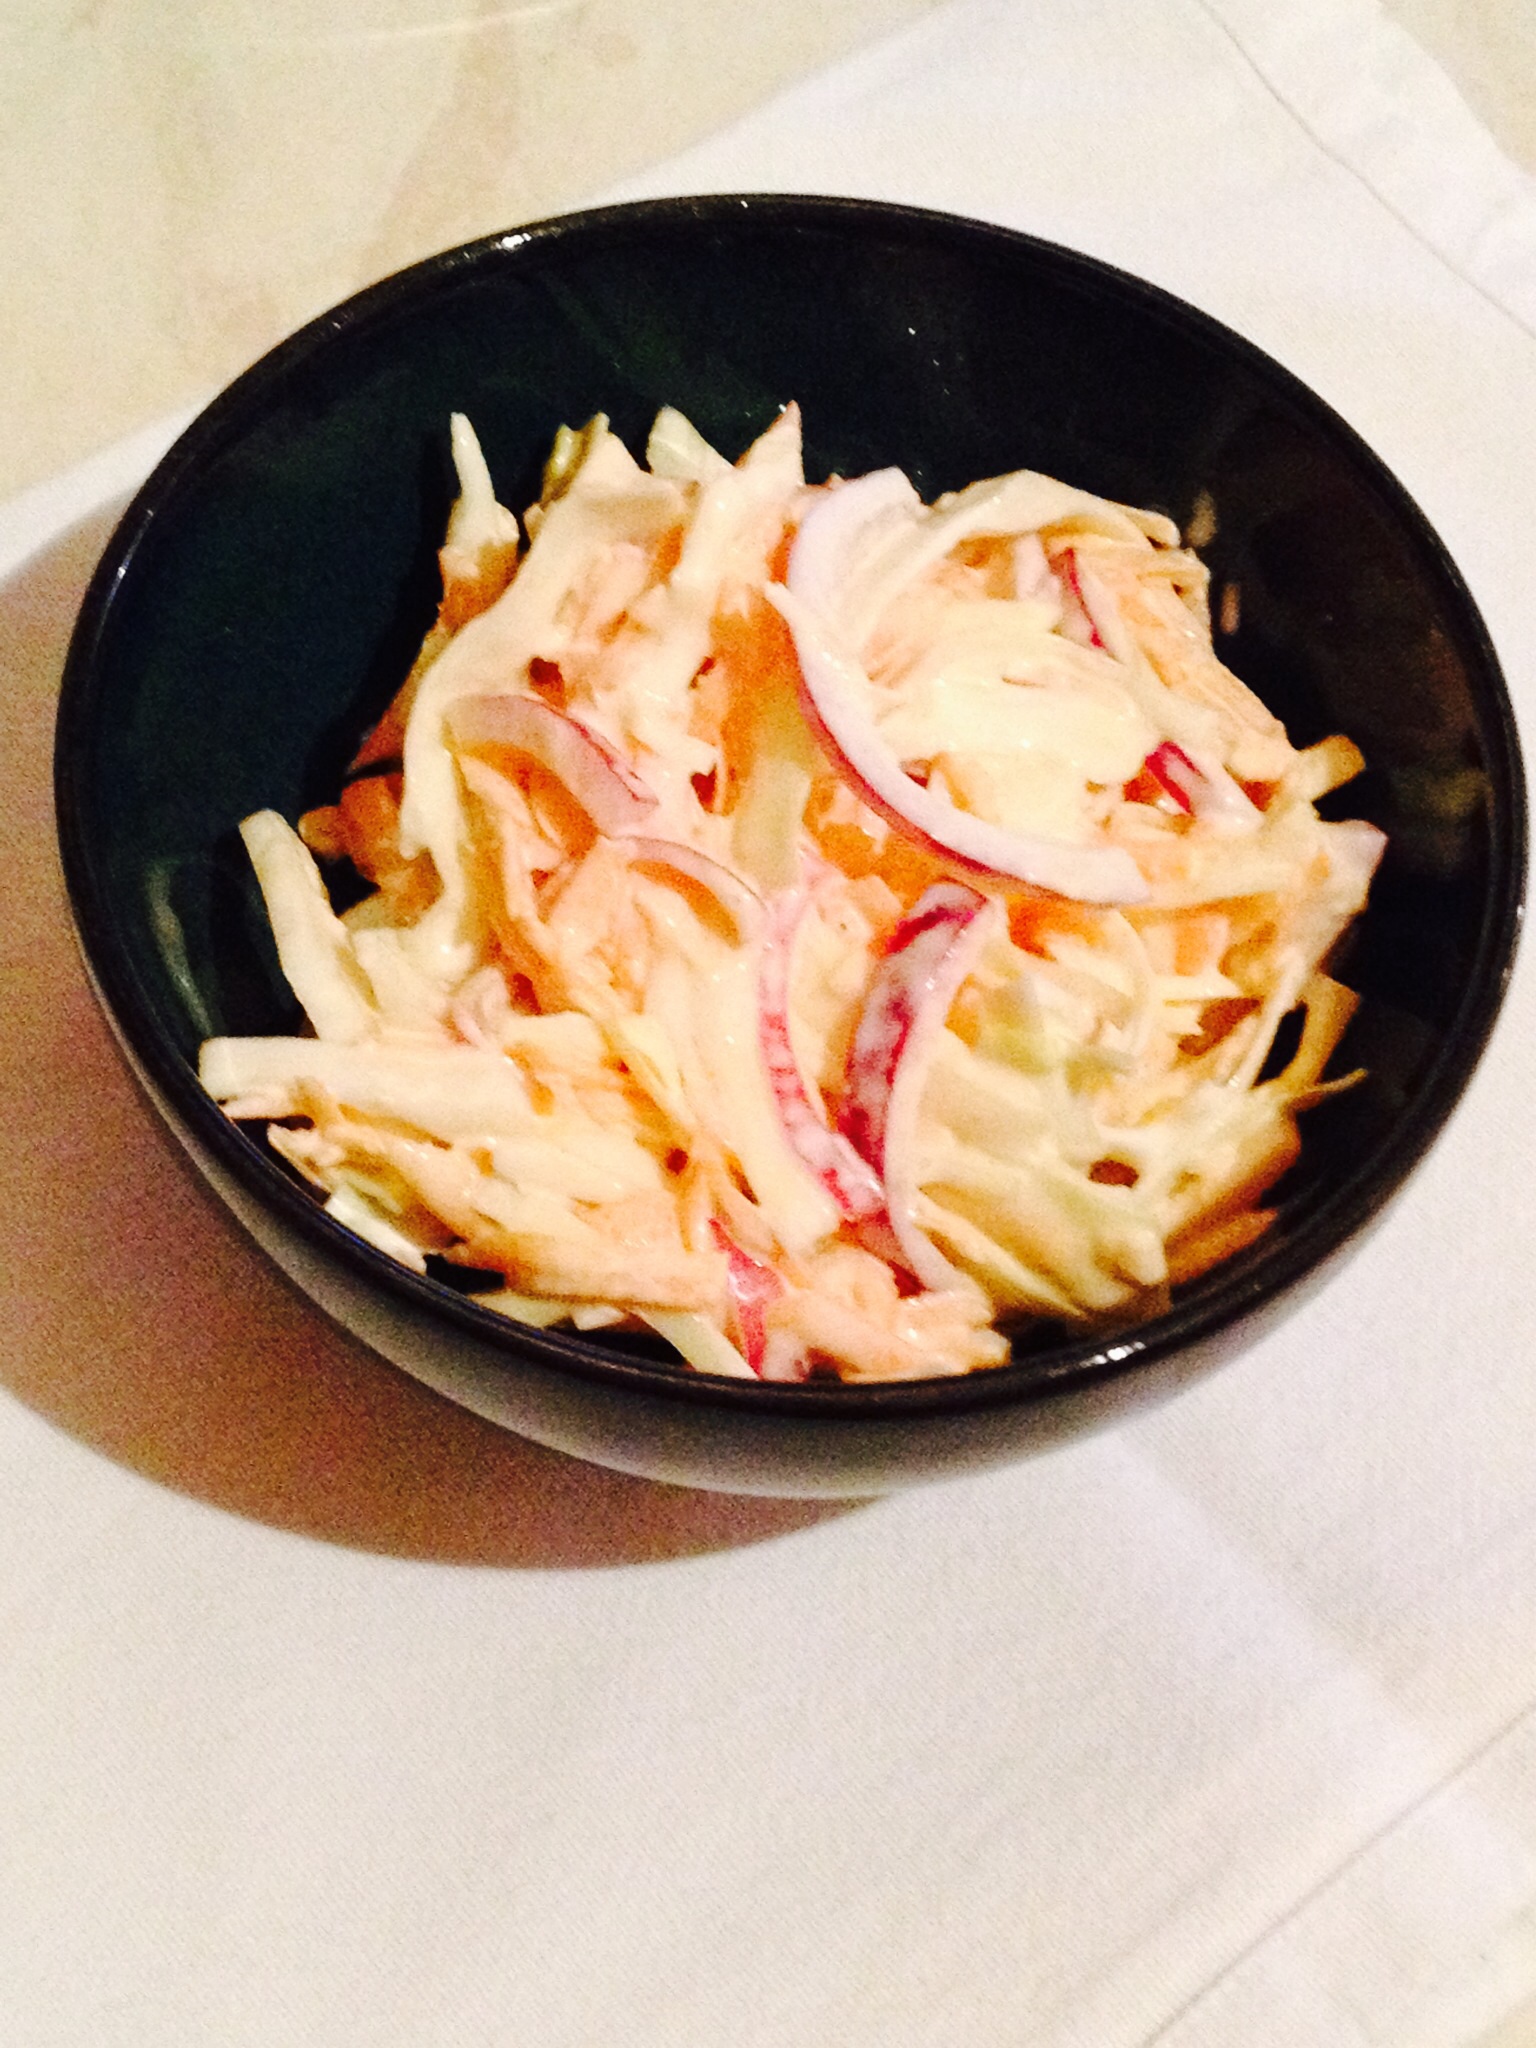
Finally, mix all the ingredients together thoroughly and you have yourself some top notch, Crunchy, Homemade Coleslaw.
I’m not a side dish – I’m the main attraction!!!
If not using straight away, cover in cling film and refrigerate for up to 24 hours. While this coleslaw is at it’s best the day you make it, you can refrigerate and eat the following day.
Put me on a jacket potato and dive in!!!!
Also, this is a fantastically portable dish and is great for taking to family and friend gatherings. And it is ideal for buffets, it’s easy to double, triple or quadruple the quantities. While being easy to make, inexpensive, cheaper and way more delicious than the shop bought alternative. As soon as you try this recipe I can guarantee you’ll think twice before buying shop bought Coleslaw again!
We love this coleslaw recipe here at home. Because it is so easy to make ahead and leave sitting in the fridge and it also tastes so good too. Since the ingredients cost very little, compared to ready made coleslaw, it makes good economical sense to make it myself. And, as with most homemade recipes, there isn’t any plastic waste either. Resulting in a great recipe that is good for us and good for the planet too.
So, whatever you are making, baking and creating in your kitchens, have fun preparing and sharing your feast.
Sammie x
No part of this post may be reproduced or duplicated without the written permission of the owner. Please see my Disclosure Policy.
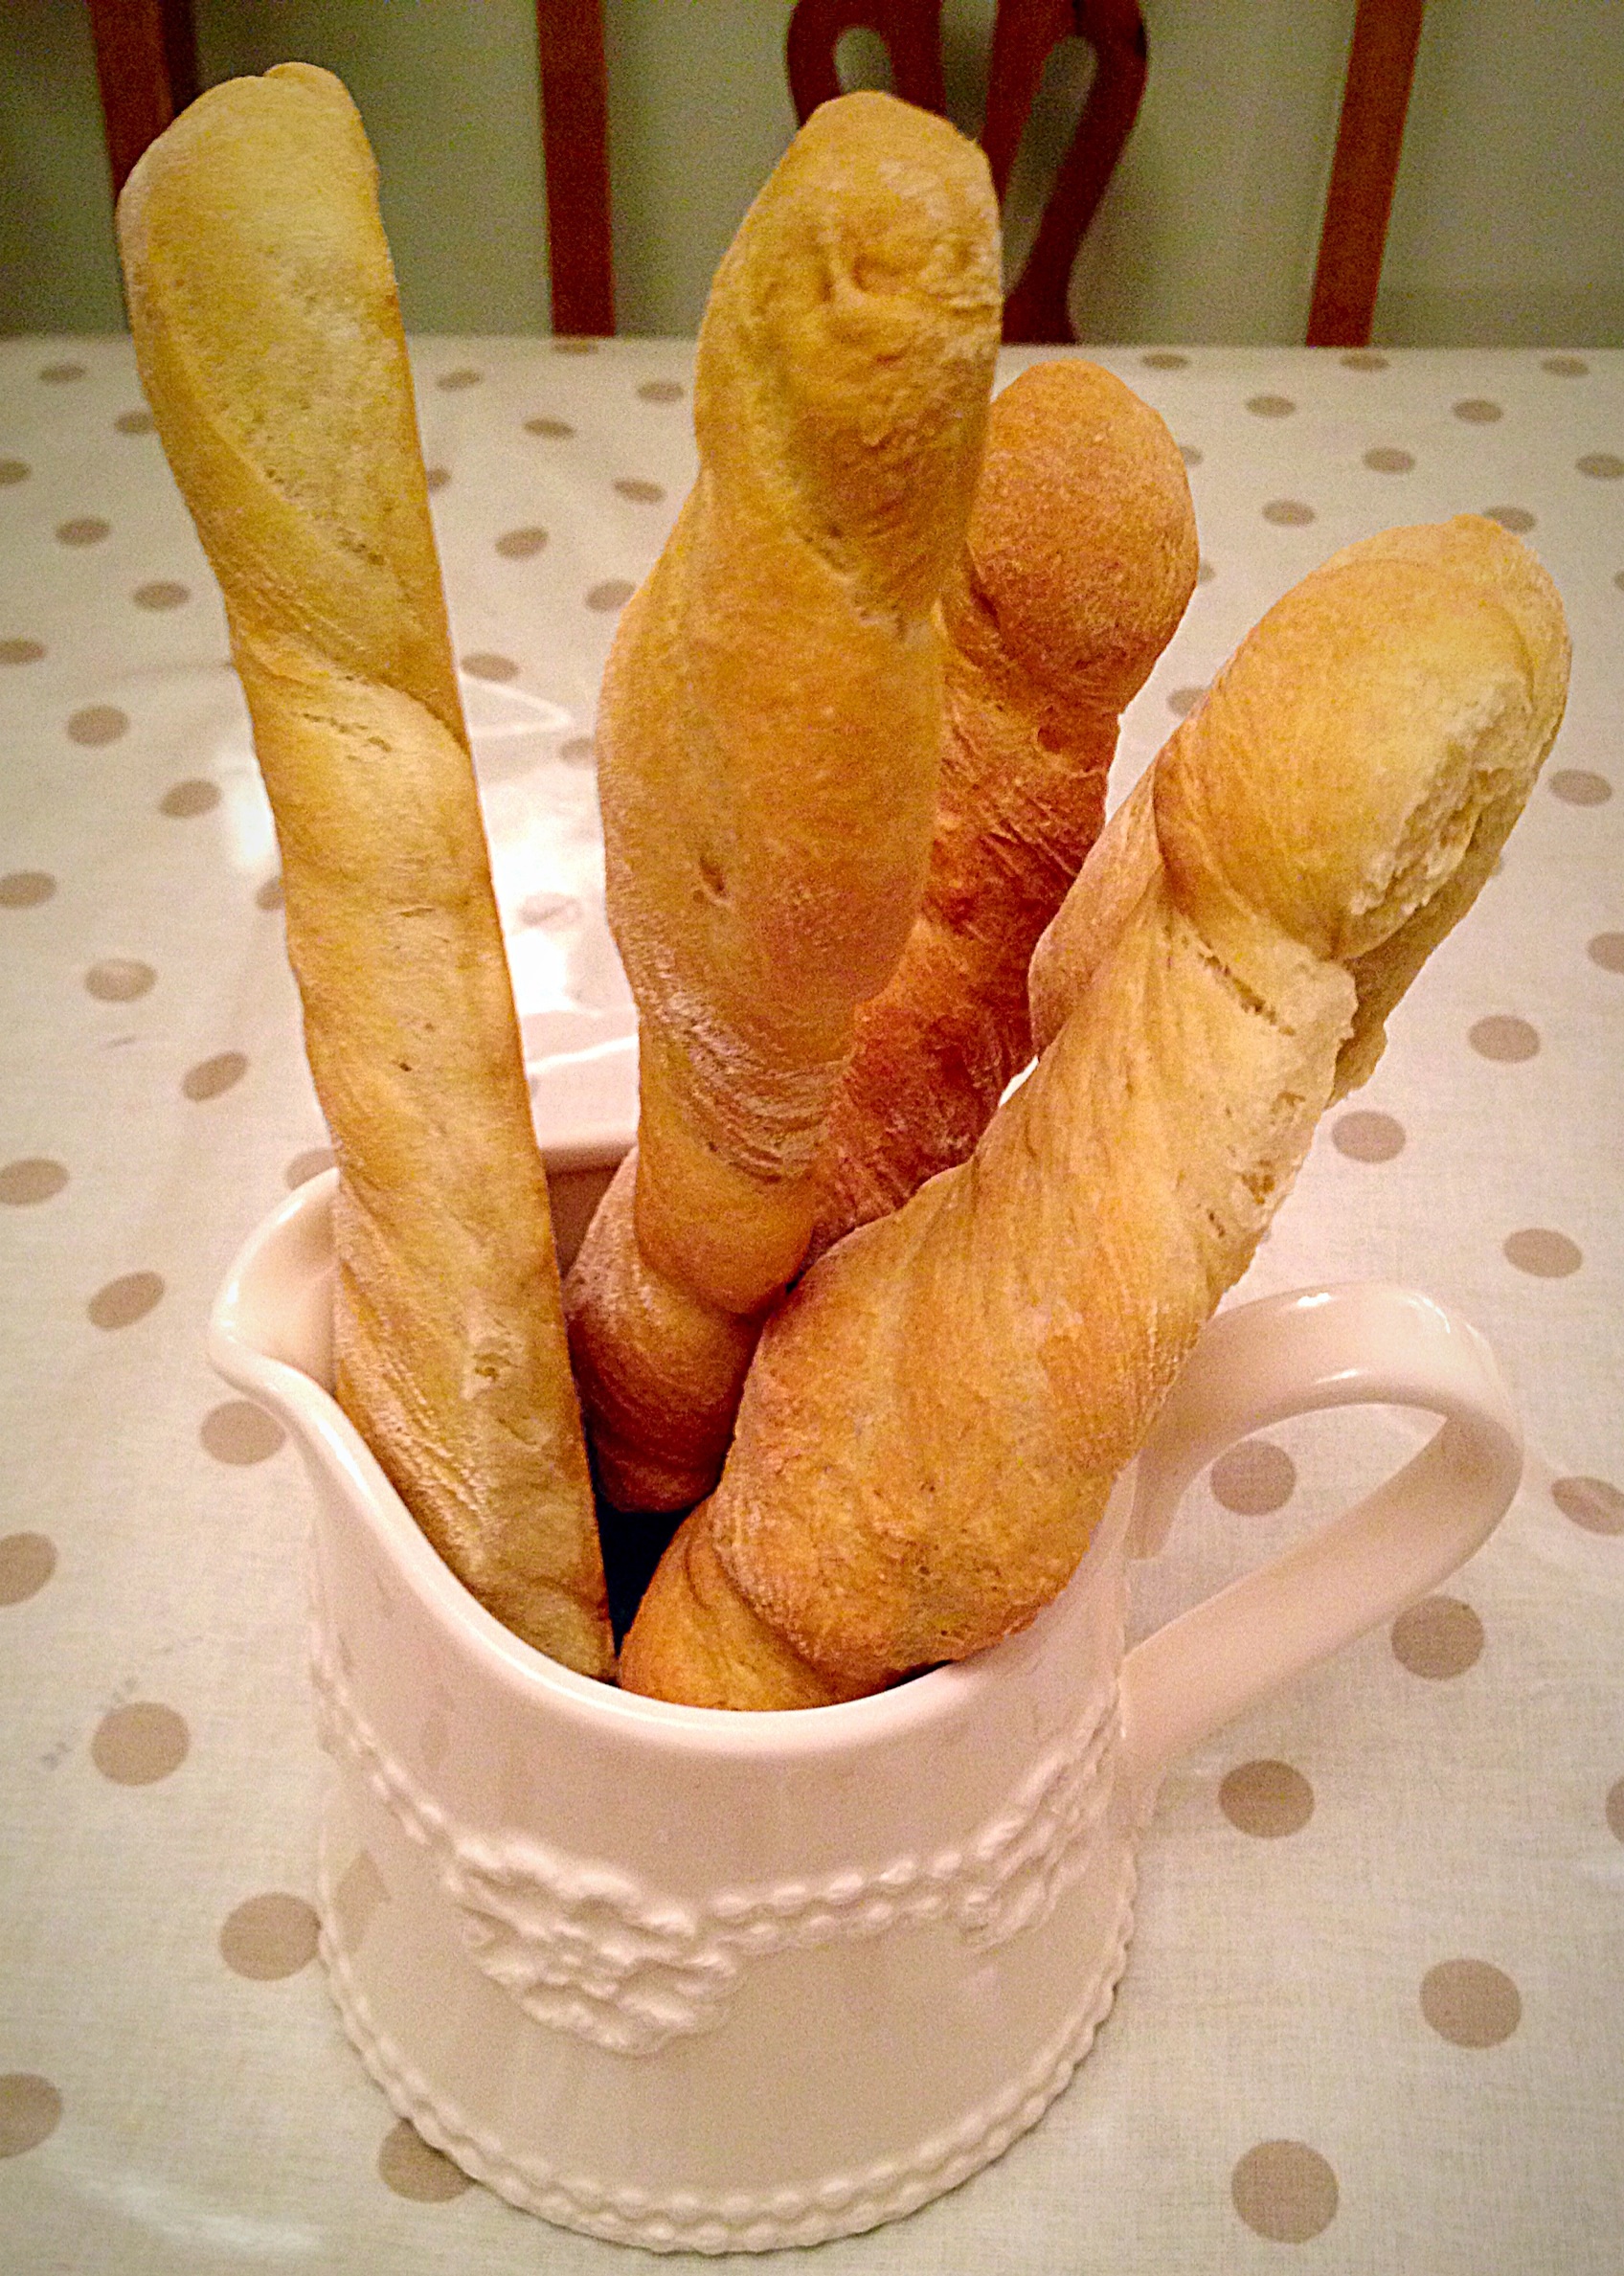
Hello there, have I got a new take on Garlic Bread for you today? Oh yes I have. Homemade BreadstickGarlic Herb Dipping Oil – deeeelish!! A fab recipe to make with the kids any day, but especially this week, during half term, here in the UK. Just like at Cafe Rouge except everyone has their own pot of dipping oil!
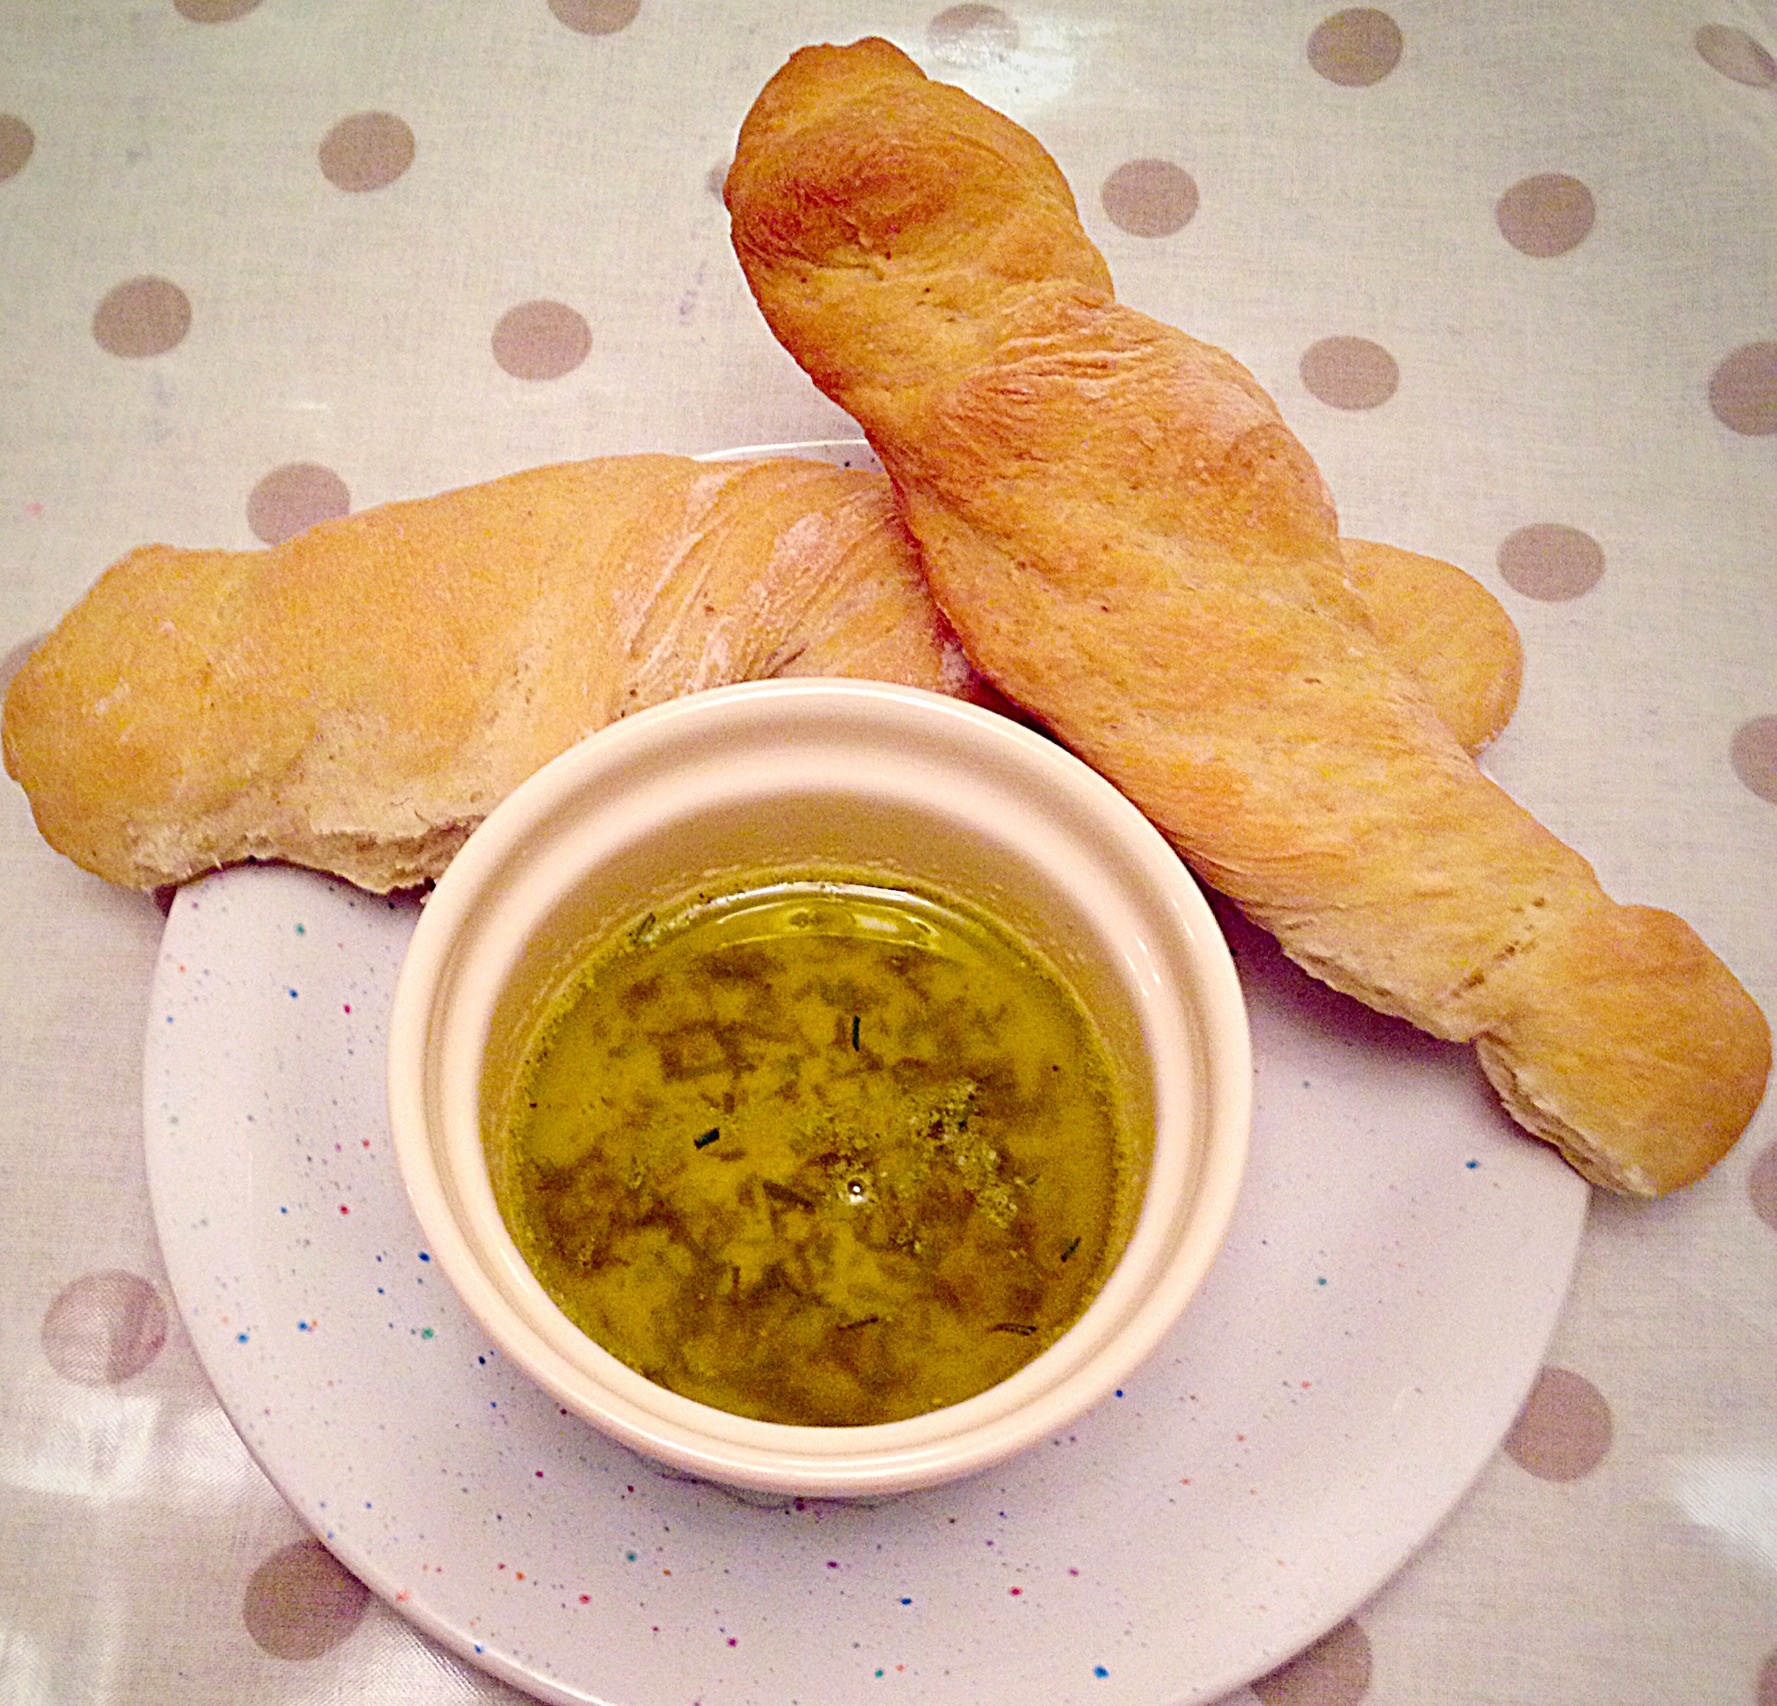
Crunchy Breadsticks with Garlic and Herb Dipping Oil
We first had a version of these at Cafe Rouge a few years ago and we all thought they were yummy. So my mind started whirring, thinking that these couldn’t be ‘that hard’ to make at home – and guess what, they’re not!! And, dare I say, they taste better!
THE perfect sharing food. Perfect with pasta.
Usually, when I’m feeding a crowd, I double up on the recipe and two people share one plate. But last night, with our Spag Bol we each had our own bowl of Garlic and Herb Dipping Oil and Breadsticks (some of us are getting over colds – so thought individual was best!!).
Crunchy Breadsticks, perfect for dunking in the Garlic and Herb Oil.
Firstly to make the breadsticks, for me it really is easier to have a bread maker or stand mixer. There is no way I could do all that kneading by myself, but if you’re happy to make the dough by hand, feel free.
Recipe :Breadsticks Makes 10
1lb/450g Strong White Bread Flour
2tsp Dried Fast Acting Yeast
300ml Water – Approx 37C Body Temp
2tbsp Olive Oil
3/4 tsp Sea Salt Flakes – I used Maldon
Method : see below for hand kneading
Place the warm water into the bowl of your bread maker or stand mixer with the dough hook attached. Add the dried yeast and mix with your fingers. Place the flour on top of the water/yeast. Pour the oil on top of the flour and sprinkle over the salt.
* For bread maker set cycle to knead and prove.
* For the stand mixer, mix the ingredients for 10 minutes. When the dough is soft and elastic remove to an oiled bowl, turn once, so the sides and top are slicked in oil, cover with cling film and place in a warm place to double in size (1-2 hours).
* For hand kneading, place all the ingredients into a large bowl, as per the other methods. Bring together with your hand, in the bowl, until a complete lump of dough is formed. Place the dough on a lightly floured worktop and knead by hand until the dough is smooth and elastic – proceed as for stand mixer.
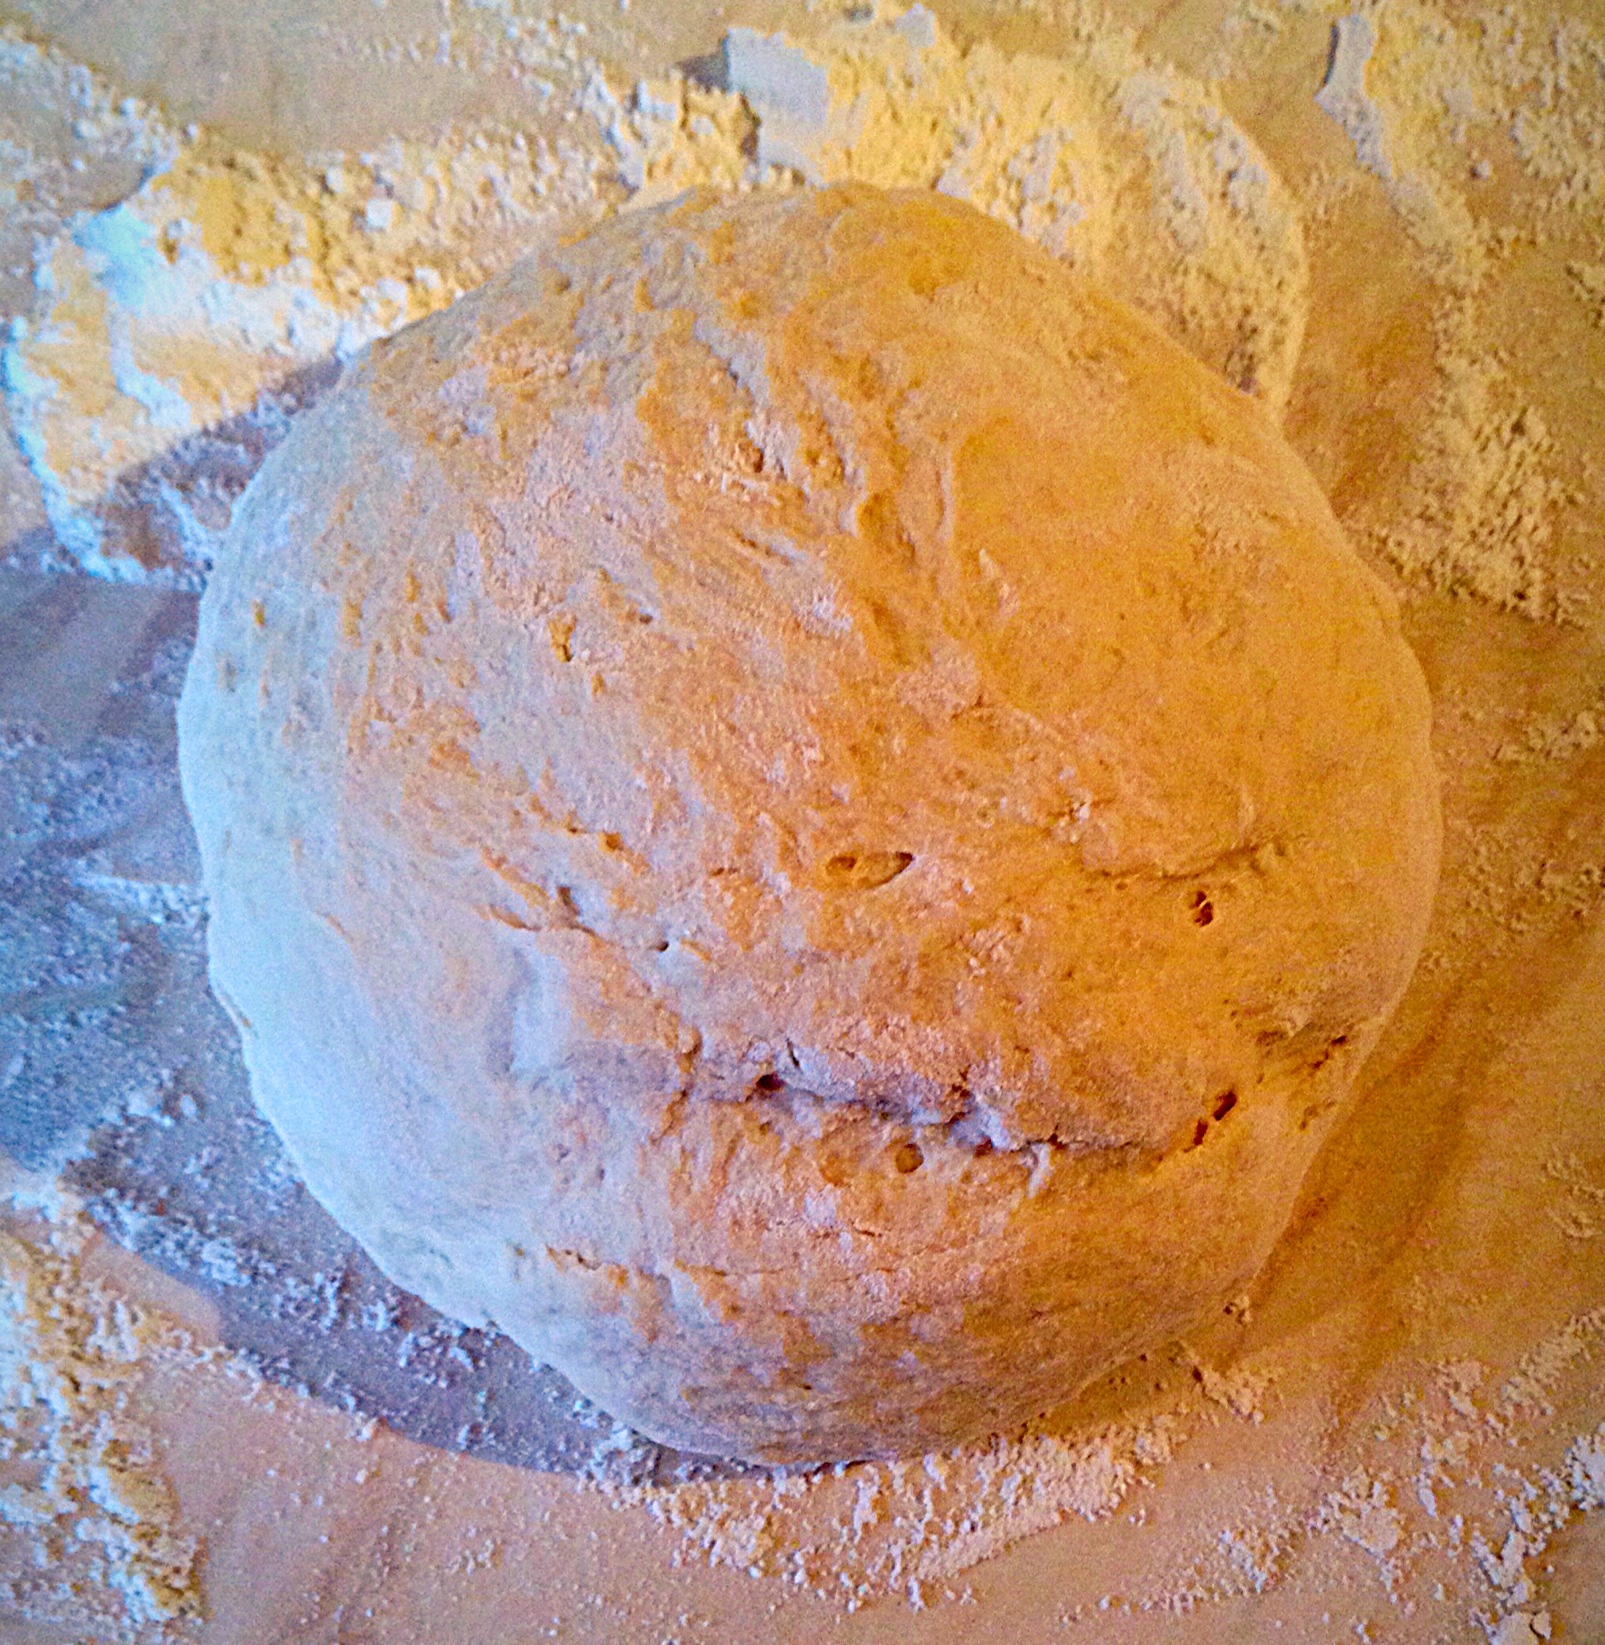
Once the dough has doubled in size knock back – gently punch down into the bowl to knock out the air (in a bread maker set to mix and allow 30 seconds of slow rotating to knock back your dough).
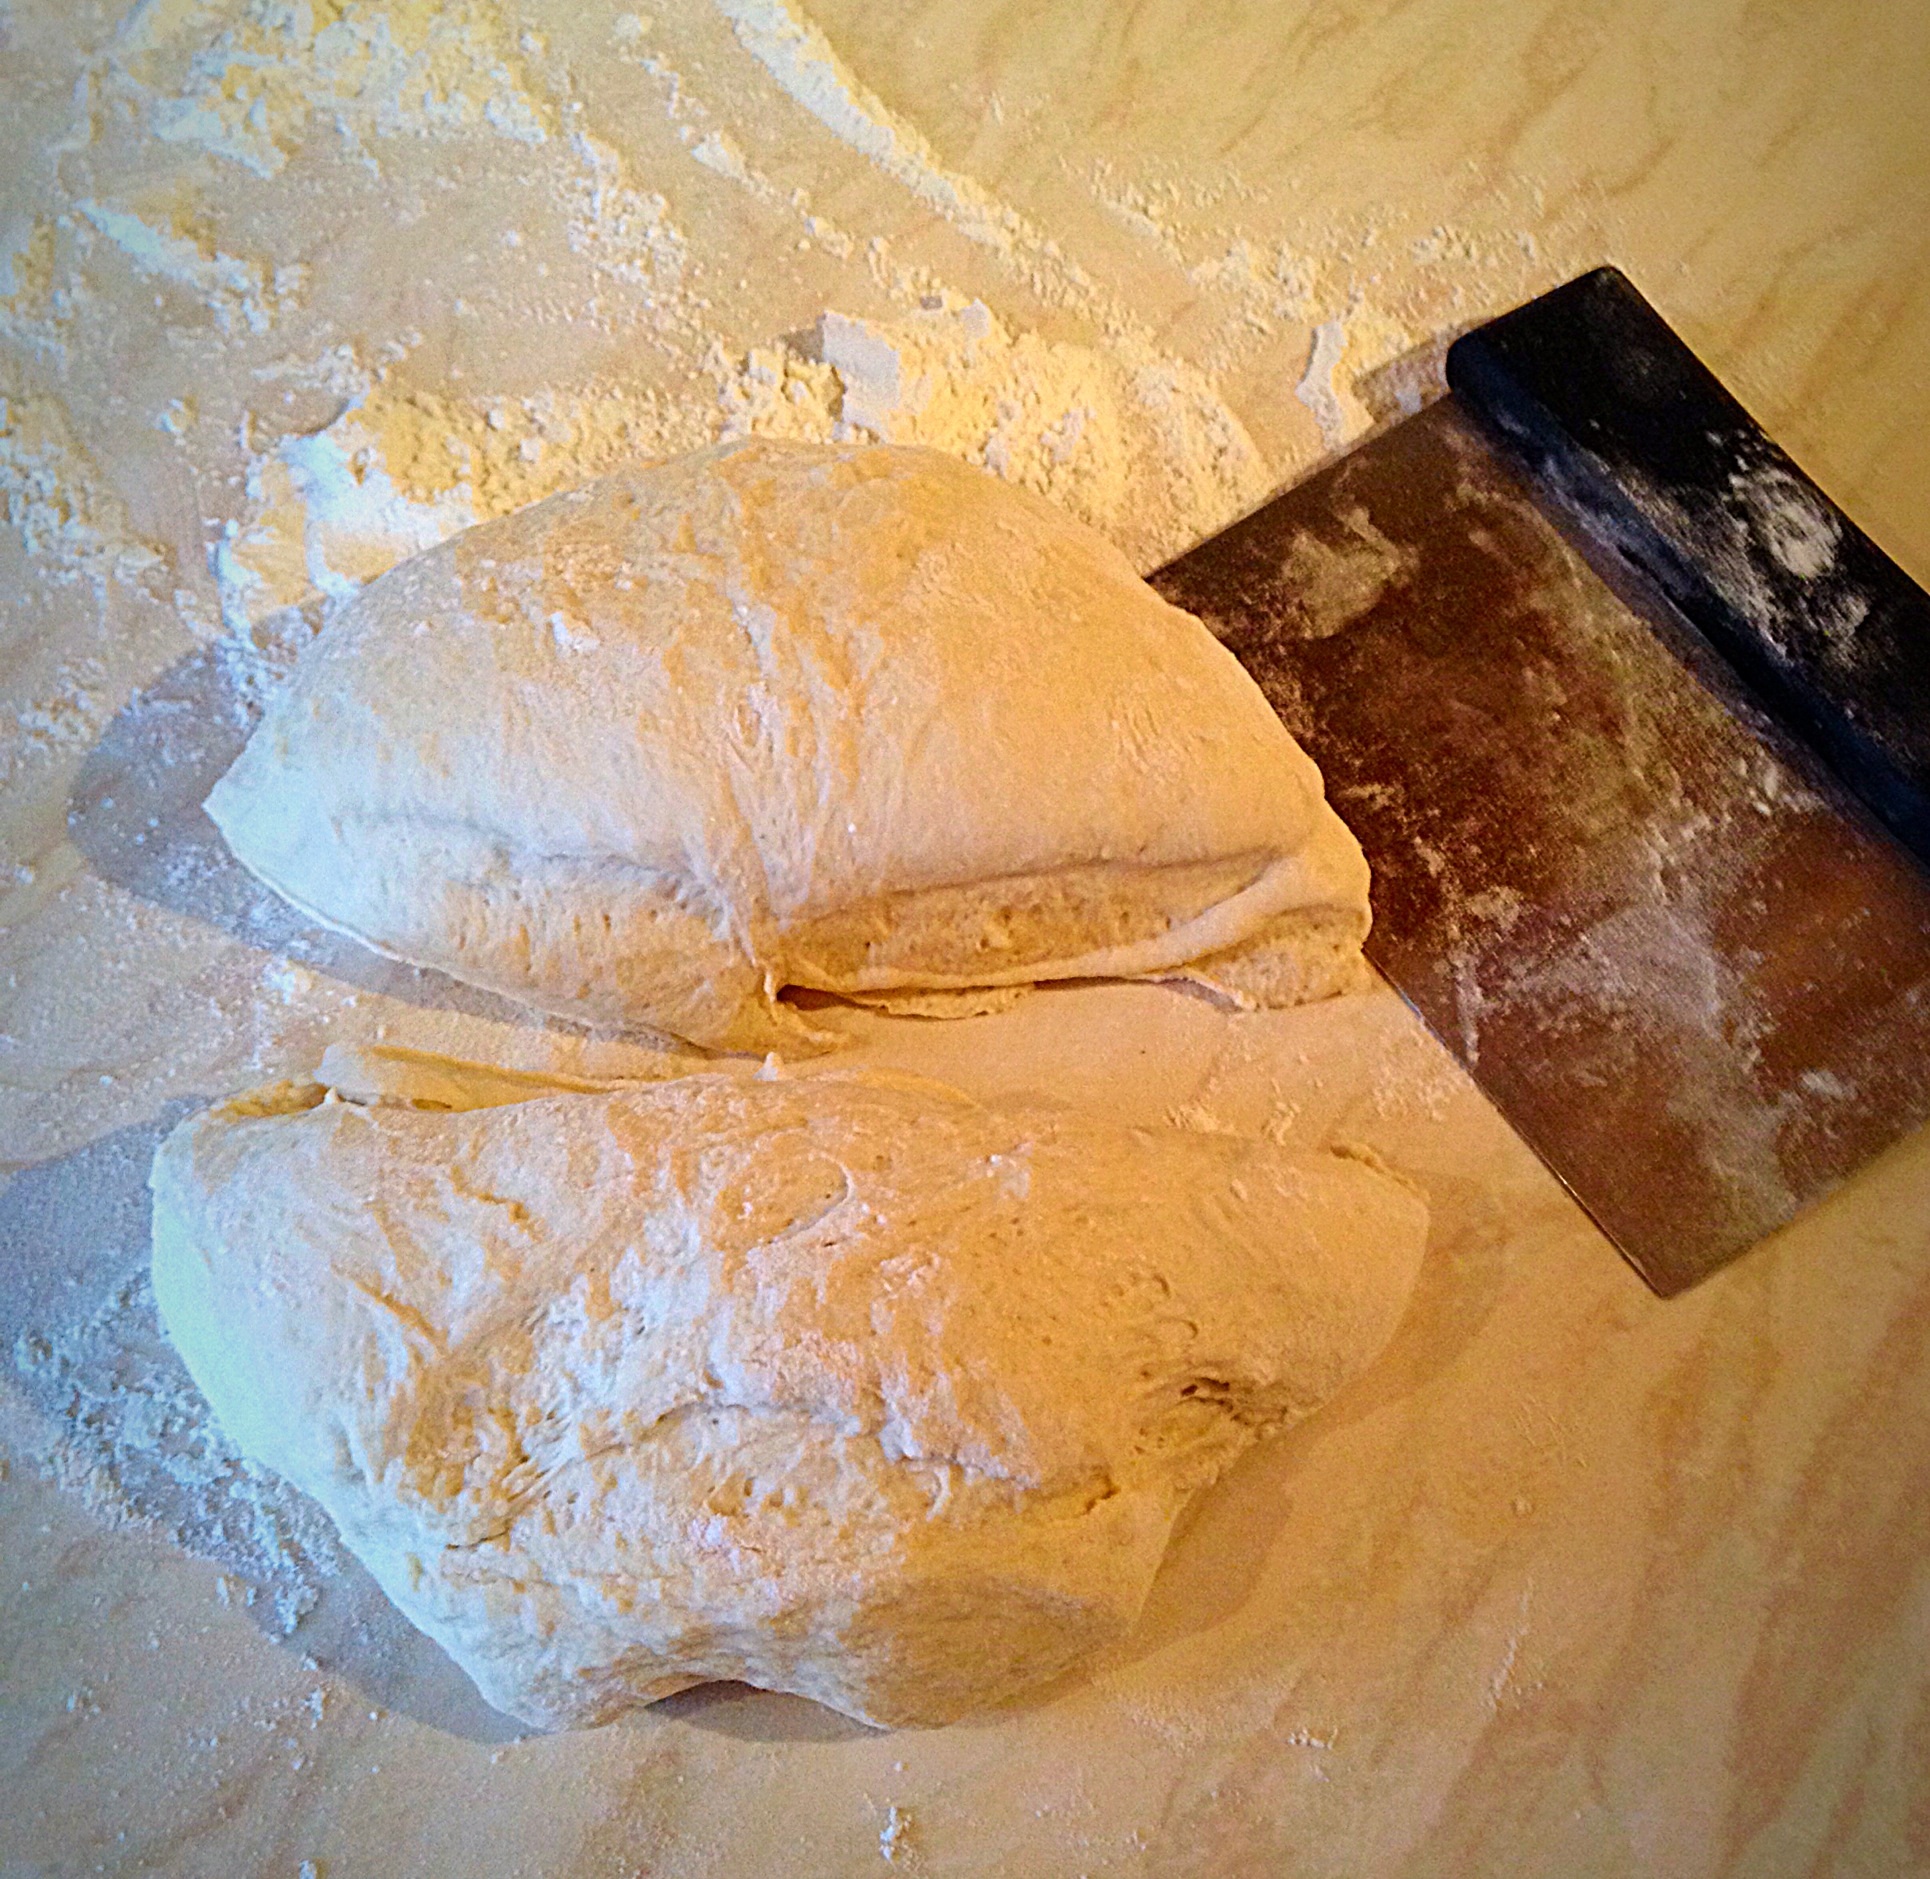
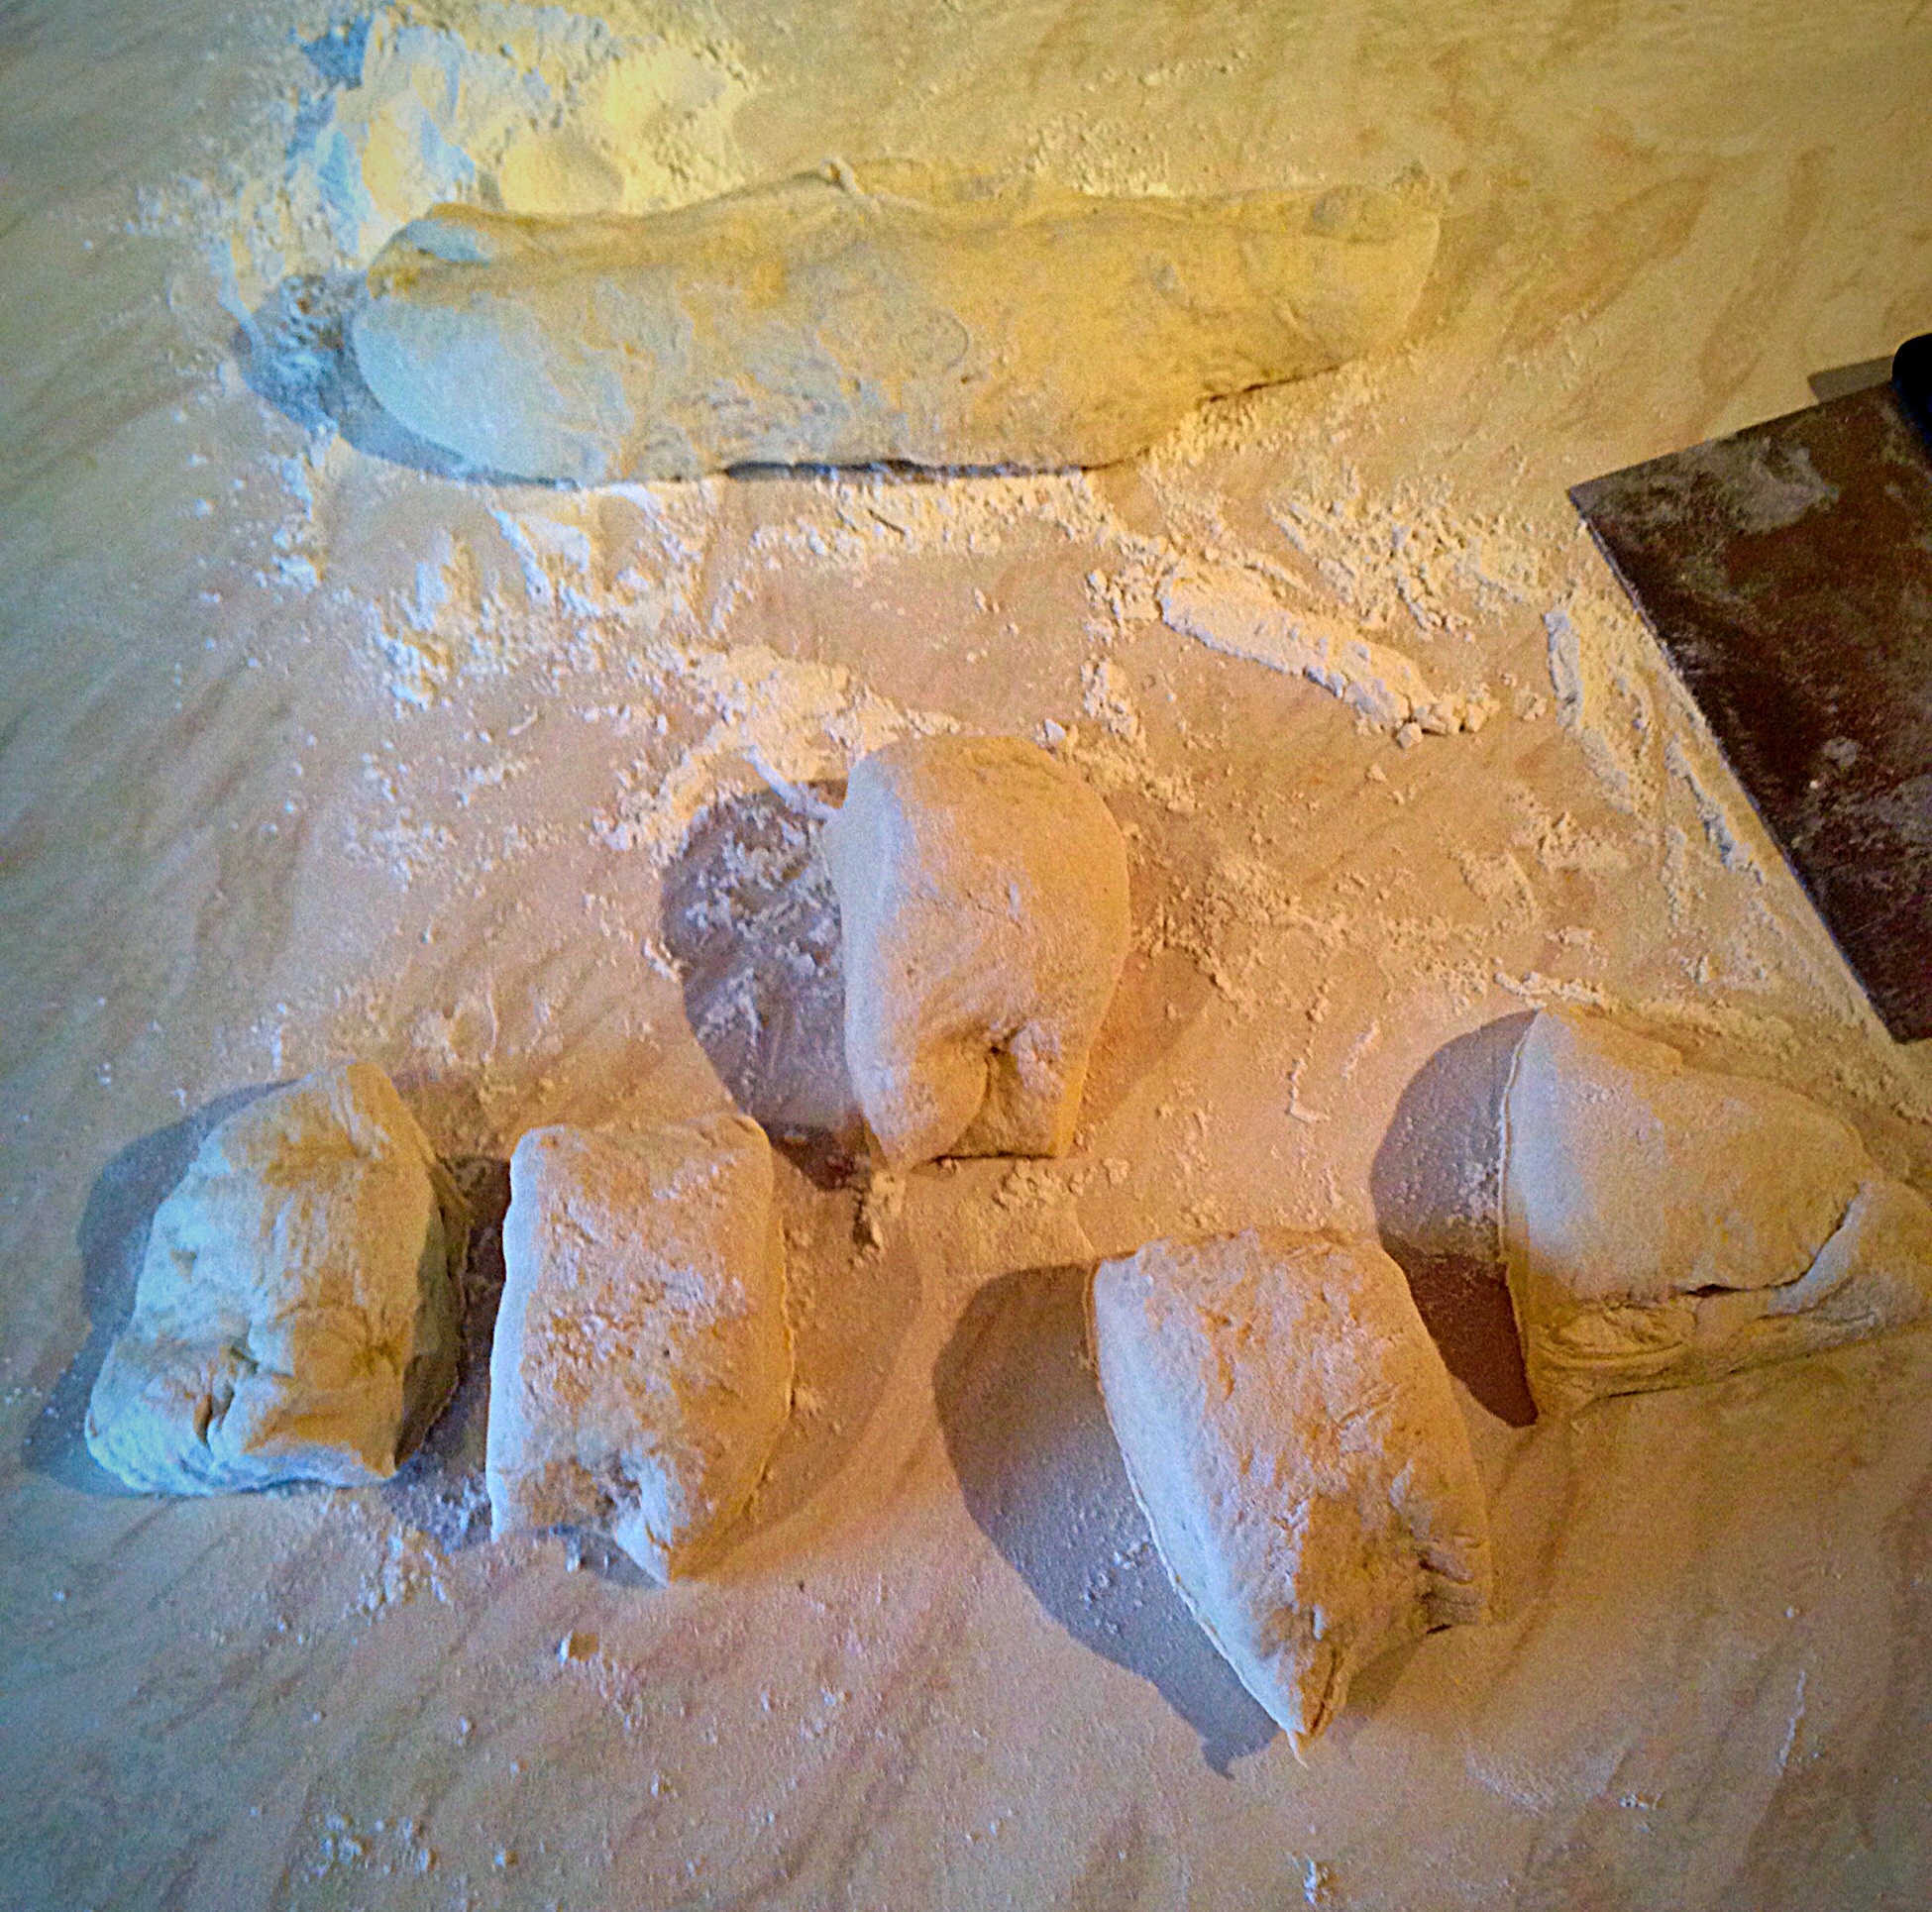
Tip your dough out onto a floured worktop.
Form the dough into a flat, dome shape.Divide the dough into half – using a dough cutter or knife.Divide the first half into 5 equal pieces of dough.Pull each piece into a length.Twist each length of dough, pulling as you do so, to make a long twisted, uncooked bread stick and place on an oiled baking sheet.
Repeat the same process for the other half of the dough. Cover with a clean tea towel and leave to rise in a warm draught free place until doubled in size.
Preheat the oven to 215C (200C fan).
Place the baking sheets into the hot oven and bake the breadsticks for 20-25 minutes until golden brown. Remove from the oven.
Crunchy, golden breadsticks.
Place the cooked breadsticks on a cooling rack to cool.
Recipe : Garlic and Herb Dipping Oil
4tbsp Virgin Olive Oil
4tbsp Butter
3 Fat Garlic Bulbs
1tbsp Fresh Finely Chopped Herbs – I used Thyme and Rosemary – or 1tsp Mixed Dried Herbs
1/2 tsp Flaky Sea Salt
1/2 tsp Freshly Ground Black Pepper
Method :
Firstly I have to admit I didn’t actually measure the butter or olive oil when I made this!! But you are aiming for a 50:50 mix of Olive oil and butter! My laziness is your gain, as you can add more oil/butter if you want to stretch this recipe out for more servings!!! And I get called Cheeky – can’t think why?????
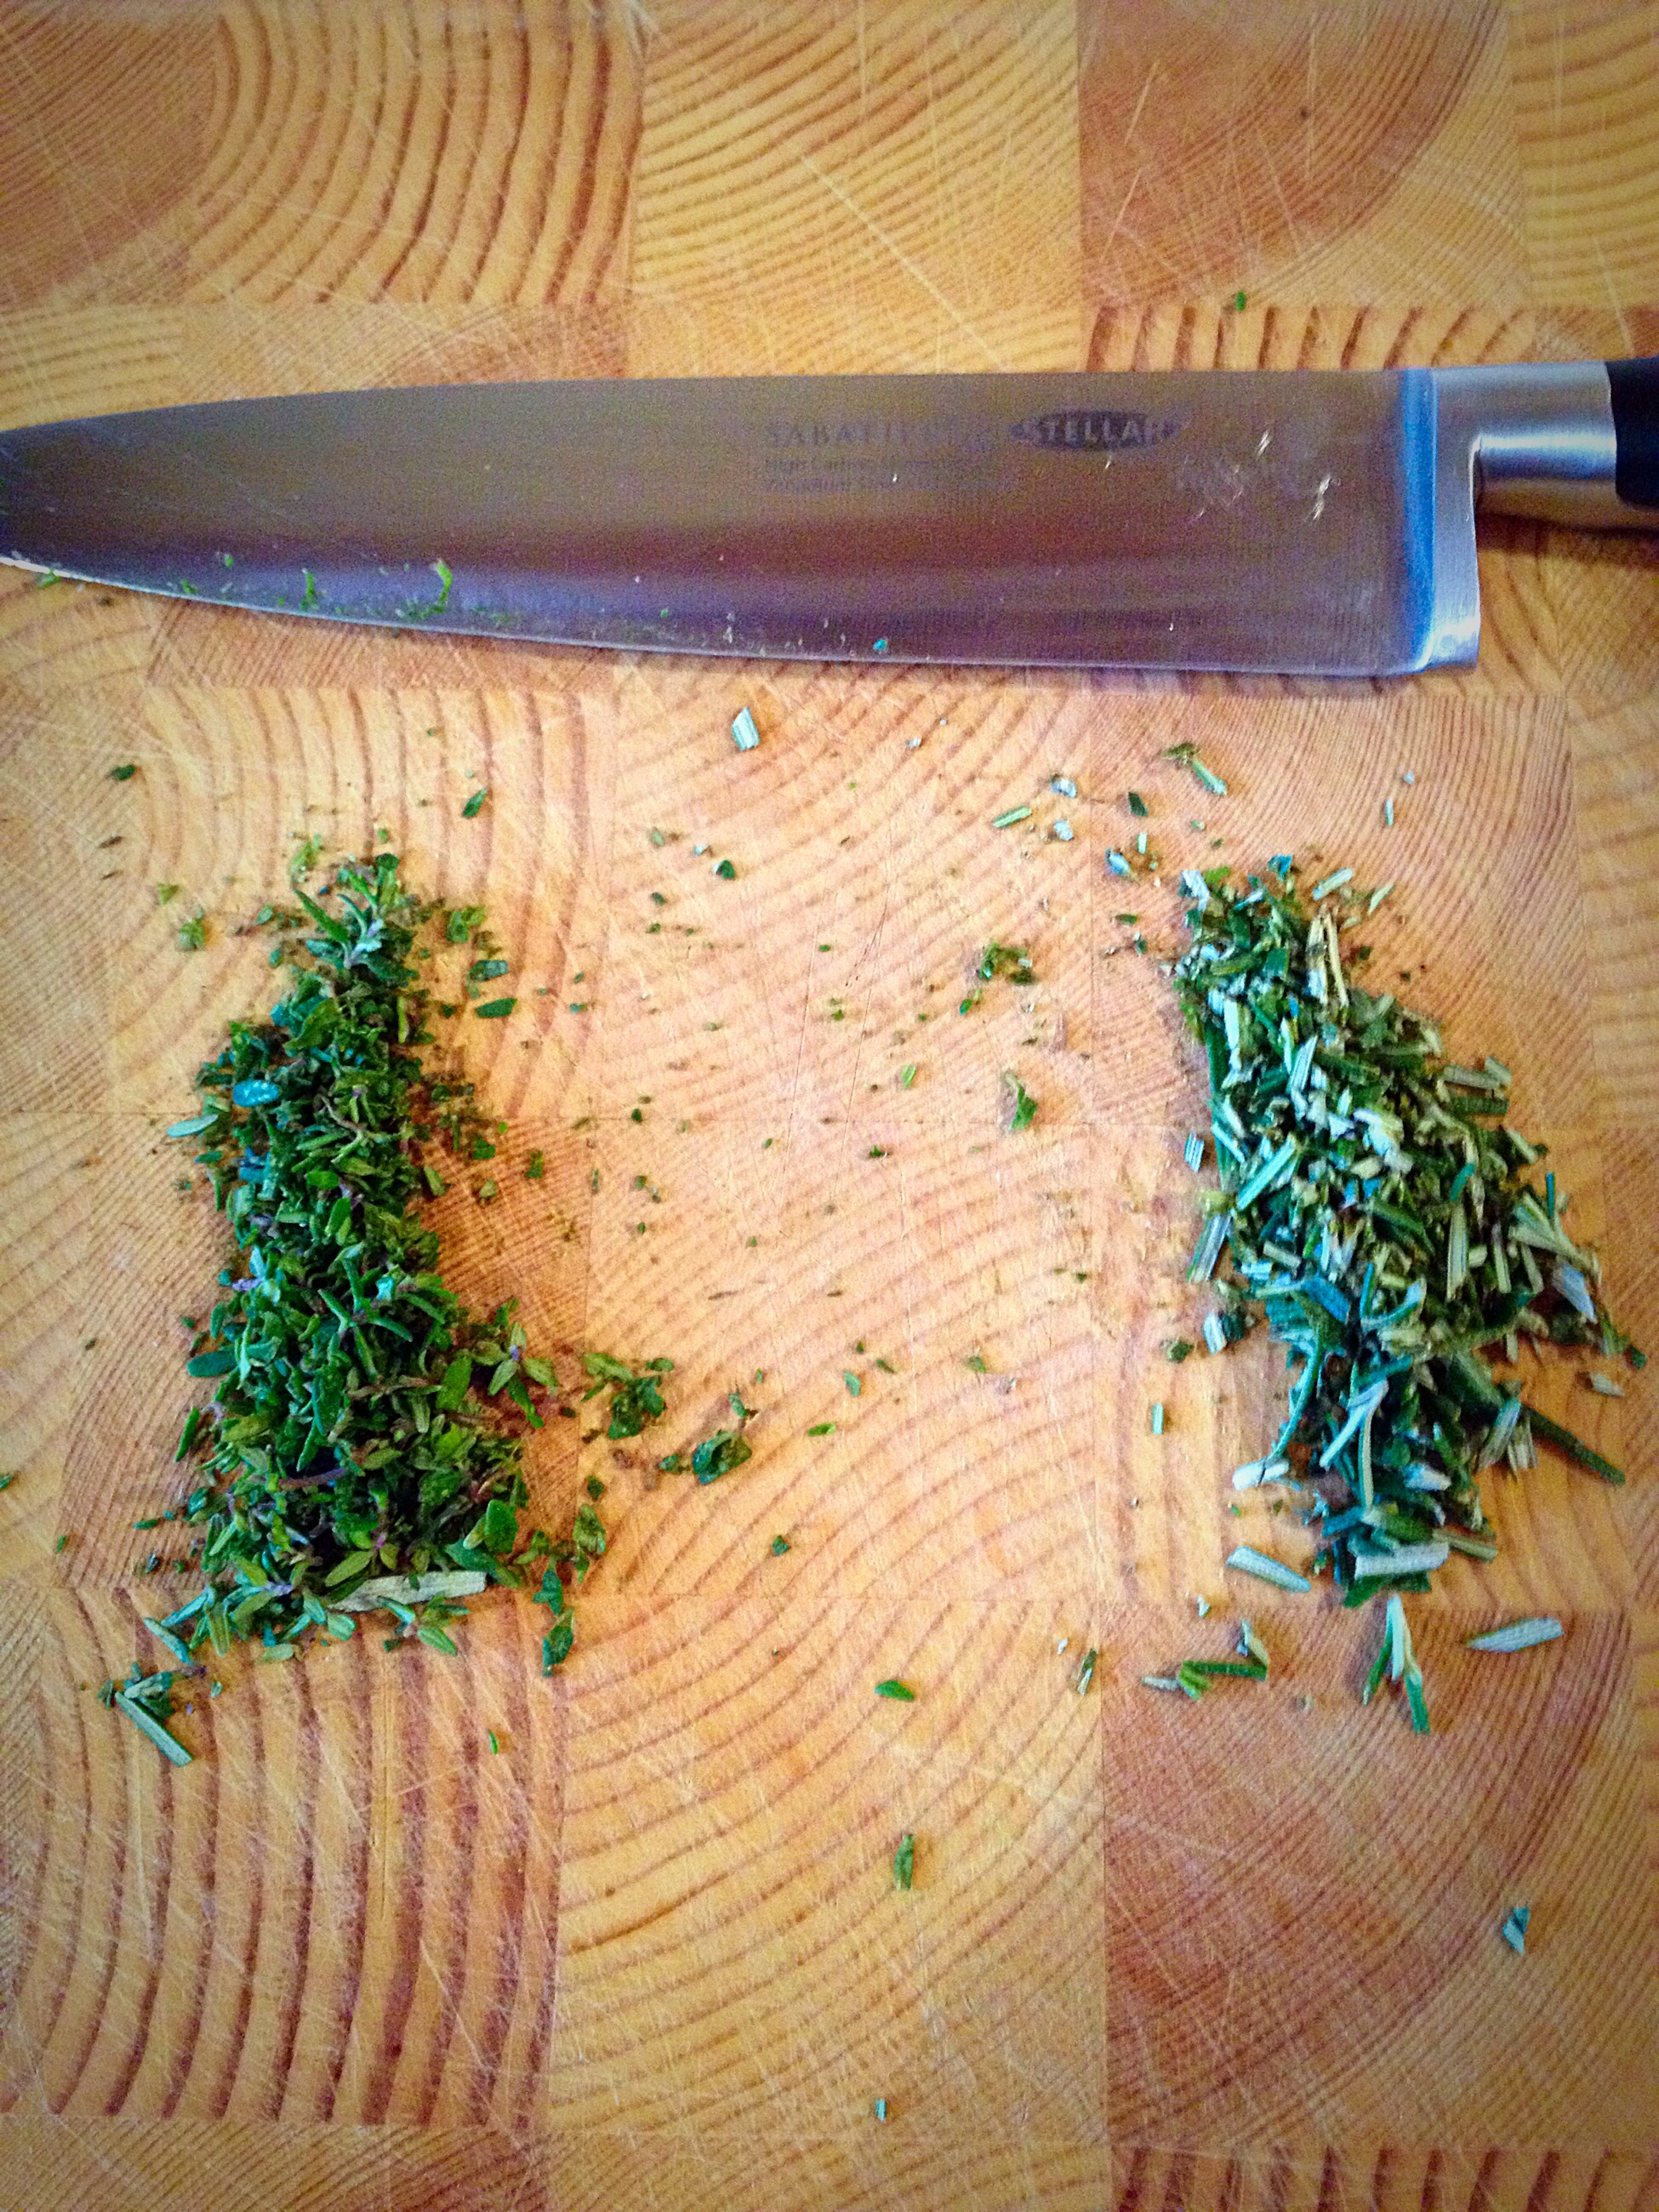
Anyway back to the dipping oil for the breadsticks! Put the Olive oil and butter into a small pan. Chop the herbs finely and add to the cold oil/butter.
Finely chopped Thyme (left) and Rosemary (right).
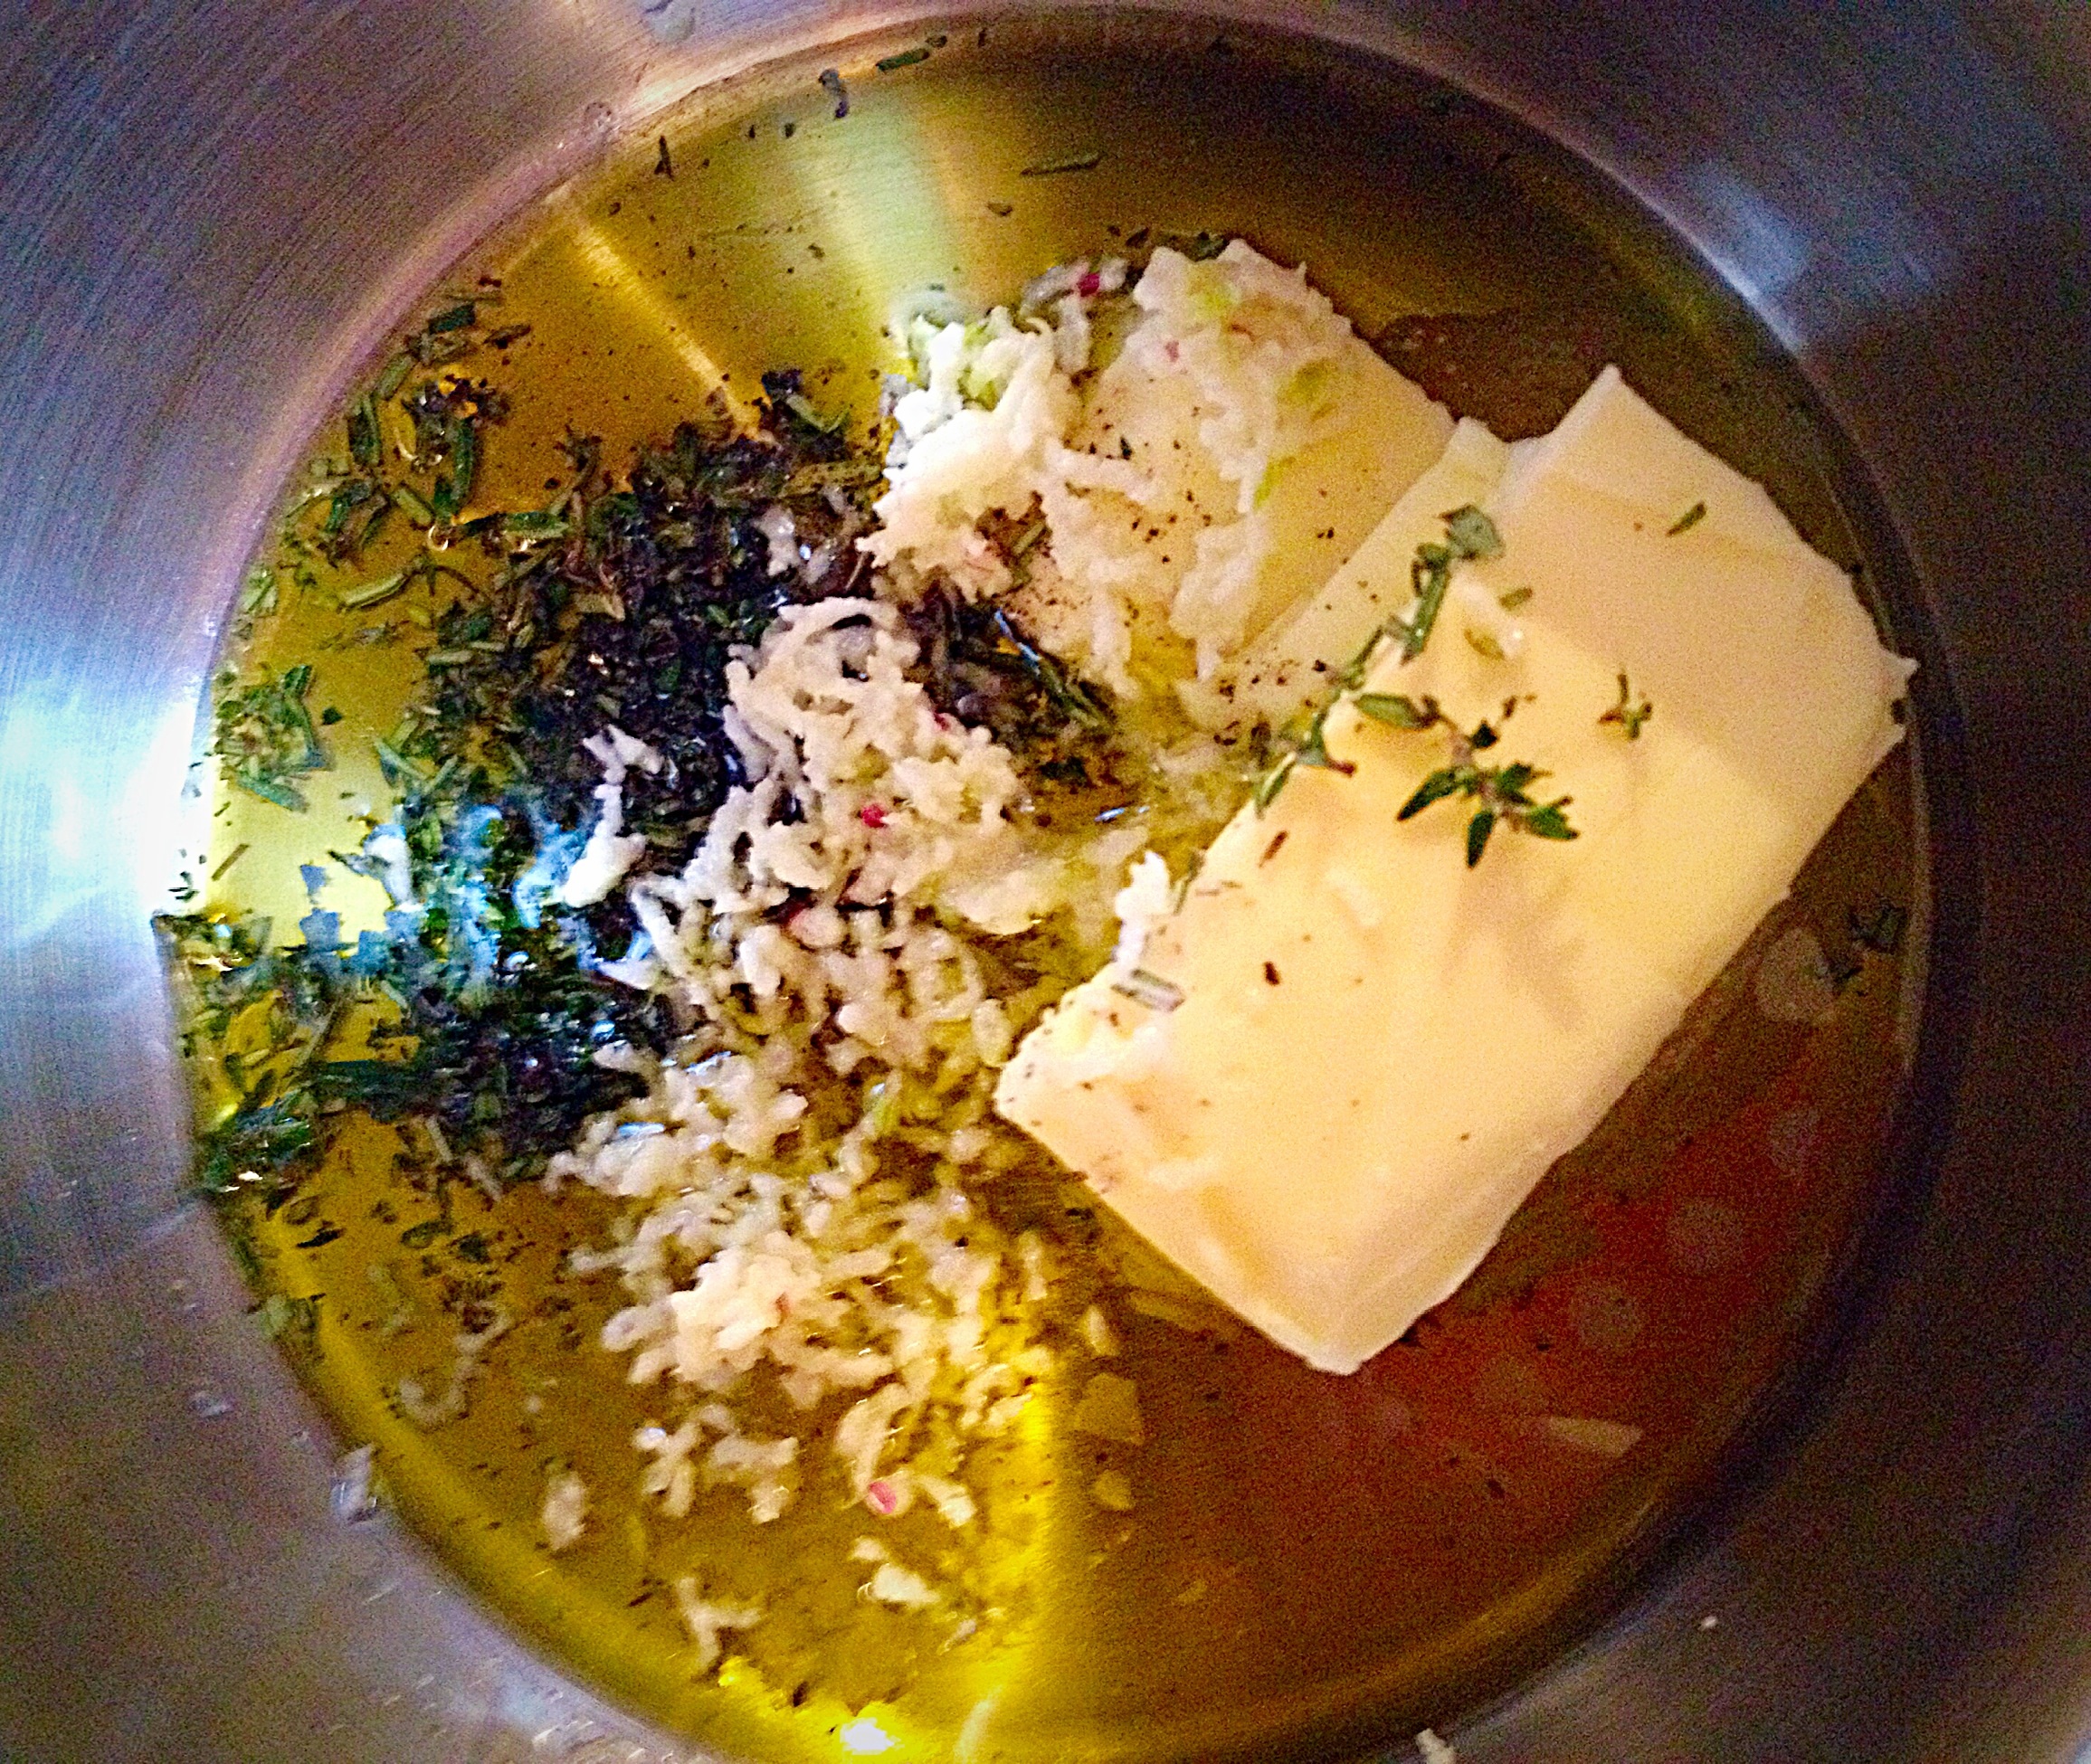
Either mince finely, or use a garlic press to chop/squish the garlic bulbs and add to the pan. Finally add the salt and pepper – you can add less salt if you’ve used salted butter – too little salt however, will result in this dipping oil having a very bland flavour (sorry Cafe Rouge, but it’s the seasoning in your dipping oil that let’s it down!).
Ooh a little heat, a little time and this will become the MOST delish Garlic and Herb Dipping Oil x x x
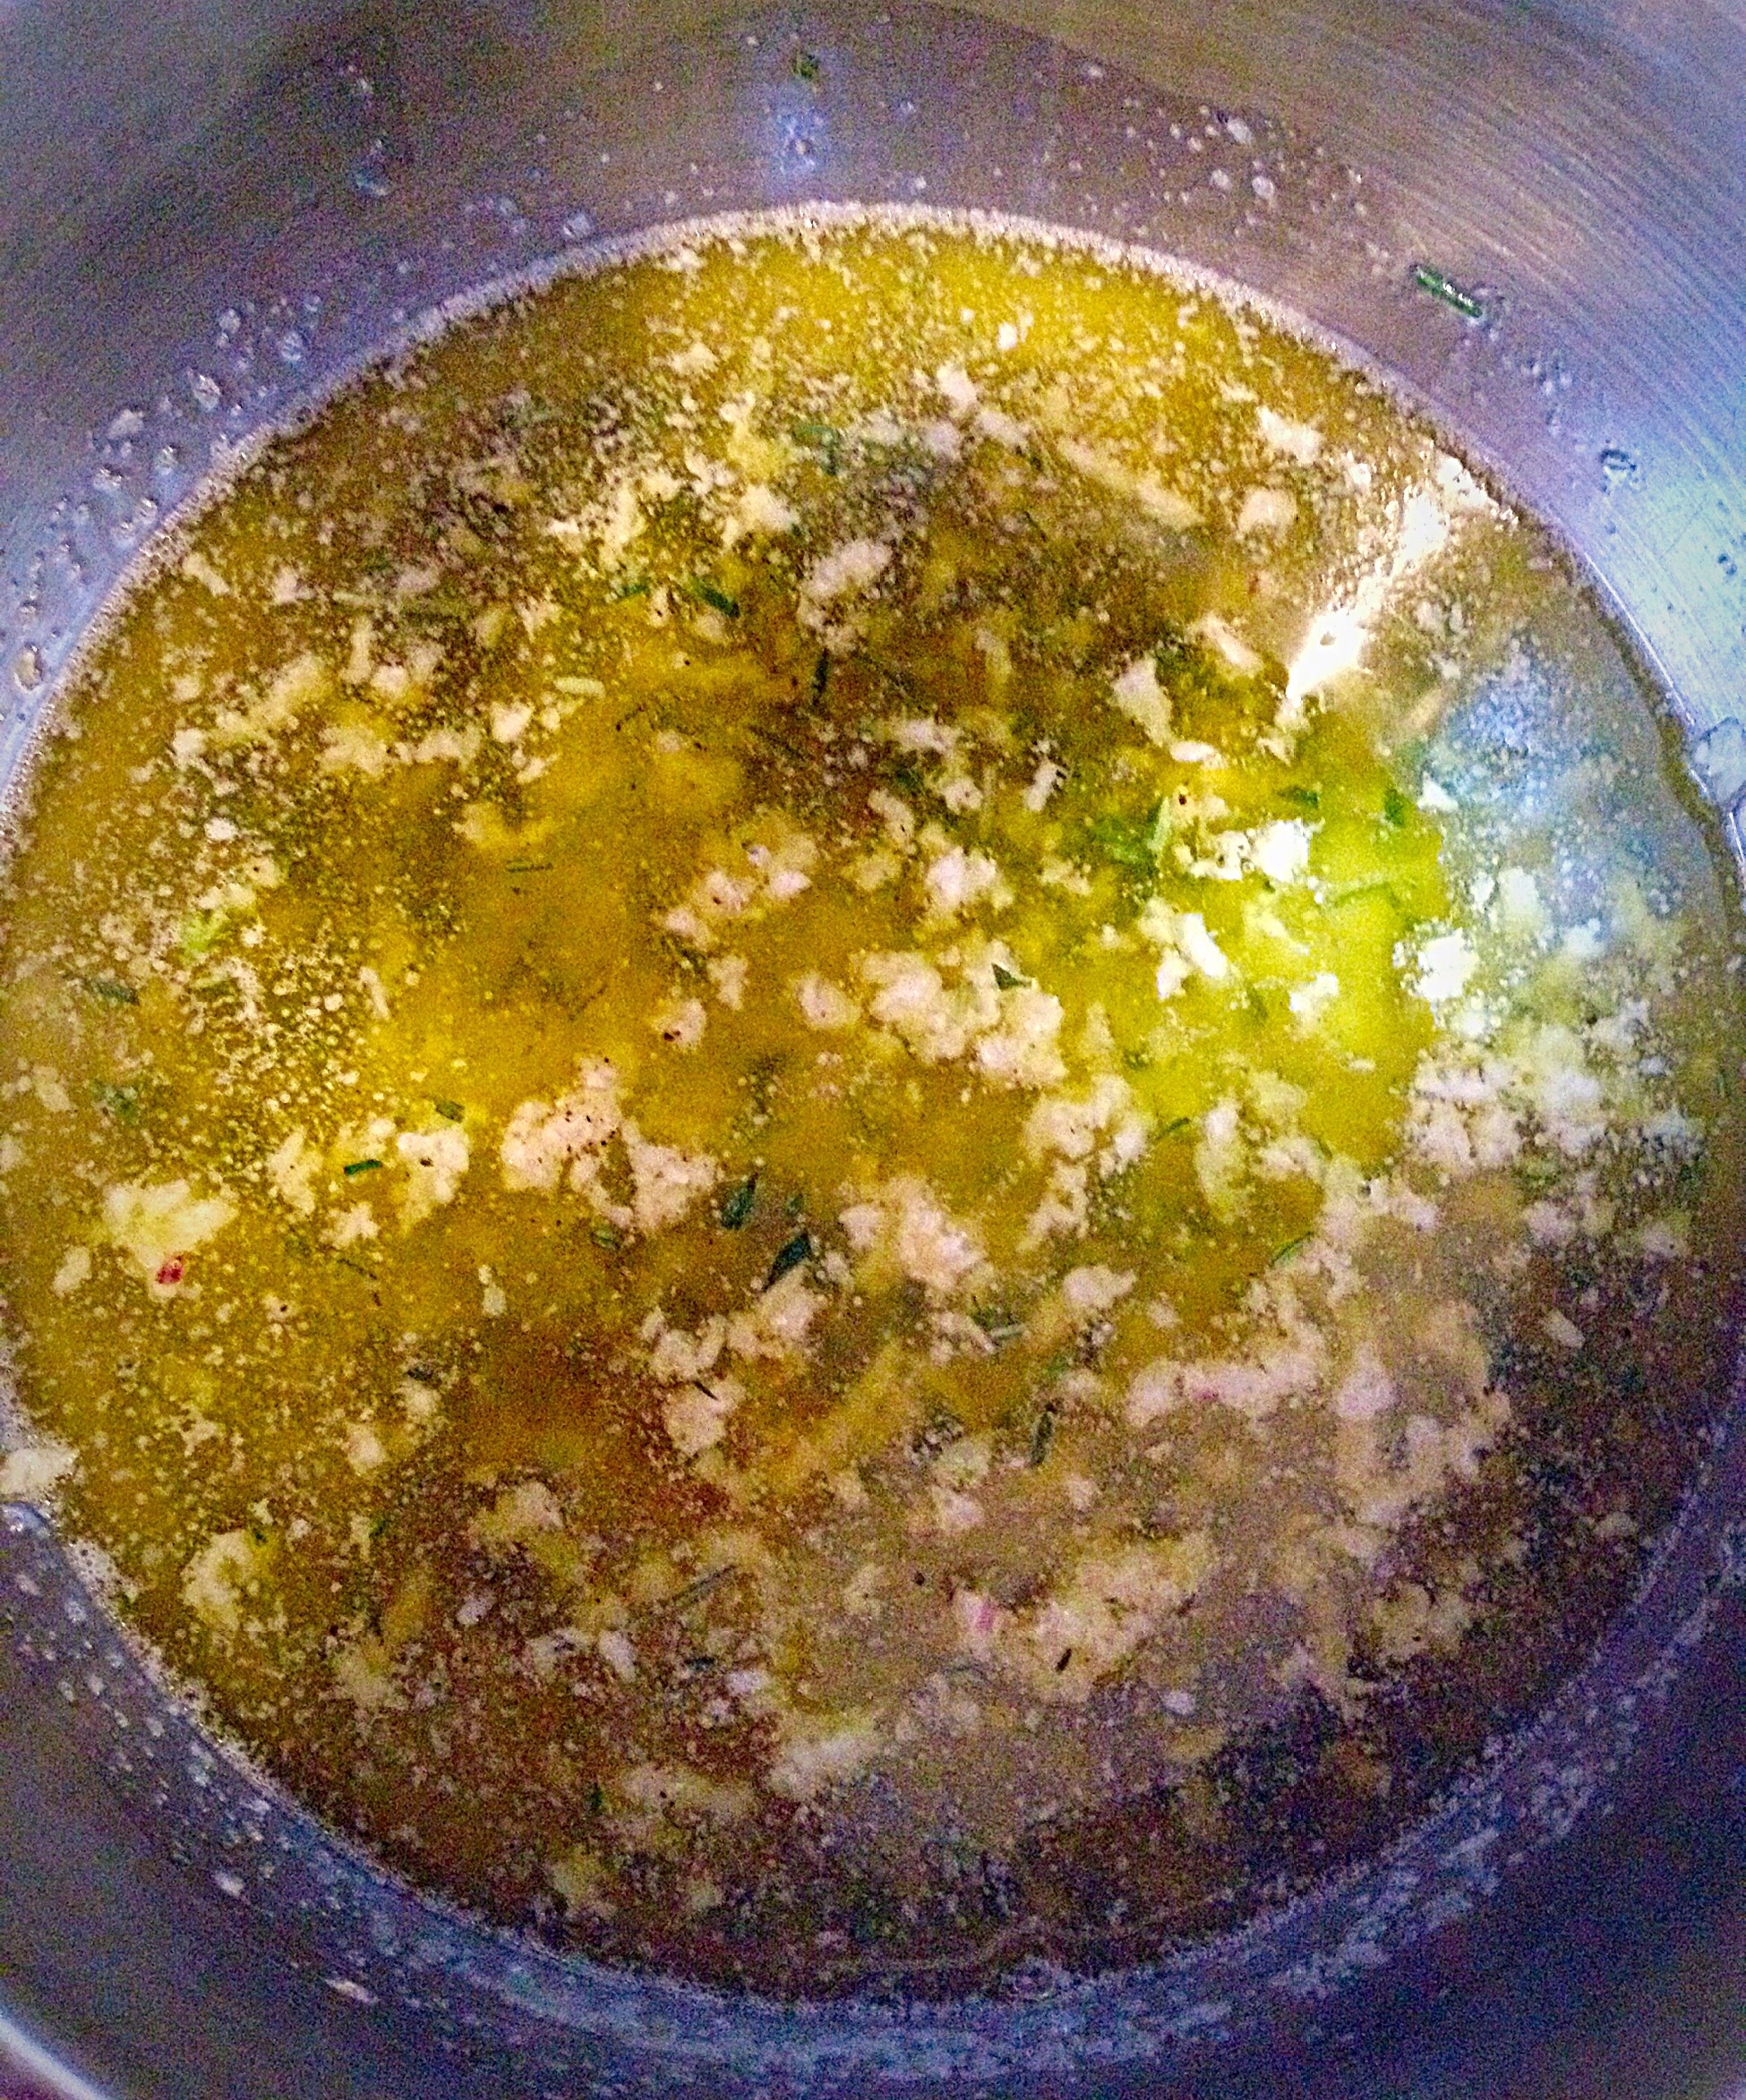
Place the pan over a very low heat. The idea is to melt the butter, infuse the oil/butter with the garlic and herbs and of course NOT BURN THE GARLIC!!!!
As soon as the butter is melted take the pan off the heat.
Leave the pan off the heat to sit and infuse with the Garlic and Herb flavours. Even a few minutes makes a big difference to the final oil. I made the oil whilst the Breadsticks were baking. 10 minutes before serving place the pan over a medium heat. As soon as the oil is bubbling and the Garlic is sizzling, remove from the heat and decant into individual serving bowls – I used ramekins.
THE perfect food for sharing. Perfect with pasta.
Breaking into the crunchy Breadsticks and dipping into the Garlic and Herb Oil is a taste explosion in your mouth!! It’s a fun change from the usual Garlic Bread. As always these Breadsticks go amazingly well with all pasta dishes.
NOTE: The Garlic and Herb Oil can also be spooned over Ciabatta or Baguette for a more traditional style Garlic Bread.
The Breadsticks can be made smaller (this will stretch out the number of servings), just remember to reduce the baking time – I’d start checking at 15 minutes.
Any leftover breadsticks can be frozen, in a freezer bag, for up to a month.
If you do try this recipe I’d love to hear how you get on?
Have fun making these and most of all sharing them!
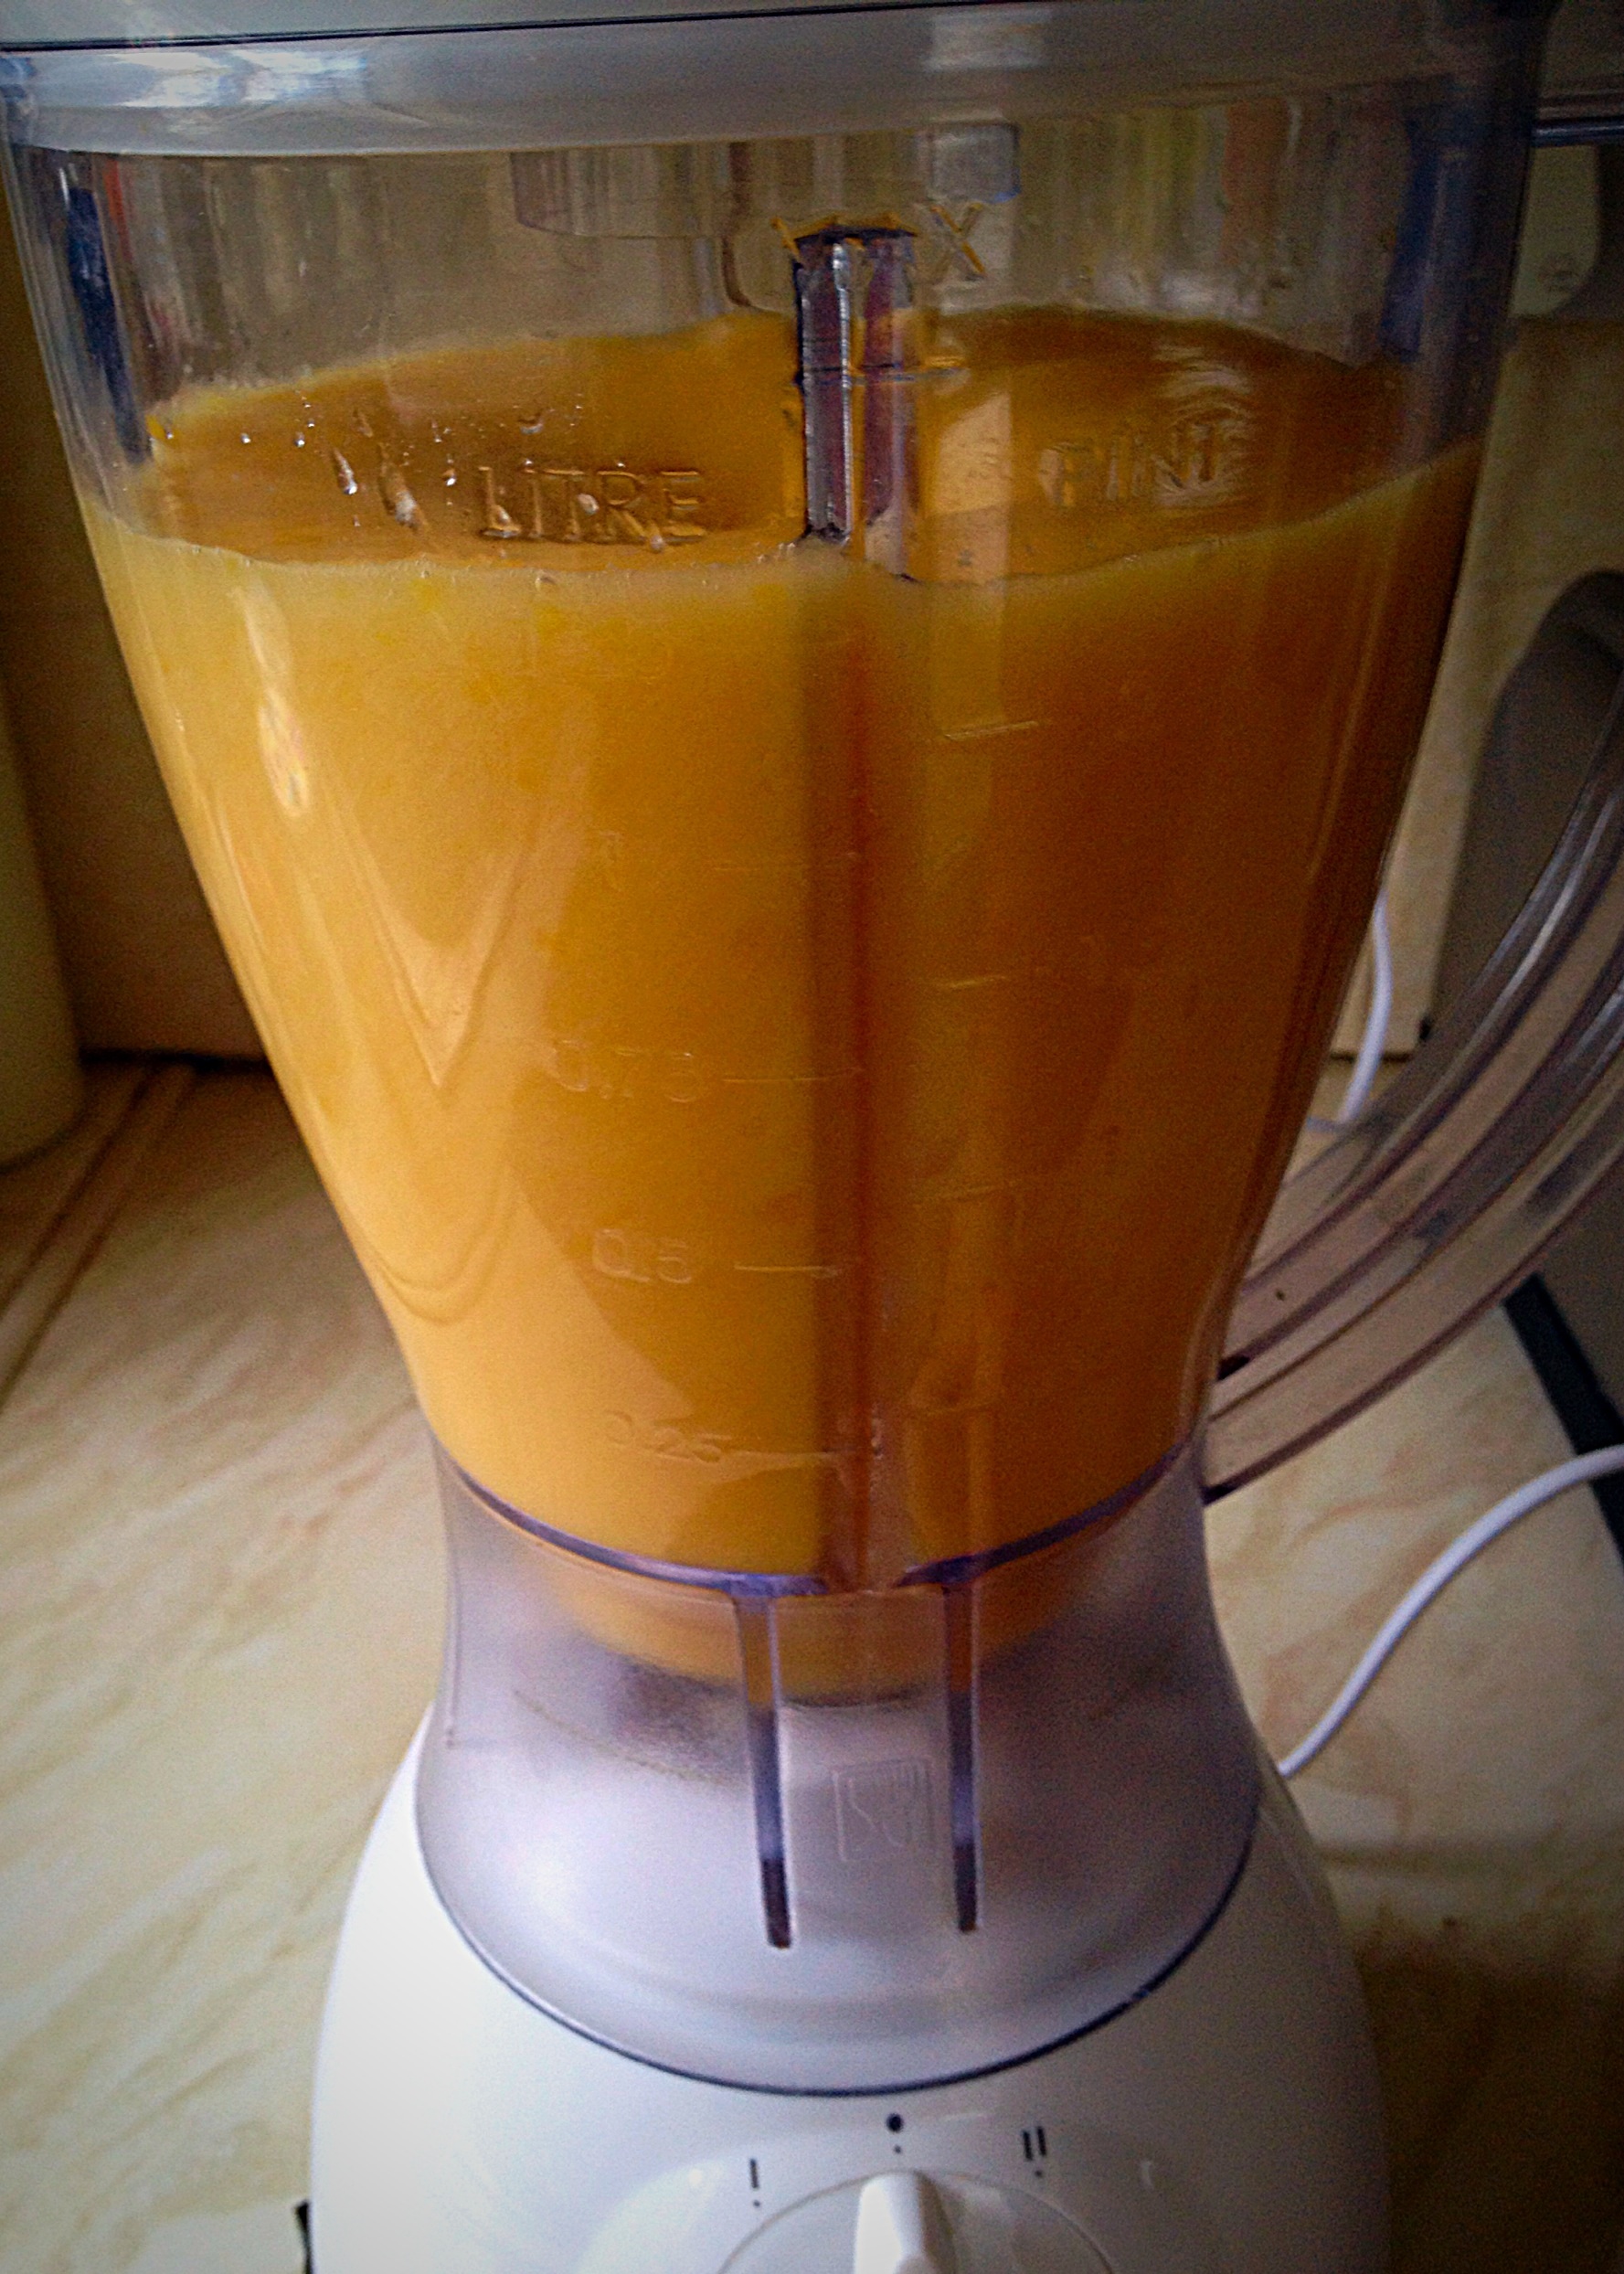
Hi and thanks for dropping by. Are you having a good Monday or is it a bit of a drrrraaaagggg? Mondays can be a real dichotomy. If you’re on holiday, honeymoon or just cos the sun’s shining, then Mondays can be great!! If it’s another week at work or school, with deadlines looming, meetings pressing and the sun nowhere to be seen, it can be the hardest thing ever having to haul yourself outta bed and start another working week. This super easy Peach and Banana Smoothie not only looks like sunshine in a glass, it tastes amazing, is made in moments and it’s good for you!! Just the pick me up needed on a Monday, or any other day of the week.
Peach and Banana Smoothie – a glass of sunshine to brighten your day!
So whatever day you are having this super easy, super delish, Peach and Banana Smoothie is exactly what you need to give you the energy to face the day!
Peach and Banana Smoothies – ideal to have with Breakfast!
Although I’ve pitched these as ideal for breakfast, I actually made this mid afternoon!!! We’d had a late breakfast, skipped lunch and I didn’t want us (me included) snacking on sugary treats whilst waiting for dinner. So far, so good! Dinner’s still an hour away and no ones hungry.
A healthy, filling, sunshine Smoothie.
To make these Peach and Banana Smoothies all you need is:
Recipe : Makes 4 servings.
3 Bananas
2 x 400g Tubs/Cans Peach Slices in Fruit Juice
Method :
Tip the peaches and juice into a blender, or a food processor.
Peaches in….
Next peel the bananas, break them into chunks and add them to the peaches.
Your Peach and Banana Smoothie is a few pulses away.
Blitz the peaches and bananas until you have a lump free Smoothie.
Get ready to pour….
And then pour your smoothie into a tall glass…
It’s like pouring liquid sunshine!!
Next enjoy!
Such a scrummy smoothie
During the summer you could add frozen bananas, or substitute tinned peaches for fresh and add some ice to make this a cool drink. But for mid February this Smoothie was fab as is. Enjoy!!!!
Easy, quick Peach and Banana Smoothies – delish x
I hope you give this a try and that it makes you smile on a Monday, Tuesday, in fact what ever day you make it!
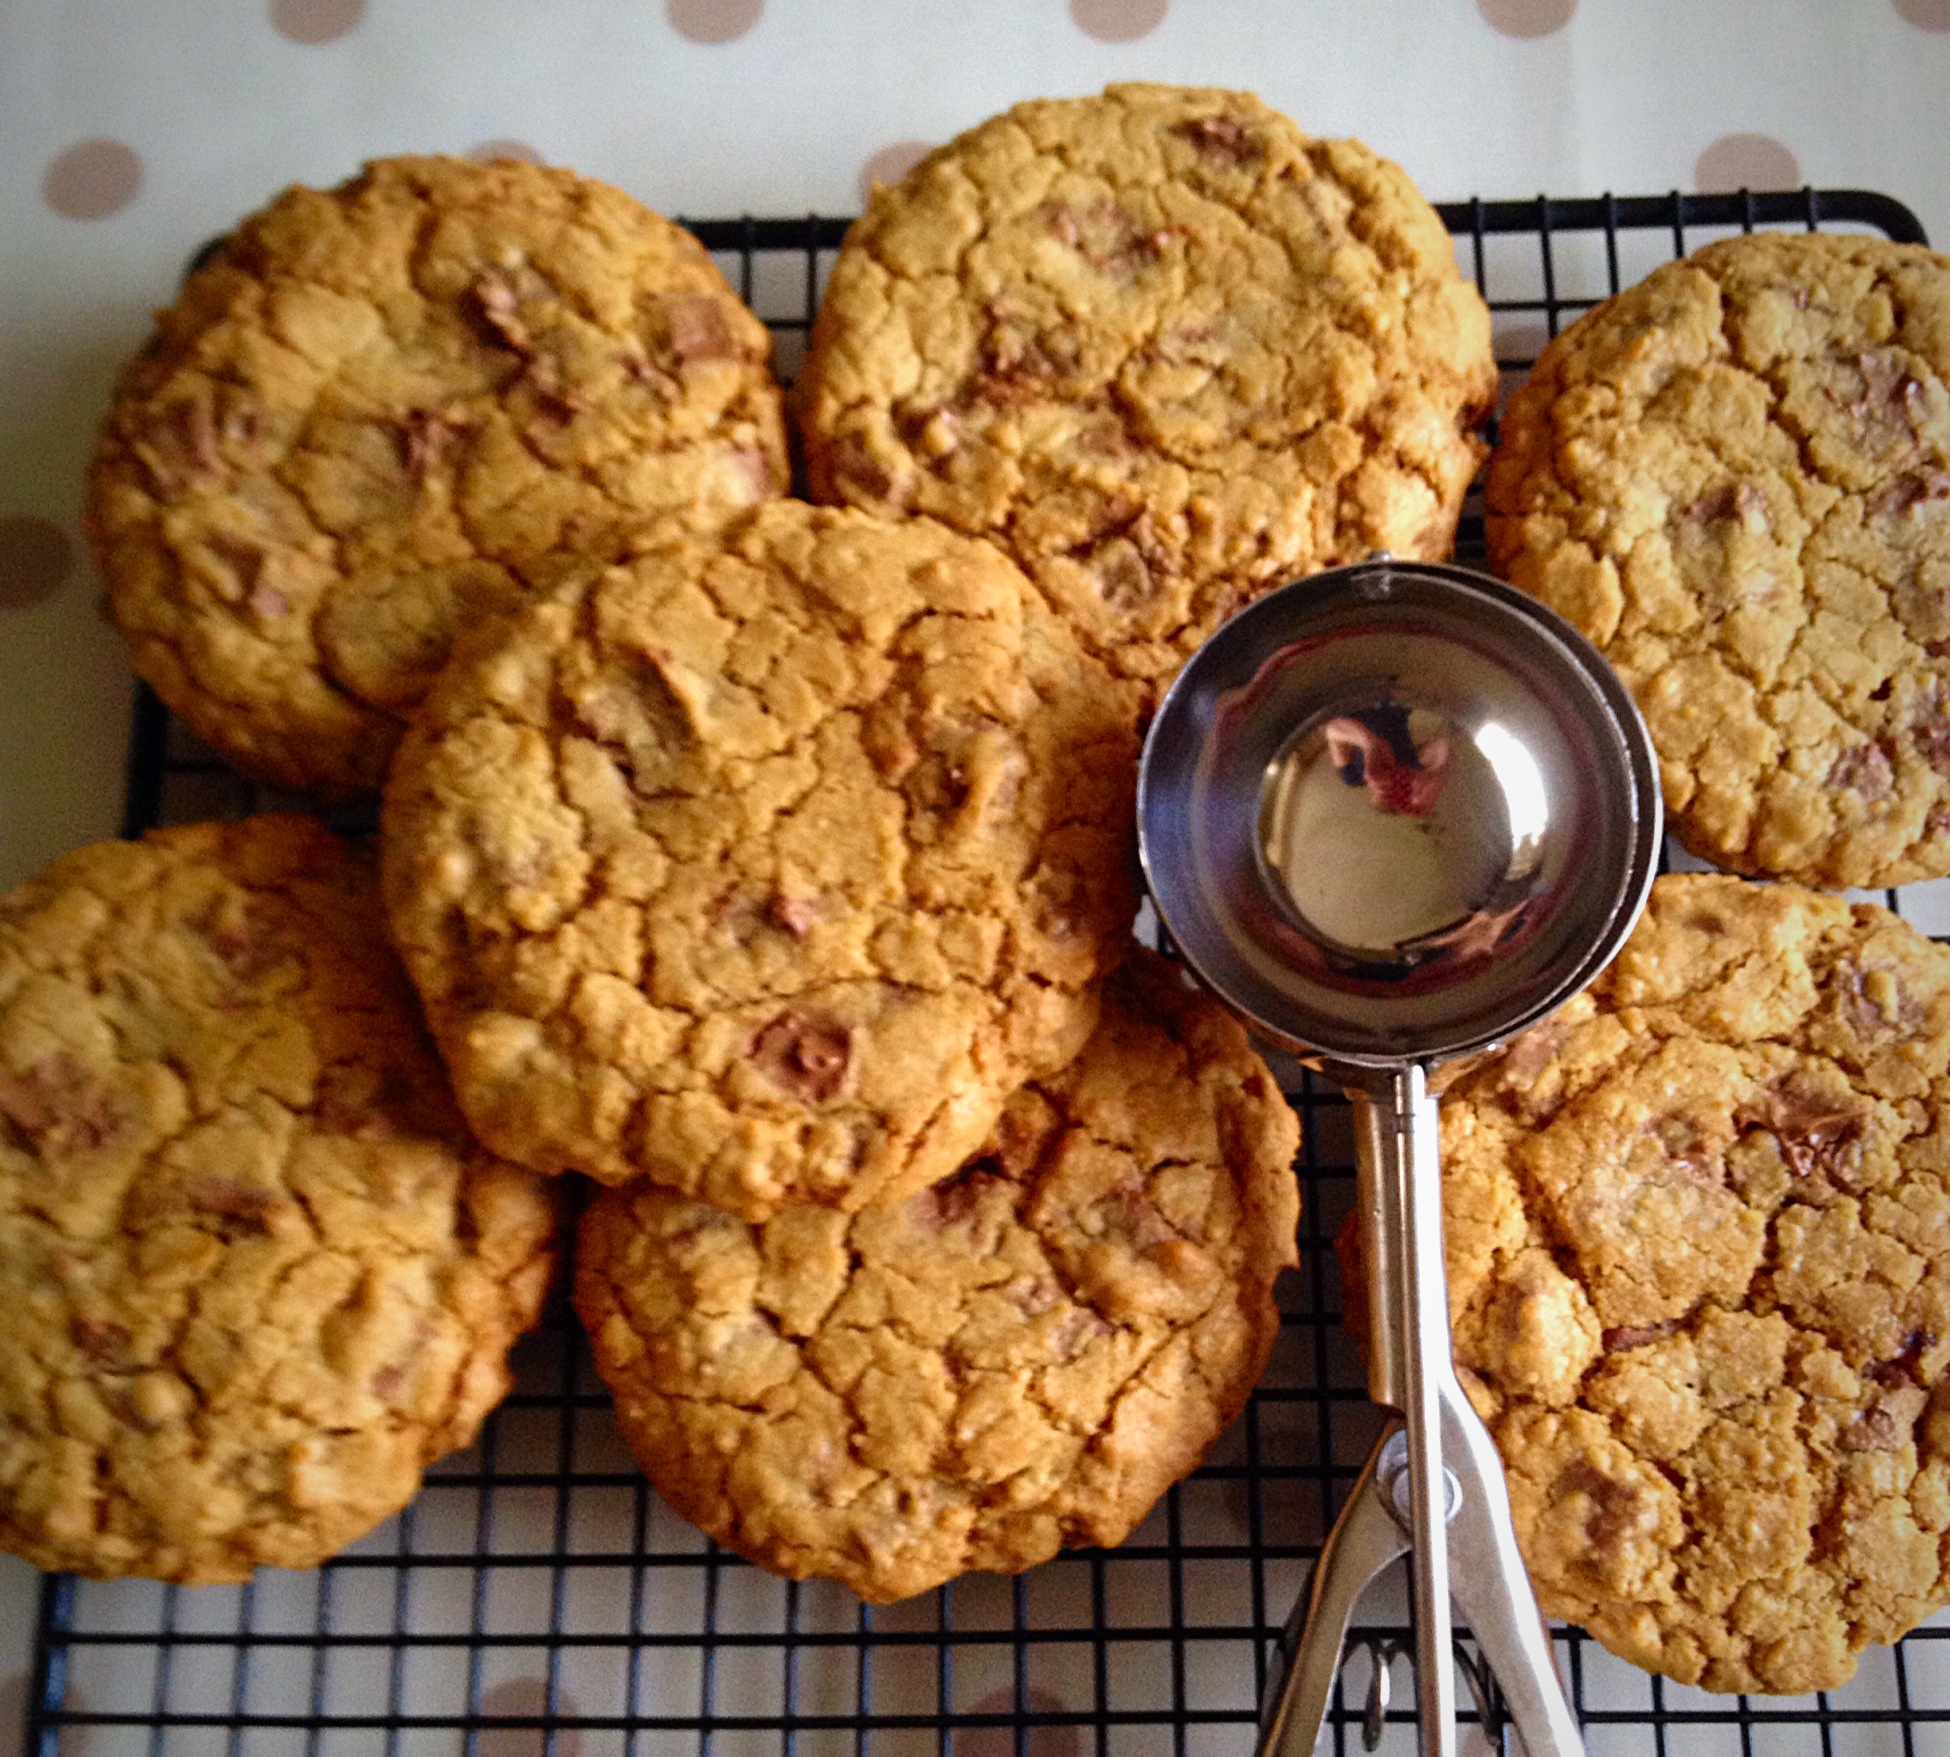
Hi, there how are you? In the mood for baking these Giant Chocolate Chip Cookies I hope???
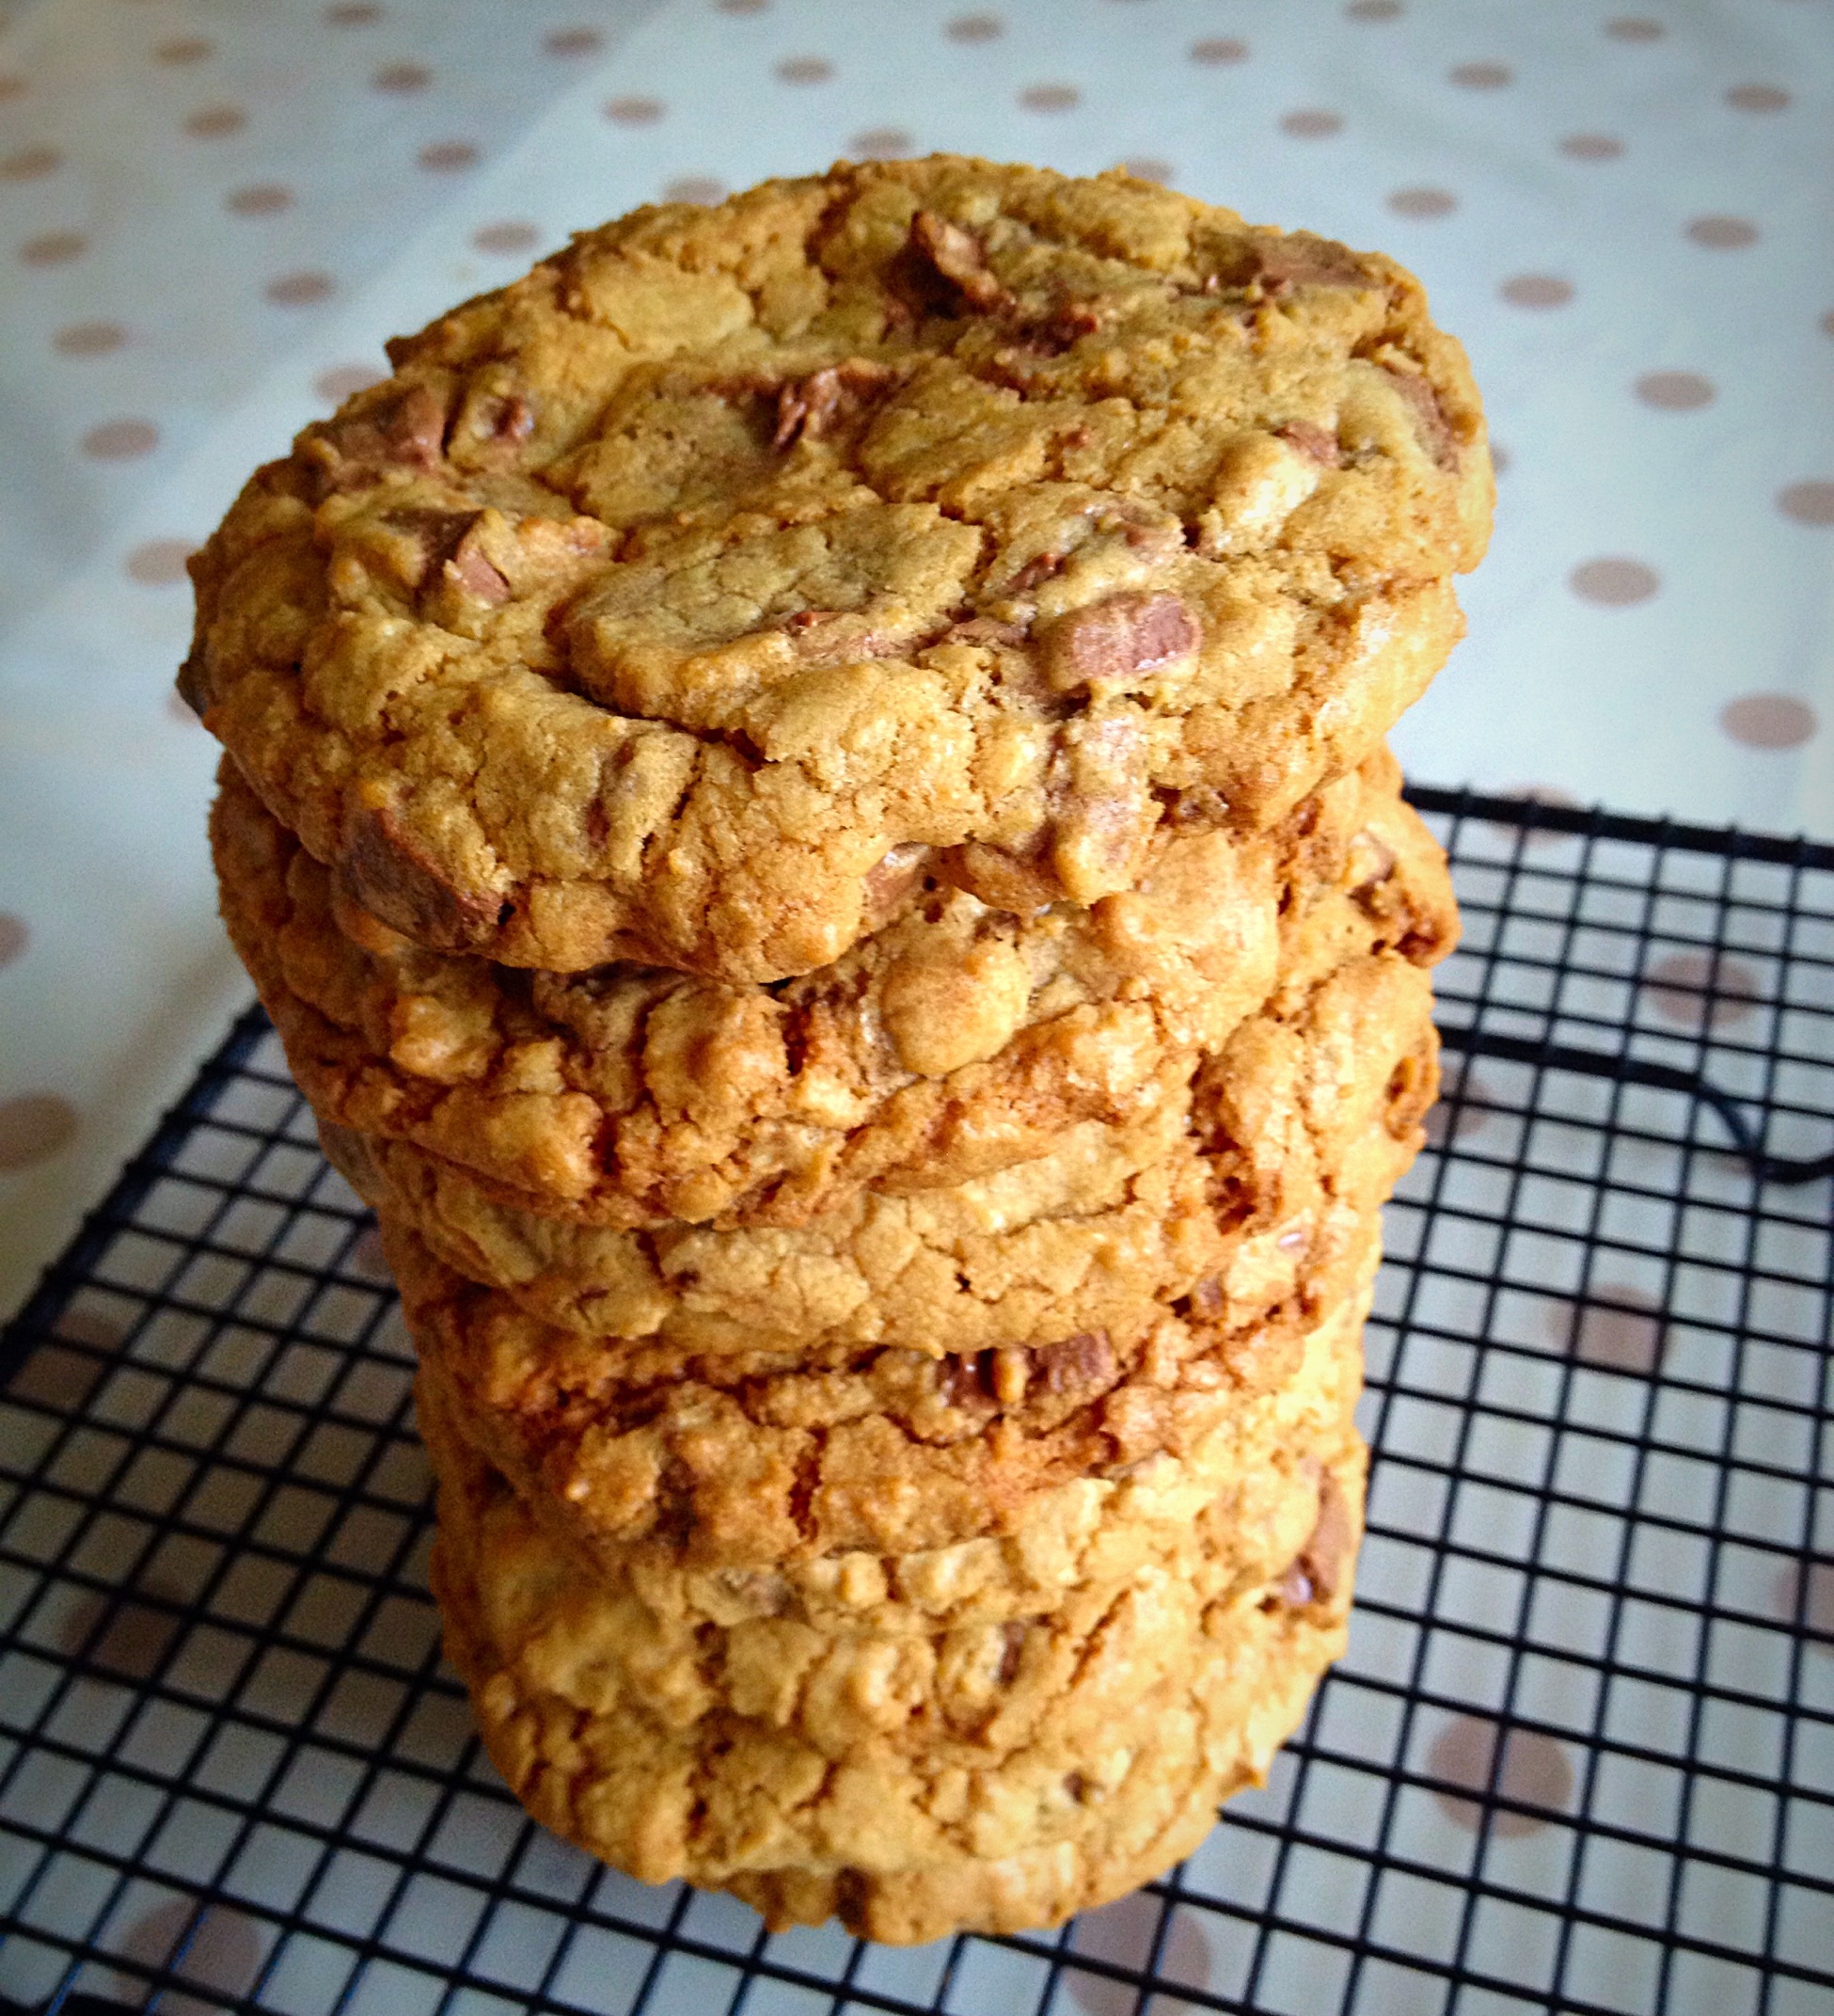
A Tower of Giant Chocolate Chip Cookies – scrumptious.
These cookies deserve some serious (only kidding!!) respect. They are sugary crisp on the outside and gooey, meltingly, chocolately on the inside. This is THE cookie you have been waiting for – and you didn’t even know it!!!
See I told you!! That’s a large ice cream scoop – lost amongst the Giant Chocolate Chip Cookies (bet it would be nice to be that scoop??!!).
I can honestly say I’ve never wanted to be an ice cream scoop before – but there’s a first time ……
That’s only 8 cookies people – nearly as tall as the Eiffel Tower (artistic license allowed!!)
Did I mention that these are GiantChocolate Chip Cookies – oh I did and you want me to get on with the recipe – fair enough: here goes!!
Recipe: This recipe makes 14-16 Giant Chocolate Chip Cookies.
225g/8oz Light Brown Sugar
150g/5oz Unsatled Butter
1 Large Egg +
1 Large Egg Yolk
2 tsp Vanilla Extract
Pinch of Salt – free flowing
275g/10oz Plain White Flour
1/2 tsp Sodium Bicarbonate.
400g/14oz Chocolate Chunks/Chips
Method :
Preheat the oven to 170C (160C fan).
In a large, microwave proof bowl, add the butter and sugar. Place in the microwave and heat until the butter is just starting to melt : it’s very hard to give exact timings here, as it depends how cold your butter is to start, what power (wattage) your microwave is etc. The only advice I would give is to heat it slowly, on medium. Once butter melts in a microwave it starts to spit and bubble. Whilst this is going to have a small impact in your recipe, it’s a real pain to have to clean out the microwave, mid baking, before the butter sets hard. Just trying to help!!
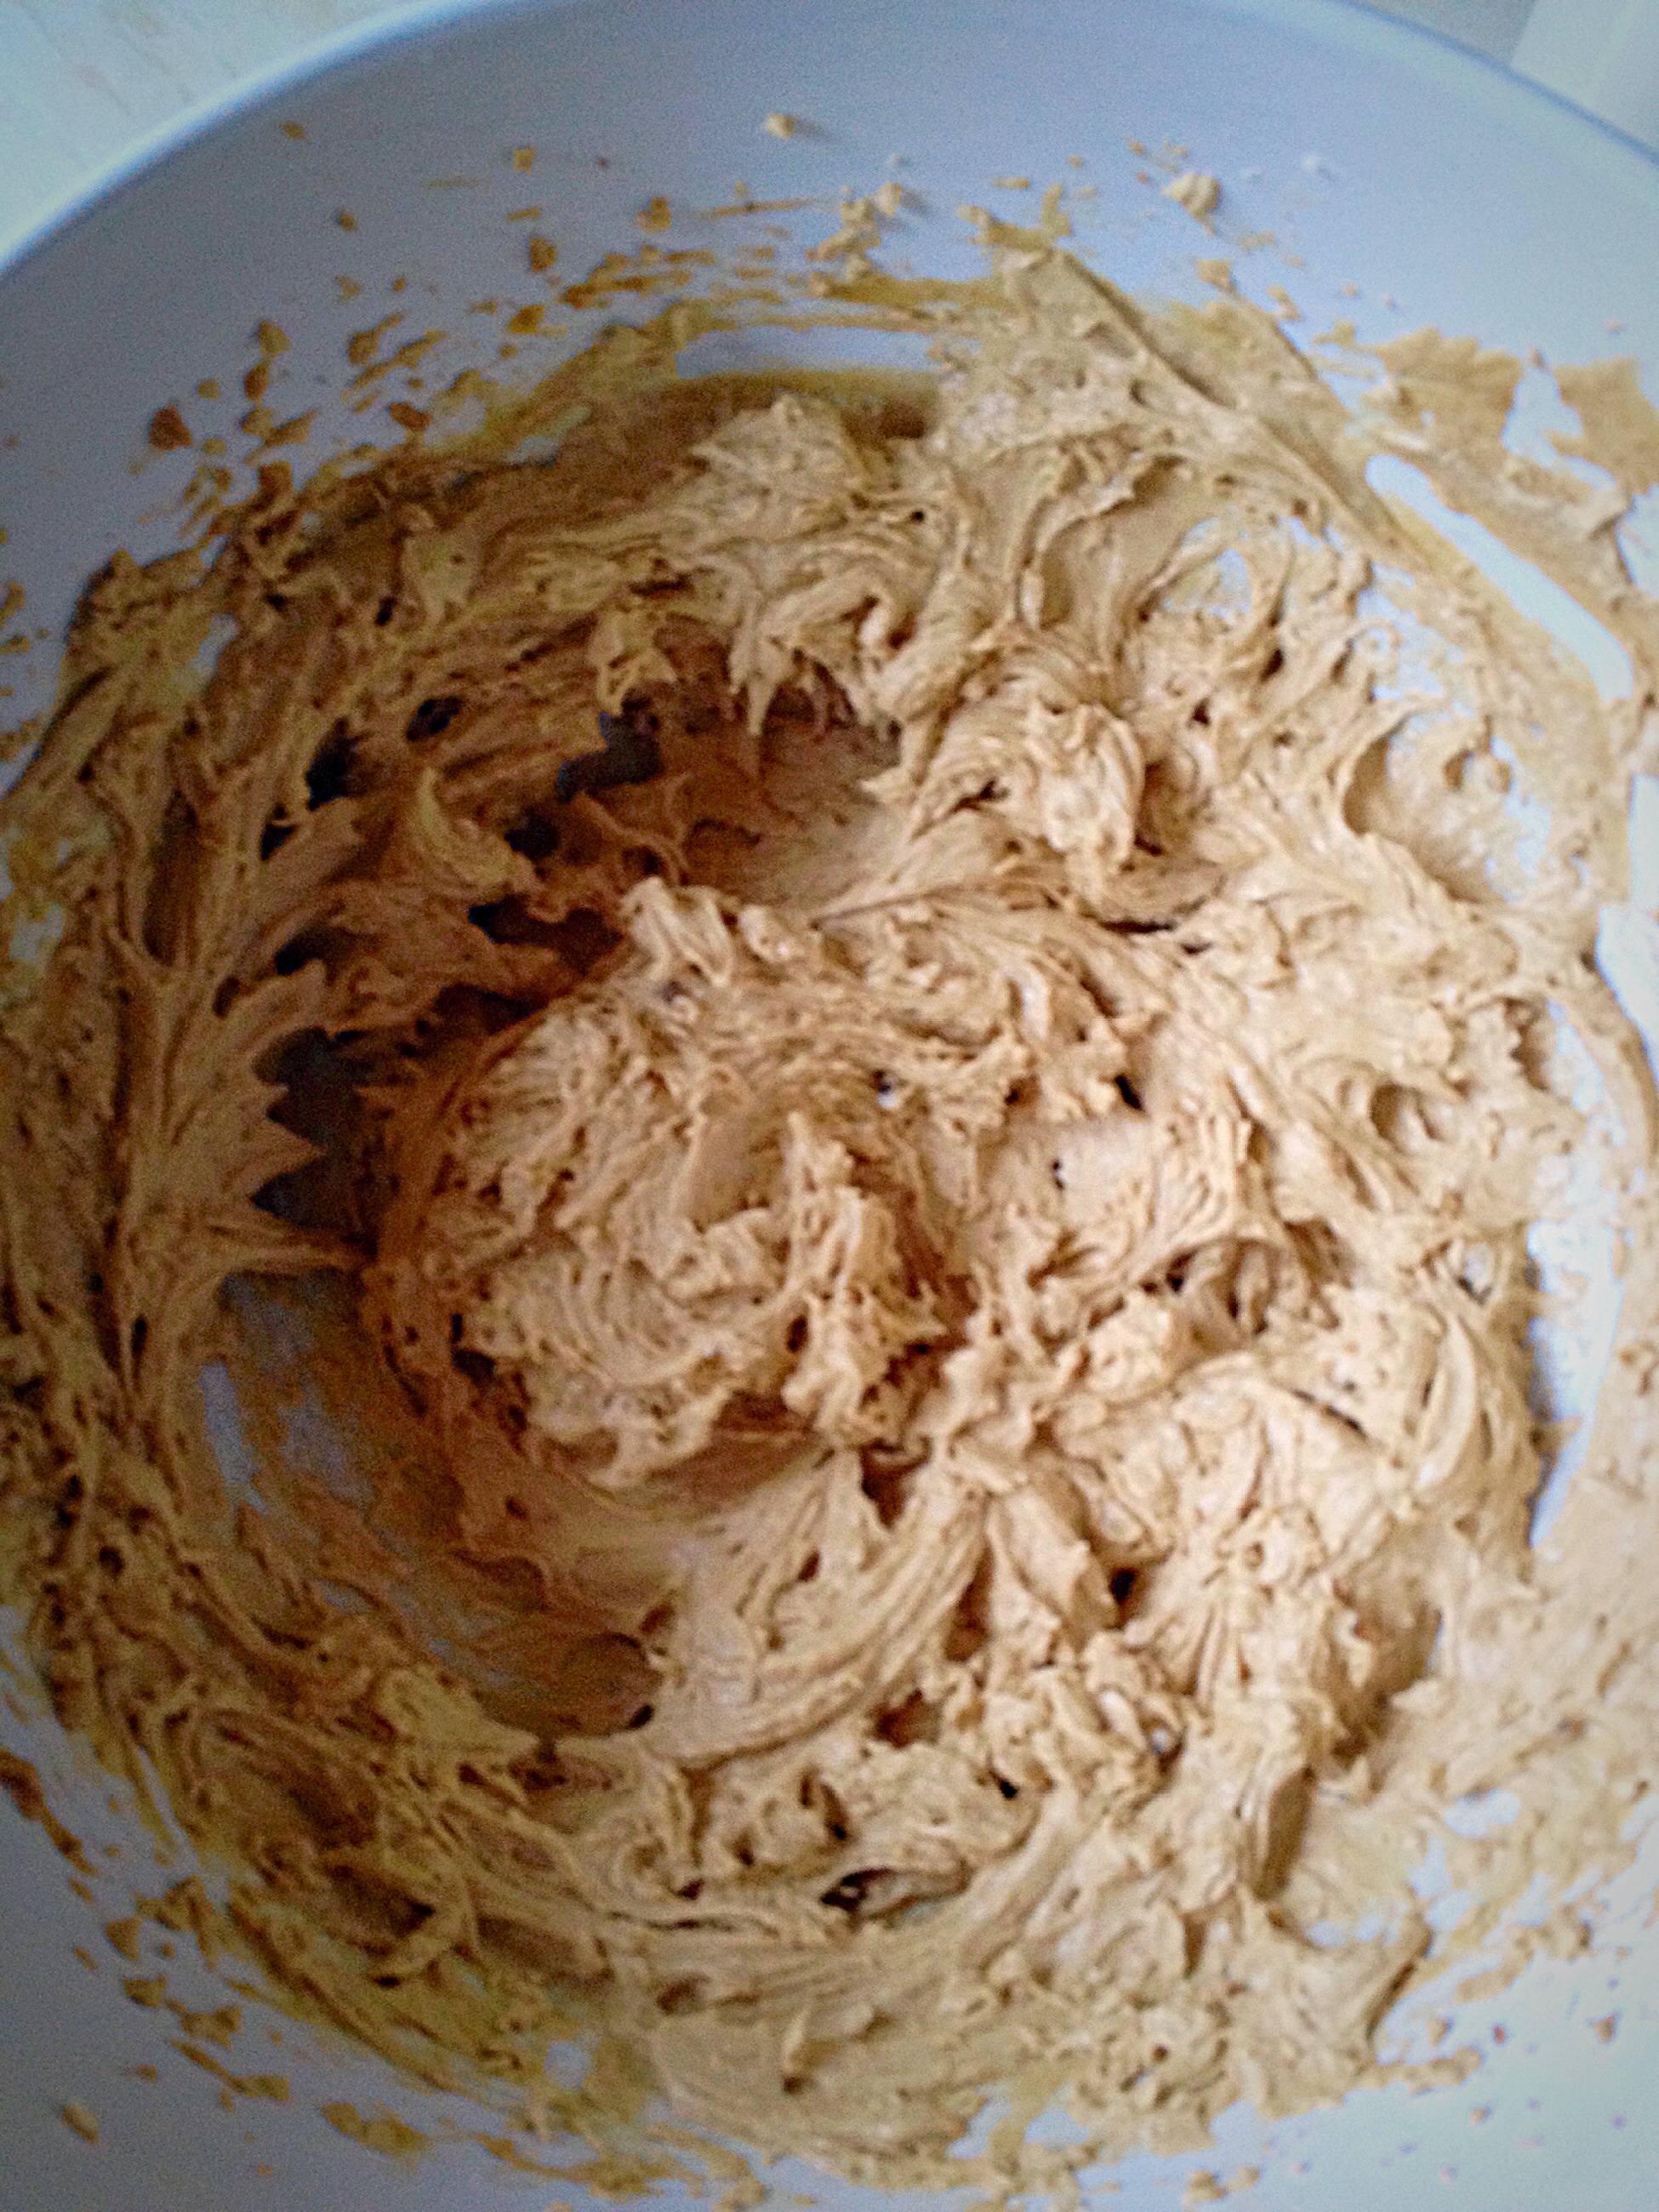
Next get whisking and I mean you really do need an electric whisk for this. I made these cookies a fair few times before I realised the importance of really whisking the butter and sugar together properly and then again when you add the egg, extra yolk and vanilla extract. Bi have absolutely no idea why it makes such a difference, but it does and so much for the better!
The whisked butter and sugar, ready to be whisked again with the egg and vanilla.Lovely fluffy, whipped eggs/butter/sugar and vanilla – almost doubled in size.
Whisking the eggs and vanilla extract into the butter/sugar mixture for a good 5 minutes makes all the difference to the finished cookie.
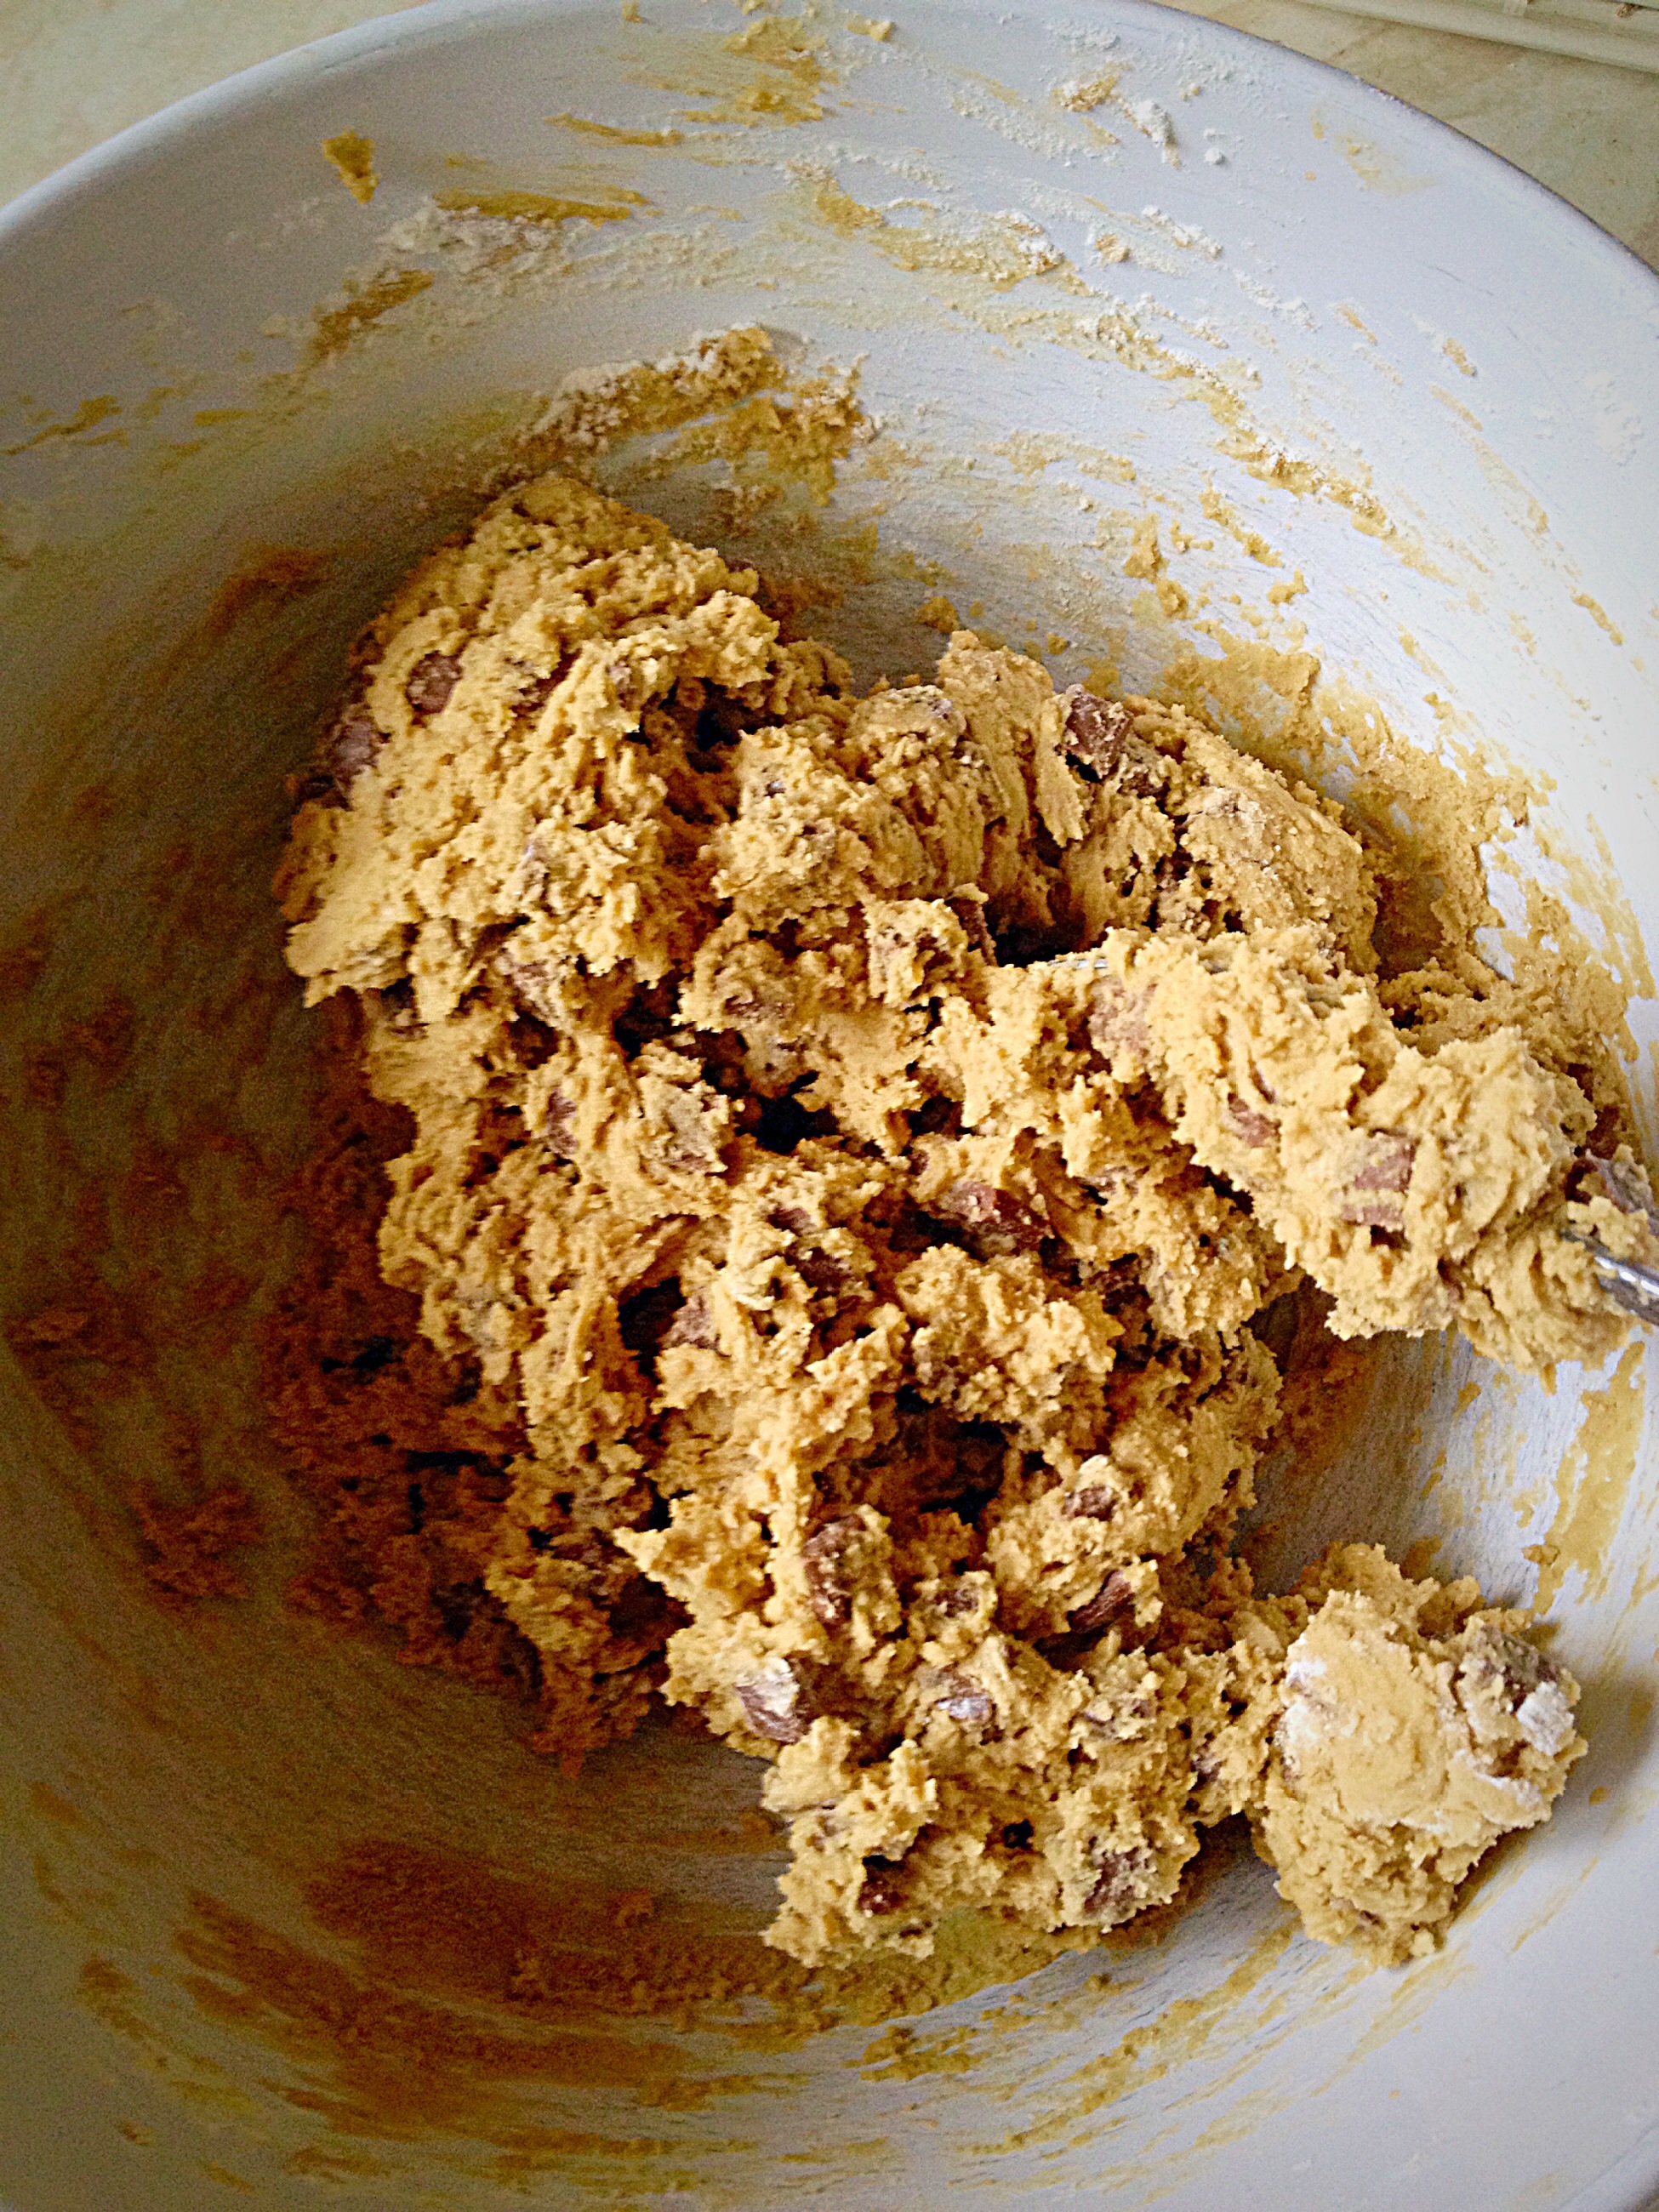
Now sift in the flour/bicarb and salt. Then add the chocolate (I used Milk Chocolate Chunks – you may use whichever chocolate you prefer!!). Using a spoon gently fold all the dry ingredients, including the chocolate chunks into the whisked mixture. I’ve found the cookie dough comes together very easily.
Chocolate Chip Cookie Dough – yummeeeee!
Line two baking sheets with parchment paper (I’m sorry I just don’t get along with greaseproof paper, it always sticks!!). Then using a large, spring operated ice cream scoop ( see 1st photo! ), proceed to scoop out 4 portions if cookie dough, well spaced apart, on each sheet. Using damp hands, slightly flatten the dome top of each unbaked cookie. Place in the oven for 20-25 minutes, or until the biscuits have a sugary, crackled sheen, turning golden and are starting to set. Remove from the oven and allow to cool for at least 5 minute before placing each cookie on a baking rack.
Giant Chocolate Chip Cookies.
Then proceed as before to bake the rest of the Giant Chocolate Chip Cookies – or make smaller cookies: take a golf ball sized piece of cookie dough, roll into a ball in you hands, place on the lined baking sheet and press down lightly as before. Bake for approx 15 minutes. The cookie dough left, yielded 13 smaller (but NOT small) cookies.
The second batch of smaller, Giant Chocolate Chip Cookies – now there’s a contradiction!
I had soooo much fun making these cookies. The recipe was originally inspired by Nigella (thank you Ms Lawson) but I’ve adapted it over time and it is absolutely, one hundred per cent, our children’s and my Nieces favourite cookie that I bake – like ever!!!
A Giant Chocolate Chip Cookie with 2 not so smaller ones!
The very best part of making these cookies is sharing them. Children and the young at heart love being treated to a Supersize cookie (as the sugar content is quite a bit higher than my other cookie recipes, these don’t get baked very often – see I am a responsible mum – almost!!).
I hope that you give these Giant Chocolate Chip Cookies a try and enjoy sharing them and revelling in the smiles you see!
Hello, how are you today? I’d like to share a few thoughts about tomorrow – Valetines Day.
Pretty swirly heart design.
Valentines Day, for me, is not about cards, flowers and all the other little love touches that surround the day – as pretty, appreciated and adorable as they are. For me Valentines Day is a gentle reminder, to show all the people in my life that I am blessed to love, that I DO indeed love and appreciate them.
A beautiful rose, blooming in the rain!
My hubby and I have always taught our, not so lil children, that love is a doing word. For me a cup of tea in bed, a thank you for an every day task, 5 minutes just snuggling with my homework laden babies, fills my love tank. There are literally thousands of ways they show us, as parents, that they love us – and I love that!!
Don’t worry, I’ve got your back x x x
As a family we watch out for each other. Making time in our fast paced 24/7 world says, you are important to me. We aren’t perfect, but we are trying. Recently during our eldest daughter’s exams, her younger sister bought her a little something (usually chocolate – the universal language of love with teenage girls, in fact most girls!!) for everyday she had an exam. She was showing her big sis love, telling her how proud she was of her and recognising how hard she had worked. That no matter what, she would always be there for her. As a mum my heart melted.
Taking time to paint/decorate someone’s nails is FUN and shows you love them!!
Our lil man gets up before everyone else at the weekend and feeds our cat and dog. A small act of love that means we get a lay-in! My gorgeous hubby brings me a cup of tea, in bed each morning through the work week, I feel loved. When I have a rotten migraine he holds back my hair, if I’m being sick, I KNOW I am loved.
I married my best friend x x
I have said before that I enjoy cooking for other people, especially as a way of showing them that they are loved, appreciated, valued and important in my life. This is not restricted to our immediate family of 5, but our parents, sisters, brothers, nieces, nephews and honorary family members. It’s nice to feel special but it’s AMAZING to make someone feel loved.
One of my favourite ways to show love!
So I guess what I’m saying is that, true love is in the giving and receiving. When God created Adam, He said “It is not good for man to be alone” and created Eve, from Adam as his helpmate/partner/wife/friend. He gave Adam a person to love – not just God himself.
Heart tree X
So while I love the opportunity to whip up a batch of heart shaped shortbread for family and loved ones on Valentines Day and cook a special dinner for us as a family, really I see Valentines Day as a reminder, to me, to be more loving, show more affection (I’m not really the most ‘cuddly person’) but others are, so I’m working on that. I prefer to do the giving rather than receiving, but others want to show me their love too! Love is not fixed. It’s adapting to others needs whilst still retaining a sense of who you are – cos that’s why you’re loved!!
So Happy Valentines Day to you all.
I wish everyone of you a Happy Valentines Day, where, no matter how hard you try, you are loved more than you love. May your Valentines Day be showered by little hearts of love, may you KNOW the truest love of all – Jesus. Let your heart be filled with His Love, Mercy, Forgiveness, Grace and Life, that you too can say, for sure “I am loved, just as I am”.