Hi everyone, Spring Has Sprung finally. The Daffodils are filling gardens and hedgerows with sunshine, even on the dullest, chilliest days. Newborn lambs are gambolling about in the fields, snow white and bleating for their mummies.
Snowdrops the first flowers to push through as Winter passes.
Spring is truly the Season of hope. Winter’s icy claws fight with the rising sun, whose warmth and light is needed more than we’d remembered.
The noisy chattering of Sparrows, in their happy little communities, only broken through by the song of a Blackbird. Morning truly has broken when you hear Blackbirds singing.
Chicks a reminder of new life.
Spring, with it’s promise of new life. Blossom refusing to obey the flat grey clouds, springs from the trees, once spent, will create Natures greatest show of confetti. Pink and white petals, flutter down, covering the ground like colourful snow.
Our Cherry Tree in full blossom.
Winter is behind and the long, scorching days of Summer lay ahead. Treasure every day. Each new bud that turns stark landscapes to vibrant green.
Yes Spring for me is truly the season of Hope. Easter, a prominent reminder, that what was dead, can indeed break the shackles of darkness and live again. Christ who gave His all on the Cross, the ultimate reminder, that when He arose from Death to Life, that we too, can have new life in Him.
A man kneeling before an empty cross. A sign that Jesus died and then rose again on the third day. Kneeling at the cross where forgiveness is found.
Yes Spring Has Sprung, grab hold of the Hope and New Life it offers. Take delight in the sounds of new birth. For One is crying out louder than all others “Come unto me, you weary and heavy laden and I shall give you rest?”.
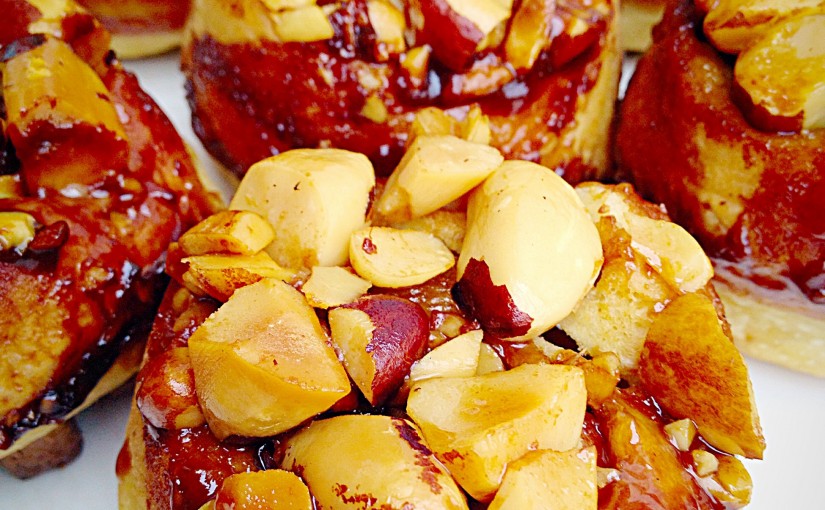
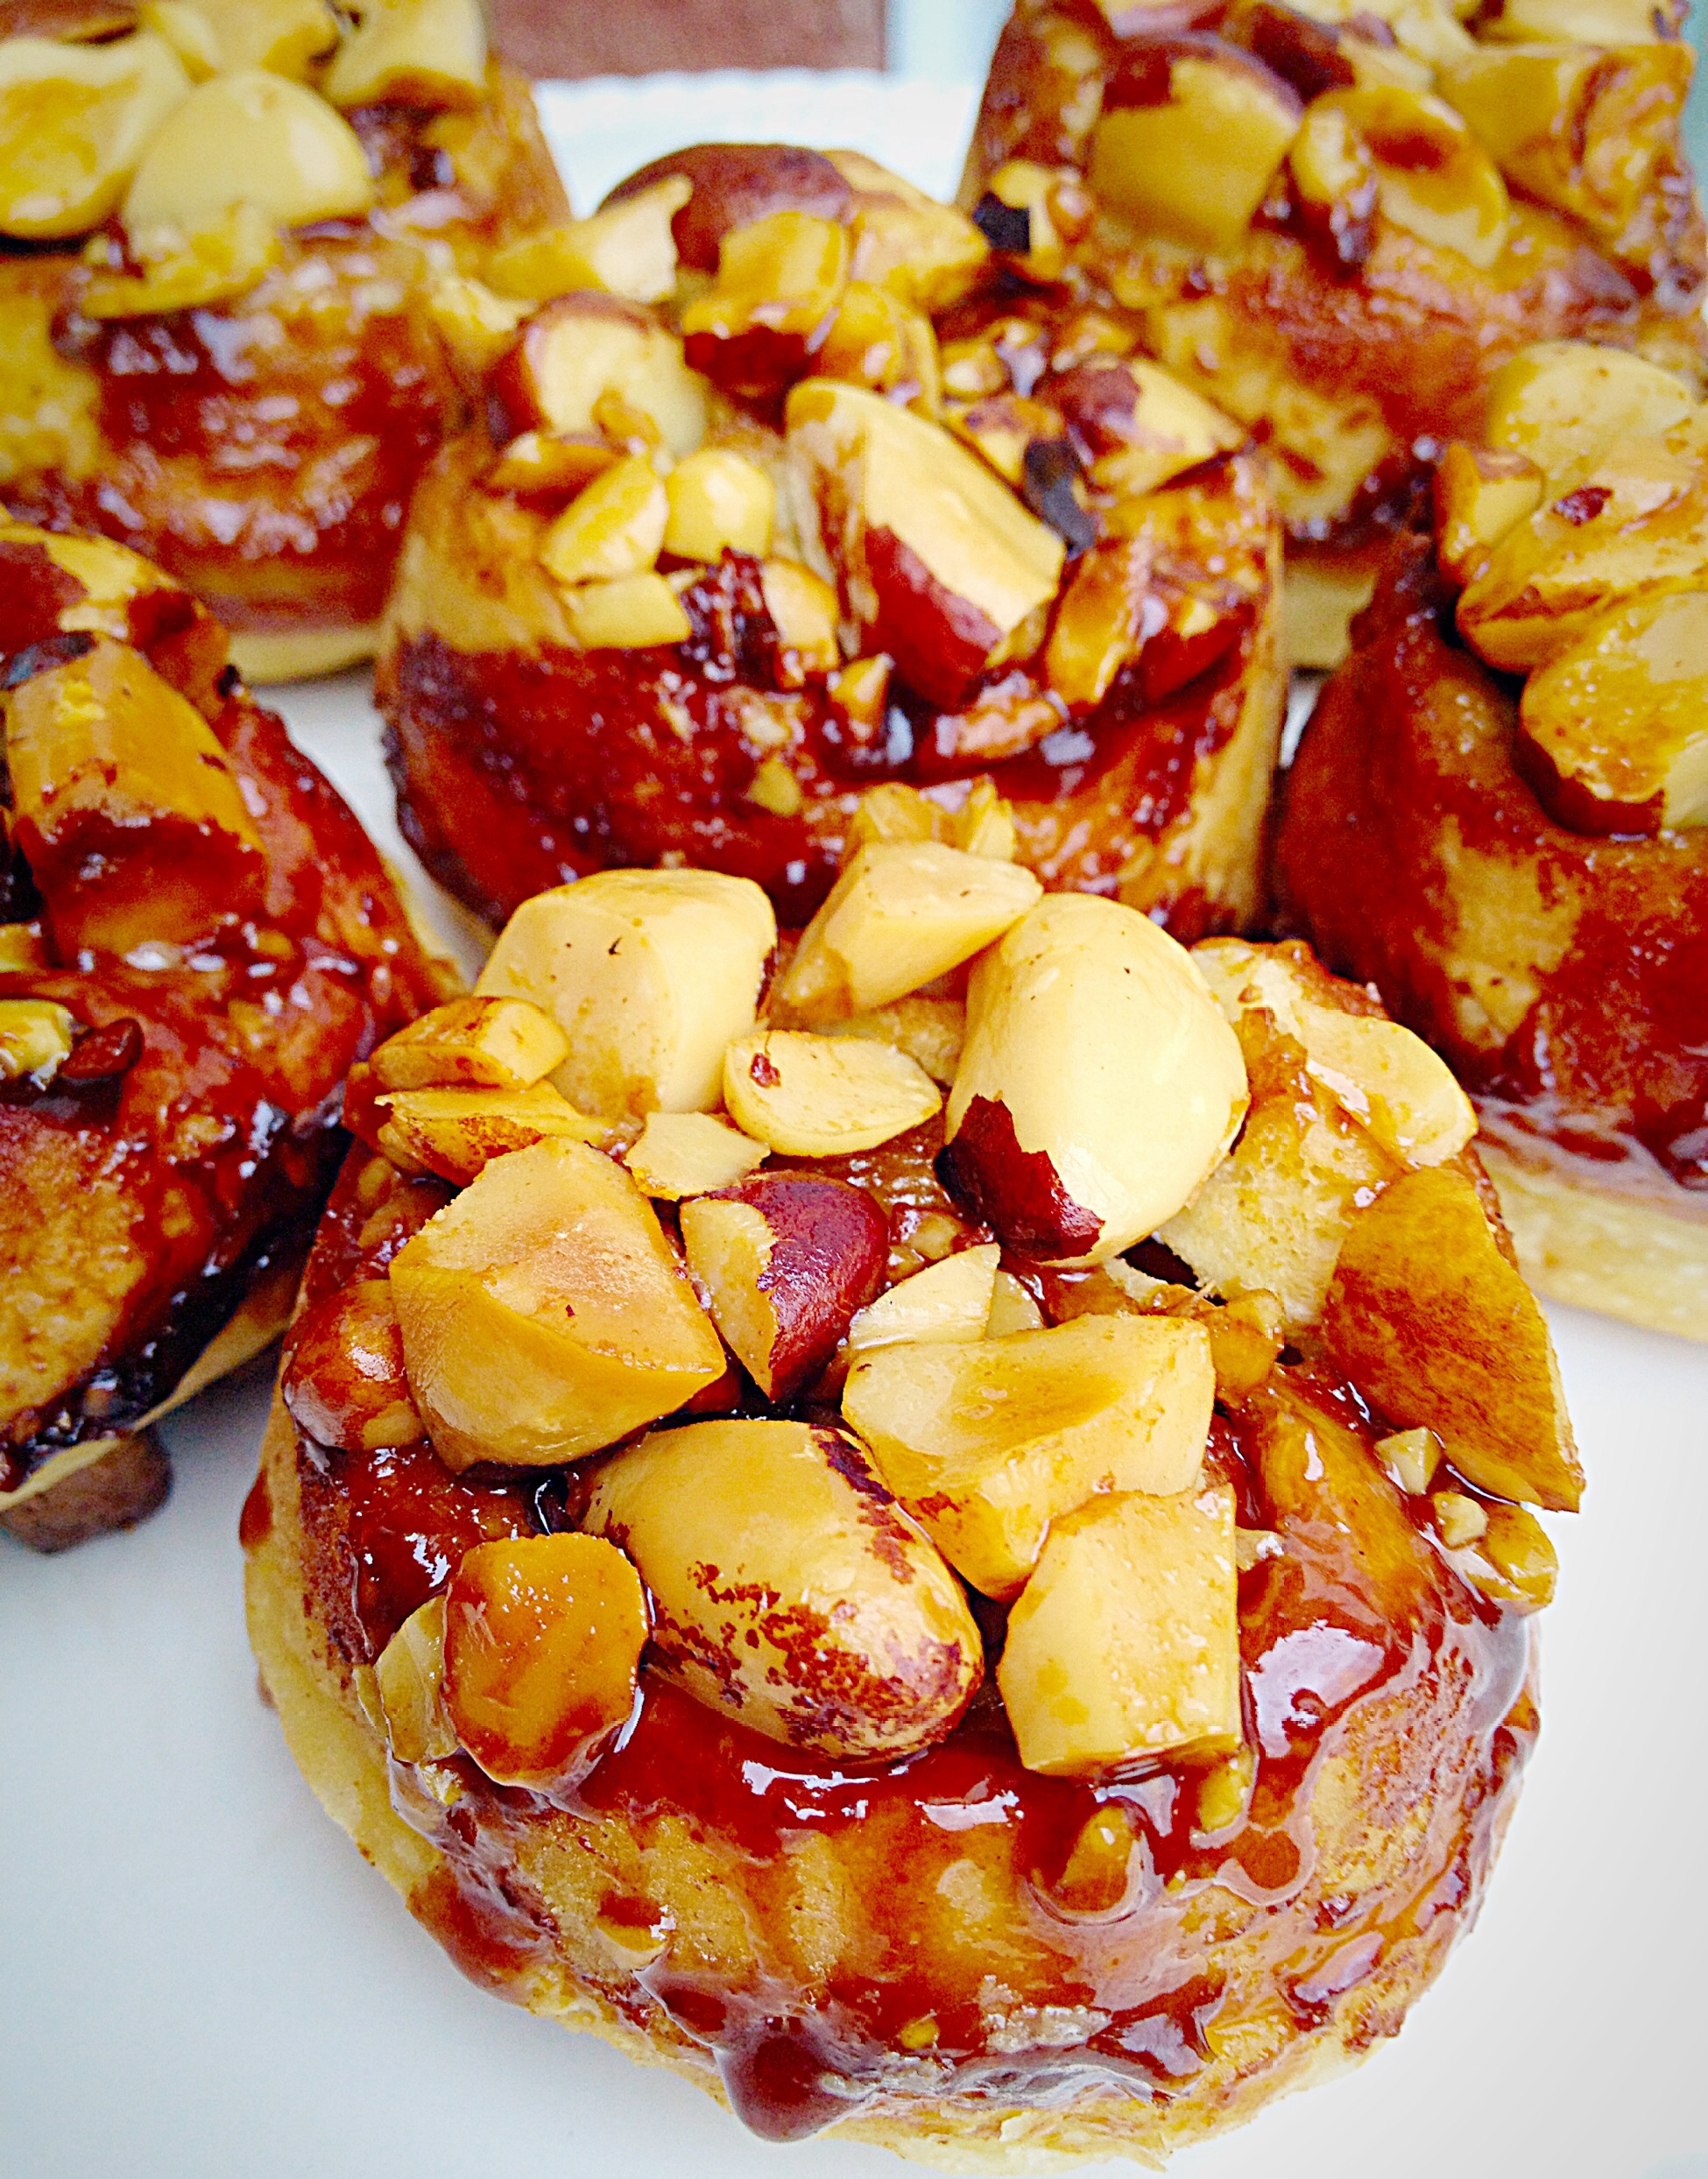
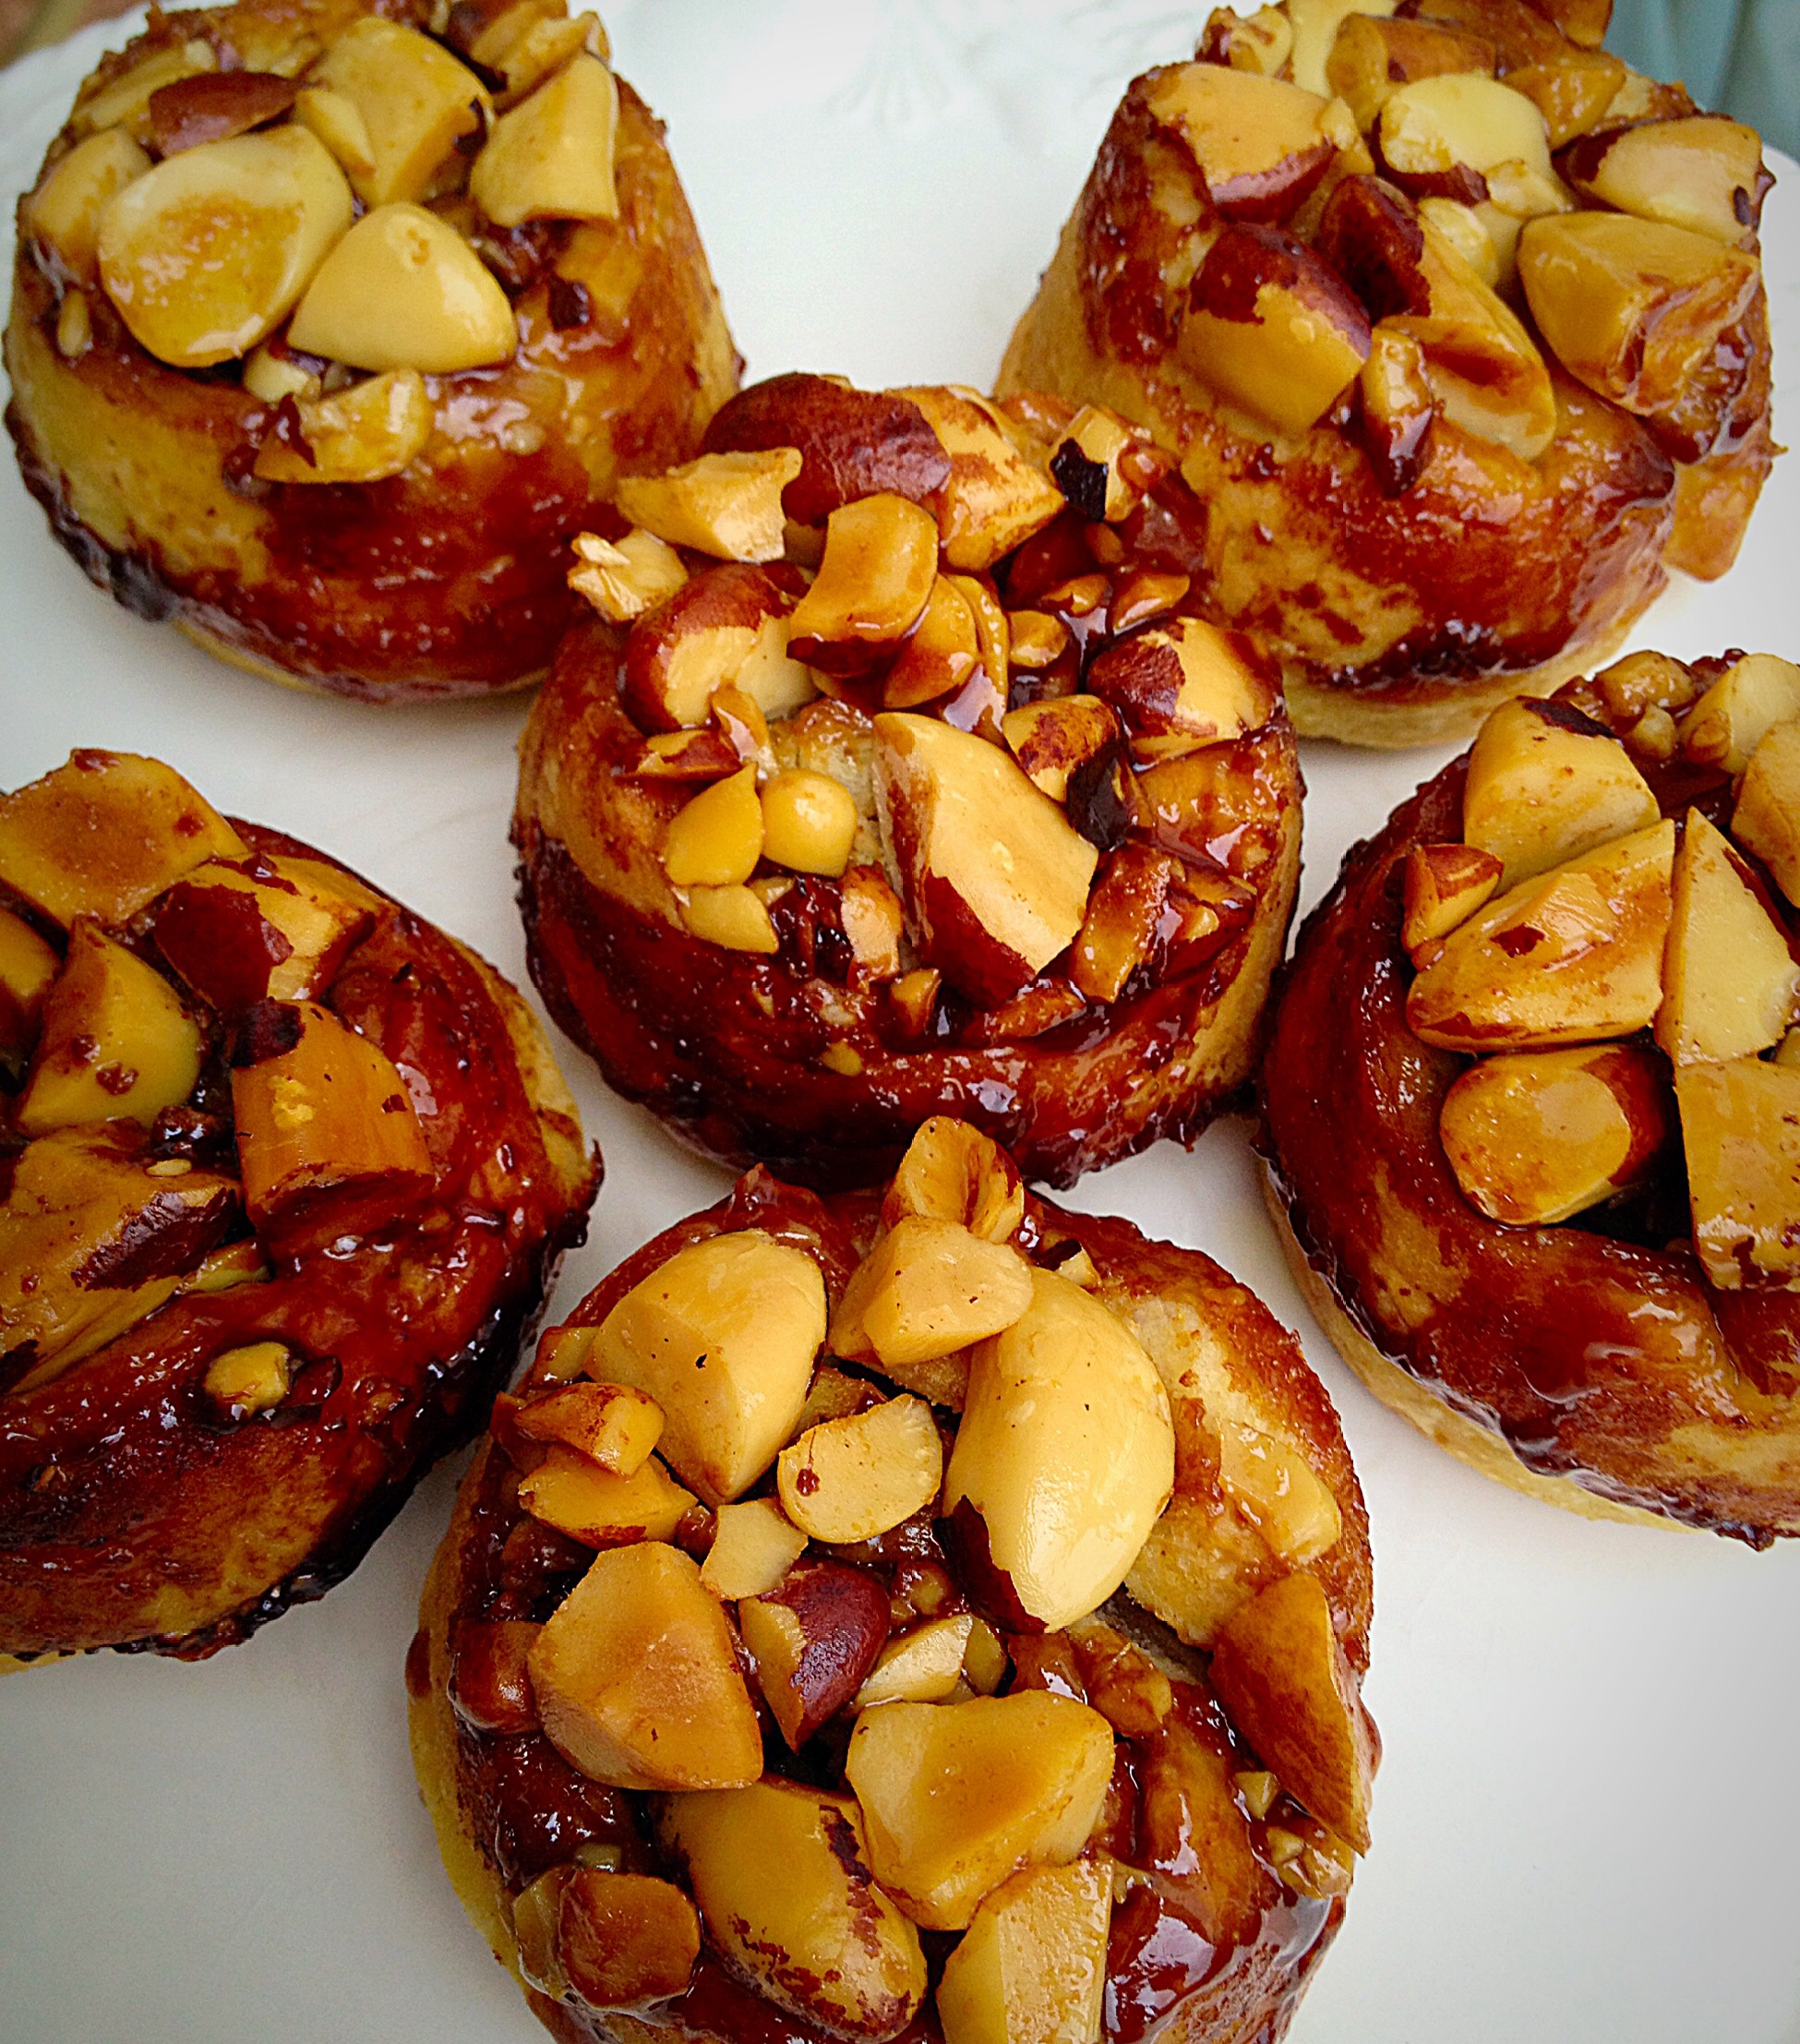
Hi there, have I got a FEAST for you, Chocolate Chip Brazil Nut Buns. Delicious, easy to make and very more-ish!
The best Chocolate Chip Brazil Nut Buns.
Ooh are these yummy! Made with all butter puff pastry these Chocolate Chip Brazil Nut Buns could not be easier to make and disappear fast as soon as they’re out of the oven.
The perfect portion of deliciousness! Gooey chocolate inner, crispy, crunchy, nutty topped buns.
It may be worth making a double batch of these, as they make the perfect portable gift, just make sure you have enough to go around as well!!!
Yum, yum and yum!!
Recipe : Makes 12 Buns
For the topping :
100g/4oz Brazil Nuts
100g/4oz Unsalted Butter – melted
75g/3oz Dark Brown Sugar
For the Buns :
1 Packet 450g/1lb All Butter Puff Pastry – thawed if frozen.
1tbsp Melted Butter
1/2 tsp Freshly Grated Nutmeg
100g/4oz Dark Brown Sugar
225g/8oz Milk Chocolate Chips
100g/4oz Brazil Nuts
Method :
Preheat the oven to 200C (185C fan).
You will need a deep muffin/cupcake tin to bake these buns in. No pre-greasing of the tin is required.
The topping of these Chocolate Chunk Brazil Nut Buns is actually placed in the bottom of the muffin tin. When the buns are turned out, the bottom becomes the top!!!
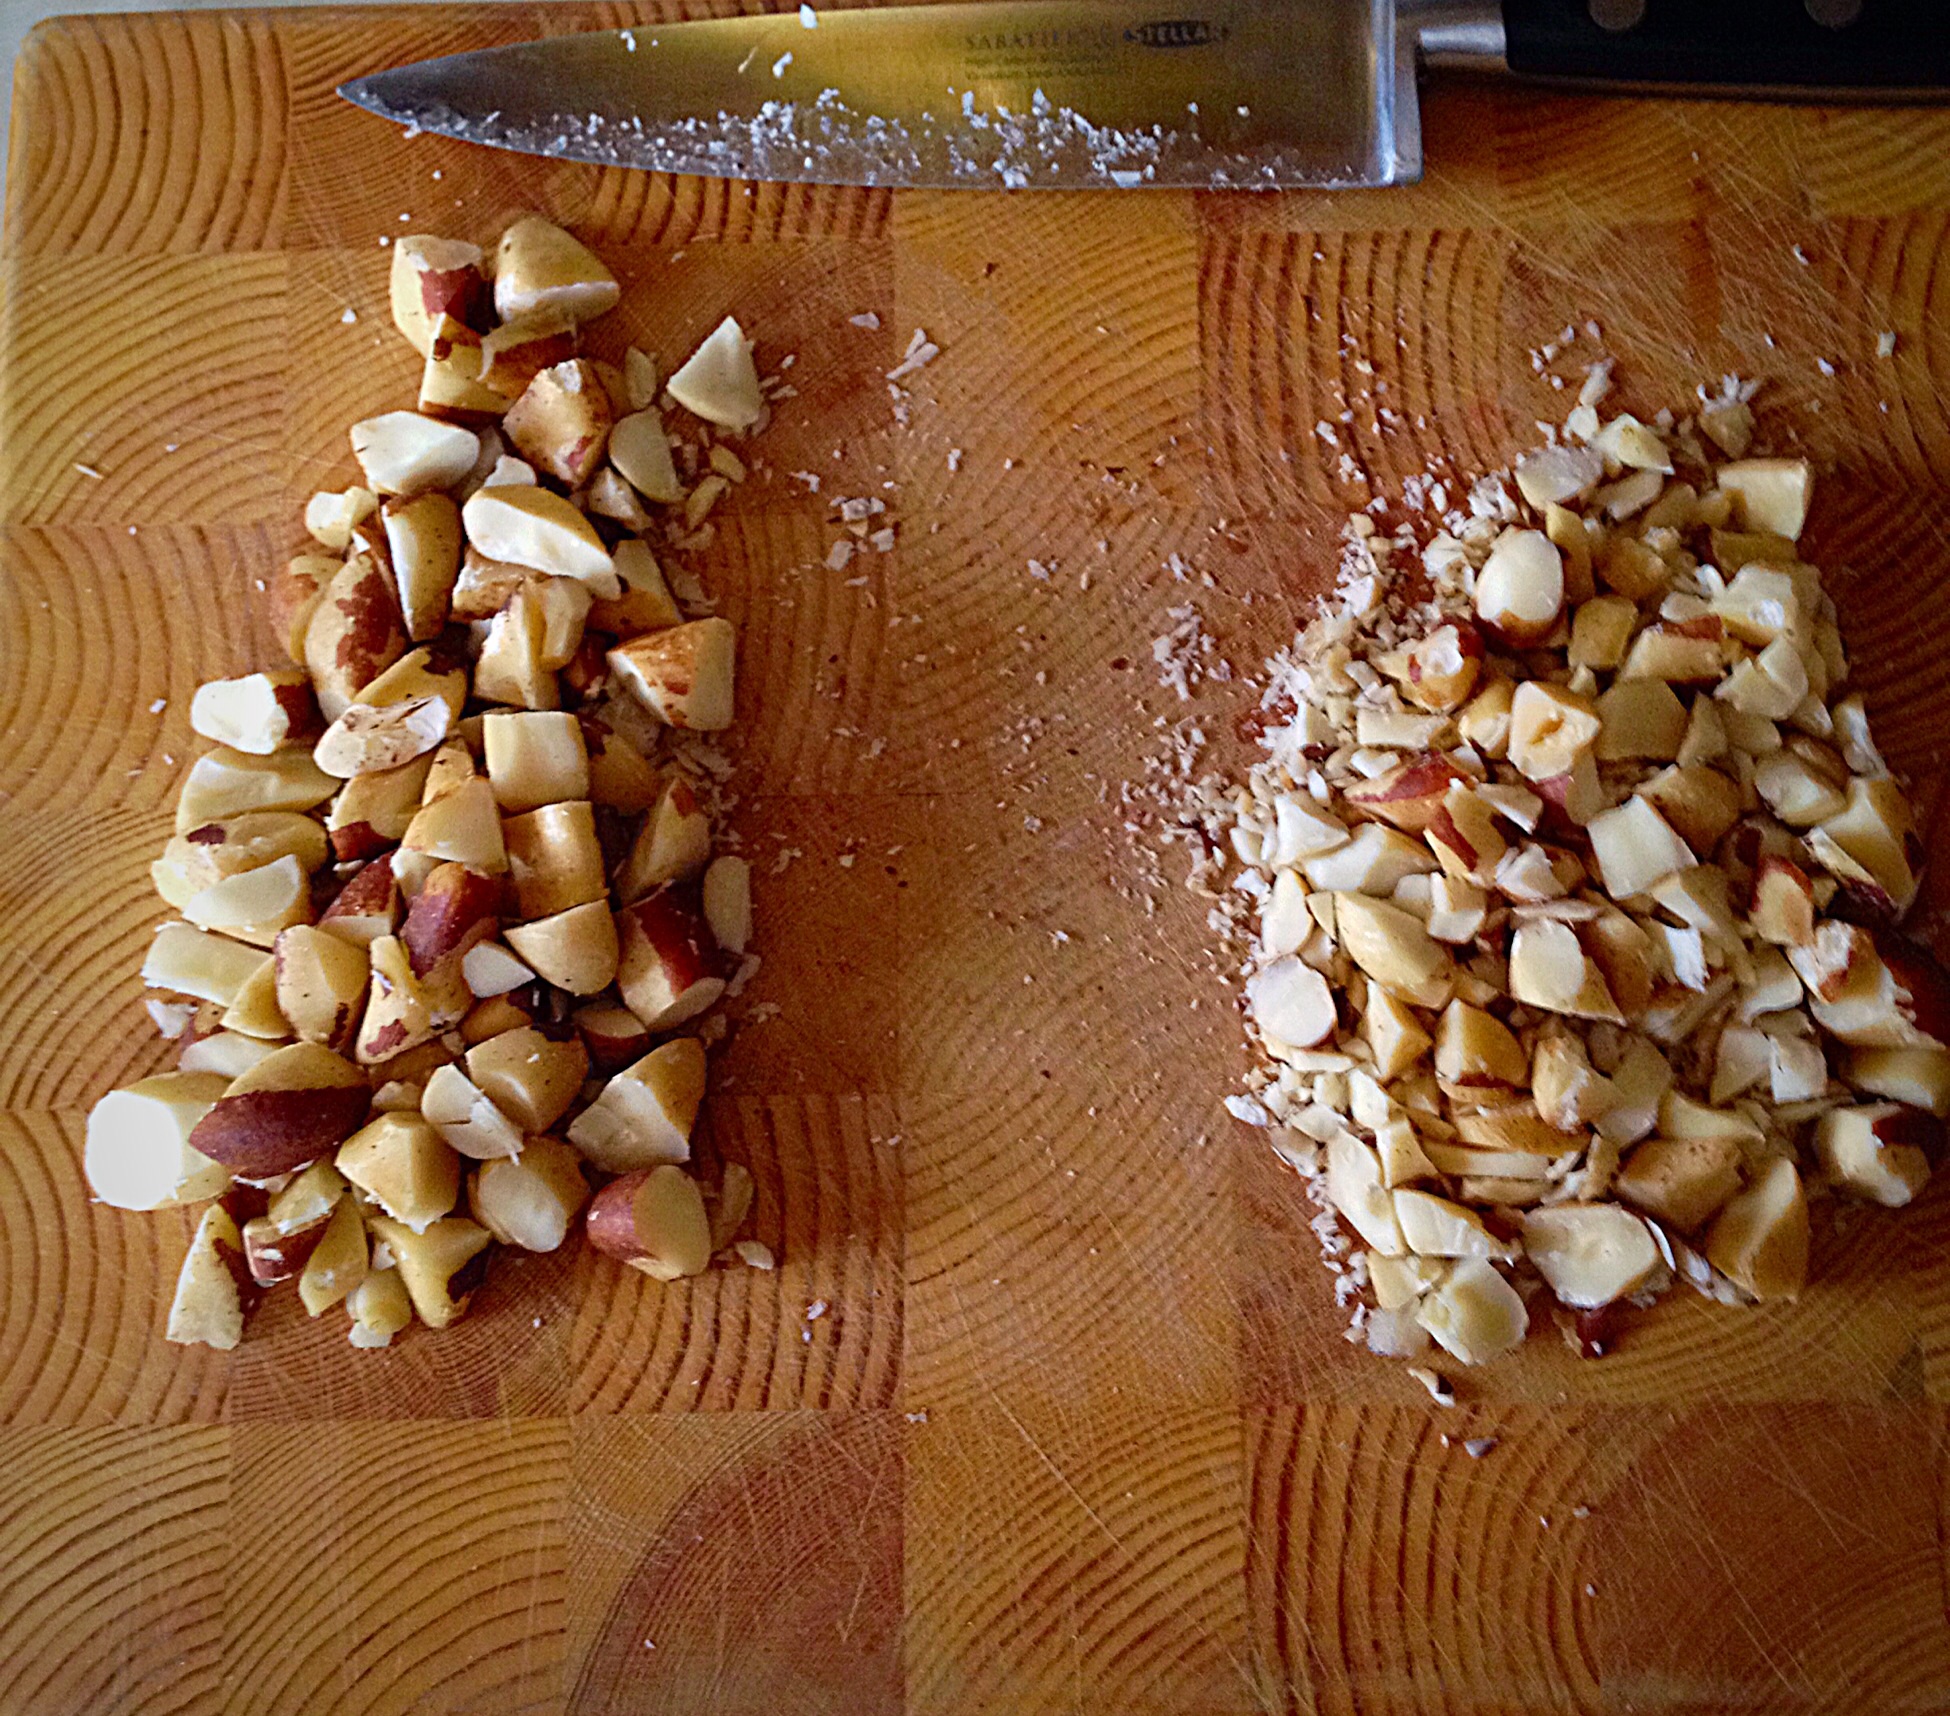
For the topping mix the melted butter and sugar together. Add in the roughly chopped Brazil nuts.
The roughly chopped Brazil nuts, on the left are for the topping. The finer chopped nuts, on the right, are for inside the buns.
Place about a teaspoon of the butter/sugar/nut mixture into each muffin holder in the tin.
This sweet, nutty mixture will become the topping for the Chocolate Chip Brazil Nut Buns!
Now for the buns :
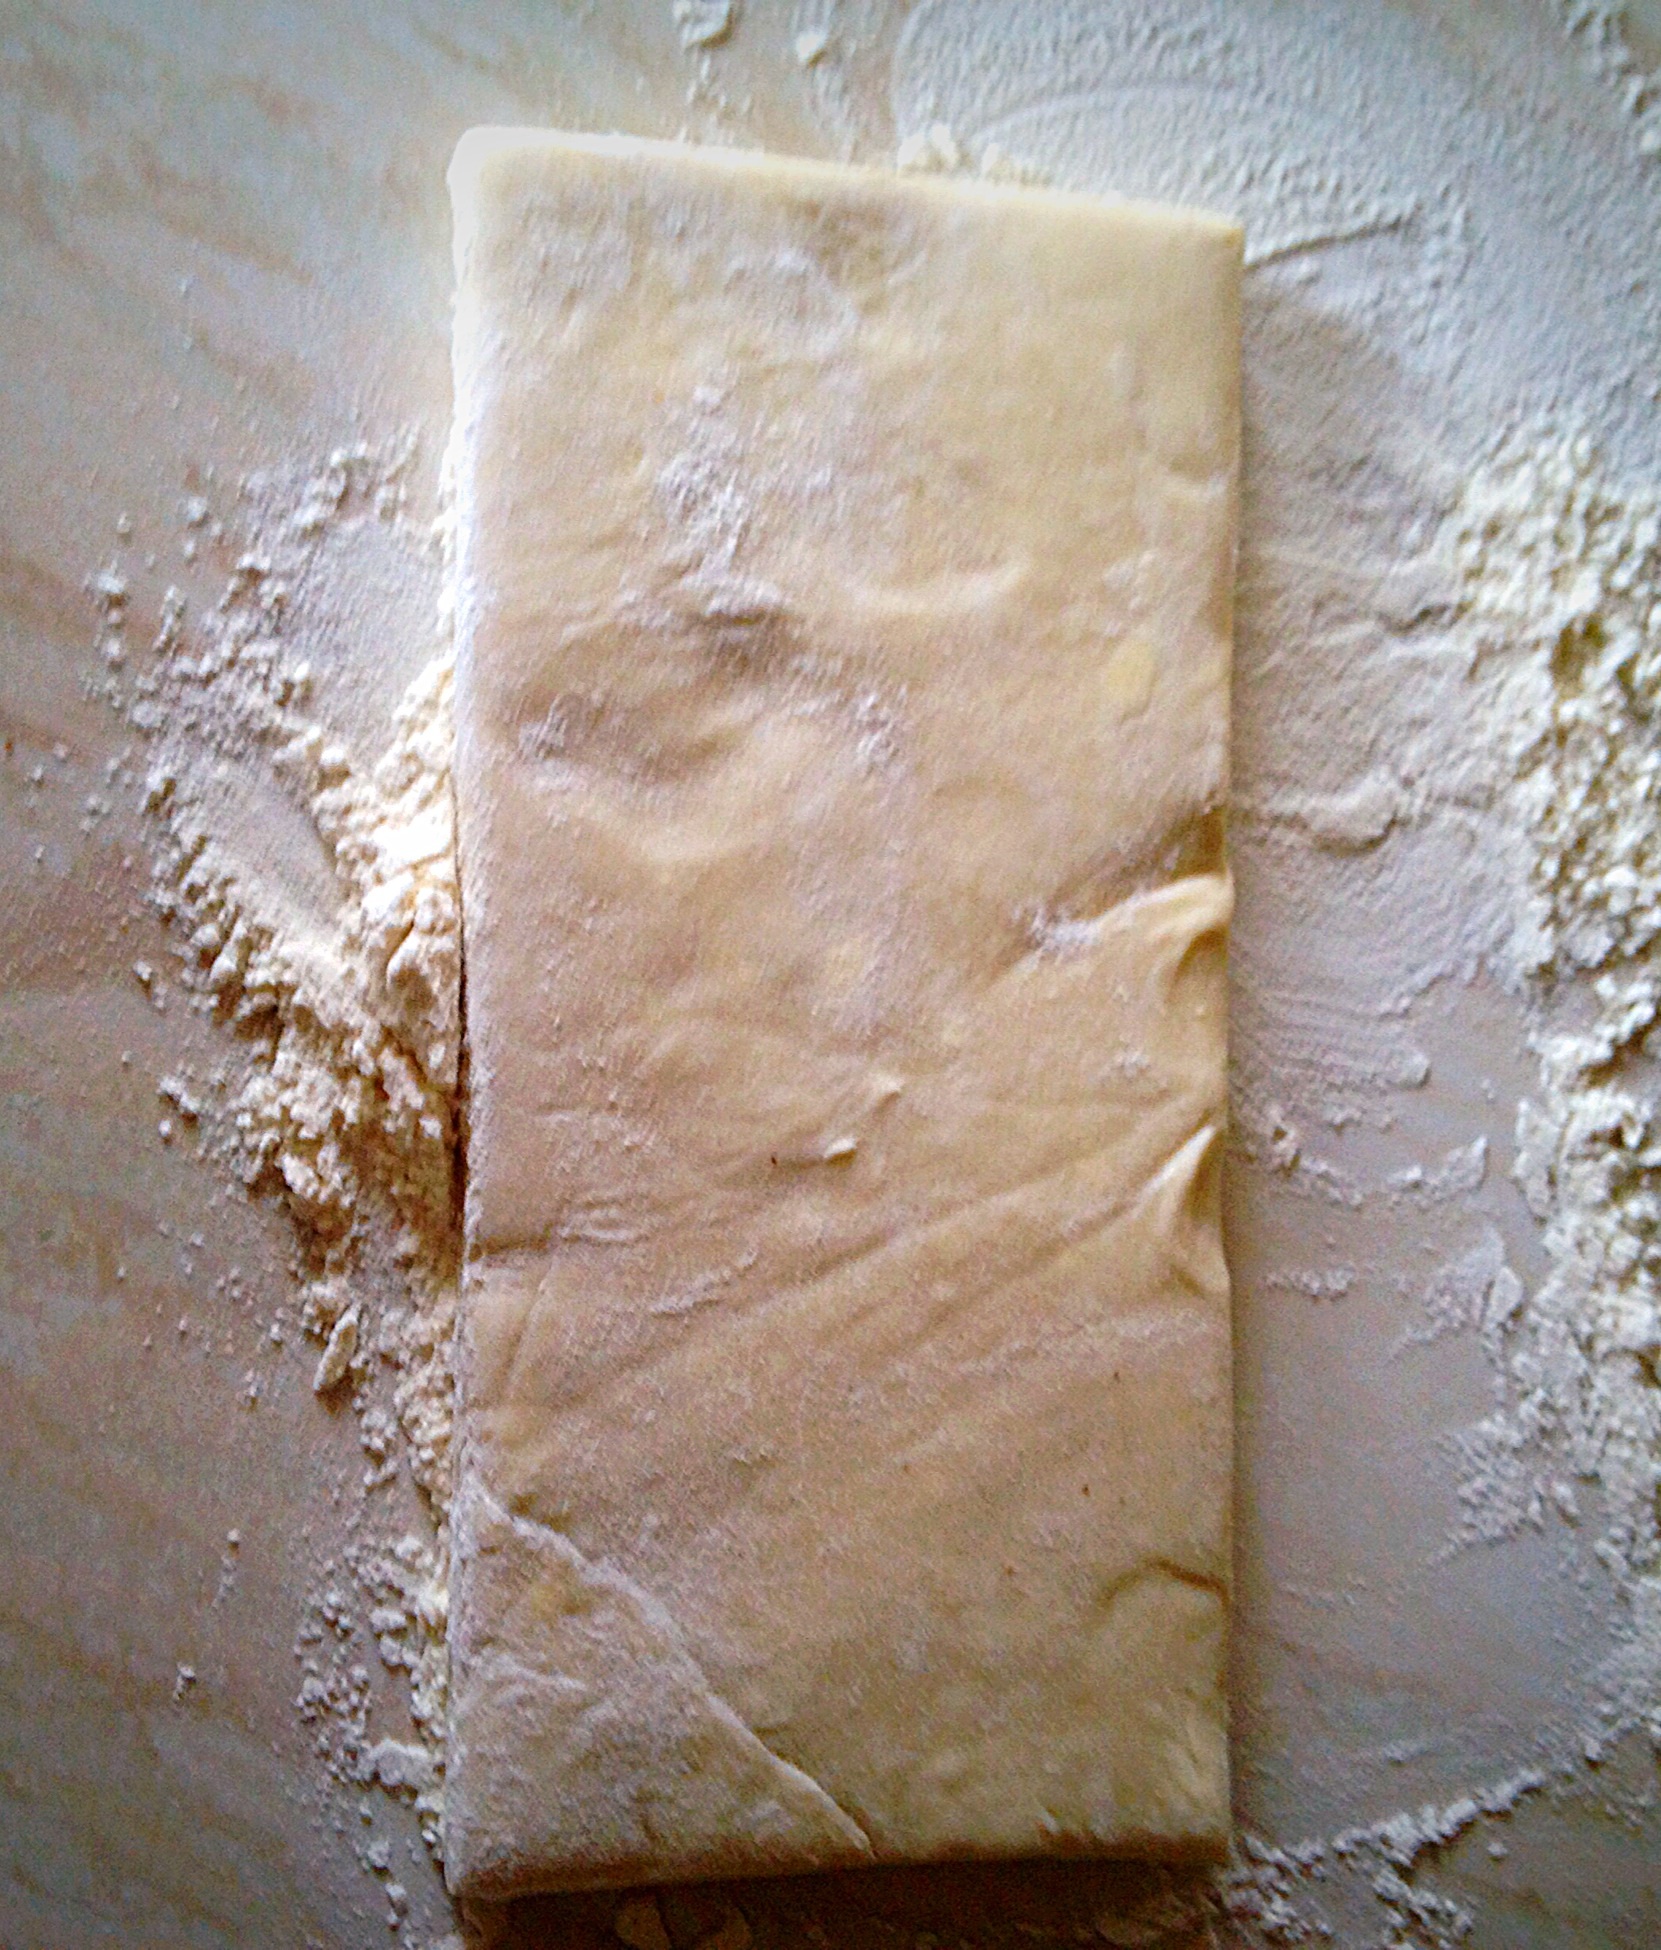
My package of puff pastry came in 2 blocks. If you have 1 block, roll out the pastry to twice the width.
One half of the pastry block. Placed on a floured surface.
Roll out the pastry to 26cm/10″ wide by 29cm/11″ long.
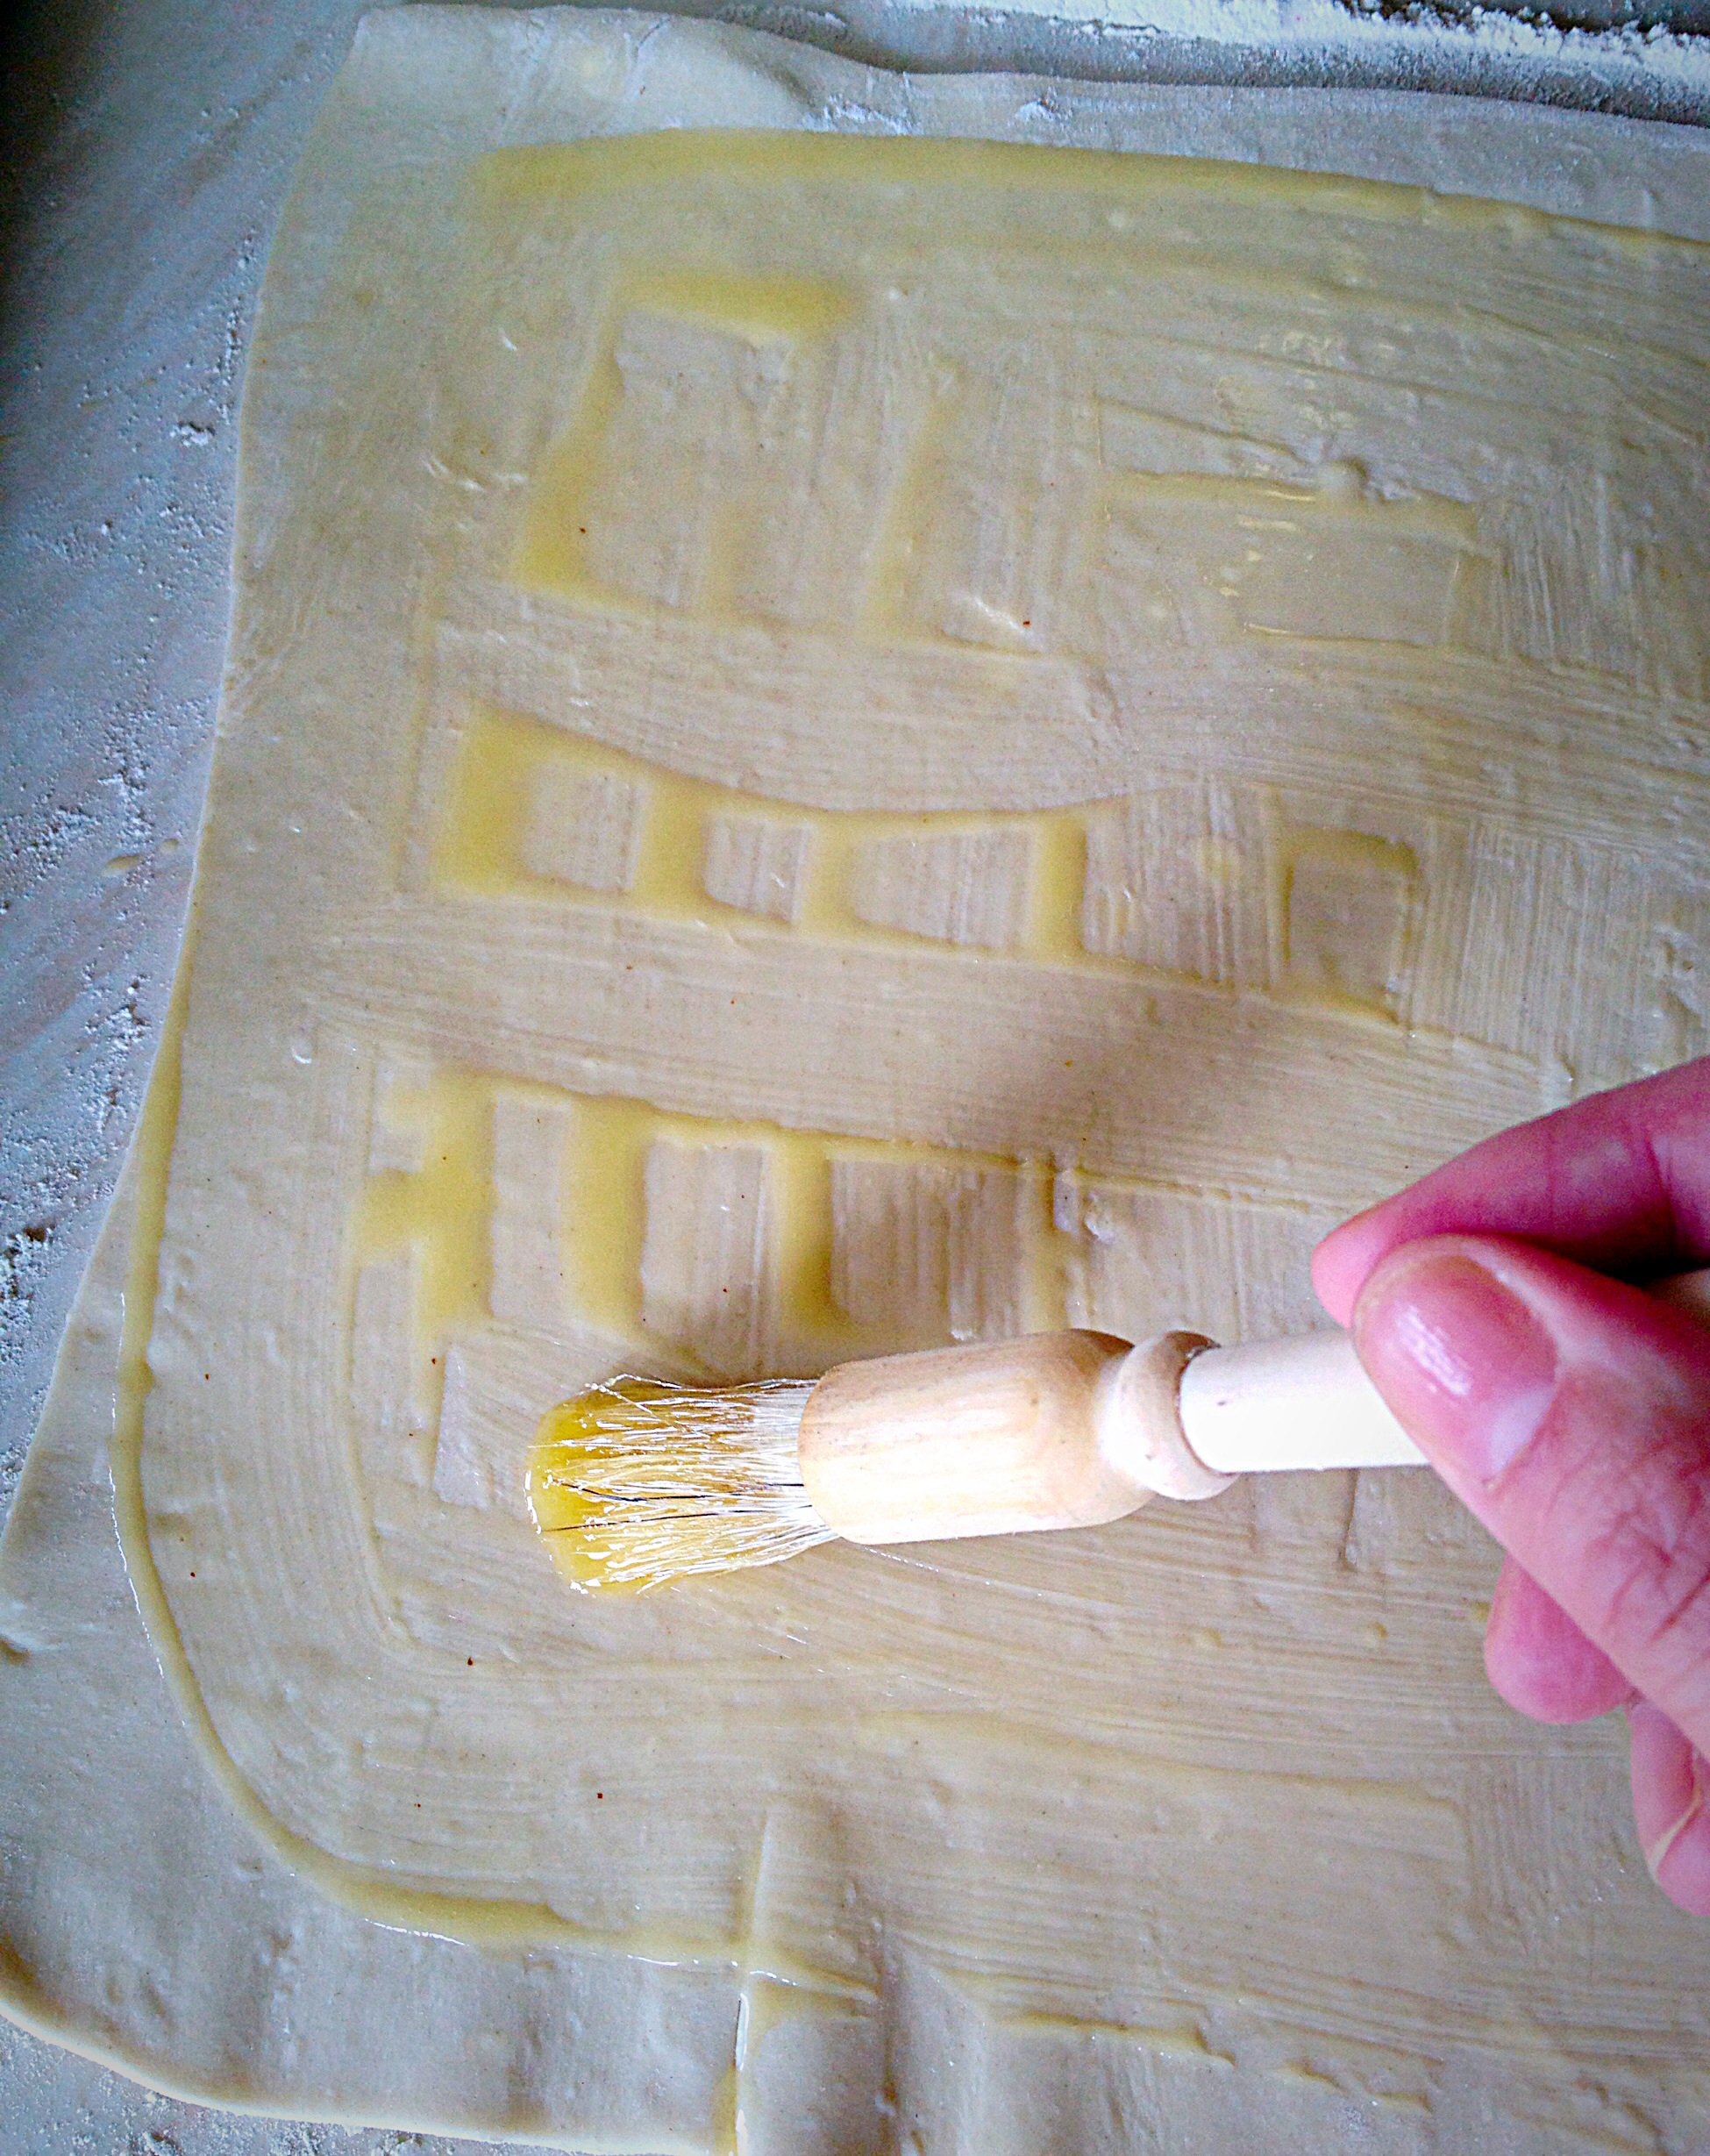
Brush the rolled out pastry with melted butter.
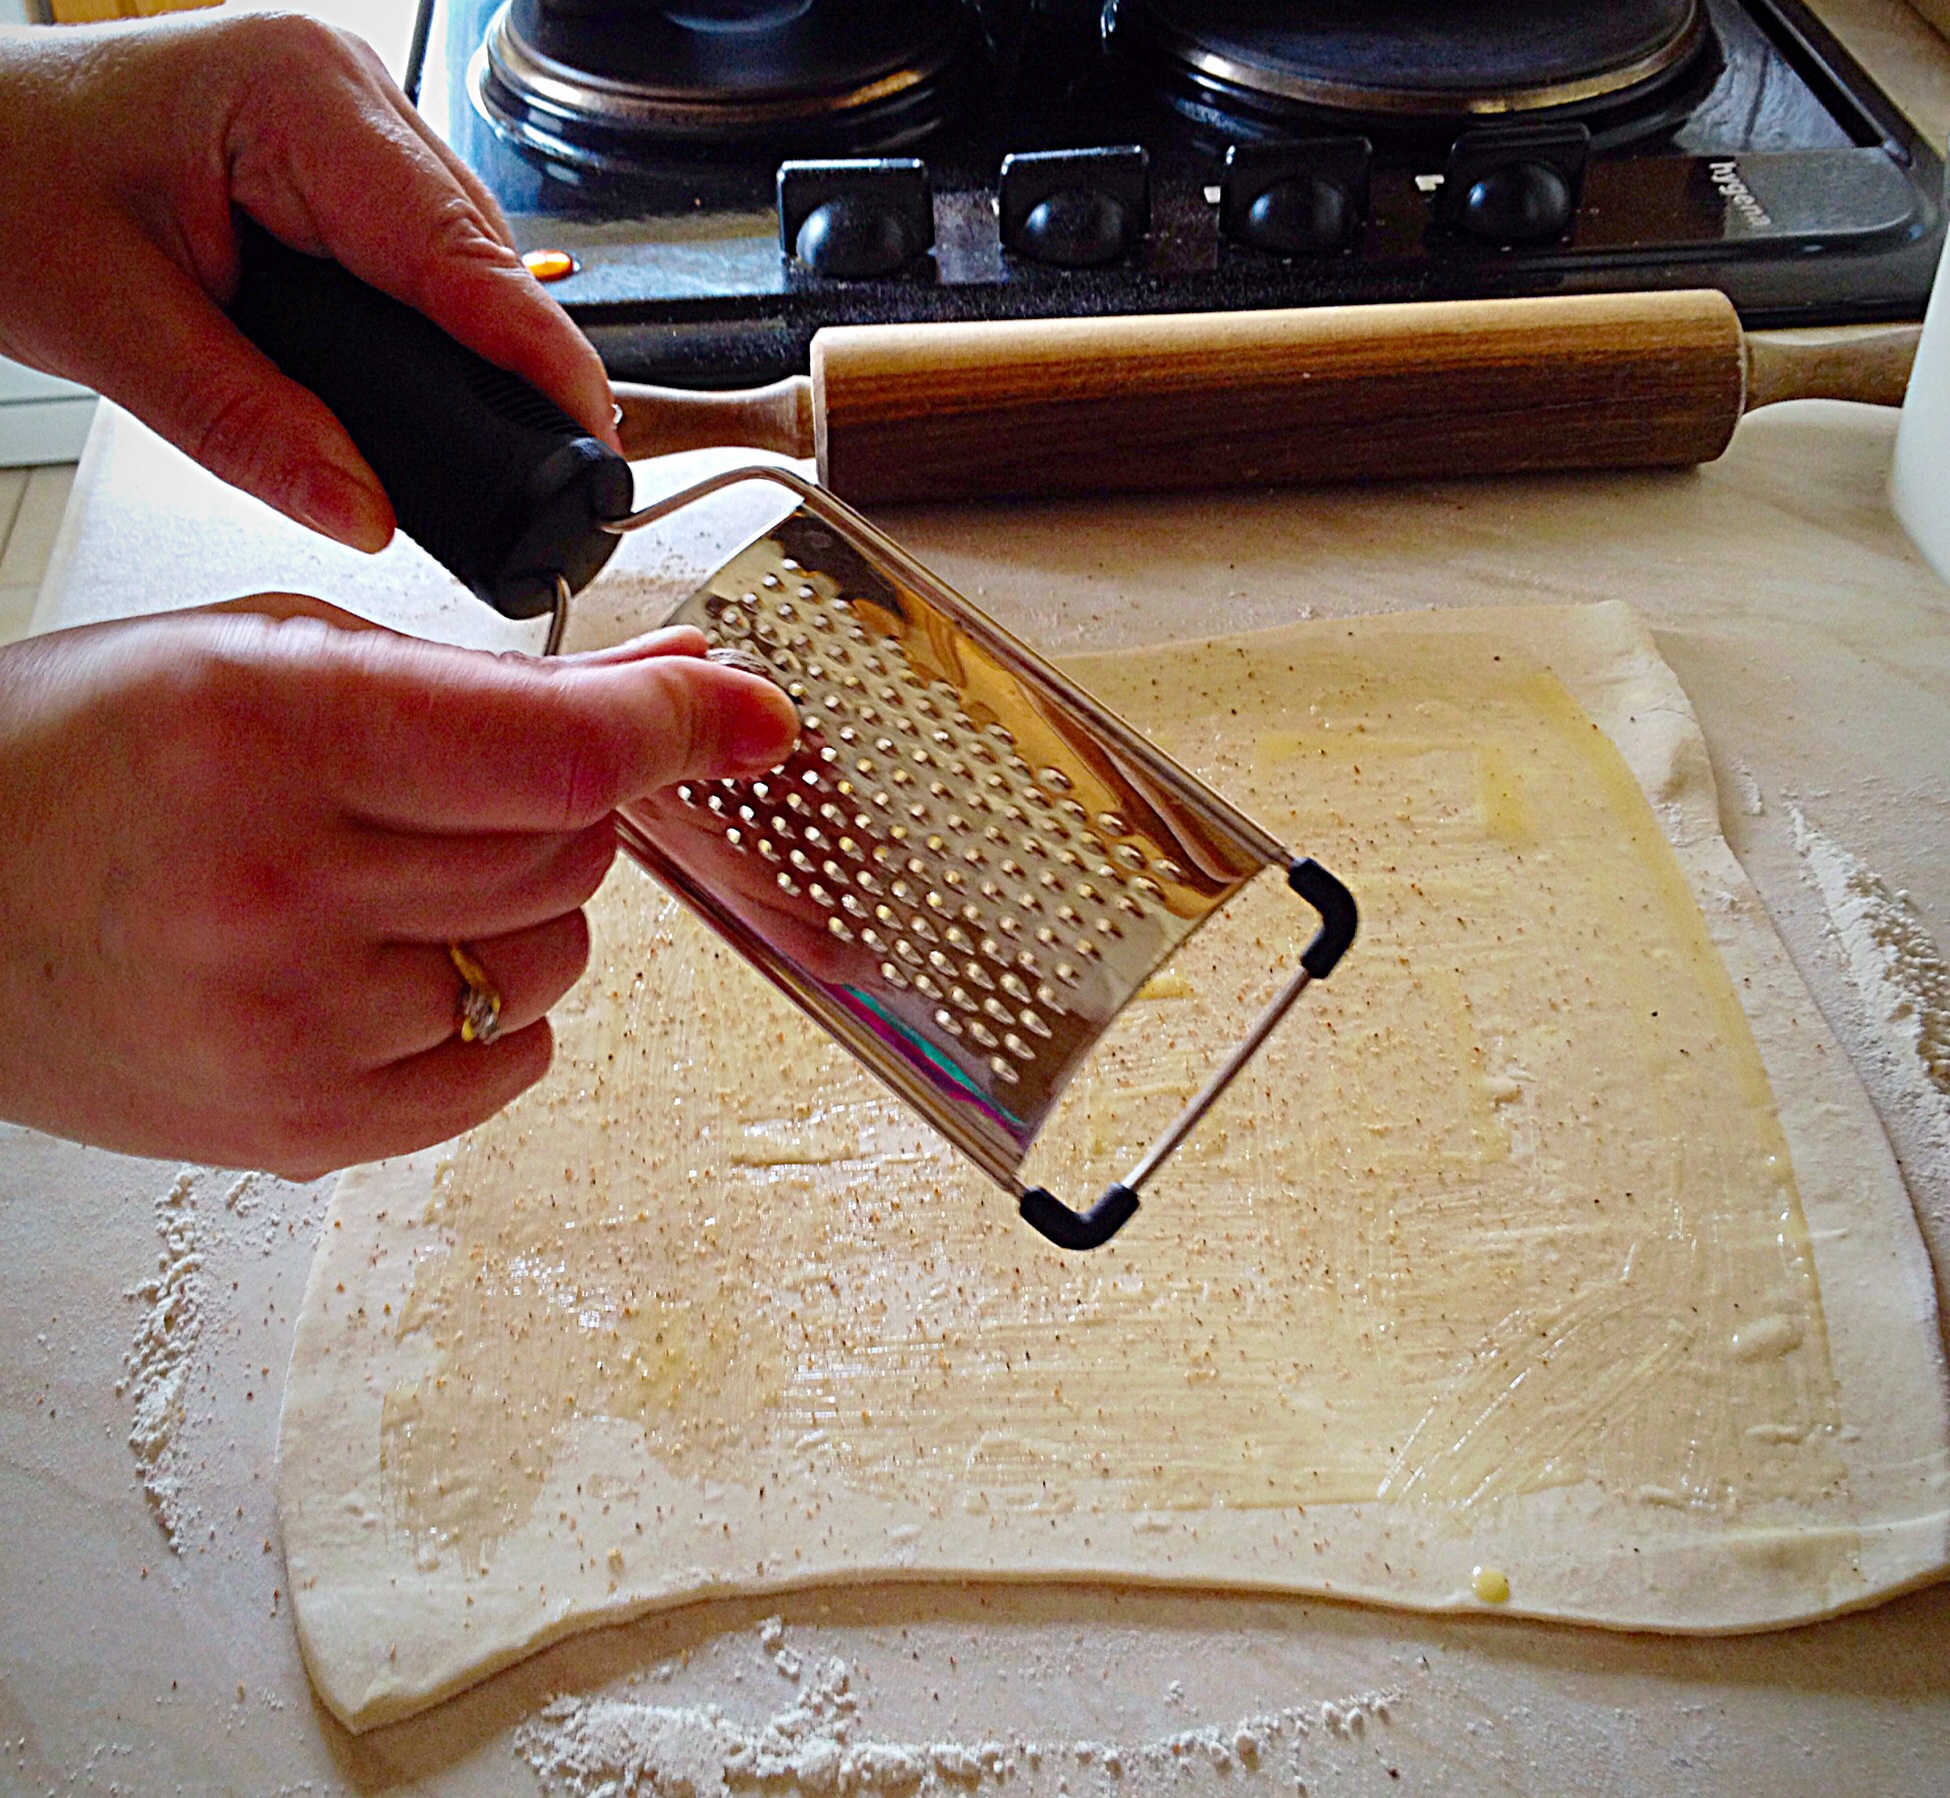
Grate the nutmeg directly over the buttered pastry. If using ground nutmeg, sprinkle evenly over the pastry.
Freshly grated nutmeg is sooo much better if you have it.
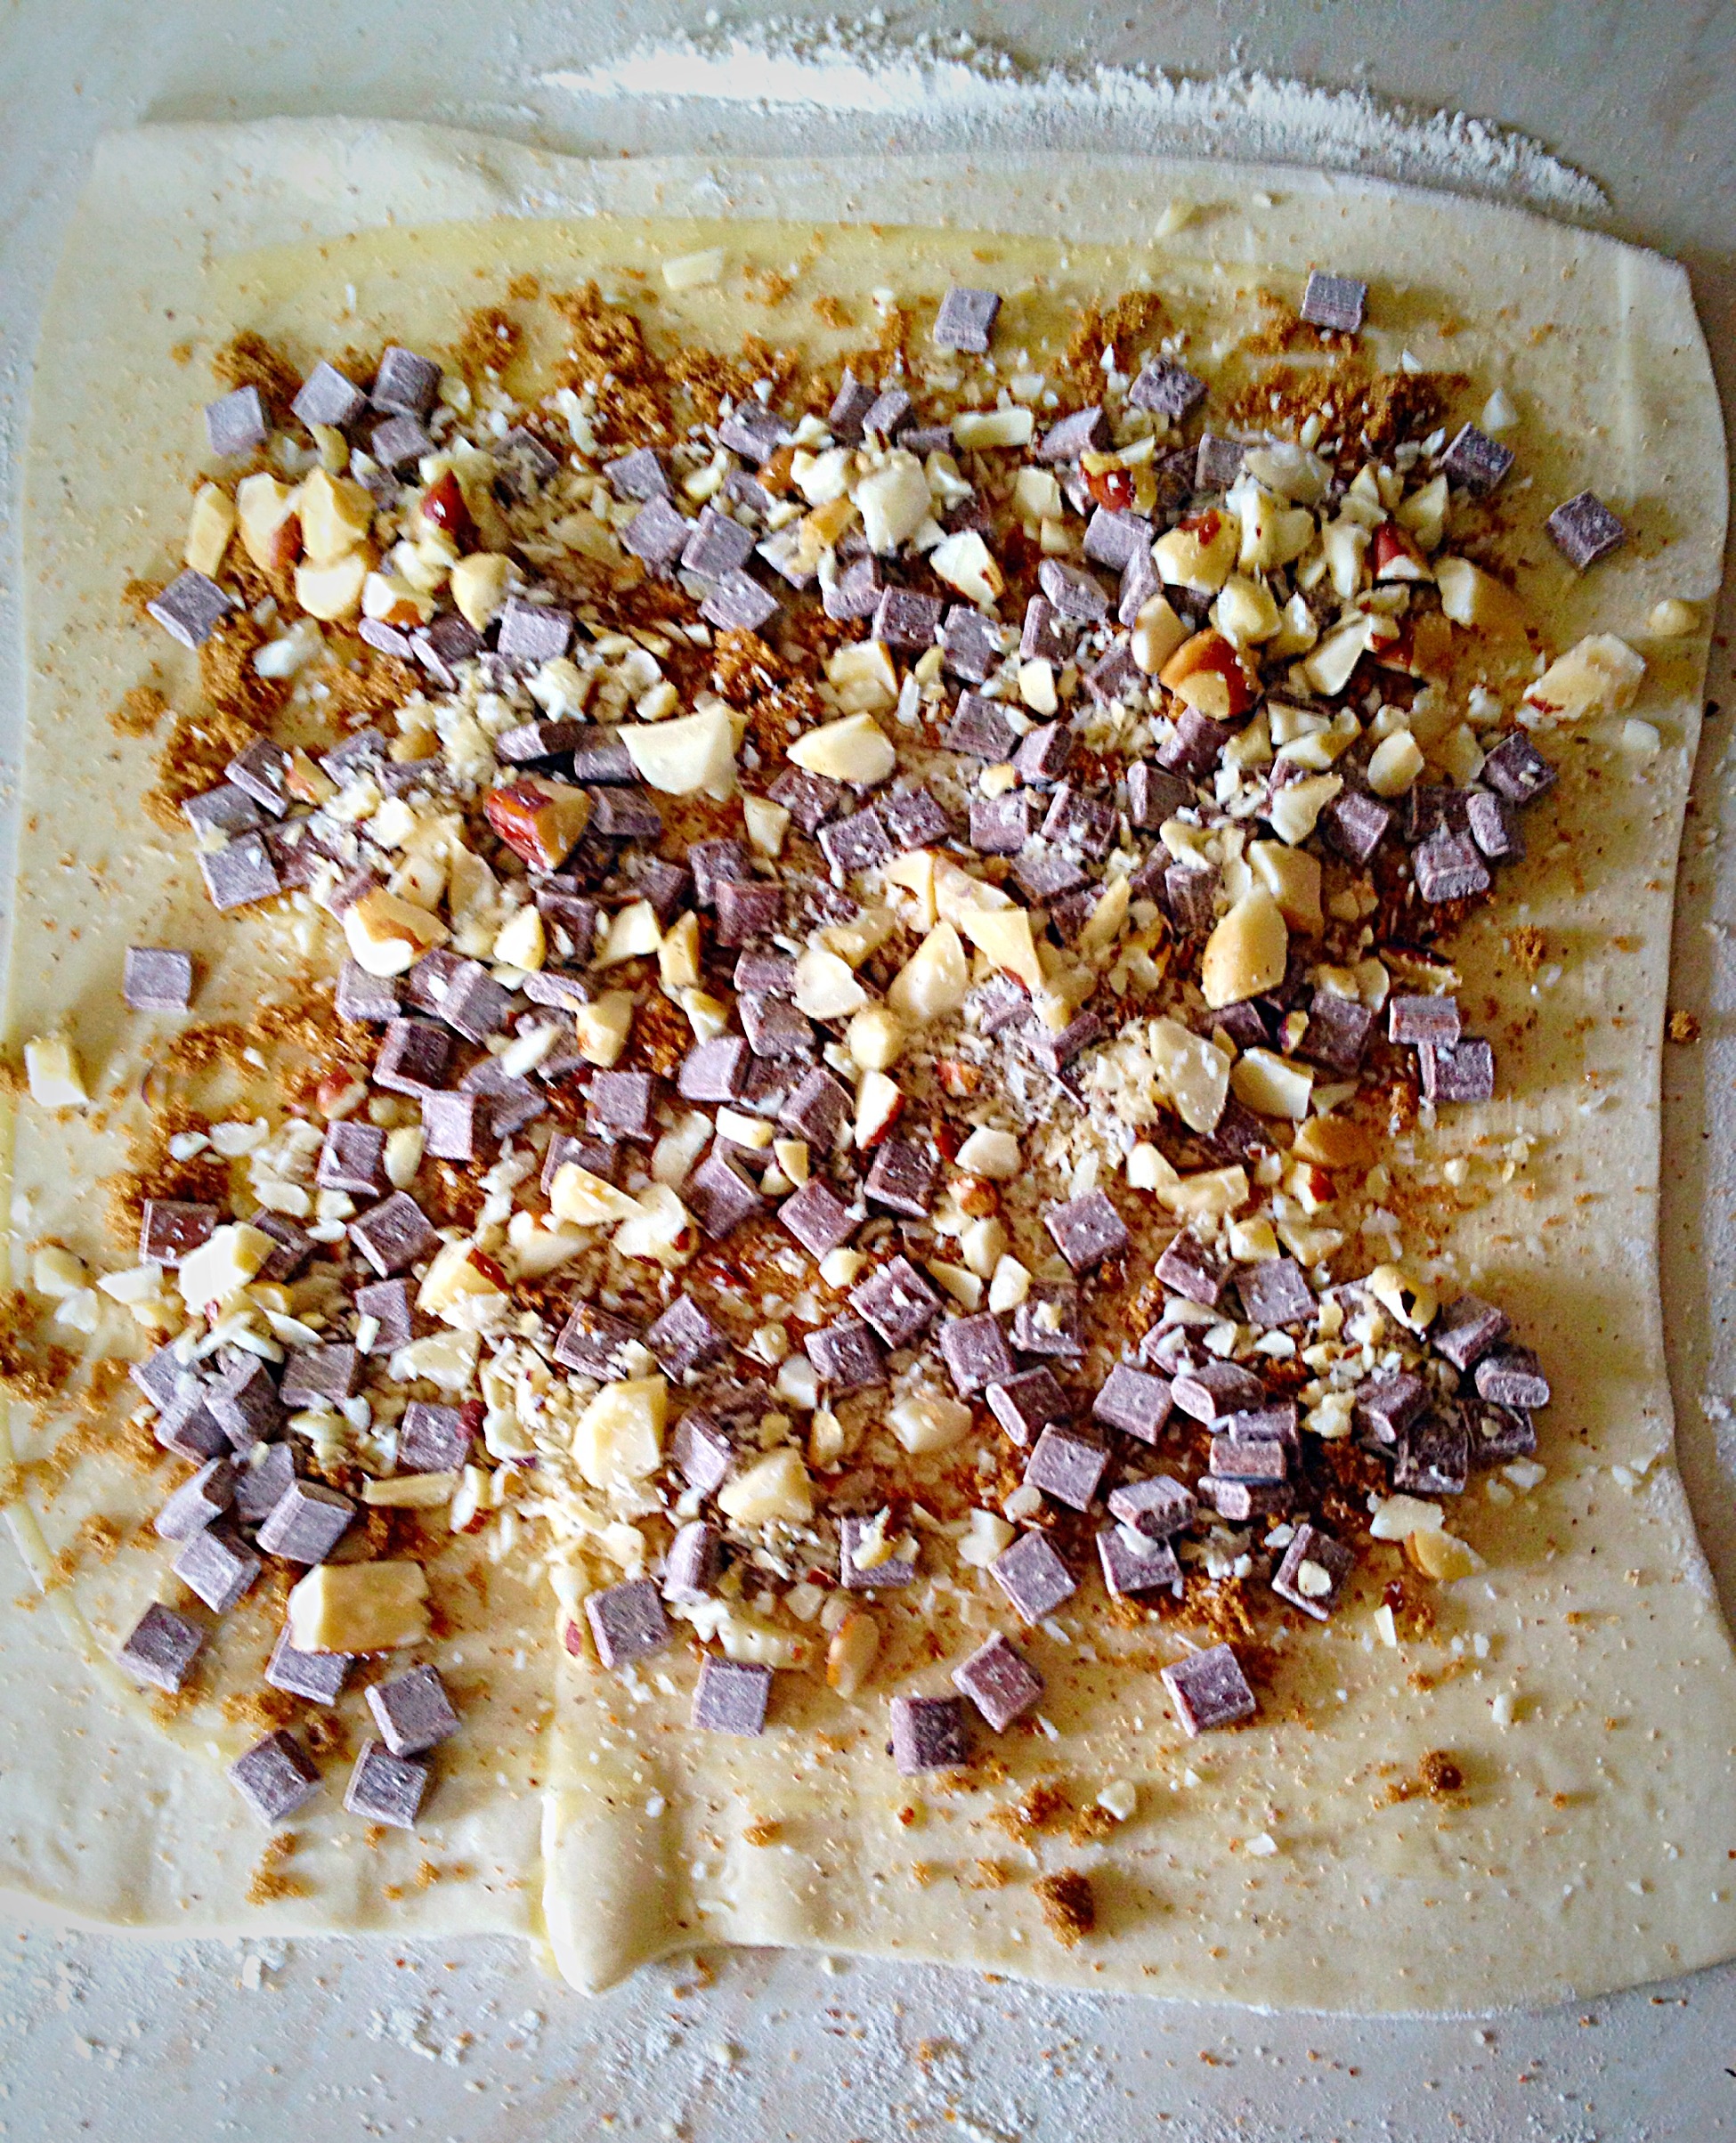
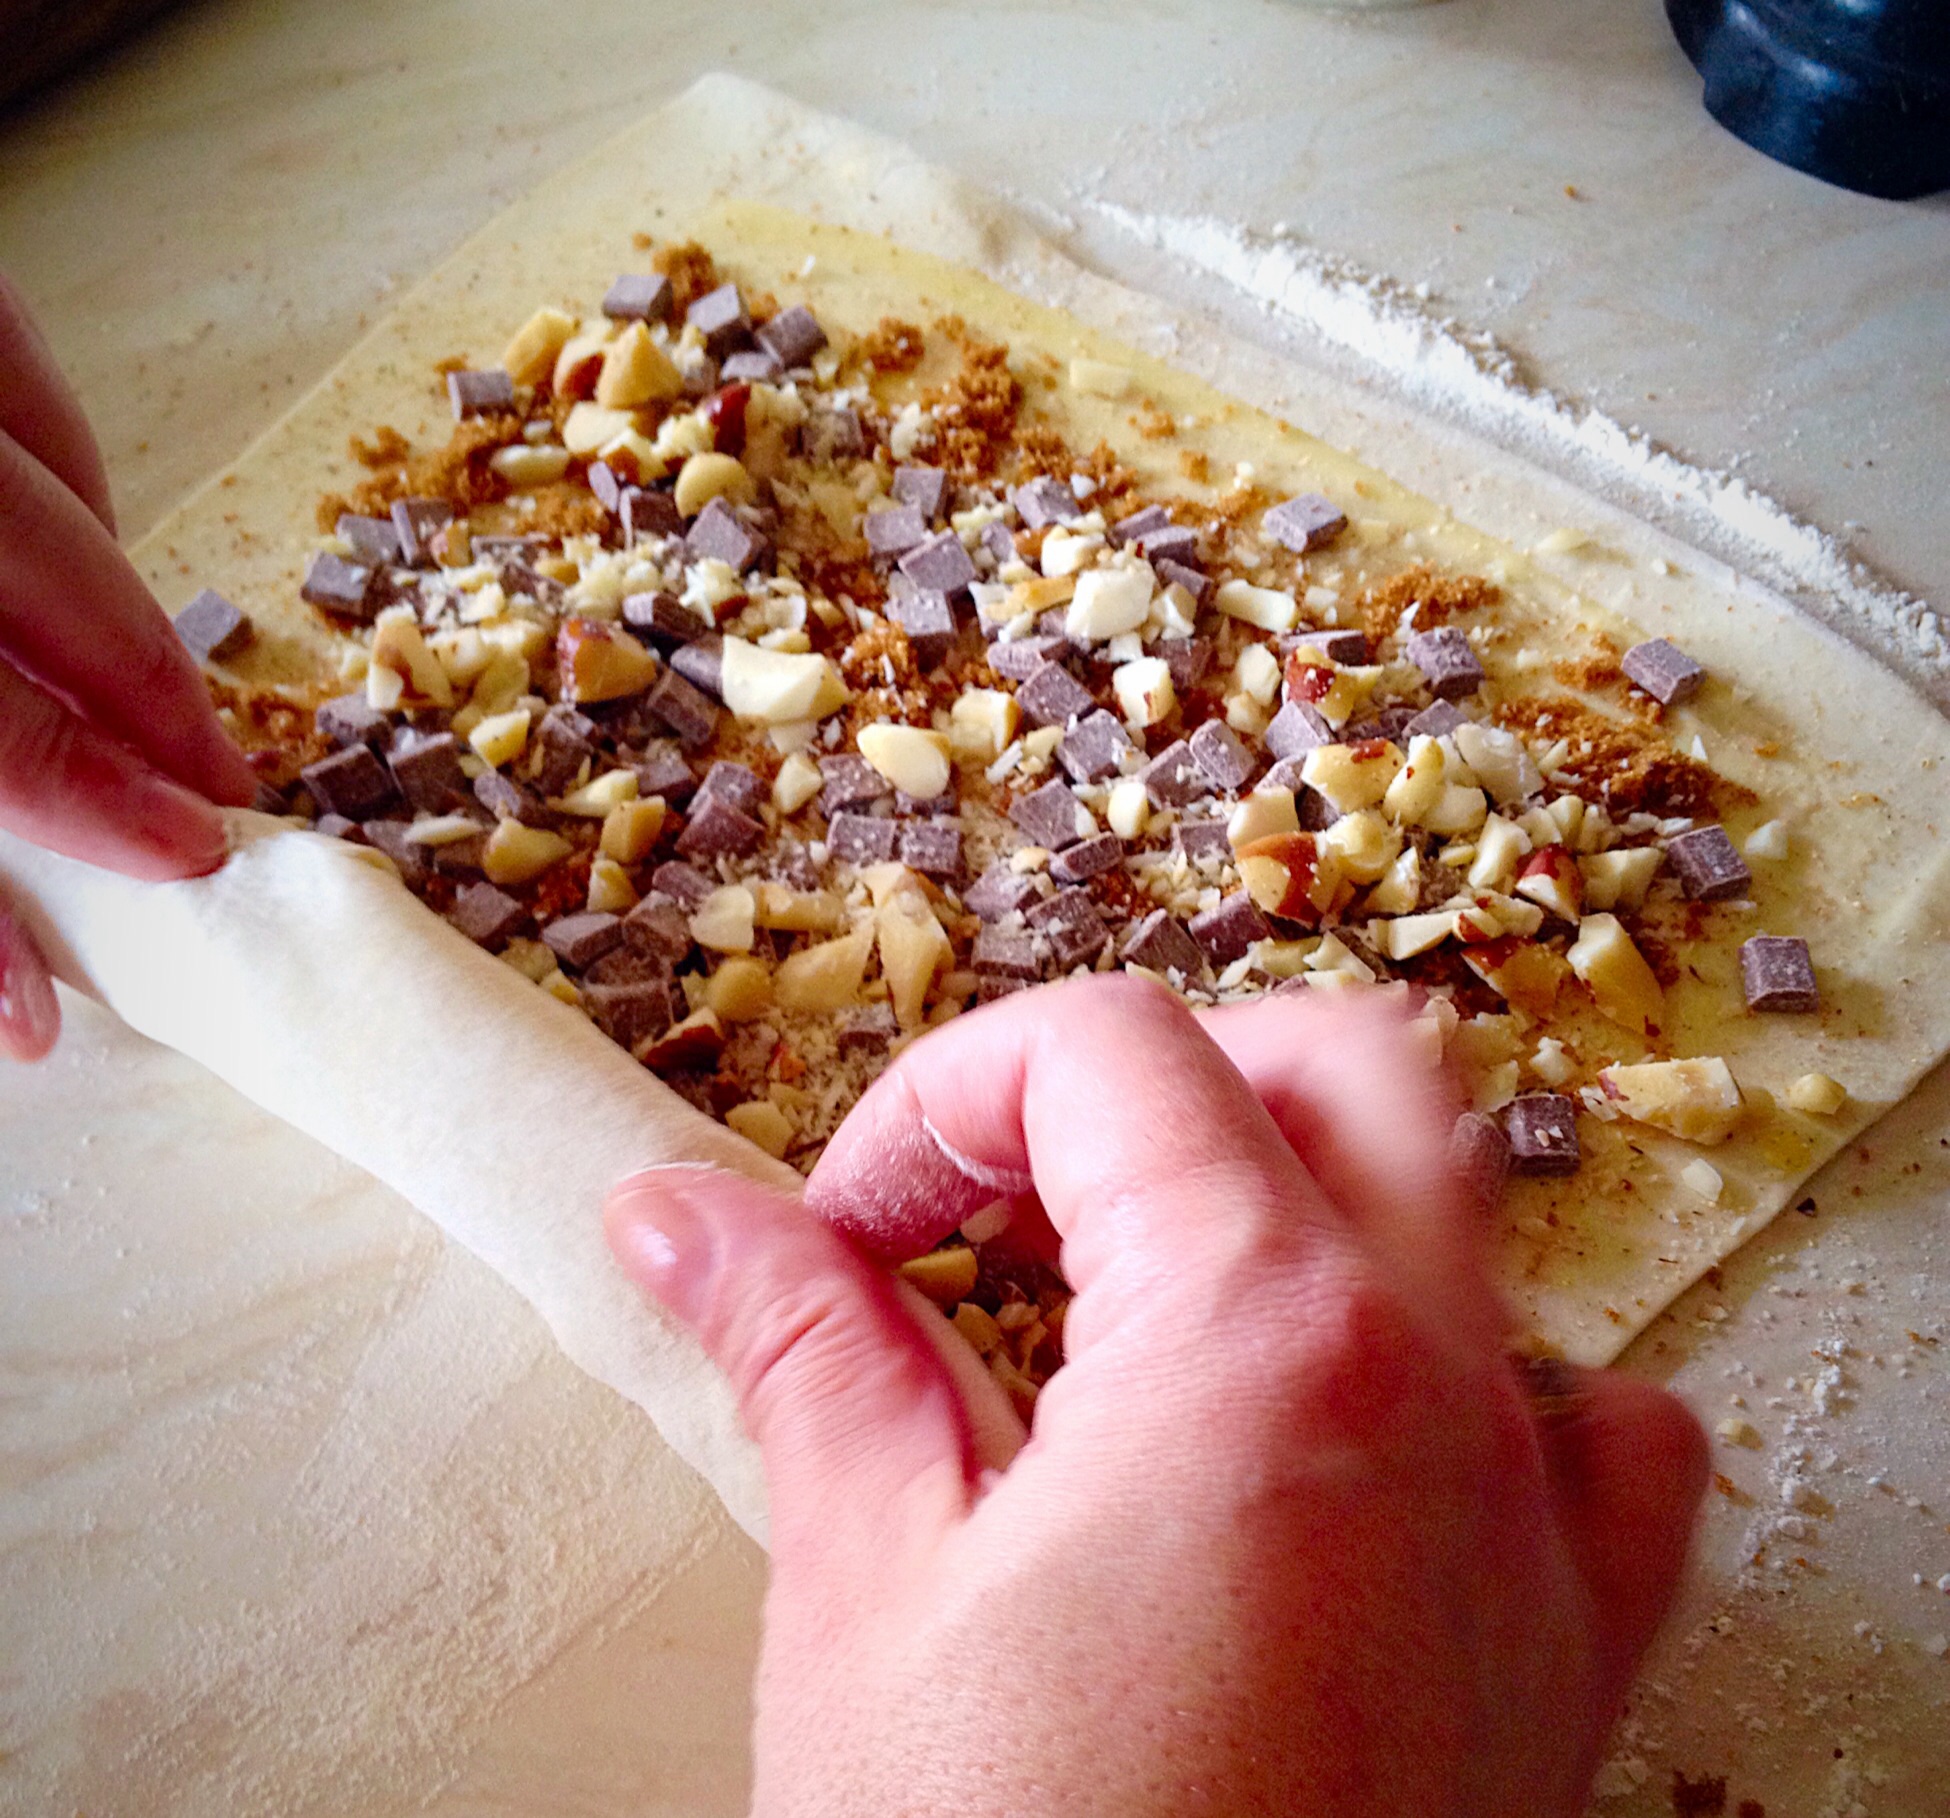
Sprinkle first the sugar, then the chocolate chips and chopped Brazil nuts evenly over the pastry (only use half of the amounts if rolling out half of the pastry, as I have).
An even layer of sugar, chocolate and nuts spread over the rolled pastry.Roll the pastry tightly and evenly.Use both hands to ensure the pastry is evenly rolled.Finishing with the pastry seam underneath.
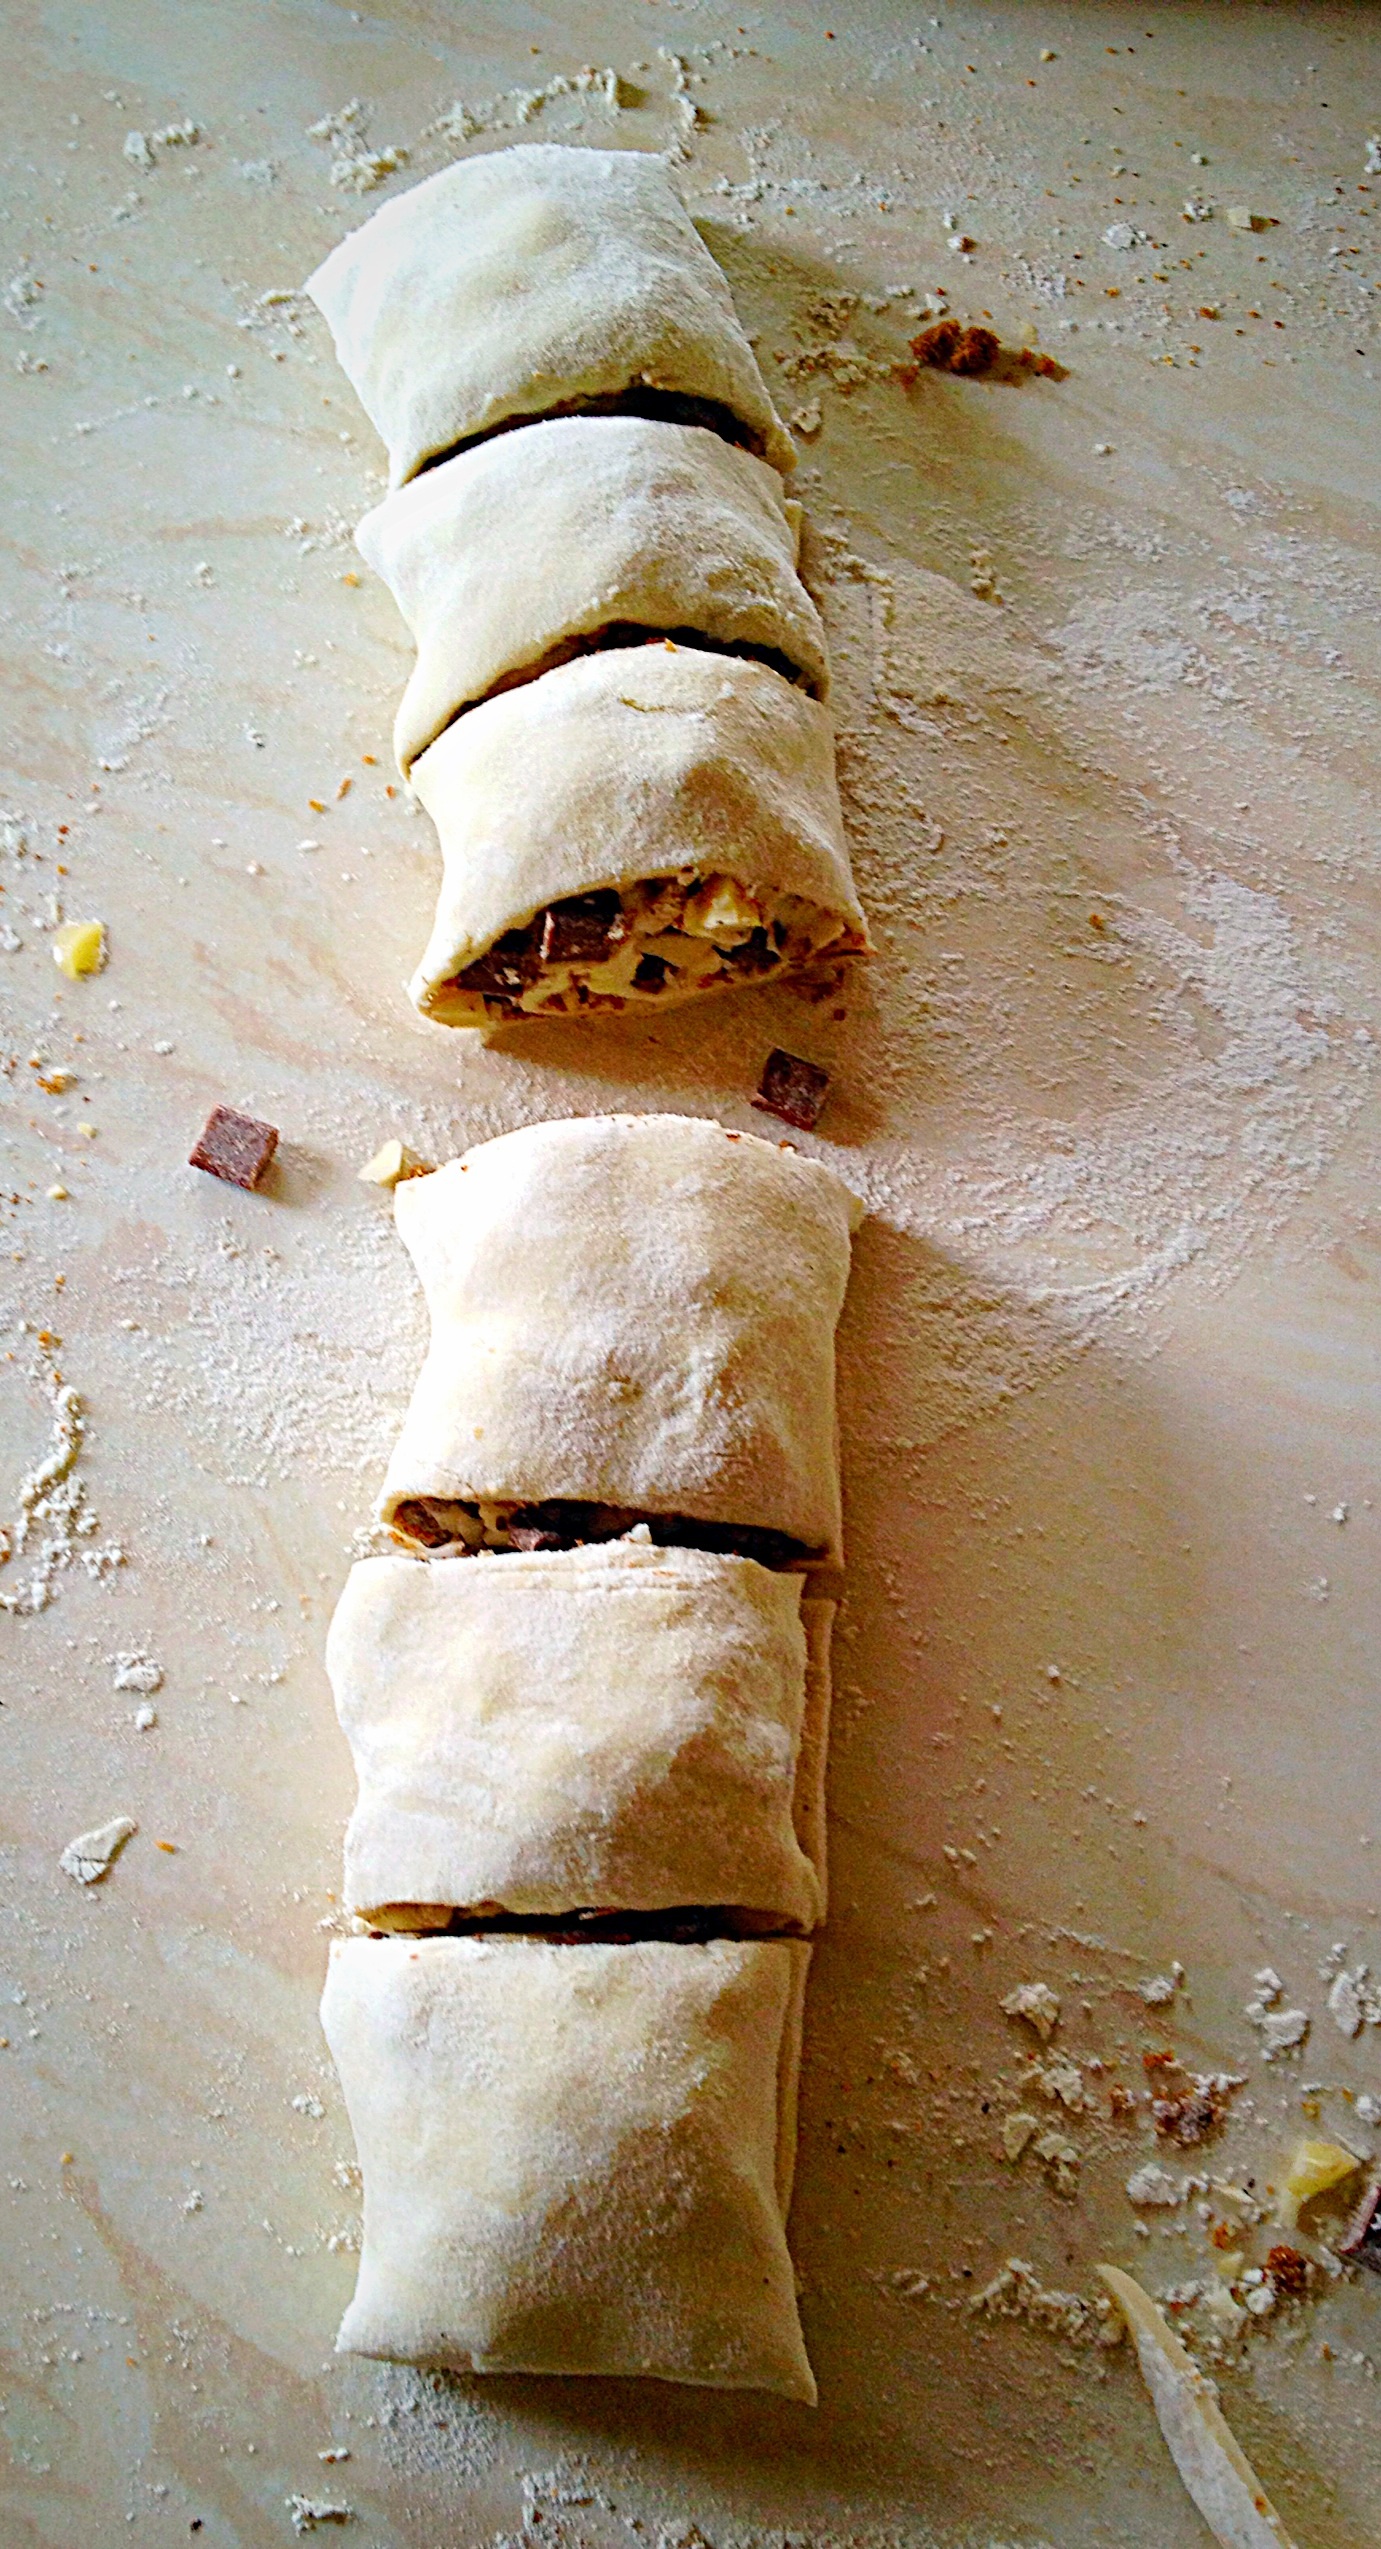
Trim either end and then cut the pastry log in half.
Divide each half into 3 (for half a pastry block), or 6 if you’ve rolled out the entire 450g pastry block.
Place each nutty, chocolate portion on top of the butter/sugar/chopped nuts in the muffin tin.
Ooh only 30 minutes away from baking deliciousness!!
Place the muffin tin into the preheated oven and bake for 30 minutes until golden and bubbling.
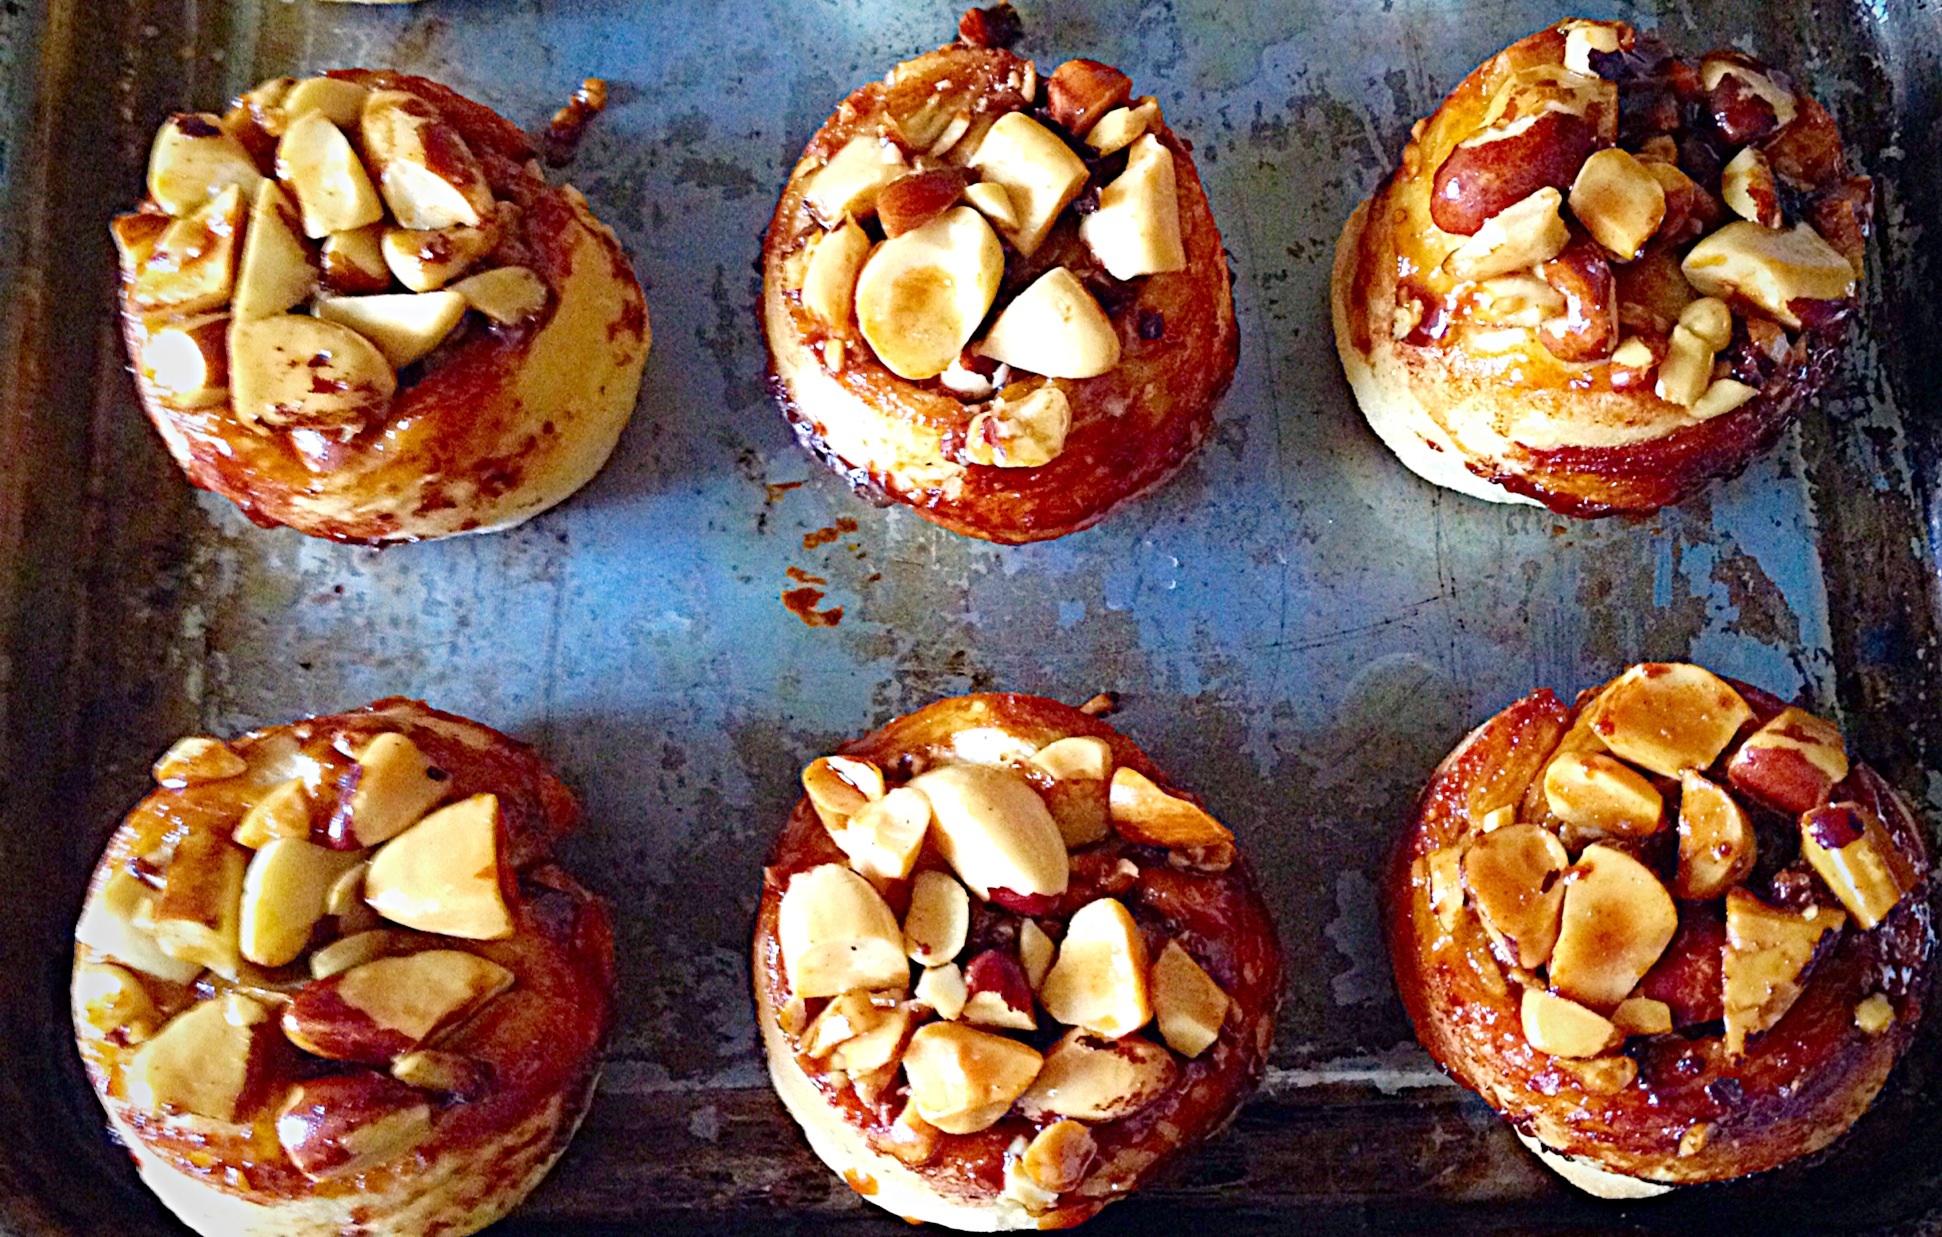
Remove from the oven, look at how scrummy these Chocolate Chip Brazil Nut Buns.
Allow to cool for 5 minutes and then place a baking tray over the buns. Flip the muffin tin over and prepare to be amazed!
It works every time! Perfect Brazil Nut topped buns.
Allow to cool as the chocolate and sugar in the centre are very hot. The perfect time to put the kettle on, invite round family, friends and neighbours and prepare to FEAST on these amazingly yummy Chocolate Chip Brazil Nut Buns!
The best Chocolate Chip Brazil Nut Buns.
If you try this recipe I’d love to here how you get on and your thoughts?
Hi there, thank you for stopping by ; this really is the easiest Best Beef Casserole. Perfect for colder spring evenings, warming you through with minimum effort!
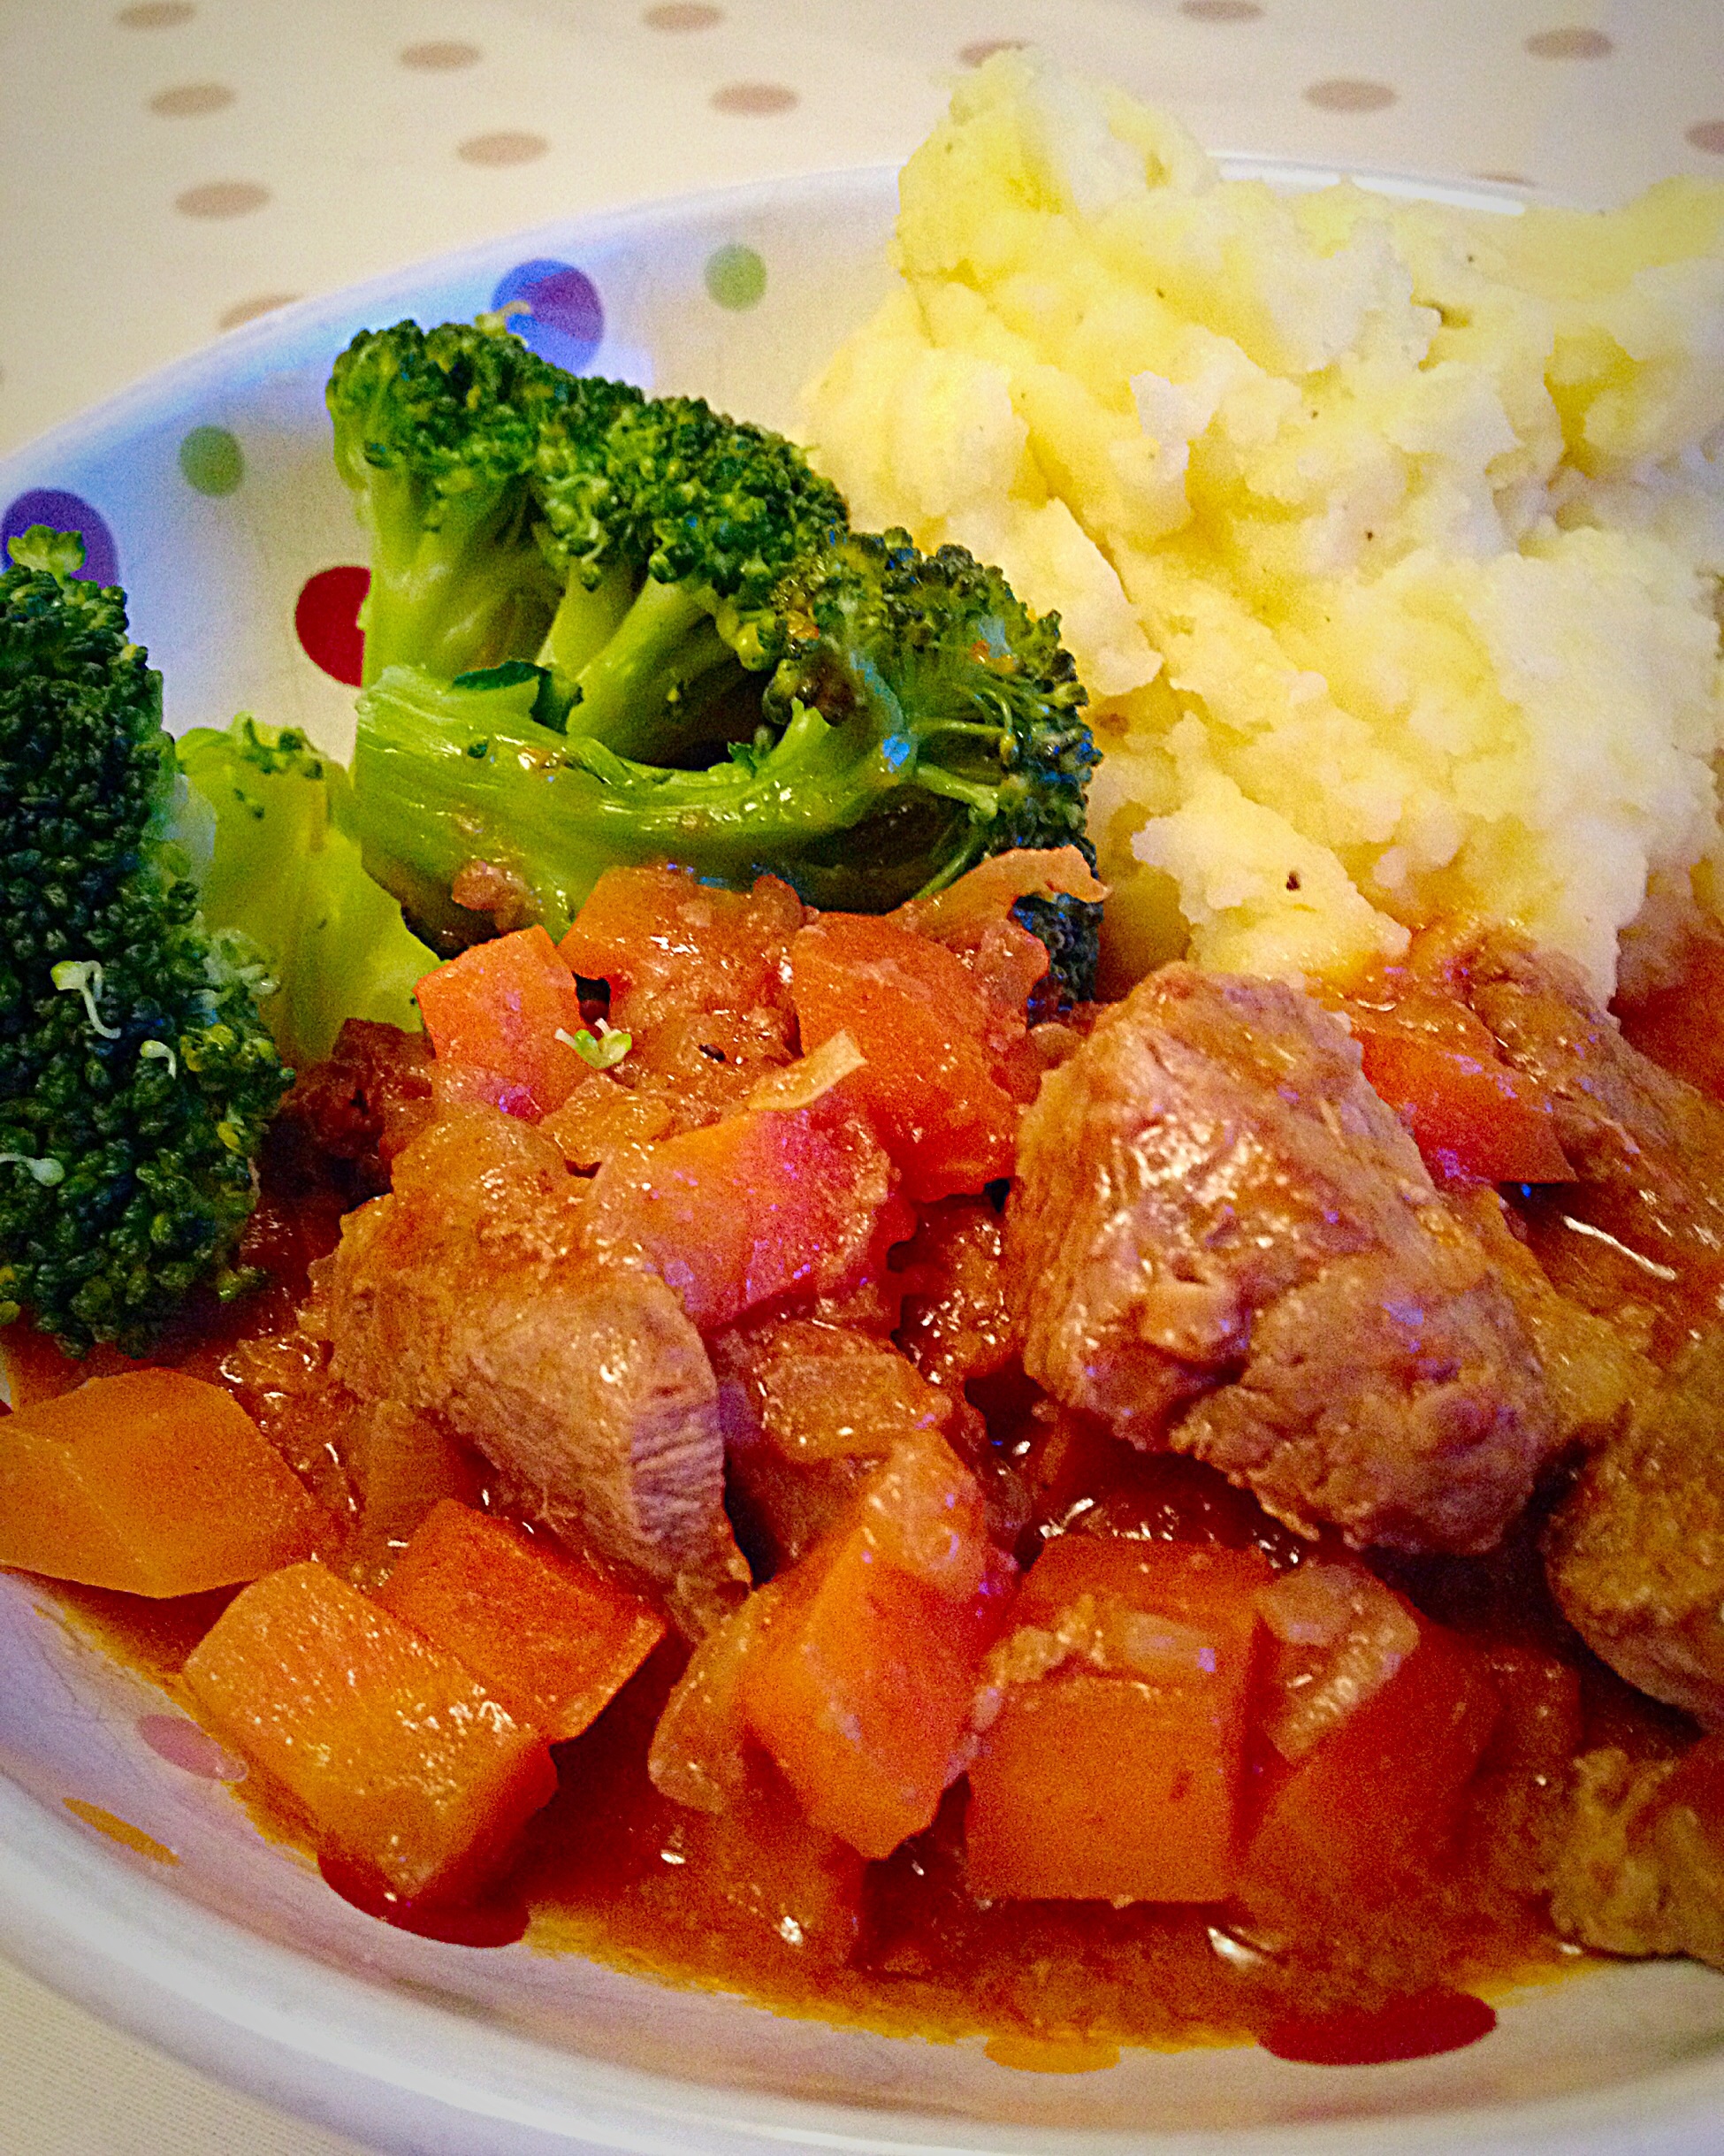
Delicious dinner! Best Beef Casserole, served with Creamy Mash and Broccoli.
Even though it’s officially Spring, here in the UK, some evenings can still be pretty chilly and this Best Beef Casserole is the perfect antidote. Also I think I’m going down with a cold, so I wanted any easy meal (I’ve zero energy) that wasn’t too rich.
Gorgeous, melt in the mouth beef.
Recipe: Serves 4 Adults
1 Large Onion – finely diced
2tbsp Olive Oil
450g/1lb Beef Steak (braising/chuck)
3tbsp Plain Flour
3 Large Carrots – peeled and diced
2 Bay leaves
1 Beef Stock Cube
2tbsp Tomato Puree
Salt and Pepper to season
Method :
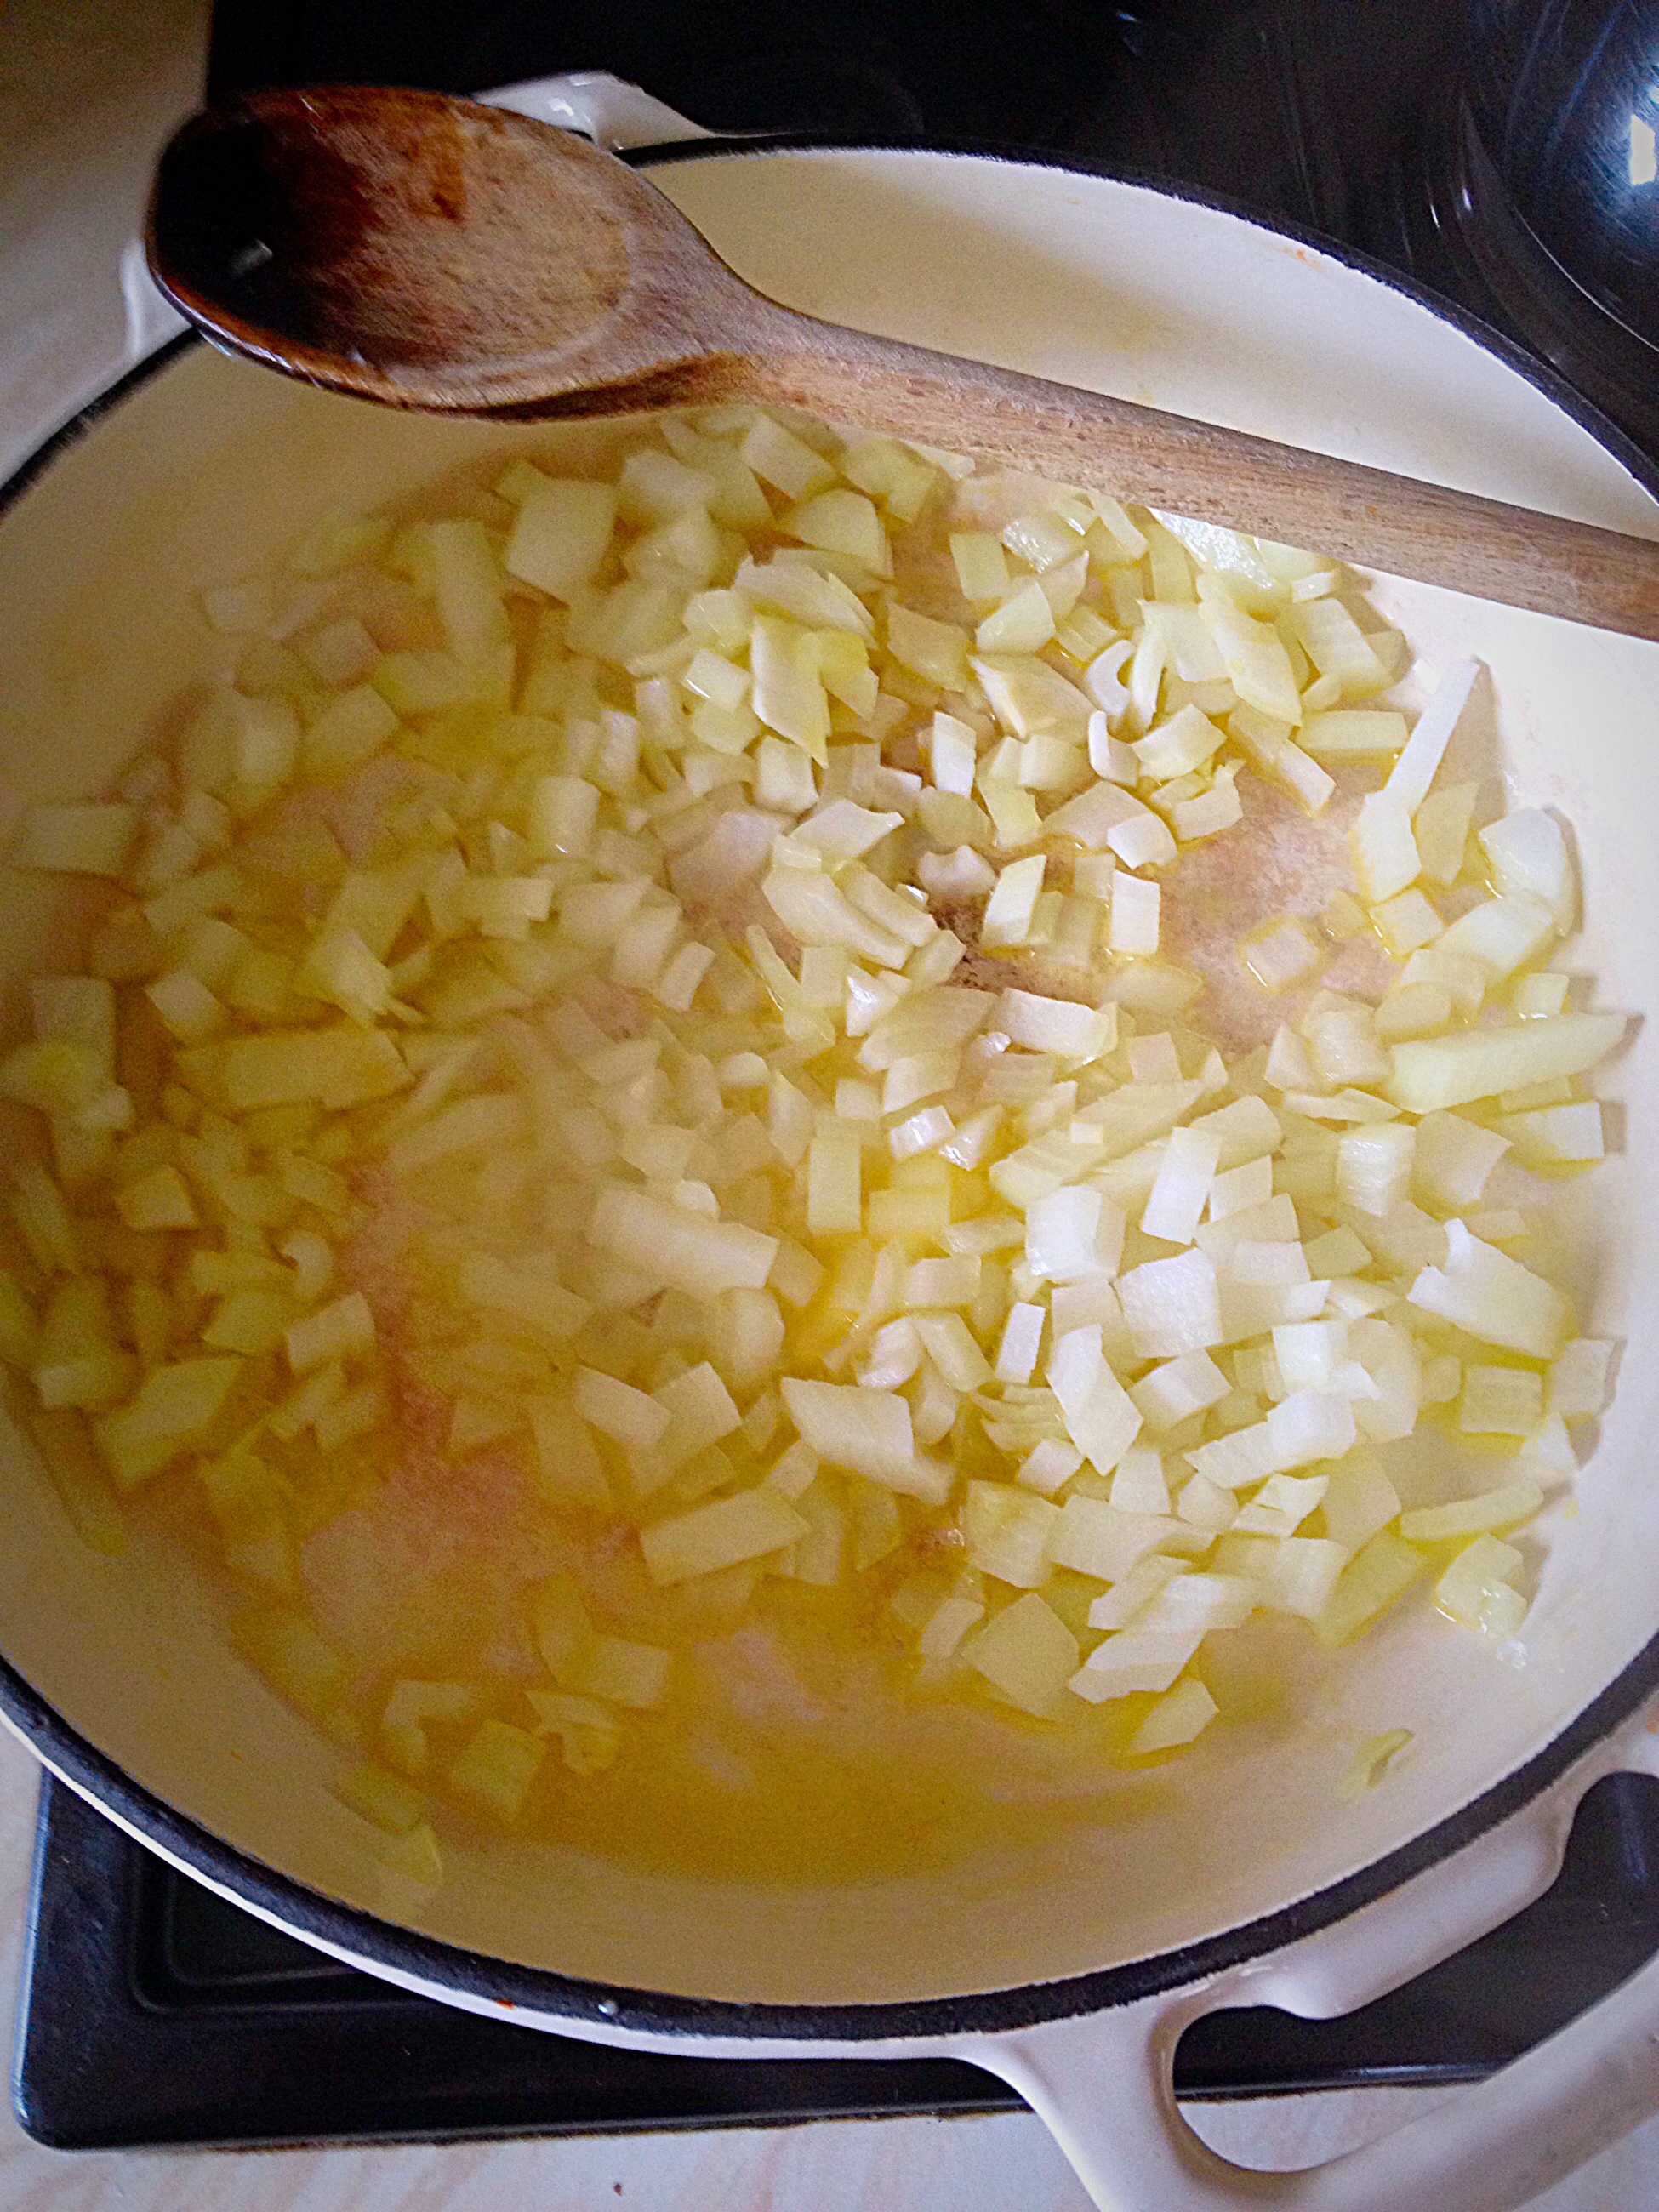
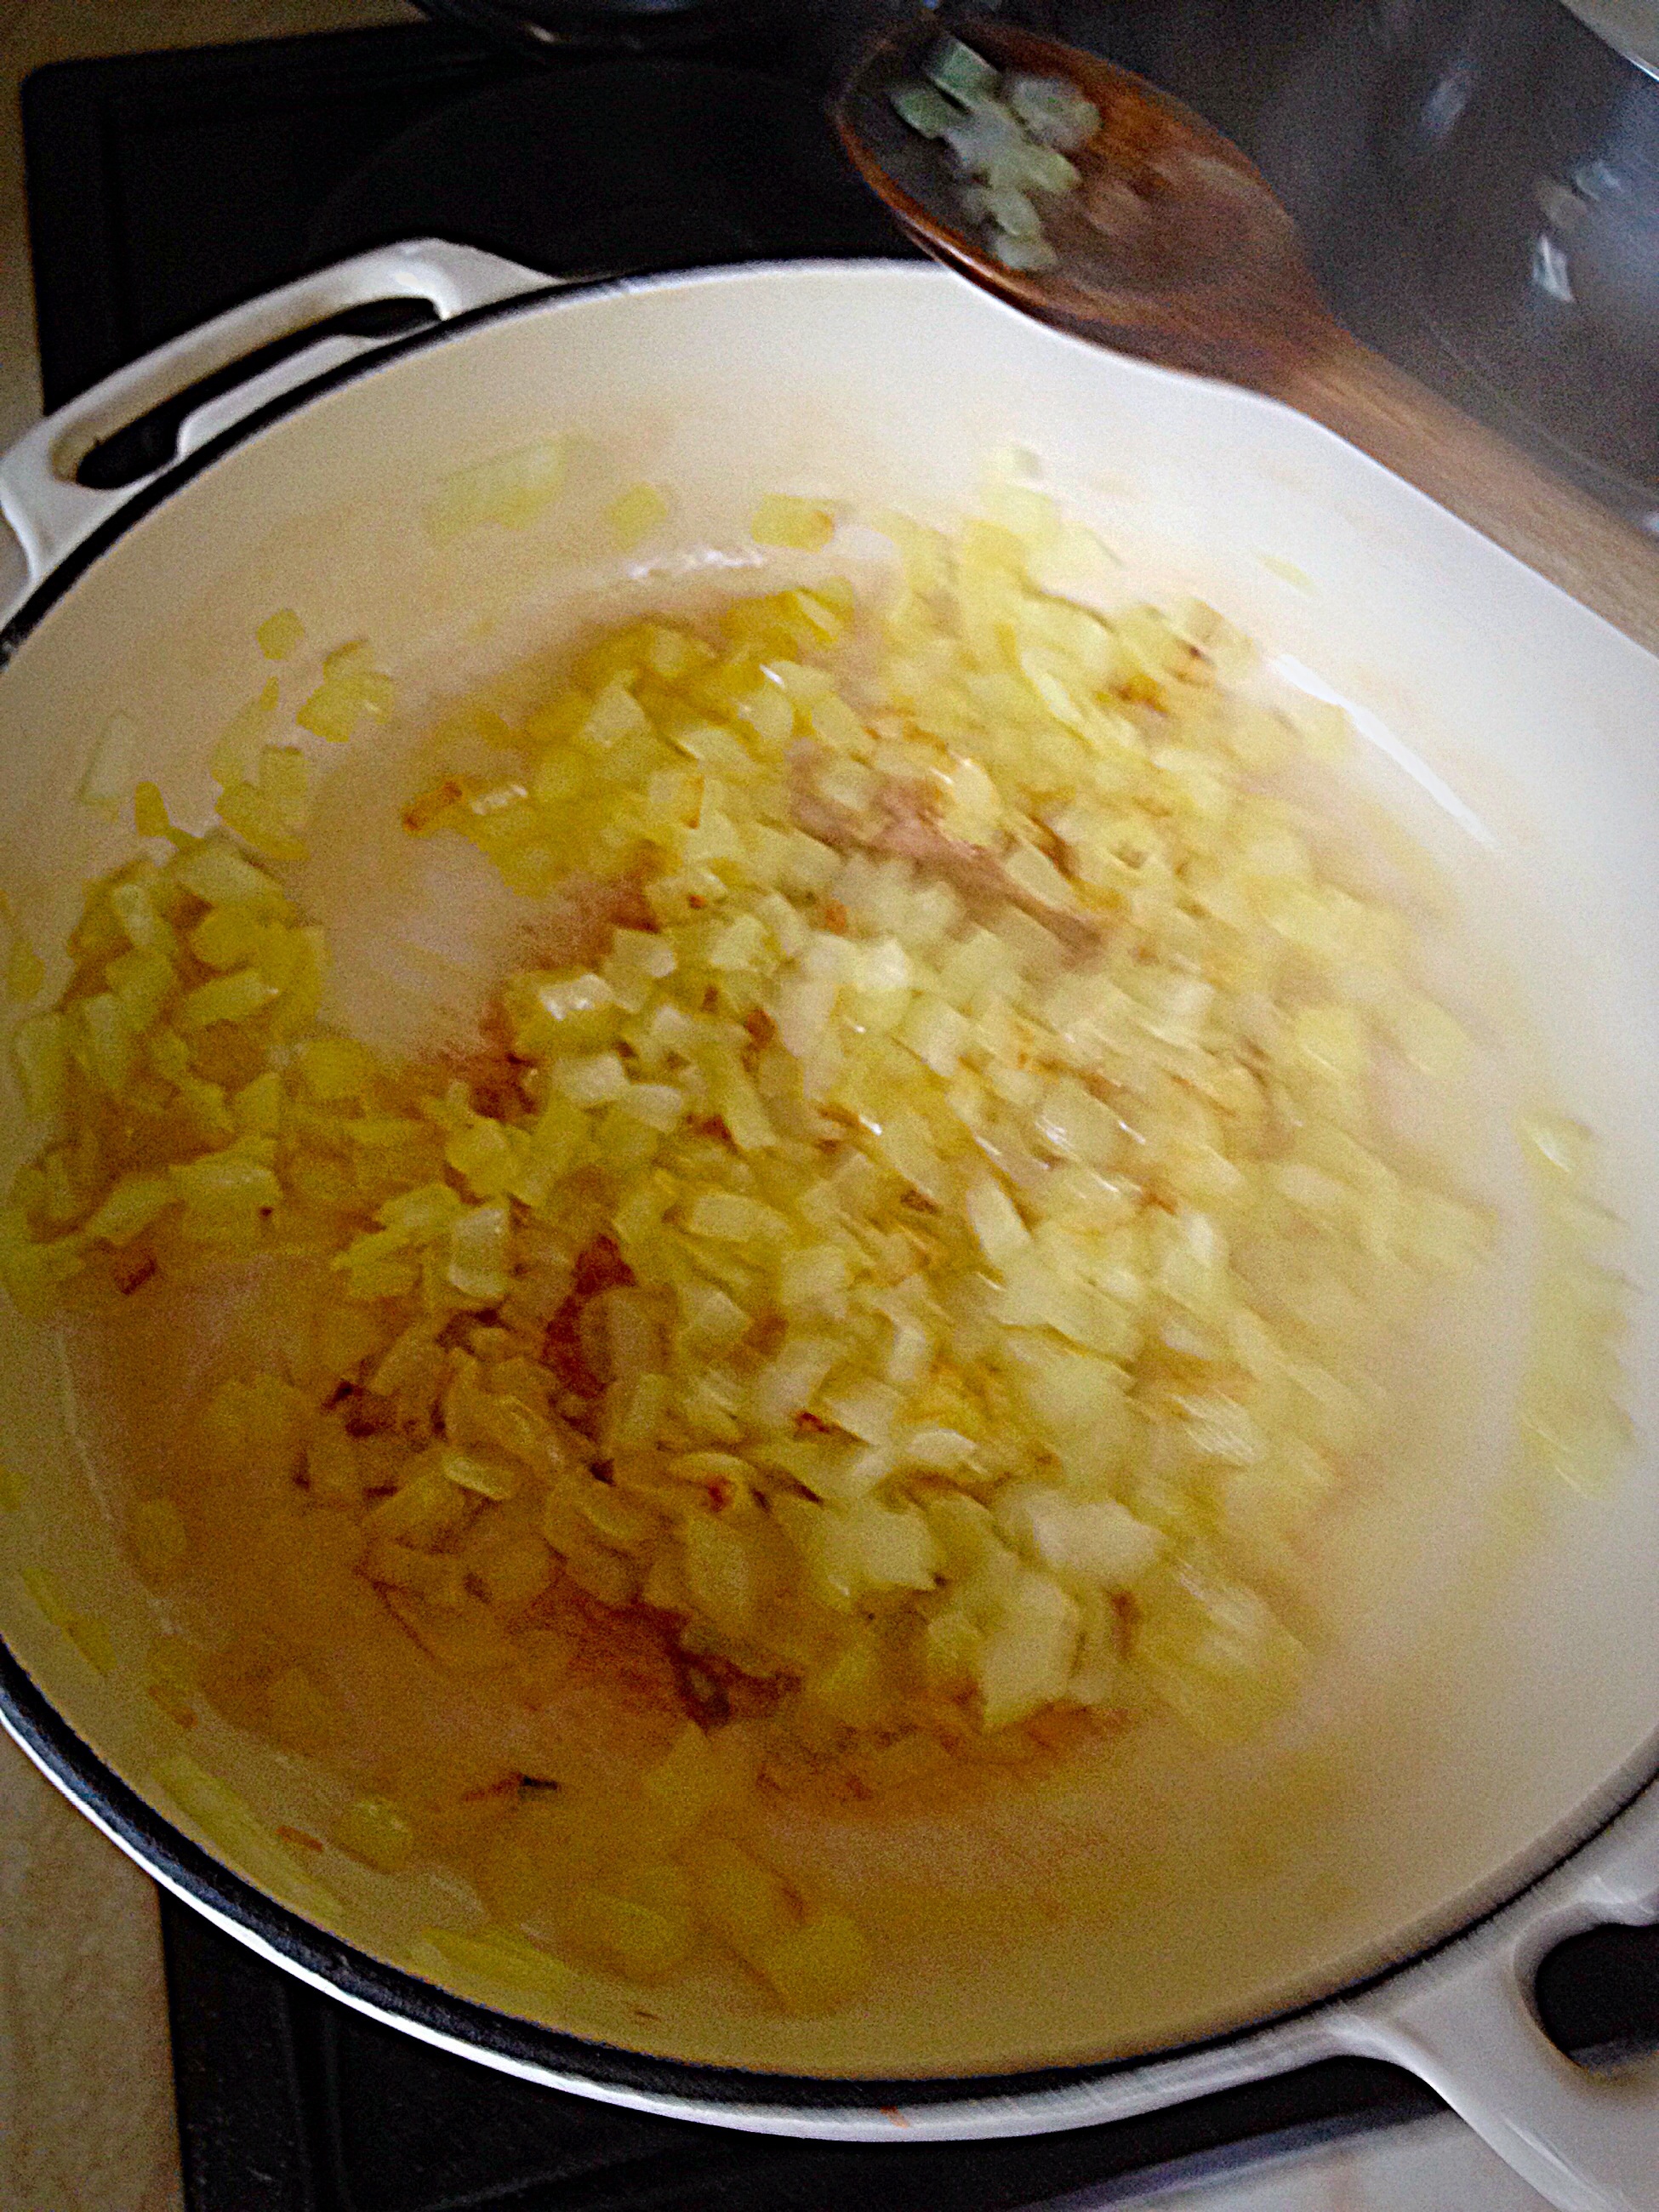
In a wide pan add the olive oil and warm over a medium heat. Add the diced onions and sauté until translucent.
Sauté the onions until……
It looks like this!! Translucent onions – it takes approx 5 mins over a medium heat.
Whilst the onions are sautéing chop the beef into bite sized chunks.
Nice bite sized chunks of beef.
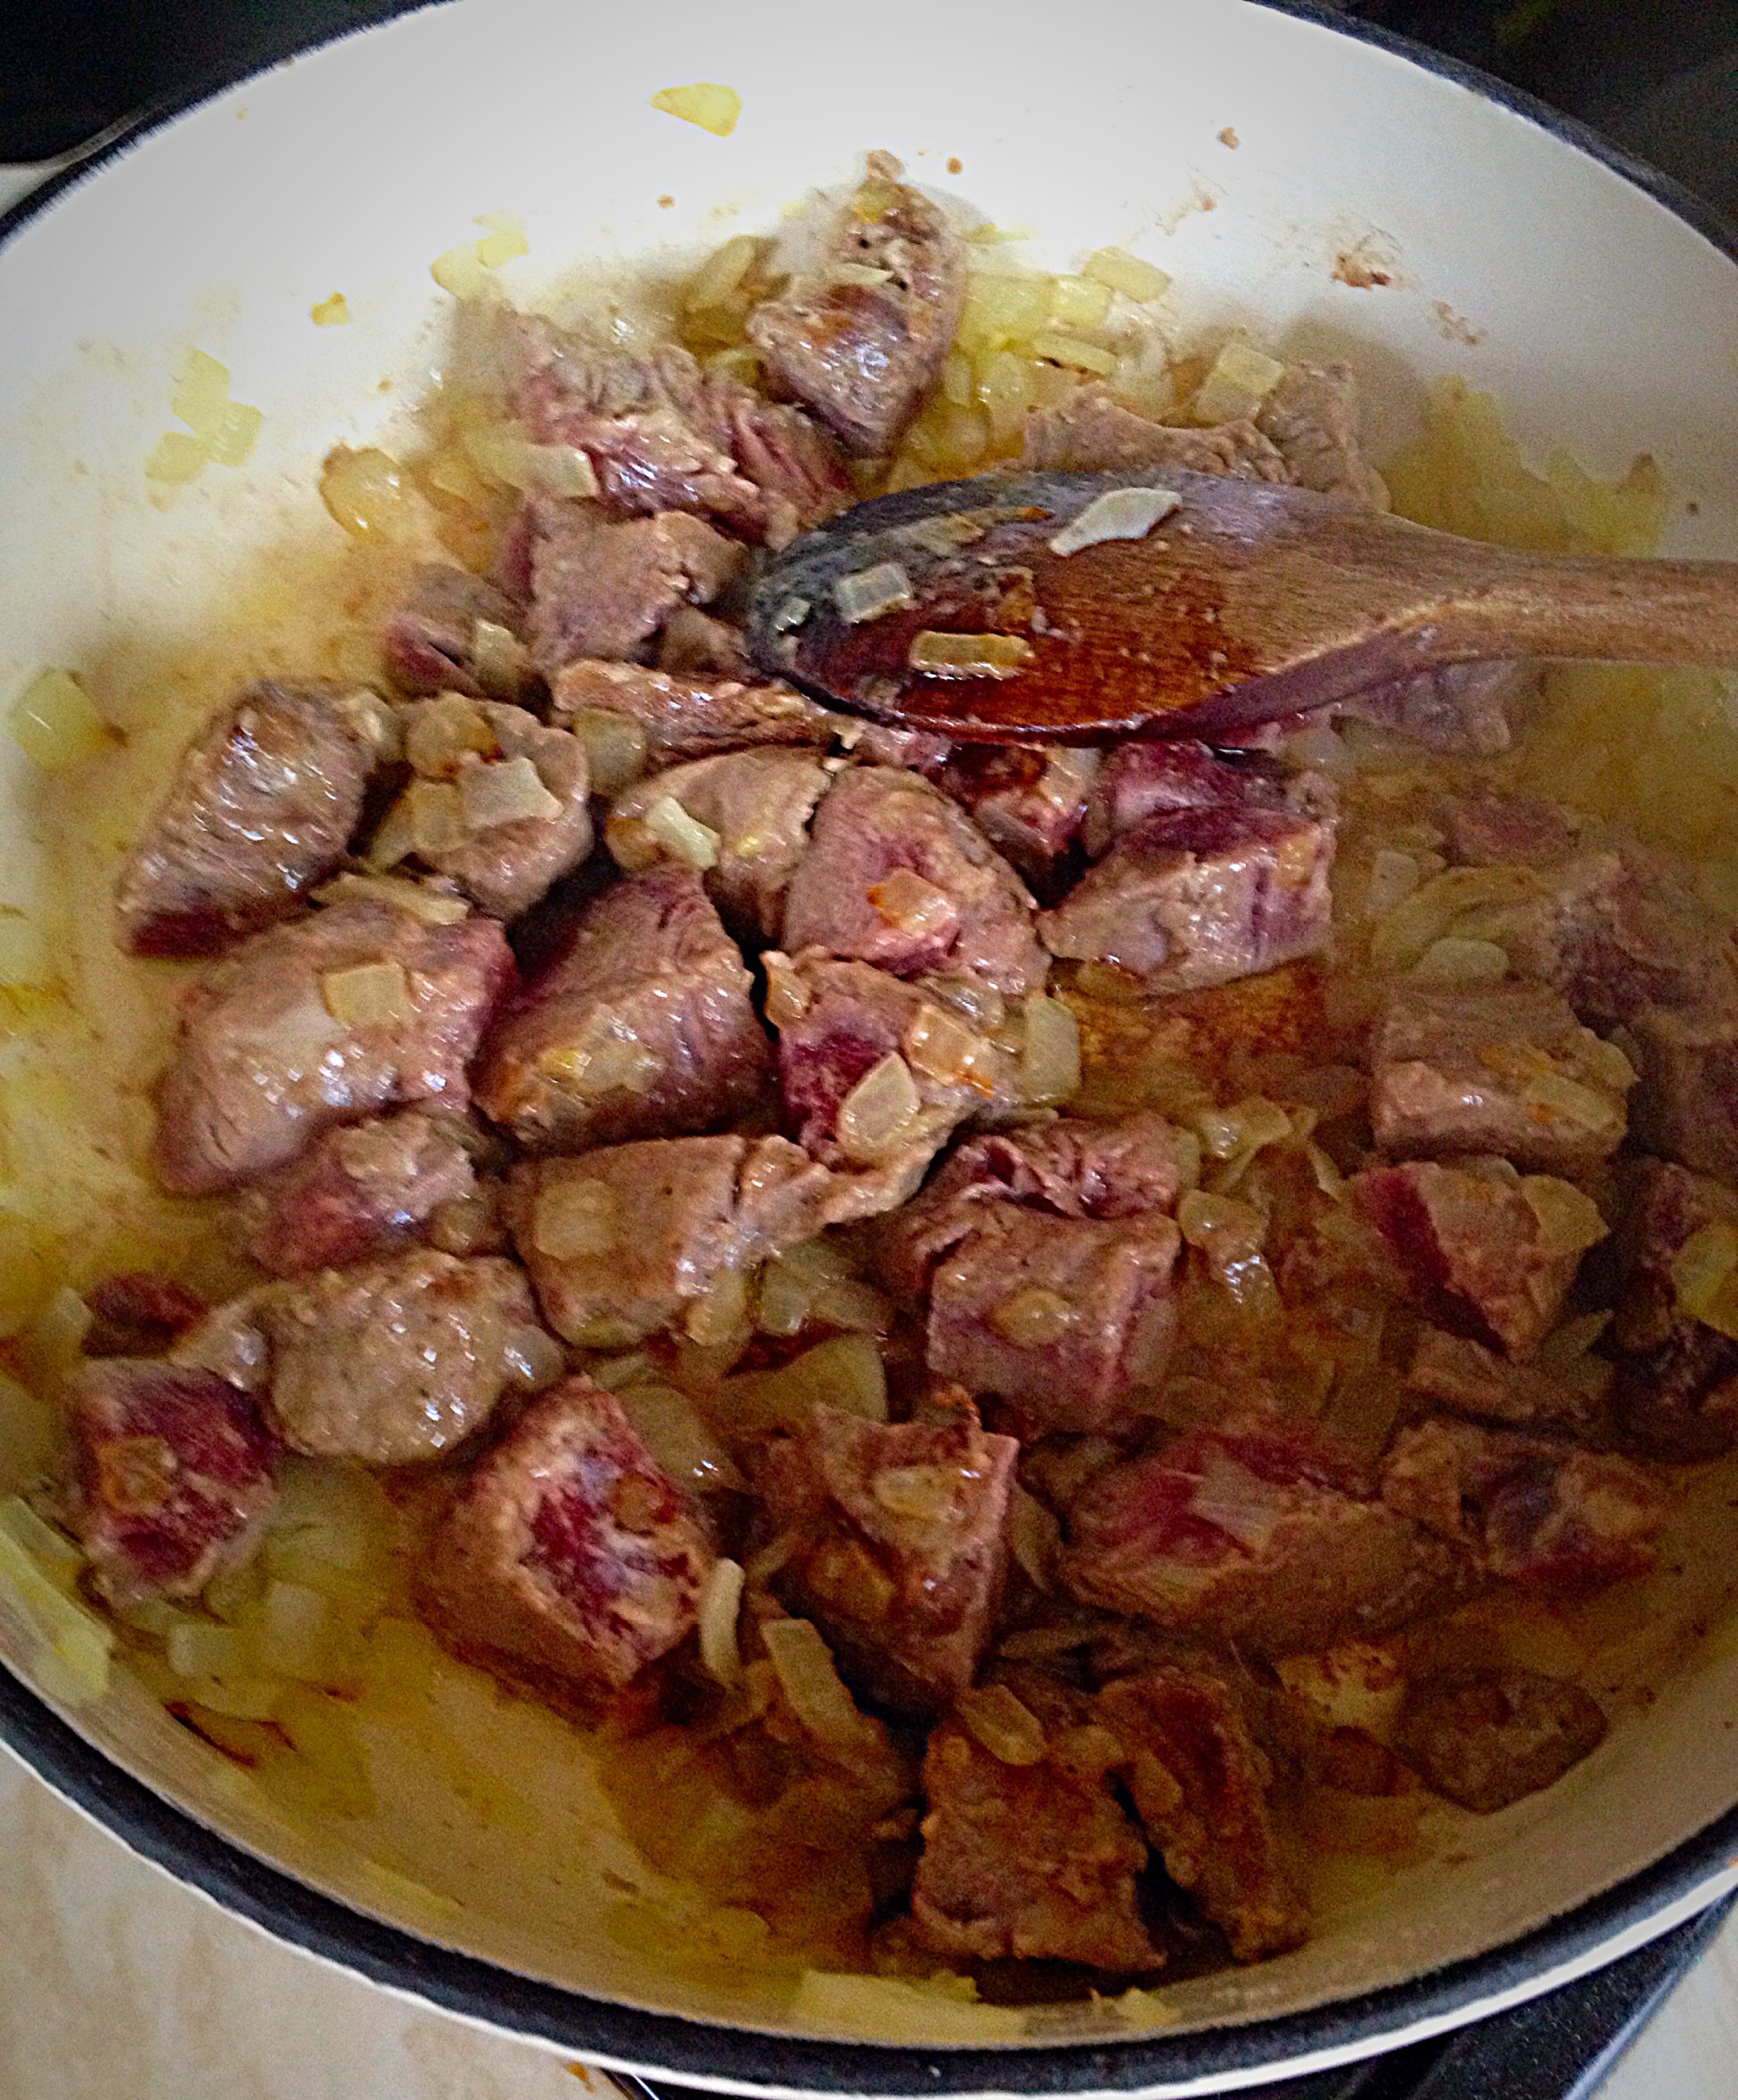
Now add the 3 tablespoons of flour and season with salt and pepper.
Toss the beef chunks in the seasoned flour.
Toss the flour coated beef chunks into the pan. Shake the pan so the beef is in one layer. When browned turn the chunks over, repeat until the beef chunks are browned on all sides.
Don’t worry if you get sticky bits on the bottom of the pan. This means flavour!
When the beef is browned all over add the diced carrots a 2 bay leaves.
Bay leaves and Beef are made for each other!
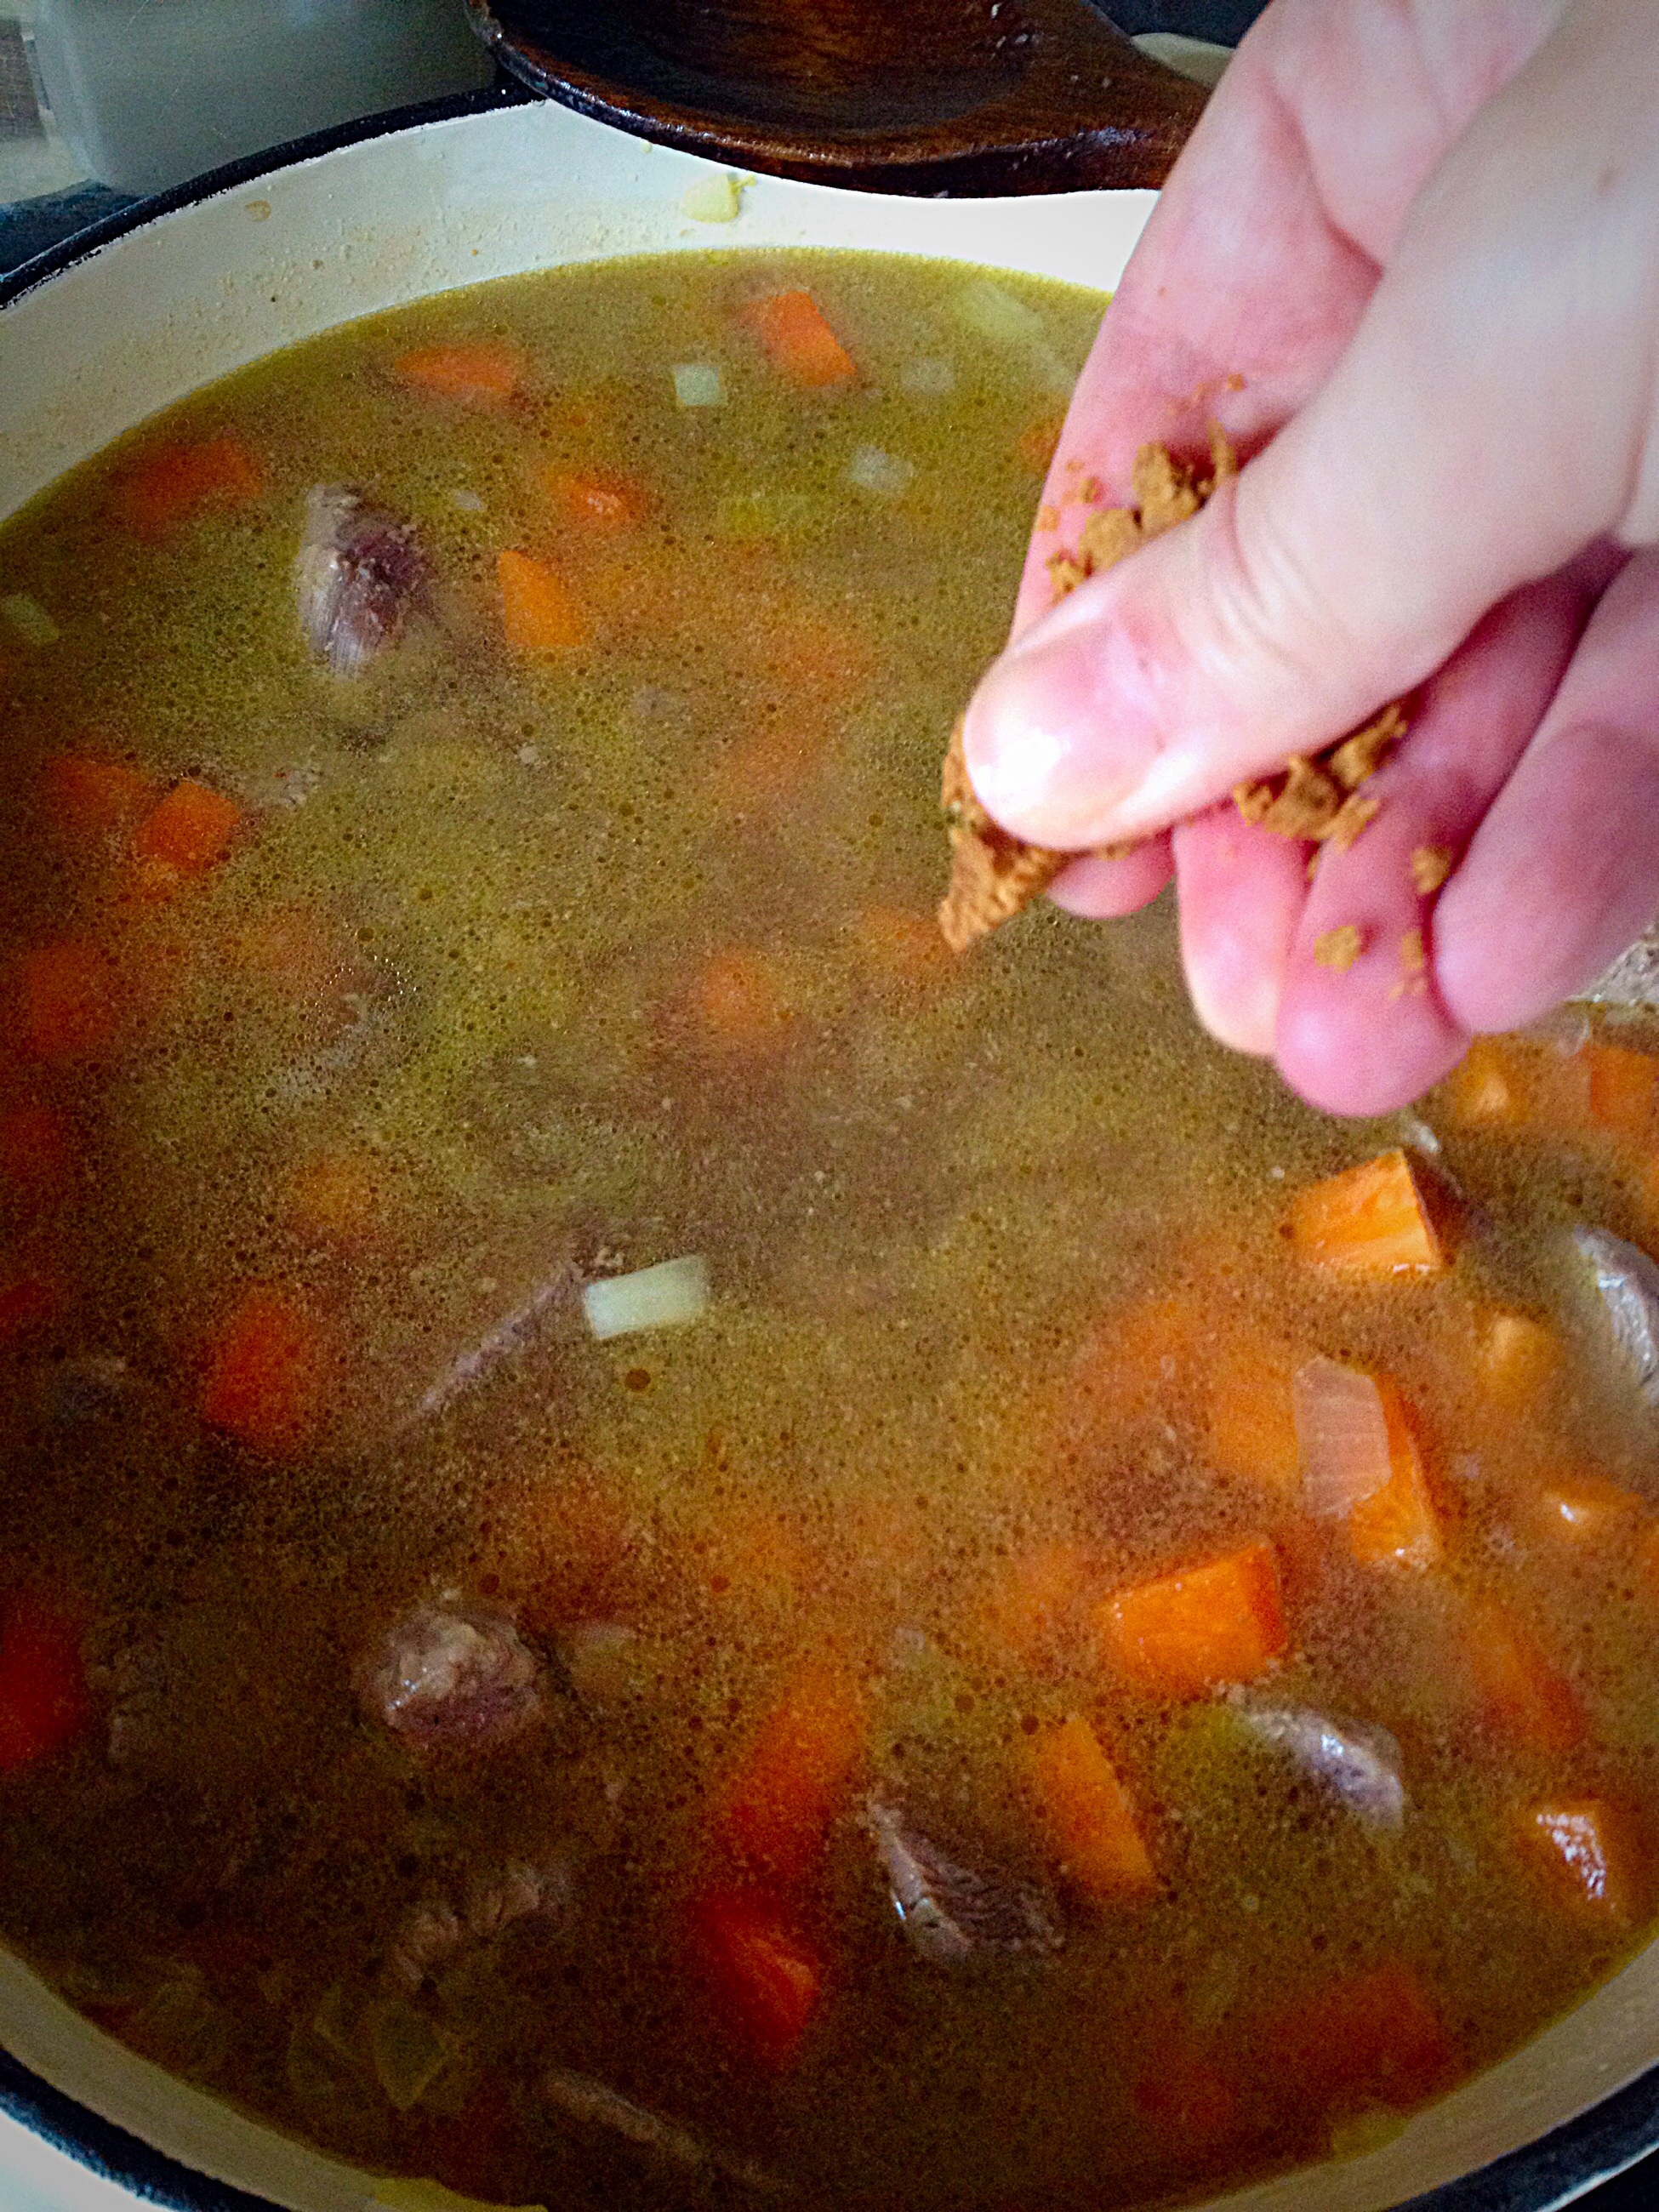
Pour water over the pan contents, until just covered. As this heats up, the flour will thicken the casserole.
Crumble in a beef stock cube.
I used a Knorr beef stock cube.
Next add the tomato purée.
The tomato purée adds flavour, colour and will also help thicken the sauce.
Stir, scraping all the delicious dark, beefy residue from the bottom of the pan, so that it mixed into the sauce.
Mmmm. Simmer on a low heat, or place in a 140C oven for approx 2 – 3 hours, until the sauce is reduced and the beef is soft and tender.
The beef should be tender enough, once cooked, so you can cut through it with a spoon! Delicious the Best Beef Casserole.
I served this casserole with mashed potato and broccoli.
A delicious, warming, homemade beef casserole. Just what I needed.
This meal was absolutely scrumptious. Perfect for a weekday meal. A feast in a bowl!
Thank you so much. I have just reached 100 followers on Bloglovin’ so I thought I’d send you all a bunch of flowers.
A big Thank you for helping me reach 100 followers on Bloglovin’
This is my absolute favourite colour combination of flowers (if you’re superstitious look away x).
Obviously I’m unable to send each and every one of my Bloglovin’ readers a bunch of flowers, so I hope you like these?
I never thought anyone would read my blog. Although I wanted to share my thoughts and recipes, I viewed my site as more of an online diary.
I’d be lying if I said I wasn’t thrilled that you are reading and enjoying it. Adding my site to Bloglovin’ was a double blessing as I get to read such a vast range of awesome blogs, that otherwise I’d be oblivious to.
Thank you Bloglovin’ readers for your support x
As I’ve mentioned in a previous blog, if you read a post and you love it, leaving a comment is the best compliment you can pay a blogger, so a big Thank you to all those of you who have taken the time to leave comments – and I’m very sorry when my site crashed I lost them ALL
Happy Saturday everyone! Here is My Blog 10 Things I’ve Learned So Far, in the 6 months since I started blogging.
I did it!! I set up my own blog. Who’da thunk it????
1 – If you put your mind to something, are willing to try, learn, make mistakes, pick yourself up and carry on, you can achieve anything!
2 – It’s completely possible to know nothing about computing and still set up and write a blog. So far everything I’ve posted/photographed has been through my iPhone 4S. Not bad eh???
My trusty iPhone. I will start to use a laptop – soon!!!
3 – You have to be yourself! Honesty is key. As is opening up to your readers. Whilst I’m protective of my family (not showing pics/real names), if I didn’t include them in my post it would be very one dimensional.
4 – Post good quality, original content on you blog. Reread it back and if it’s not good bin it! For every blog I’ve posted at least 2 others haven’t made it.
5 – Be polite and reply to comments. As part of Bloglovin’ it’s fab to see my followers increase, but comments on a post mean the world to me. That’s why I was gutted to lose ALL my comments when I faced the WordPress White Screen of Death.
I love WordPress usually – but not when it doesn’t work – I’m fickle!!!
6 – Take time to read a variety of other peoples blogs and if they inspire you, leave a comment. I read a vast range of blogs, from Hannah Gale to Sally’s Baking Addiction and pretty much everything in between! Through Bloglovin’ I’ve created my own, online magazine. You don’t have to read every blog in your feed, but it’s great to be able to save posts that inspire you.
7 – All the bloggers I’ve had contact with have been really lovely and supportive. The blogosphere genuinely should be a place for freedom of speech and mutual encouragement. Yes you might read a blog and not agree with the content, that’s not an excuse to leave a mean or rude comment. Express your feelings in a polite, positive way – you maybe surprised at the reply!!!
Support means everything.
8 – DON’T rip off other peoples content and pass it on as your own. NOT COOL! I was horrified to learn that this happens, especially on food blogs. It’s simply WRONG!
Totally NOT COOL dude!
9 – Don’t be afraid to diversify. My blog was set up originally to share my love of cooking, recipes, successes and failures! Yet my post Migraines – why life’s not always sunshine and roses (sorry haven’t figured out how to do links yet!), received an amazing response. It opened my site up to a wider range of people, more importantly it touched individual lives. Life is easier when you know your not ‘the only one’ dealing with stuff.
10 – Keeping a healthy perspective. I was seriousy heart broken when my website ‘died’. All my hardwork, content, comments locked away and I didn’t have the key. My reaction surprised me. This was my baby, something I had accomplished on my own. You understand, right? I was sooooo relieved when I’d pretty much fixed it and recovered most of what I lost. It did make me realise that in all things there should be balance and whilst my blog is important to me, so are the living, breathing, real, touchable people in my life. Don’t neglect them and be sucked into cybersphere. Real, face to face relationships are sooo important!
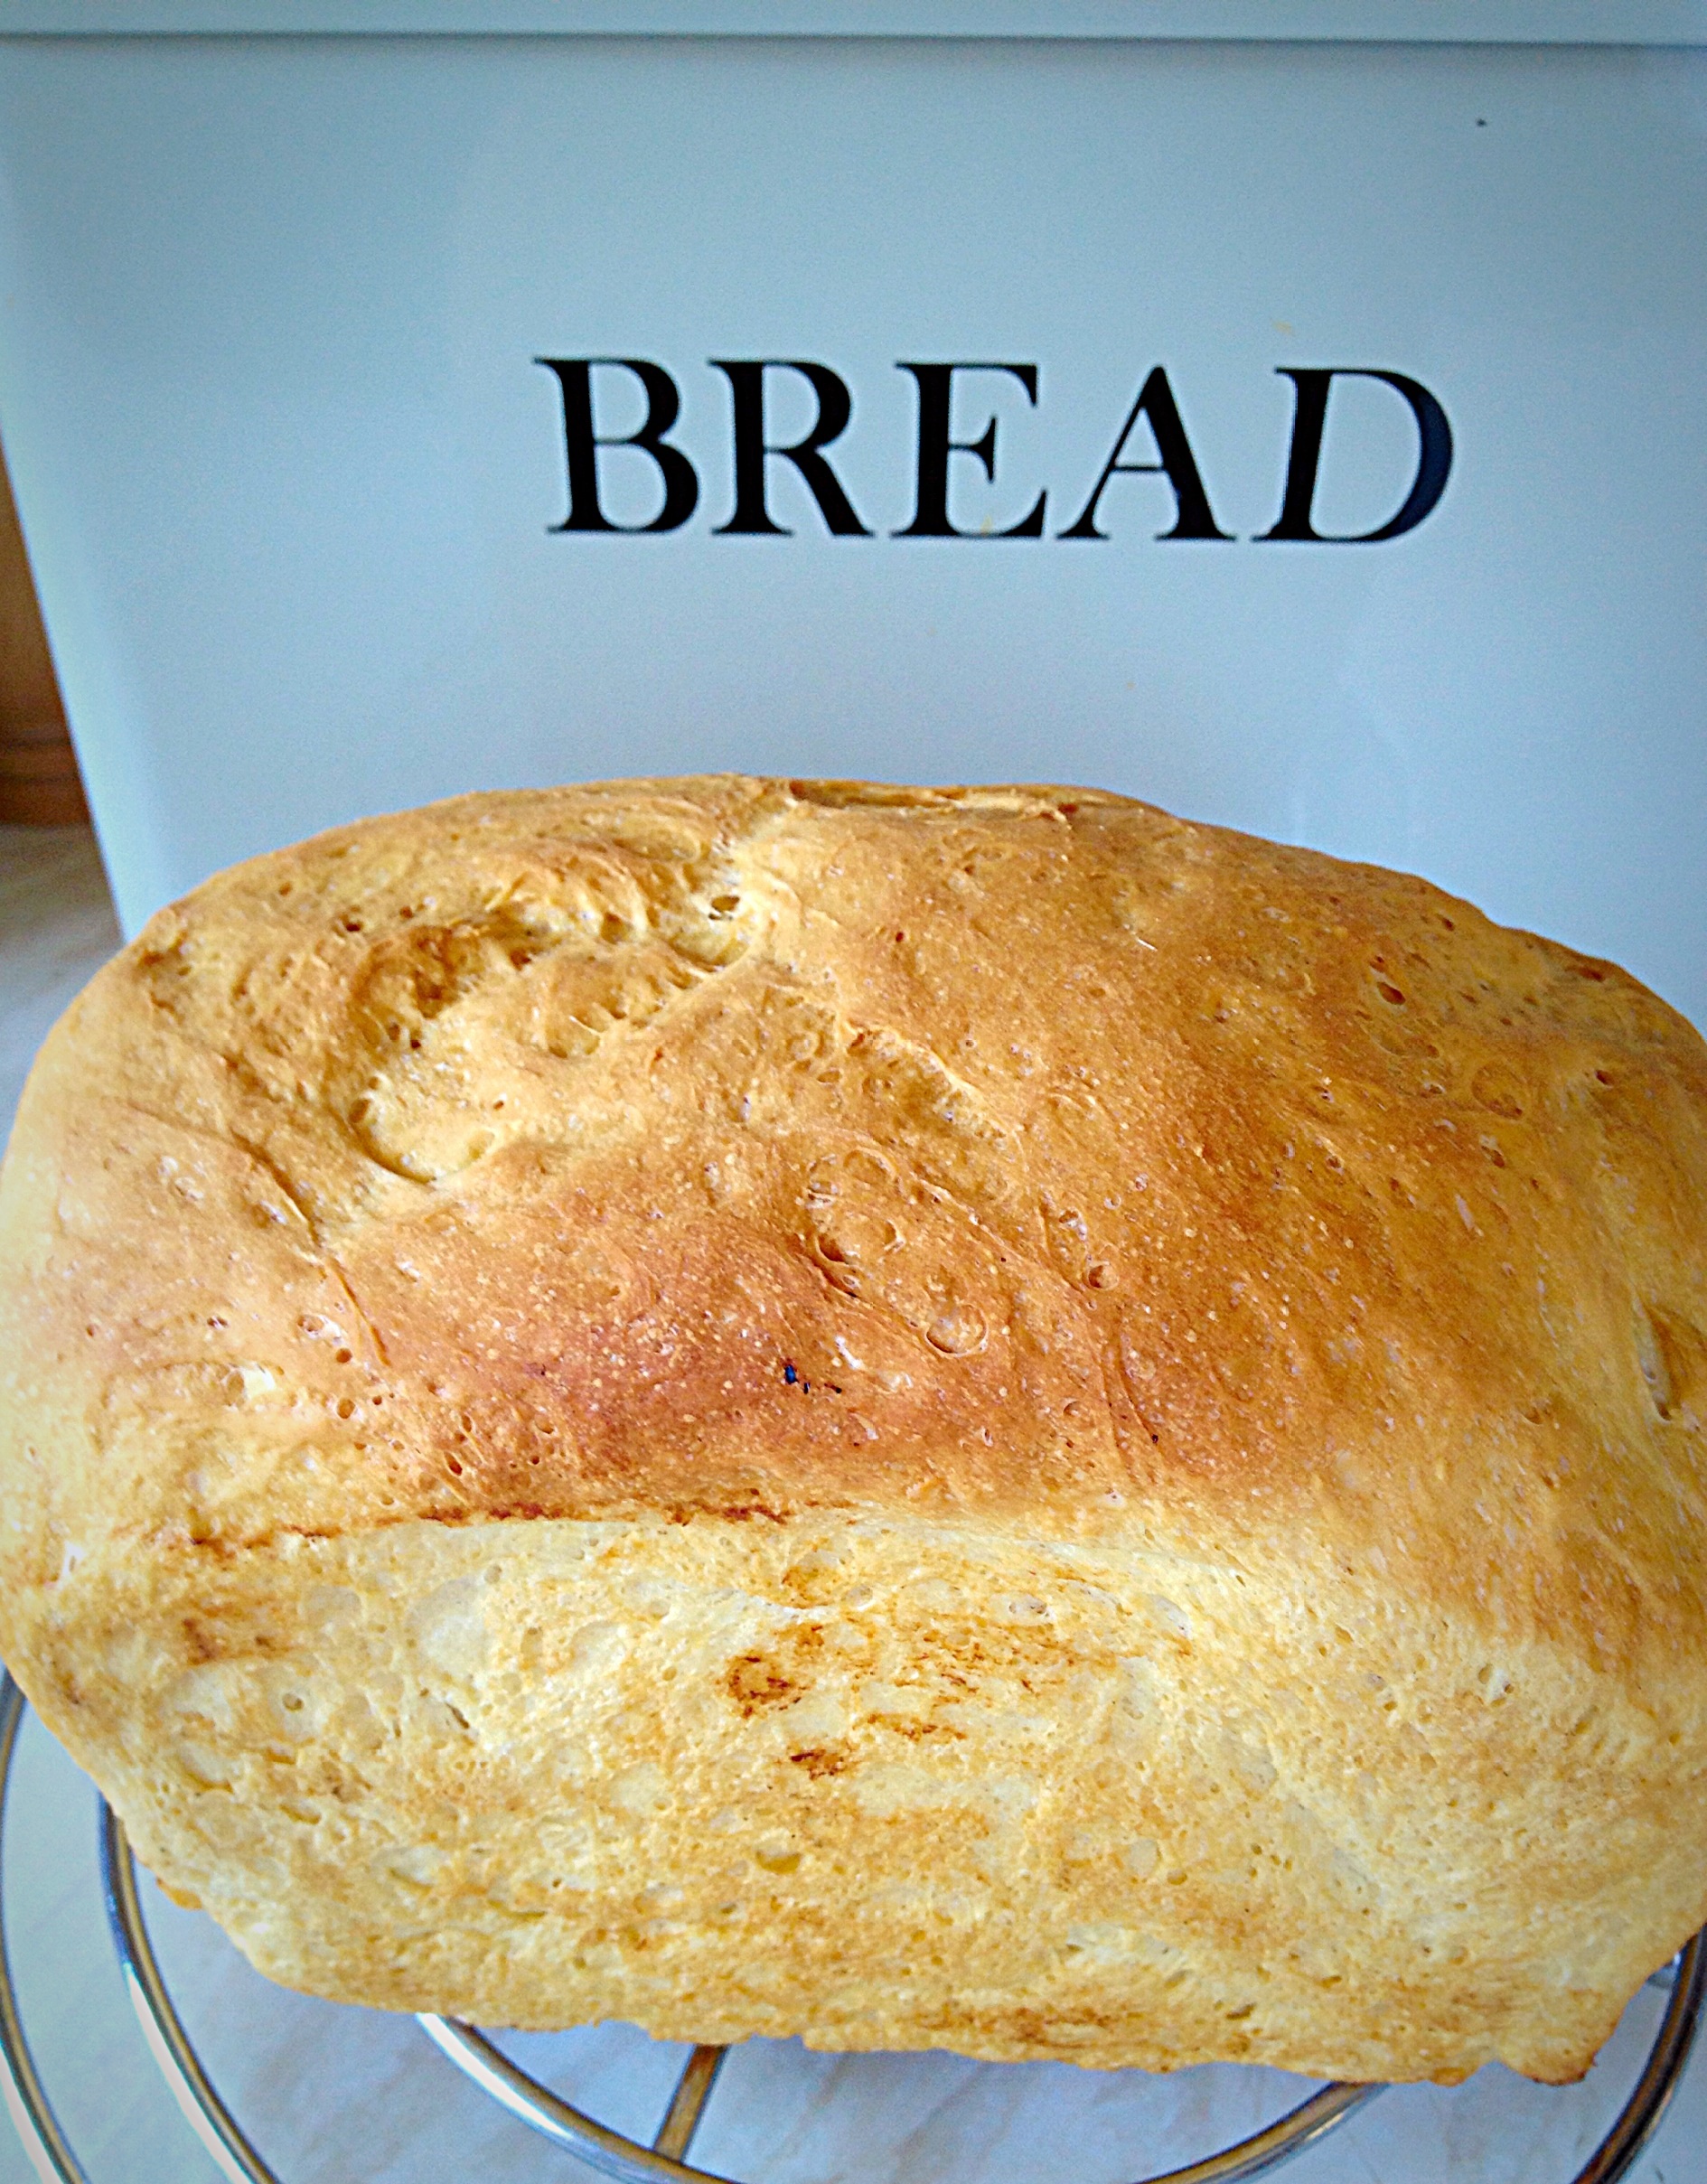
Hi, how are you liking my new site layout? This is my first recipe post : CrustyWhite Bread. Delicious and Homemade,since recovering my site from WordPress Help The WhiteScreen Of Death. It’s not completely ‘fixed’ yet – so I’m going through, remaking some of my earlier recipes and posting them, starting with CrustyWhite Bread.
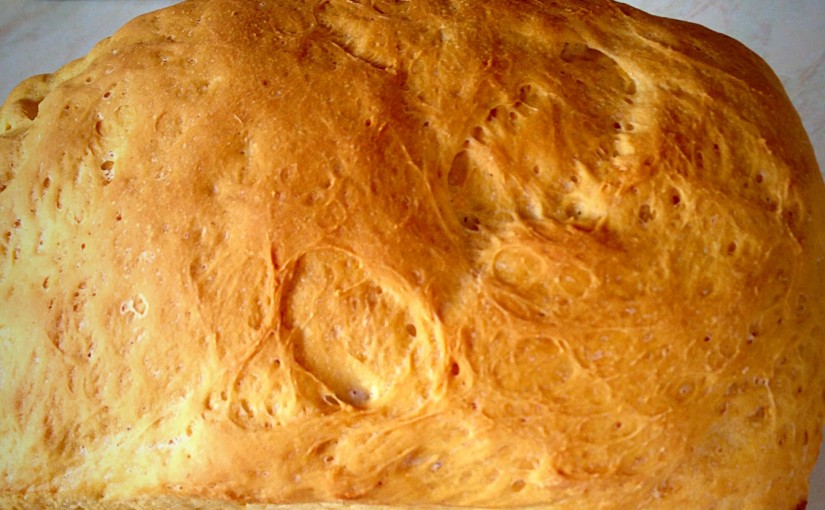
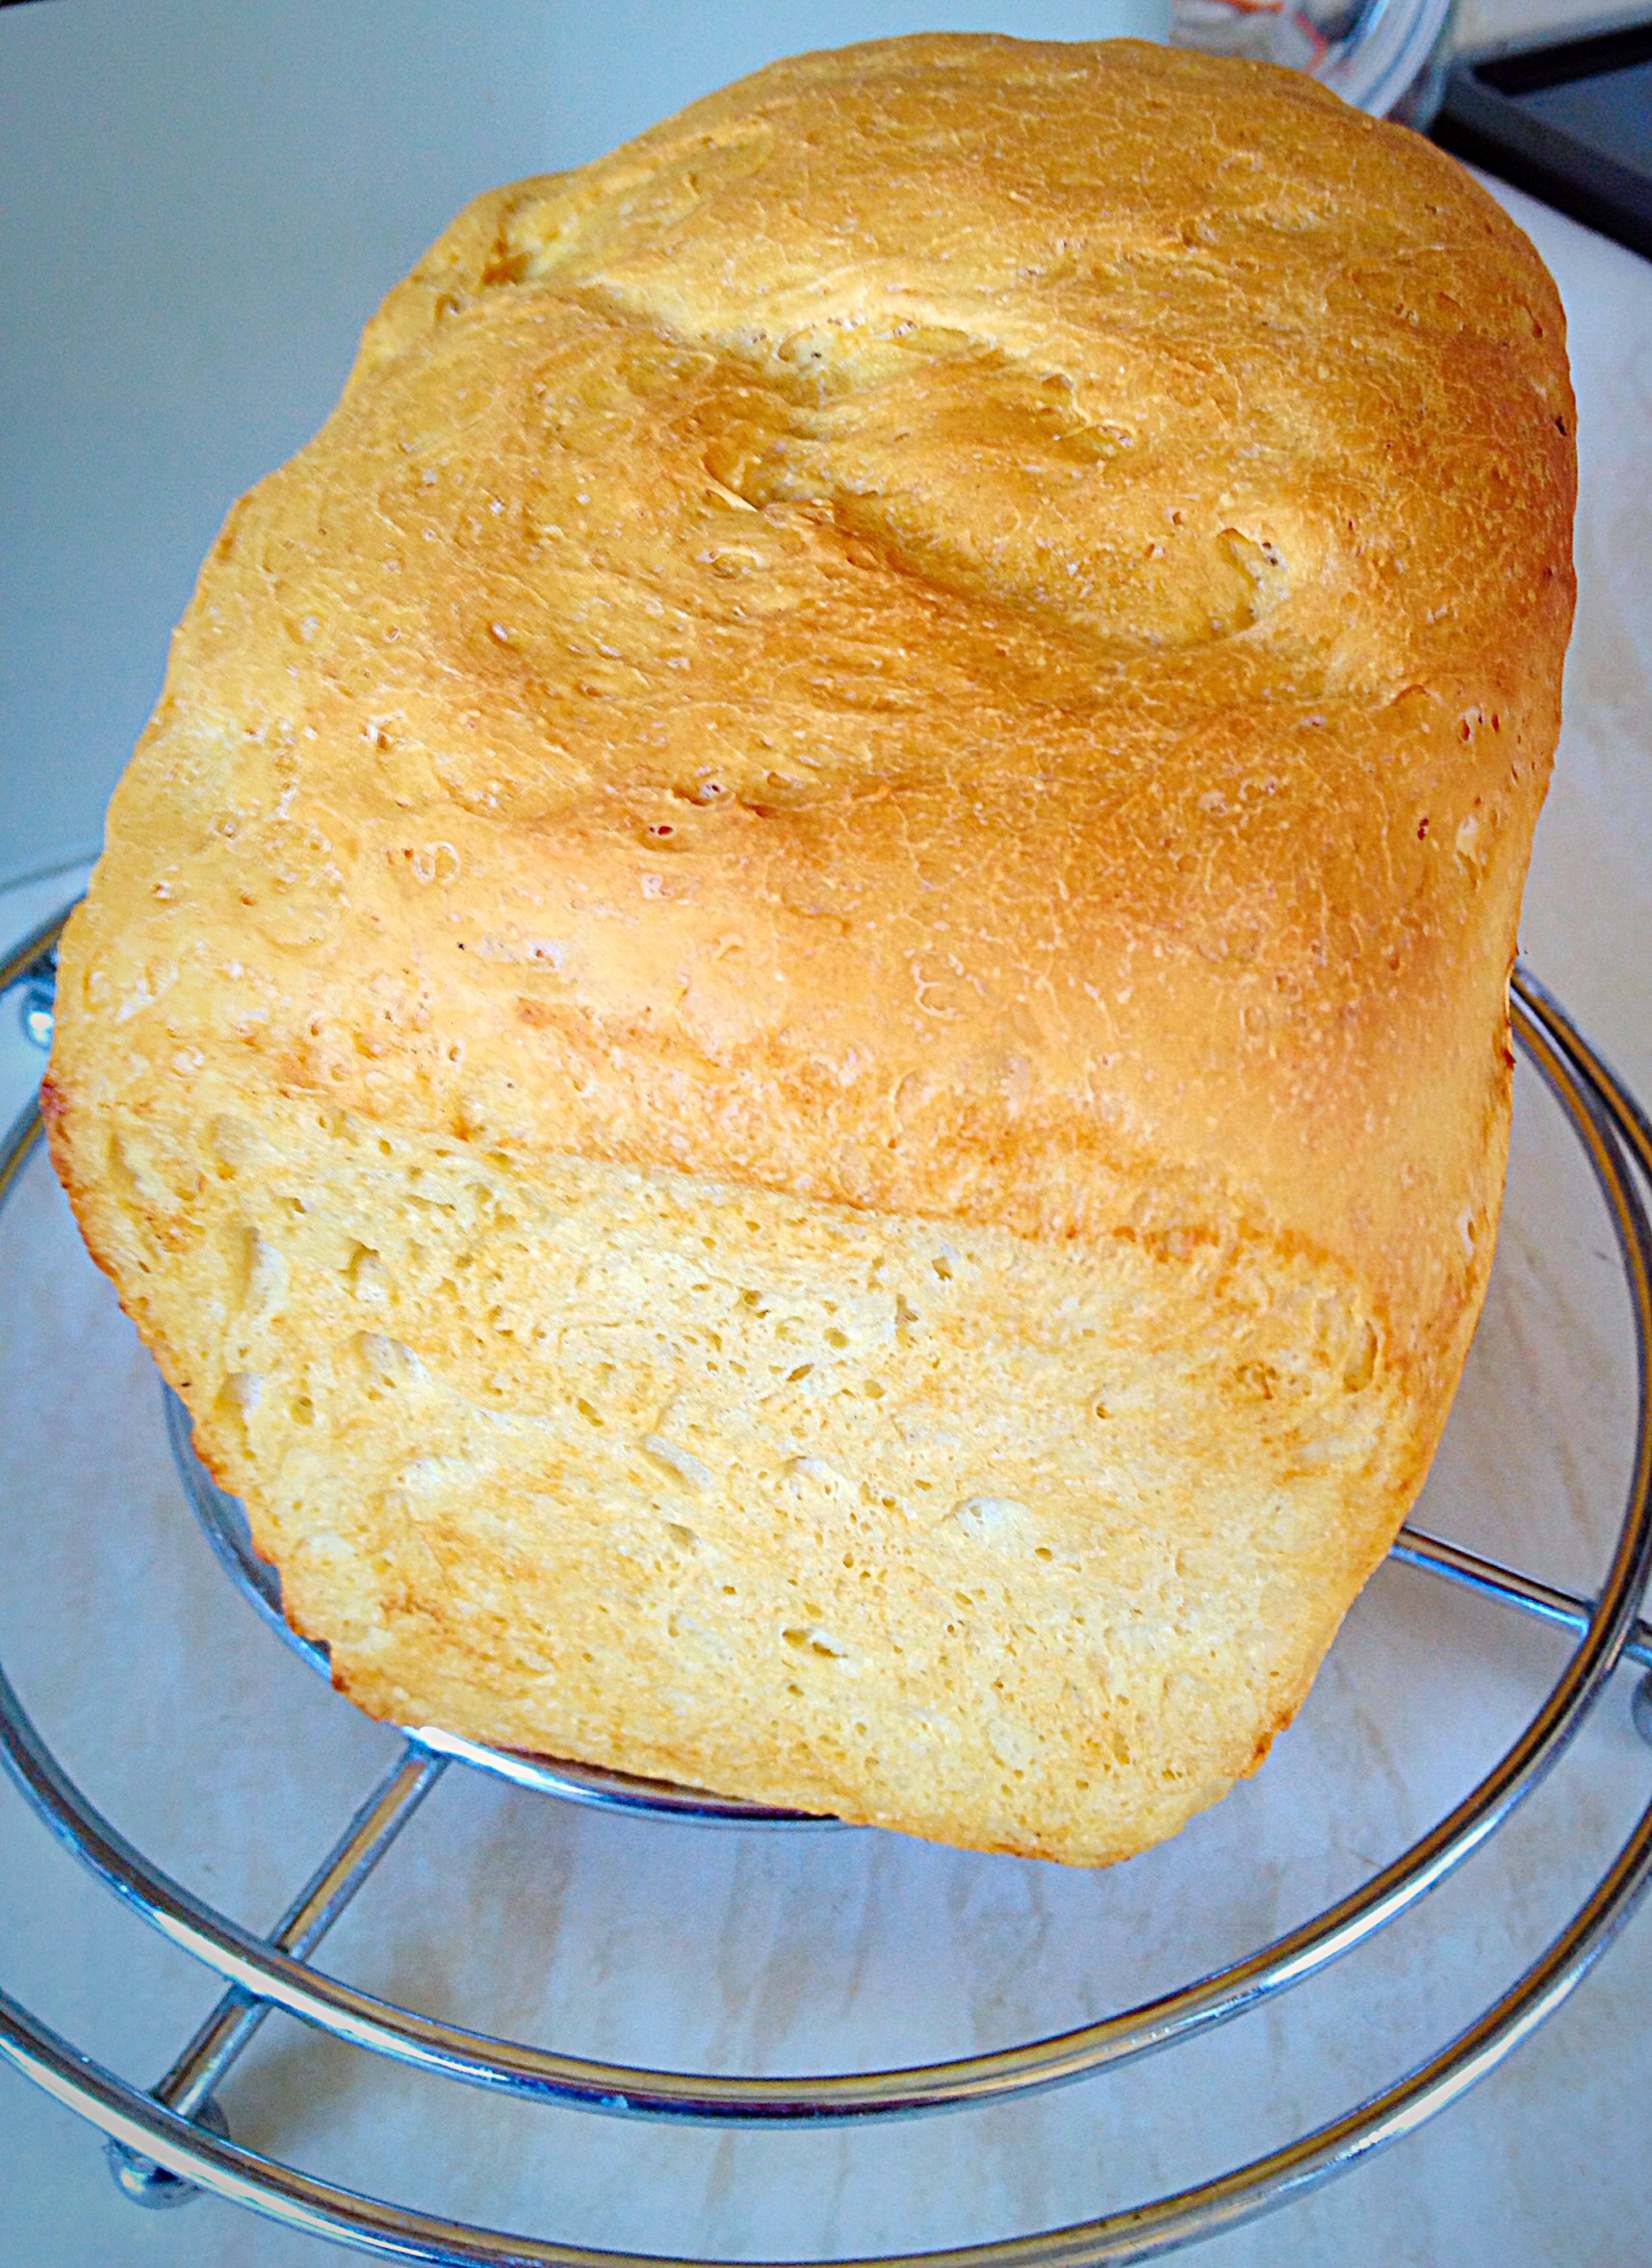
Ooh yummy. Perfect, Crusty, White Bread
This loaf of CrustyWhite Bread is for a small loaf (450g/1lb flour) baked in a 2lb loaf tin.
I just want to take a moment to talk about ingredients; as there are only 5 ingredients in this CrustyWhite Bread it really pays to use good quality flour. Shop brand, cheap bread flour WILL make a perfectly good loaf, however, if you want the BEST tasting loaf; organic, unbleached, strong bread flour will REALLY make a difference!
Yes this flour is more expensive (I buy in bulk online – it really helps bring down the cost), but when comparing the price of a homemade, organic, loaf of CrustyWhite Bread to a shop bought, plastic wrapped loaf, not only is the difference astoundingly smaller, but the quality of the homemade loaf is way, way better!!
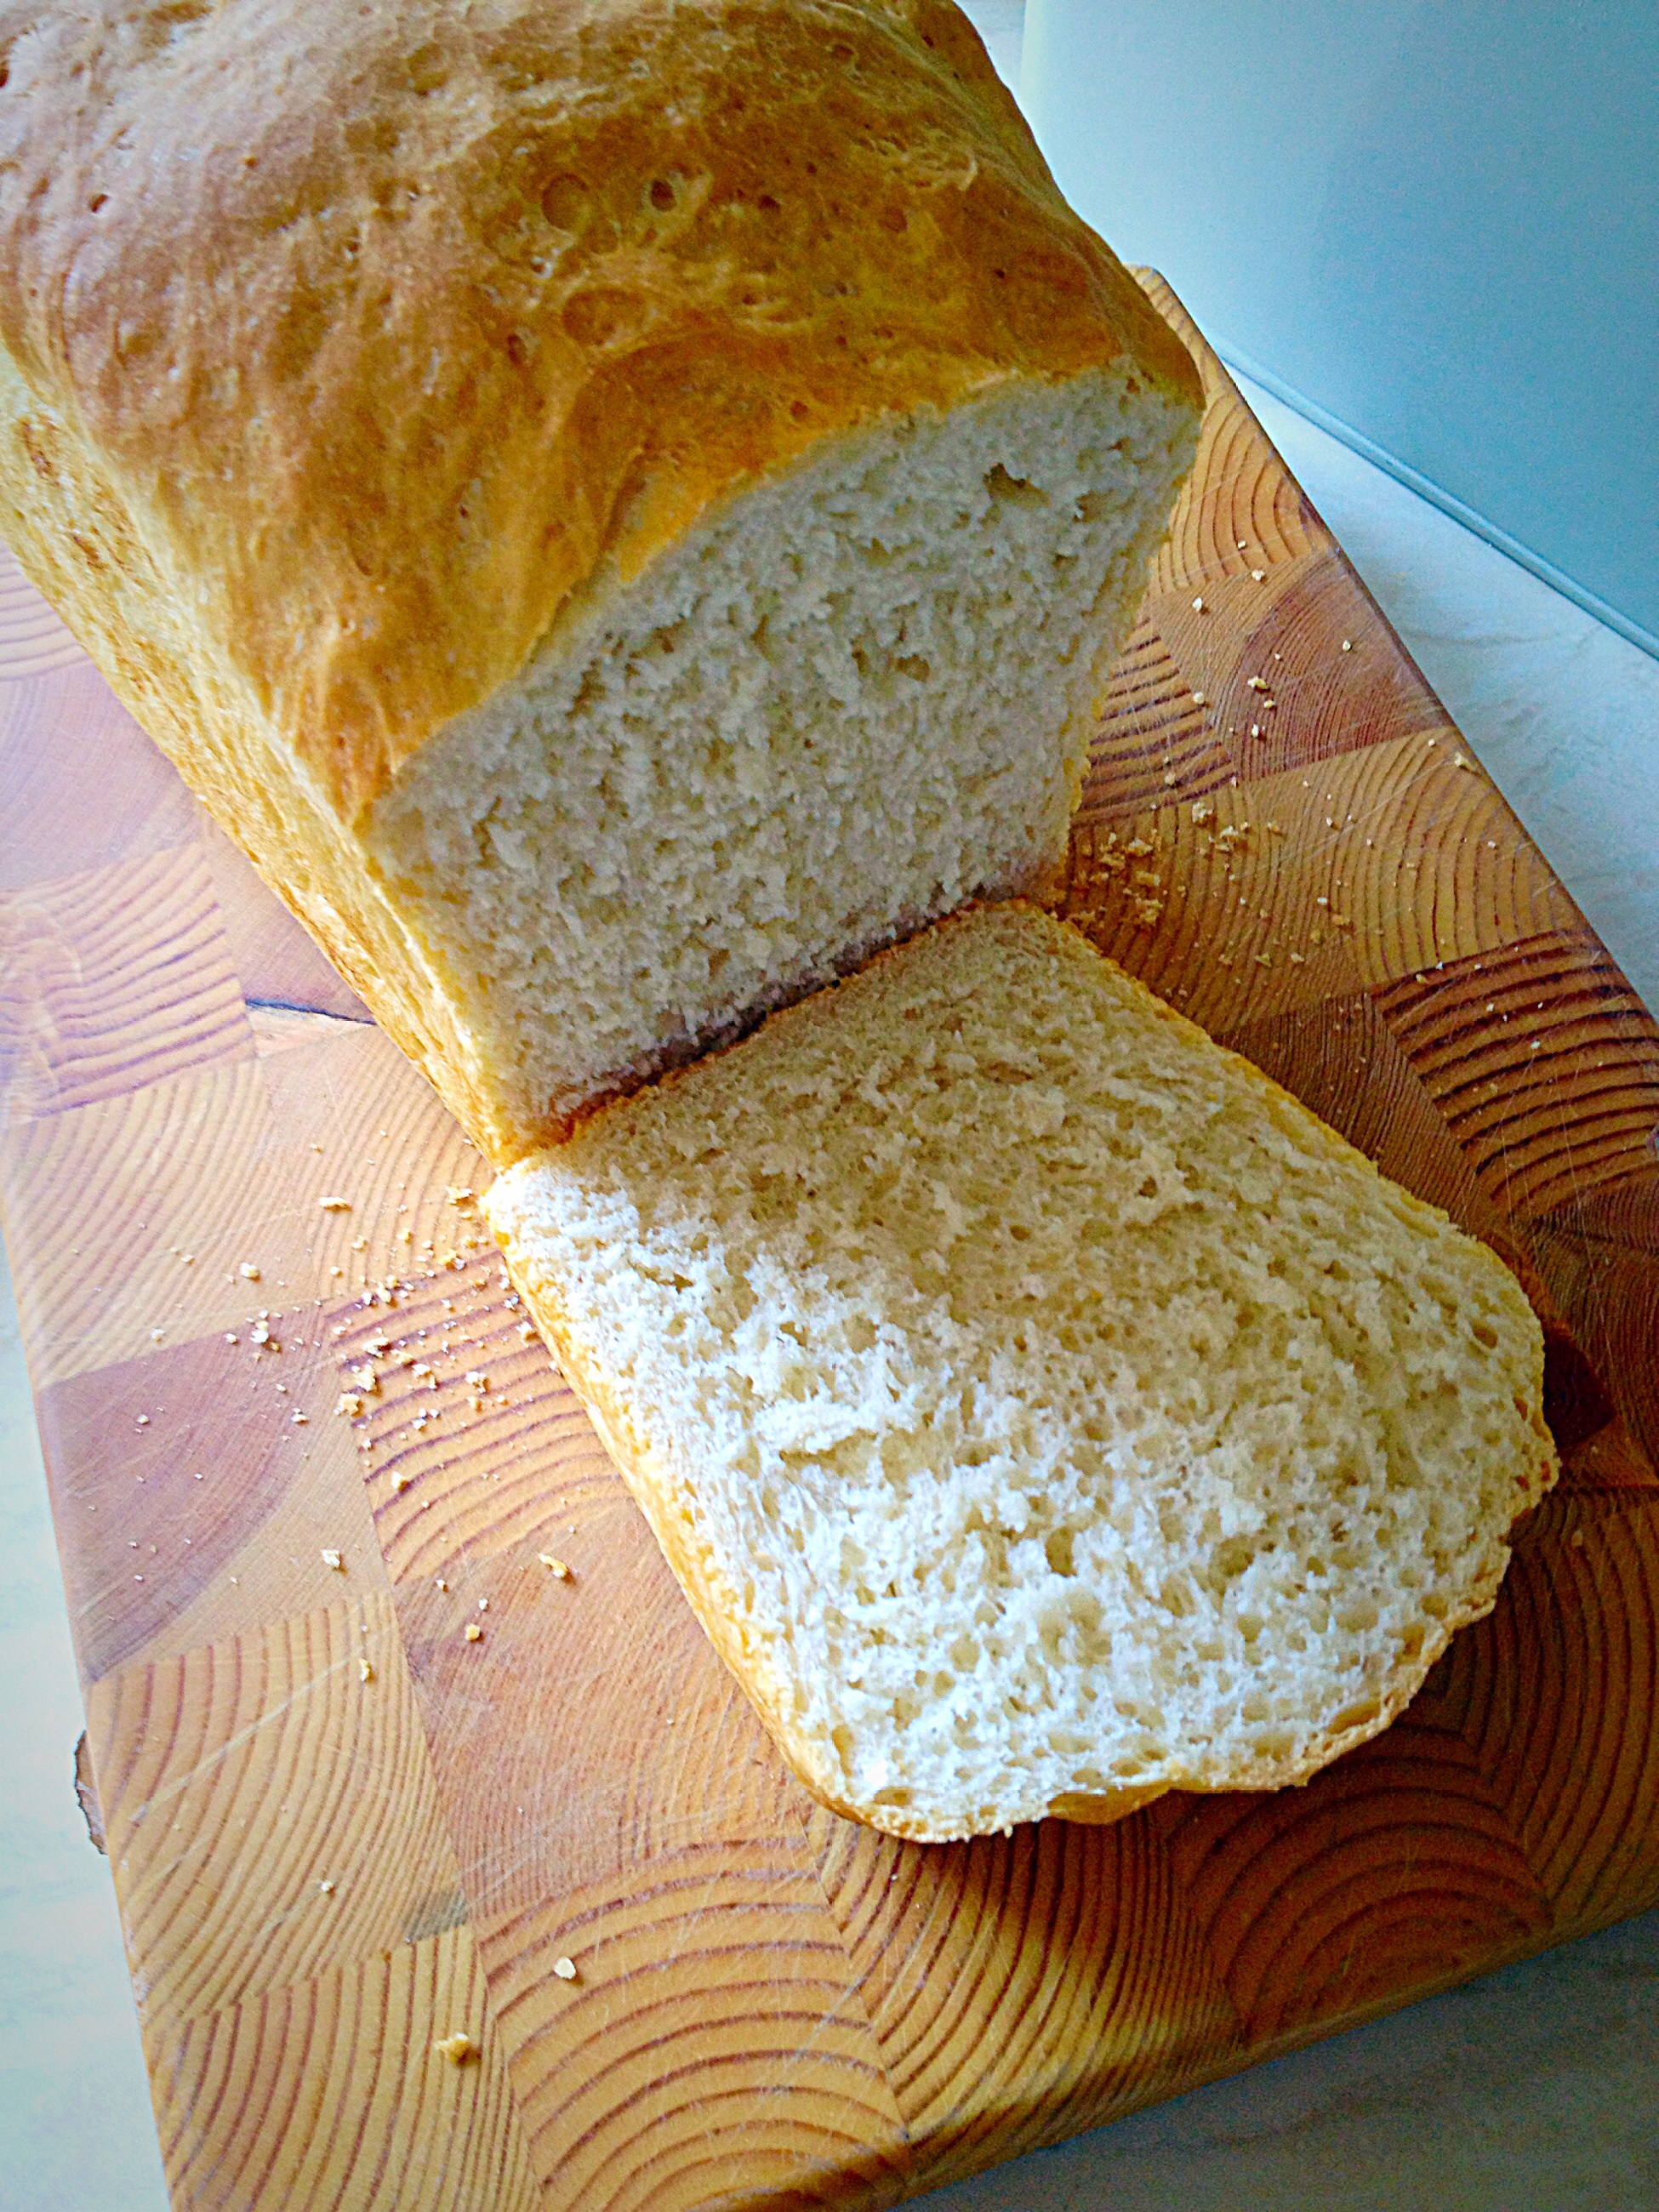
The perfect slice. Lovely soft crumb inside with a nice crunchy crust.
Convinced yet?? Make one loaf of CrustyWhite Bread and try for yourself!
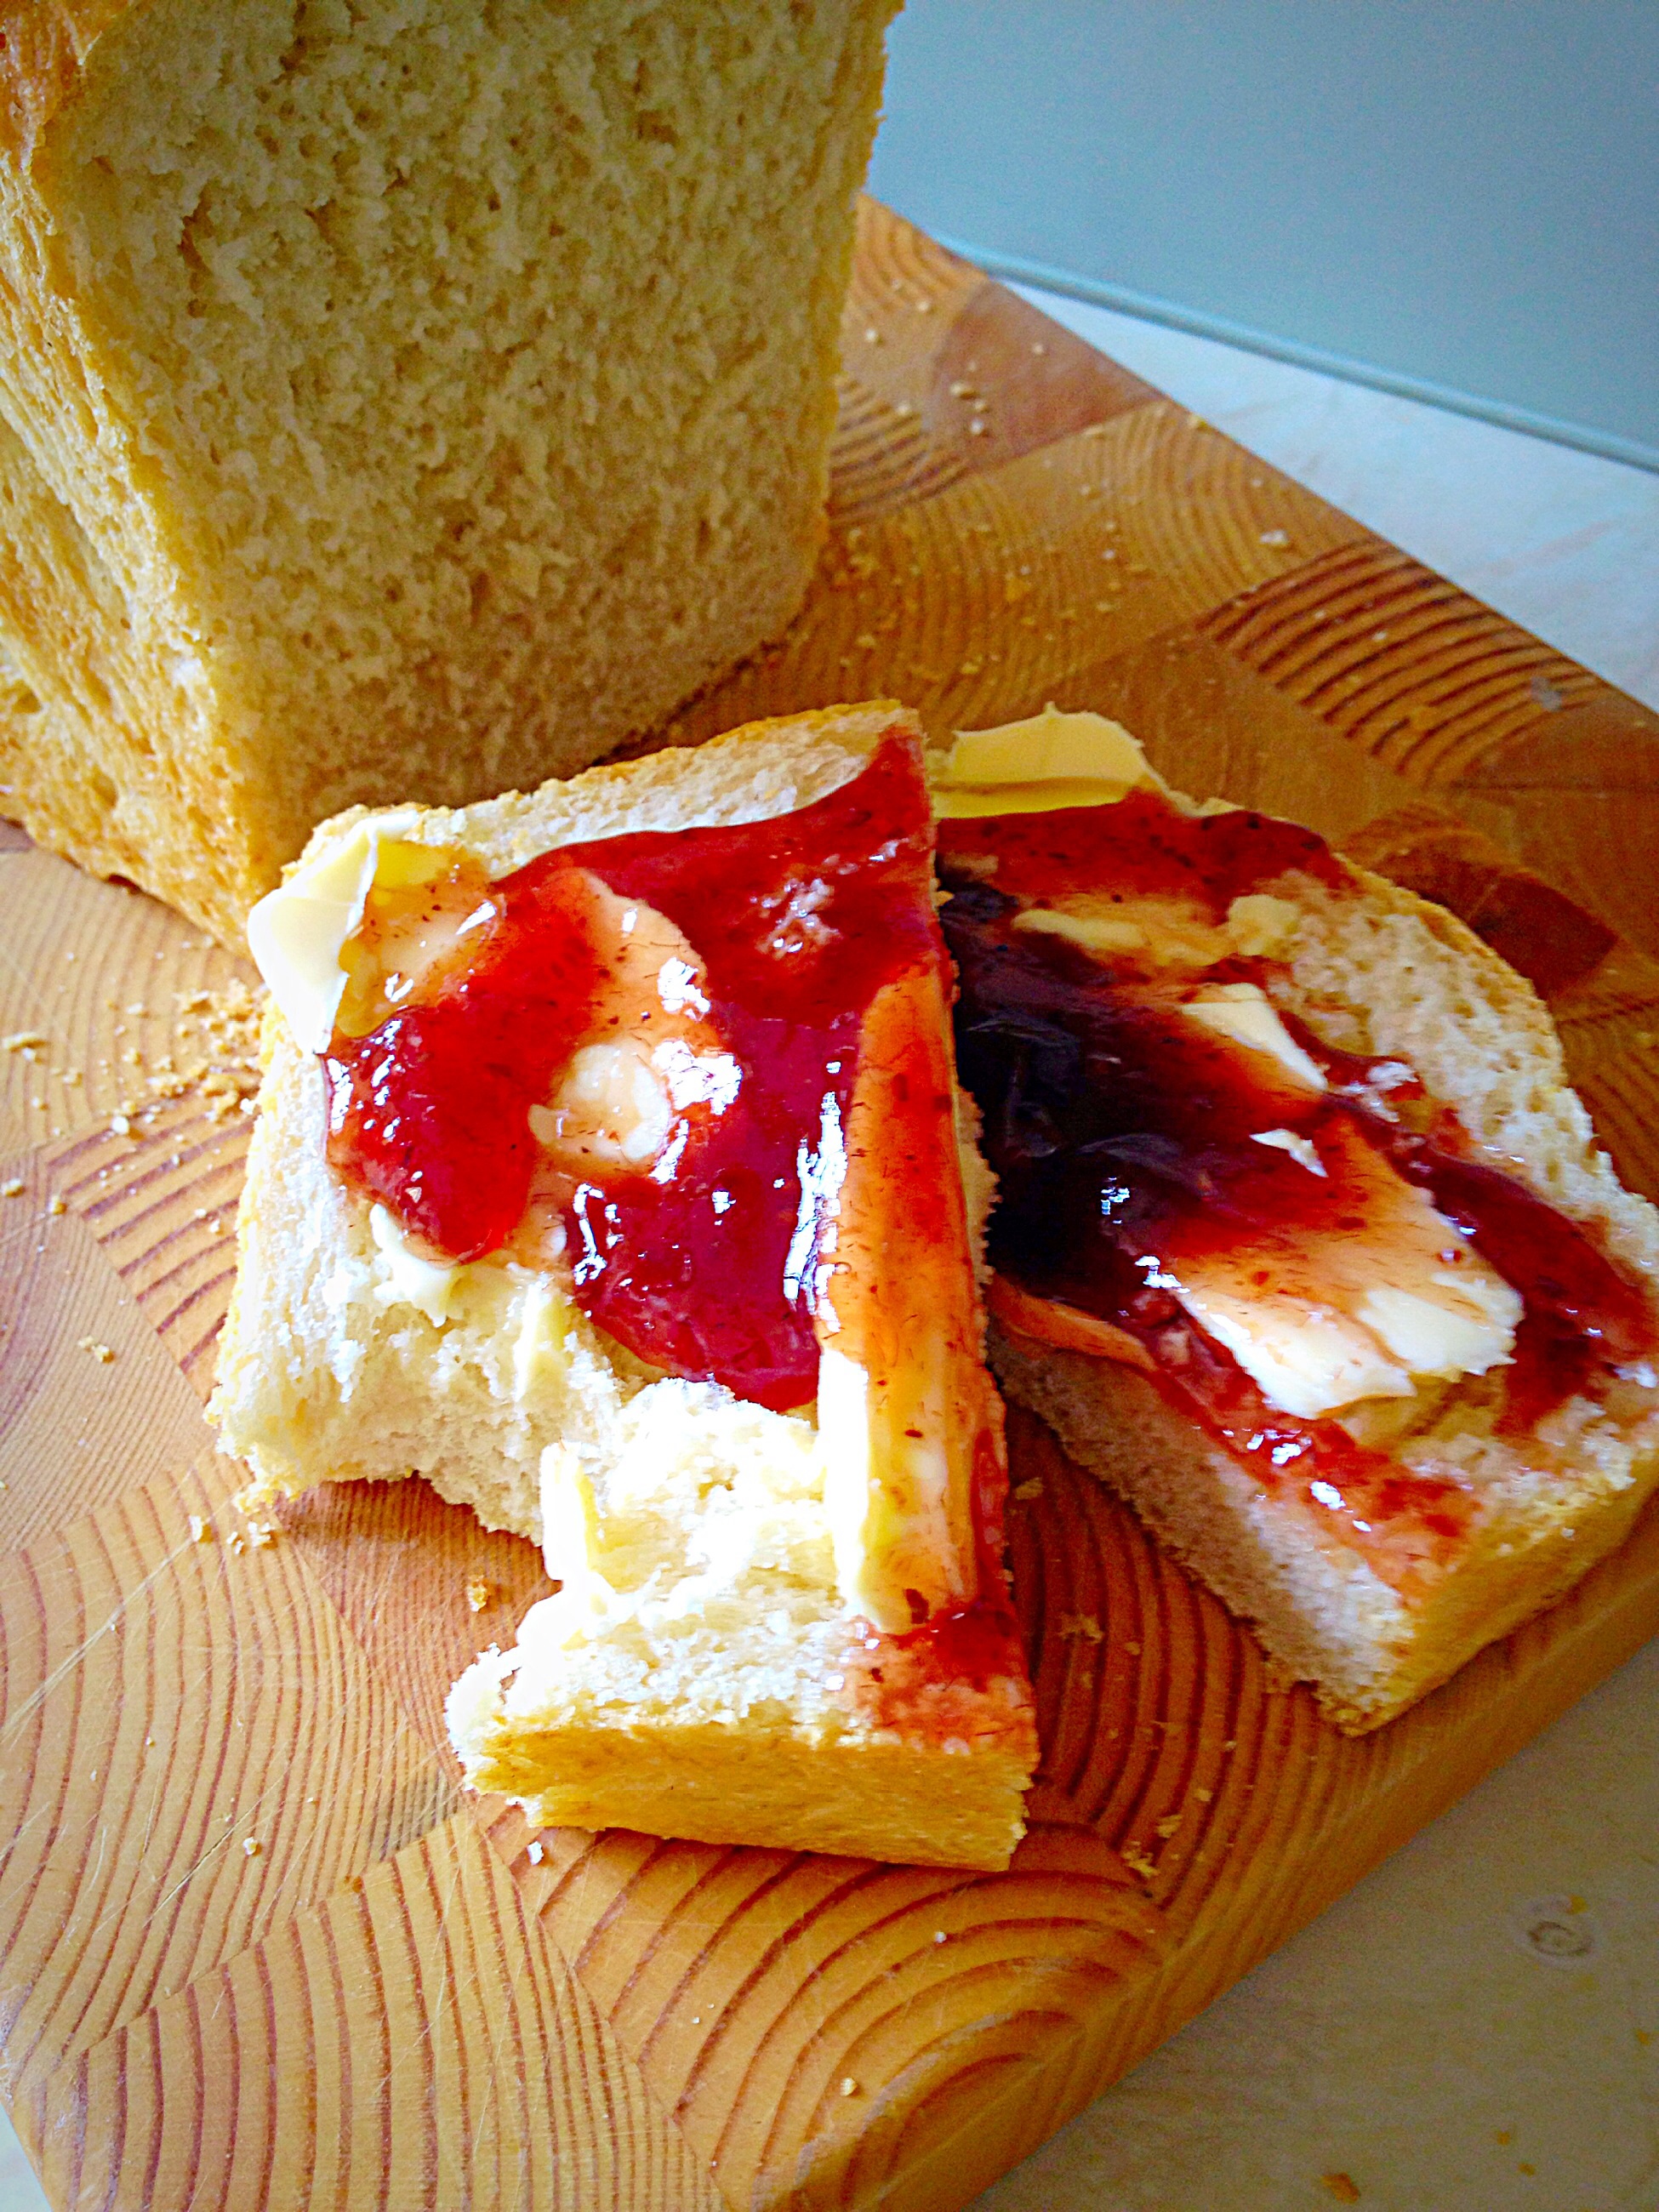
Buttered and slathered in strawberry jam. The best Crusty White Bread ever!!
Recipe :
300ml Tepid Tap Water
1 Sachet/7g Active Dried Yeast
450g/1lb Strong White Bread Flour – I use Organic, unbleached.
3/4tsp Sea salt (1/2tsp free flowing)
25g/1oz Unsalted Butter – cubed
Method:
For ease I use a bread maker to mix, prove and knock back the dough.
You can also make the Crusty White Bread by hand, or use a stand mixer with a dough hook attached.
For the purpose of this and every other Bread recipe, the bowl is a large bowl/the bowl of the stand mixer/the removable container from a bread maker.
Pour 300ml of warm water into the bowl. Sprinkle over the yeast. Add the flour to the bowl. Next add the salt and butter.
Set your bread maker to mix and prove, press start, make a cup of tea!!
Set your stand mixer to slow mix, allow the dough hook to mix and knead the dough for 10 minutes until smooth and elastic. Place the dough into a lightly oiled bowl, cover with cling film, place in a warm, draught free spot until doubled in size 1-2 hours.
*If making the bread by hand, rub the butter into the flour, sprinkle over the yeast/salt and mix through the flour using your hand, make a well in the middle of the flour and add most of the water (280ml). Bring all the ingredients together using your hand (in a claw like position). Mix thoroughly adding the rest of the water if the dough seems dry. Tip out the dough onto a lightly floured surface, using the heel of your hand push out the dough from the centre. Fold the dough back into the centre, rotate a quarter turn and repeat for 10-15 minutes until the dough feels, smooth, springy and elastic in your hands. Place the dough in a lightly oiled bowl, cover with cling film and leave in a warm draught free spot until doubled in size 1-2 hours.
Once doubled in size gently punch the dough in the oiled bowl (if using a bread maker, set to mix for 20 seconds – this will ‘knock back the dough and is the main method I use).
Turn the knocked back dough onto a lightly floured surface. Stretch the dough lengthways, then fold the ends into the middle. Rotate the dough a quarter turn and repeat the stretching/folding/rotating 3 more times – this technique builds structure into the loaf and my bread baking really improved once I’d adopted this small extra technique.
Place the dough into a buttered 2lb loaf tin. Cover with a clean tea towel, leave again to double in size, as before.
Preheat the oven to it’s hottest setting (250C in my oven). Place a deep tray, half filled with hot tap watering the bottom of the oven – this will create steam, helping build a crunchy crust.
Once the dough has doubled in size remove the towel and place the tin in the oven. Immediately turn the oven down to 225C (or down 1 gas mark).
Bake for 20 minutes until golden brown (30 minutes for a thick crust). I then turn my loaf out directly onto the oven rack and continue to bake for a further 10 minutes, this allows the base and sides to get really crusty.
When baked remove from the oven and turn out of the tin immediately (if not already done). The base of the loaf should sound hollow when tapped with your knuckle. Leave to fully cool on a rack.
Nothing beats the smell of homemade bread! Mmmmm
Inhale deeply, enjoy the smell of freshly homemade bread! No matter how many times I bake bread, the smell still warms my heart every time.
Ideally you should leave the loaf to cool completely, it will cut much better when cold. Who am I though to deny you warm bread, smothered in butter???
If you try to cut through the loaf, hot, straight from the oven, the inside will squish together and it will be almost impossible to spread butter on! Give the loaf at least 30 minutes to cool a bit before you start slicing.
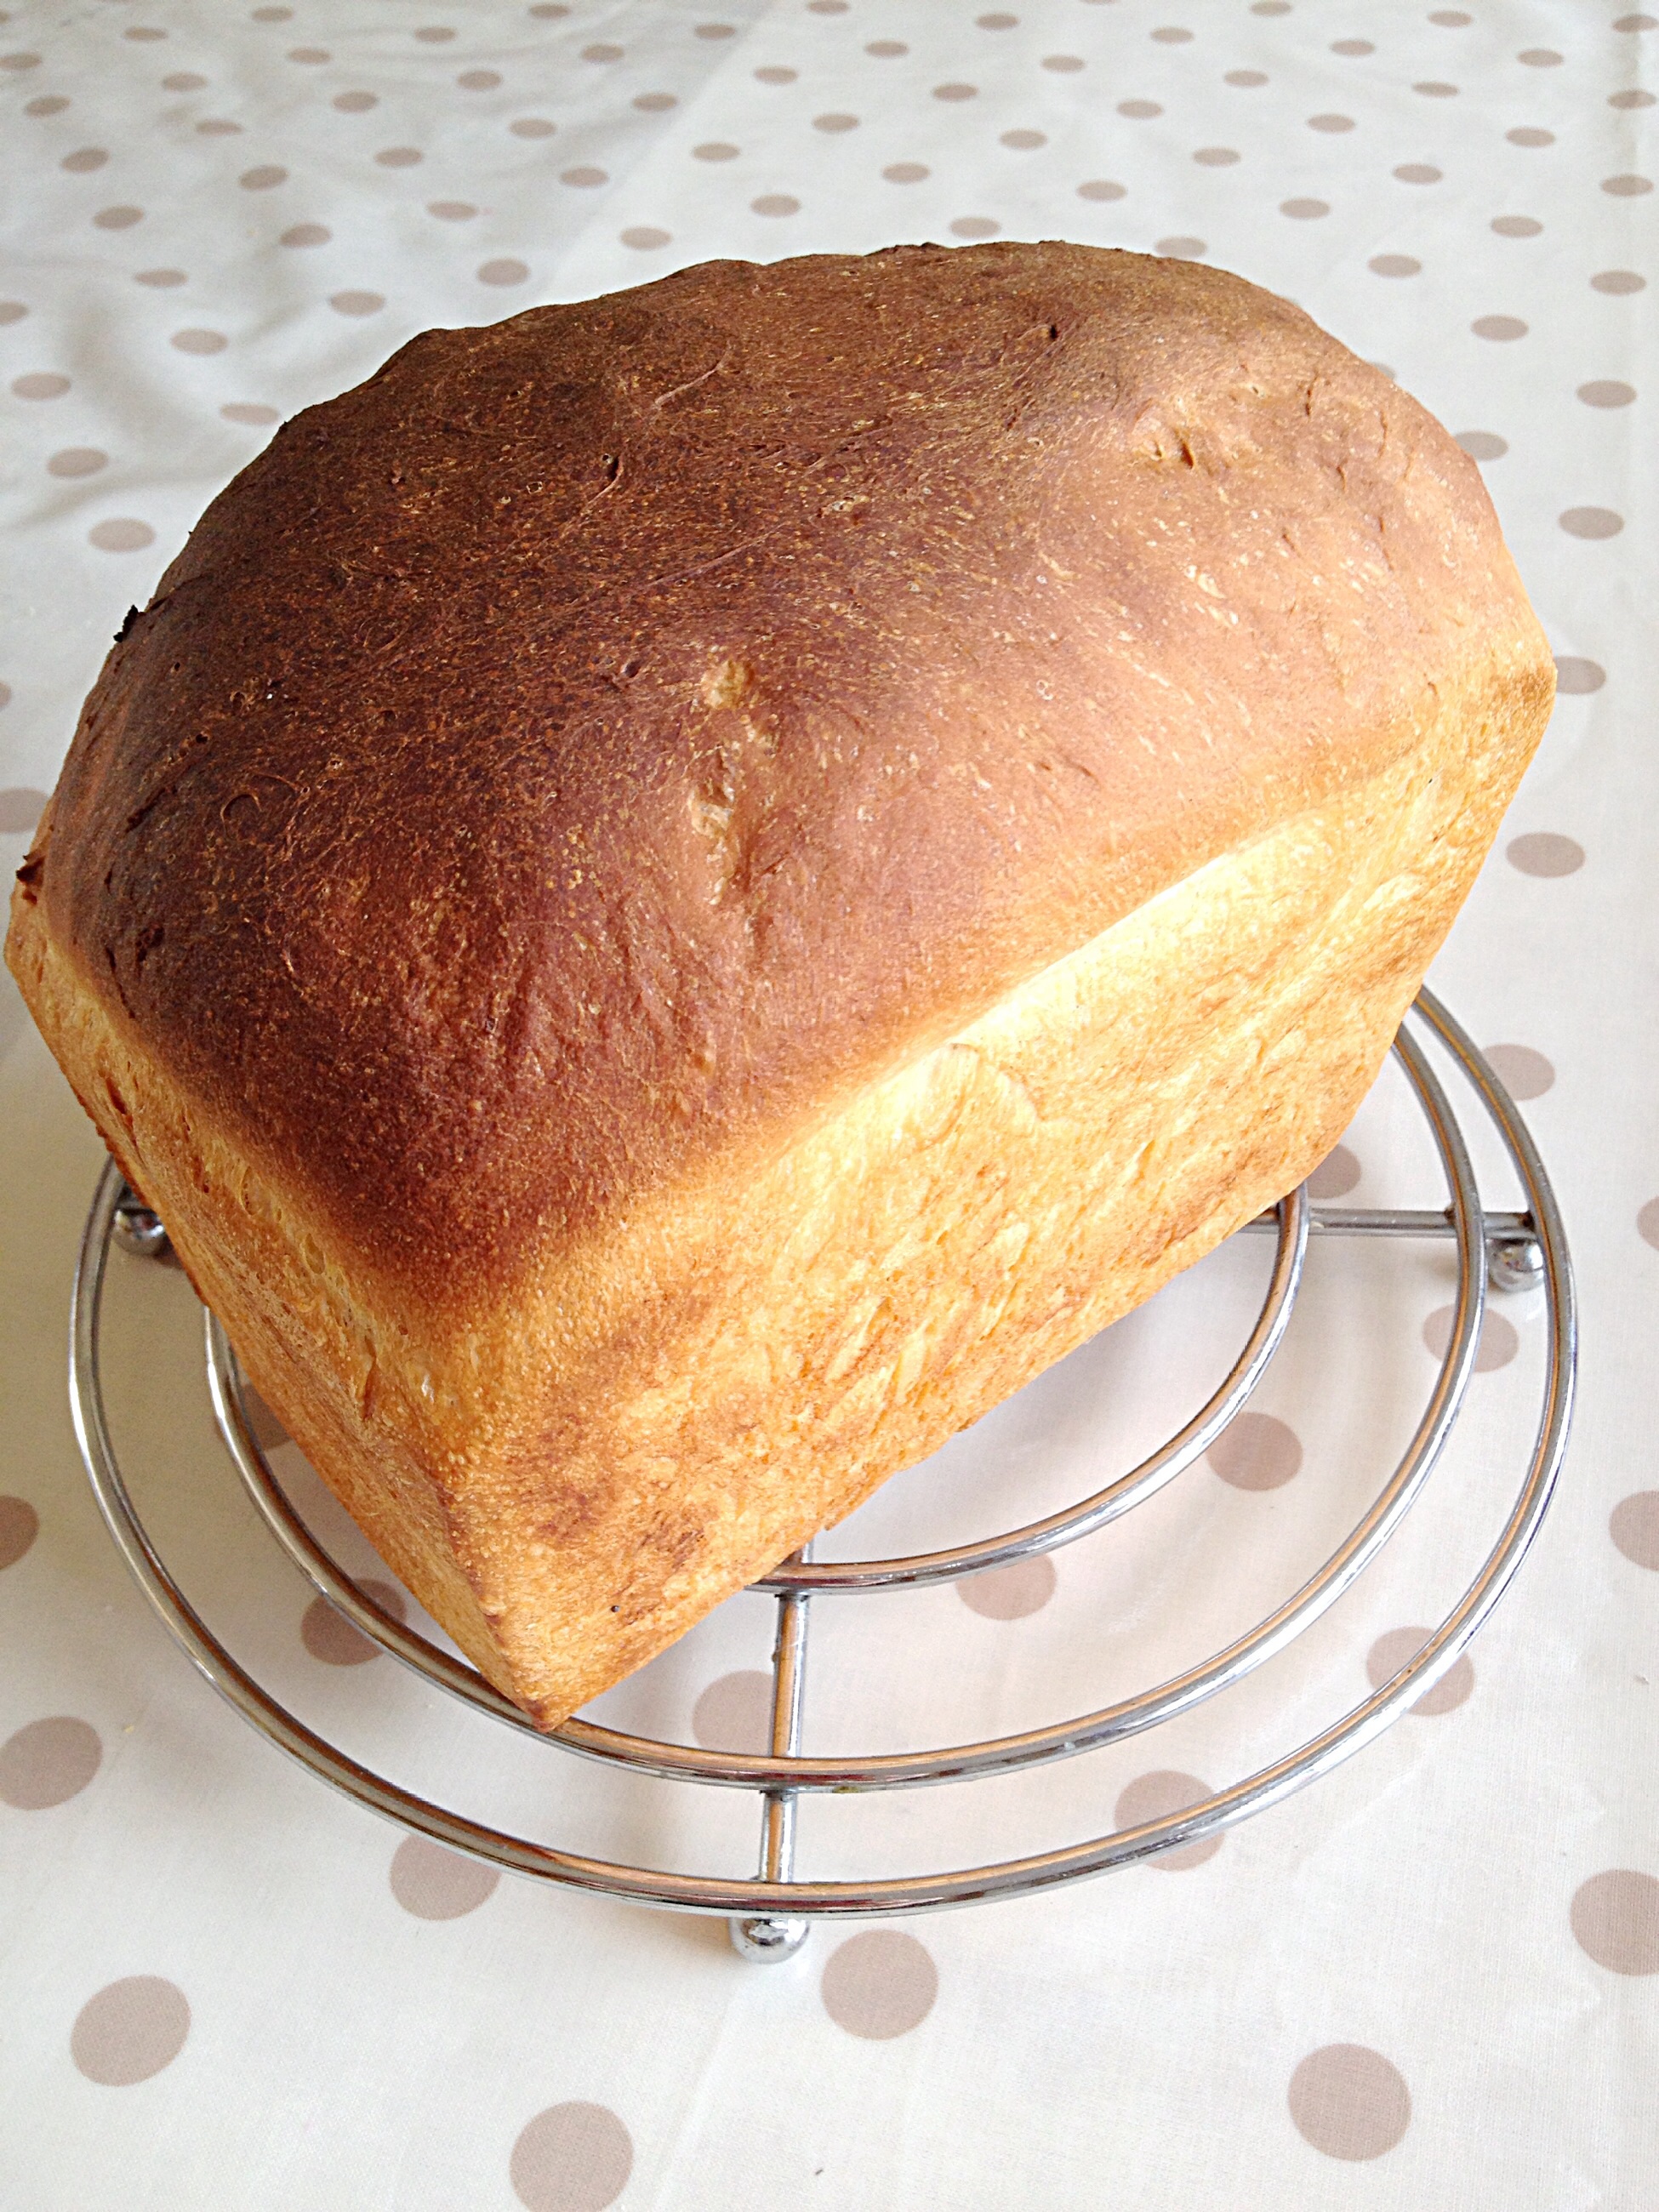
The perfect slice. Lovely soft crumb inside with a nice crunchy crust.
Yummy Crusty White Bread!
The same loaf baked the following day for 20 minutes in its tin – I forgot to turn the oven temp down!!!!!
Bread is the ultimate sharing food. Everyone sitting round the table having toast for breakfast, or dunking thick slices into warming soup. Even Jesus took bread and shared it with His disciples and when feeding the 5000. Wow what a feast that must have been?
Bake a loaf for someone – it will make them smile and feel loved?
Until next time remember Food Tastes Better When It’s Shared!
Hi, if you’re reading this then you are probably panicking, sweating, anxious and worried that all your hard work has disappeared forever as all you see is the WordPress White Screen of Death, when you try to access your WordPress site. Hopefully my recent experience will Help you with WordPress Help Fixing the White Screen of Death.
My site’s crashed and I need Help NOW!!!
Let me say : if you understand coding, know a techy, have a complex site – then this blog isn’t for you, if not read on I may be able to help.
The opinions and advice given in this blog are solely to share my experience of ‘fixing’ my WordPress site https://www.feastingisfun.com
I do not accept any responsibility for individuals actions based on the content of this blog.
If in any doubt please contact WordPress or someone who specialises in working/fixing WordPress hosted sites.
Help! What do I do?????
WordPress Help Fixing The White Screen of Death :
Let me start by explaining what happened : I was trying to insert some code into the Headerphp of my site (I don’t even know what a Header php is – it’s just where I was told to insert the code!). All I had to do was copy and paste some code into a certain place in the Header php – simple you’d think – yep, a doddle! Except it didn’t work. The feed that I was trying to link my blog to didn’t recognise it. So I deleted the inserted code and tried again a couple of times. It still wasn’t recognised and then the worst thing happened – when I tried to review my blog all I saw was an error message and what I now know was TheWhite ScreenOfDeath. HELP?????
A similar error message to this came up on my WordPress site – The White Screen of Death.
Nooooo. Help?????????
This is exactly how I was feeling. Totally outta my depth.
I started Googling like mad ; Help my WordPress site has an error message, how do you fix a WordPress White Screen of Death, etc, etc???? I went onto WordPress.org (unless you understand coding I personally found this the least helpful – it’s almost impossible to contact them for support, you are just redirected to the forums – very disappointed at the lack of direct support).
What do I do? Where do I look? Someone help me pleeeeaaase?
I needed a website called ; WordPress Help Fixing The White Screen of Death
I looked at soooo many sites, all giving good advice on coding!! I set up my blog to write. I am not computer savvy AT ALL. In the end, despite potentially losing 6 months of work, I started to look at how I could reinstall/reset my site. Drastic I know, but I had tried different coding remedies and I was just making the problem worse.
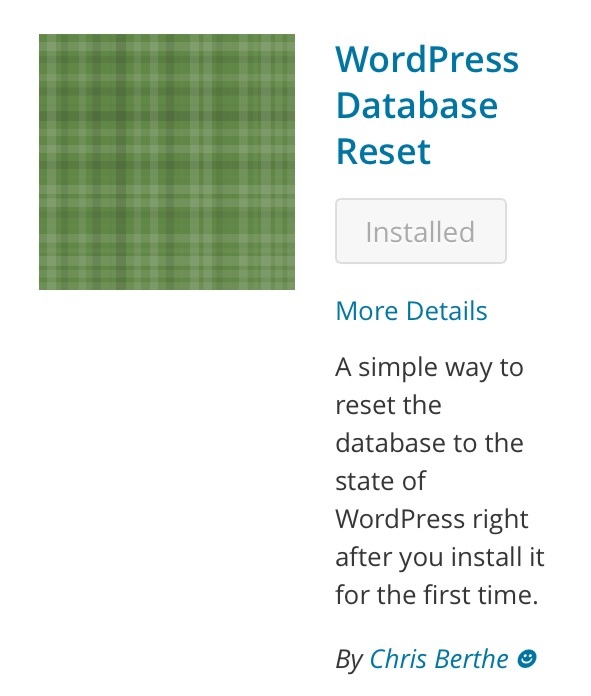
Then I stumbled upon a site (I’m sorry I was in such a state I didn’t think to save the sites name). It recommended a plugin that would reset my WordPress site to its default settings. Hope and help finally.
Now this is where my computer’s/iPhone’s history was vital. I loaded an earlier (2 days previous) edit page from a post. It’s IMPORTANT to load a page that was saved prior to the coding error AND that the page is in EDIT MODE – this should allow you to access your PLUGINS-through the Dashboard. DO NOT load your site through view post, or directly through the blog title, this will just cause the updated, incorrect code to be loaded with that post and you will see is an error message on The White Screen Of Death!
Click on Plugins – add new. Type in WordPress Database Reset.
This is the plugin I found and used.
This WordPress Database Reset Plugin by Chris Berthe, is the Plugin recommended by the site I had visited. It is worth mentioning on the 6th March 2015 my site was running the most up to date WordPress version and the Plugin I used had not been verified as suitable with my version of WordPress!! I was DESPERATE!!!! Once you have found this Plugin click on Instal. You are now one step closer to recovering your site!
Once the Plugin is installed you will be given the option to ‘remove’ certain aspects of your site. These include content/media/comments etc. By clicking on the ‘remove’ button these components of your site WILL NOT be reset to default. In my haste I only ‘removed’ content (all my blogs) from being reset. Once you are happy with the parts of your site that you want reset click ‘Activate’. I held my breath and prayed.
Phew. All had not been lost. I recovered my WordPress site’s content.
I then viewed a post and it was there!! All of my writing and photos. The Set Feature image was lost and the Yoast SEO plugin that I had previously installed wasn’t working. It didn’t matter though. I had ALL of my content.
It worked. All of my posts were still intact along with photos!!!!
Sure my site was reset to the default black and white, I had lost all of my customisations. I was absolutely gutted that I had also lost all of my comments; invaluable words of support and encouragement gone, forever. Still I had my content – I initially thought I would lose everything, so by comparison I came out of it quite well.
As part of the reset all images in my Media file weren’t named or linked to the blog. I also can’t see them – there is just a box with image.jpg, but the images still showed up on each blog. I have now installed another Plugin which has systematically renamed and link each image to its blog!
What have I learned from experiencing The WordPress White Screen of Death?
* I will absolutely NEVER EVER insert code into my site’s code, EVER, EVER again! I may insert code on a blog page – for example, with BlogLovin’ you copy and Paste code onto the beginning of a new blog. BlogLovin’ then recognises this and you can claim the blog.
* Up until and including today my site https://www.feastingisfun.com has been set up and fully run using my iPhone 4S! I now intend to start using a computer to write/post my blogs.
* When using a computer I will regularly (once a week) backup my site.
* I know absolutely nothing about code and admire those who understand ; () <> %% {} numbers and figures. This allows me to sit down, press a button, log in and write.
* I realised how important my blog was to me. Not only the content, but the comments ; readers actually connecting with an article – Migraine – not all Sunshine and Roses – really hit a spot with my readers. I’ve only been blogging for just over 6 months, imagine if it had been years?
* How supportive the blogging community are towards each other. My heartfelt thanks to the guy who wrote the article about WordPress Database Reset. I’d been searching ALL day for something to help me!
* I will look around at other blogging platforms before I renew my hosting contract with WordPress.org in a few months time. They have no direct support system (that I could find). WordPress rely on their ‘forums’ to help people. I do not write/understand code. I set up a blog so that I could have a creative outlet, not so that I could become a computer whizz!!
* I hope by sharing this information with you, should you ever need it, it’ll be a lifeline and help you resolve site issues more easily.
* Which blogging platform do you use? How do you rate the support offered by your host? Has the White Screen of Death ever happened to you? If so how did you fix it?
Finally a big thank you to all of my readers, I’m sorry I’ve lost your comments. Hopefully I will publish future content that will inspire you to comment again.
I’m still not 100% finished with my blog customisation yet – but on the bright side I’ve changed the colours and tweaked a few other bits and pieces!