Baked Whole Epoisses De Bourgogne bubbling, gooey, pungent cheese.
Do you like cheese? Then you will love this rich, melted Baked Whole Epoisses De Bourgogne, perfect for dipping, dunking and feasting on.
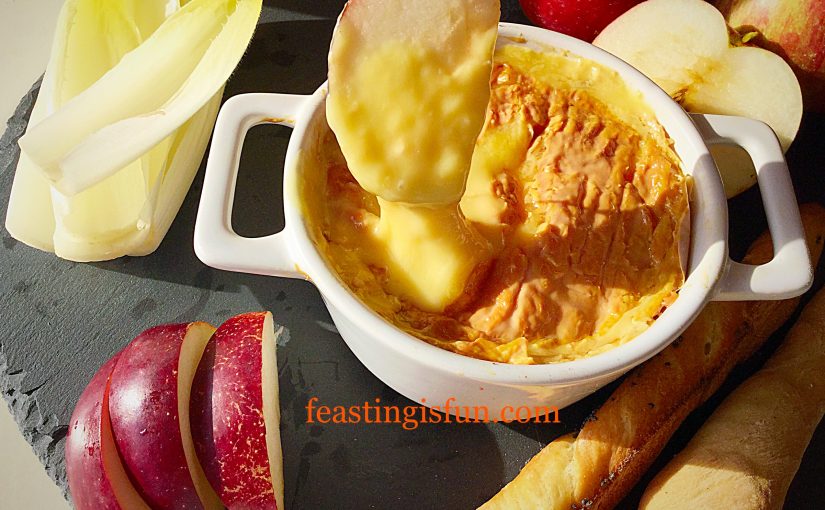
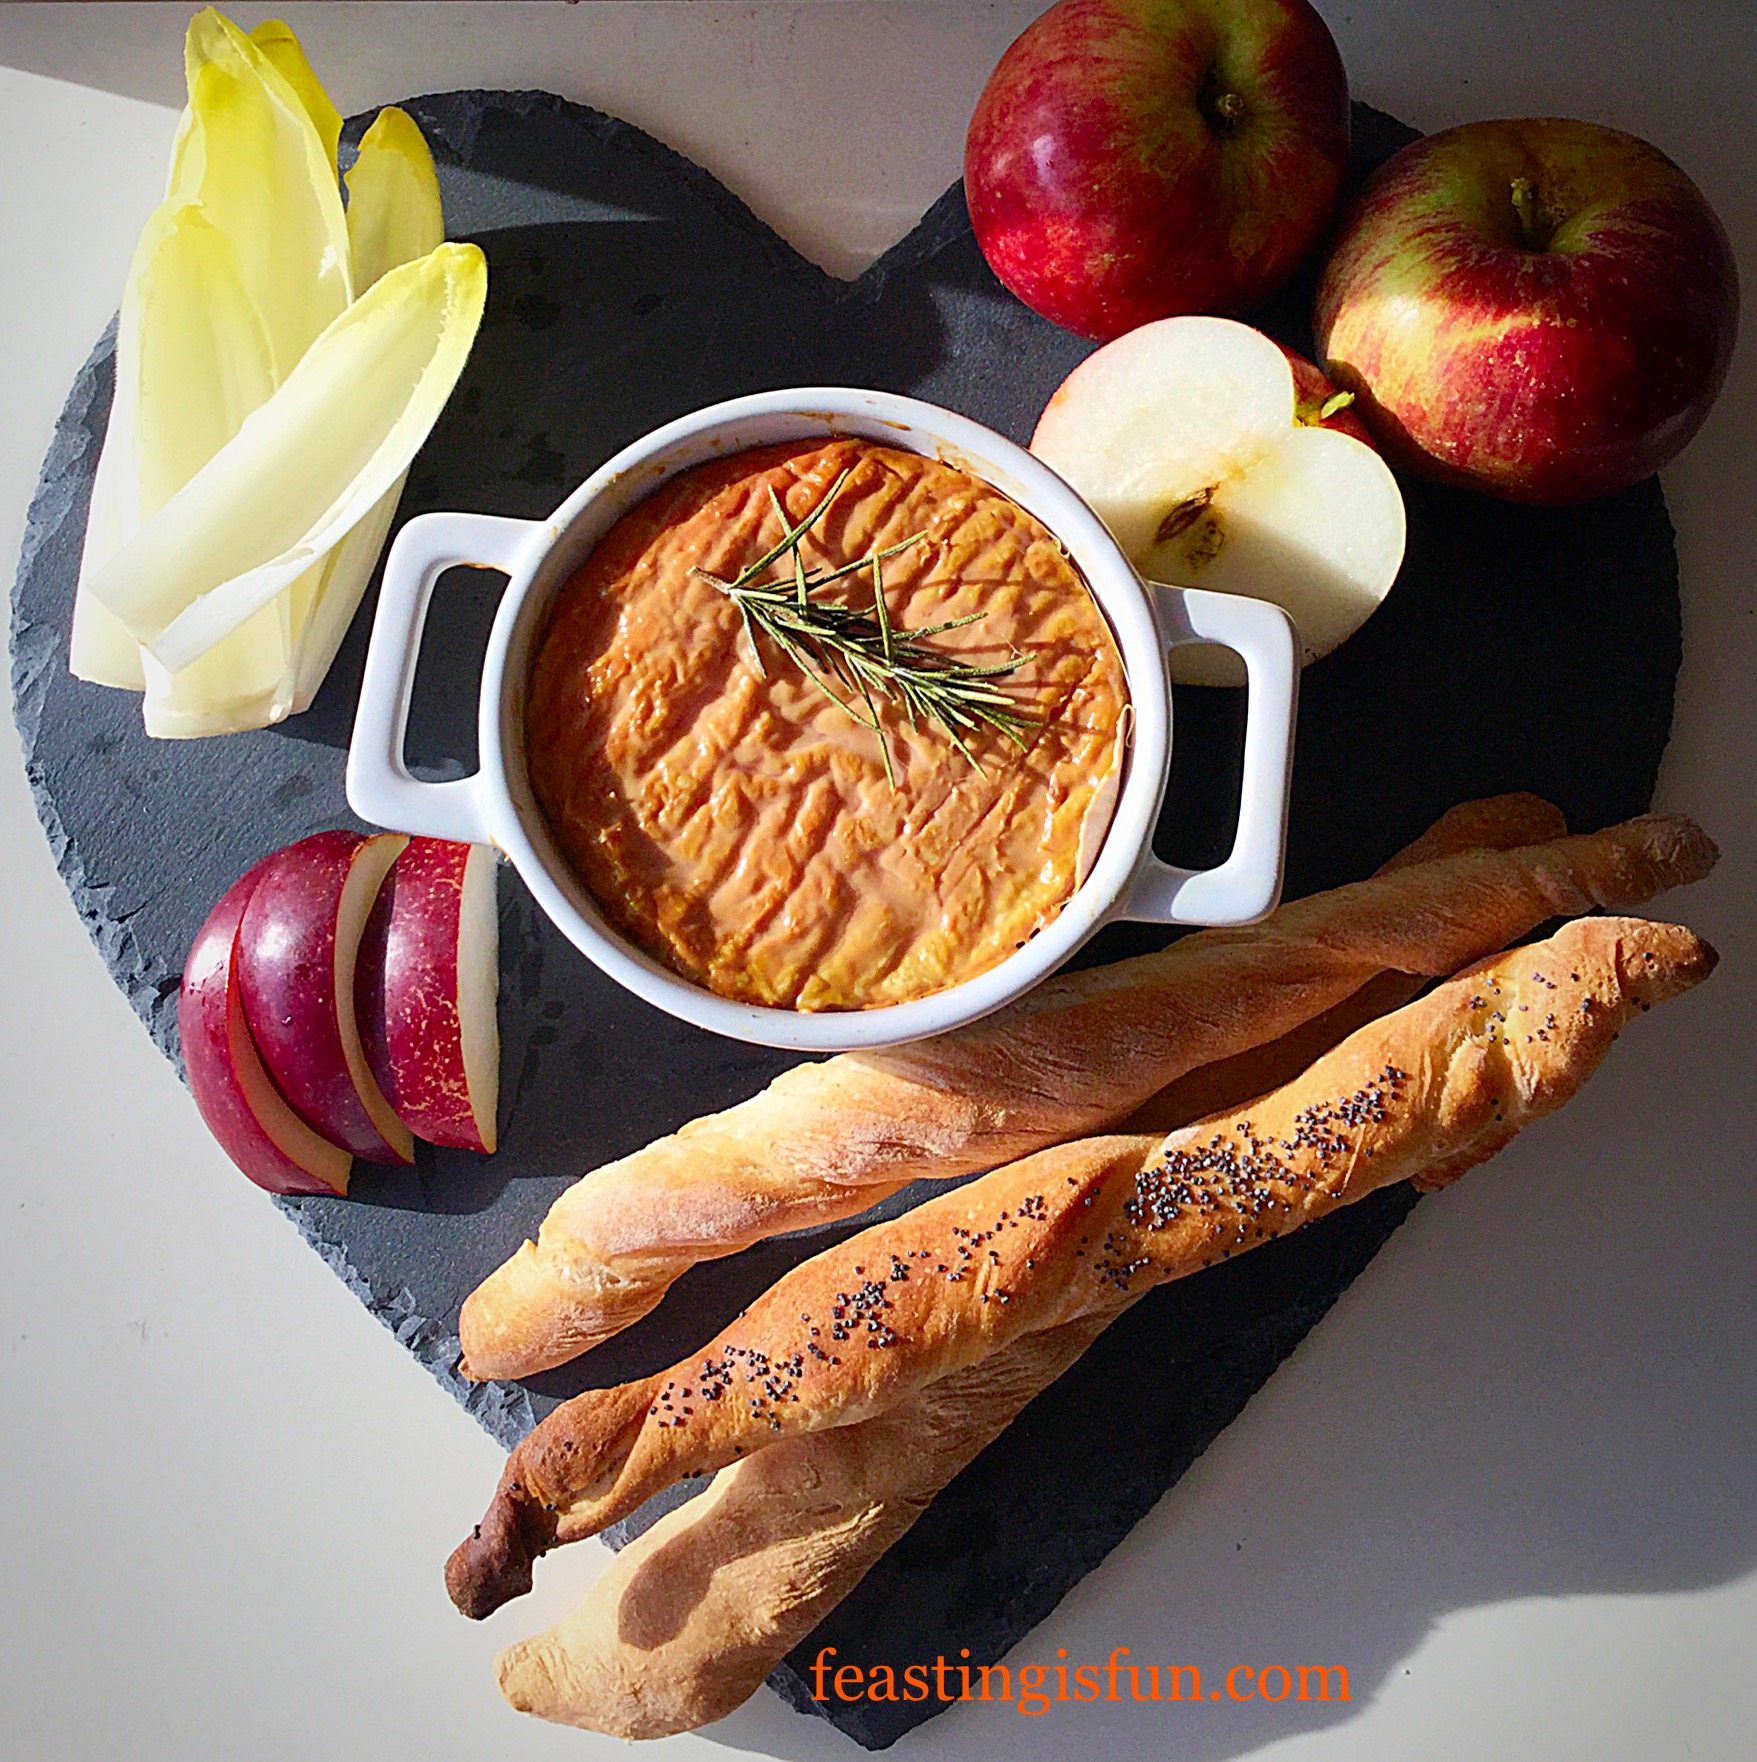
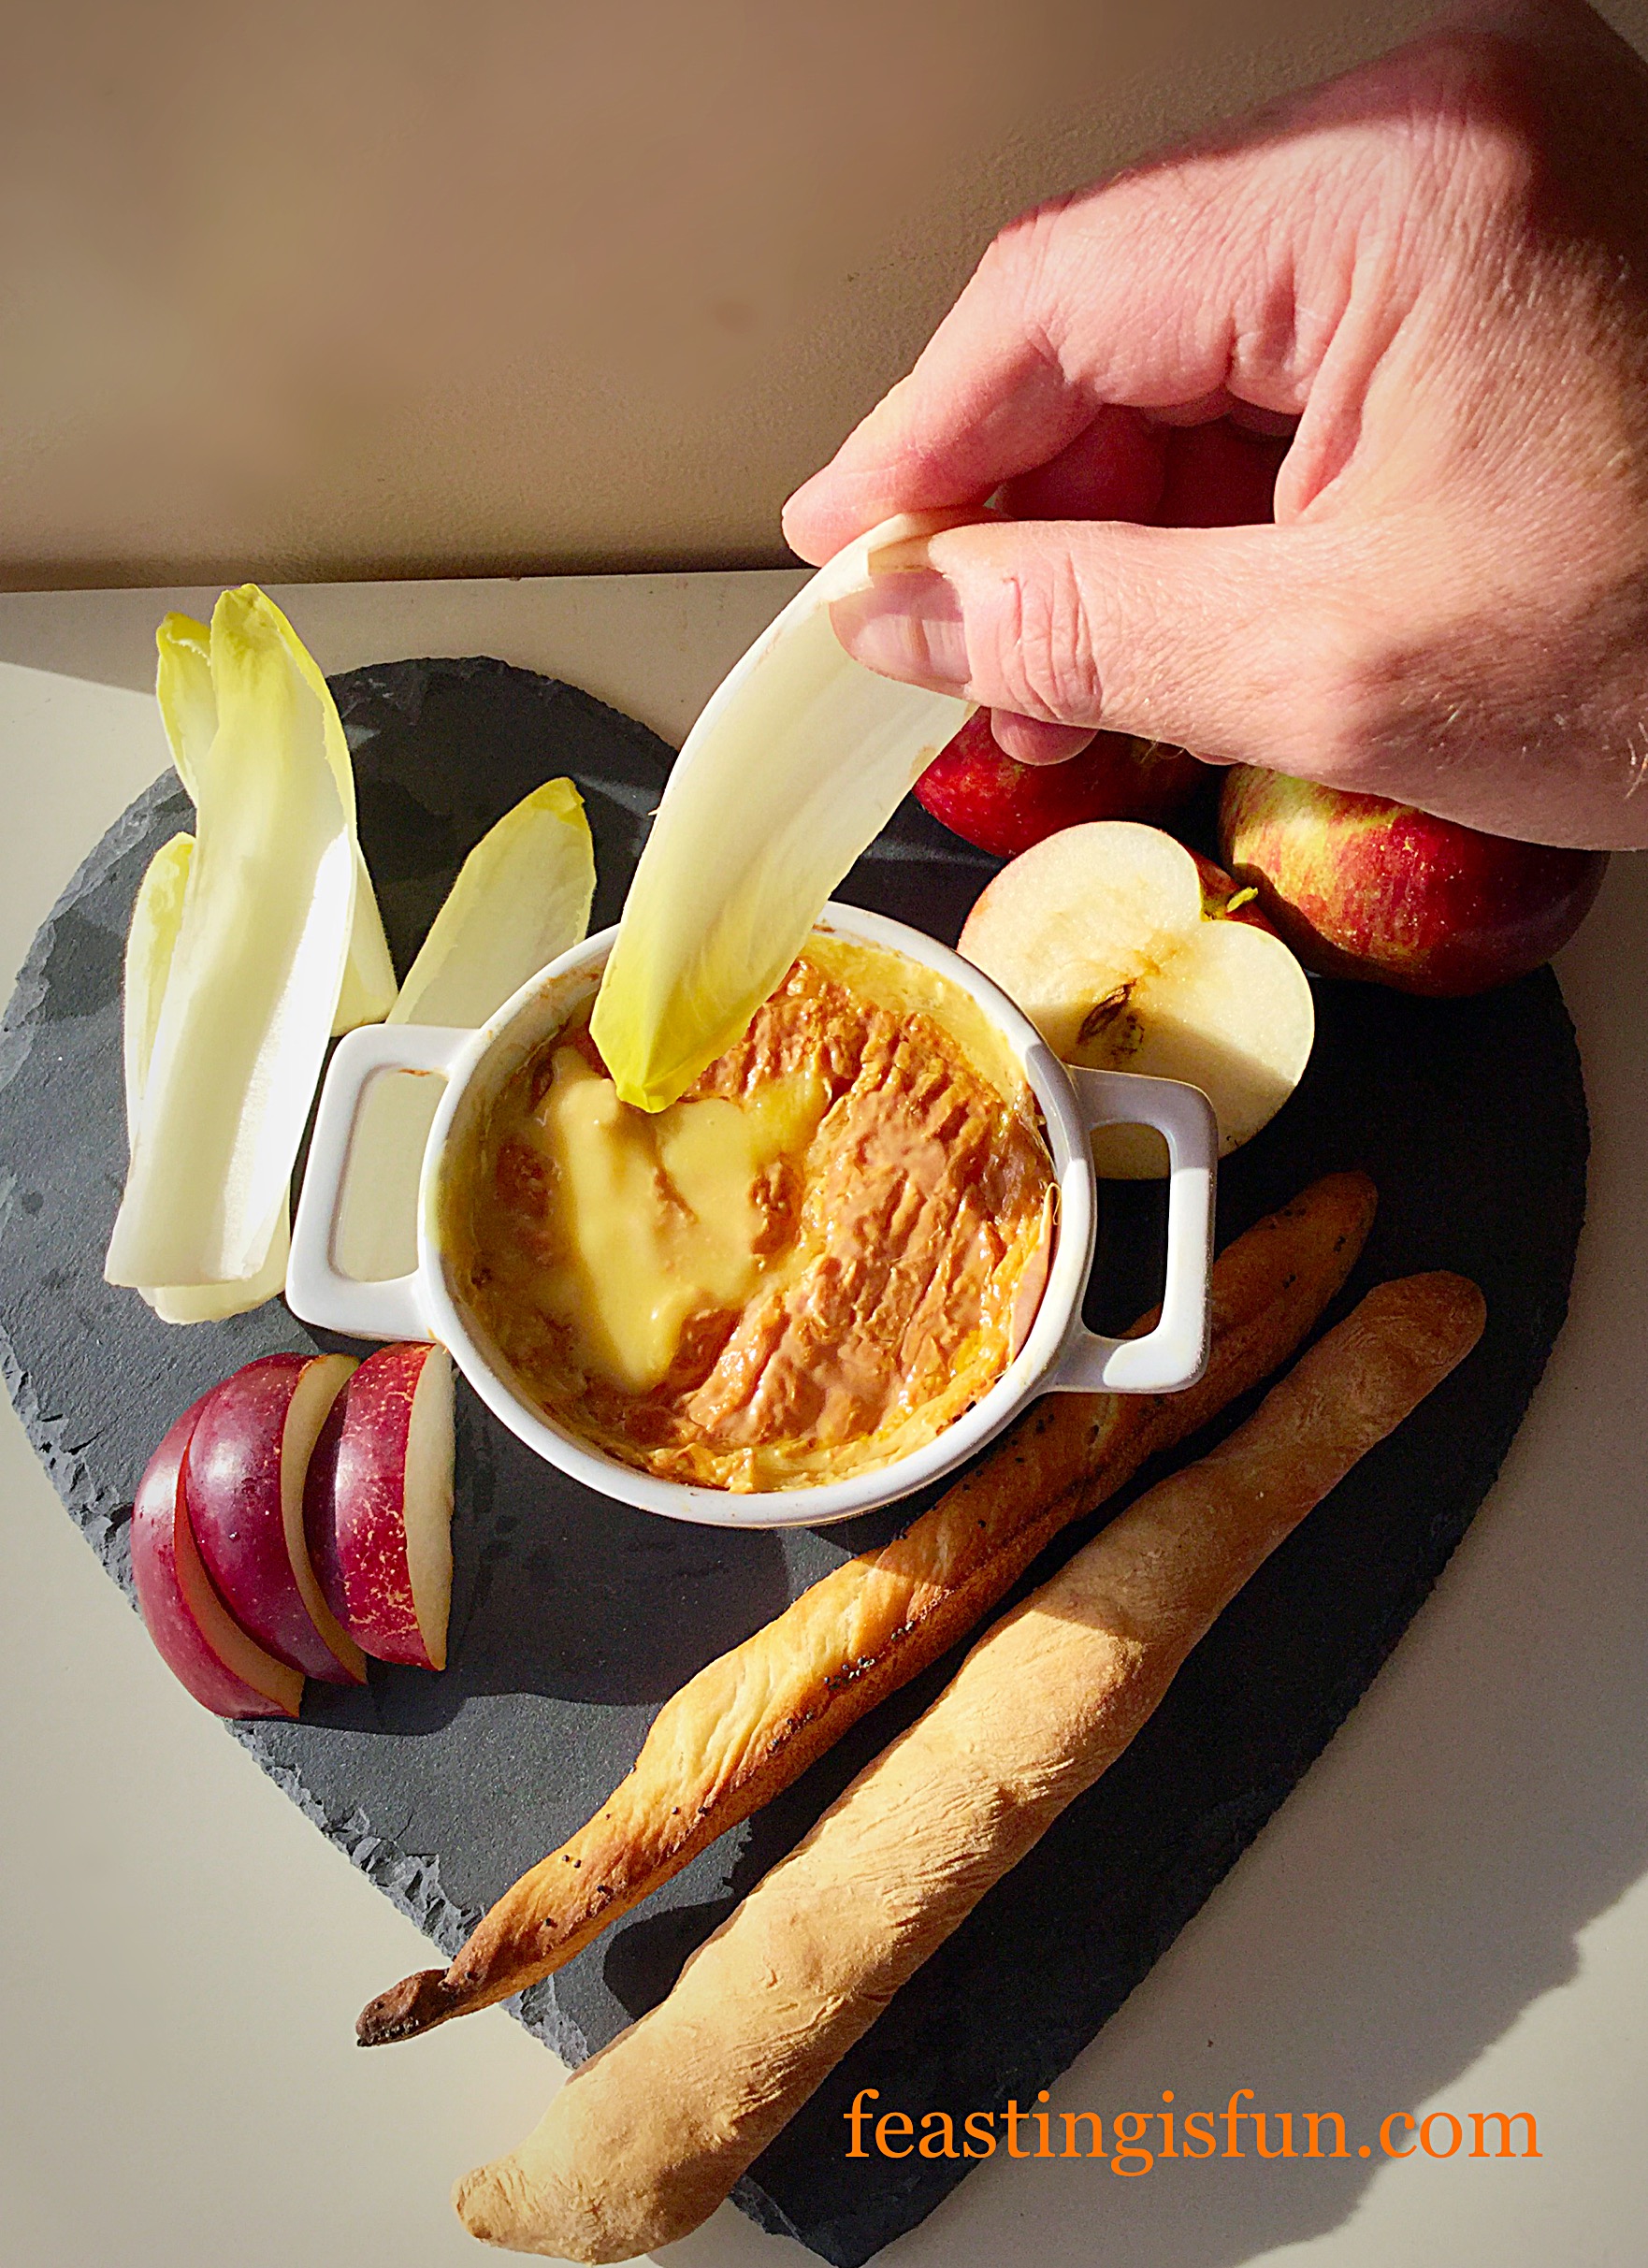
Baked Whole Epoisses De Bourgogne with homemade breadsticks, apple and chicory.
When asked by Pong Cheese to bake this heady Epoisses De Bourgogne, I knew that I would need my hubby’s help. First, I needed a hand model and also I absolutely knew he would relish the taste of this incredible cheese. A semi-soft to soft, pasteurised cow’s cheese, washed in Marc De Bourgogne, creating a spicy, pungent cheese. Most importantly, this incredible cheese is only made in the Burgundy region of France and therefore has an AOC – authentication of origin certificate.
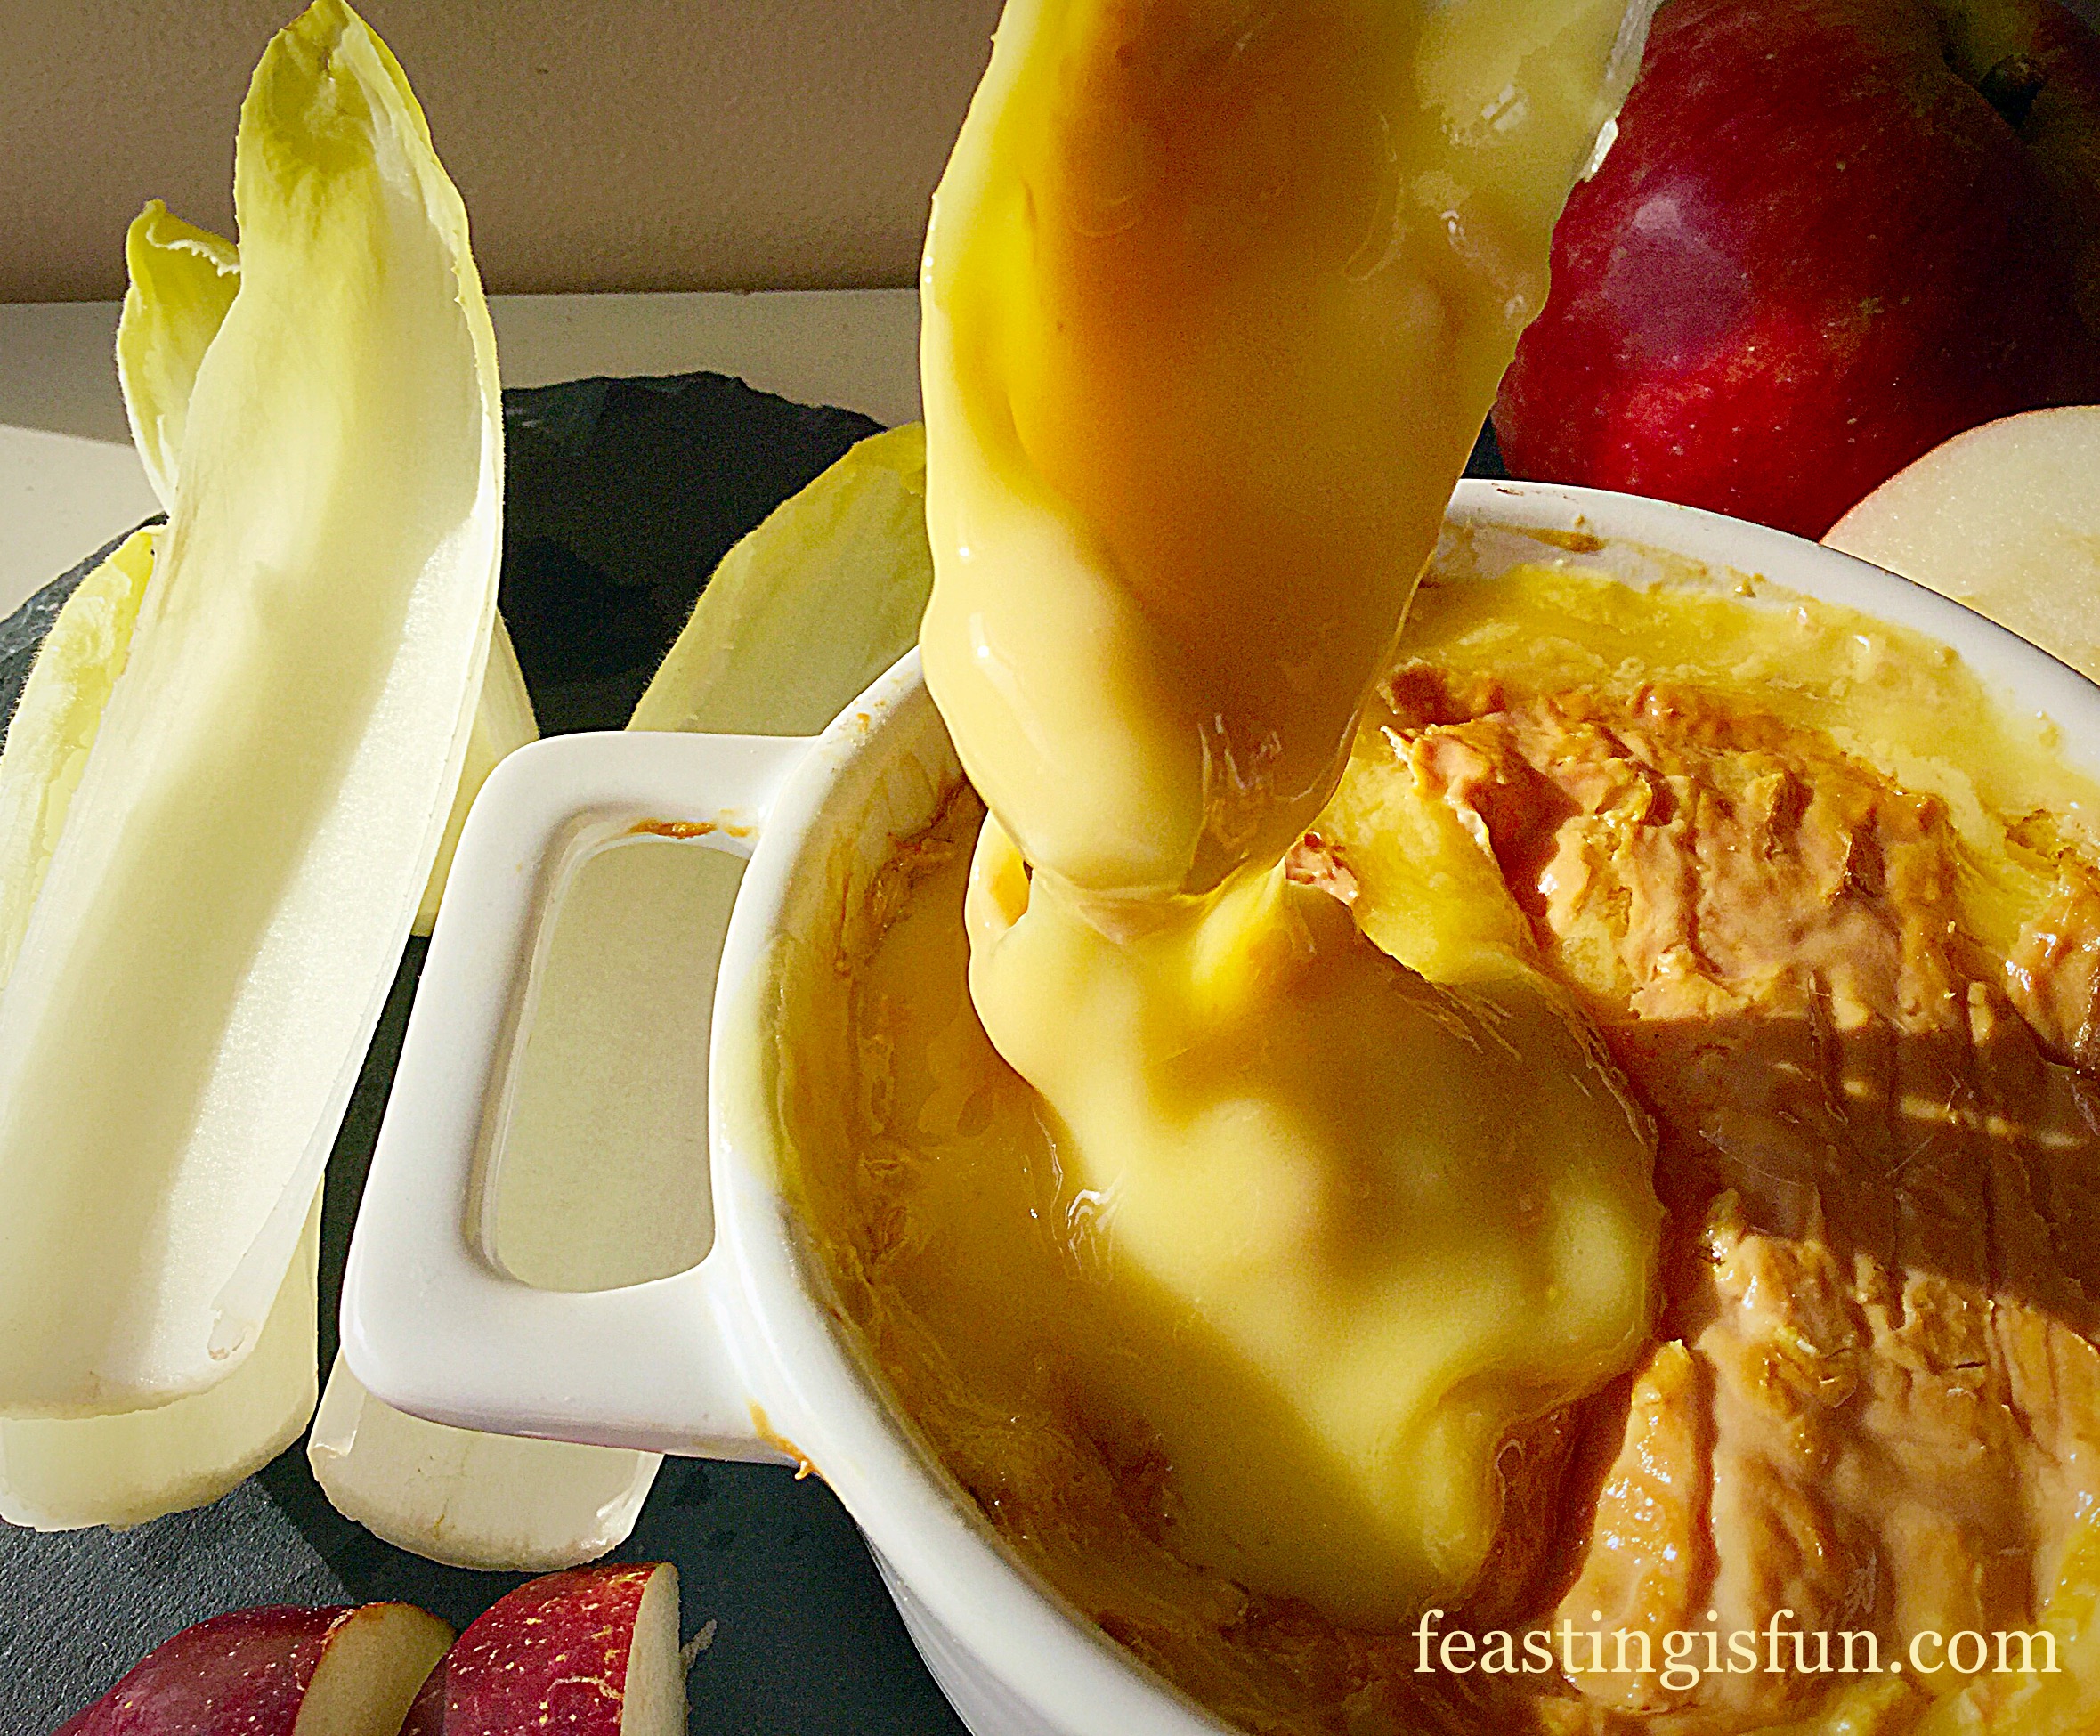
Baked Whole Epoisses De Bourgogne breaking through into the molten cheese.
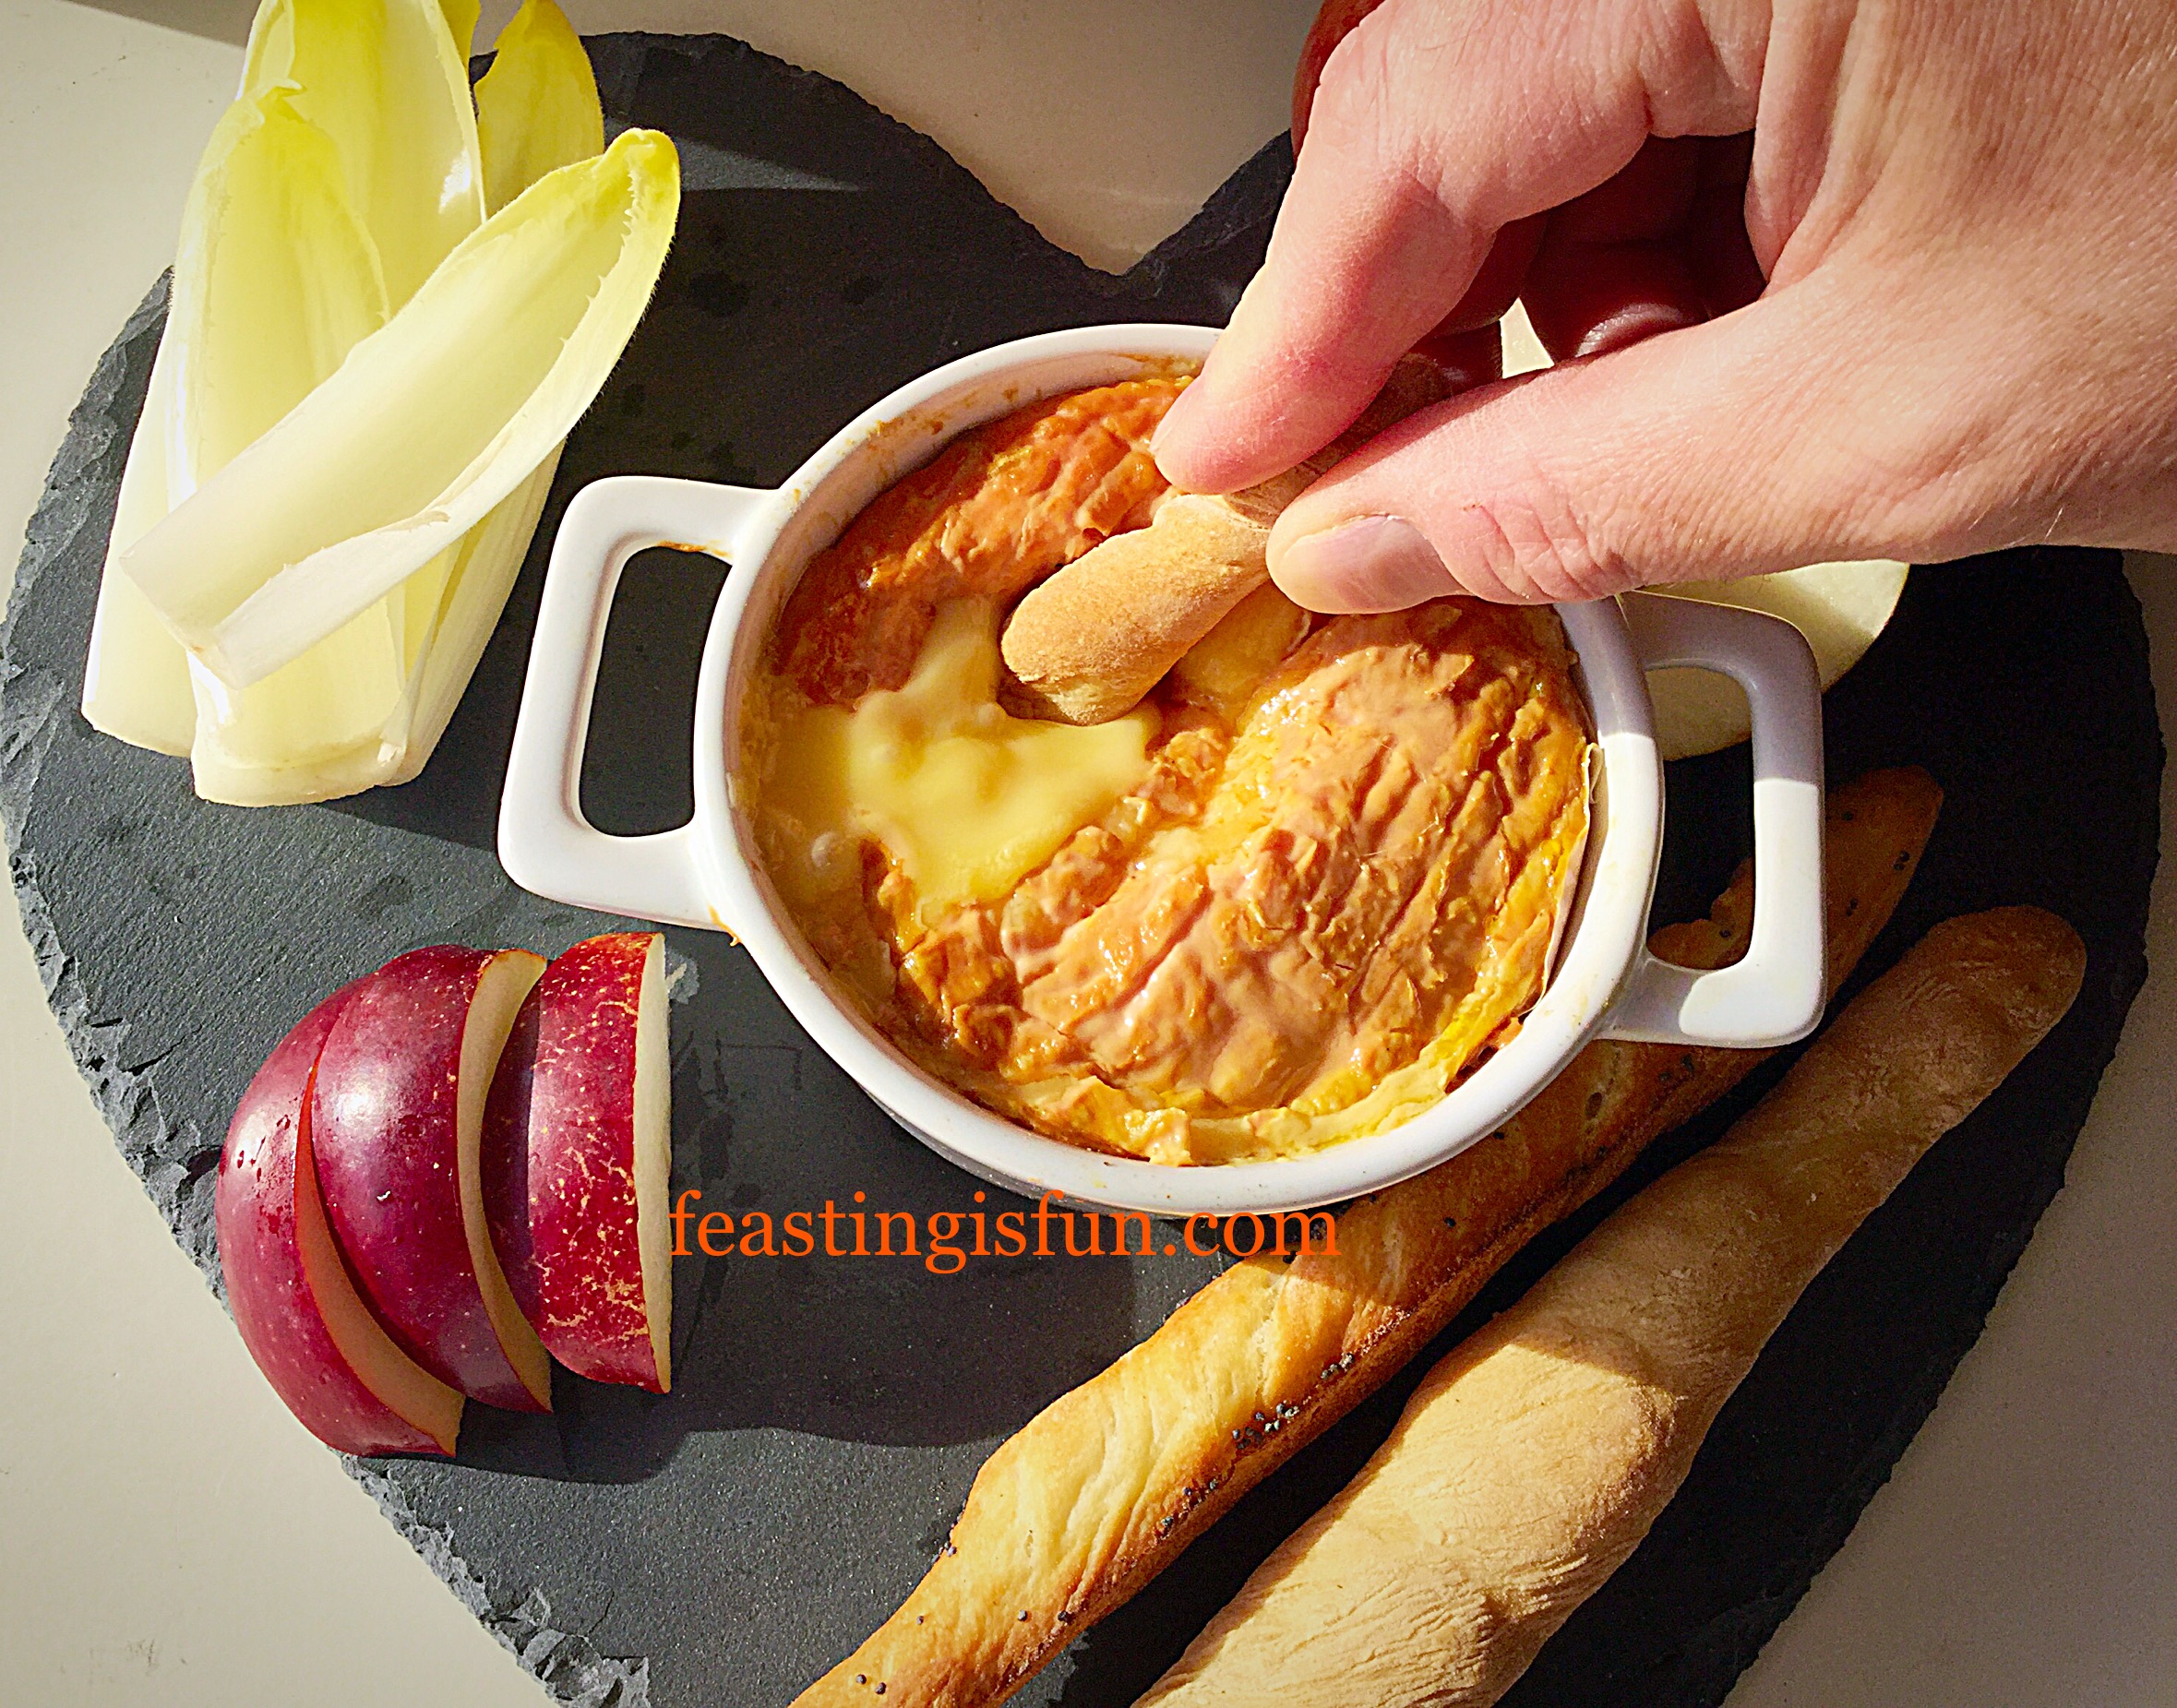
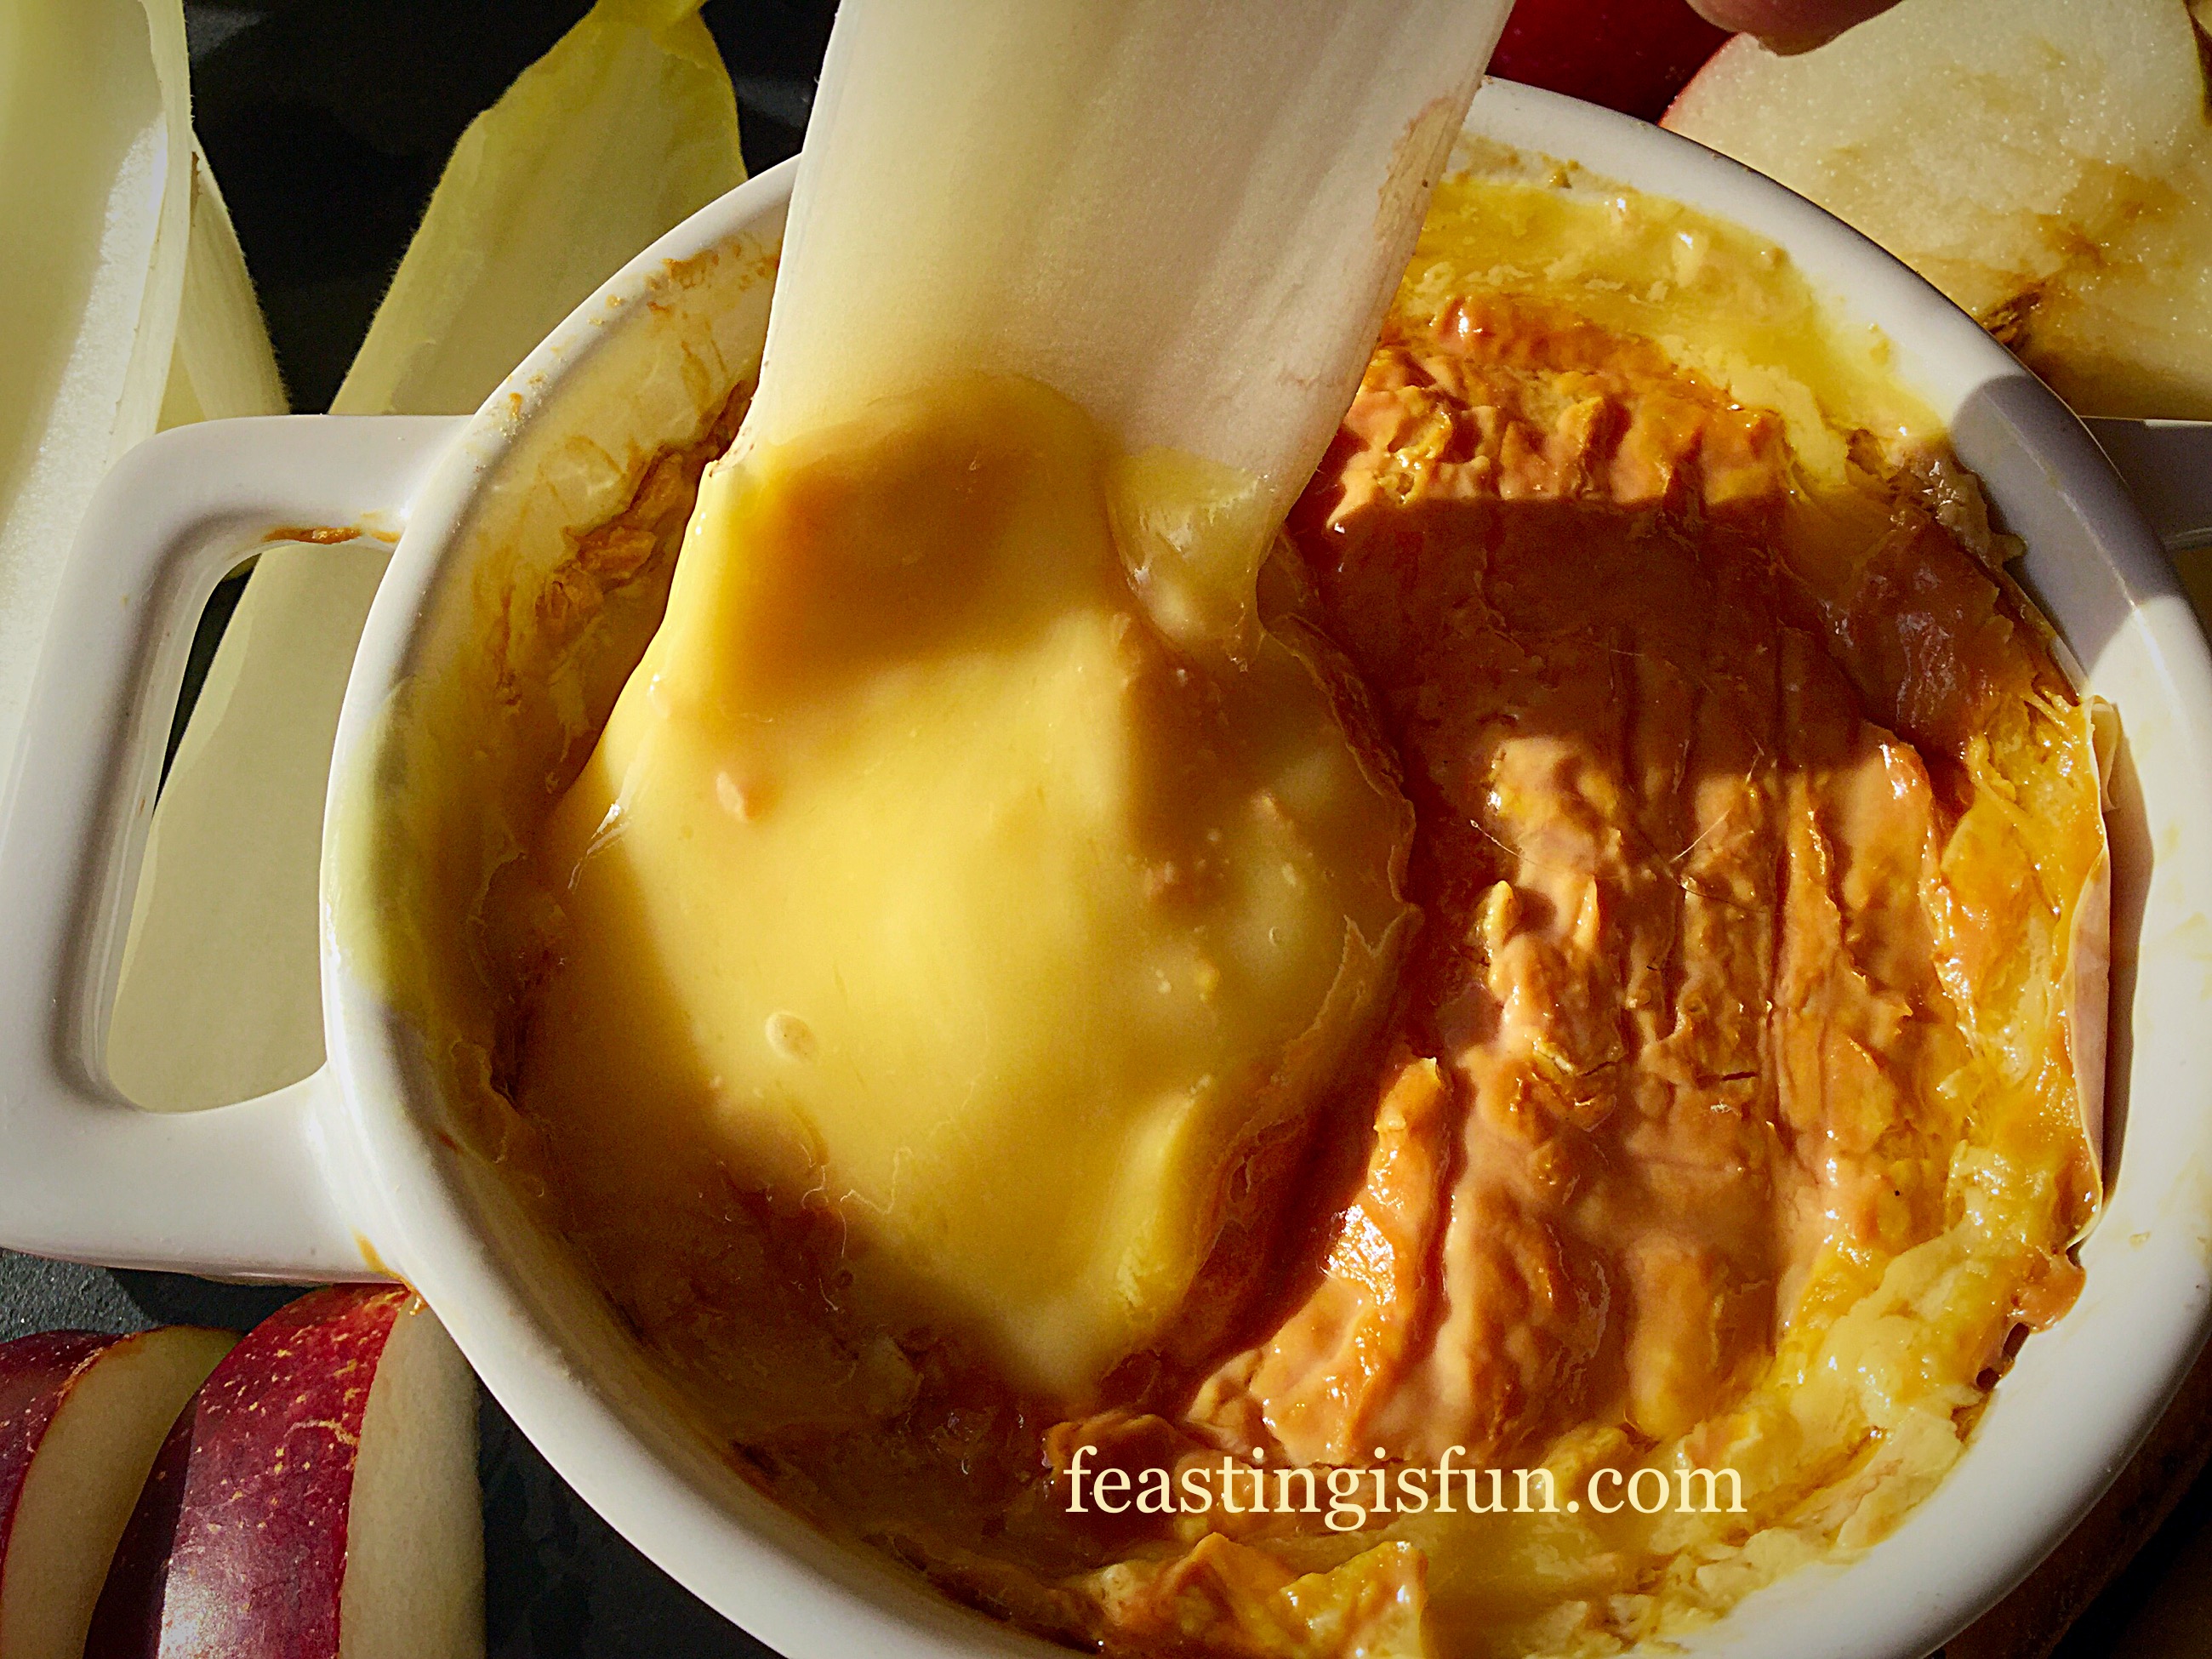
Homemade breadsticks break through the crust to reveal the warm, bubbling, unctuous cheese below. The full taste is revealed when eaten with bread. Salty, spicy and pungent, any cheese lovers dream.
Chicory, with it’s crunch and slightly bitter flavour is a perfect accompaniment to the melted cheese. While sweet, red apple provides contrast to the saltiness of the cheese. This for me was my favourite flavour pairing, my husband preferring the full flavour of the cheese, unhindered by the breadsticks.
While, this is hardly a recipe, the method and increased flavour of the cheese, means it is extremely worthwhile taking the extra step to bake it.
Recipe: Baked Whole Epoisses De Bourgogne
250g Whole Epoisses De Bourgogne available from Pong Cheese
Sprig of rosemary – either fresh from the garden or order a plant from most supermarkets such as Waitrose
Breadsticks, chicory, apple, pear, crackers for dunking
Method: Preheat the oven to 180C/160C fan, gas mark 4, 350F.
Baking The Cheese
You will need an ovenproof dish that is about the same size as the Epoisses. A Camembert dish will be fine, any bigger and the cheese will spread as it bakes.
First, remove all of the packaging from the Epoisses.
Next place the whole cheese into the ovenproof dish, laying a sprig of rosemary on the top.
Now place the ovenproof dish on to a baking tray and place in the middle of the preheated oven.
Bake the cheese for 15 minutes, or until you can see it bubbling around the side of the dish.
Once baked remove the baking tray, with the bubbling cheese in its dish, from the oven.
Allow the cheese to sit for a couple of minutes as it will be extremely hot.
Serve the cheese in its dish with a selection of fresh fruit, vegetables and bread or crackers. Most of all share with good company and an excellent glass of wine!
Baked and ready for enjoying.
Sharing this baked cheese, either with a group of friends, or with the one that you love, infinitely improves the whole experience of eating it. Since memories are created and observations exchanged, whilst feasting together.
If you have enjoyed this recipe you may also like these:
Mini Sparkenhoe Red Leicester Tarts a delicious canapé.
Cheese is such a versatile ingredient. Whether baked and eaten as is, piled on top of chilli pickle in a crunchy filo tart, or simply eaten cold with crackers, it remains one of my favourite ingredients. As with most things that have a relatively high fat content, their flavour truly comes alive when heated. Baking the Epoisses De Bourgogne certainly brought all of its delicious and interesting flavours to the fore.
Do you enjoy using cheese as an ingredient?
Have fun baking, making and creating in your kitchens, preparing a feast.
Sammie xx
Pong Cheese supplied me with the Epoisses De Bourgogne for this recipe. All opinions, views, photographs and content are my own. Please see my Disclosure Policy.
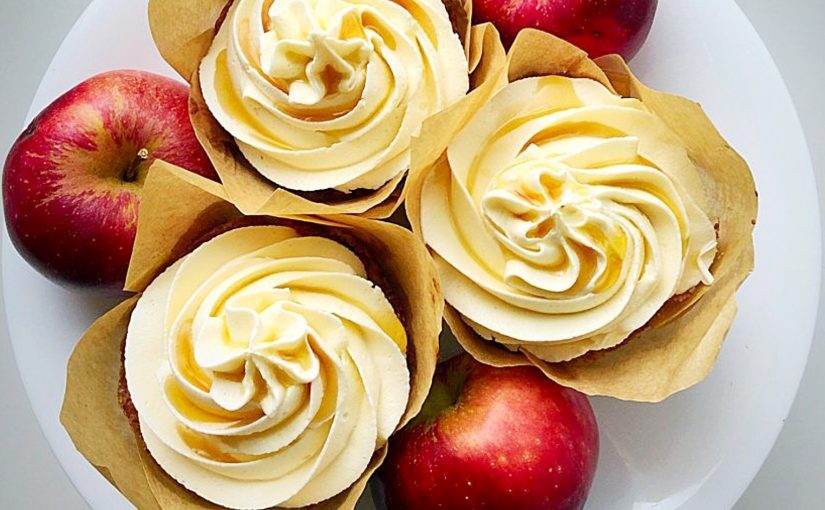
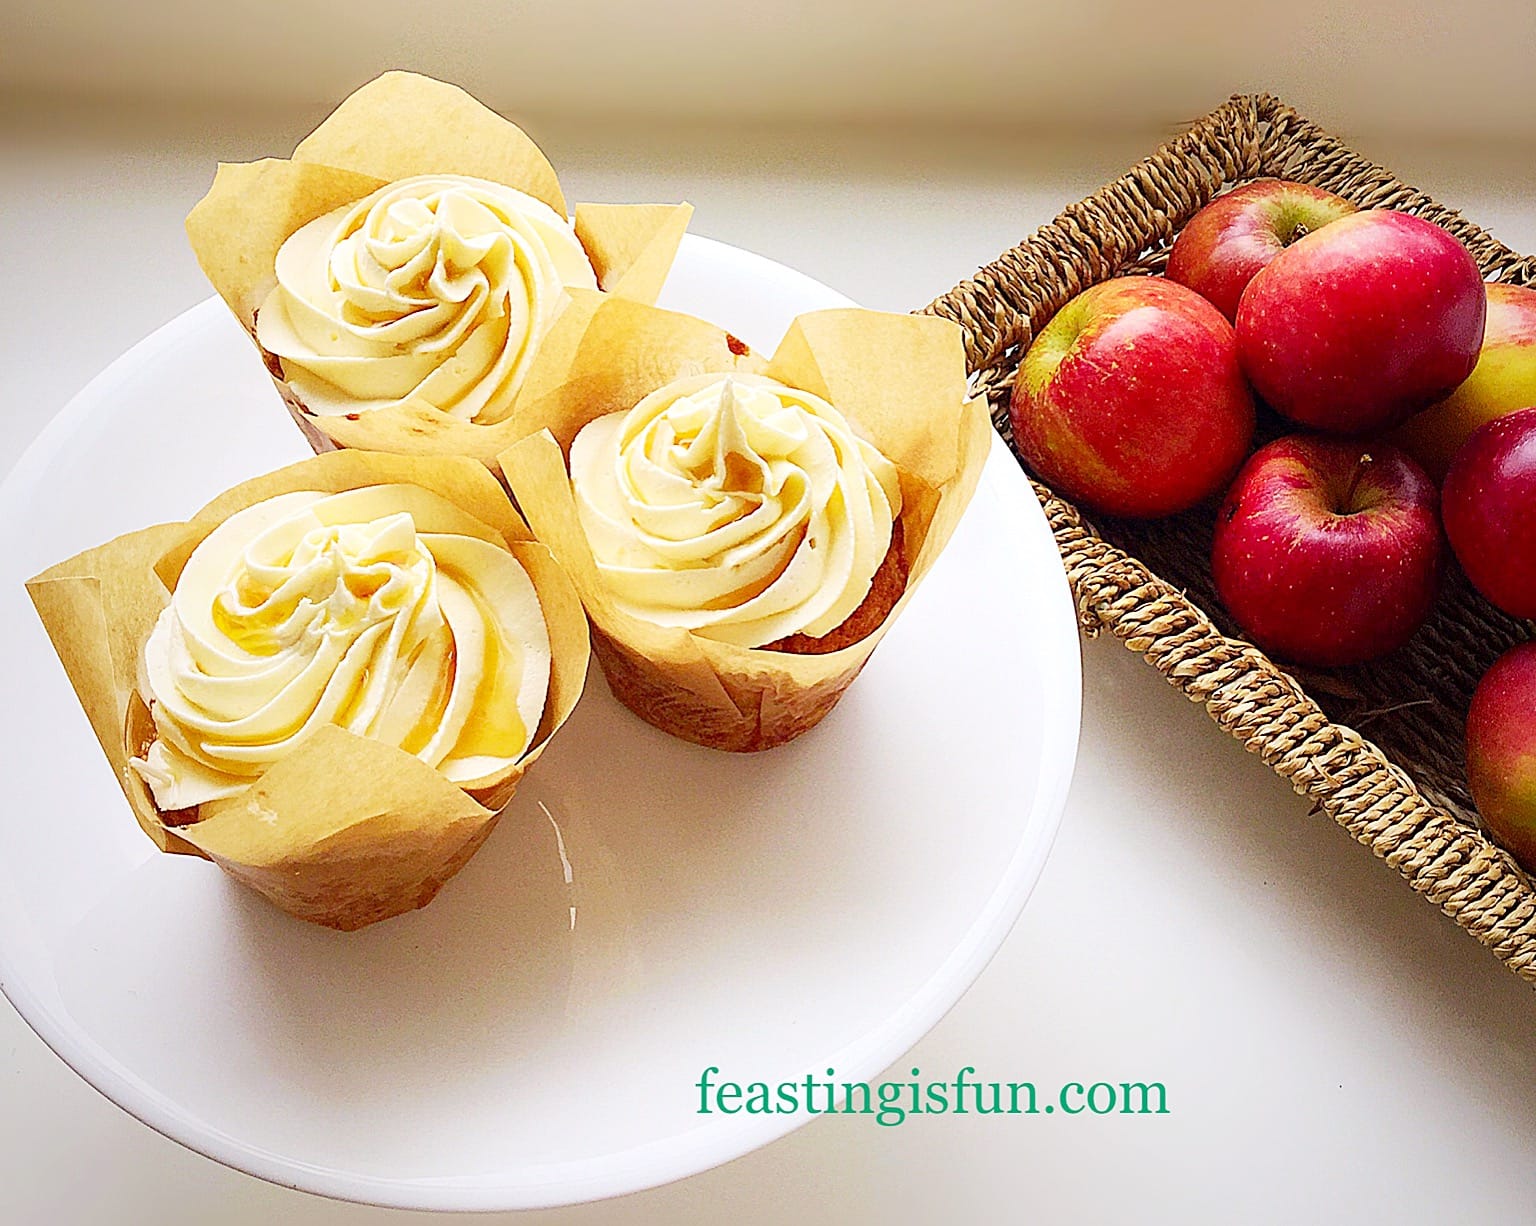
Today we are celebrating National Apple Day here in the U.K. Since there are two trees groaning under the weight of their abundant apple harvest in our back garden, an apple bake is needed. And a gift of maple syrup sparked inspiration resulting in these Maple Syrup FrostedApple Cupcakes. Finally, the finished result is better than I could imagine.
Maple Syrup Frosted Apple Cupcakes
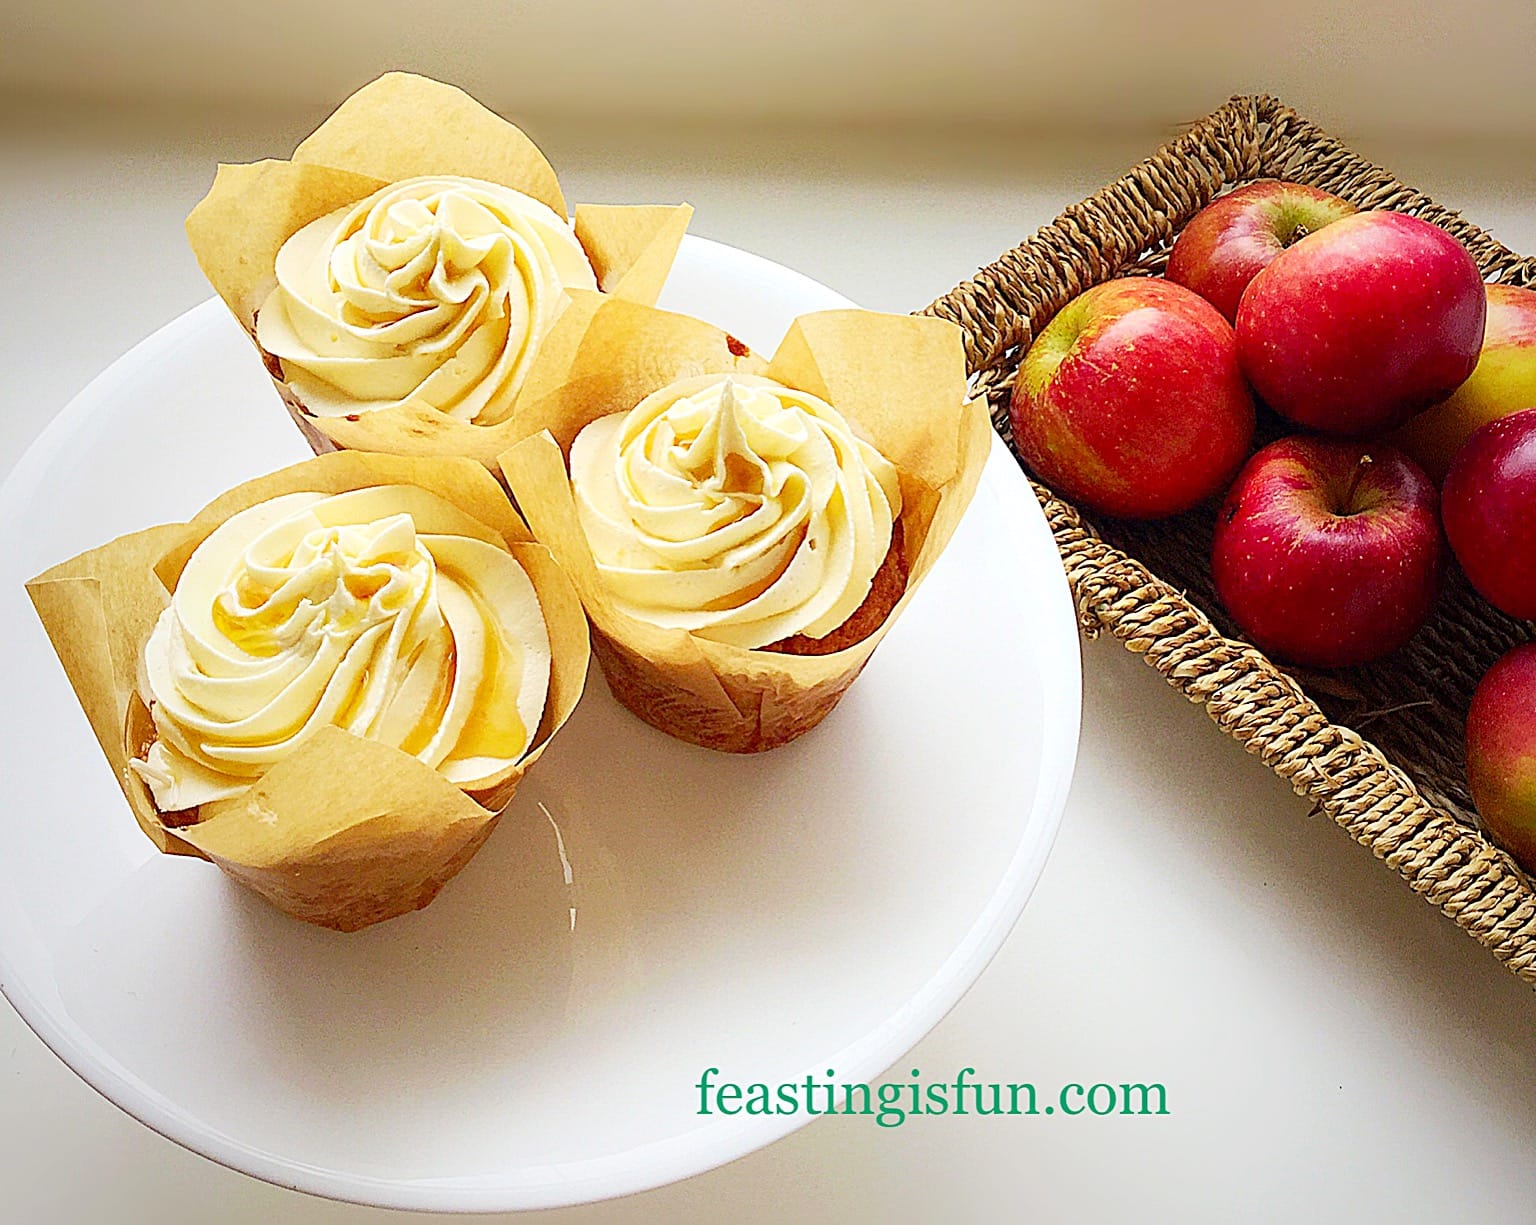
One apple tree produces Spartan apples. Tennis ball sized, shiny red-green apples that are deliciously crunchy, sweet and ideal for little people hands! While the other apple tree variety is unknown. Sharper in taste than the Spartans, they are similar to a slightly sweeter version of Granny Smith apple. Also they are slightly larger with a similar colour that when rubbed becomes shiny. And fortunately, both apples are great for eating and cooking. Resulting in a combination of both being used for these cupcakes.
Maple Syrup Frosted Apple Cupcakes
Apples, The Core Of These Cupcakes:
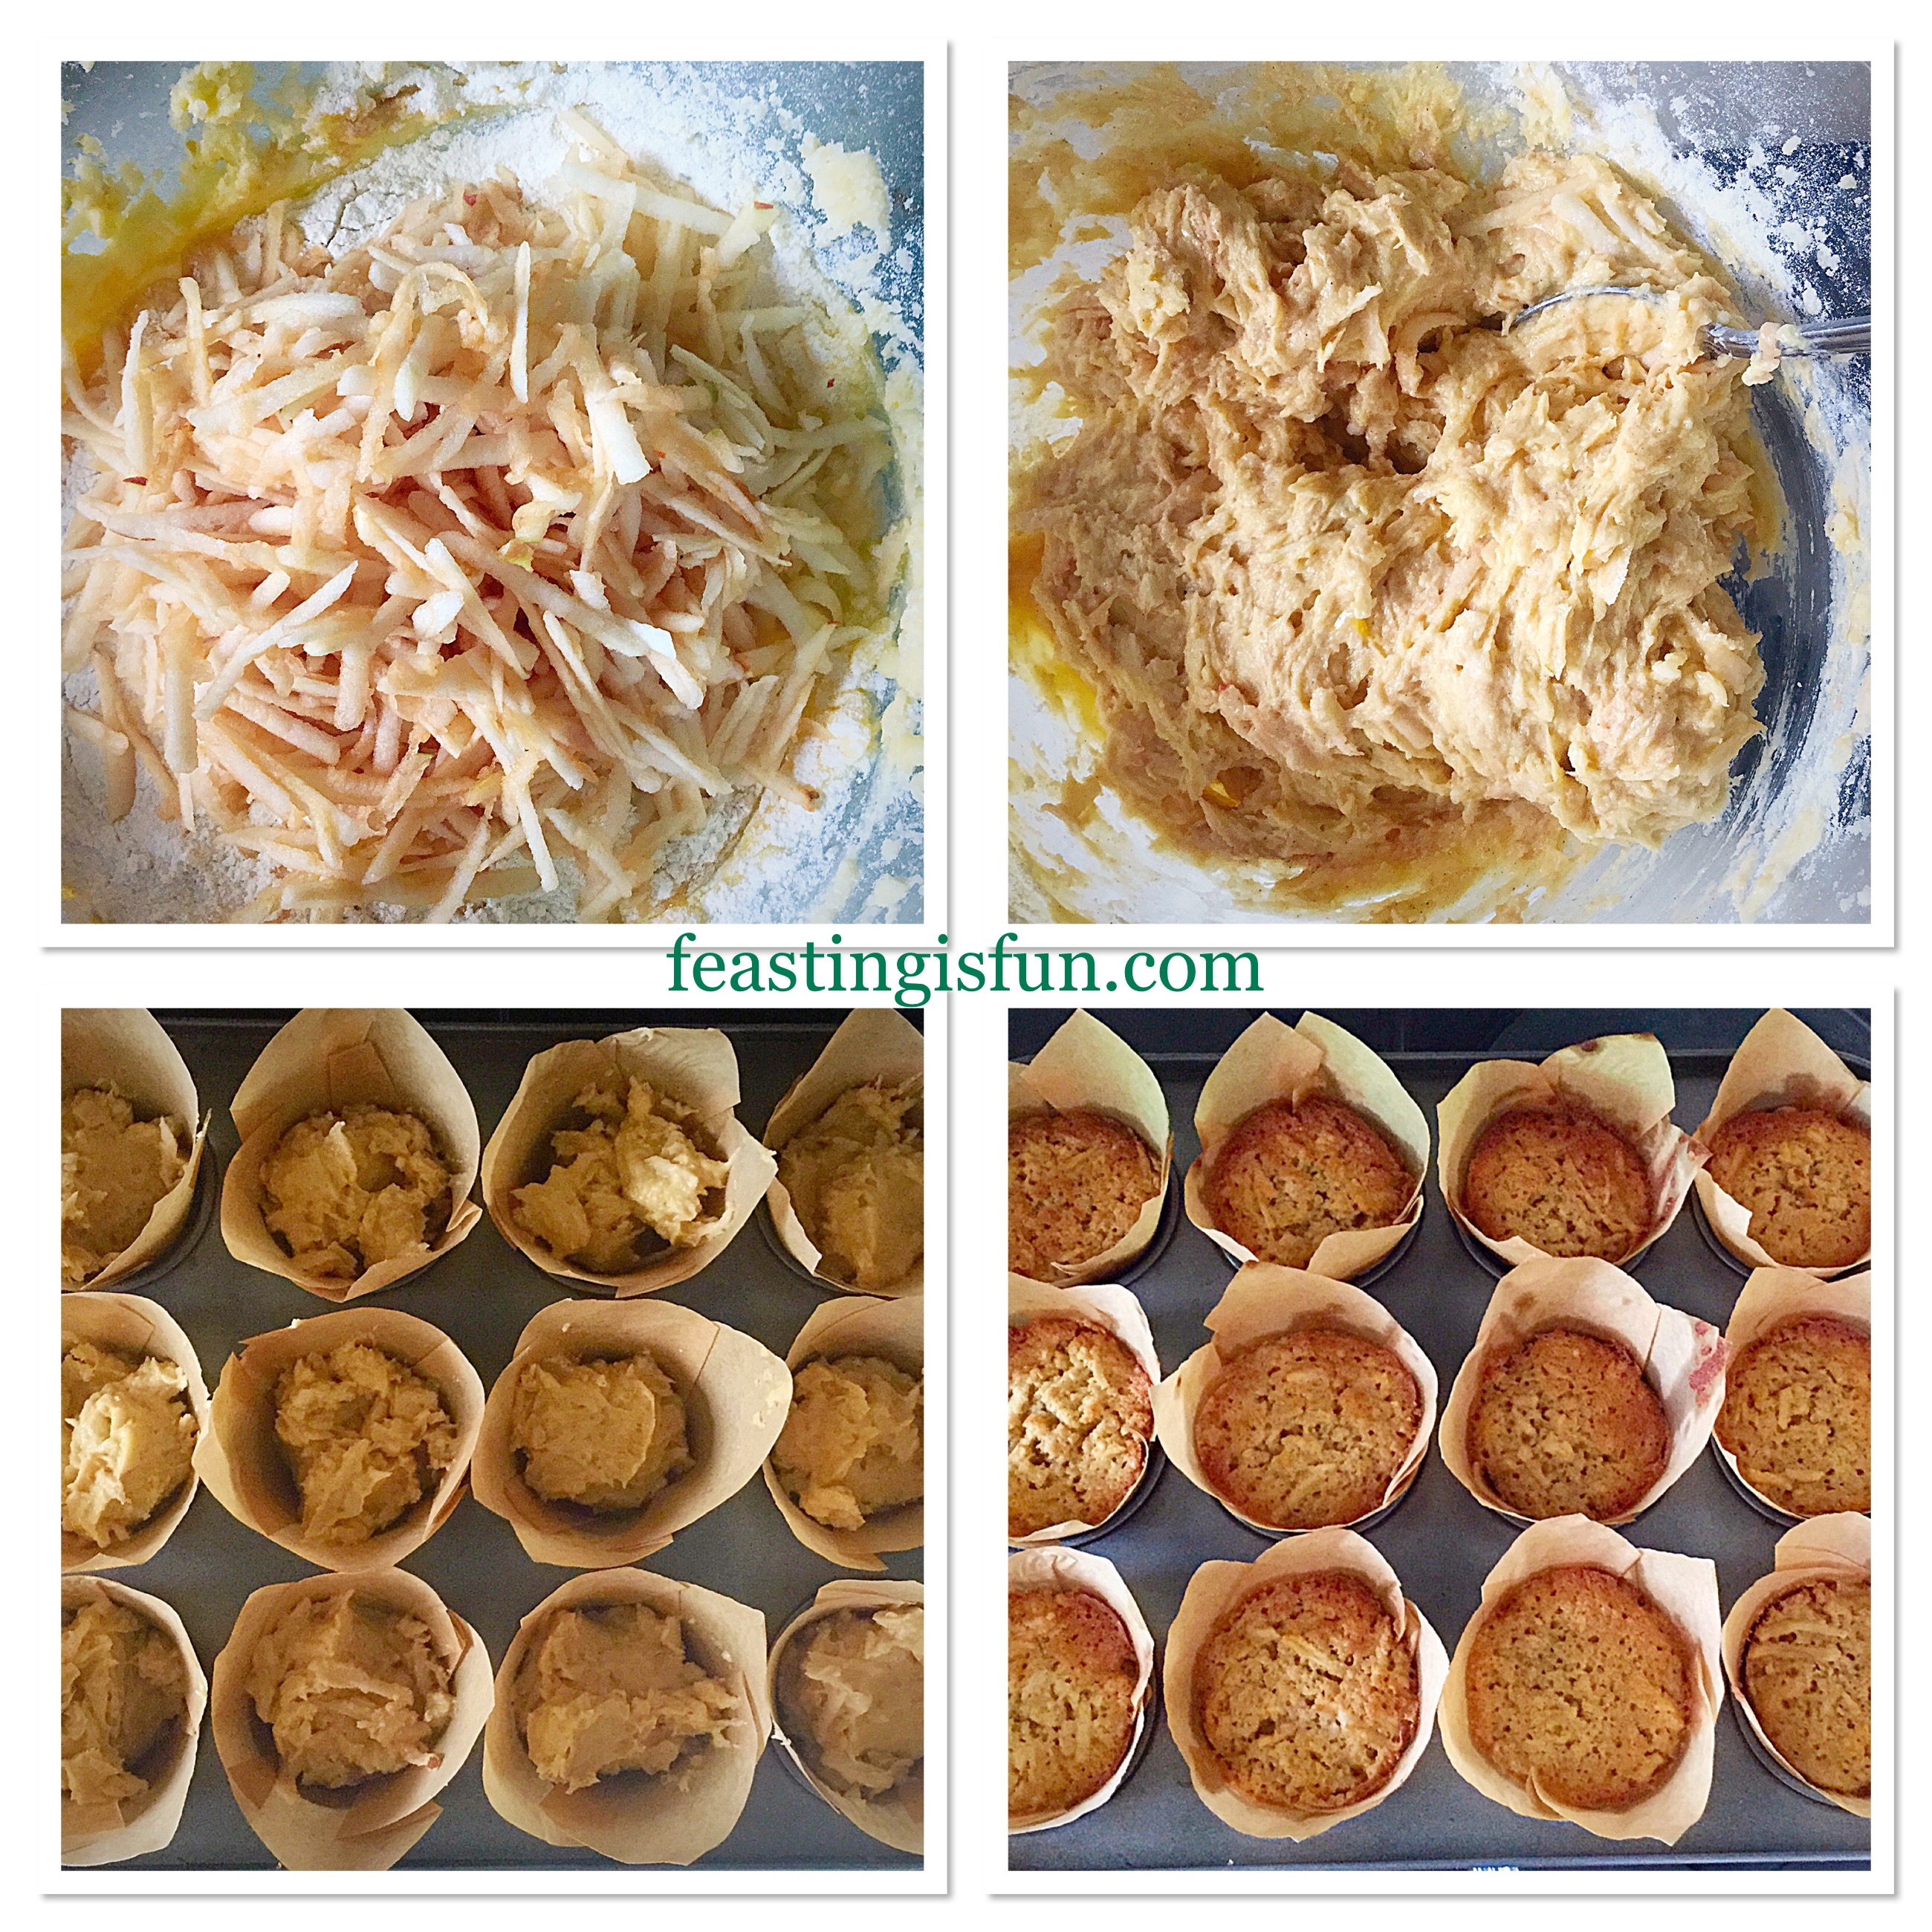
Unlike Granny Smith apples, both varieties brown easily when sliced/grated and exposed to the air. While the grated apple be tossed in some fresh lemon juice, which would have prevented discolouration, I didn’t want to do this for two reasons. First of all, the lemon flavour would change the cupcake flavour, possibly overpowering the apple and frosting. Also, the lemon juice would have added moisture, resulting in a wetter batter, where the apple may not have kept it’s even distribution. Grating the apples into the cake batter keeps any discolouration to a minimum.
Maple Syrup Frosted Apple Cupcakes
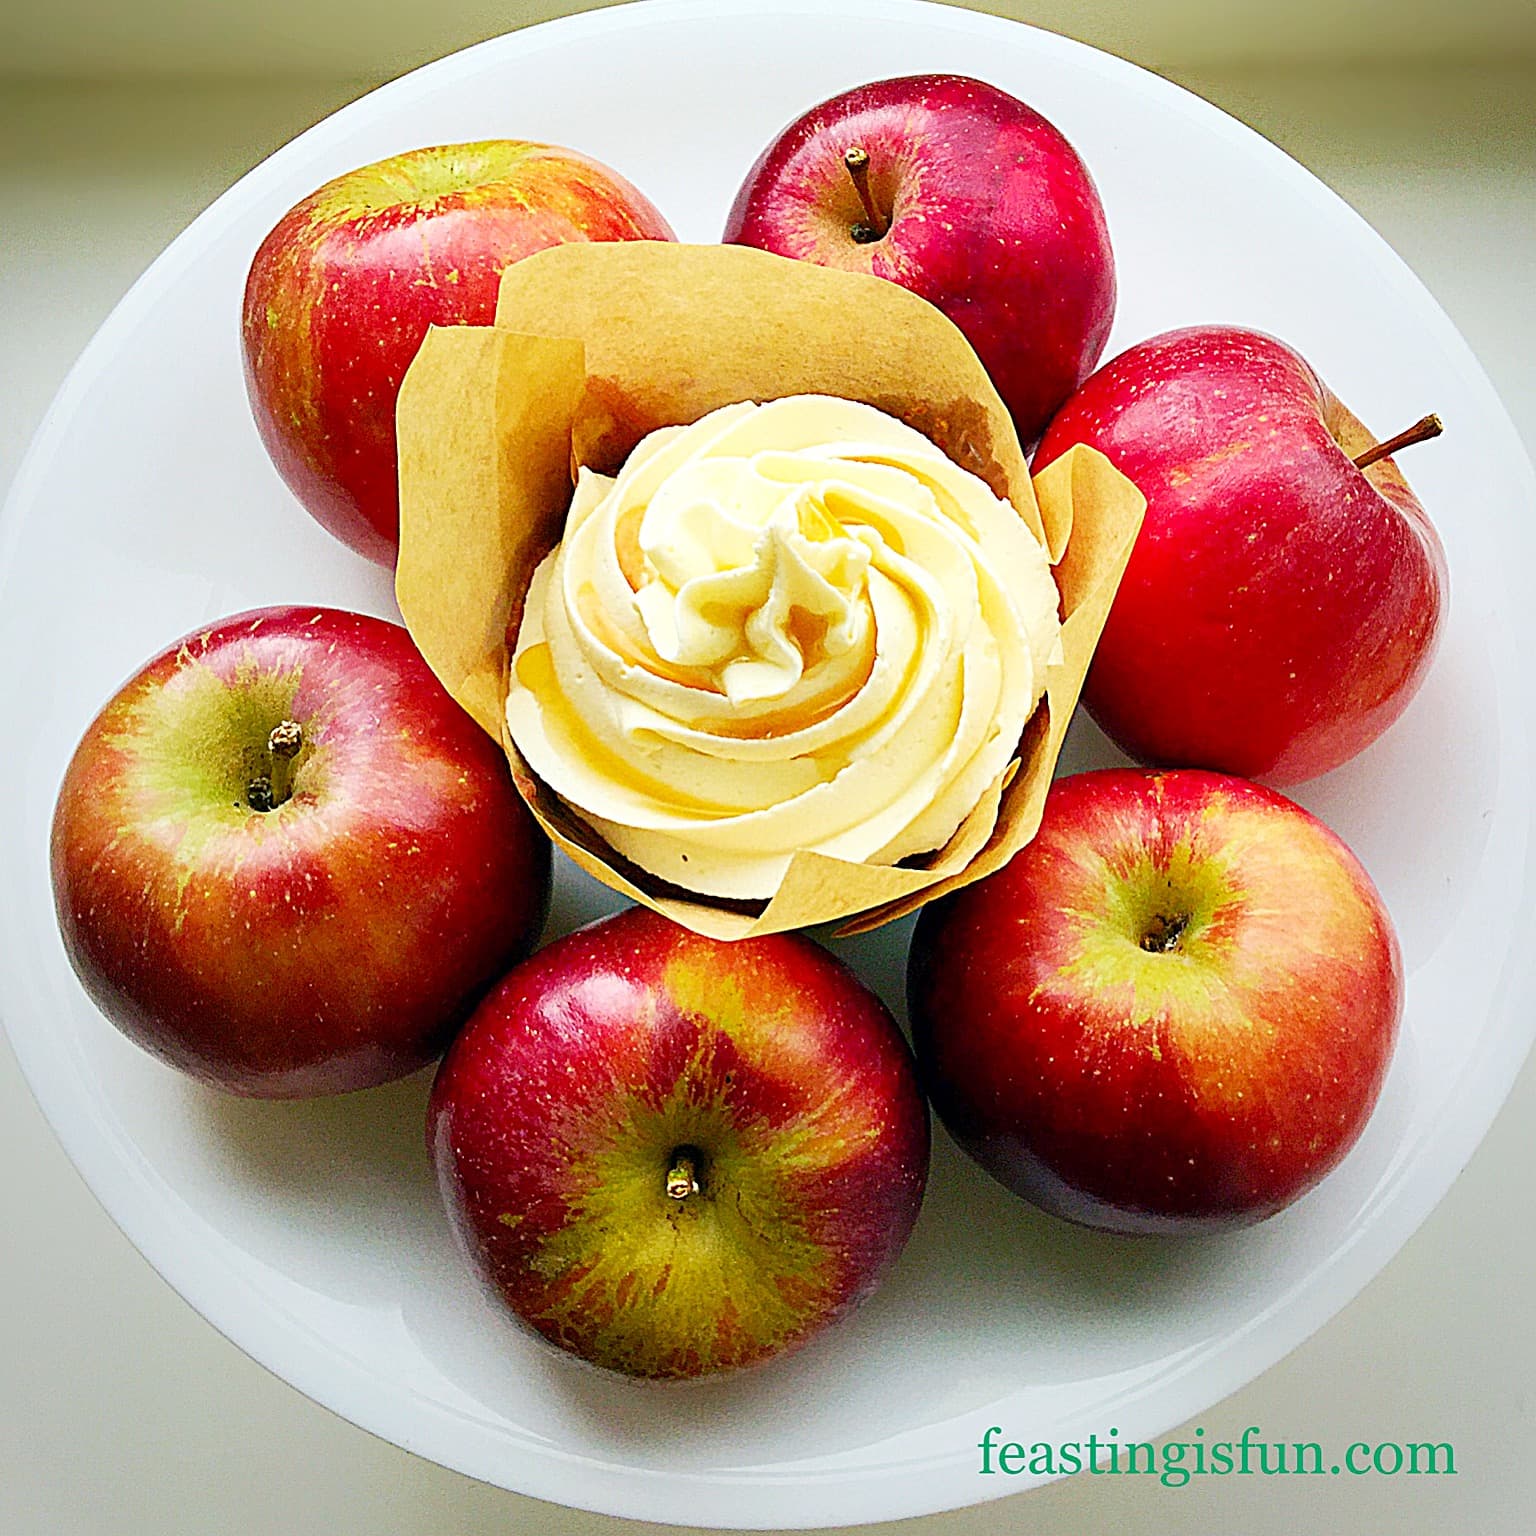
Preparing the cake batter first and then adding the grated batter works really well. As it ensures each cupcake has plenty of evenly distributed apple within a light, moist crumb. Without the maple syrup frosting, these could easily be served as muffins, in which case the addition of some toasted pecan or walnut pieces would bring added flavour and texture. Tasting these cupcakes with the dreamy frosting means I could not possibly eat them any other way now!
A Maple Syrup Frosted Apple Cupcake cut in half.
Maple syrup frosting. Just think on those words for a moment!
Initially I had worried that the addition of maple syrup to a buttercream frosting would result in a too sweet topping. Instead, the opposite happened, with the maple syrup adding a very slight smoky, creamy flavour. Resulting in the sweetness of the unflavoured frosting being dumbed down. As a result, the final flavour paired beautifully with the lightly spiced apple cupcake.
Recipe: Maple Syrup Frosted Apple Cupcakes – makes 12
200g/7oz Grated Eating Apple – approximately 3-4 peeled apples
Frosting Ingredients: you may have extra frosting left over
250g/9oz Salted Butter very soft, ideally removed from the fridge the night before
500g/1lb 2oz Sifted Icing Sugar
1tsp Vanilla Extract
2tbsp Maple Syrup – use real maple syrup not maple syrup flavouring
1tbsp Very Hot Water from a recently boiled kettle
Extra Maple Syrup to drizzle over the finished cupcakes
Method: Preheat the oven to 180C/160C fan, gas mark 4, 350F.
Making And Baking The Cupcakes:
First of all, line a 12 hole deep muffin tin with tulip cupcake wrappers, or deep muffin cases.
Next in a large bowl add the butter, sugar and salt. Whisk/beat them together until they are very pale and creamy.
Add the vanilla extract and all 3 eggs to the bowl. Whisk/beat briefly to partially mix the ingredients, without the risk of them curdling – no more than 30 seconds.
Now sift the flour, baking powder and cinnamon into the bowl. Set the bowl to one side.
Working quickly, yet carefully, peel and grate 200 grams of apple.
Add the grated apple on top of the flour, in the large bowl and using a spoon mix all the ingredients together, until they are just combined.
Next, using a dessert spoon, place a heaped spoonful of cake batter into each of the cupcake wrappers. Finish by dividing any remaining batter between the twelve cases, so that they are all equally filled.
Finally place the tin in the middle of the preheated oven and bake the cupcakes for 25-35 minutes.
The cupcakes are baked when they spring back from a light touch. Use an inserted skewer to check if they are baked, if it comes out clean they are ready to remove from the oven.
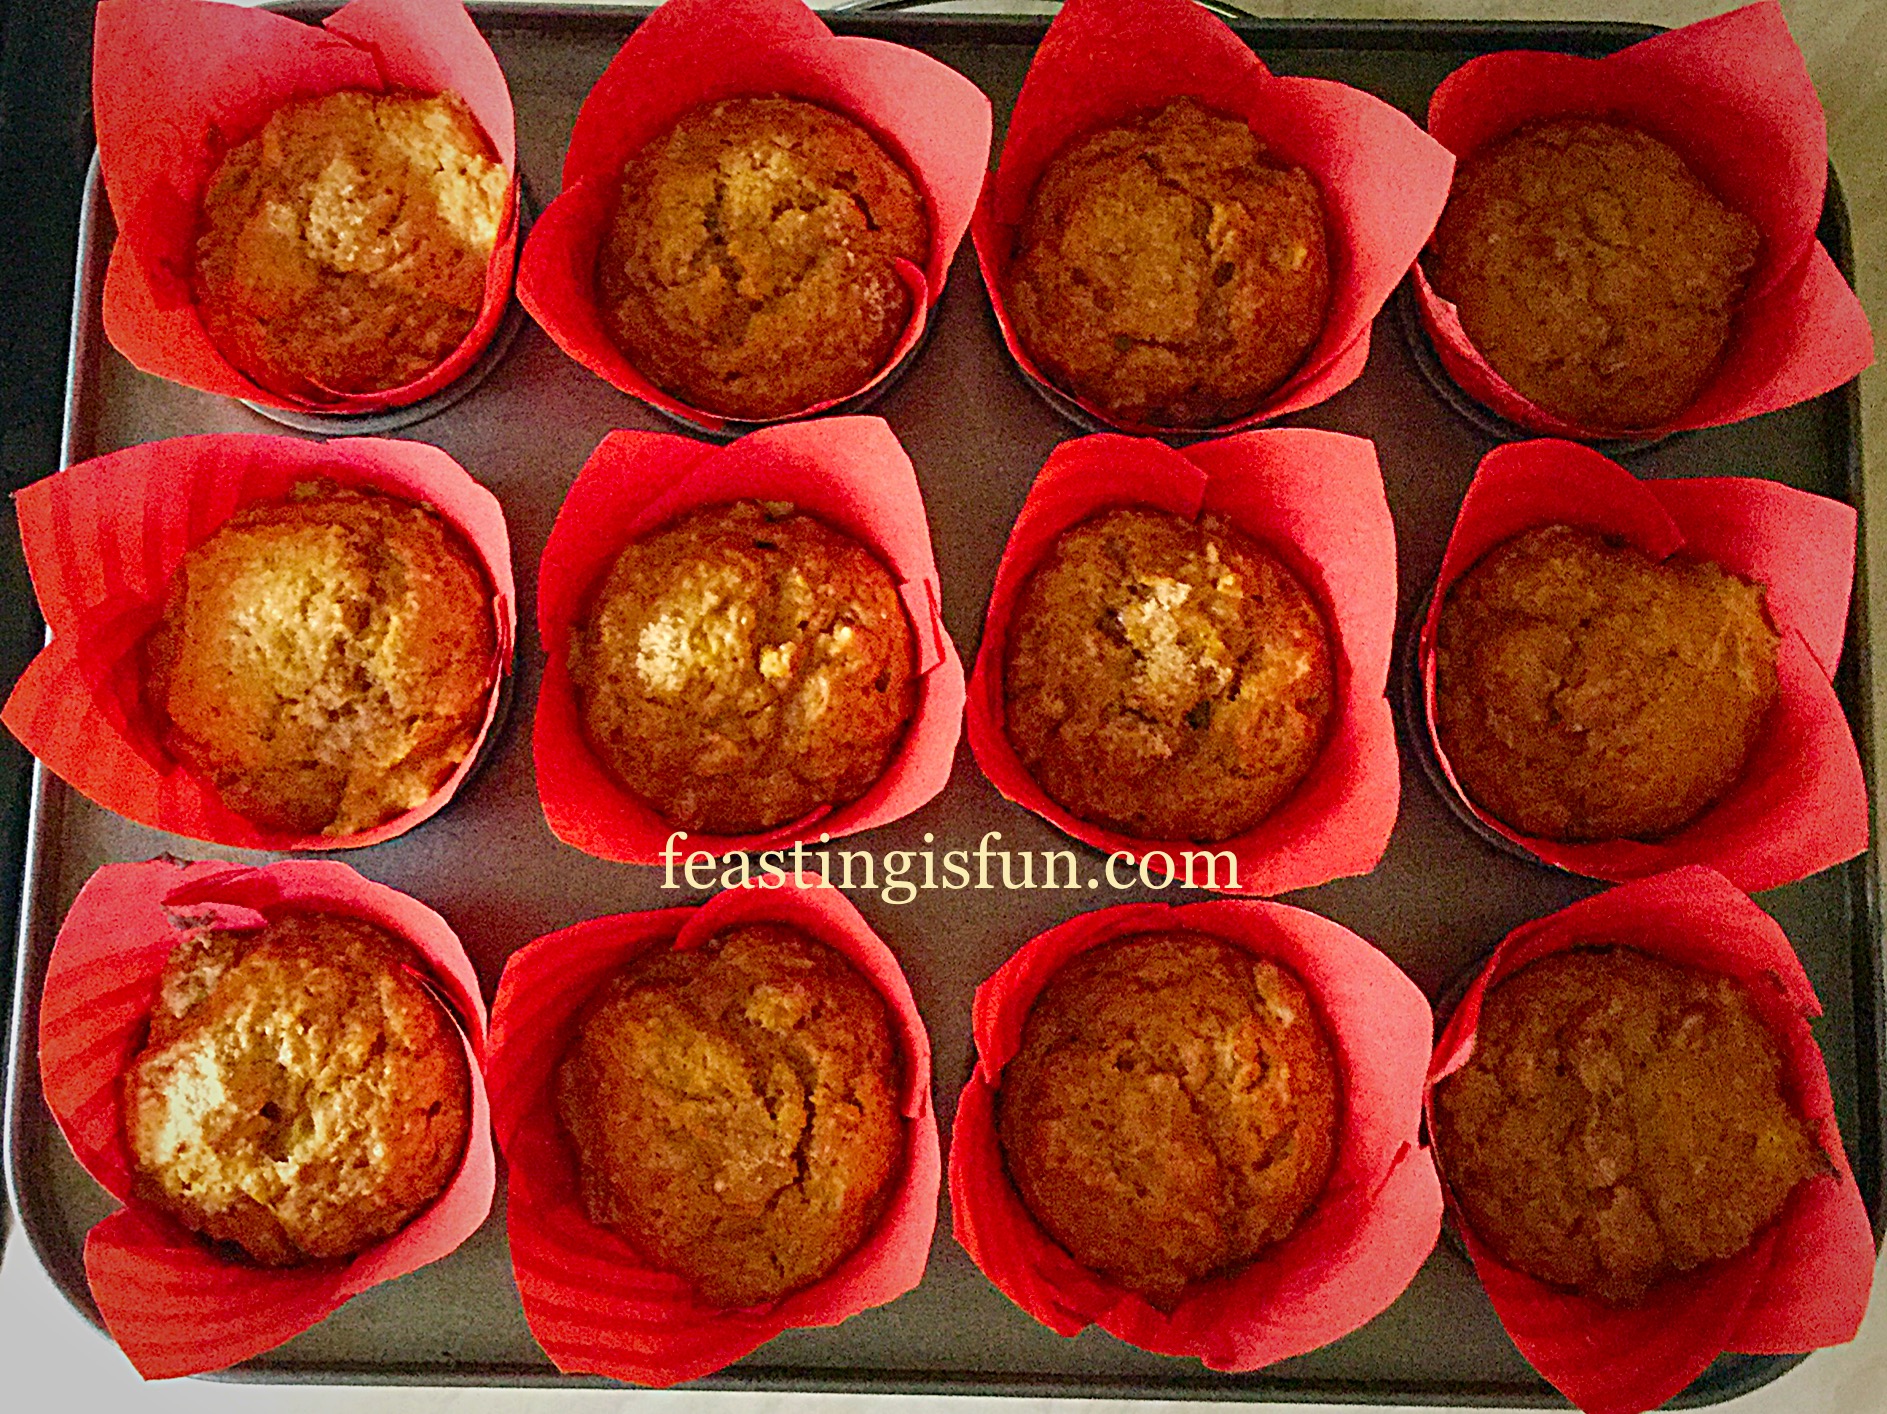
As soon as the cupcakes are baked remove them from the oven and leave them in the tin to fully cool, regardless of which type of wrapper/case has been used.
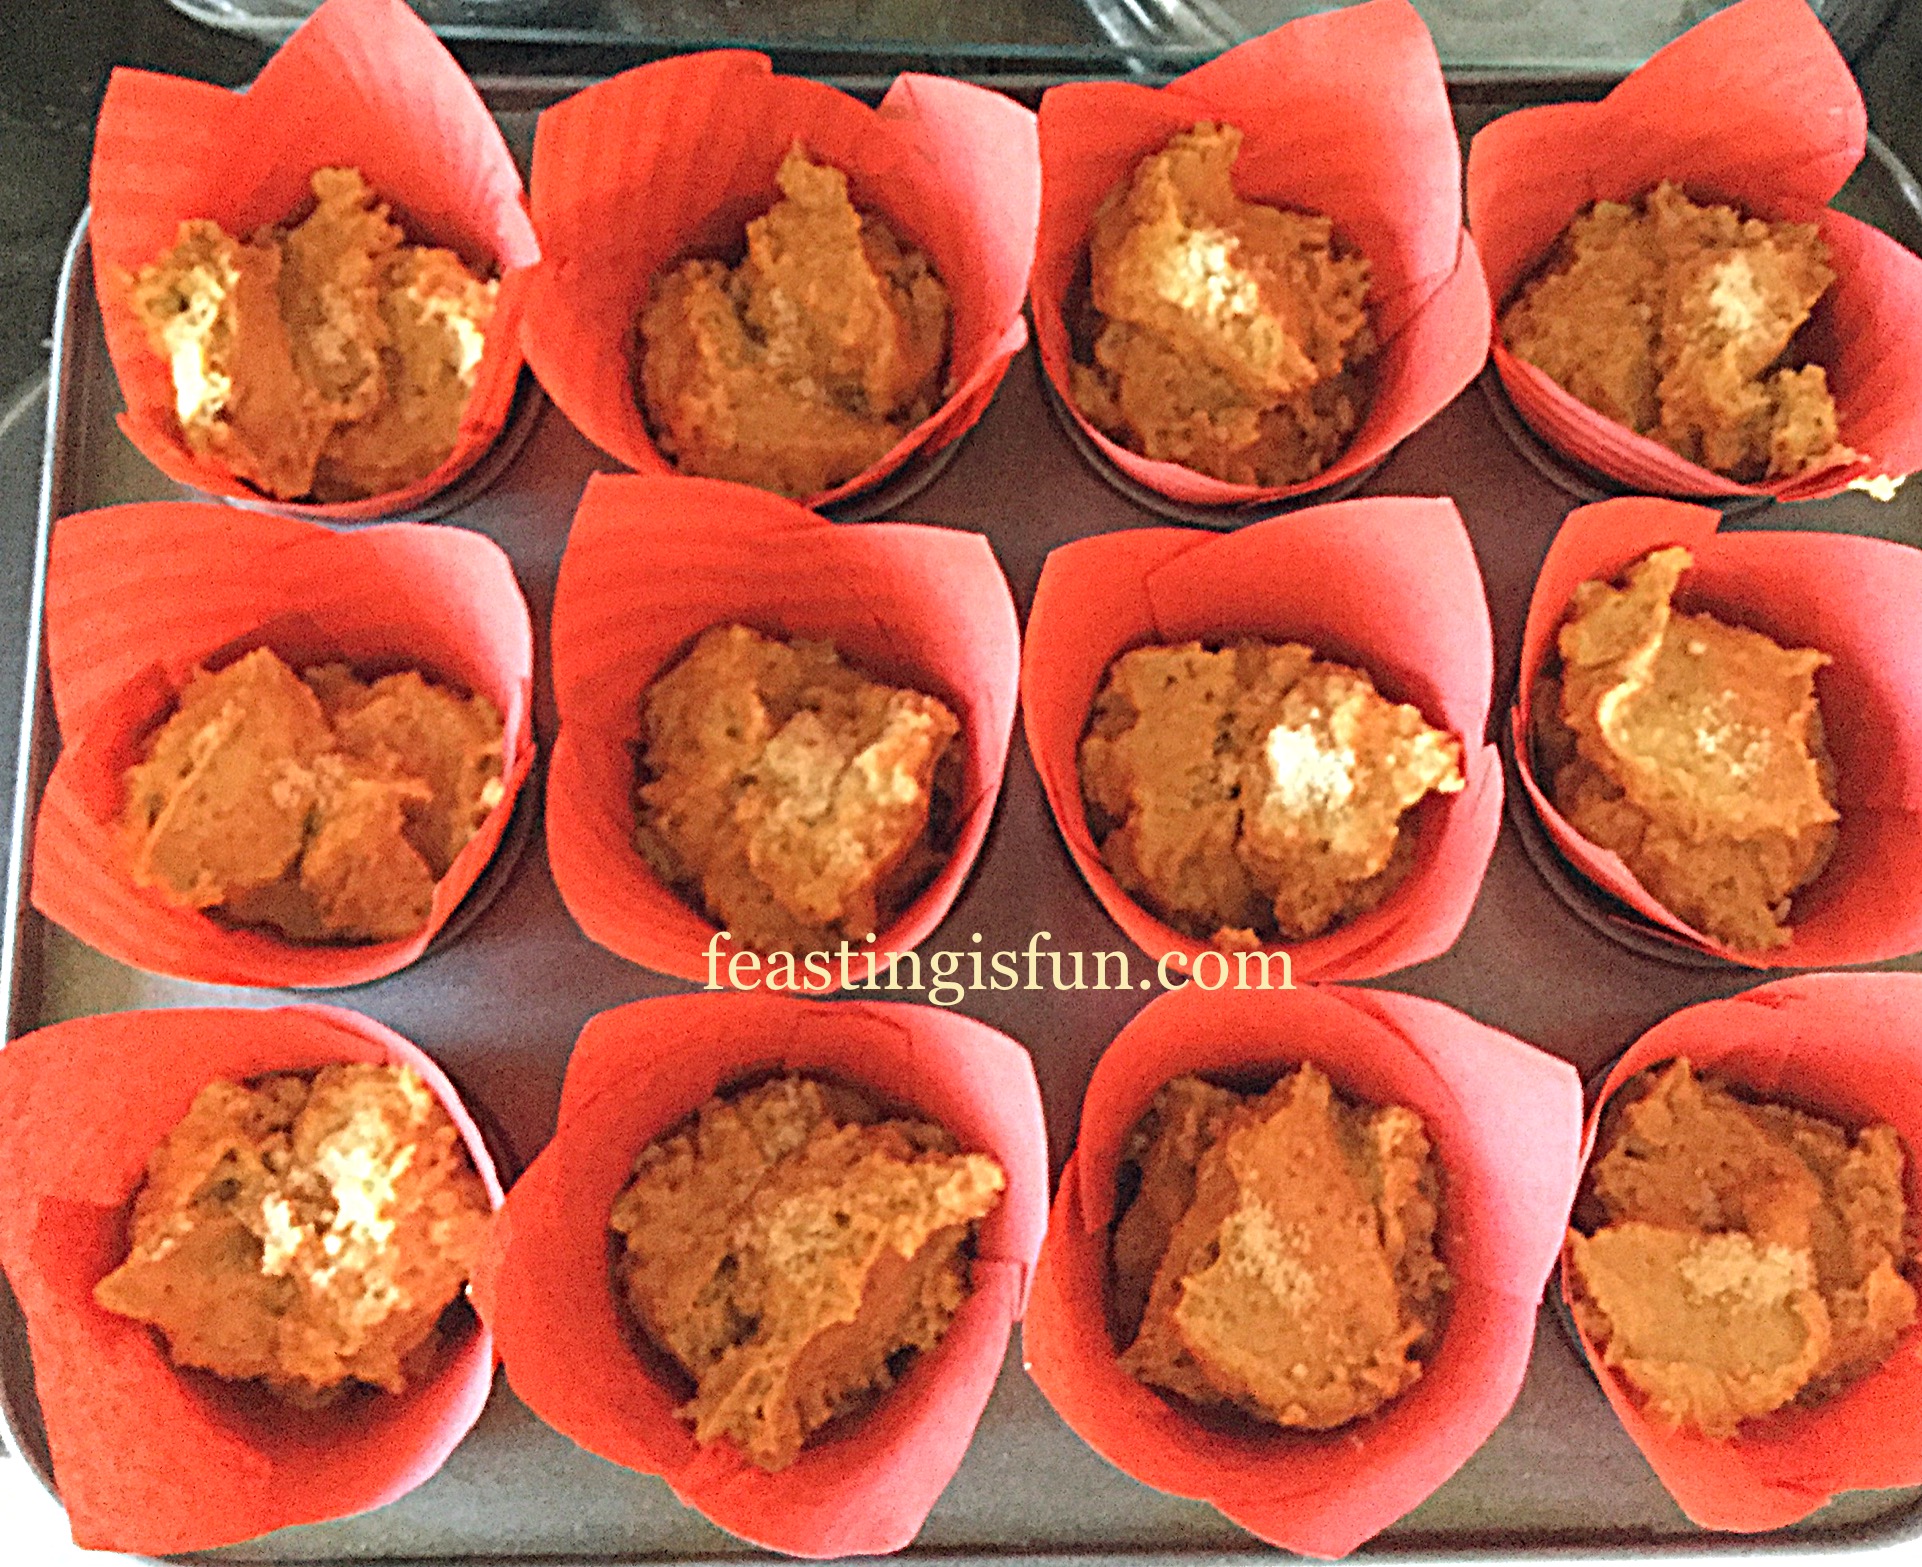
The stages of making the cupcake batter, through to filling and baking them.
Allow the cupcakes to fully cool before frosting them.
Making The Frosting And Decorating The Cupcakes:
First, add the very soft butter to a large bowl.
Then sift the icing sugar into the bowl.
Next add the vanilla extract, maple syrup and very hot water.
Finally whisk the ingredients, starting slowly and increasing in speed, until you have a smooth, creamy, light buttercream.
Fit a large piping bag with a large star piping nozzle – Wilton #1M.
Fill the piping bag with the maple syrup frosting.
Start in the centre of each cupcake pipe swirls, so the entire top of the cupcake is covered and then, continue to pipe, bringing the tip back to the centre and finishing with a star, as the nozzle is pulled away.
Continue to pipe frosting until each cupcake is generously topped with frosting.
To finish the decoration, drizzle approximately 1/2 teaspoon of maple syrup on to the top of the frosting, allowing the drizzle to drip around the frosting swirls.
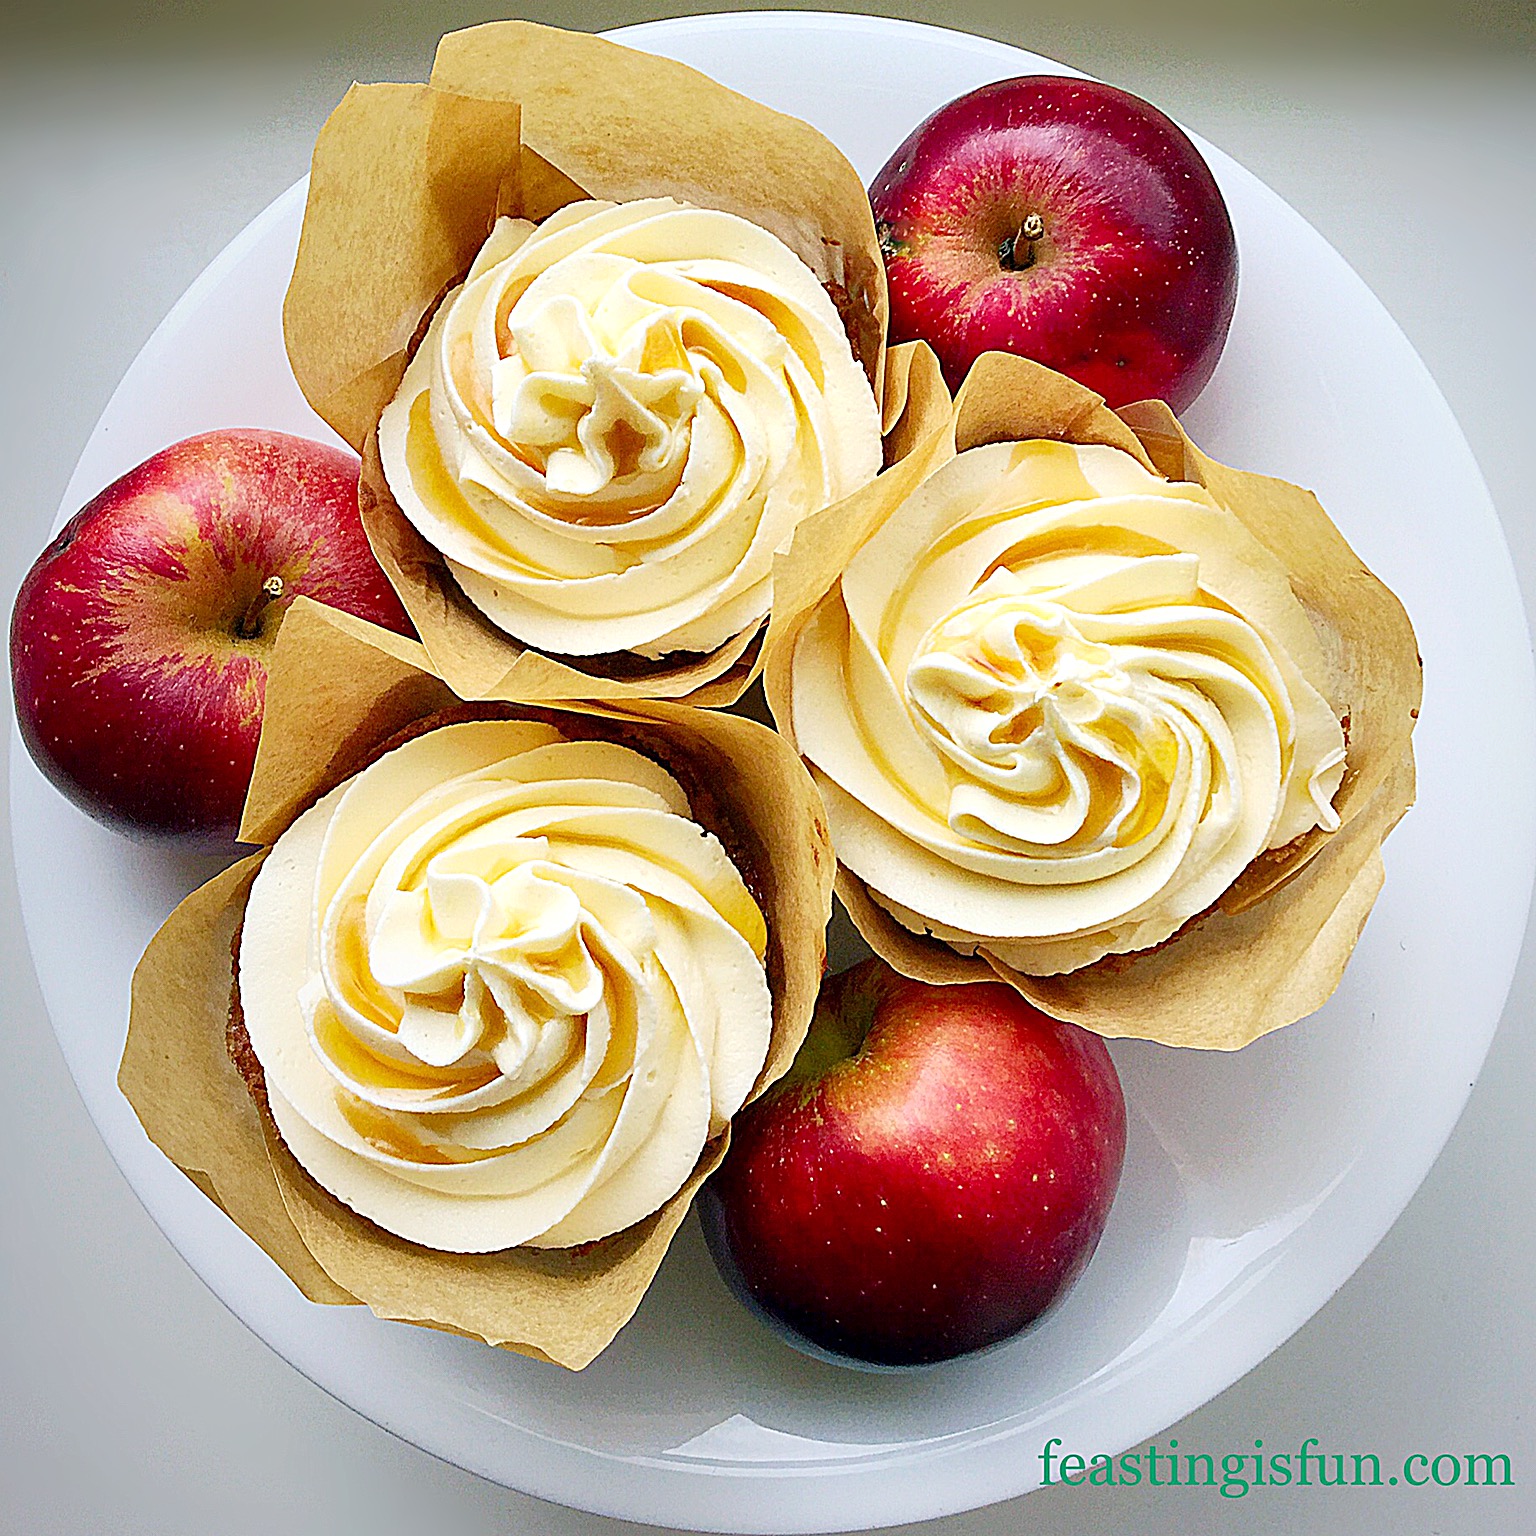
Maple Syrup Frosted Apple Cupcakes ready to be served.
Maple Syrup Frosted Apple Cupcakes a taste of Autumn in a cupcake! If you enjoy the season of Autumn, or Fall as it’s also known, take a look at this non food related post Autumn The Most Beautiful Season.
Maple Syrup Frosted Apple Cupcakes
Baking these cupcakes certainly makes the most of seasonal fruit. Since there are plenty of apples freely available I will be making again. Another reason to bake them is also so they can be shared. While none of our friends or neighbours expect deliveries of cake, it is an extra special way of sharing our abundance of apples, which are also given away.
If you have enjoyed the recipe for these Maple Syrup Frosted Apple Cupcakes you may also like these:
I enjoy baking and find the process very relaxing. And creating new recipes is also be very rewarding, especially as I get to share them here, on Feasting Is Fun. Firstly as a personal achievement and also because of the pleasure my baking brings to others. Watching faces full of pleasure as they bite into a delicious treat, big smiles when a friend receives a birthday bake and gracious thanks from a busy, tired family upon receipt of a homemade lasagne, all bring me a deep sense of joy. Life is for sharing and if my small contribution encourages others to do the same, well then, this blog, Feasting is Fun, will have served its purpose.
Do you share your makes and bakes?
Sammie xx
No part of this post may be reproduced or duplicated without the written permission of the owner. Please see my Disclosure Policy.
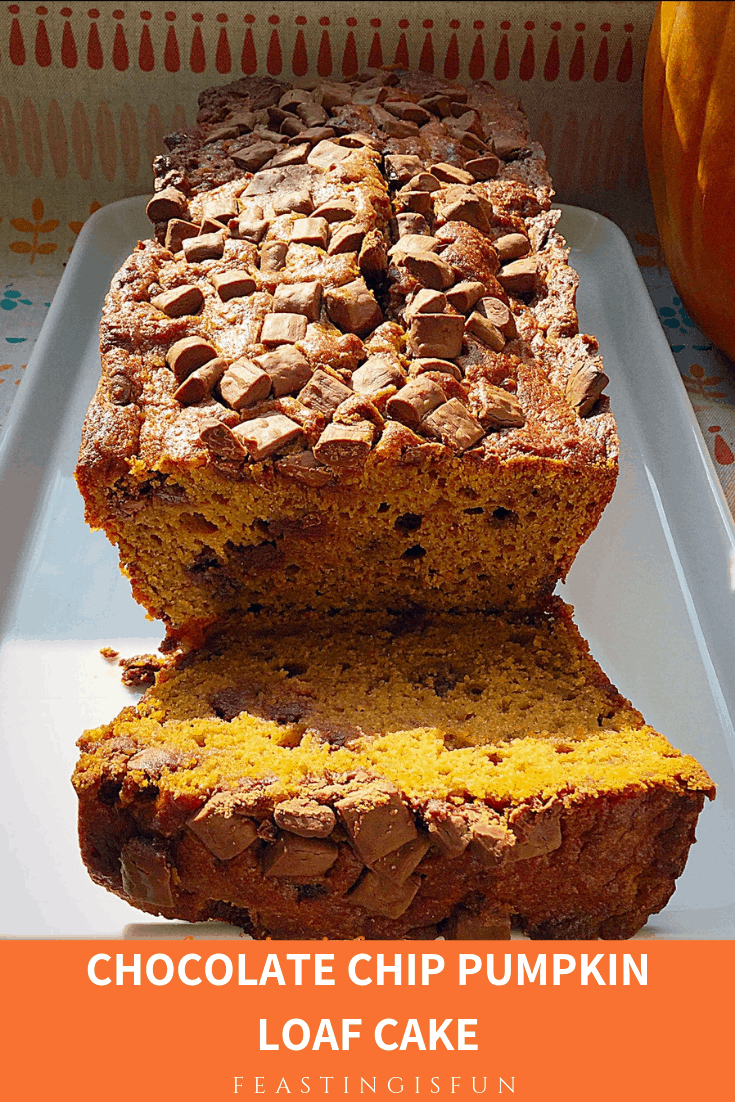
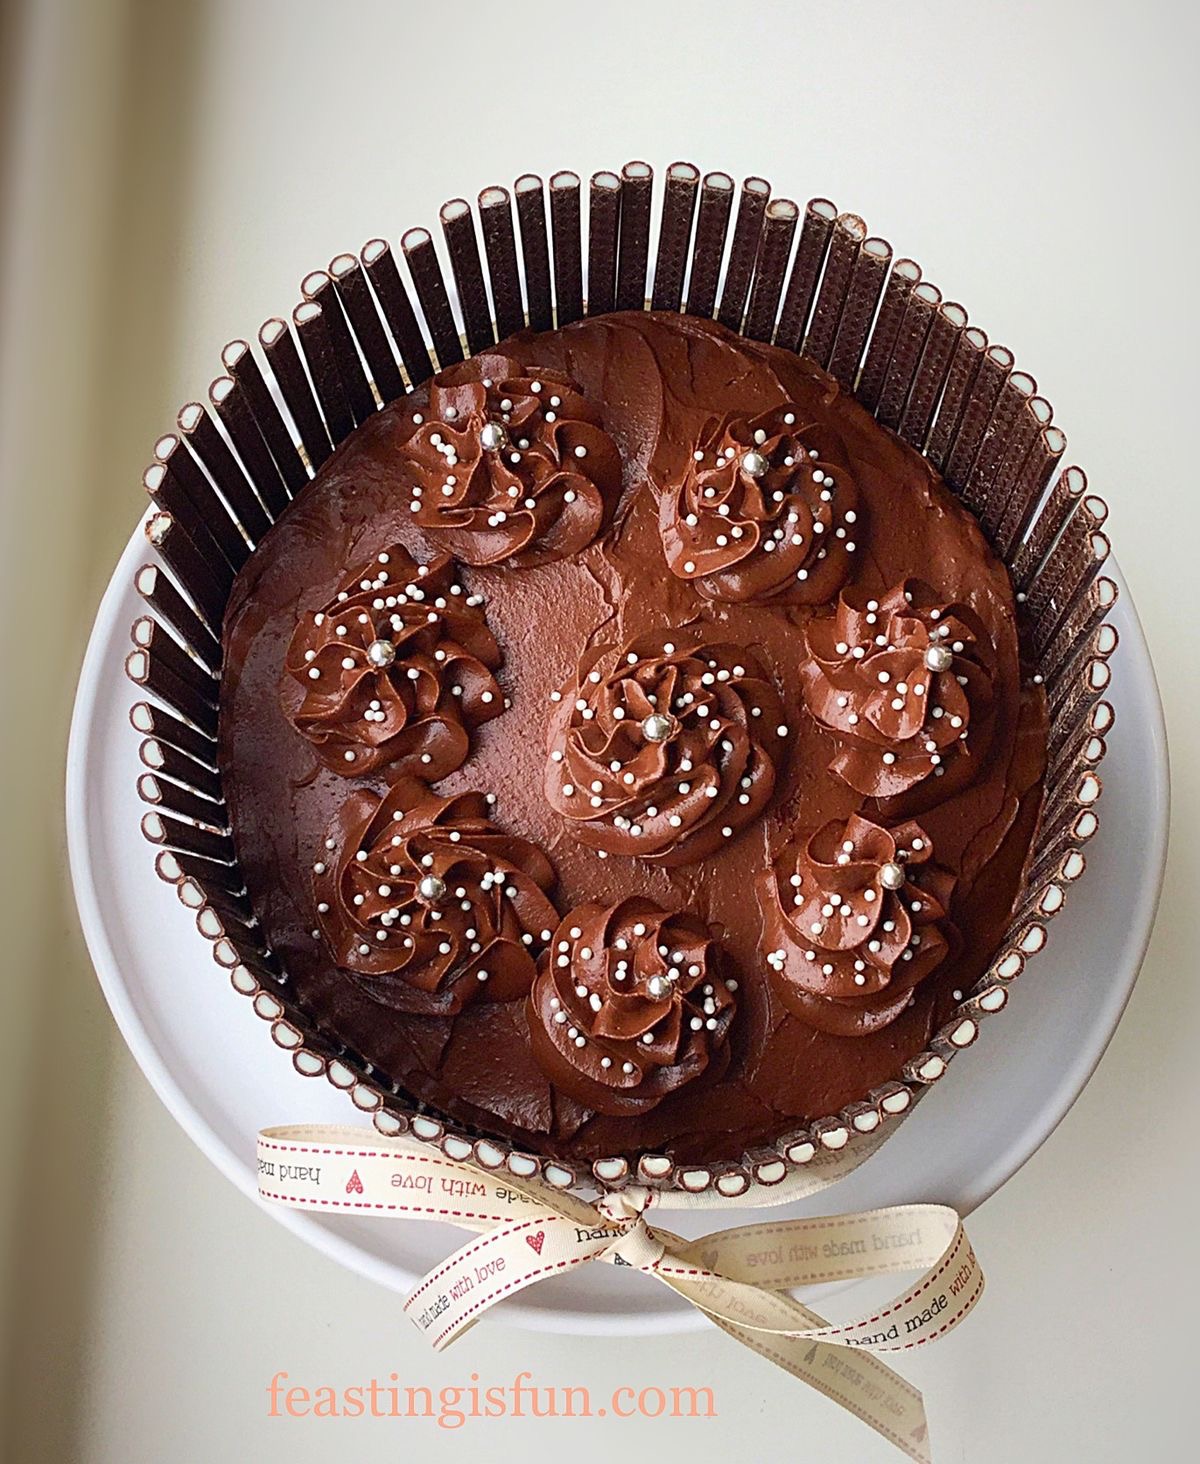
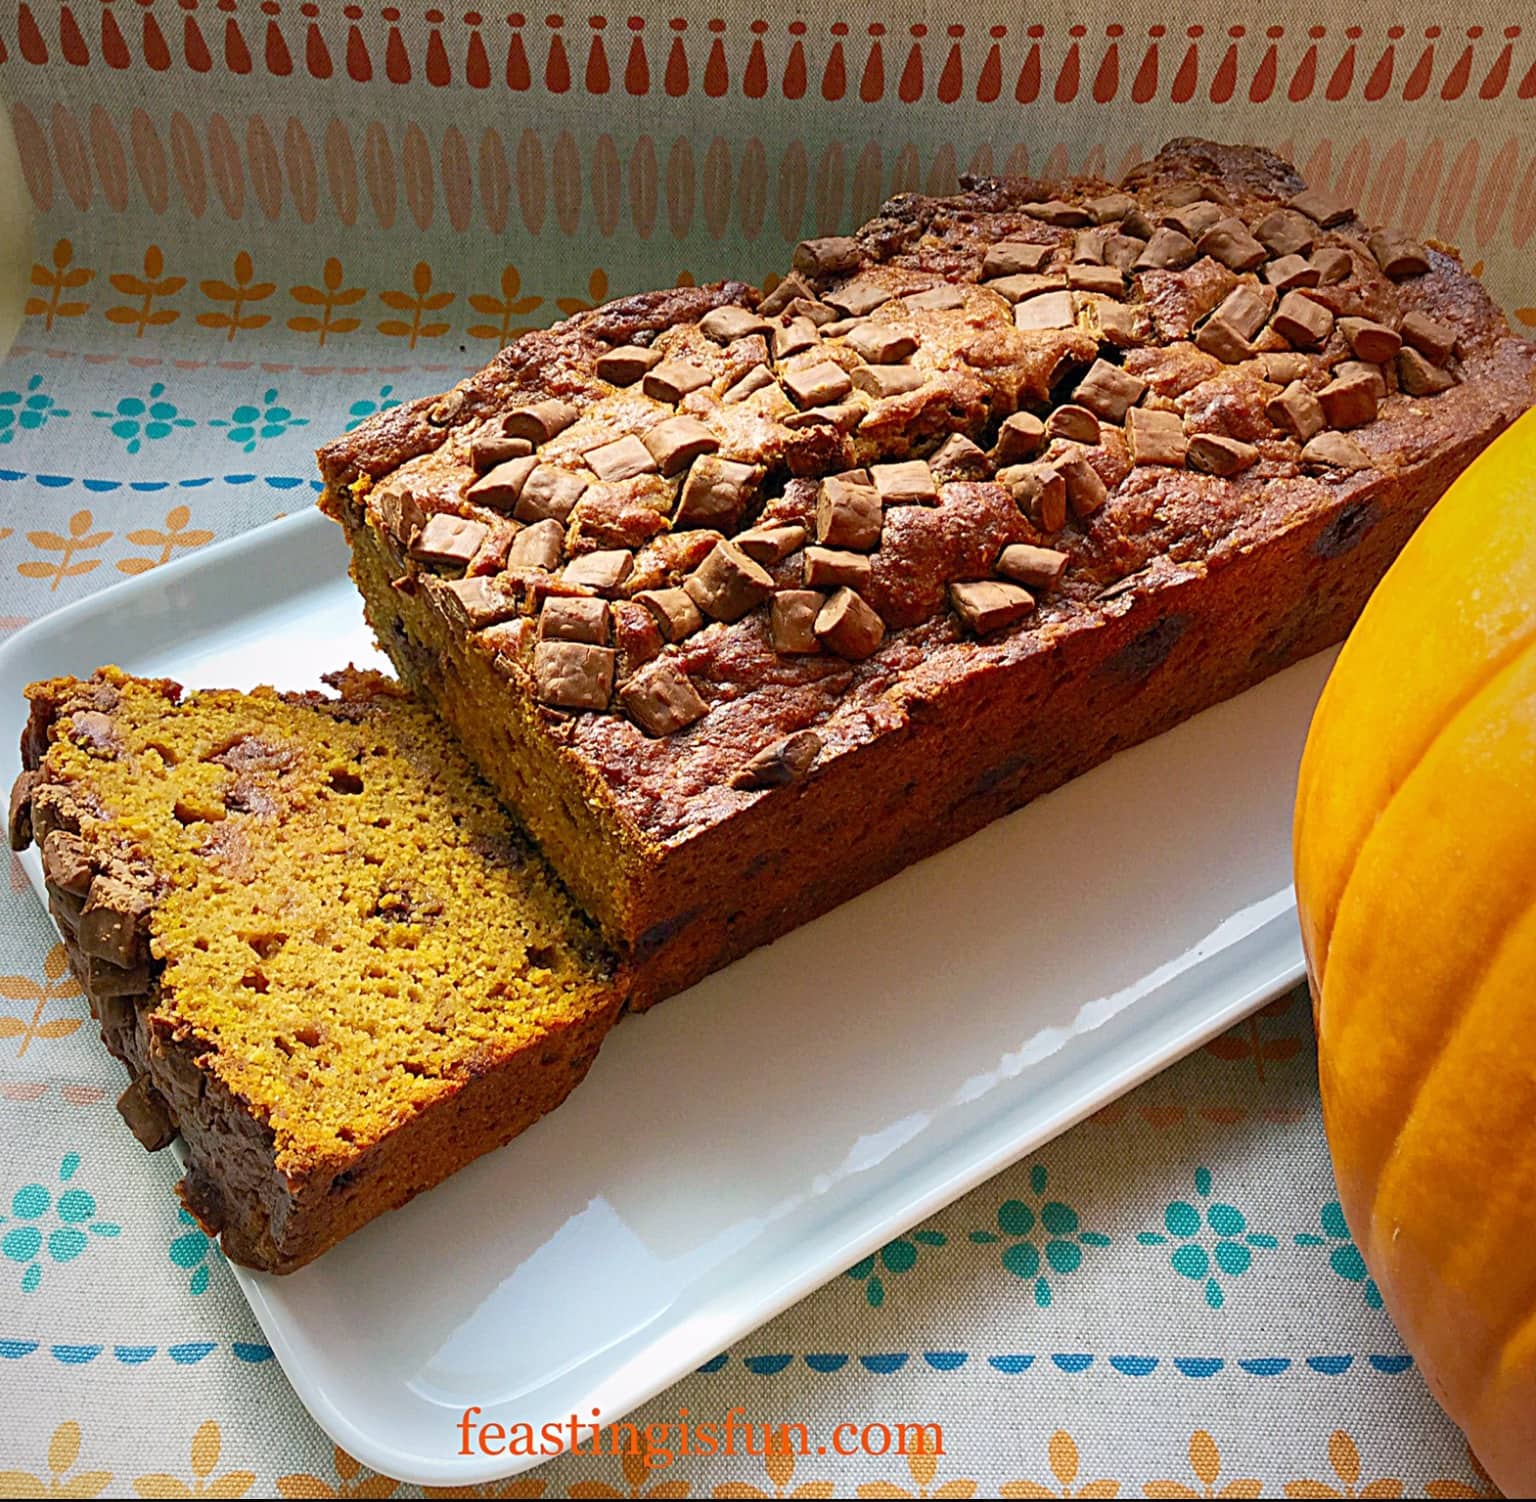
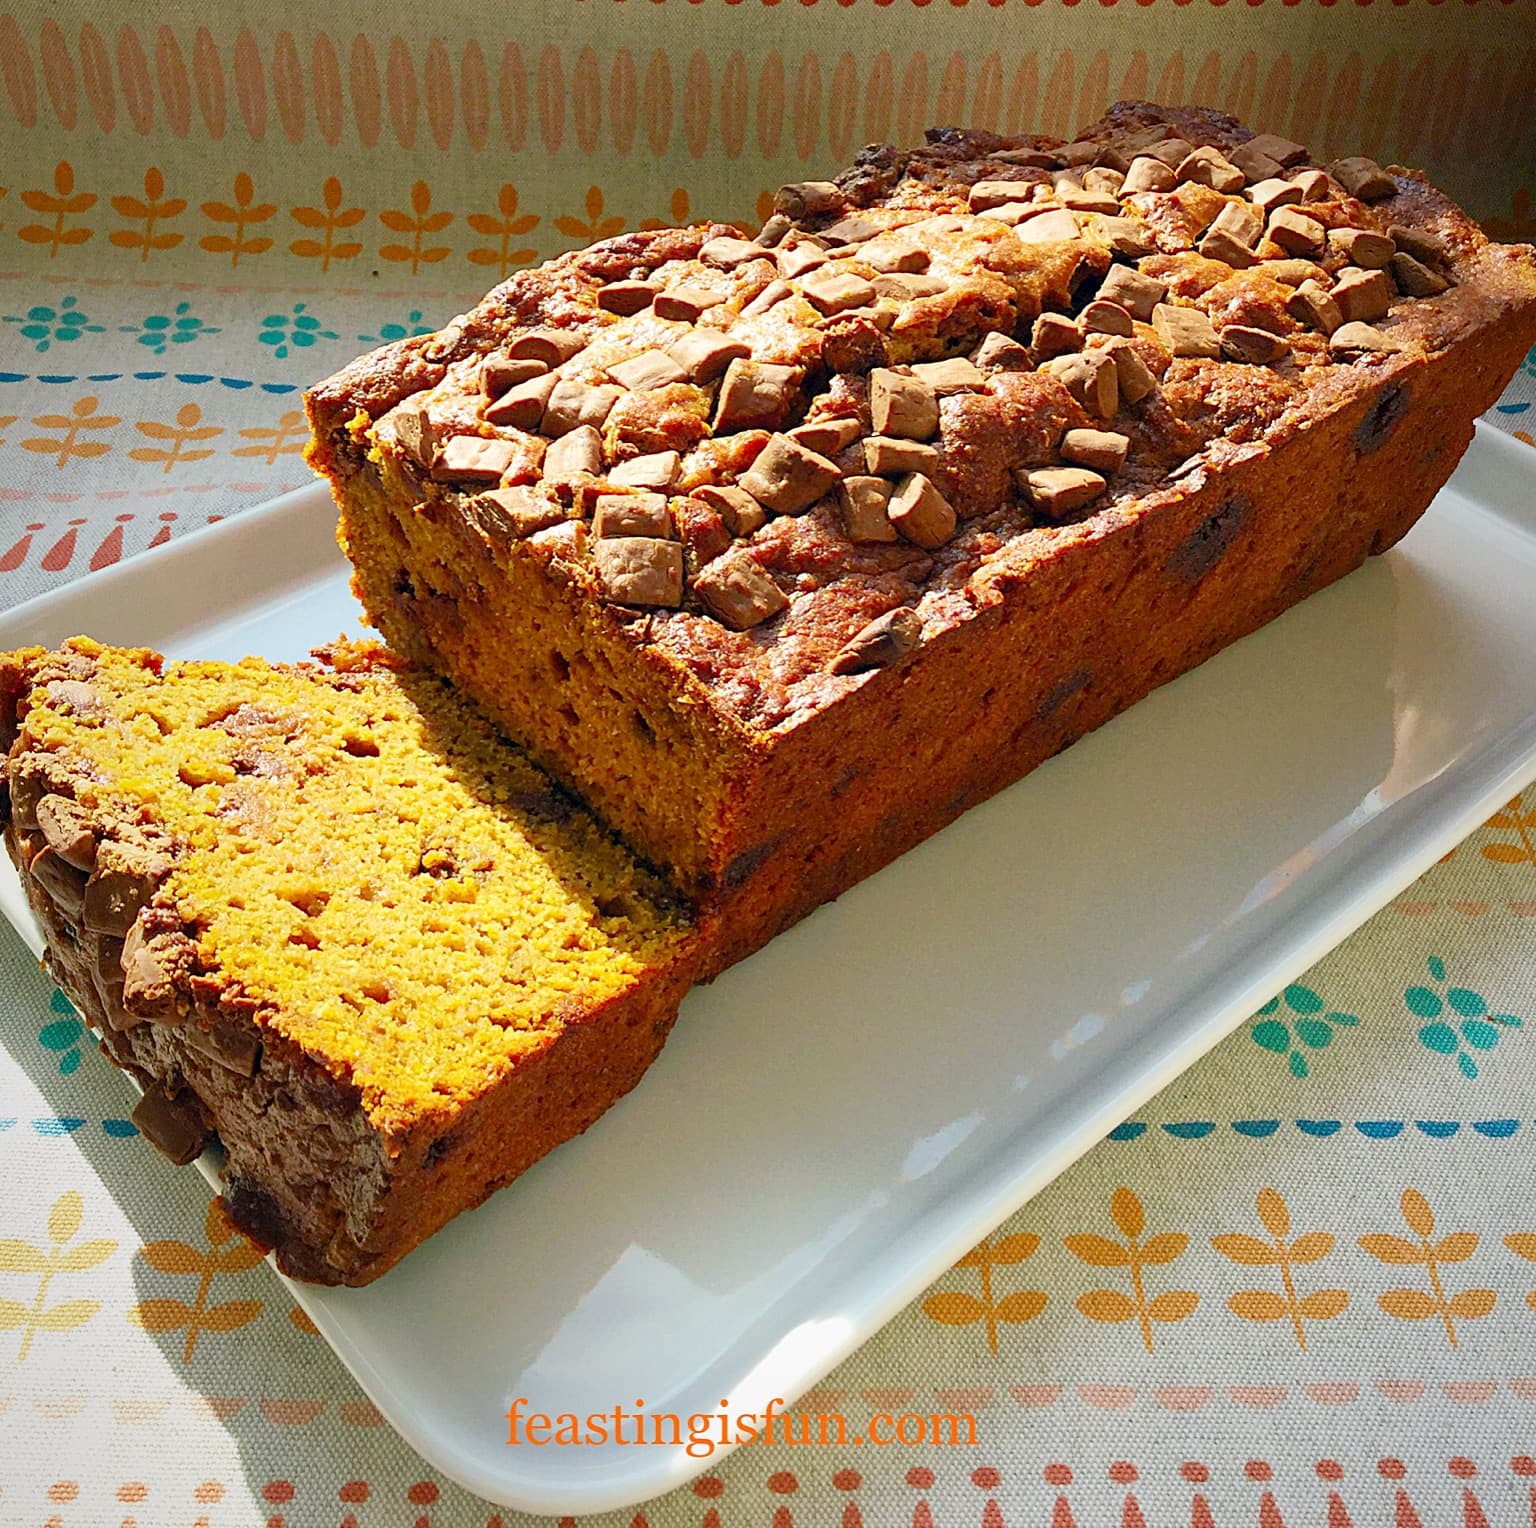
The leaves are finally starting to change colour, during a gusty breeze they flutter through the air, landing on the ground, blown into crunchy, golden piles. Autumn is here and with it comes the need to snuggle under soft blankets, while watching telly on a chilly evenings. Warming, comforting food is an absolute necessity. Gone are the salads of summer, instead soups, stews and puddings taking their place. Baking this Chocolate ChipPumpkin Loaf Cake fills the house with pumpkin spice scent, welcoming all who come home after a busy day at work or school.
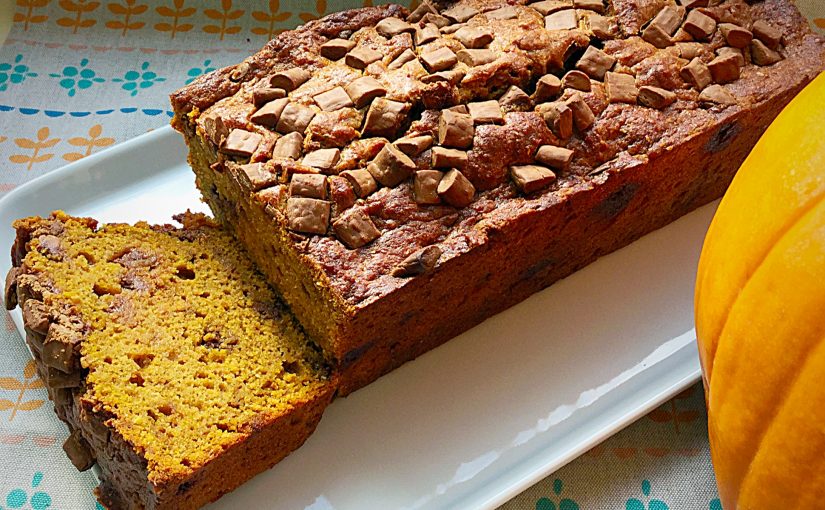
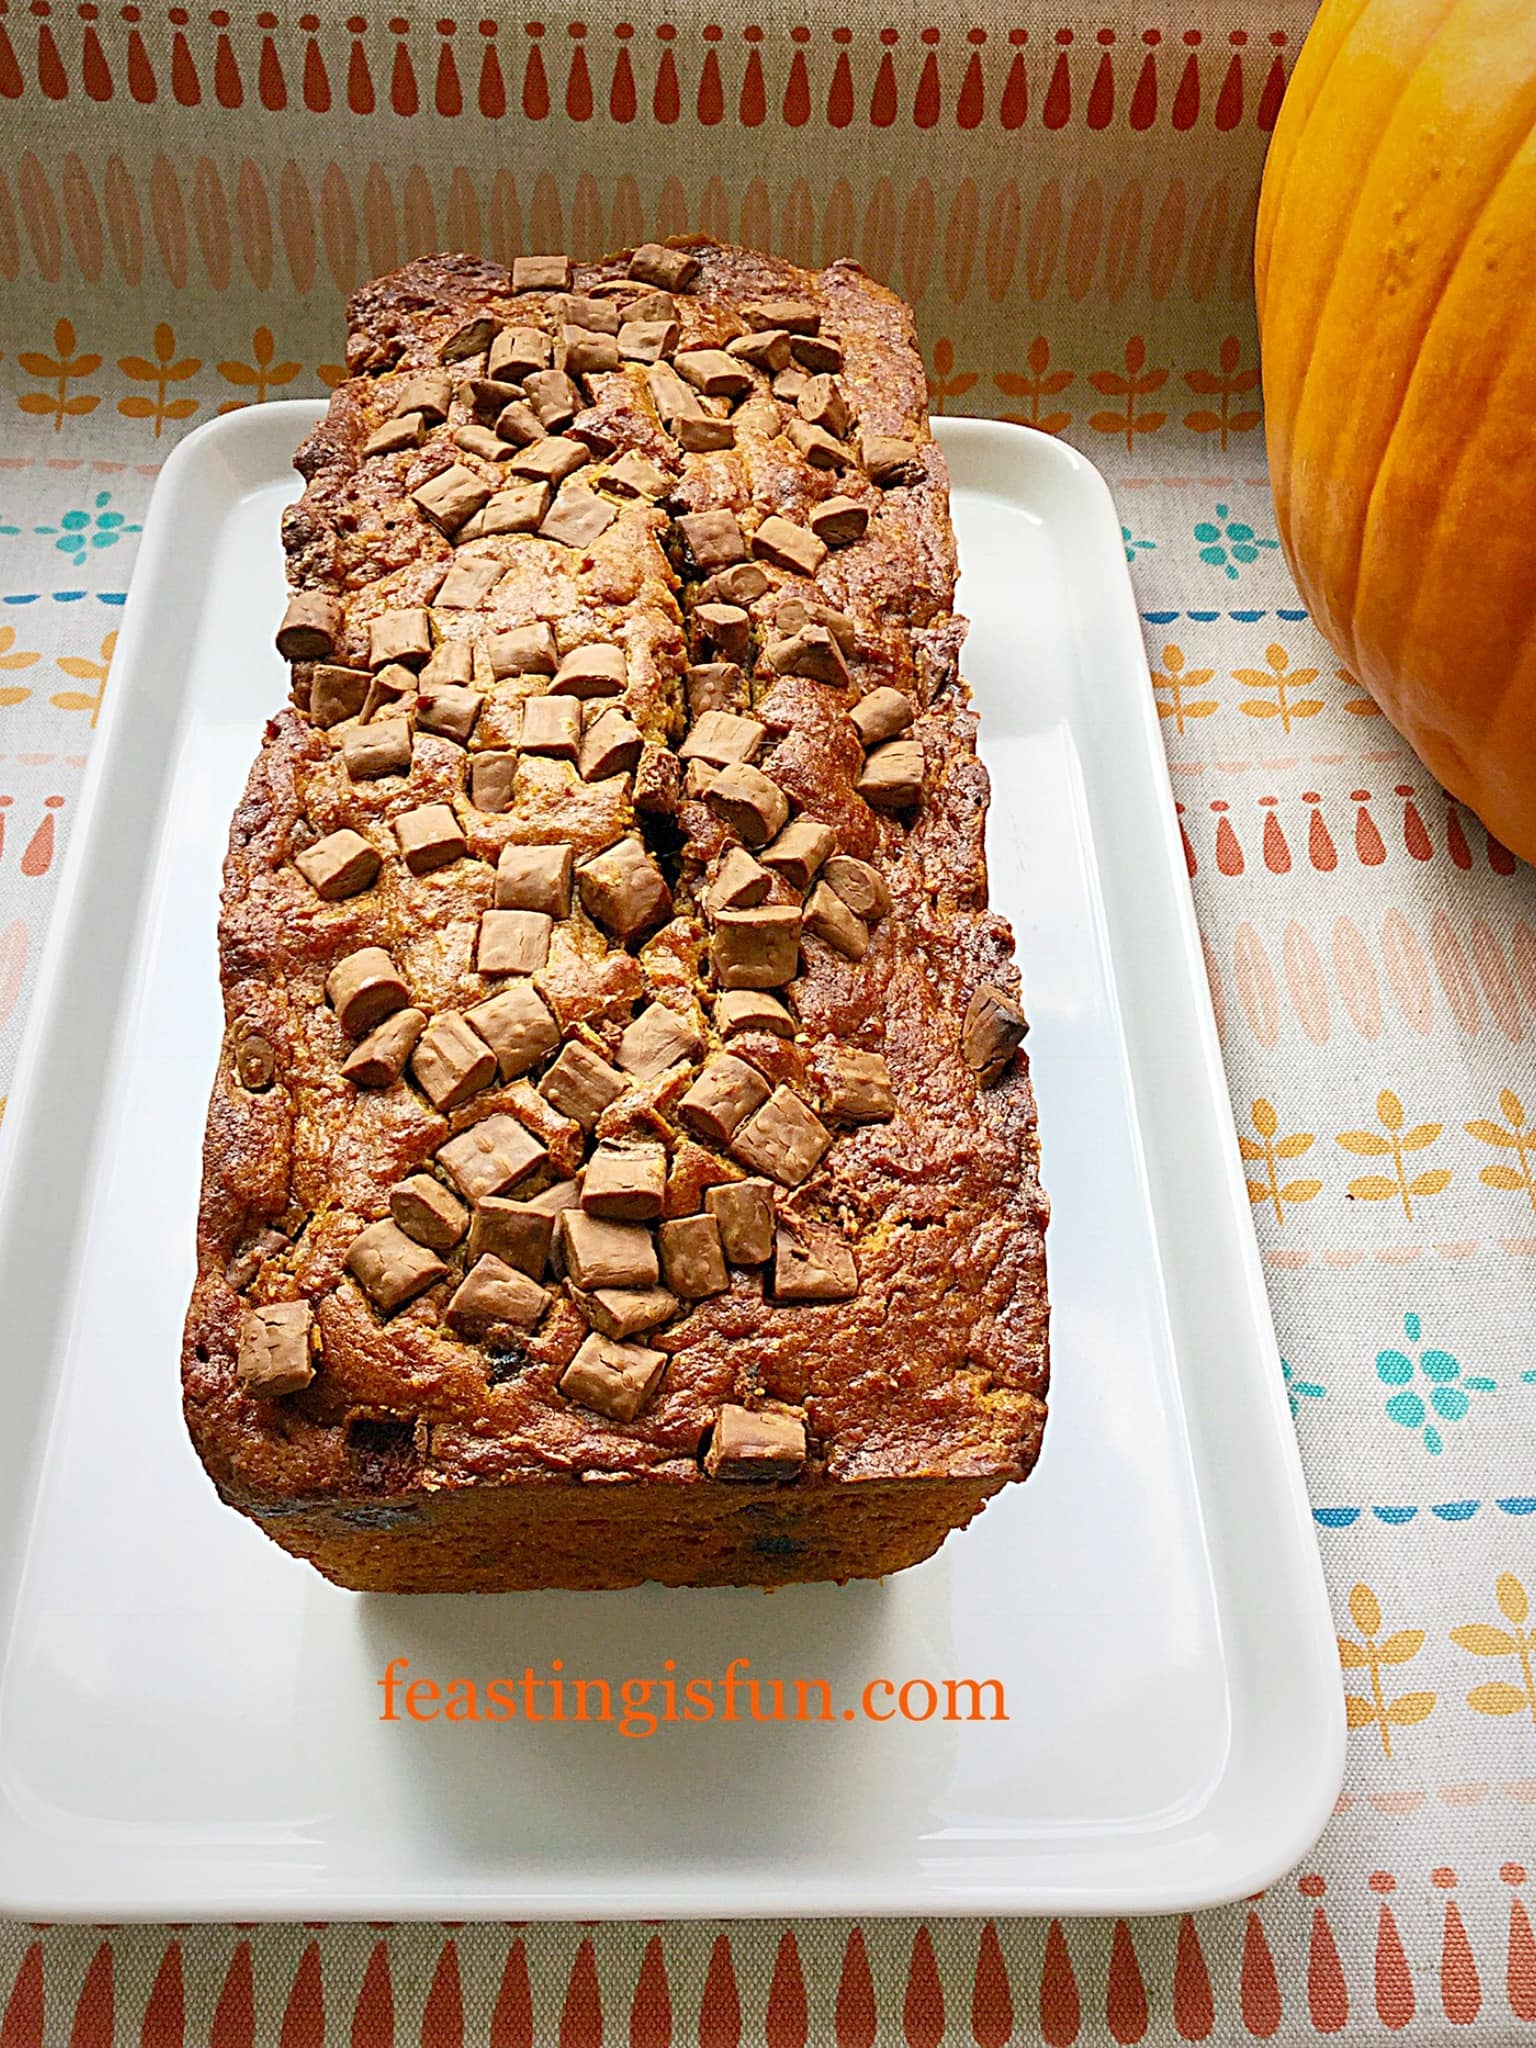
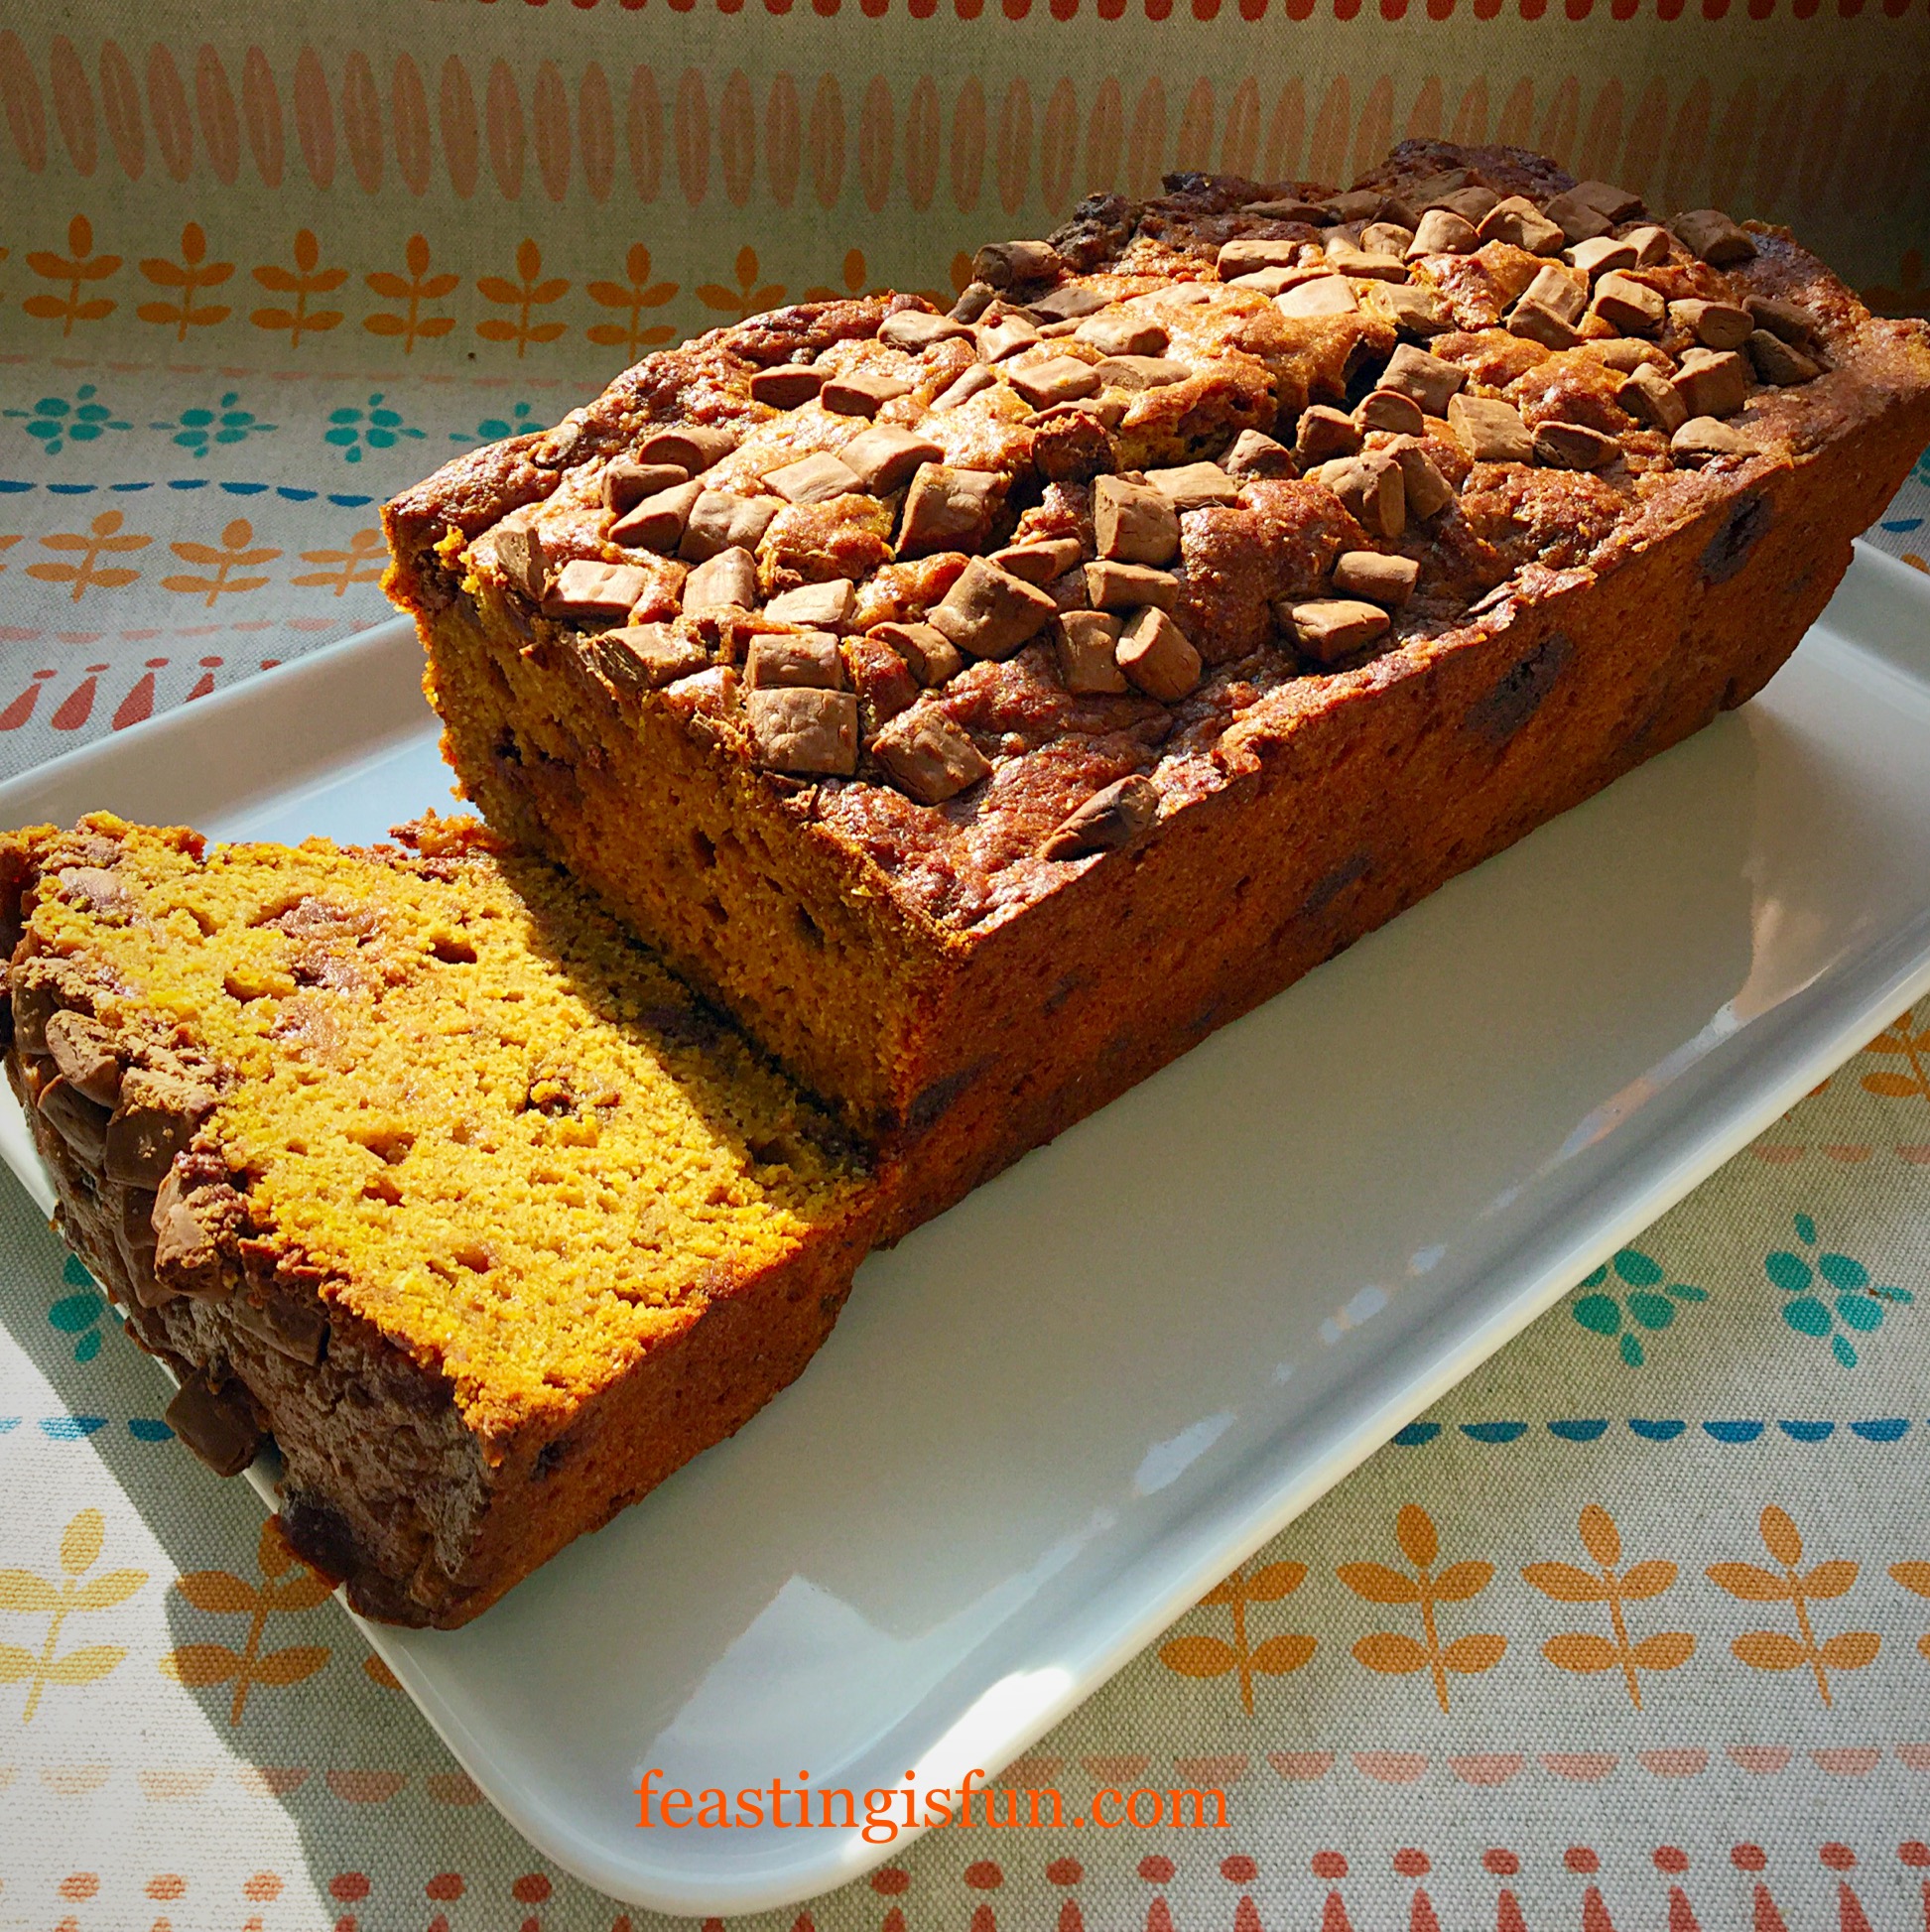
Chocolate Chip Pumpkin Loaf Cake
As the days become increasingly colder, what better than warm pumpkin spices combined with chocolate chips in a moist pumpkin cake, to make you feel ready to tackle the rest of the day? Sliced and wrapped, this Chocolate Chip Pumpkin Loaf Cake is perfect for packed lunches. While at school or work, the taste and warmth of home can be with us, wherever we are.
Creating this loaf cake was a real triumph. Successfully combining pumpkin, pumpkin spices and chocolate into a tasty, moist, healthier cake. Since loaf cakes are so much easier to cut, wrap and pack to go, this has been a huge hit here, especially with hubby. Therefore you will see more loaf cakes appearing on Feasting is Fun.
Starting with the recipe for Spiced Pumpkin Walnut Muffins, while delicious, I wanted to add chocolate chips and increase the size of the bake. Because I wanted a cake that was full of flavour, skimping on the chocolate chips was not an option. Deciding to hold back one third to top the cake with, added to the cake’s overall aesthetic.
Method: Preheat the oven to 180C/160C fan, gas mark 4, 350F.
A loaf tin that measures 25cm x 11.5cm x 7.5cm (10″ x 4.5″ x 3″) approximately, is needed for this recipe. Grease the tin with butter and line the base with baking parchment.
Making The Cake Batter
First of all, weigh and melt the butter. Then pour the butter into a separate, medium sized bowl or jug to cool.
While the butter is cooling assemble the dry ingredients. In a large bowl add the plain and wholemeal flour together with the baking powder.
Next add the sugar, salt and pumpkin spice to the flour. Use a balloon whisk to mix the dry ingredients thoroughly, ensuring any clumps of sugar are broken up. Finally add 100g of chocolate chips and set the bowl to one side.
Now check the melted butter, it should be just warm. Add the eggs, yoghurt and pumpkin purée. Use a fork to break up the eggs and lightly whisk all the wet ingredients together until they are combined.
With both bowls in front of you make a well in the centre of the larger bowl containing the dry ingredients.
Pour the wet ingredients into the dry and then stir with a spoon until everything is just combined. Over mixing will result in a heavy cake.
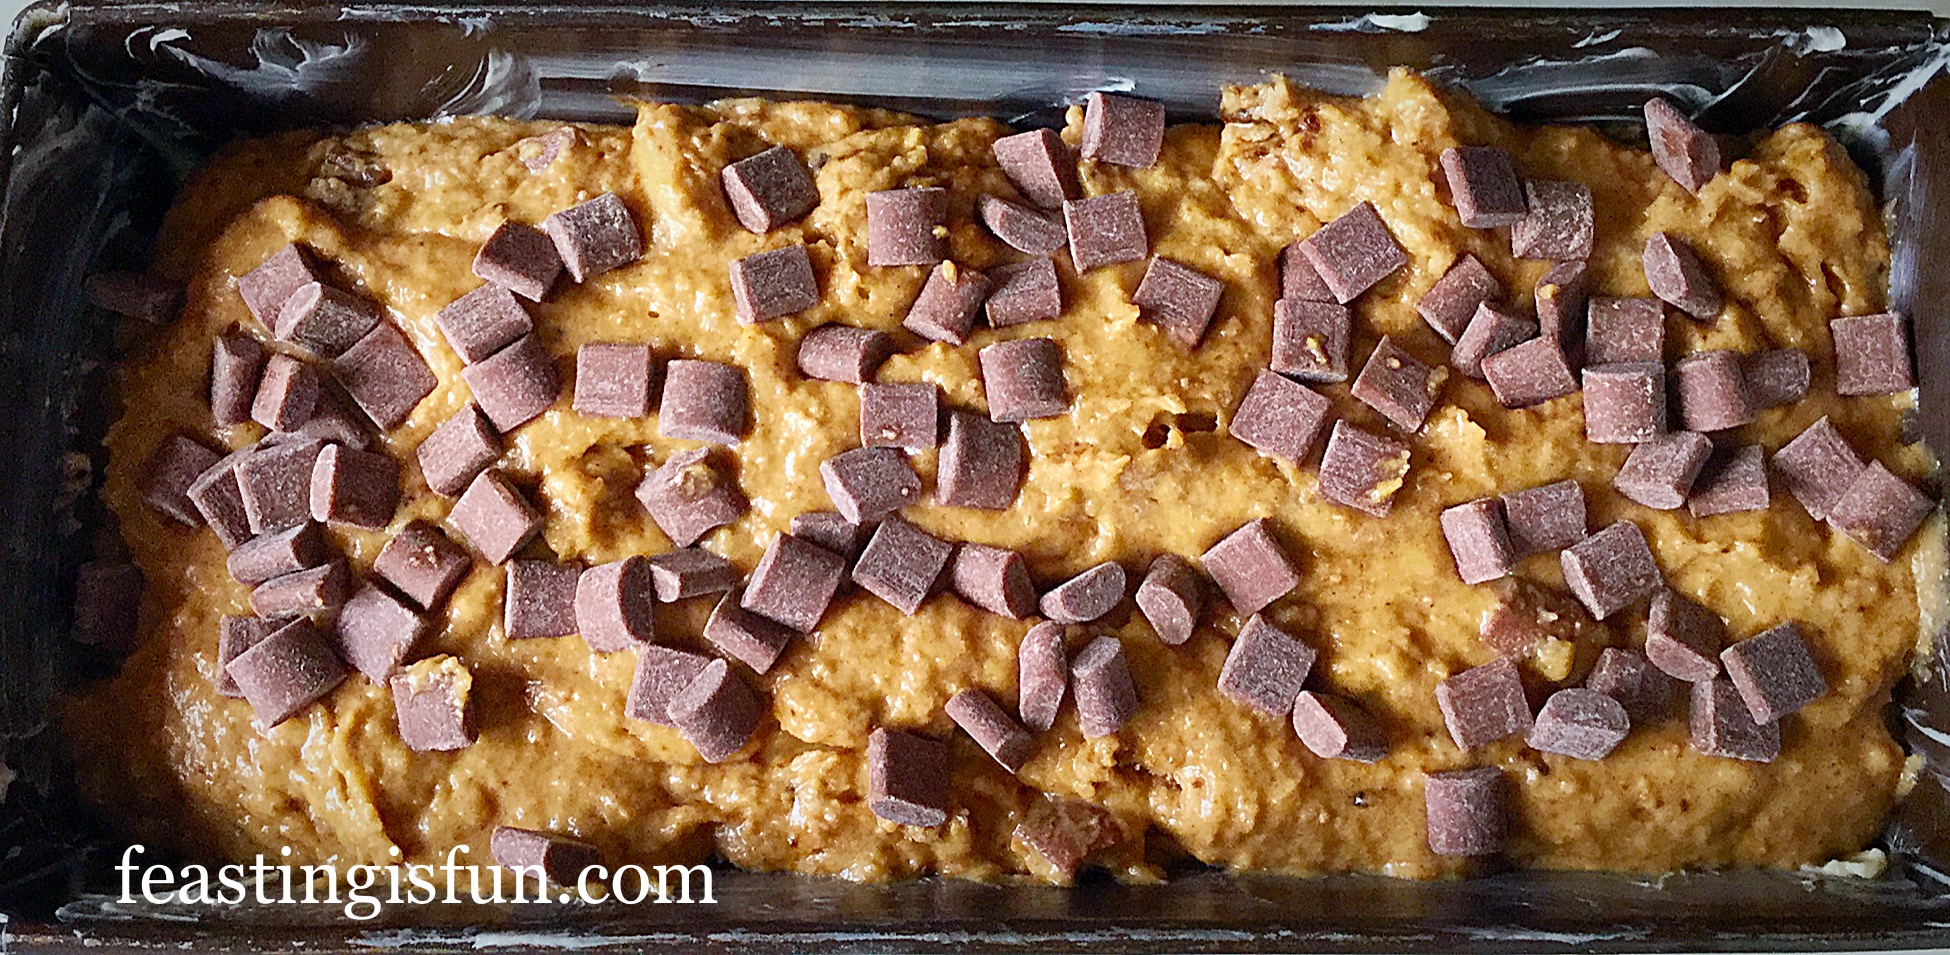
Now spoon the Chocolate Chip Pumpkin Loaf Cake batter into the loaf tin, then add the remaining chocolate chips evenly on to the top of the cake.
Chocolate Chip Pumpkin Loaf Cake ready for the oven.
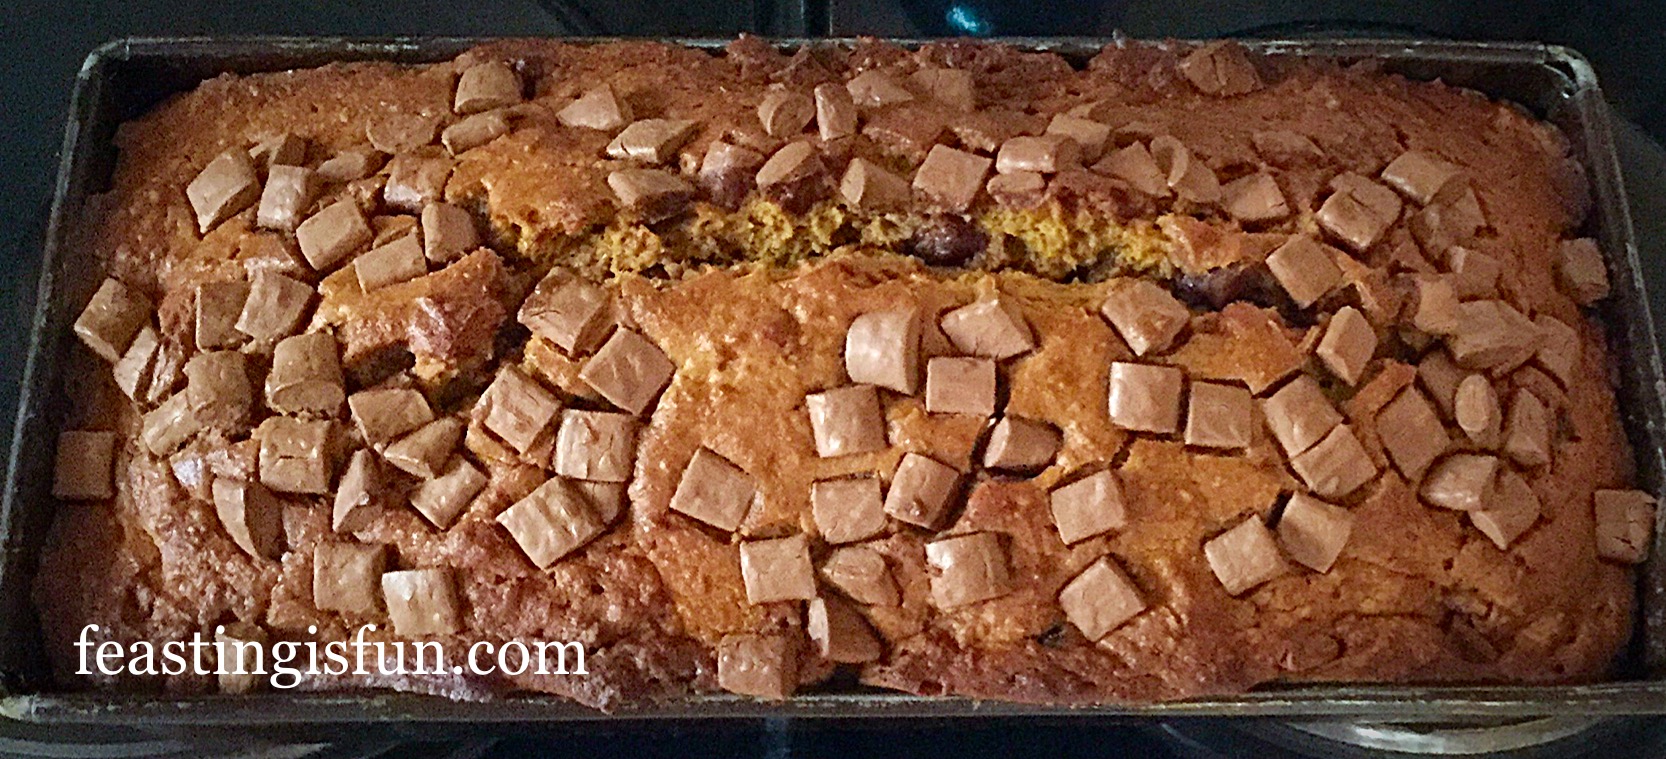
Baking The Loaf Cake
Place the loaf tin into the centre of the oven and bake for 45 minutes to 1 hour.
Insert a skewer into the centre of the cake. When it comes out clean the cake is ready.
As soon as the cake is fully baked remove it from the oven.
Place the loaf tin on a trivet or cooling rack and allow the cake to fully cool in the tin.
Chocolate Chip Pumpkin Loaf Cake cooling in the tin.
When fully cooled run a palette knife around the edges of the cake. Turn the cake out of the tin and carefully remove the baking parchment from the base of the cake.
Chocolate Chip Pumpkin Loaf Cake
Since this cake is so delicious, it is perfect for sharing. Invite friends round for a coffee morning and I guarantee that this cake will be a hit. It is also ideal to serve with frothy hot chocolate after a family walk on a chilly day out. Sharing food with others makes it taste infinitely better, simply because it is a experience that engages others while also creating memories.
If you have enjoyed this recipe for Chocolate Chip Pumpkin Loaf Cake you may also like these:
Baking can be a very therapeutic and rewarding experience. Working methodically through a recipe, from start to finish, I find myself relaxing in the process. While baking and giving a cake to friends or family shows that they have been thought of and most of all, are cared about. As a result of a little fore thought and preparation, it is really possible to change someone’s day in a positive way.
So, whatever you are making, baking and creating in your kitchens, have fun preparing and sharing your feast.
Sammie xx
No part of this post may be reproduced or duplicated without the written permission of the owner. Please see my Disclosure Policy.
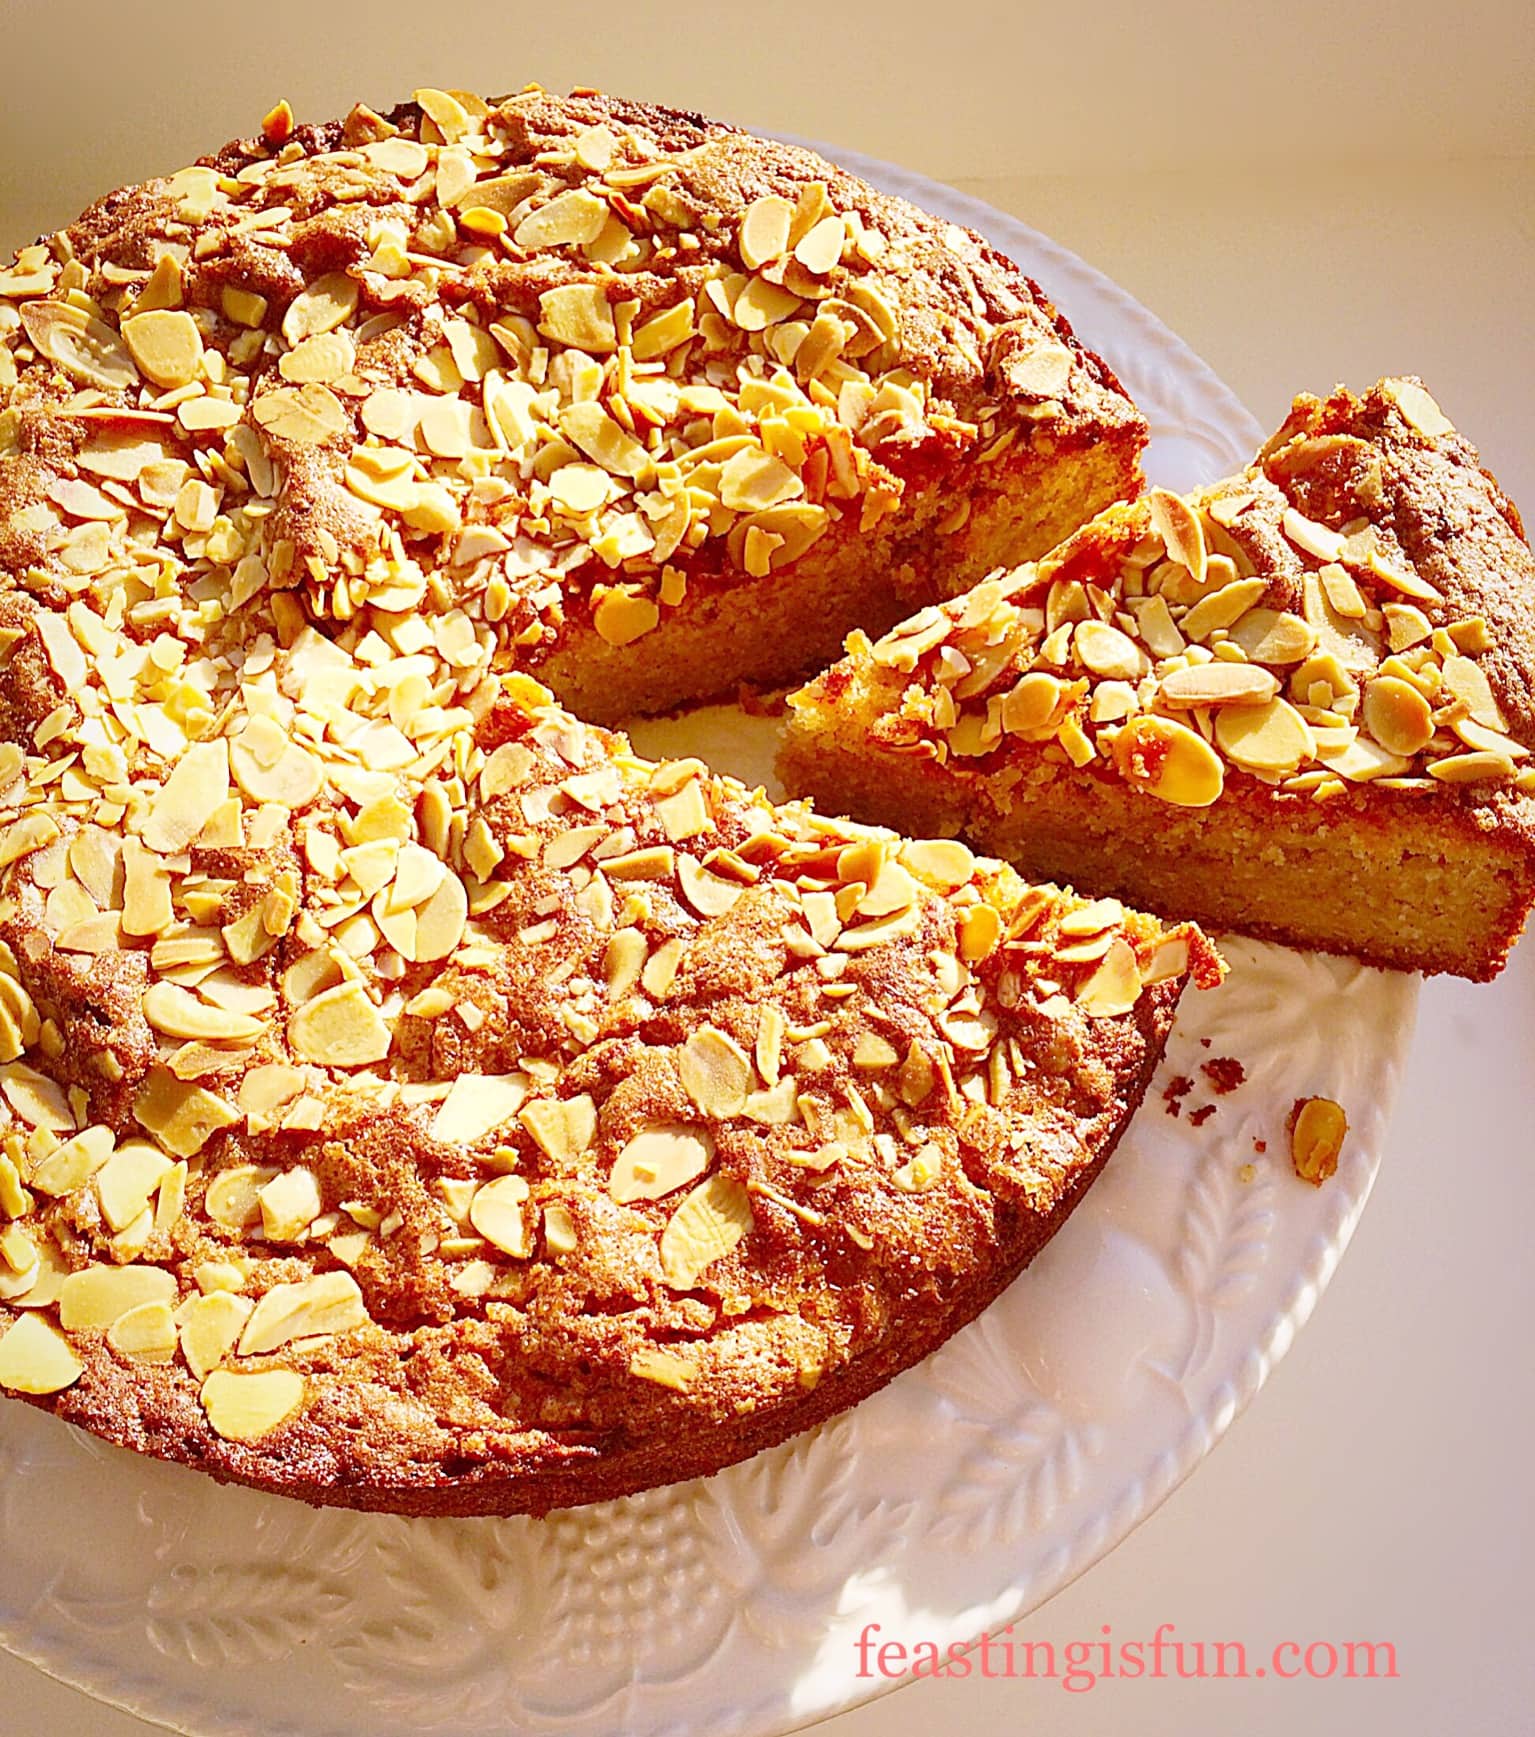
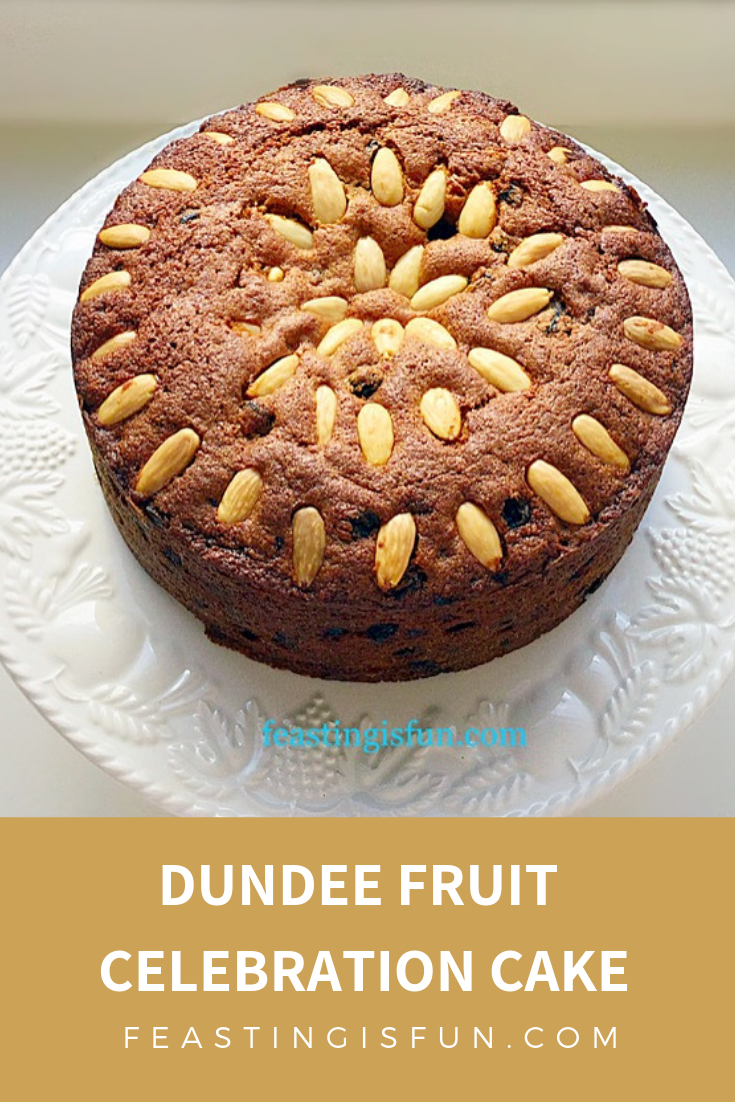
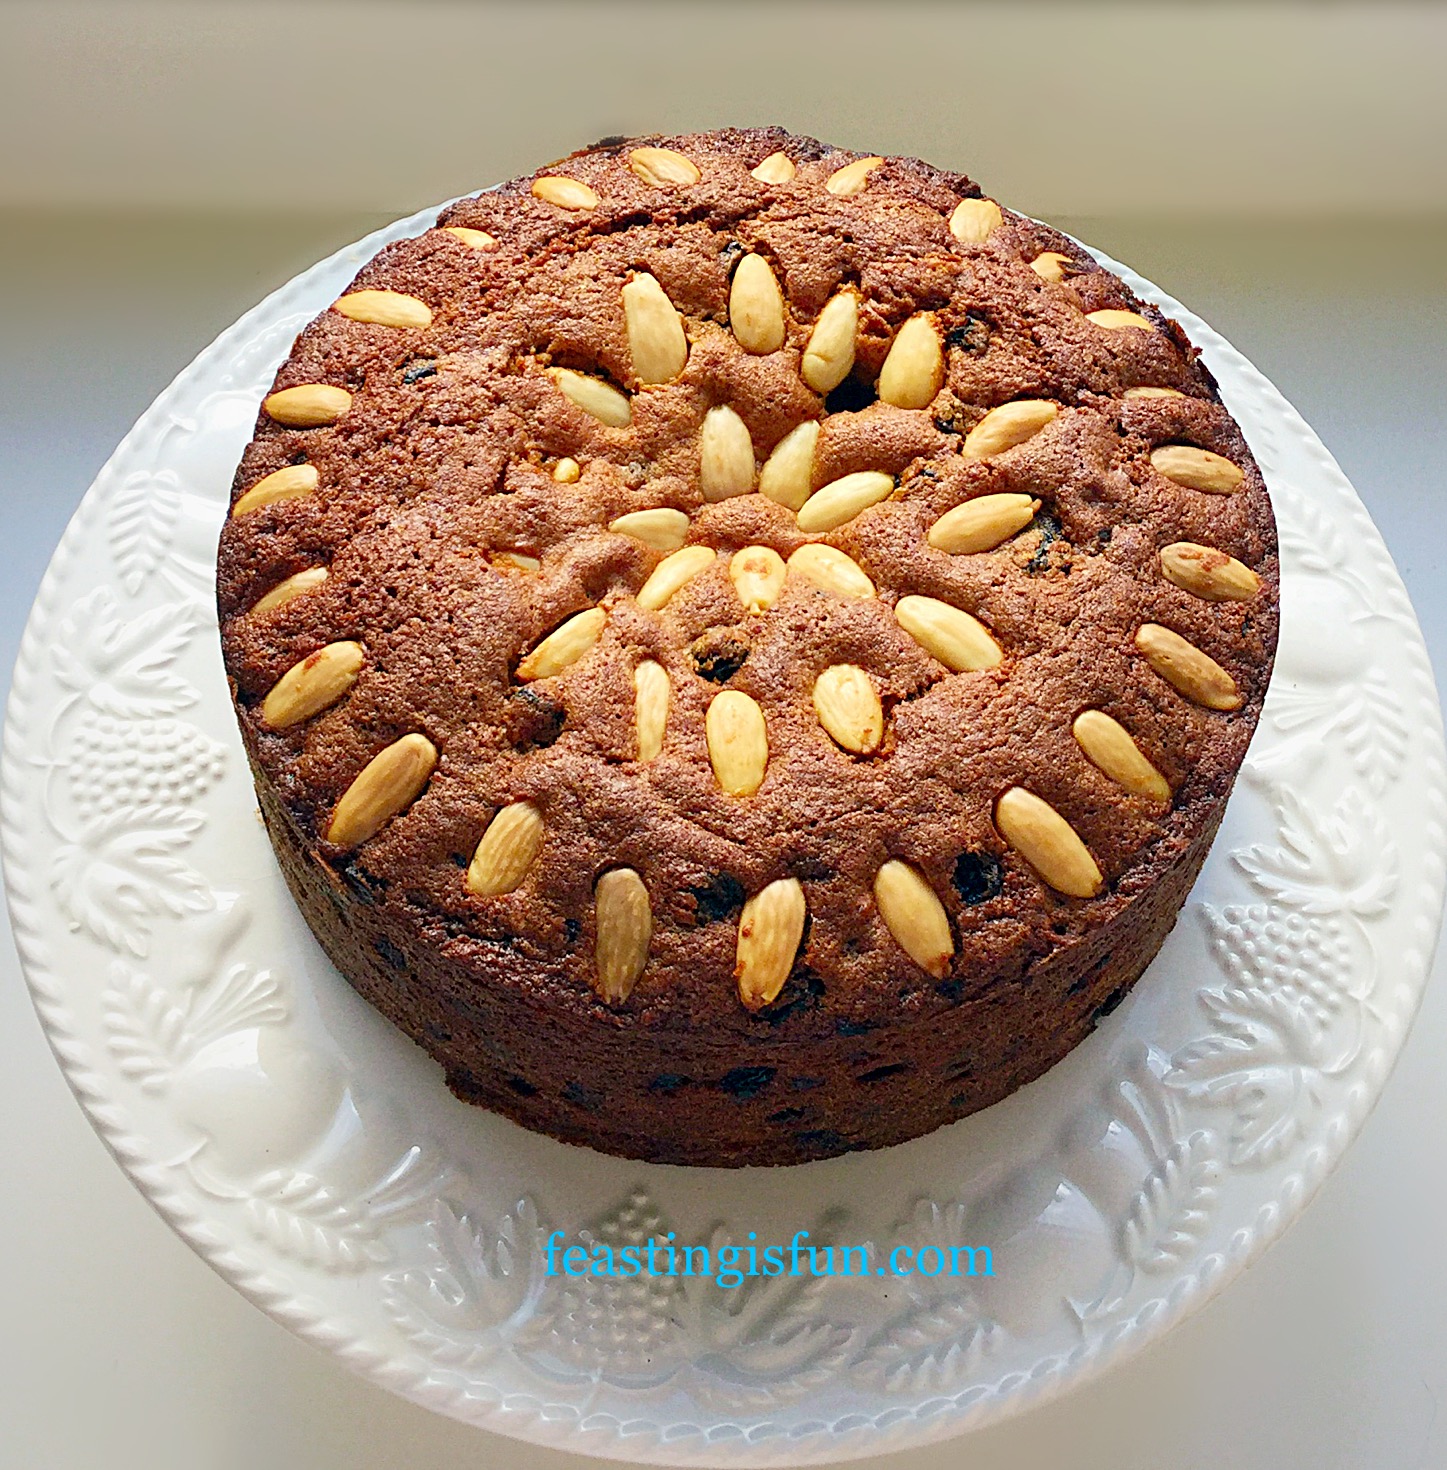
Today’s post is a celebratory one. Since our son turned 14 yesterday. While enjoying everything about celebrating his birthday, from blowing up balloons, hanging fairy lights, presents, cards, seeing family. Aside from seeing his Auntie, he really looks forward to his birthday cake. Since he’s not a huge fan of icing, although he loves Christmas cake, after much discussion he decided on this Dundee Fruit Celebration Cake.
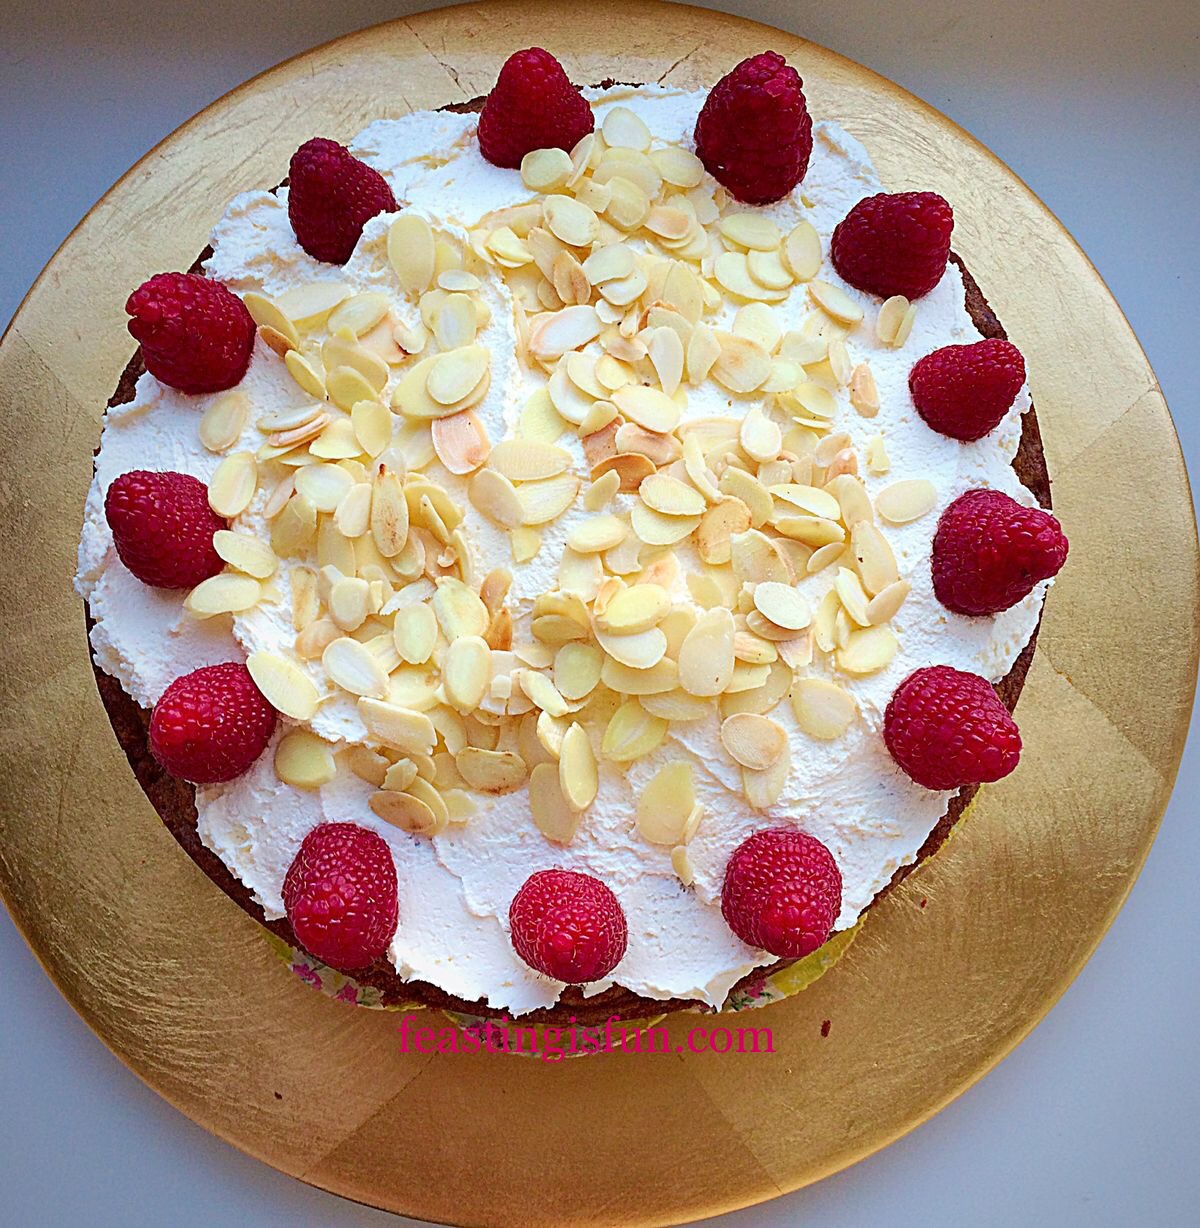
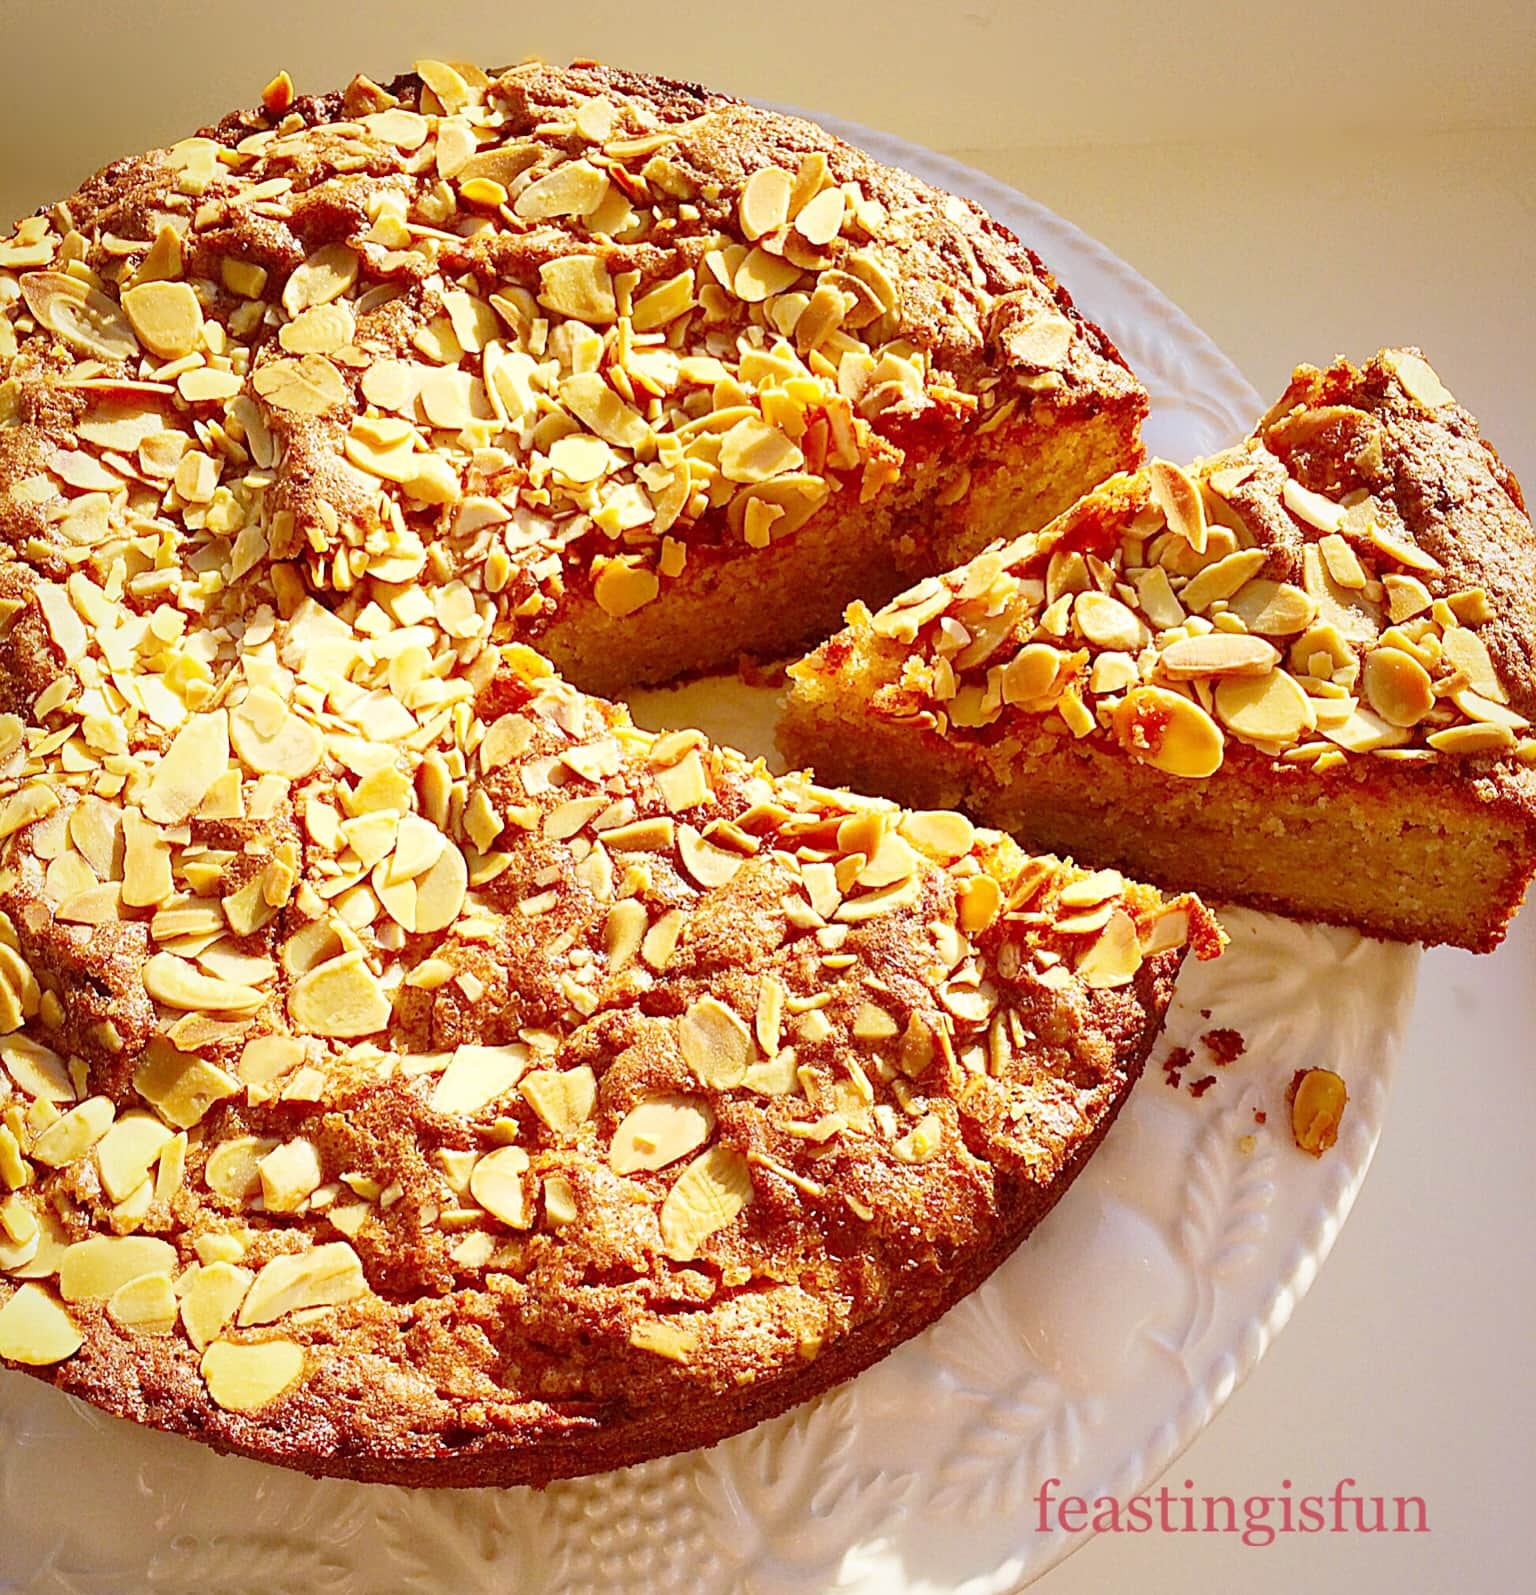
Dundee Fruit Celebration Cake topped with crunchy whole almonds.
Since he would happily eat Christmas cake every single day, this seemed to be a good compromise. Rather than soaking the dried fruit in an alcoholic concoction, as is needed for Christmas cake, this Dundee FruitCelebration Cake is easily made in one day. Although as much as I enjoy making Christmas cake, usually with our son’s help, having it throughout the year, would make it less of a special event.
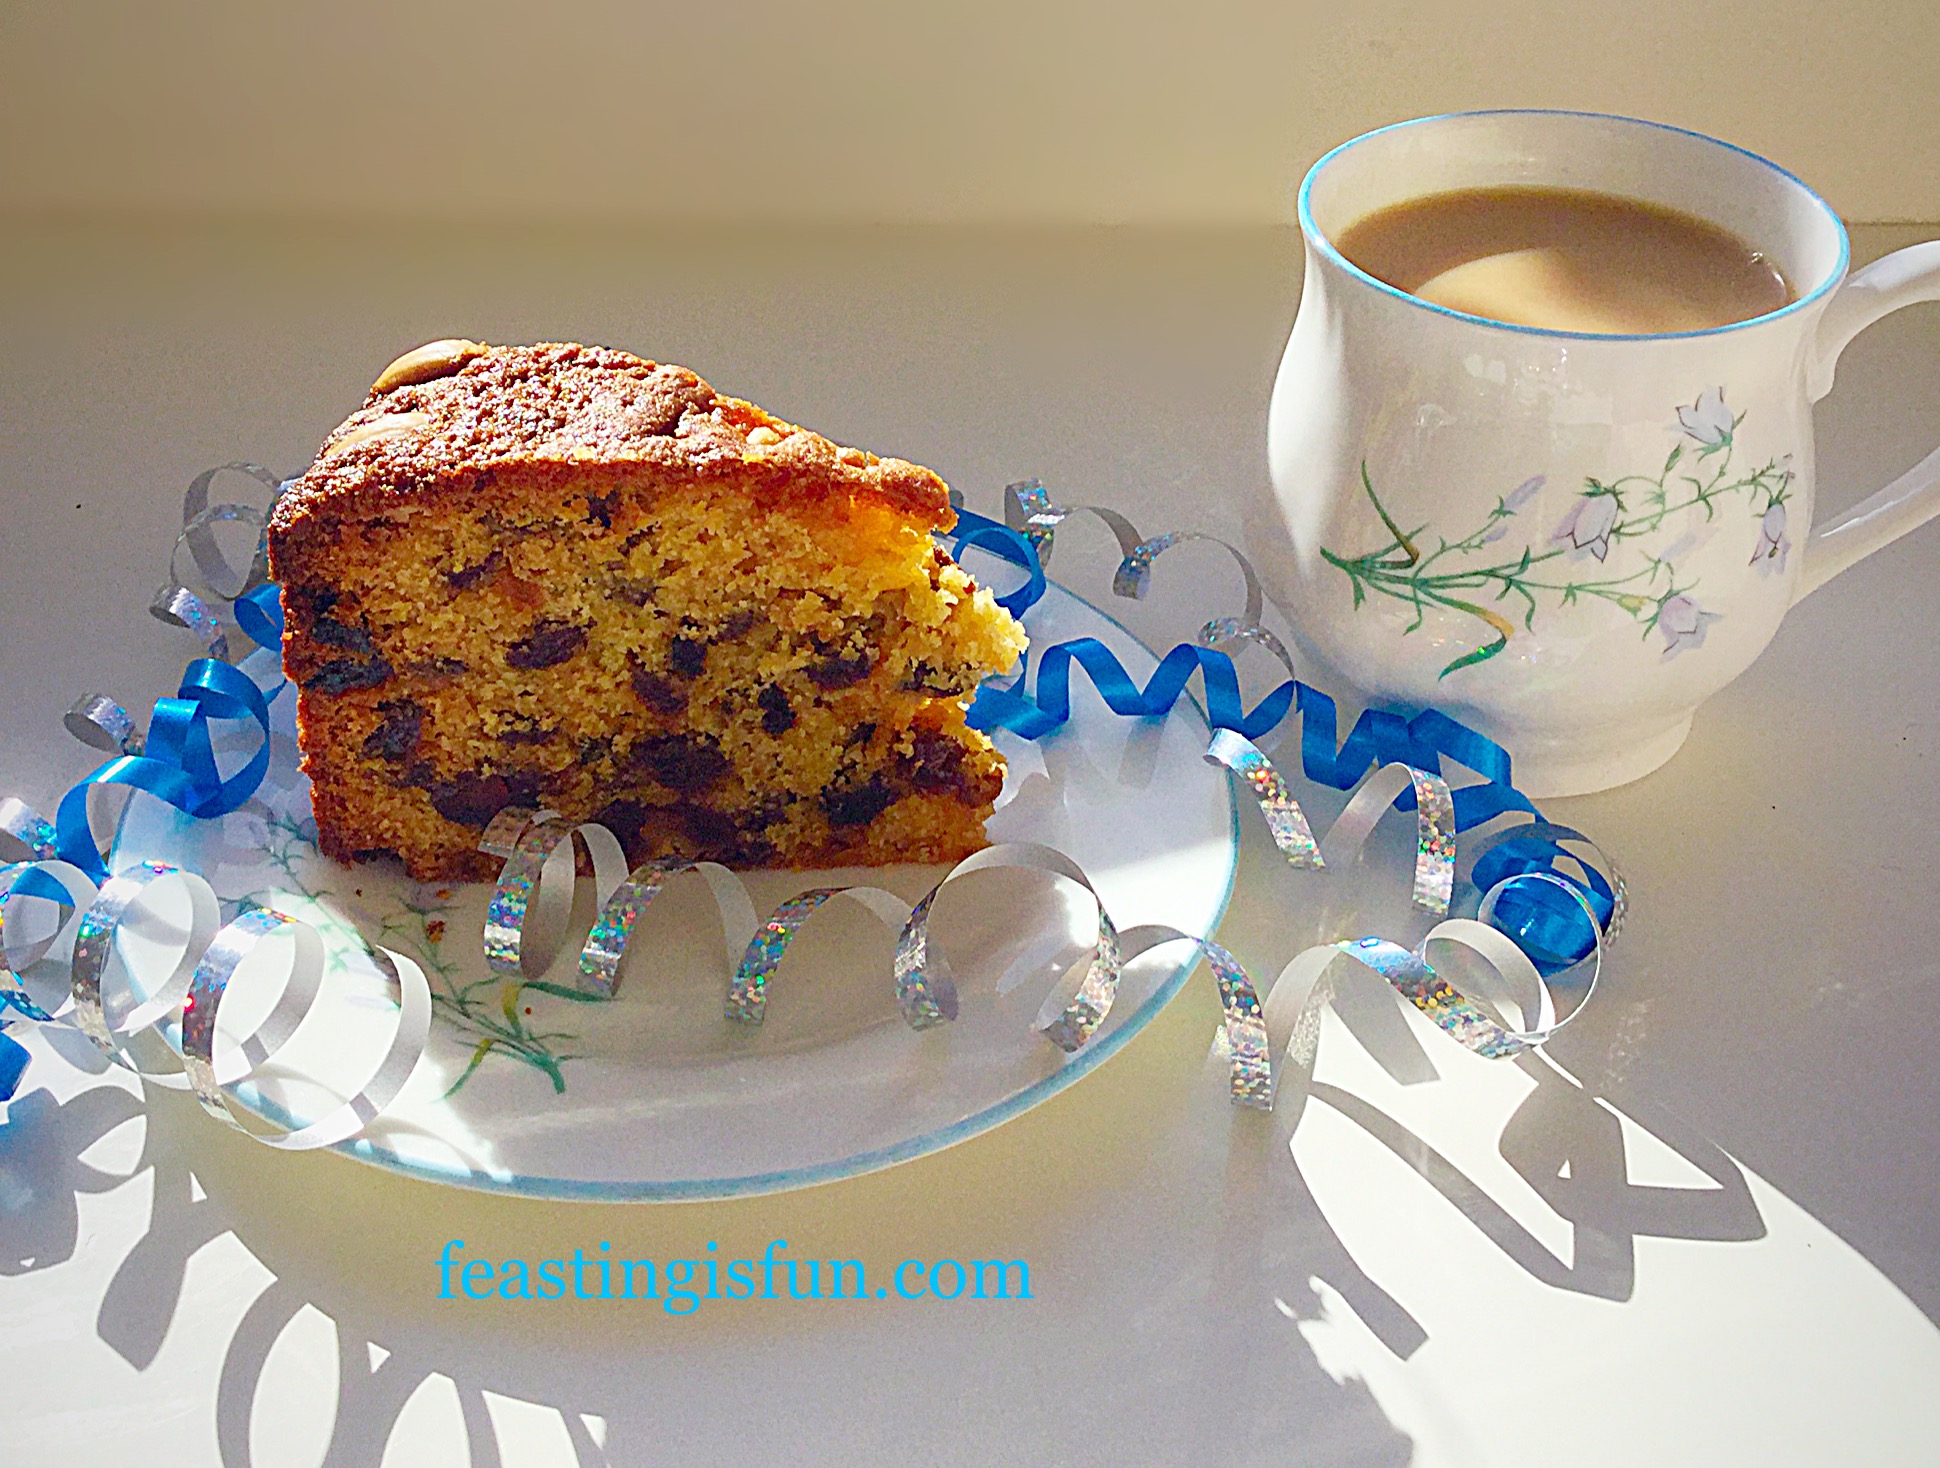
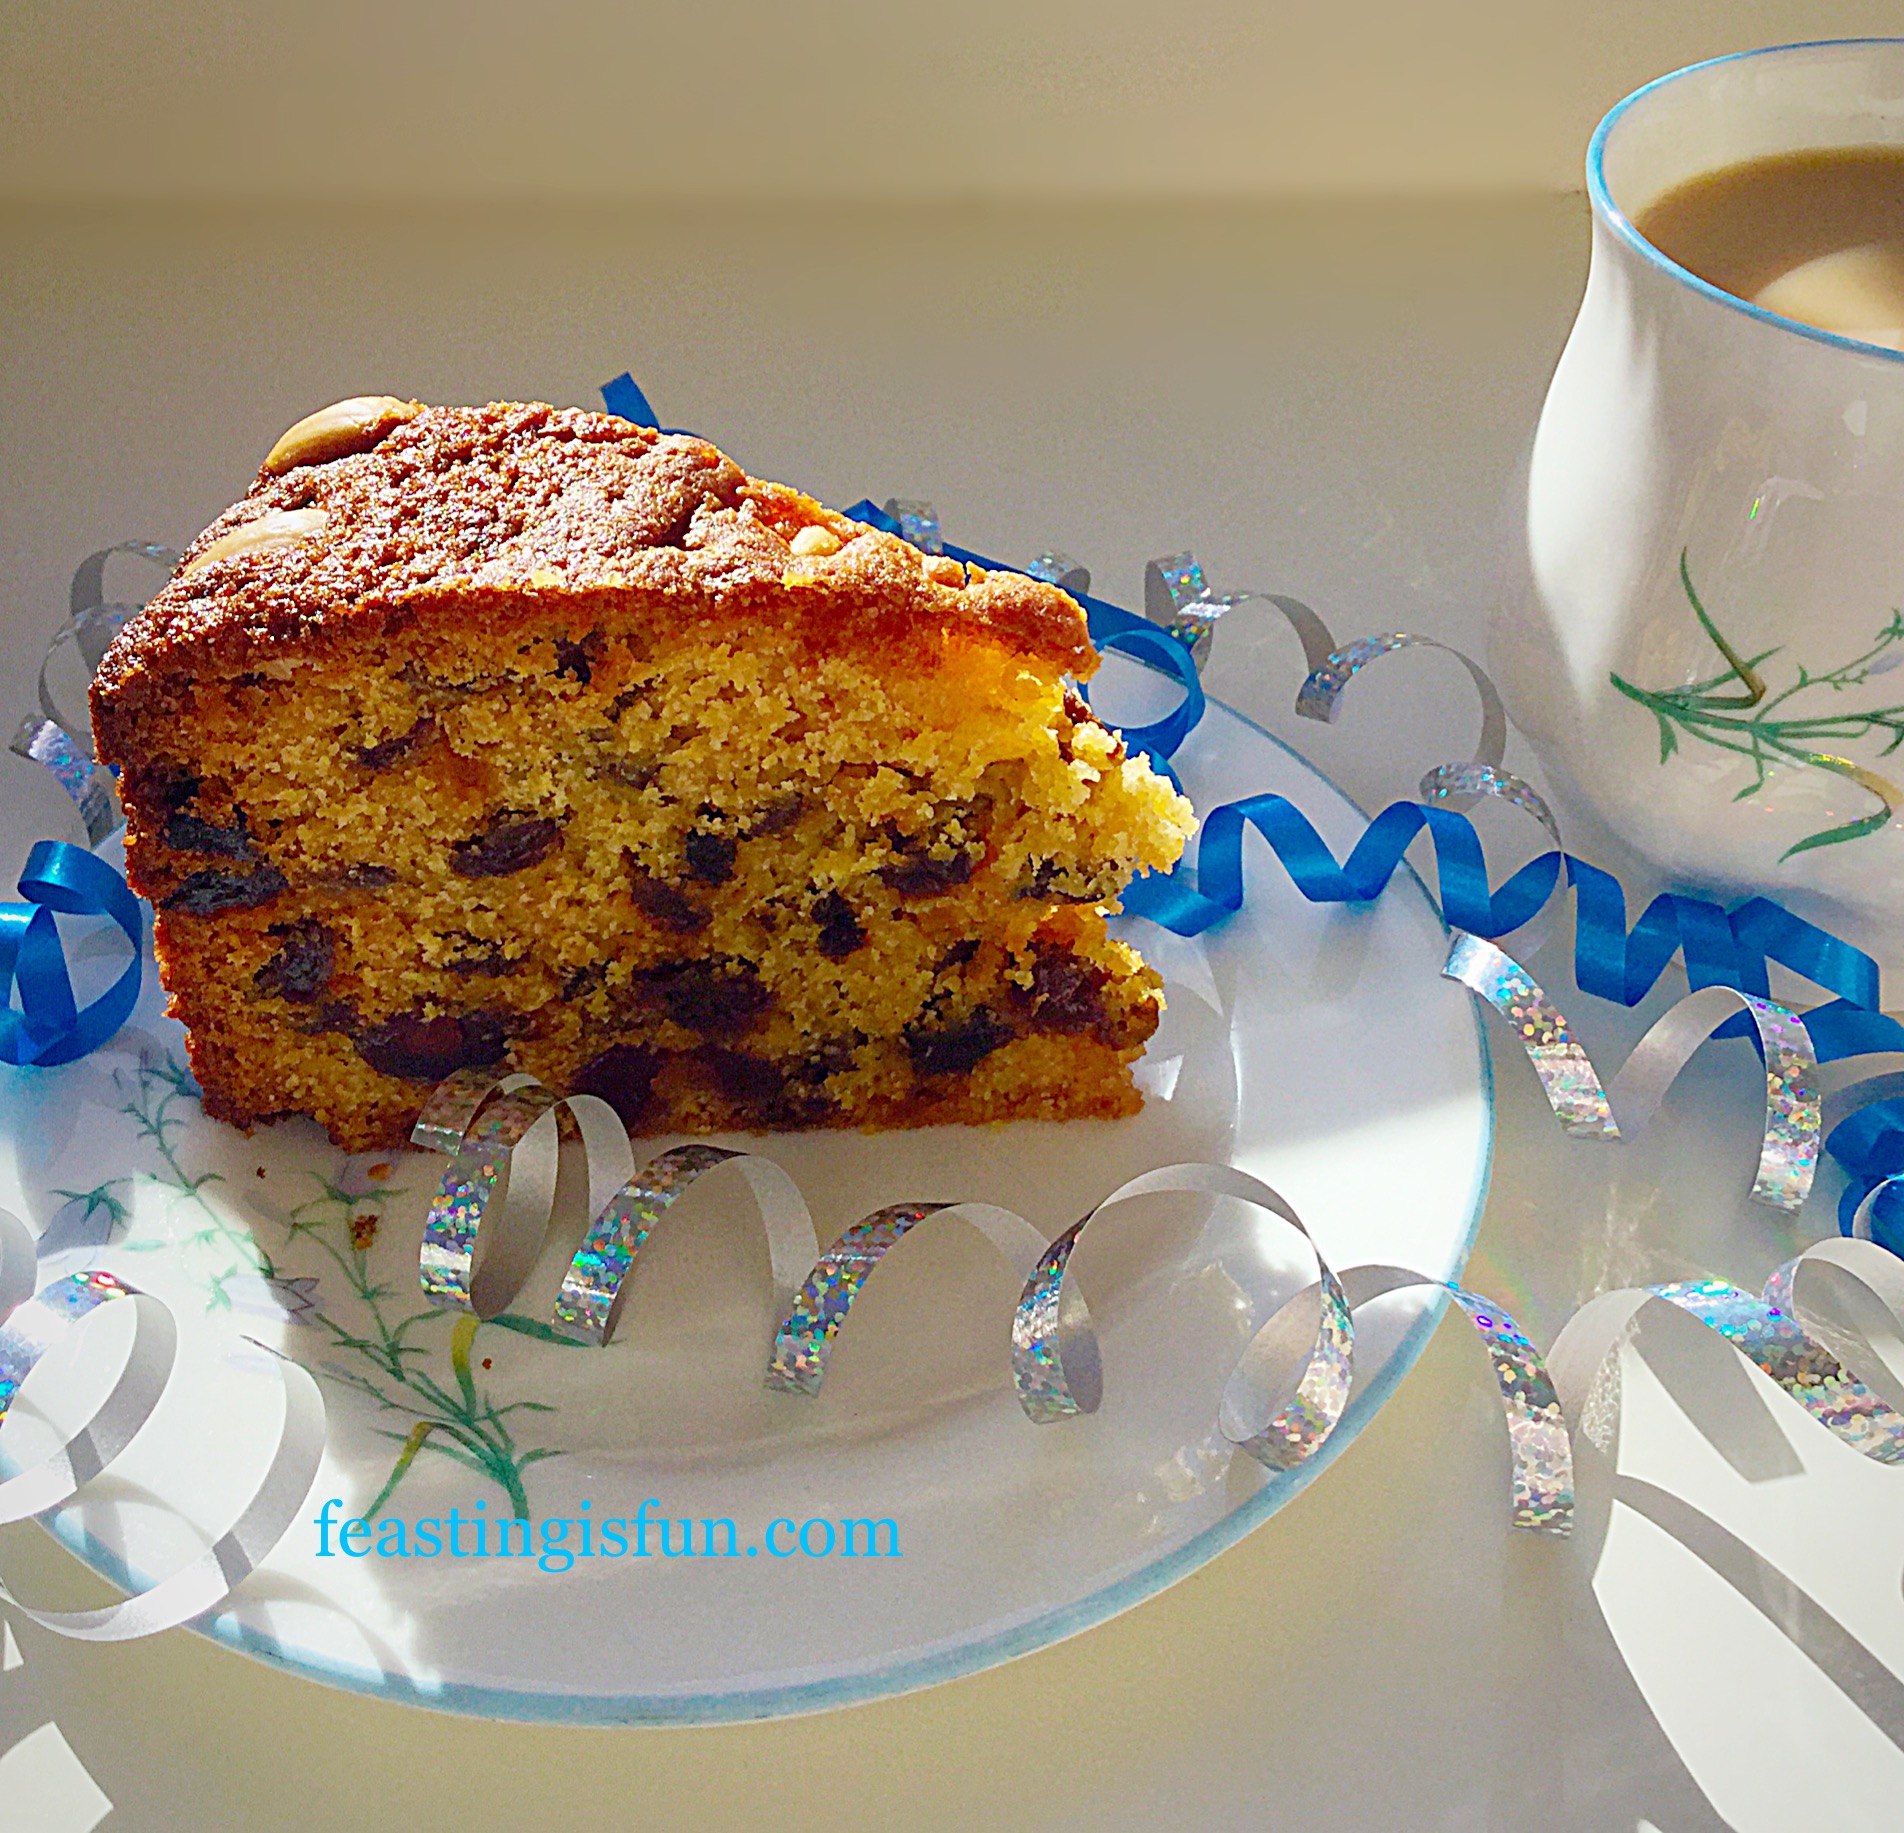
Dundee Fruit Celebration Cake packed full of flavour and dried fruits.
A Lighter Fruit Cake
Dundee Fruit Celebration Cake is a lighter fruit cake, filled with raisins, sultanas and in this recipe, glacé cherries. Because recipes differ I am unsure as to how authentic their addition is. However, in our home their presence in any fruit cake is a must. Alternatively, simply leave them out if you aren’t a fan and add more dried fruit.
Dundee Fruit Celebration Cake perfect for any celebration.
Since baking a fruit cake without spices allows the other flavours in the cake to come through. So, taking my first bite the freshness of the lemon hit with the warmth from the sherry, creating a deliciously moist cake. While the cherries and fruit add to the overall flavour, the almonds, in contrast, provide a delightful crunchy topping. Resulting in a perfectly balanced cake, both in flavour and texture.
A single firework candle lit in the centre of this cake, creating a spectacular display that had our son enthralled. And when we cut the cake, his pleasure was clear to see. While devouring his first slice he had a big smile on his face. Thoroughly pleased with this Dundee FruitCelebration Cake for his birthday, this was most definitely a hit. Most importantly, our son thoroughly enjoyed his birthday, it was indeed a true celebration.
Recipe: Dundee Fruit Celebration Cake serves 10-12
225g/8oz Unsalted Butter plus 1tbsp – at room temperature
225g/8oz Soft Light Brown Sugar I use – Billington’s
200g/7oz Glacé Cherries cut half of the cherries in half and leave the remaining whole
1 Whole Lemon – scrubbed with a nail brush under hot water
2-3tbsps Sherry – alternatively replace with full fat milk
75g/3oz Whole Blanched Almonds
Method: Preheat the oven to 160C/140C fan, gas mark 3, 325F.
Cake Tin Size And Preparation
A 20cm/8″ diameter 10cm/4″ deep round cake tin is needed for this bake. Grease the tin with butter and line the bottom and sides with baking parchment. The sides of the parchment should be above the top of the tin by 3-4 inches. Cut a spare circle of parchment that fits the base. This may be used later to stop the cake from browning too quickly on the top.
Making The Fruit Cake Batter
First sift the flour together with the baking powder into a spare bowl.
Next in a large bowl add the softened butter, sugar and salt. Whisk these together until they are pale and creamy.
Add the vanilla extract, 1 egg and 1 tablespoon of sifted flour. Whisk for 30 seconds until just incorporated.
Repeat this process, adding an egg and 1 tablespoon of flour, whisking to mix, until all the eggs have been added.
Now add the remaining flour and ground almonds. Then add the sultanas, raisins and glacé cherries.
Grate the zest of the lemon directly into the bowl and then add its juice.
Finally add 2 tablespoons of sherry, or milk and using a large spoon fold all the ingredients together, adding another tablespoon of sherry/milk if the batter is too thick.
Spoon the lemon/sherry flavoured cake batter into the parchment lined cake tin, smoothing the top so that it is flat.
Decorate the top of the cake with 3 rings of blanched almonds – see the photos for guidance. Tip – lay the almonds flat on to the cake batter surface. I pushed them in a little and a couple were enveloped by the cake batter whilst baking.
Making the cake batter, filling the tin and decorating with almonds.
Baking The Dundee Cake
Place an ovenproof dish of water on the shelf underneath the middle shelf in the oven. This should ensure a flat, even top as the cake bakes.
Next put your cake tin into the middle of the oven and bake for 2 – 3 hours.
Check the cake after 1.5 hours baking. If the top is already golden, then place the spare circle of baking parchment on top of the cake. Because the cake still has a while to bake, this should stop the top from burning.
Once 2 hours baking time has elapsed, check to see if the cake is baked by inserting a skewer. The cake is baked when the removed skewer is clean. Should it have cake batter on it, the cake is not fully baked and needs more time in the oven.
Continue checking the cake at 15 minute intervals. As soon as the skewer comes out clean the cake is fully baked and can be removed from the oven.
Place the cake tin on a trivet or cooling rack and allow the cake to cool completely in the tin.
Serving The Fruit Cake
Leaving the cake to cool overnight is ideal.
When the cake is completely cooled turn it out from the tin and then carefully remove the baking parchment from the base and the sides.
Place on a board or cake stand.
Dundee Fruit Celebration Cake a beautifully baked fruit cake.
Serve the cake with a cup of tea, or a glass of something bubbly.
Dundee Fruit Celebration Cake each bite is a celebration of good home baking.
Homemade cake is far superior in both taste and texture when compared to mass produced, shop bought alternatives. Any celebration, whether a birthday, anniversary, or family get together, will be richly enhanced, with the addition of a home baked cake.
If you have enjoyed the recipe for this Dundee Fruit Celebration Cake then you may also like these:
Mascarpone Topped Carrot Cake made to celebrate my love of carrot cake!
While I enjoy baking cakes, getting together with family and friends is always a celebration when cake is present. Catching up over a slice of cake and a cup of tea can turn any event into a celebration, even if it is simply sharing with a neighbour.
Most of all, my long held belief that food shared, not only tastes better, it also somehow enriches the experience of eating. As a result our lives are made richer, purely by eating with others. A simple concept that can easily be achieved.
Whatever you are making, baking and creating in your kitchens, have fun preparing your feast.
Sammie xx
No part of this post may be reproduced or duplicated without the written permission of the owner. Please see my Disclosure Policy.
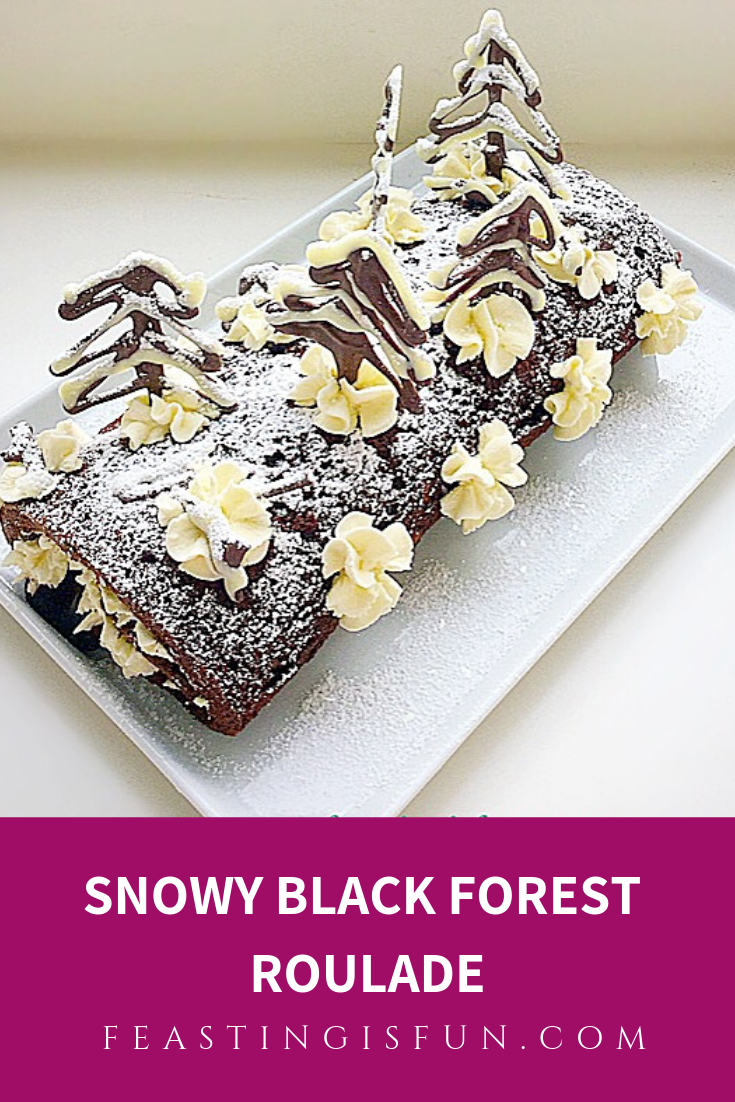
Happy holidays to all of my wonderful readers. Since we are all getting in the festive mood here at Feasting headquarters (home!) I have an easy to make and delicious gluten free dessert to share. While you can absolutely make this Snowy Black Forest Roulade with regular wheat flour, using a gluten free alternative ensures this dessert recipe is available to more people. And we are all about inclusivity here at Feasting is Fun.
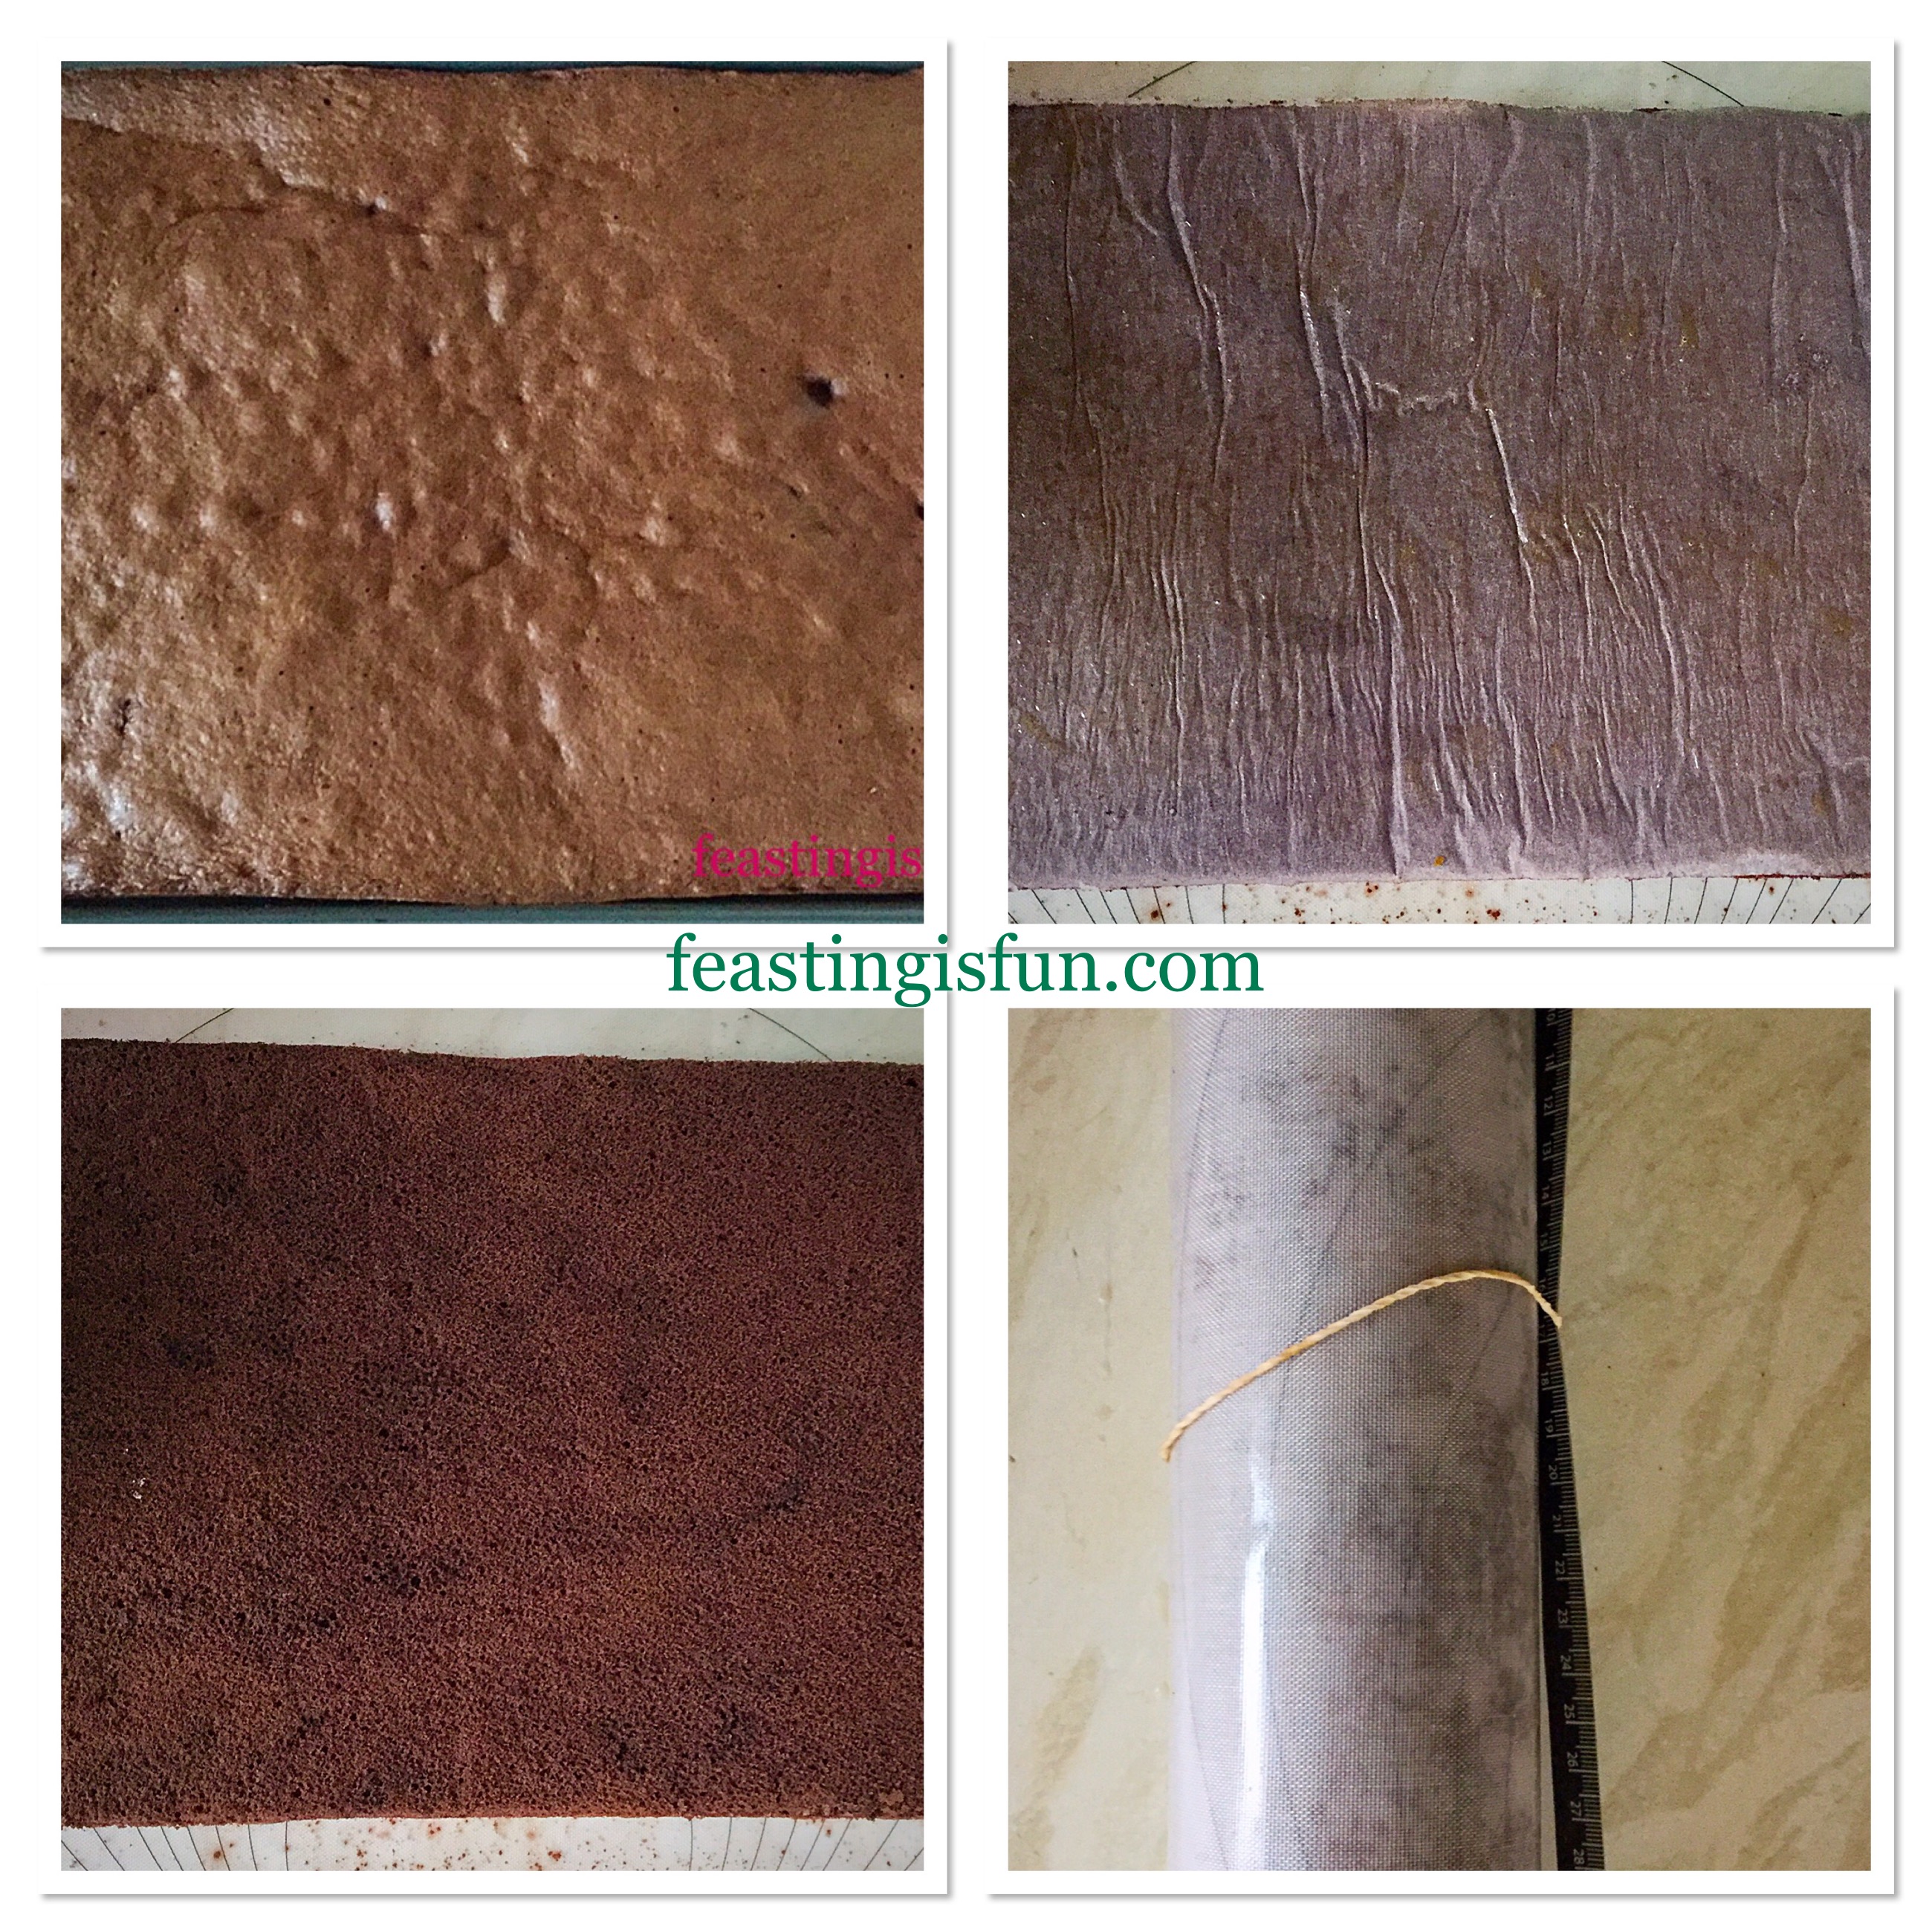
Making A Genoise Sponge
Since I have never made a gluten free genoise sponge before, I wanted to attempt it. No fat is added when making a Genoise Sponge. Rather, whisking eggs and sugar until light and foamy. And then you carefully fold both the flour and cocoa powder into the mix. Most importantly is to be careful not to knock out the whipped air. Resulting in a baked sponge that is beautifully light.
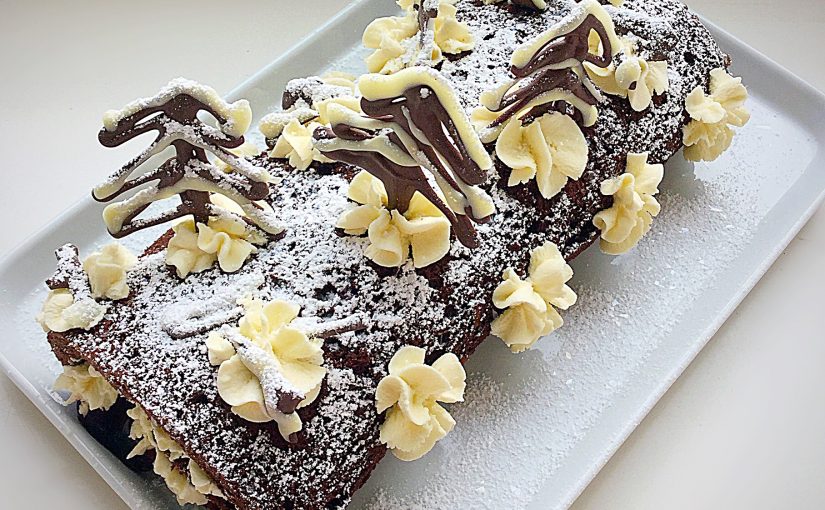
Snowy Black Forest Roulade with gluten free option.
Because adding cocoa can have a drying effect on the sponge, I worried whether the cake would hold up to being rolled. Since a good roulade sponge should withstand rolling, without cracking. So the possibilities of how wrong this sponge could go, seemed endless. Maybe this bake would fail? Yet the only way to know, was to try.
Gluten Free Snowy Black Forest Roulade
Gluten Free Genoise Sponge Roulade
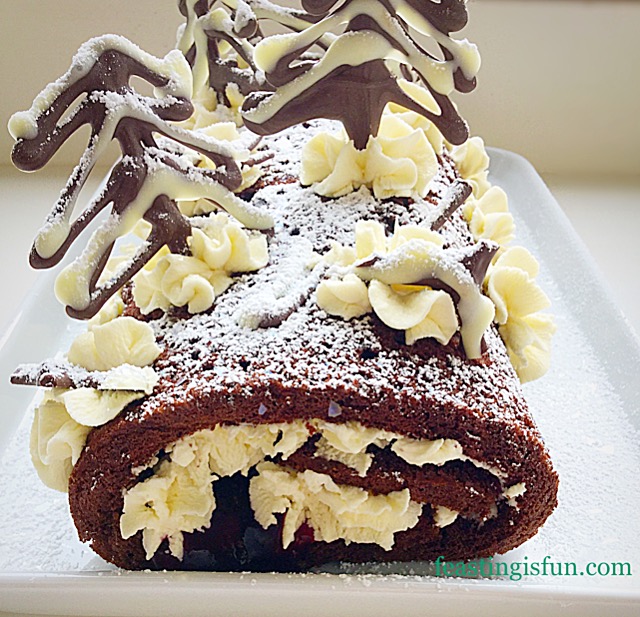
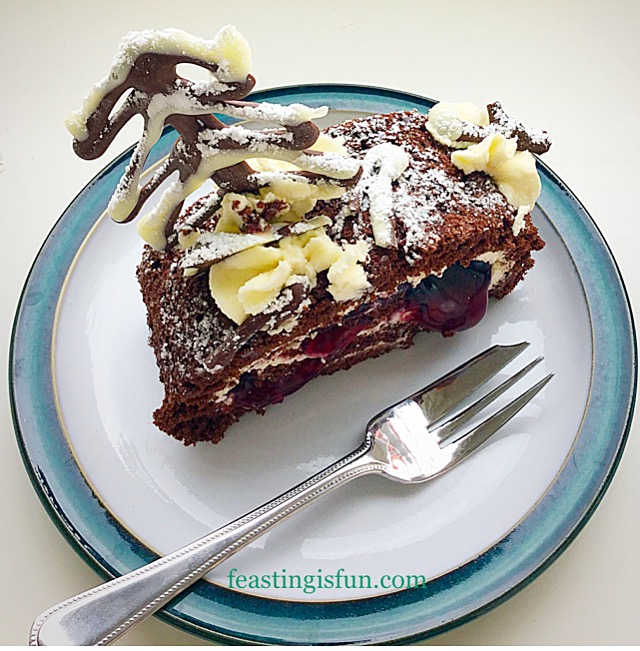
So, the gluten free chocolate genoise sponge was made and baked. And as you can see from the photos, it did indeed roll, without cracking and the flavour is utterly delicious. Light, soft, chocolate sponge, filled with kirsch flavoured whipped cream and soft, sweet cherries. One mouthful of this Snowy Black ForestRouladand I am completely lost in one of my favourite flavour combinations.
Finally, my taste testers were happily enjoying eatythe roulade, completely unaware it was gluten free. A very positive sign. Since I have baked quite a few gluten free recipes, it’s a thrill when the texture and flavour are spot on. A soft, yielding sponge, that tastes just like a sponge should. As a result of this bake I have plans to make another gluten rolled sponge, that is simply flavoured with vanilla or lemon.
I find that the proof of the pudding is in the eating! And when plates and bowls are left empty, I am satisfied that whatever I have made is a hit. Our children can be brutally honest, especially Snugs, our youngest daughter. She scored this Snowy Black Forest Roulade at 9 out of 10. Another success for the Feasting kitchen.
Recipe: Snowy Black Forest Roulade
1tbsp Unsalted Butter
4 Large Free Range Eggs
80g Caster Sugar
50g Gluten Free Plain White Flour – I use Doves Farm alternatively use Plain White Flour (for non gluten free Roulade)
50g Cocoa Powder plus an extra 2tbsp – I use Callebaut
1tsp Baking Powder – I use Waitrose as it is gluten free
Method: Preheat the oven to 180C/160C fan, gas mark 4
Note: To bake the sponge for this Snowy Black ForestRoulade you will need a baking tray that measures 38cm x 25cm x 3cm (15″ x 10″ x 1″).
Creating the Chocolate Genoise Sponge Batter
First of all grease the baking tray with butter and line the base with baking parchment.
Sift the gluten free flour, cocoa, baking powder and salt into a bowl.
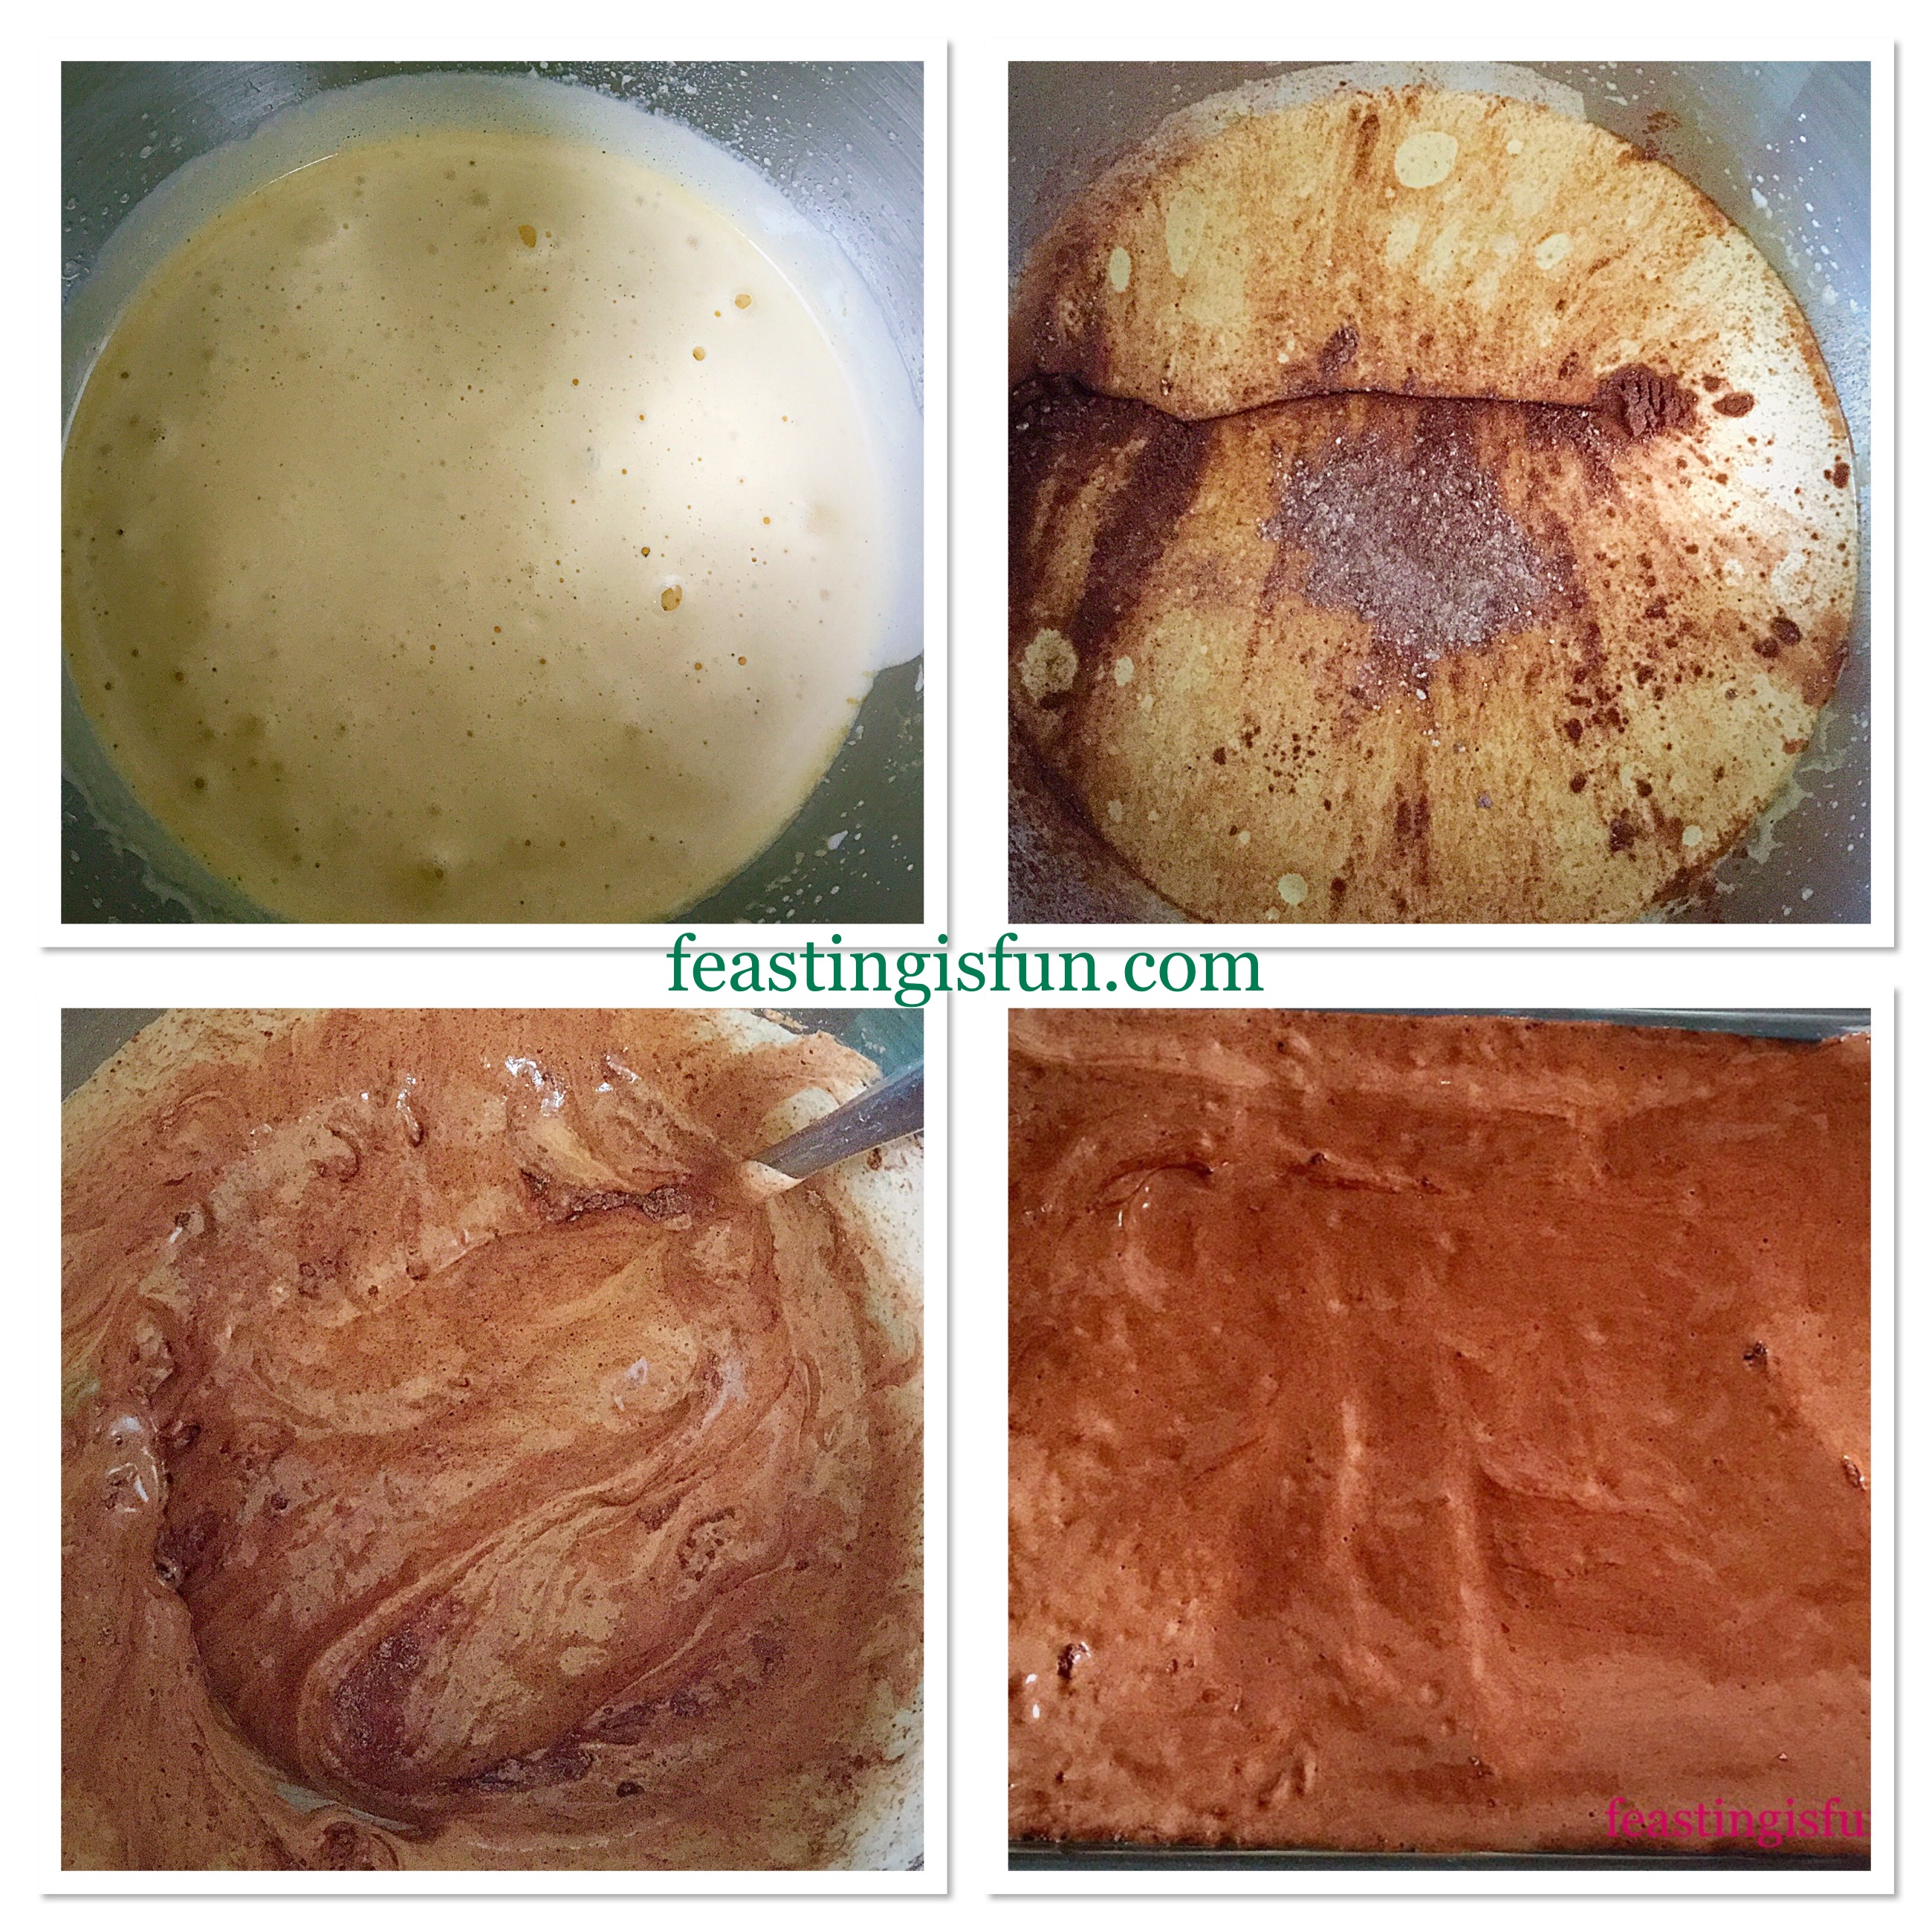
Next, in a large bowl, or if you have a stand mixer use the bowl with the whisk attachment, add the sugar and eggs. Whisk continuously for at least 5 minutes, until the egg/sugar mixture has more than tripled in size. The mixture will be a pale cream colour that is very light and airy. It should leave a ribbon trail, that lasts a few seconds, after you remove the whisk.
Tip the sifted ingredients into the whisked egg mixture and using a large metal spoon, carefully fold the sifted ingredients in. The aim is to retain as much air within the finished cake batter as possible.
Once the ingredients are completely combined pour the mixture in to the prepared baking tray. Use a palette knife to ensure that the cake batter is evenly spread, ensuring that it reaches all of the corners.
Making the sponge batter and filling the baking tray.
Baking and Cooling the Sponge
Now place the baking tray into the centre of the preheated oven and bake for 15-20 minutes.
To test if the sponge is baked press lightly in the centre, when baked the sponge will spring back. Note – be careful not to over bake as this will cause the sponge to be dry and it will then be harder to roll without cracking.
Finally, when the sponge is baked, remove it from the oven.
Next, allow the sponge to cool in the tin for 2 minutes.
While the sponge is cooling, lay a large, just bigger than the sponge, piece of baking parchment on the work top.
Dust the baking parchment with the extra 2 tablespoons of cocoa, so that it is evenly covered.
Now run a palette knife around the edge of the sponge and then turn it out on to the baking parchment.
Very carefully remove the parchment that lined the baking tray.
Starting at one side and using the baking parchment to help, gently roll the sponge, while it is still warm.
Once rolled, set to one side until completely cooled.
Please use baking parchment, my brain wasn’t working and I used a pastry mat. It worked absolutely fine but next time I will turn the sponge out on to parchment!
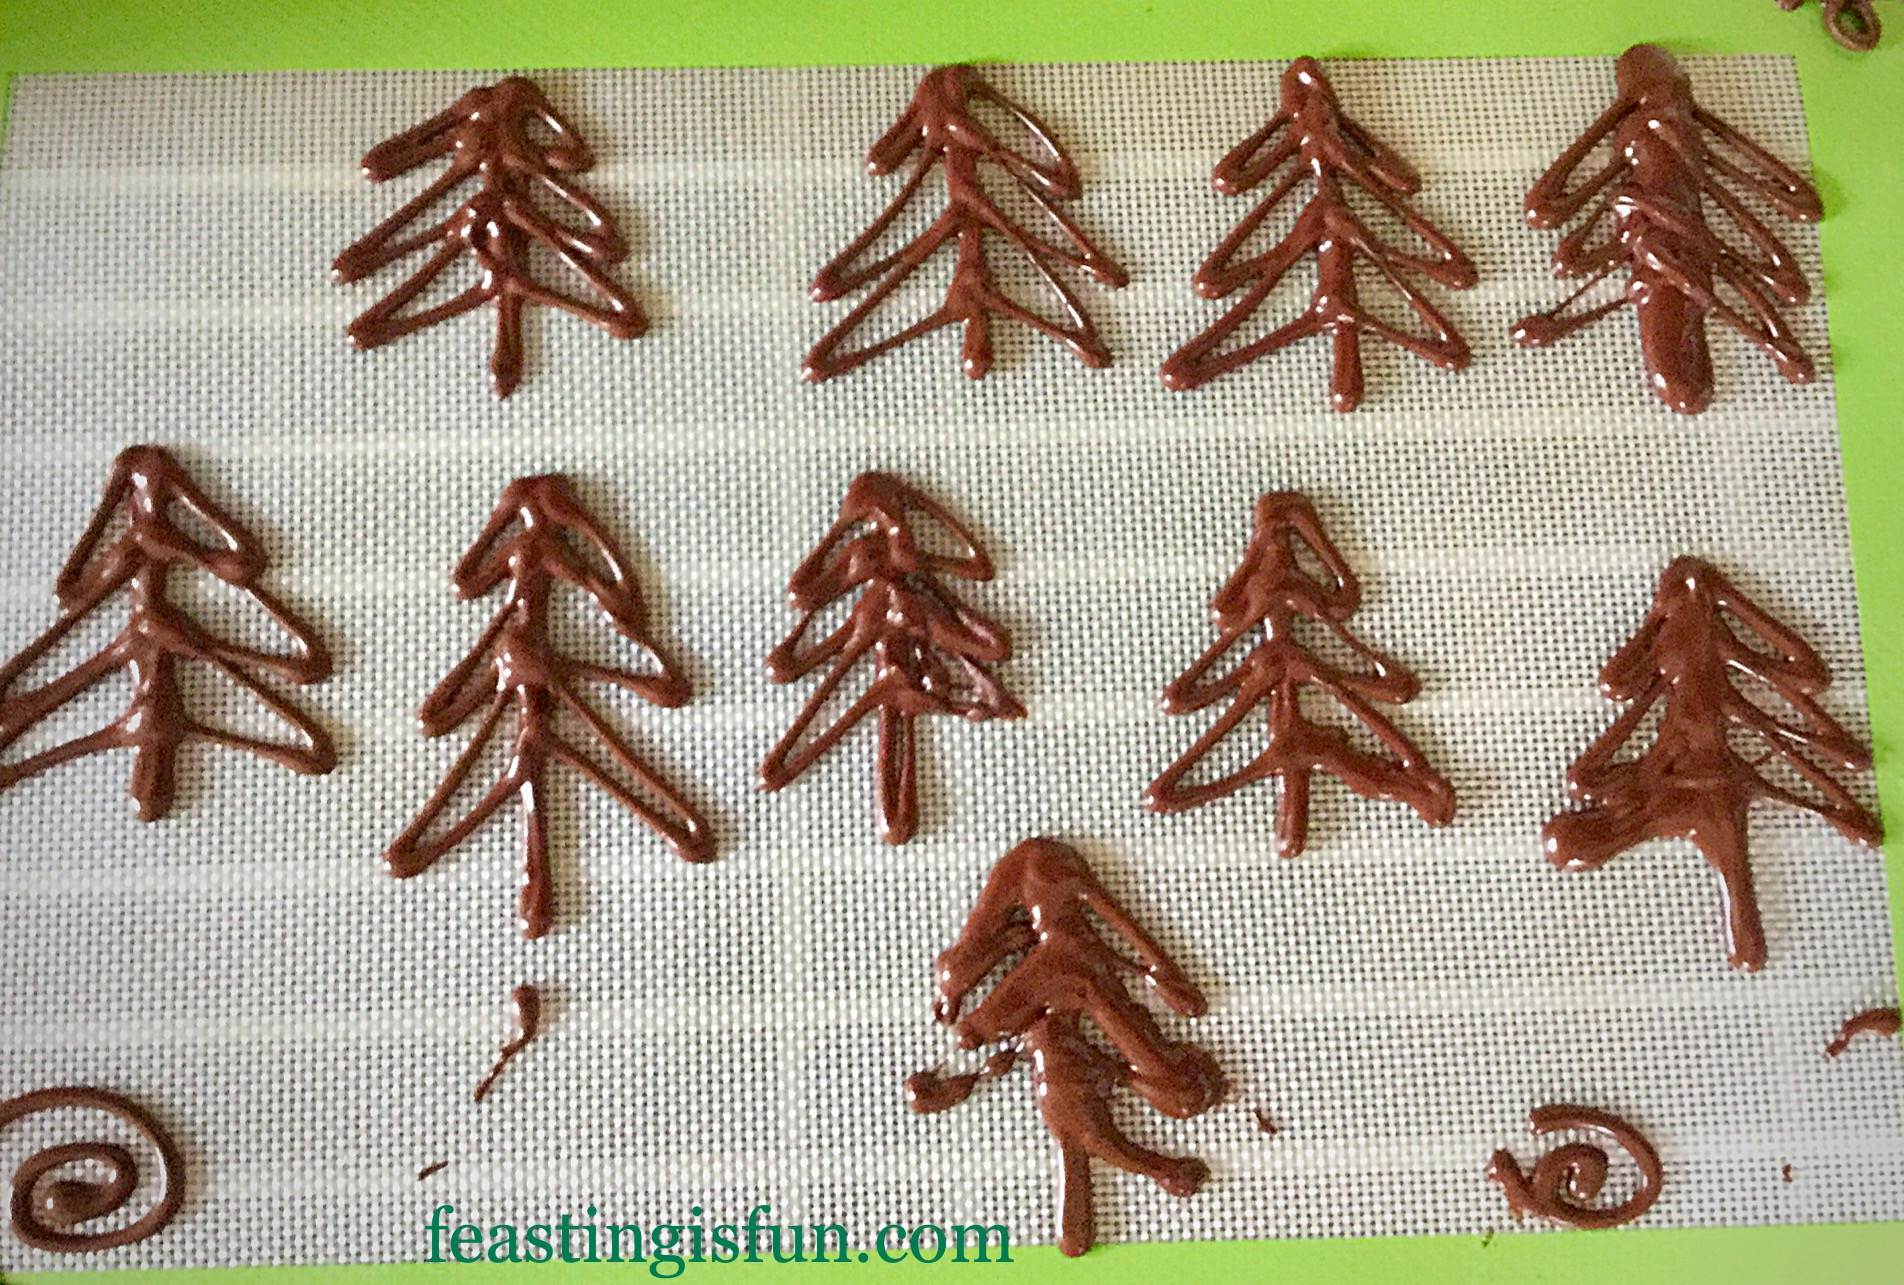
Making the Chocolate Trees:
While waiting for the sponge to cool, the chocolate trees can be made.
First you will need 2 small disposable piping bags to pipe the trees with.
Next break up both types of chocolate and place in heatproof, microwaveable bowls.
Heat the chocolate, individually, on medium until it has started to melt.
Remove the bowl from the microwave and stir until the chocolate has completely melted.
Now fill each piping bag with melted chocolate. Leave the chocolate to cool, until it is still liquid, yet warm, not hot, in the piping bag. As a result of leaving the chocolate to cool, it will be thicker and easier to control whilst piping the trees.
Starting with the dark chocolate, pipe tree shapes on to a non stick silicone mat, or baking parchment. The trees should be about 3 inches (7.5cm) high, please see the photo below.
Pipe the main trunk down then up and then pipe the branches.
Allow the dark chocolate to set and then pipe white chocolate on the top of each branch. Leave the trees to completely set before attempting to remove them.
It is inevitable that some trees will break as they are removed. This is great as most forest floors have fallen/broken branches on them. So they can be used to add further decoration to the roulade.
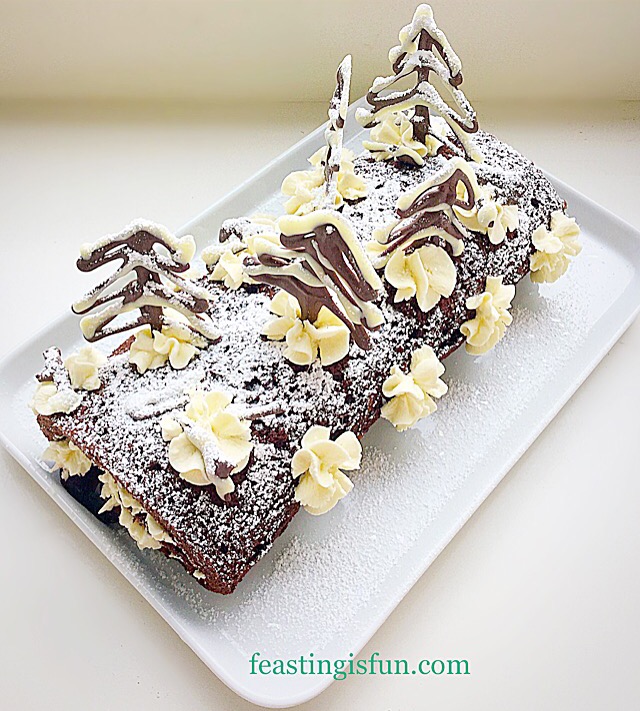
Filling and decorating the Snowy Black Forest Roulade:
In a large bowl add the cream, vanilla extract, 1 tablespoon of Kirsch and 2 teaspoons of sifted icing sugar – a tea strainer is handy for sifting small amounts.
Whisk the cream until it just holds a stiff peak.
Unroll the chocolate sponge and then, using a palette knife, spread half of the cream over the sponge.
Decant the cherry pie filling into a bowl. Add 1 tablespoon of kirsch and stir to mix.
Next, using a spoon, place cherries evenly across the sponge, then spoon the syrup in between the cherries.
Using the baking parchment roll the sponge into it a log, finishing with the seam underneath.
Transfer the Roulade to a suitable plate.
Fit a piping bag fitted with a large star tip, then fill the bag with the remaining whipped cream.
Pipe single flower stars along the top of the Roulade and then along the sides.
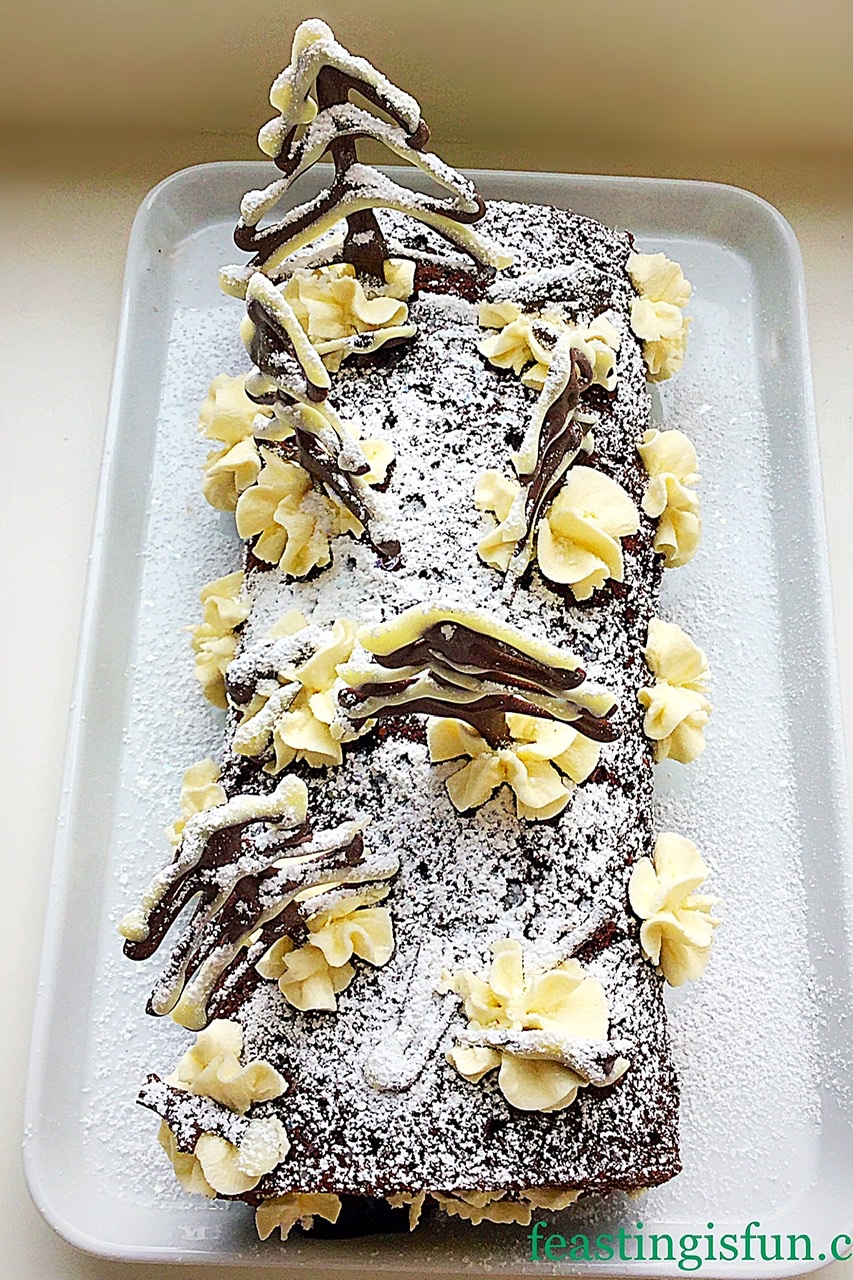
Building, rolling and piping the Roulade.
To finish the decoration, carefully peel the piped chocolate trees away from the non stick surface.
Place the trees evenly along the top of the Roulade, pushing them into the piped cream.
Use any broken tree parts as forest floor decorations, anchoring them to the roulade with the piped cream.
Finally finish the dessert by sifting icing sugar snow over the Roulade, sprinkling edible glitter for added sparkle!
Snowy Black Forest Roulade
Serve sliced with a smile!
A slice of Black Forest Roulade.
All the flavour of a Black Forest Gateaux rolled into a stunning, Christmassy, Snowy Black Forest Roulade that is completely gluten free. A dessert that can be enjoyed by more people, without any loss of taste, texture or quality.
If you have enjoyed this recipe for this Snowy Black Forest Roulade here are some other gluten free recipes you may enjoy:
Gluten free recipes can taste just as great as their regular, wheat based counterparts. Also, creating recipes that can be made and eaten by people on a restricted diet, is an important part of what I do at Feasting is Fun. So you can look forward to more recipes being added, especially with Christmas not very far away.
Finally, when a recipe tastes as good as this Snowy BlackForest Roulade, there is no need to bake separate desserts. And that has to be a good thing, for both those on a restricted diet and the cook!
So, whatever you are making, baking and creating in your kitchens, have fun preparing and sharing your feast.
Sammie xx
I am submitting this Snowy Black Forest Roulade to October’s We Should Cocoa over at Tin and Thyme
Birthday season is upon us in the Feasting family. Cakes, bakes, canapés and celebration continue from now, right through to the New Year. Therefore, making this Orange Lemon Ombre Piped Rose Cake with family in mind, resulted in a beautifully decorated, delicious cake, perfect for guys and girls of all ages.
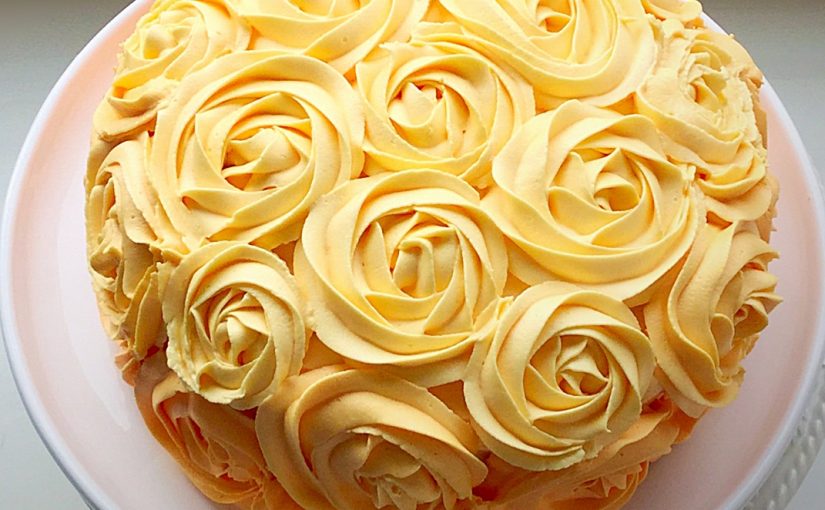
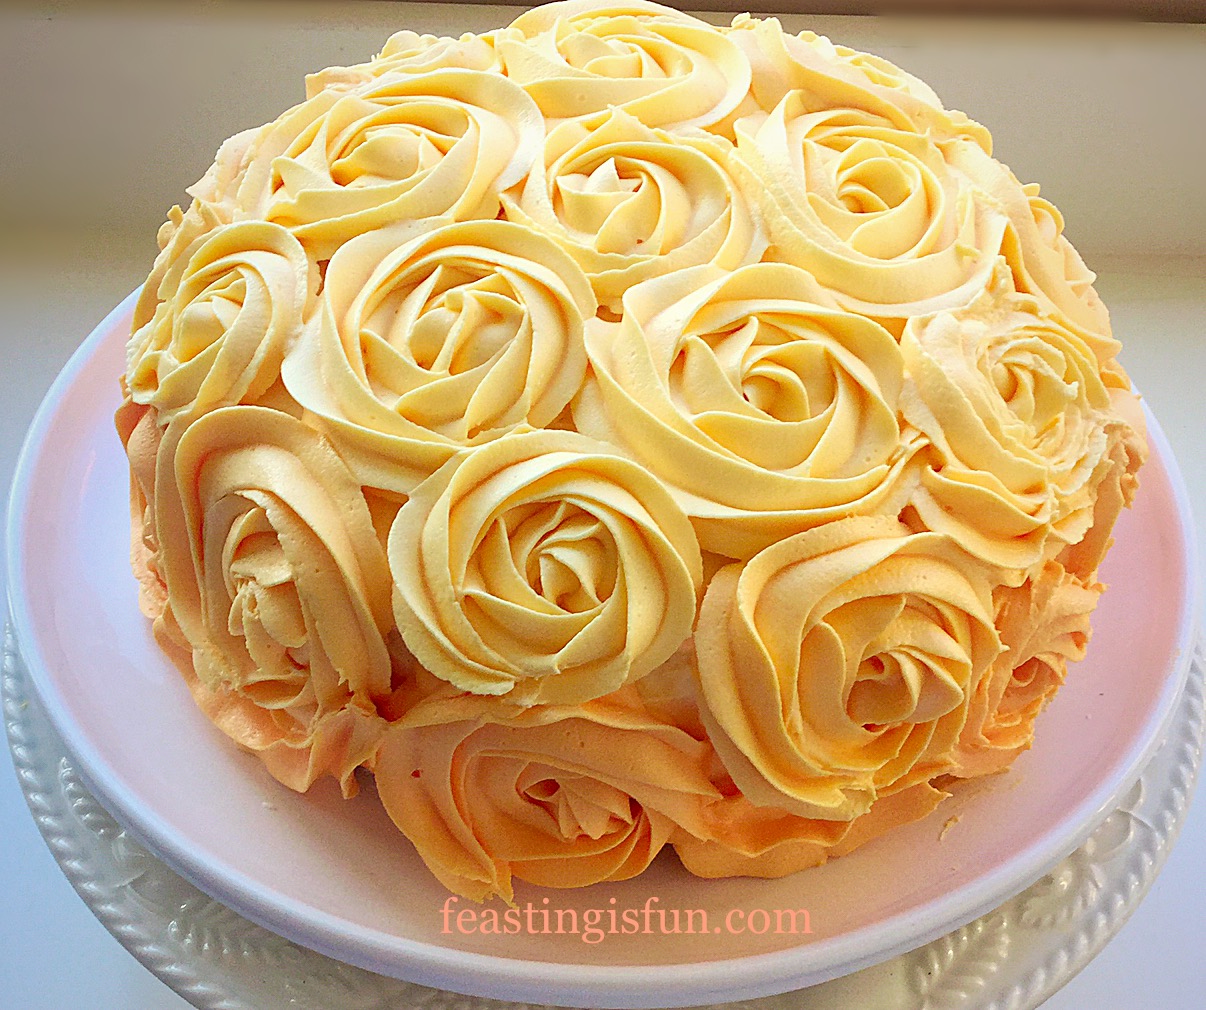
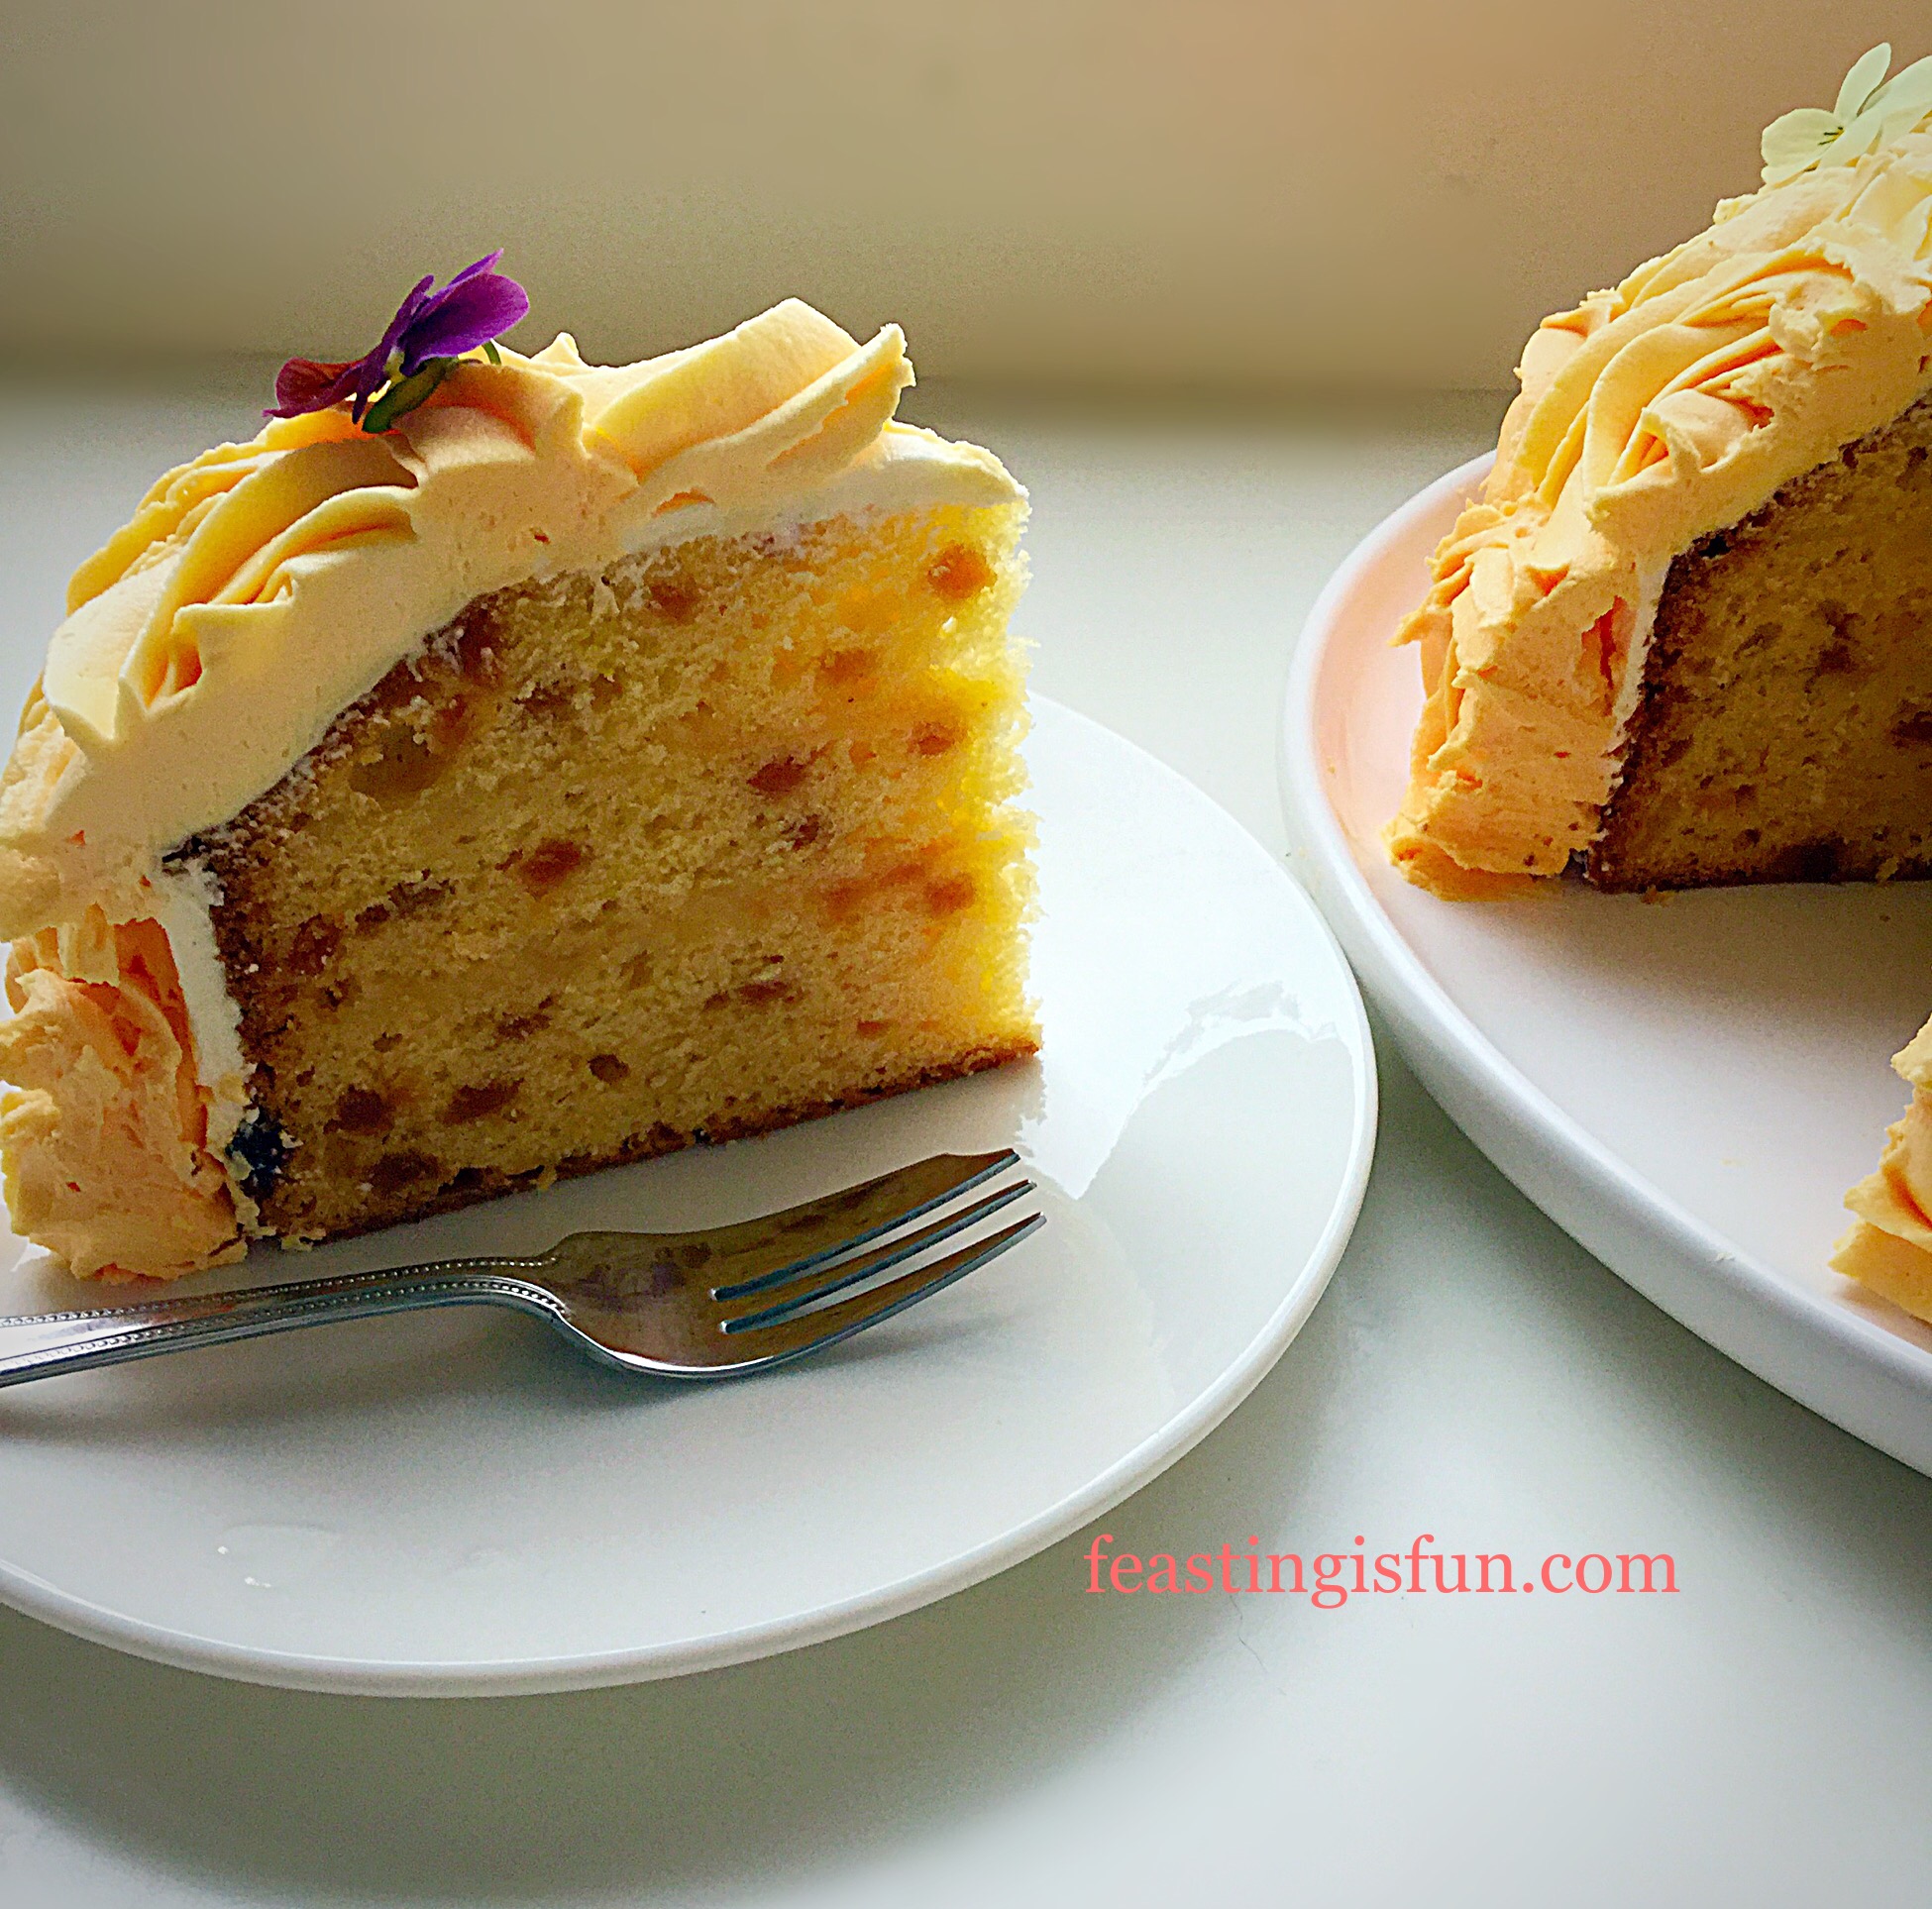
Orange Lemon Ombre Piped Rose Cake delicious citrus flavours all the way through.
So the cake itself is made using Wright’s Baking Orange Cake Mix, to which lemon zest is added. Baked as a single cake, it is then sliced into three layers which are sandwiched back together using tart lemon curd. The result, a balanced citrus flavoured cake, that wakes up your tastebuds ready to party!
Orange Lemon Ombre Piped Rose Cake full of hidden fruit.
In addition, the decision to decorate the cake with piped buttercream roses, shows an increase in confidence with regard to piping. Creating an ombré effect, from pale lemon swirls to deeper tangerine lends a modern finish to this cake.
Orange Lemon Ombre Piped Rose Cake a stunning centrepiece perfect for celebrating.
Since piping this Heart Engagement BundtCake, crumb coating, covering the whole cake in a thin layer of buttercream, was not an option, it was a must. Resulting in a cake that looks much cleaner, more professional, as well as any gaps between the roses are already covered.
Orange Lemon Ombre Piped Rose Cake my entry for #GBBOTwitterBakeAlong
While not absolutely necessary, the added edible violas give the finished cake an elegant, yet natural touch. Their presence hints at the floral, citrus flavoured cake hidden by the piped roses.
Recipe: Orange Lemon Ombre Piped Rose Cake serves 12-14
2 Packets Orange Cake Mix available from Wright’sBaking online shop you will need 1 1/2 packets of mix for this recipe
90ml Vegetable Oil – I use sunflower oil plus a little extra for greasing the cake tin
300ml Water
1 Large Free Range Egg
1tsp Lemon Zest – the zest of one regular lemon
Approx 1/2 jar Lemon Curd
For the ombre buttercream:
700g White Icing Sugar
350g Unsalted Butter – softened to room temperature
2tbsp Very Hot Water
Gel Food Colouring – Red and Yellow, or Orange – I use Wilton
Method: Preheat the oven to 170C/150C fan, gas mark 3.5
You will need a 20cm/8″ diameter 8.5cm/3.5″ deep tin to bake this cake.
Starting with the cake tin, grease the entire tin and also line the base with parchment paper.
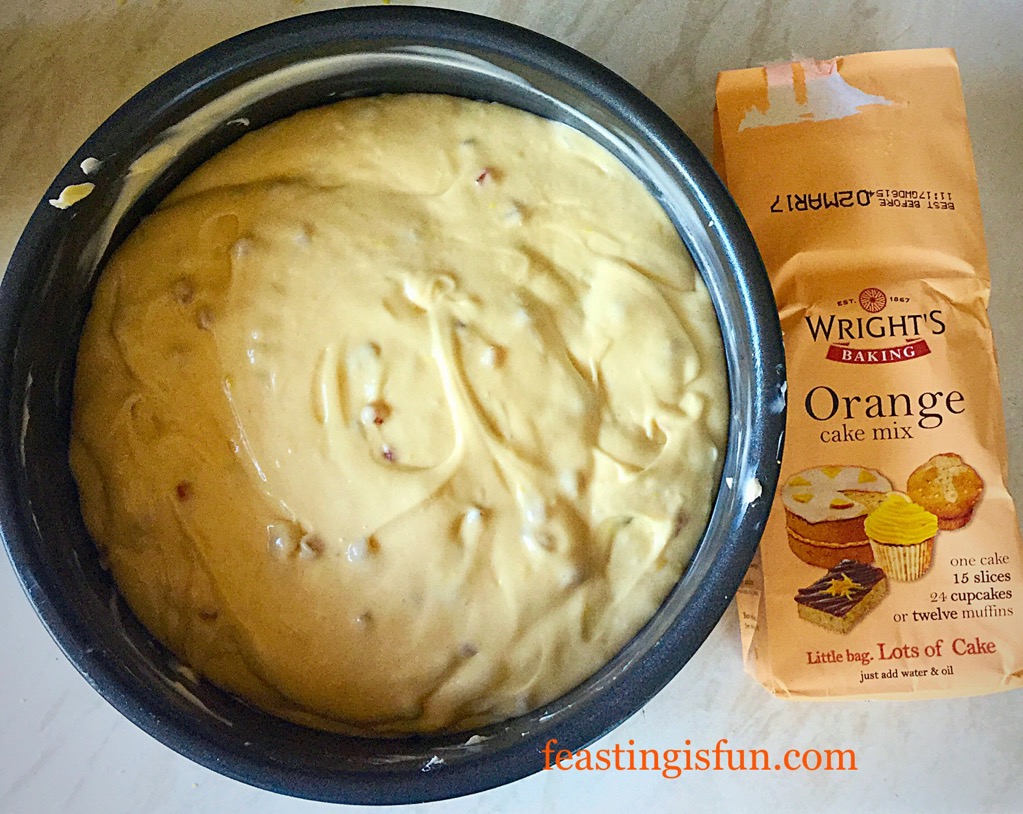
Into a large bowl add the water, egg, oil and one packet of the orange cake mix. Weigh the other packet of cake mix and divide in half. Add half of the packet contents to the bowl – it was approximately 260g. Please check the weight for yourself.
Whisk the ingredients together according to the instructions on the packet.
Finally add the finely grated zest of 1 lemon, approximately 1tsp, to the bowl. Whisk to distribute and combine.
Pour the citrus cake batter into the prepared tin.
Cake batter in the tin and ready for the oven.
Place the cake tin in the centre of the oven and bake for 1 hour 30 minutes. Test the cake at 1 hour 20 minutes with a skewer. The cake is baked when an inserted skewer comes out clean.
As soon as the cake is baked remov from the oven, place on a rack and allow the cake to cool completely in the tin.
Breath in the rich, citrus, homebaked aroma.
When the cake has cooled turn it out of the tin. Also if necessary, run around the outer rim of the cake with a palette knife. Doing this will loosen any slight sticking, that said Wright’s cake mixes are excellent and always turn out of the tin easily.
Preparing the cake for decoration:
During baking the cake rose slightly more in the centre. The cause may have been the addition of an egg to the cake mixture, or, baking at a slightly higher temperature.
First cut off any dome on the top of the cake. Having a small rise in the centre is an advantage with the finished cake.
Slice the cake evenly into 3 layers. A serrated knife cuts cleanly through the cake, minimising crumbs.
Place the bottom layer, cut side up, on a board or cake stand.
Spread the bottom layer with an even, thin layer of lemon curd, so that it almost reaches the edges.
Next, place the middle layer on top of the bottom layer, matching up the sides.
Again, spread a thin, even layer of lemon curd on to the cake, keeping just inside the edges.
Finally place the top of the cake on to the middle layer.
Shaping, slicing and then reassembling the cake.
Preparing the cake:
Place the softened butter into a large bowl.
Sift the icing sugar into the same bowl.
Next add the very hot water and lemon extract.
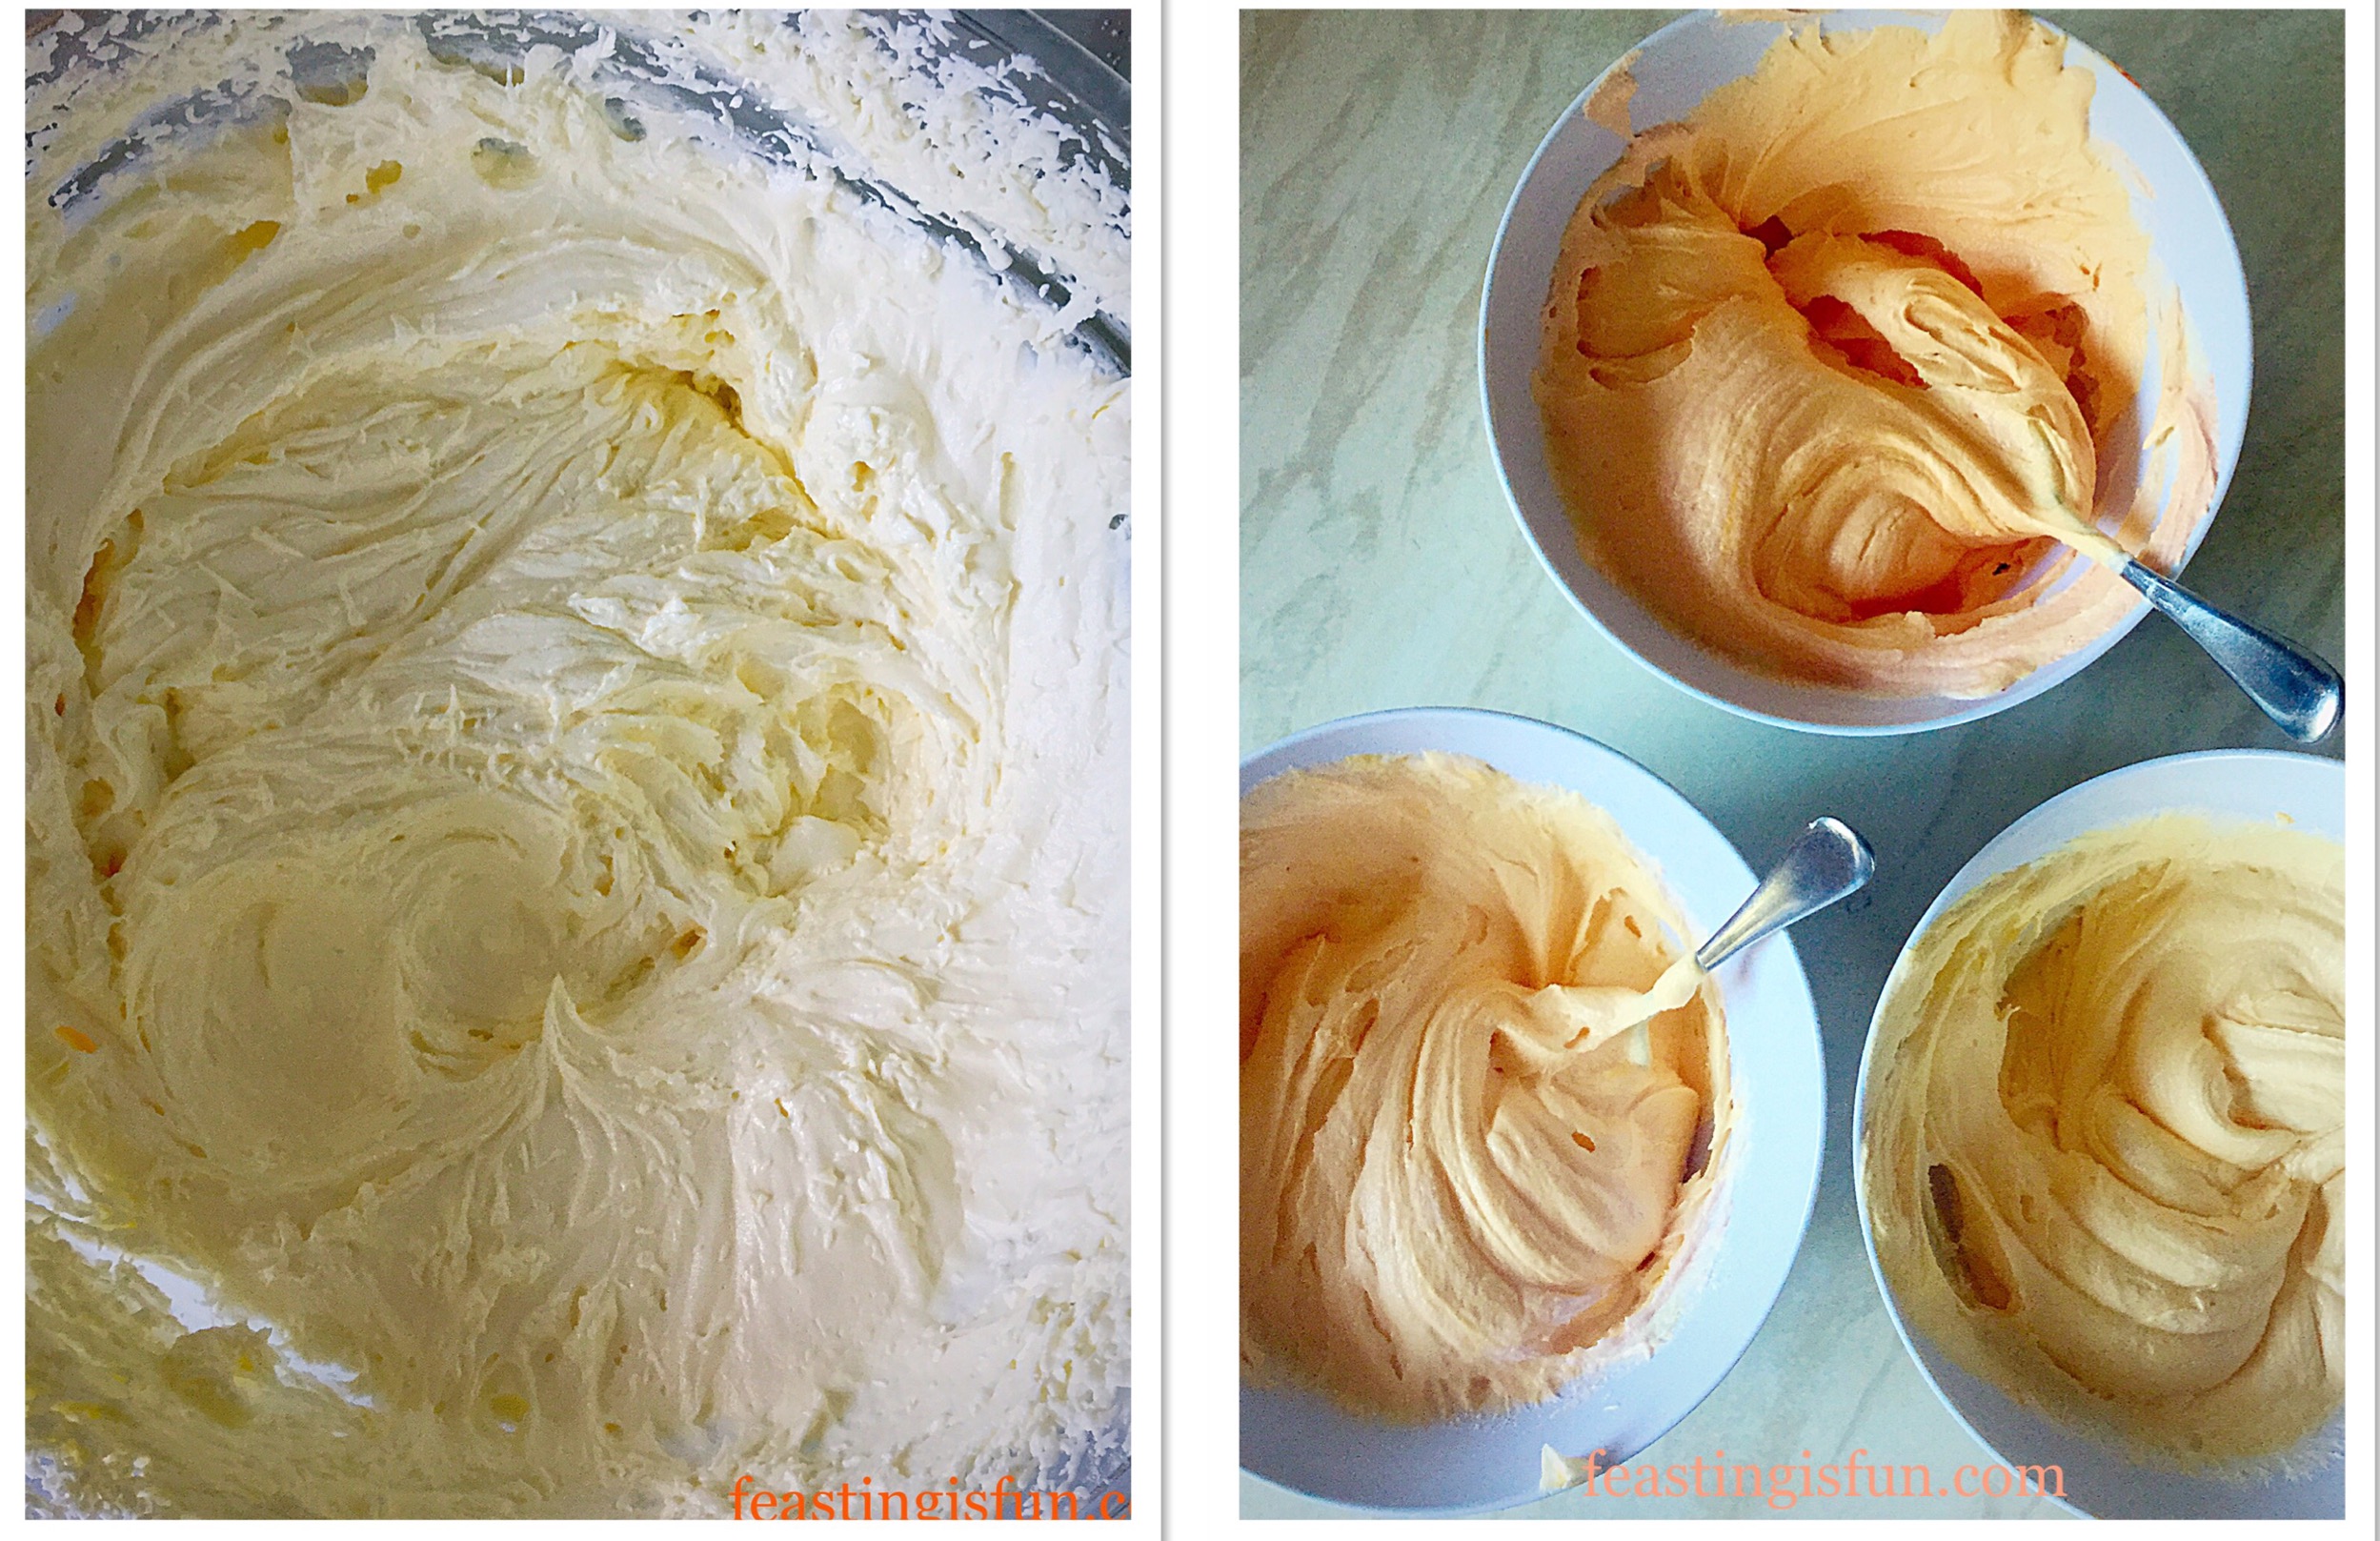
Finally whisk the ingredients together, starting on a slow speed and increasing the speed, until you have a pale, fluffy, lump free, buttercream.
Remove 3 heaped tablespoons of the buttercream and set aside to crumb coat the cake. First place the buttercream on the top of the cake. Use an offset spatula to spread the icing across the top of the cake, gently pushing it over the sides. Rotating the stand, or board, gradually cover the sides of the cake with a thin layer of buttercream. Finish by dipping a palette knife into hot water, drying and running the hot knife over the cake, this will produce a smooth finish. Place the cake in the fridge for 30 minutes to allow the crumb coat to set slightly.
Colouring the buttercream:
Divide the remaining buttercream equally, between 3 bowls.
Use cocktail sticks, gel food colouring and a teaspoon to stir, start colouring the icing. It is easier to achieve the lightest colour, which is piped on to the top of the cake, first. Doing so sets the shade and tint of the icing.
Following on, add more colouring to the next bowl, until the shade is correct. Finishing with the last bowl and deepest colour, add extra red and yellow gel until the desired deeper colour is obtained.
To pipe the buutercream, fit 3 large, disposable piping bags with large star piping nozzles – Wilton #1M. Fill each bag with a separate shade of buttercream. Label the piping bags light, medium, dark, so they are distinguishable.
Natural lemon flavoured buttercream and the 3 shades created for the ombré effect.
Decorating the Cake:
Starting right in the centre, on top of the cake, using the lightest shade, pipe the first rose. Begin in the centre of the rose, keeping pressure steady on the bag pipe a star, continuing into an e shape, then continuing round to form a rose swirl.
Continue working evenly around the centrally piped rose, piping more rose swirls. Carry on until the top of the cake is covered, or almost covered, in evenly piped rose swirls.
Following on, use the next shade darker, pipe rose swirls around and inbetween the lighter shade, then pipe evenly around the side of the cake.
The image on the right shows the colour difference.
Complete the cake by piping the darkest shade around the base of the cake. The full ombré effect is then complete.
Orange Lemon Ombre Piped Rose Cake very effective.
For the very best results place the piped cake into the fridge, or somewhere cold, for 30 minutes.
Just prior to serving add the edible violas.
Orange Lemon Ombre Piped Rose Cake perfect with a Buck’s Fizz!
Beautifully baked, evenly distributed fruit, decorated with rose swirls, this Orange Lemon Ombre Piped Rose Cake demonstrates how easy it is to create a sensational cake using a mix.
Because of my health limitations, creating this cake from scratch would be too much for me. Of most importance, my aim, to show how the ombré piping effect is achievable, at home, with a little practice. Secure in the knowledge that the cake underneath is reliably good. A couple of badly piped roses were removed, using a butter knife and re-piped. Practice and making mistakes is how we learn to improve our skills.
If you have enjoyed the recipe for this Orange Lemon Ombre Piped Rose Cake you may also like these:
Beautiful cakes do not have to be difficult to create. Since I am most definitely not an accomplished cake decorator, I have learned a few decorating techniques that enable me to finish a cake to a good standard.
Most of all I hope you have been inspired to try out a new technique? Also homemade cakes taste infinitely better than their supermarket counterparts. While they are convenient, no amount of love, has, at any stage been added to the cake. Whereas baking at home creates a unique, delicious cake that will prompt huge smiles from the recipient and those who share in the celebration and cake!
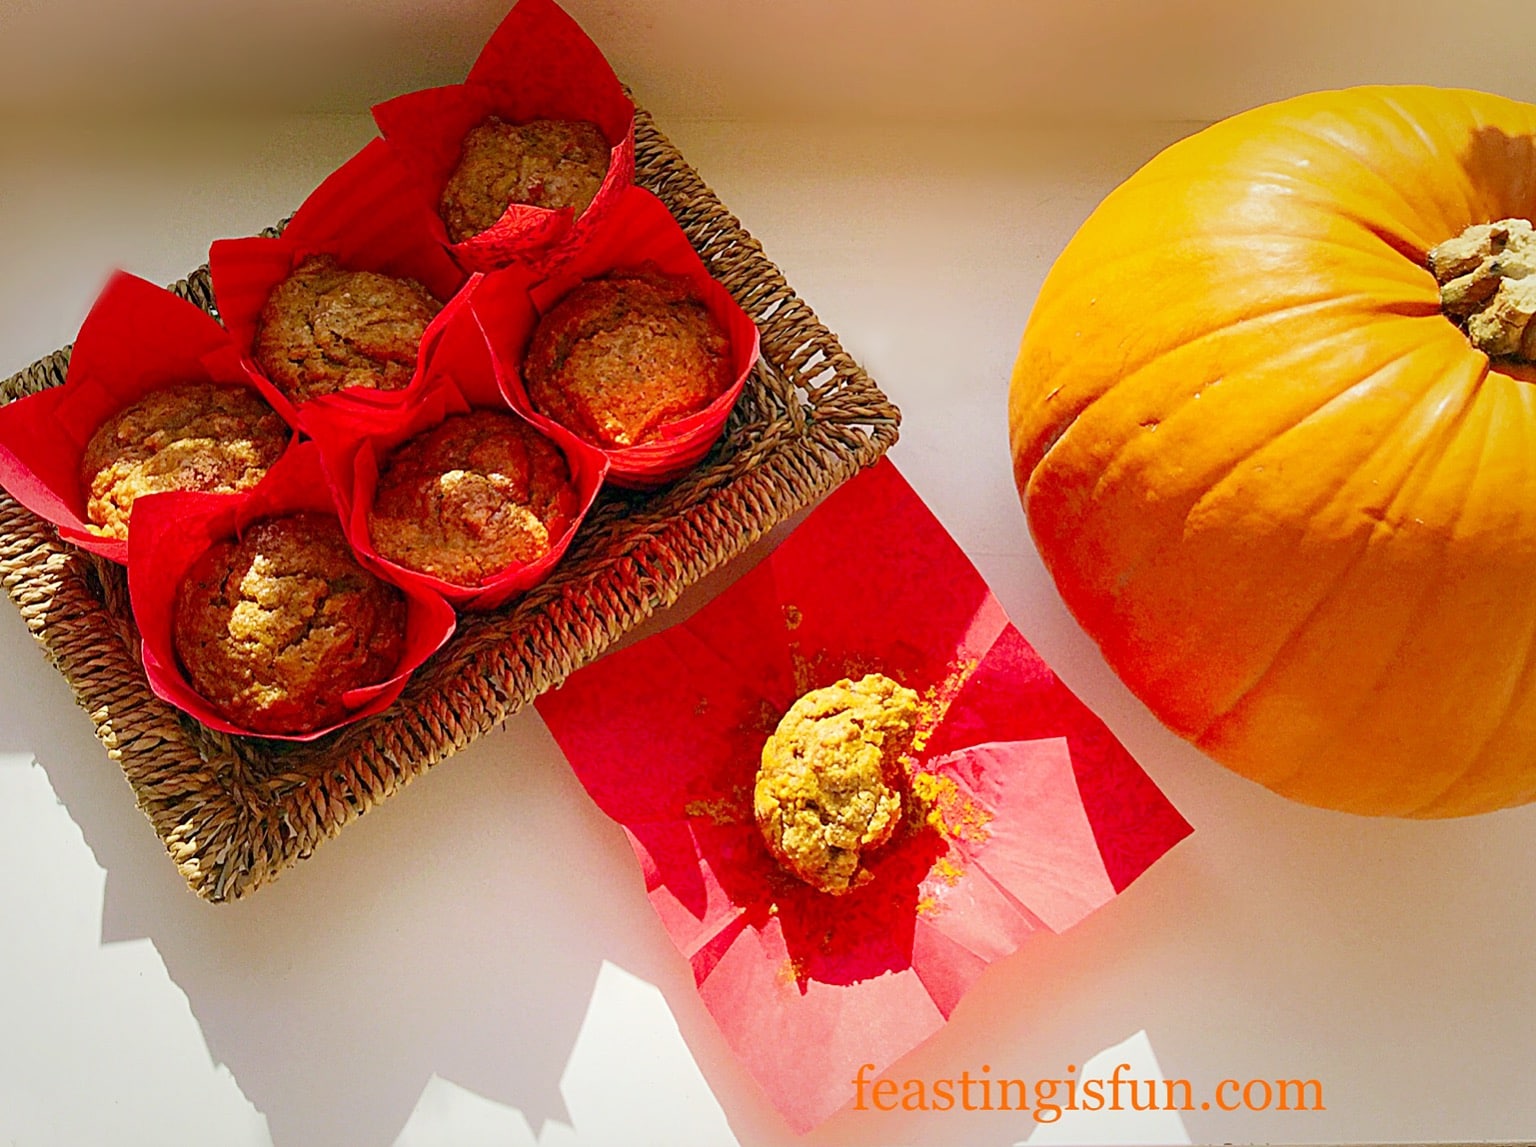
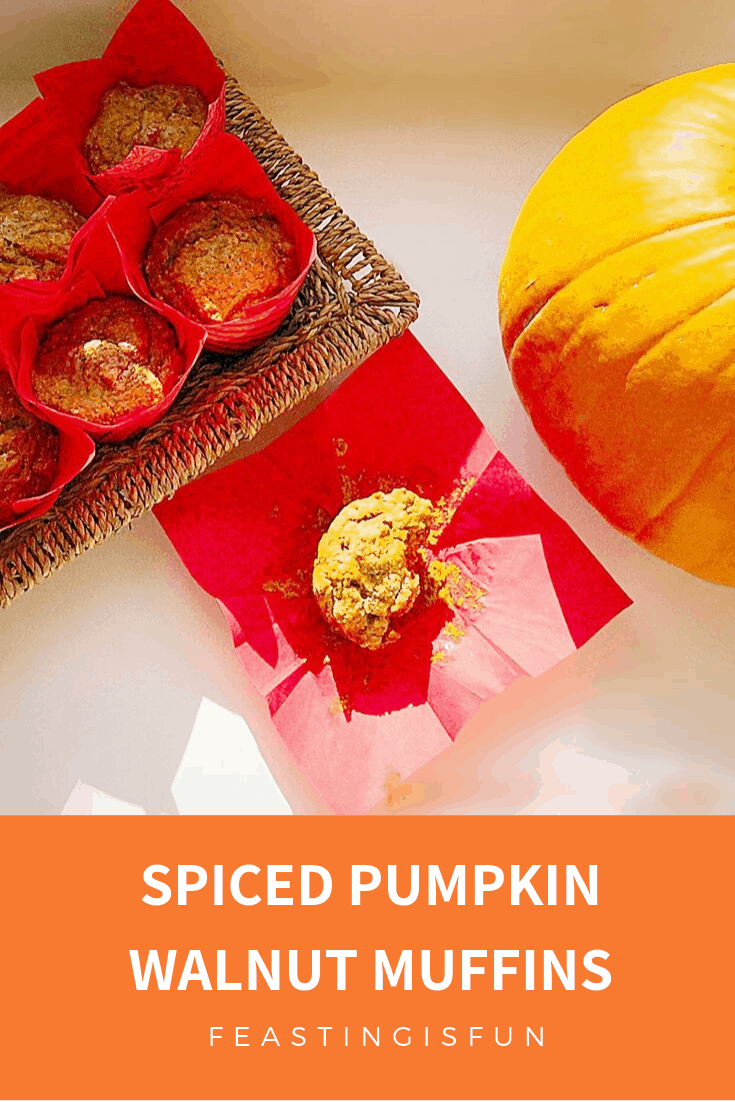
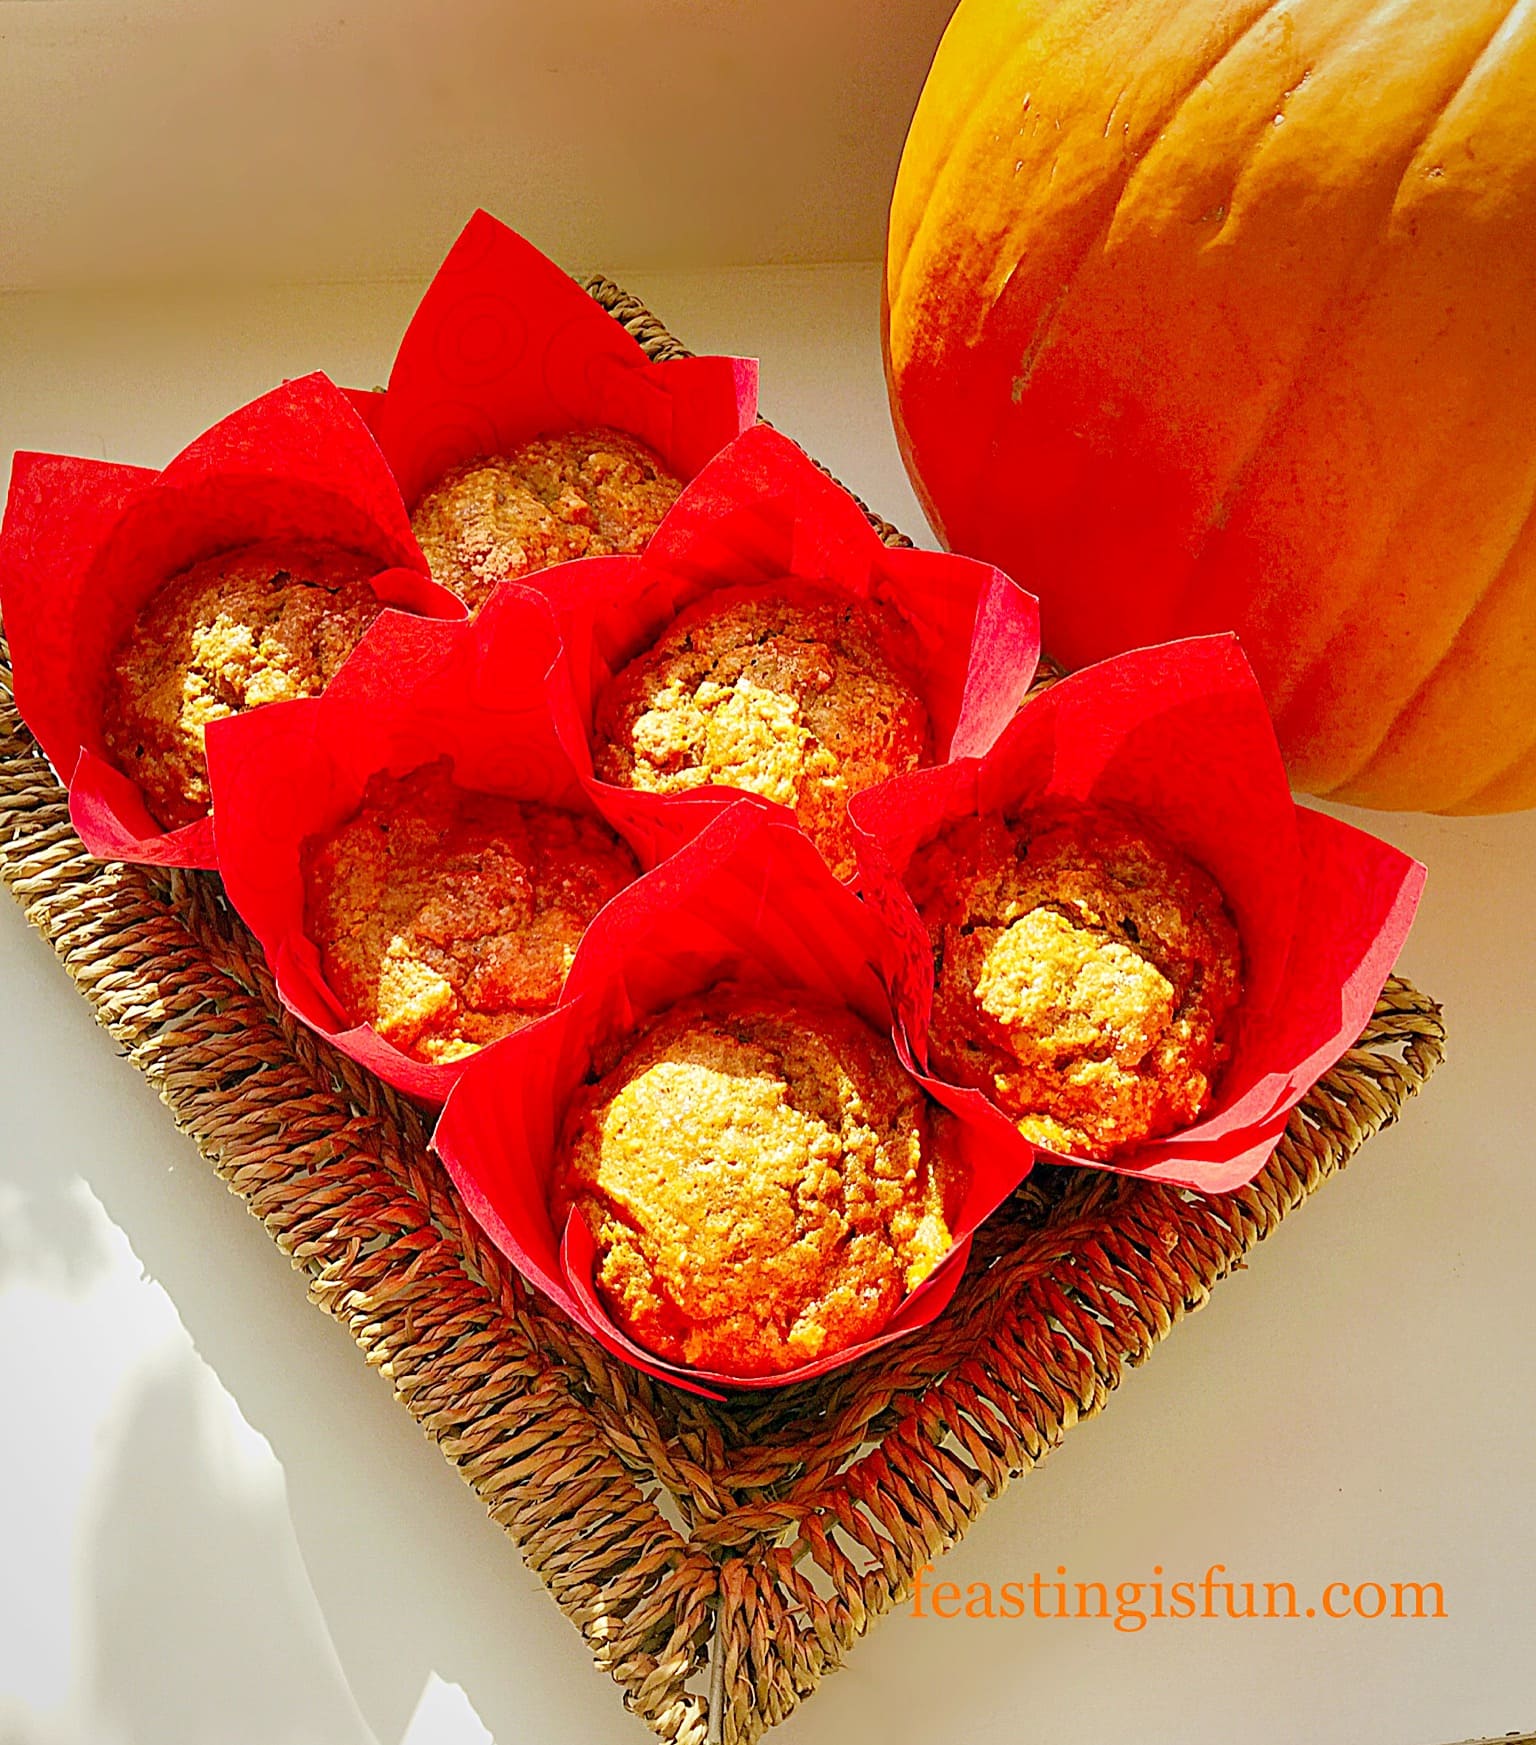
I have most definitely fallen in love. The kind of head over heels, mind consuming, heart compelling love that completely takes over one’s life. And the object of my desire is orange, coincidentally my favourite colour, big and round. Pumpkin where have you been all my life? It would seem, puréed in a can, far, far away. Until now, where I can hoard cans of this delicious ingredient, ready to make Spiced Pumpkin Walnut Muffins whenever I desire.
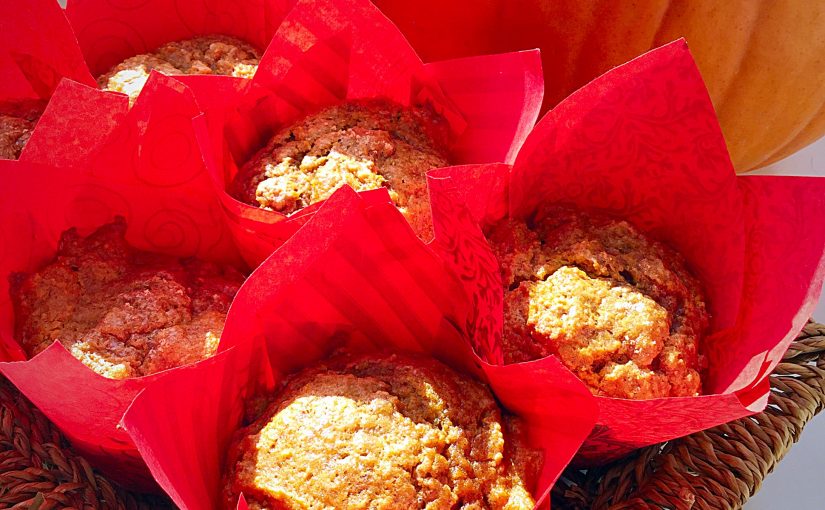
Spiced Pumpkin Walnut Muffins
Americans, Canadians, no doubt many other countries have long known the delight that is pumpkin purée. While not the most compelling ingredient straight from the can, it lends a flavour and texture to bakes that other ingredients cannot.
Spiced Pumpkin Walnut Muffins
Late To The Pumpkin Party!
Since venturing into Pumpkin Spice World with my very first pumpkin bake, these doughnuts, I soon realised that I had uncovered an amazing ingredient. The tenderness, colour and delicate flavour that pumpkin purée lends to a bake is unique. Resulting in some of the best bakes I have ever tasted.
Spiced Pumpkin Walnut Muffins
So, now I have found a regular supplier long may this love affair continue. Since I intend to explore as many different bakes and desserts using my newly discovered love and they will be posted on here. Because sharing my passion seems only fair. Hopefully you will discover a love for all things pumpkin, by the time October ends.
Spiced Pumpkin Walnut Muffins
And as always, here on Feasting is Fun, sharing is a key part of my passion behind blogging. An example of how I share, just happened. Unable to drive at the present seehere, I appreciate the Pharmacy, adjoined to my doctors, delivering my prescriptions. Just now, once I’d received my medications, I was able to share one of these Spiced Pumpkin Walnut Muffins with the delivery lady. The perfect way to show my thanks.
Recipe: Makes 12 Spiced Pumpkin Walnut Muffins
100g/4oz Unsalted Butter melted and cooled
200g/7oz Pumpkin Purée – available from Sainsbury’s
150g/5oz Full Fat Natural Yoghurt – I use Yeo Valley
2.5tsp Pumpkin Spice Mix see here if you would like to make your own
Method: Preheat the oven to 180C/160C fan, gas mark 3, 325F
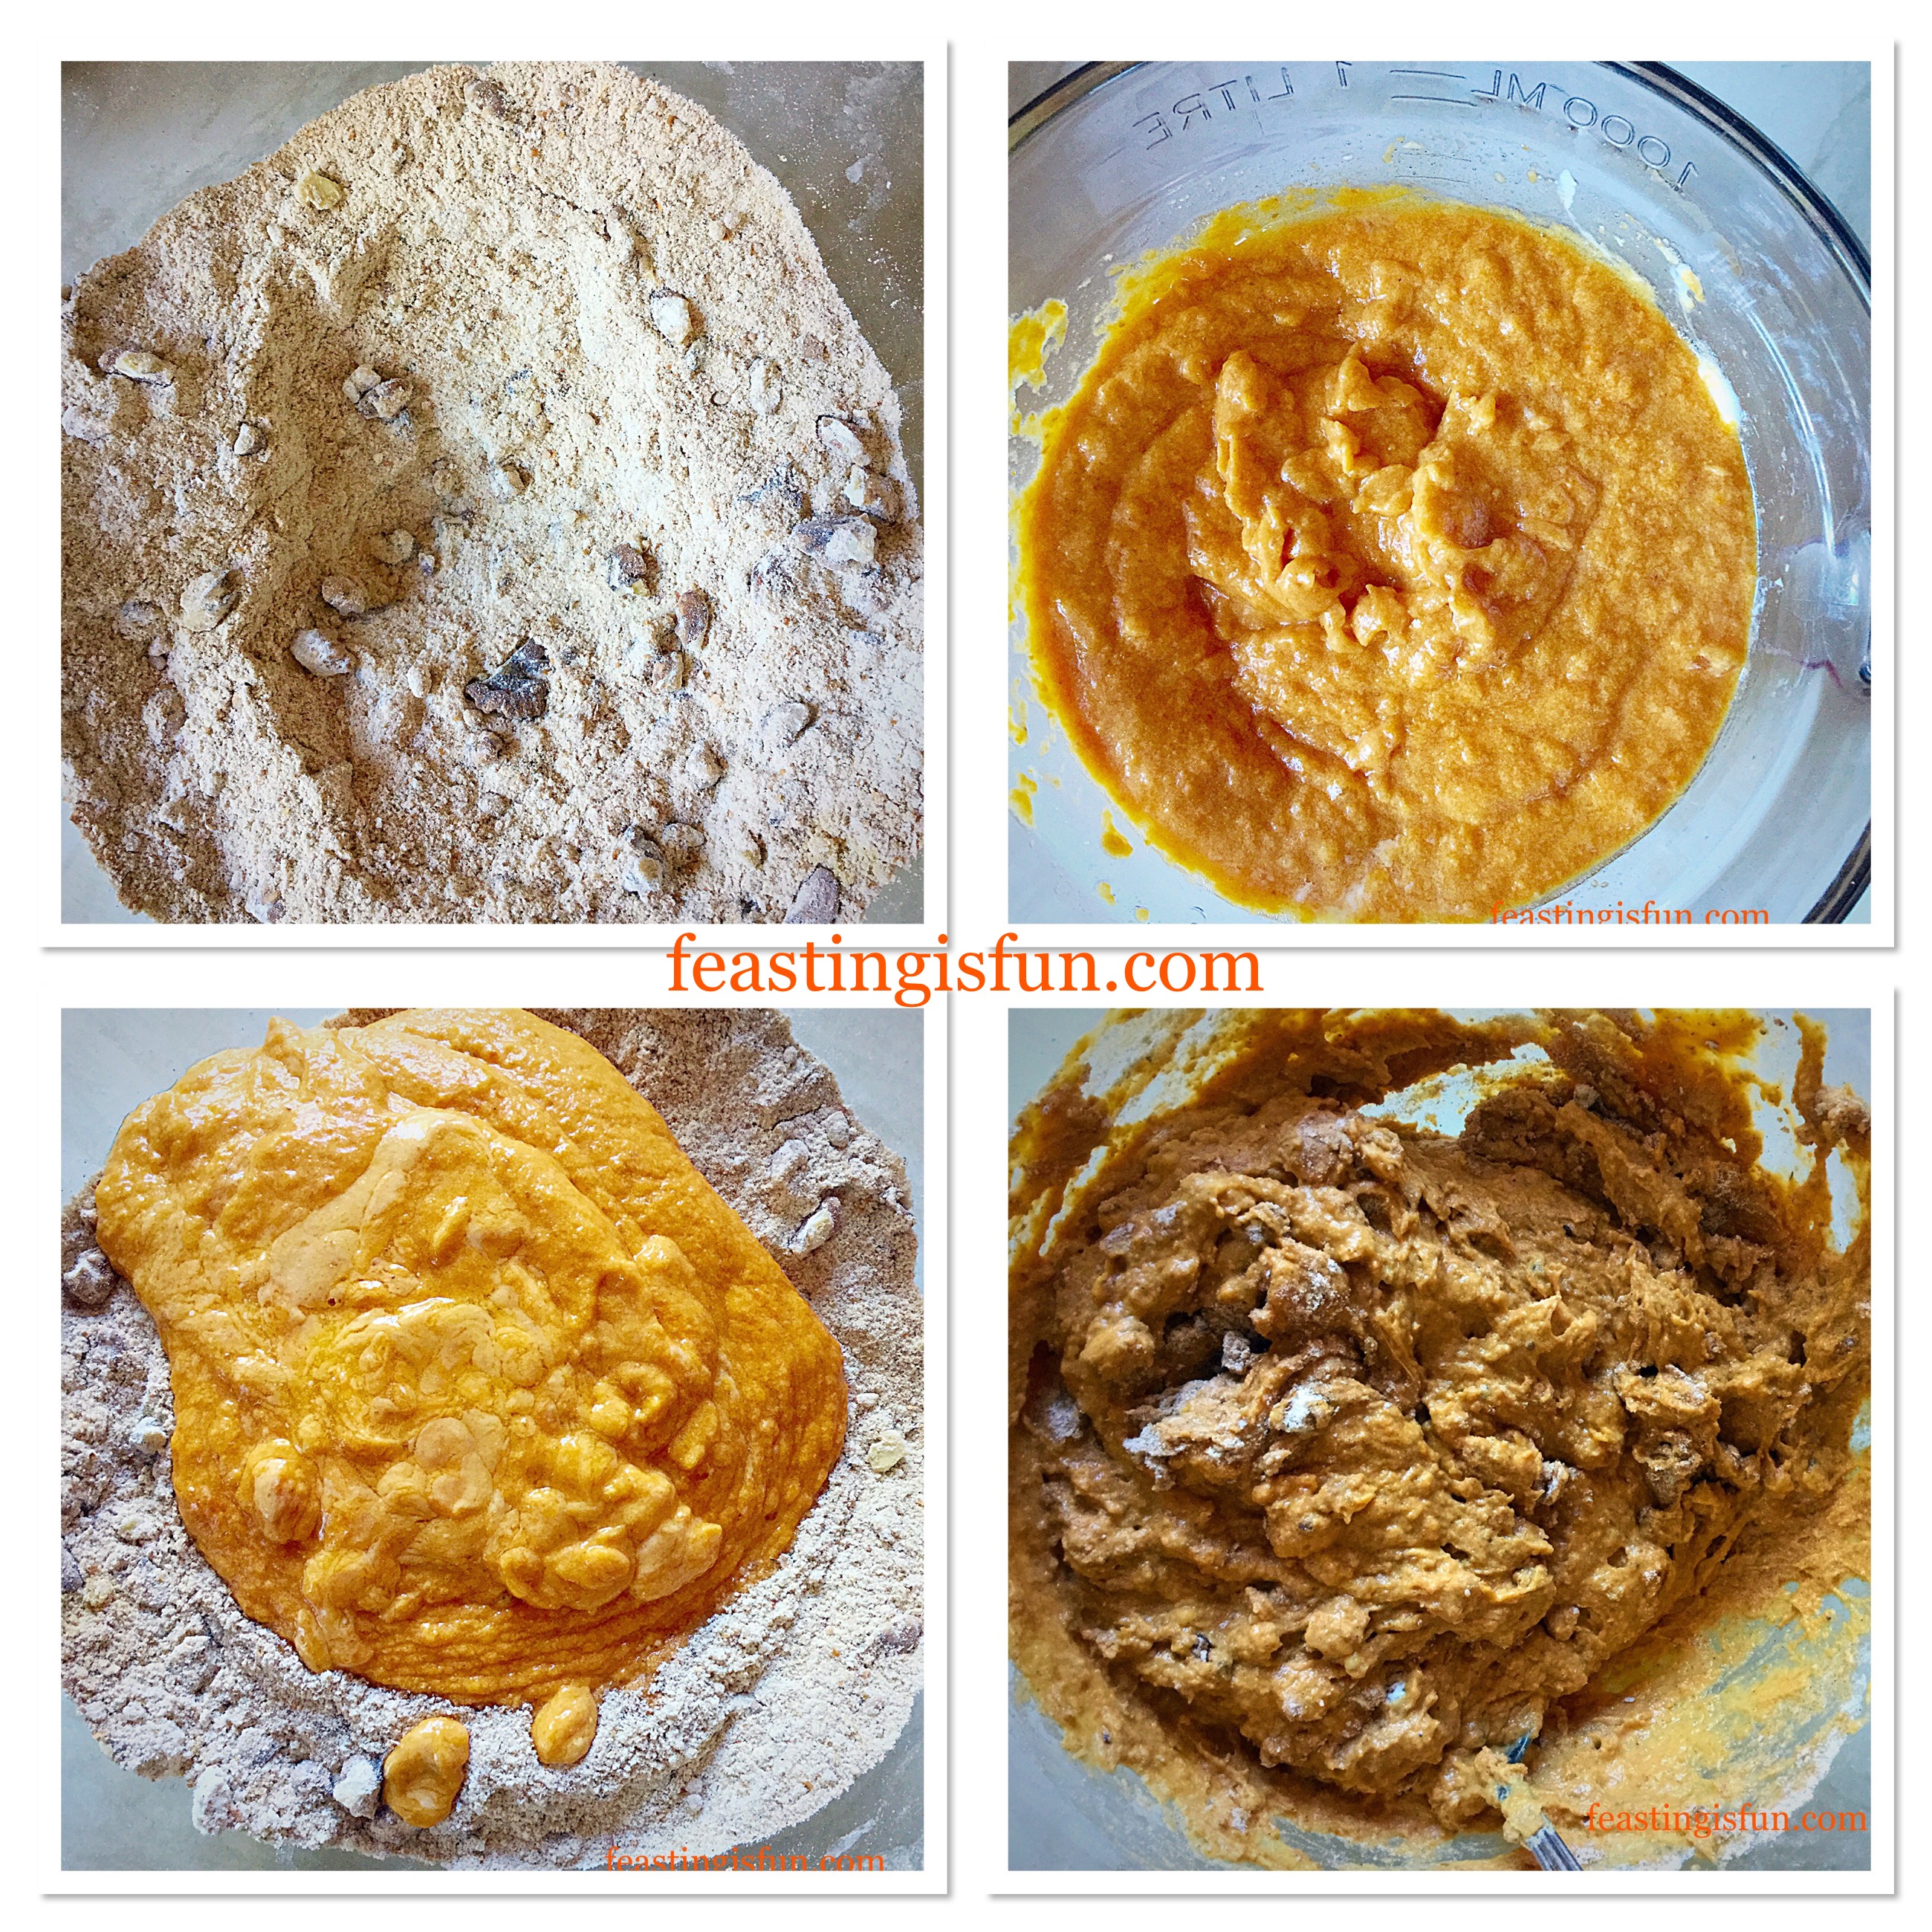
Making The Muffin Batter
Firstly melt the butter in a heatproof, microwaveable jug and set to one side to cool.
Line a 12 hole muffin tin with cases, I used pretty tulip wrappers.
Next, in a large bowl add the flours, chopped walnuts, sugar, spice and salt. Stir with a balloon whisk to distribute the ingredients evenly and break up any lumps in the sugar. Dry ingredients.
As soon as the butter has cooled add in the yoghurt, pumpkin purée and eggs. Beat with a fork until the ingredients are combined. Wet ingredients.
Make a well in the centre of the dry ingredients and then pour the wet ingredients into the dry.
Mix until just combined. Over mixing will cause the muffins to become tough.
Bringing the muffin batter together.
Spoon the muffin mix into the muffin cases, distributing the mix as evenly as possible.
Finally, using the extra tablespoon of sugar sprinkle a little over the top of each unbaked muffin.
Spiced Pumpkin Walnut Muffins ready for the oven.
Baking The Spiced Pumpkin Walnut Muffins
Place the muffin tin in the centre of the preheated oven and bake for 20-25 minutes.
My muffins were baked at 25 minutes, but I started checking after 20 minutes.
Once baked the muffins should be just firm to the touch, without any visible wobble (this was present when checking at 20 minutes). The Spiced PumpkinWalnut Muffins will have a slight sparkle, or sheen to them from the additional sugar sprinkled just prior to baking.
As soon as the muffins are baked remove the tin from the oven.
Spiced Pumpkin Walnut Muffins their smell will fill your kitchen.
Inhale deeply. The baked pumpkin spices smell of warm, comforting, welcoming food. Who needs scented candles?
If you have used the tulip style muffin wrappers I strongly suggest leaving them to cool completely in the muffin tin. Because, I find doing so prevents them from unwrapping themselves, as can be the case if removed whilst hot.
Regular muffin cases can be removed after cooling for 10 minutes in the tin. Place on a cooling rack.
Spiced Pumpkin Walnut Muffins best served warm.
These delightful Spiced Pumpkin Walnut Muffins are their best served warm. One of the benefits of using tulip style wrappers is that they unfold to create the perfect napkin, to hold and enjoy the experience of eating a muffin.
Pulled apart or bitten straight into, these muffins are all that is good about Autumn, wrapped up in an edible parcel. Also golden in colour, they imitate the autumnal palette, crunchy walnuts akin to walking through fallen leaves. Warm spices and tender crumb resemble falling into a big sofa near an open fire, after a crisp afternoon walk.
If you have enjoyed this recipe for Spiced Pumpkin Walnut Muffins you may also enjoy these:
Baking these Spiced Pumpkin Walnut Muffins releases the aroma of the pumpkin spice mix within, creating a welcoming ambiance in the home. When visitors arrive, or the postman knocks on the front door, I want them to feel welcome. Nurtured by the warmth of our home and good food, they leave contented and comforted.
While baking, making and creating in the kitchen, my aim is to convey love, acceptance and warmth through food. Since sharing the food made, is an extension of home and all it represents. Because, meeting another’s needs on both a physical and emotional level, while sharing time and companionship over a coffee and a home baked treat, shows food really can be so much more than fuel.
So, whatever you are making, baking and creating in your kitchens, have fun preparing and sharing your feast.
Sammie xx
No part of the post may be reproduced or duplicated without the written permission of the owner. Please see my Disclosure Policy.
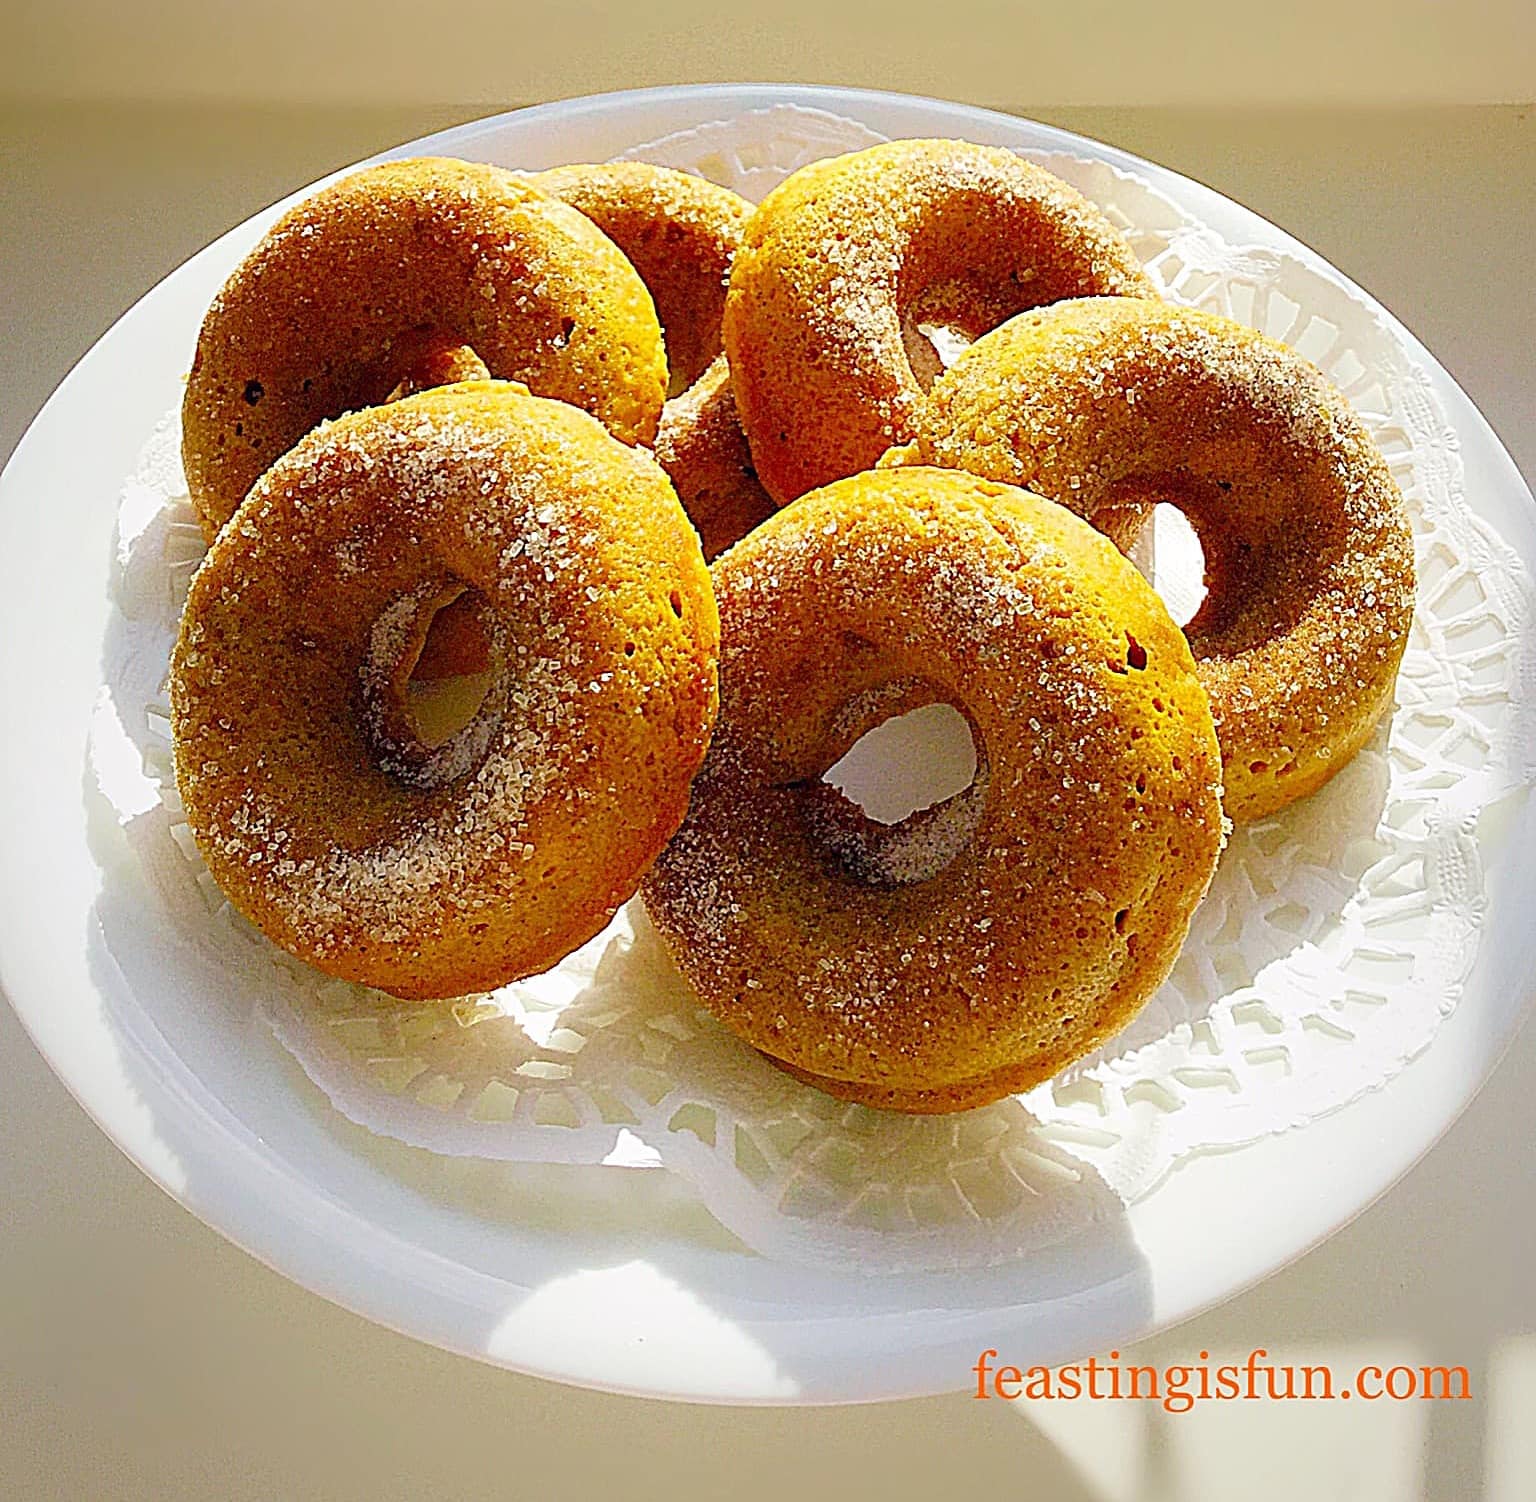
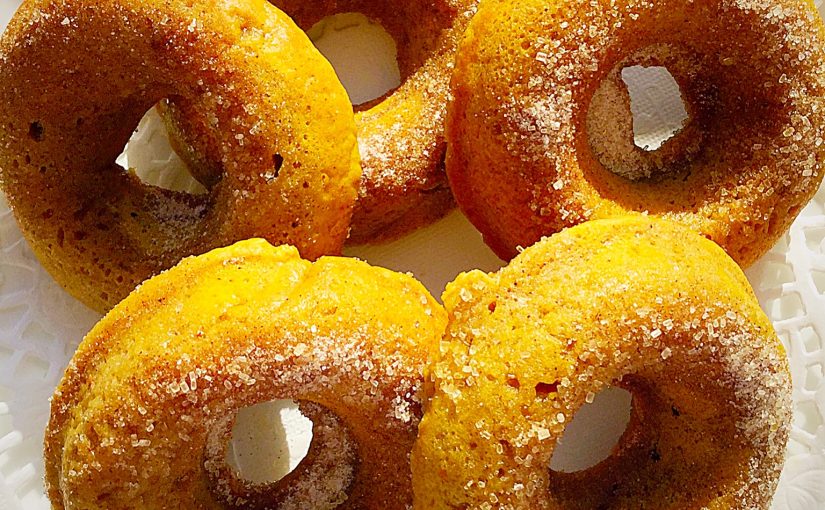
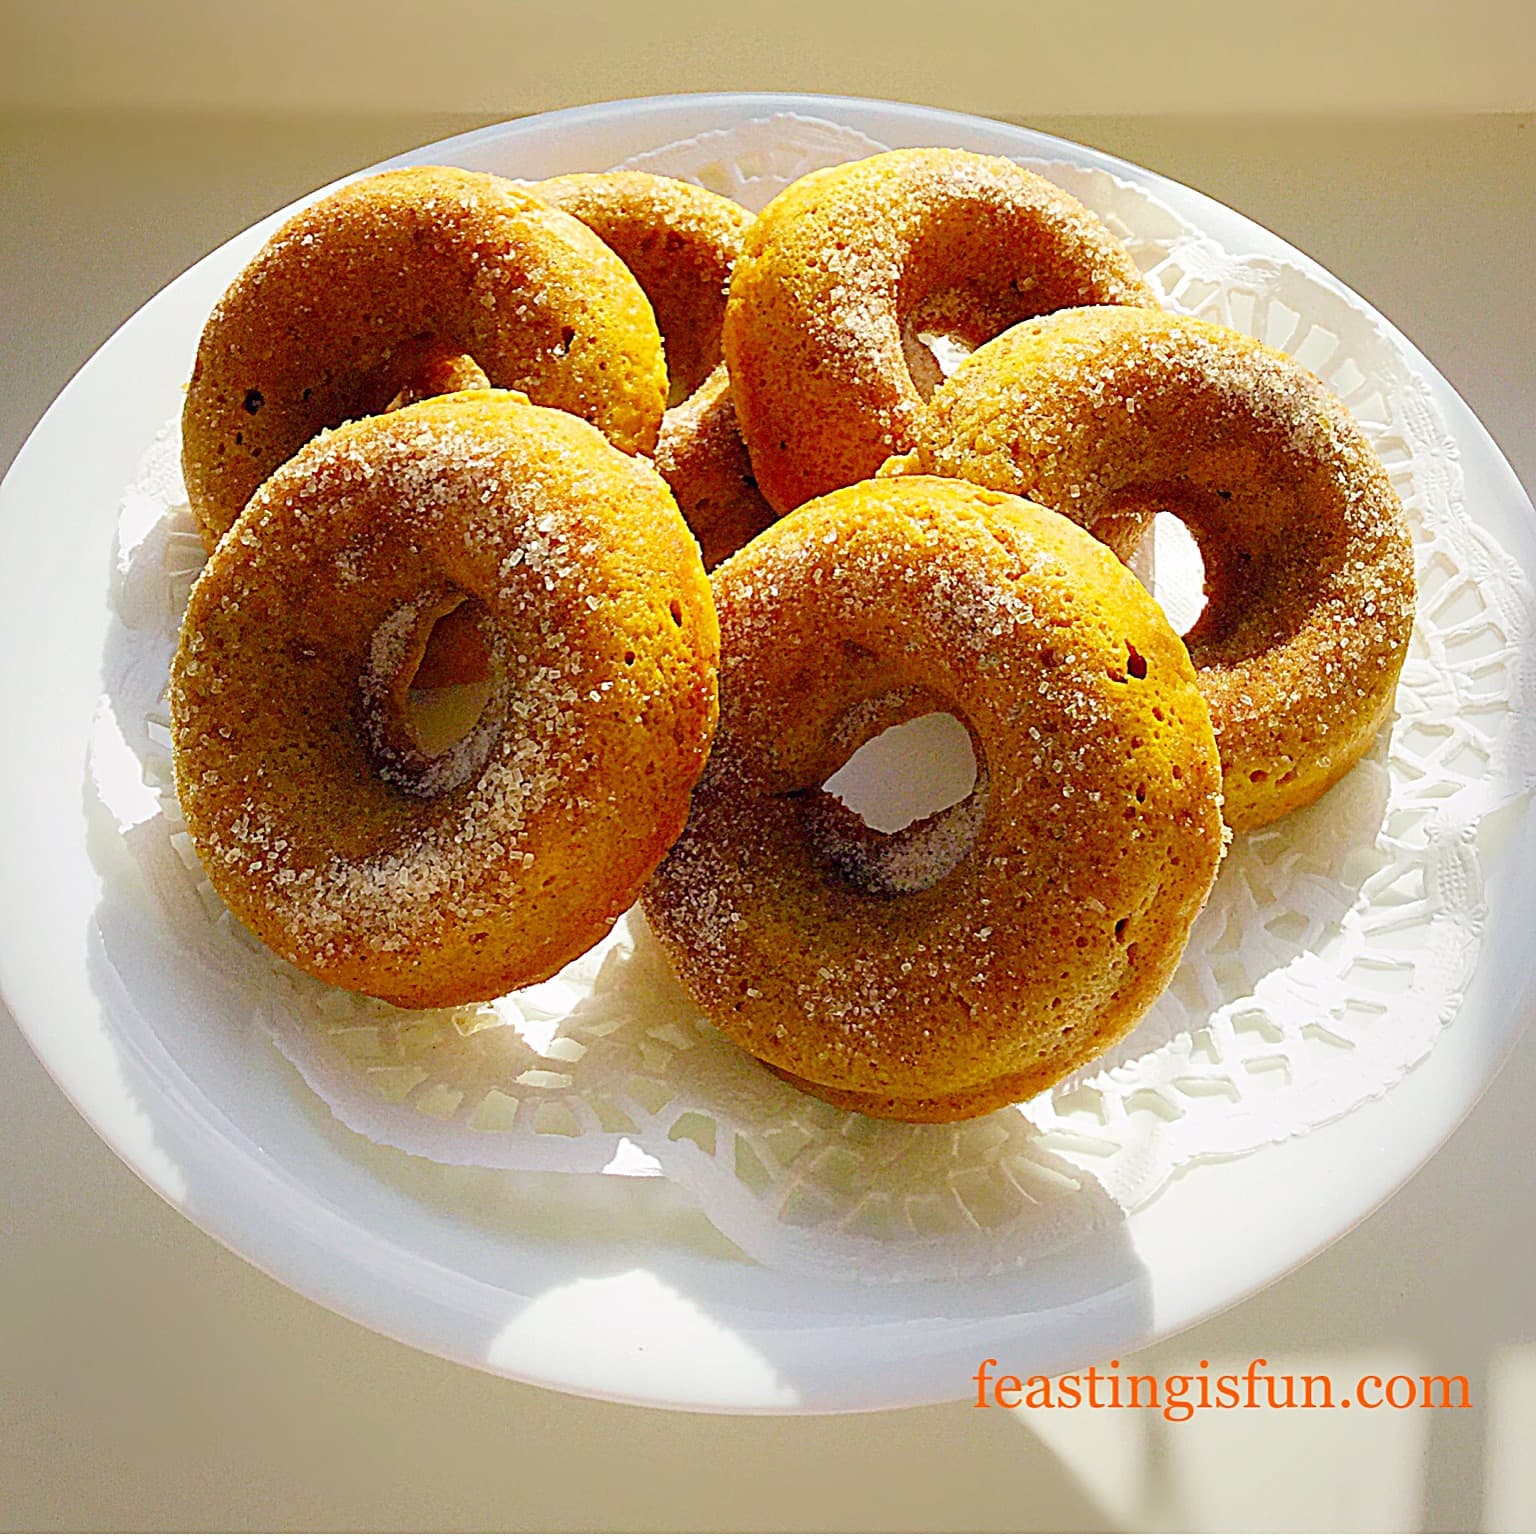
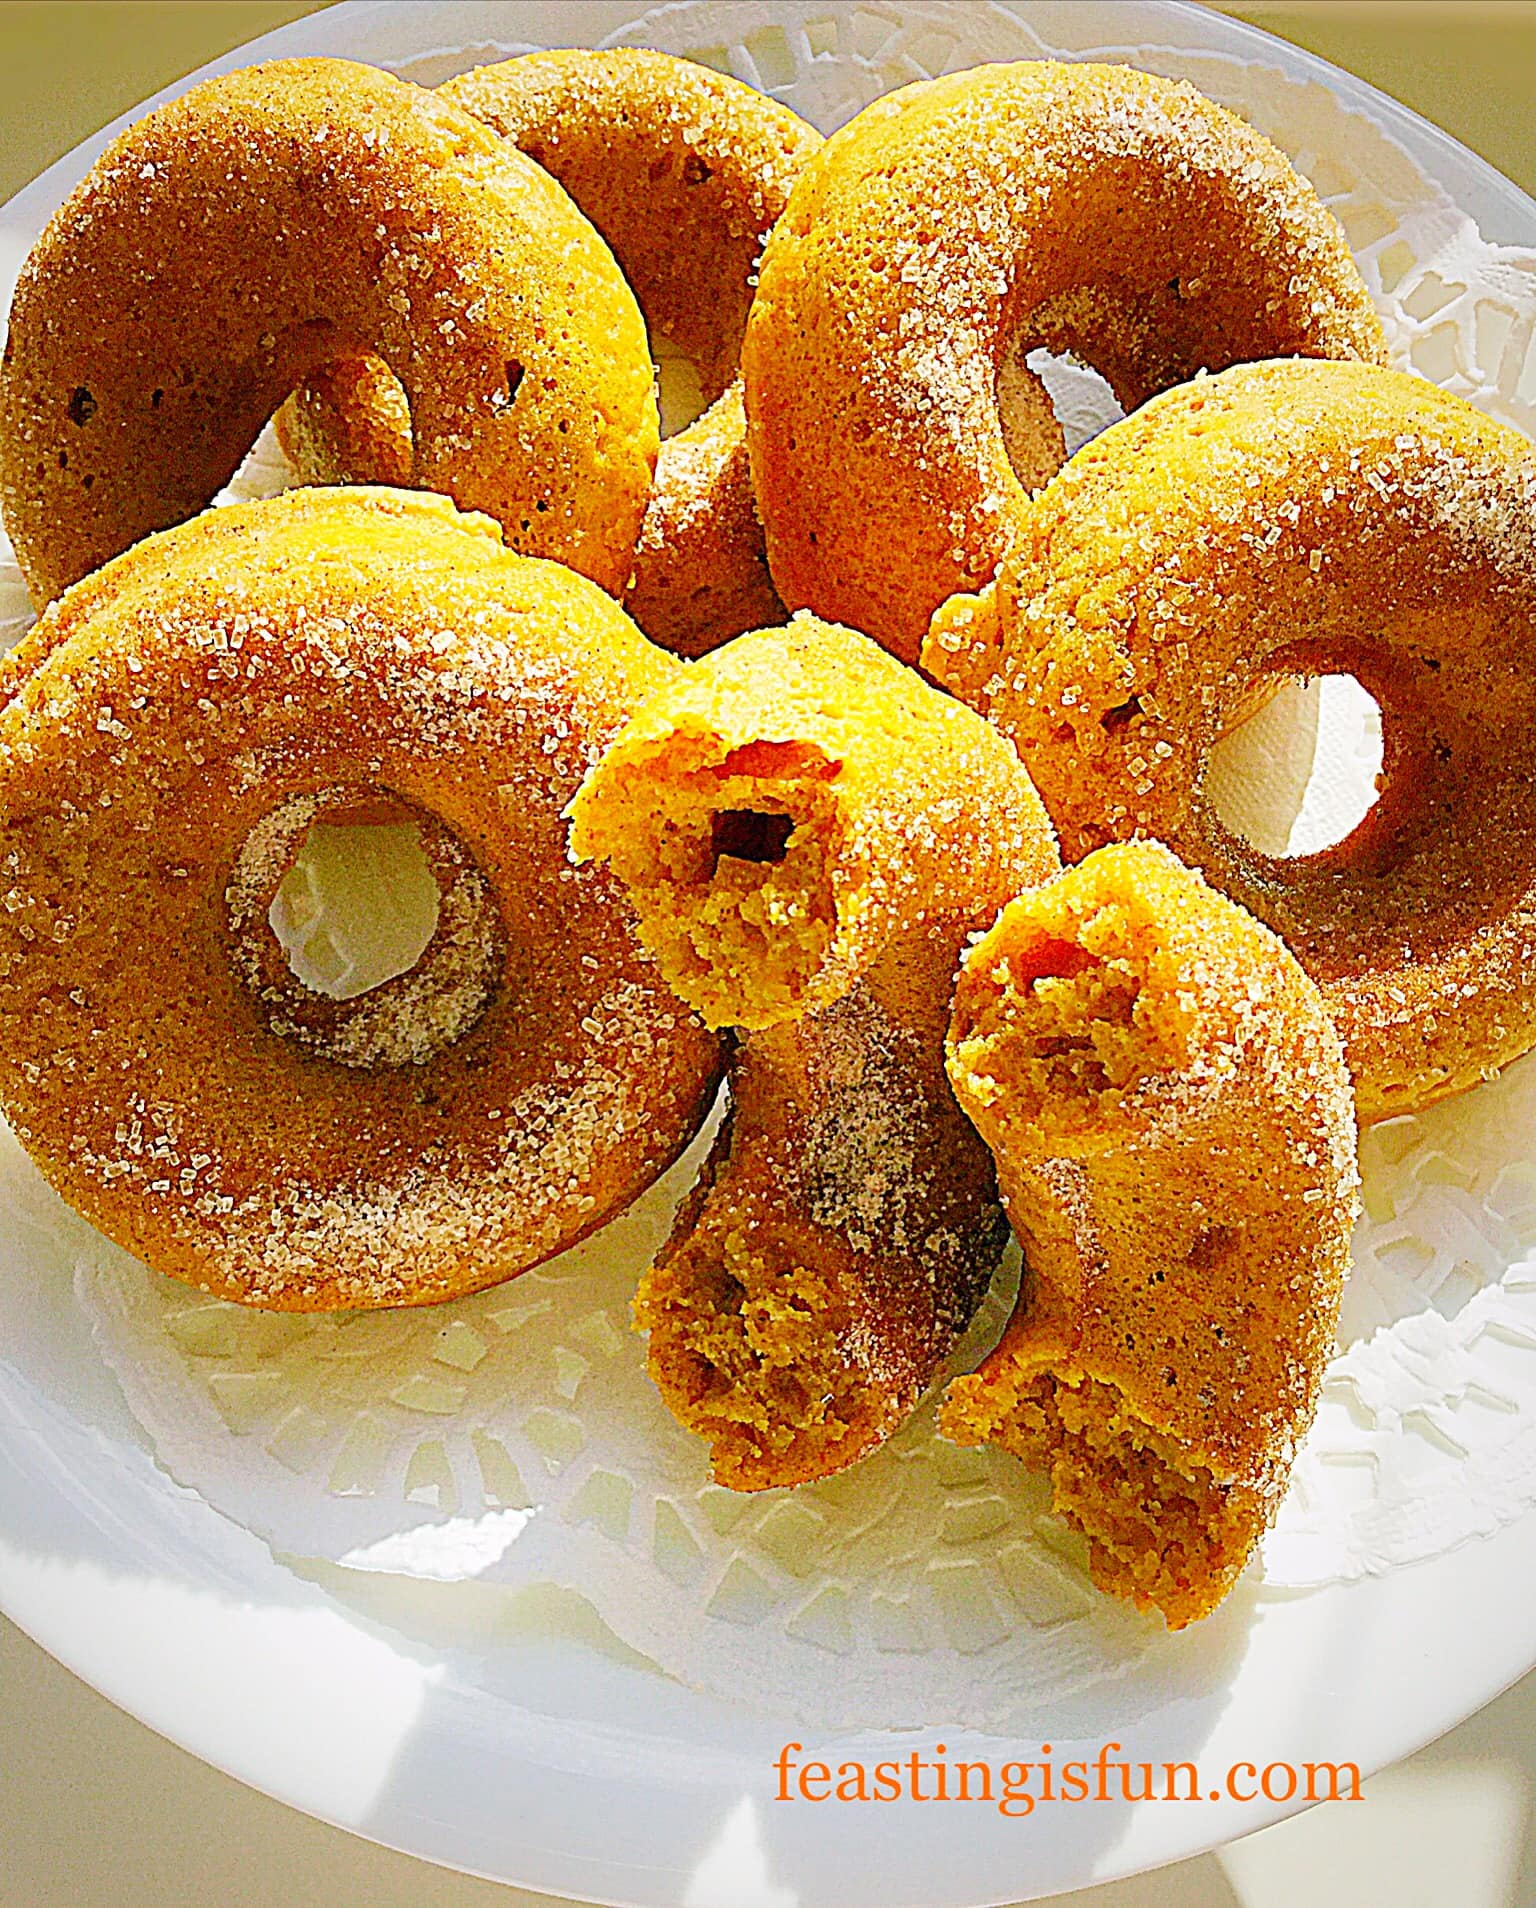
Autumn is such a beautiful season. As leaves change through a rainbow of green, yellow, gold, orange and rust. Low sunlight casting a golden glow on days that are spared from wind and rain ravaged storms. Because Autumn is a season of transition. Summer salads gradually disappear, replaced by comforting soups, stews and roasts. While these Baked Pumpkin Spiced Doughnuts not only look autumnal, they warm the senses with long since forgotten spices.
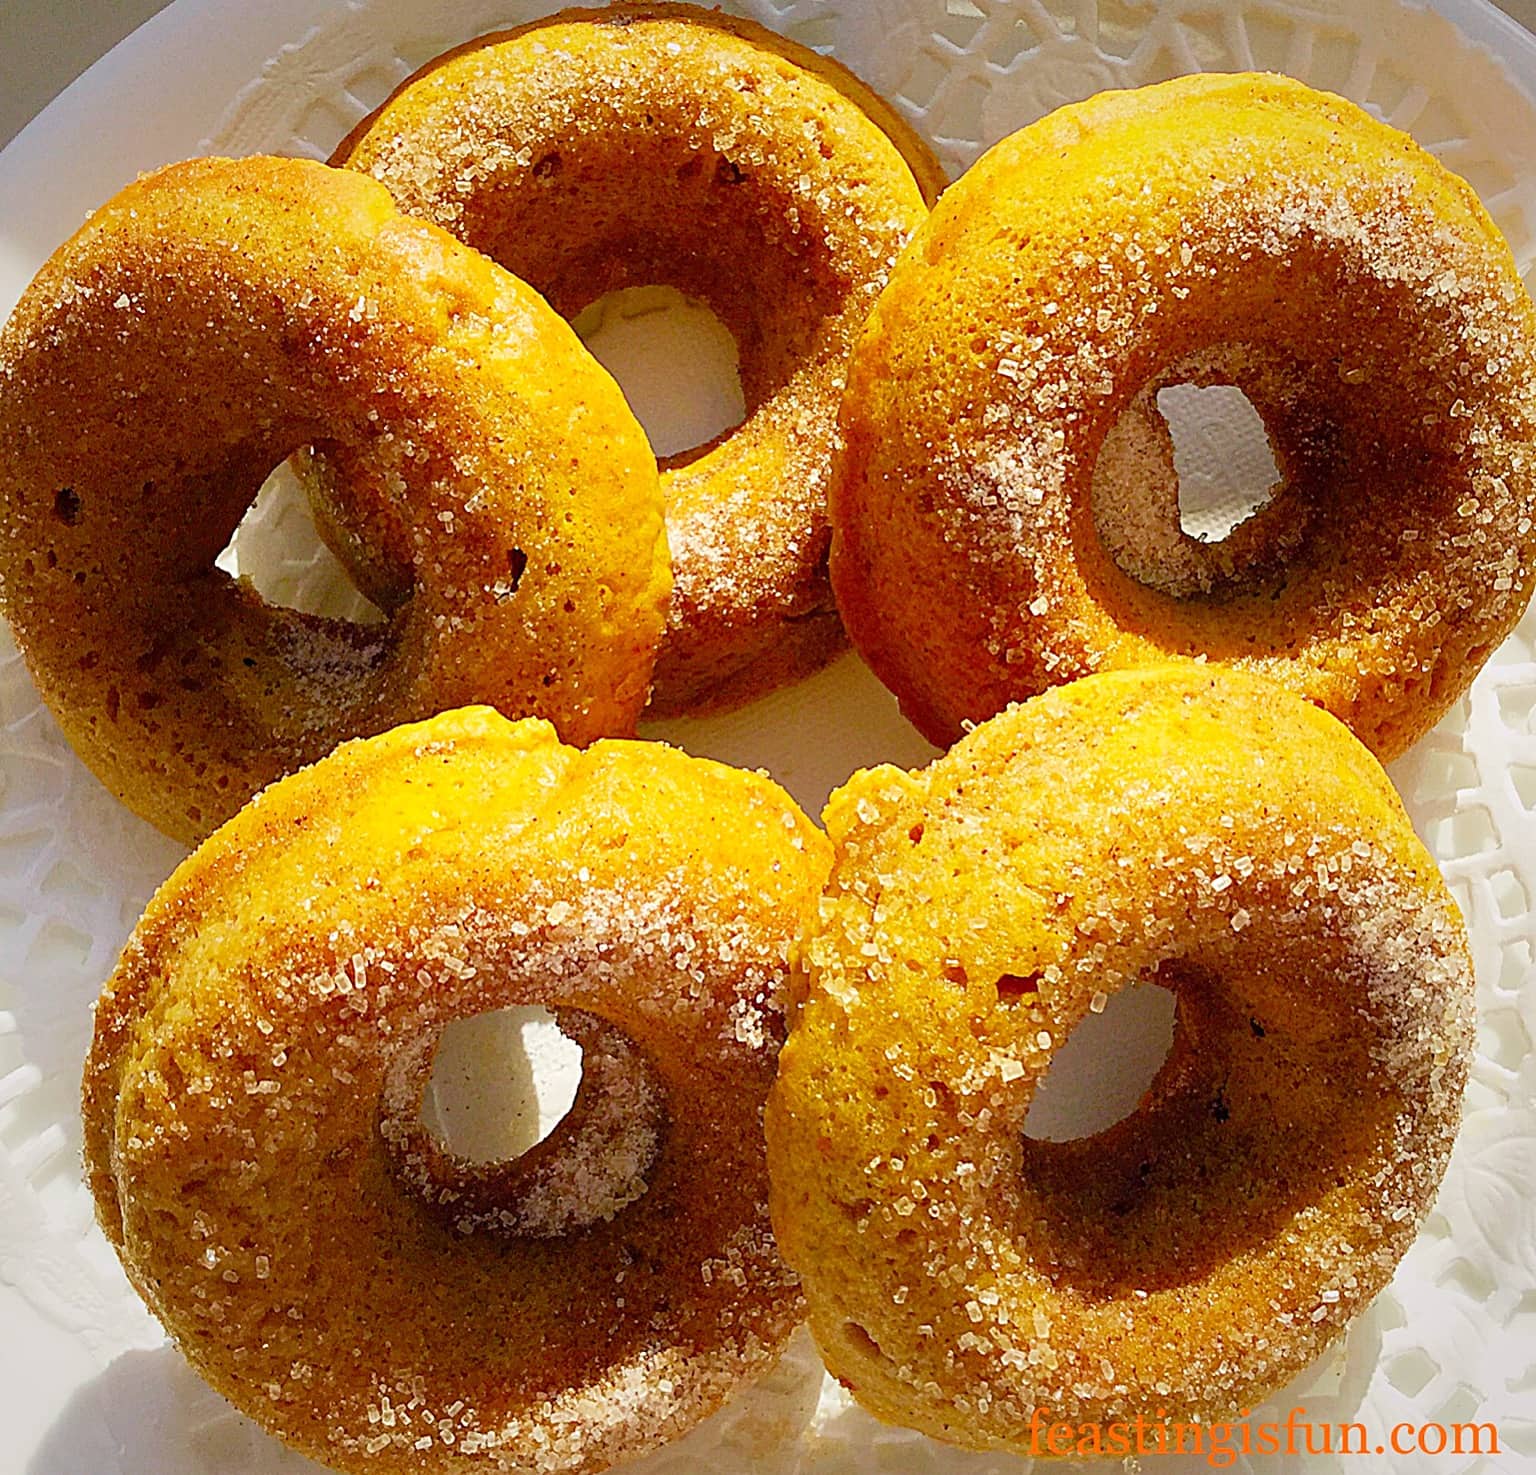
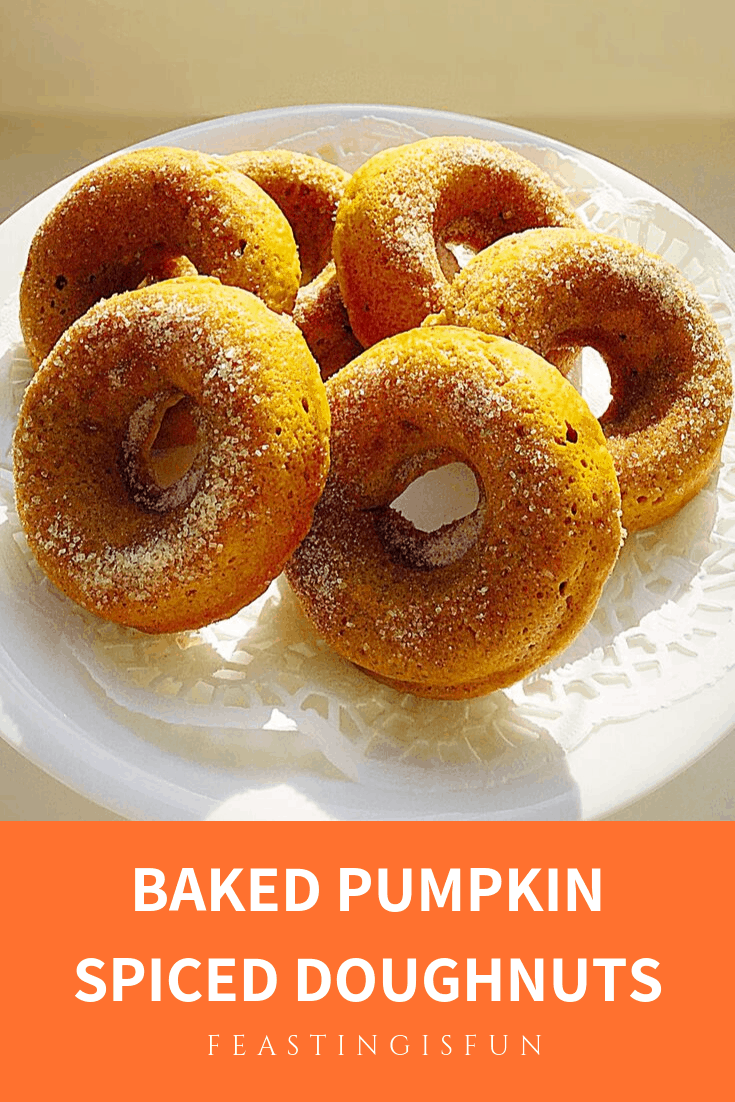
Baked Pumpkin Spiced Doughnuts
Baking Blogger Inspiration:
Inspiration hit to make these Baked Pumpkin Spiced Doughnuts after reading a similar recipe from Baker ByNature. Although I had never baked with pumpkin purée before, the first batch had me hooked. Since, as is the nature of most bakers, after testing, the recipe needed a little tweaking to accommodate our family’s taste preference, a second batch was the made the following day.
Baked Pumpkin Spiced Doughnuts really are the beautiful ochre colour that can been seen in the photographs. Also the spiced sugar sparkles in the low afternoon sunlight. So, for once there wasn’t a temptation to sprinkle with glitter!
Baked Pumpkin Spiced Doughnuts
Pumpkin love
While the inhabitants of North America’s continent have been using pumpkin in pies, cakes and bakes for many years, over the pond we have been missing out. It seems that here in the U.K. we tend to carve out a stinky, cabbage smelling pumpkin at Halloween, without a thought to eating the flesh. Yes I know we eat butternut squash, in fact I put it in this RoastedGarlic Butternut Squash Soup. Yet, I cannot feel as though we are losing out.
Pumpkin purée lends a tenderness to the crumb of these doughnuts that has to be tasted to be believed. Because the flavour is subtle, it allows the pumpkin spice mix to compliment, rather than overwhelm it. Finishing with a sprinkle of cinnamon spiced sugar creates the contrast in texture and awakens the senses. Resulting in a not quite as light as a fried doughnut, yet delicious in its own right.
Becky’s recipe for Pumpkin Pie Spice Mix:
4 tbsp Ground Cinnamon
3tsp Ground Ginger
2 tsp Ground Nutmeg
2 tsp Ground Allspice
1 tsp Ground Cloves
Mix together and store in an airtight jar.
Making the Baked Pumpkin Spiced Doughnuts:
Recipe: Makes 7-8 Baked Pumpkin Spiced Doughnuts
50g Unsalted Butter – melted and cooled plus extra butter for greasing the doughnut tin.
Preheat the oven to 180C/160C fan, gas mark 4, 350F.
Making The Pumpkin Spiced Doughnut Batter:
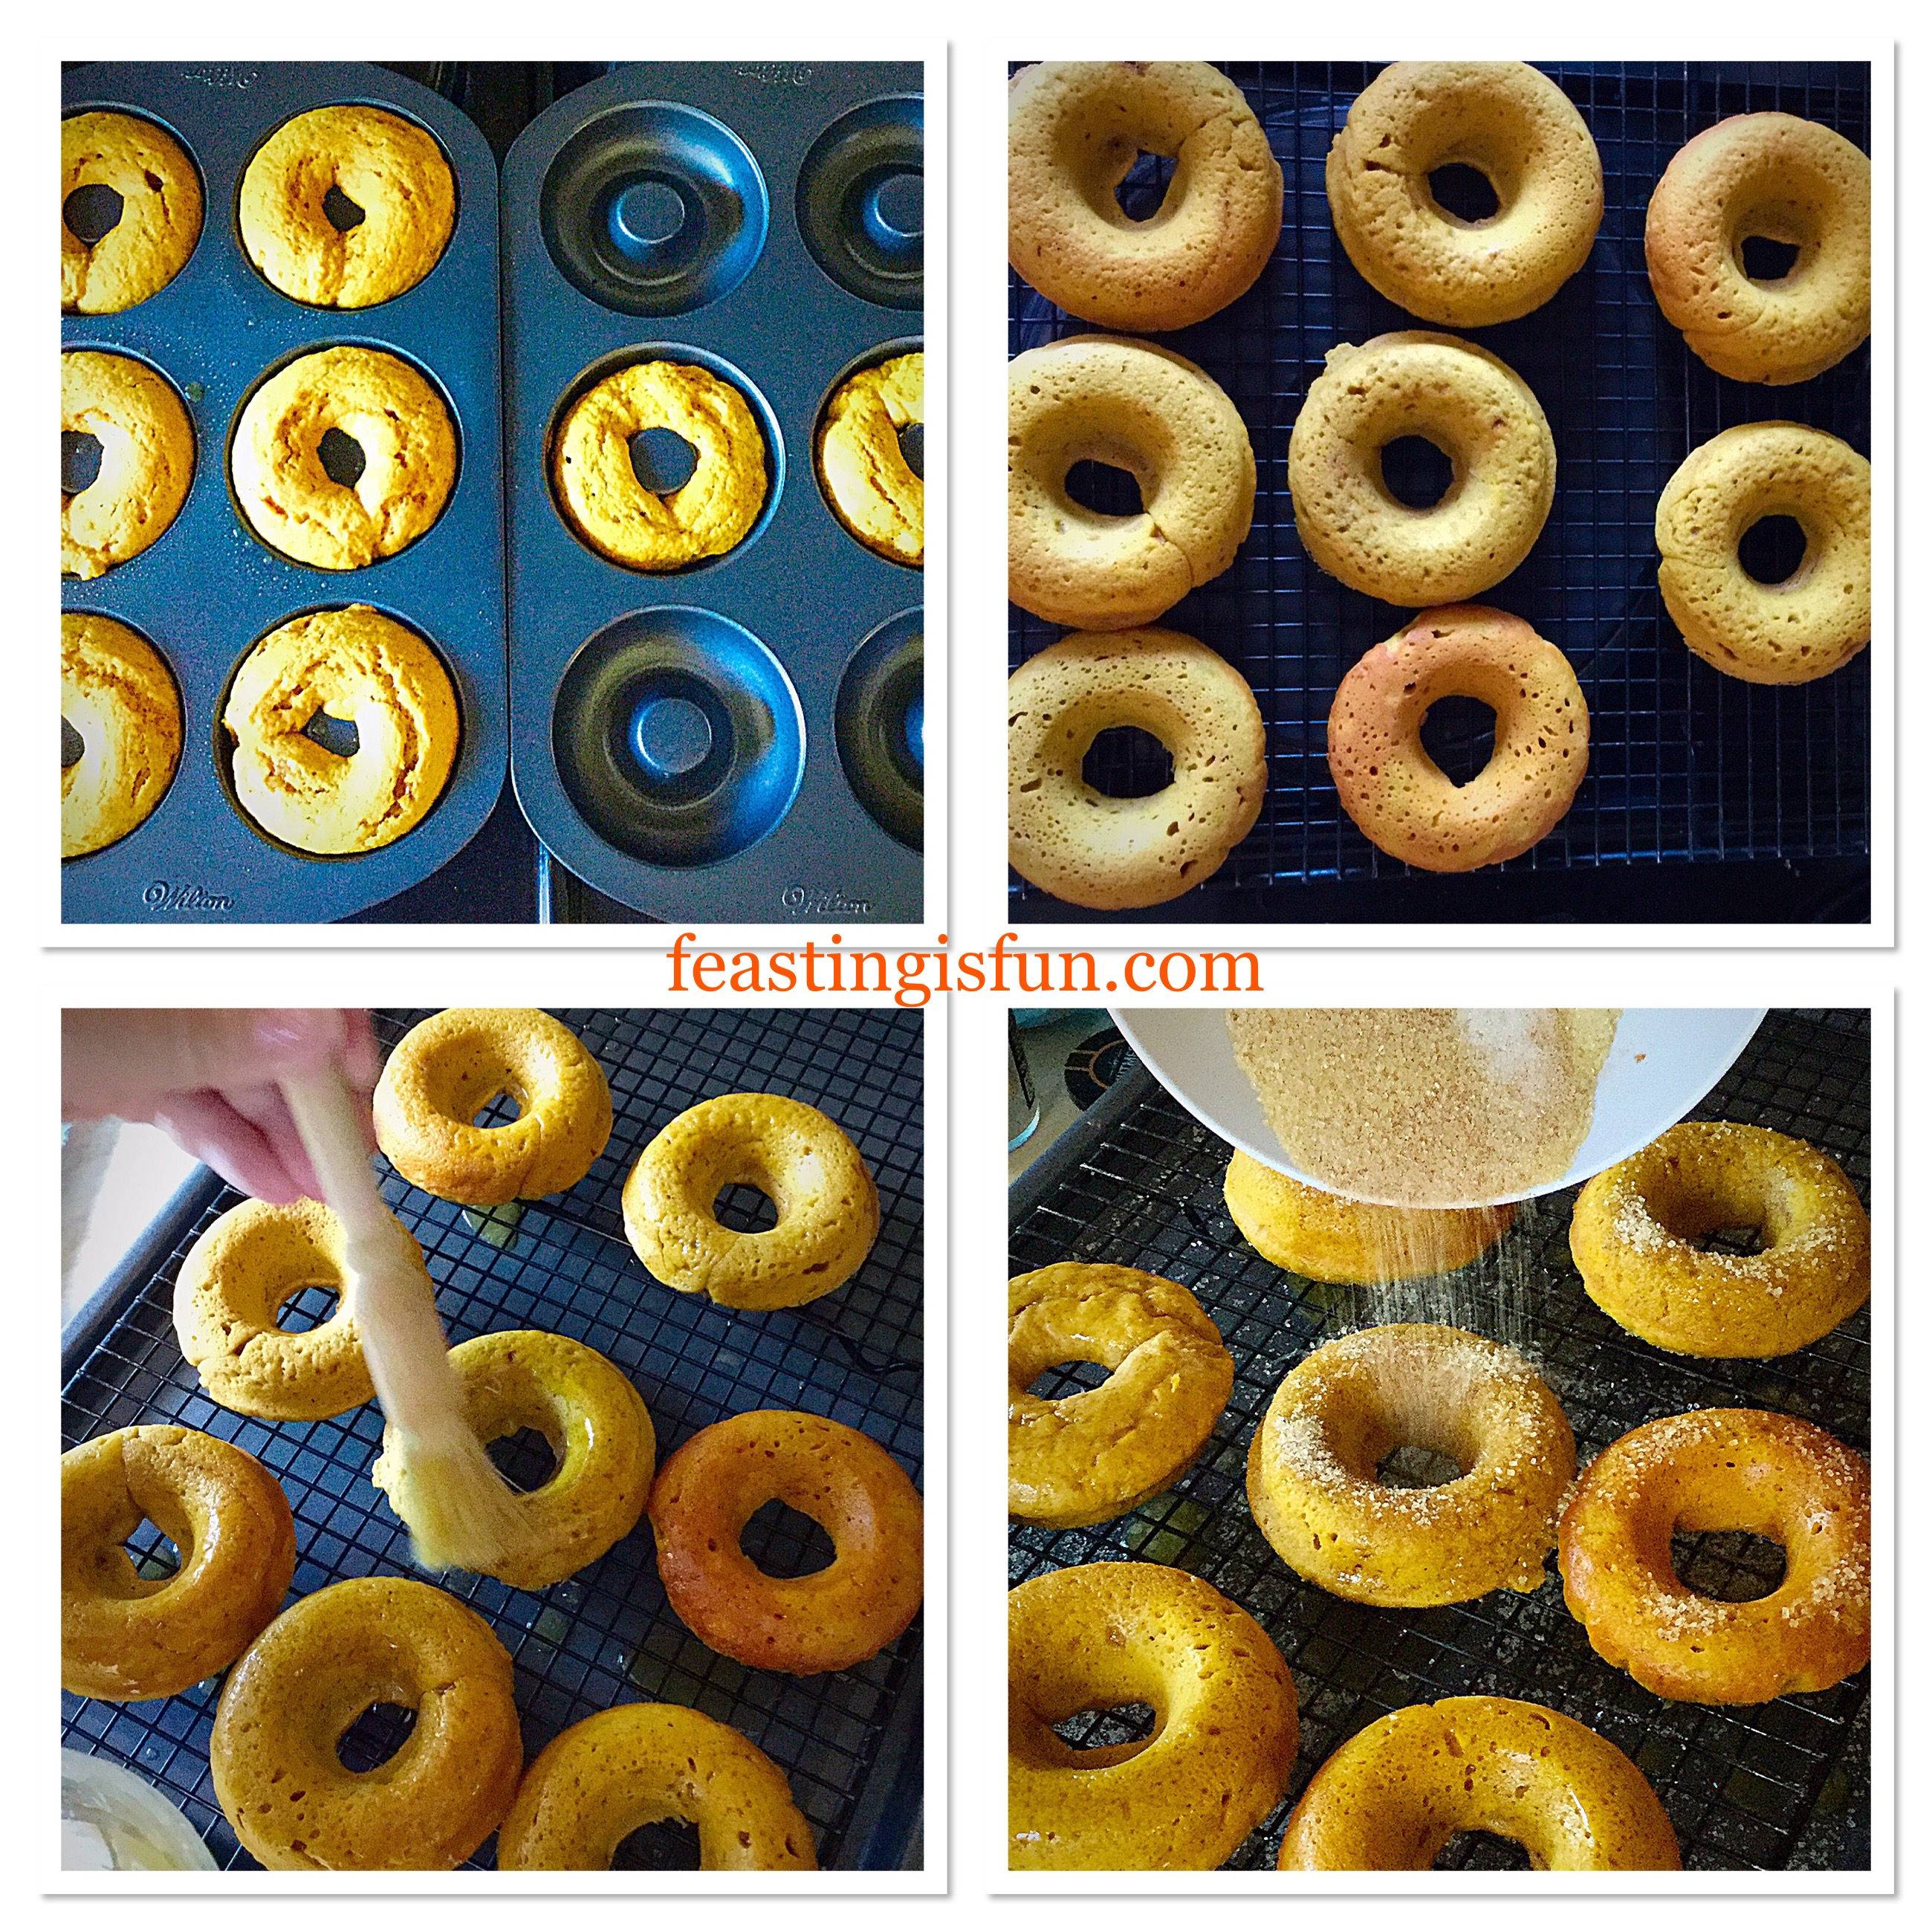
The baked doughnut tins I use are from Wilton and on testing did not need greasing. However, brushing the doughnut tin with melted butter is recommended.
In a large bowl add the flour, sugar, baking powder, salt and pumpkin spice. Stir with a balloon whisk, breaking up any lumps in the sugar. Dry ingredients.
In a jug or smaller bowl add the pumpkin, yoghurt, egg and melted butter. Whisk together lightly with a fork until the mixture is a uniform orange colour. Wet ingredients.
Make a well in the centre of the dry ingredients and pour the wet ingredients in. Stir with a spoon until just combined. Similar to making a muffin mix.
Fill a piping bag, fitted with a circular nozzle, approximately 1.5 – 2 cm diameter, with the doughnut batter.
Pipe 7-8 doughnuts into the tins.
Baked Pumpkin Spiced Doughnuts in the making.
Baking The Doughnuts:
Place the doughnut tins in the centre of the oven and bake for 13-15 minutes – mine took 13 minutes.
The doughnuts will be firm, with a little spongy give when pressed, slightly golden and look a little crinkled on top when baked.
As soon as the doughnuts are baked remove from the oven and immediately tip out on to a cooling rack.
Coating The Baked Pumpkin Spiced Doughnuts:
While the doughnuts are cooking melt the butter to dip them in. 30 seconds on medium was sufficient in our microwave. Ensure the bowl is big enough to take a complete doughnut if you choose to dunk.
Next place the sugar and cinnamon in a bowl, ensuring it is big enough as before and mix to combine.
While the doughnuts are still warm, dunk, or as I did, brush all over with melted butter. Remembering to turn the doughnut to ensure even coverage.
Immediately after, either dunk the doughnut in the spiced sugar, or sprinkle over the sugar while the doughnuts are on the rack.
Coating the Baked Pumpkin Spiced Doughnuts in butter and spiced sugar.
Since trying both dunking and brushing/sprinkling methods, the second method is my preference.
In reality, brushing with butter used exactly the same amount as dunking them. The choice really is yours.
As a family, although utterly delicious, we decided that the first batch of doughnuts were too sugary. Yes that really is possible 😉.
Finally, when dunking the doughnuts in the sugar, the butter makes the spiced sugar damp. An example of this can be seen in the photograph below. Therefore, I decided to sprinkle them with sugar, resulting in less sugar sticking, whilst keeping its sparkly appearance.
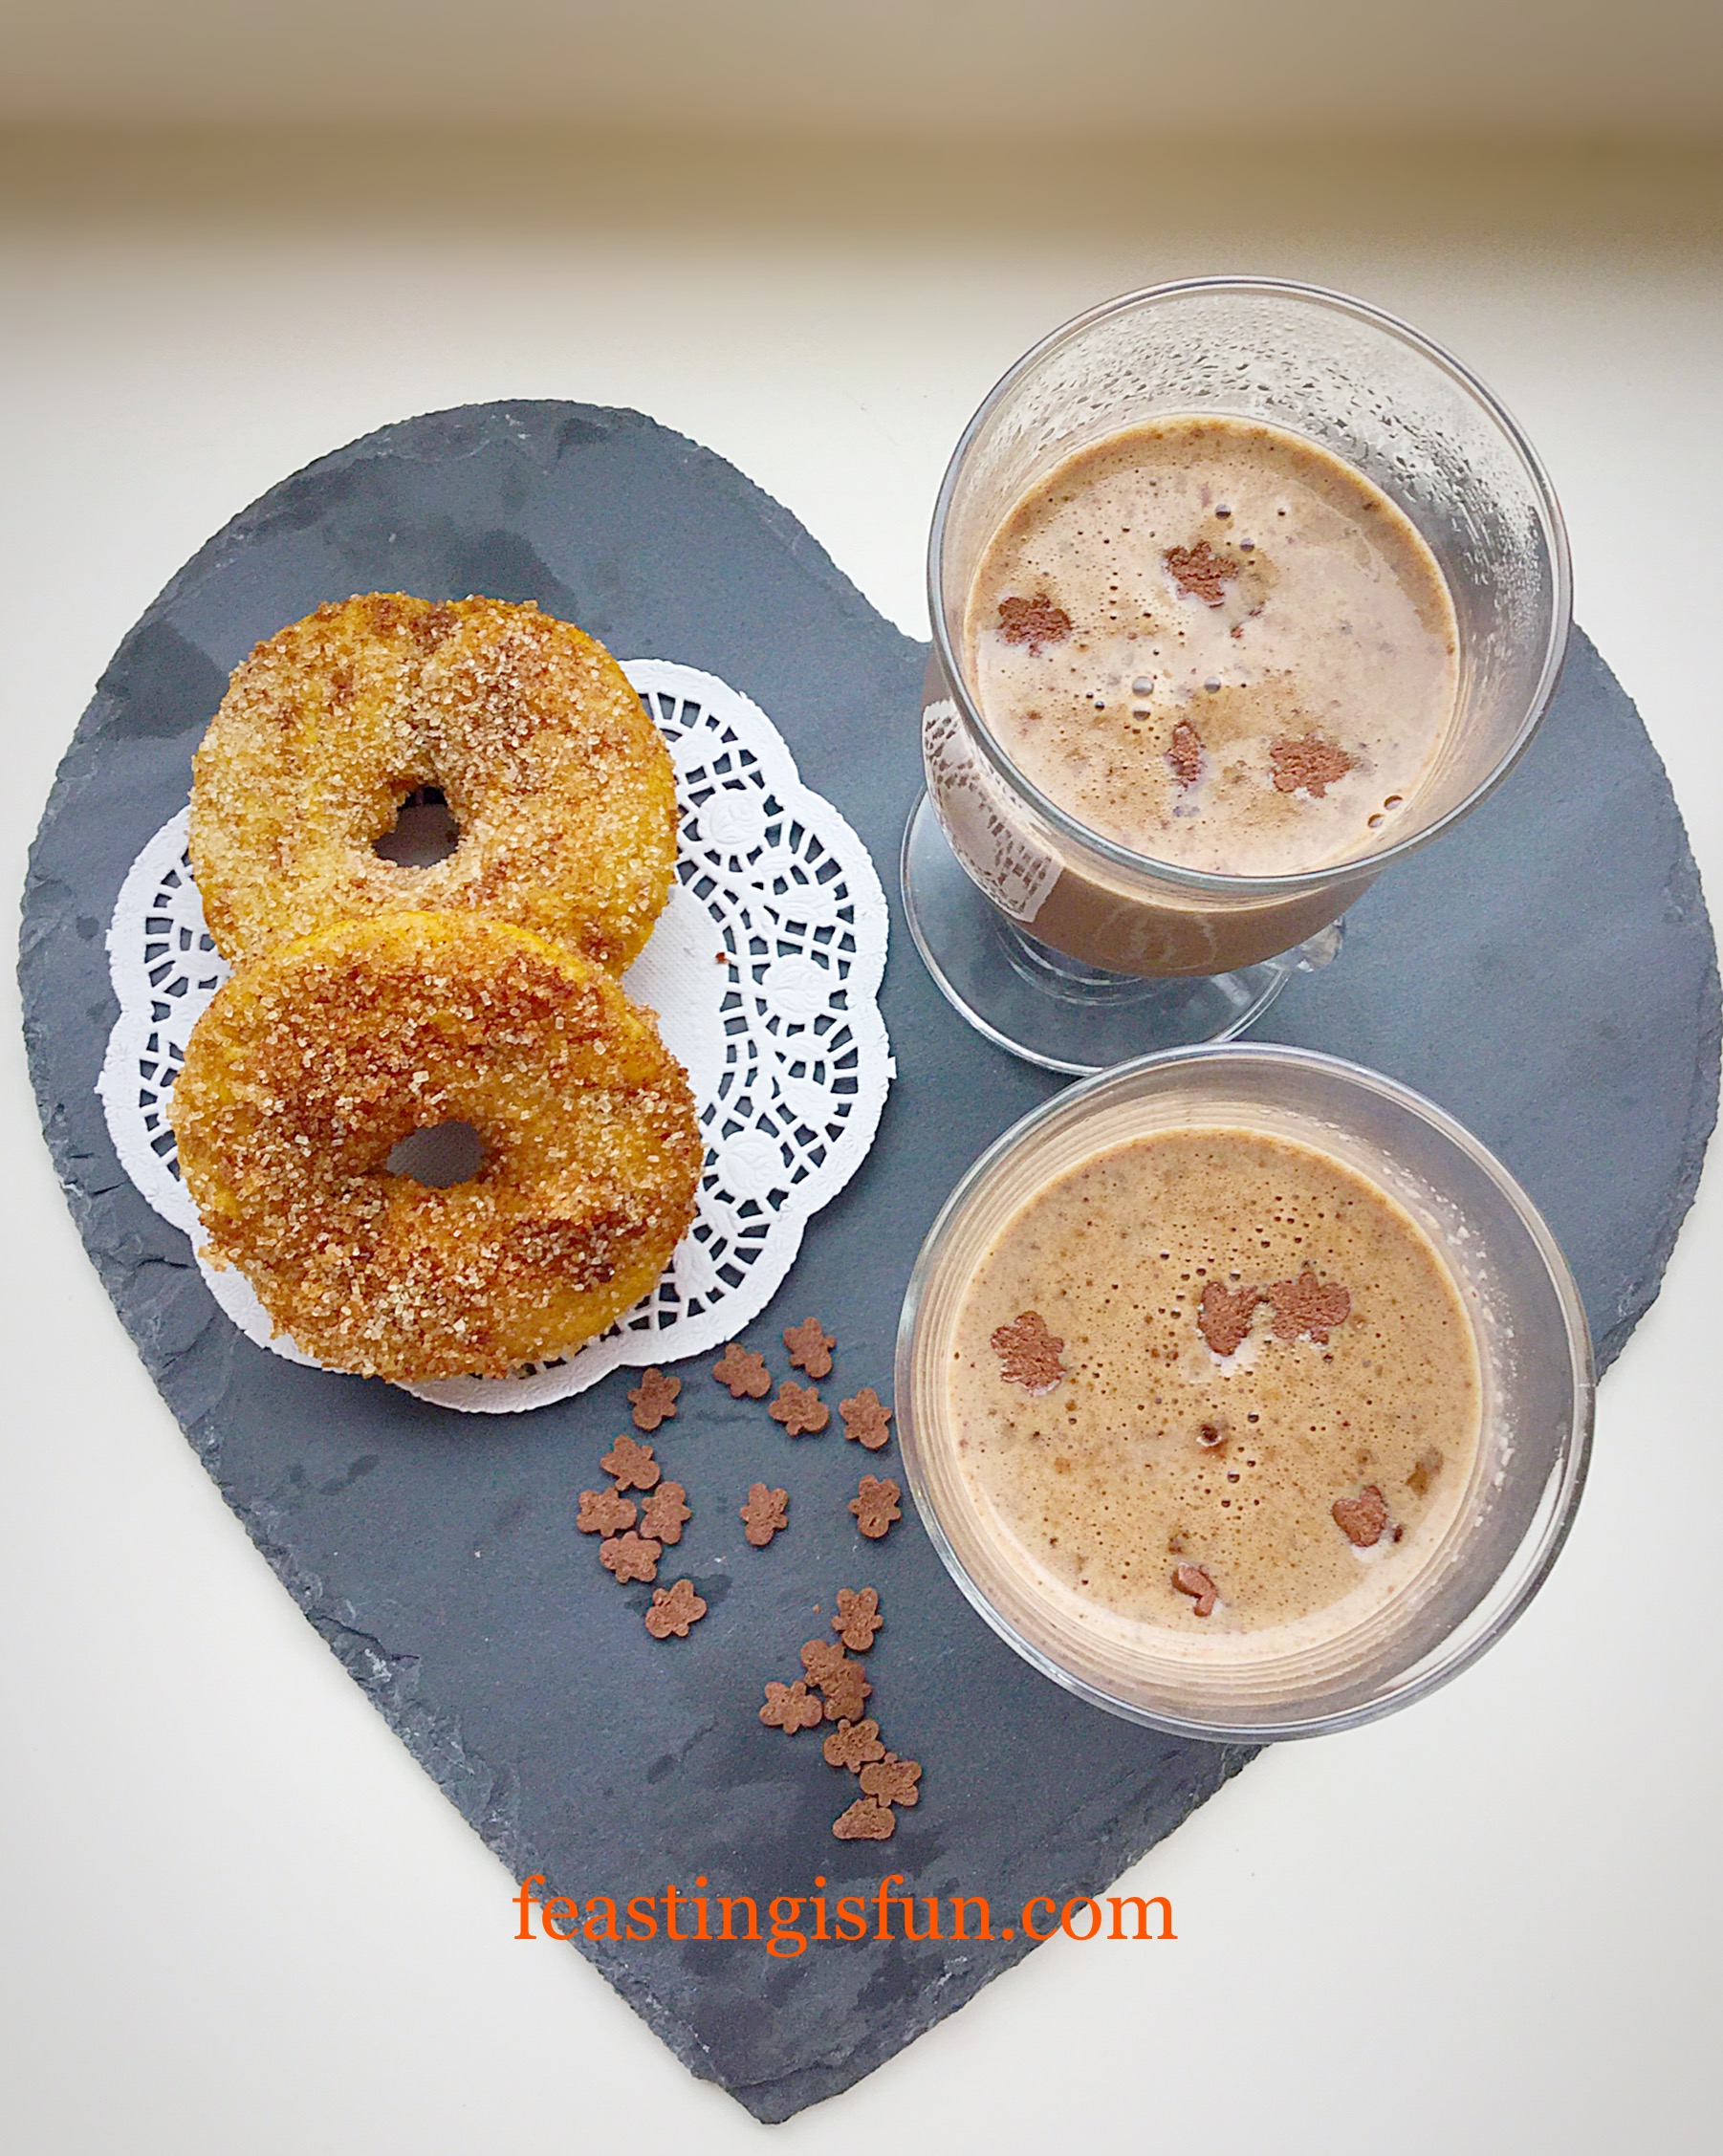
Baked Pumpkin Spiced Doughnuts accompanied by hot mocha drinks with a dash of ginger syrup.
Serve immediately, with a warming drink.
Cafe culture at home
I heated a Chocolate Chip Latte Milkshake in a jug with a little extra milk, poured into fancy glasses and given a splash of ginger syrup. The drinks were then topped with mini gingerbread sprinkles. Resulting in a Cafe Culture experience at home. Alternatively, make a hot chocolate and add a sprinkle of cinnamon or ginger spices.
Finally, for those of you who would rather not, or cannot, go out, especially when the weather is bleak, this is the ultimate, at home, Cafe Culture treat!
So light and fluffy.
If you have enjoyed the recipe for Baked Pumpkin Spiced Doughnuts you may also enjoy these:
When served slightly warm I think that these doughnuts truly are at their best. While the recipe makes 8 individual Baked Pumpkin Spiced Doughnuts unless you are baking for more I really wouldn’t recommend doubling it. Because the preparation time is scarcely 10 minutes max and these are definitely better eaten the day they are made. That said, kept in an airtight container they will last an extra day. Pinged for 10 seconds in the microwave and they are almost back to freshly baked tenderness.
So, whatever you are making, baking and creating in your kitchens, have fun preparing and sharing your feast.
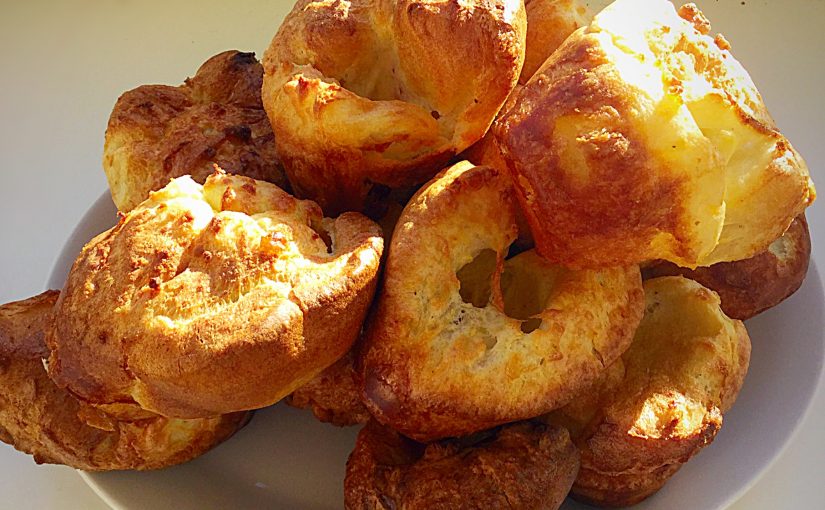
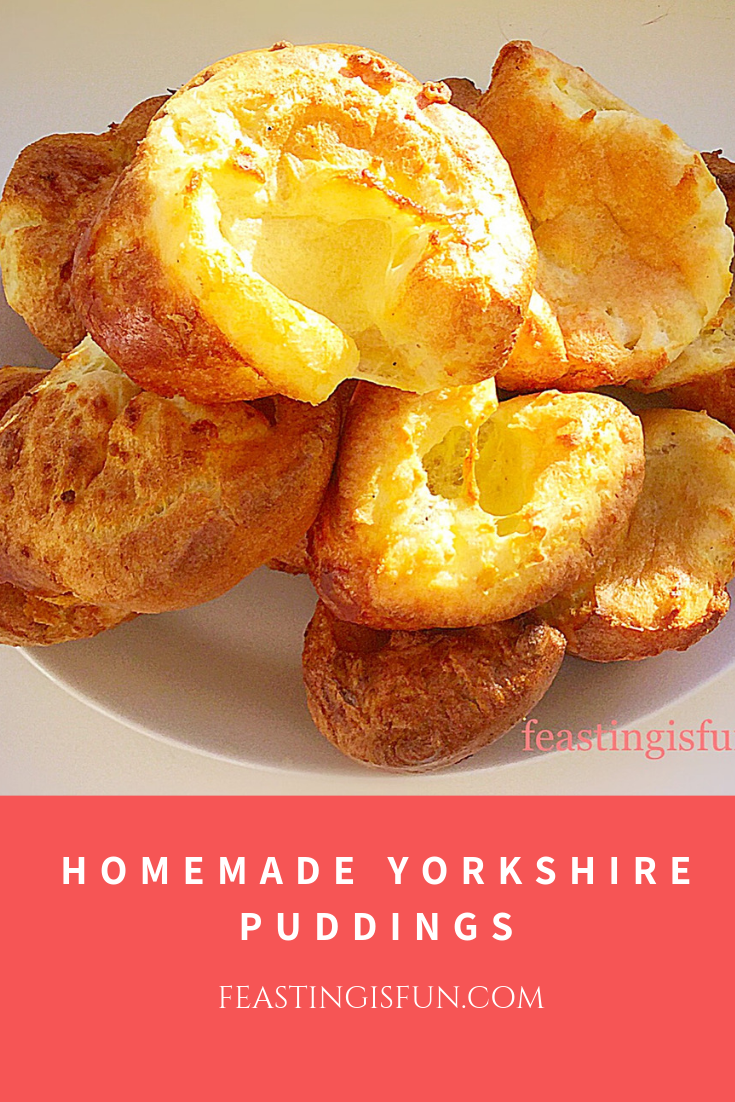
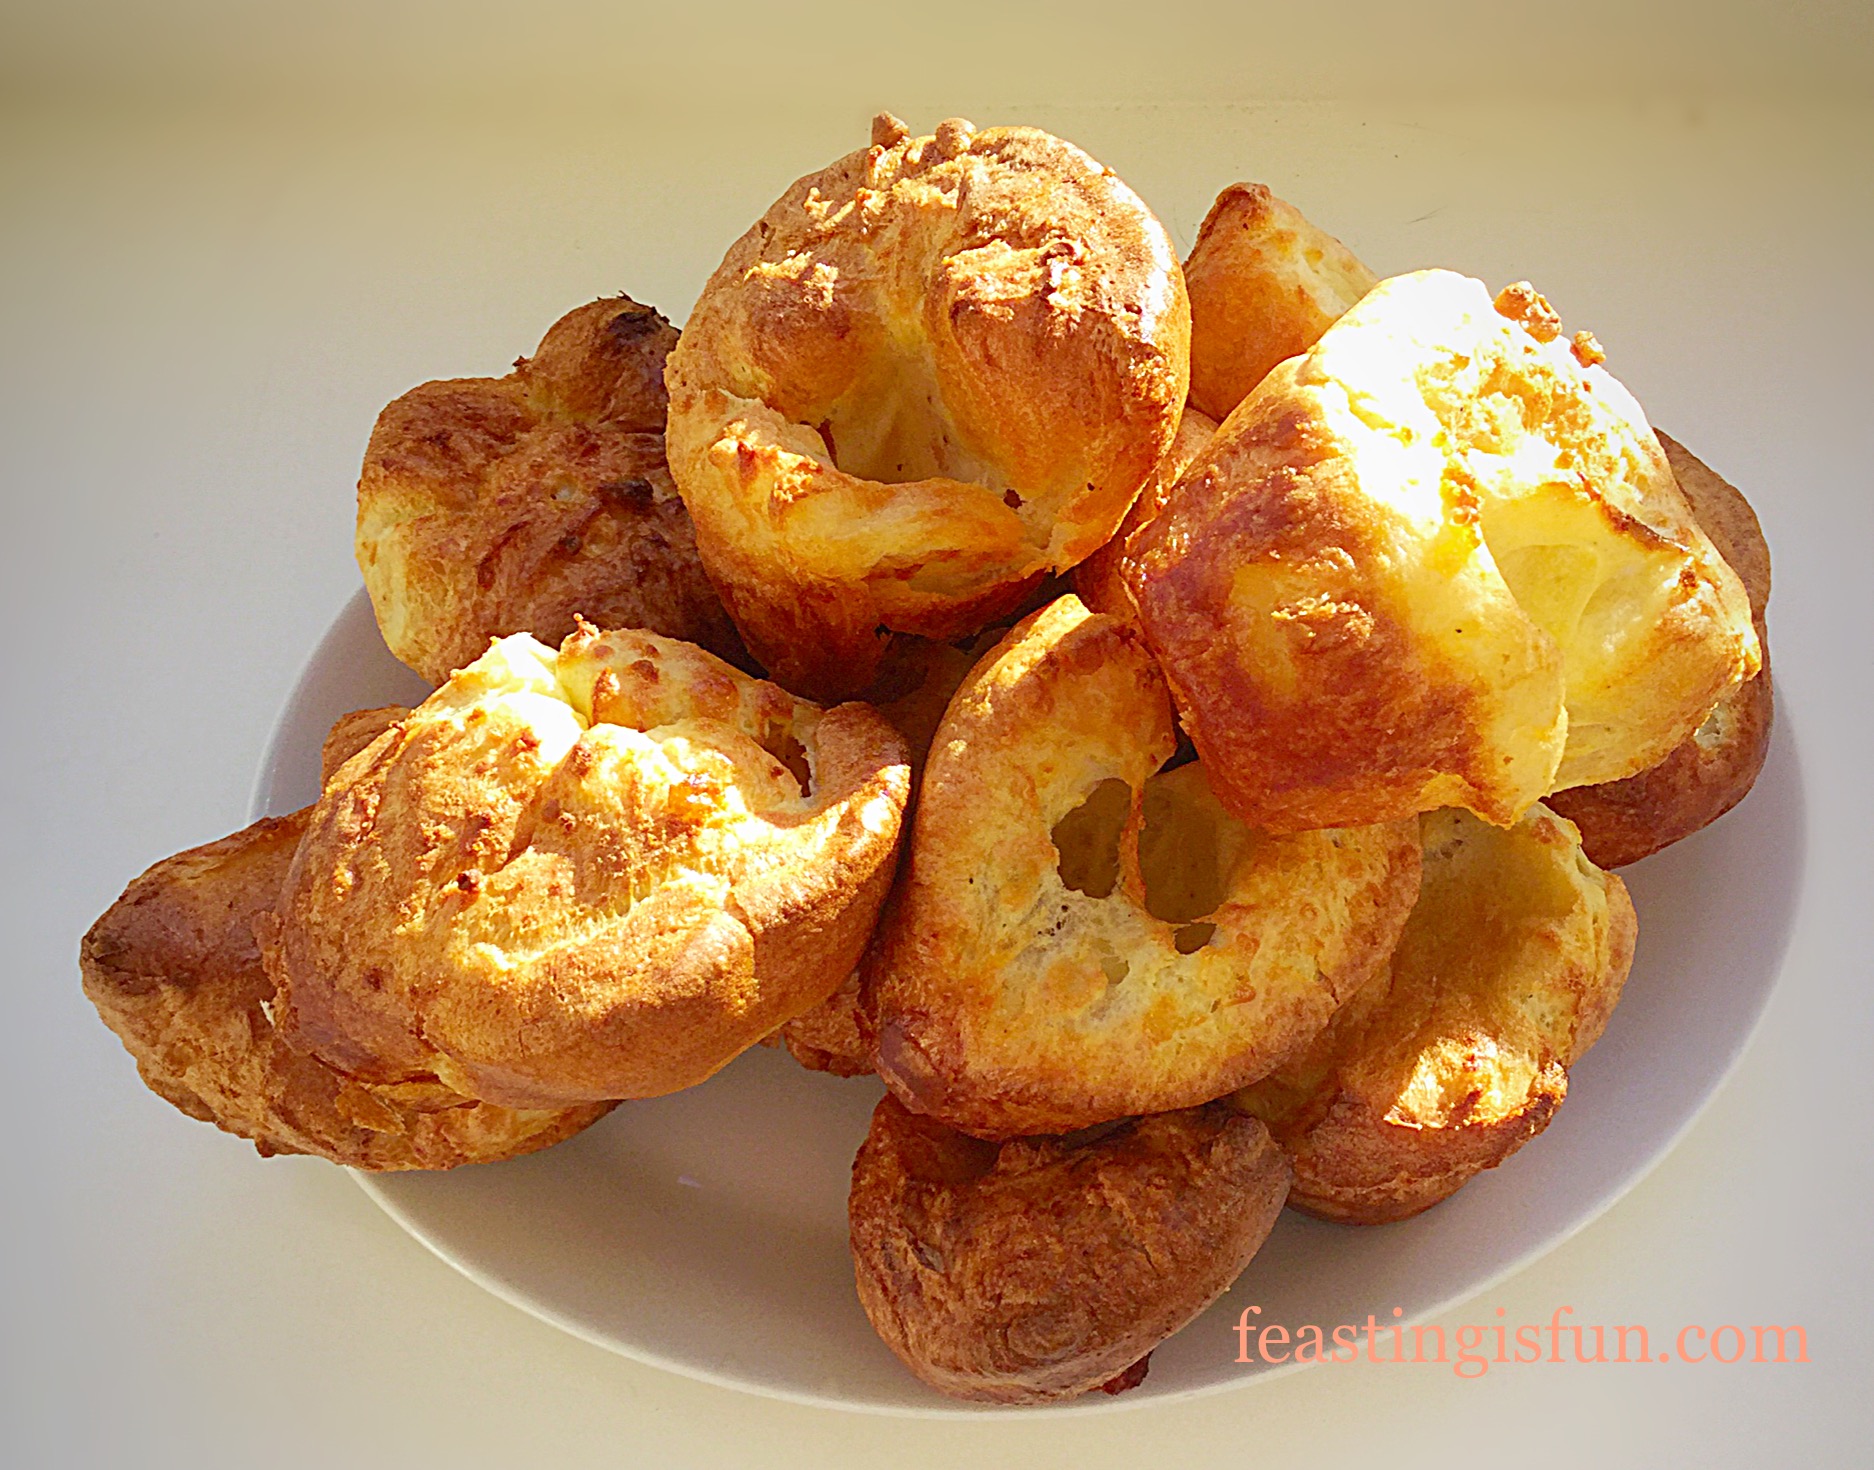
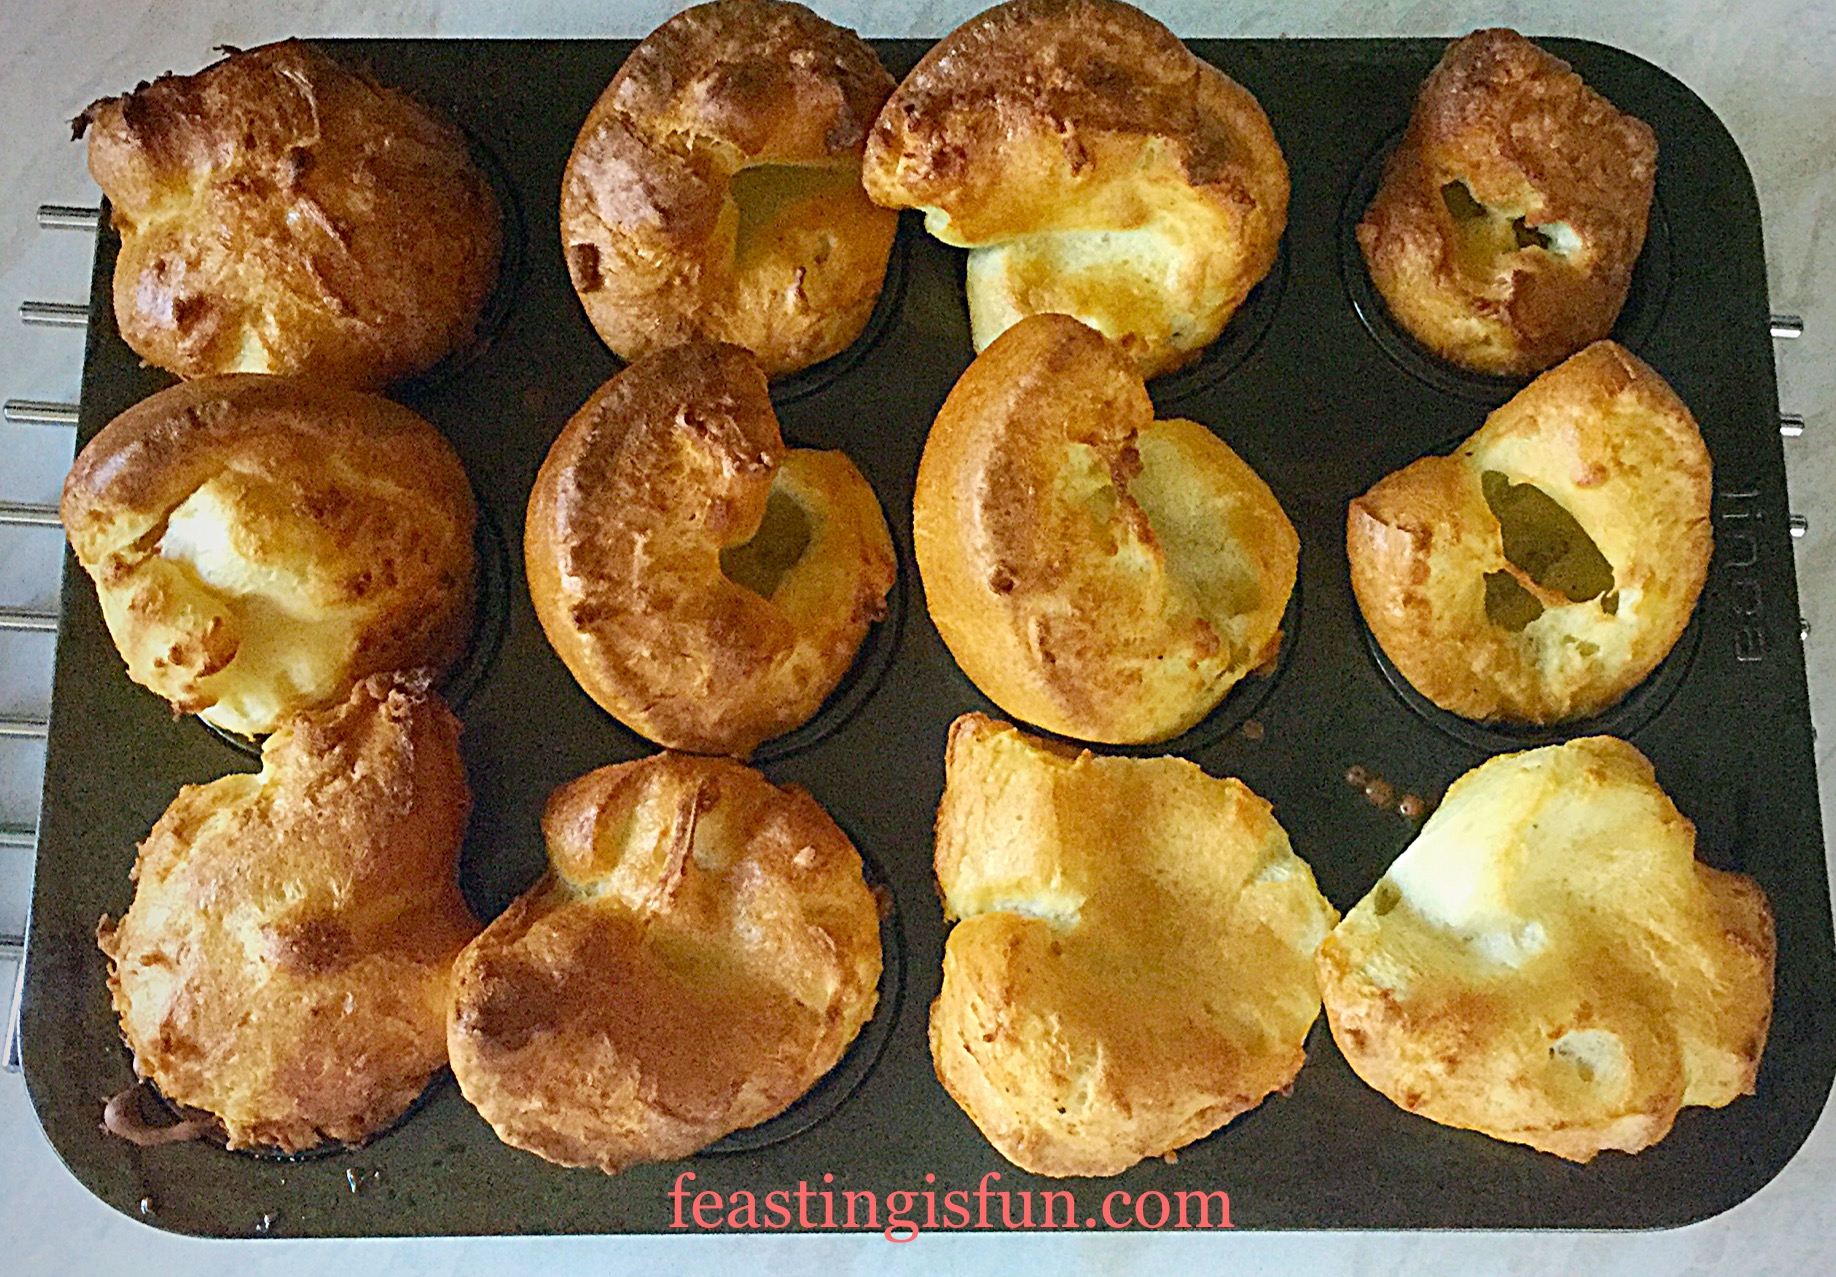
Homemade Yorkshire Puddings are golden, crisp, well risen, individual bakes of pure, indulgent, comfort food.
While no meal HAS to have Homemade Yorkshire Puddings, what they add, to a roast, bangers and mash, or cooked with the sausages as ‘Toad in the Hole’, is immeasurable. Ultimately, eating them with roast beef is the traditional accompaniment here in England. Rather like stuffing with chicken or turkey.
Actually, for me, Homemade Yorkshire Puddings me shouldn’t be uniformly perfect. Because part of their charm is the craggy appearance, some with a hole, others billowing like cumulus clouds. Ready to soak up rich, meaty gravy.
Homemade Yorkshire Puddings little effort for big reward.
Yet in the U.S.A. our beloved Yorkie Puds, are called ‘Popovers’. A fantastic name that I think describes them perfectly. Since they literally popover the top of the muffin tin whilst they bake.
Since childhood I enjoy happily watching these incredible bakes, laying prostrate, in front of the oven, in awe at the ‘magic’ as they rise.
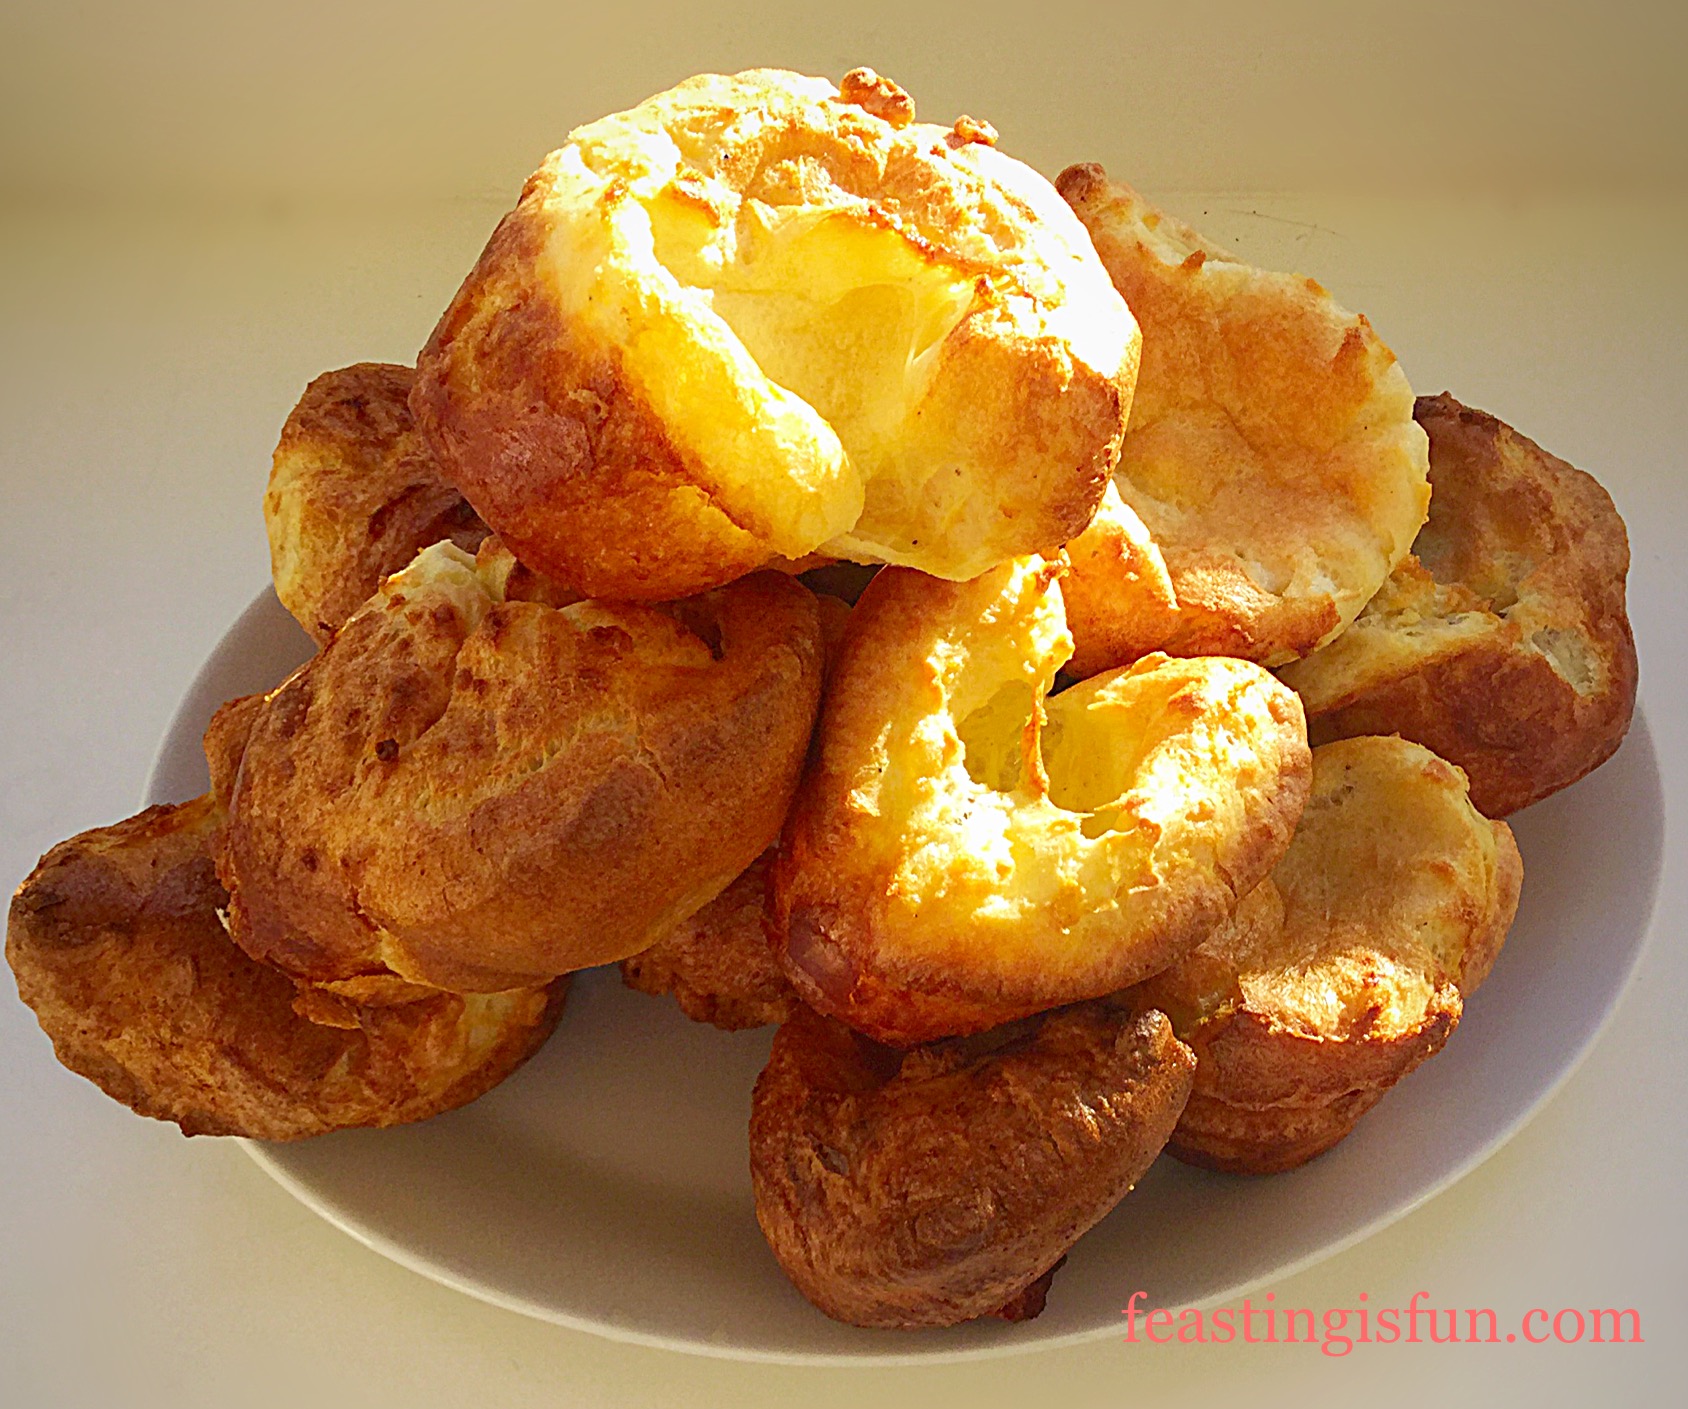
Homemade Yorkshire Puddings just add meat and gravy.
Made from a simple batter, these gravity defying delights enhance any dinner plate they grace.
Various methods as well as recipes exist claiming to be the ‘best way’ of making a Yorkie Puds. While my method is tried and tested over the years. I have found no difference in the final result, whether I rest or use the batter immediately. Finally, what I am sure of, is that this recipe consistently works for me.
Furthermore, a real bonus to making these is that they can be made ahead and even frozen. What’s not to love about these savoury wonders?
Recipe: Makes 12 Large Homemade Yorkshire Puddings
Method: Preheat the oven to 220C/200C fan, gas mark 7, 425F
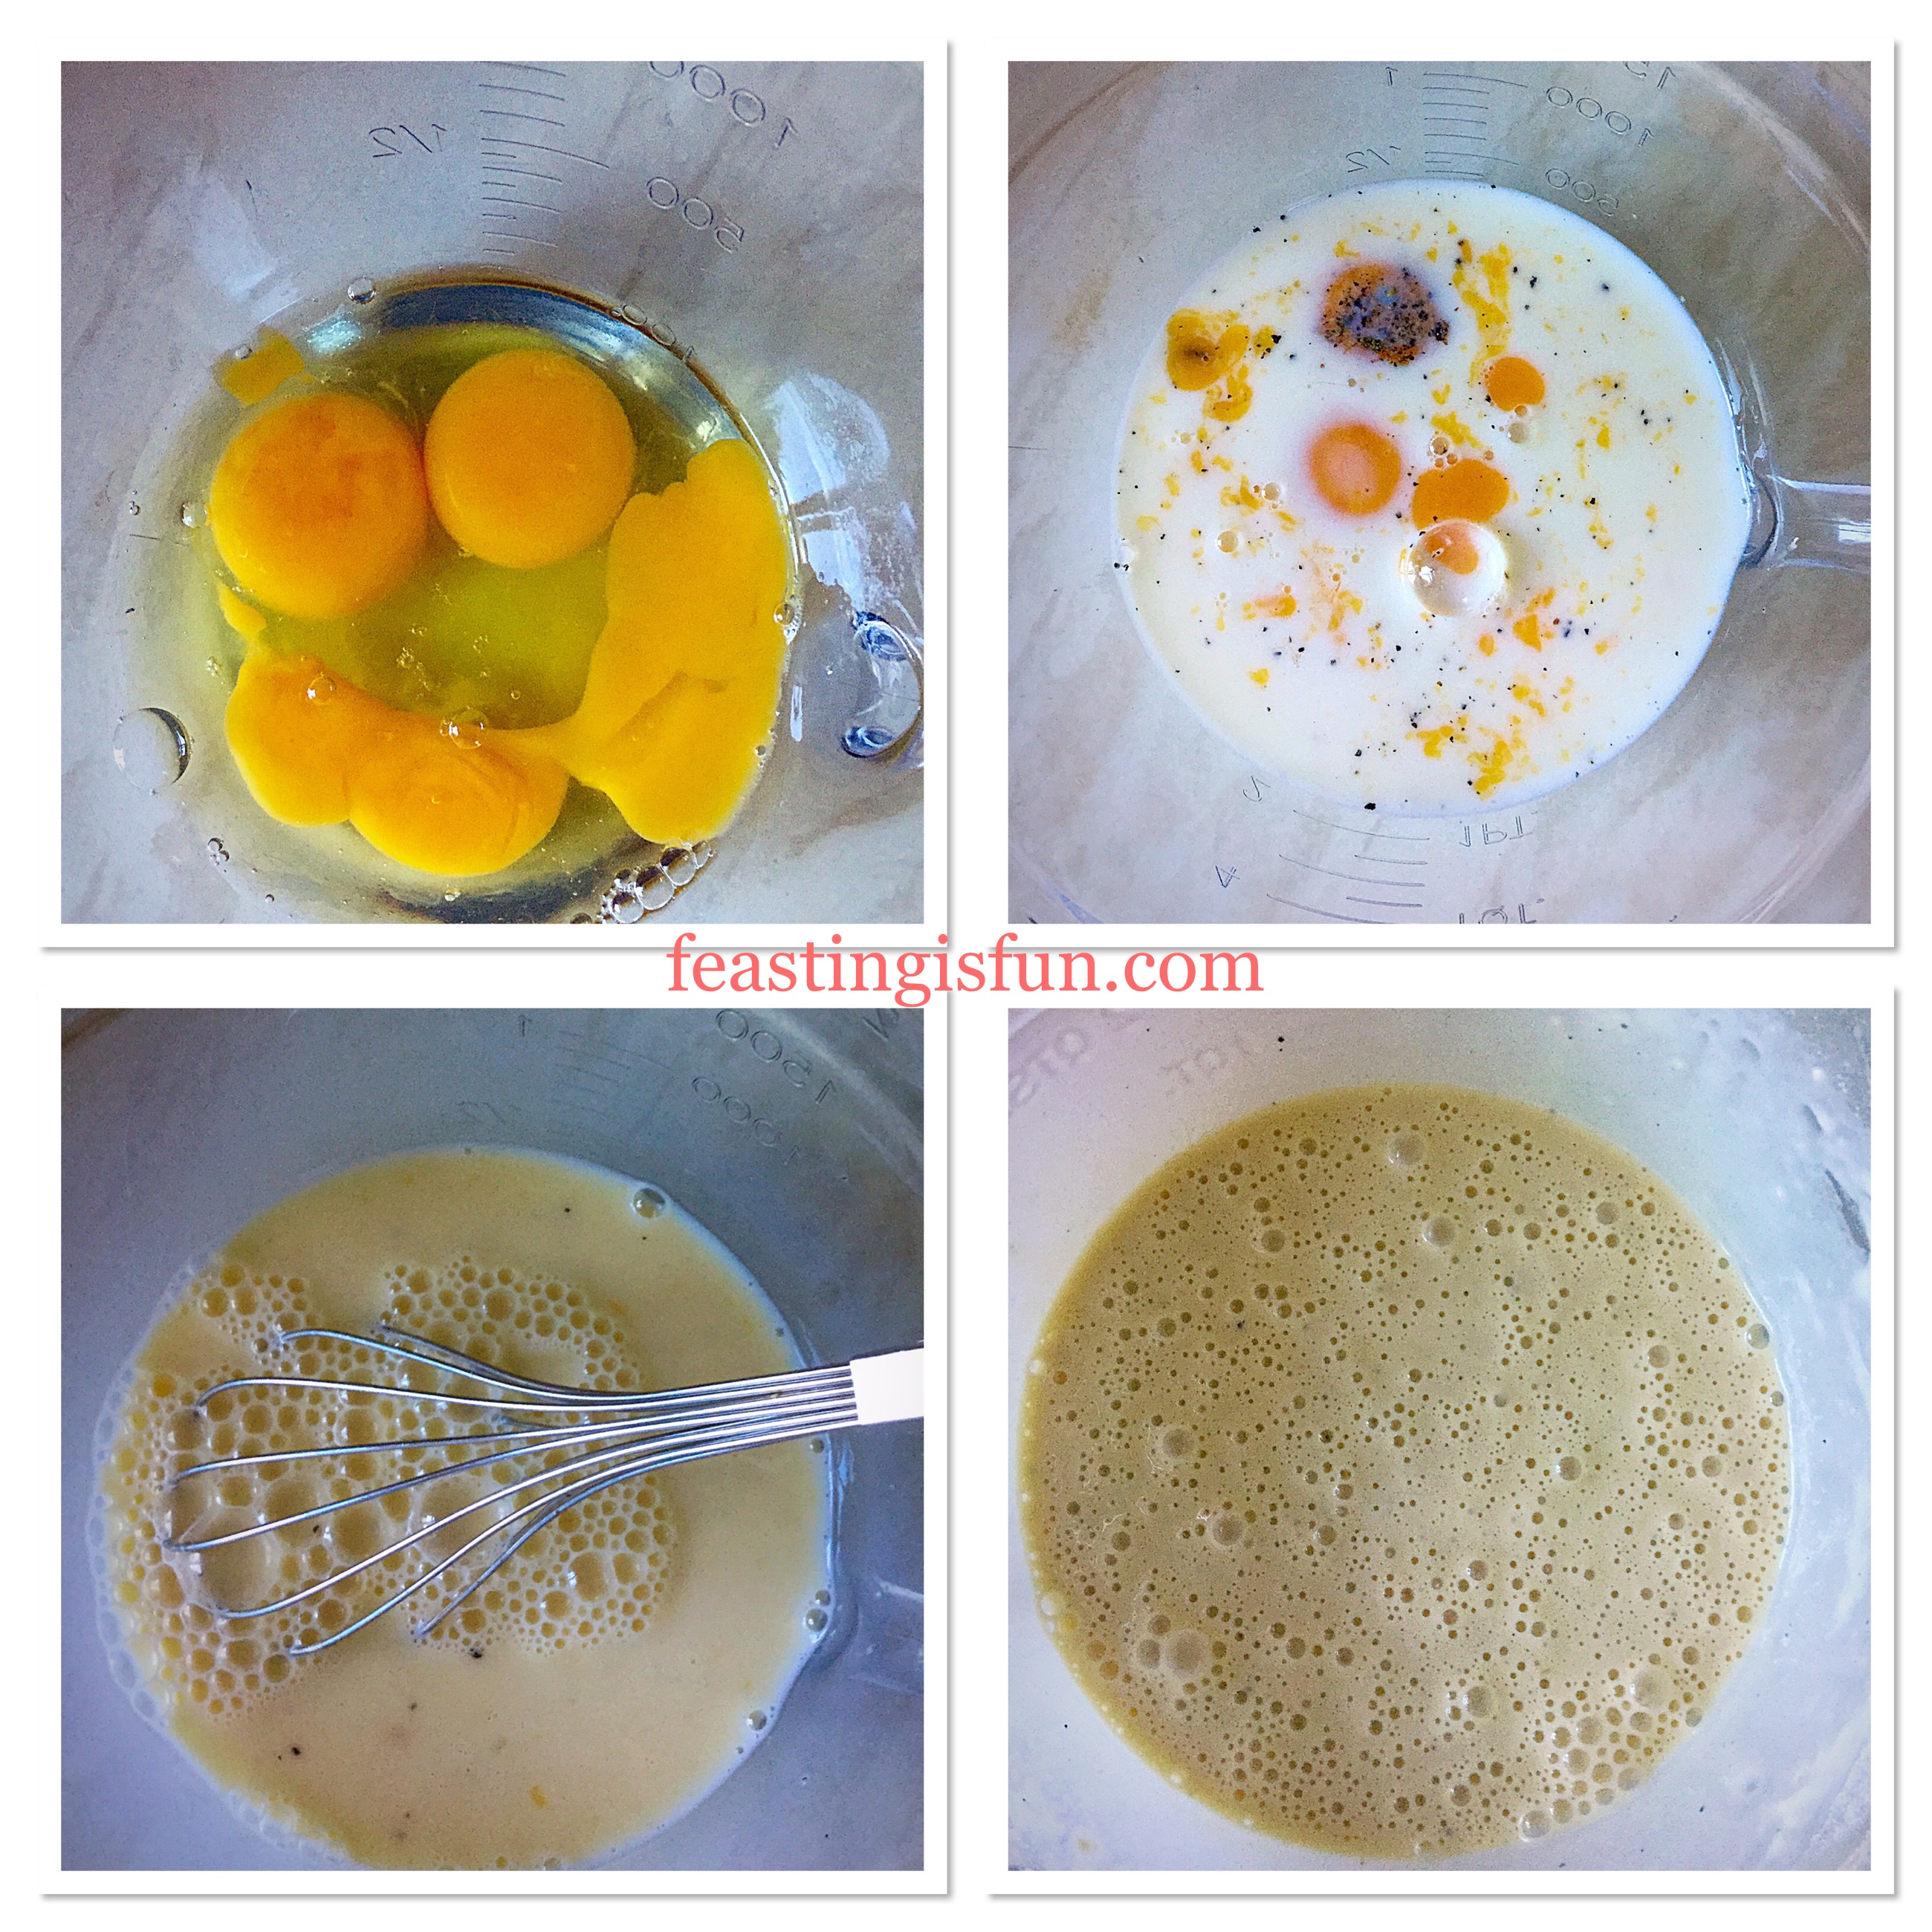
Making The Yorkshire Pudding Batter
In a large jug add the eggs.
Next add the milk, salt, black pepper and sugar. Whisk using a balloon whisk until the egg and milk are thoroughly combined and there are lots of bubbles.
Now add the plain white flour, sugar and salt and pepper. Continue to whisk, by hand, for a couple of minutes. The batter should be completely lump free. Cover and set to one side.
Steps showing the batter making process.
Baking The Homemade Yorkshire Puddings
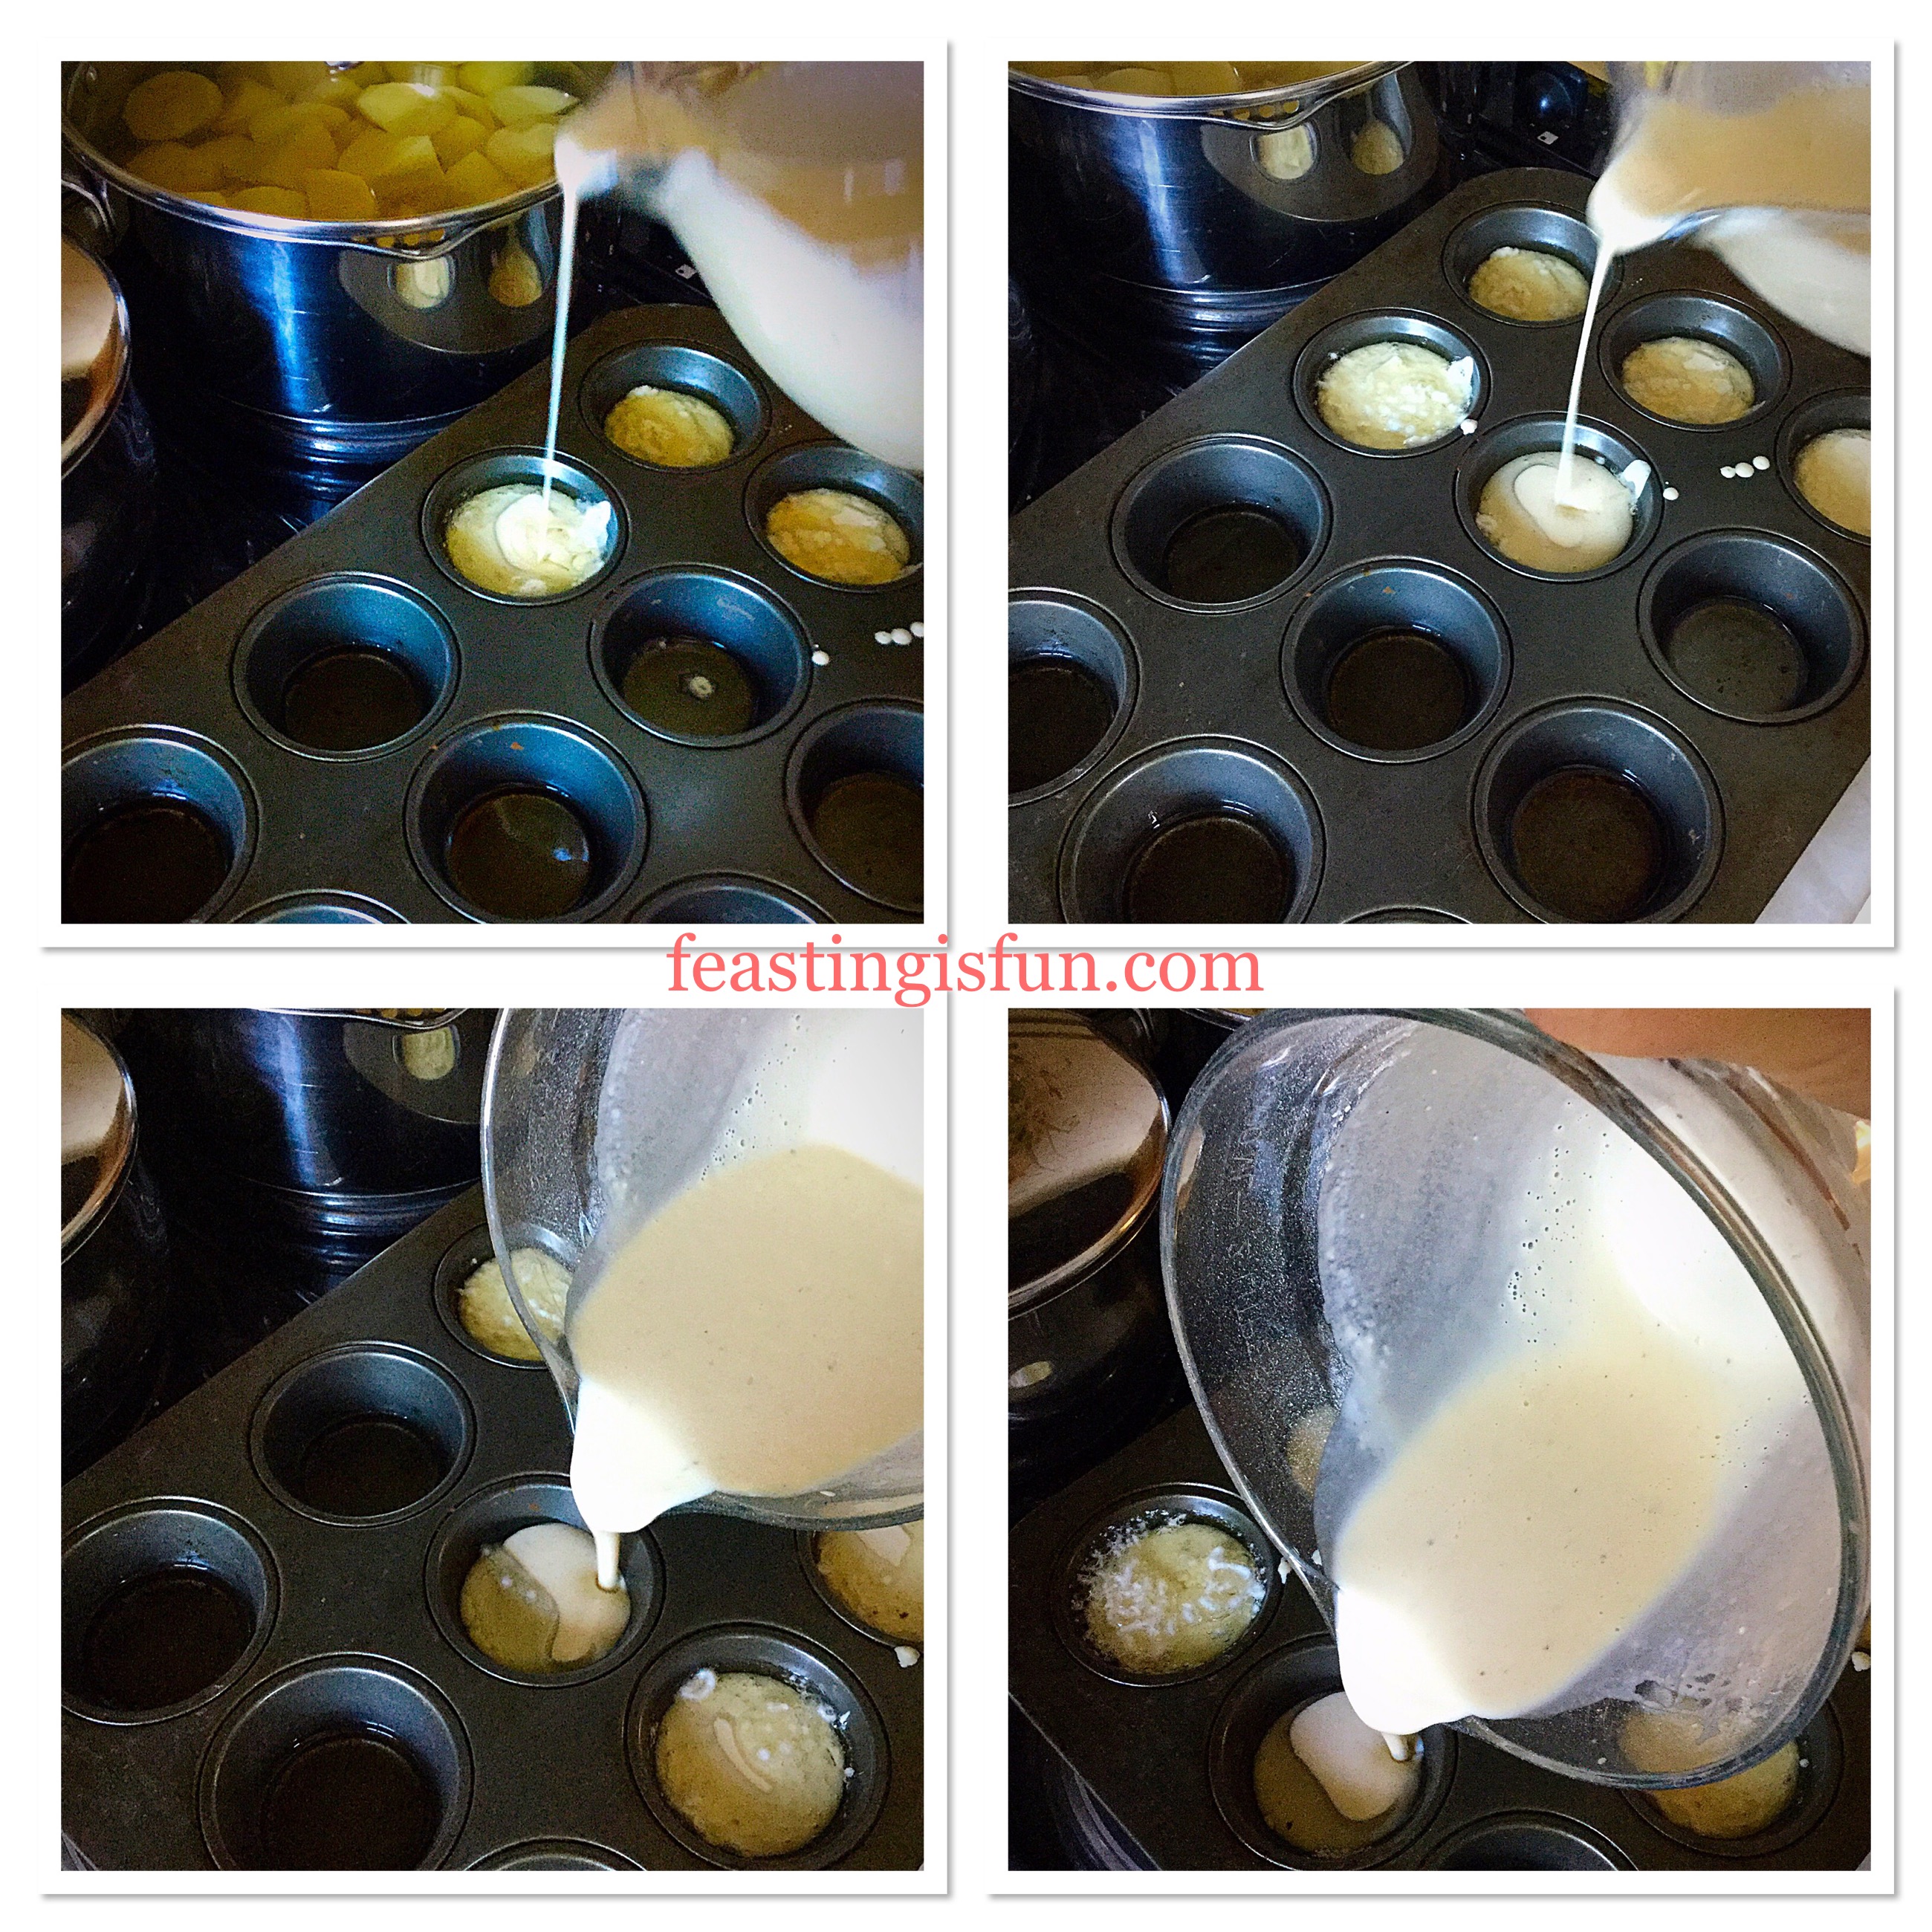
Place a teaspoon of vegetable oil, or lard into a 12 hole muffin tin (or popover tin).
Put the muffin tin in the oven for 10 minutes until it is smoking hot.
Just prior to removing the tin from the oven, give the batter a quick whisk, in case it has settled.
Working quickly, yet safely, remove the hot muffin tin from the oven and pour the batter mix into each hole. The batter should fill each muffin hole by half.
Return the muffin tin back into the top of the hot oven and bake for 20-25 minutes.
Filling the muffin tin with batter.
As soon as the Yorkshire Puddings are well risen, golden and crispy remove from the oven.
Homemade Yorkshire Puddings they simply cannot be beaten.
To remove the Yorkshire Puddings simply lift them out from the muffin tin. If any have slightly stuck run a butter knife between the tin and the pudding and it should release easily.
Serve straight away, or as I frequently do, place on a baking tray to cool. While dishing up the roast potatoes, pop the Homemade Yorkshire Puddings back into a hot oven to reheat.
Homemade Yorkshire Puddings gloriously golden.
Make Ahead And Storage Instructions
Although our kitchen isn’t small, it does lack workspace. Yet being able to make these in advance, really is a huge help, especially if we have guests joining us for dinner.
To freeze, cool thoroughly, place in a freezer proof bag and keep in the freezer for up to one month. To reheat from frozen, place on a baking tray in a hot oven for 5 minutes. Once they are reheated they will taste as if you have just made them. No one will will ever know! Actually, I always make our Christmas Yorkshire Puddings ahead of the big day and freeze them. While I love cooking, I also want to have fun and enjoy myself too.
If you have enjoyed this recipe for Homemade Yorkshire Puddings you may also like these.
Because this is such a simple recipe, im always surprised that shop bought Yorkshire Puddings so popular. Since I like the slightly softer centre that comes with HomemadeYorkshire Puddings. For such a simple recipe I am amazed at the extra ingredients needed for their pre made, shop bought counterparts.
Baking and cooking from scratch will always be my priority. I hope that you too choose to try these?
Sammie xx
No part of this post may be reproduced or duplicated without the written permission of the owner. Please see my Disclosure Policy.