Tangy Lemon Potato Salad

Share
Facebooktwitterpinterestlinkedintumblr

When the sun is shining and the temperature gauge keeps going up, cool, refreshing food is what we need. So my Tangy Lemon Potato Salad is perfect, cool and refreshing with a hint of crunch. Also this is the perfect side dish to, well, just about anything! We’re having this with fish tonight.

Pinterest image with descriptive graphics


While my Tangy Lemon Potato Salad does have mayonnaise in the sauce, you can easily substitute a light/lower fat mayo. The mayonnaise is thinned down with the juice of a whole lemon. And it’s this zesty juice that permeates the warm potatoes so that once chilled they take on a tongue tingling tang. Also at the same time it stops the mayonnaise from becoming gloopy.

Overhead image of freshly made potato salad with lemon slices and chopped chives.
Tangy Lemon Potato Salad

If, like me you’re organised, cooking the potatoes and getting this salad made first thing in the morning, or even the night before, not only allows all the flavours to merge together, but you are also guaranteed a cold salad. Resulting in a side dish that works well with hot fish, quiche and any number of dishes including barbecues. Also it is ideal as part of a cold meal, buffet and picnic.

Close up of the pretty bowl, which has flowers around the outside rim.
Tangy Lemon Potato Salad

So I can guarantee that once you have made this Tangy Lemon Potato Salad you will want to keep making it. Especially if you take it to friends and family to share. Easy to make and perfectly portable!

Recipe : Tangy Lemon Potato Salad, serves 6 as a side dish.

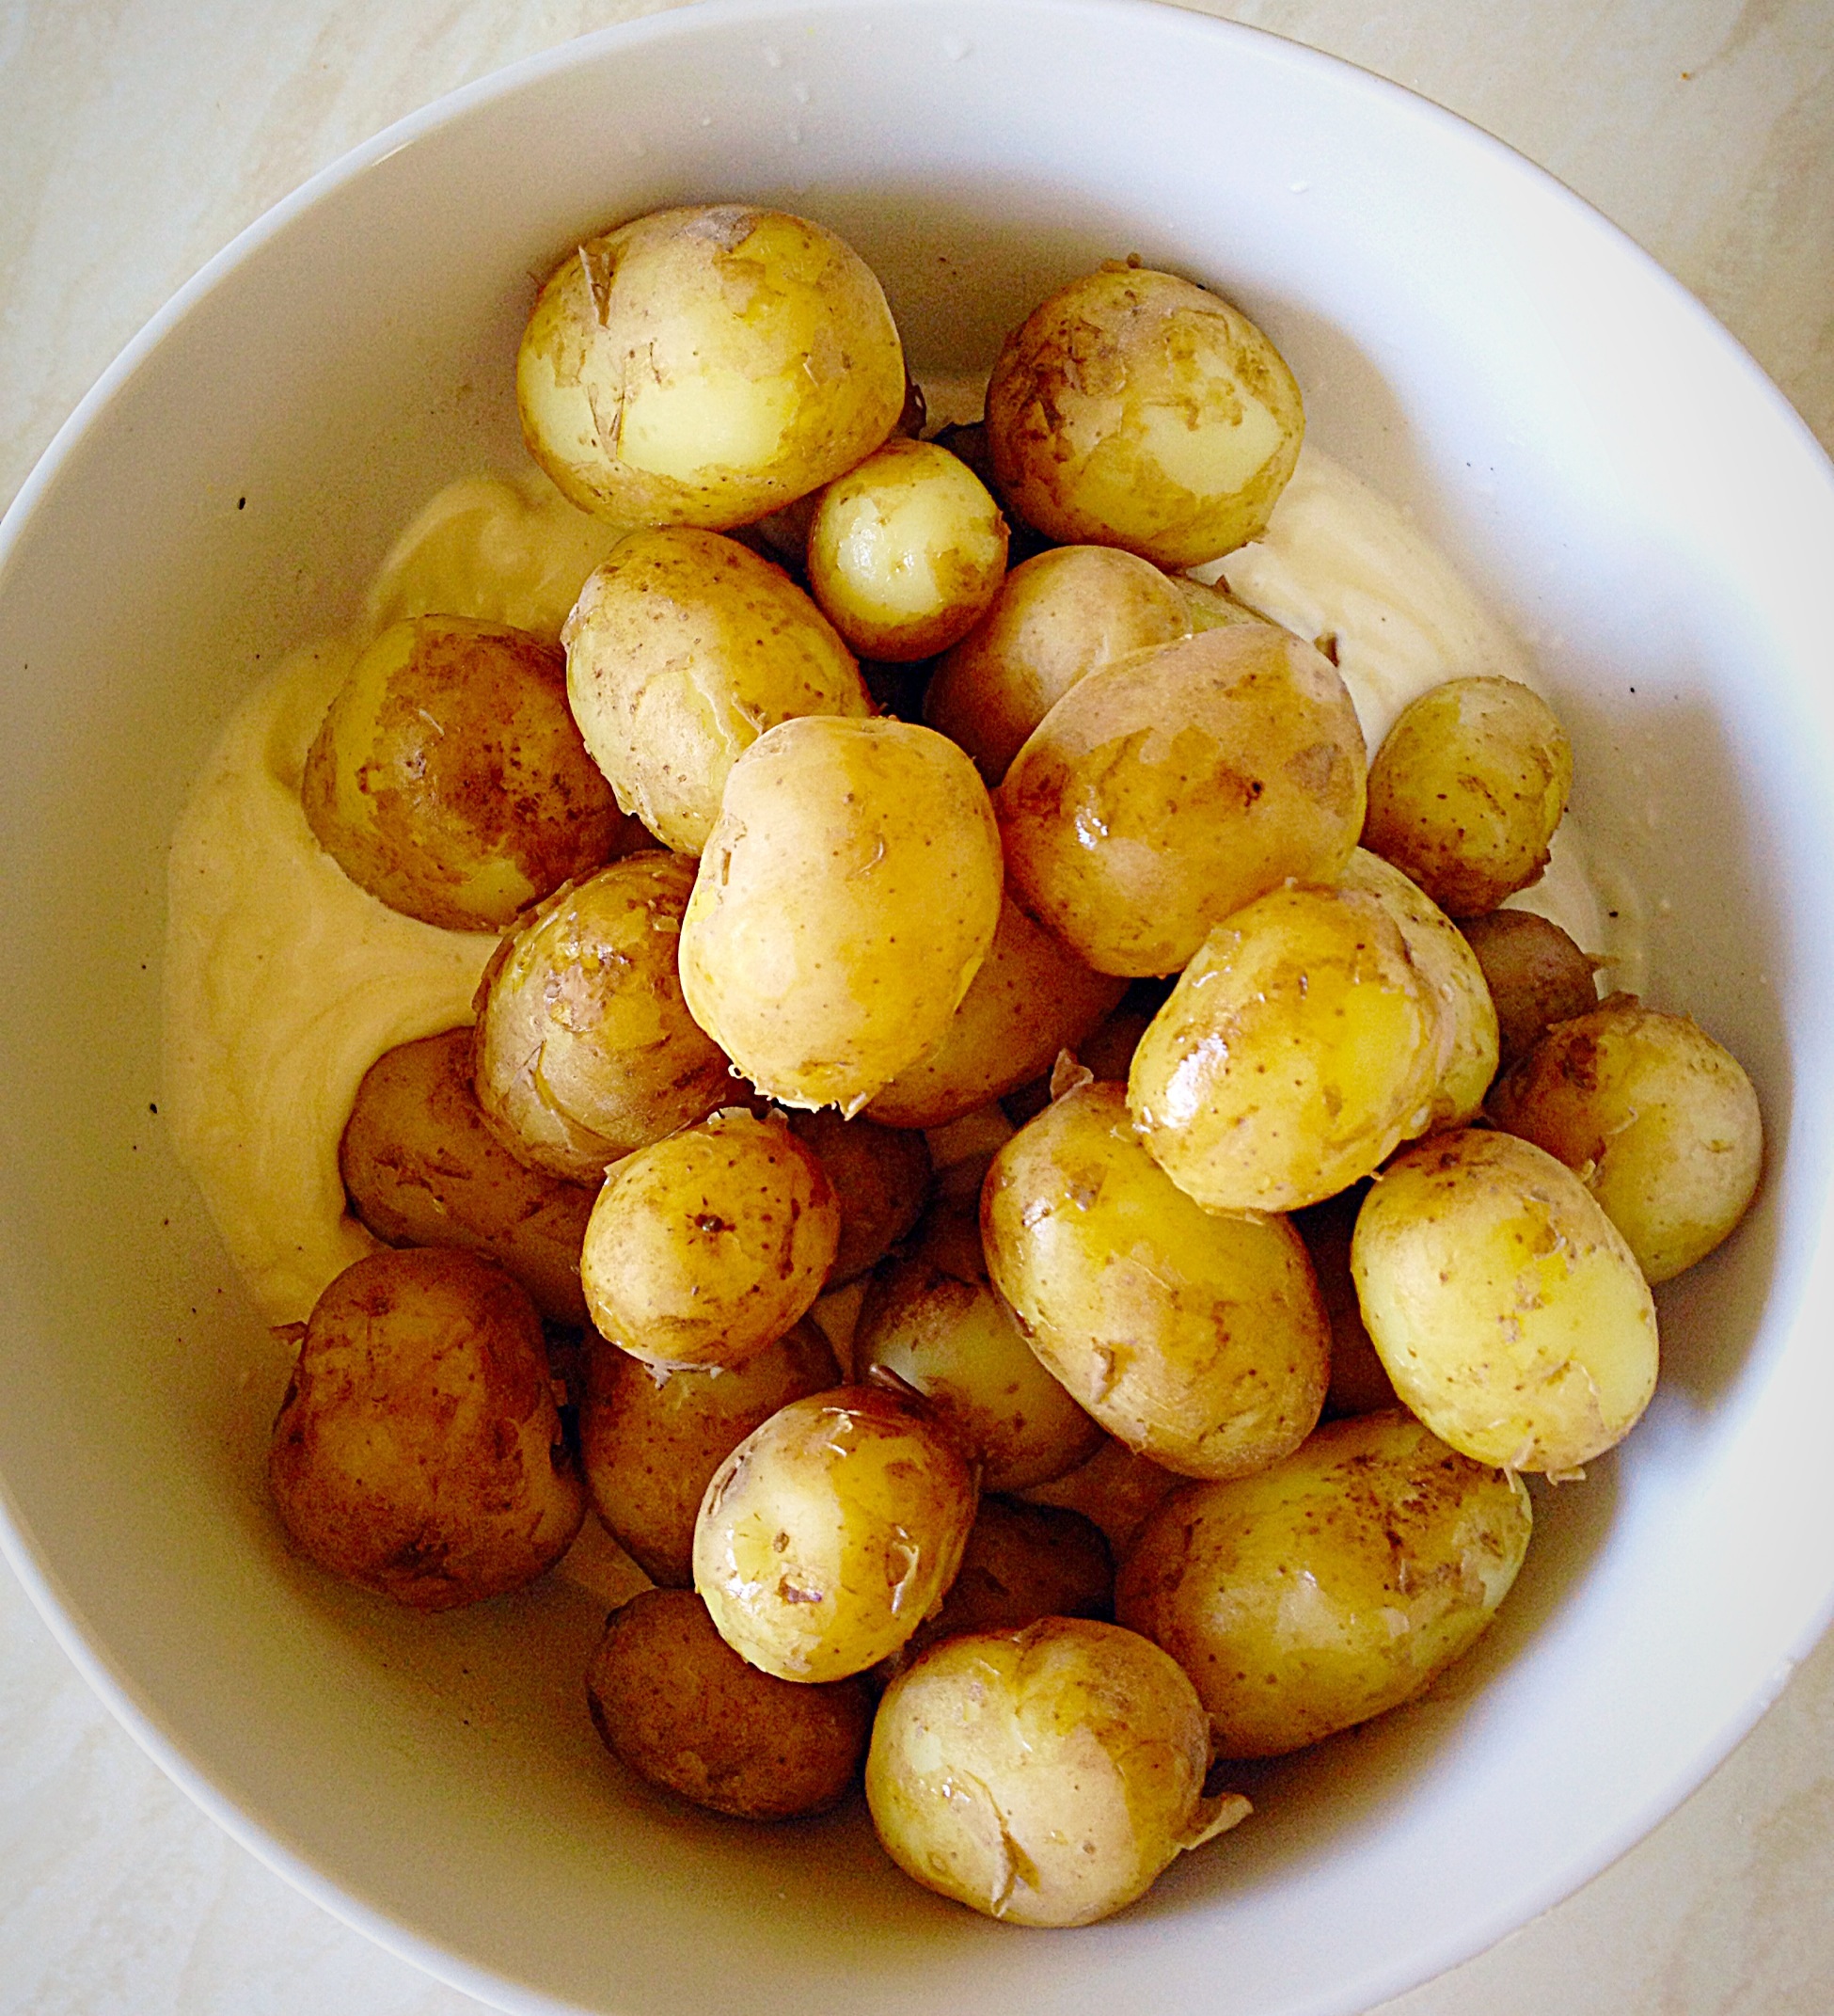
1kg/2.2lb Baby New Potatoes I like Charlotte as they are available all year roundfrom most supermarkets including Waitrose and Sainsbury’s

Juice of 1 Whole Lemon

1 Lemon – for slicing

4 Heaped Tablespoons Mayonnaise

1/2tsp Sea Salt – I use Maldon, halve the quantity if using free flowing

1/2tsp Ground Black Pepper

2 Celery Sticks

3 Spring Onions

2 tbsp Chives

Making The Potato Salad

First of all, scub the potatoes to remove any dirt. Cut any larger potatoes in half so that all the potatoes are roughly the same size.

Place the potatoes in a saucepan, cover with water and bring to the boil.

Simmer the potatoes until just tender, drain, return to the pan and leave with the lid on, to finish steaming for 20-30mins.

In a bowl add the juice of one lemon, mayonnaise, salt and pepper.

Stir until thoroughly combined.

Drain the potatoes and leave to steam dry in a colander for 5 minutes.

Add the potatoes to the bowl.

Chop the spring onions and celery into small dice.

Add the chopped celery and spring onions to the bowl.
Give everything a gentle mix.
Snip the fresh chives over the top of your Tangy Potato Salad.
Snip the fresh chives over the top, taste and adjust the seasoning as necessary.

Finally, if you prefer you can serve the Tangy Lemon Potato Salad as it is. Although I like to jazz it up with a few, very finely sliced lemon halves. Because they are perfectly edible (although if you just want to use them for garnish that’s fine) and taste delicious. Also the sliced lemon let’s people know that there is lemon juice in the potato salad.

Salad bowl from Emilie OConnor Home Store.

Make this Tangy Lemon Potato Salad up to a day ahead. Store in a bowl wrapped in cling film and keep refrigerated. Eat within 3 days.

If you like the bowl featured in this post, it is available from Emilie OConnor  home store. It is made using bamboo fibre and comes with a fitted chopping board lid and inset salad servers. I was very fortunate to win this eco-friendly bowl in a competition on Instagram. Check out her website, as her items are practical, beautiful and kind to the environment.

If you have enjoyed this recipe for Tangy Lemon Potato Salad then you may also like these:

Lemon Garlic Roast Chicken

FF Tangy Lemon Potato Salad
Lemon Garlic Vegetable Orzo

Crunchy Homemade Coleslaw

FF Tangy Lemon Potato Salad
Crunchy Homemade Coleslaw

Lime Couscous

FF Tangy Lemon Potato Salad
Lime Couscous

Lemons give a fresh, zesty, citrus burst to any dish they are used in, whether sweet or savoury. And a particular favourite of ours, here at home is Lemon Thyme Roast Chicken followed by Lemon Ripple Ice Cream for dessert. Sharing a feast around the table as a family is an important part of our lives.

So, whatever you are making, baking and creating in your kitchens, have fun preparing and sharing your feast.

Sammie xx

No part of this post may be reproduced or duplicated without the written permission of the owner. Please see my Disclosure Policy.


Share
Facebooktwitterpinterestlinkedintumblr

Quiche Lorraine

Share
Facebooktwitterpinterestlinkedintumblr

I was thrilled when my Mum yesterday, who is herself, a great quiche maker, complimented me. On seeing my Quiche Lorraine she said “The apple doesn’t fall far from the tree”. Although, thinking about it, that’s surely a compliment to her? Anyway, this cheddar cheese and smoked bacon tart is both easy to make and delicious to eat.

FF Cheddar Bacon Tart

I used a combination of bacon and lardons, as that’s what I had in the freezer and I’m trying to clear it out. So you get lovely chunks as well as pieces of delicious smoked bacon throughout the Quiche. Alternatively leftover cooked Gammon at Christmas, or indeed any other time of the year, works fabulously well in this Quiche Lorraine. Cut into chunks and use in place of the bacon, the beauty being no pre-cooking is required!

Quiche Lorraine a classic recipe using sharp cheddar, gammon or bacon in a shortcrust pastry egg tart.

Sooo I made the pastry for this quiche myself, but, umm, well let’s just say, I’m gonna leave that for another post. Which I know doesn’t help you, as you need pastry for this recipe. I’m sorry. Really I am. Either use your go-to shortcrust pastry recipe, or buy it!! Just know you’ll need 450g/1lb. I promise I will post my recipe ASAP. Finally I have the recipe, see the link in the recipe below for Pefect Butter Shortcrust Pastry.

Cheddar, bacon and egg tart slice served on a plate with fresh salad and a baked potato.
A slice of quiche lorraine served with salad and a baked potato.

Quiche Lorraine is also perfect, portable, picnic food. So easy to slice and pack up with chunks of cucumber and cherry tomatoes. And as the evenings stay light we can always take our food and eat outside.

Makes 1 x 25cm/10” Quiche Lorraine serves 6-8

450g/1lb Shortcrust Pastry – see my recipe here

8 Large Eggs – I use Burford Brown eggs from Clarence Court

125ml/4.5fl oz Whole Milk

300g/11oz Smoked Bacon/Lardons – cooked and cooled on kitchen paper

175g/6oz Sharp Cheddar – grated – I use Wyke Farms Mature Cheddar

1/2tsp Ground Black Pepper

Method : Preheat oven to 200C/180C fan oven, gas mark 4, 350F.

You will need a 25cm/10in tart tin, preferably with a loose base.

Preparing The Tart Case

Roll out the pastry on a floured surface to approx 16″ across. This will ensure it fits easily inside the Quiche tin, without stretching.

If using a ceramic dish, grease thoroughly with butter before lining with pastry. For tins I don’t find it necessary, but grease if you’re worried about the pastry sticking.

Transfer the pastry by rolling it around the rolling pin and then carefully unrolling over the Quiche tin.


I always place my quiche tin on a baking sheet. Gently press the pastry into the sides and bottom of the tin. Then using the rolling pin, roll it over the top of the tin. This creates a clean finish to the pastry. If using a ceramic dish, neatly trim off the excess pastry with a knife.

Nice neat pastry finish.


Next doc the pastry at the bottom of the tin with a fork. This will stop the pastry from rising up when baked.

Place parchment paper onto the pastry and fill with baking beans or ceramic balls. These keep the pastry from collapsing during the blind baking.


Place the quiche tin into the oven and bake for 15 minutes. Remove from the oven and discard the parchment paper and baking beans. Return to the oven and bake for a further 5 minutes. Remove and allow to cool for 10 minutes.

The pastry case is now part baked. This ensures the egg mixture will not seep into the pastry. The quiche will have a crisp bottom, when fully cooked.

Making The Cheddar Bacon Filling And Baking The Quiche

Whilst the pastry case is cooling gather the other ingredients together.


Add a good grinding of black pepper to the eggs and milk, then whisk together.

Sprinkle the cooked bacon evenly over the pastry base.
Then do the same with the grated cheese.

Slowly pour the egg mixture into the centre of the quiche, making sure that it doesn't flow over the top of the pastry.

Slowly pour the egg mixture into the centre of the quiche, ensuring it doesn’t flow over the edge if the pastry.

Reduce the oven temperature by 10C/25F, one gas mark lower. Place the Quiche Lorraine in the oven and bake for 20-25 mins until set and golden. Remove from oven. Allow to cool for at least 10 minutes before slicing and serving.

Quiche Lorraine

This Quiche is so versatile. It can be packed up for lunch, a picnic, or as part of a meal with an endless choice of sides.

If you have enjoyed this Quiche Lorraine recipe you may also like these:

Wigmore Cheese Red Pepper Tart

Wigmore Cheese Red Pepper Tart

Cherry Tomato Mozzarella Basil Quiche

Cherry Tomato Mozzarella Basil Quiche

Smoked Bacon Asparagus Quiche

Smoked Bacon Asparagus Quiche

Because I enjoy making quiches and tarts so much, it makes sense to make my own pastry. Since one batch of pastry makes two tarts I always freeze half to use later. Also this Quiche Lorraine freezes really well, simply defrost overnight in a refrigerator and then reheat until hot all the way through.

Sammie x

No part of this post may be reproduced or duplicated without the written permission of the owner. Pleas see my Disclosure Policy.

Bacon and cheese, egg tart in tin.

Share
Facebooktwitterpinterestlinkedintumblr

Sausage Plait With A Twist

Share
Facebooktwitterpinterestlinkedintumblr

So today I have another super easy, recipe for you, my Sausage Plait With A Twist. What’s the twist? Sun-dried tomatoes and fresh thyme that lift the flavours of this savoury pastry to the next level.

Pinterest sized image of sliced sausage plait with descriptive graphics.


The addition of sundried tomatoes and thyme to pork sausage meat gives this sausage plait a deep savoury flavour. Ideal for a mid week meal, perfect for a buffet and portable for picnics!!

Lattice puff pastry topped savoury sausage meat pastry.
Sausage Plait With A Twist

I have used a special roller to create the lattice pattern on the top of the Sausage Plait. I bought it 20+ years ago. I’ve just had a quick peek on Amazon and they sell them for about £5. Which is probably about what I paid all those years ago!

Pastry Lattice Cutter


So, if you bake a lot of pies and tarts then I would say this is a good buy. Likewise, the diamond effect on the pastry below was achieved by lightly scoring the uncooked pastry, on a slant, one way and then the other. When baked it produced a pretty, diamond effect pattern and I didn’t need a Lattice Roller. And this technique also works for any Sausage Plait.

Diamond effect puff pastry sausage plait.
Diamond effect on the puff pastry is very effective.


So, whichever method you use, your Sausage Plait With A Twist is sure to go down well with everyone who tries it. Served hot or cold, it is completely delicious. Why not bake my  Tomato Thyme Garlic Focaccia Bread? It is the perfect, picnic accompaniment. As is my Tangy Lemon Potato Salad. While these Blueberry Lemon Shortbread Cake Bars are a delicious sweet treat that won’t attract every bug in a 10 mile radius.

Recipe: Sausage Plait With A Twist serves 6

500g/1lb Block Puff Pastry – defrosted if frozen – I use  Just Rol not the all butter version.

500g/1lb Pork Sausage meat – use the best quality sausage meat

15 Sundried Tomatoes (drained if in oil)

1 tbsp Fresh Thyme Leaves – simply strip from the stems, or chop if very new green growth

1/2 tsp Black Pepper – freshly ground

1 Egg – for egg wash

Method : Preheat the oven to 190C/170C fan, gas mark 5, 375F

Making The Filling

  • First of all, chop the sun-dried tomatoes roughly, so there are no big pieces.
  • Place the chopped tomatoes into a bowl and add the thyme, sausage meat and black pepper.
  • Using your hand, squish (technical term) all the ingredients together until well combined.


Dark red pieces of sundried tomato and flecks of green thyme are spread throughout the sausagemeat.
Dark red pieces of sundried tomato and flecks of green thyme are spread throughout the sausage meat.

Assembling And Baking The Sausage Plait

  • On a floured worktop roll out the puff pastry so that it measures 30cm x 35cm (10″x12″). Trim to neaten the edges.
  • Now place the pastry onto a piece of parchment paper that is the same size as your baking sheet. Since this will make transferring the sausage plait MUCH easier. MUCH! I speak from experience!!
  • Place the sausage meat mixture evenly down one side of the pastry, leaving a 1 inch (2.5cm) border.
Pat the sausage mixture so that it is spread evenly. Then get ready to roll.....
Pat the sausage mixture so that it is spread evenly. Then get ready to roll…..
Place the Lattice Roller just inside the bottom edge of the pastry and roll to the top!
Brush the beaten egg around the border of the sausage mixture.
Fold the lattice cut side over the sausage meat, so the edges meet.
I have crimped the pastry edges by twisting them together, then brushed egg wash over the top of the Sausage Plait.

Finally you can see how much easier it is to assemble the sausage plait on the baking parchment.

  • Place the sausage plait into the centre of a preheated oven and bake for 40 – 50 minutes, until golden brown.
  • The sausage plait is baked when golden in colour and any juices run clear.
  • As soon as it is baked remove from the oven and leave to cool on the baking tray.
Sausage Plait With A Twist

Such an easy dish to make, yet super impressive to look at and eat! It can be served hot or cold and is ideal for picnics and buffets as well as dinner time.

Cool completely and refrigerate for up to 3 days.

If you have enjoyed this recipe for Sausage Plait With A Twist you may also like these:

Spicy Sausage Rolls

Spicy sausage rolls freshly baked and cooling on a rack.
Spicy Sausage Rolls

Smoked Bacon Asparagus Quiche 

Baked quiche on a baking tray.
Smoked Bacon Asparagus Quiche

Red Onion Sausage Plait 

Sausage plait on a baking tray with fresh tomatoes and a jar of red onion marmalade from Hawkshead Relish.
Red Onion Sausage Plait

I really enjoy creating recipes for my family and for you to try on this blog. Especially recipes that are diverse. While this sausage plait is tasty served with salad and new potatoes for dinner, it also is great to slice and pack up for a picnic too. Because, in my opinion, diversity in recipes allows me to have more options for both mealtimes and buffets, when entertaining a crowd of people. Most importantly it’s easy. And we all love an easy recipe, right?

Whatever you are making, baking and creating in your kitchens, have fun preparing and sharing your feast.

Sammie x

No part of this post may be reproduced or duplicated without the written permission of the owner. Please see my Disclosure Policy.

Share
Facebooktwitterpinterestlinkedintumblr