Lemony Strawberry Pavlova

Share
Facebooktwitterpinterestlinkedintumblr

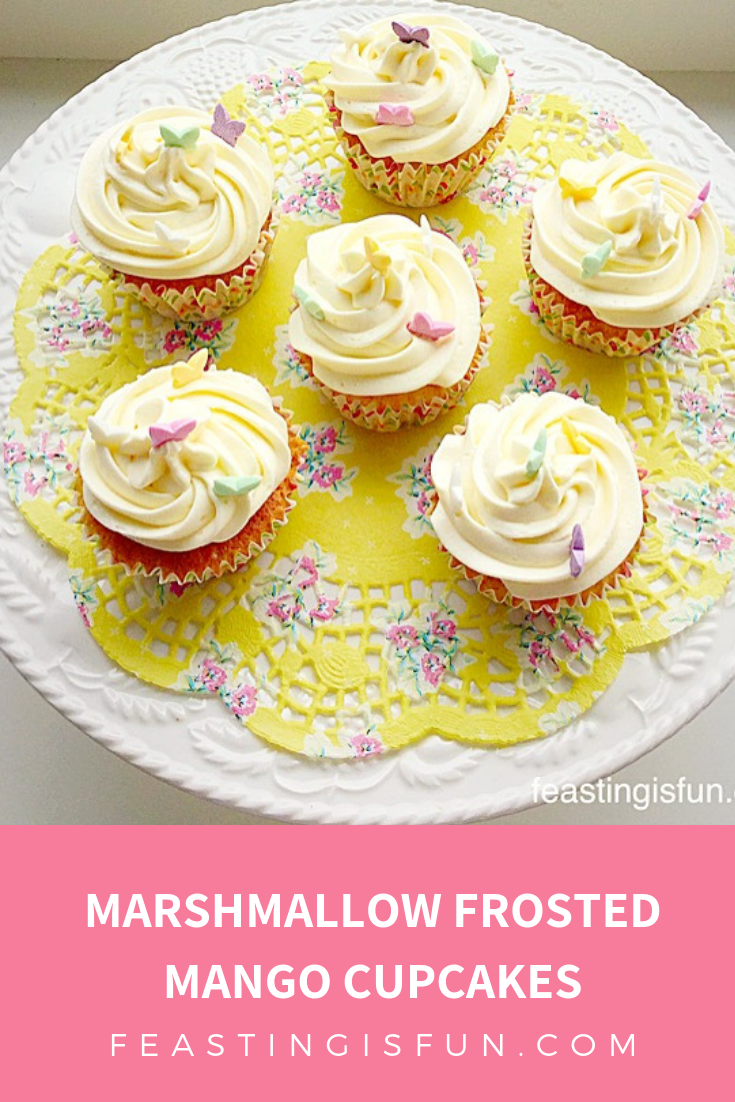
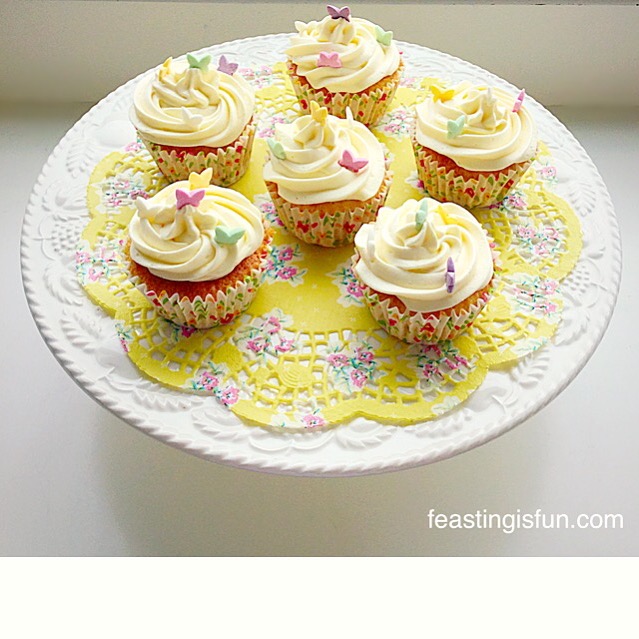
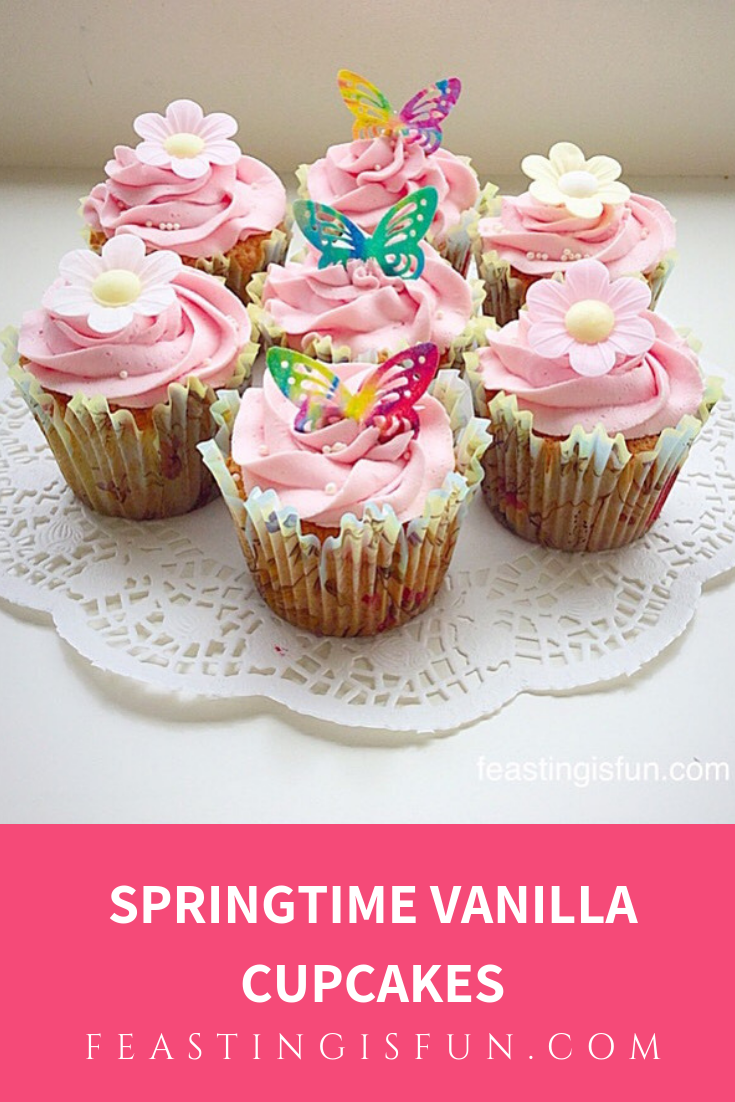
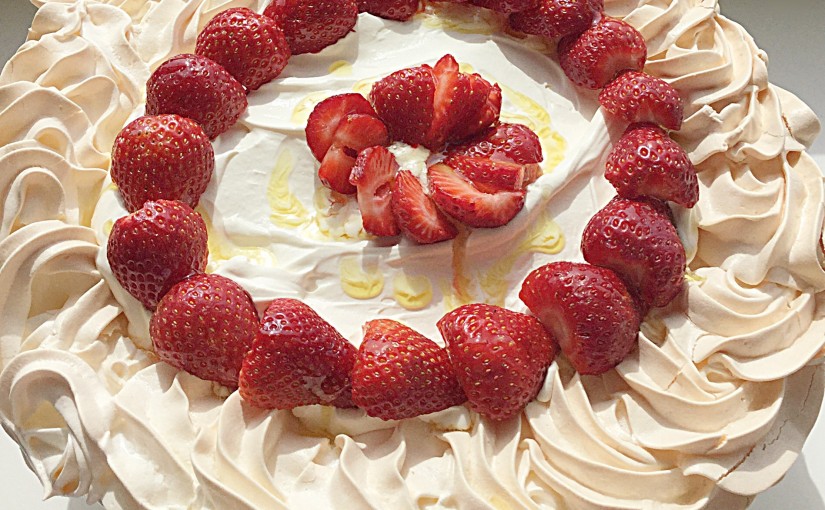
Hello my lovely readers. I have a rare recipe on my blog for you today – a dessert. I was shocked when I realised just how few dessert recipes I have. It just goes to show, we may have cake or cookies in the tin, but I rarely make dessert, much to my Hubby’s disappointment. So in order to correct this I have made a delicious Lemony Strawberry Pavlova!

FF Lemony Strawberry Pavlova
Lemony Strawberry Pavlova so light and refreshing.

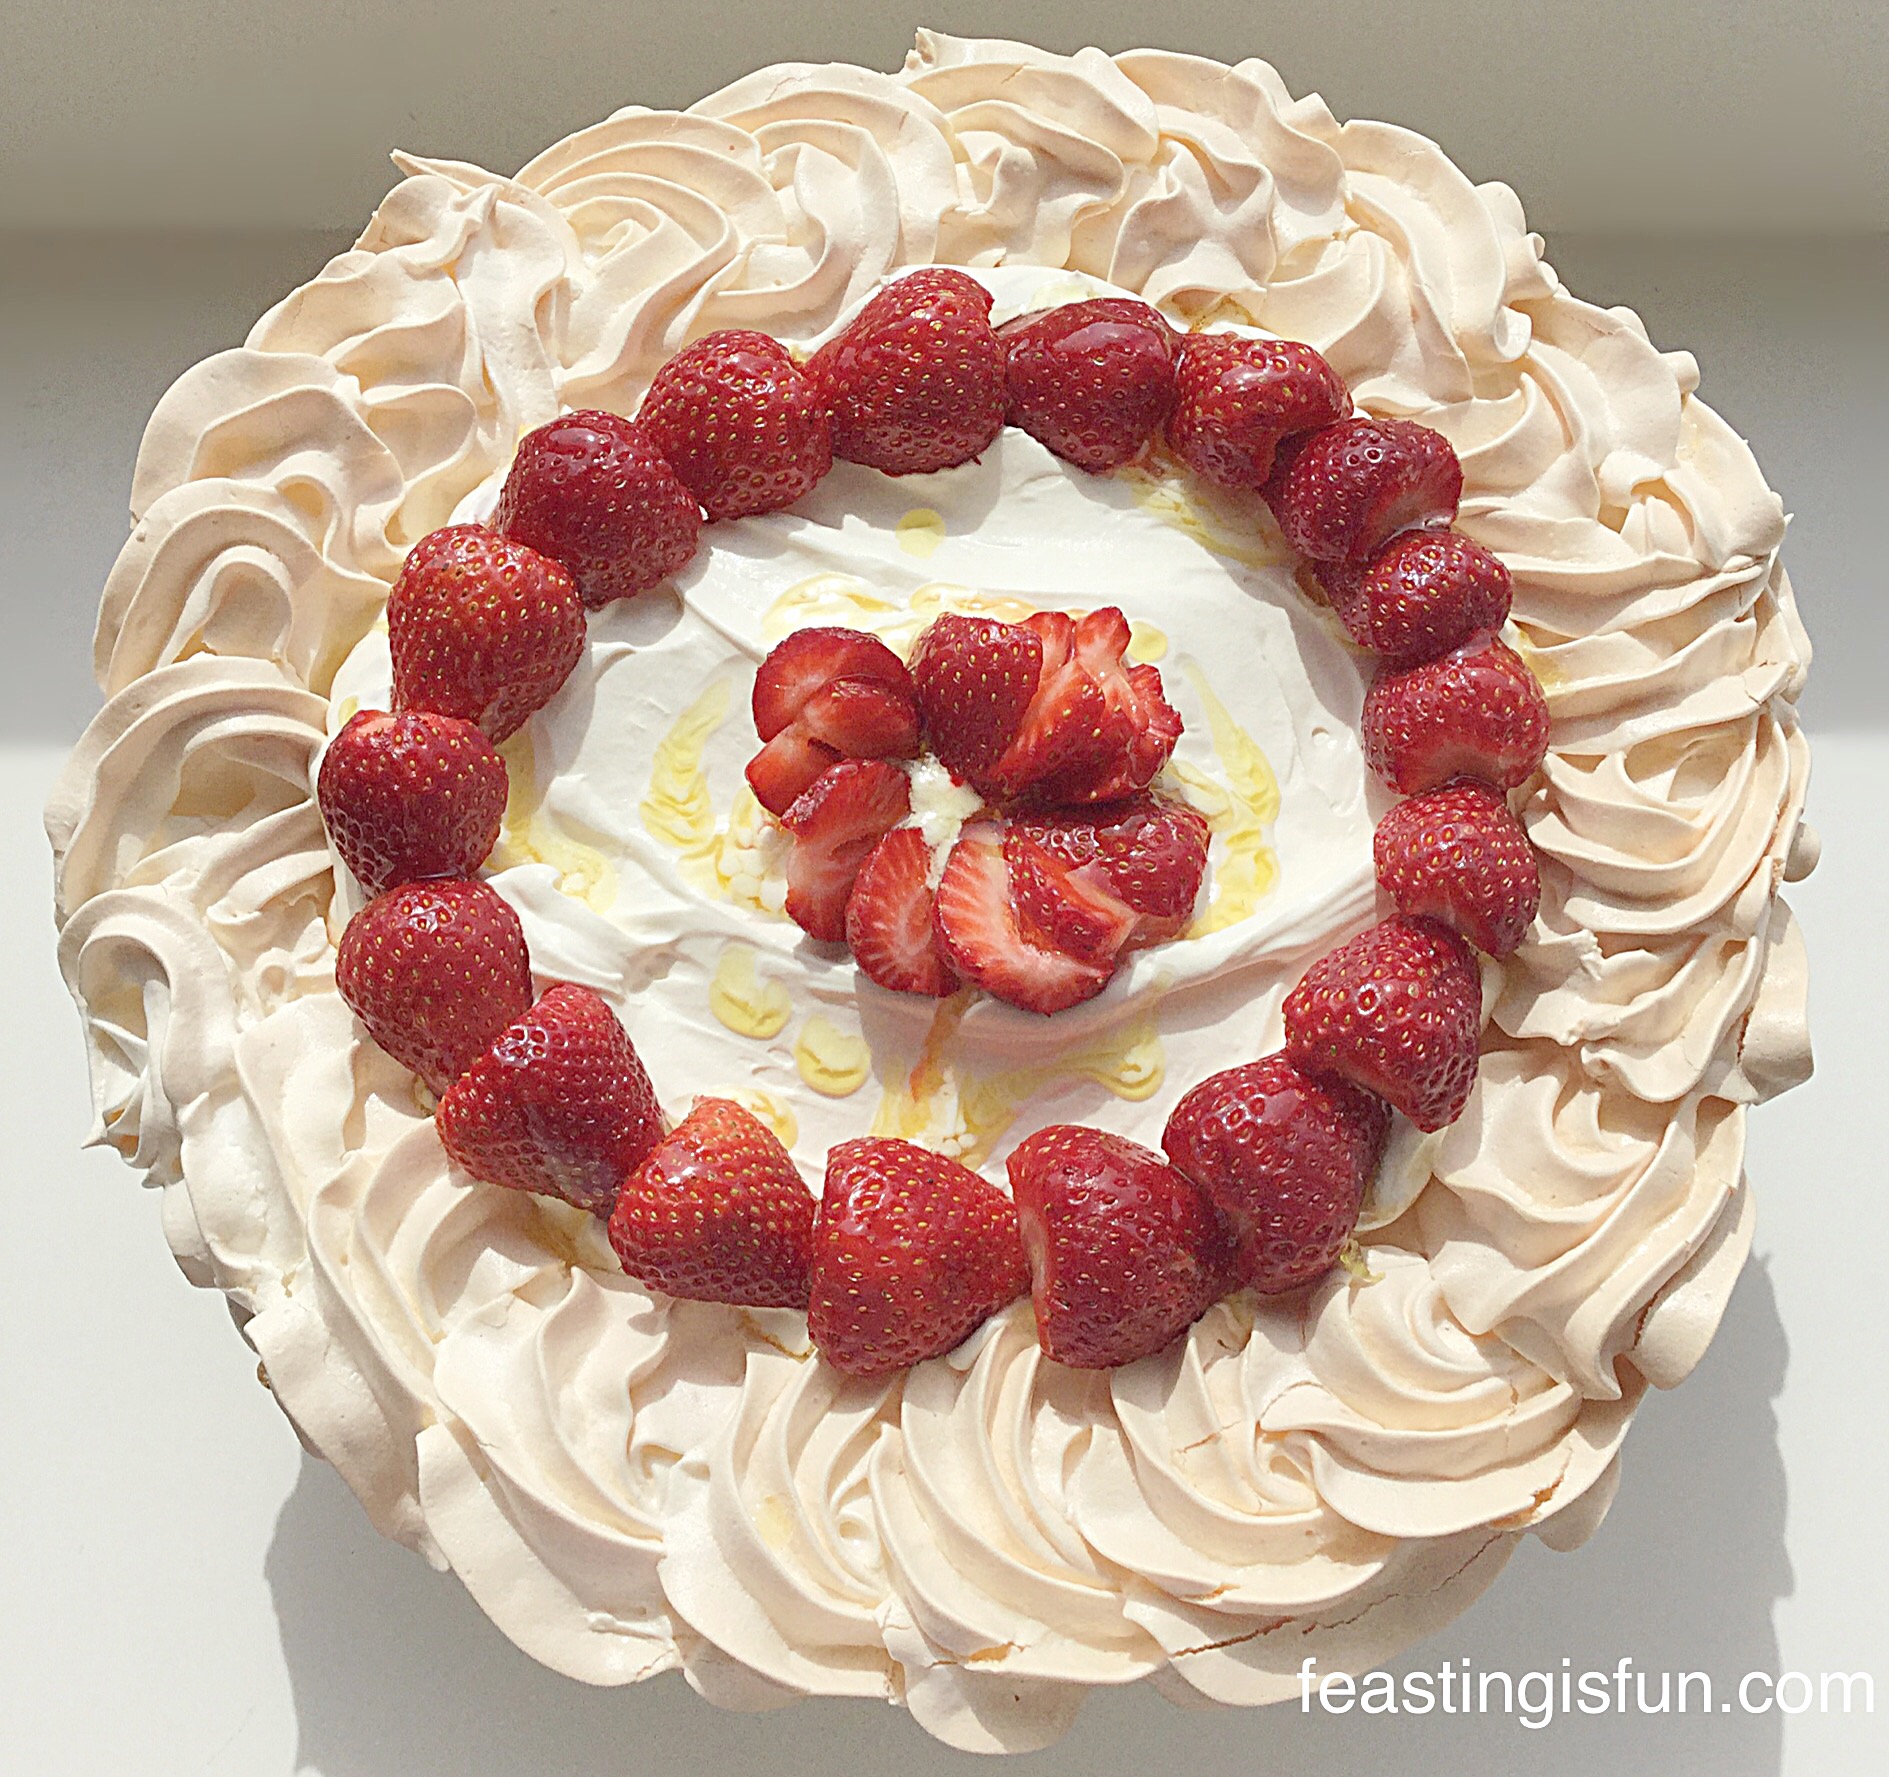
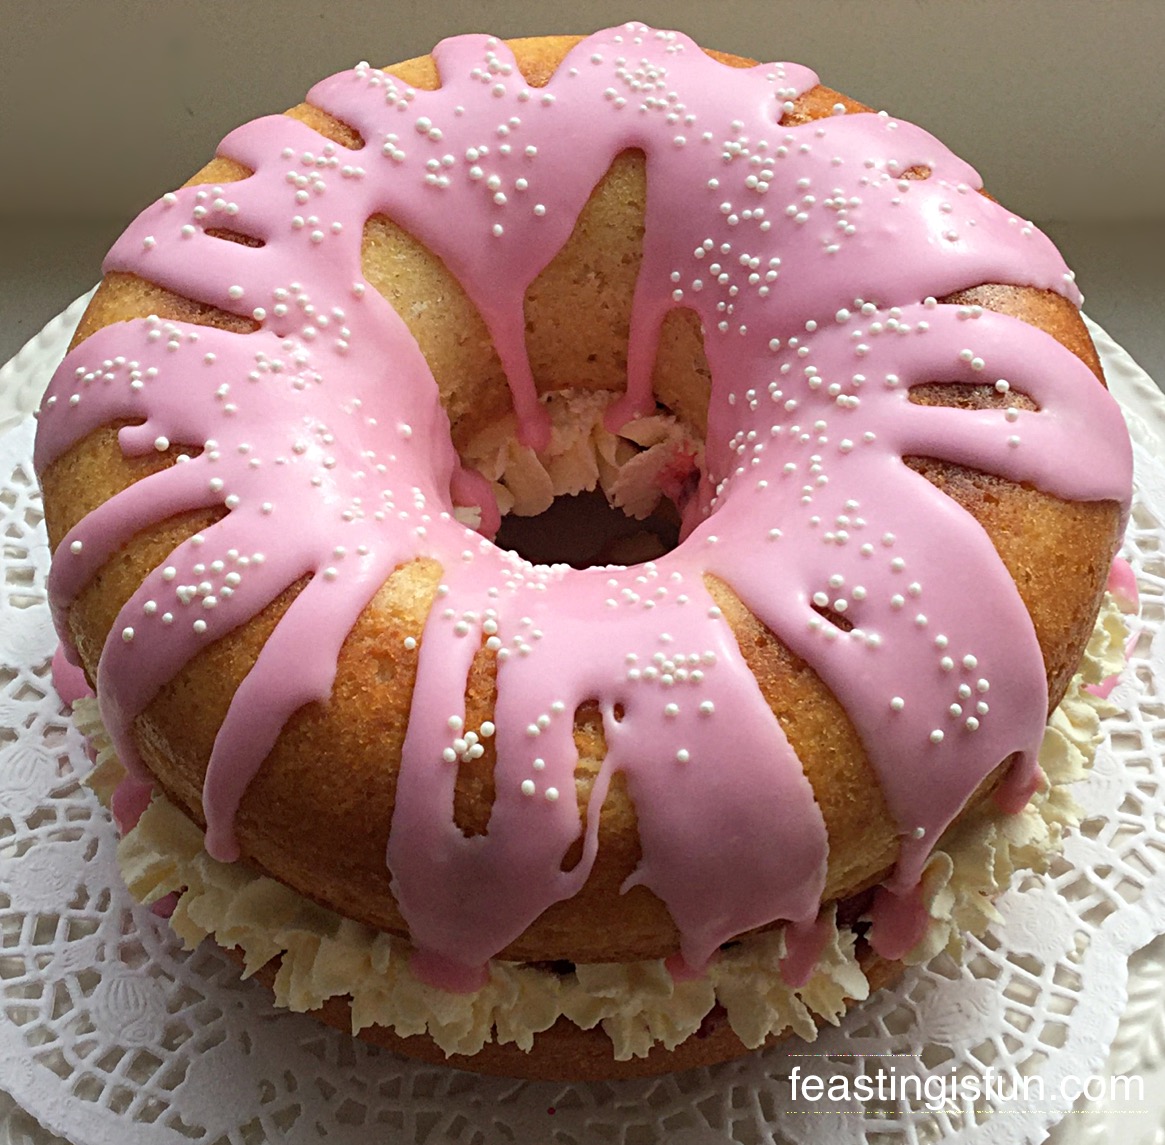
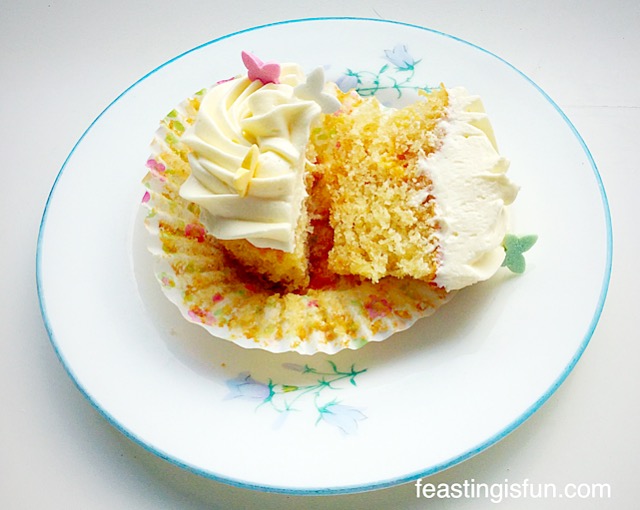
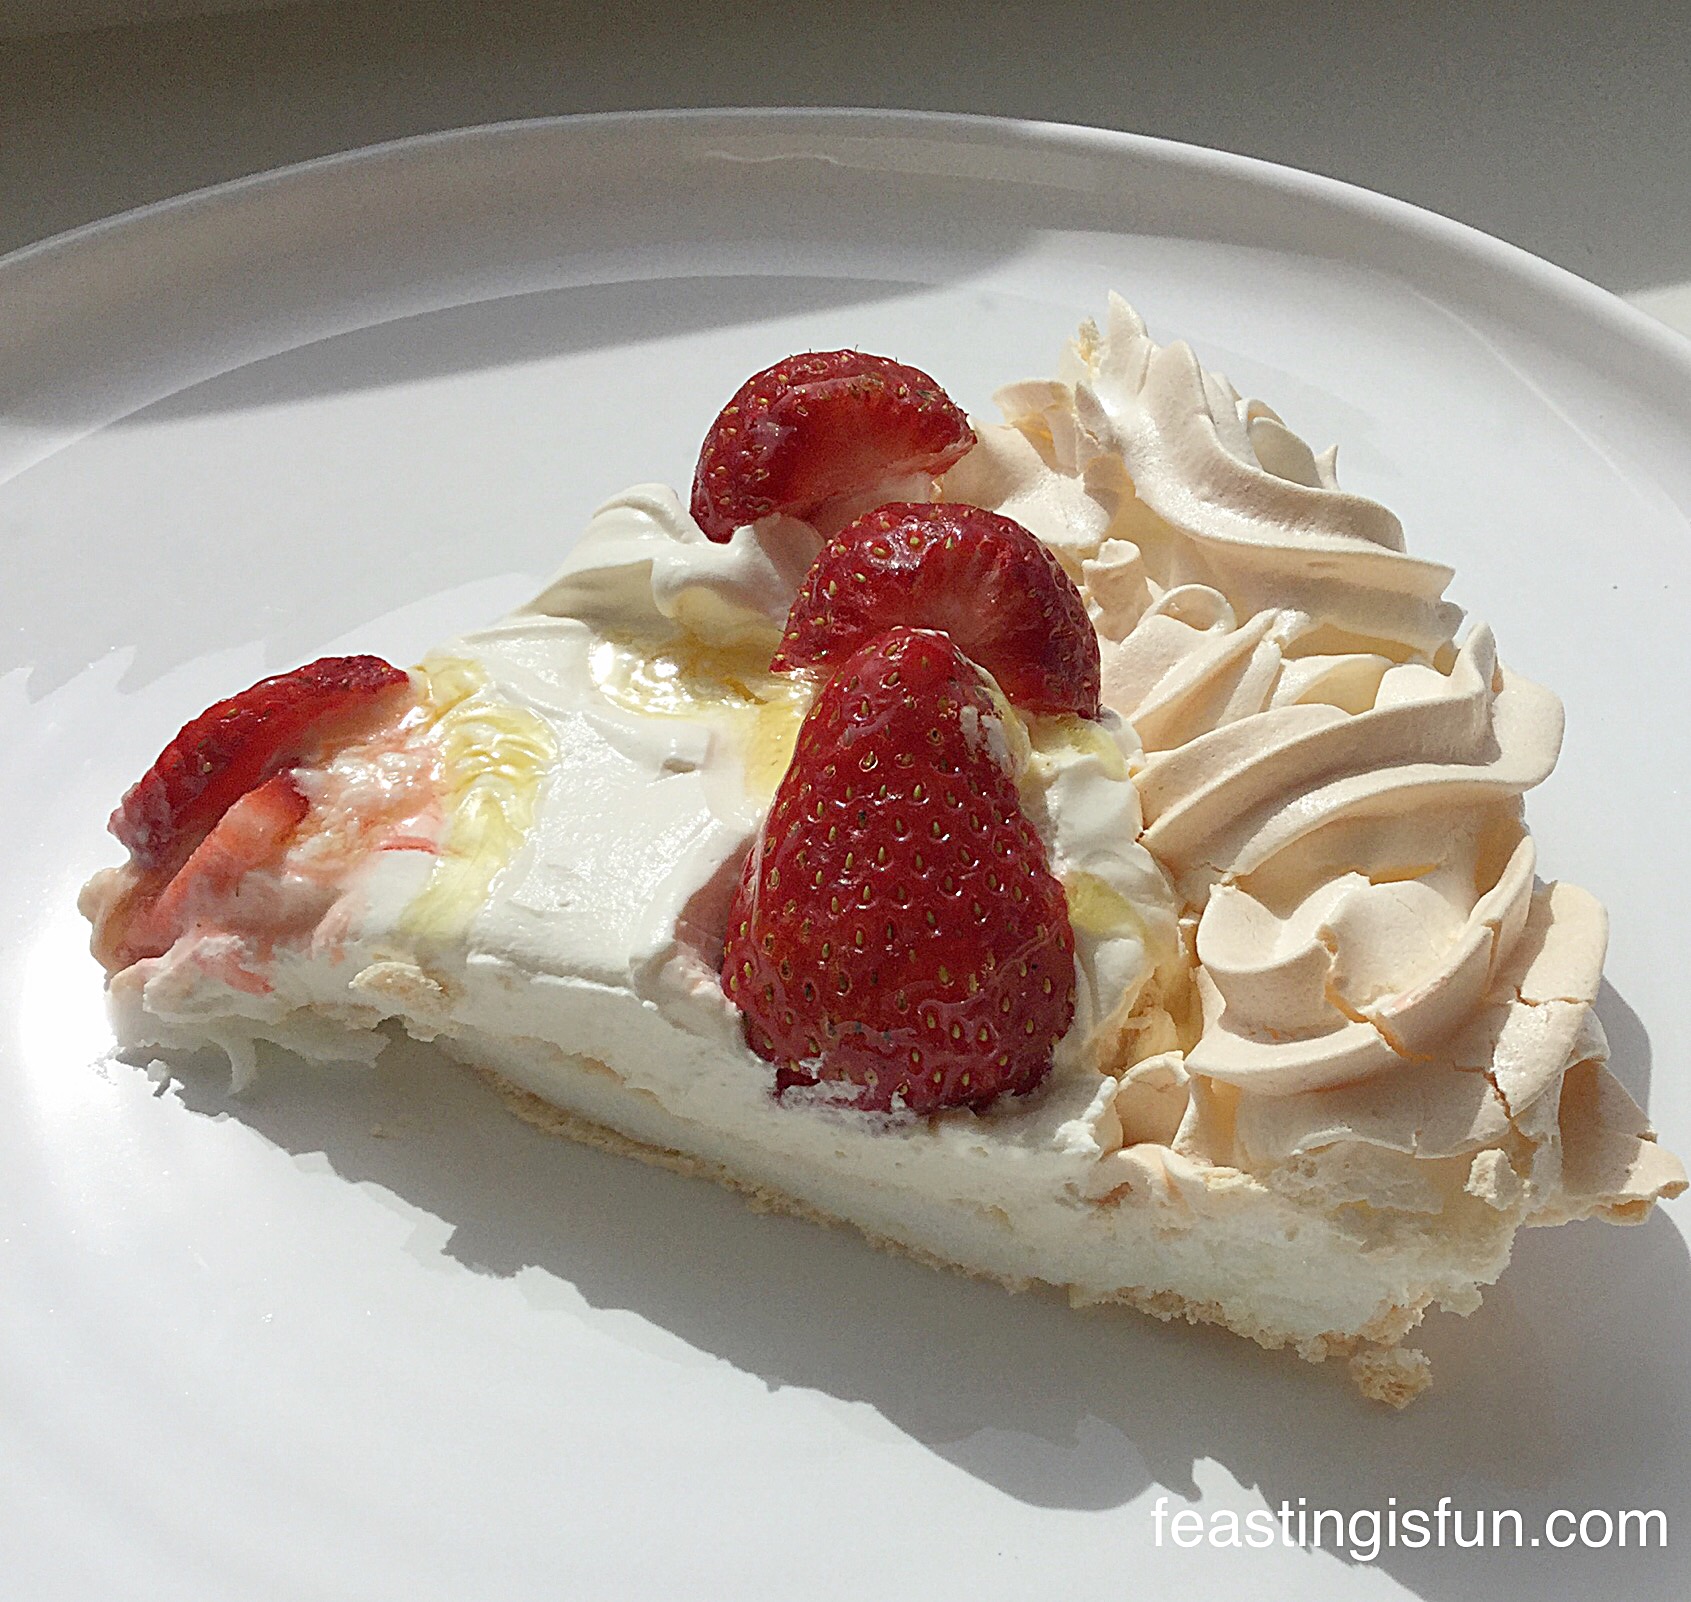
As you may be aware, I love lemons, especially in cakes like my Mini Lemon Drizzle Bundt Cakes. This lemon pavlova is the stuff of fairies, rainbows and dreams. It is incredibly light, with a crisp, outer shell that hides a soft, marshmallow like interior. It really does melt in your mouth!

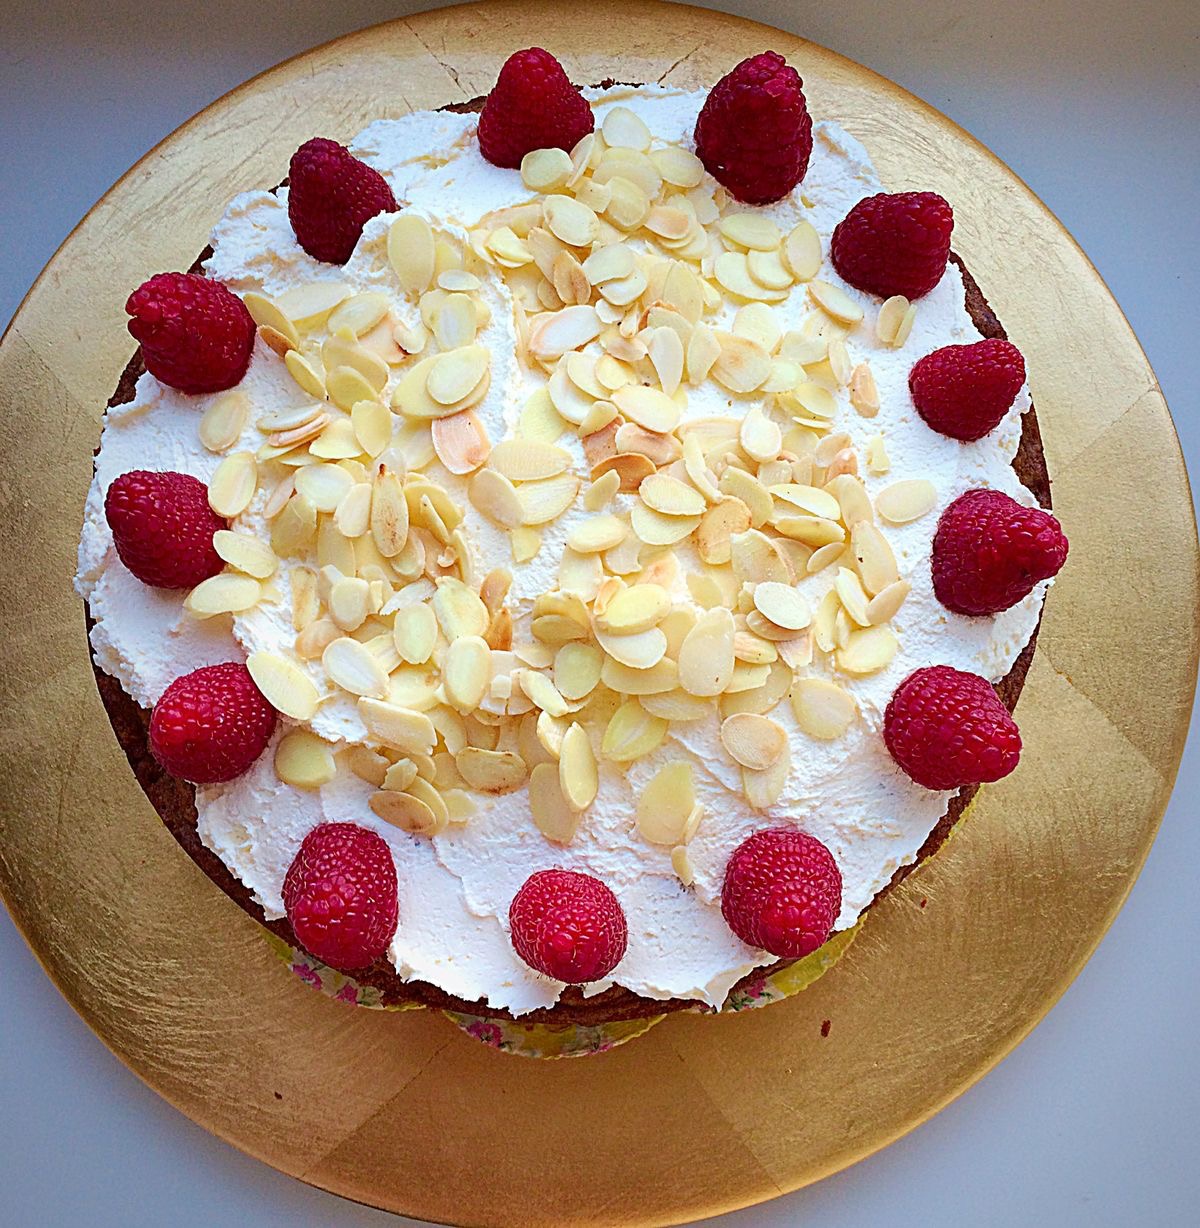
Slathering the top with dreamy, lightly whipped cream, fragrant strawberries and finishing with a limoncello sticky drizzle. This Lemony Strawberry Pavlova is the perfect dessert, especially on a Sunday after a roast.

FF Lemony Strawberry Pavlova
Lemony Strawberry Pavlova a generous slice!

Having made a few pavlovas now, I think that I’ve got them pretty much nailed. Yes I know that the weather, in particular humidity, can play havoc with them, but they are a fairly easy, foolproof dessert. The way I see it is this; if the worse happens and they crack and crumble, then make an Eton mess – whipped cream, crumbled meringue and fresh fruit. Altenatively if the cracking isn’t that bad, slather them with whipped cream and fruit and nobody will notice the disaster you have managed to avert 😉.

FF Lemony Strawberry Pavlova
Lemony Strawberry Pavlova look at the marshmallow inner, utterly melt in the mouth.

Fortunately this Lemony Strawberry Pavlova behaved. Today is a sunny dry day and apart from me using a new baking tray that was just a teeny bit too wide for our oven, hence this pavlova was cooked on a slant, it turned out beautifully. Better than that it tastes amazing. If you’ve ever eaten lemon roulade, then that has a similar texture to this pavlova.

When I first started making pavlovas I hadn’t any pictures to guide me through the process, so I’ve included a few so that you will know how things are supposed to look!

Also I managed to get hold of some early season British strawberries, they smelled so fragrant. This pavlova would also work well with Raspberries, Blackberries and Blueberries, so use whatever fruit is in season.

Recipe: Makes one Lemony Strawberry Pavlova serves 8

6 Large Free Range Egg Whites – the yolks will keep for a day in the fridge and I’m making ice cream tomorrow which they will be perfect for!

300g/10.5oz Caster Sugar plus 1tablespoon for the drizzle

2 Lemons

1tsp Corn Flour – also known as corn starch I use Dove Farms as it is gluten free

1tsp White Wine Vinegar

300ml Double Cream

300g/10.5oz Fresh Strawberries

50ml Limoncello – optional use water if preferred

Method: Preheat the oven to 180C/160C fan, gas mark 4.

  • Make sure the large bowl you will be whisking the egg whites in is scrupulously clean.
  • Cut 1 lemon in half and wipe around the inside of the bowl with it.
  • Separate the egg whites from the yolks and place the egg white into the clean, lemon wiped bowl.
  • Squeeze the juice of the cut lemon into the bowl with the egg whites, ensuring pips and pulp are caught by a sieve.
  • Start whisking on a slow speed and gradually build up to high.
  • Keep whisking until the egg whites have reached the stiff peak stage.
  • This is where, if you hold the whisk up the whisked egg white will not flop over
FF Lemony Strawberry Pavlova
This is a stiff peak – now time to start adding the sugar.
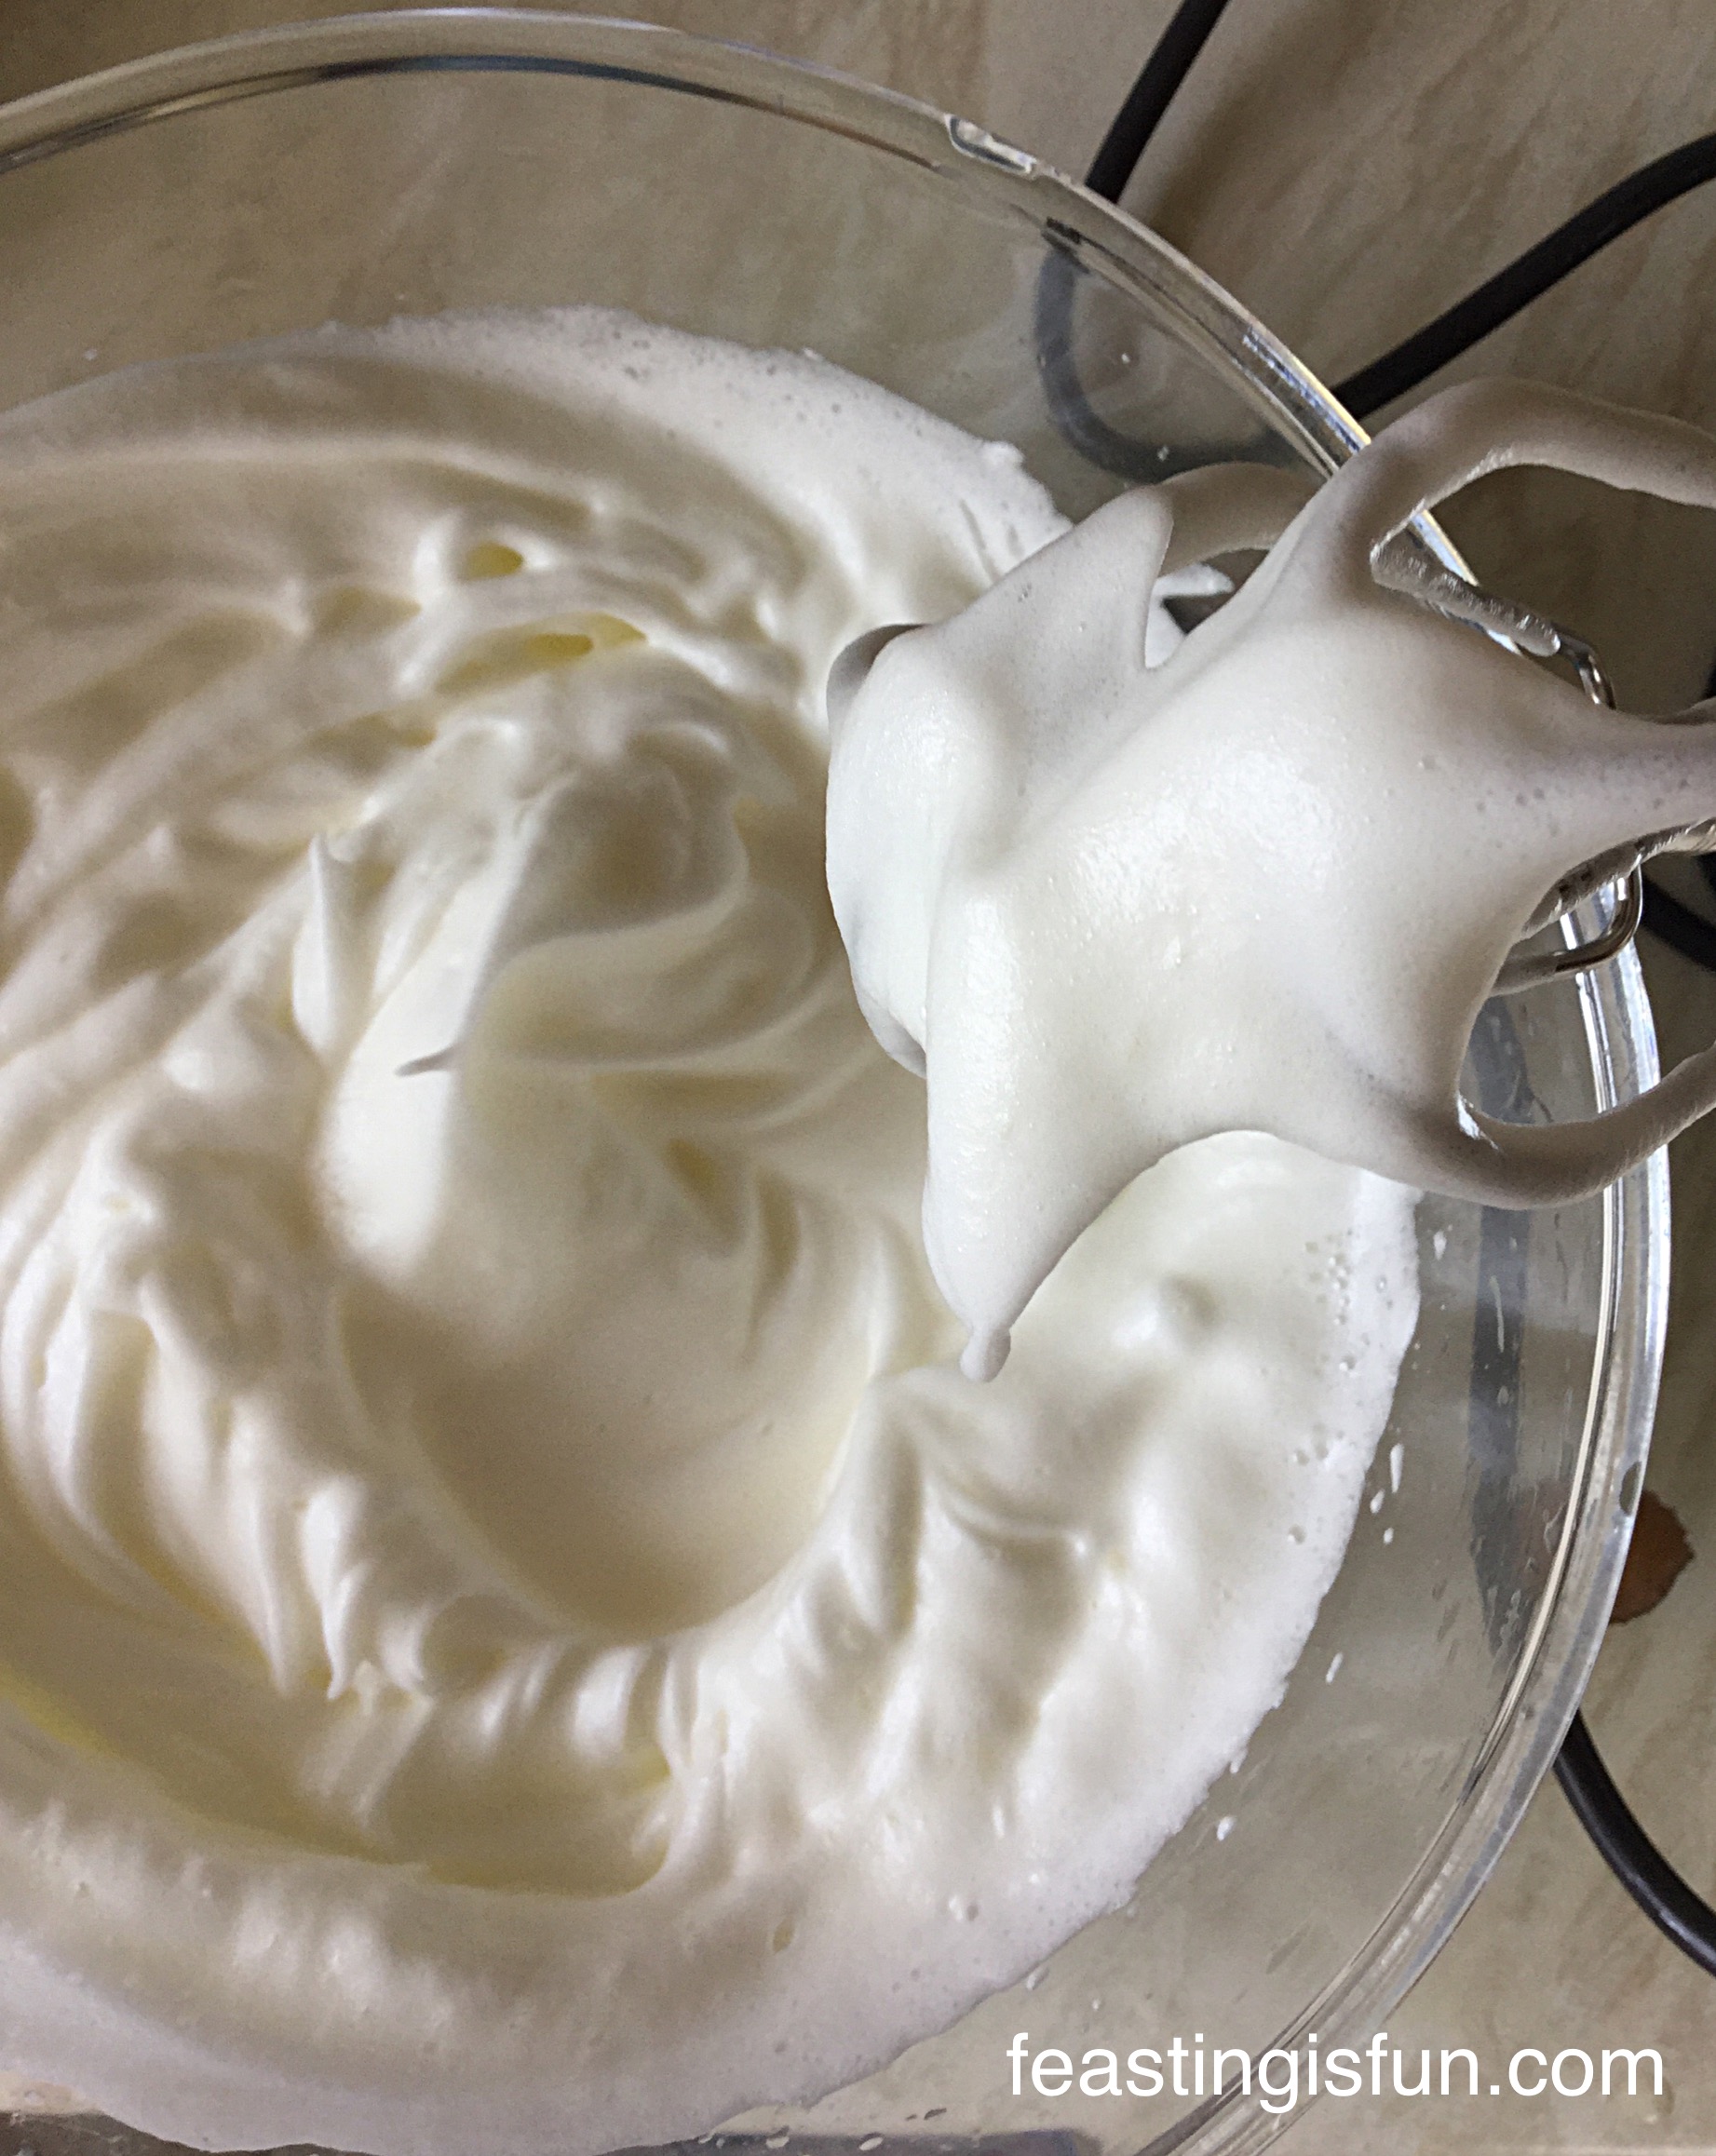
  • I couldn’t take a photo and hold the whisk up, but you can see the peaks in the bowl stand up and the egg white on the whisk didn’t move whilst I stopped to take a snap.
  • Resuming whisking on a high speed add the caster sugar 1 tablespoon at a time, or do as I did, pour it from a jug in a slow gentle stream so that it all becomes slowly incorporated into the egg whites.
FF Lemony Strawberry Pavlova
Beautifully glossy, satin meringue.
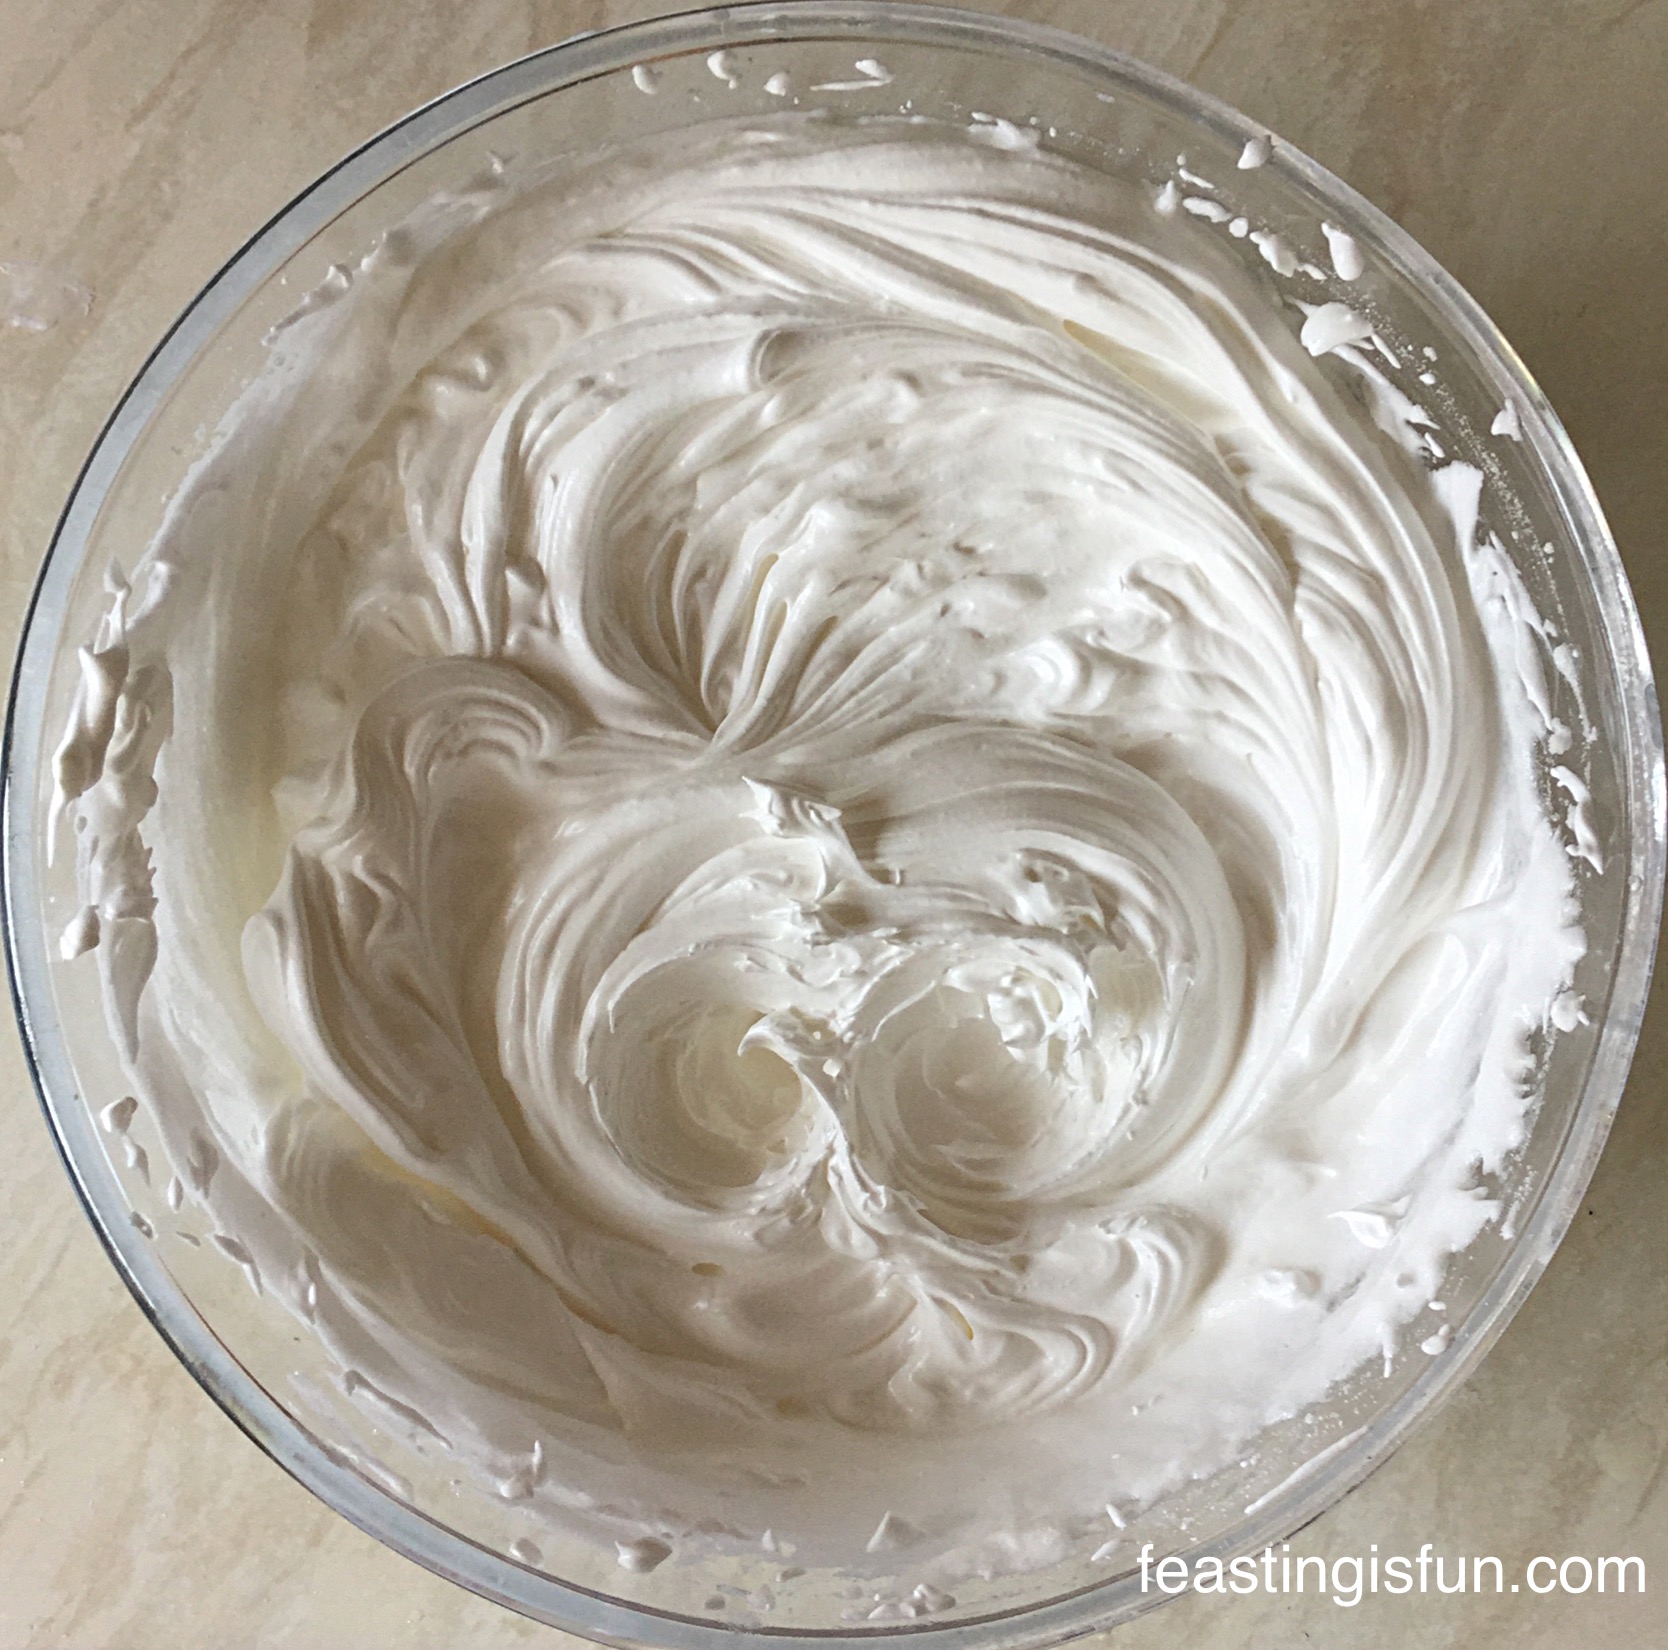
  • Once the meringue looks glossy, with a satin sheen, the meringue is mixed.
  • Add the corn flour and vinegar and gently fold into the meringue, so as not to knock out any of the air.
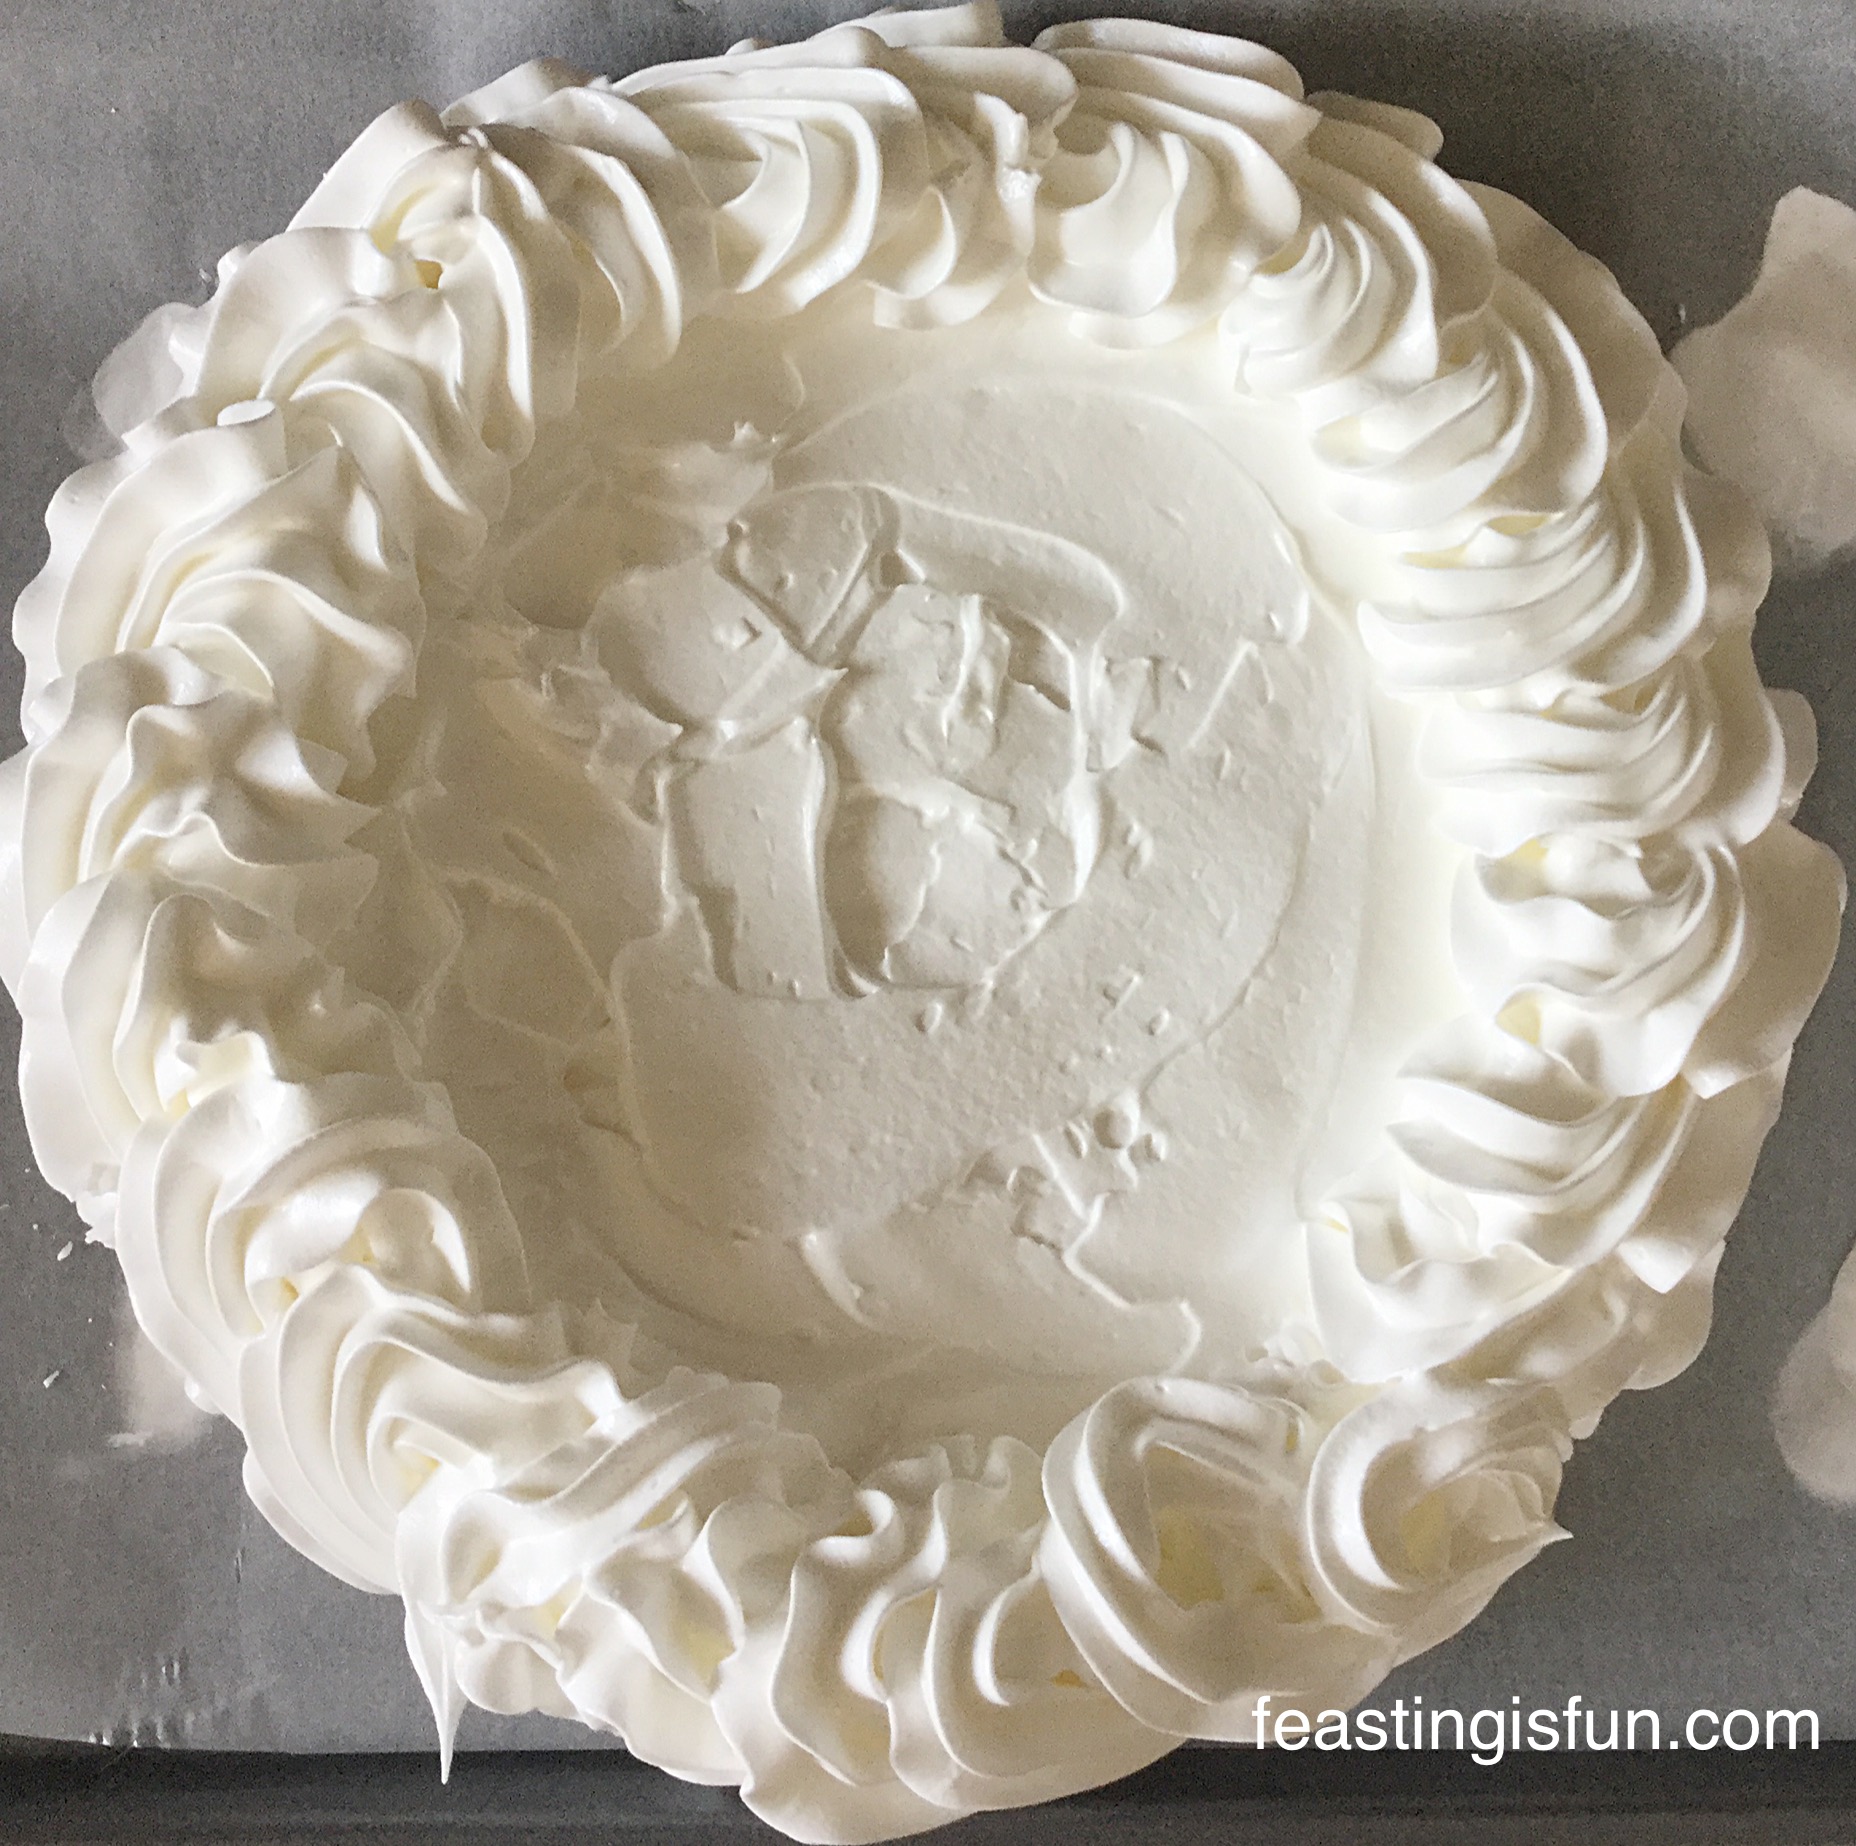
  • Draw a 25cm circle on a piece of baking parchment that fits onto a baking tray.
  • I drew round a 10″ cake pan.
  • Flip the baking parchment over and secure to the baking tray with a dob of meringue in each corner.
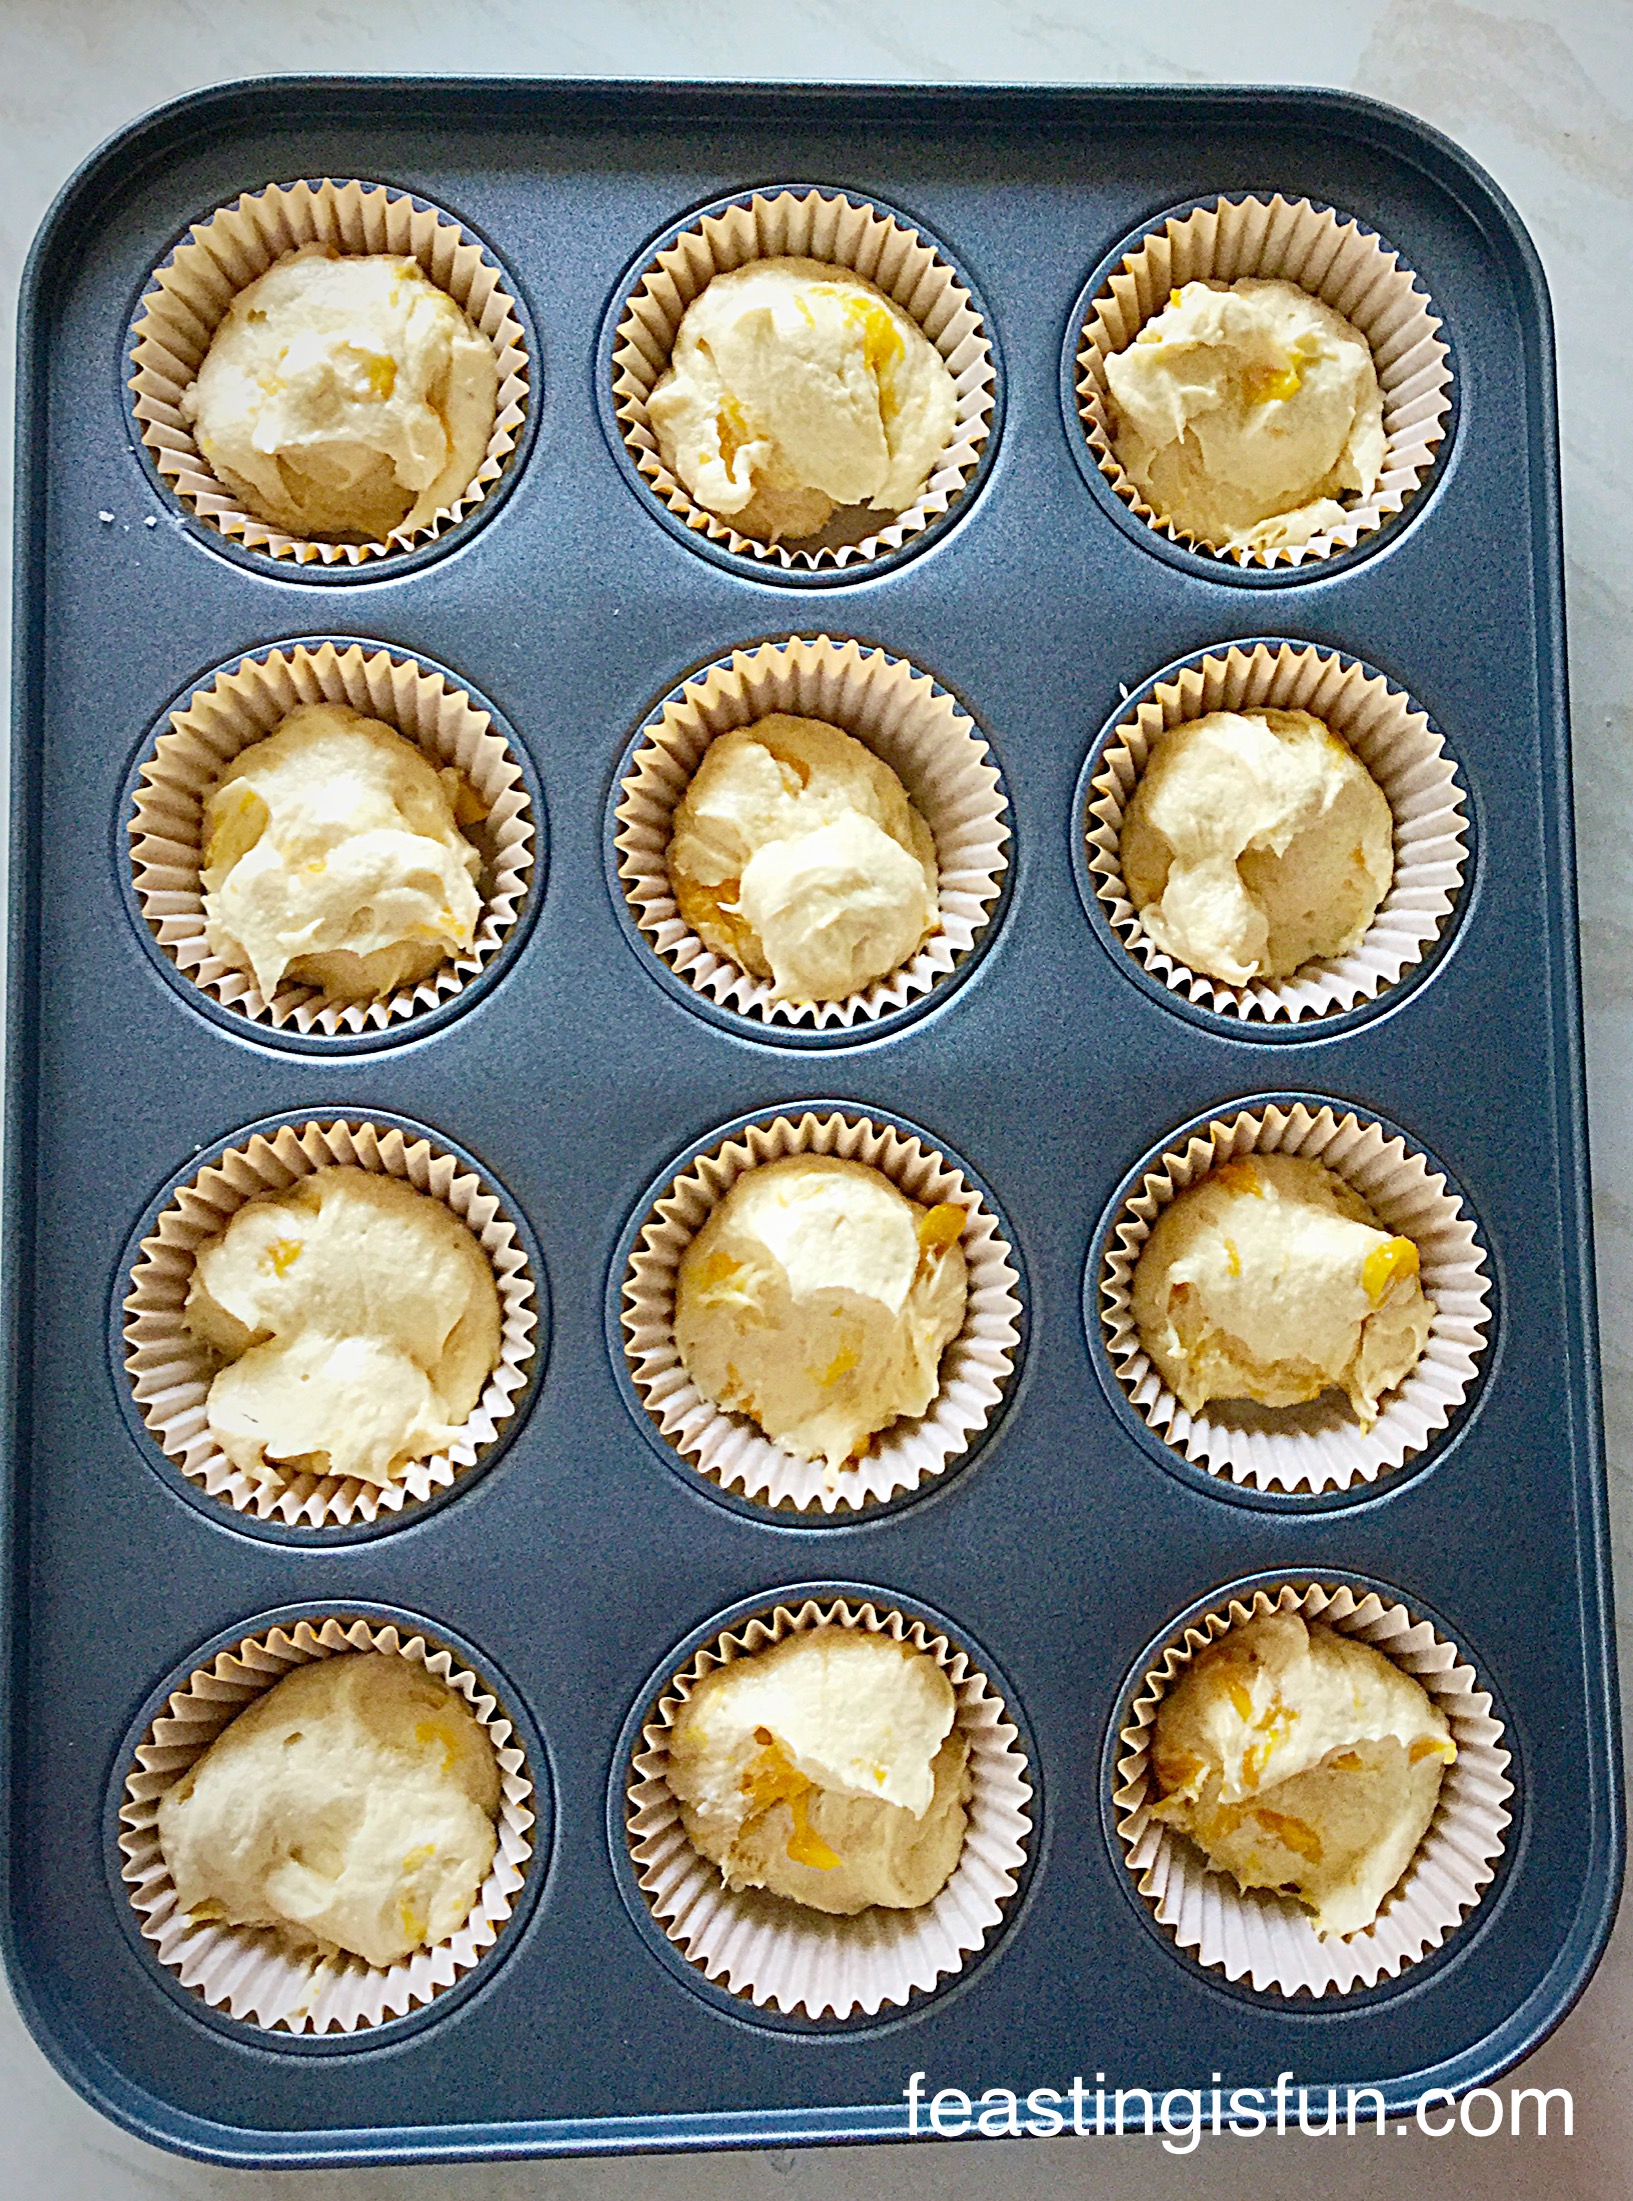
  • Scoop half of the meringue onto the middle of the disc.
  • Using a palette knife spread the meringue out so that it fills the marked circle, ensuring it is fairly level.
FF Lemony Strawberry Pavlova
The pavlova base.
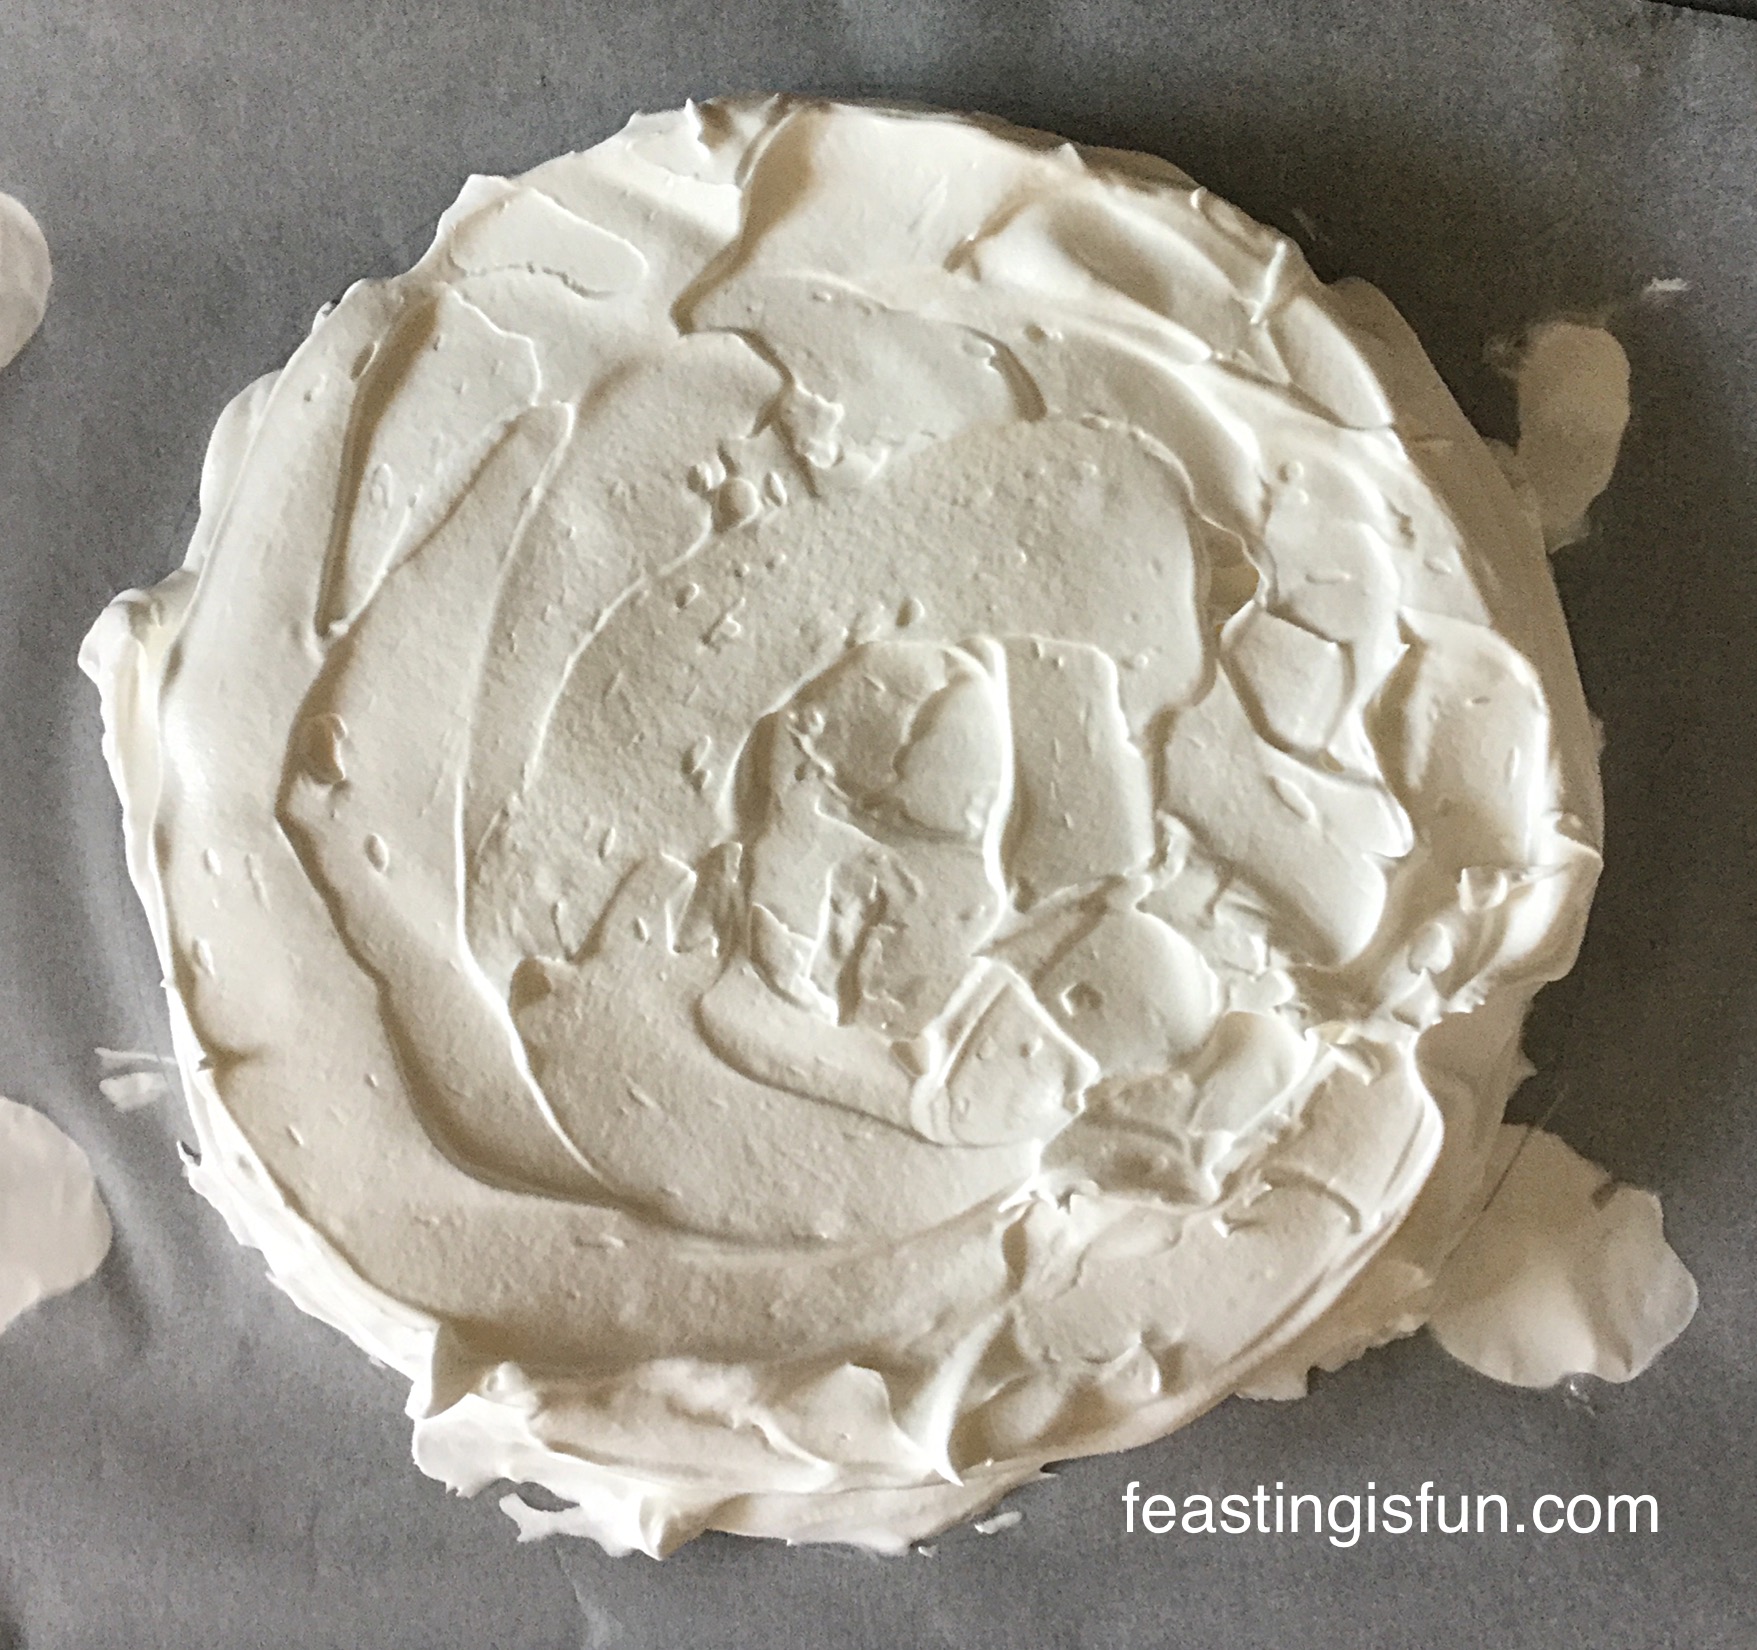
  • Fill a large piping bag, fitted with a large star tip, with the remaining half of the meringue.
  • Pipe a swirl pattern around the edge of the pavlova base.
FF Lemony Strawberry Pavlova
Piped swirls around the edge of the base give this pavlova a very pretty finish.
  • Place the meringue into the hot oven and immediately turn the heat down to 150C/130C fan, gas mark 2.
  • Bake for 1 hour 15 minutes – 1 hour 30 minutes.
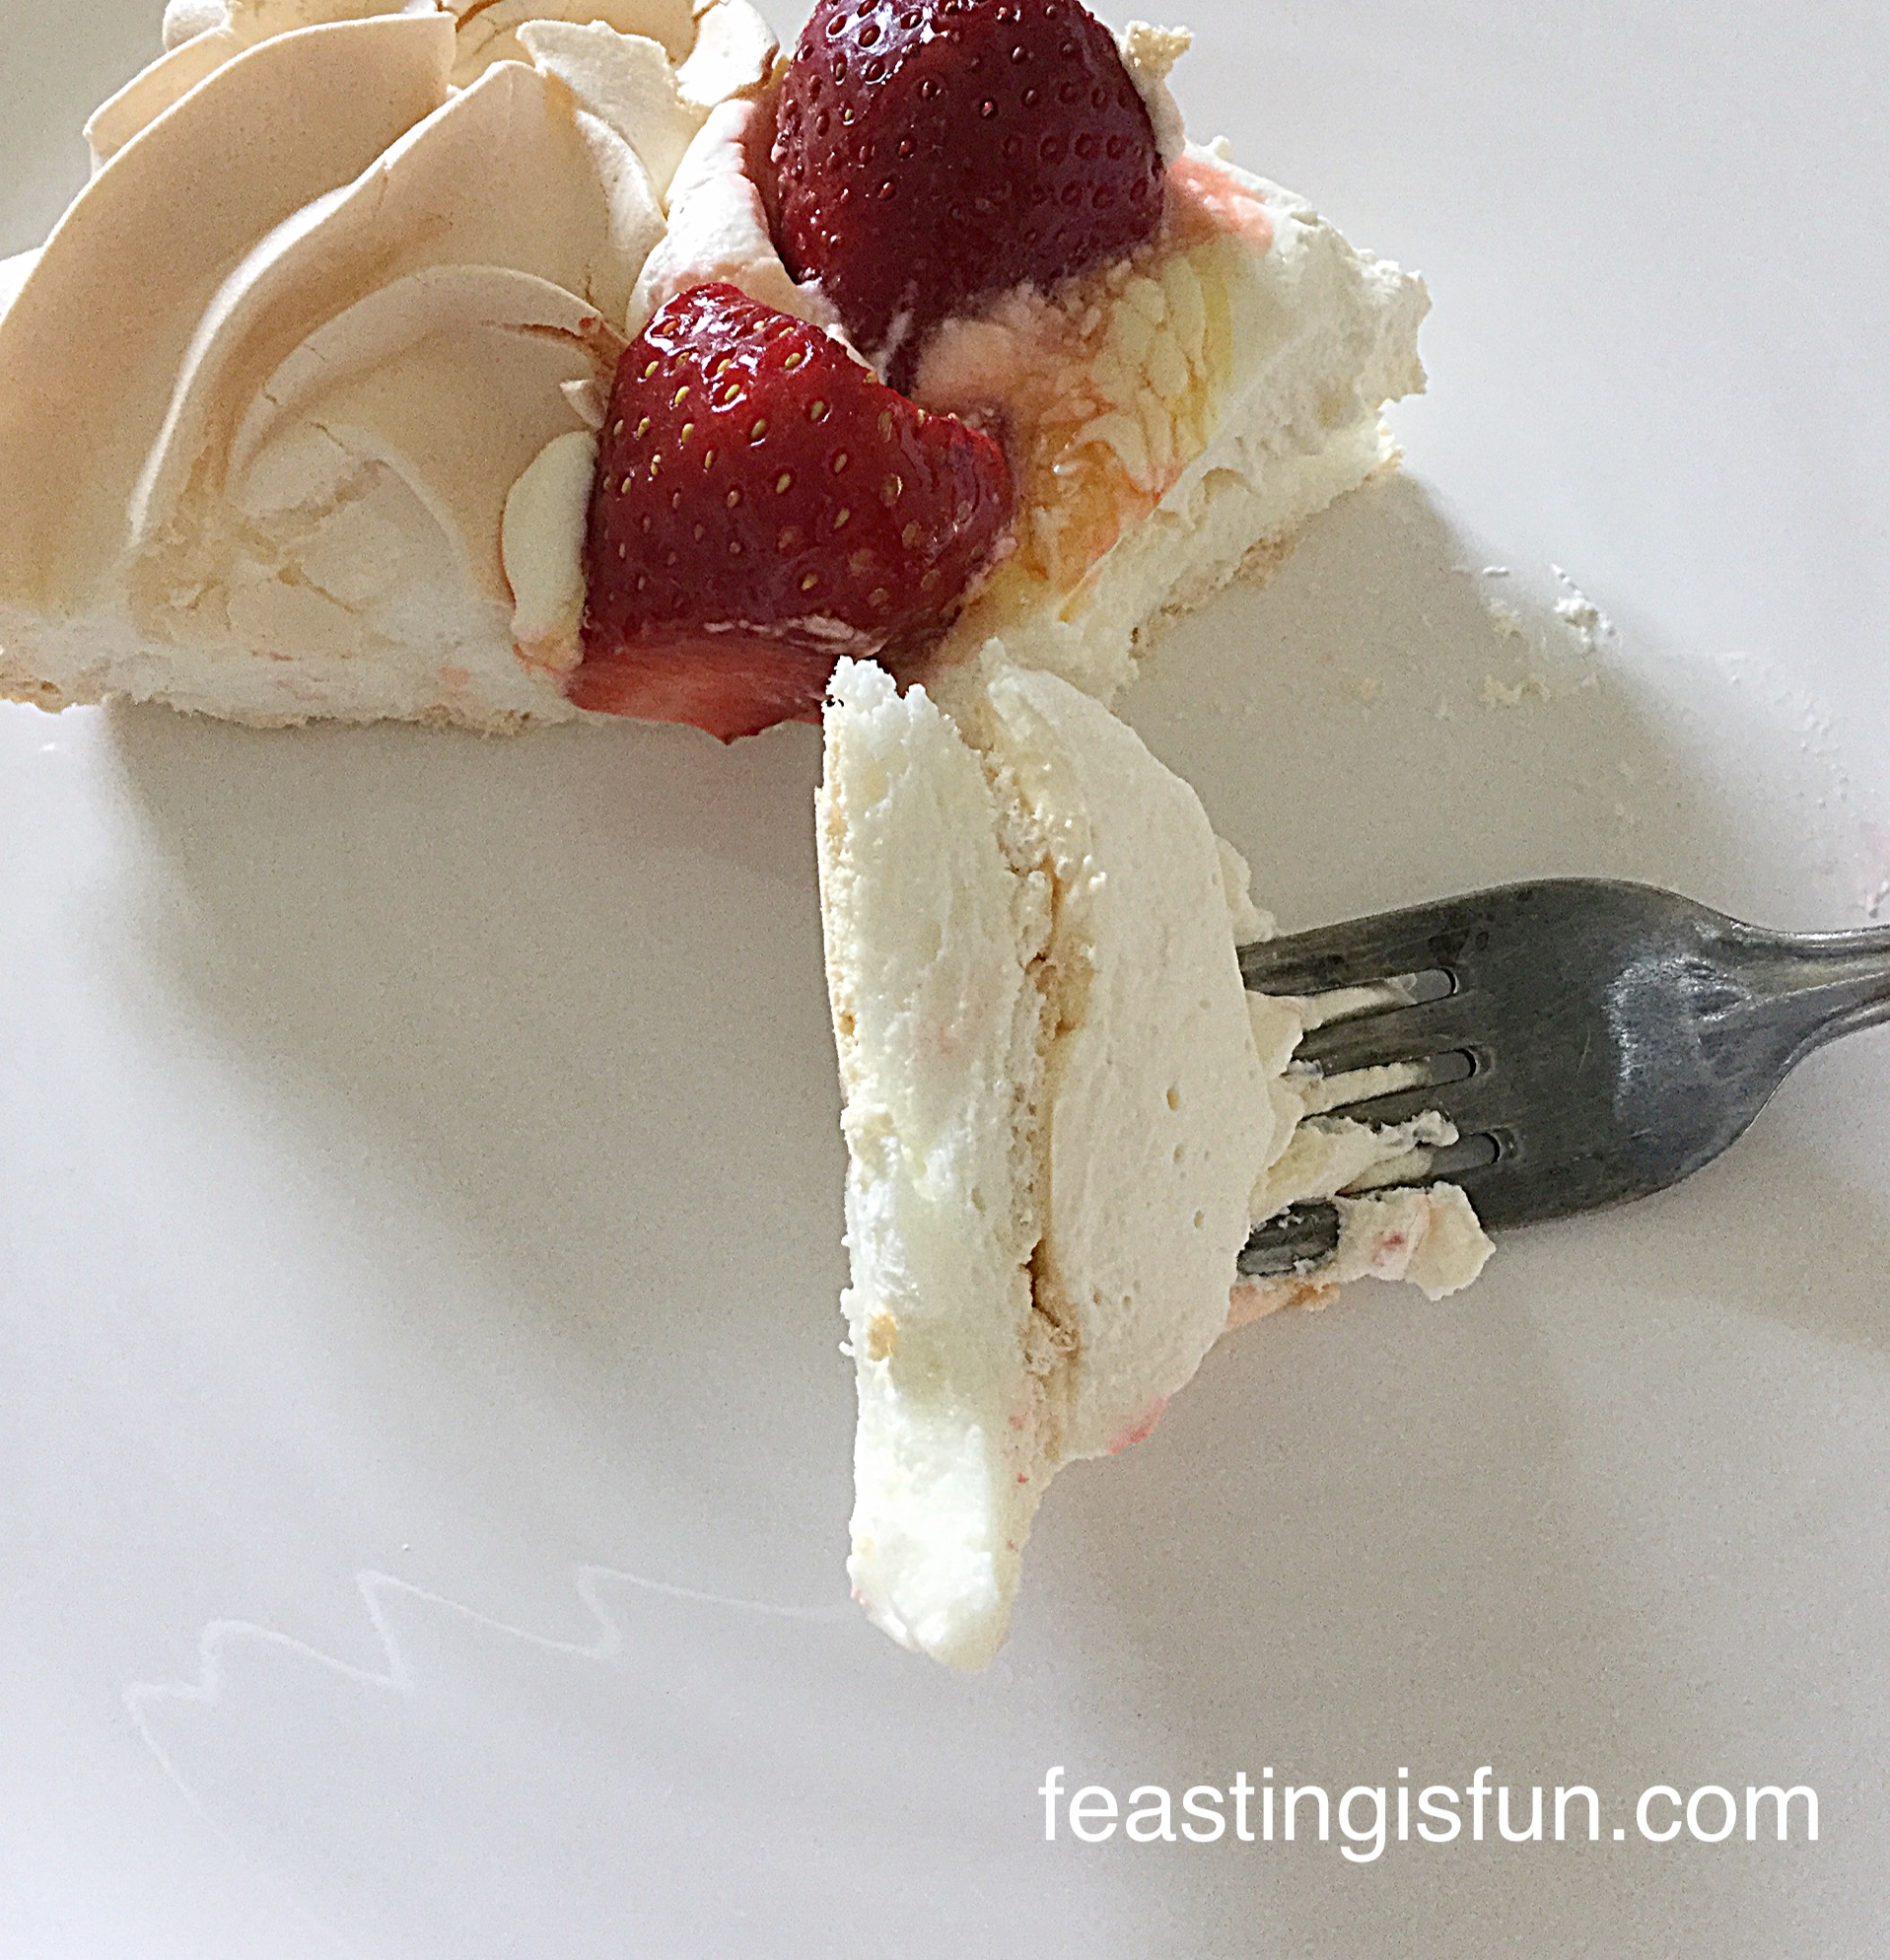
  • When baked the pavlova will have a hard outer shell with a hint of soft marshmallow deliciousness inside.
  • Remove from the oven and allow to cool on the baking tray.
  • Once cooled use a palette knife to slide under the pavlova and separate it from the baking parchment. Transfer to a cake stand or serving dish.
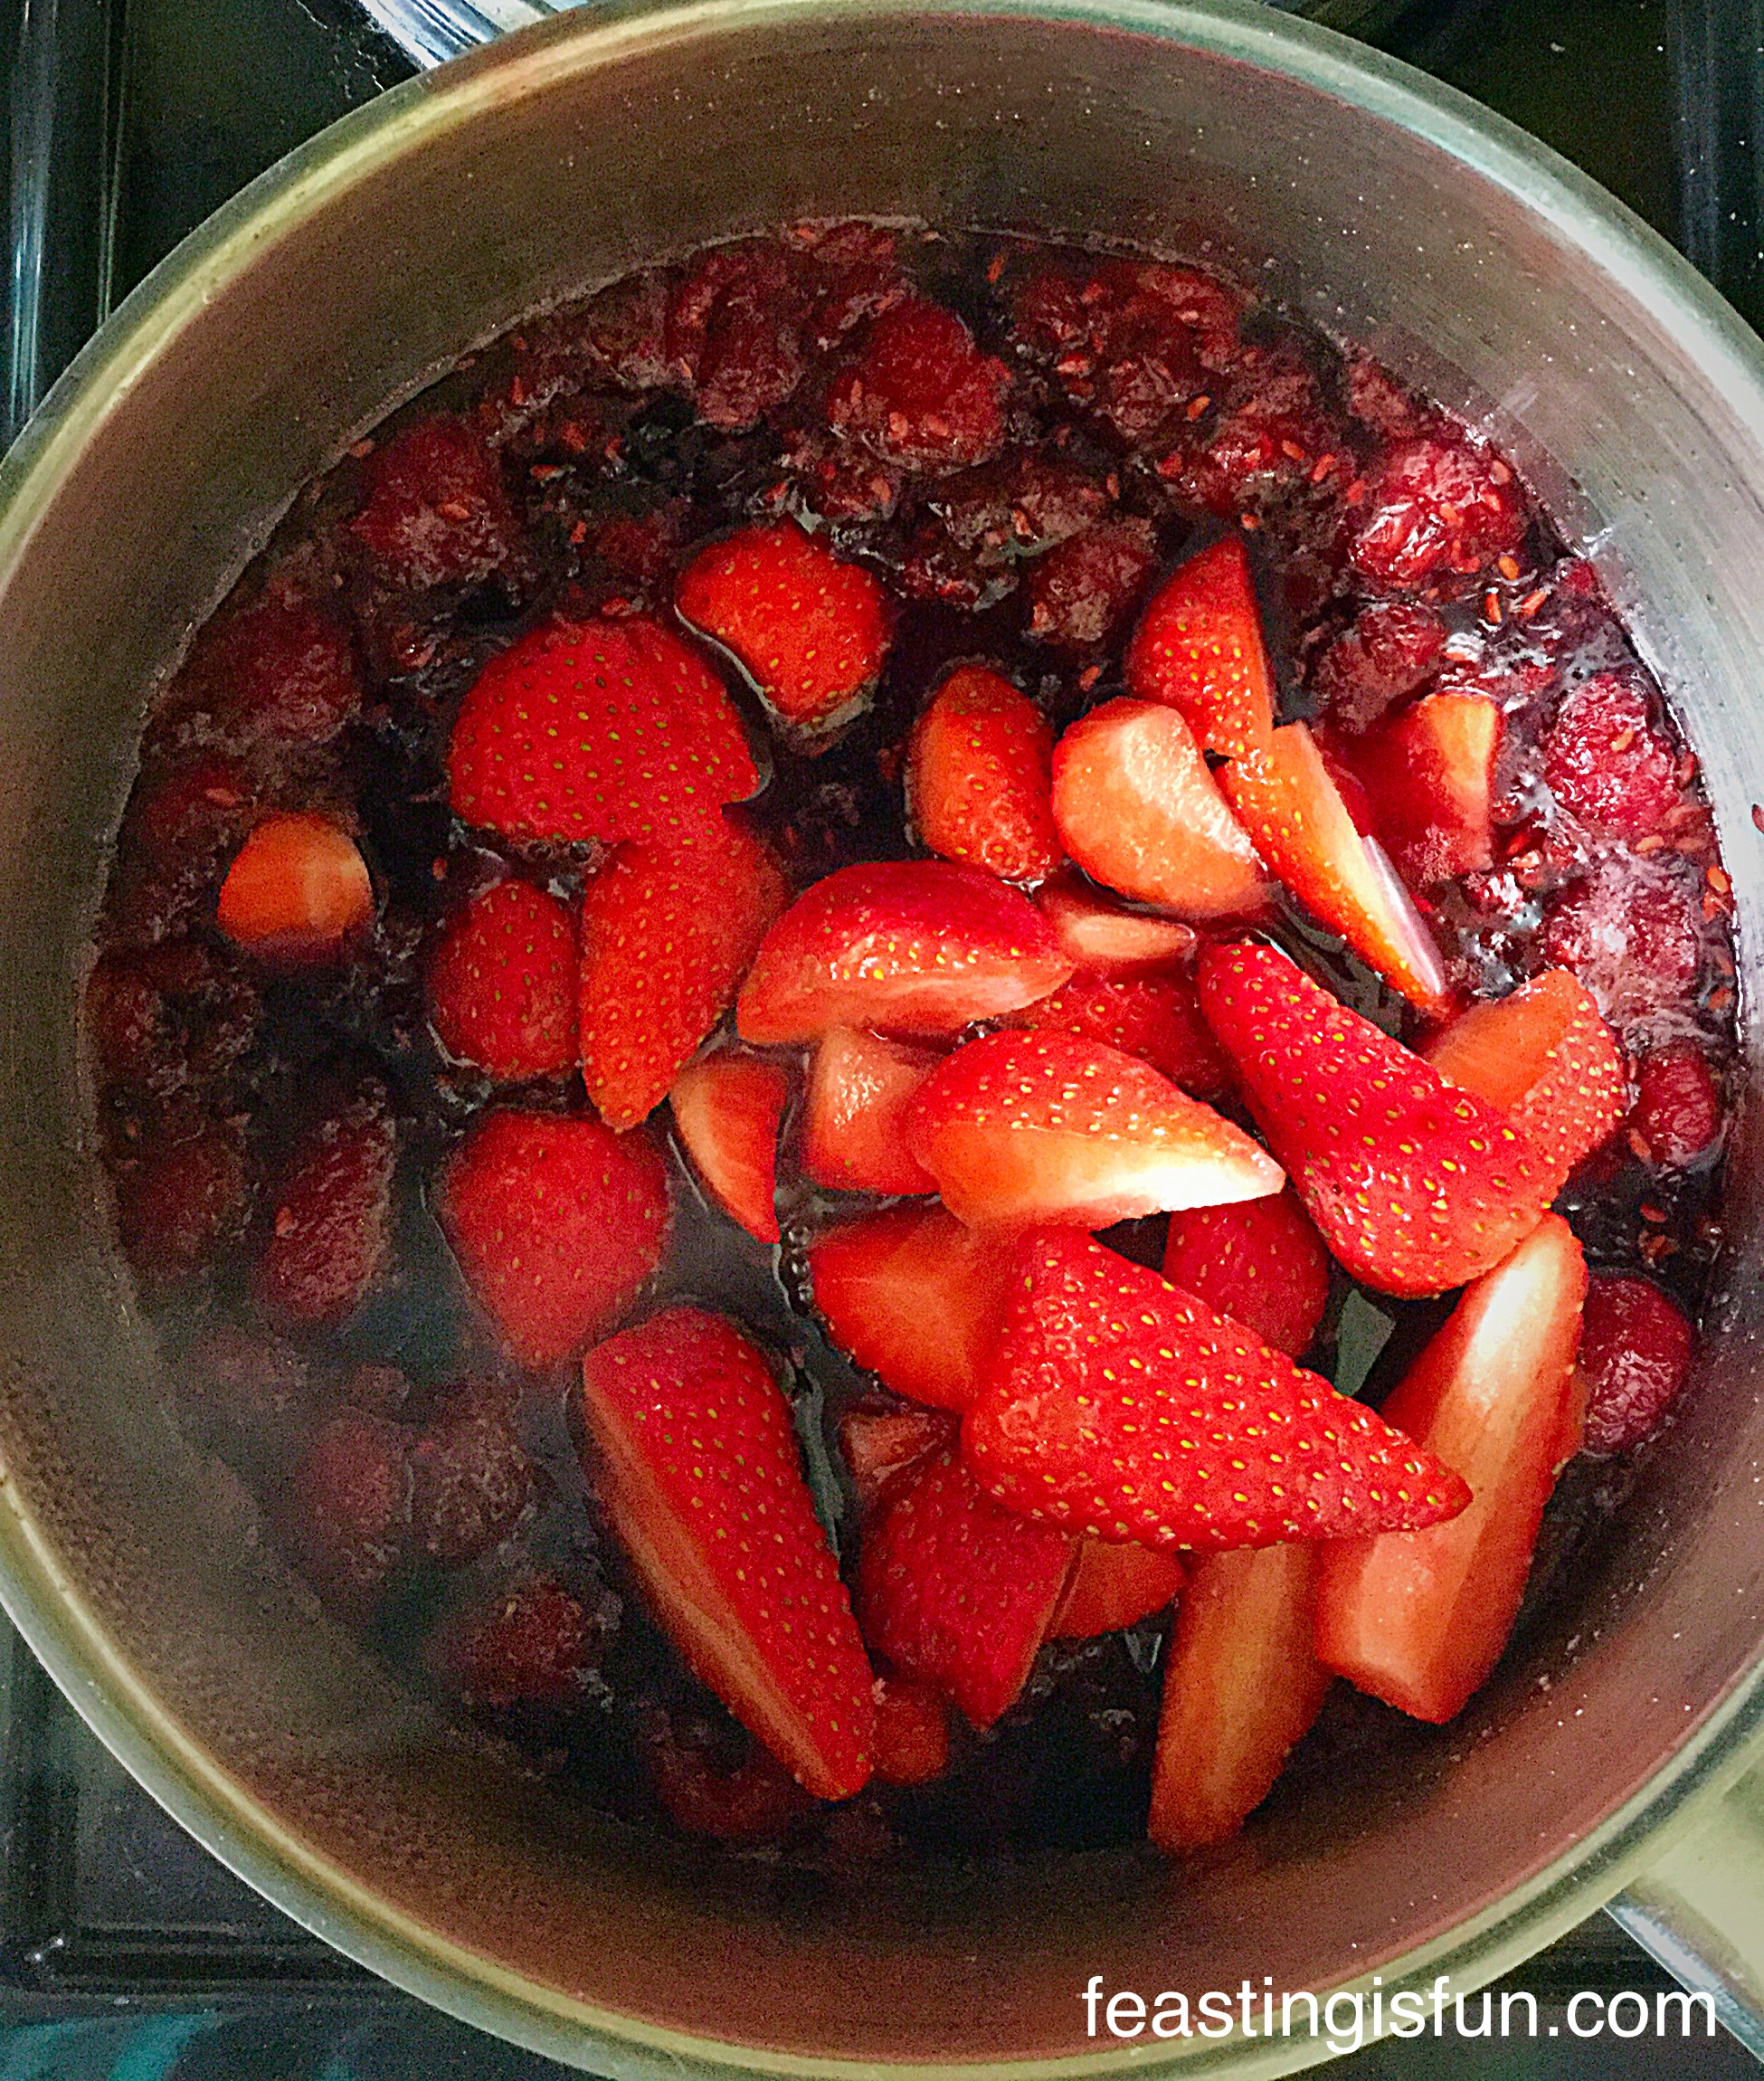
  • When ready to decorate, place the limoncello, juice of 1 whole lemon and tablespoon of caster sugar into a small pan. Bring to a bubble and reduce the heat until the liquid is about a quarter of its original volume.
  • Whilst the lemon drizzle is reducing, pour the double cream into a bowl and whisk until it has reached the floppy stage. It will not be stiff, just thickened enough to hold a figure of eight.
  • Spoon the whipped cream onto the inner part of the pavlova.
  • Decorate with strawberries.
FF Lemony Strawberry Pavlova
Concentrated lemon luscious drizzle.
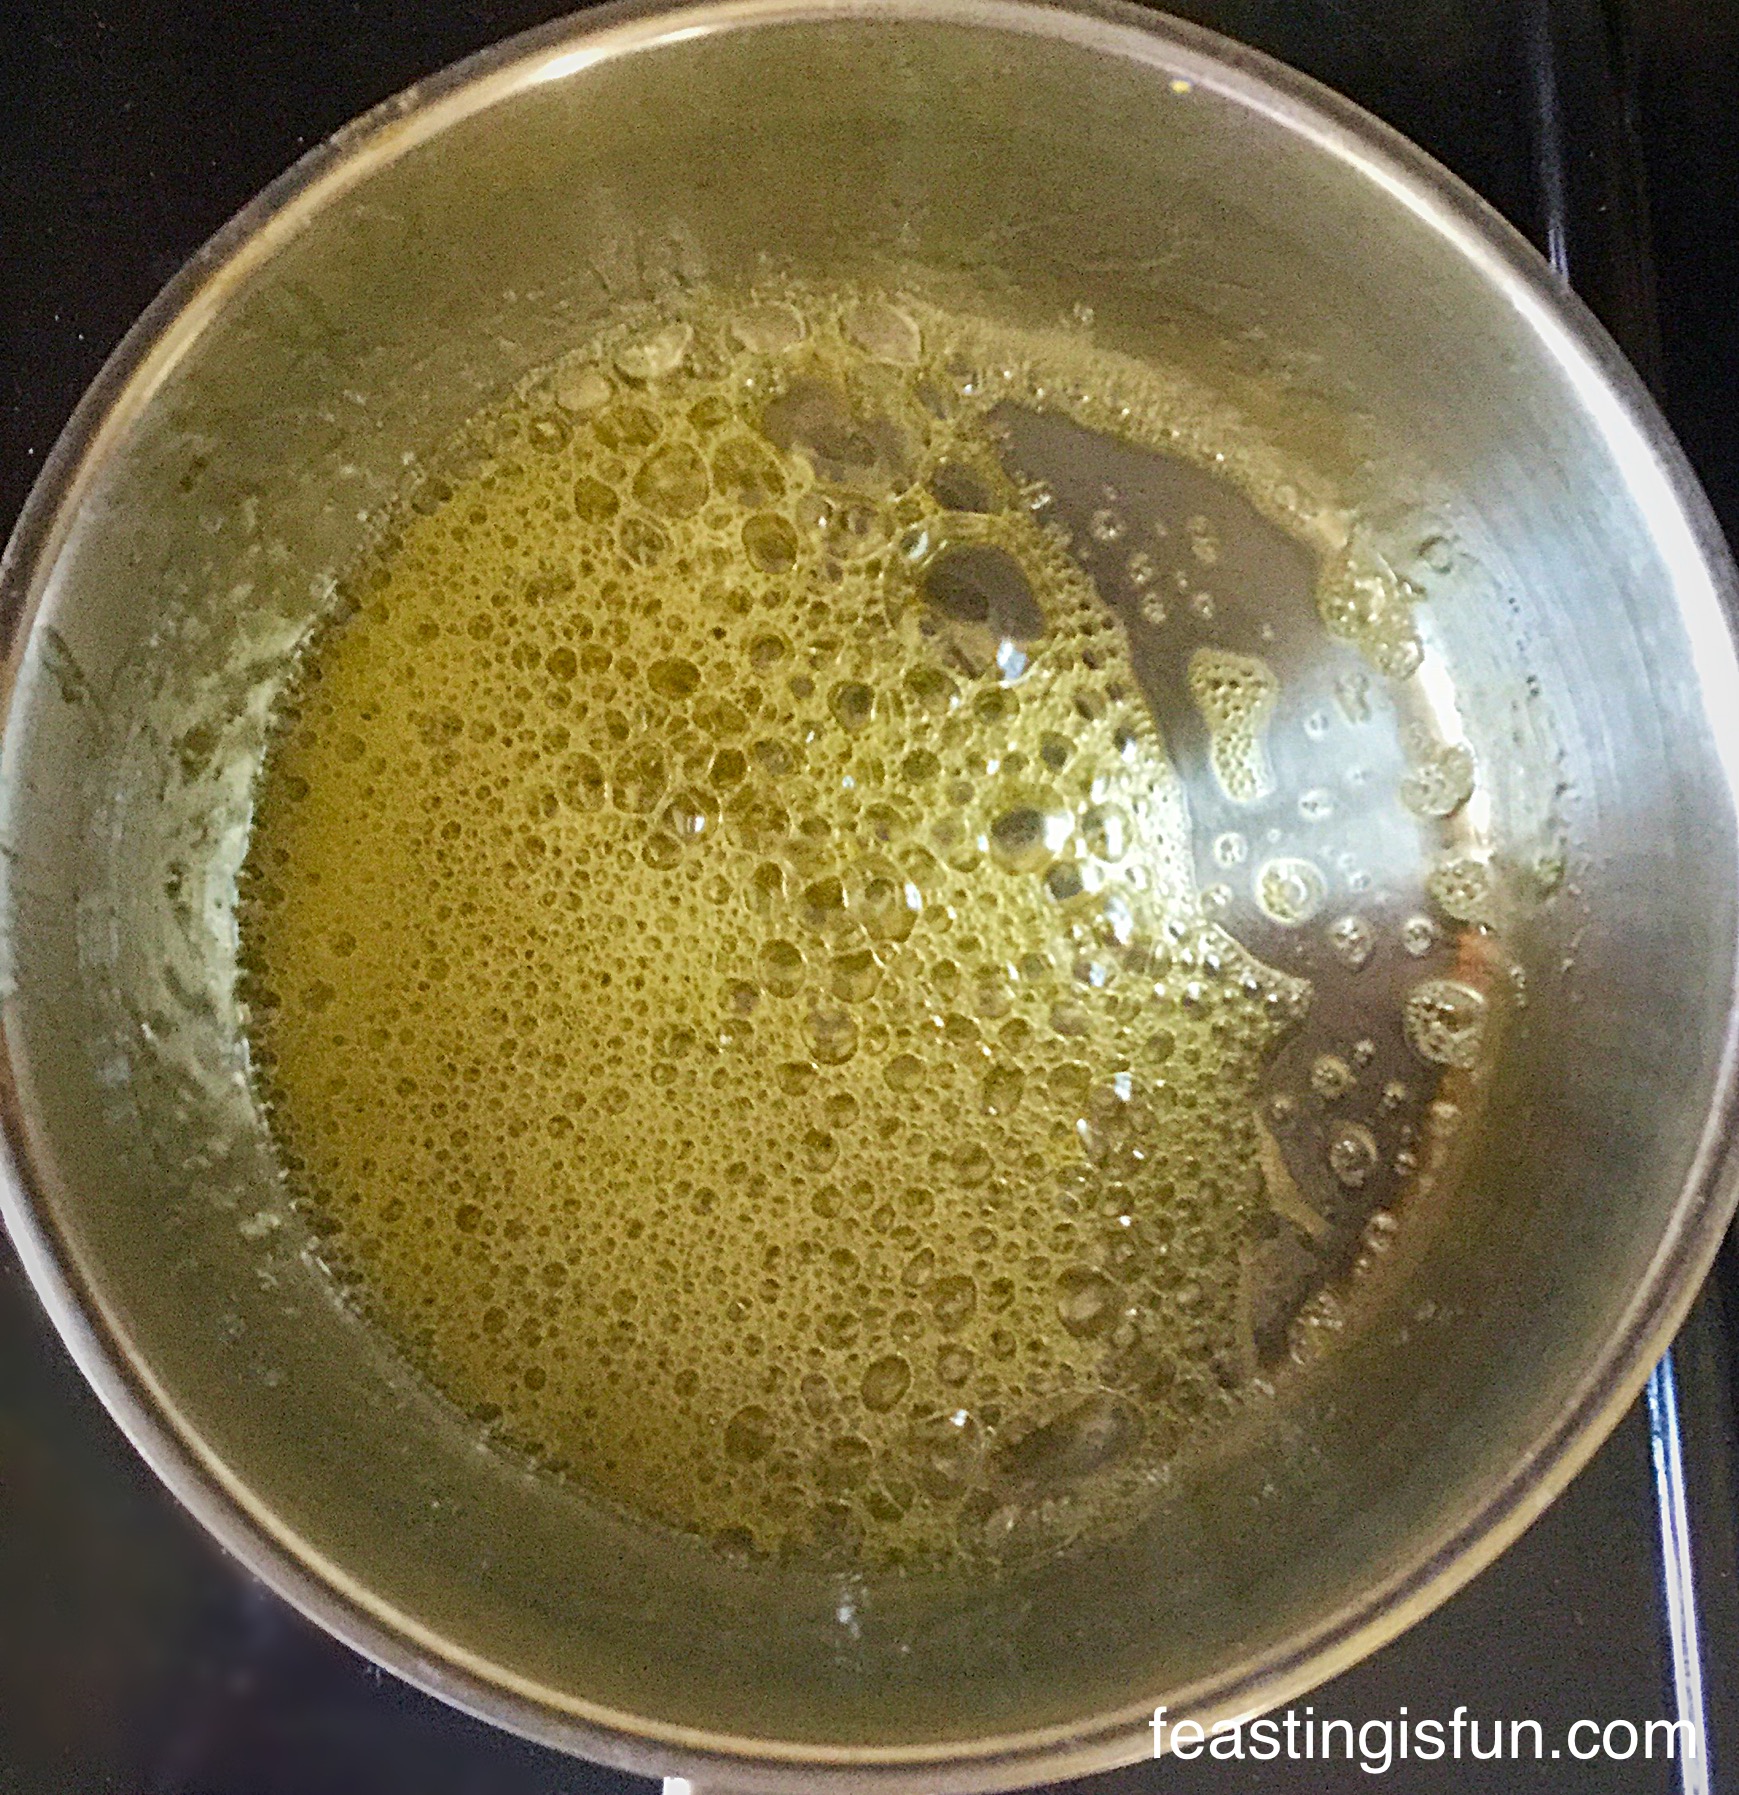
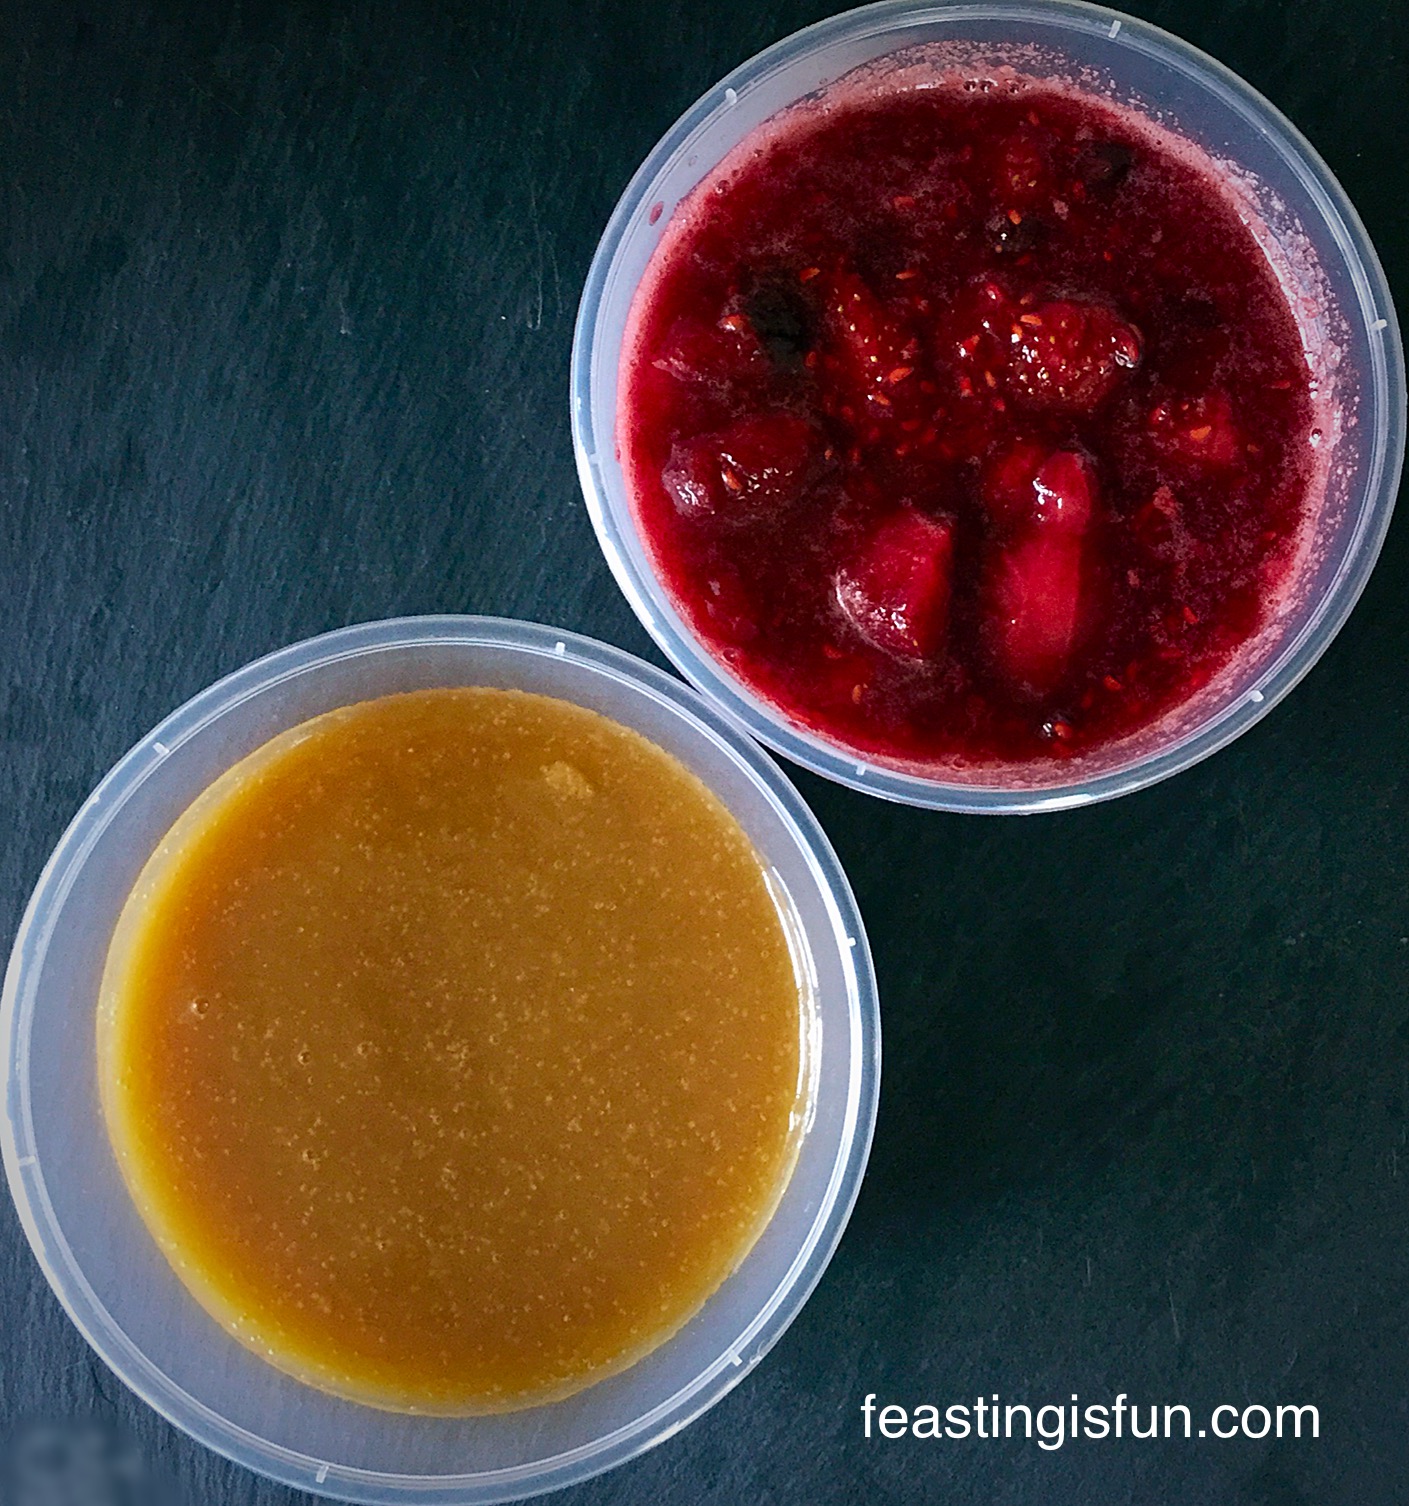
  • The concentrated lemon drizzle should look like the picture above.
  • Drizzle it over the strawberries, for an intensely lemon flavour.
  • Serve immediately.
FF Lemony Strawberry Pavlova
Lemony Strawberry Pavlova pretty delicious.

The lemon pavlova can be made, unfilled a day in advance. Store on the original baking parchment, but loosen it first with palette knife, wrap in cling film. The cream can be whipped ahead of time and stored covered, in the fridge. Make the drizzle and assemble just before serving.

This Lemony Strawberry Pavlova is sure to wow any dinner party guests and your family. It is so light and the lemon so refreshing, it is absolutely perfect for dessert after a heavy meal, such as a roast or curry.

One bite of this delicious delight and my mouth felt cleansed and ready for a second, third……. 😉.

Whilst I am unreliable at the best of times, I really am going to try to make one dessert a month. Yes really, a proper pudding, or lighter dessert during the warmer months. My husband will be a very happy man!

Are you a dessert person? Do you look at a restaurant menu, pick your dessert and plan your meal around it??

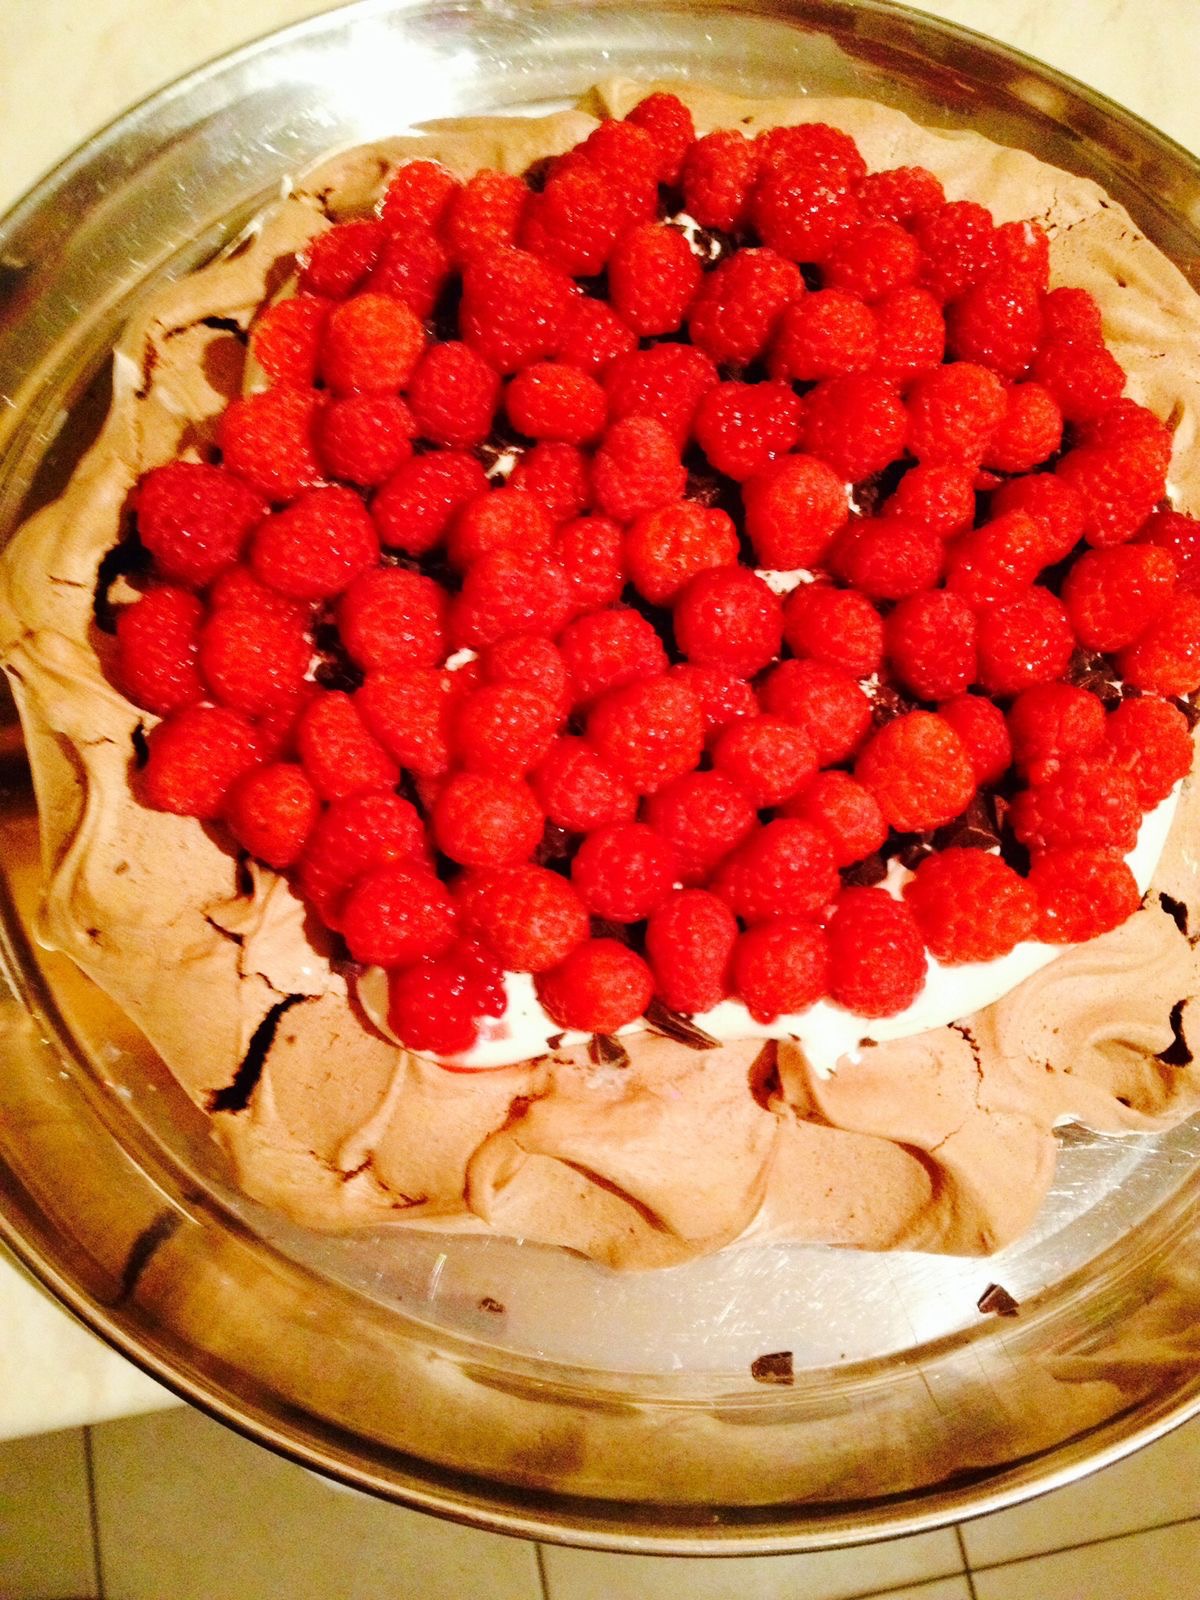
If you have enjoyed this Lemony Strawberry Pavlova here is my other pavlova dessert for you to try:

Raspberry Chocolate Pavlova

FF Raspberry Chocolate Pavlova
Raspberry Chocolate Pavlova soo good.

I love reading your comments, thank you for taking the time to leave them and keep them coming please? I’m usually around on Twitter most days, so if you have any cooking/baking dilemmas send me a tweet and I’ll do my best to get back to you? I may not always have the answers, but I belong to an awesome community of amazing cooks and bakers. Between us there isn’t usually much that we can’t help with!

Have fun whilst you are cooking/baking and remember a feast can be improved with good company.

Sammie xx


Share
Facebooktwitterpinterestlinkedintumblr

Raspberries Cream Giant Doughnut

Share
Facebooktwitterpinterestlinkedintumblr

Do any of you, my lovely readers have fears? I like to think that I don’t, yet I am never too happy with heights – the bridge in ‘Indiana Jones and the Temple of Doom’. I’m pretty sure I’d have to be blindfolded, gagged and carried across!! Another irrational fear I’ve had for a while has been baking with silicone. Because it looks like plastic to me and plastic melts in the oven – right? Well today I faced my fear and baked this delicious Raspberries Cream Giant Doughnut using a silicone mould!

And guess what – it didn’t melt!

FF Raspberries And Cream Giant Doughnut

Yep you can always trust Sammie to NOT be at the forefront of new baking technology 😉.

I cannot tell you what a relief it is to have finally baked using a silicone mould. So much so that I have to agree with friends that bake with silicone all the time, they are an absolute dream to work with. I’ve had these silicone giant doughnut moulds since the January sales, I like to ease into things gradually!!

FF Raspberries Cream Giant Doughnut
Raspberries Cream Giant Doughnut such a light fluffy sponge.

Seasonal Fruit And Vegetables Are Unbeatable

When baking and cooking I really try to use seasonal fruit and vegetables. So this Raspberries Cream Giant Doughnut has defrosted frozen raspberries in the middle. Because raspberries are most definitely not in season, however I find the frozen British raspberries from Waitrose are fantastic quality and perfect for use, as fresh fruit, during the colder months.

We grow quite a bit of fruit in our back garden, including raspberries, strawberries, cherries, apples, plums and pears – ooh blackcurrants, redcurrants and blackberries too. Last year wasn’t brilliant for raspberries in our garden, yet we had buckets full of cherries. Our children are duly dispatched to various neighbours houses, sharing the fruit.

FF Raspberry And Cream Giant Doughnut
Raspberries Cream Giant Doughnut perfect for afternoon tea.

In a good year when there is an abundance of raspberries I always try to freeze some down. Usually there are only enough for our trifle on Christmas Day, as we love eating them fresh, or turning them into jam. Raspberry jam has to be my absolute favourite and I was going to make a small batch of fresh jam to use in this Raspberries Cream Giant Doughnut – however, my body had other ideas.

Keeping Positive

Rather I focus on the positives, those being: this Raspberries Cream Giant Doughnut is so easy to make, bake and decorate. And on top of that, once the doughnut is assembled and sliced into – well, the flavour is outstanding. Resulting in a sponge that is lighter than light, the ‘fresh’ raspberry tartness works well with the sweetness of the jam and the hint of almond in the glacé icing, adds that extra level of flavour.

Recipe: Makes one Raspberries Cream Giant Doughnut

At a guess I’d say this should serve 8-10 people, but there again if they want seconds…….

200g/7oz Unsalted Butter – softened plus 1tbsp extra for grasing the doughnut moulds

200g/7oz Caster Sugar

1tsp Vanilla Bean Paste – can substitute for vanilla extract – I use Nielsen-Massey

5 Large Free Range Eggs

200g/7oz Plain Flour

1.5tsp Baking Powder

1/4tsp Salt – I use Maldon

For the filling:

3-4tbsp Raspberry Jam for my homemade recipe see here

150g/5oz Fresh or Defrosted Raspberries

300ml/ 1/2 pint Double Cream + 1tsp Caster Sugar

For the icing:

100g Icing Sugar – sifted

1/2tsp Almond Extract – again I use – Nielsen-Massey

Pink Gel Food Colouring

Sprinkles of your choice

Method: Preheat the oven to 160C/140C fan, gas mark 3, 325F

Making The Doughnut Batter

FF Raspberries Cream Giant Doughnut
The two silicone doughnut moulds.
  • Grease both of the doughnut moulds with butter – remembering to grease the middle section that will make the doughnut hole.
  • Into a large bowl add the butter and sugar.
  • Whisk/beat together for 5 minutes. This is important as it will help the sponge be very light and tender.
  • Add the vanilla bean paste and whisk/beat for a further 2 minutes.
  • Add all 5 eggs to the bowl.
  • Sift in the flour, baking powder and salt.
  • Whish/beat slowly until the ingredients have just come together.
  • Use a rubber/silicone spatula to give the mix a couple of stirs, ensuring all the ingredients, especially from the bottom of the bowl are combined.
  • Carefully spoon half of the batter into each of the doughnut halves.
  • Smooth the top of the batter for an even bake.
  • Place the doughnut halves, making sure they do not touch, on a baking tray and place in the middle of the oven.
FF Raspberries Cream Giant Doughnut
Fill each doughnut mould with half of the mixture.

Baking The Doughnut Halves

  • Cook for 40-50 minutes. Mine took 45 minutes.
  • The doughnut is cooked when it is golden and springs back from a light touch. You will also notice, from the picture below that the cake has started to come away from the side of the mould.
  • As soon as the giant doughnut halves are baked remove from the oven and place onto a cooling rack for 10 minutes.
FF Raspberries Cream Giant Doughnut
Move the moulds onto a cooling rack.
  • After 10 minutes cooling in the mould has elapsed, gently tip each doughnut half out of its mould.
  • Allow to cool completely on the rack
FF Raspberries Cream Giant Doughnut
Two halves of a giant doughnut cooling on the rack.

Filling And Decorating The Raspberries Cream Giant Doughnut

  • As soon as both halves are cooled the doughnut can now be decorated.
  • Place one half, flat side up, on a pretty serving plate, board or cake stand.
  • Carefully spread the raspberry jam so that it covers the flat surface.
  • Arrange the raspberries in a pattern, on top of the jam.
FF Raspberries Cream Giant Doughnut
The bottom layer is decorated.
  • In a bowl add the double cream and sugar.
  • Whisk until it just holds a stiff peak.
  • Fit a large piping bag with a #1M Wilton large star tip.
  • Fill the piping bag with the whipped cream.
  • Pipe a swirl pattern around the middle of the bottom layer.
  • Pipe stars all around the inside and outside edge of the doughnut half.
FF Raspberries Cream Giant Doughnut
Piped swirls and stars of freshly whipped cream.
  • Place the other doughnut half on top of the fruit and whipped cream, curved side facing up. You now have a giant doughnut!!
  • To make the icing, sift the icing sugar into a small bowl, add the almond extract.
  • Add 2tsp of water and mix, then add a tiny bit of pink gel colouring using a cocktail stick.
  • The icing consistency needs to be thick but still pourable – add a little extra water to achieve this.
  • Using a spoon, drizzle the thick icing over the top of the doughnut, as shown in the picture.
  • Finally add your sprinkles before the glacé icing sets.
FF Raspberries Cream Giant Doughnut
Finished with almond glacé icing and pretty pearlised sprinkles.

Serve the Raspberries Cream Giant Doughnut sliced with a nice cup of afternoon tea.

FF Raspberries Cream Giant Doughnut
Raspberries Cream Giant Doughnut

If you have enjoyed this Raspberries Cream Giant Doughnut recipe you may also like these:

Raspberry Almond Cream Cake

FF Raspberry Almond Cream Cake
Raspberry Almond Cream Cake

Lemon Drizzle Whipped Cream Filled Giant Doughnut 

FF Lemon Drizzle Whipped Cream Filled Giant Doughnut
Lemon Drizzle Whipped Cream Filled Giant Doughnut

Black Forest Giant Doughnut 

FF Black Forest Giant Doughnut
Black Forest Giant Doughnut

While Sunday tea may not be a national tradition anymore, sometimes it’s nice to have a beautiful slice of something delicious, mid afternoon, just because you can!

Since I find baking a pleasure not a burden. Yet, sometimes it is nice to share things out, that way we all get to enjoy each other’s bakes!

Personally I’m all for tradition and think bringing back a proper Sunday afternoon tea, where all the family gathers together, is a brilliant idea. Perhaps not every week, although there is nothing wrong with that. Rather, once a month, with everyone contributing so that the burden of baking doesn’t fall on only one pair of shoulders.

Whatever you make and bake in your kitchen, remember feasting really is fun, especially when we share with others.

Sammie xx


Share
Facebooktwitterpinterestlinkedintumblr

Marshmallow Frosted Mango Cupcakes

Share
Facebooktwitterpinterestlinkedintumblr

At long last, today is the first day of Spring! And as the sun shone this morning I listened to birds chirping in the garden. While people are outside in the sunshine mowing their lawns I was inspired to create a cupcake that celebrates the passing of Winter. So, here are my gluten free Marshmallow Frosted Mango Cupcakes.

FF Marshmallow Frosted Mango Cupcakes

Sarah at Heavenly Marshmallows sent me a selection of her homemade, artisan marshmallows. Since the selection included nine mango and passionfruit flavour I decided to use them in a recipe.

Because the mango and passionfruit marshmallows are gluten free I decided to make a gluten free cupcake, with mango in the cake batter.

HM Marshmallow Frosted Mango Cupcakes
Marshmallow Frosted Mango Cupcakes

While making gluten free cupcakes was first for me, I also wanted to incorporate the delicious mango and passionfruit marshmallows into the frosting. Since I had seen lots of different marshmallow frosting ideas on Pinterest. However, after reading through a few different recipes, as usual I decided to come up with something of my own.

Marshmallow Frosted Mango Cupcakes

The Gluten Free Taste Test

So, for these Marshmallow Frosted Mango Cupcakes I decided to make two cake batters. As can be seen, the first gluten free batch of cupcakes are baked in yellow cupcake cases. Because the cupcake wrappers are yellow floral they are ideal for Spring.

While the second batch are in the orange wrappers and are made using plain flour, that is NOT gluten free. Since no one in our home is gluten intolerant, my wonderful family were to serve as ‘taste testers’, in a blind taste testing.

FF Marshmallow Frosted Mango Cupcakes
Marshmallow Frosted Mango Cupcakes

Each batch of cake batter had some mango added to it. Because I didn’t have any fresh mango, I used mango from a pot in juice. Mashing up the mango with a fork and adding it to the cake batter. And, in both bakes, the mango stayed evenly distributed throughout the baked cupcake. Finally, I had successfully made gluten free cupcakes, with a good texture.

Marsmallow In The Frosting?

The Success Of Marshmallow Frosted Mango Cupcakes

Next came the frosting, which wasn’t as daunting as I’d imagined. While the hardest part was saying goodbye to each of the 8 mango and passionfruit marshmallows as I put them in a heatproof bowl, over a double boiler.

Effectively this dreamy marshmallow frosting is buttercream, with melted marshmallows added to it.  While there’s a bit more to making it than that, it is no more difficult than making a chocolate ganache, that is then whipped and piped.

FF Marshmallow Frosted Mango Cupcakes

Rather than the sticky, sweet, frosting I’d imagined, the opposite was true. Resulting in marshmallow frosting that is the stuff of dreams, where fairies and unicorns live and rain falls like glittery sprinkles. I took myself off into my dream world there. And the result is amazing. Because, the melted marshmallows lighten the buttercream frosting. Resulting in a mallow, sponginess, that doesn’t set hard and melts, almost like sherbet on your tongue.

Recipe: Makes 12 Marshmallow Frosted Mango Cupcakes

Alternatively these cupcakes can be made with regular wheat flower. Substitute the same quantity of plain white, wheat flour instead of gluten free flour. Method and cooking times are exactly the same.

For the Mango Cupcakes

100g/4oz Unsalted Butter-at room temperature

100g/4oz Caster Sugar

2 Large Free Range Eggs

1tsp Vanilla Extract – I use Nielsen-Massey

100g/4oz Gluten Free White Flour – I use Doves Farm

1tsp Baking Powder – Waitrose Cooks’ Homebaking baking powder as it is gluten free – check yours not all brands are gluten free.

1/4 tsp Salt – I use Maldon

75g/3oz Fresh or Tinned Mango – any juice strained off and mango mashed with a fork.

For the Marshmallow Frosting

Heavenly Marshmallows Mango and Passionfruit flavour marshmallows – see note at bottom of post Art of Mallow

1tbsp Glycerine

300g/11oz Icing Sugar – sifted

150g/6oz Unsalted Butter – very soft

3tsp Boiling Water

Sprinkles of your choice

Making And Baking The Mango Cupcakes

  • First of all, place 12 cupcake cases in a cupcake or muffin tin.
  • Add the caster sugar,vanilla and butter into a medium sized bowl and whisk/beat together until pale and creamy.
  • Sift in the gluten free flour, baking powder and salt.
  • Add 2 eggs.
  • Whisk/beat until all the ingredients have come together and the batter is smooth.
  • Always take care to not over mix the cake batter.
  • Add the mashed mango and fold into the cake batter.
  • Spoon the cupcake mixture evenly into the cupcake cases.
HM Marshmallow Frosted Mango Cupcakes
Mango Cupcakes ready for the oven.
  • Bake in the middle of the oven for 25-30 minutes. The low slow cooking will ensure flat tops, perfect for frosting.
  • The cupcakes are baked when they are golden brown and spring back from a light touch.
  • As soon as the cupcakes are baked remove from the oven.
  • Allow to cool for 5 minutes in the tin.
  • Remove the cupcakes from the tin and place on a cooling rack to cool completely.
HM Marshmallow Frosted Mango Cupcakes
Gluten Free Cupcakes cooling on the rack.

Making The Marshmallow Frosting

  • First of all, place the marshmallows into a heatproof bowl and place over a saucepan of barely simmering water.
HM Marshmallow Frosted Mango Cupcakes
Mango and Passionfruit Marshmallows starting to melt.
  • As the marshmallows melt it is important to keep stirring continuously.
  • As soon as they are melted remove the bowl from the saucepan and set to one side to cool.
HM Marshmallow Frosted Mango Cupcakes
Heavenly Melted Marshmallows!
  • While the melted marshmallows are cooling make the buttercream.
  • Add the softened butter and boiling water into the bowl of sifted icing sugar.
  • Whisk on a high speed until light and creamy.
  • Add the glycerine and whisk into the buttercream.
  • Pour the warm melted marshmallows into the buttercream, whilst the whisk is still mixing.
  • Continue mixing on a medium speed for 5 minutes.
  • Resulting in the lightest frosting to pipe onto your cakes.
HM Marshmallow Frosted Mango Cupcakes
Light, creamy, marshmallow frosting.

Piping The Marshmallow Frosting

  • Fit a large piping bag with a large star tip – I used Wilton #1M
  • Place the bag inside a sturdy jug or glass, folding back the sides of the bag.
  • Fill the bag with the marshmallow frosting.
  • Pipe swirls (like ice cream in cones) or roses see here.
  • Finally, sprinkle over the topping of your choice.
FF Marshmallow Frosted Mango Cupcakes
Marshmallow Frosted Mango Cupcakes

Unsurprisingly, these Marshmallow Frosted Mango Cupcakes are completely delicious and in a blind taste test the gluten free cupcakes tasted exactly the same as the regular ones! Most importantly, no difference at all was detected between the two versions. Obviously, as a recipe developer, this made me very happy.

And one part that was declared “exceptional” was the marshmallow frosting. So, this is a frosting that I will definitely be making again. Since both taste and texture are most definitely worth the extra step!

If you enjoyed this recipe for Marshmallow Frosted Mango Cupcakes You May Also Like These:

Raspberry Ripple Almond Cupcakes

Smartie Raspberry Ripple Almond Cupcakes
Raspberry Ripple Almond Cupcakes.

Springtime Vanilla Cupcakes

HM Springtime Vanilla Cupcakes
Springtime Vanilla Cupcakes

Maltesers Popping Candy Cupcakes 

FF Marshmallow Frosted Mango Cupcakes
Maltesers Popping Candy Cupcakes

So, if you make these, or indeed any of my recipes, please post a photo, if you are able, on Twitter or Instagram and tag me in. Because I really enjoy seeing your makes and bakes.

So, whatever you are making, baking and creating in your kitchens, have fun preparing and sharing your feast.

Sammie xx

Heavenly Marshmallows  provided me with the marshmallows for this recipe. All content, photographs and recipes are my own. Please see my Disclosure Policy.

Unfortunately Heavenly Marshmallows are no longer trading. So, I suggest Art of Mallow  Mango Passion Fruity Mallows, which I have tested using this recipe and are an equally good alternative.


Share
Facebooktwitterpinterestlinkedintumblr

Chocolate Mini Egg Brownies

Share
Facebooktwitterpinterestlinkedintumblr

Finally, Easter is nearly here and the shops are filling up with all sorts of chocolate goodies. Including chocolate bunnies, Easter chicks and eggs in every size, shape and colour. So, to have some Easter baking fun I added colourful mini eggs in these Chocolate Mini Egg Brownies.

Chocolate Mini Egg Brownies

Using Smarties mini eggs with their bright colours means they show up well on top of the chocolate brown, baked brownies. Also, Smarties mini eggs are hidden within each brownie, keeping their shape once baked.

Each of these Chocolate Mini Egg Brownies are deliciously fudgey as you bite into them, with extra crunch and chocolate when you find a hidden egg.

FF Chocolate Mini Egg Brownies

Since our children were little we have made up an Easter egg hunt for them. Sometimes friends and cousins get involved too, now they are a bit older. Yet, what never ceases to amaze me is the sharing that happens after the egg hunt is finished.

As each child and sometimes adults, sit down with their spoils from the hunt and make sure that everyone has the same number of eggs. Because, I can never remember where they were hidden the numbers aren’t always even! So a good tip is to have a few eggs stashed in the cupboard, ready to even out the numbers so it’s fair.

And, if they do manage to find all of the eggs, you’ve got a secret stash of chocolate hidden away 😉.

FF Chocolate Mini Egg Brownies

What Easter Means To Me

While I celebrate Easter for it’s true Christian meaning, see Important StuffI’ve never found being a Christian to be boring.

We certainly have lots of fun in our home and making these Chocolate Mini Egg Brownies, really is good fun! I had specific instructions from one daughter to make them larger than the Chocolate Fudge Brownie Bites and also to bake them with whole, Smarties mini eggs, hidden inside.

Each Chocolate Mini Egg Brownie is drizzled in white chocolate before topping with more Smarties mini eggs. Easter is most definitely not the time in our house, for chocolate restriction!

In fact I’m not sure there ever is an appropriate time for that, however that’s a whole different conversation!

FF Chocolate Mini Egg Brownies

Recipe: Makes 16 Chocolate Mini Egg Brownies

200g/7oz Plain Chocolate – minimum 70% Cocoa solids

200g/7oz Milk Chocolate – minimum 35% Cocoa solids

4 Large Free Range Eggs

225g/8oz Plain White Flour

225g/8oz Dark Brown Sugar

1tsp Vanilla Extract – I use Nielsen-Massey

1/4tsp Sea Salt – I use Maldon

4 Packets of Smarties Mini Eggs – 4 X 100g packets

75g/3oz Plain White Flour

1/2tsp Bicarbonate of Soda

100g/4oz White Chocolate – optional

Method: Preheat oven to 170C/150 fan, gas mark 3 1/2, 325F

Making The Brownie Batter

  • First of all, line a 22.5cm x 30cm (9″ x 12″) deep baking tin with aluminium foil
  • Break up the chocolate (or chop) into individual squares, dice the butter and place both into a heat proof bowl.Place the bowl over a simering pan of water (a double boiler) ensuring the bottom of the bowl doesn’t touch the water.
  • Stir continuously until both the chocolate and butter are two thirds melted.
  • Carefully remove the bowl from the pan and continue stirring until the contents are completely melted.
  • Set the chocolate aside to cool.
  • Into a separate bowl add the eggs, sugar and vanilla extract.
  • Whisk lightly to combine the ingredients.
  • When the chocolate has cooled to just warm pour it into the egg mixture slowly, while gently stirring.
  • Sift the flour, salt and bicarbonate of soda into the bowl and add two packets of the Smarties Mini Eggs.
  • Using a wooden spoon gently fold all the ingredients together.

Smartie Chocolate Mini Egg Brownies

  • Pour the brownie batter into the prepared tin.

Smartie Chocolate Mini Egg Brownies

  • Give the tin a couple of sharp taps against the worktop. This helps bring any trapped air bubbles to the surface.

Baking The Brownies

  • Place the tin into the middle of the preheated oven and bake for 35-40 minutes.
  • Halfway through the baking time carefully tap the tin against the oven shelf, this helps the brownies stay fudgey and not rise, like a cake.
  • The brownies are baked when the outside edge has set and the top has the familiar, sugar cracked look. There should still be a bit of wobble at the centre.
  • As soon as they are baked remove the tin from the oven and allow the brownies to cool in the tin.

Smartie Chocolate Mini Egg Brownies

  • Once cooled remove the brownies from the tin and peel away the sides of the foil.

Decorating The Easter Brownies

  • First of all break up the white chocolate and place into a heatproof, microwaveable bowl.
  • Zap in short 20 second bursts, stirring after each heating period.
  • When the chocolate has almost melted, remove and keep stirring until completely melted.
  • Using a teaspoon drizzle half of the chocolate over the brownie slab.
  • Next add as many Smarties mini eggs as you dare, the melted chocolate will help them stick.
  • Now drizzle the other half of the white chocolate over the eggs and brownie.
  • Leave to set in a cool place.

Smartie Chocolate Mini Egg Brownies

  • As soon as the chocolate has set cut the large brownie into quarters. Continue, cutting each quarter into quarters and you will have 16 delicious Chocolate Mini Egg Brownies!

Smartie Chocolate Mini Egg Brownies

  • Use a palette knife to remove each fudgey brownie from the foil.
  • Store any spare brownies in an airtight container for up to 5 days, however,  there’s no way they’d last that long in our house!

FF Chocolate Mini Egg Brownies

I like to serve these Chocolate Mini Egg Brownies with a few extra eggs, so that everyone can have the same number of eggs on top of their brownie. While watching their surprise when hidden mini eggs within the brownie.

And so, whatever your plans this Easter, I hope that you take a minute to remember the reason it is celebrated?

Jesus gave His life that we may all know Him, true forgiveness, unconditional love and peace. With Him life may not be perfect, but the journey is much easier.

If you’ve enjoyed these Easter Chocolate Mini Egg Brownies then you may like these recipes too:

Golden Egg Chocolate Sponge Cake

FF Chocolate Mini Egg Brownies
Golden Egg Chocolate Sponge Cake

Chocolate Mini Egg Sponge Cake

FF Chocolate Mini Egg Brownies
Chocolate Mini Egg Sponge Cake

Mini Egg Millionaires Shortbread

Mini Egg Millionaires Shortbread squares displayed on a white platter.
Mini Egg Millionaires Shortbread

Baking for any special occasion always feels like a treat to me. Especially with family wandering in and out of the kitchen, snatching nibbles of this and that. Ultimately, this time of year reminds me of Jesus and the family, his disciples, that He too surrounded Himself with. So important was family to Him that He asked His disciple John to take care of His mother, while hanging on the cross. And if family is important to Him, then it is also important to me.

Whatever you are making, baking and creating in your kitchens this Easter, have fun preparing and sharing your feast.

Sammie xx

No part of this post may be reproduced or duplicated without the written permission of the owner. Please see my Disclosure Policy.

Entered for March We Should Cocoa over at Tin and Thyme  and Lancashire Food

we should cocoa brownies

Easter sweet traybake filled and decorated with pretty little Easter eggs.

Share
Facebooktwitterpinterestlinkedintumblr

Toffee Banoffee Waffles

Share
Facebooktwitterpinterestlinkedintumblr

You may have noticed I’ve been Waffle-ing a lot on here lately? Because ever since I received my Waffle Maker my mind has been buzzing with different recipes. So much so that I wondered if I could make waffles using a packet cake mix – the result my Toffee Banoffee Waffles.

W Toffee Banoffee Waffles
Toffee Banoffee Waffles perfect with a glass of fresh juice for breakfast.

Look good don’t they?

I have some very delicious, made from scratch recipes for waffles like my Vanilla Bean Waffles which are utterly delicious. Yet I’m aware that not everybody has the time, or confidence to make waffle batter from scratch and that’s ok. I’m not going to beat up on you because you want waffles but feel intimidated by not only cooking them yourself, but also having to follow a recipe.

Since everyone has to start somewhere and if using a packet mix is going to help you get started on the scary home baking journey, then Sammie is here to hold your hand.

W Toffee Banoffee Waffles
Toffee Banoffee Waffles add a scoop of ice cream and you have a fabulous dessert! 

Also I find it a great convenience knowing I  have a reliable packet mix in the cupboard for when the urge to Waffle strikes 😉.

Finally, I set about testing some different cake mixes, so you can be sure your waffles will turn out brilliantly.

Using a mix isn’t cheating!

Wright’s Baking have a range of cake mixes that are very good quality. I was tempted by the toffee cake mix – with the idea of Toffee Banoffee Waffles already buzzing around my brain.

With one very small adaptation to the recipe the Wright’s toffee cake mix makes outstanding waffles. I mean these are seriously tasty and have a great texture too.

W Toffee Banoffee Waffles
Toffee Banoffee Waffles perfect for a weekend lazy morning brunch.

Toffee flavoured waffles, topped with banana slices and drizzled with caramel sauce – utterly scrummy!

My waffle maker by Andrew James Ltd. recommends wiping (although I use a soft pastry brush) butter or vegetable fat over the waffle plates before use. I prefer to use melted butter. Because I was melting  butter to prepare the waffle plates it made sense to add melted butter, instead of vegetable oil to the cake mix.

That is the only change I made. Tip the contents of the toffee cake mix into a bowl, add the specified amount of water and melted butter (I think the butter gives the waffles a more waffle-like taste), whisk as instructed and you have waffle batter in around 2 minutes!

How easy is that??!!

So here are the pictures to take you through making Toffee Banoffee Waffles step by step:

One packet of Wright’s Toffee Cake Mix makes 12 waffles

Melt the butter and prep your waffle maker as per the instruction booklet.

Making the Waffles

  • First of all tip one packet of Wright’s Toffee Cake Mix into a bowl.
  • Add the water and melted butter, as per instructions on the packet.
  • Whisk for 1 minute.
  • Spoon 2 dessert spoons of mixture (or specified quantity for your machine) onto each waffle plate.
W Toffee Banoffee Waffles
Cake mix in a waffle maker? This Wright’s toffee one works a treat!
  • Close the lid and cook the waffles for 4-5 minutes.
  • The waffles will be slightly soft when cooked but harden on cooling.
W Toffee Banoffee Waffles
Toffee Banoffee Waffles serve straight away.

I recommend eating these waffles straight away with a sliced banana, drizzle of caramel sauce and dusting of icing sugar. Although if eating for dessert I would absolutely add a scoop of ice cream, or a swirl of whipped cream and sprinkle over some crumbled Cadbury’s Flake.

Perfect!

Sometimes cheats are necessary and if they work well why not?!

Note: I tested other cake mixes by the same company and they were not suitable for turning into waffles. If more mixes become available I will add/link them to this post.

Do you have a super successful cheat that you’d like to share?

If you have enjoyed these Toffee Banoffee Waffles and would like to try making your own from scratch, here are the recipes:

Vanilla Bean Waffles 

W Vanilla Bean Waffles
Vanilla Bean Waffles utterly delicious and versatile.

Chocolate Dunking Waffles 

W Chocolate Dunking Waffles
Chocolate Dunking Waffles perfect alongside a delicious hot chocolate.

Please tag me in on Twitter/Instagram with photos of your makes and bakes. I love seeing what you are making?

Whatever you are feasting on, enjoy and remember food tastes better when it’s shared!

Sammie xx

@sammiefeasting Twitter/Instagram/Pinterest

Wright’s Baking provided me with the cake mixes to review. I was not paid to write this post. All opinions, views and content are my own. Please see my Disclosure Policy.


Share
Facebooktwitterpinterestlinkedintumblr

Andrew James Waffle Maker Review

Share
Facebooktwitterpinterestlinkedintumblr

Waffles, I have been wanting to make my own forever – very slight exaggeration there, honestly though for a long time. I was sent an Andrew James Waffle Maker, by Andrew James UK Ltd to review and set myself the challenge of also coming up with a few recipes along the way!

Andrew James Waffle Maker Review
Chocolate Dunking Waffle anyone????

When reviewing a product, especially a non-essential kitchen item, which is what I would have classed the Andrew James Waffle Maker as, I’m pretty tough. If another gadget or electrical appliance is going to take up precious space in my already overcrowded kitchen, well, it’s got to earn its place.

So I look for durability, consistency, versatility, ease of use and the one we all love to hate, how easy is it to clean. I’m a home cook, not a chef, but I still want good quality and a variety of recipes, in order for an appliance to warrant being kept.

Andrew James Waffle Maker Review
This is the Andrew James Waffle Maker that I reviewed.

Firstly I was impressed with how well the Andrew James Waffle Maker was packaged. There wasn’t any excess space in the box and the sides of the waffle maker were protected with polystyrene. Actually after use, once cooled and cleaned, I store it, in it’s protective packaging, back in the box.

I read through the instruction booklet, which was easy to follow, brief and concise. Before use it is recommended to wipe over the waffle maker, including the waffle plates with a clean damp cloth. This I did.

Andrew James Waffle Maker Review
Press the big button and this is what the Andrew James Waffle Maker looks like.

The instruction booklet recommends wiping over the waffle plates with butter/vegetable fat, prior to each use, to maintain the non stick waffle plates. Having square ridges on the waffle plates meant this could potentially be quite tricky. Instead I opted to brush melted butter onto the plates with a soft pastry brush, although a silicone brush would be suitable as well. Using melted butter also ensures, that as it cools on the cold waffle plates, you can see if you have evenly covered the plates.

Using the Andrew James Waffle Maker for the first time, I decided to make a batch of Vanilla Bean Waffles.

Andrew James Waffle Maker Review
Vanilla Bean Waffles – ooh so good.

As each waffle recipe calls for melted butter, that has been cooled, I melted an extra 20g of butter (than called for in the recipe), specifically for brushing onto the waffle plates.

Once the waffle plates have been brushed with melted butter, close the waffle maker and switch on via the plug. An orange light illuminates on the top of the waffle maker to show it is switched on. When the green light illuminates, the waffle maker is ready to use.

Andrew James Waffle Maker Review
Andrew James Waffle Maker orange light indicates that it is heating up.

From the time of switching on ALWAYS use suitable heat protection for your hands whilst using.

I found it very easy to open and close the waffle maker whilst wearing oven gloves. Also be aware that the top and sides of the waffle maker get very hot!

Once the green light illuminates you can start cooking your waffles.

The instruction booklet does not give any guidance as to how much waffle mixture should be added to each plate. I found that for all the recipes I used,  two dessert spoons  of waffle batter was sufficient.

Andrew James Waffle Maker Review
Andrew James Waffle Maker add the waffle batter to the middle of each waffle plate.

Close the lid of the waffle maker as soon as the batter has been added to the waffle plates. The length of time required for cooking each waffle varies with each recipe. As a guide it is between 4 – 6 minutes.

Whilst cooking, the waffle maker may emit steam. I simply wiped away any condensated water from the worktop after use.

Once the cooking time had elapsed, wearing oven gloves, I pressed the large button, opened the waffle maker and there were my very first, deliciously cooked waffles.

I used a simple wooden spatula to lift each cooked waffle from the waffle plate. Again metal, or anything abrasive should not be used against the waffle plates, as this may damage their non stick surface.

Andrew James Waffle Maker Review
Andrew James Waffle Maker and my first ever waffles!

You will notice that the waffles above have slightly irregular edges. This is because not enough waffle batter has been added to the waffle plates. However, from experience, I personally think it is better to slightly under fill the waffle maker. Once you have made your first two waffles you can slightly adjust the amount of batter added to the waffle plates.

If you overload the waffle plates with too much batter, you will still get beautiful waffles, as well as batter oozing out of the sides of the closed waffle maker and excess batter cooking on the hot surround of the waffle plates.

Although I found this relatively easy to clean up, it is a waste of waffle batter. I want all my batter to turn into delicious cooked waffles!

Andrew James Waffle Maker Review
Stacks of waffles cooked two by two with the Andrew James Waffle Maker

Over the period of 2 weeks I cooked over 60 waffles using the Andrew James Waffle Maker. I tested different recipes and consistency. Above is a picture of 28 waffles cooked one after the other, with the waffle plates having only been greased at the start of the waffle making marathon.

What I found was complete consistency, throughout the process – obviously quantity of batter added to the plates and cooking time were kept the same. Also throughout the whole review period NOT A SINGLE WAFFLE STUCK!

After each cooking session was complete, the waffle maker was switched off and left open to cool before cleaning. To be completely honest this was the part that I was not looking forward to!

Cleaning the Andrew James Waffle Maker

Once cold and unplugged I used the wooden spatula to scrape any excess cooled batter from the waffle plate surround. Then using a cloth rinsed in warm soapy water I wiped over the entire inside of the waffle maker. Certainly on the waffle plate surround, where excess batter had stuck, I had to rub a few times to clean it off. I then wiped around the back of the waffle maker, where the hinges are. Finally I found that the underside of the waffle maker became greasy, so that was then thoroughly wiped. I left the waffle maker open to dry and before packing away gave the top a quick wipe over and then dried with a clean tea towel.

Each time I cleaned the waffle maker it took no longer than 5 minutes.

To conclude, I absolutely love this Andrew James Waffle Maker! It was very easy to operate and use. During the waffle making marathon it proved to be consistent and durable. I was able to create a range of new recipes, both savoury and sweet, so it ticked the versatility box.

The Andrew James Waffle Maker has most certainly earned it’s place in my kitchen and is now classed as an essential kitchen appliance for me. I thoroughly recommend this waffle maker.

If you like waffles, you will love the smell of them freshly cooking, in your own home, using the Andrew James Waffle Maker.

Cherry Bakewell Waffles makes 8

Andrew James Waffle Review
Cherry Bakewell Waffles utterly delicious.

Vanilla Bean Waffles

200g/7oz Sugar and Crumbs Cherry Bakewell flavour icing sugar – alternatively use plain icing sugar with 1/2tsp almond extract added

50g/2oz Flaked Almonds lightly toasted

8 Glacé Cherries chopped into quarters

Sift the icing sugar into a bowl and add enough water to make a light drizzling consistency. Stir well to ensure there aren’t any lumps.

Toast the Vanilla Bean Waffleyou want them very slightly crisp.

Drizzle the flavoured icing over the waffles. Add a few pieces of cherry to each waffle and then scatter over with toasted almond flakes. Serve immediately, or let cool and keep in an airtight container for 3 days.

These are great for afternoon tea, picnics, or with a large latte and a good book!

In fact, these Cherry Bakewell Waffles are perfect any time of the day.

Smoked Salmon Waffle Appetisers makes 16

Andrew James Waffle Maker Review
Smoked Salmon Waffle Appetisers

These Smoked Salmon Waffle Appetisers are a perfect savoury twist for the waffle and they are completely delicious! Perfect for parties.

Use the Vanilla Bean Waffle recipe only adding 10g of sugar and leaving out the vanilla bean paste.

You need 4 waffles for this recipe – excess waffles can be frozen in a zip lock freezer bag for up to one month.

Toast each waffle so that it is slightly crisp. Set aside on a rack to cool.

Place 200ml Creme Fraiche into a bowl.

Add 4 heaped teaspoons of creamed horseradish sauce (I used the hot variety).

Stir to combine – add salt and pepper to taste.

Cut each waffle into quarters.

Place a teaspoonful of the horseradish/creme fraiche sauce on top of each waffle quarter.

Top with a slither of smoked salmon.

Sprinkle over chopped chives, or dill and serve on a platter.

If you have enjoyed the Andrew James Waffle Maker review you are sure to enjoy these recipes too:

Chocolate Dunking Waffles 

Andrew James Waffle Maker Review
Chocolate Dunking Waffles have fun with your waffles!

Vanilla Bean Waffles with Boozy Berry Sauce

Andrew James Waffle Maker Review
Vanilla Bean Waffles with Boozy Berry Sauce a classy dessert.

Do you love waffles?

Would you like to experience the aroma of freshly cooked waffles in your kitchen?

I for one am a complete waffle convert. I have loved seeing how tasty and versatile they are. Most of all, I have realised how much fun they can be. Breaking the ‘rules’ by dunking them in delicious hot chocolate, or serving as a classy appetiser with smoked salmon. Who knew??

As always have fun with your waffle experience. Enjoy the feasts you create and don’t forget to tag me in on Twitter/Instagram, I love seeing your makes and bakes.

Sammie xx

@sammiefeasting Twitter/Instagram/Pinterest

All opinions, recipes and content are my own. I did not receive payment for carrying out this review. Please see my Disclosure Policy.

To see the Andrew James Waffle Maker I reviewed please click here.


Share
Facebooktwitterpinterestlinkedintumblr

Boozy Berry Sauce

Share
Facebooktwitterpinterestlinkedintumblr

If you want to vamp up your desserts I have the perfect Boozy Berry Sauce to do it with. Raspberries, strawberries and morello cherry conserve, mingle together with a decent splash of Framboise, to make a very classy fruit sauce.

Waffles Boozy Berry Sauce
Boozy Berry Sauce delicious with Vanilla Bean Waffles.

This Boozy Berry Sauce is the work of moments, however, your dinner party guests won’t know that. We’ll just keep it a secret between us. Ok?

I firmly believe that if you can make a couple of sauces really well, it can transform your dessert menu. Pour this intensely fruity sauce, with it’s little hint of raspberry liquer, over good quality vanilla ice cream and you have yourself one extremely tasty after dinner treat!

I developed this recipe to go with my Vanilla Bean Waffles it was a fantastic pairing, what surprised me more was how well it went with my Chocolate Waffles.

Waffles Boozy Berry Sauce
Boozy Berry Sauce perfectly compliments these gorgeous chocolate waffles,

I should have realised that raspberries and chocolate are a classic pairing and this Boozy Berry Sauce with it’s delicious raspberry flavour, only need be poured over a chocolate waffle for the magic to happen. A taste bud party that you won’t want to end!

This rich fruity sauce is also perfect poured, warm, over a pavlova, piled high with whipped cream and fresh berries. Ooh crunchy meringue with marshmallow inner, fresh fruit, cream and this glorious Boozy Berry Sauce, that is one dessert I must make – soon!

Waffles Boozy Berry Sauce
Boozy Berry Sauce perfect to make ahead and keep in the fridge.

You can of course substitute the raspberry liquer, for it’s blackcurrant counterpart Cassis, ooh that would be delicious. Of course you can leave the alcohol out altogether, in which case I’d recommend adding pomegranate juice, for it’s deep purple colour and intense flavour.

I do love a recipe that is versatile. With this sauce I actually used frozen raspberries. I see no reason why other berries can’t be substituted, providing the quantities are kept the same.

For the ‘boozy’ part of this sauce, if you have both Framboise and Cassis to hand, I’d say keep with the colours and flavour – so if you make this whilst blackberries are abundant  add Cassis, for red berries and cherries I’d stick with Framboise. That said it is all a matter of taste and preference. I would advise against adding a stronger spirit, for example brandy, as it would completely over power the fruit flavour.

Recipe: Makes 6 servings of Boozy Berry Sauce

300g Raspberries

300g Strawberries – hulled and quartered

100g Morello Cherry Conserve

3tbsp Caster Sugar

1tsp Vanilla Extract- I use Nielsen-Massey

3tbsp Framboise – raspberry liquer

1tsp Corn Flour – also known as Corn Starch

Method:

Waffles Boozy Berry Sauce
Add the raspberries, sugar and Framboise to a small, heavy based pan.

Bring gently to a simmer and stir to dissolve the sugar.

Once the raspberries are gently bubbling add the cherry conserve.

Waffles Boozy Berry Sauce
Next add the morello cherry conserve to the saucepan.

Stir to mix the cherry conserve with the raspberries.

When the sauce is bubbling add the strawberries.

Waffles Boozy Berry Sauce
Add the chopped strawberries to this delicious smelling Boozy Berry Sauce.

Stir and leave to bubble away on a gentle heat for 15 minutes.

In a small bowl add the teaspoon of cornflour to 2 teaspoons of cold water.

Mix together and then pour into the sauce.

Stir until the sauce thickens – less than one minute.

Allow the Boozy Berry Sauce to continue bubbling gently on a low heat for 5 more minutes.

Allow the sauce to cool until warm before using.

Once cooled it can be poured into airtight containers and kept in the fridge for 3 days.

When needed, add the cold sauce back to a saucepan, over a medium heat bring the sauce up to simmering point.

Allow to cool slightly before serving.

Waffles Boozy Berry Sauce
Boozy Berry Sauce alongside a delicious caramel sauce.

What will you pour your Boozy Berry Sauce over?

The Caramel Sauce can be found here.

I do hope you try my Boozy Berry Sauce with or without the booze! It really is delicious and will turn any dessert into a taste adventure.

If you have enjoyed making my Boozy Berry Sauce then you’ll love these:

Blackberry Nectarine Tart 

Blackberry Nectarine Tart Sauce
Blackberry Nectarine Tart the simplest of desserts.

Raspberry Chocolate Pavlova 

Raspberry Chocolate Pavlova Sauce
Raspberry Chocolate Pavlova everyone’s favourite.

Have fun whatever you make and send me a photo via Twitter/Instagram, I really love seeing what you make.

Sammie xx

@sammiefeasting Twitter/Instagram/Pinterest


Share
Facebooktwitterpinterestlinkedintumblr

Springtime Vanilla Cupcakes

Share
Facebooktwitterpinterestlinkedintumblr

Wednesday this week was a truly dreary, dark and very cold day. All types of weather threw themselves at the ground; hail, snow, rain, sleet and it was windy too. Especially as it is March, I want to see evidence of Spring. Most of all flowers and lambs. Finally, I an attempt to cheer us all up I made these very pretty and extremely delicious Springtime Vanilla Cupcakes.

FF Springtime Vanilla Cupcakes

So, does the image of pink, raspberry buttercream topped cupcakes, adorned with large daisy flowers and butterflies cheer you up?

FF Springtime Vanilla Cupcakes
Springtime Vanilla Cupcakes

While the weather was so chilly and dreary, I was also feeling a little blue too, having just received news that a very close friend is extremely poorly. And so baking these cupcakes was therapeutic on both counts.

Do you find baking relaxing?

FF Springtime Vanilla Cupcakes

    Springtime Vanilla Cupcakes

Using Naturally Flavoured Icing Sugar

Although these are called Springtime Vanilla Cupcakes, which is true, the cake part is flavoured with Nielsen – Massey Vanilla Extract, for the buttercream I have used a favourite flavoured icing sugar.

Sugar and Crumbs sell an amazing range of naturally flavoured icing sugars. While making my Raspberry Ripple Cupcakes I used their Raspberry Ripple flavoured icing sugar. Since the day that last cupcake was eaten, in Kylie’s own words “I just can’t get you outta my head” I have wanted more. Especially more of the delicious tasting buttercream and more cupcake to swirl it onto!!

And so these Springtime Vanilla Cupcakes were the perfect excuse to indulge my passion again.

Importantly, this time I wanted to leave the option of using flavoured buttercream as a choice. Also, if you do buy some flavoured icing sugar, you can choose to make the buttercream any flavour you want. Especially, as the vanilla sponge goes well with any flavoured frosting. Alternatively, if you want to stick with vanilla buttercream that tastes awesome as well.

FF Springtime Vanilla Cupcakes
Springtime Vanilla Cupcakes

Personally I think the pink icing, along with the decorations, really set these cupcakes apart. Although ‘Springtime’ was at the forefront of my mind whilst creating these beauties, with Mother’s Day being this coming Sunday, they would also make a perfect gift for any Mum.

Recipe: Makes 18 Large Springtime Vanilla Cupcakes

For the Cake:

175g/6oz Caster Sugar

175g/6oz Unsalted Butter at room temp.

1tsp Vanilla Bean Paste – or you can substitute for Vanilla Extract

3 Large Free Range Eggs

3tbsp Milk – whole or semi skimmed

175g/6oz Plain White Flour

1.5tsp Baking Powder

1/8th tsp/pinch of Salt – I use Maldon

For the Buttercream:

350g12oz Icing Sugar – I used 250g Sugar and Crumbs Raspberry Ripple flavour and 100g/4oz Plain Icing Sugar. (Confectioners Sugar)

175g/6oz Unsalted Butter

Pink Food Colour – I used Wilton pink food colouring gel (available from cake decorating shops, Amazon and similar from Lakeland UK)

2tbsp Very Hot Water

Dr Oetker rice paper daisies, various sprinkles (available from most supermarkets)

Rice paper butterflies – from Amazon

Method: Preheat the oven to 170C/150C fan oven, gas mark 3, 325F

Making The Vanilla Cupcake Batter

  • First of all, line 2 cupcake tins with 18 muffin or deep cupcake cases – the ones I used were a Christmas present from Lakeland.
  • Into a large bowl add your butter and sugar.
  • Whisk or beat until pale and creamy – approx 5 minutes.
  • Add 3 eggs, milk and Vanilla Bean Paste.
  • Sift into the bowl the flour, baking powder and salt.
  • Note: This is called the all-in-one method.
  • Whisk or beat until all of the ingredients are combined – take care not to over mix and this will make the cupcakes tough, not light and springy.
  • Place a heaped dessert spoonful of cake batter into each cupcake case.
NM Springtime Vanilla Cupcakes
Springtime Vanilla Cupcakes

Baking The Vanilla Cupcakes

  • Place the cupcakes into the oven and bake for 20-30 minutes,
  • The cupcakes are baked when they have risen and are a golden colour. They should spring back when pressed lightly on the top.
  • As soon as the cupcakes are baked remove from the oven.

NM Springtime Vanilla Cupcakes

  • Allow to cool completely before icing.

Making The Pink Buttercream

  • Place the softened butter into a large bowl.
  • Sift the icing sugar into the same bowl.
  • Add the 2 tablespoons of hot water.
  • Add the food colouring, I use a cocktail stick and simply insert the tip into the food colouring gel and then add to the bowl.
  • Start slowly, whisking the buttercream ingredients until light, creamy and uniform in colour.

NM Springtime Vanilla Cupcakes

  • Fit a piping bag with a large star tip.

Springtime Vanilla Cupcakes

Piping Swirls Of Buttercream On To The Cupcakes

  • Place the icing bag into a tall sturdy container, I use a jug.
  • Use a spoon or spatula, fill the icing bag with all of the buttercream.
  • Practise on a plate, if piping for the first time.
  • Squeeze the bag so that all the buttercream is together.
  • Keep an even pressure with one hand squeezing the bag and using the other hand to guide the piping tip, pipe swirls onto the cupcakes.
NM Springtime Vanilla Cupcakes
Springtime Vanilla Cupcakes
  • Finally add the decorations.
Springtime Vanilla Cupcakes

Gifting Springtime Vanilla Cupcakes

Because I like giving the food I make away, I bought some cupcake pods, little plastic containers, perfect for holding one cupcake in and a great way to give individual cupcakes away as a gift. Since they were from Amazon and work out to about 10 pence per pod. Also, they can be washed up and used again, which is great recycling and means you can share even more cupcakes with others!

Springtime Vanilla Cupcakes
Springtime Vanilla Cupcakes 

Since piping the swirls onto the cupcakes gives them a beautiful, professional finish. means use whatever cupcake toppers and sprinkles that you have to hand. The beauty of these Springtime Vanilla Cupcakes is that they are individual to your own sense of taste and style.

FF Springtime Vanilla Cupcakes
Springtime Vanilla Cupcakes

If you like the Springtime Vanilla Cupcakes you will love these recipes:

Vanilla Bean Cupcakes

Vanilla Bean Cupcakes
Vanilla Bean Cupcakes so pretty.

Raspberry Ripple Almond Cupcakes

Raspberry Ripple Almond Cupcakes
Raspberry Ripple Almond Cupcakes the perfect way to say I Love You.

Strawberry Sweatheart Cake

Strawberry Sweetheart Cake
Strawberry Sweetheart Cake swirled with roses and sprinkled with love

So, enjoy baking and experimenting with piping different swirls!

Sammie xx

No part of the post may be reproduced or duplicated without the written permission of the owner. Please see my Disclosure Policy.


Share
Facebooktwitterpinterestlinkedintumblr

Vanilla Bean Waffles

Share
Facebooktwitterpinterestlinkedintumblr

Vanilla Bean Waffles. Just think on that for a while, whilst you gawp stare graciously at this picture.

Waffles on a plate with sliced strawberries and whipped cream.

Light and fluffy inside, crispy and golden outer, these Vanilla Bean Waffles may just about be the best invention for breakfast, since sliced bread got a one-up and became toast!

Two waffles on a plate in the foreground with a stack of waffles and strawberries in the background.
Vanilla Bean Waffles

I have wanted a waffle maker for longer than I care to remember. This in itself is kind of odd, seeing as I’ve never eaten a waffle before in my life! Let alone made one. Yet after watching Diners, Drive-ins and Dives on Food Network UK, where Guy Fieri travels around the U.S. visiting various eating establishments. Since seeing all the incredible waffles sold all over the U.S.A I have been craving them. While I haven’t ever bought them pre-made from the supermarket, or even eaten them at a cafe or restaurant, I wanted to make them.

Homemade Food Tastes Better

It’s a little thing of mine, if I can buy it I want to make it. With only a couple of exceptions, don’t mention the croissants homemade always tastes better than pre-made, packaged, mass produced, supermarket produce.

Please don’t misunderstand me? I really couldn’t manage without the convenience of my weekly online grocery shop, especially as I cannot drive at the moment. Rather, it is simply that, fresh from the Waffle iron, these Vanilla Bean Waffles are a million miles away from their shop bought counterpart. Plus you can switch up what you add to them.

AJ Vanilla Bean Waffles
Vanilla Bean Waffles better than shop bought?

Fortunately our daughter has eaten (and loves) shop bought waffles. Her verdict after eating two Vanilla Bean Waffles was a firm 10 out of 10 and “so much better than any I’ve eaten before” verdict. And that response was thrilling. She can be a tough cookie and 8.5 out of 10 is usually the highest she goes! So I knew I’d struck gold with this recipe.

Served warm with a dusting of icing sugar, super fragrant strawberries and a swirl of cream to seal the deal, the plate you see above was my lunch.

Oh boy. Why have I waited so long? All these years I’ve been missing out on the absolute, utter deliciousness of homemade waffles. Plus I was pretty pleased that I’d managed to nail the recipe on my first attempt!

Back to the waffles. You must try these. Seriously, even if you’re not the worlds greatest cook, with this recipe and a trusted Andrew James Belgian Waffle Maker, you can’t go wrong.

Note: It is always recommended that you read through the entire recipe before proceeding. This applies to all recipes on this site and in general.

Recipe: Makes 10 Vanilla Bean Waffles

This recipe assumes that you have read the waffle maker’s instruction booklet and carried out any pre-treatment required. Mine was simple to wipe over the non stick plates with a clean, damp cloth.

  • 120g Unsalted Butter
  • 3 Large Free Range Eggs
  • 150ml/5fl oz Whole Milk
  • 1tsp Vanilla Bean Paste – I use Nielsen-Massey 
  • 30g/2tbsp Caster Sugar
  • 225g/8oz Plain Flour – Self Raising can be substituted, omit the baking powder
  • 2tsp Baking Powder
  • 1/8tsp Salt – I use Maldon-sea salt

Method:

Making The Waffle Batter

  • First of all place the unsalted butter into a small saucepan on a low – medium heat. Allow the butter to completely melt. Remove from the heat and allow to cool.
  • While the butter is cooling crack the eggs into a large bowl. Give them a quick whisk.
  • Add the milk, sugar and vanilla bean paste to the eggs and lightly whisk to combine.
  • Once cooled weigh 100g of the melted butter into the egg, milk, sugar, vanilla bean paste mixture and whisk briefly to combine (wet ingredients).
  • Weigh the flour and sift along with the baking powder and salt into the bowl containing the wet ingredients.
  • Gently mix both the wet and dry ingredients together until just combined – over mixing will lead to tough waffles.

Prepping The Waffle Maker


AJ Vanilla Bean Waffles

  • While the Waffle Maker is switched off brush the melted butter so that it completely covers each of the waffle plates.
  • Close the waffle maker and switch on. For the Andrew James Belgian Waffle Maker it is ready to cook with when the green ‘ready’ light illuminates.
  • Using oven gloves, to protect your hands, as the top of the waffle make plus the waffle plates get very hot, press the button and open the waffle maker.

AJ Vanilla Bean Waffles

  • Use an American 1/4 cup measure (50ml – 2 heaped tablespoons).
  • Close the lid of the waffle maker and set a timer for 5 minutes.
  • Ensure the room is well ventilated as the cooking process produces steam.
  • I found 5 minutes to be the optimum time for cooking these Vanilla Bean Waffles in this waffle maker. Adjustments to time maybe needed if using a different brand.
  • Really enjoy the smell as the waffles are cooking – don’t be surprised if your neighbours line up at your front door!
  • After 5 minutes, wearing oven gloves, press the button to release the lid of the waffle maker.
AJ Vanilla Bean Waffles
Vanilla Bean Waffles.
  • Use a wooden spatula to help remove the waffles from the plates. They come away really easily. Most importantly do not use anything metallic to remove the waffles as it could scratch the non stick coating on the waffle plates.
  • Repeat adding 1/4 cup (50mls) as before to each plate.
  • Continue until all the waffle batter has been used.
  • As soon as the last waffle has been removed switch the waffle maker off and leave to cool.
AJ Vanilla Bean Waffles
Vanilla Bean Waffles.

What I Added To The Waffles

Enjoy your Vanilla Bean Waffles however you want.

I added sliced strawberries, a dusting of icing sugar and some whipped cream. Our children reheated their waffles in the toaster, before adding various combinations of ice cream, Nutella and strawberries! What you put on yours is up to you. Flavoured fruit or spiced butters work well. Also a drizzle of maple syrup tastes amazing on these golden beauties.

They keep for up to 2 days in an airtight container and can be reheated in the toaster or oven. To freeze, ensure the waffles are completely cold then pack into zip lock bags or containers with an airtight lid. Keep for one month in the freezer.

AJ Vanilla Bean Waffles
Vanilla Bean Waffles

For a first attempt at waffle making I am surprised and pleased with how easy it is. I would happily make these at weekends, invite some friends over for a breakfast party.

Oh wow how much fun would that be?

However you enjoy your waffles, I really hope I have inspired you to have a go and make some at home. They simply taste so unbelievably good.

Vanilla Bean Waffles perfect for feasting, sharing and having fun!

If you have enjoyed making these Vanilla Bean Waffles you may also like these recipes:

Toffee Banoffee Waffles 

FF Vanilla Bean Waffles
Toffee Banoffee Waffles

Chocolate Dunking Waffles

FF Vanilla Bean Waffles
Chocolate Dunking Waffles


Cherry Bakewell Waffles

AJ Cherry Bakewell Waffles
Cherry Bakewell Waffles

Since discovering the deliciousness and versatility of homemade waffles, weekend brunches in our house have become something we all look forward to. And while I have the waffle maker out it makes sense to double up the recipe and freeze some for another day. Also, if you prefer savoury toppings on your waffles, simply leave the vanilla bean paste out of the recipe. Alternatively you could make some plain waffles and then add some vanilla for a sweeter version. Finally, to reheat cold waffles, simply pop them in the toaster.

So, whatever you are making, baking and creating in your kitchens, have fun preparing and sharing your feast.

Sammie xx

The Andrew James Belgian Waffle Maker was provided for the purposes of review. All opinions, recipes and content are my own. Please see my Disclosure Policy.


Share
Facebooktwitterpinterestlinkedintumblr

Chocolate Fudge Brownie Bites

Share
Facebooktwitterpinterestlinkedintumblr

Do you like chocolate? I mean really, really love it? Yes! Then you will go crazy for these Chocolate Fudge Brownie Bites. The ultimate, easy brownie recipe!

FF Chocolate Fudge Brownie Bites

Because these Chocolate Fudge Brownie Bites are C R A Z Y good, which shouldn’t be surprising when you consider how much chocolate is in these little edible, morsels of happiness!

Chocolate Fudge Brownie Bites
Chocolate Fudge Brownie Bites – sharing the love.

Although I have a few brownie recipes already on this site, such as Nuts About Brownies and they are all utterly delicious. Instead, I wanted to make a Brownie that stood alone on its own, deep, chocolatey merit. nuts, no extra topping, apart from the optional white chocolate heart. Just pure chocolate fudge brownie bliss.

And wow these certainly deliver. Above all these deliver on deep chocolate flavour, perfect amount of squidge, leavingyou wondering just how these Chocolate Fudge Brownie Bites manage to hold together. Also they have a satisfying depth of sweetness, melting against your tongue.

FF Chocolate Fudge Brownie Bites
Chocolate Fudge Brownie Bites

So, if you want a straight up brownies, no faffing with nuts and the like, just one hundred per cent chocolatey goodness, this is the only recipe you need.

Finally one quick, yet impoarrant note, these brownies contain A LOT of chocolate, it really is worth using the best quality chocolate that you can afford. Because, it really does make a difference to the finished taste and texture.

Recipe: Makes 24 Chocolate Fudge Brownie Bites

200g/7oz Plain Chocolate – minimum 70% Cocoa solids

200g/7oz Milk Chocolate – minimum 35% Cocoa solids

225g/8oz Unsalted Butter

4 Large Free Range Eggs

225g/8oz Dark Brown Sugar

1tsp Vanilla Extract – I use Nielsen-Massey

1/4tsp Salt – I use Maldon

300g/11oz Chocolate Chips or Chunks

75g/3oz Plain White Flour

1/2tsp Bicarbonate of Soda

100g/4oz White Chocolate – optional

Making the brownie batter

Preheat oven to 170C/150C fan, gas mark 3, 325F.

  • First of all line a 22.5cm x 30cm (9″ x 12″) deep baking tin with aluminium foil.
  • Break up the chocolate (or chop) into individual squares, dice the butter and place both into a heat proof bowl.Place the bowl over a simering pan of water (a double boiler) ensuring the bottom of the bowl doesn’t touch the water.
  • Stir continuously until both the chocolate and butter are two thirds melted.
  • Carefully remove the bowl from the pan and continue stirring until the contents are completely melted.
  • Set the bowl to one side to allow the chocolate to cool slightly.

Pyrex bowl containing melted chocolate.

  • Into another large bowl add the eggs, vanilla and sugar.


Mixed eggs vanilla and sugar in a clear bowl.

  • Mix together to combine.
  • Whilst still slowly mixing pour the cooled chocolate mixture into the larger bowl.
  • Mix until completely combined – try not to incorporate too much air whilst mixing.
  • Sift the flour, bicarbonate of soda and salt into the bowl.
  • Add the chocolate chunks.

Clear bowl containing dry ingredients as part of a recipe process.

  • Using a large metal spoon, fold all the ingredients together.
  • Pour the brownie mixture into the foil lined tray.
Chocolate Fudge Brownie Bites.
Chocolate Fudge Brownie Bites ready for the oven.
  • Give the baking tin a good couple of sharp taps on the worktop. This will bring any air bubbles to the surface.

Baking the brownies

  • Place the baking tin into the oven and cook for 35 – 40 minutes.
  • Halfway through the cooking time remove the tin from the I’ve and give it another sharp tap against a heatproof surface.
  • The brownies are cooked when the outside edge has set and the top of the brownies has the familiar, sugar cracked look. There should still be a little wobble to the centre of the tin.
  • As soon as the brownies are baked remove the tin from the oven and allow the brownies to cool completely in the tin.
  • Once cooled turn the brownies out onto a board and removing the foil.

Chocolate Fudge Brownie Bites


Slicing and decorating the brownie bites

Cut across the brownie at 4 even spaces, then cut down at 6 even spaces. Now you have 24 delectable Chocolate Fudge Brownie Bites! These truly are delicious as the are. Seeing as Valentine’s Day is almost upon us, I couldn’t resist piping some white chocolate hearts on them.

Simply pop some white chocolate, broken up, into a microwaveable bowl and melt using 20 second bursts, in the microwave until two thirds melted. Then stir continuously until the chocolate is a smooth liquid.

Spoon the melted chocolate into a small, disposable piping bag and cut the tip off, leaving a very small hole. I found it took a bit of practise, getting even hearts and that it was better if I piped the heart in one complete go.

Chocolate Fudge Brownie Bites
Chocolate Fudge Brownie Bites perfect for sharing with all those you love.

However you pipe your hearts, your loved ones will enjoy these Chocolate Fudge Brownies Bites, not just because they taste so amazing, but more importantly because you have baked them with love, to show people they are loved.

Do you like to celebrate Valentine’s Day, with your significant other, or with all of your loved ones?

If you have enjoyed these Chocolate Fudge Brownie Bites you may also like these:

Caramel Crunch Rocky Road Bars 

FF Chocolate Fudge Brownie Bites
Caramel Crunch Rocky Road Bars

Bakery Style Soft Triple Chocolate Cookies 

FF Chocolate Fudge Brownie Bites
Bakery Style Soft Triple Chocolate Cookies

Chocolate Heart Cookies

Chocolate heart shaped cookies with a white chocolate drizzle.


I wish you all a very happy Valentine’s Day and sincerely hope you know that you are loved see Important Stuff.

Sammie xx

No part of this post may be reproduced or duplicated without the written permission of the owner. Please see my Disclosure Policy

Share
Facebooktwitterpinterestlinkedintumblr