Cheddar Sun Dried Tomato Scones

Share
Facebooktwitterpinterestlinkedintumblr

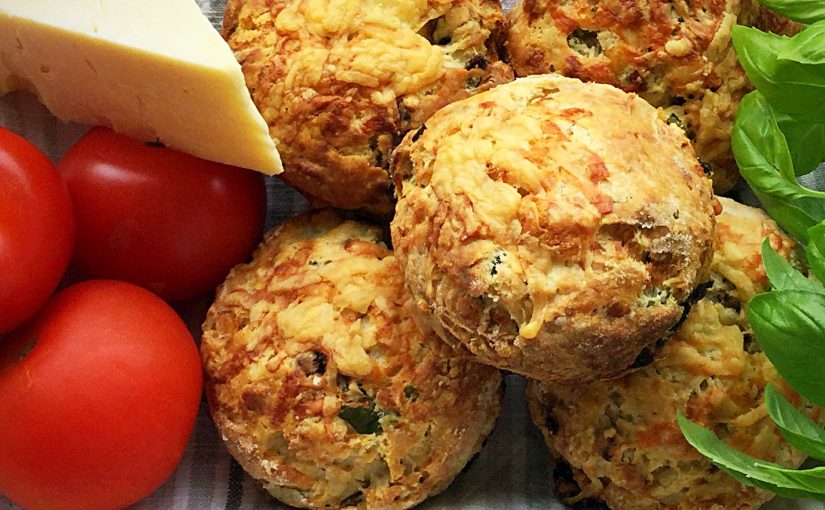
Cheddar Sun Dried Tomato Scones are the best savoury scones made at Feasting headquarters so far. Sharp, mature cheddar pairs beautifully with the sun dried tomatoes and the addition of fresh basil completes the final flavour. These scones need no addition as they are moist and light.

FF Cheddar Sun Dried Tomato Scones

Two things are really important when making these scones. First of all, use great ingredients. That doesn’t mean everything has to be top of the range, but buy the best mature cheddar you can afford. While the final flavour is not overpowering, using a mild cheddar results in a bland tasting scone. Also keeping your hands light, while making the scone dough will result in a light scone. Because if you work the dough too much the baked scones will be heavy.

FF Cheddar Sun Dried Tomato Scones
Cheddar Sun Dried Tomato Scones it’s hard to stop at one!

Since the sun dried tomatoes add a depth of savoury flavour to the finished scone, they are crucial to the recipe. Dry packaged are best, however if they are only available in oil that’s okay. Simply remove slightly more than the recipe calls for and drain them thoroughly using kitchen towels. While their deep, unique flavour and texture will still work in this recipe.

FF Cheddar Sun Dried Tomato Scones
Cheddar Sun Dried Tomato Scones the cheese melts into the scone, yet the basil and tomatoes are still visible.

Time to get baking!

Recipe: Cheddar Sun Dried Tomato Scones makes 10-12

450g/1lb Plain White Flour

3tsp Baking Powder

25g/1oz Trex – solid vegetable fat kept very cold

50g/2oz Unsalted Butter kept very cold

250mls Whole Milk straight from the fridge – plus a little extra for brushing the tops of the scones

150g/5oz Freshly Grated Mature/Sharp Cheddar – I used Wyke Farm mature cheddar

50g/2oz Sun Dried Tomatoes preferably not in oil

Handful of Fresh Basil Leaves – approx. 10 large leaves.

1/4tsp Sea Salt Flakes – I use Maldon

Good grinding of Black Pepper to taste

Method: Preheat oven to 220C/200C fan, 425F, gas mark 7,

You will need two large baking trays lined with baking parchment and a 5cm/2″ plain round cutter.

Making The Cheddar Scone Dough

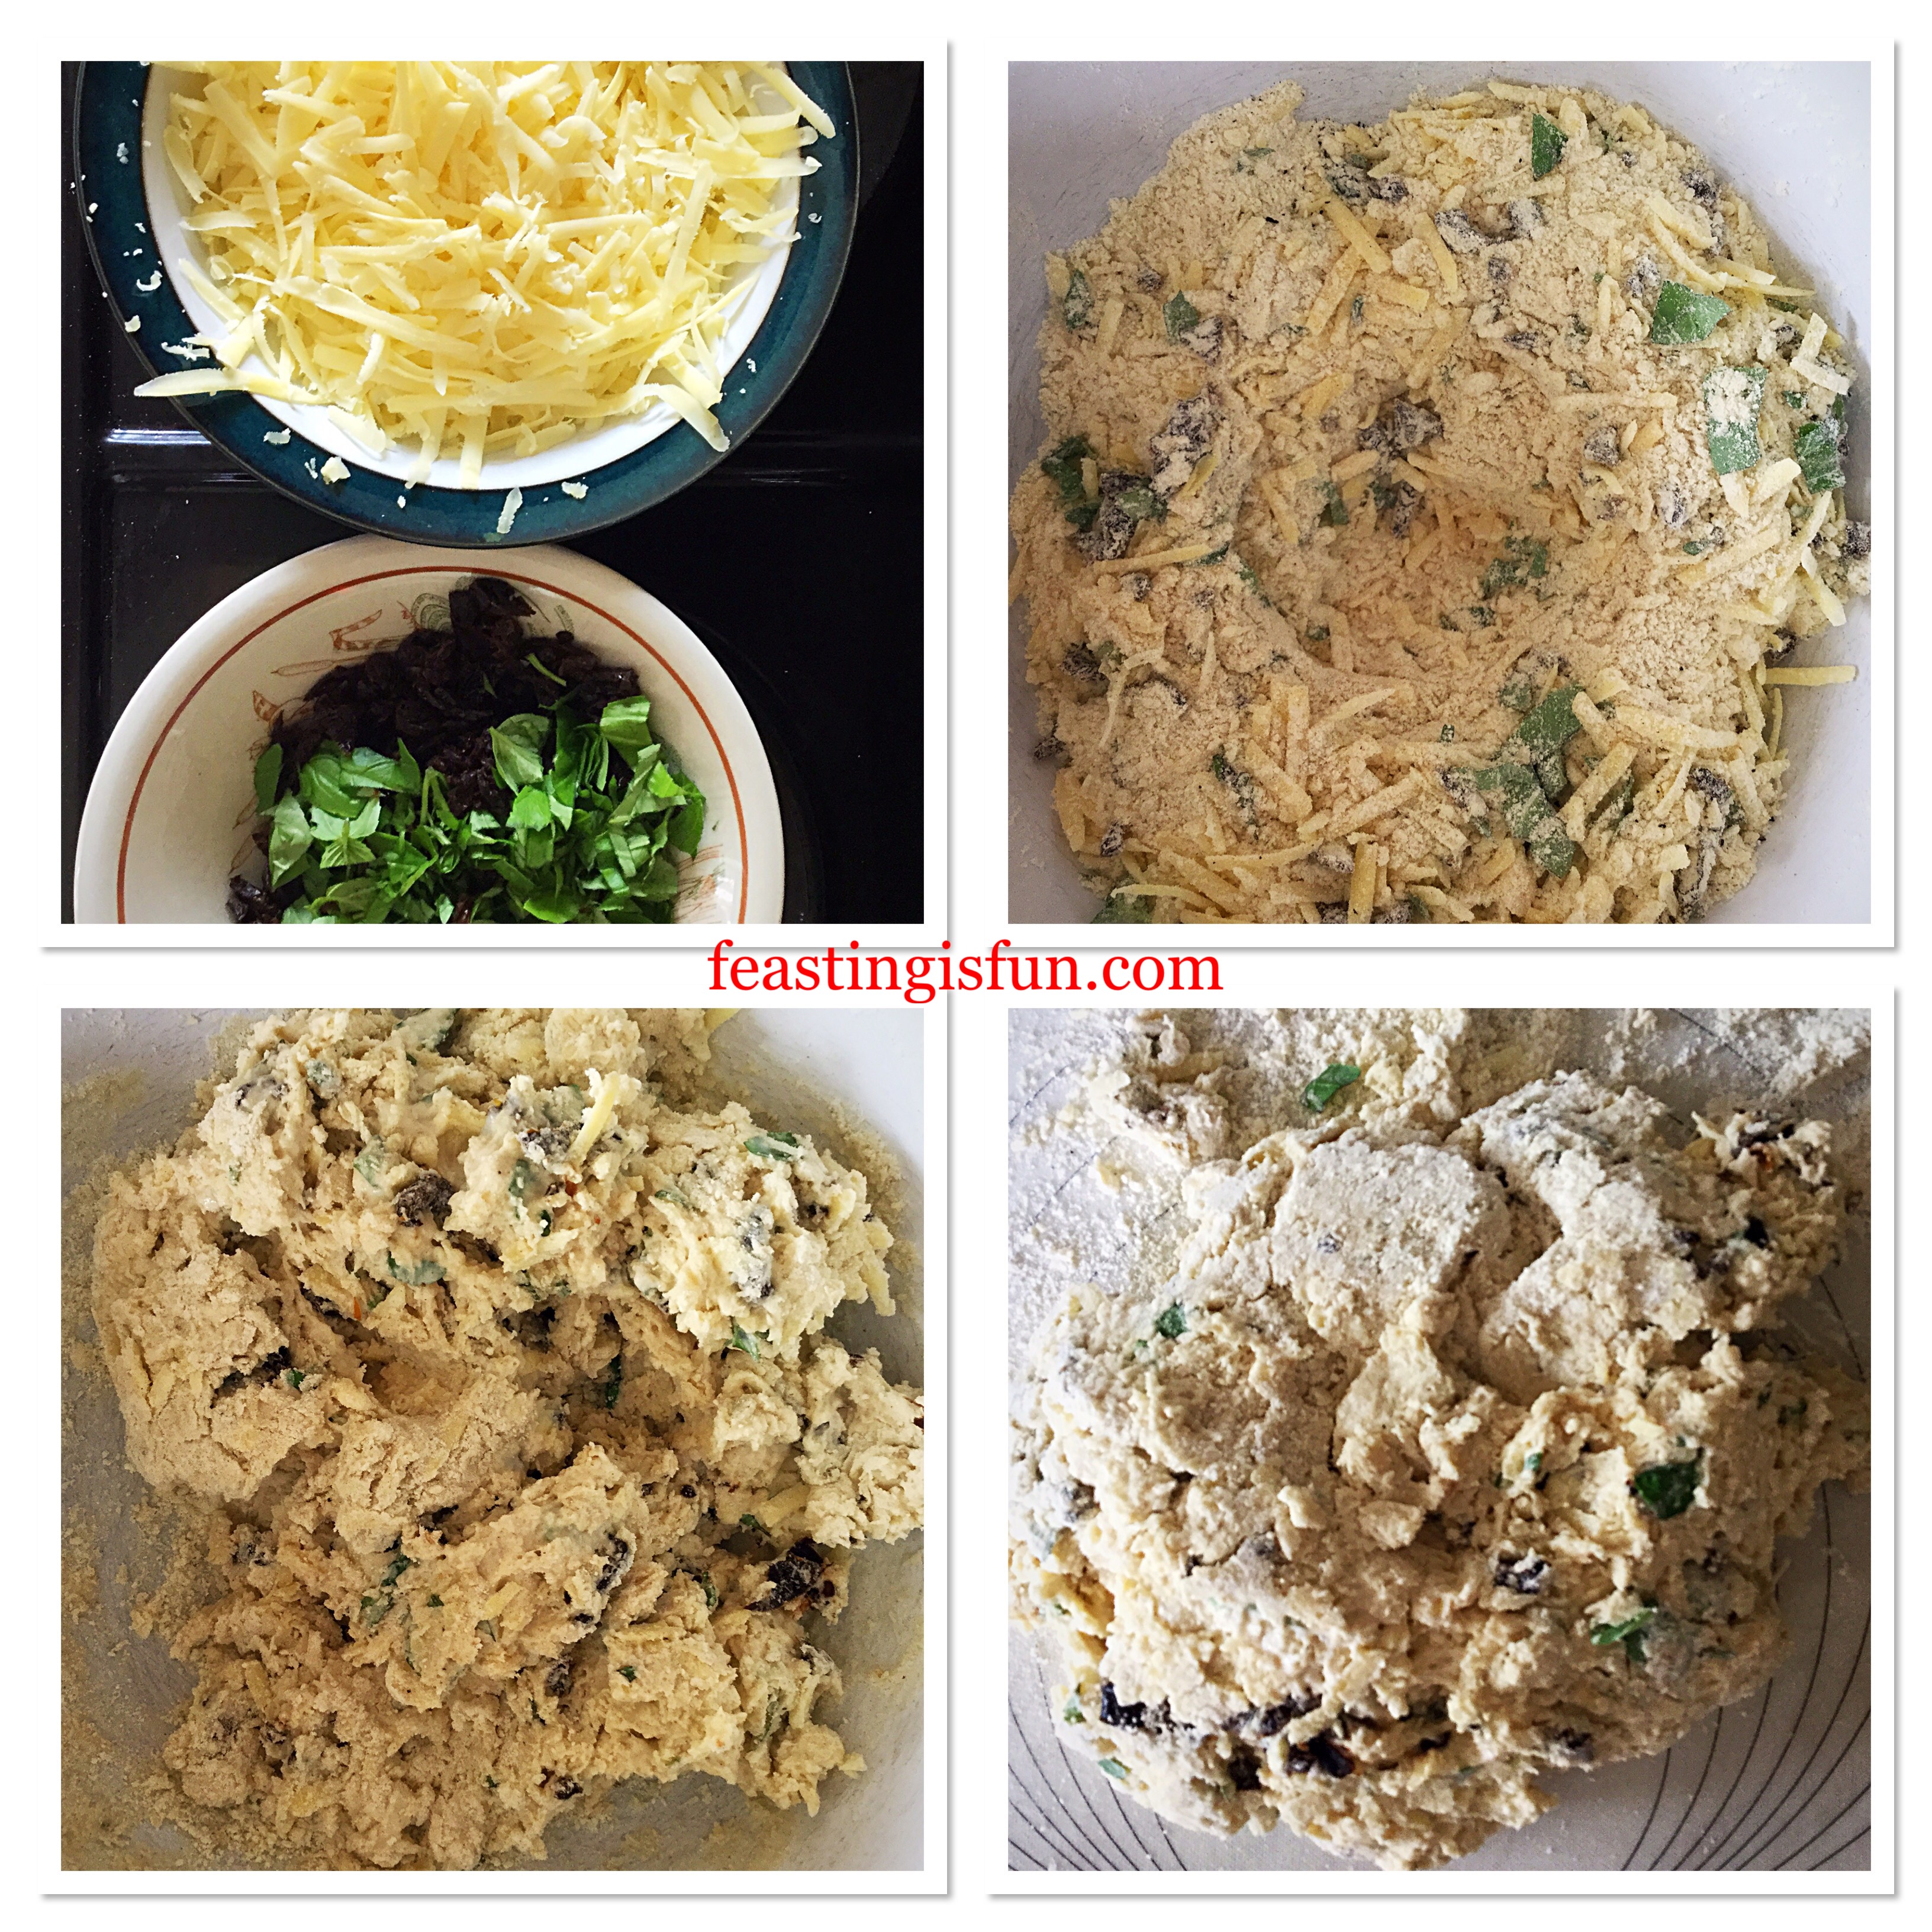
  • First of all prepare the ingredients. Grate the cheese and chop, or snip the sun dried tomatoes and basil into similar sized pieces – see photo.
  • Add your flour, baking powder, salt and a good grinding of black pepper to a large bowl. Use a balloon whisk to blend the ingredients together.
  • Next add both the fats and blend them into the flour using a pastry cutter. Alternatively rub the fat into the flour using your fingers. Finally the flour should have a breadcrumb appearance with some larger, pea sized, pieces of fat visible.
  • Add one third of the grated cheese to the bowl. Use your fingers to toss the cheese in the flour. This coats the cheese and stops it from clumping. Repeat with half of the remaining cheese. Set the unused cheese to one side.
  • Now do the same with the sun dried tomatoes and fresh basil, tossing them in the flour to coat them.
  • Make a well in the centre of the bowl and pour in the cold milk.
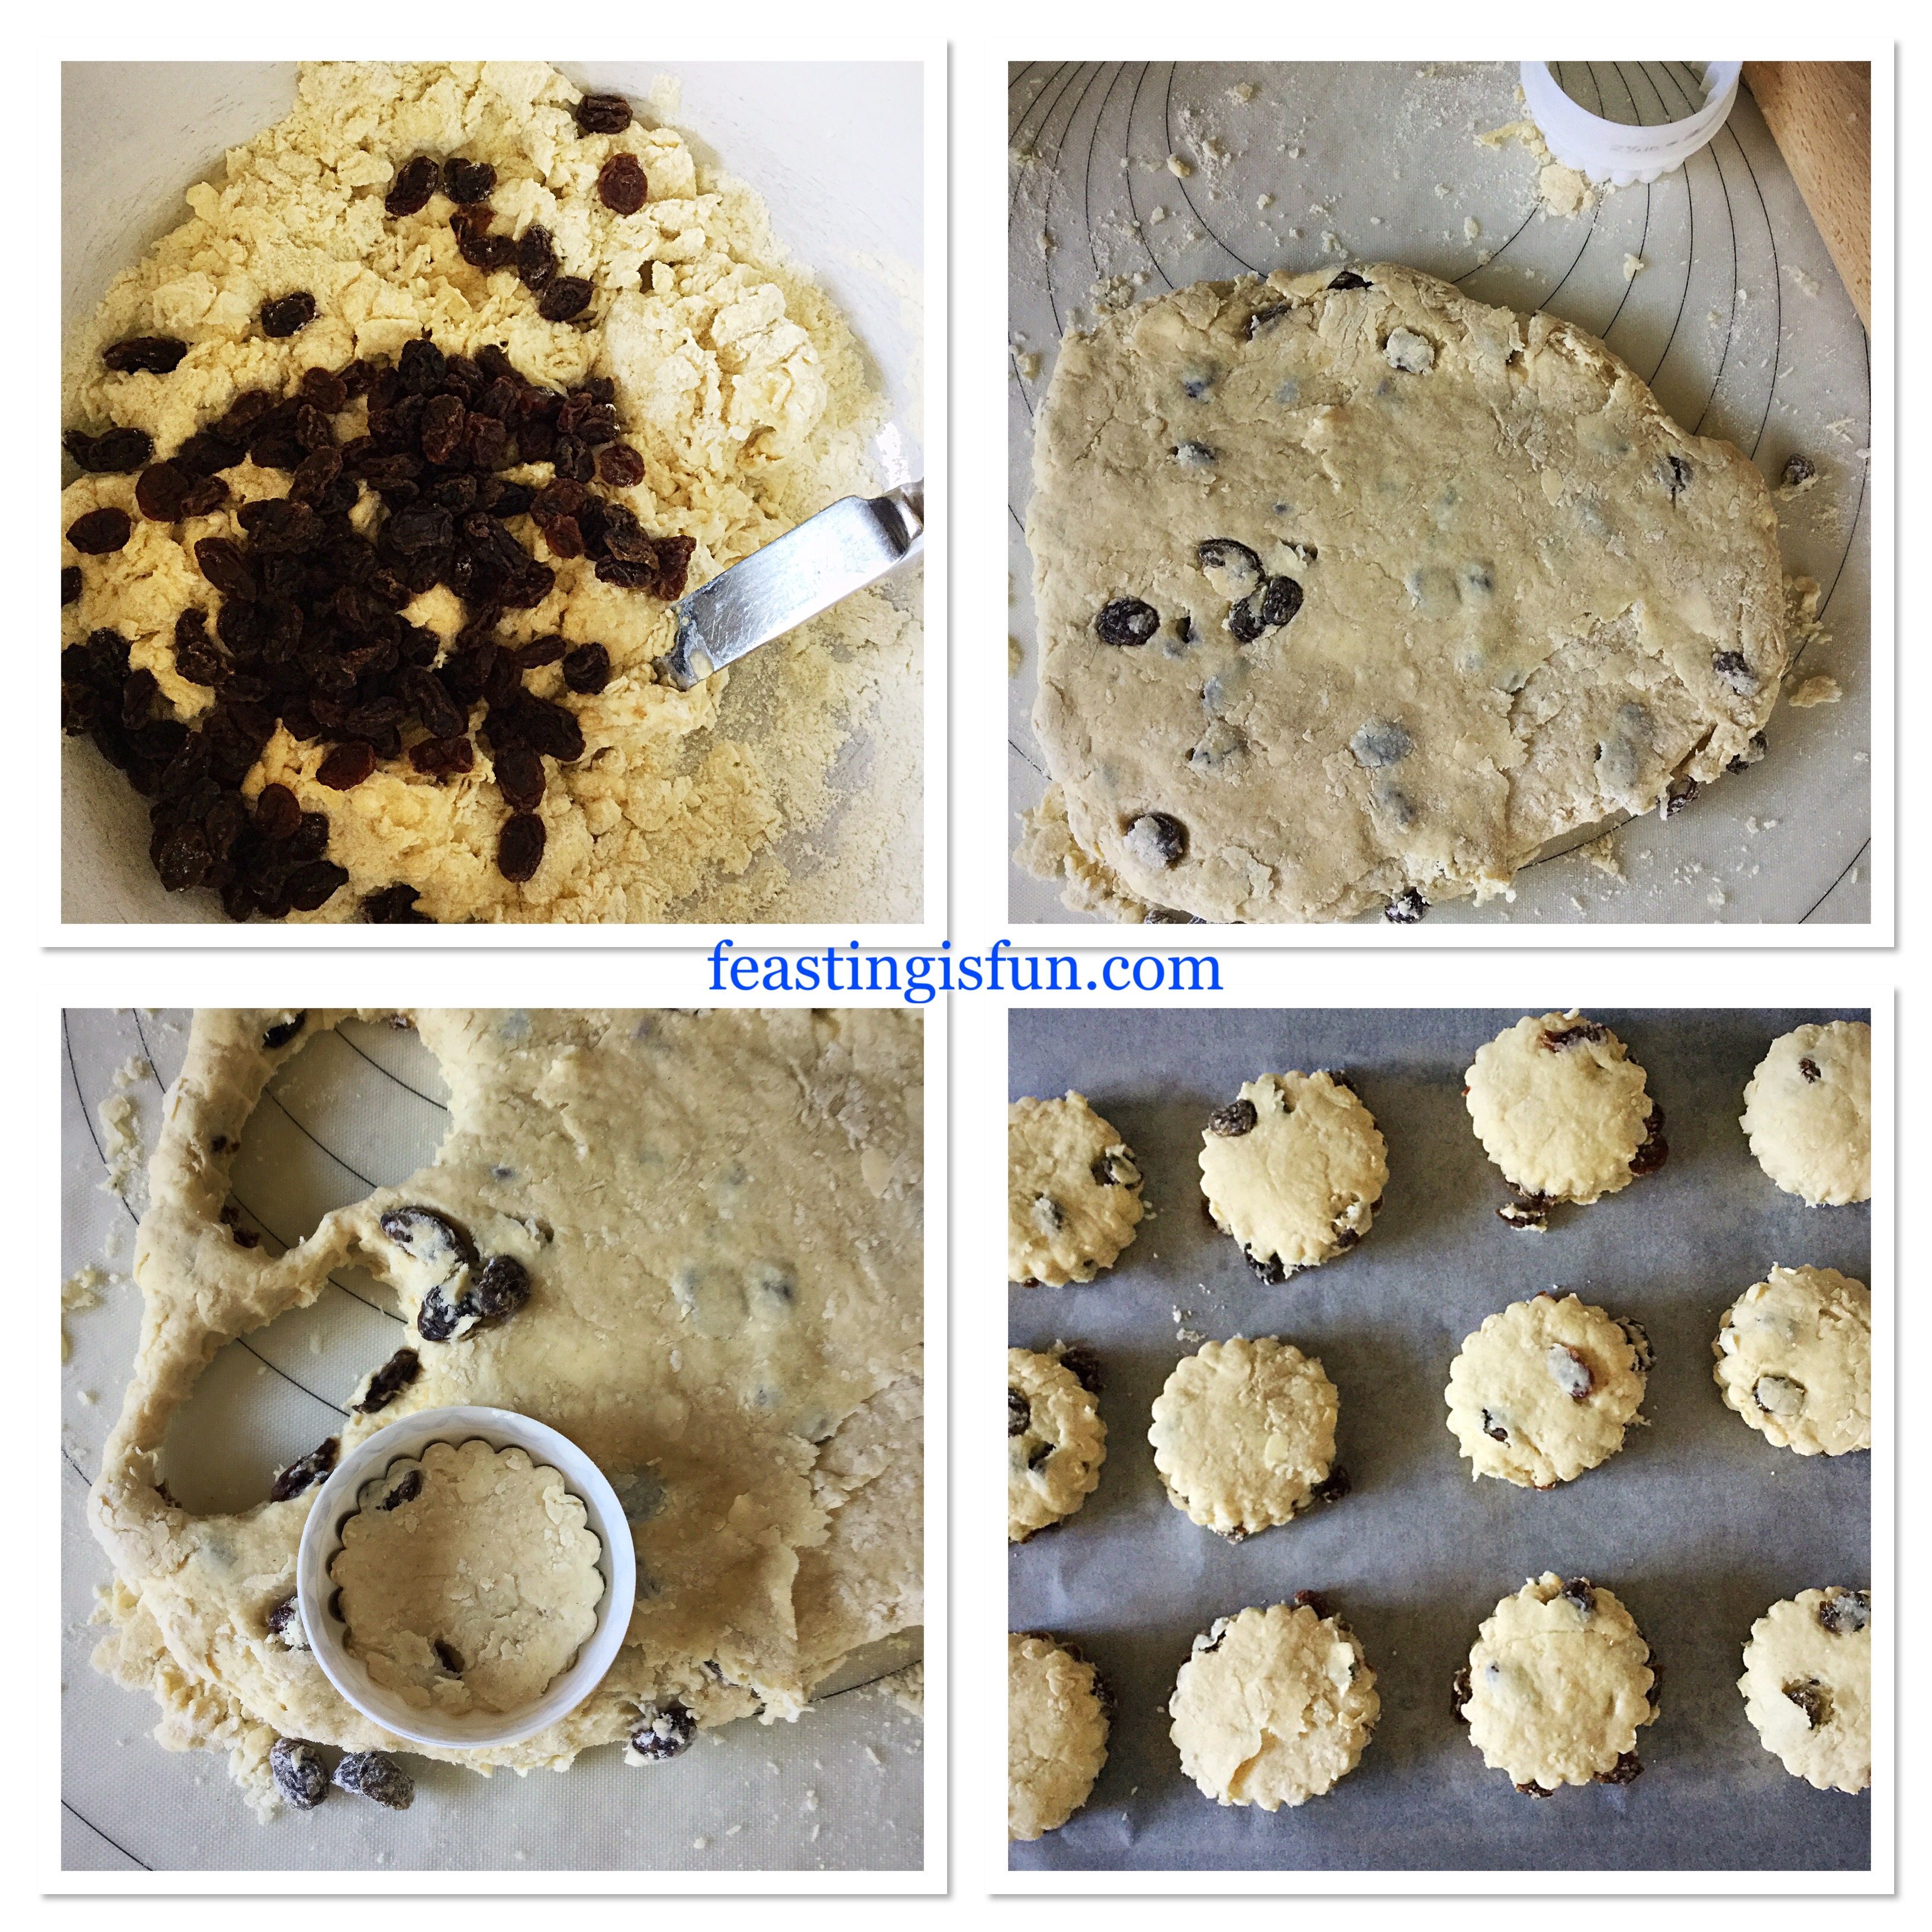
  • Stir the ingredients together with a dinner knife, until they form a rough dough.
  • Use your hand, shaped like a claw to pull all the ingredients together.
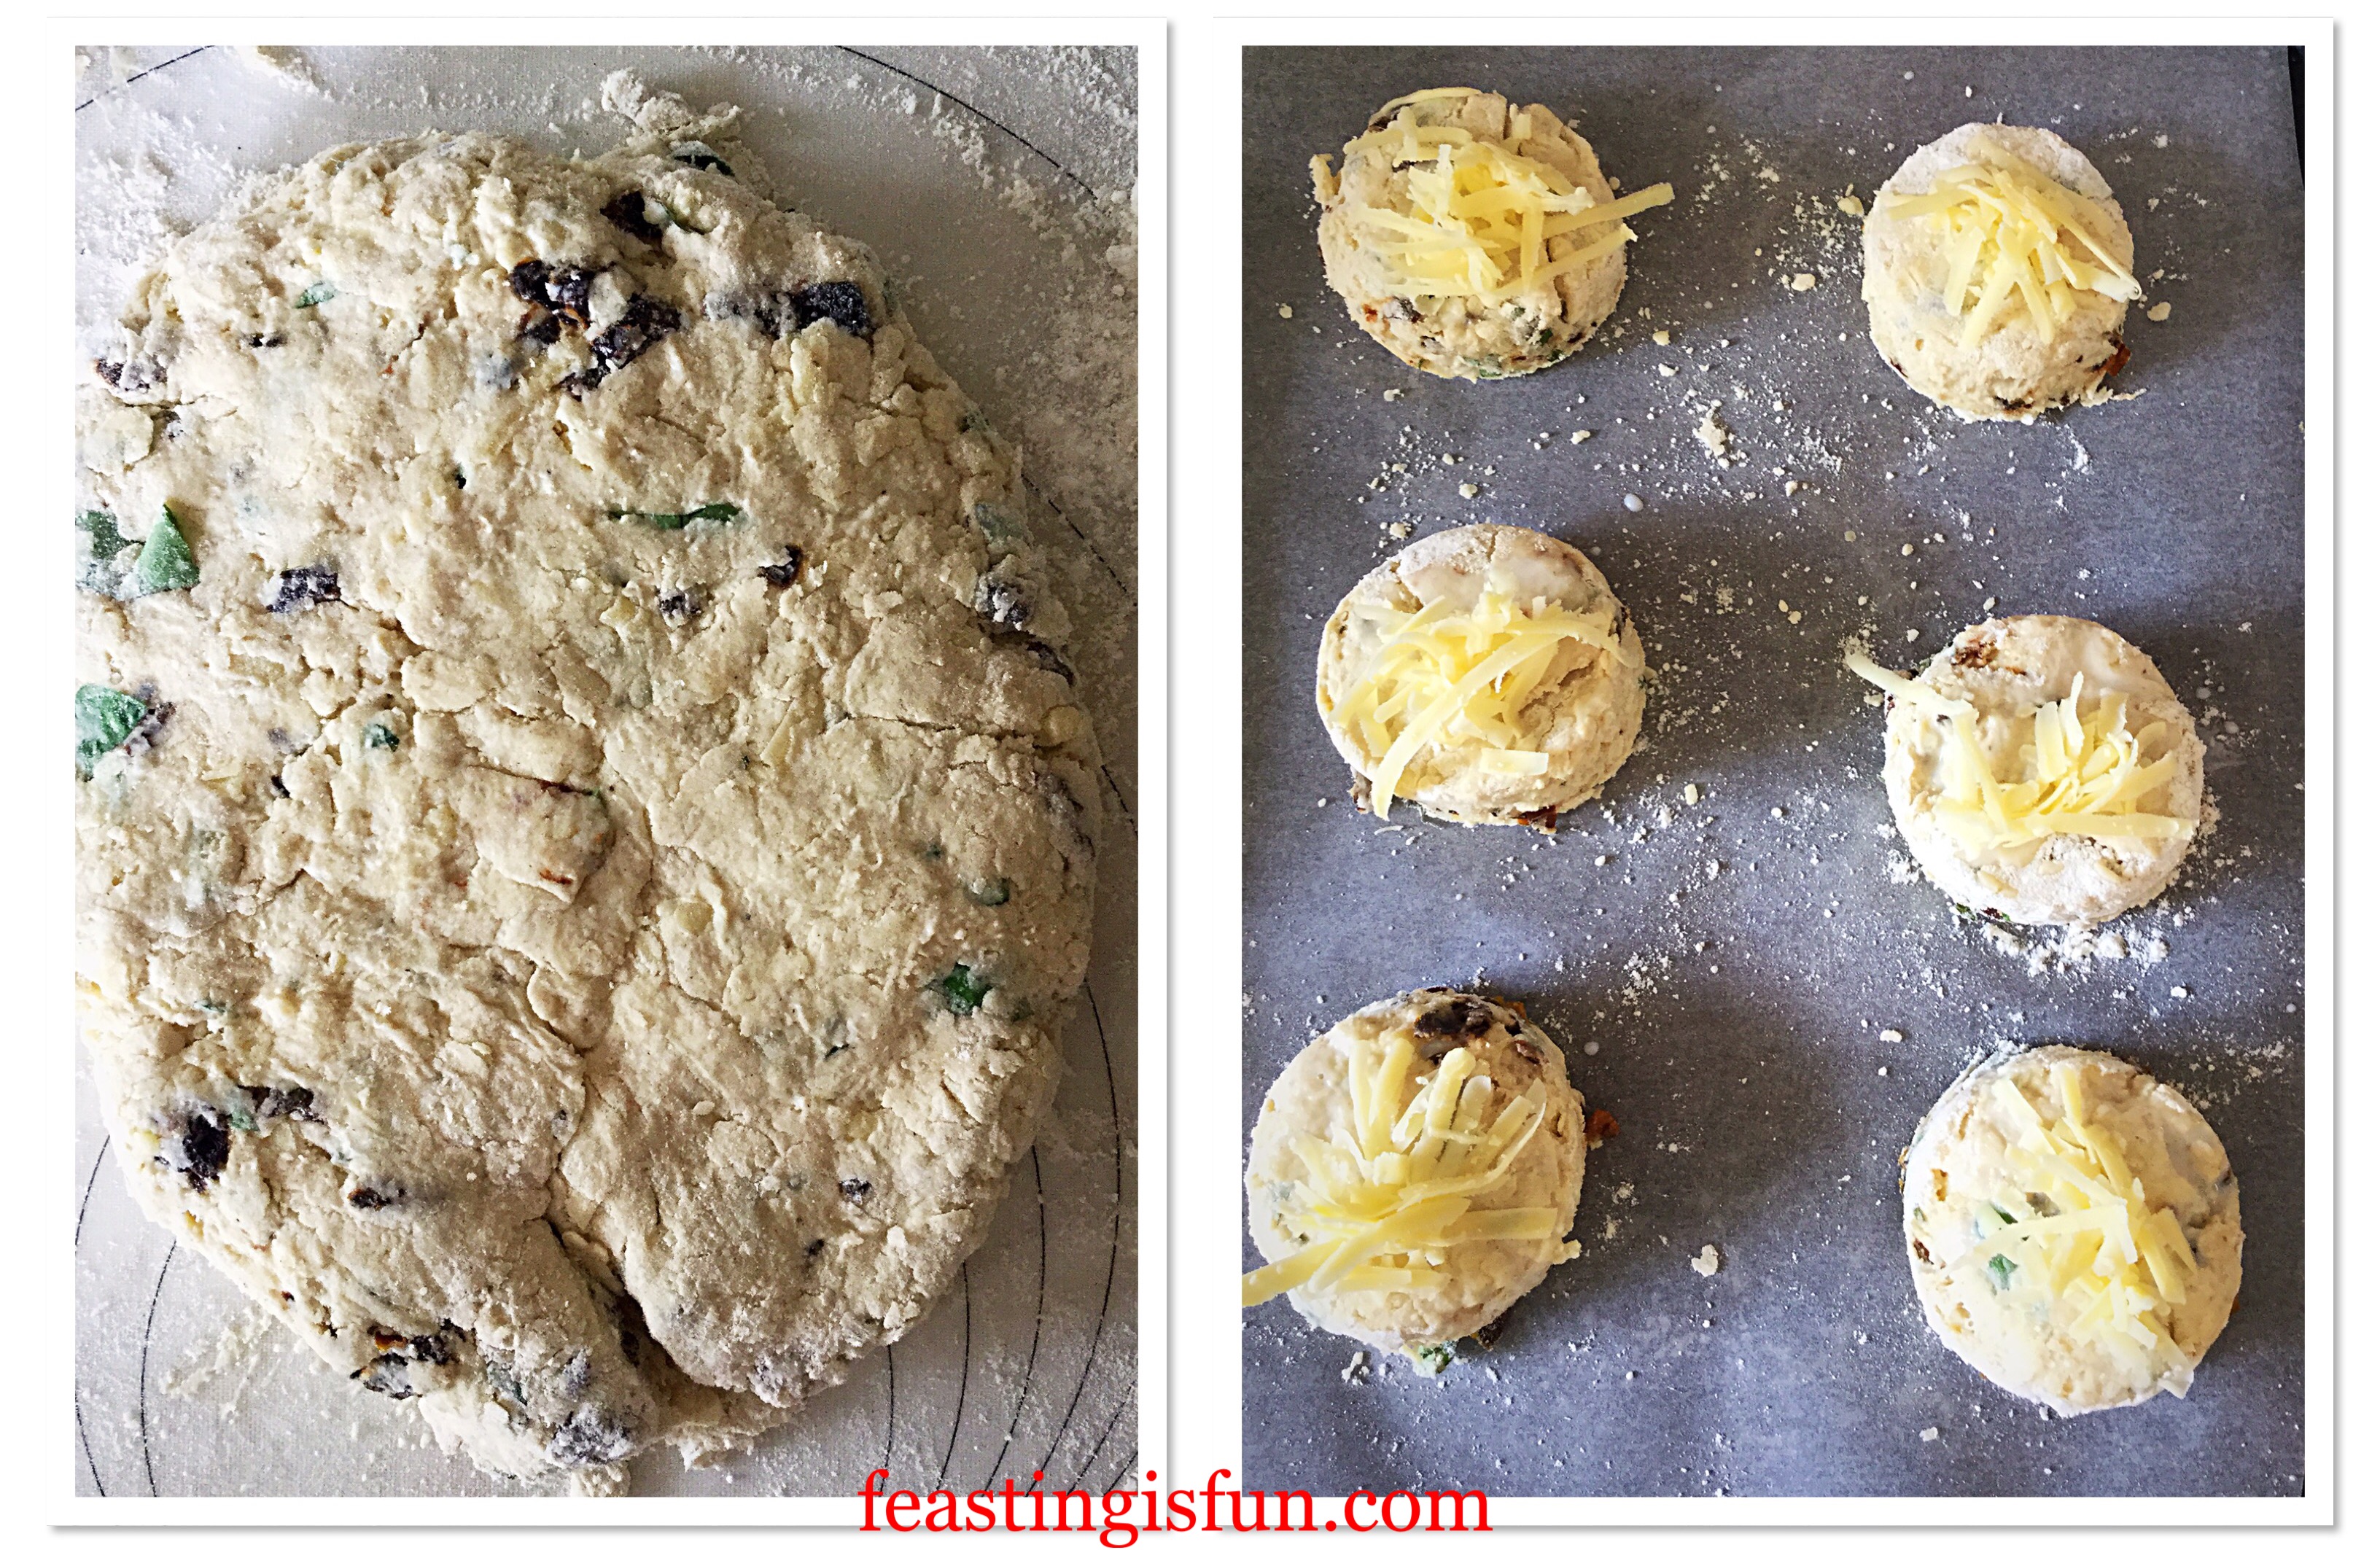
  • Tip the scone dough on to a lightly floured work top.
FF Cheddar Sun Dried Tomato Scones
Making the Cheddar Sun Dried Tomato Scones dough.

Shaping The Dough And Cutting Out The Scones

  • Bring the dough together with your hands and pat into a rough circle approximately 1 inch/2.5cm deep.
  • Thoroughly flour the round cutter and cut out the scones. NOTE: Do not twist the cutter as you push through the dough as this will result in uneven/lopsided final bakes. Place the scones on to the lined baking trays.
  • Brush the top of each scone with milk and add a little of the remaining cheese.
FF Cheddar Sun Dried Tomato Scones
Shaping the dough and cutting out the scones.

Baking The Cheddar Sun Dried Tomato Scones

  • Place the baking trays into the preheated oven and bake for 20-25 minutes.
  • The scones are baked when they are a golden colour and similar to bread sound hollow when rapped on the base with a knuckle.
  • As soon as they are baked remove the scones from the oven.
  • Immediately place the scones on to a cooling rack, using a clean tea towel to transfer them as they will be very hot.
FF Cheddar Sun Dried Tomato Scones
Cheddar Sun Dried Tomato Scones cooling on a rack.

Since these scones are at their absolute best when still slightly warm, there is no need to wait for them to completely cool before tasting!

FF Cheddar Sun Dried Tomato Scones
Cheddar Sun Dried Tomato Scones delicious split with a little butter!

While delicious eaten warm, cool completely before packing into an airtight container to store.

Also the scones can be made ahead, cooled and packed into freezer bags. They will keep for up to one month in the deep freeze. Ideal for making ahead.

If you have enjoyed this recipe for Cheddar Sun Dried Tomato Scones you may also like these:

Beauvale Cheese Walnut Scones

FF Cheddar Sun Dried Tomato Scones
Beauvale Cheese Walnut Scones.

Super Light Scones

FF Cheddar Sun Dried Tomato Scones
Super Light Scones

Goddess Cheese Pine Nut Muffins

FF Cheddar Sun Dried Tomato Scones
Goddess Cheese Pine Nut Muffins

Cheddar Sun Dried Tomato Scones, such a delicious combination of flavours and texture. Also perfect for making ahead and freezing, ready to pop in the oven on a low heat when unexpected guests arrive. Make ahead recipes are my all time favourites. Especially as I never know from one day to the next how my body will be. Fortunately it’s always nice to know that there is good, homemade food in the house.

So, whatever you are making, baking and creating in your kitchens, have fun preparing and sharing your feast.

Sammie xx

No part of this post may be copied. Please see my Disclosure Policy.

Share
Facebooktwitterpinterestlinkedintumblr

Cherry Chocolate Ice Cream

Share
Facebooktwitterpinterestlinkedintumblr

Are you a fan of ice cream? I am and I absolutely love making it myself. The reason for that is, firstly I own an awesome ice cream maker from Andrew James and secondly any flavour combination is possible.The only limit is your own imagination. So welcome to my Cherry Chocolate Ice Cream.

Pinterest sized image with descriptive graphics.

So, yesterday I was going to make a batch of Strawberry Ripple Ice Cream. Yet while foraging around in the cupboard for ingredients I came across a bar of Lindt Cherry Chocolate. And an idea started to form. Further rummaging and the second ingredient was found. A can of tinned cherries. Not sure if they would make it to the final recipe I hooked them out anyway. So it was time to start experimenting!

A tub of frozen swirled ice cream.
A tub of frozen Cherry Chocolate Ice Cream.

Flavours That Compliment Each Other

Cherry and chocolate are a classic combination. In truth, during cherry season I may try this recipe with gorgeous, glossy fresh cherries. Especially as we have a cherry tree in our garden. Instead their flavour is imparted firstly through the cherry chocolate bar. Resulting in a pleasantly mild flavour. However, once frozen the flavours dull. Resulting in the decision to use a full can of cherry pie filling (please don’t hate me) with the additional dark chocolate chunks added as well.

Scoops of flavoured ice cream in a bowl with a spoon.
Cherry Chocolate Ice Cream

Taste is an important part of developing a recipe, is key. As soon as the ice cream is churned, frequent tastings are made and more cherries are added. It’s a hard life! Eventually the balance was perfect using the entire can. Dark chocolate chunks transform any ice cream, with both flavour and texture. Here they provide deep chocolate flavour within the silky, mild chocolate ice cream. Resulting in this incredible Cherry Chocolate Ice Cream, my hubby’s all time favourite.

Scoops of ice cream in a glass bowl.
Cherry Chocolate Ice Cream

Recipe: Cherry Chocolate Ice Cream makes approx. 1L

300ml Double Cream

300ml Whole Milk

1tsp Vanilla Extract – I use Nielsen-Massey

4 Large Free Range Egg Yolks – the whites can be frozen for up to 1 month

1tsp Corn Flour – I use Dove’s Farm as it is certified gluten free

4tbsp Caster Sugar

100g Bar Lindt Cherry Chocolate

1 x 410g Can Cherry Pie Filling – check that the pie filling is gluten free. Alternatively use frozen, pitted cherries available from most supermarkets.

100g Dark Chocolate Chunks/Bar

Method:  Place the bowl of the ice cream maker in the freezer at least 8 hours/overnight or follow the manufacturer’s instructions, prior to making this ice cream.

For step by step instructions and photos please see Very Vanilla Ice Cream .

Making The Custard Base

  • First of all pour the cream and milk into a heavy based saucepan placed over a medium heat.
  • While the cream is heating place the egg yolks, sugar, vanilla extract and corn flour into a large heatproof bowl.
  • Whisk the ingredients together until pale and frothy, keeping an eye on the heating cream.
  • Heat the cream and milk to scalding point, when a ring of bubbles appear around the rim of the saucepan, just prior to the liquid boiling. Remove from the heat once scalding point has been reached.
  • With the whisk on slow, gently pour in the heated cream, increasing the speed once it is all added.
  • Pour the custard mixture back into the pan and place over a medium heat. Stir to ensure that the base doesn’t burn. Continue until the custard is thickened and coats the back of a wooden spoon. Remove from heat.

Turning The Vanilla Custard Into A Cherry Chocolate Base

  • Break up the cherry chocolate bar and place into a heatproof bowl. Place a sieve over the bowl.
  • Next, pour the thickened custard through the sieve into the bowl.
  • Stir the custard until all of the chocolate has melted. Cover the custard with cling film placed directly on to the top of the hot, thick liquid, this will stop a skin from forming.
  • Set the hot, flavoured custard to one side and allow to cool.
FF Cherry Chocolate Ice Cream
Churning The Ice Cream And Adding Cherries And Chocolate Chunks 
  • When the ice cream base has cooled place in the fridge to chill.
  • While the ice cream base is chilling prepare the chocolate chunks. If using a bar chop into pieces.
  • Set up the ice cream maker once the ice cream base is cold.
  • Pour the base into the ice cream maker and churn until softly frozen.
  • Decant the ice cream into a freezer proof container with a tight fitting lid.
  • Add the cherries and chopped chocolate.
FF Cherry Chocolate Ice Cream
Creating the Cherry Chocolate Ice Cream
  • Using the handle of a wooden spoon swirl the ingredients together.
FF Cherry Chocolate Ice Cream
Cherry Chocolate Ice Cream swirled together and ready for the freezer.
  • Clip on a tight fitting lid and place in the freezer for 6 hours or ideally overnight.
  • Remove the ice cream 10-20 minutes prior to serving to allow it to soften, which will allow easy scooping.
FF Cherry Chocolate Ice Cream
Cherry Chocolate Ice Cream ready to serve

Serve generous scoops of this utterly scrumptious ice cream in bowls or cones. And watch the smiles on faces as they discover whole cherries, nuggets of dark chocolate and enjoy feasting.

FF Cherry Chocolate Ice Cream
Cherry Chocolate Ice Cream Sundae

Why not turn this delicious ice cream into a Cherry Chocolate Ice Cream Sundae?

If you have enjoyed this recipe for Cherry Chocolate Ice Cream there are many other ice cream recipes on Feasting is Fun, here are a few:

Triple Chocolate Chunk Ice Cream

FF Cherry Chocolate Ice Cream
Triple Chocolate Chunk Ice Cream

Lemon Ripple Ice Cream

Lemon Ripple Ice Cream scoops in a bowl.
Lemon Ripple Ice Cream

Chocolate Rolo Ice Cream

FF Cherry Chocolate Ice Cream
Chocolate Rolo Ice Cream

Nothing beats homemade ice cream, especially on a hot, sunny day. And the flavour combinations are limitless. Since you are in control you can simply make flavours that aren’t available in the shops. I could not be parted from my ice cream maker. So the bowl has a permanent place in our freezer, ready for whenever the need for ice cream arises. And yes sometimes it is a need!

So, whatever you are making, baking and creating this weekend have fun.

Sammie xx

No part of this post may be copied without my specific written agreement. Please see my Disclosure Policy.


Share
Facebooktwitterpinterestlinkedintumblr

Toffee Cookie Base Chocolate Cheesecake

Share
Facebooktwitterpinterestlinkedintumblr

If you are a pudding or dessert lover, with a sweet tooth, this Toffee Cookie Base Chocolate Cheesecake will absolutely hit the spot. Easy to make, using great products, this is the perfect end to any meal. Or, as happened this morning, a great breakfast!

FF Toffee Cookie Base Chocolate Cheesecake
Toffee Cookie Base Chocolate Cheesecake easy to make using great ingredients.

Starting at the bottom, the toffee cookie base provides a soft, chewy, toffee flavoured biscuit. Butterscotch cheesecake sits on top, then covered with a thick toffee sauce. Once set after being chilled in the fridge a dark chocolate ganache floods the top of the toffee covered cheesecake. Finally, it is finished with swirls of caramel Caramac, creating an overall balance of flavours and texture.

FF Toffee Cookie Base Chocolate Cheesecake
Toffee Cookie Base Chocolate Cheesecake a delightful dessert.

While this is a rich dessert, it isn’t overwhelming sweet. Cutting down through a slice, so every layer is tasted together, definitely enhances the eating experience.

FF Toffee Cookie Base Chocolate Cheesecake
Toffee Cookie Base Chocolate Cheesecake decadent and delicious.

To make this cheesecake you will need a 15cm/6″ diameter, springform, removable base cake tin.

Recipe: Toffee Cookie Base Chocolate Cheesecake serves 6-8

Toffee Cookie Mix – available from Wright’s Baking

25g Unsalted Butter – plus a little extra for greasing the tin

1 Packet Butterscotch Angel Delight easily available from Asda and some other supermarkets

200mls Single Cream

280g Tub Philiadelphia Cream Cheese

3/4 Jar Toffee Sauce – available from Hawkshead Relish if using a different make ensure that it is semi solid so that it will set in the fridge

200g Dark Chocolate

200mls Double Cream

50g Caramac or White Chocolate as an alternative

Recipe notes – use 200g of toffee biscuits, bashed to crumbs in a bag. Tip into a bowl then add 100g melted butter if you are unable to obtain the cookie mix. Press the sandy biscuit/butter mixture into the base of the tin and chill for an hour.

Method: Preheat oven 180C/160C fan, gas mark 5

Preparing the base:

  • First of all, line the base of the tin with aluminium foil – this protects the cake tin base from knife marks and allows the cheesecake to be removed easily from the base.
  • Then very lightly grease the base with butter.
  • Make up the Toffee Cookie Mix according to the packet instructions. Butter is better to use than oil as it will give a firmer cookie base once baked and chilled.
  • Place the tin into the middle of the preheated oven and bake for 25-30 minutes.
  • The cookie base is baked when it is golden brown on top. It will not feel firm, however it will set as the base cools.
  • Place the tin on to a cooling rack and leave to cool completely. DO NOT REMOVE FROM THE TIN.
FF Toffee Cookie Base Chocolate Cheesecake
Making and baking the cookie base and ingredients for the next stage.

Building the cheesecake:

  • To make the next layer of the cheesecake, place the cream cheese and single cream into a bowl.
  • Whisk together until there is a smooth consistency.
  • Now add the packet of angel delight. Whisk until the mixture becomes very thick.
  • Spoon the butterscotch cheesecake on to the cold cookie base. Smooth with the back of a spoon, ensuring the top is level.
  • Place the cheesecake into the fridge to chill and set for 30 minutes.
FF Toffee Cookie Base Chocolate Cheesecake
Making the butterscotch cheesecake layer.
  • While the cheesecake is chilling in the fridge check the toffee sauce.
  • If the sauce has set in the jar, it simply needs to be warmed so that it can be poured over the cheesecake layer. Pour some warm-ish water into a jug and then place the jar in the jug. The sauce will become less cloudy as it warms up. Remove the jar from the water and stir thoroughly with a spoon.
  • Take the cheesecake from the fridge and pour over the toffee sauce. It should cover the entire top of the cheesecake. Then return the cheesecake to the fridge, to allow the toffee to set.
  • While the toffee is setting make the dark chocolate ganache.
  • Break or chop the dark chocolate and place into a heatproof,microwaveable bowl. Pour over the double cream.
  • Place the bowl into the microwave and heat on medium for 30 second bursts, stirring after each heating.
  • When the chocolate is melting and the cream has warmed, remove from the microwave and continue stirring until the ganache is thick and glossy.
  • Leave the ganache to cool slightly, without setting, so that it doesn’t heat up the toffee layer.
FF Toffee Cookie Base Chocolate Cheesecake
The toffee covering and making the chocolate ganache.
  • While the ganache is still liquid, but cooled, pour it over the entire top of the chilled toffee sauce layer.
FF Toffee Cookie Base Chocolate Cheesecake
Toffee Cookie Base Chocolate Cheesecake with a smooth ganache topping.
  • Place the cheesecake back into the fridge to chill and set.
  • Meanwhile place the Caramac into a small heatproof, microwaveable bowl and heat in short 20 second bursts, stirring in between until completely melted.
  • Pour the melted Caramac into a small disposable piping bag.
  • Remove the cheesecake from the fridge. Cut the very end of the piping bag off.
  • Pipe squiggles, or whatever pattern you like on to the chocolate ganache.
  • Place the uncovered cheesecake back into the fridge to completely set.
  • Due to the different layers in this cheesecake, it should be chilled for 4 hours, after the last stage, or ideally overnight.
FF Toffee Cookie Base Chocolate Cheesecake
Toffee Cookie Base Chocolate Cheesecake ready to serve.

To serve, remove from the fridge, run a sharp knife around the edge of the cheesecake to ensure it releases easily. Place the tin on to a large jar/tin and release the springform clip. Ease the side of the tin down, away from the cheesecake. Put the cheesecake on to a flat plate or cake stand.

Enjoy with friends and a drink of your choice. My preference would be strong coffee!

FF Toffee Cookie Base Chocolate Cheesecake
Toffee Cookie Base Chocolate Cheesecake

Treat your friends and family, indeed yourself, to this amazing dessert.

This cheesecake is best eaten within 48 hours of making.

If you have enjoyed this recipe for Toffee Cookie Base Chocolate Cheesecake then you may also like these:

No Bake White Chocolate Strawberry Cheesecake

FF Toffee Cookie Base Chocolate Cheesecake
No Bake White Chocolate Strawberry Cheesecake

Raspberry Chocolate Pavlova

FF Toffee Cookie Base Chocolate Cheesecake
Raspberry Chocolate Pavlova

Chocolate Brownie Raspberry Cheesecake

FF Toffee Cookie Base Chocolate Cheesecake
Chocolate Brownie Raspberry Cheesecake

Dessert is a real treat here at home. Yet it can be the crowning glory to any meal. I have friends who will choose dessert before their main when we are out for a meal. I think that is awesome. But then I have awesome friends 😉.

Whatever you are making, baking and creating in your kitchens, have fun preparing your feast.

Sammie xx

Wright’s Bakingprovided me with the cookie mix and Hawkshead Relish provided me with a curtesy jar of their toffee sauce. All content, including views and opinions are my own. i was not paid to create this recipe. Please see my Disclosure Policy for complete copyright and intellectual property laws that cover this website. No content may be copied or linked to without my consent.

Share
Facebooktwitterpinterestlinkedintumblr

Double Chocolate Exam Busting Cupcakes

Share
Facebooktwitterpinterestlinkedintumblr

If you are a parent and have children, you will know that from year 6, exams become an important part of their lives. Whether it’s SATS, GCSE’s, A Levels. College or University exams. The end game always focuses on tests or exams. Since today is the start of GCSE’s here in England these Double Chocolate Exam Busting Cupcakes, are designed to lift the spirits and fill the tummies of all students sitting their exams.

FF Double Chocolate Exam Busting Cupcakes
Double Chocolate Exam Busting Cupcakes with coffee – study fuel!

Of course these cupcakes could and should be made all year round, such is their delicious simplicity. Chocolate cake topped with the ultimate white chocolate vanilla frosting. Perfect for chocolate lovers everywhere.

FF Double Chocolate Exam Busting Cupcakes
Double Chocolate Exam Busting Cupcakes the reflect balance of flavours.

A quick bake

Since these cupcakes can be made, from start to finish in under an hour, they are also handy for short notice or unexpected guests. Likewise they can be whipped up, literally, in moments. The comforting aroma of home baking, wrapping around your weary children, like a cosy, soft blanket, when they arrive home.

FF Double Chocolate Exam Busting Cupcakes
Double Chocolate Exam Busting Cupcakes comfort at the ready.

While my hard working teens are sitting and studying for their exams, I can be found in the kitchen. Busy rustling up delicious, sustained energy food and lots of treats. The amount of energy burned up during studying is vast. Since this can be a tough time of year for them, their usual ‘healthy’ food intake is topped up with extra yummy goodies!

Recipe: Double Chocolate Exam Busting Cupcakes makes 12

100g/4oz Unsalted Butter – softened to room temperature

50g/2oz Caster Sugar

50g/2oz Light Brown Sugar

1/4tsp Salt – I use Maldon

1tsp Vanilla Extract – I use Nielsen-Massey

3 Large Free Eggs

60g Plain White Flower

1tsp Baking Powder

40g Cocoa Powder – I use Callebaut

For the frosting:

150g/5oz Icing Sugar

75g/3oz Unsalted softened to room temperature

1tsp Vanilla Bean Paste

100g/4oz White Chocolate

Sprinkles of your choice

Method: Preheat the oven to 160C/140C fan, gas mark 3

First of all line a 12 hole cupcake tin with cupcake cases.

Making the cupcakes

  • Into a medium sized bowl add the butter, both sugars and salt. Beat together until the mixture is free from lumps and smooth.
  • Now add the vanilla extract and all three eggs.
  • Sift in the flour, cocoa and baking powder.
  • Beat/whisk all of the ingredients together until fully mixed.
  • Divide the mixture between the 12 cupcake cases – approximately one dessert spoonful of mixture per case.
  • Place the cupcake tin into the centre of the preheated oven and bake for 25-30 minutes.
  • The chocolate cupcakes are baked when they spring back from a light touch.
  • When baked remove from the oven and allow to cool for 10 minutes  before transferring to a cooling rack. Allow to fully cool.
FF Double Chocolate Exam Busting Cupcakes
Making, filling and baking chocolate cupcakes

Preparing the frosting and decorating the cupcakes

  • Note – due to the high chocolate content of the frosting it is advisable to make it directly before piping, while it is soft.
  • Firstly, break up the white chocolate and place in a heatproof, microwaveable bowl. Set to one side.
  • Into a separate bowl add the icing sugar, butter and one teaspoon of very hot water, from a recently boiled kettle. Whisk until almost combined.
  • Place the bowl with the white chocolate into the microwave. Heat for 20 seconds, stirring in between, until the chocolate is liquid.
  • Pour the warm, melted chocolate in with the butter and icing sugar mixture.
  • Whisk the ingredients together immediately and then continue to whisk until the frosting is light and fluffy. During the whisking add the vanilla bean paste.
FF Double Chocolate Exam Busting Cupcakes
Making the frosting, piping and decorating the chocolate cupcakes.
  • Fit a large piping bag with a large closed star piping nozzle.
  • Fill the piping bag with the frosting and proceed to pipe rose swirls on each cupcake. Starting in the centre of the cupcake, pipe the shape of an ‘e’ then continue around until the cupcake has a complete swirl on top.
  • Finally, sprinkle over your choice of decoration.
FF Double Chocolate Exam Busting Cupcakes
Double Chocolate Exam Busting Cupcakes so good!

Serve with a hug, smile and a hot drink!

FF Double Chocolate Exam Busting Cupcakes
Double Chocolate Exam Busting Cupcakes much needed.

Store these cupcakes in an airtight container where they will last for three days.

If you have enjoyed this recipe for Double Chocolate Exam Busting Cupcakes you may also like these:

Marshmallow Frosted Mango Cupcakes

FF Double Chocolate Exam Busting Cupcakes
Gluten Free Marshmallow Frosted Mango Cupcakes

Maraschino Cherry Chocolate Drizzle Cupcakes

FF Double Chocolate Exam Busting Cupcakes
Maraschino Cherry Chocolate Drizzle Cupcakes

Cheer Up Chocolate Chip Cookies

FF Double Chocolate Exam Busting Cupcakes
Cheer Up Chocolate Chip Cookies

While cupcakes are delicious, the cookies are for those meltdown moments when the pressure is simply too much. Firstly, so that whoever reads this blog post realises that they aren’t on their own. Sometimes it all gets too much. Fresh air, good music and a break all help. As do hugs, talking and simply letting it all out.

Wishing anyone taking exams, all the very best. If you do your best, no one can expect more of you than that x.

Sammie xx

Share
Facebooktwitterpinterestlinkedintumblr

Lemon Drizzle Whipped Cream Filled Giant Doughnut

Share
Facebooktwitterpinterestlinkedintumblr

Lemon Drizzle Whipped Cream Filled Giant Doughnut, perfect any time of the year. Most especially when shared with friends and a great cup of tea. Recently having seen a list of the most popular cakes depending on season, there wasn’t any surprise when Lemon Drizzle made all four lists.

FF Lemon Drizzle Giant Doughnut

Lemon Drizzle A National Favourite

Since this week is National Doughnut Week, a baked giant doughnut was the desired way to celebrate in our home. Honestly though, it’s never difficult eating a doughnut! Still this had to be a celebratory doughnut. As mentioned before, lemon drizzle is not only the Nation’s favourite, it is ours too, here at home.

Large baked lemon doughnut filled with whipped cream and topped with a lemon drizzle icing.
Lemon Drizzle Whipped Cream Filled Giant Doughnut

Light, lemon sponge, filled with the best lemon curd from Hawkshead Relish piped, whipped cream. Topped with another deliciously lemon sponge and then drizzled in fresh lemon icing. Finally, finished with colour co-ordinating sprinkles, for fun and added crunch.

FF Lemon Drizzle Whipped Cream Filled Giant Doughnut
The whipped cream cuts through the delicious tart lemon flavours.

Giant Doughnut Or Sandwich Cake?

The silicone moulds needed to bake this giant doughnut are available online, Amazon or from Lakeland. Inexpensive and easy to use, I can guarantee you will not regret buying. Alternatively, this doughnut can also be baked in two 7-8″ sandwich, cake tins. Perhaps add the moulds to a birthday or Christmas list?

FF Lemon Drizzle Whipped Cream Filled Giant Doughnut
Lemon Drizzle Whipped Cream Filled Giant Doughnut dessert anyone?

Due to the flavour and presentation of this bake, it is perfect to serve for dessert, or any time you have friends or family pop round.

Recipe: Lemon Drizzle Whipped Cream Filled Giant Doughnut serves 8-10

200g/7oz Unsalted Butter softened to room temperature – plus a little extra to grease the moulds

200g/7oz White Caster Sugar

1/8th tsp Salt – I use Maldon

5 Large Free Range Eggs

1tsp Vanilla Extract – I use Nielsen-Masey

200g/7oz Plain White Flour

2tsp Baking Powder – note Waitrose is gluten free

1 Large Lemon scrubbed clean – zest of whole lemon and juice of half used in the Sponge batter

Filling and Icing:

3-4 tbsp Lemon Curd – I use Hawkshead Relish

1/2 juiced lemon – see above

200g/7oz Icing Sugar

Optional – Yellow Gel Food Colouring – I use Wilton

300ml Double/Heavy Cream

Sprinkles of your choice

Method: Preheat the oven to 160C/140C fan, gas mark 3, 325F

Making And Baking The Lemon Doughnut Halves

  • First of all, grease the silicone moulds well, with softened butter.
  • Now into a large bowl add the caster sugar, butter and salt. Whisk/beat until very pale and fluffy.
  • Next, add the vanilla extract, lemon juice and sift in the flour and baking powder. Lastly add the lemon zest.
  • Finally mix all of the ingredients on slow, or by hand. This is called the all-in-one method and works particularly well with this recipe.
  • Divide the mixture between the two moulds and place them on separate baking trays.
  • Place the baking trays, evenly spaced in the preheated oven.
  • The doughnut sponge will take between 30 and 40 minutes to bake.
  • The sponge is baked when golden in colour and springs back from a light touch.
  • Once baked remove the moulds from the oven. Allow to cool for 5 minutes and then turn out the doughnut sponge halves onto a cooling rack.
  • While the sponges are cooling, the lemon drizzle icing can be made.
FF Lemon Drizzle Whipped Cream Filled Giant Doughnut
Creating, making and baking the giant doughnut.

Decorating The Lemon Drizzle Whipped Cream Filled Giant Doughnut

  • Weigh the icing sugar into a bowl containing the juice of half a lemon.
  • If desired add the tip of a cocktail stick, which has been dipped in yellow gel food colouring.
  • Stir vigorously, ensuring a uniform colour. If the icing seems too thick to drizzle add a drop more lemon juice or cold tap water.
  • Cover the icing with cling film placed directly in contact with the top of the yellow icing. Doing so stops the icing from drying out.
  • For the whipped cream, pour 300mls of cold cream into a bowl. Whisk lightly until the cream just holds a stiff peak.
  • Place the whipped cream into a piping bag fitted with a round piping nozzle, approximately 1cm diameter. Place the piping bag into the fridge until needed.
  • When the sponges are completely cool, decide which one will be the top and the bottom of the doughnut.
  • Place the bottom doughnut sponge, flat side up on a serving plate.
  • Spoon the lemon curd on top and spread with a knife so that it covers evenly.
  • To pipe the whipped cream, firstly see the picture below. Start just inside the outside edge, piping single ‘blobs’ around the outside. Continue with two more rows of piped cream, until the base is prettily covered.
  • Now place the top of the doughnut evenly on to the base.
  • Spoon the lemon drizzle on to the top sponge, leaving any drips as they add to the finished look.
  • Scatter sprinkles over the drizzle icing while it is still wet.
FF Lemon Drizzle Whipped Cream Filled Giant Doughnut
Building and decorating the Lemon Drizzle Whipped Cream Filled Giant Doughnut.
  • Serve this delicious doughnut chilled and with a smile.
FF Lemon Drizzle Whipped Cream Filled Giant Doughnut
A generous slice of Lemon Drizzle Whipped Cream Filled Giant Doughnut.
FF Lemon Drizzle Whipped Cream Filled Giant Doughnut
Lemon Drizzle Whipped Cream Filled Giant Doughnut

If you have enjoyed this recipe for a Lemon Drizzle Whipped Cream Filled Giant Doughnut then you may also like these:

Strawberry Whipped Cream Giant Doughnut

FF Lemon Drizzle Whipped Cream Filled Giant Doughnut
Strawberry Whipped Cream Giant Doughnut comes with a Gluten Free recipe included.

Chocolate Hazelnut Baked Giant Doughnut

FF Lemon Drizzle Whipped Cream Filled Giant Doughnut
Chocolate Hazelnut Baked Giant Doughnut.

Raspberries and Cream Giant Doughnut

FF Lemon Drizzle Whipped Cream Filled Giant Doughnut
Raspberries Cream Giant Doughnut.

I hope these delicious recipes have shown how versatile the silicone doughnut moulds can be?

The gluten free recipe for the Strawberry Doughnut, also works well for both the Raspberry and Lemon Drizzle doughnuts. Please ensure that any decorations, baking powder are certified gluten free. I am sure that anyone on a restricted diet, would be thrilled with a giant doughnut as a birthday cake!

So, whatever you are making, baking and creating in your kitchens, have fun preparing and sharing your feast.

Sammie xx

No part of this post may be reproduced or duplicated without the written permission of the owner. Pleased see my Disclosure Policy.

National Doughnut Week is 11-18 May 2019. And proceeds from doughnuts sold during this week are donated to The Children’s Trust, which supports children with brain injury. Why not bake some doughnuts and take them to work, selling slices to colleagues and donating the proceeds?


Share
Facebooktwitterpinterestlinkedintumblr

Fruit Filled Butter Scones

Share
Facebooktwitterpinterestlinkedintumblr

Today it is Mother’s Day here in the U.K. A day where we celebrate mums, aunts, grandmothers and other significant women in our lives. My Grandma had a hugely positive input into my upbringing. Indeed it was at her apron strings that I learned the basic fundamentals of baking, that I still employ today. On the day prior to any beach trip, picnic, or family celebration, she would be found, busy baking in the kitchen. I am certain she would enjoy these Fruit Filled Butter Scones.

FF Fruit Filled Butter Scones
Fruit Filled Butter Scones perfect with Afternoon Tea.

While Afternoon Tea consists of small cakes, pastries, finger sandwiches and other sweet or savoury nibbles. Yet, scones, clotted cream and jam are essential element. Also small plates are used as it is small portions that are served. Enough to keep you going until dinner, yet not enough to spoil the main meal later in the day.

FF Fruit Filled Butter Scones
Fruit Filled Butter Scones served with clotted cream and strawberries.

Even young children, supervised by an adult of course, can easily make these scones. Also if you choose not to have clotted cream, these are light, not dry or claggy. So, perfect to eat unaccompanied. Since both the fat and sugar levels are fairly low, they can also be enjoyed by those watching their weight. Or simply want to eat two!

FF Fruit Filled Butter Scones
Flaky layers within the Fruit Filled Butter Scones

Did I mention that they take approximately half an hour from make to bake. So, what’s stopping you?

Recipe: Fruit Filled Butter Scones makes 12 scones

200g/7oz Plain White Flour

2tsp Baking Powder

50g/2oz Cold Unsalted Butter cut into cubes

1/4tsp Salt – I use Maldon

2tbsp Caster Sugar

75g/3oz Sultanas

165mls Buttermilk – alternatively add 1tsp/5mls of lemon juice to 160mls of milk and stir. Wait 5 minutes before using.

1 Free Range Egg plus one tablespoon of milk combined for the egg wash

Method: Preheat the oven to 220C/200C fan, gas mark 7, 425F.

Making the scones

Prior to starting line a large baking tray with baking parchment.

  • First of all, sift the flour, baking powder and salt together in a large mixing bowl. If using sea salt crumble straight into the bowl.
  • Next add in the cubed butter and rub into the flour, or cut into the flour using a pastry cutter. The mixture should resemble breadcrumbs with some pea sized lumps of butter present.
  • Now add in the caster sugar and mix lightly.
  • Make a well in the centre of the ingredients and pour in the buttermilk. Follow by mixing with a butter knife 4-5 times.
  • Add the sultanas and bring the scone dough together with one hand.
  • Tip the dough out on to a lightly floured, clean surface.
  • Knead the dough lightly until it forms a disc. Gently roll out the disc until it is 2.5cm/1 inch thick.
  • Use a 4cm/just under 2 inch deep cutter to cut out the scones. Do not twist the cutter when pushing down, as this can affect the rise.
  • Place each cutout scone on to the lined baking tray.
  • Combine leftover scone dough pat out and cut out more scones. Continue until all of the dough has been used.
FF Fruit Filled Butter Scones
Making and cutting out the Fruit Filled Butter Scones.

Baking the Scones

  • Brush the top of each scone with egg wash and then place in the top of the oven to bake for 15-20 minutes.
FF Fruit Filled Butter Scones
Egg washed and then baked.
  • The scones are baked when they are golden, well risen and sound hollow when tapped on the base.
  • As soon as they are baked remove from the oven.
  • Transfer the scones on to a cooling rack.
FF Fruit Filled Butter Scones
Fruit Filled Butter Scones cooling on a rack.

Serve slightly warm or cold. Since these scones have sultanas in, they can be eaten as is, with butter or clotted cream. Also, fresh fruit is nice served alongside. Rather than one single tea, why not offer a selection, including fruit teas.

FF Fruit Filled Butter Scones
Fruit Filled Butter Scones with tea and fresh fruit.

Most of all serve with a smile.

If you have enjoyed these Fruit Filled Butter Scones, you may also like these:

Iced Bakewell Tart

Iced Bakewell Cake
Iced Bakewell Cake

Mother’s Day Afternoon Tea

Afternoon Tea
Afternoon Tea
Gluten free marshmallow frosted mango cupcakes
Marshmallow Frosted Mango Cupcakes – GLUTEN FREE

Marshmallow Frosted Mango Cupcakes


Since creating the Mother’s Day Afternoon Tea for Steamer Trading, I have enjoyed continuing to create small, bitesize treats. I absolutely love having making a selection of mini treats. As well as being able to have a little taste of everything, afternoon tea is the perfect opportunity to share. Feasting with family and friends, enjoying conversation and most of all fun. For me sharing it with those I love, building bonds and creating new memories.

So, whatever you are making, baking and creating in your kitchens, have fun preparing and sharing your feast.

Sammie xxx

No part of this post may reproduced or duplicated without the written permission of the owner. Please see my Disclosure Policy.


Share
Facebooktwitterpinterestlinkedintumblr

Lloyds Chocolatiers Product Review

Share
Facebooktwitterpinterestlinkedintumblr

Carrying out reviews is always a pleasure and sometimes a challenge here at Feasting is Fun. While taking great care to bring an honest, thorough review, creating new recipes can sometimes stretch me. Yet challenging myself to come up with new ideas, is, ultimately, what delivers the most satisfaction. With this in mind, I hope you enjoy my Lloyds Chocolatiers Product Review.

FF Lloyds Chocolatiers Product Review
The product selection I received from Lloyds Chocolatiers.

Receiving such a varied selection was a real treat. Allowing me to get creative with my recipes. Since Valentine’s Day is nearly upon us, the chocolate hearts immediately grabbed my attention. A delicious variety of truffles, filled with ganache, whipped fruit fillings and the most incredible caramel. These chocolates became the inspiration behind my Chocolate Heart Topped Rose Bundt Cake . Perfectly complimenting the rose and vanilla flavoured cake, I highly recommend them.

FF Lloyds Chocolatiers Product Review
Chocolate Heart Topped Rose Bundt Cake

Included in the package were also some beautiful Rose and Violet chocolate fondants. The finish on these chocolates is outstanding and our daughter observed that they resembled marbles, such was the shine. These chocolate fondants would also work well with the Rose Bundt Cake. While the Rose fondants had a subtle flavour, similar to turkish delight, in comparison the Violet fondants were stronger. Reminiscent of years gone by, both flavours were enjoyable.

FF Lloyds Chocolatiers Product Review
Rose and Violet Chocolate Fondants.

Presentation of all the chocolates was outstanding. Great care had been taken to ensure that they arrived in perfect condition, always a consideration when ordering any product online, especially food items. Also, each individual product’s packaging was sleek, streamlined and designed to show the product off at its best. While it also protected the chocolates.

FF Lloyds Chocolatiers Product Review
Lloyds Chocolatiers Product Review bags of boozy truffles.

Chocolate truffles are a weakness of mine. Add in a splash of something boozy and I’m sold! Yet, occasionally I am disappointed. Too much alcohol and the truffle is ruined. Not so with these delicious beauties. The gold wrapped chocolate truffles contain just the right amount of whiskey and are finished with a dusting of cocoa. While the vermicelli covered chocolate rum truffles just edged past, in terms of my flavour preference. Both are delicious and highly recommended.

FF Lloyds Chocolatiers Product Review
Lloyds Chocolatiers Product Review the chocolate bars.

Finally, the chocolate bars. The milk chocolate was creamy, yet not too sweet. This is a great chocolate bar. When ordering chocolates as presents, one or two would also be added to the basket! The white chocolate bar is sublime. Most white chocolate is very sweet. Too sweet. Not Lloyds Chocolatier’s white chocolate bar. A great balance of creaminess and vanilla. This simple, yet excellent bar of chocolate could well be my undoing! While a little on the pricey side, the flavour is absolutely worth it, for both chocolate bars.

White Chocolate Valentine’s Bark

FF Lloyds Chocolatiers Product Review
White Chocolate Valentine’s Bark.

As part of the Lloyds Chocolatiers Product Review this White Chocolate Valentine’s Bark was made. The recipe is simple and requires only 2 ingredients.

1 x 110g White Chocolate Bar – from Llyods Chocolatier’s

Heart Sugar Sprinkles – available from most supermarkets.

Making the White Chocolate Valentine’s Bark:

  • First of all, line a baking tray with baking parchment.
  • Next chop up the white chocolate until it is in small pieces. Less than 1cm in size.
  • Place approximately two thirds of the chopped white chocolate into a heatproof, microwaveable bowl.
  • Heat the chocolate for 20 seconds at a time, stirring in between each heating.
  • As soon as the chocolate is melted add the remaining chopped chocolate to the bowl and stir until all of the chocolate is completely melted. If necessary, heat for a further 10 seconds at a time, in the microwave.
  • Once melted stir to ensure the melted chocolate is free from lumps.
  • Pour the melted chocolate on to the baking parchment.
  • Using either an off set spatula or the back of a spoon spread the chocolate out into a rectangular shape.
  • Ideally the chocolate should be about the thickness of a one pound coin, 3-4mm.
  • Scatter over sugar heart decorations, while the chocolate is still tacky.
  • Place the baking tray somewhere cool to allow the chocolate to set. During very hot weather it may have to be placed in the fridge for a few minutes.
FF Lloyds Chocolatiers Product Review
Making the White Chocolate Valentine’s Bark.
  • Once the chocolate has set it is ready to be cut.
  • Use a sharp, un-serrated knife to cut 4 lines, equally spaced, from top to bottom.
  • The chocolate will naturally crack into shards.
FF Lloyds Chocolatiers Product Review
Notice how the chocolate splits and cracks.
  • Place the heart studded chocolate shards in a pretty bowl to serve.
FF Lloyds Chocolatiers Product Review
Lloyds Chocolatiers Product Review with homemade White Chocolate Valentine’s Bark.

The White Chocolate Valentine’s Bark can also be placed into cellophane bags, tied with pretty ribbon and given as presents.

Considering that all of the chocolates are handmade by Lloyds Chocolatier’s, I was very impressed the the sharp snap of the chocolate bark. While tempering chocolate can be quite a procees. Certainly one I am happy to leave to the proffessionals. In comparision the easy tempering technique used here gave great results.

Whatever type of chocolate you enjoy, or wish to give as a gift, I highly recommend Lloyds Chocolatiers. From variety to beautiful packaging, they certainly make great chocolate.

If you have enjoyed this post Lloyds Chocolatiers Product Review you may also like these:

Luxury Amaretto Hot Chocolate

FF Lloyds Chocolatiers Product Review
Luxury Amaretto Hot Chocolate.

Raspberry Chocolate Pavlova

FF Lloyds Chocolatiers Product Review
Raspberry Chocolate Pavlova

Chocolate Sunflower Cake

FF Lloyds Chocolatiers Product Review
Chocolate Sunflower Cake.

Whether you celebrate Valentine’s Day, or not, creating something delicious for loved ones is always fun. Either adorning a cake with beautiful chocolate hearts, or making chocolate bark with the children, a personal touch can add so much more, any day of the year. Such as remembering someone’s favourite chocolates.

Whatever you are baking, making and creating in your kitchens, have fun preparing your feast and remember, food always tastes better when it is shared.

Sammie xx

Lloyds Chocolatiers provided me with the chocolates in this post, for the purposes of a review. All content, photography, opinions and views are my own. Please see my Disclosure Policy.

Share
Facebooktwitterpinterestlinkedintumblr

Creamy Low Fat Mushroom Soup

Share
Facebooktwitterpinterestlinkedintumblr

Autumn is well and truly here. Golden and red leaves, flutter like confetti to the ground. The perfect time of year for walks in the park or woods. Also, it is the season for fungi and mushrooms. If you go foraging, whilst out on a walk, make sure you have a guide, or book, to ensure you only pick what is edible. The mushrooms for this Creamy Low Fat Mushroom Soup came from the supermarket where they are available all year round.

FF Creamy Low Fat Mushroom Soup

Being able to buy mushrooms all year round means that this soup can also be made whenever you want. Since this soup is incredibly easy to make and completely delicious, you may find yourself making it year round!

FF Creamy Low Fat Mushroom Soup
Creamy Low Fat Mushroom Soup perfect with rustic wholemeal bread.

Mushrooms And Their Unique Flavour

While I used white, button mushrooms for this recipe, chestnut, or portobello would also taste delicious. Sautéing the mushrooms slowly, ensures that they release their deep, earthy flavour. As a result, the finished soup has a rich mushroom flavour, that is not heavy. Sneaking in a potato not only thickens the soup, it also gives it beautiful creamy texture too.

FF Creamy Low Fat Mushroom Soup
Creamy Low Fat Mushroom Soup add a splash of cream if you dare 😉

Ok so I added a swirl of cream, just to see what it would add to this soup. While it does add an extra luxurious note, perfect for special occasions, or dinner parties, the soup doesn’t need it. For example in my Leek and Potato Soup the cream really rounds out the flavour and texture. Whereas here, with the mushroom soup, the creaminess is already present.

FF Creamy Low Fat Mushroom Soup
Creamy Low Fat Mushroom Soup so full of healthy flavour.

Full of flavour and texture, an immersion blender is used to ‘cream’ this soup. Rather than whizzing the soup to a completely smooth consistency, very small chunks are left in to give a better, more interesting texture. However, you may purée the soup to whatever consistency you desire.

Recipe: Creamy Low Fat Mushroom Soup serves 4 people

1 Leek washed and trimmed

1tbs Butter – alternatively you may use olive oil

300g Mushrooms

1 Medium Sized Floury Potato

1 Vegetable/Chicken Stock Cube – I use Knorr

1L Very Hot Water – from a kettle

1/4tsp Freshly Ground Black Pepper

1/4tsp Sea Salt – I use Maldon

Making The Mushroom Soup

  • First, place a heavy bottomed soup pan on to the hob, over a medium heat. Now add the butter.
  • While the butter is melting chop the leek into a medium dice – approximately 1cm pieces.
  • Once the butter has melted add the chopped leek to the pan and sauté for 3-4 minutes until they become soft.
  • Meanwhile slice the mushrooms and then cut the slices in half.
  • Next add the sliced mushrooms to the softened leeks.
  • Lower the heat slightly and continue to cook the mushrooms and leeks for a further 10 minutes, until the mushrooms are soft.
  • Peel and medium dice the potato, then add it to the saucepan.
  • Now add 1 litre of very hot water, from the kettle and a stock cube. Stir, put on the lid and allow to simmer for 30 minutes.
FF Creamy Low Fat Mushroom Soup
Preparing the soup.
  • After simmering for 30 minutes, remove the saucepan from the heat.
  • Make sure you are wearing an apron for the next step. I speak from soup splattered experience!
  • Use an immersion blender to blend the soup until it is almost smooth. One of the benefits of using this method to blend soup is, it allows you to feel, as well as see, how smooth the soup is. Also, if you do not have an immersion blender, a standard blender will still blend the soup well. Take care not to overfill the blender and allow the soup to cool slightly before using this method.
  • Check the soup for seasoning and adjust as necessary.

Serving The Soup

To serve, warm the soup and serve with thick chunks of rustic bread, such as my homemade Seeded Cob Loaf.

FF Creamy Low Fat Mushroom Soup
Creamy Low Fat Mushroom Soup a delicious way to warm up!

Each mouthful of this soup is a treat to your tastebuds. Perfectly balanced flavour that is nutritious and delicious.

This soup will keep, cool and place into an airtight container, keep in the fridge for up to 4 days. Alternatively, freeze in single portions and eat within a month.

If you have enjoyed the recipe for my Creamy Low Fat Mushroom Soup you may also like these other healthy and low fat soup recipes:

Carrot Soup

Carrot Soup in a bowl with crumbled Stilton cheese on top.
Carrot Soup

Roast Chicken Noodle Soup

Roast Chicken Noodle Soup served with rustic homemade bread.
Roast Chicken Noodle Soup

Roasted Garlic Butternut Squash Soup

Roasted Garlic Butternut Squash Soup served in a bowl with curly parsley to garnish.
Roasted Garlic Butternut Squash Soup

Homemade soup is so easy to make. Also, the reward, far outweighs the minimum effort needed to prepare and cook the soup. Delicious, good for you and incredibly soothing on cough ravaged, sore throats, which seem in abundance at this time of year. While eating this soup, you can almost feel it doing you good.

Do you have a favourite soup recipe?  Please let me know as I love new ideas, old ideas, any ideas that taste great!

So, whatever you are making, baking and creating in your kitchens, have fun preparing and sharing your feast.

Sammie xx


Share
Facebooktwitterpinterestlinkedintumblr

Baked Whole Epoisses De Bourgogne

Share
Facebooktwitterpinterestlinkedintumblr

Baked Whole Epoisses De Bourgogne bubbling, gooey, pungent cheese.

Do you like cheese? Then you will love this rich, melted Baked Whole Epoisses De Bourgogne, perfect for dipping, dunking and feasting on.

FF Baked Whole Epoisses De Bourgogne
Baked Whole Epoisses De Bourgogne with homemade breadsticks, apple and chicory.

When asked by Pong Cheese to bake this heady Epoisses De Bourgogne, I knew that I would need my hubby’s help. First, I needed a hand model and also I absolutely knew he would relish the taste of this incredible cheese. A semi-soft to soft, pasteurised cow’s cheese, washed in Marc De Bourgogne, creating a spicy, pungent cheese. Most importantly, this incredible cheese is only made in the Burgundy region of France and therefore has an AOC – authentication of origin certificate.

FF Baked Whole Epoisses De Bourgogne
Baked Whole Epoisses De Bourgogne breaking through into the molten cheese.

Homemade breadsticks break through the crust to reveal the warm, bubbling, unctuous cheese below. The full taste is revealed when eaten with bread. Salty, spicy and pungent, any cheese lovers dream.

FF Baked Whole Epoisses De Bourgogne

Chicory, with it’s crunch and slightly bitter flavour is a perfect accompaniment to the melted cheese. While sweet, red apple provides contrast to the saltiness of the cheese. This for me was my favourite flavour pairing, my husband preferring the full flavour of the cheese, unhindered by the breadsticks.

FF Baked Whole Epoisses De Bourgogne

While, this is hardly a recipe, the method and increased flavour of the cheese, means it is extremely worthwhile taking the extra step to bake it.

Recipe: Baked Whole Epoisses De Bourgogne

250g Whole Epoisses De Bourgogne available from Pong Cheese

Sprig of rosemary  – either fresh from the garden or order a plant from most supermarkets such as Waitrose

Breadsticks, chicory, apple, pear, crackers for dunking

Method: Preheat the oven to 180C/160C fan, gas mark 4, 350F.

Baking The Cheese

You will need an ovenproof dish that is about the same size as the Epoisses. A Camembert dish will be fine, any bigger and the cheese will spread as it bakes.

  • First, remove all of the packaging from the Epoisses.
  • Next place the whole cheese into the ovenproof dish, laying a sprig of rosemary on the top.
  • Now place the ovenproof dish on to a baking tray and place in the middle of the preheated oven.
  • Bake the cheese for 15 minutes, or until you can see it bubbling around the side of the dish.
  • Once baked remove the baking tray, with the bubbling cheese in its dish, from the oven.
  • Allow the cheese to sit for a couple of minutes as it will be extremely hot.

Serve the cheese in its dish with a selection of fresh fruit, vegetables and bread or crackers. Most of all share with good company and an excellent glass of wine!

FF Baked Whole Epoisses De Bourgogne
Baked and ready for enjoying.

Sharing this baked cheese, either with a group of friends, or with the one that you love, infinitely improves the whole experience of eating it. Since memories are created and observations exchanged, whilst feasting together.

If you have enjoyed this recipe you may also like these:

Bath Soft Cheese Chilli Tarts

FF Baked Whole Epoisses De Bourgogne
Bath Soft Cheese Chilli Tarts an ideal appetiser or light lunch.

Goddess Cheese Pine Nut Muffins

FF Baked Whole Epoisses De Bourgogne
Goddess Cheese Pine Nut Muffins glorious flavour & texture.

Mini Sparkenhoe Red Leicester Tarts

FF Baked Whole Epoisses De Bourgogne
Mini Sparkenhoe Red Leicester Tarts a delicious canapé.

Cheese is such a versatile ingredient. Whether baked and eaten as is, piled on top of chilli pickle in a crunchy filo tart, or simply eaten cold with crackers, it remains one of my favourite ingredients. As with most things that have a relatively high fat content, their flavour truly comes alive when heated. Baking the Epoisses De Bourgogne certainly brought all of its delicious and interesting flavours to the fore.

Do you enjoy using cheese as an ingredient?

Have fun baking, making and creating in your kitchens, preparing a feast.

Sammie xx

Pong Cheese supplied me with the Epoisses De Bourgogne for this recipe. All opinions, views, photographs and content are my own. Please see my Disclosure Policy.

Share
Facebooktwitterpinterestlinkedintumblr

Spiced Pumpkin Walnut Muffins

Share
Facebooktwitterpinterestlinkedintumblr

I have most definitely fallen in love. The kind of head over heels, mind consuming, heart compelling love that completely takes over one’s life. And the object of my desire is orange, coincidentally my favourite colour, big and round. Pumpkin where have you been all my life? It would seem, puréed in a can, far, far away. Until now, where I can hoard cans of this delicious ingredient, ready to make Spiced Pumpkin Walnut Muffins whenever I desire.

Autumnal bake with large orange squash.
Spiced Pumpkin Walnut Muffins

Americans, Canadians, no doubt many other countries have long known the delight that is pumpkin purée. While not the most compelling ingredient straight from the can, it lends a flavour and texture to bakes that other ingredients cannot.

Spiced Pumpkin Walnut Muffins

Late To The Pumpkin Party!

Since venturing into Pumpkin Spice World with my very first pumpkin bake, these doughnuts, I soon realised that I had uncovered an amazing ingredient. The tenderness, colour and delicate flavour that pumpkin purée lends to a bake is unique. Resulting in some of the best bakes I have ever tasted.

Spiced Pumpkin Walnut Muffins

So, now I have found a regular supplier long may this love affair continue. Since I intend to explore as many different bakes and desserts using my newly discovered love and they will be posted on here. Because sharing my passion seems only fair. Hopefully you will discover a love for all things pumpkin, by the time October ends.

Spiced Pumpkin Walnut Muffins

And as always, here on Feasting is Fun, sharing is a key part of my passion behind blogging. An example of how I share, just happened. Unable to drive at the present see here, I appreciate the Pharmacy, adjoined to my doctors, delivering my prescriptions. Just now, once I’d received my medications, I was able to share one of these Spiced Pumpkin Walnut Muffins with the delivery lady. The perfect way to show my thanks.

Autumn breakfast bake in tulip wrappers. Sized for Pinterest with descriptive graphics.

Recipe: Makes 12 Spiced Pumpkin Walnut Muffins

100g/4oz Unsalted Butter melted and cooled

200g/7oz Pumpkin Purée – available from Sainsbury’s

150g/5oz Full Fat Natural Yoghurt – I use Yeo Valley

2 Large Free Range Eggs

125g/4.5oz Plain White Flour

100g/4oz Wholemeal Flour

2tsp Baking Powder

85g/3.5oz Chopped Walnuts

1/4tsp Salt – I use Maldon

150g/5oz Soft Light Brown Sugar plus 1tbsp

2.5tsp Pumpkin Spice Mix see here if you would like to make your own

Method: Preheat the oven to 180C/160C fan, gas mark 3, 325F

Making The Muffin Batter

  • Firstly melt the butter in a heatproof, microwaveable jug and set to one side to cool.
  • Line a 12 hole muffin tin with cases, I used pretty tulip wrappers.
  • Next, in a large bowl add the flours, chopped walnuts, sugar, spice and salt. Stir with a balloon whisk to distribute the ingredients evenly and break up any lumps in the sugar. Dry ingredients.
  • As soon as the butter has cooled add in the yoghurt, pumpkin purée and eggs. Beat with a fork until the ingredients are combined. Wet ingredients.
  • Make a well in the centre of the dry ingredients and then pour the wet ingredients into the dry.
  • Mix until just combined. Over mixing will cause the muffins to become tough.
FF Spiced Pumpkin Walnut Muffins
Bringing the muffin batter together.
  • Spoon the muffin mix into the muffin cases, distributing the mix as evenly as possible.
  • Finally, using the extra tablespoon of sugar sprinkle a little over the top of each unbaked muffin.
FF Spiced Pumpkin Walnut Muffins
Spiced Pumpkin Walnut Muffins ready for the oven.

Baking The Spiced Pumpkin Walnut Muffins

  • Place the muffin tin in the centre of the preheated oven and bake for 20-25 minutes.
  • My muffins were baked at 25 minutes, but I started checking after 20 minutes.
  • Once baked the muffins should be just firm to the touch, without any visible wobble (this was present when checking at 20 minutes). The Spiced Pumpkin Walnut Muffins will have a slight sparkle, or sheen to them from the additional sugar sprinkled just prior to baking.
  • As soon as the muffins are baked remove the tin from the oven.
FF Spiced Pumpkin Walnut Muffins
Spiced Pumpkin Walnut Muffins their smell will fill your kitchen.
  • Inhale deeply. The baked pumpkin spices smell of warm, comforting, welcoming food. Who needs scented candles?
  • If you have used the tulip style muffin wrappers I strongly suggest leaving them to cool completely in the muffin tin. Because, I find doing so prevents them from unwrapping themselves, as can be the case if removed whilst hot.
  • Regular muffin cases can be removed after cooling for 10 minutes in the tin. Place on a cooling rack.
FF Spiced Pumpkin Walnut Muffins
Spiced Pumpkin Walnut Muffins best served warm.

These delightful Spiced Pumpkin Walnut Muffins are their best served warm. One of the benefits of using tulip style wrappers is that they unfold to create the perfect napkin, to hold and enjoy the experience of eating a muffin.

Pulled apart or bitten straight into, these muffins are all that is good about Autumn, wrapped up in an edible parcel. Also golden in colour, they imitate the autumnal palette, crunchy walnuts akin to walking through fallen leaves. Warm spices and tender crumb resemble falling into a big sofa near an open fire, after a crisp afternoon walk.

If you have enjoyed this recipe for Spiced Pumpkin Walnut Muffins you may also enjoy these:

Baked Pumpkin Spiced Doughnuts

Baked pumpkin spiced doughnuts displayed on a cake stand.
Baked Pumpkin Spiced Doughnuts

Autumn Apple Almond Cake

Gluten free apple and almond cake with a slice cut.
Autumn Apple Almond Cake a GLUTEN FREE recipe.

Chocolate Chip Pumpkin Loaf Cake 

Chocolate Chip Pumpkin Loaf Cake sliced at one end to show the tender crumb.
Chocolate Chip Pumpkin Loaf Cake

Baking these Spiced Pumpkin Walnut Muffins releases the aroma of the pumpkin spice mix within, creating a welcoming ambiance in the home. When visitors arrive, or the postman knocks on the front door, I want them to feel welcome. Nurtured by the warmth of our home and good food, they leave contented and comforted.

While baking, making and creating in the kitchen, my aim is to convey love, acceptance and warmth through food. Since sharing the food made, is an extension of home and all it represents. Because, meeting another’s needs on both a physical and emotional level, while sharing time and companionship over a coffee and a home baked treat, shows food really can be so much more than fuel.

So, whatever you are making, baking and creating in your kitchens, have fun preparing and sharing your feast.

Sammie xx

No part of the post may be reproduced or duplicated without the written permission of the owner. Please see my Disclosure Policy.

Image showing partially eaten muffin with a pumpkin and basket of spiced pumpkin muffins. Sized for Pinterest with descriptive graphics.


Share
Facebooktwitterpinterestlinkedintumblr