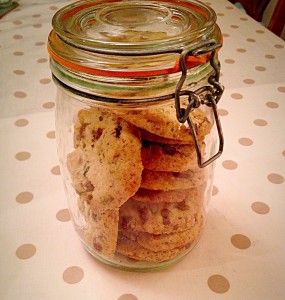
Hello, thank you for stopping by to take a peek at my blog and the recipe for these scrumptious Almond and Cranberry Cookies.

Just because Cranberries are naturally in season over the holiday period, doesn’t mean you can’t use the dried version any time of the year!

Dried cranberries have a sweet/tart flavour and work wonderfully well in these cookies as they are not too sweet. Most supermarkets stock Craisins (by Ocean Spray) otherwise I’ve found reliable stockists of dried Cranberries on Amazon/eBay.
Recipe : Makes 20 – 30 cookies
5 oz Caster Sugar
8 oz Unsalted Butter (at room temp)
1/4 tsp Salt (I use Kosher – no additives)
1 tsp Vanilla Extract
1/2 tsp. Almond Extract
1 Large Egg Yolk (free range if possible)
2 oz Ground Almonds
8 oz. Plain White Flour
4 oz Dried Cranberries
2 oz Flaked Almonds
Method :
Preheat the oven to 160C fan ((175C conventional oven).
Line 2 baking trays with parchment paper (if the trays aren’t non stick).
Cream together the butter, sugar and salt, using either an electric whisk (much easier!!) or wooden spoon, until pale and smooth to touch (rub a little of the mixture between your thumb and forefinger, it should not feel grainy).
Whisk/beat in the Egg Yolk, Vanilla and Almond extracts.
I now always switch to a spoon for mixing the dry ingredients, this way I can ‘feel’ when everything is combined and avoid overworking the flour (this can lead to tough cookies).
Add the Plain White Flour, Ground Almonds, Dried Cranberries and Flaked Almonds. Mix until all the ingredients are just combined.

Using a teaspoon form small balls (the size of large marbles) of the mixture, approx 12-14 balls – this will use approx half of the mixture.
Place the cookie dough balls, spaced evenly, onto the baking sheets. Lightly press the balls to form 1/4 inch thick disc.
Put both baking trays into the preheated oven and cook for 18-25 mins. They are cooked when they have turned a light, golden colour. Do not expect the cookies to be hard, they will firm up on cooling.
Leave to cool fully on the baking tray.

With the remaining cookie dough, wipe your worktop with a clean cloth and place at least 14 inches of cling film onto the worktop. Where the worktop is damp it will anchor the cling film in place!!
Place the cookie dough onto the cling film, form into a roll (approx 1 1/2 inch diameter). Wrap with the cling film and place in the fridge, it will keep fresh for up to one week. Or you can place in the freezer for up to one month.
Defrost the dough overnight in the fridge. To bake, preheat the oven and remove the dough log 20 minutes before slicing – this allows the dough to warm slightly and will help stop the cookies cracking when being cut.
Slice 1/4 inch (1cm) discs from the dough log, place on baking sheets as before and bake for 18-25 minutes. The time will vary depending on the diameter and thickness of your cookies.
Again they are cooked when lightly golden. Leave to cool on the baking sheet.
These cookies make lovely gifts. Pack a few up in a cellophane bag, tied with a pretty ribbon, reuse a Christmas chocolate tin and fill with Cookies, or pop some into a Kilner jar!

Not only are these so easy to make, you can keep the dough stored in the fridge to whip out when unexpected guests arrive and have freshly baked cookies, ready to share with a smile and a cuppa!
Food really does taste better when it’s shared!!
