For me, nothing quite compares to the beauty, taste and smell of homemade bread. Four ingredients, flour, yeast, water and salt, when mixed together, worked, rested, shaped and baked give such incredibly satisfying results. Bread is surely the heart of any feast and therefore, teaching others to bake it is of upmost importance to me. Using step by step instructions and photographs, you too can learn how to make and bake this Easy Homemade Cottage Loaf.

Bread Making Is Easy To Learn And Bake At Home
Inspired by a friend on Twitter, who claimed that bread baking was beyond her, I set out to show her she could. While she is a very accomplished baker, far more so than me, bread is her baking stumbling block. Everyone can make bread. Are you wary of baking bread? With this guide and a relaxing cup of tea, read through and then get baking!
Following the techniques and tips in this recipe will guarentee that you too, can make delicious, homemade bread. Also the more that you practise, the more confident and better you will get a baking bread at home. It is important to remember that occaisionally a loaf of bread will turn out mishapen. Rarely is it inebible though!
Recipe: Easy Homemade Cottage Loaf
320mls Water at room temperature
1/2tsp Caster Sugar
7g Dried Yeast make sure that is reasonably fresh (3 months old max) – I use Allinson in the green tub/sachets
500g/1lb 2oz Strong White Bread Flour – I use Shipton Mill
25g/1oz Unsalted Butter at room temperature
7g Sea Salt – I use Maldon
Method: For making by hand or using a stand mixer with dough attachment.
You will need a large, buttered baking tray.
Making The Bread Dough Using A Stand Mixer:
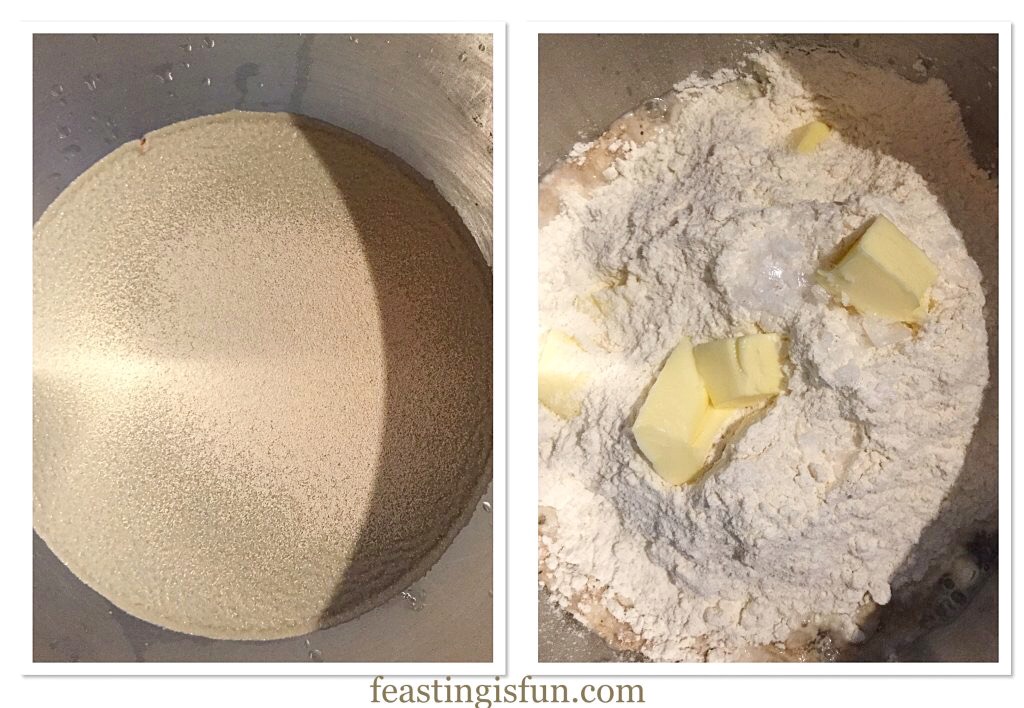
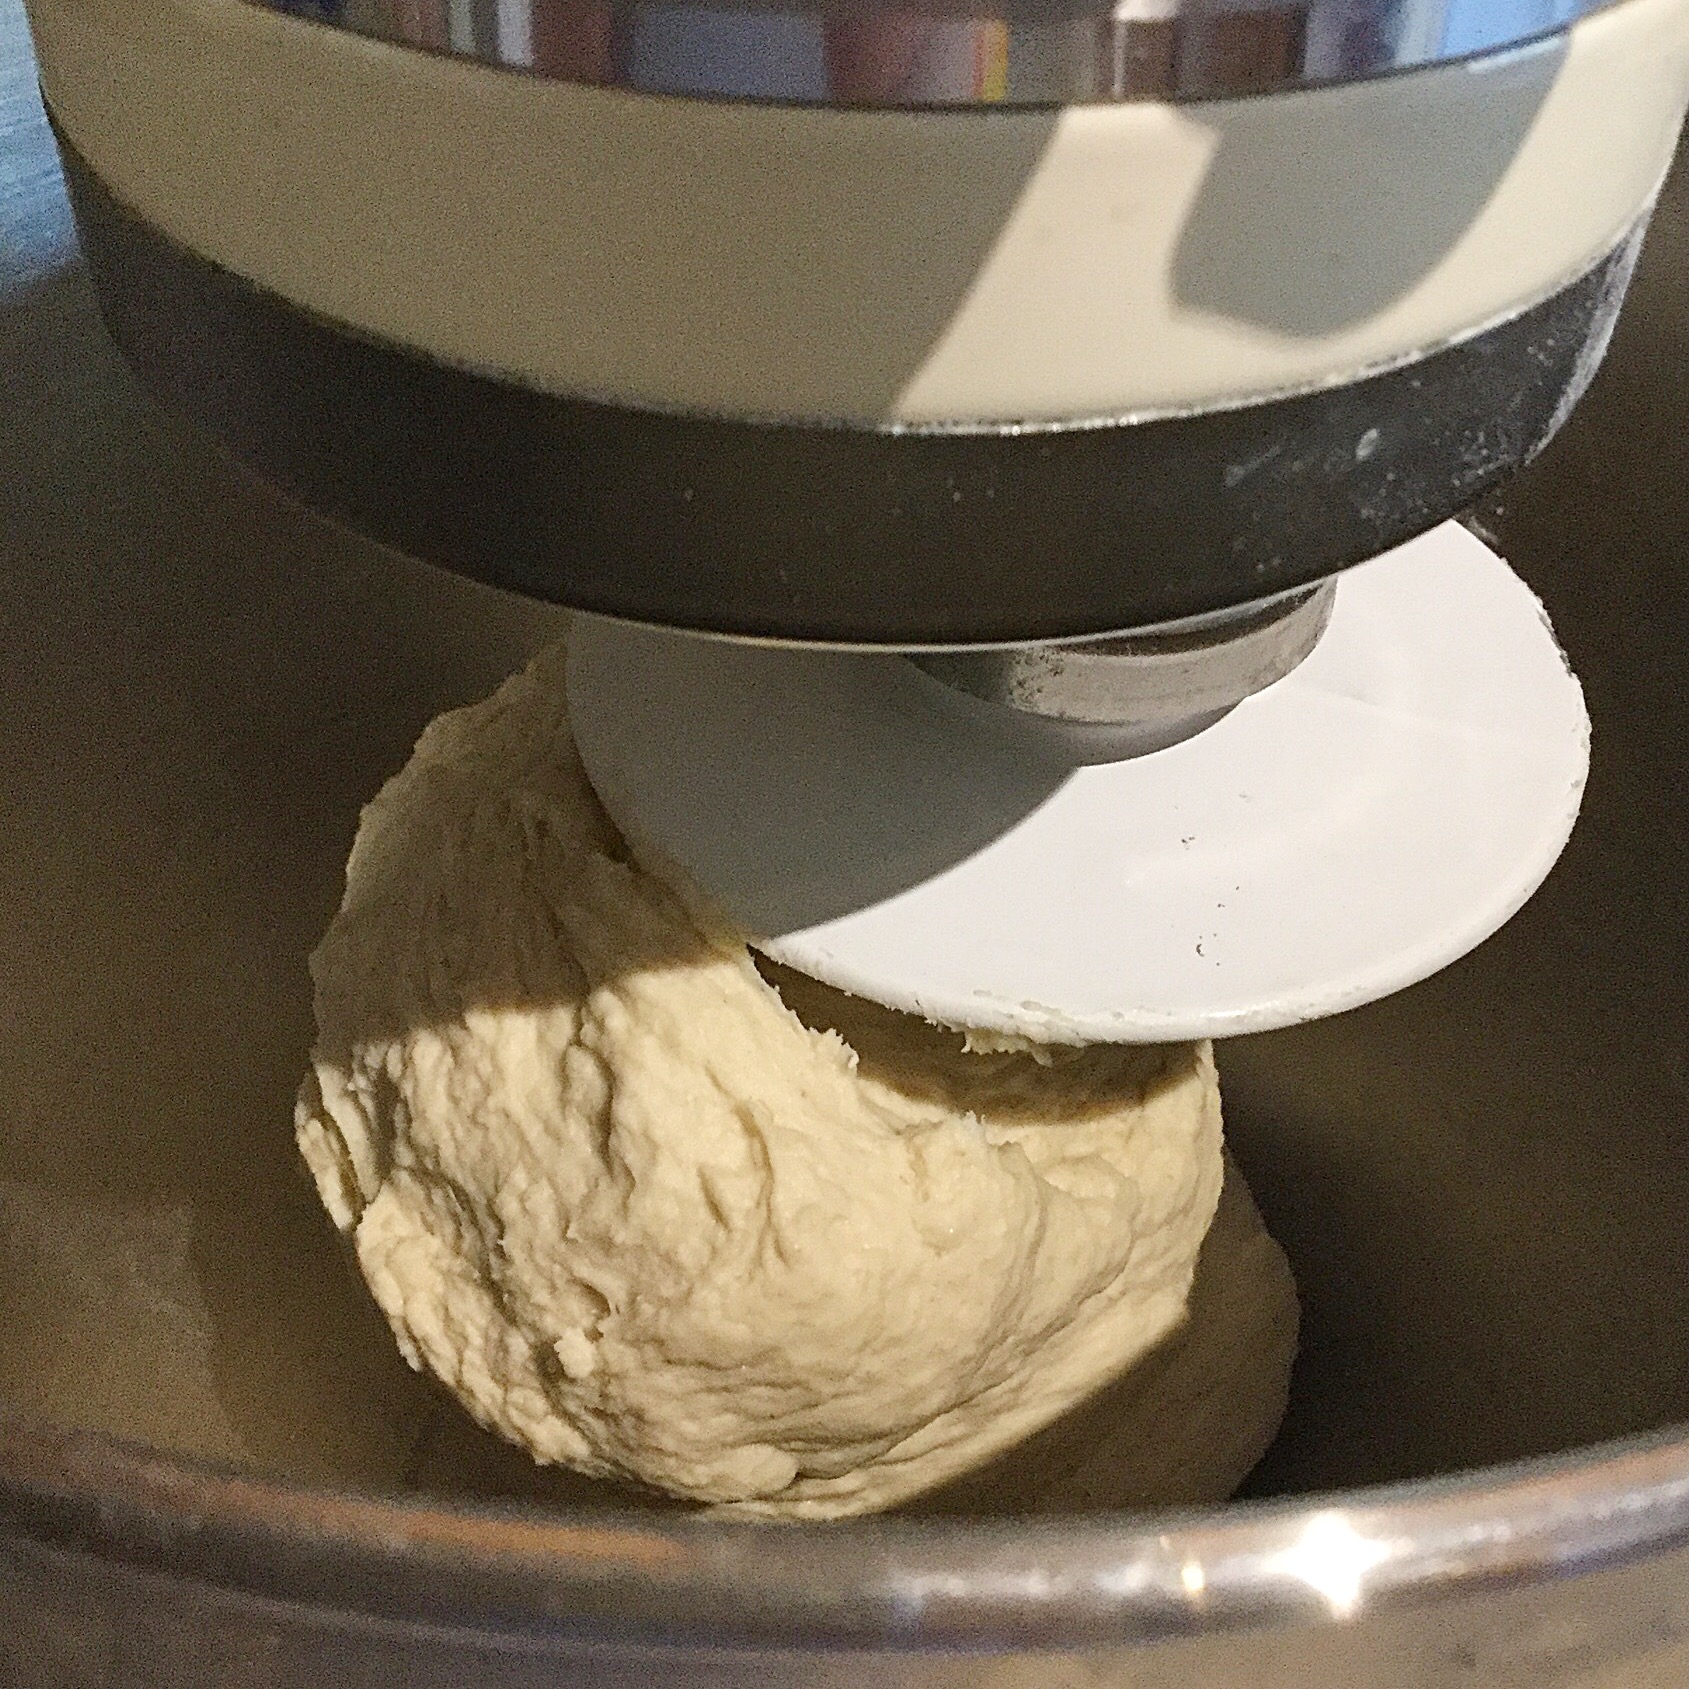
- Add all of the ingredients to the bowl of a stand mixer in the order that they are listed. This ensures that the yeast does not come into direct contact with the salt.
- With dough hook attached mix on low speed until all the ingredients are combined.
- At this point if you wish to knead by hand, scrape the dough from the dough hook into the bowl. See making by hand method.
- Continue mixing the dough on medium speed for a further 10 minutes.
- After the kneading time has elapsed stop the machine and tear off a small piece of dough. Stretch it between your fingers until it is so thin that light can be seen through it. This is known as the windowpane test. If it tears whilst stretching, add back to the dough and continue to mix for a further 2 minutes as before. Repeat after each mixing period until the dough passes the test.
- Scrape the dough from the dough hook into the bowl and cover with a clean tea towel.
- Place the covered bowl in a draught free place, away from a direct heat source.

- Leave until the dough has doubled in size.
Making The Dough By Hand
- Place the flour and butter into a large bowl.
- Rub the butter into the flower using your fingertips.
- Add the sugar and yeast to the bowl on one side. Place the salt on the opposite side, so that it doesn’t come into direct contact with the yeast.
- Make a well in the centre of the flour and then add all of the water.
- Using your hand, shaped like a claw, bring the dry ingredients into the water and mix them together.
- Continue mixing in the bowl until the dough has formed a sticky ball.
- Place the dough on to a clean worktop and push with the heal of your hand to
- Tear a small piece of the dough and perform the windowpane test as described above. If the dough tears knead for a further 2 minutes and test again.
- Repeat the kneading and testing procedure until the dough passes the windowpane test.
- Form the dough into a ball, place in a clean bowl, cover with a tea towel and leave in a draught free place until doubled in size.
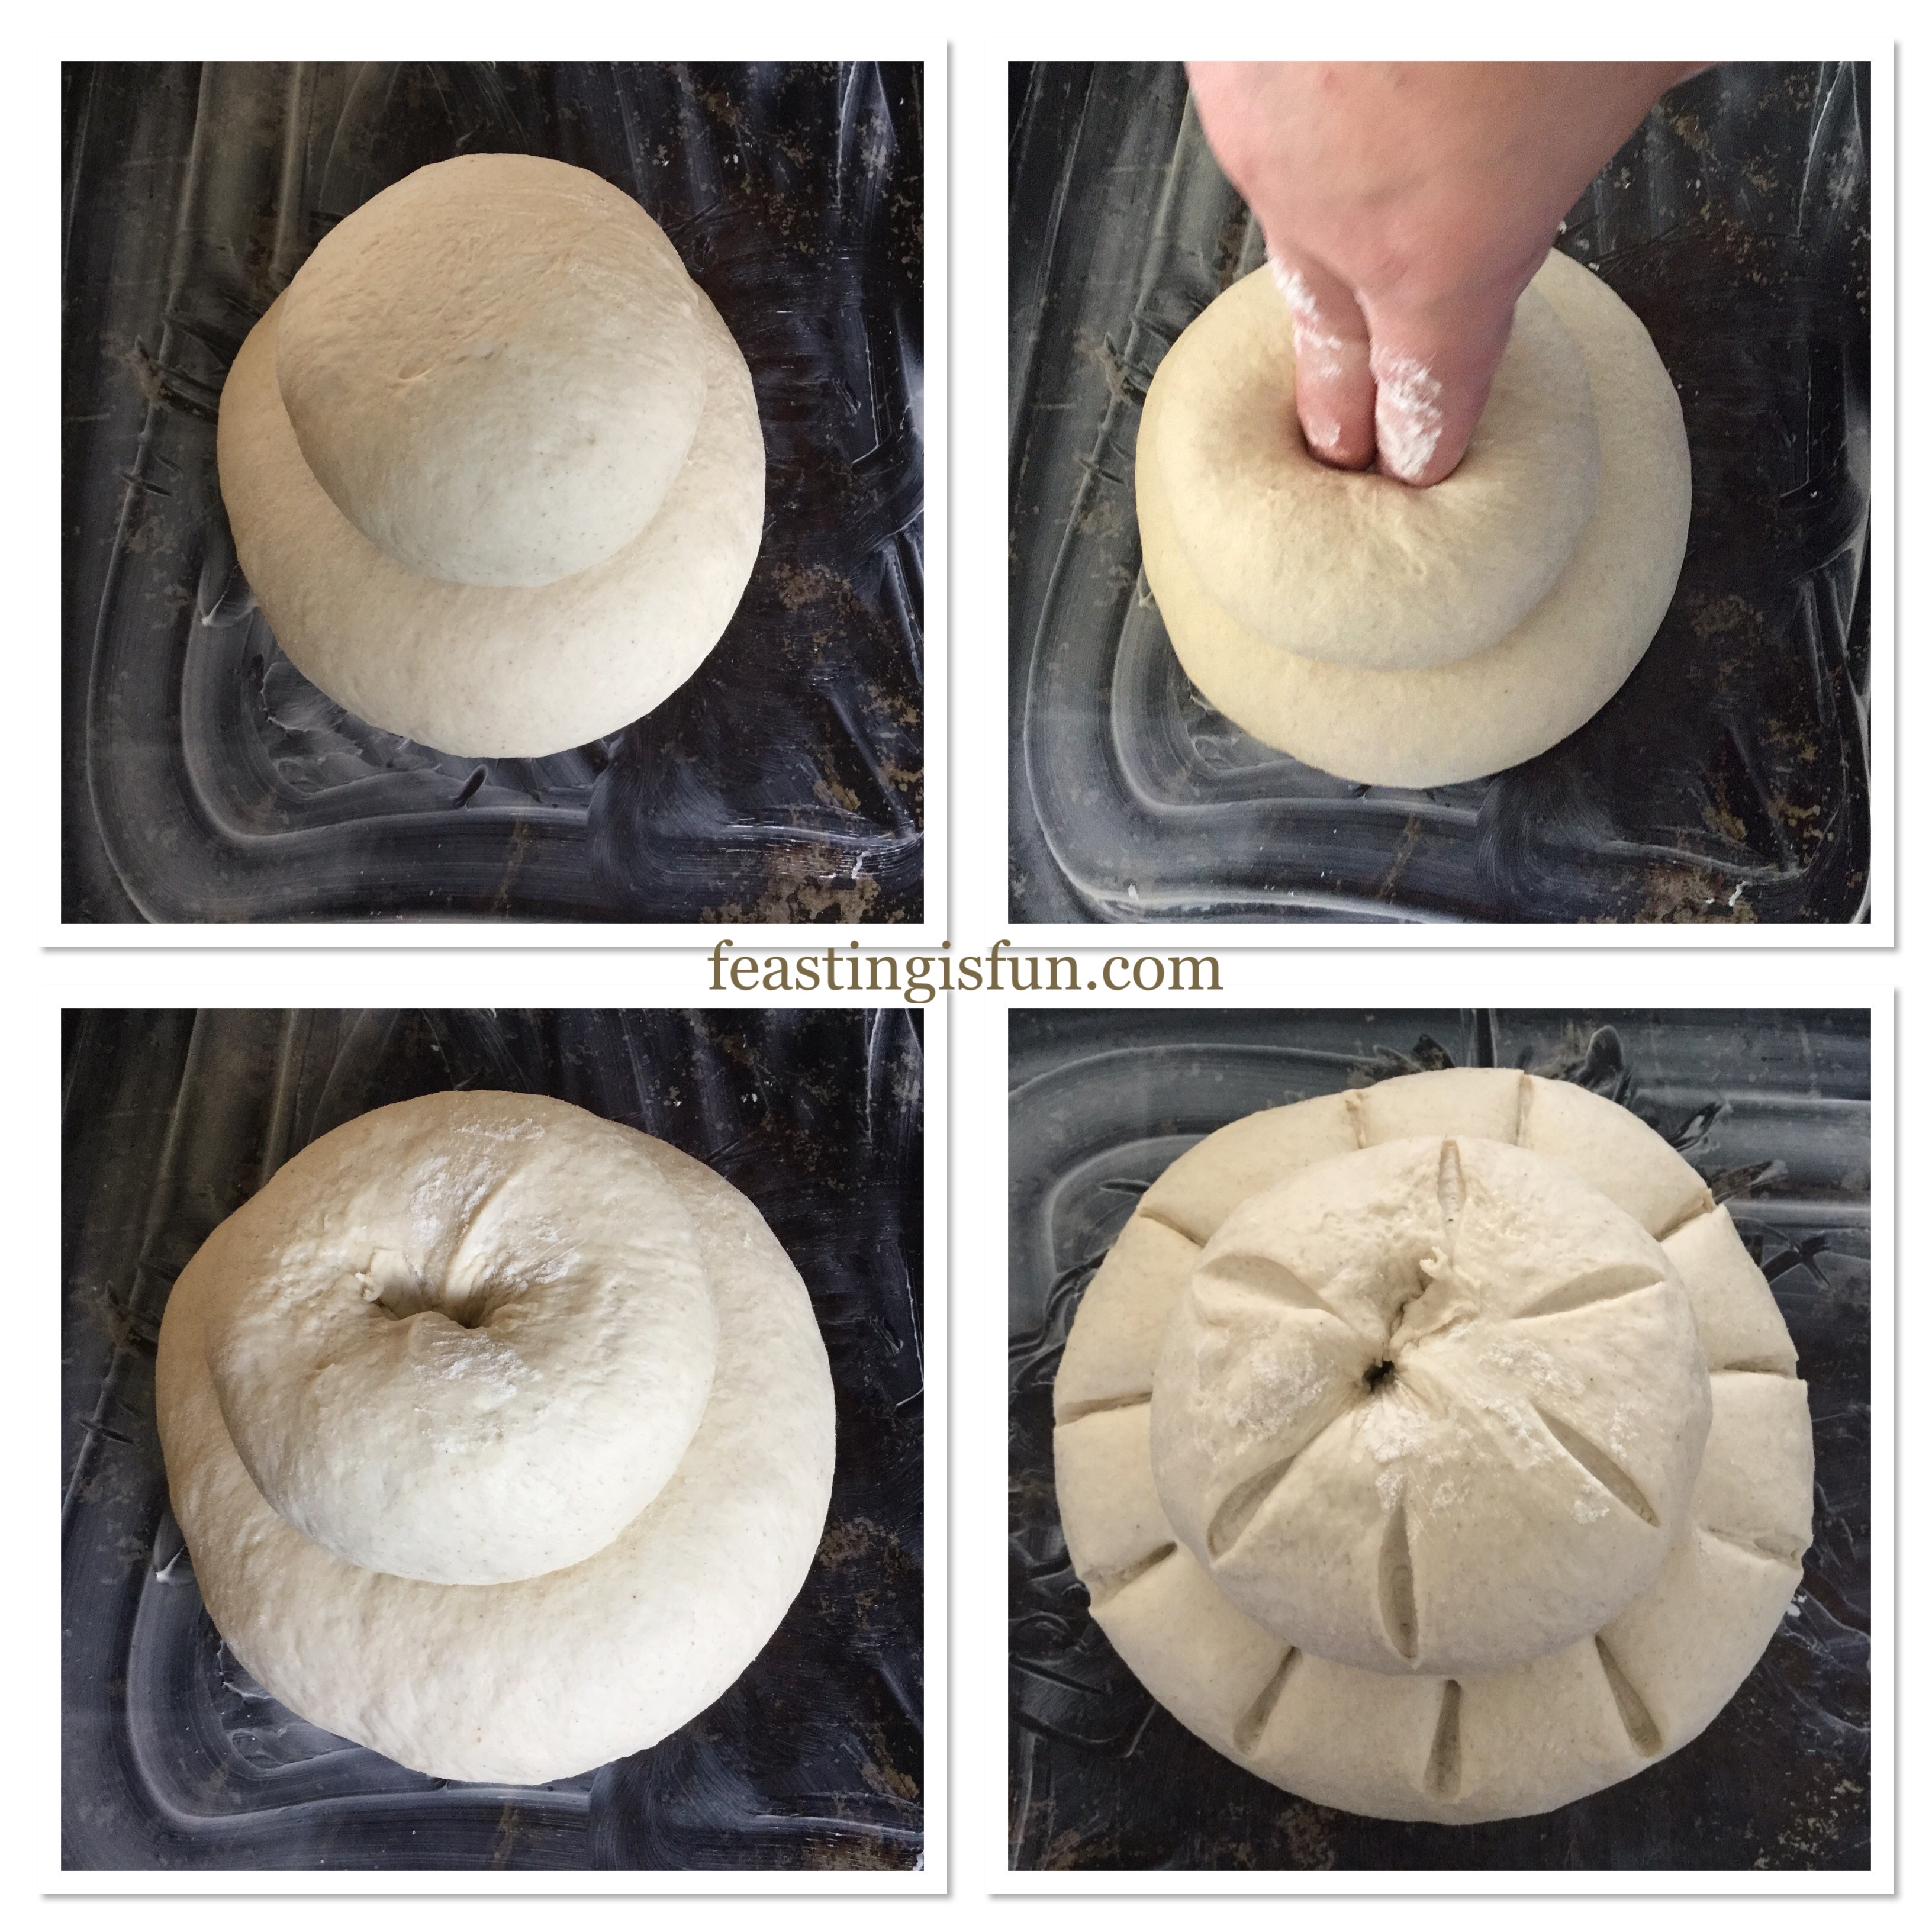
Shaping And Building The Easy Homemade Cottage Loaf
For both methods given:
- When the dough has doubled in size turn out on to a lightly floured surface, ensuring the top of the dough is in contact with the worktop. What was the top is now the bottom.
- Weigh the dough and cut off one quarter.
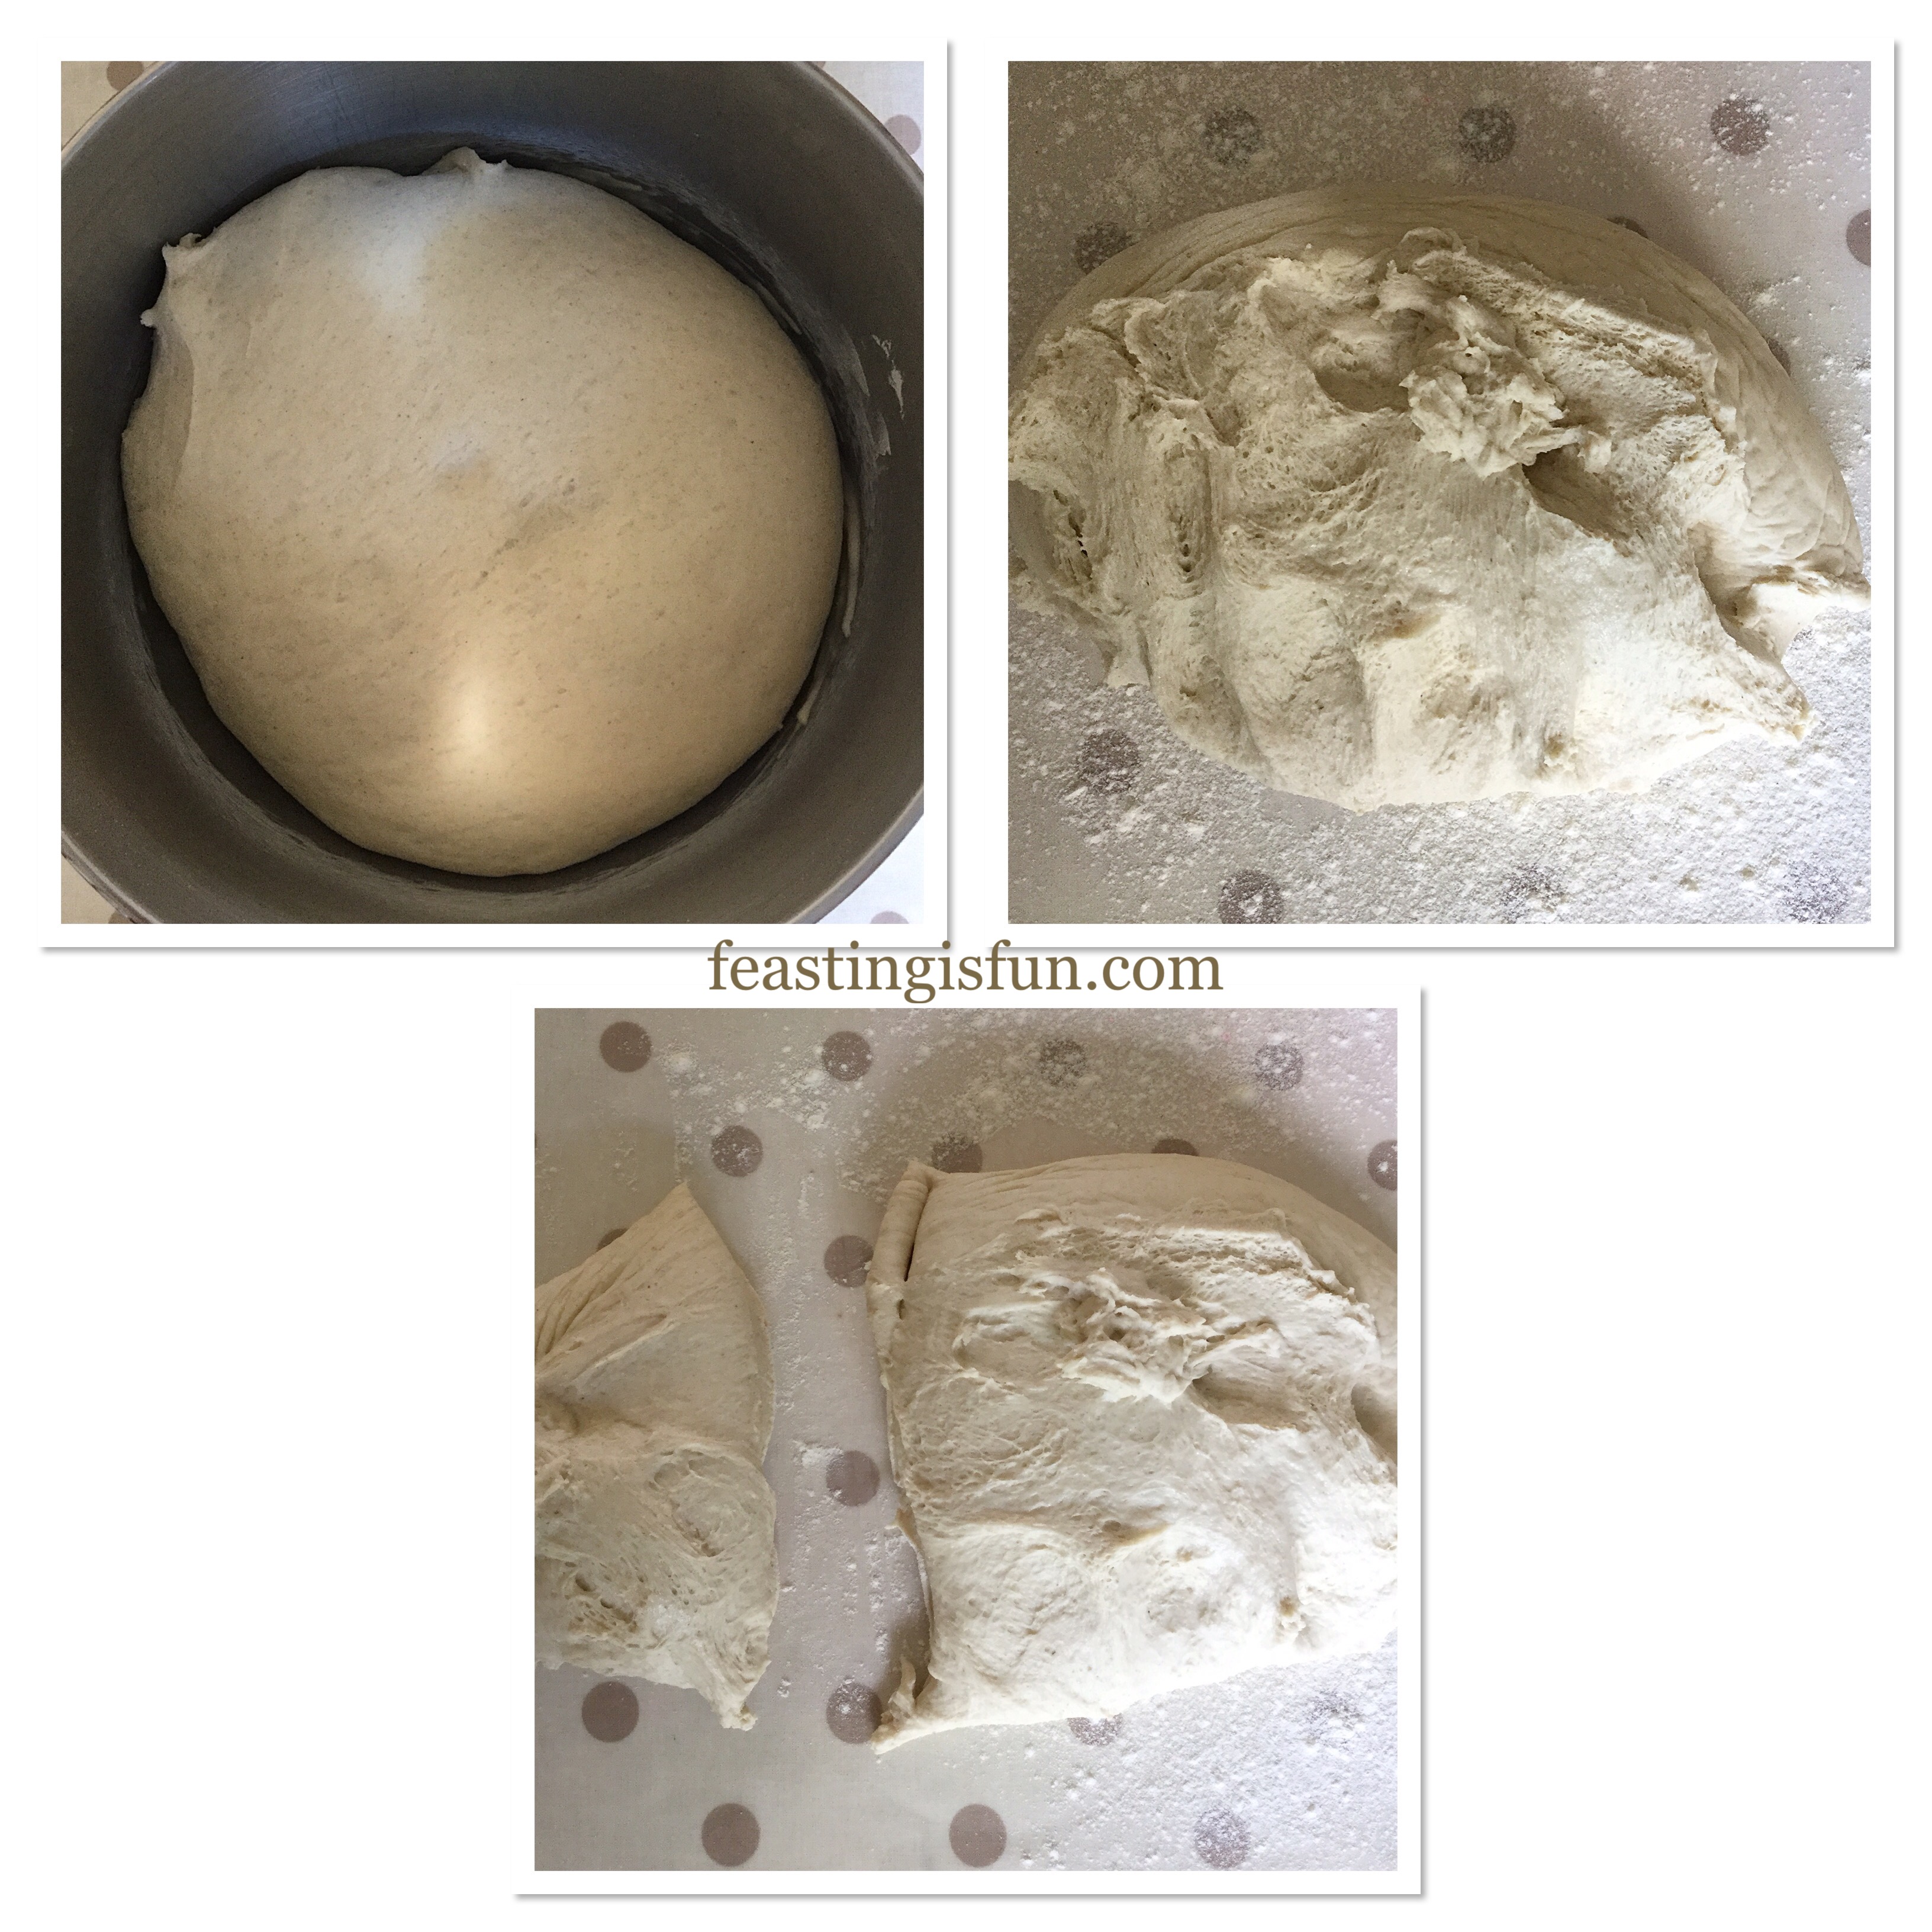
- Starting with the larger piece of dough, stretch and pull one side and press down into the opposite side.
- Now stretch and pull the opposite side. Press down as before.
- Turn the dough and repeat 4 more times, where the edge is rough and untouched, until your dough resembles the bottom right photo.
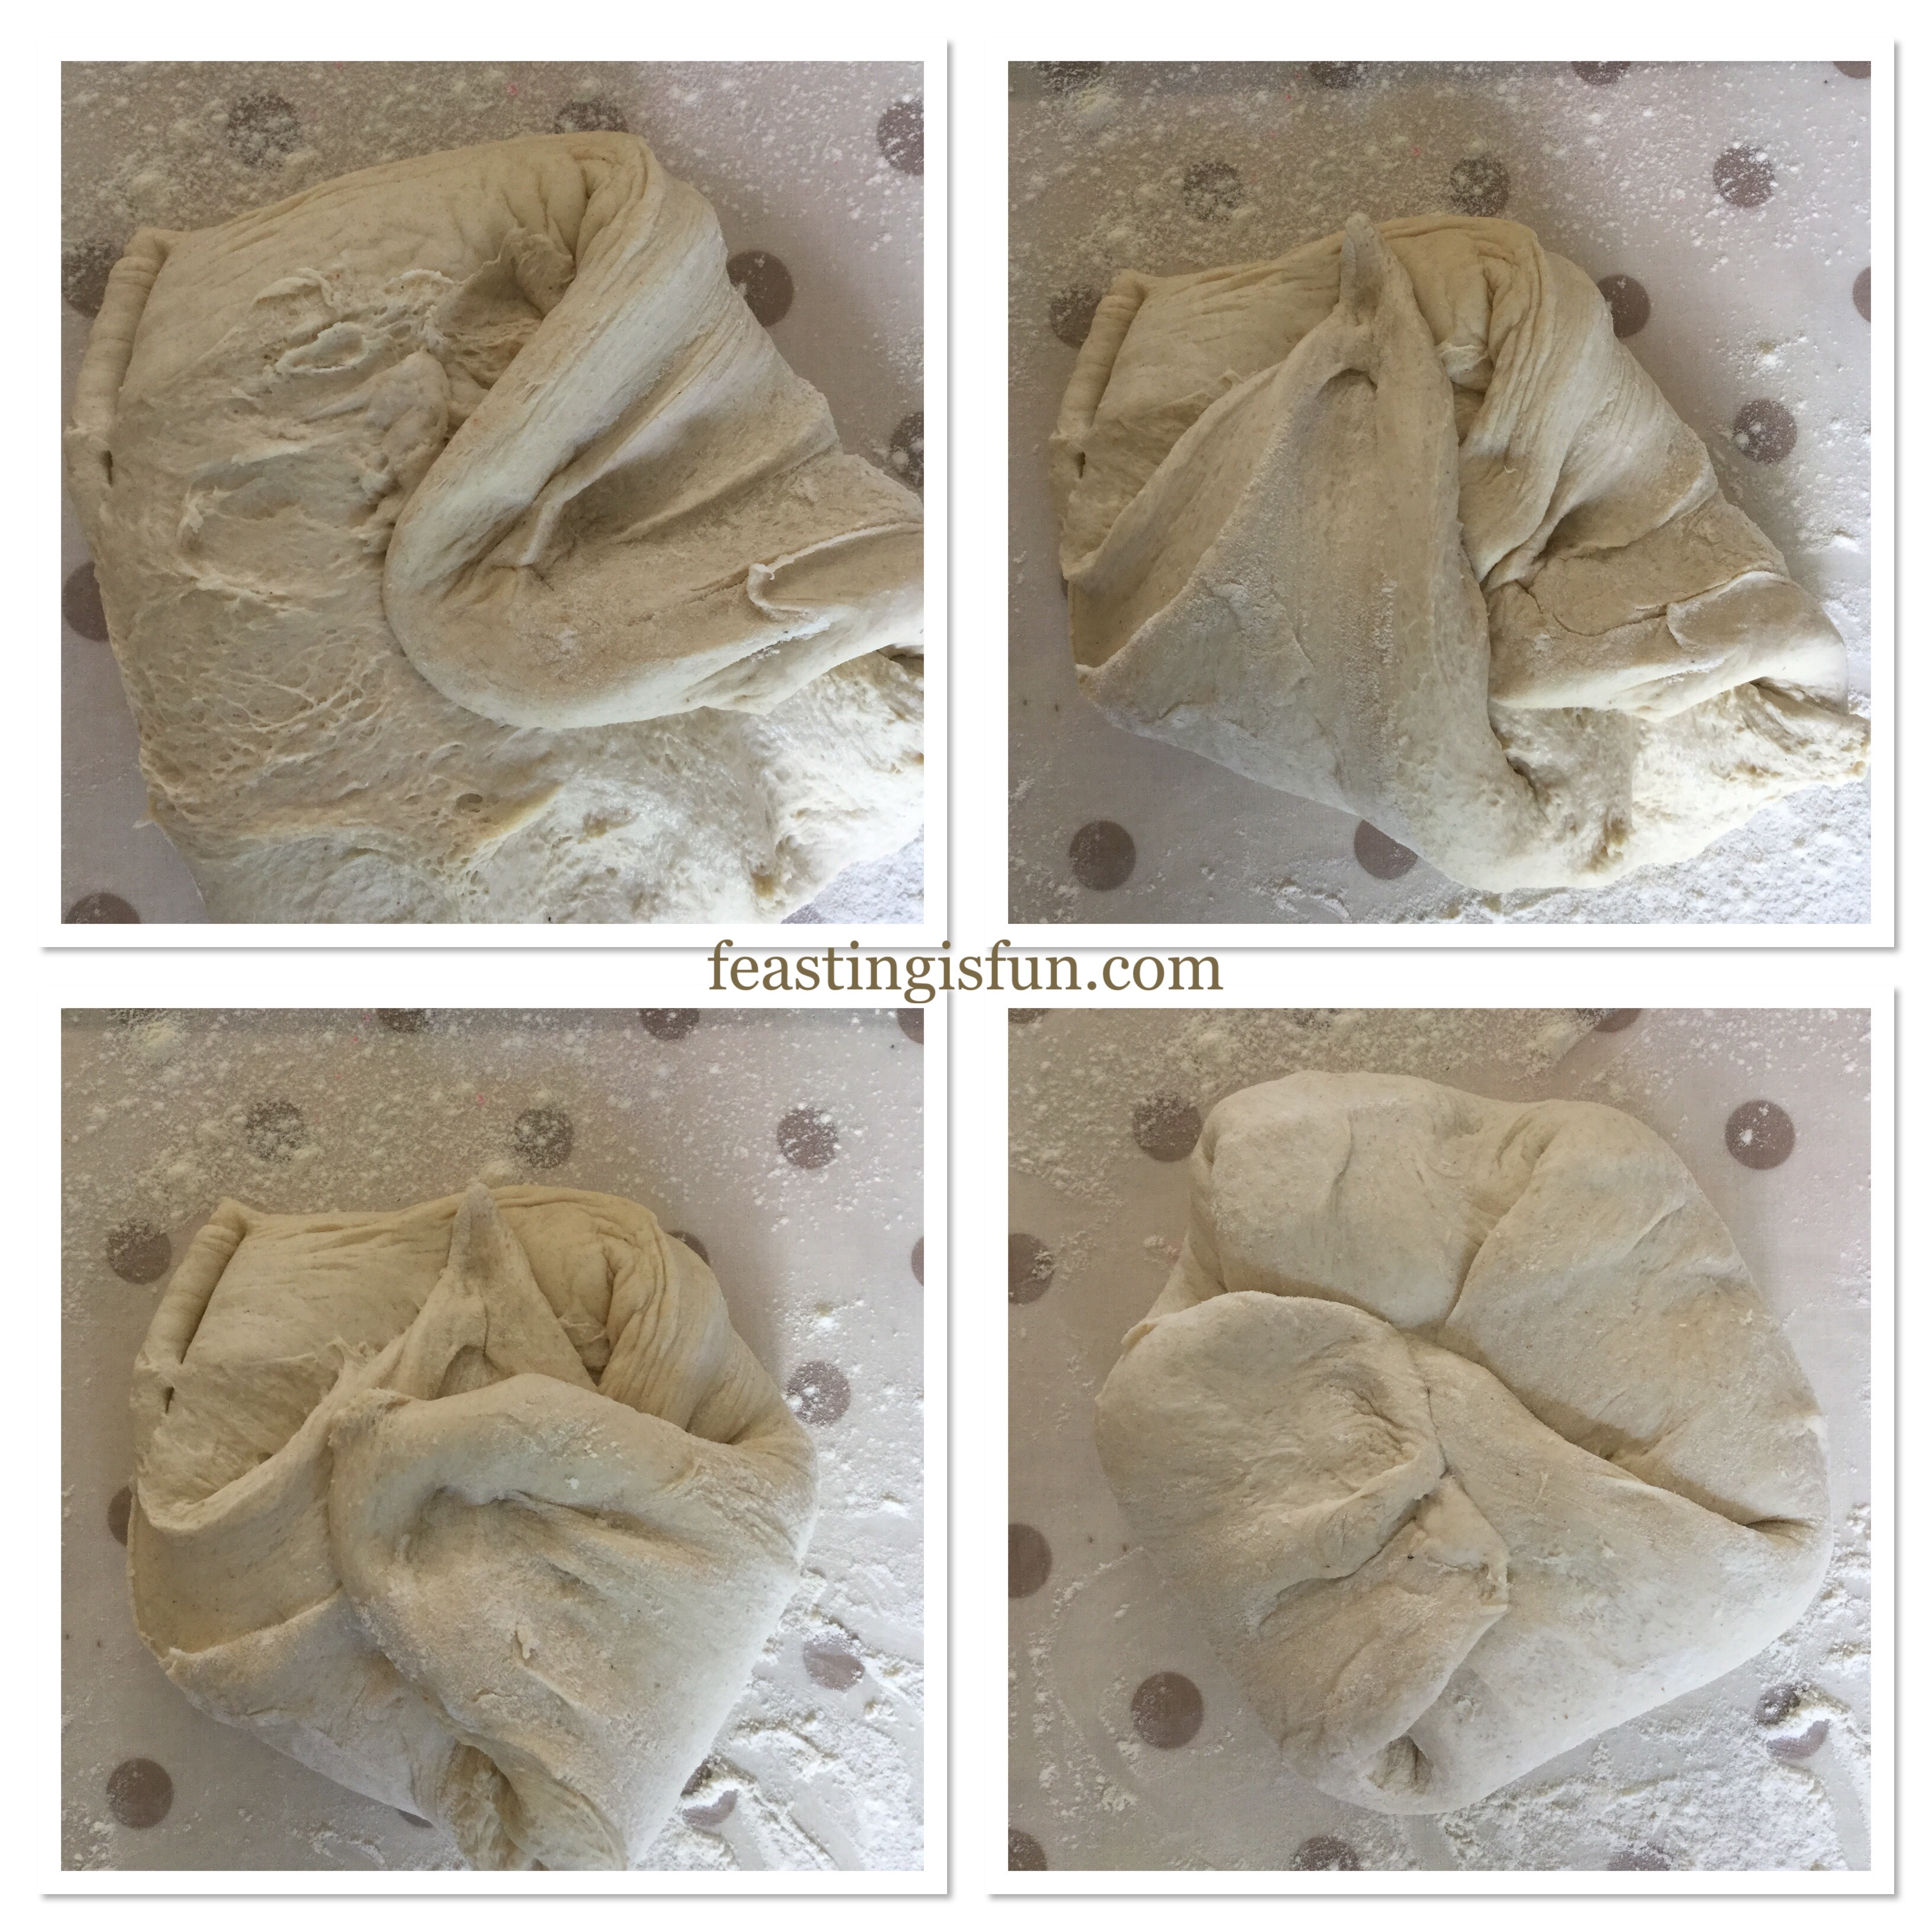
- Flip the dough over and create a ball shape. Cup your hands around the dough, tucking and turning to create a tight ball shape.
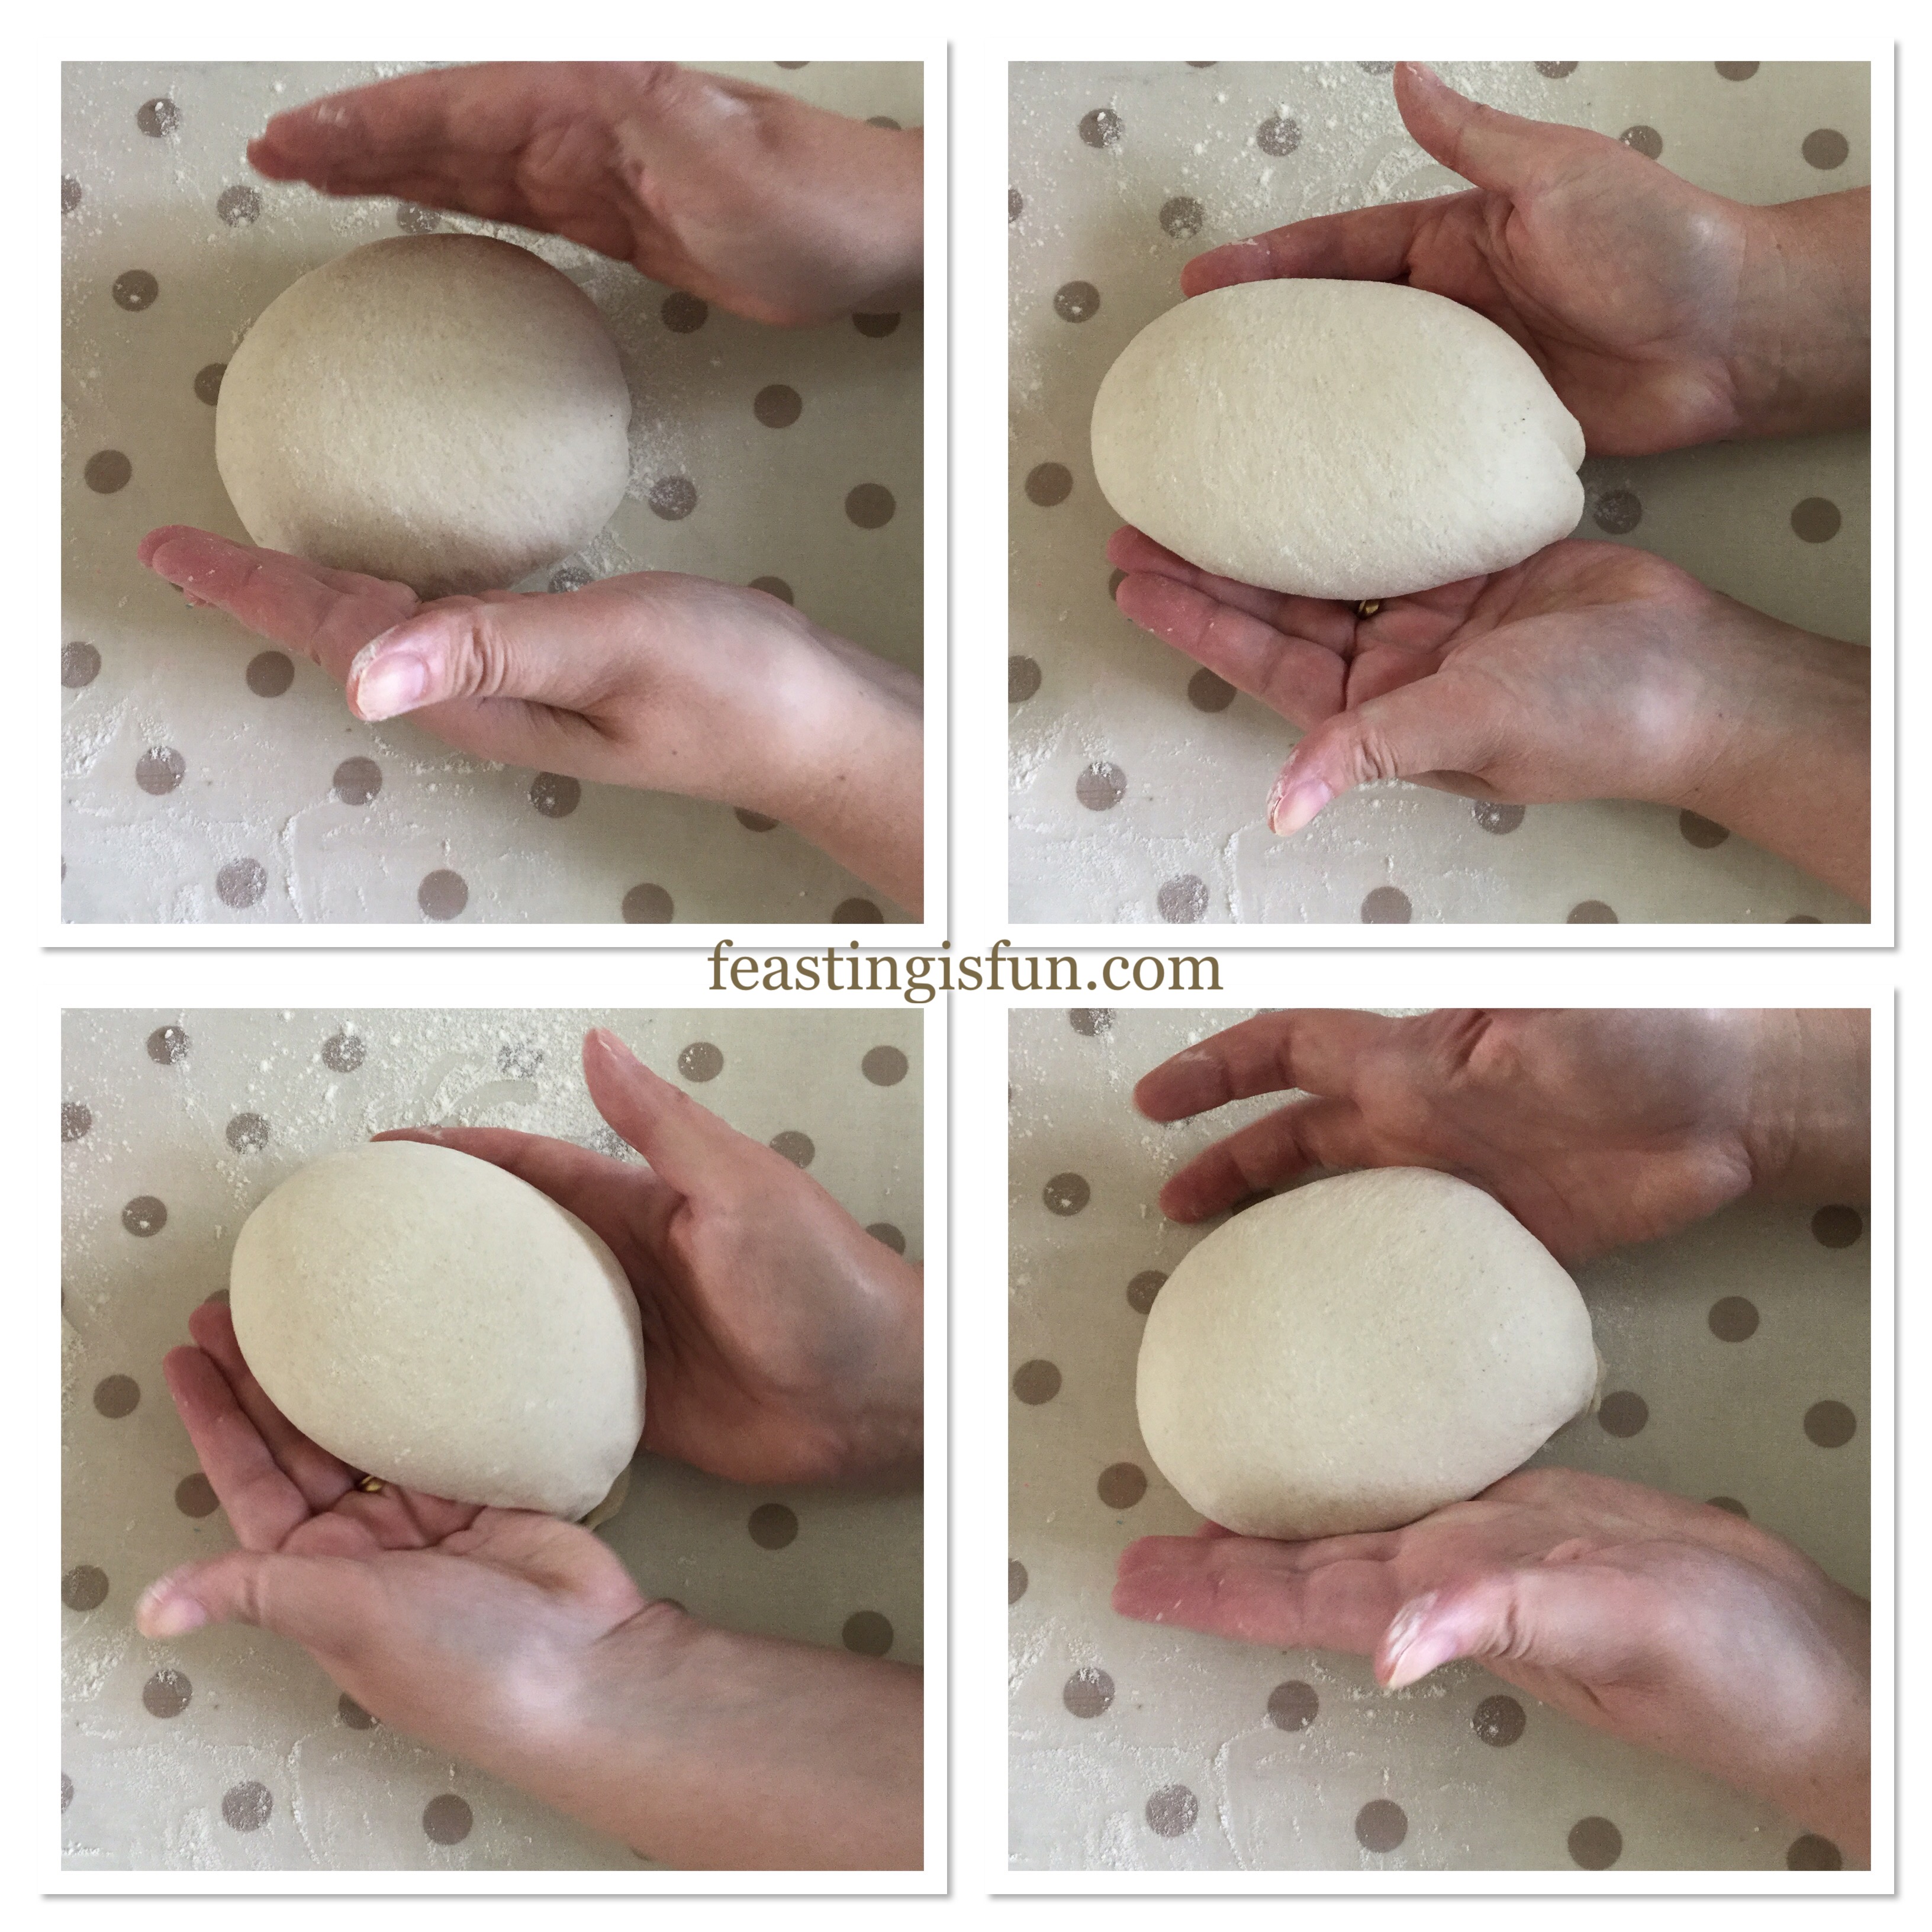
- Place the dough ball base of the cottage loaf, on to a prepared baking tray.
- Repeat the streching/pulling process with the smaller piece of dough, then shape into a ball.
- Place the smaller ball centrally on top of the base.
- With two floured fingers push down, through the centre of the top ball, tight into the base. Doing so joins the top and bottom together, creating one loaf.
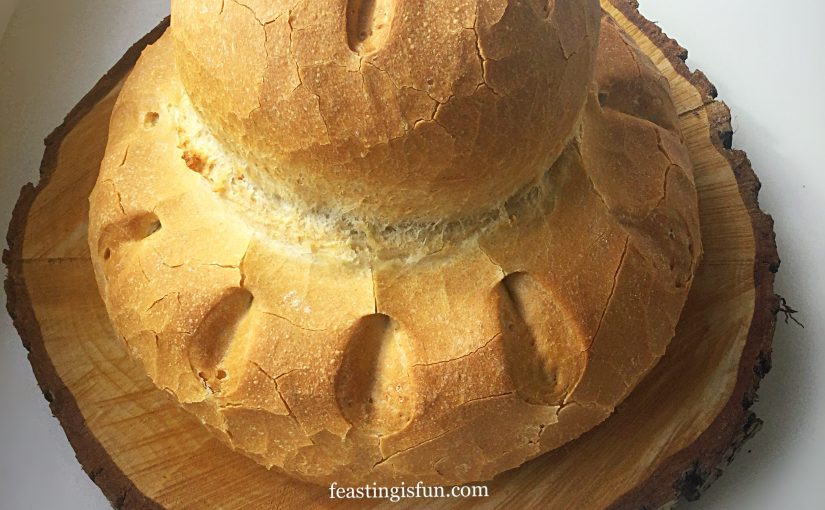
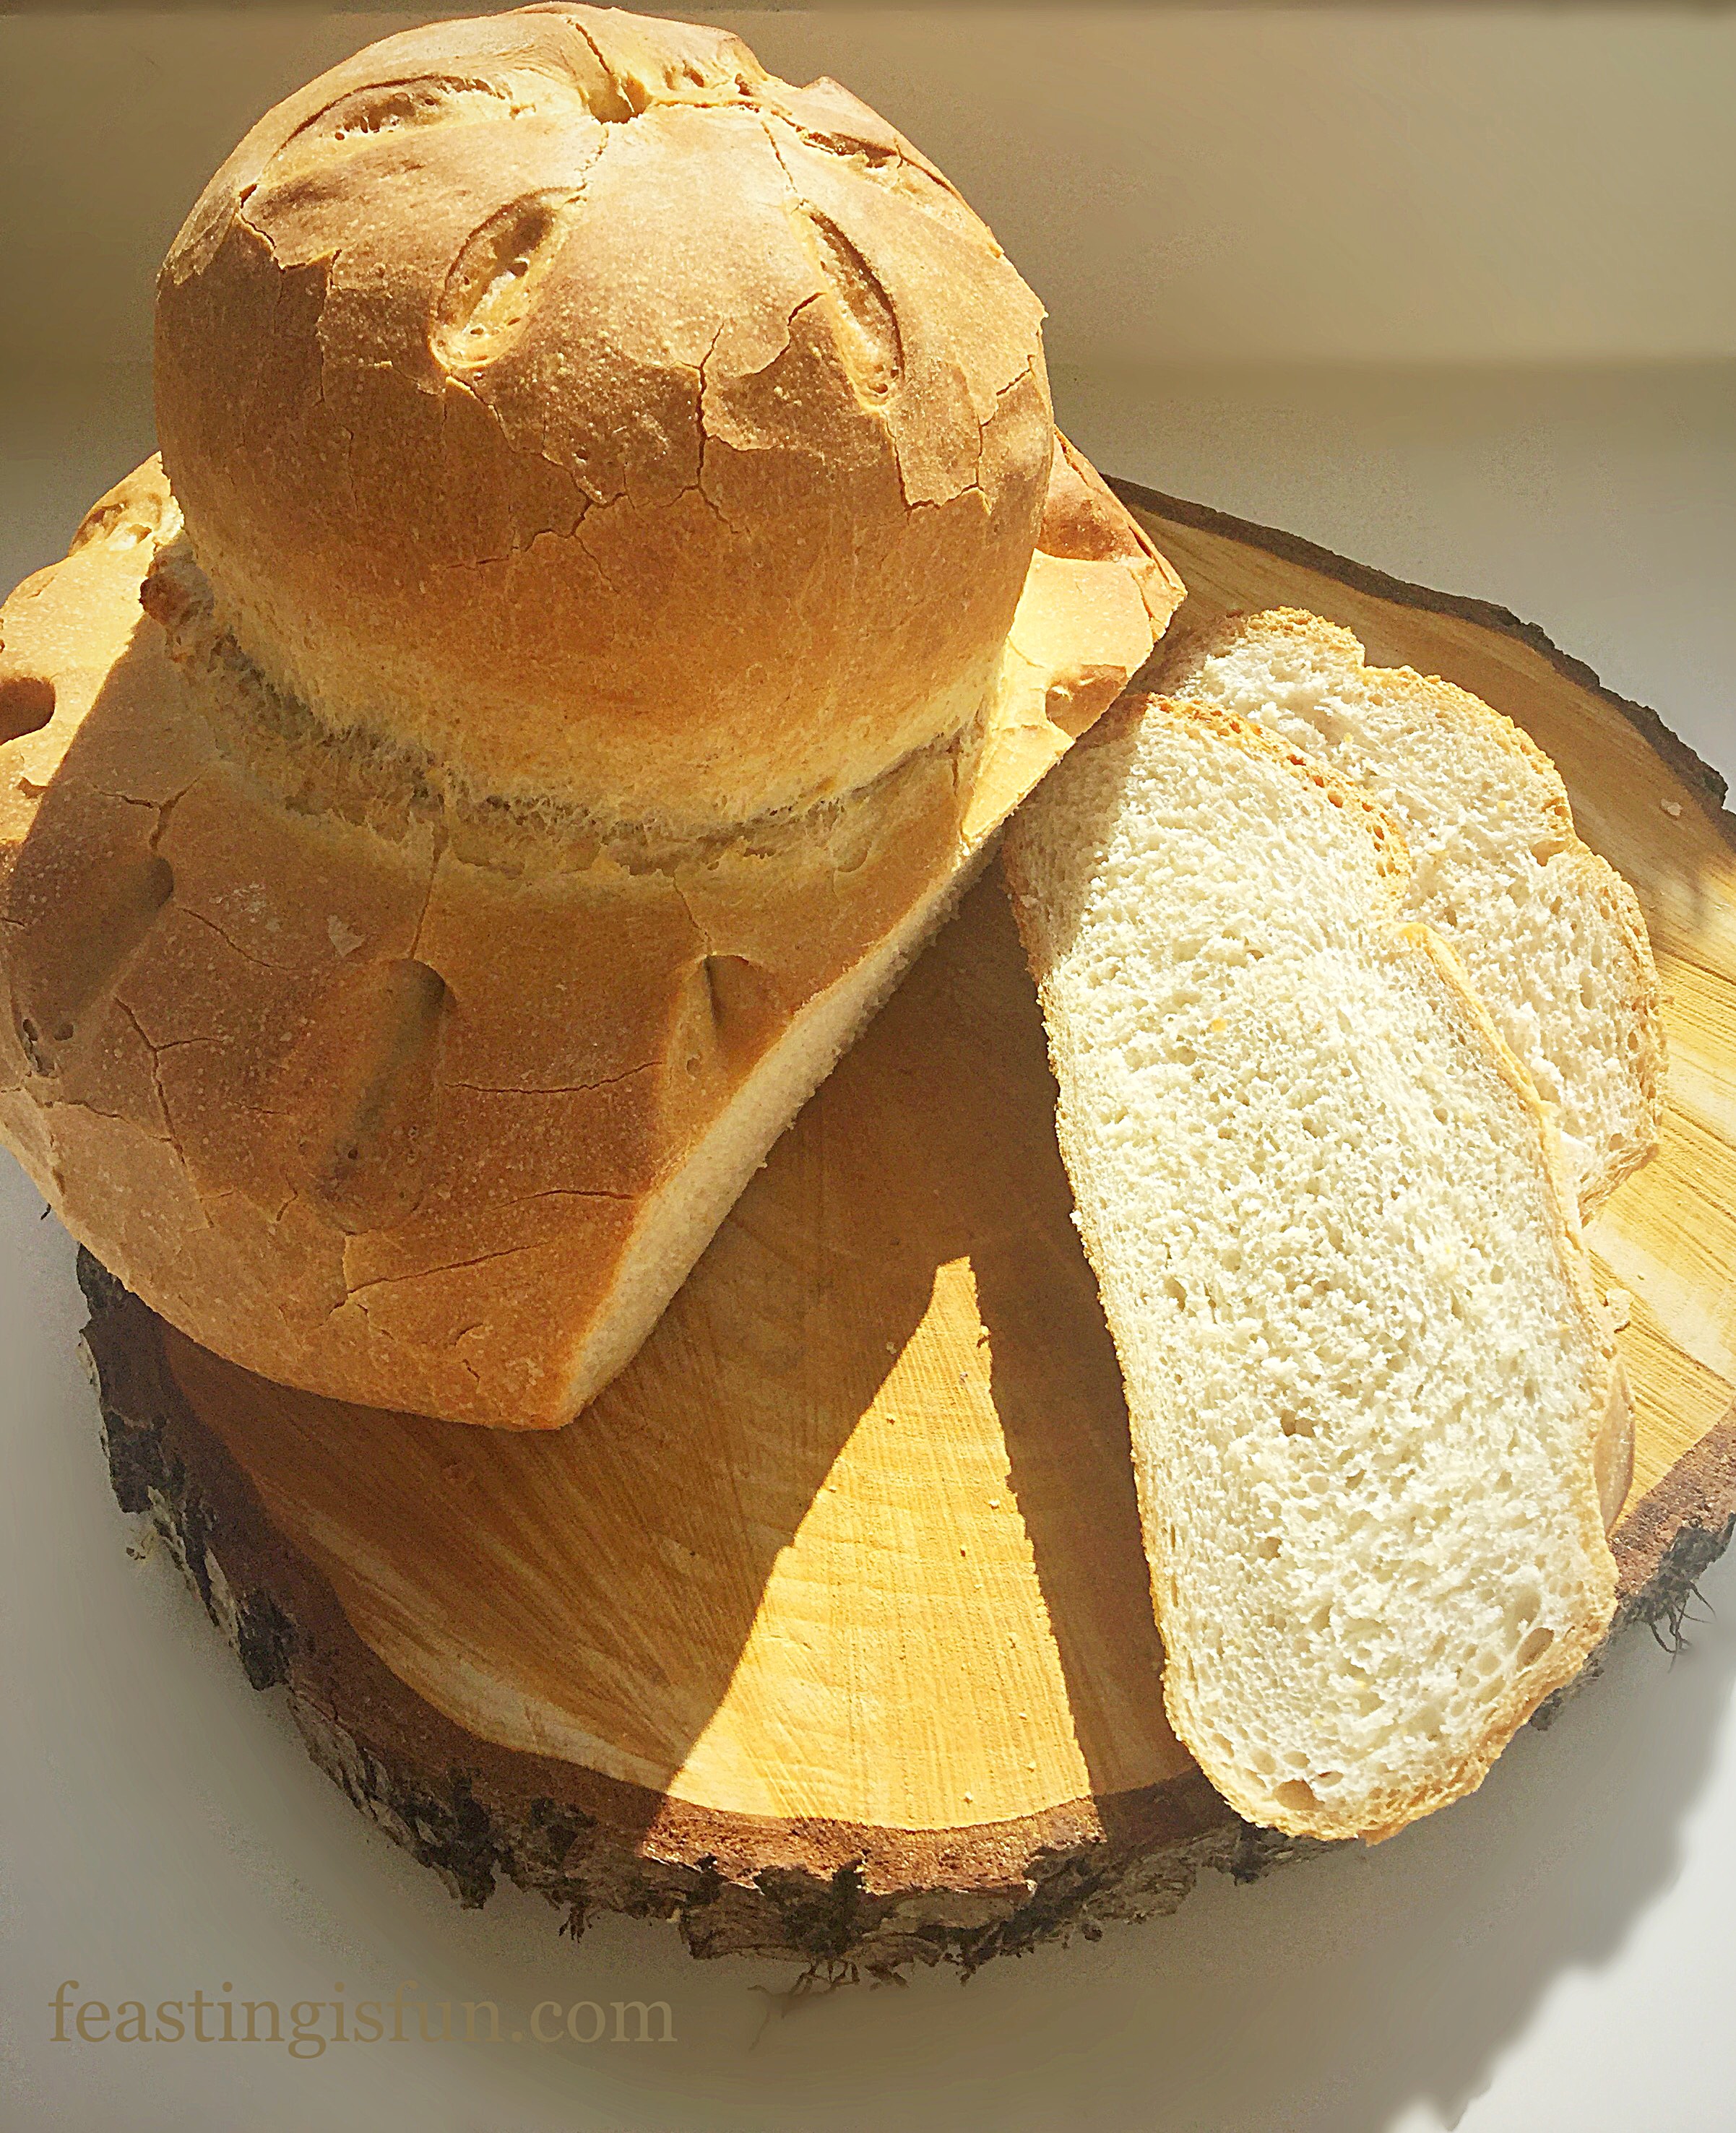
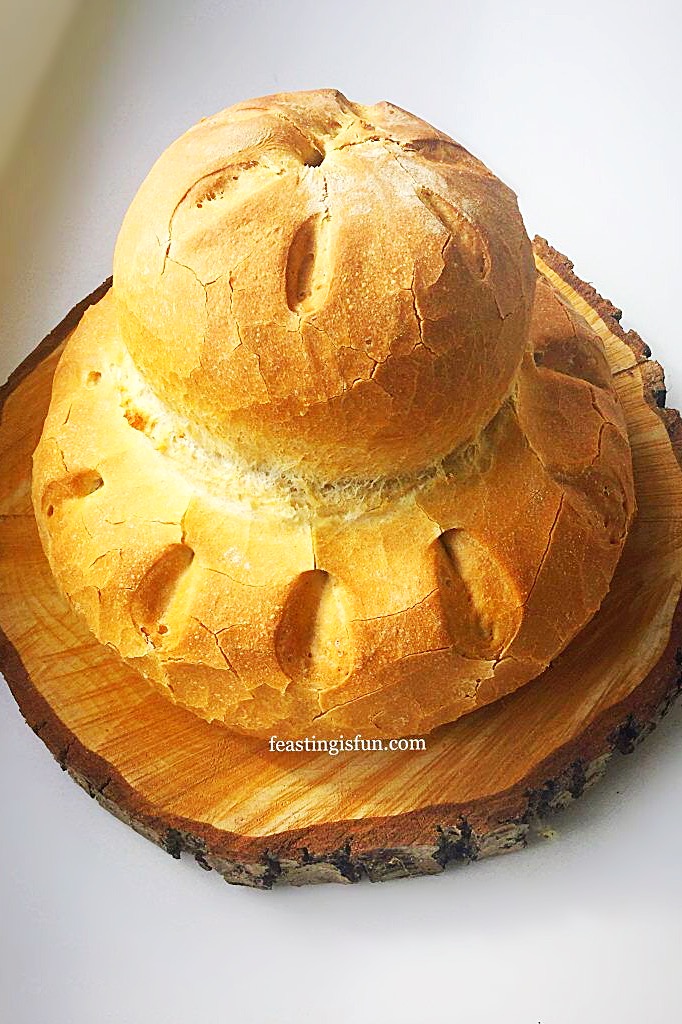
- Score the top 6 times and the bottom 12 times. Cut vertically, from top to bottom.
Proving The Cottage Loaf A Second Time
- Cover with a tea towel, leave in a draft free place until doubled in size, 45 – 60 minutes.
- While the loaf is undergoing its second prove, preheat your oven to it hottest setting. Usually 250C/230C, gas mark 9, 500F.
- 15 minutes before the loaf is ready, place a pan with 5cm/1″ of water in the base of the oven. The steam created will delay the forming of a hard crust on the loaf, allowing maximum expansion, also called oven spring, to take place.

Baking The Cottage Loaf
- As soon as the loaf has doubled in size it is ready to bake.
- Remove the tea towel and place in the middle/lower part of the oven. Make sure there is enough height room, allowing for oven spring, when placing your loaf in the oven.
- Bake for 5 minutes at the hottest temperature and then reduce the oven temperature to 220C/200C fan, gas mark 7, 450F.
- Continue to bake for a further 35-45 minutes.
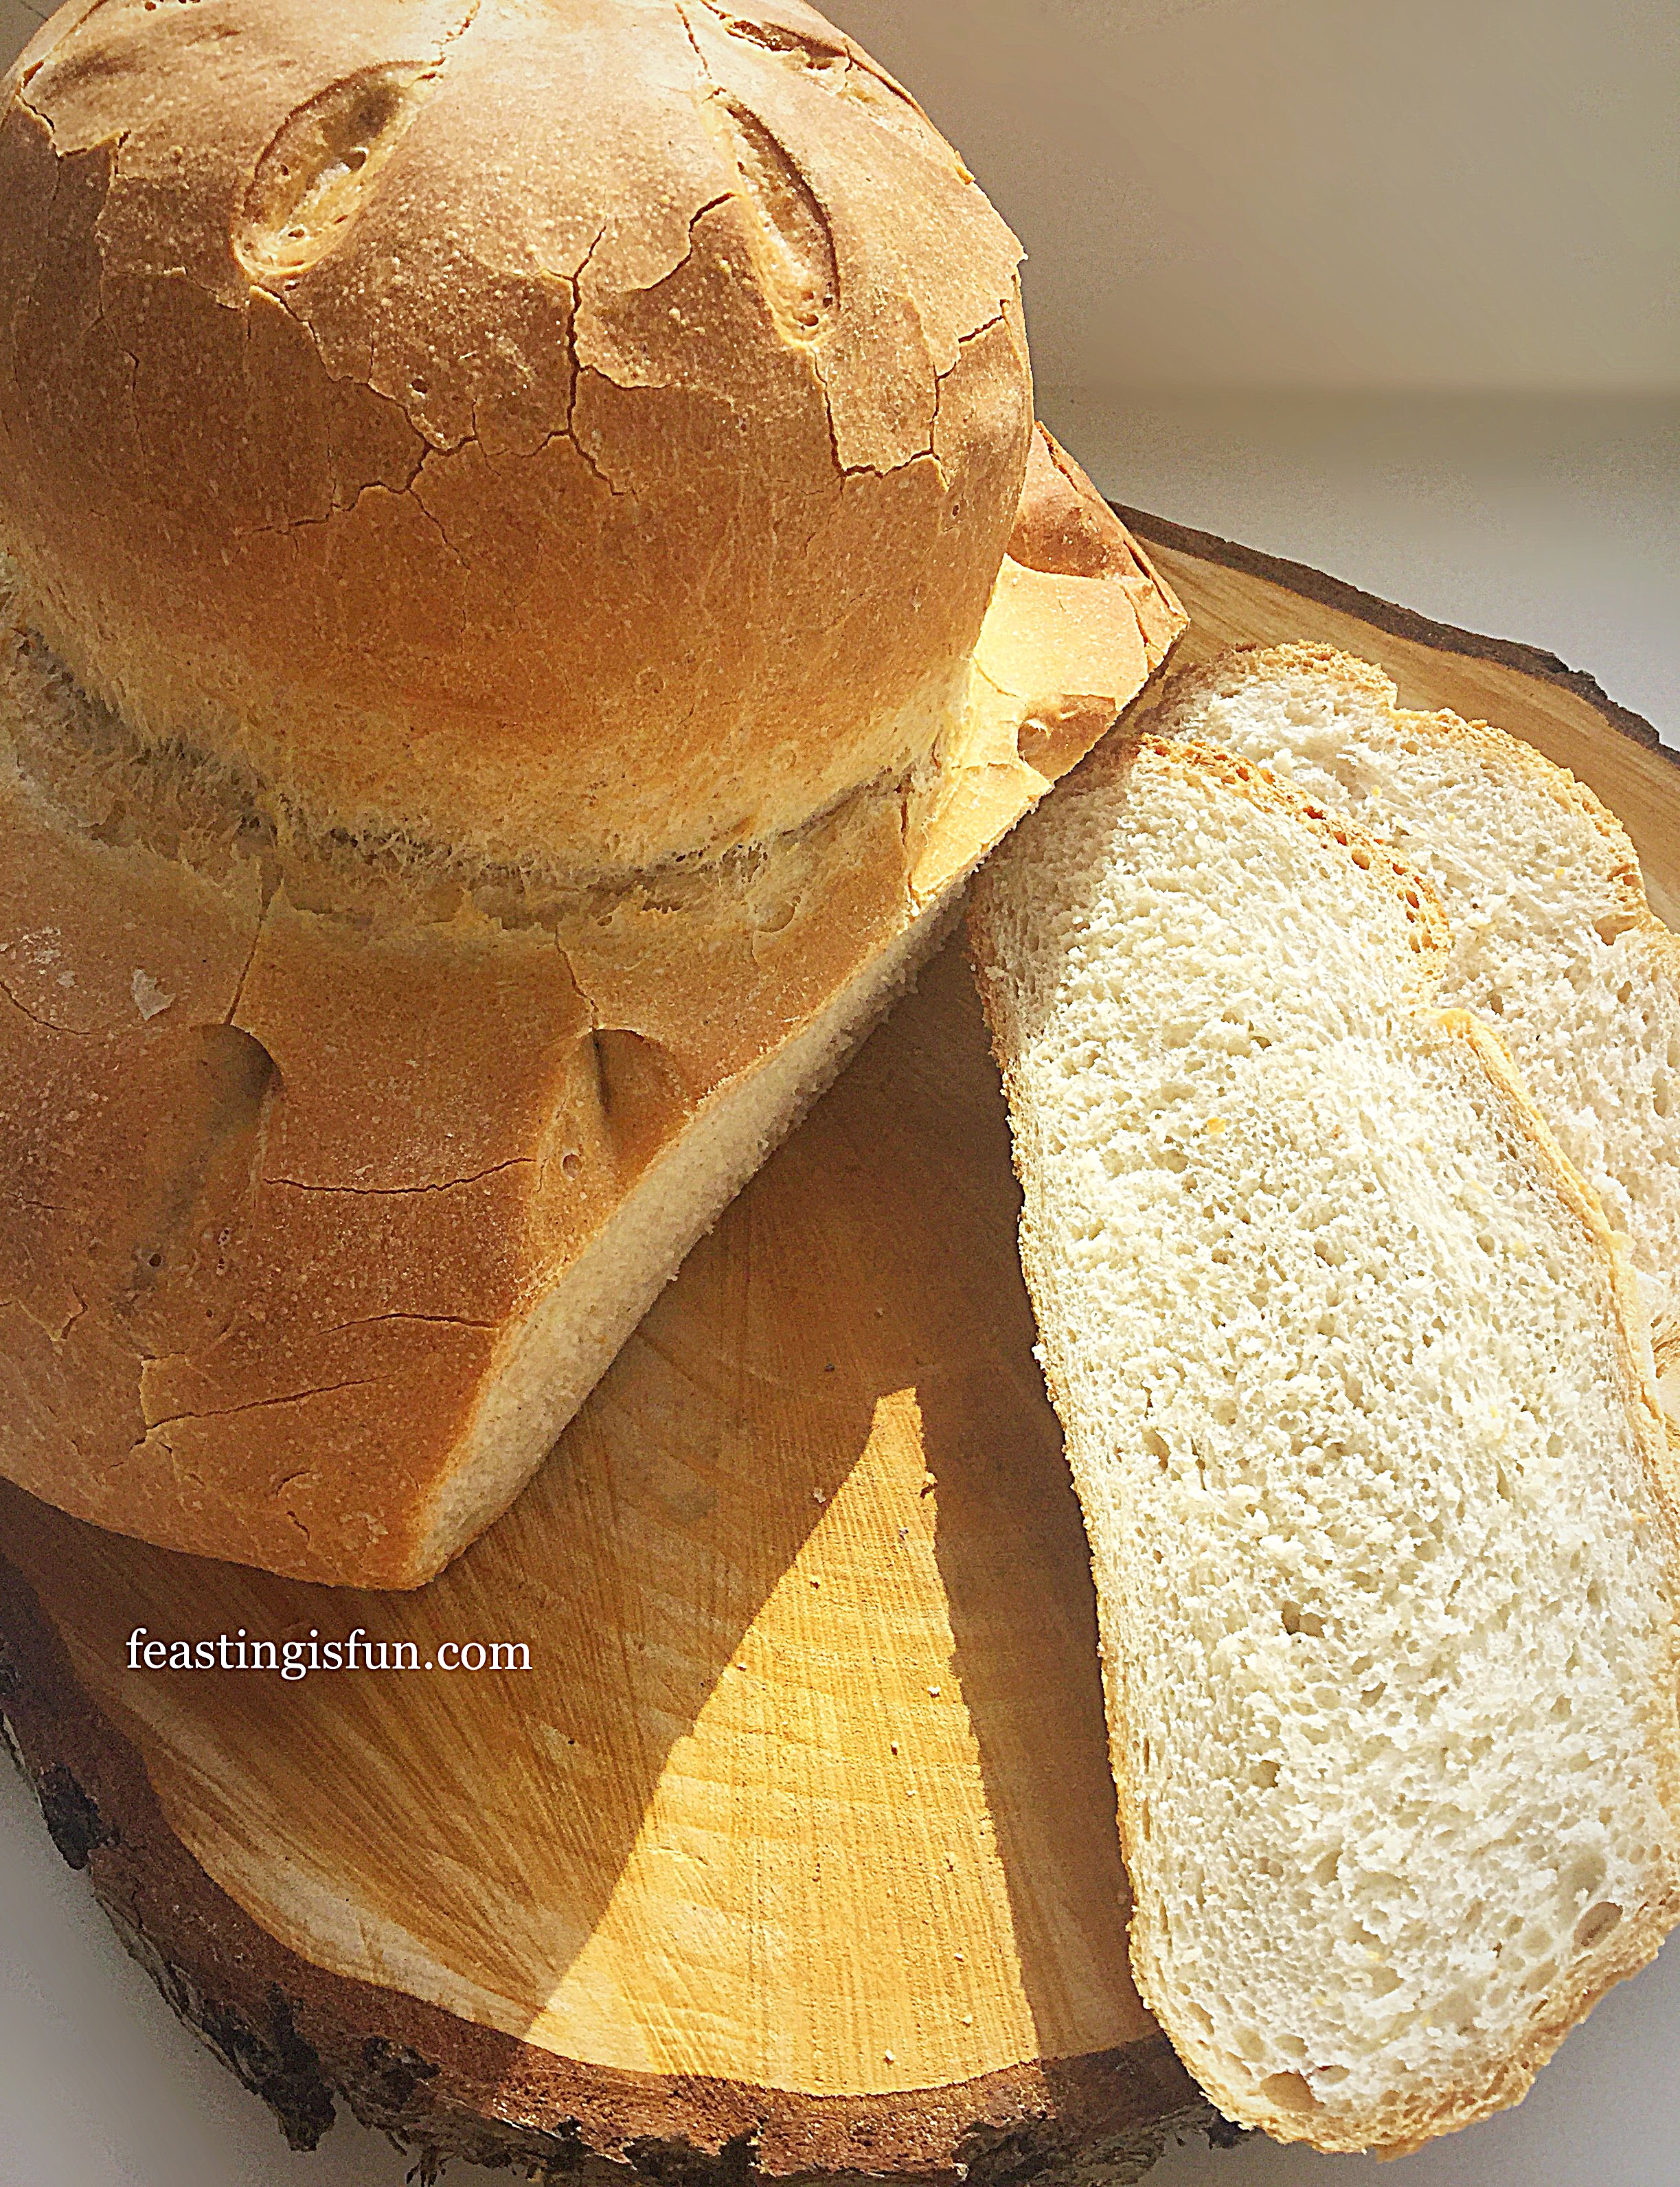
- The loaf is baked when it is a deep golden colour, feels light (not heavy and dense) in your oven glove protected hands and most importantly sounds hollow when rapped on the top and base with a knuckle.
- Remove from the oven and place immediately on to a cooling rack.

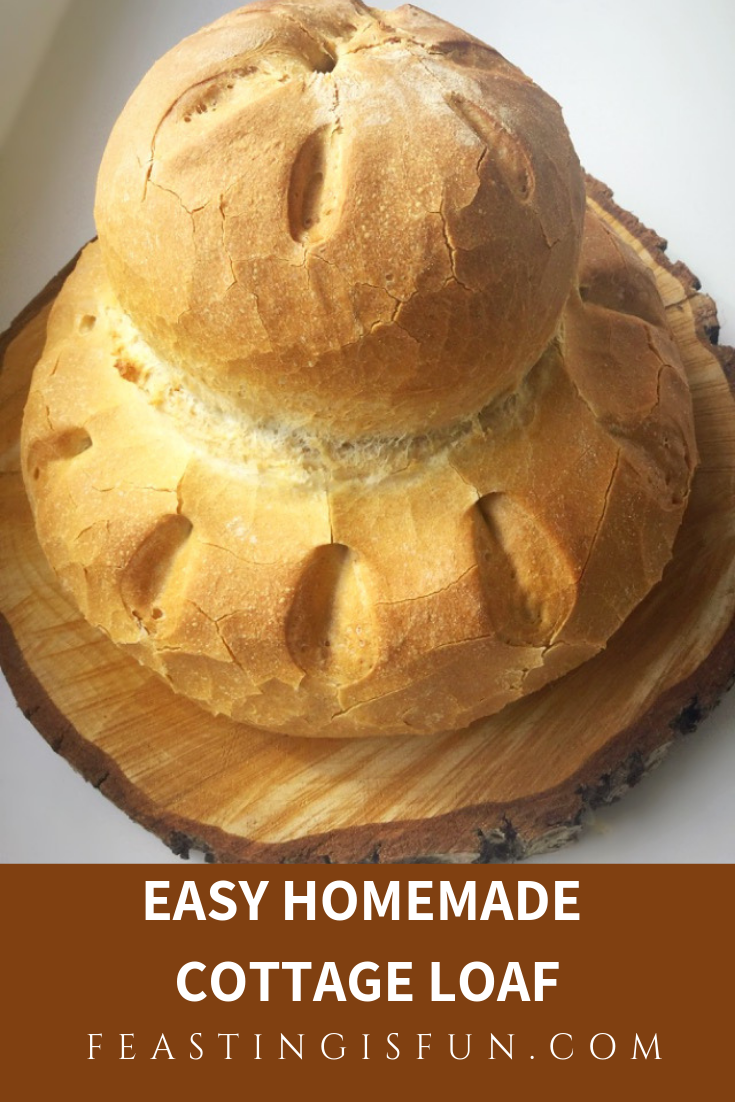
An incredible homemade, home baked artisan style bread.

Serve sliced as open sandwiches, or toasted. Alternatively serve as an accompaniment to a meal, such as Spicy Sausage Bean Casserole.
Best eaten within a day of making, this bread will keep for up to 4 days in a bread bin, which allows air to circulate. Do not to keep in an airtight container as it may go mouldy very quickly.
To freeze, thoroughly cool, then double wrap in cling film. Keep in the freezer for no longer than a month. Defrost at room temperature and refresh by placing in a moderate oven for 10 minutes.
If you have enjoyed this recipe for Easy Homemade Cottage Loaf then you make also like these:


Baking bread is such a rewarding experience. Whether you make the entire loaf by hand, or enlist the help of kitchen machinery, each loaf will be far superior in both flavour and quality than it’s mass produced counterpart. Even if you have a great bakery in your local vicinity, baking your own means you can make unusual, rarely seen loaves such as this Easy Homemade Cottage Loaf.
Whatever you are making, baking and creating in your kitchens, enjoy preparing your feast.
Sammie xx
No part of this post may be reproduced without the written consent of the owner. Please see my Disclosure Policy.
I am entering my Easy Homemade Cottage Loaf in the #GBBOBloggers2017 linky hosted by http://www.mummymishaps.co.uk

Add all of the ingredients to the bowl of a stand mixer in the order that they are listed. This ensures that the yeast does not come into direct contact with the yeast.
Very difficult to stop yeast coming into contact with yeast unless you separate the granules! 😀
Hi Nick, thanks for the spelling check! Now amended. Please let me know if you do make this delicious bread? Sammie.
What great instructions Sammie, and a fab result with your KitchenAid. I’m definitely going to write to Santa and ask for one of those – it looks to have kneaded the bread a whoe lot better than our standmixer! 🙂 #GreatBloggersBakeAlong
Angela x
Hi Anger thank you for your comment. My Kitchen Aid needs to go off to be repaired! It is great a kneading dough though. X
Your Cottage Loaf was just perfect! I am going to make it this week. I had this bread in Denver when I went to visit my son and fell in love with it. Of course they didn’t make it here where I live. Now that I’m baking more bread I’m super excited to try your recipe!
Thank you Bea. I hope that you have fun making this bread and that it brings back happy memories for you. X
I find that a lot of people worry about baking their own bread. I find it quite easy actually, and very relaxing. Plus the finished bread is always worth the effort.
Your loaf looks gorgeous Sammy and it is so big and the shape is perfect.
Thank you for linking to #GBBOBloggers2017 x
Thank you for letting me join in. I wrote this post to try and de-mystify the bread making process and encourage people to relax and give it a go. I’m so thrilled that people are finding the step by step guide helpful. X
Your cottage loaf looks so tasty! The crust looks so deliciously crispy with the rest looking so fluffy. Really like your step by step photos too x
Thank you Cat. Bread is something I bake pretty much everyday, having said that and baked this loaf twice getting the loaf to bake level was the hardest part!
I followed this recipe to try out the Bake Off technical challenge for myself. I found the instructions really easy to follow, and have a Kitchenaid myself, so the steps for using that were really handy! The pictures are really helpful so you know what things should be looking like as you go along. My bake turned out pretty well I think, so thank you! 🙂
Izzi thank you so much for trusting my recipe and leaving such a gracious comment. Your loaf looks amazing on Instagram, better than mine! I really hope that you get Star Baker 🌟. X
Looks so crusty! Yum. I’m always intrigued (and a little puzzled) by the shape of a Cottage Loaf, wondering where it came from and how you are meant to slice it/eat it! Like you. I love making bread, it’s my favourite thing.
Thank you Kevin. Actually once you cut a couple of slices off the side you then get what looks like the top of Russian dolls or Gingerbread men! Interesting trying to get that slice in the toaster! X
Thank you for your comment MK. I use organic, stoneground flour which is unbleached. Cottage loaves are traditionally made with white flour. Should you wish to make a healthier, more fibre and nutrient packed loaf, I suggest the Seeded Cob Loaf, which is pictured, with a link, on this blog post.
Hi, Like the bread making technic. I would suggest a request that fiber content and nutrition level is very low in white flour than whole grains. Due to cultivar adaptation it would be better to include flour of millets, oats, etc. Though I appreciate the way you write about making a bread. Thanks.