Winter Fruit Topped Pavlova

Share
Facebooktwitterpinterestlinkedintumblr

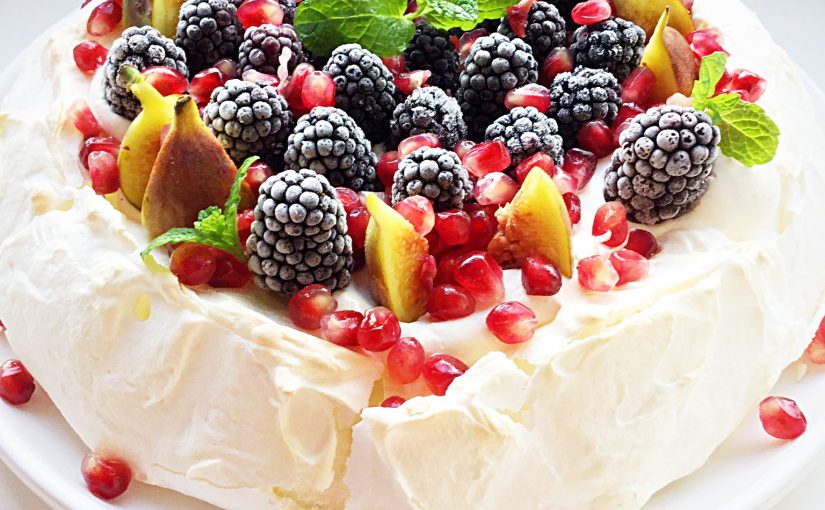
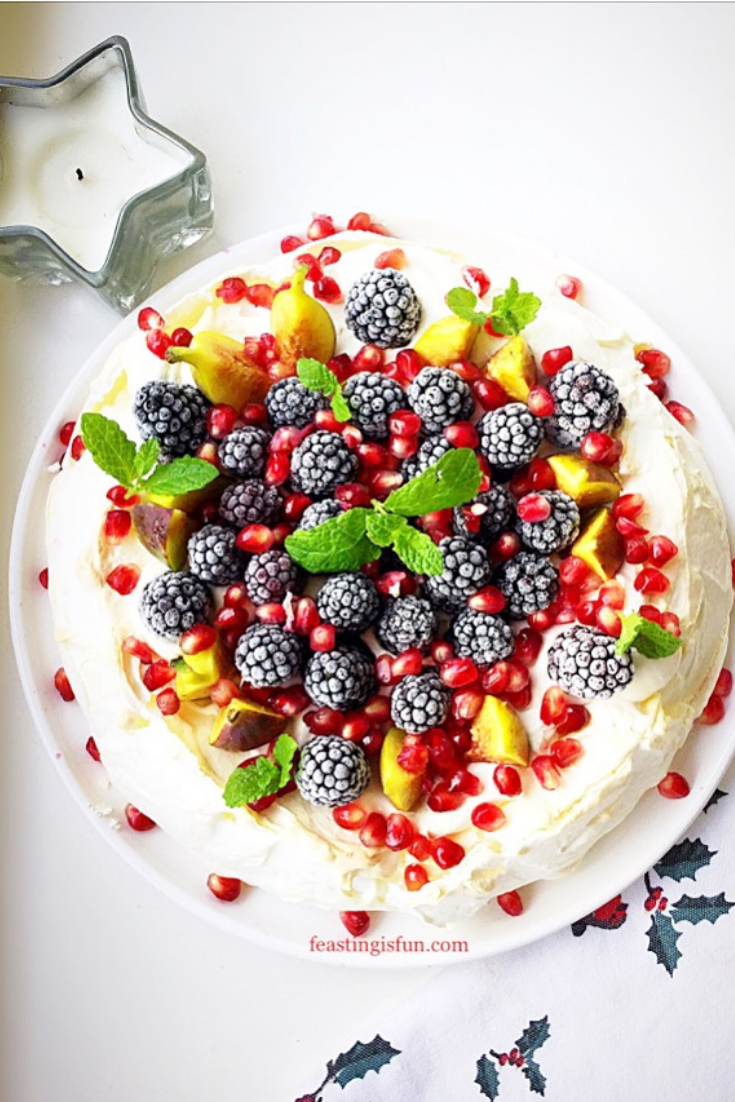
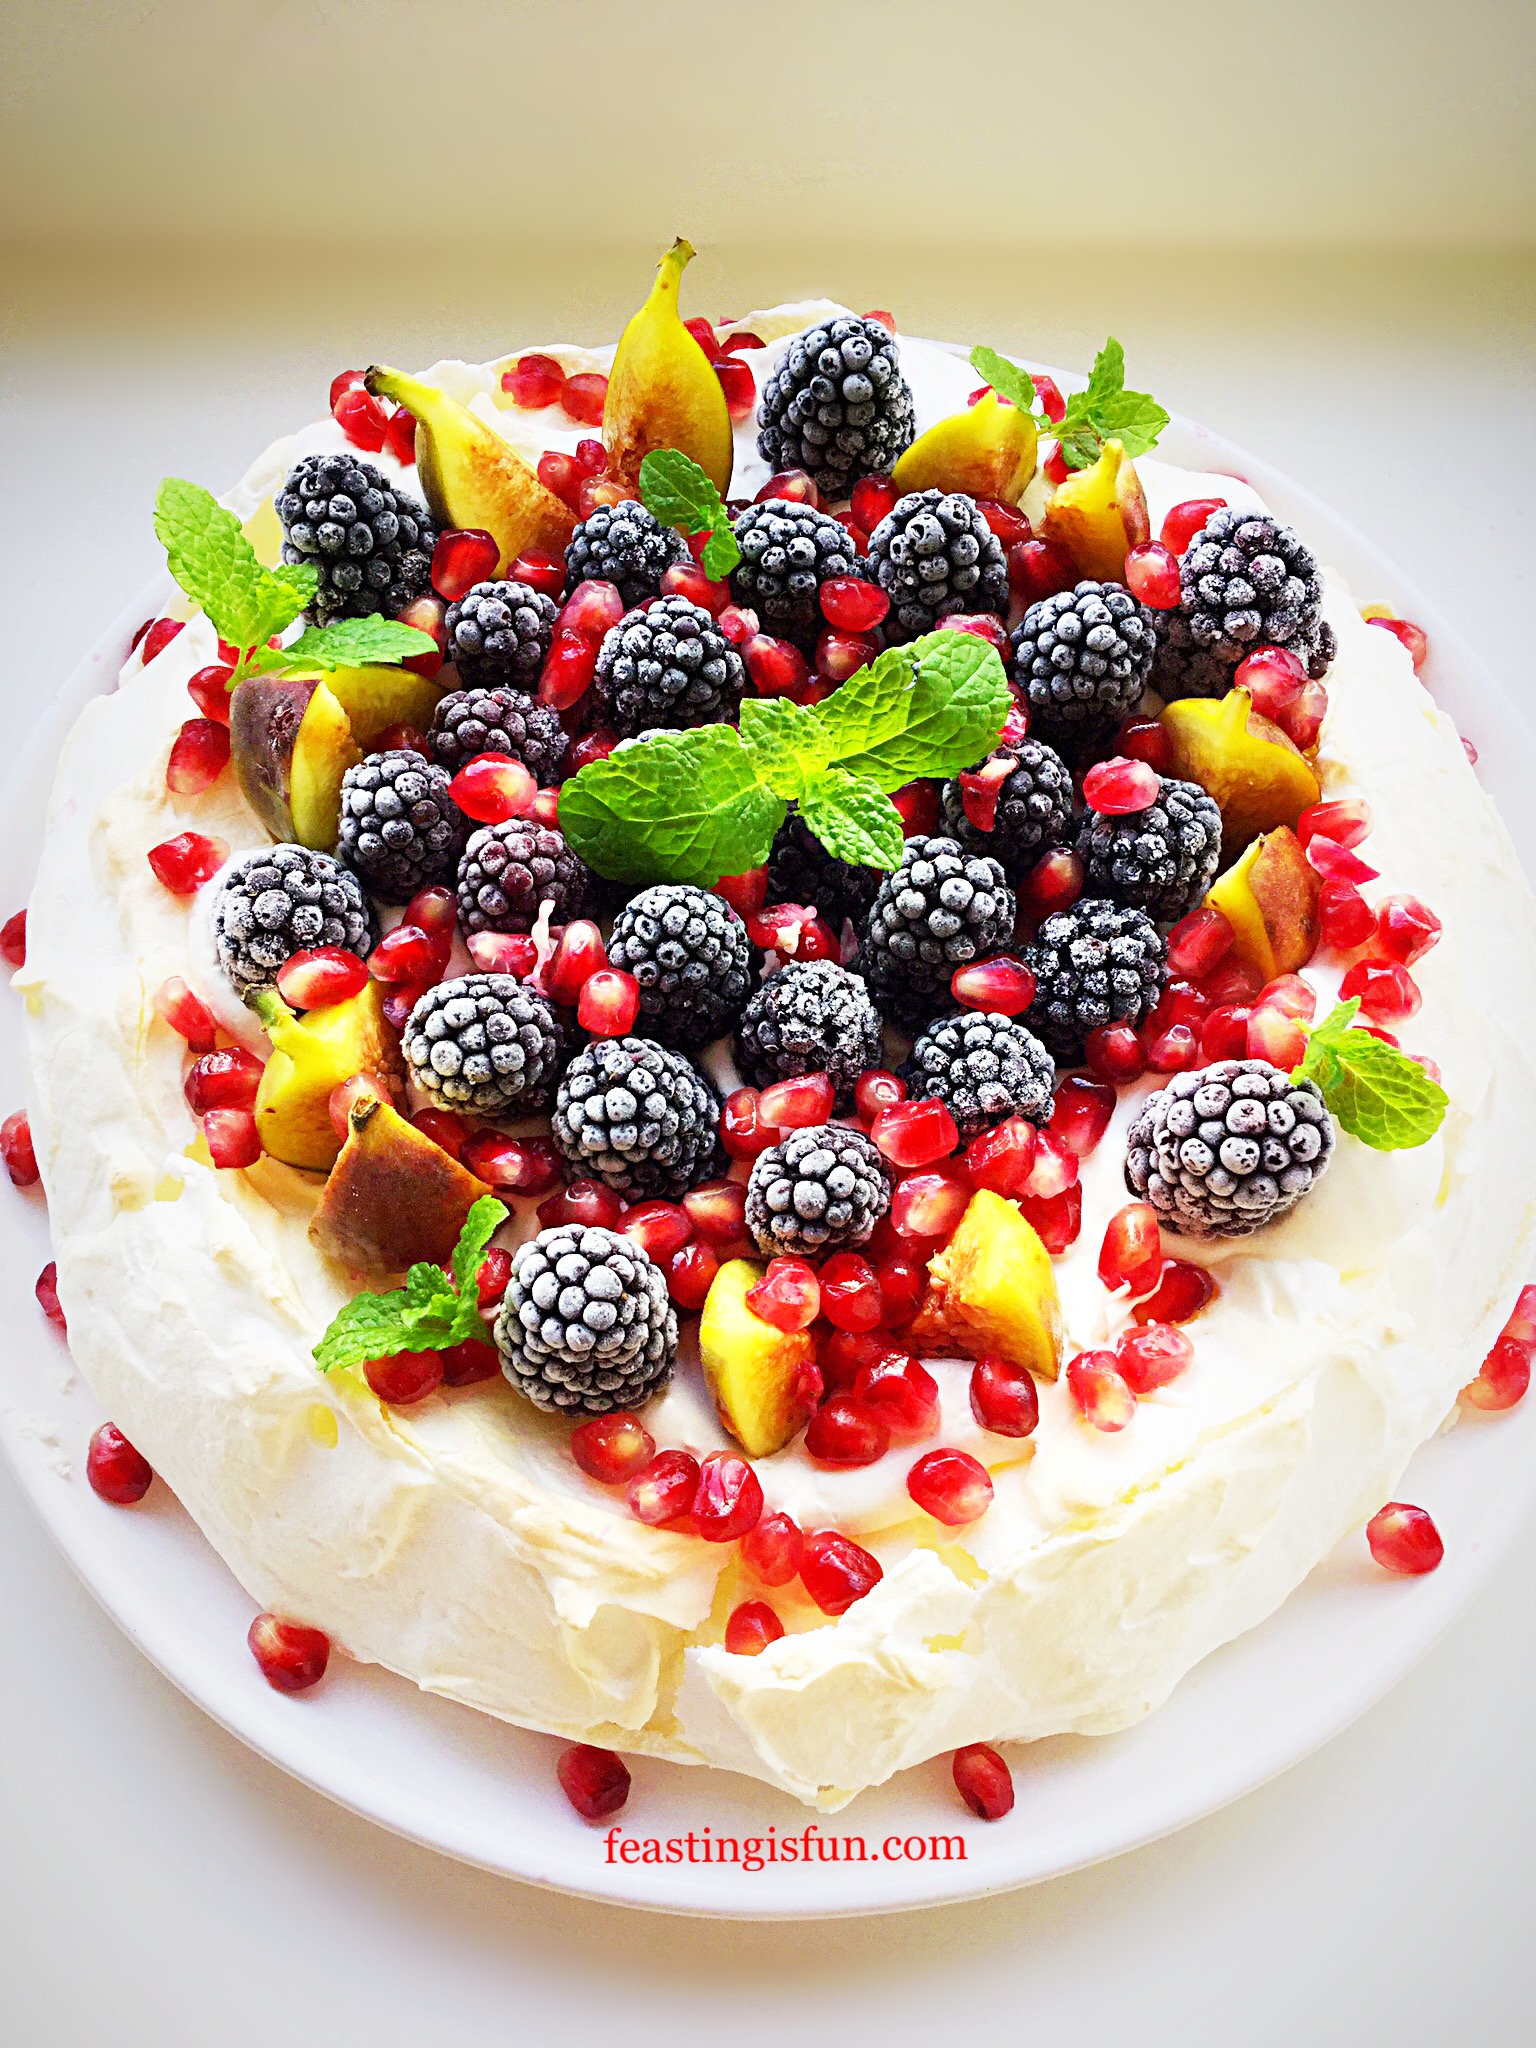
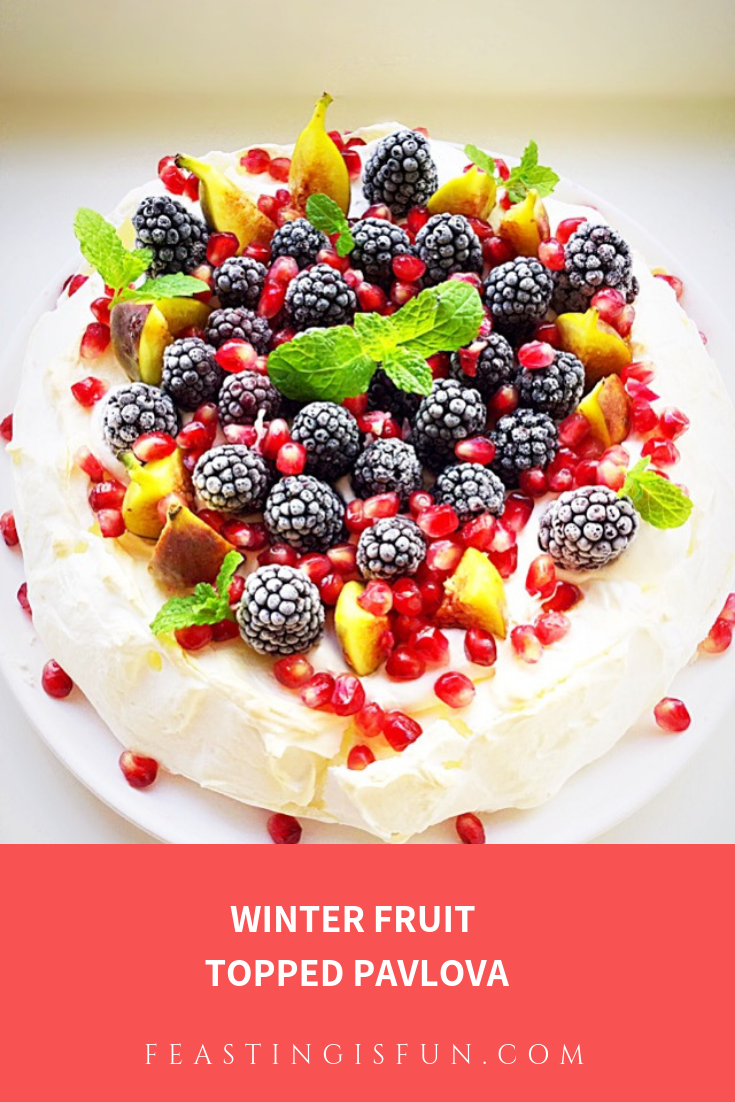
Finally December is here, heralding the start of Winter. And with it we celebrate a month of festive planning, carols by candlelight and sellotape everywhere! While, here at home, there are also two birthdays during December, the celebrating can seem never ending. Since there’s only so much cake you can eat, fear not, because this gluten free Winter Fruit Topped Pavlova is the perfect celebratory dessert.

FF Winter Fruit Topped Pavlova

Tips For The Perfect Pavlova:

For me, Pavlovas always feel like such an elegant dessert. Since they are simple to make as long as you follow a few basic rules. And they cannot, must not and should not be rushed. Either during the whisking or baking stage. While whisking, all of the sugar must be given time to dissolve in the egg white, otherwise it will leak out during cooling and the meringue will collapse. Likewise, after baking it is important to leave the Pavlova to cool slowly, preferably in the oven. Rushing this stage can cause the meringue structure to badly crack.

FF Winter Fruit Topped Pavlova
Winter Fruit Topped Pavlova

Please do not let the previous advice discourage you from making a pavlova. Rather I hope it has the opposite effect and encourages you. Because, taking an extra five minutes (that’s 5 minutes not forever!) to ensure the meringue is properly mixed will improve your bake.. Another tip is to bake the Pavlova in the evening, leaving it in the oven overnight to cool. Since this allows the meringue to cool slowly overnight without tying up the oven. Resulting in a quick assembly job the next day and easy your festive workload!

FF Winter Fruit Topped Pavlova
Winter Fruit Topped Pavlova

And if the meringue does crack, it will be covered with whipped cream and fruit. While no one ever need know!

Recipe: Winter Fruit Topped Pavlova serves 8

4 Large Free Range Egg Whites

200g/7oz Caster Sugar

Juice of half a Lemon

400ml Double Cream (Heavy Cream)

1tsp Vanilla Bean Paste – I use Nielsen-Massey 

4 Fresh Figs – cut into quarters

300g Frozen Blackberries – I buy them from Waitrose 

1-2 Fresh Pomegranates – seeds removed

Optional – Fresh Mint to garnish

Preheat the oven to 180C/160C fan, 350F, gas mark 4

Making the meringue base:

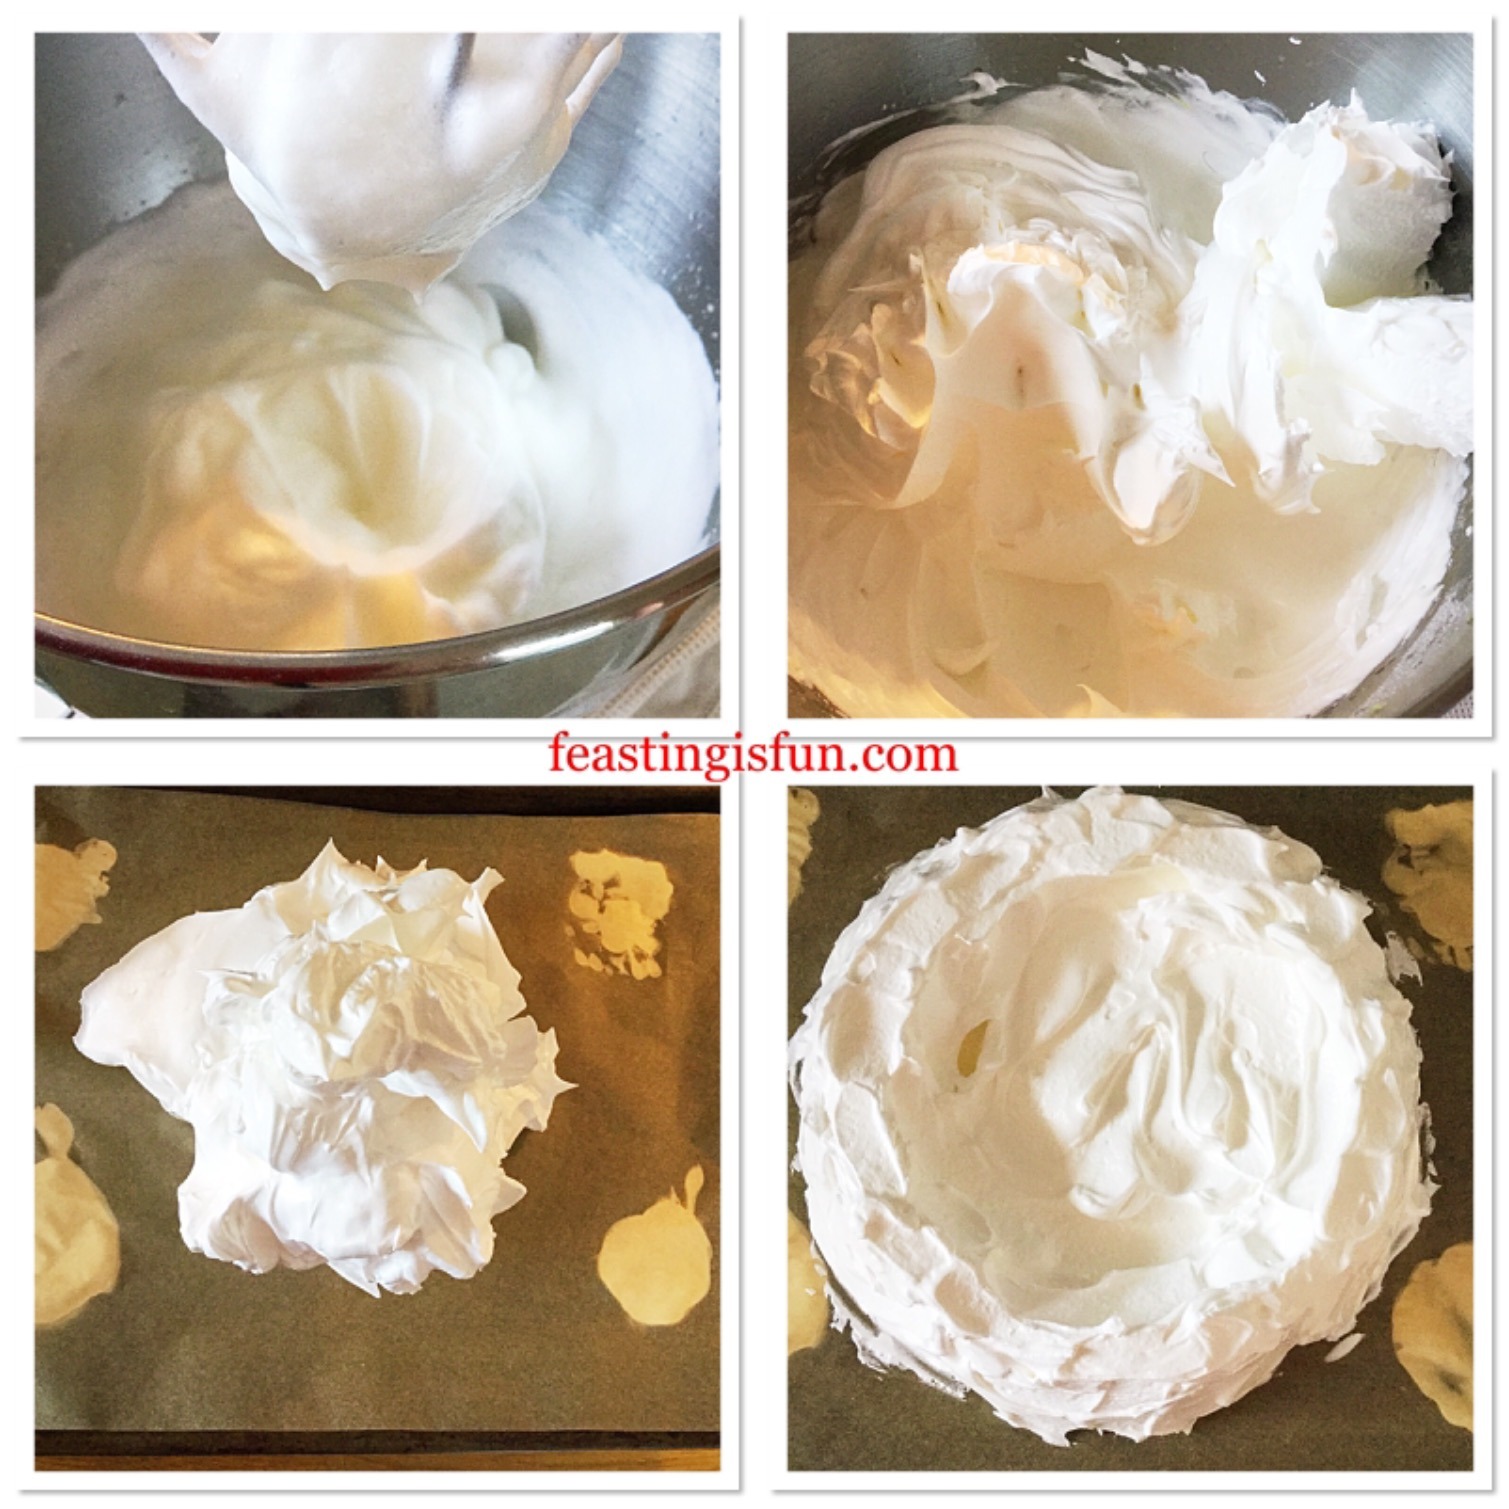
  • First of all draw an 8in/20cm circle on to a piece of baking parchment. Turn the paper over and place on to a baking tray.
  • Wipe around the inside of a very clean, large bowl with half a lemon.
  • Add four eggs white to the bowl and the juice of half a lemon.
  • Whisk the egg whites until they form a stiff peak.
  • Continue whisking on a medium speed, slowly adding one tablespoon of sugar at a time to the egg whites.
  • When all of the sugar is added the mixture should be thick and glossy. Rub a little of the meringue between your finger and thumb, if it feels gritty continue to whisk. Check again after a couple of minutes. As soon as it feels smooth and silky it is ready.
  • Remove a small amount of the meringue and use it as glue to stick the baking parchment to the baking tray.
  • Spoon the meringue mixture on to the baking parchment, inside the circle.
  • Use a palette knife to shape the meringue into a disc, building up the outside edge.

Making and shaping a meringue.

Baking the meringue:

  • Place the meringue into the centre of the oven and bake at the preheated temperature for 5 minutes.
  • Reduce the oven temperature to 120C/100C fan, 250F, gas mark 1/2 and continue to bake for 1 hour.
  • Do not open the oven during baking.
  • As soon as the baking time has elapsed turn off the oven and leave the meringue  to cool completely in the oven.
  • Once cooled remove the meringue from the oven.

Filling and decorating the Pavlova:

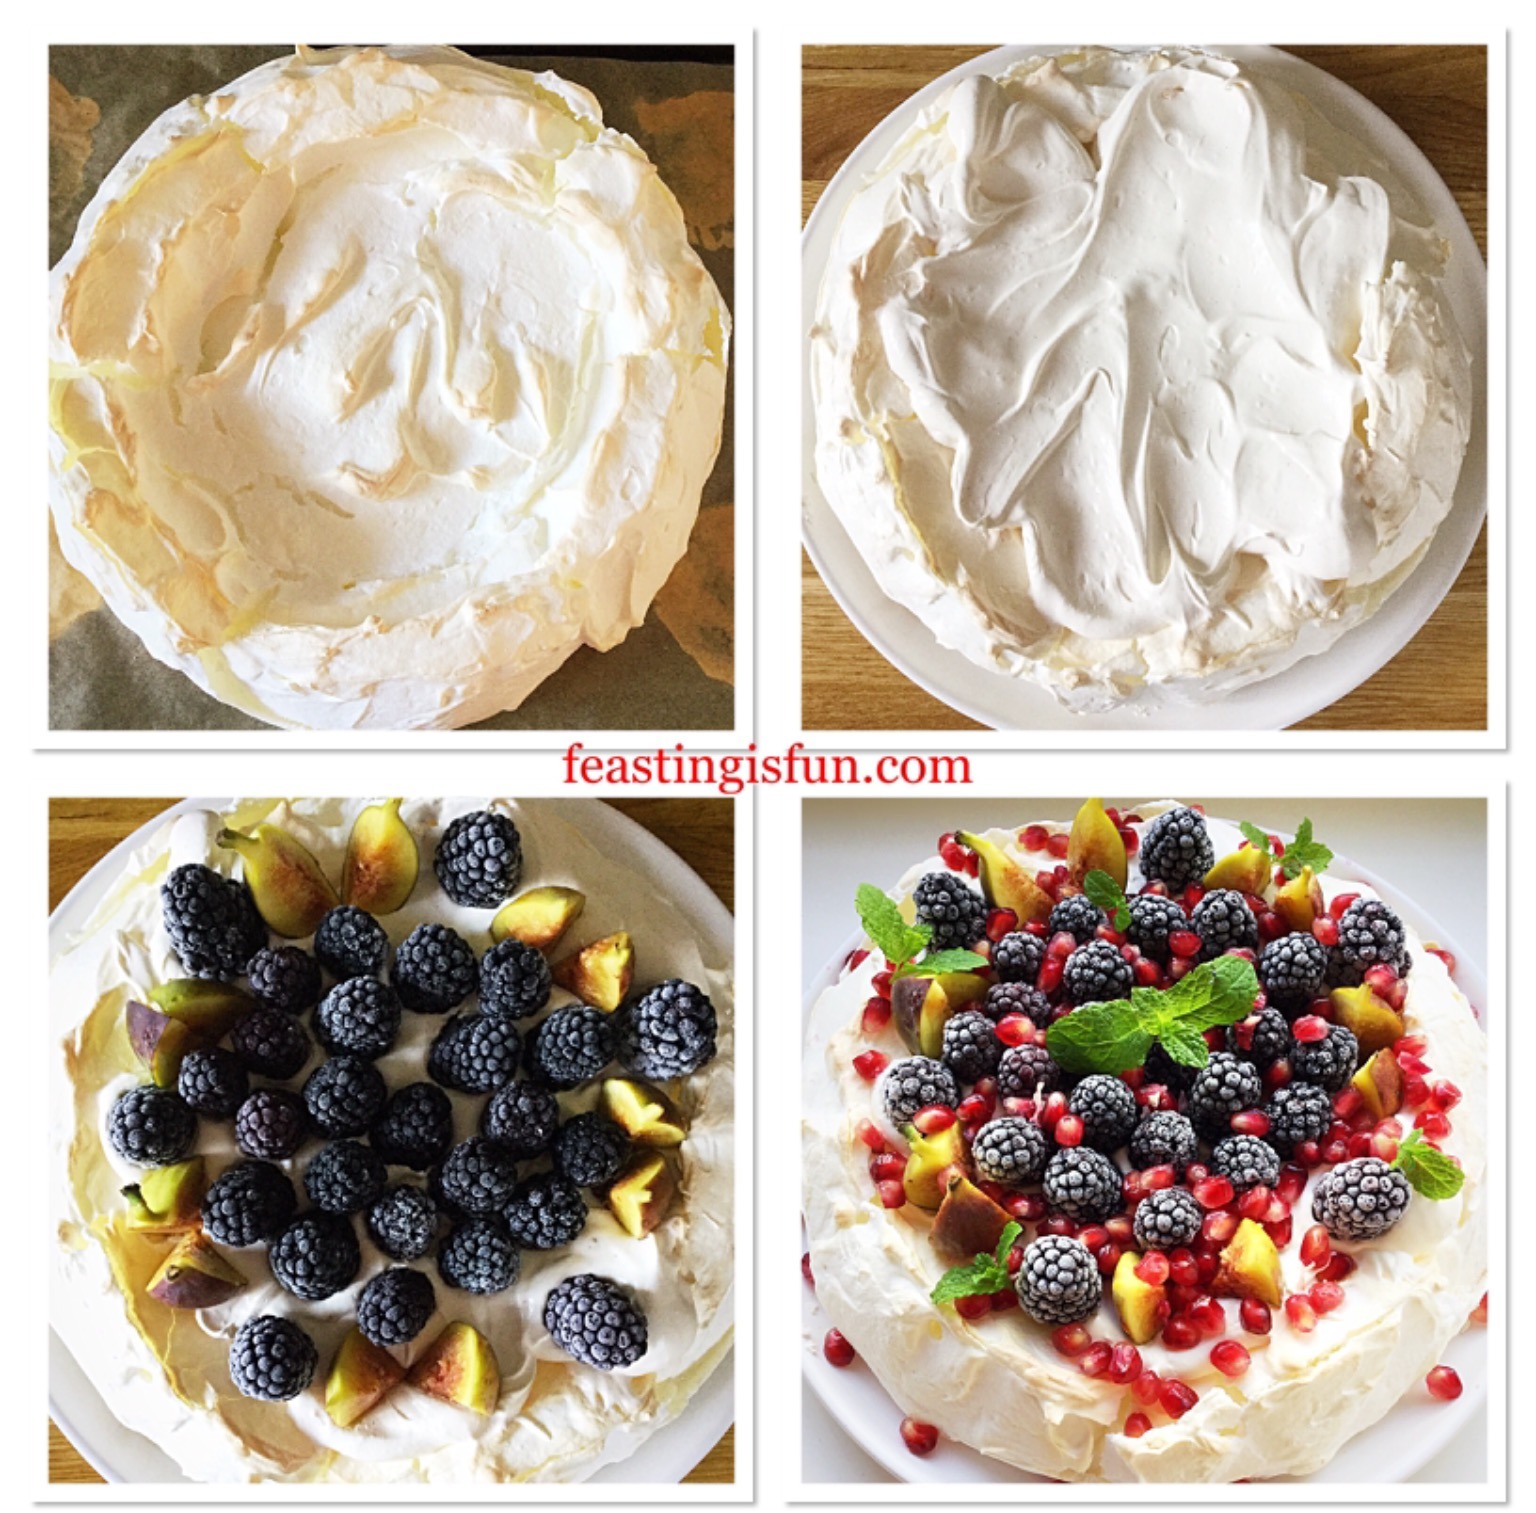
  • Pour the cream into a large bowl. Add the vanilla bean paste.
  • Whip the cream until it is thick but not stiff.
  • Carefully run a palette knife between the meringue and baking parchment.
  • Place the meringue on to a plate or cake stand.
  • Spoon the whipped cream on to the meringue.
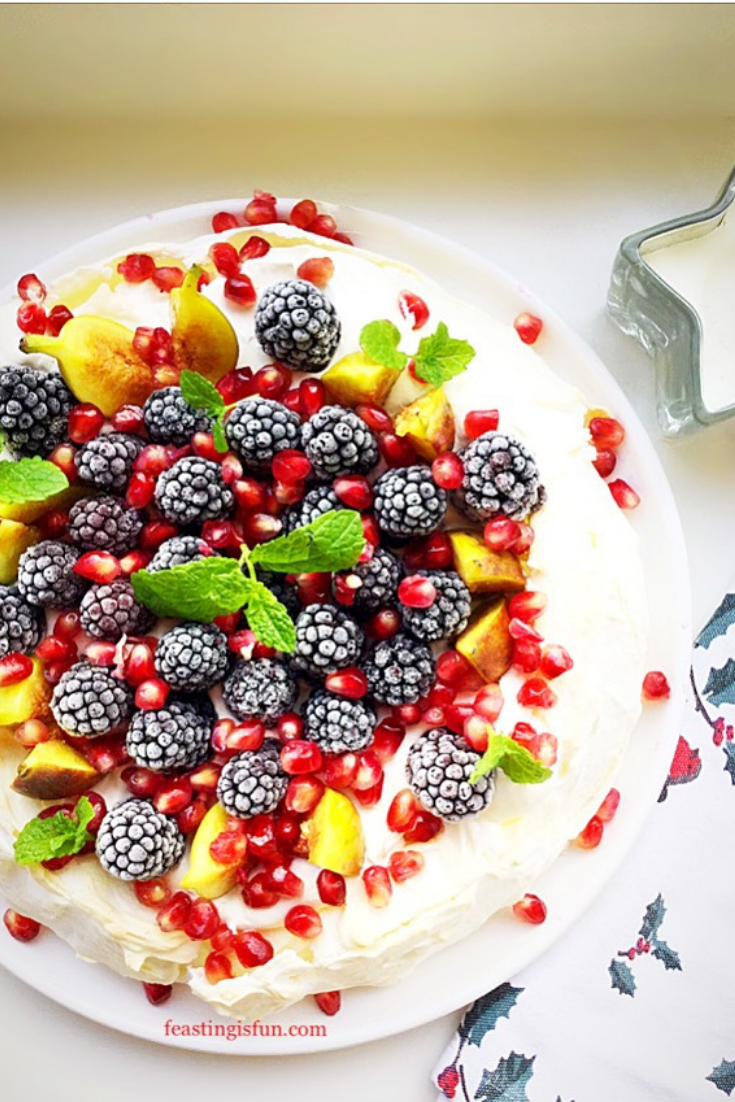
  • Add the figs and blackberries. Finally sprinkle over with pomegranate seeds.
  • Garnish with fresh mint.
  • Alternatively, sprinkle over a dusting of icing sugar to create an extra festive feel!

Filling and decorating a baked meringue.

Fill and decorate the Pavlova 1-2 hours prior to serving. So that the blackberries have time to defrost.

FF Winter Fruit Topped Pavlova
Winter Fruit Topped Pavlova

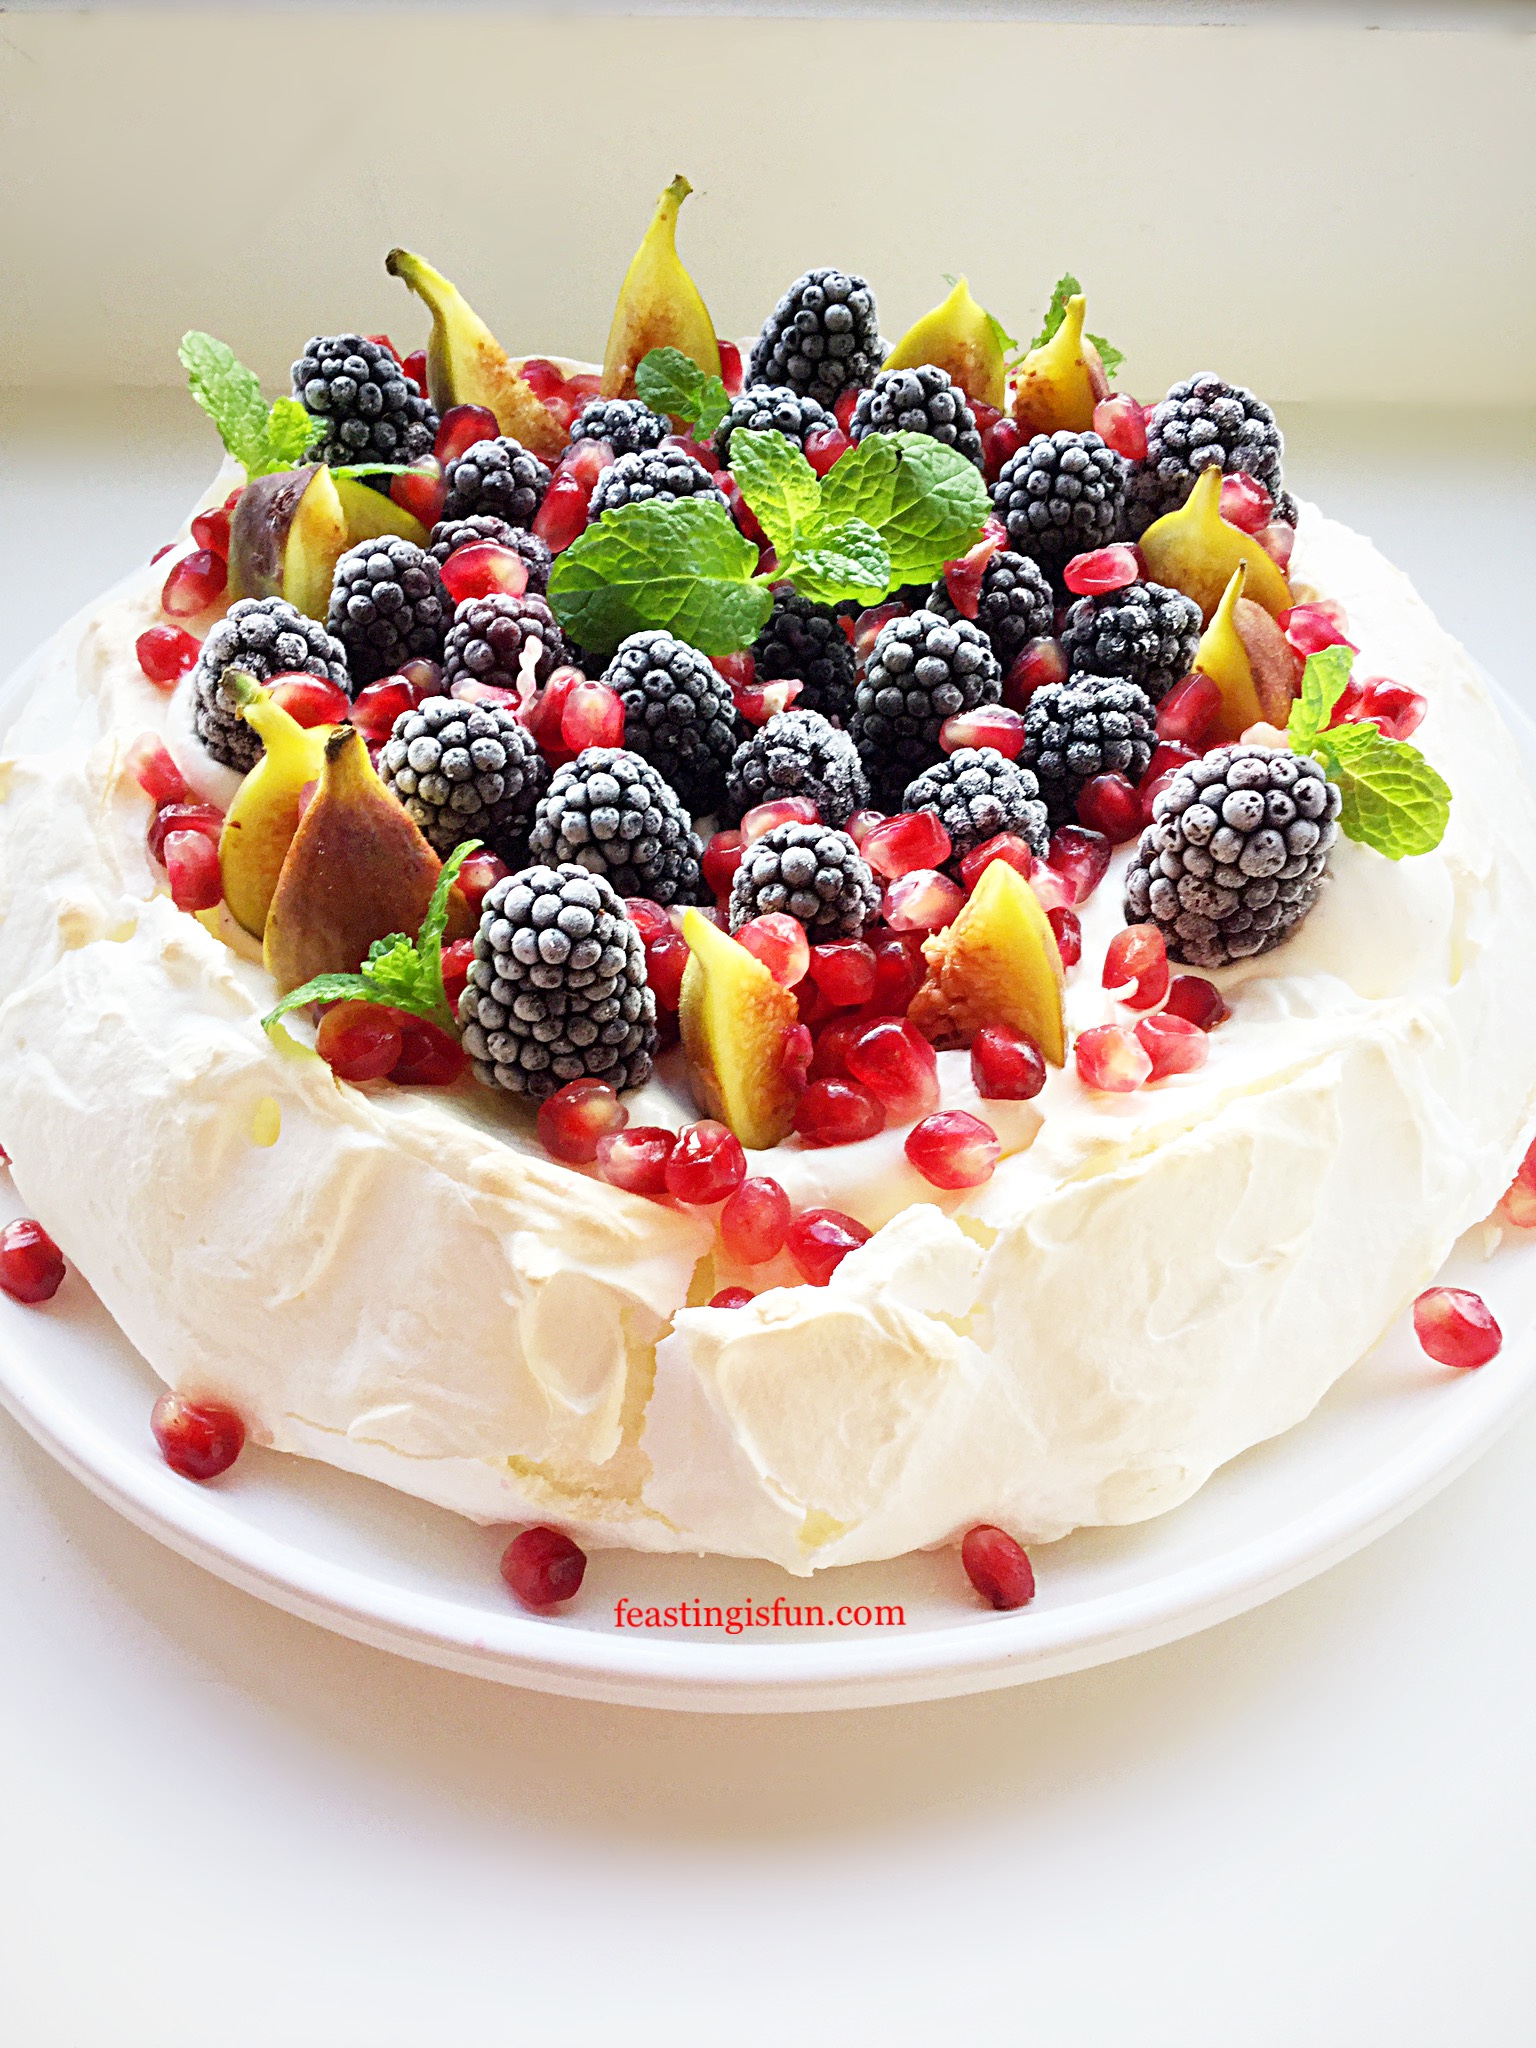
To serve, cut the Pavlova into slices and use a cake knife to transfer to a dessert plate.

The meringue pavlova base can be made a day in advance. After filling and decorating keep the Pavlova refrigerated and away from strong smells. The Pavlova will keep for up to 2 days in the fridge.

FF Winter Fruit Topped Pavlova

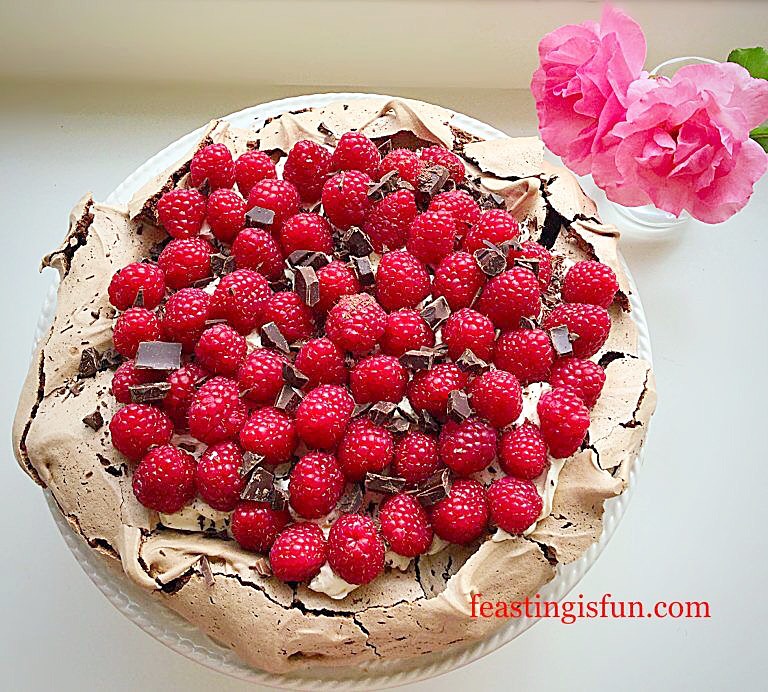
If you have enjoyed this recipe for Winter Fruit Topped Pavlova you may also like these:

Raspberry Chocolate Pavlova 

FF Winter Fruit Topped Pavlova
Raspberry Chocolate Pavlova

Blackberry Nectarine Tart 

FF Winter Fruit Topped Pavlova
Blackberry Nectarine Tart

Dark Chocolate Drizzle Pear Ginger Pavlova 

FF Winter Fruit Topped Pavlova
Dark Chocolate Drizzle Pear Ginger Pavlova

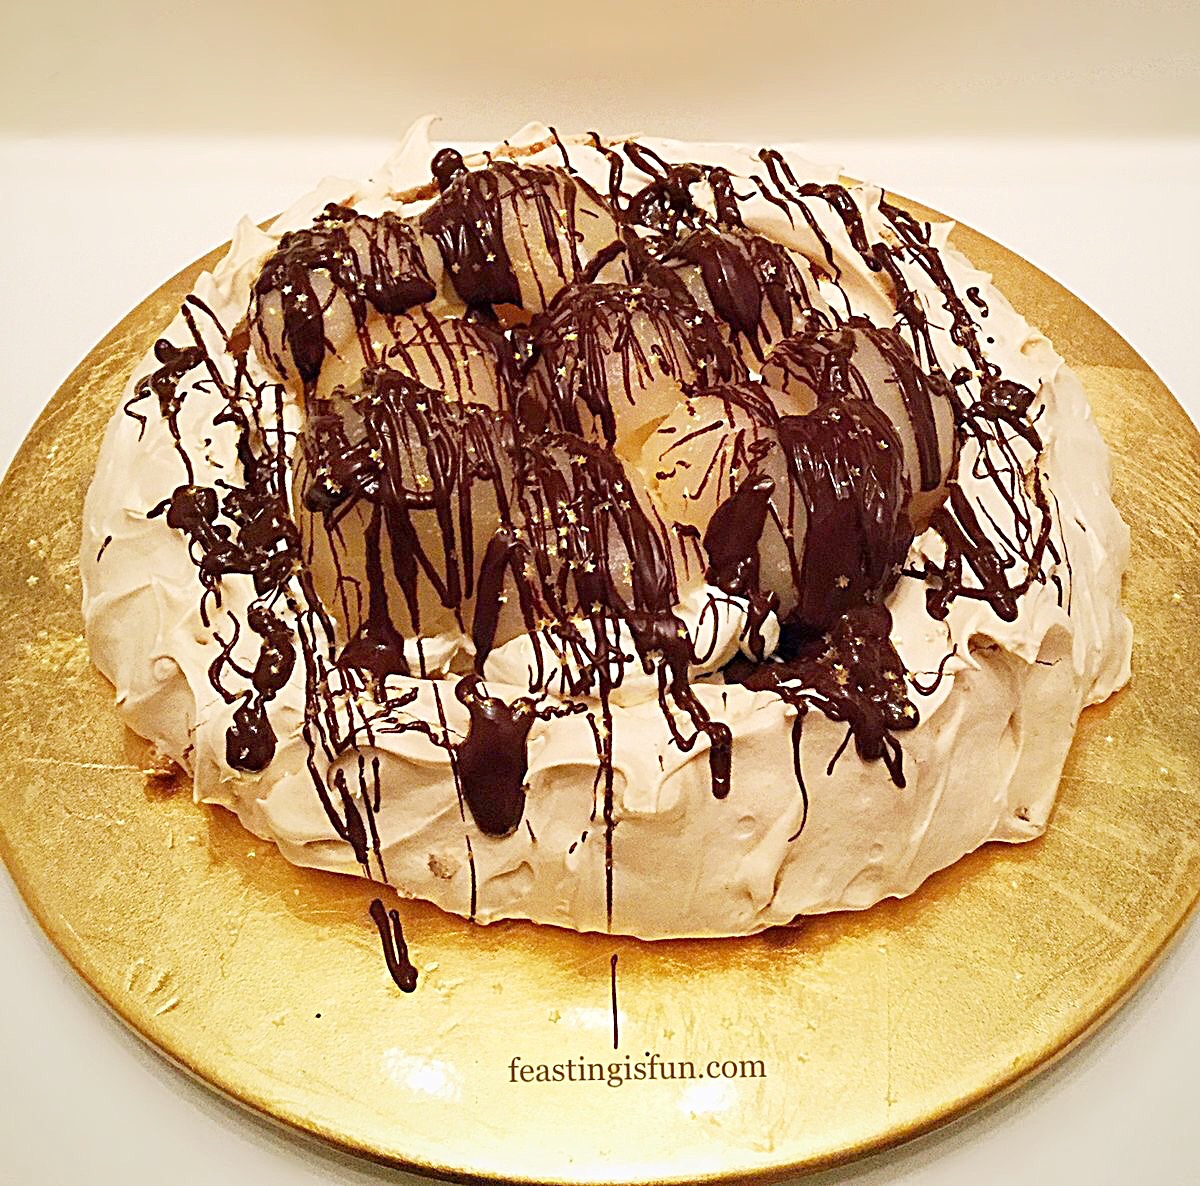
With a crisp outer shell and marshmallow centre Pavlovas are a delicious dessert. Since they can be filled with many different combinations of fruit they are perfect for using seasonal or frozen fruit. While this recipe uses a whipped cream filling, see my Raspberry Topped Lemon Curd Pavlova for an alternative filling. Also, all Pavlova recipes here on Feasting is Fun are gluten free (please see individual recipes for recommendations). As a result this dessert is a festive winter feast that more people can enjoy.

So, whatever you are making, baking and creating in your kitchens at this festive time, have fun preparing and sharing your feast.

Sammie xx

No part of this post may be reproduced or duplicated without the written permission of the owner. Please see my Disclosure Policy.

Christmas meringue dessert.


Share
Facebooktwitterpinterestlinkedintumblr

Peppermint Candy Cane Topped Brownies

Share
Facebooktwitterpinterestlinkedintumblr

Chocolate and Christmas go together like strawberries and cream in summer. Add in traditional candy canes and you have an incredible combination.  So using a fantastic Classic Brownie Kit makes baking these Peppermint Candy Cane Topped Brownies easy and a super delicious Christmas treat.  And don’t worry if you can’t get hold of the kit, there’s a link before the recipe to help you make them from scratch.

FF Peppermint Candy Cane Topped Brownies
Peppermint Candy Cane Topped Brownies

While I enjoy baking from scratch, I am not averse to keeping good quality mixes and baking kits in the kitchen.  Using the Classic Brownie Kit to whip up a batch of Brownies, makes the house smell amazing. Also, adding extra mint chocolate chunks and a topping of crushed candy cane turns these into a festive treat. Especially handy during the busy Christmas holiday season.

FF Peppermint Candy Cane Topped Brownies
Peppermint Candy Cane Topped Brownies

As soon as you bite into these rich chocolate brownies a range of textures hits your mouth.  Soft fudgey chocolate brownie, crisp mint chocolate chunks, chewy crushed candy cane all blend together to create a flavour sensation.  Perfect for a quick bake when unexpected guests arrive.  Welcoming them in with the aroma of baking chocolate. Is there anything better?

Close up of broken candy cane on top of a chocolate drizzled brownie.
Peppermint Candy Cane Topped Brownies

Everything you need to bake delicious Brownies is included in the kit.  Yet, if you are unable to get hold of the Classic Brownie Kit then please use the recipe for Chocolate Fudge Brownie Bites.  Either halve the recipe, or double the quantity of candy canes, chocolate drizzle and mint chocolate.

Recipe: Peppermint Candy Cane Topped Brownies makes 9

Classic Brownie Kit available from If I Knew You Were Comingalternatively use the brownie recipe for my Chocolate Fudge Brownie Bites *follow the ingredient list and tin size for * recipe. You will make more brownies

2 Large Free Range Eggs

115g/4.5oz Unsalted Butter softened at room temperature

50g/2oz Dark Mint Chocolate chopped into chunks – I use                                                                          Elizabeth Shaw Dark Mint Chocolates

100g/4oz Milk Chocolate

2 Peppermint Candy Canes

Method: Preheat oven to 200C/180C fan, gas mark 6, 400F.

Making The Brownie Batter

  • First of all set out the baking tin included in the kit and place on to a baking tray.  Alternatively line a 9” x 9” square tin with aluminium foil.
  • Place the chocolate and butter in a heatproof microwaveable bowl and heat on medium powder until just melted. Stir until completely liquid and set to one side to cool.
  • Whisk the eggs and sugar together until fully combined.
  • Pour the eggs slowly into the cooled chocolate mixture and stir to incorporate.
  • Sieve the cocoa and flour into the chocolate/egg mix and fold in until just combined.
FF Peppermint Candy Cane Topped Brownies
Making the Brownie batter.
  • Pour the thick, chocolate, brownie batter into the prepared baking tin.
  • Scatter over the chocolate chips from the kit and the mint chocolate chunks.

Baking The Peppermint Brownies

  • Place the Brownies into the centre of the preheated oven and bake for 15 – 20 minutes.
  • The Brownies are baked when the top is set and shiny with a slight crackle. There should be a very slight jiggle in the centre.
  • Once baked remove from the oven and allow to cool completely.
  • As soon as the Brownies are cooled peel away the foil.  Cut into 9 even sized squares and place on a cooling rack, spaced well apart.
FF Peppermint Candy Cane Topped Brownies
Making, baking and cutting the brownies.

Decorating The Candy Cane Brownies

  • Melt the milk chocolate for drizzling in the microwave and transfer to a small, disposable piping bag.  Alternatively use a plastic zip lock bag and cut one corner off, leaving a small hole.
  • Take the candy canes and place in a small plastic bag.  Place on to a solid surface and use a rolling pin to break the canes into small pieces.
  • Drizzle melted chocolate over each individual brownie, then sprinkle over some crushed candy cane.
FF Peppermint Candy Cane Topped Brownies
Finishing the Peppermint Candy Cane Topped Brownies

Serve straight away, while the chocolate drizzle is still gooey.  Leave to set before storing in an airtight container.  Eat within 5 days.

Brownie Pinterest image with descriptive graphs.

If you have enjoyed this recipe for Peppermint Candy Cane Topped Brownies then you may also like these:

Dark Chocolate Ginger Brownies

FF Peppermint Candy Cane Topped Brownies
Dark Chocolate Ginger Brownies

Peppermint Sparkling Snowflake Cookies

FF Peppermint Candy Cane Topped Brownies
Peppermint Sparkling Snowflake Cookies

Chocolate Christmas Pudding Cupcakes

FF Peppermint Candy Cane Topped Brownies
Chocolate Christmas Pudding Cookies

Baking should be fun and not stressful. So having some reliable mixes and baking kits in the kitchen cupboard, especially during extra busy times of the year such as Christmas, simply makes sense. Also they make great presents for those who are just learning to bake. As well as being reliable the Complete Brownie Kit is also versatile see my recipe for Chocolate Brownie Raspberry Cheesecake.

So, whatever you are making, baking and creating in your kitchens, have fun preparing your feast.

Sammie xx

If I Knew You Were Coming provided the Complete Brownie Kit for me to make this recipe. I have not been paid to write this post. All content, opinions and photography are my own. No part of this post may be reproduced or duplicated without the written permission of the owner. Please see my Disclosure Policy.

Festive mint chocolate baked squares on a slate platter surrounded with silver tinsel
Peppermint Candy Cane Topped Brownies
Share
Facebooktwitterpinterestlinkedintumblr