Here on Feasting is Fun we encourage sharing. Whether it be bakes freshly made in our kitchens, or inviting friends and neighbours round for a cup of tea and a natter. As part of this I get asked by different companies to review products or produce. Resulting in me getting to share with you, my lovely readers, great products that really do earn their place in the kitchen. Today I share with you the Elizabeth Harris Perfect Cupcake Decorating Kit Review.
Elizabeth Harris learned to bake when she was young, in her Mum’s kitchen. Her love and passion deveolped over the years and she is now renowned for making bespoke cakes for every occasion. Developing her own product range, including the Perfect Cupcake Decorating Kit, is a step further to equipping and teaching others how they too can create stunning cakes.
Few people have the luxury of large kitchens with empty cupboards waiting to be filled. Items that take up valuable storage space need to earn their place. Everything needed, except for ingredients, to decorate a cupcake is contained within the sturdy, neat tin. First impression when handling the tin and it’s contents is of quality as well as a beautiful design.
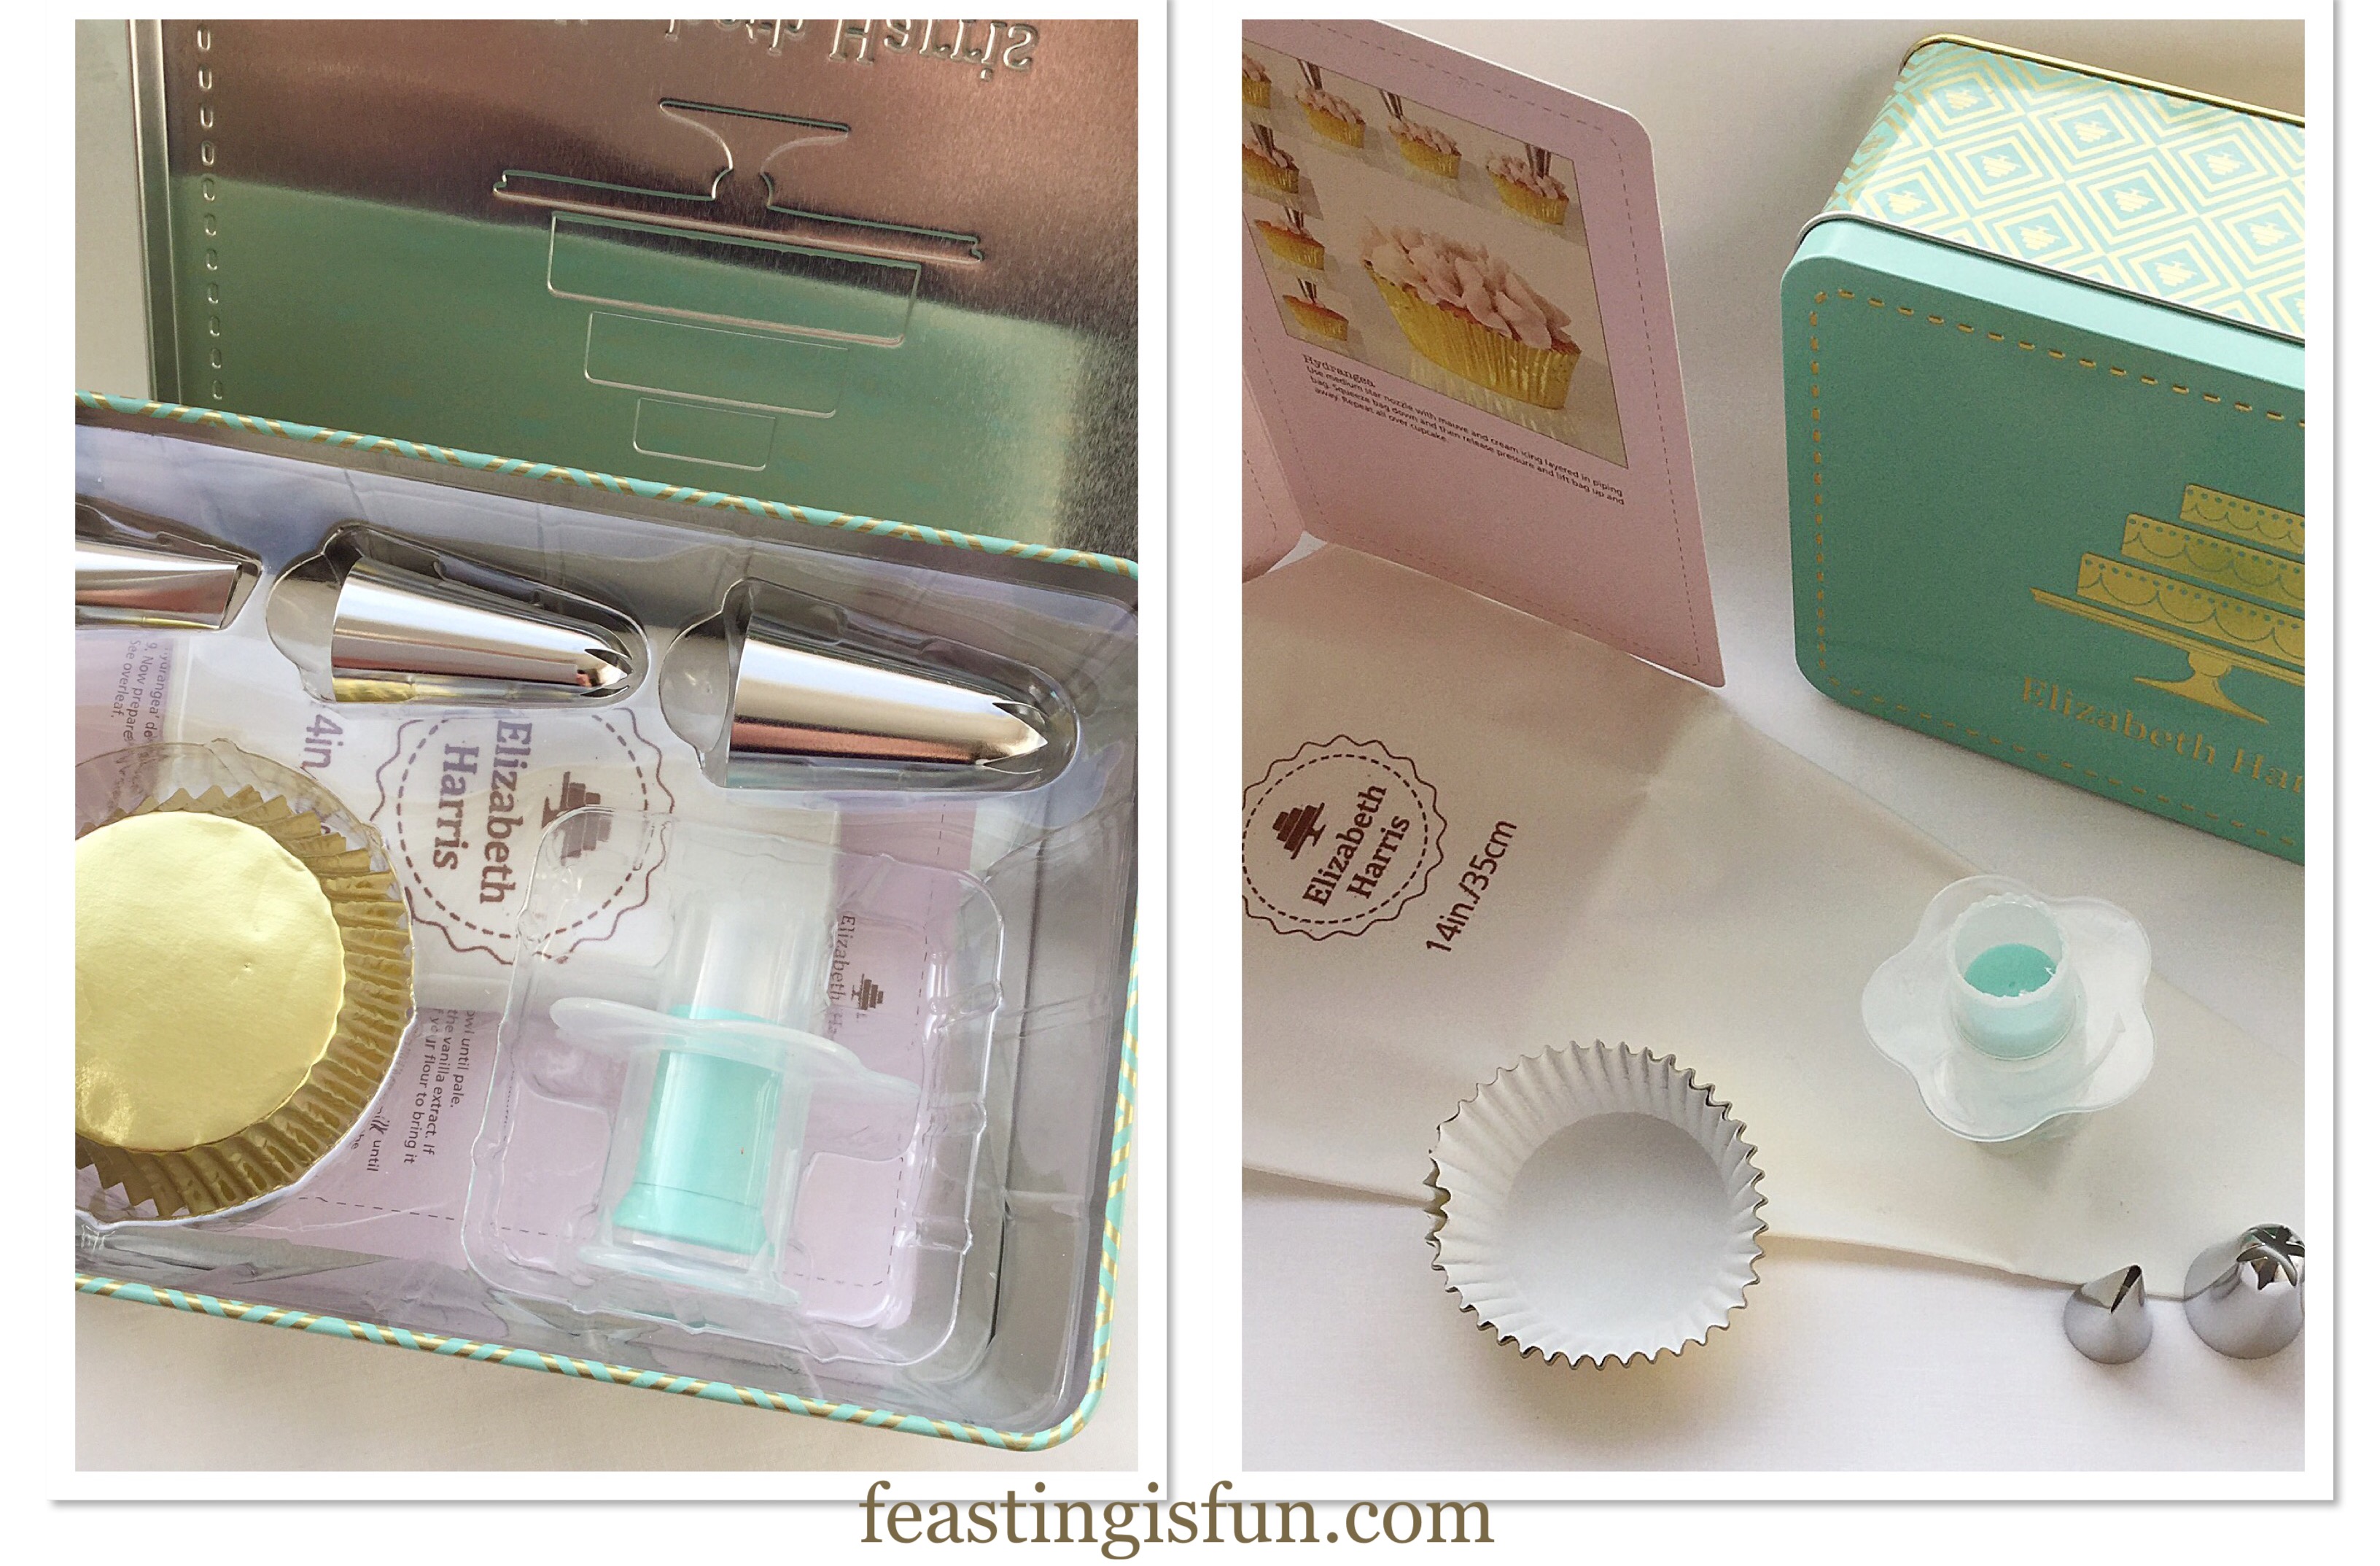
Neatly packaged within the tin are the following items:
- 12 cupcake cases.
- 3 piping nozzles of different sizes and shapes.
- Cupcake corer, used to remove the centre of a cupcake so that it can be filled.
- Sturdy 14in/35cm reusable piping bag.
- Splatter proof, fully comprehensive instruction guide, including basic cupcake and buttercream recipe. Also step-by-step photographs showing how to achieve 3 different cupcake decorations.
Since the instruction guide provides a reliable cupcake and buttercream recipe, it is ideal for those who are just learning to bake. Likewise, the quality of the nozzles and variety of decorating designs is perfect for both the inexperienced and more proficient cake decorator. A washable reusable piping bag not only helps the environment, but also saves money on buying their disposable counterparts. Finally the addition of a cupcake corer allows the baker to fill the cupcake with a sweet surprise.
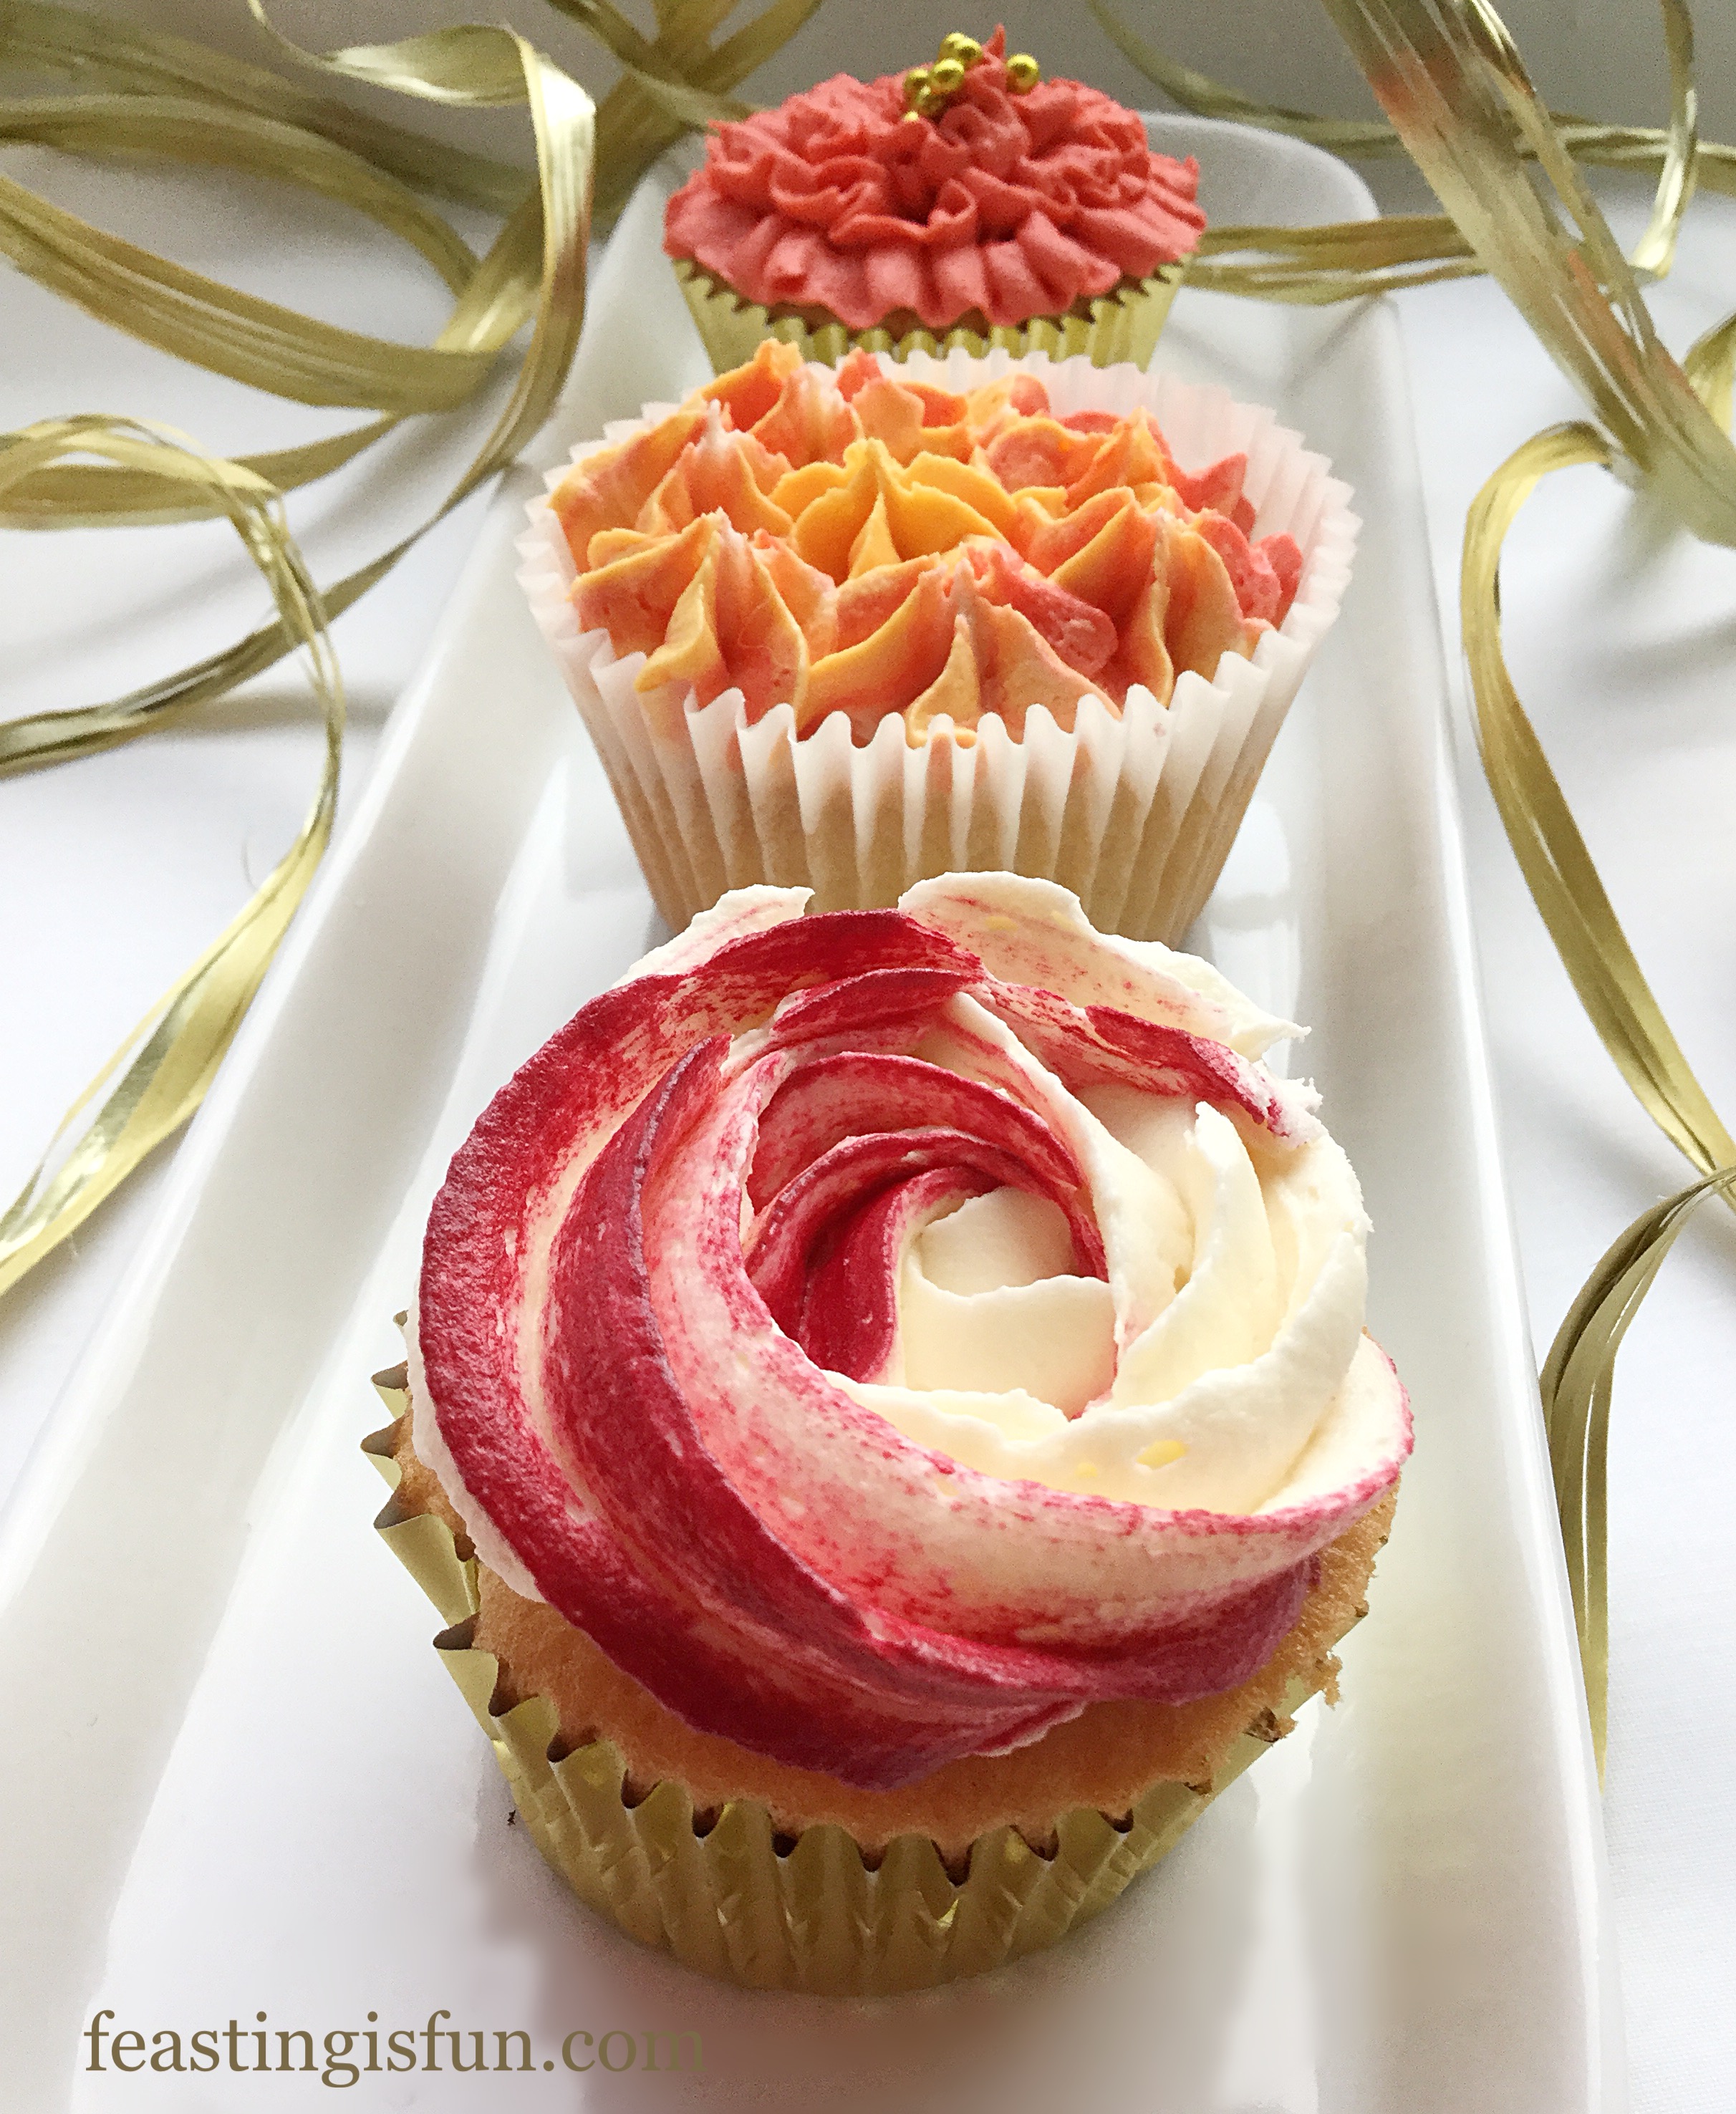
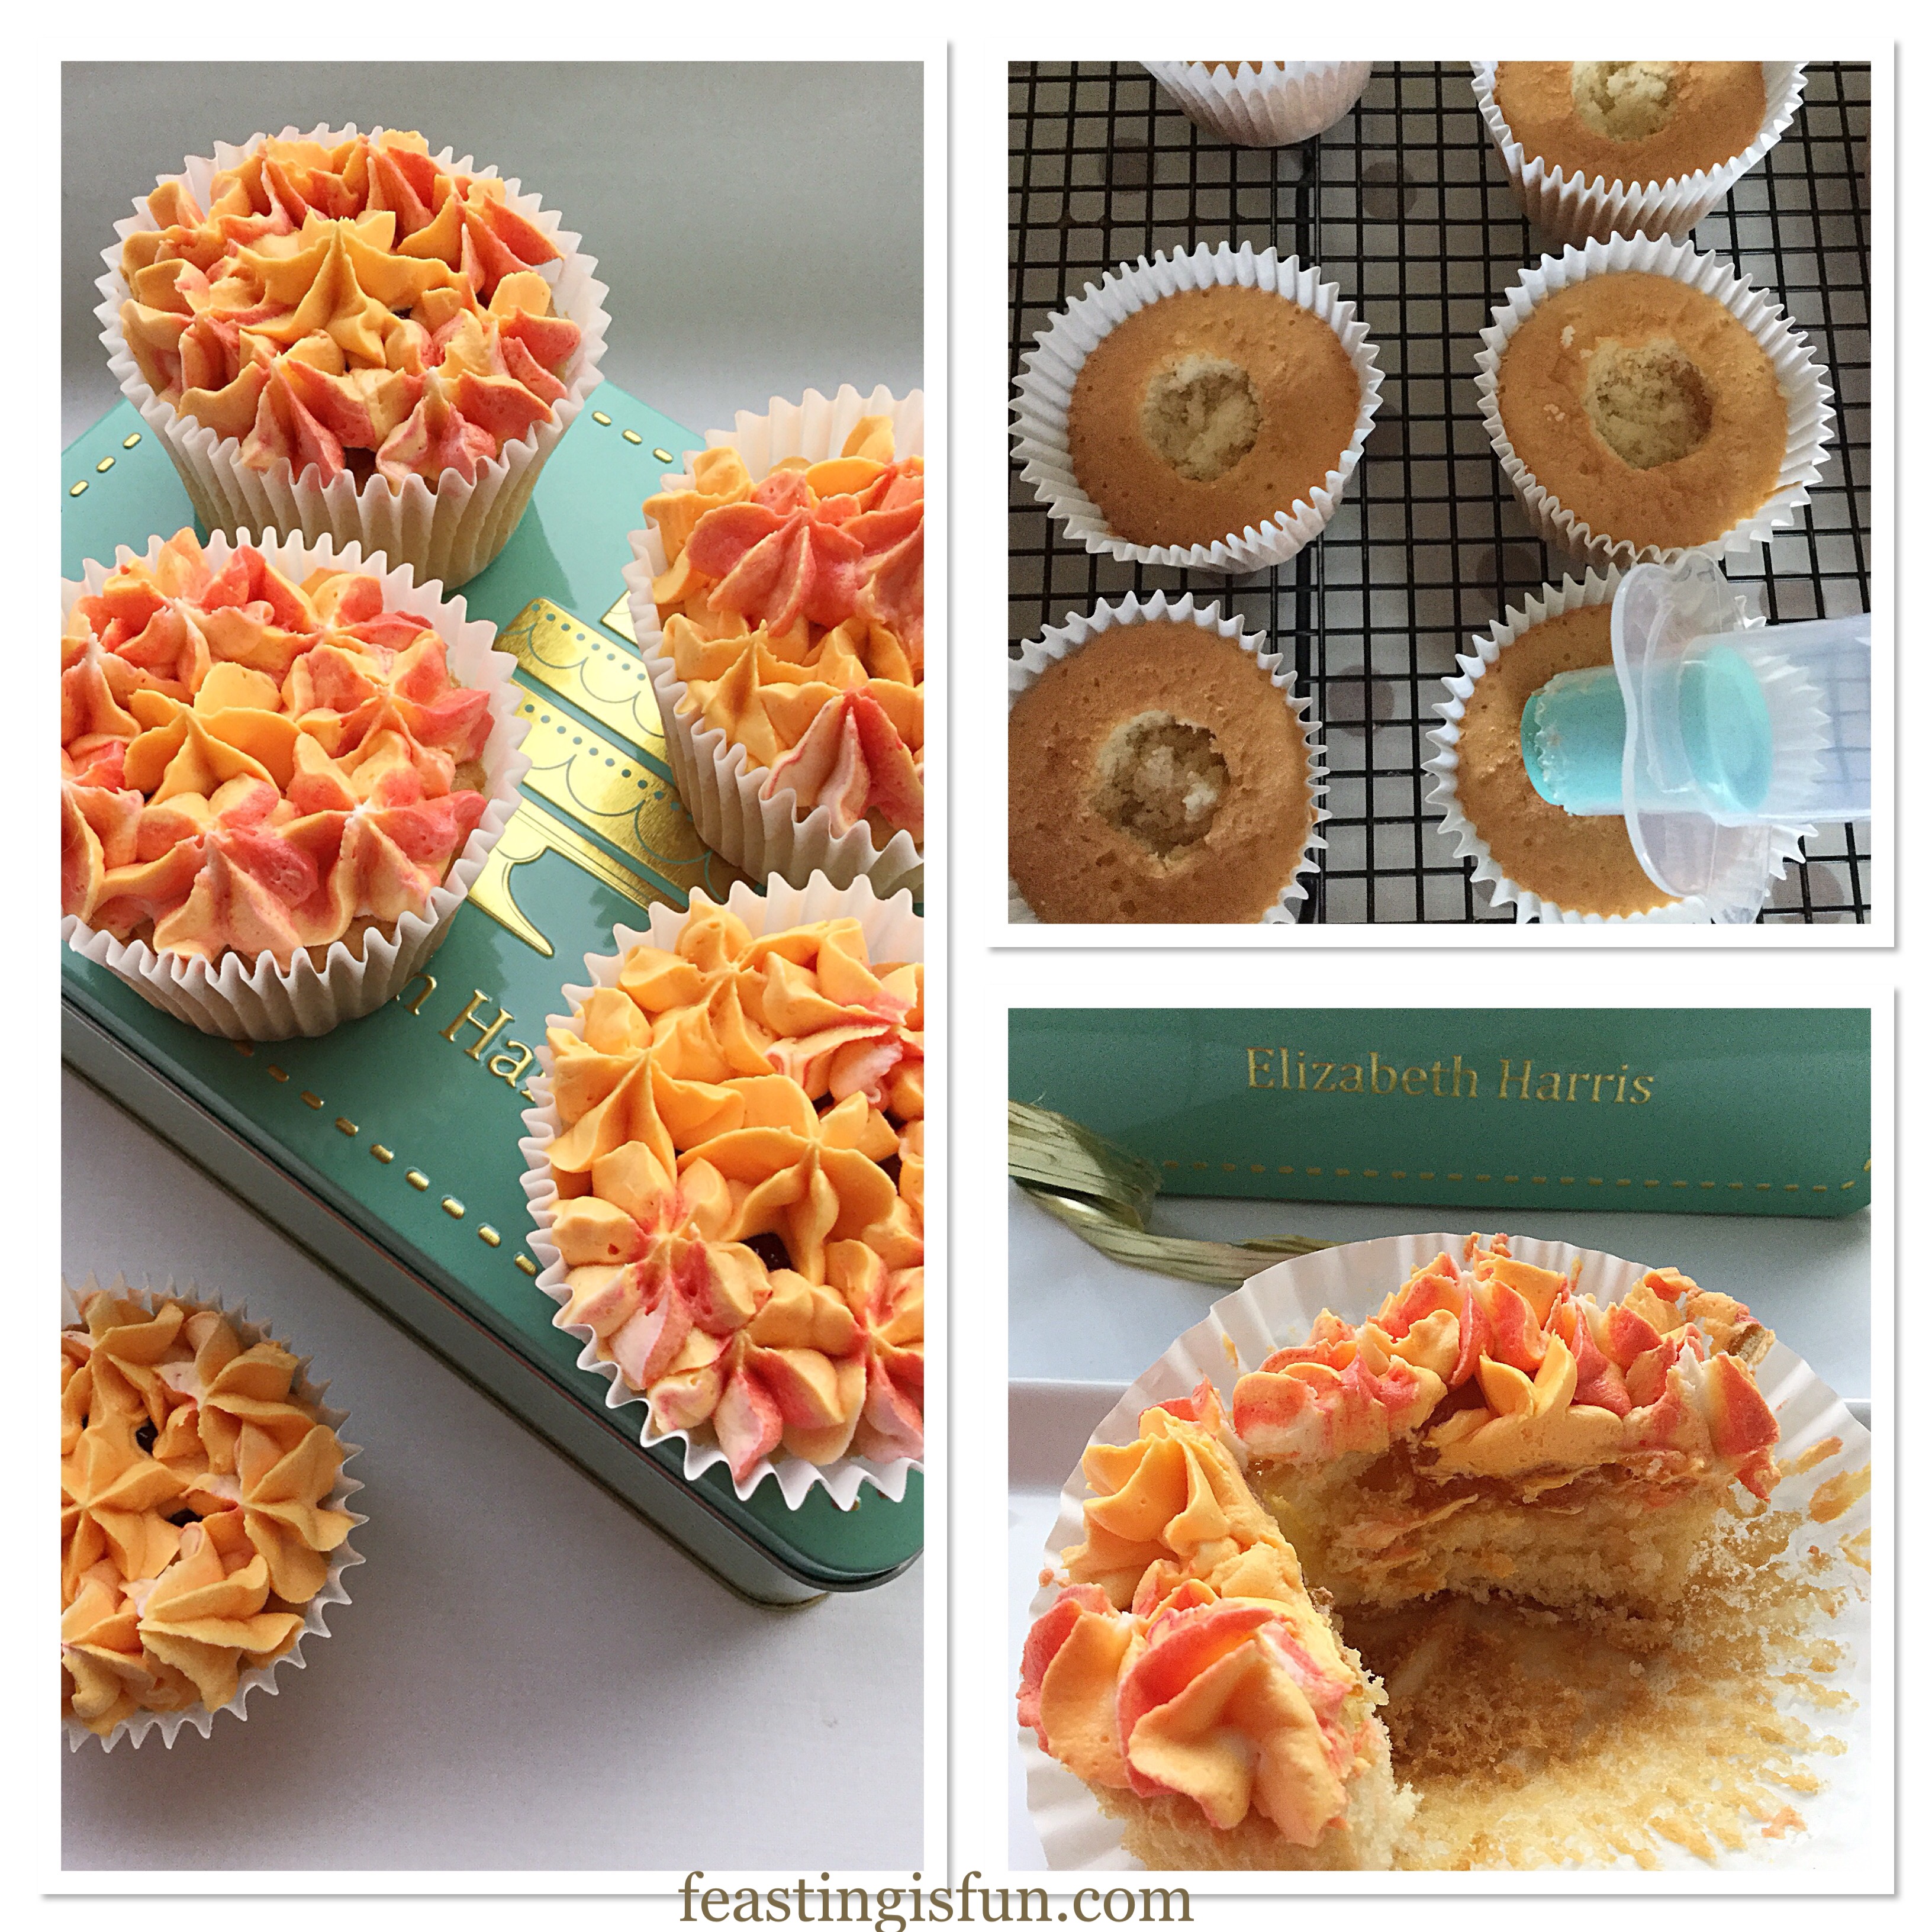
While reviewing the kit, the basic cupcake recipe included in the instruction guide was used. Three different flavoured cupcakes were made. Vanilla, rose and lemon and peach with an apricot jam filling. Flavour extracts were used for the cake batter and food colours for the buttercream. The recommended buttercream recipe was also used.
Recipe used from the instruction leaflet. Makes 12 cupcakes.
- 110g/4oz Butter softened at room temperature
- 110g/4oz Caster Sugar
- 1/8tsp Salt – added as unsalted butter was used
- 2 Free Range Eggs – I use large – lightly beaten
- 1tsp Vanilla Extract – I use Nielsen-Massey
- 110g/4oz Self Raising Flour
- 1-2tbsp Milk
- Optional 1/4tsp each Lemon and Rose extract. Also available from Nielsen-Massey
- Optional 15 drops Peach flavouring available from – Foodie Flavours. Apricot Jam for the hidden filling.
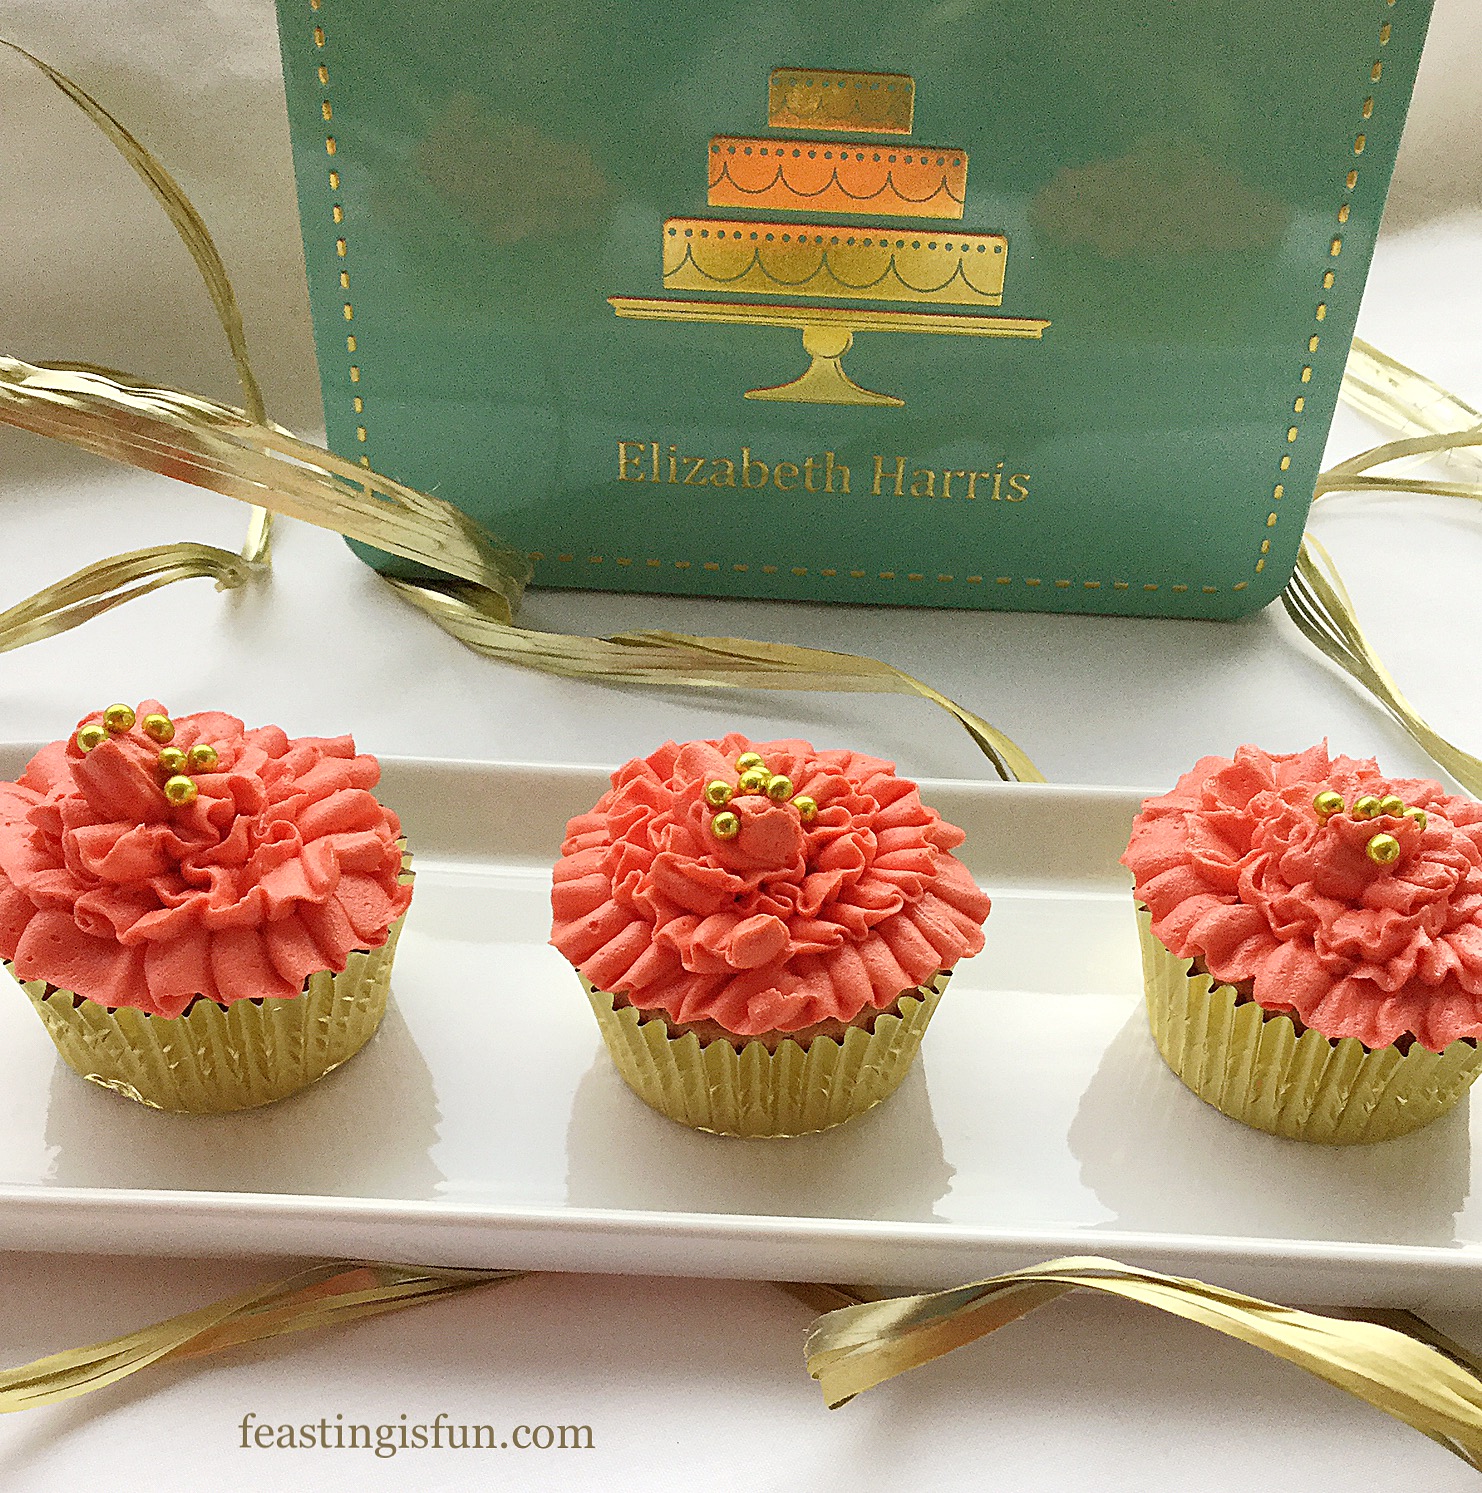
- Gold Sugar Balls
Method: followed from the instructions given.
Preheat oven to 180C/160C fan, 350F, gas mark 4.
- Line a muffin tin with 12 cupcake cases.
- Cream together the butter, salt and sugar in a bowl, until pale.
- Add 1tbsp of flour, vanilla extract and slowly beat in the eggs to the mixture.
- If using flavourings add and beat into the mix.
- Gently fold in the remaining flour, adding 1-2tbsp milk until the cake batter just drops from a spoon (dropping consistency).
- Spoon the cake batter to half fill each cupcake case.
- Place the muffin tin in the centre of the oven and bake for 10-15 minutes.
- The cupcakes are baked when they are golden in colour and an inserted cocktail stick comes out clean. As soon as the cupcakes are baked remove from the oven.
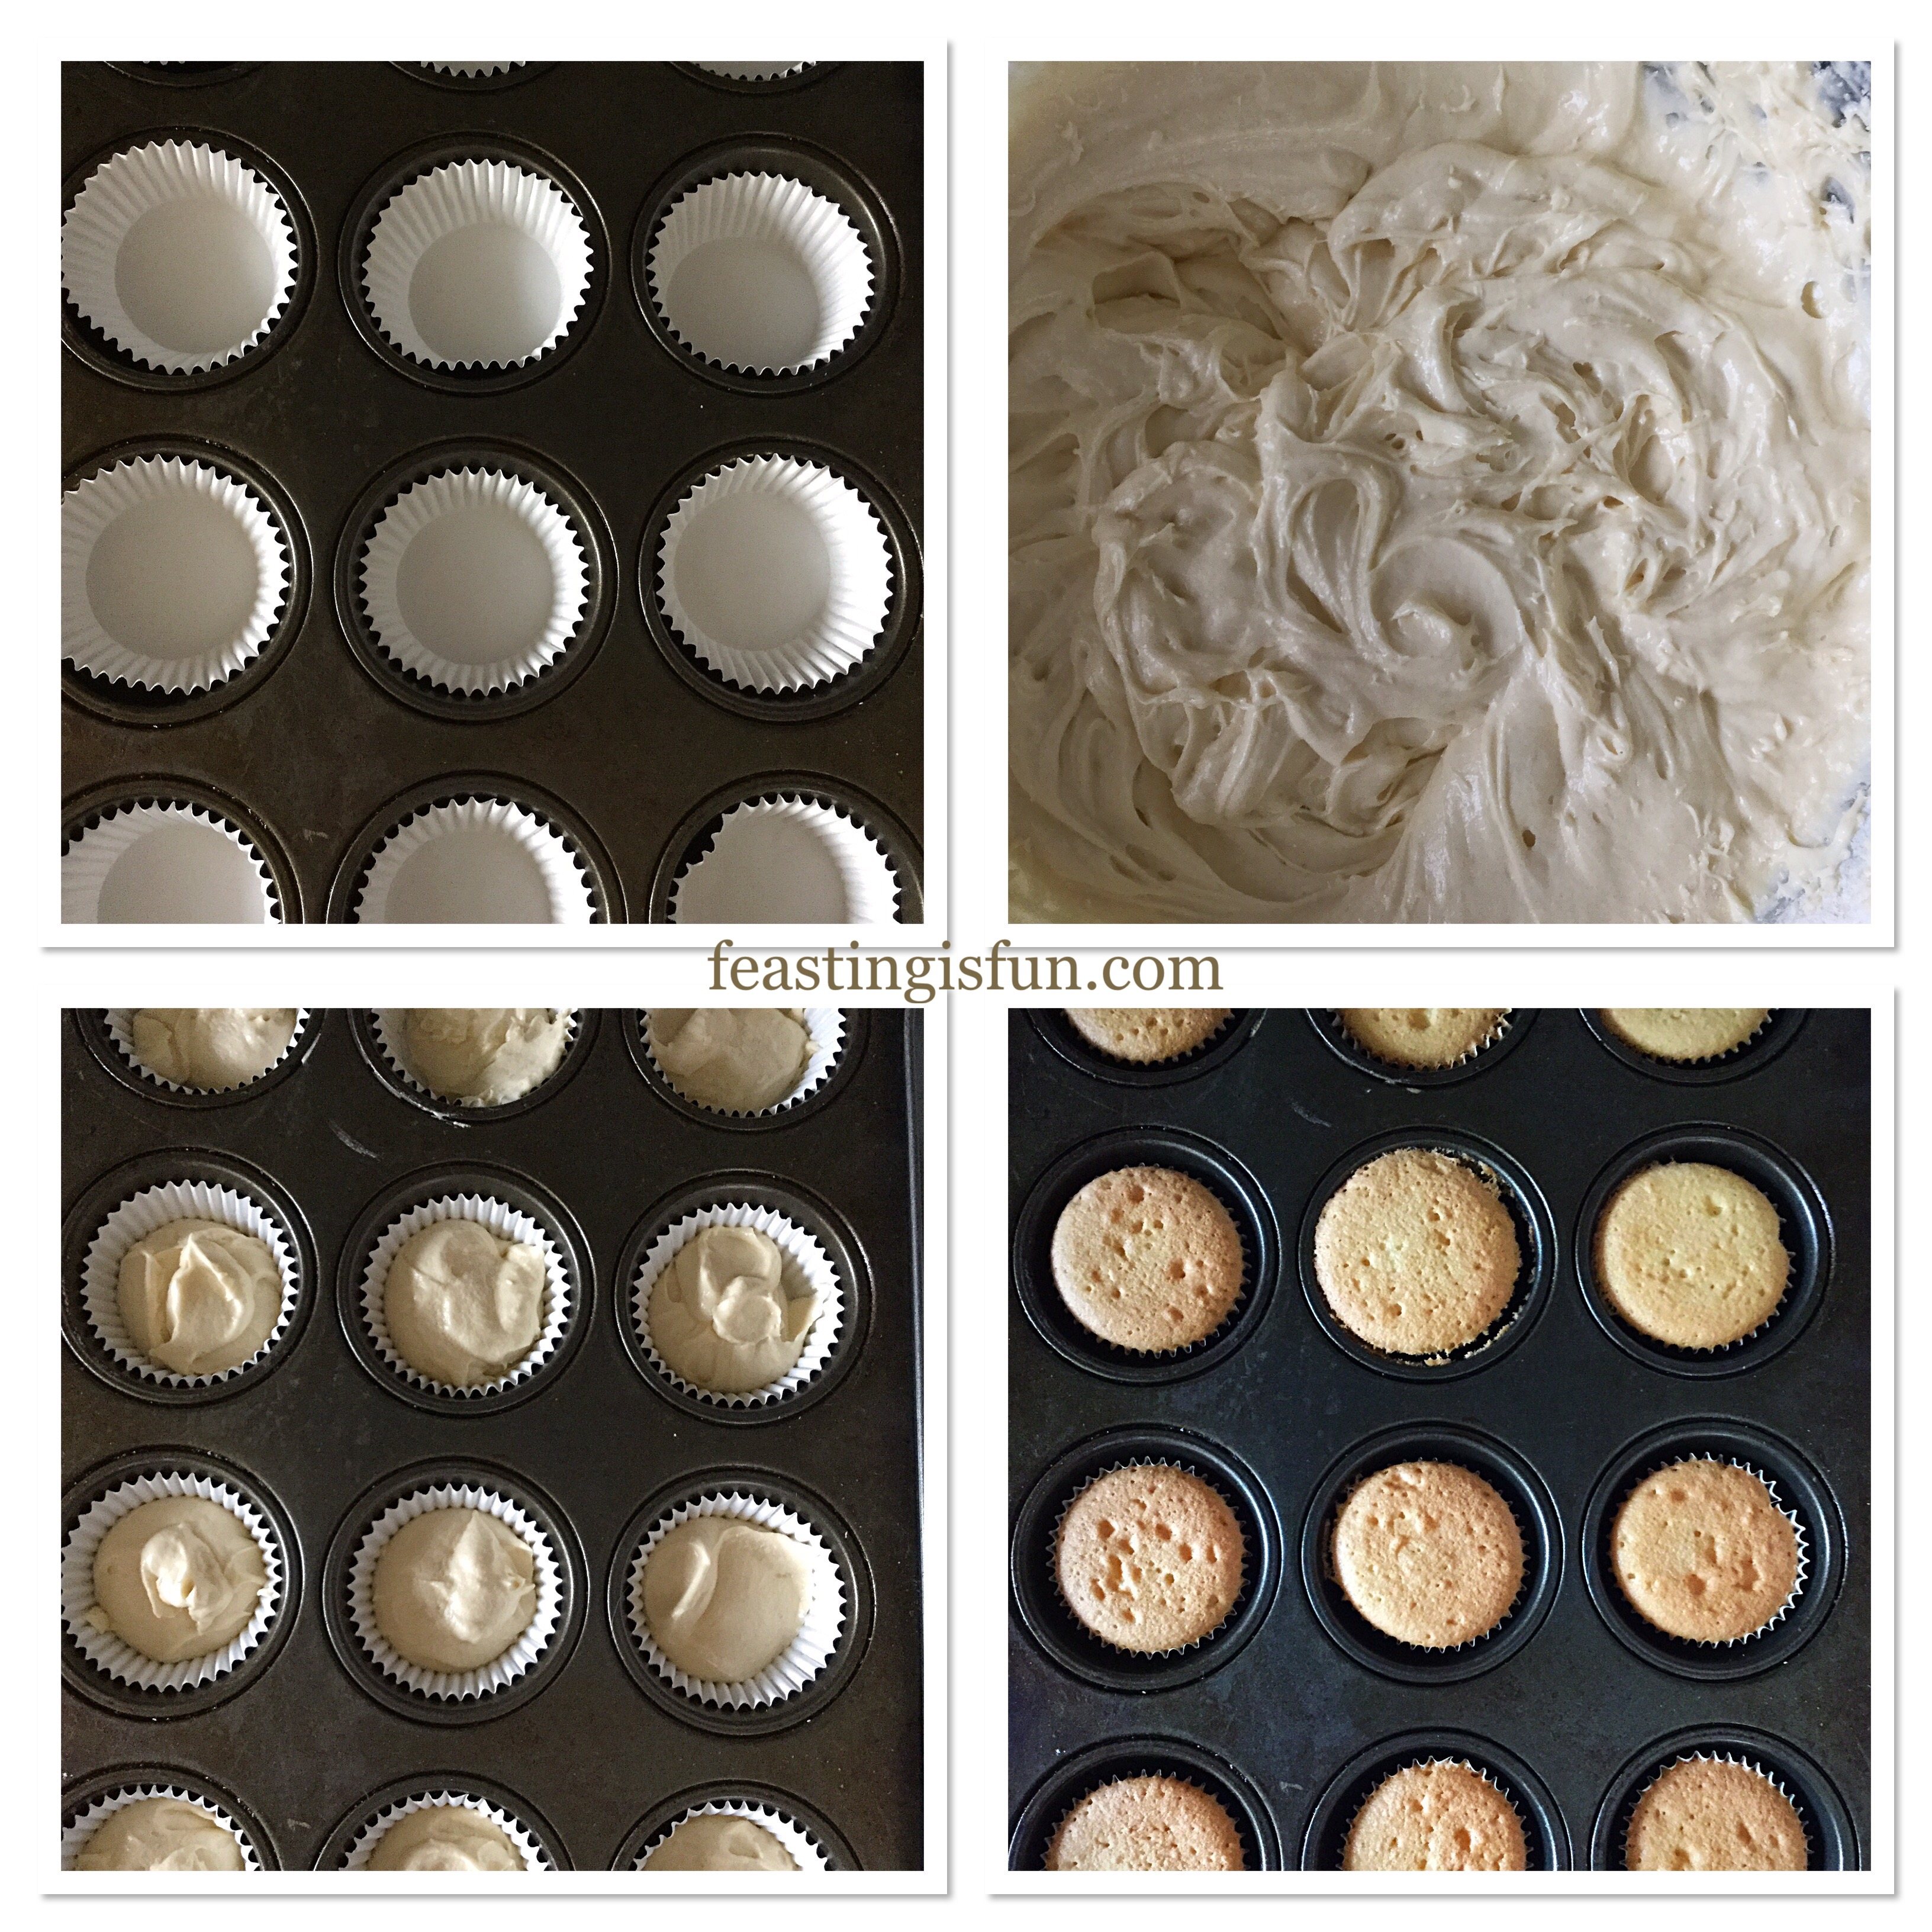
- Allow the cupcakes to cool for 10 minutes in the tin then remove and place on a cooling rack to completely cool.
- For apricot jam filled peach cupcakes, once cool, place the cupcake corer on to the centre of the cupcake. Twist until the corer touches the top of cupcake. Remove and add 1/2tsp of jam. Press the top of the corer and the cake plug will be released. Place on top of the jam filled cupcake. Continue until each cupcake is filled.
- Proceed to pipe a hydrangea pattern, using the medium star nozzle, as detailed in the instructions. See below for buttercream recipe.
Making the buttercream:
- 140g/5oz Butter softened
- 280g/10oz White Icing Sugar
- 1-2tbsp Milk
- Food Colouring – I used gel colours available from Wilton
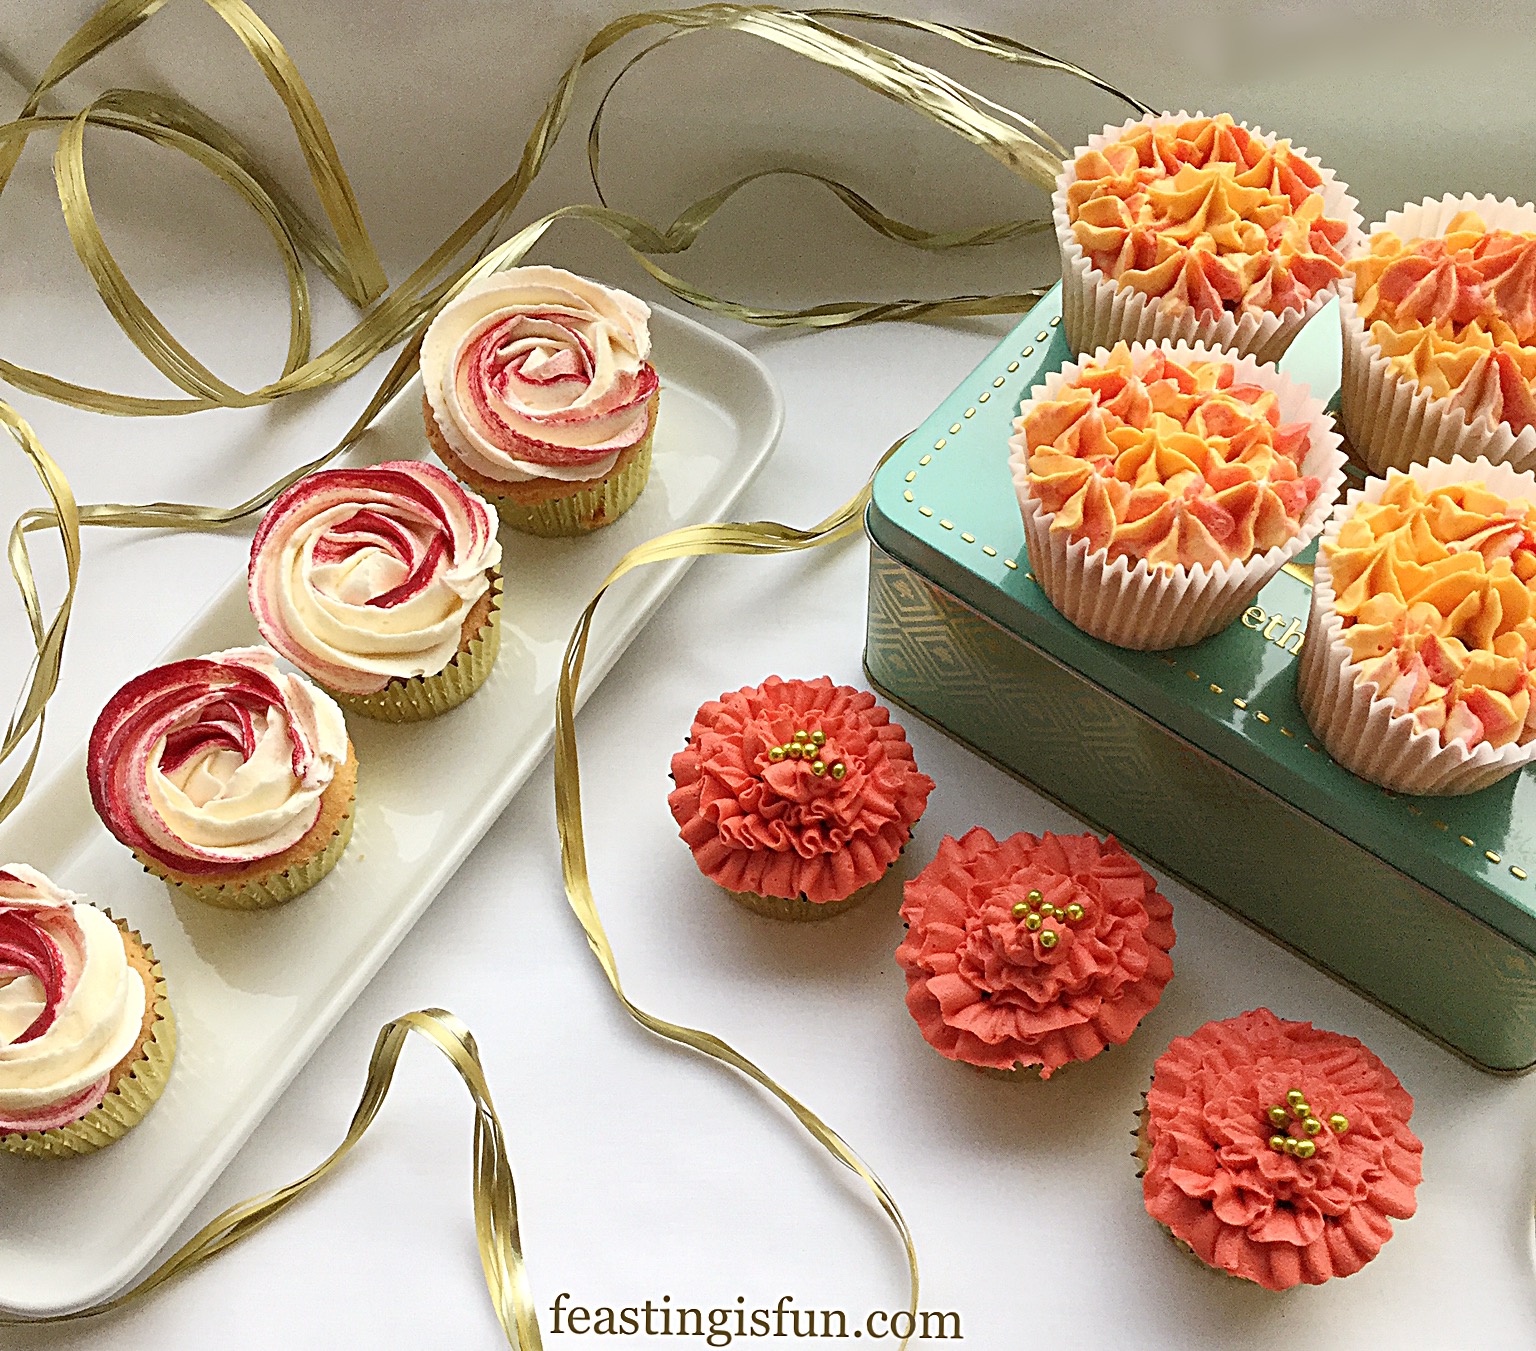
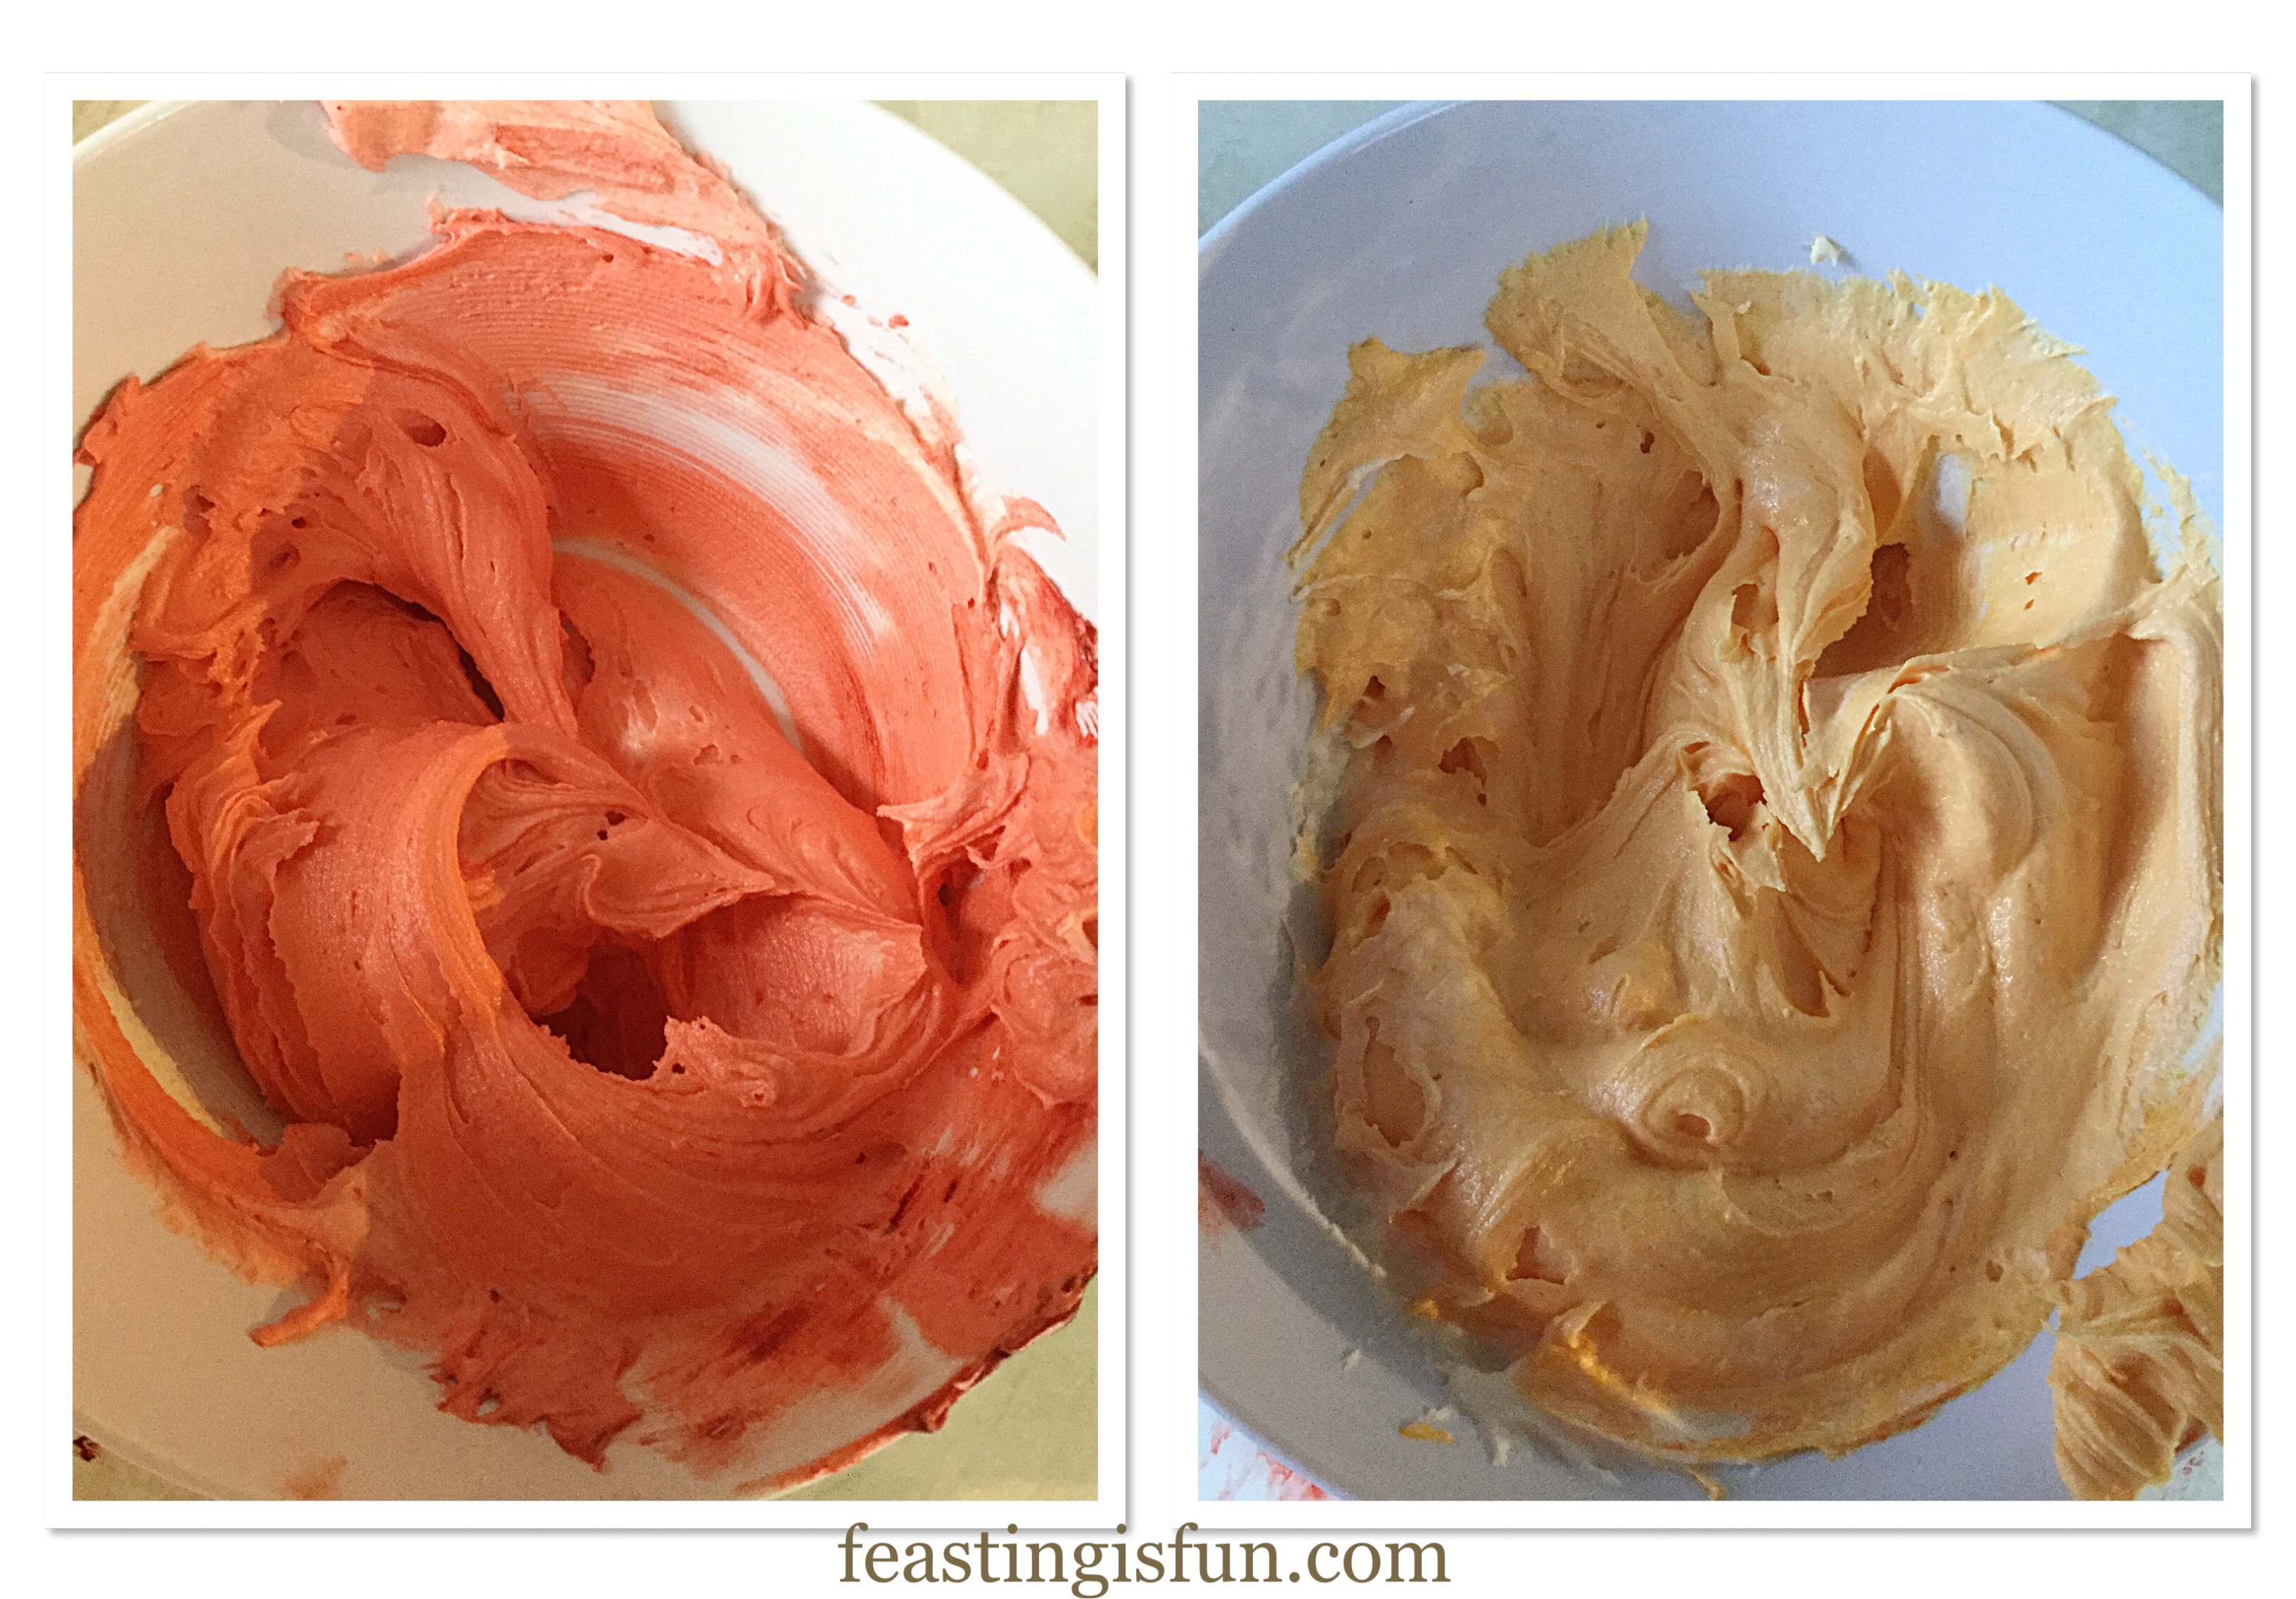
Whisk the butter in a bowl until softened. Add the icing sugar and whisk slowly to start, increasing in speed. Add milk if the mixture is too stiff. Continue whisking until the buttercream is pale and fluffy. Divide the buttercream into separate bowls and colour as desired. A cocktail stick dipped into gel colouring allows control of depth of colour. While carrying out the review I created a light and dark orange. Finishing the frill and hydrangea cupcakes with these colours.
While simply spooning alternate colours into a piping bag gave the hydrangea cupcakes a pretty, range of colours. Just like on a real flower.
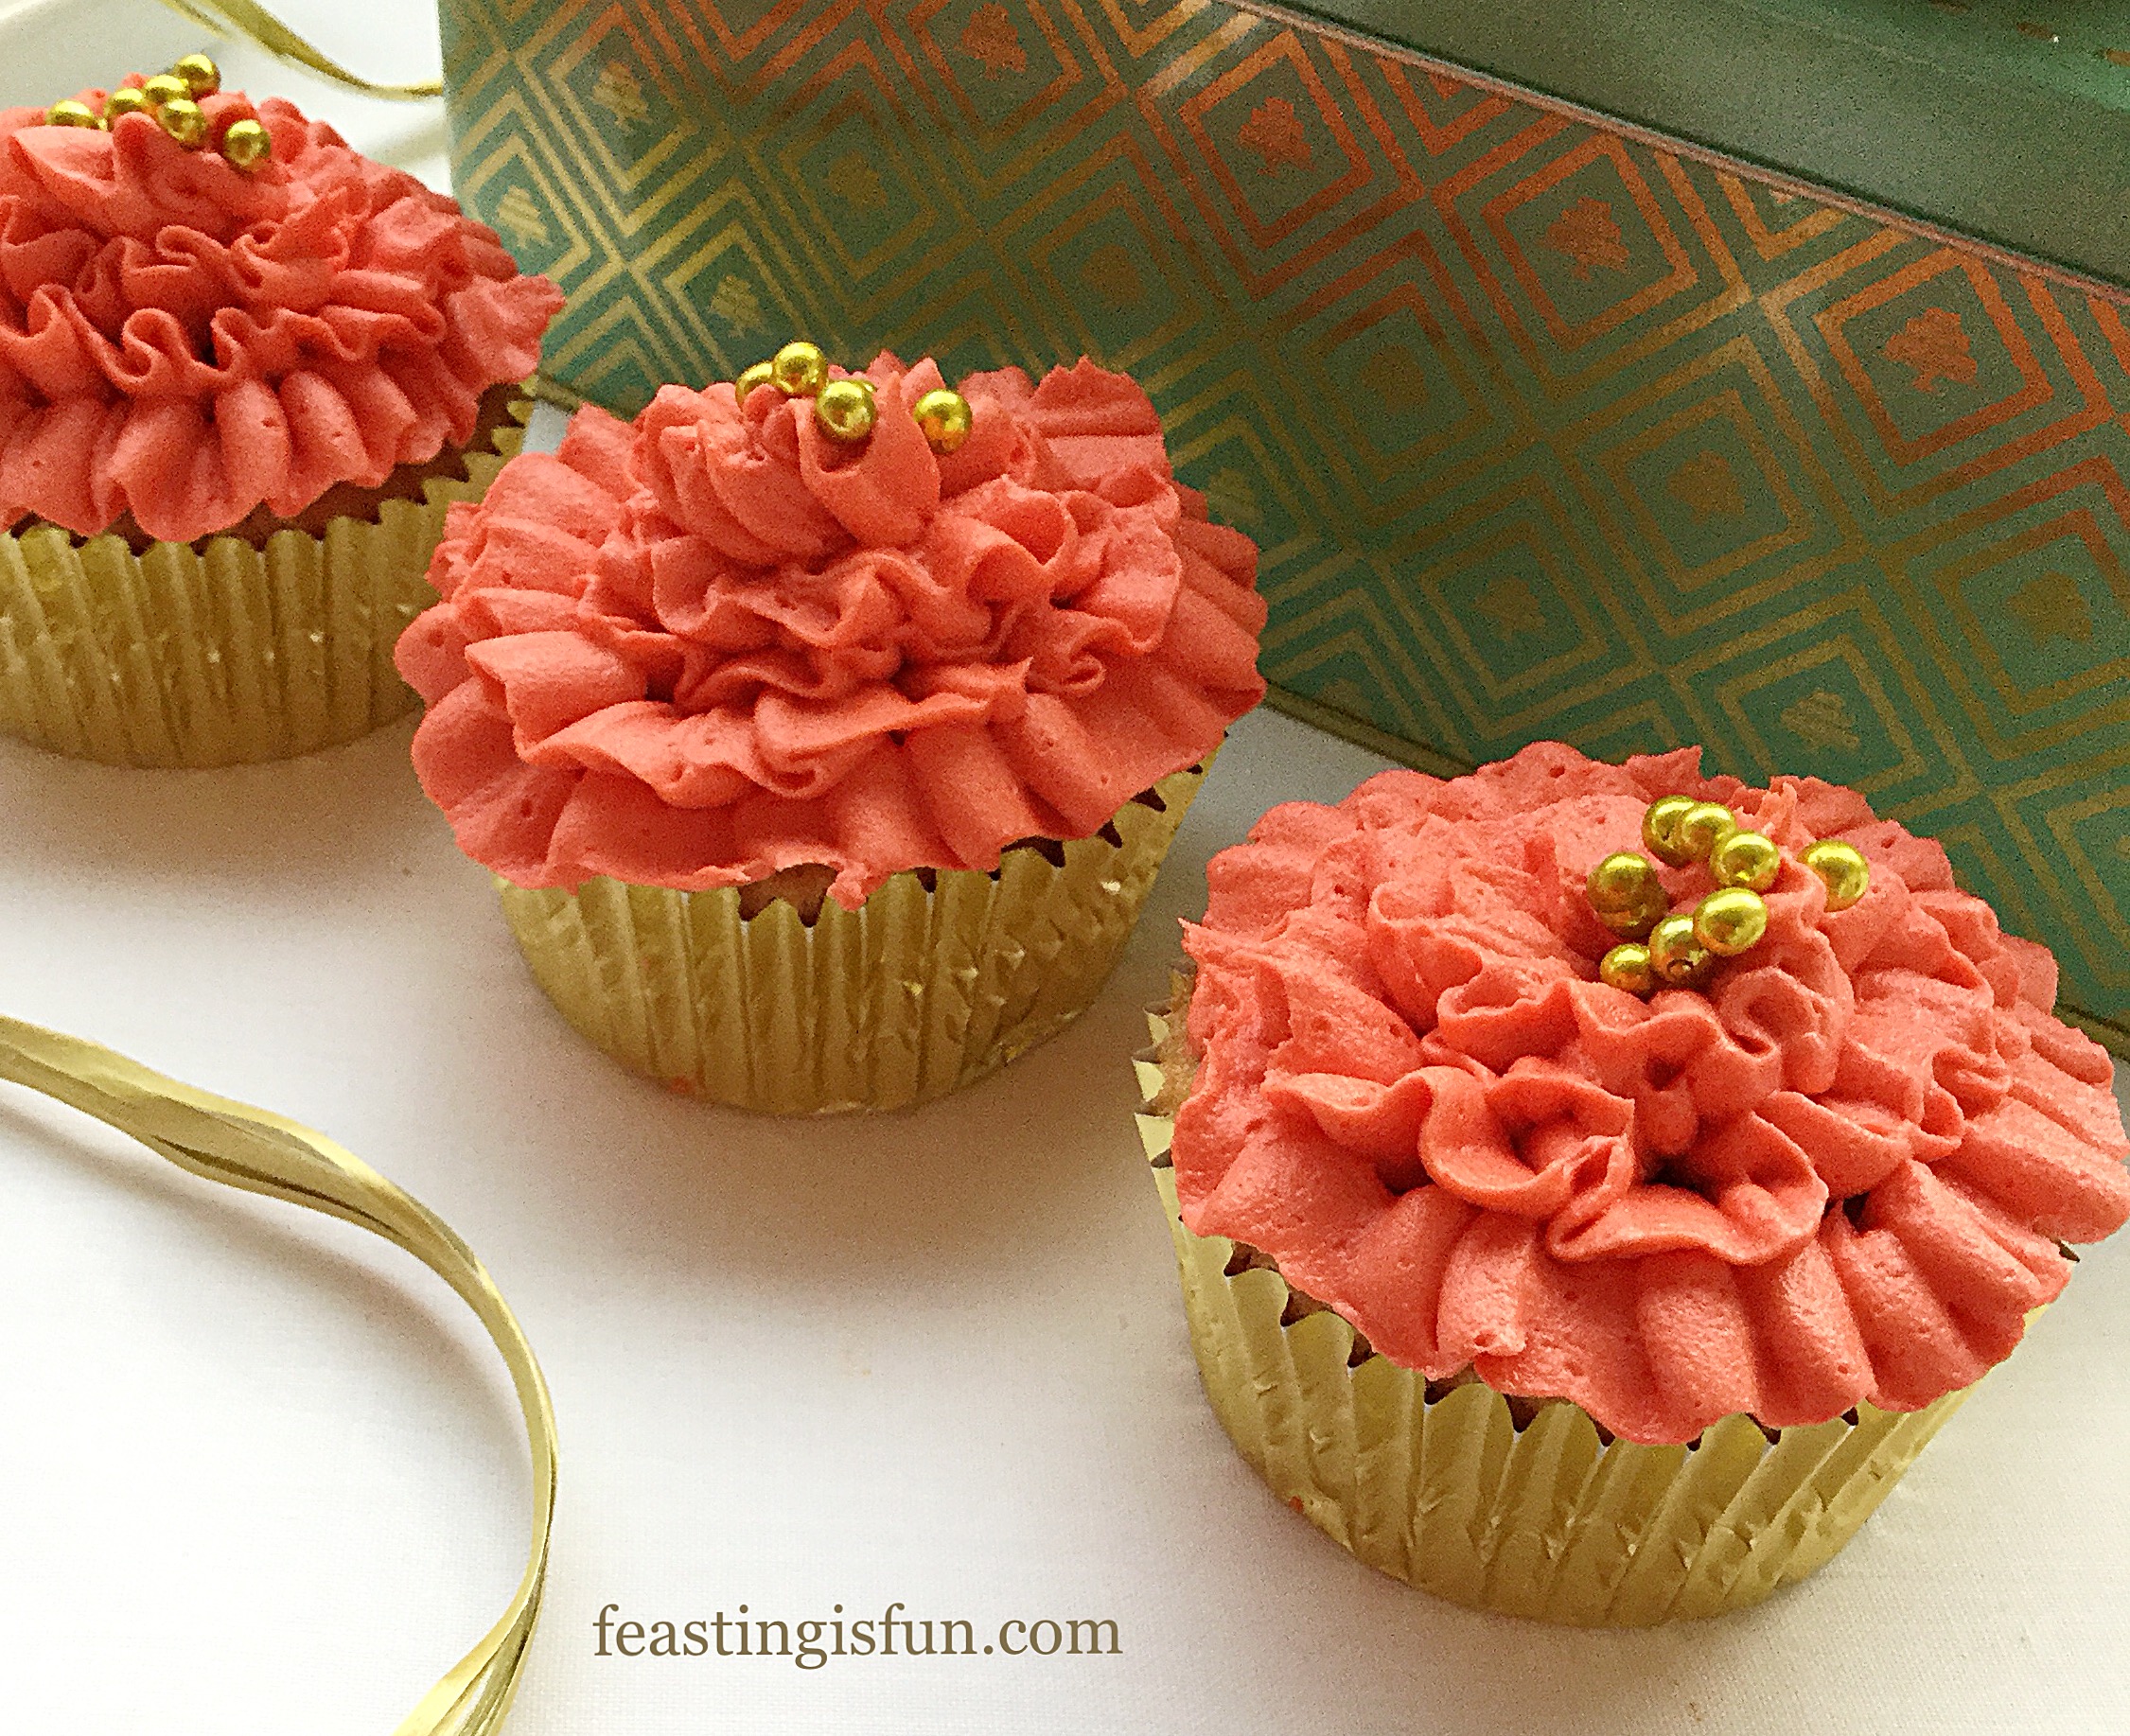
Using deep orange buttercream with the flat nozzle fitted to the piping bag, the frilled cupcakes were decorated. Since the nozzle was the wrong way round each frill faced downwards creating a ballerina tutu effect. Gold sugar balls topped off these vanilla cupcakes.
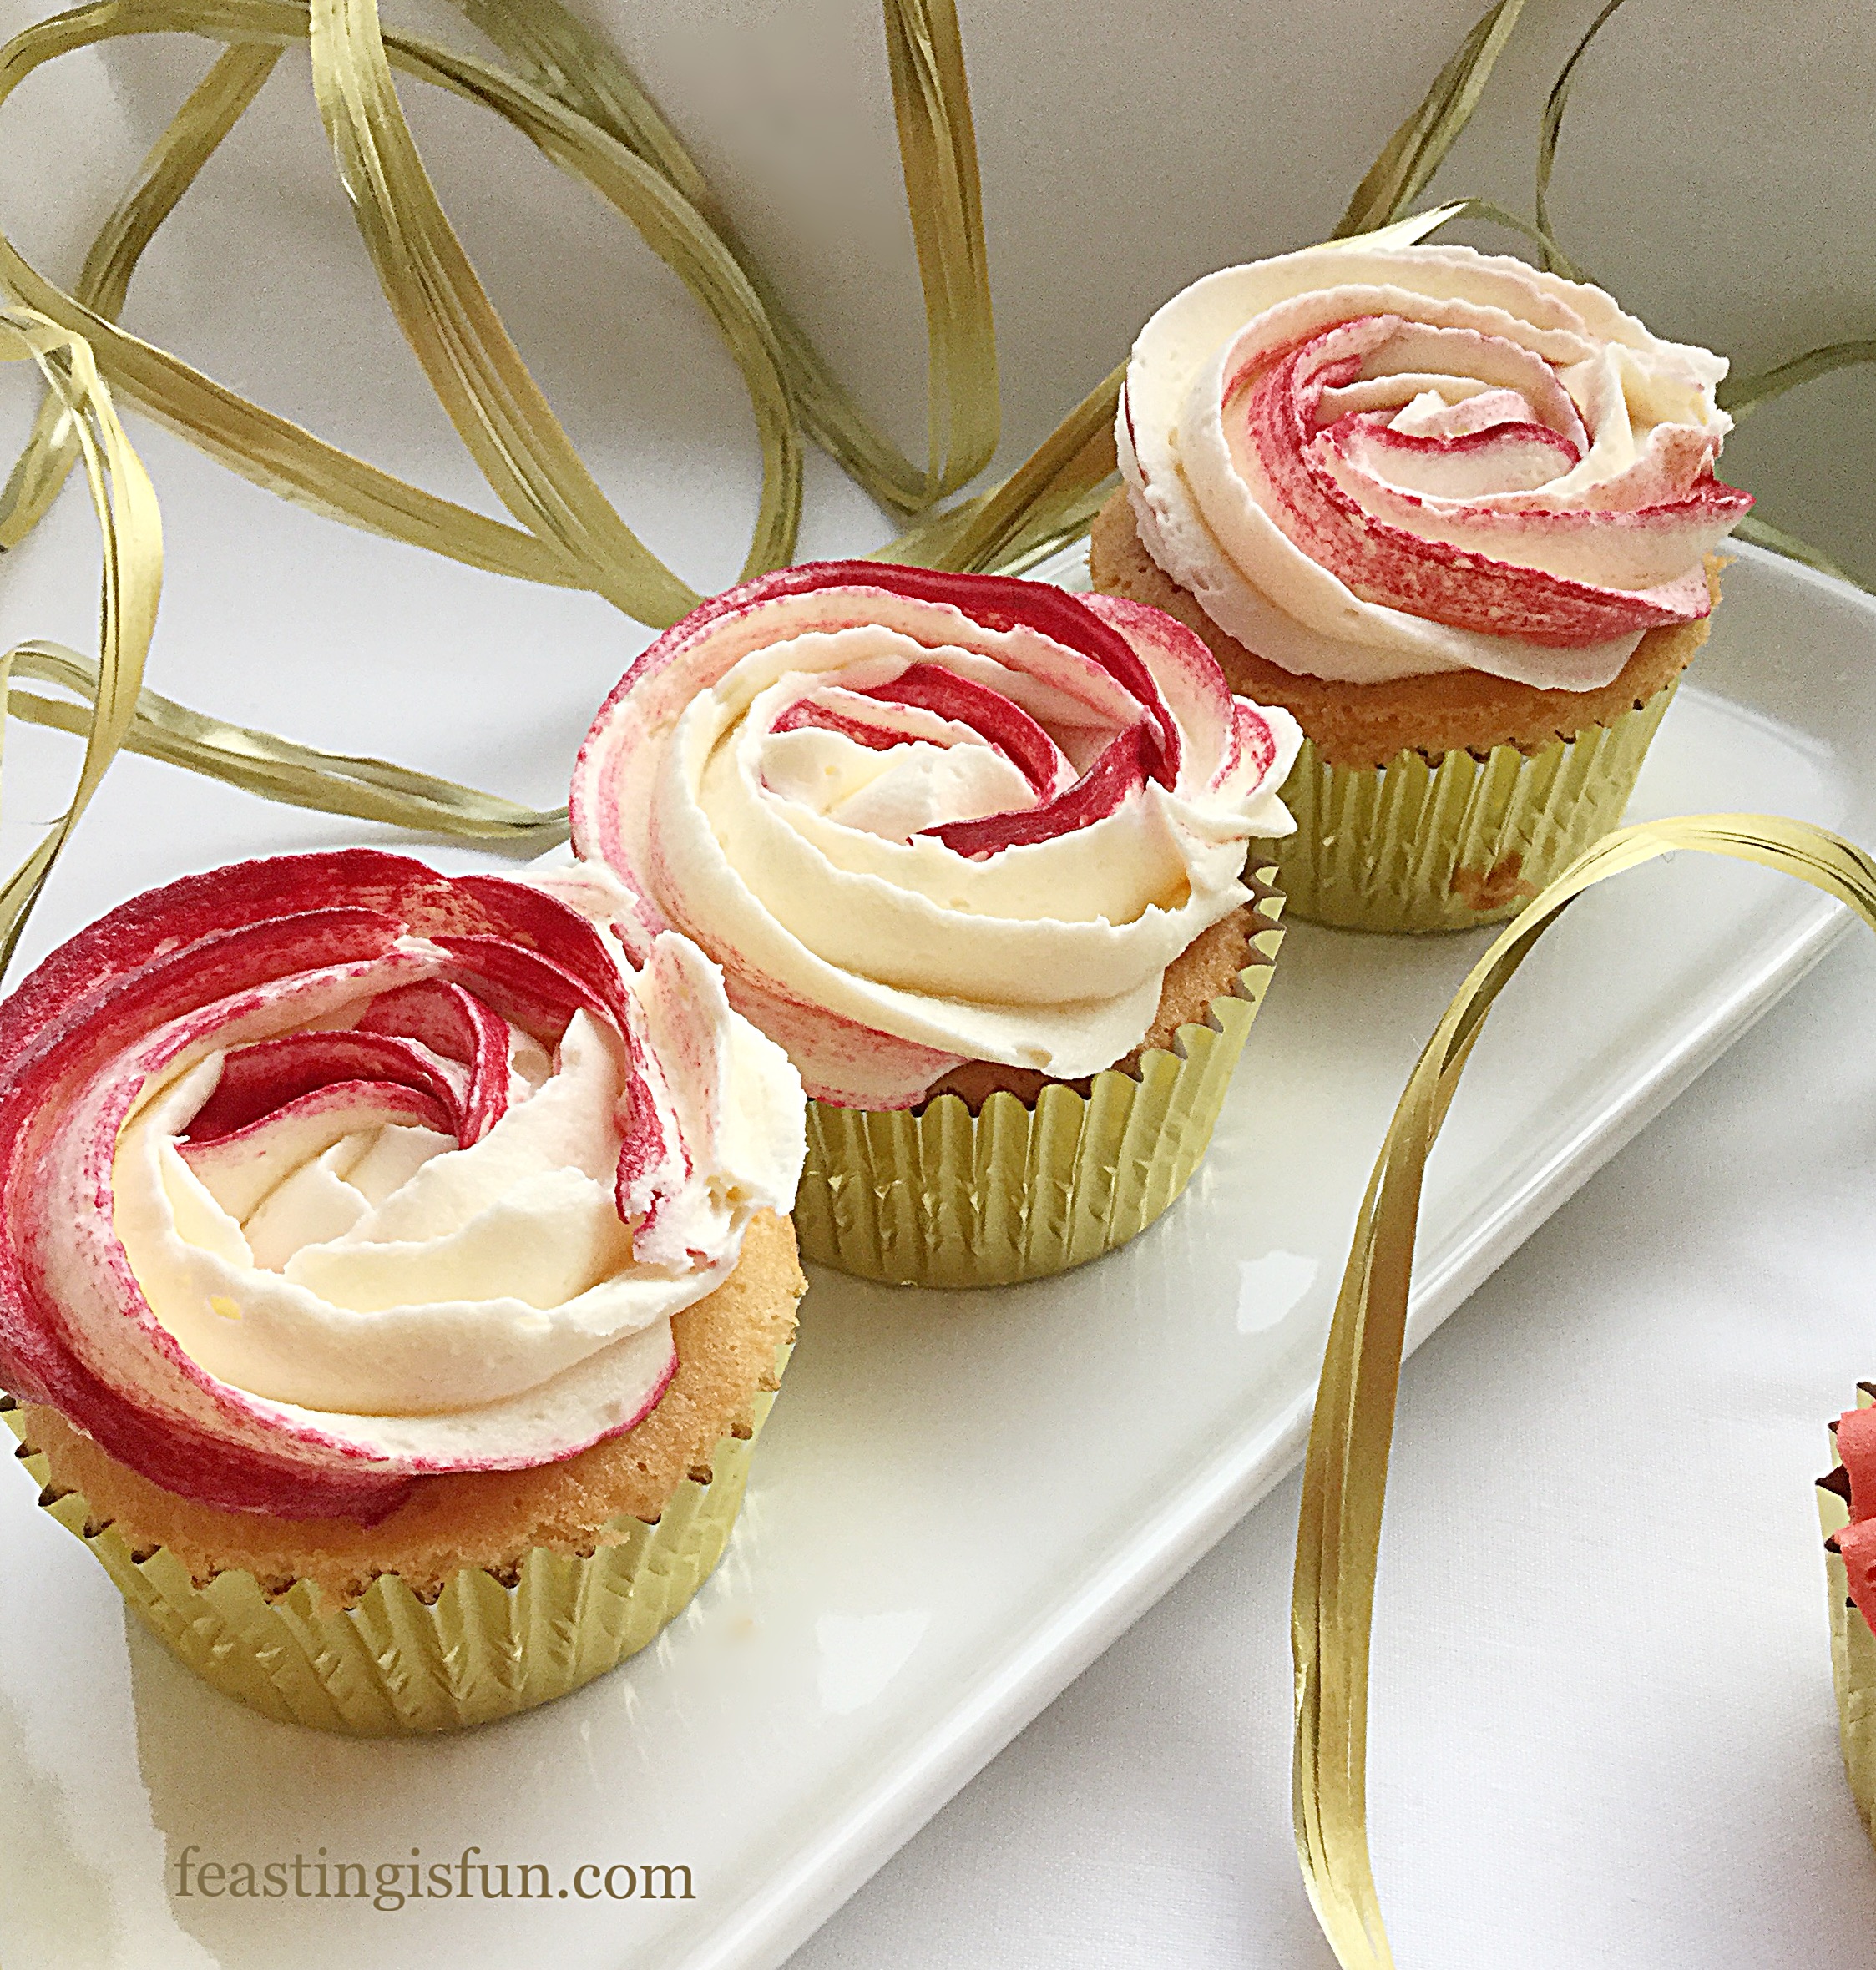
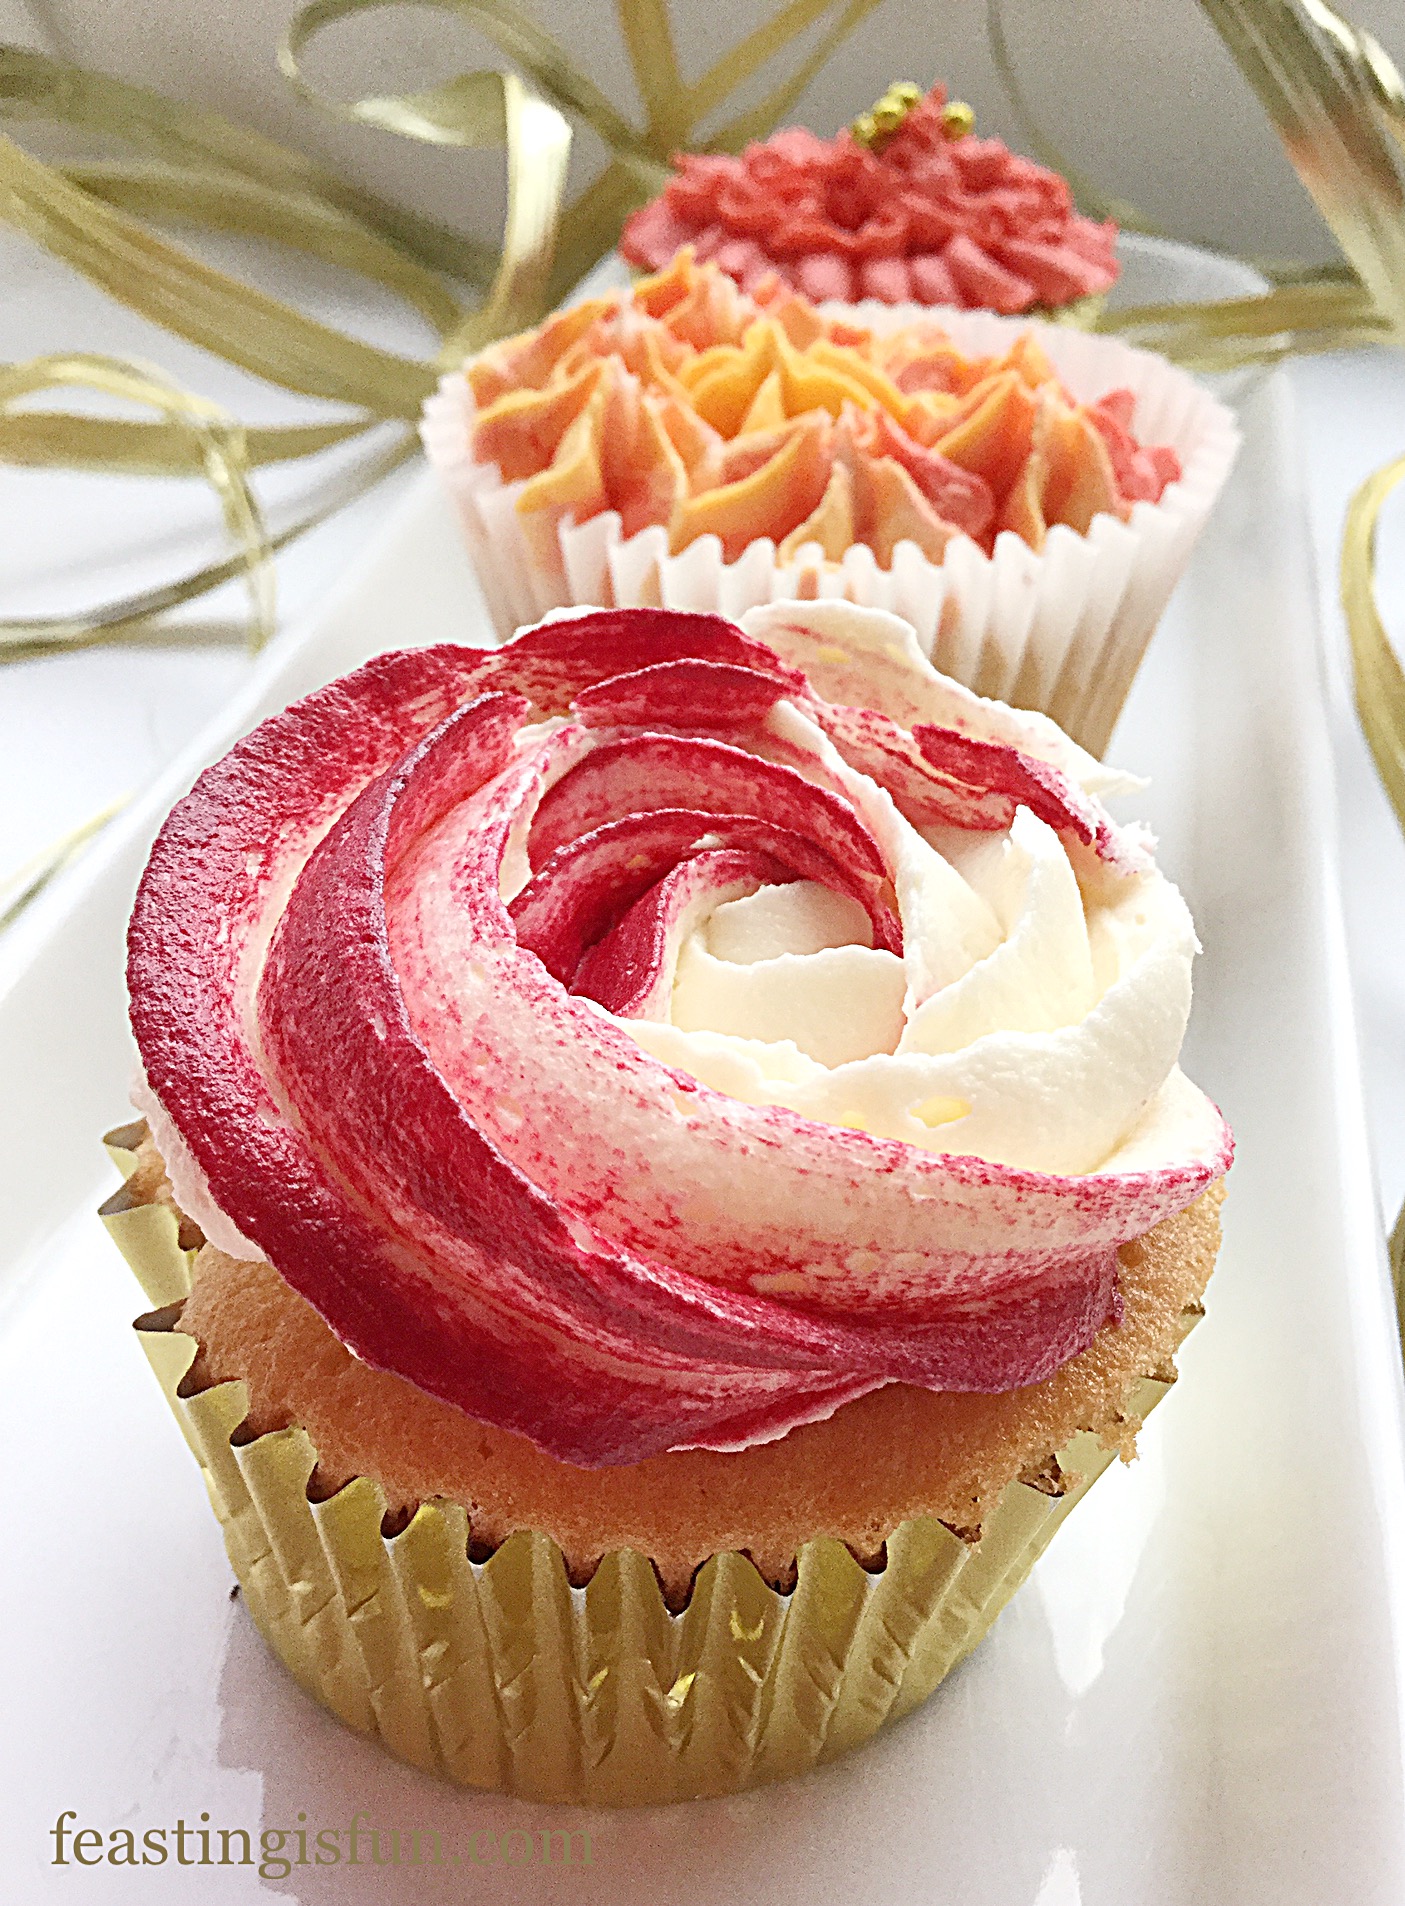
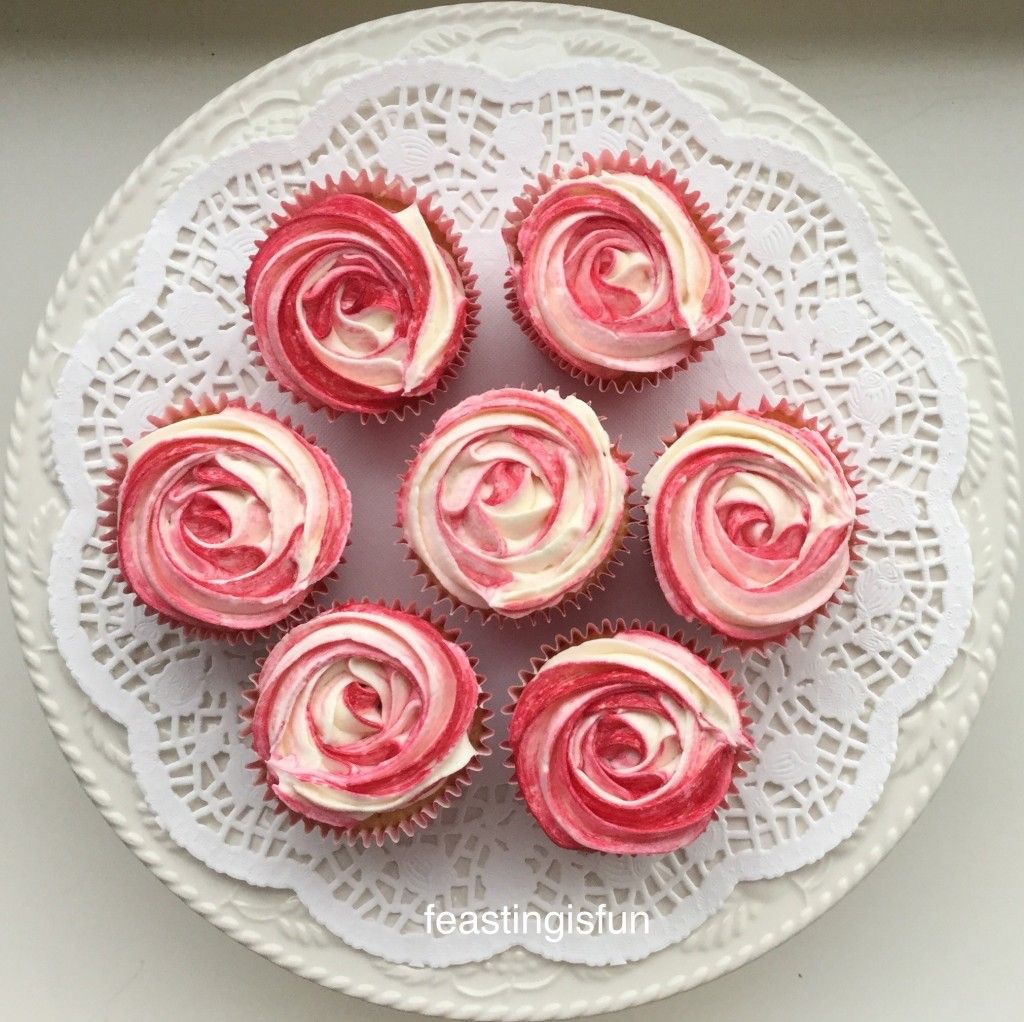
Finally the rose and lemon cupcakes, topped with a deep red edged cream frosting. A technique that is easier than it looks. Since, as suggested in the instructions dual coloured icings can be spooned either side of the piping bag, fitted with the large star nozzle, giving a pretty coloured rose when piped. Yet a different effect can also be achieved by dipping the blunt end of a wooden barbecue skewer into your chosen colour food colour. Place the gel end of the skewer into the empty piping bag, nozzle attached and wipe the gel up once side of the bag. Repeat on the other side. Fill the bag with uncoloured buttercream.
To decorate, squeeze out some buttercream into a bowl until the colour starts to show. Spoon back into the piping bag. Starting in the centre of a cupcake, keep an even pressure and pipe a swirl as detailed in the instructions. As each cupcake is frosted the intense colour will pale in colour. Finally giving variation, similar to real roses.
After washing, drying, reusing and storing every part of the Elizabeth Harris Perfect Cupcake Decorating Kit, I am thoroughly impressed. The instructions are clear and easy to wipe down for the messy baker! Each piece of equipment feels strong and sturdy. Three decorating ideas are given, each with great photos and easily understood. More ideas are available on Elizabeth’s YouTube channel here.
Elizabeth Harris Perfect Cupcake Decorating Kit is available to buy from larger Home Bargains stores nationwide. An ideal present for a beginner baker, or someone who bakes but wants to learn decorating techniques. Finally a warning, cake decorating can become addictive. Elizabeth Harris has a beautifully designed range of cake decorating equipment, bakeware and items for the kitchen, simply visit her website.
If you have enjoyed this review of the Elizabeth Harris Perfect Cupcake Decorating Kit you may also enjoy these cupcake recipes to use with your kit:
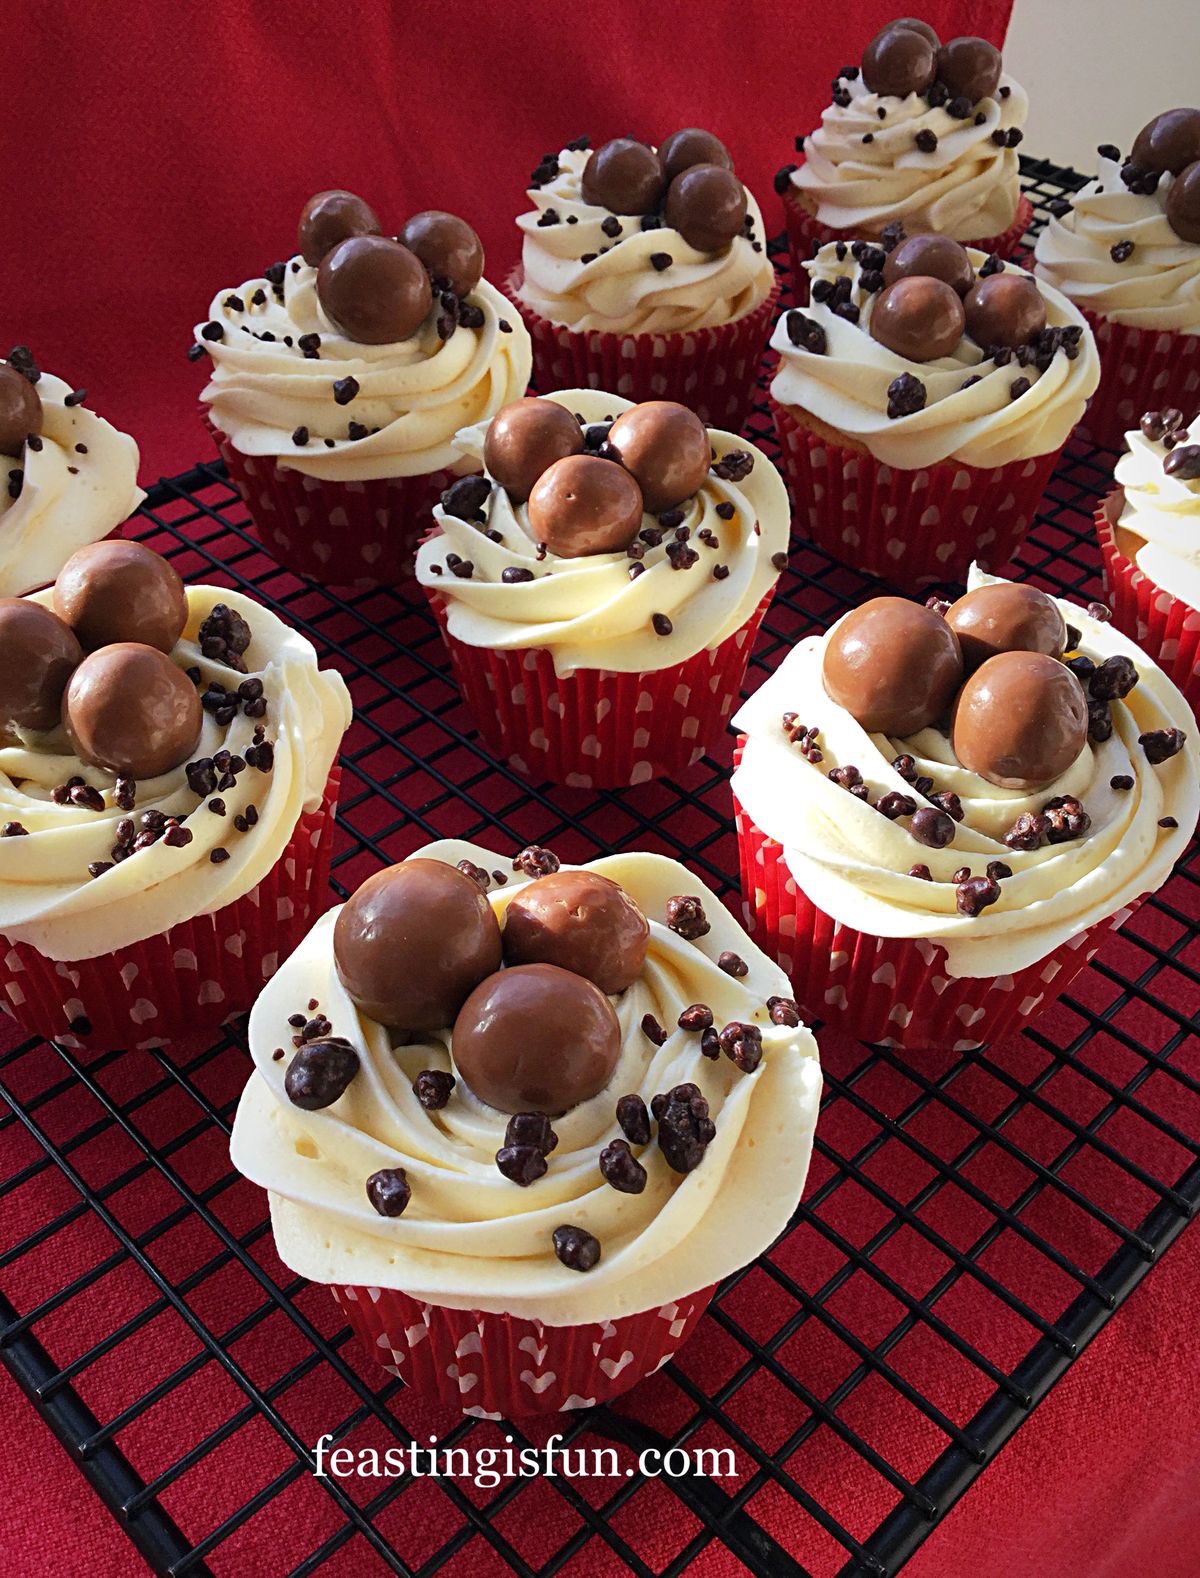
Maltesers Popping Candy Cupcakes
Raspberry Ripple Almond Cupcakes
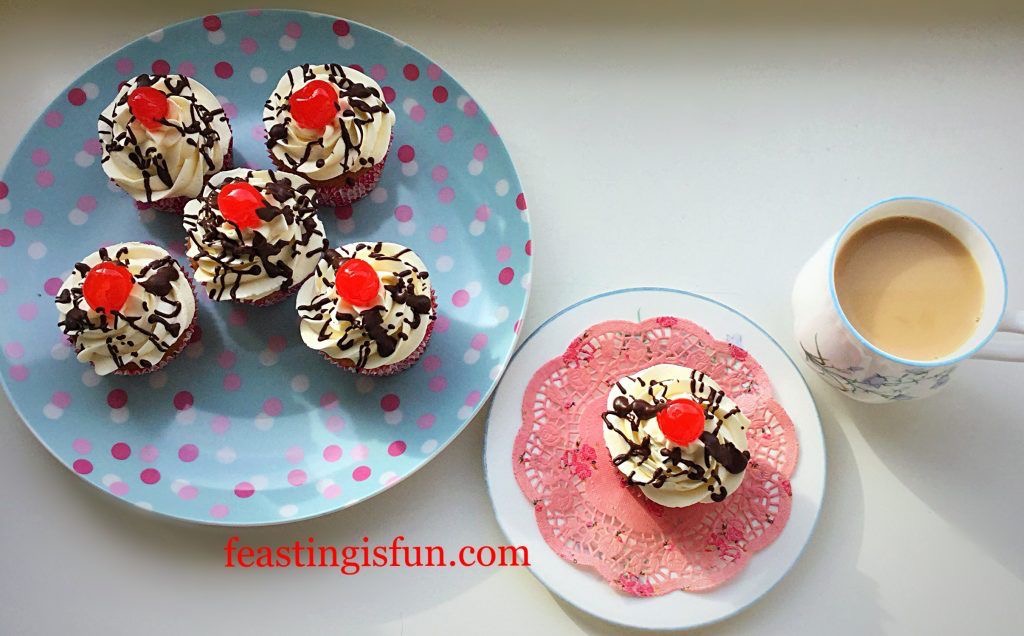
Maraschino Cherry Chocolate Drizzle Cupcakes
Carrying out reviews allows access to products that I may not normally come across. Creating cupcakes with this Perfect Cupcake Decorating Kit taught me new decorating techniques. Also, developing new cupcake recipes is always a bonus. Quite often I give away reviewed products. Not so with this kit. It has found a permanent home in my newly decorated kitchen. It will be bought and given as gifts.
Whatever you are making, baking and creating in your kitchen, have fun preparing your feast.
Elizabeth Harris sent me the Perfect Cupcake Decorating Kit to review. I was not paid for carrying out this review or writing this blog post. All opinions, observations, product/ingredient recommendations are mine alone. No part of this blog post may be copied or reproduced without the written permission of the owner. Please see my Disclosure Policy.