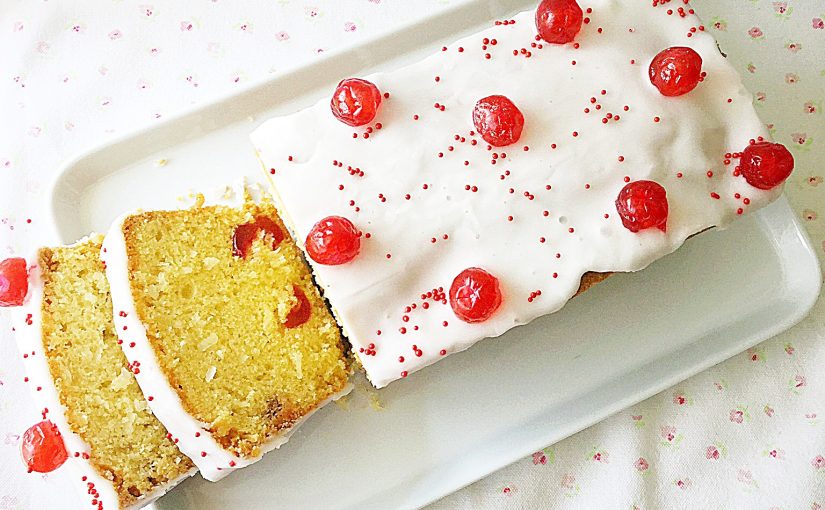
I adore pretty things. Whether it be polka dot plates, wild flowers in a jug, or brushing my hands on cow parsley while out for a walk. And given a choice my garden will always be full of old english roses and rambling honeysuckle, rather than neatly edged borders containing structural plants. Likewise, this relaxed approach is also reflected in my baking. Since a drizzle of icing here and there makes a cake not only beautiful, but shouts that it is homemade. Resulting in this Iced Cherry Coconut Loaf Cake that not only looks pretty but tastes pretty good too!
A rich buttery coconut cake, packed full of glacé cherries, simply decorated with glacé icing and more cherries. Yet it looks like an afternoon tea party. In fact this cake makes me want to get out my best china, string bunting everywhere and hold a garden party. Why? Because it is such a cheerful, pretty and delicious cake. Resulting in THE perfect cake to share.
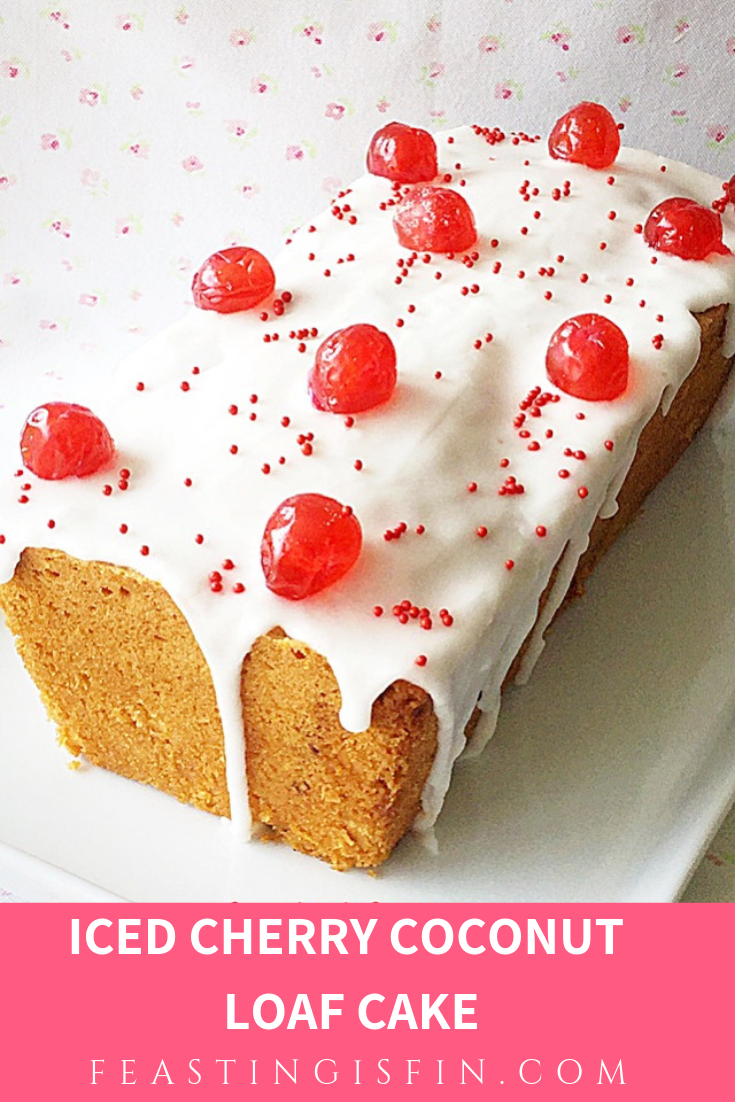
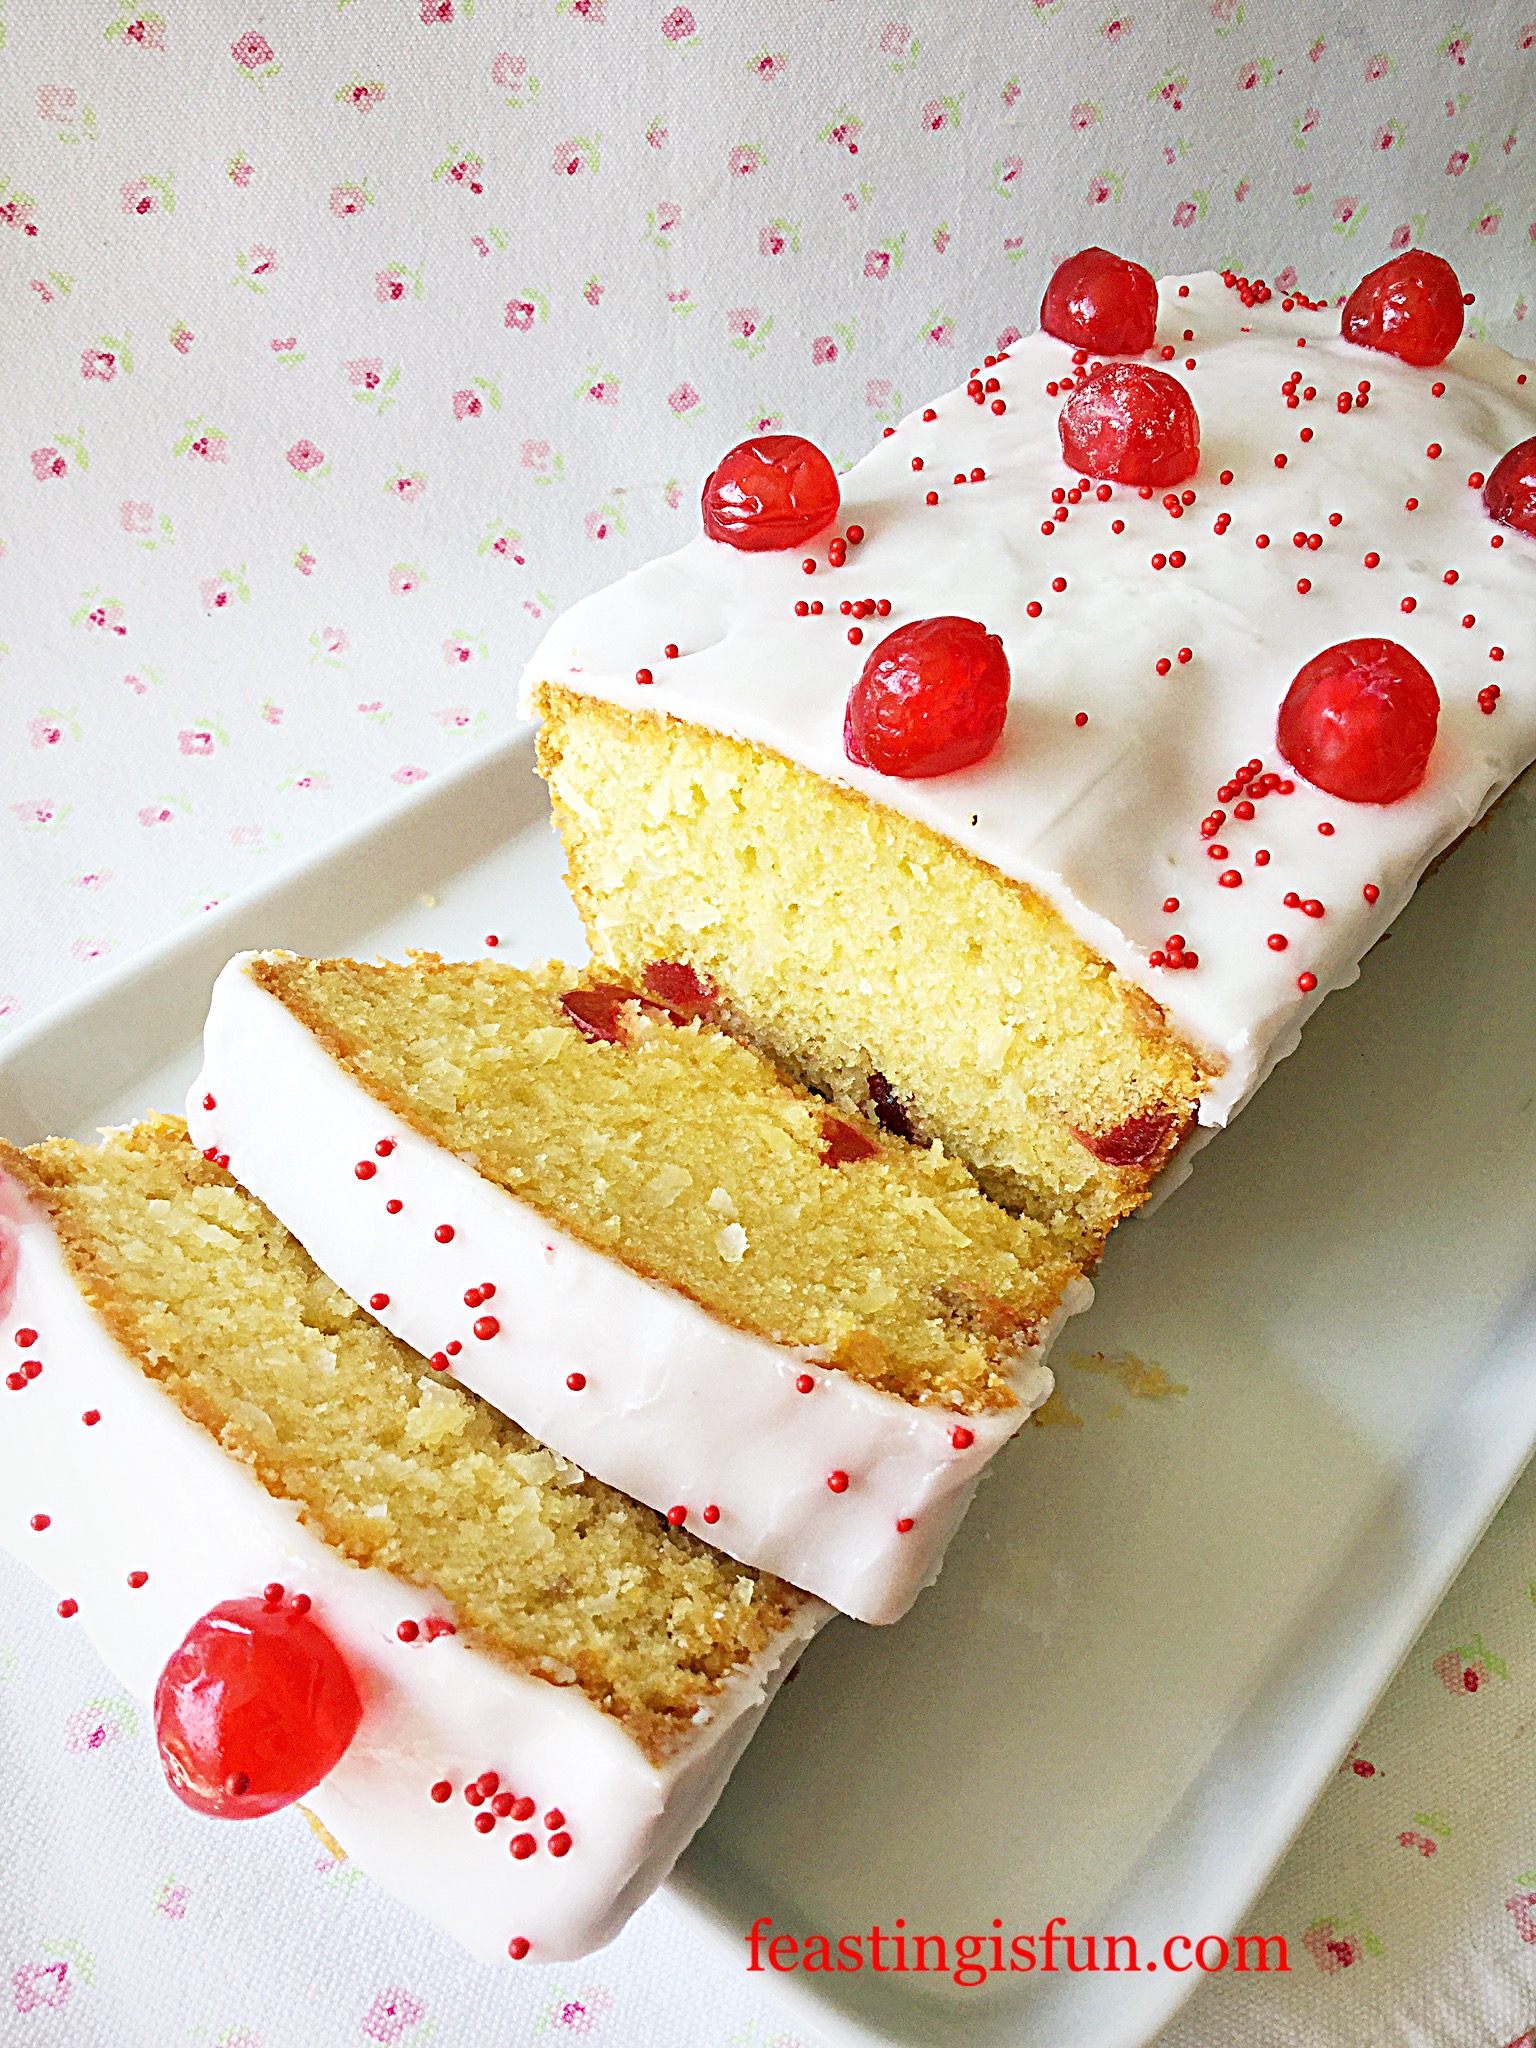
Iced Cherry Coconut Loaf Cake
I rather enjoy baking loaf cakes such as this Mascarpone Topped Carrot Cake. Since the loaf tin makes them easy to slice and perfect for packing up and taking on a picnic. Also, should the cake need to be shared further than anticipated, each slice can easily be cut in half. So, when I look at photographs of this Iced Cherry Coconut Loaf Cake they make me smile. And any cake that does that is a winner in my book.
Iced Cherry Coconut Loaf Cake.
Recipe: Iced Cherry Coconut Loaf Cake serves 8
For the cake:
200g/7oz Unsalted Butter at room temperature
200g/7oz Caster Sugar
1/4 tsp Sea Salt – I use Maldon halve quantity if using free flowing
125/4.5oz Sweetend Shredded Coconut – such as Bakers available from Amazon alternatively use the equivalent weight of desiccated coconut and add 3 tbsp whole milk to the cake batter
100g/4oz Glacé Cherries halved
250g/9oz Plain White Flour
2 tsp Baking Powder
To decorate:
175g/6oz White Icing Sugar (Confectioners sugar)
2 Tbsp Tap Water
10 Whole Glacé Cherries
Small Red Sugar Balls approximately 1 tsp
Method: Preheat oven to 160C/140C fan, 325F, gas mark 3
You will need approximately a 25cm x 11.5cm x 7.5cm (10” x 4.5” x 3”) 2lb loaf tin for this recipe. Grease with butter and line the base with baking parchment.
Making And Baking The Cherry Coconut Cake
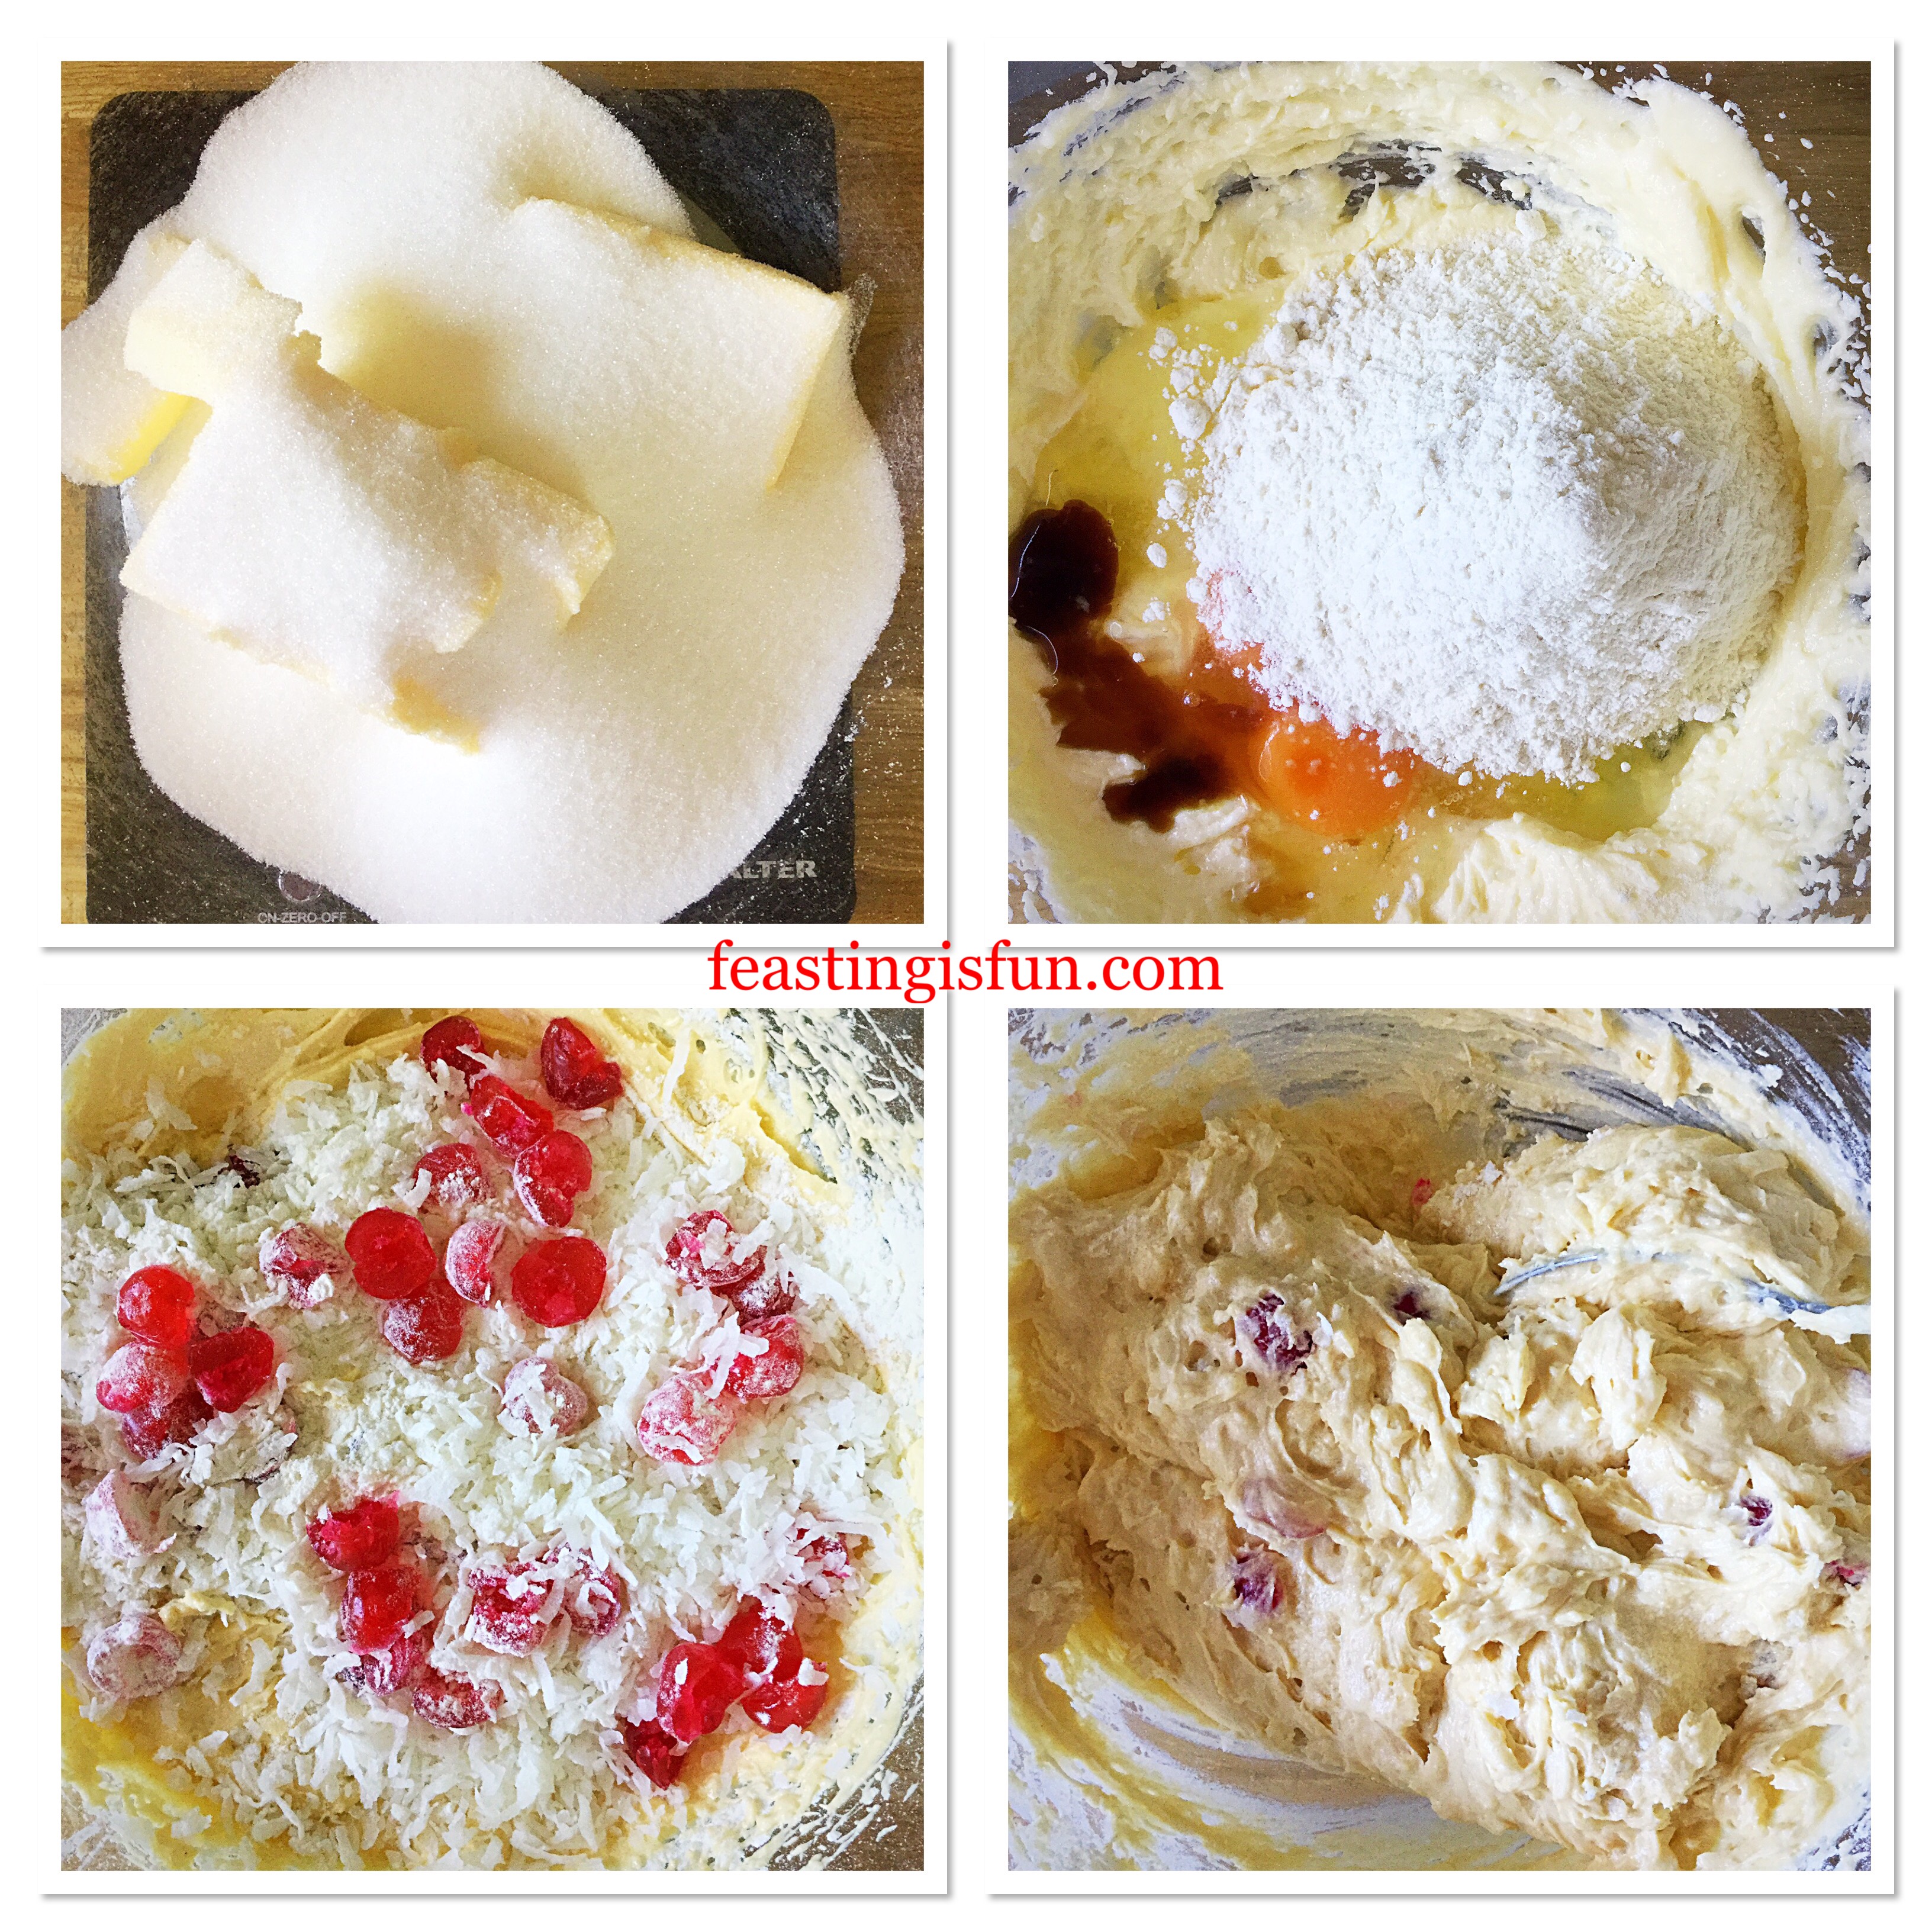
First of all add the butter, sugar and salt to a large mixing bowl. Whisk together until the ingredients are fully combined, pale and creamy.
Now add 2 eggs, half the flour and vanilla extract. Whisk together until just combined.
Add the last 2 eggs and whisk to incorporate.
Finally add the remaining flour, baking powder, coconut and cherry halves. Toss the cherries in the flour, this will stop them sinking to the bottom of the cake during baking.
Fold all of the ingredients together (adding additional milk if using desiccated coconut) until they are combined.
Making the cherry coconut cake batter.
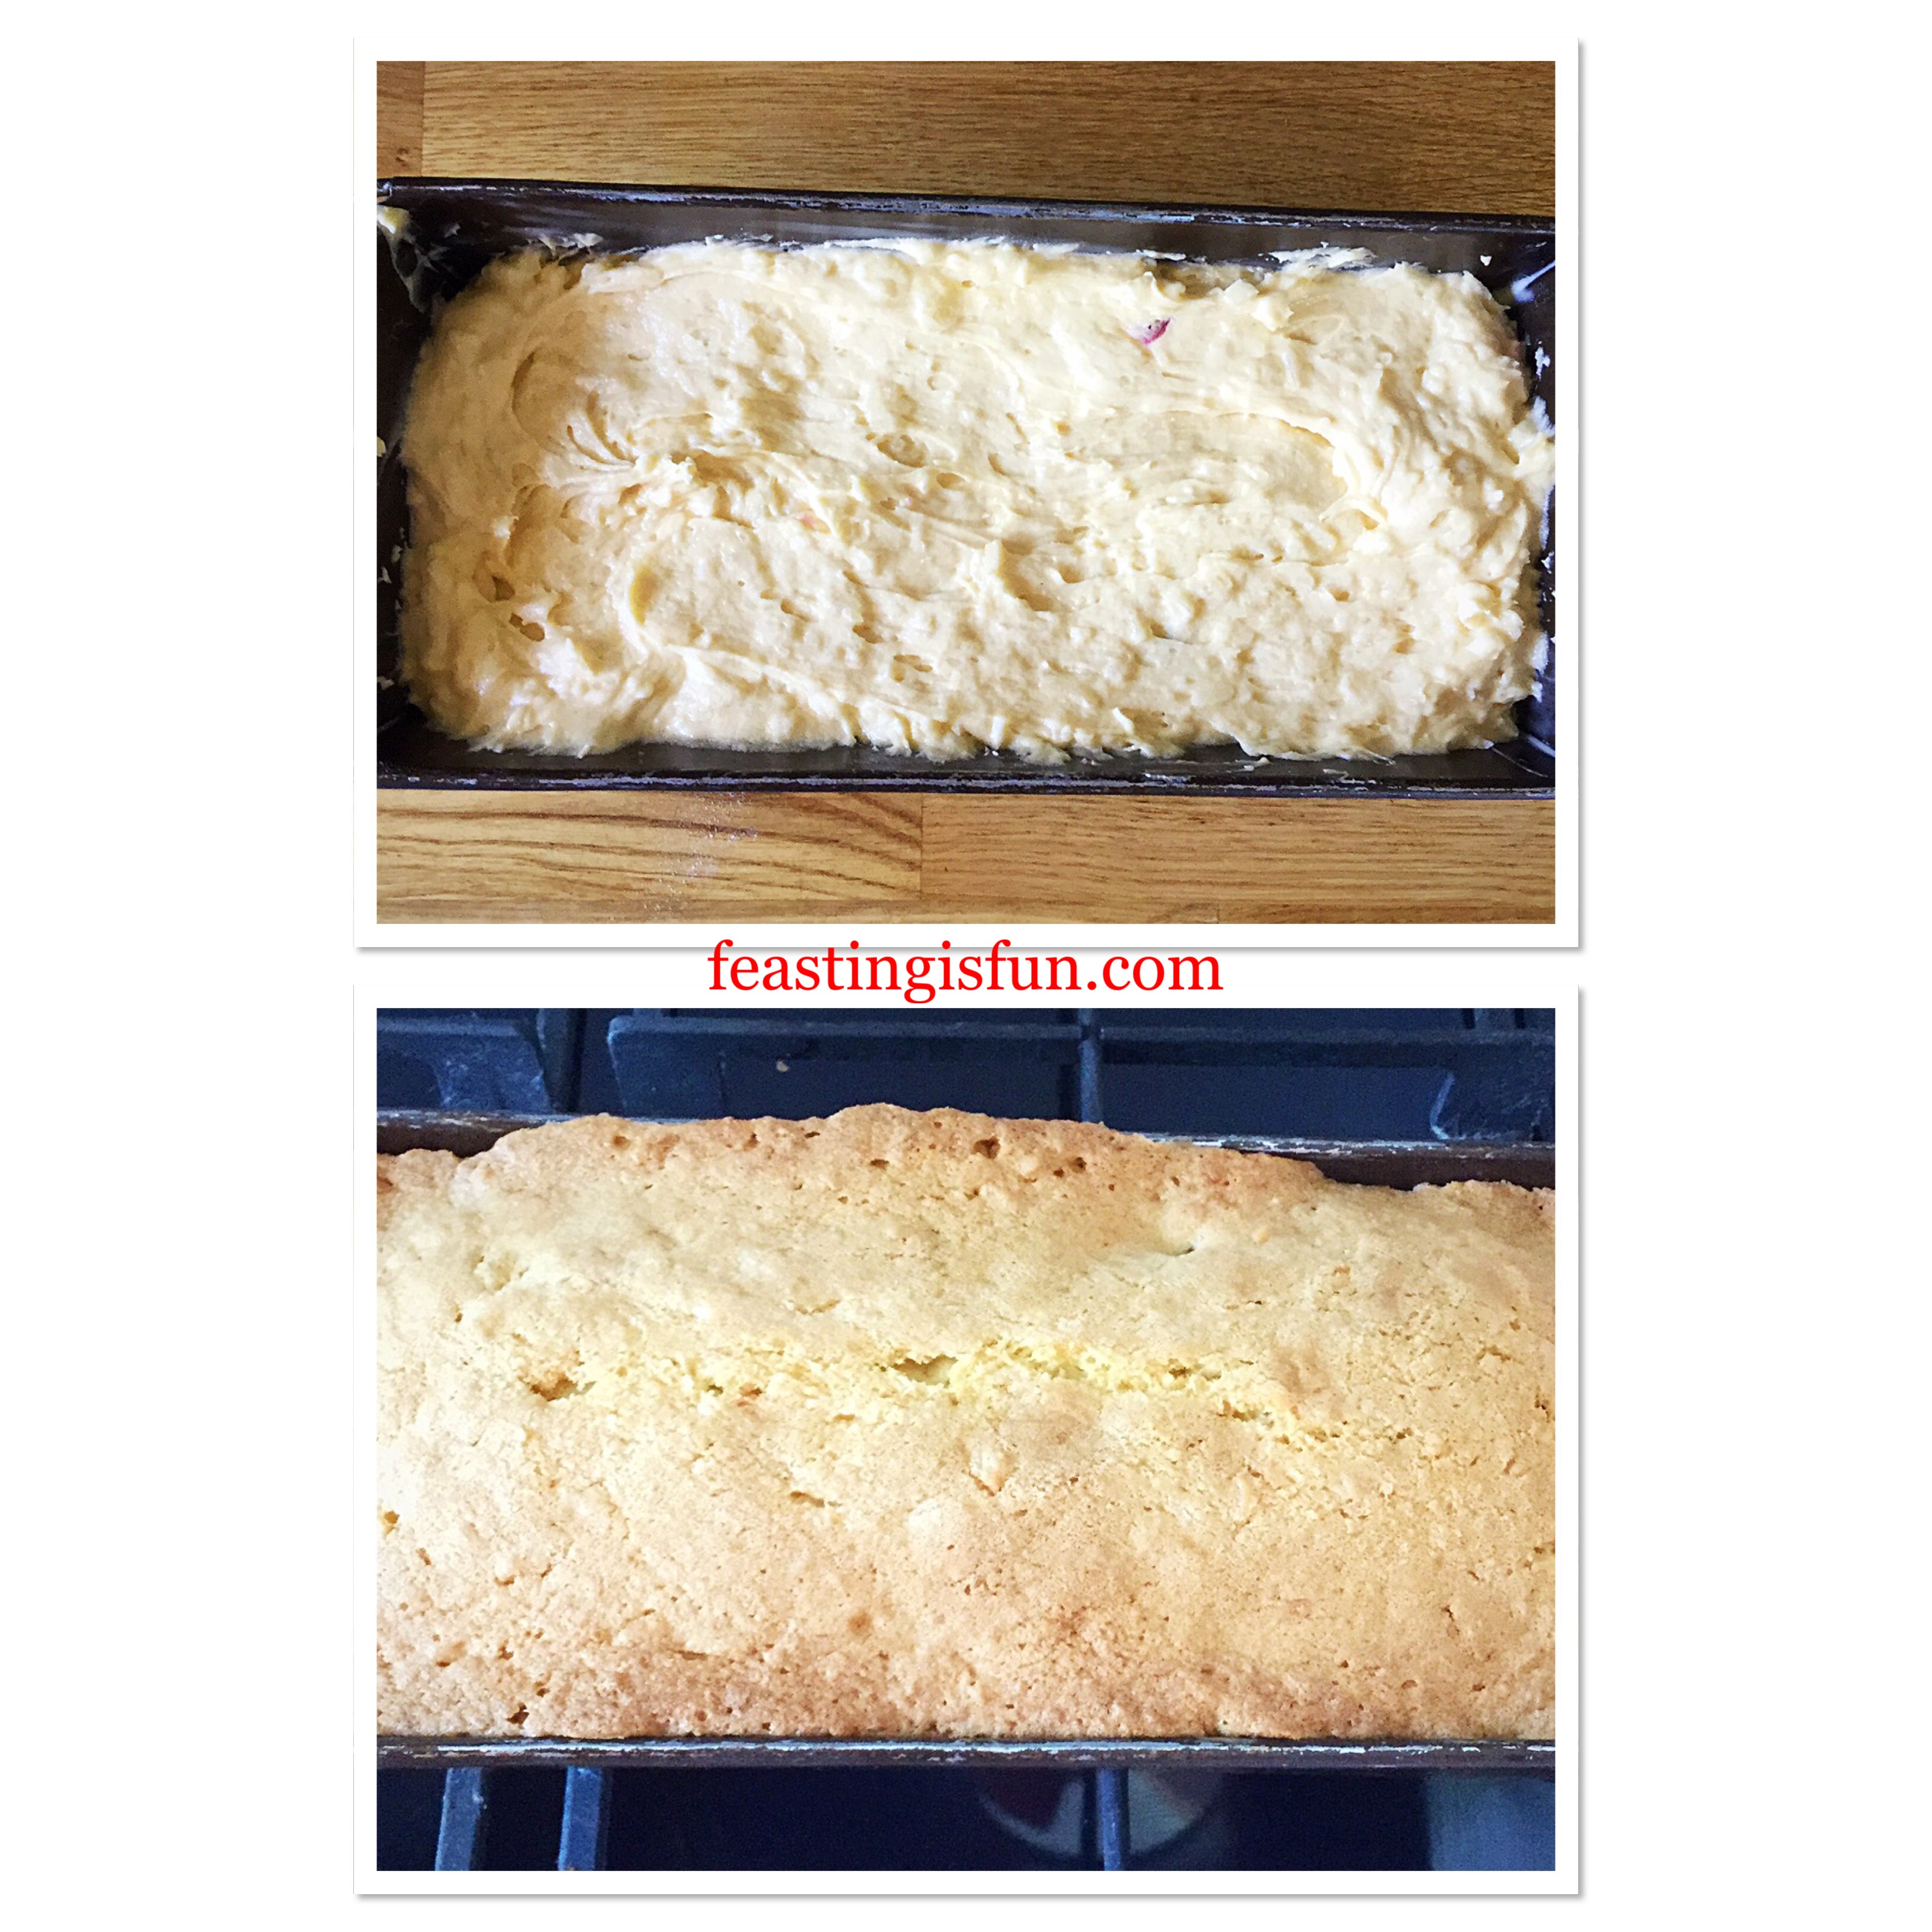
Spoon cake batter into the prepared tin making sure the top is level.
Place the cake tin into the middle of the oven and bake for 1 hour – 1 hour 15 minutes. My cake took 1 hour and 10 minutes to bake.
The cake is baked when golden brown and an inserted skewer comes out clean.
As soon as the cake is baked remove from the oven and allow to cool in the tin.
Baking the cherry coconut loaf cake.
Once the cake has cooled run a palette knife around the inside of the tin. Turn out the cake, remove the baking parchment and place on a rack over a baking tray.
Decorating The Loaf Cake
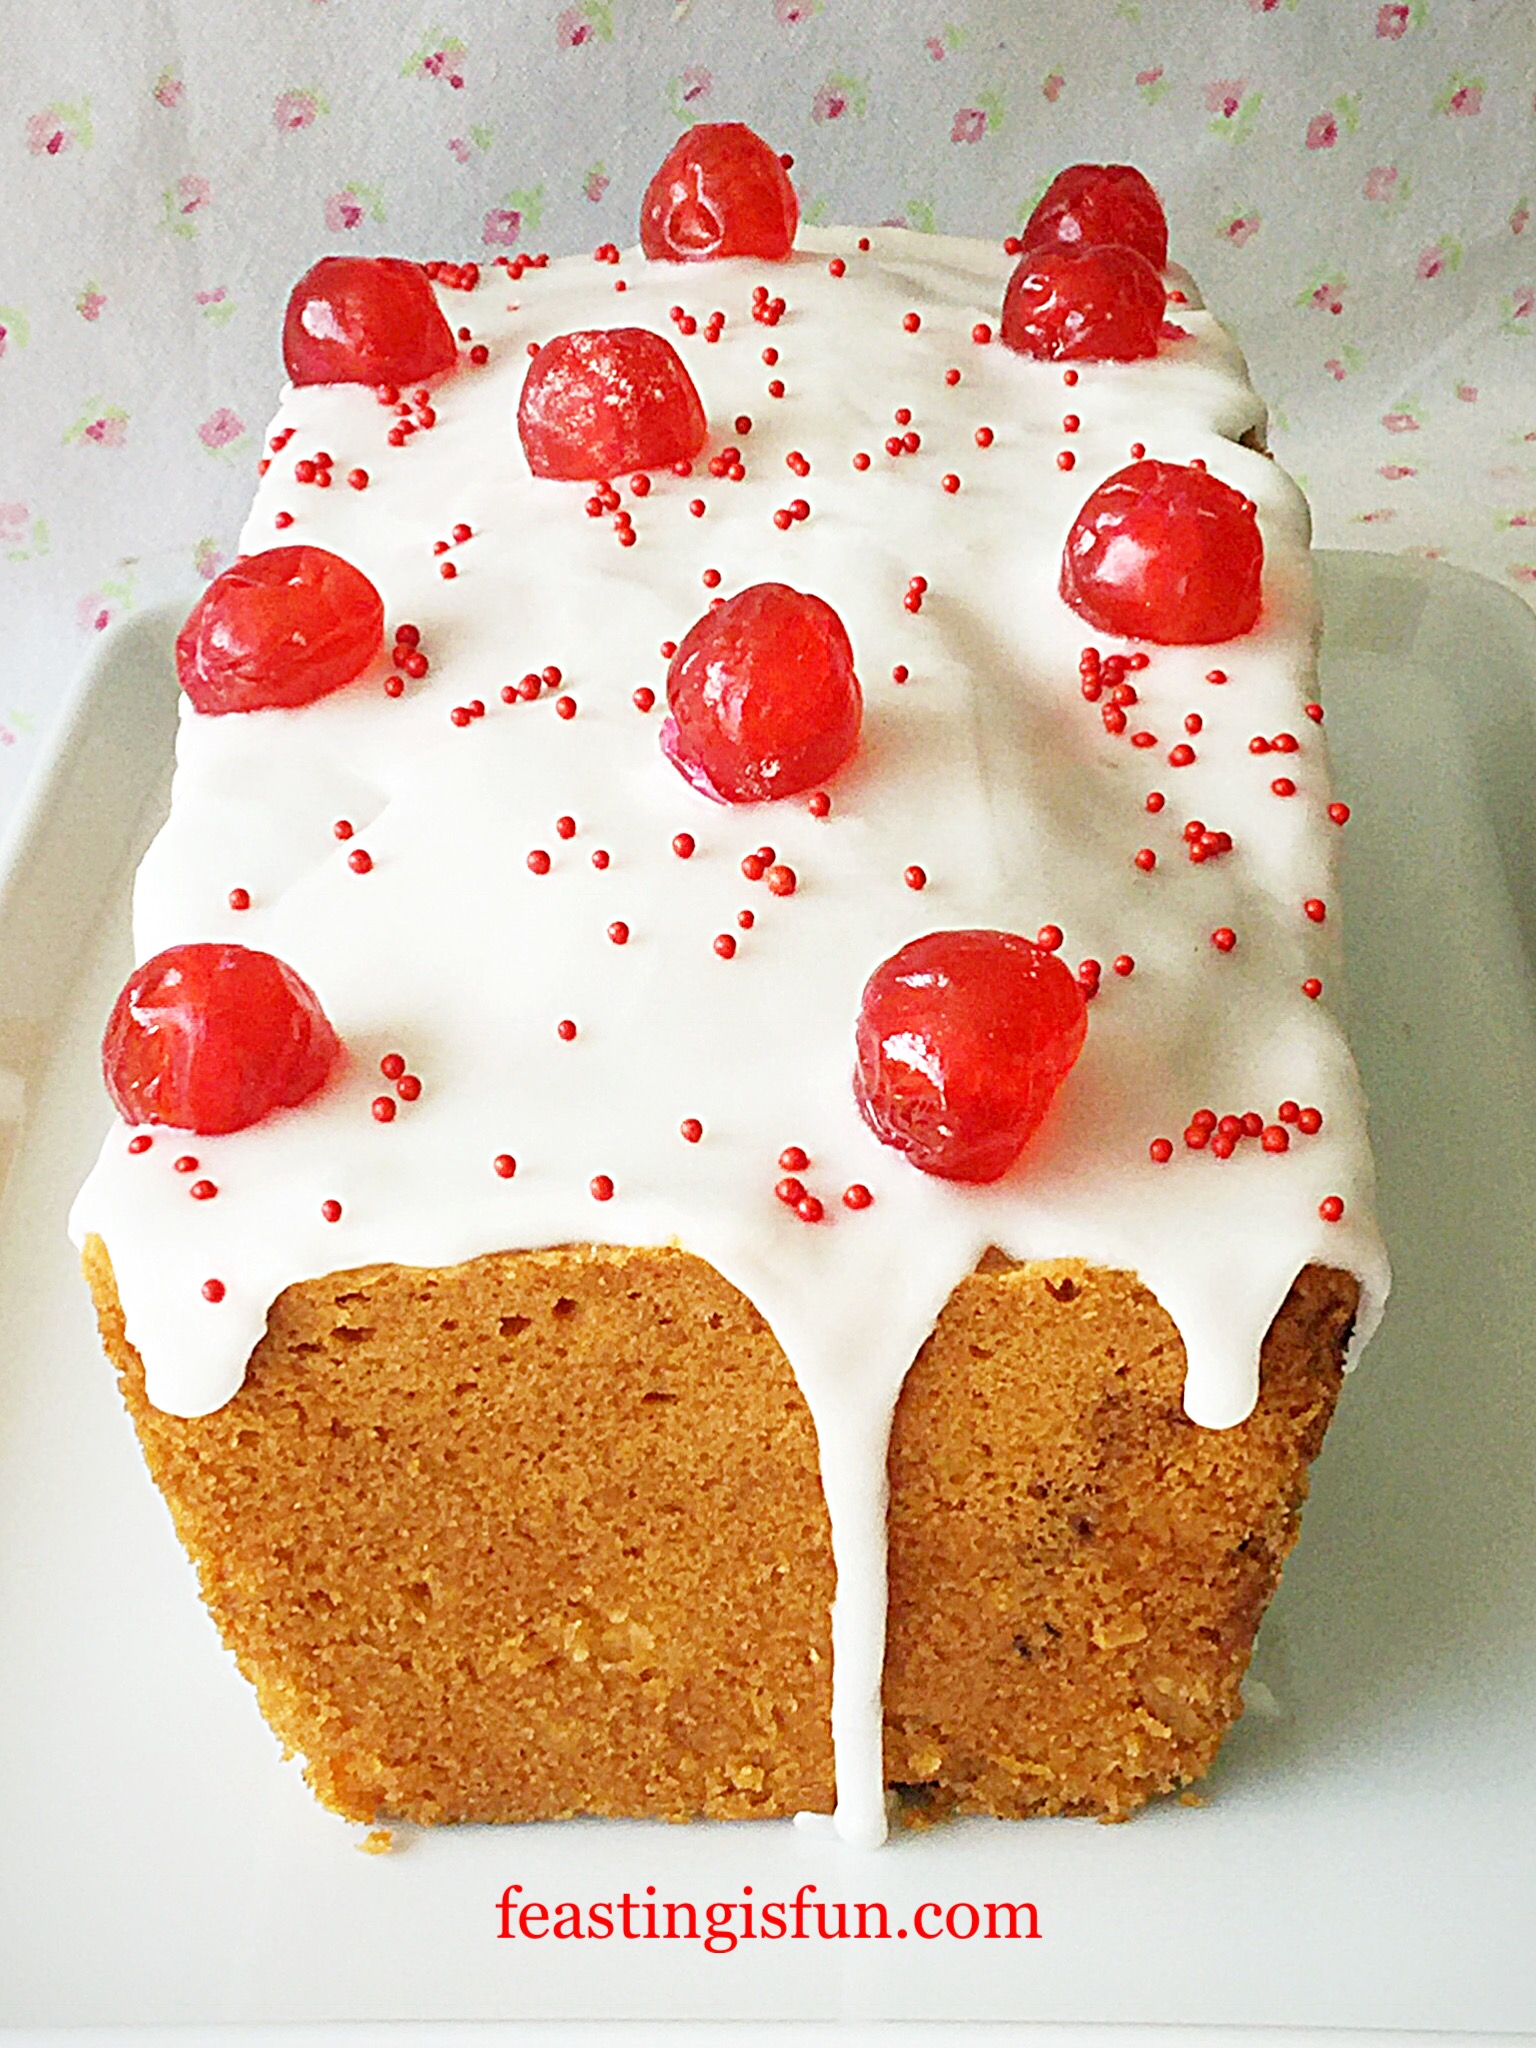
Use a whisk to mix the icing sugar and water.
Spoon the thick glacé icing on to the top of the cake.
Add the glacé cherries to the iced cake.
Decorating the Iced Cherry Coconut Loaf Cake.
Finally sprinkle over red sugar balls before the icing sets.
The finished Iced Cherry Coconut Loaf Cake.
Put the cake to one side and leave to set.
Iced Cherry Coconut Loaf Cake
Serve sliced and placed on your very best china, along with a freshly made pot of tea.
Store in an airtight container. Eat within 5 days.
If you have enjoyed this recipe for Iced Cherry Coconut Loaf Cake you may also like these:
While I am not the world’s best cake decorator, I’ve developed several strategies for making the cakes I bake look presentable. Because we eat with our eyes first AND as I mentioned, I like pretty things, cakes being one of them. So, for inspiration I follow several bakers and cake decorators on Twitter and Instagram. And they are an invaluable source of tips, tricks and ideas. Likewise, Pinterest is also full of inspiration. Most importantly, nature is the greatest source of inspiration for me. None more so than my beautiful back garden.
What inspires you?
So, whatever you are making, baking and creating in your kitchens, have fun preparing and sharing your feast.
Sammie xx
No part of this post may be reproduced or duplicated without the written permission of the owner. Please see my Disclosure Policy.
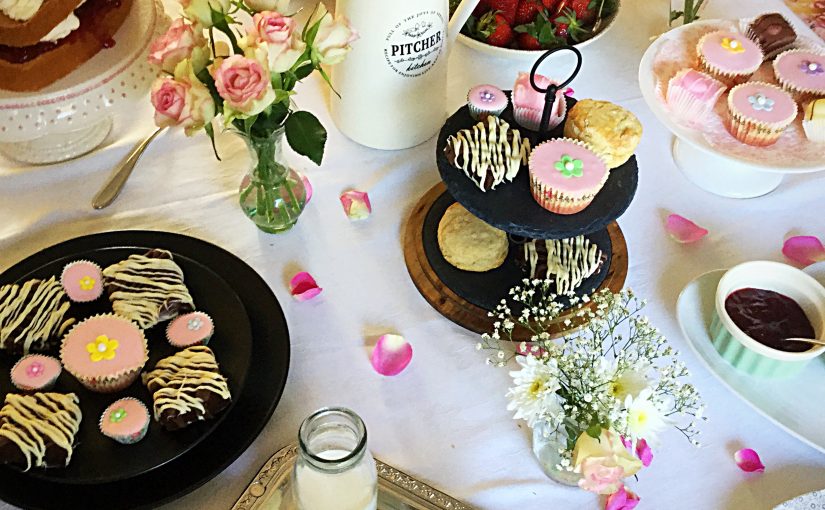
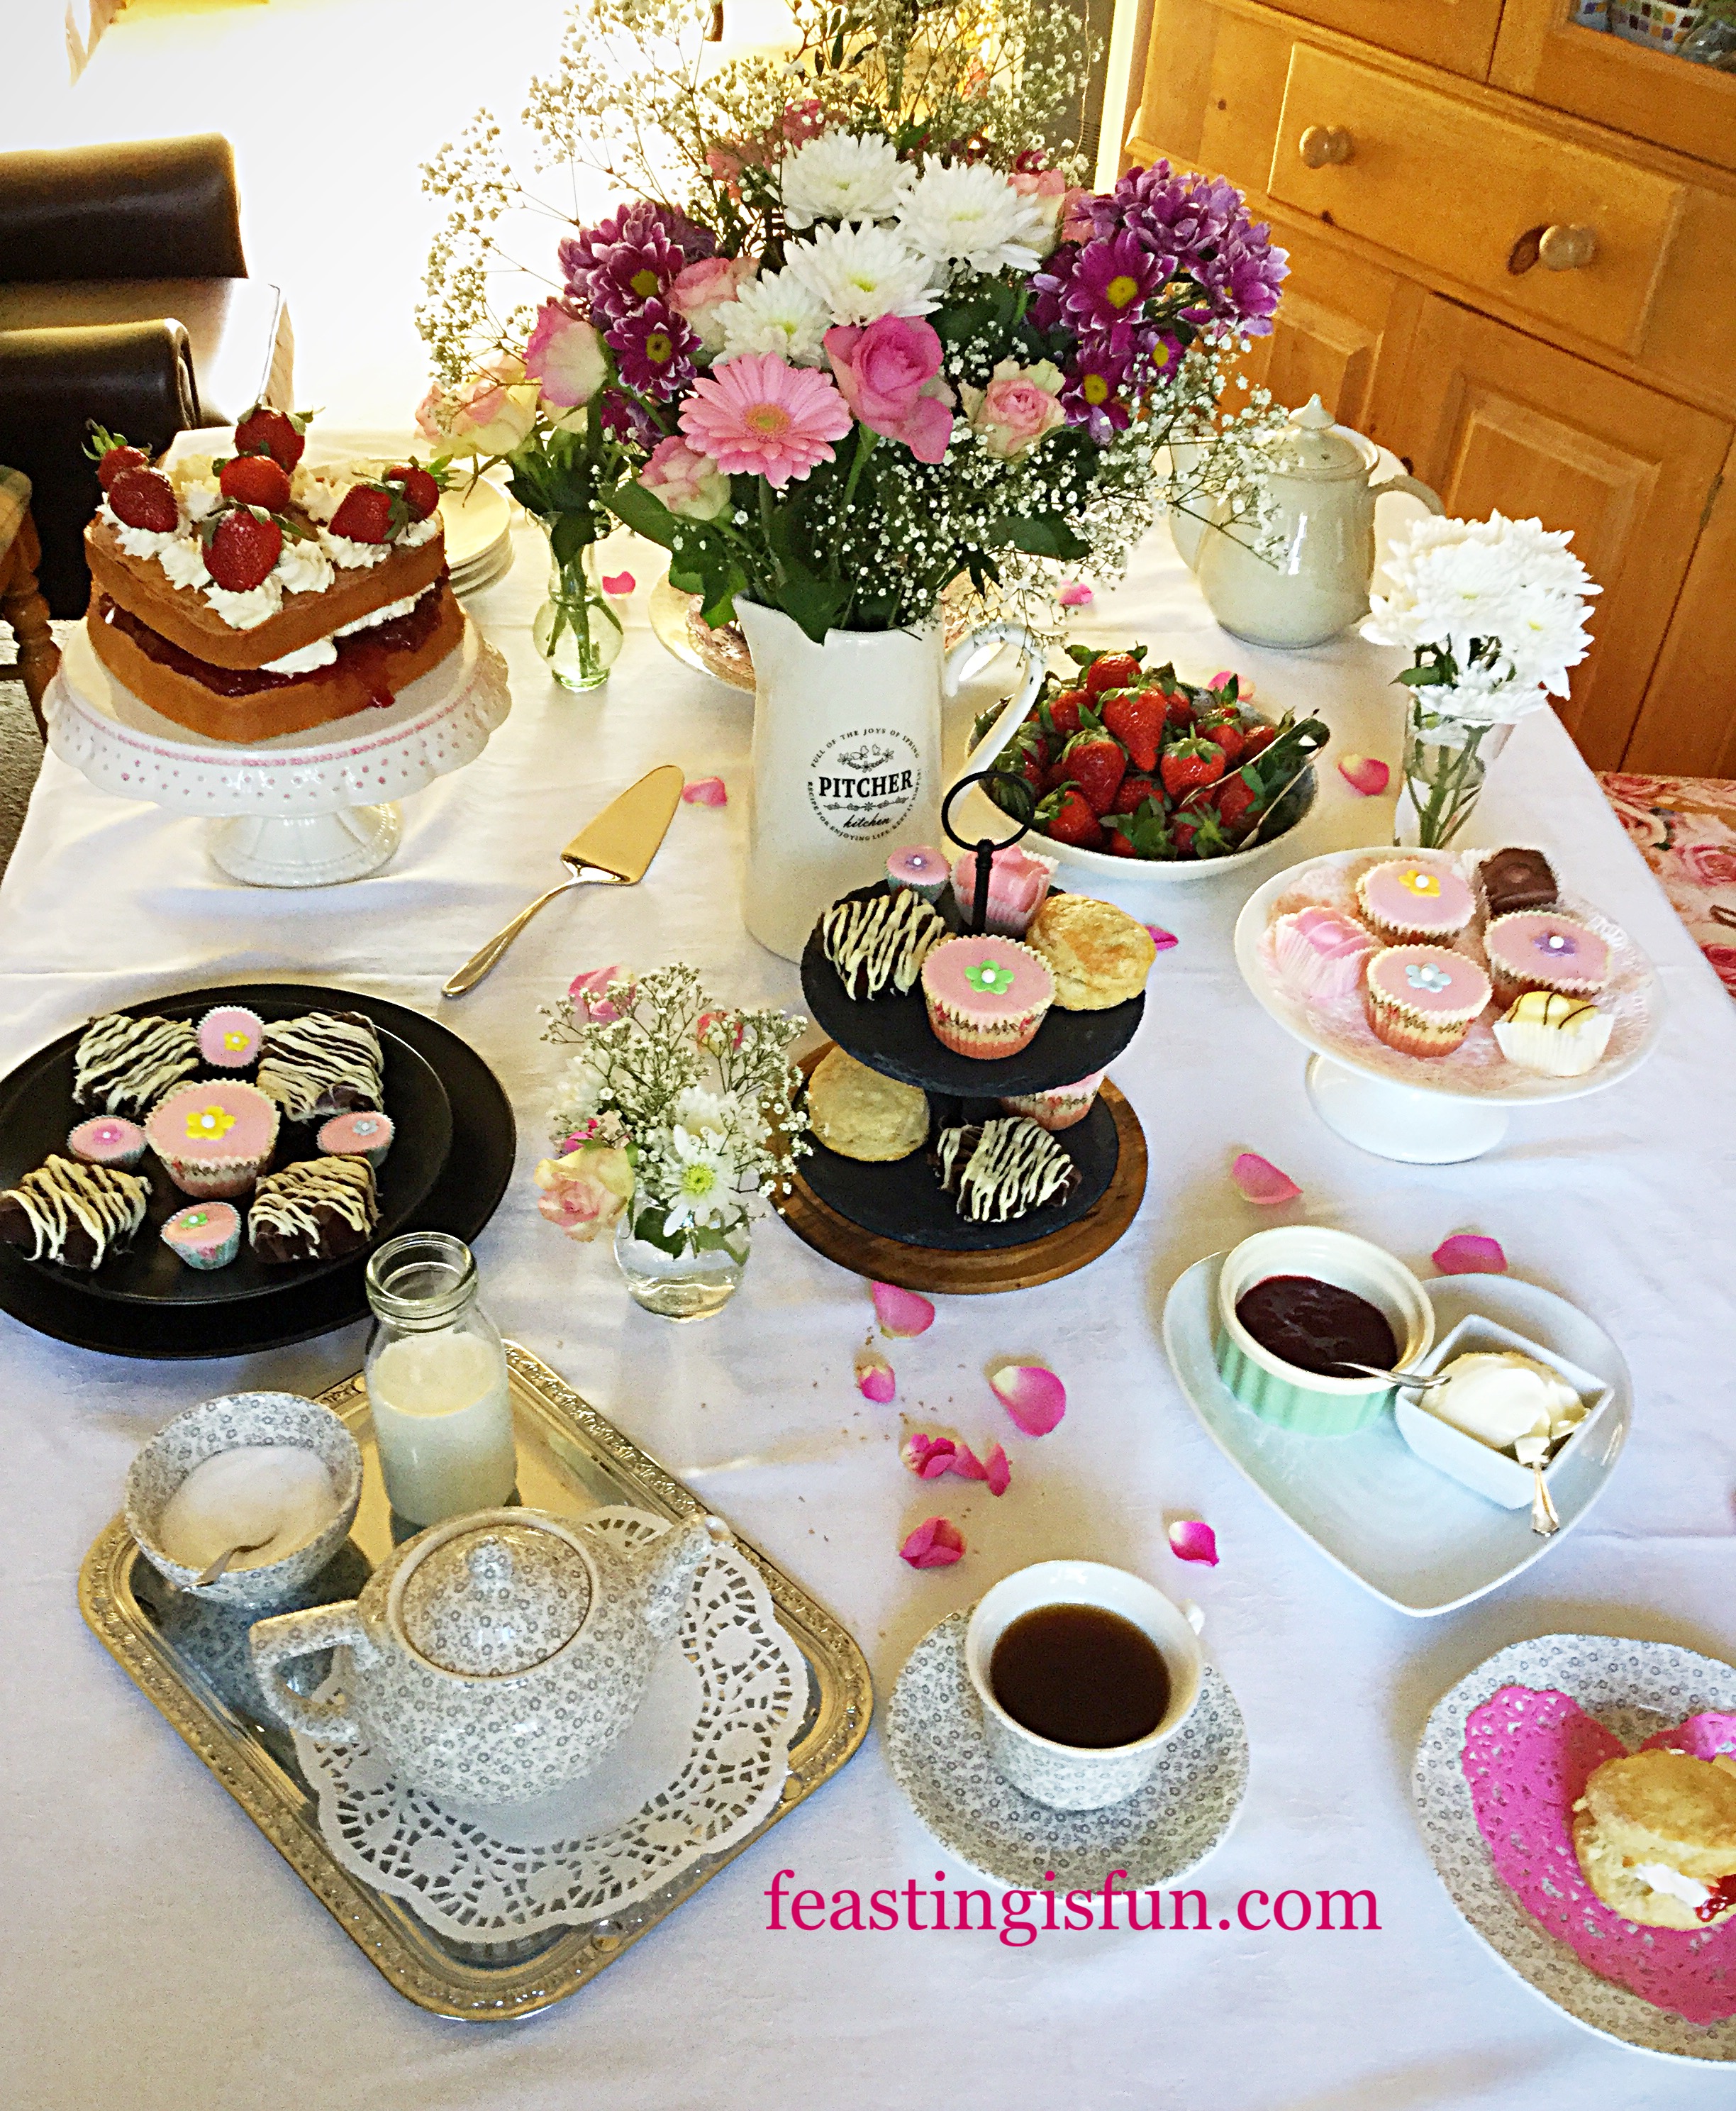
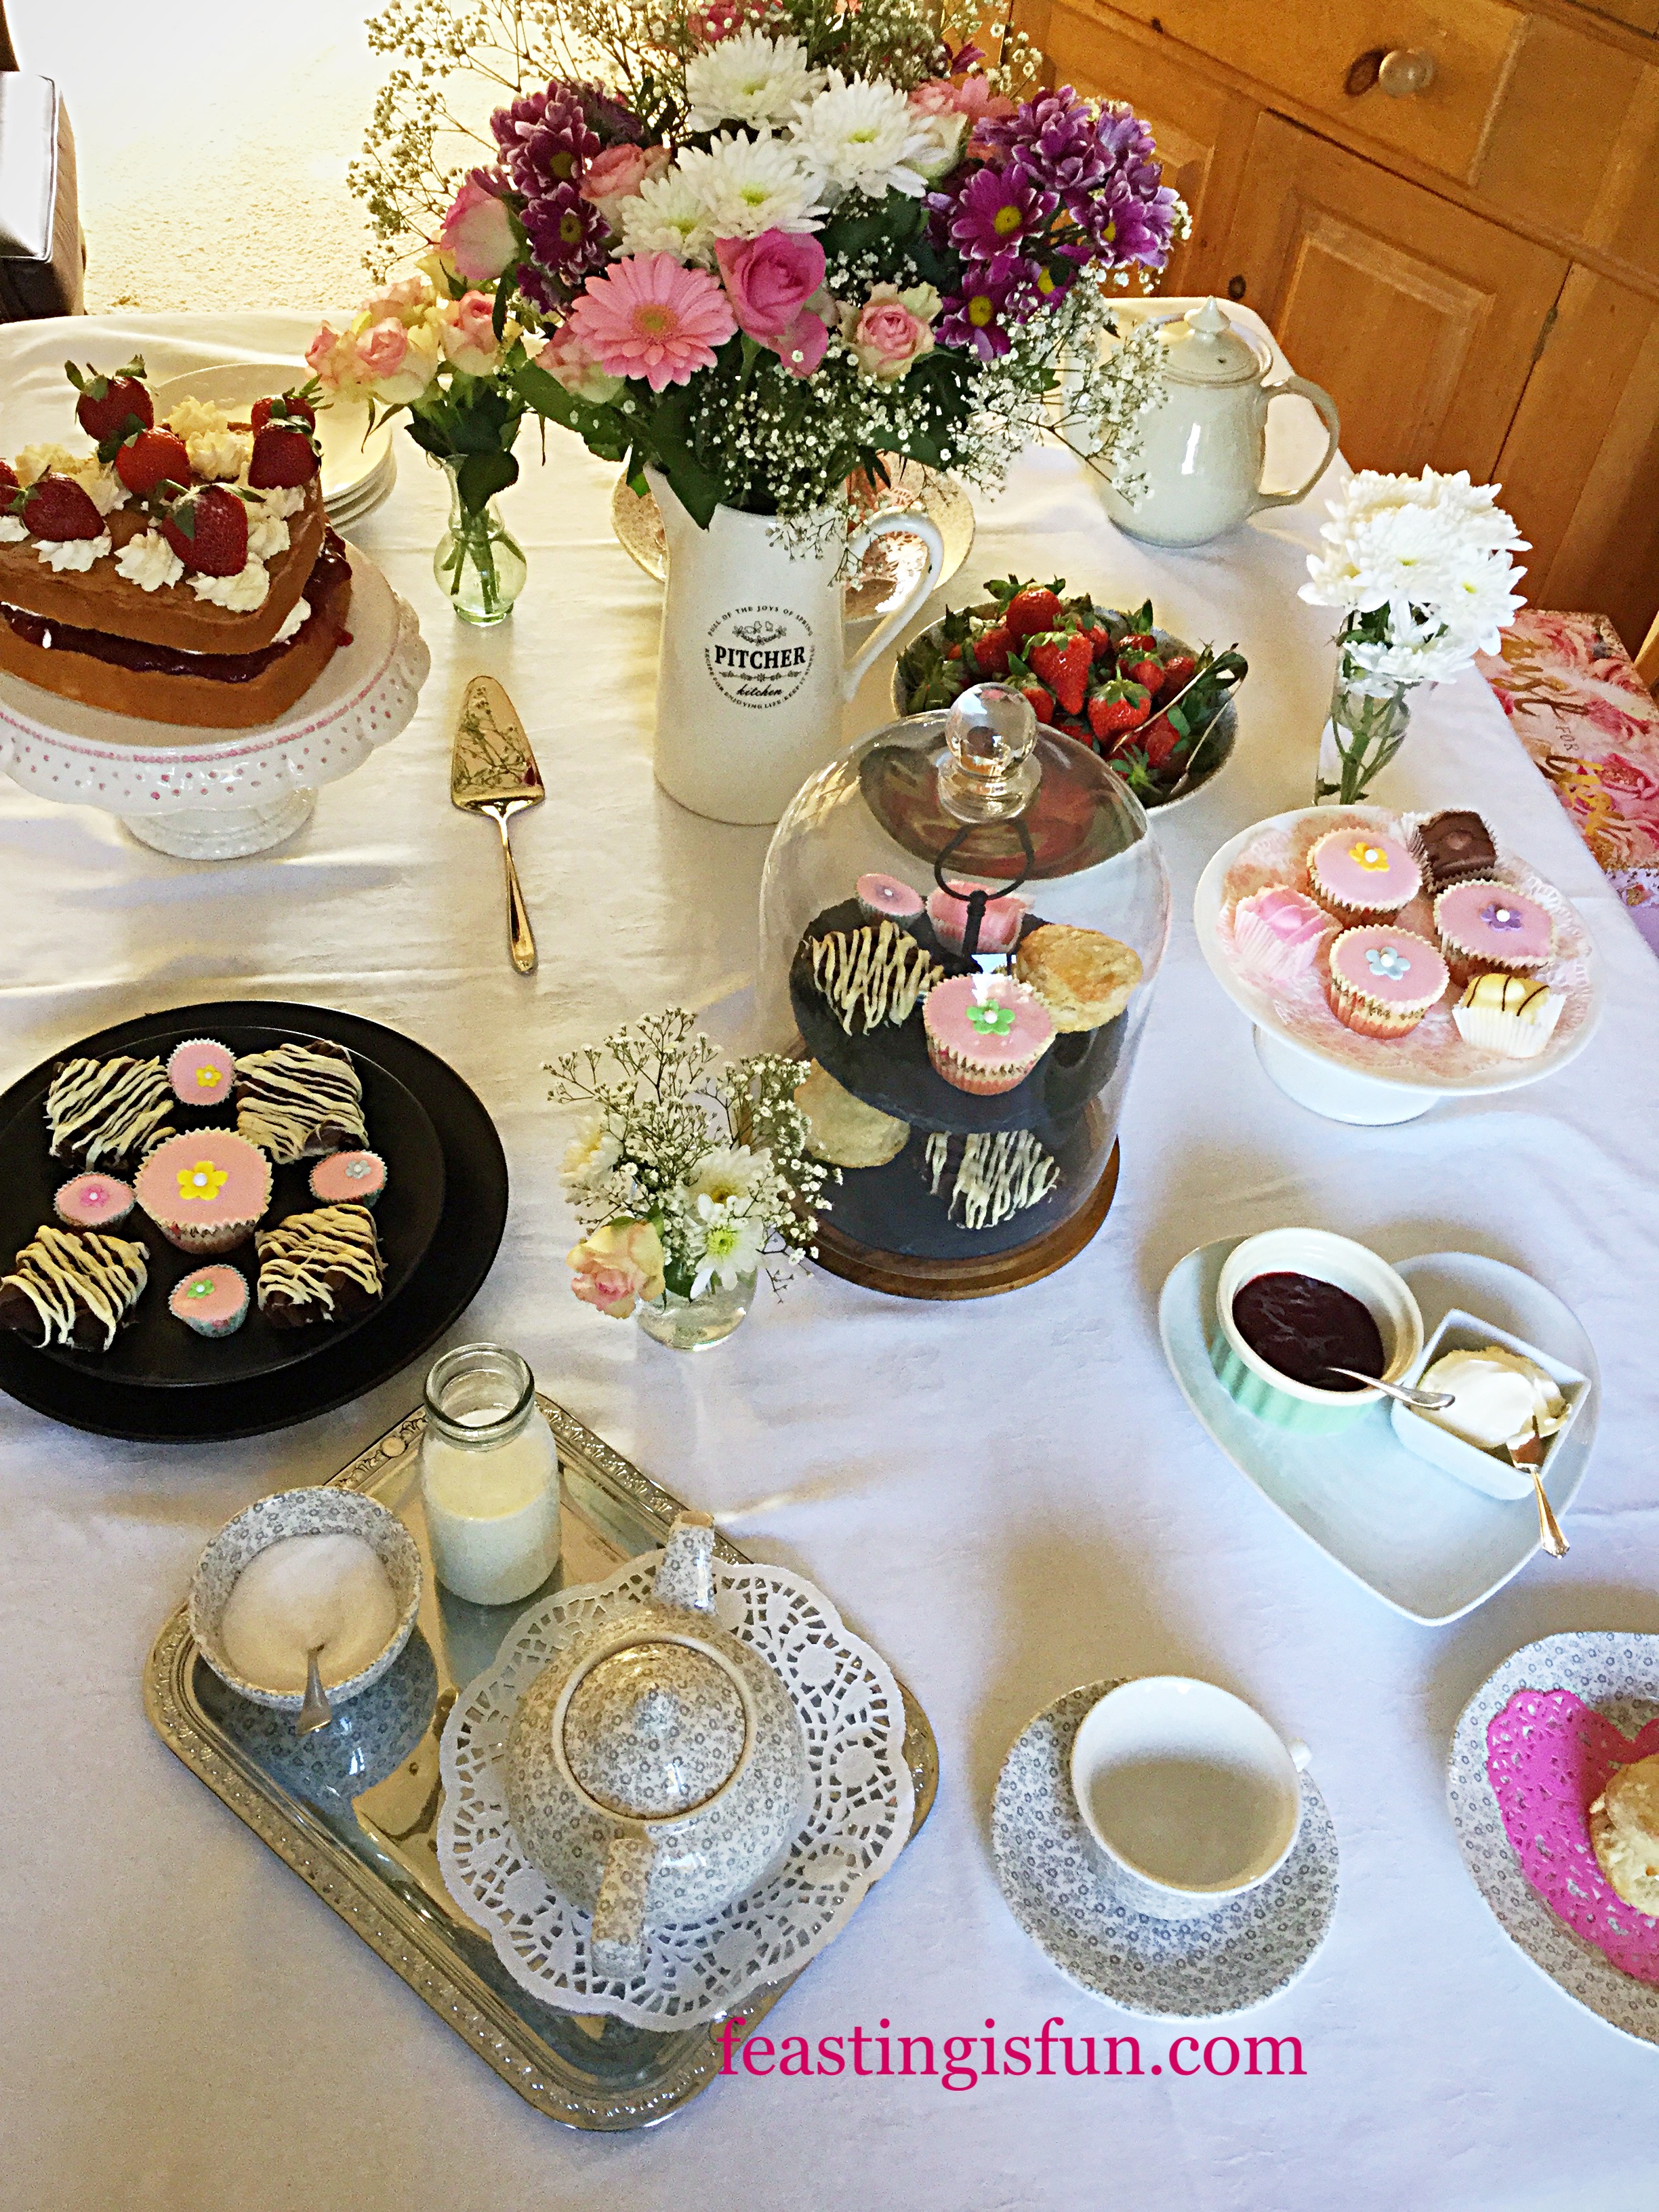
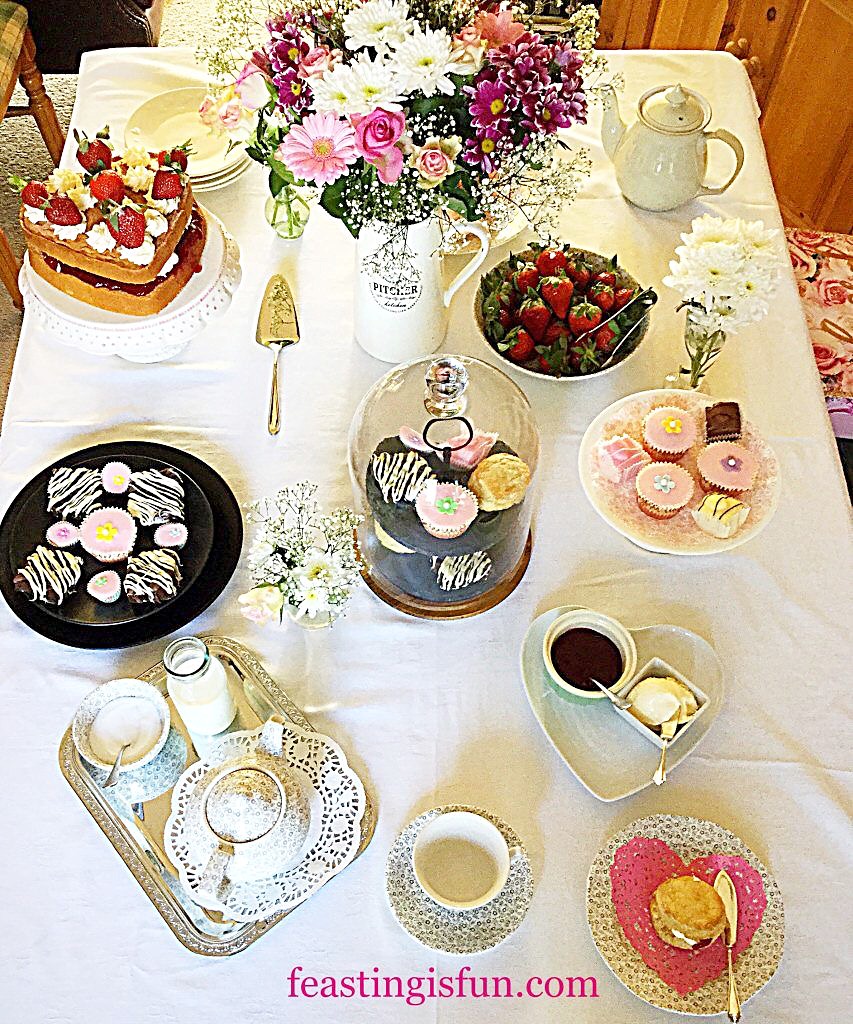
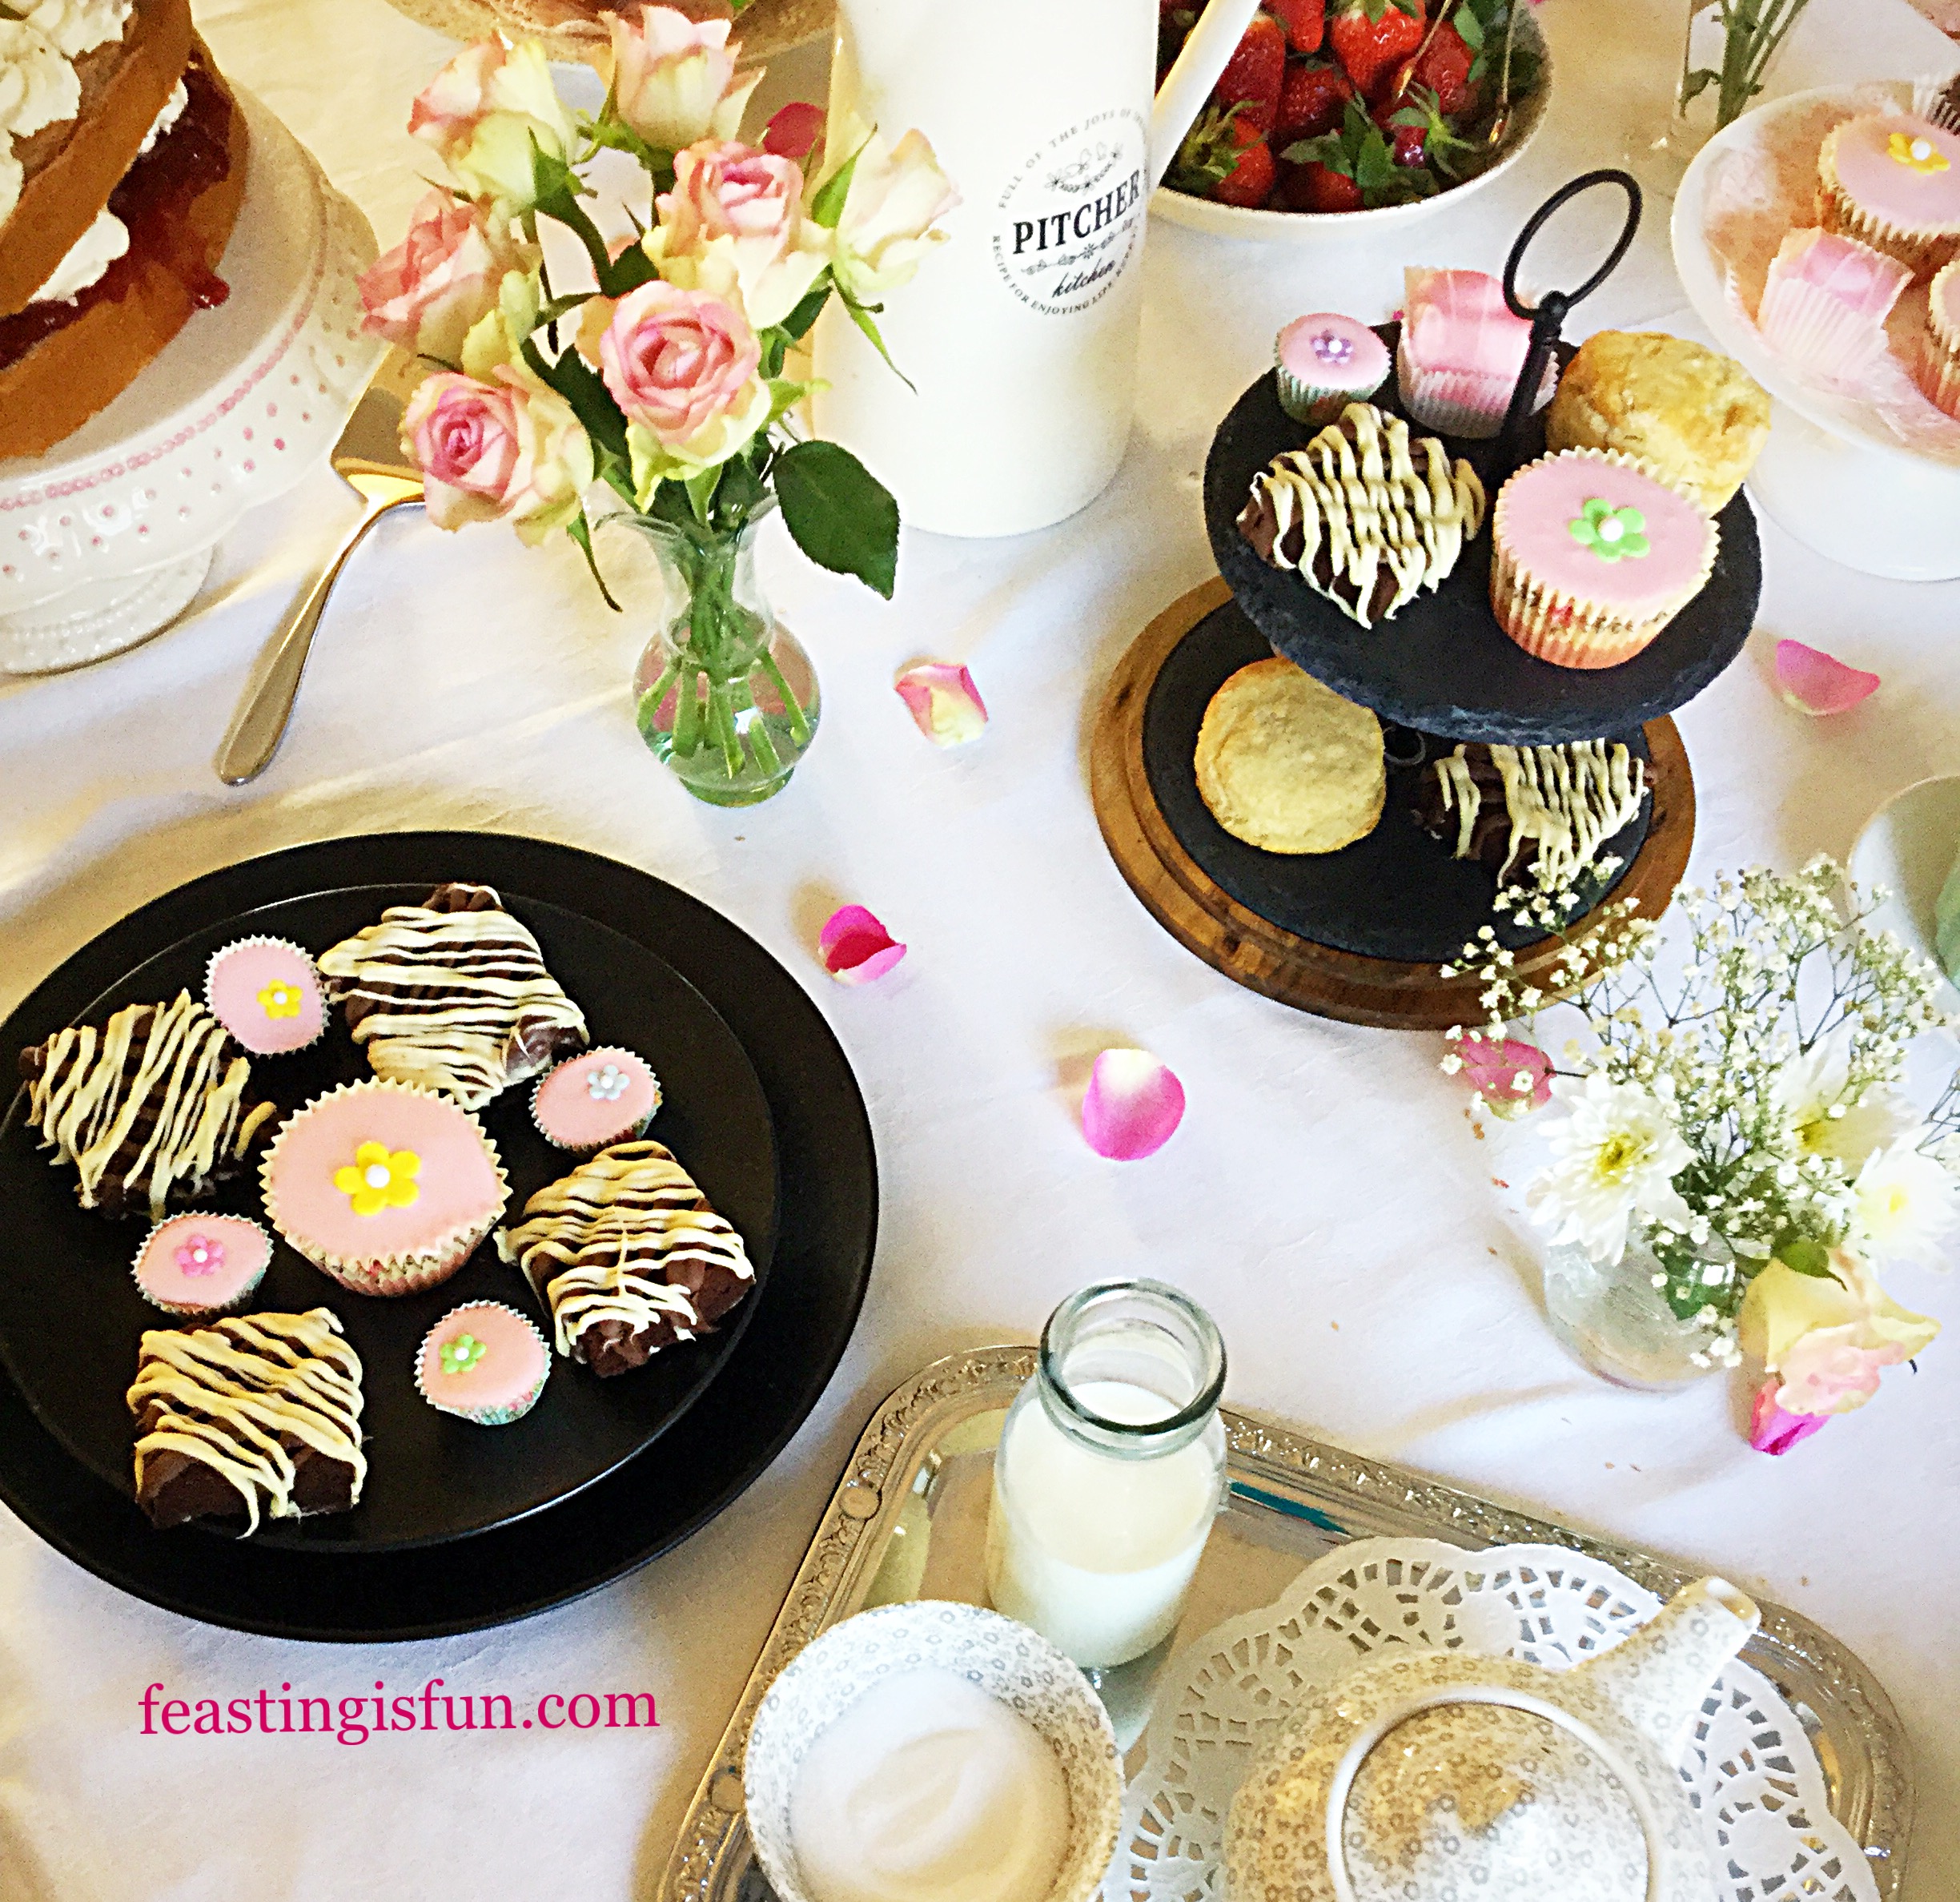
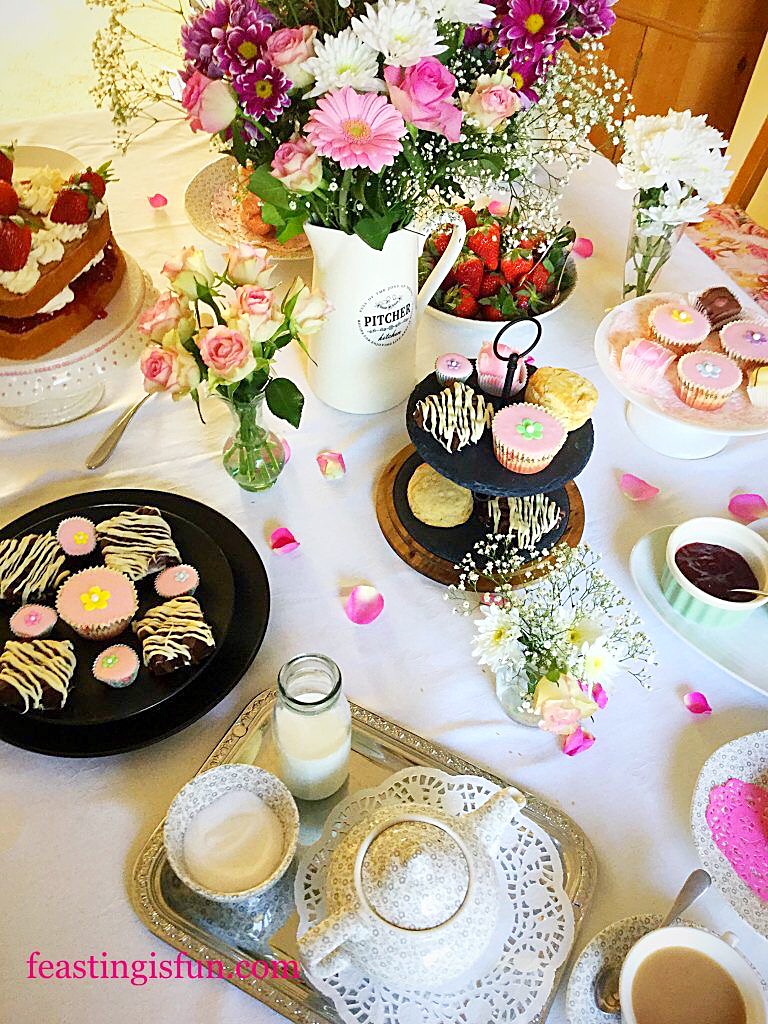
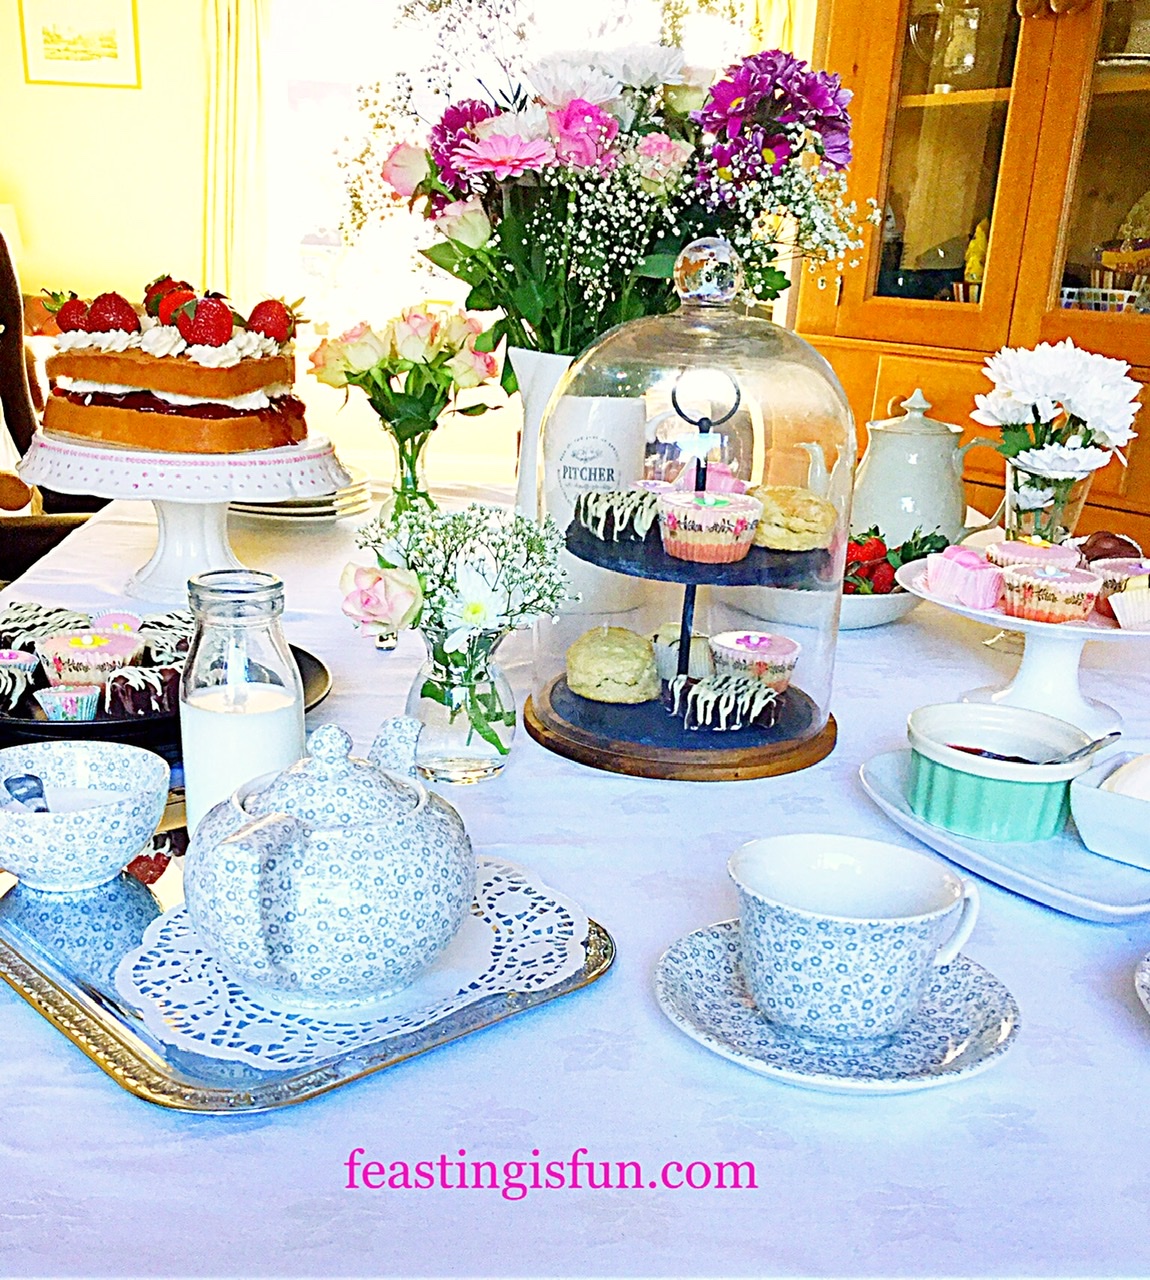
Mother’s Day will soon be upon us. Sunday March 26th 2017 here in the U.K. To help celebrate Mothering Sunday, Steamer Trading asked me to help them set up an Afternoon Tea. I jumped at the opportunity, knowing that the quality and variety of kitchen and cookware they sell is outstanding. While also confident that some easy bakes would partner perfectly with beautiful table and bakeware. See for yourself how Steamer Trading Host Mother’s Day Afternoon Tea.
Steamer Trading Host Mother’s Day Afternoon Tea beautifully laid out delightful sweet treats.
Homemade cakes and treats always taste much better than shop bought. If, however, baking is an area where confidence is lacking here’s the perfect solution. Buy a few pretty cakes and then make the scones, Super Light Scones . Since this recipe is the easiest on Feasting is Fun and guaranteed to bring a smile to Mum’s face. Add a pot of luxurious clotted cream and strawberry jam to turn this Afternoon Tea into a real feast!
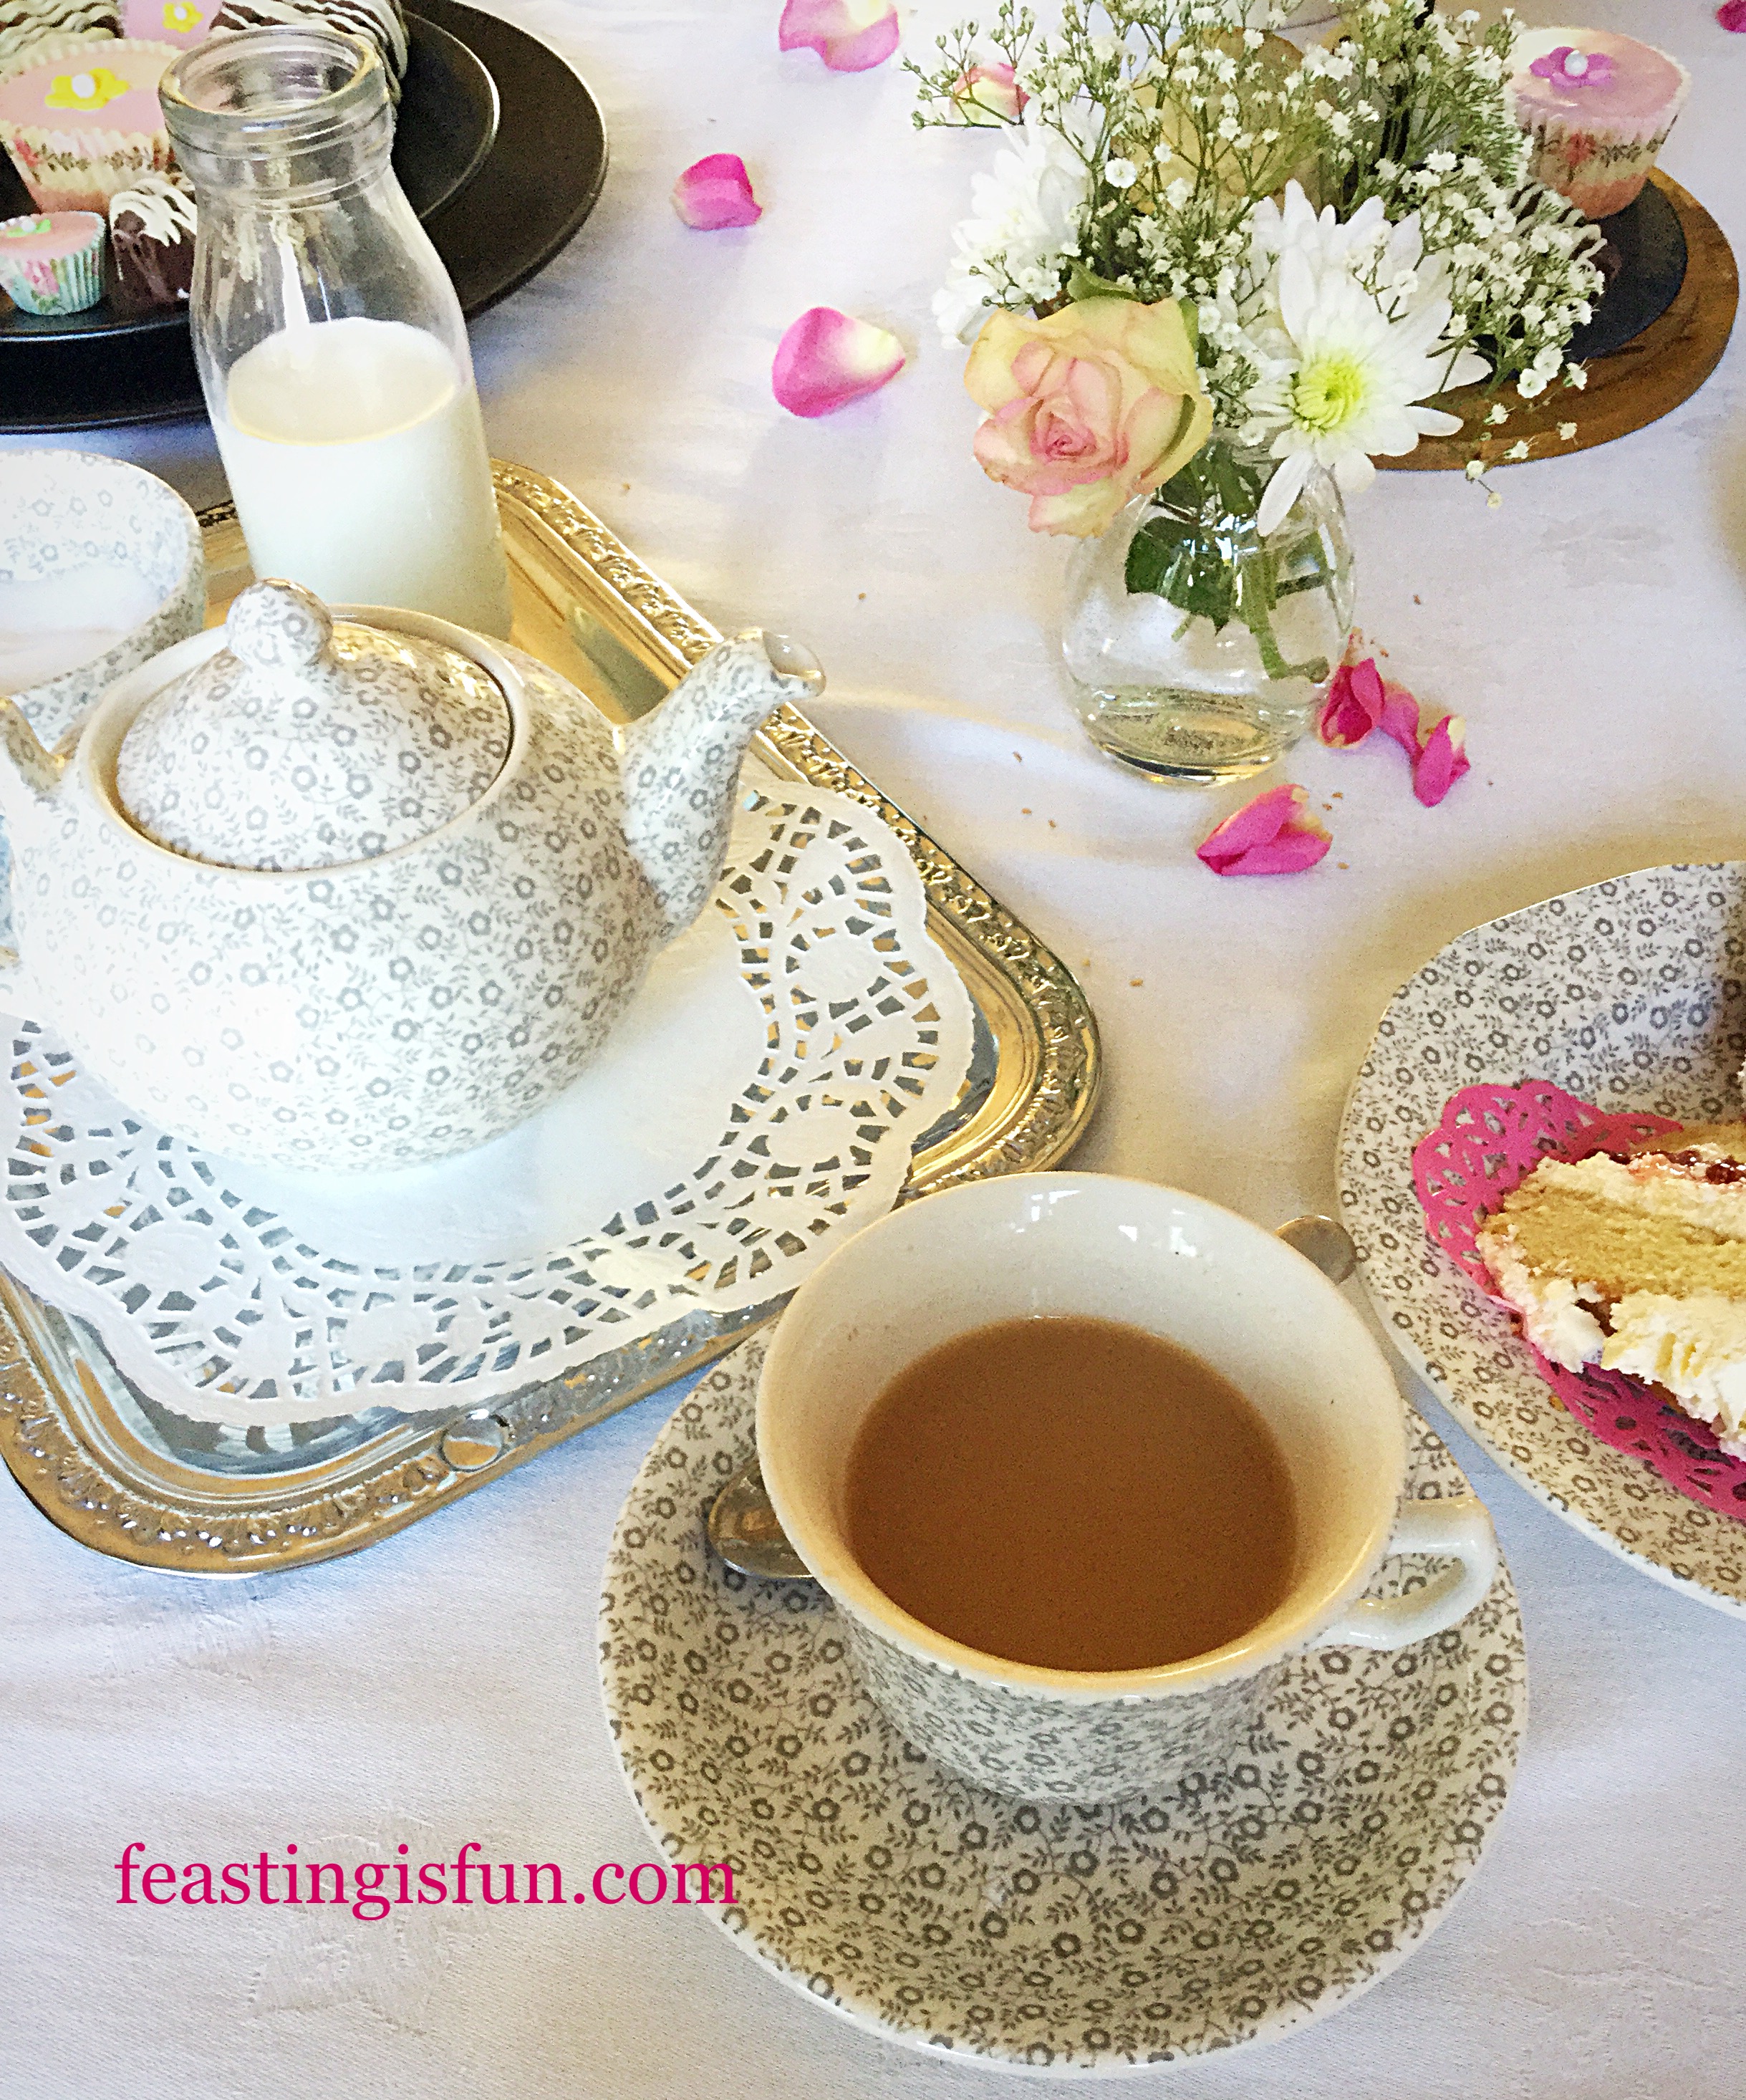
Afternoon Tea using the Burleigh Felicity tea set
Afternoon Tea Needs A Tea Set
No Afternoon Tea is complete without a beautiful tea set. Having been sent a Burleigh Felicity Teapot I decided to start a collection. Tea cup and saucer, large dinner plate, side plate, pasta bowl and finally a sugar bowl. All bought to start my own collection. As a result I am now building a complete set. The pattern and style have a timeless quality and style.
The domed two tier cake stand takes centre stage.
Putting Afternoon Tea On Display
Within the items sent to me is this Domed Slate Cake Stand. Perfect for keeping bugs out and cakes fresh. Since the slate cake stand also stands alone, the wooden base and dome may also be used to display another tasty item. Maybe cheese and crackers. Most of all, the packaging keeps the cake stand and dome well protected between use. While the slate is sturdy and creates a solid background on which to display the cakes.
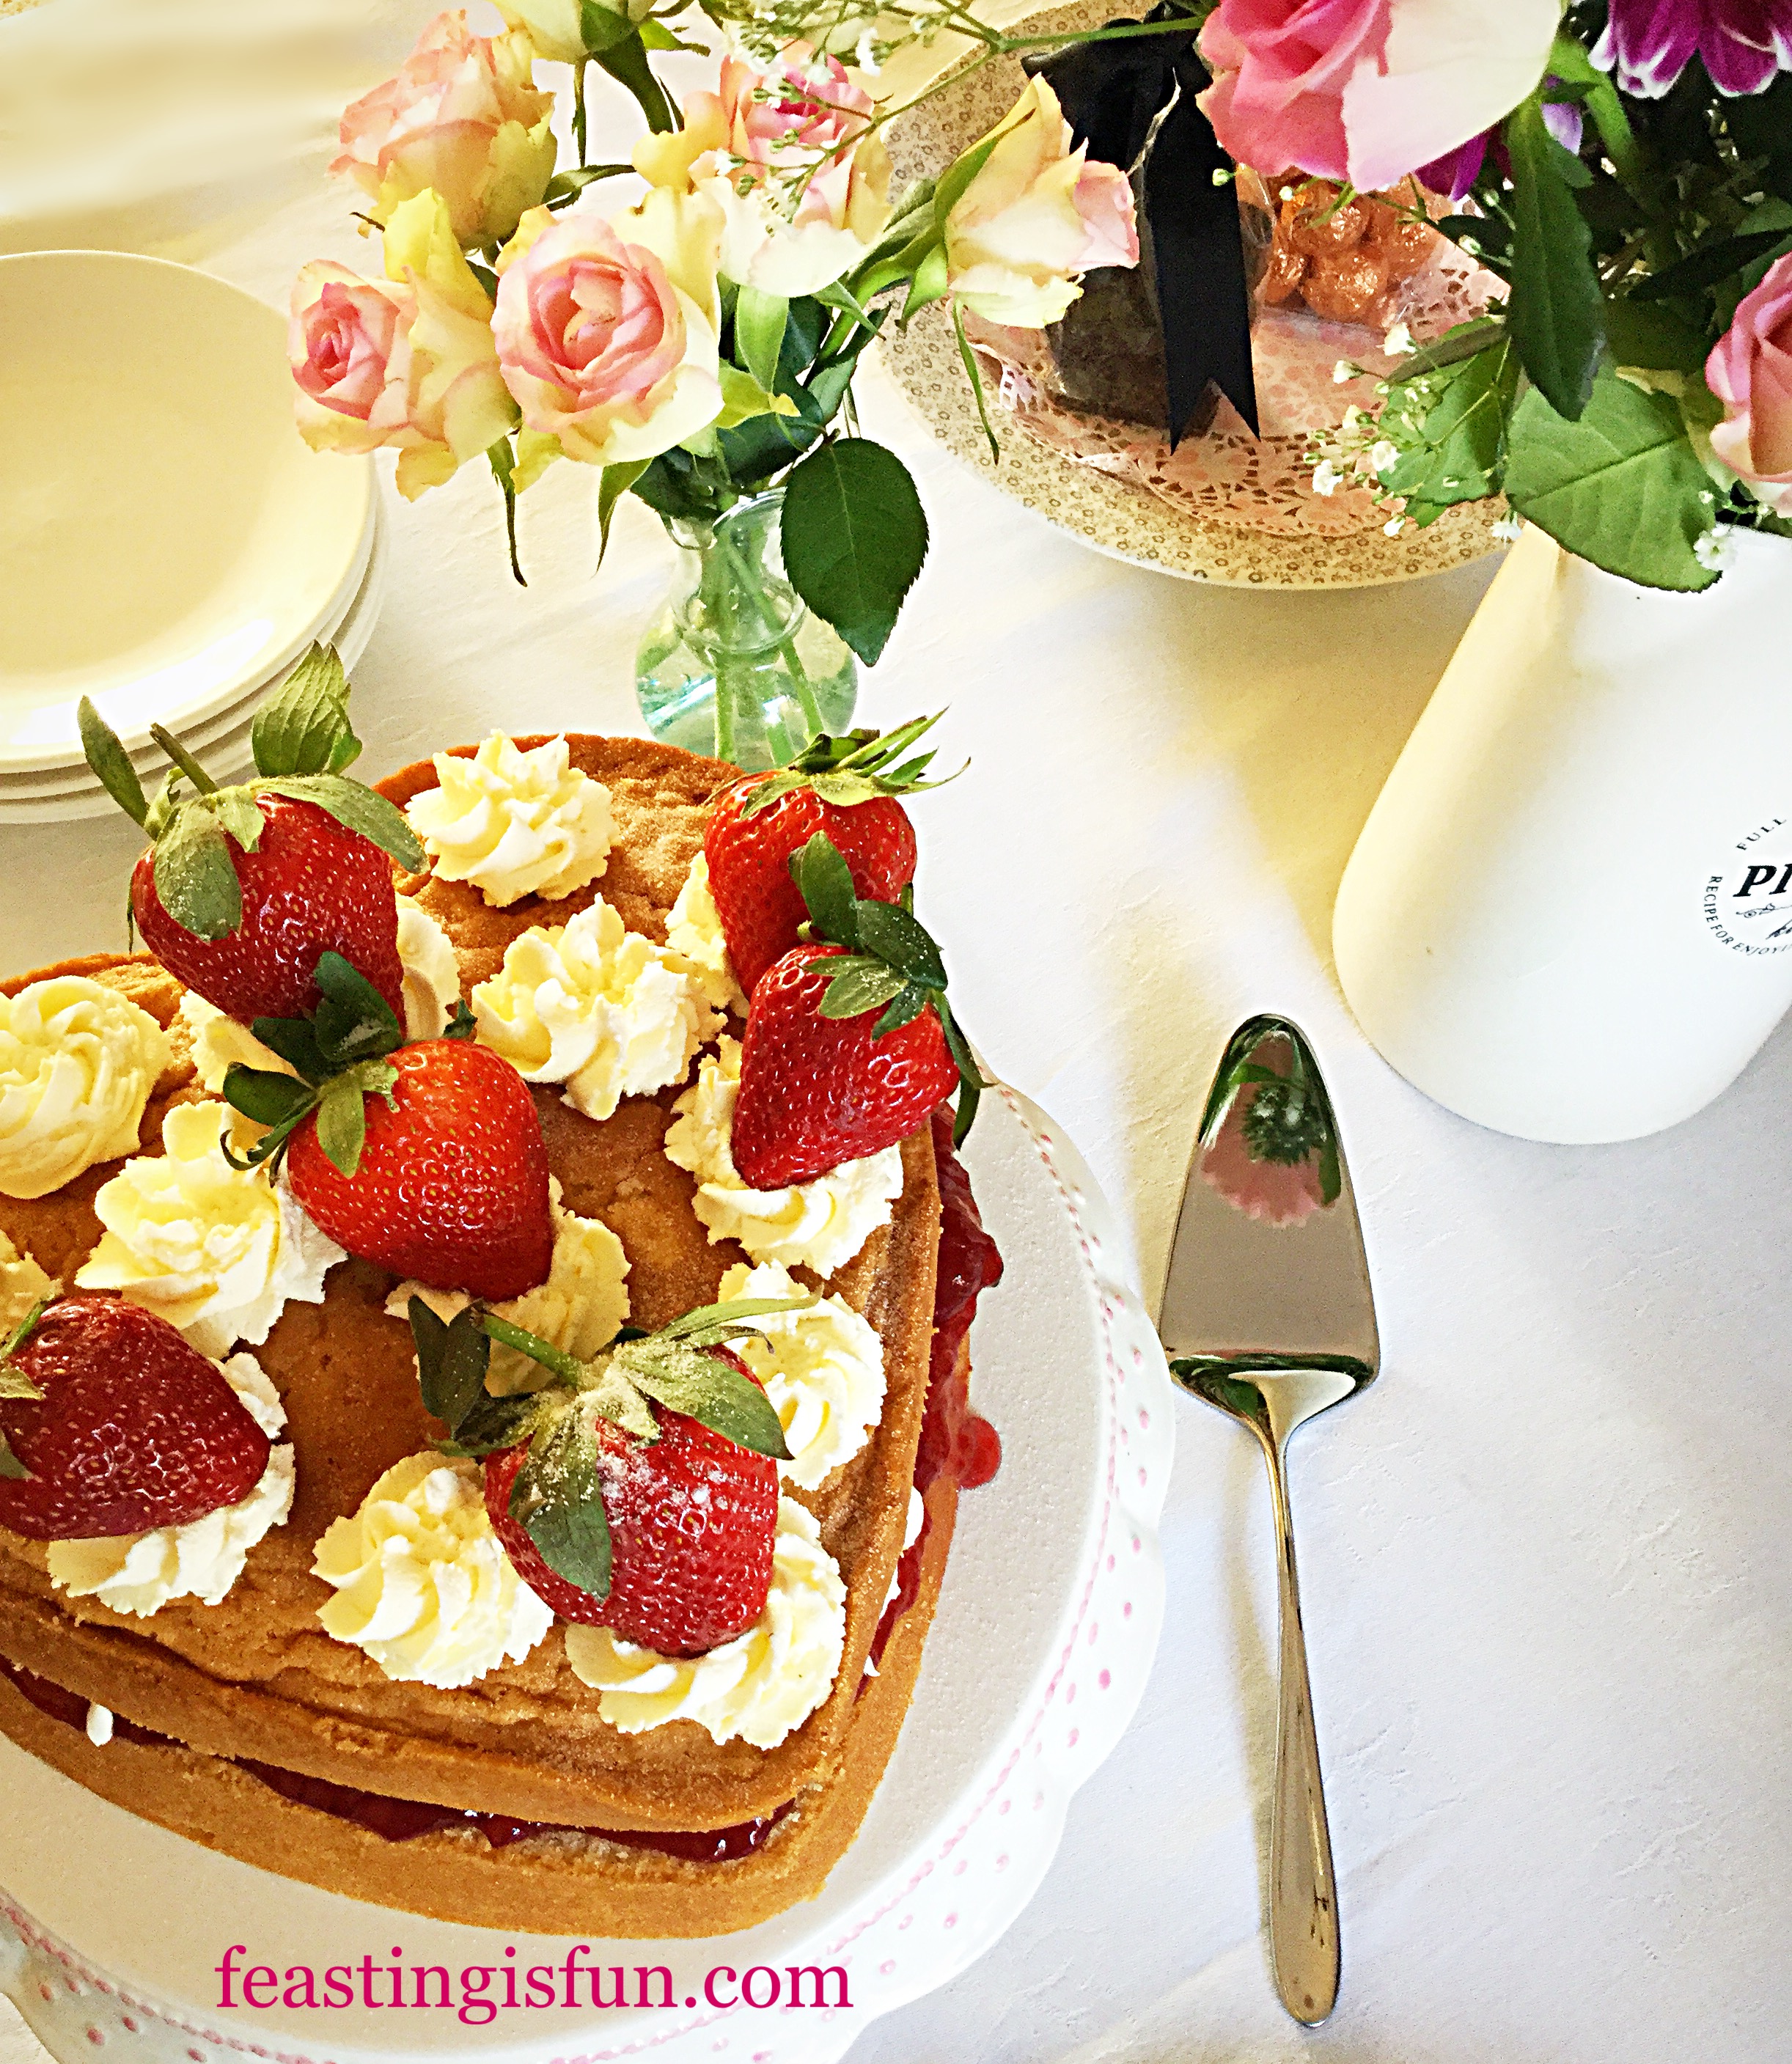
Heart shaped Strawberry and Cream Victoria Sponge.
Baked And Served With Love
Pictured above is Sophie Conran Cake Server. Highly polished, with a simple, smooth design. As beautiful sitting on the table as it is practical in serving the Heart Shaped Strawberry and Cream Victoria Sponge Cake. Baked using the Springform Heart Tin. In addition to baking cakes, because of the springform element, this tin would be especially good for creating cheesecakes.
A beautifully laid out Afternoon Tea.
Bowls of fresh strawberries with both large and smaller vases of flowers enhance not only the table setting, but add to the special theme of Mother’s Day. Also, they can be wrapped up, alongside any leftover cakes and scones, for Mum to take home with her. As a result Mum receives a double treat. After all, Mother’s Day is a special day, set aside to thank Mothers.
Tiny little Turkish Delight cakes along with regular cupcakes add quaintness to the pretty table setting.
Bite Size Cakes
Since being sent Masterclass Mini Muffin Tin, I made tiny, pixie cupcakes. Turkish Delight in flavour, their larger cupcake cousins were also baked. Impressed with the strength, non stick coating and durability of the mini muffin tin, I will definitely look to this brand for larger fairy cake and cupcake tins.
Treat Mum to a special Afternoon Tea in your own home.
Finally, no Mum, or Afternoon Tea is complete without a touch of chocolate. Chocolate Drizzle Cake Squares are easy to make and even easier to eat!
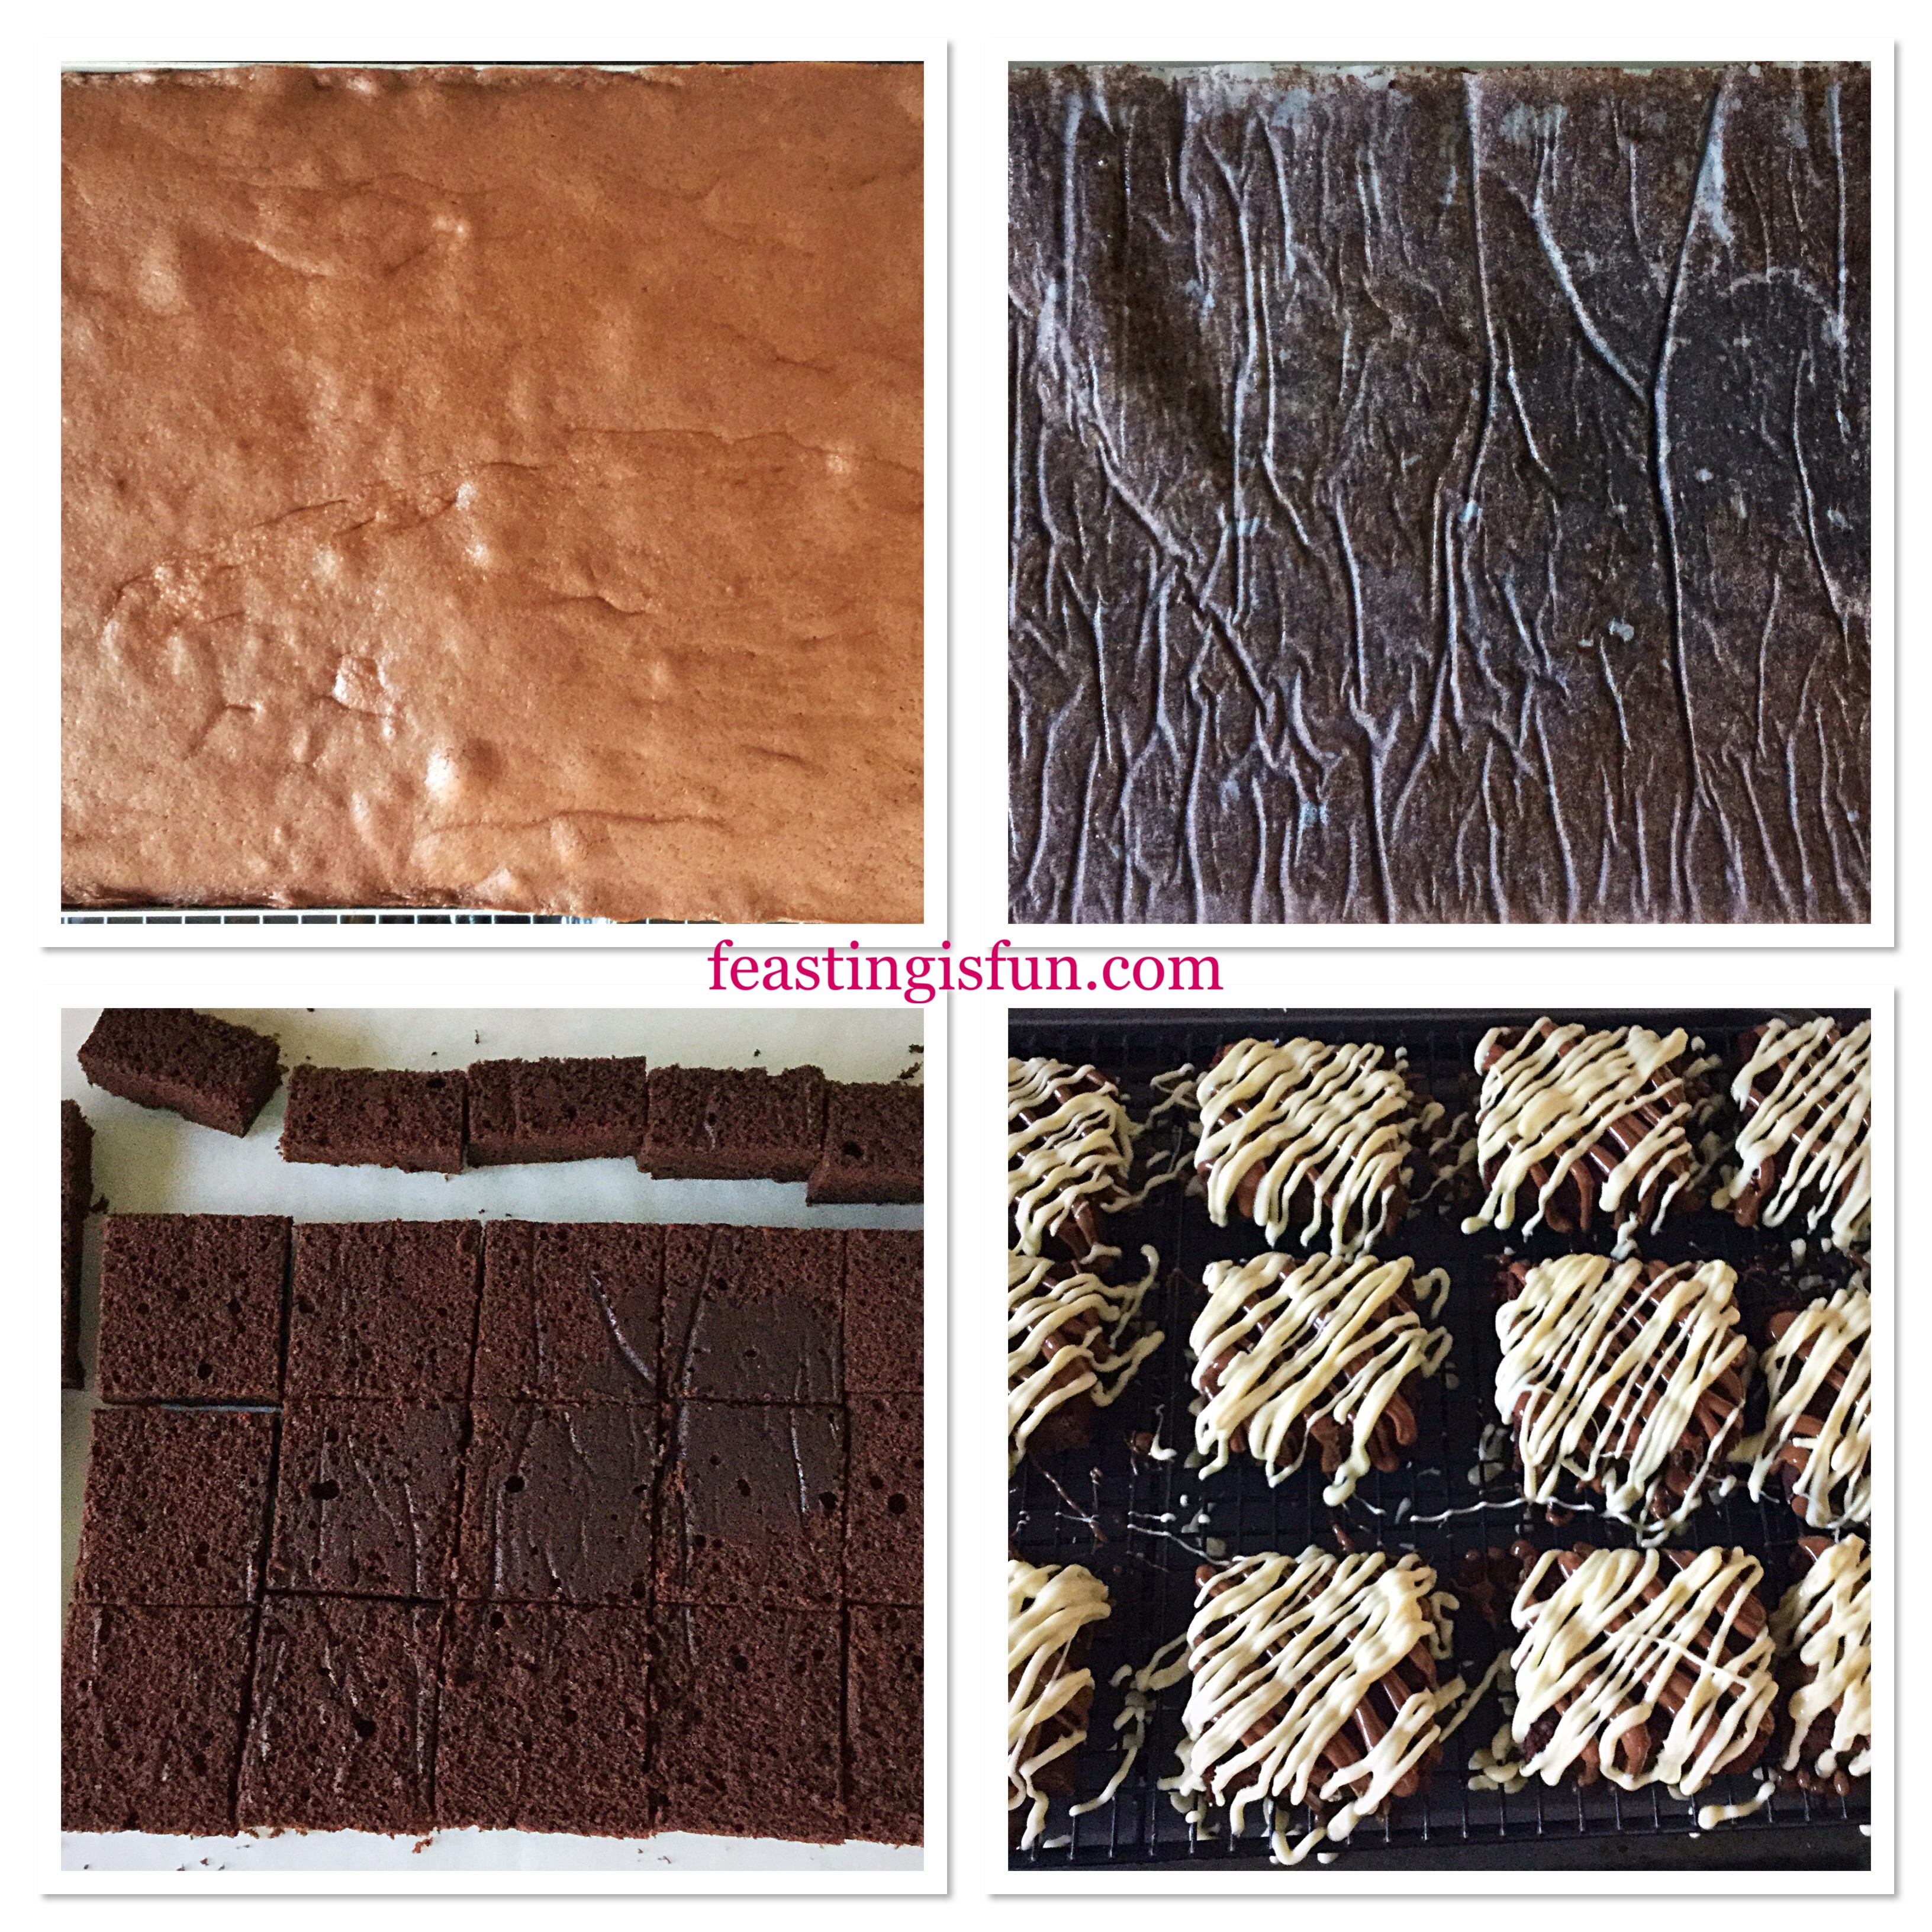
Preheat the oven to 160C/140C fan, gas mark 3, 325F.
Lightly grease, with butter a 28cm x 20cm x 5cm ( 12″ x 8″ x 2″ ) tin and line the base with baking parchment.
In a large bowl add the butter, sugar and salt. Whisk until pale and fluffy.
Next add the eggs, vanilla extract and milk. Then sift in the cocoa, flour and baking powder on top. Whisk slowly until all of the ingredients are combined.
Spoon the chocolate cake batter into the prepared tin. Smooth the batter so that it fills the tin evenly.
Place the tin in the centre of the oven and bake for 25-35 minutes.
The cake is baked when it springs back form a light touch. It will also be coming away for the sides of the tin.
As soon as the cake is baked remove the tin from the oven and set to one side to cool.
When the cake has cooled, tip out on to a parchment lined, flat board.
Remove the parchment from the base of the cake and for afternoon tea portions, slice the cake into 15 x 2″ (5cm) squares.
Chocolate Drizzle Cake Squares
Decorating The Cake Squares
Place the cake squares on a cooling rack placed over a large baking tray.
Into separate, heatproof, microwaveable bowls, break up the white and then the milk chocolate.
Place one bowl at a time into the microwave. Heat for 30 seconds at a time, stirring after each zap.
When both the white and milk chocolate are completely melted transfer into 2 medium disposable piping bags.
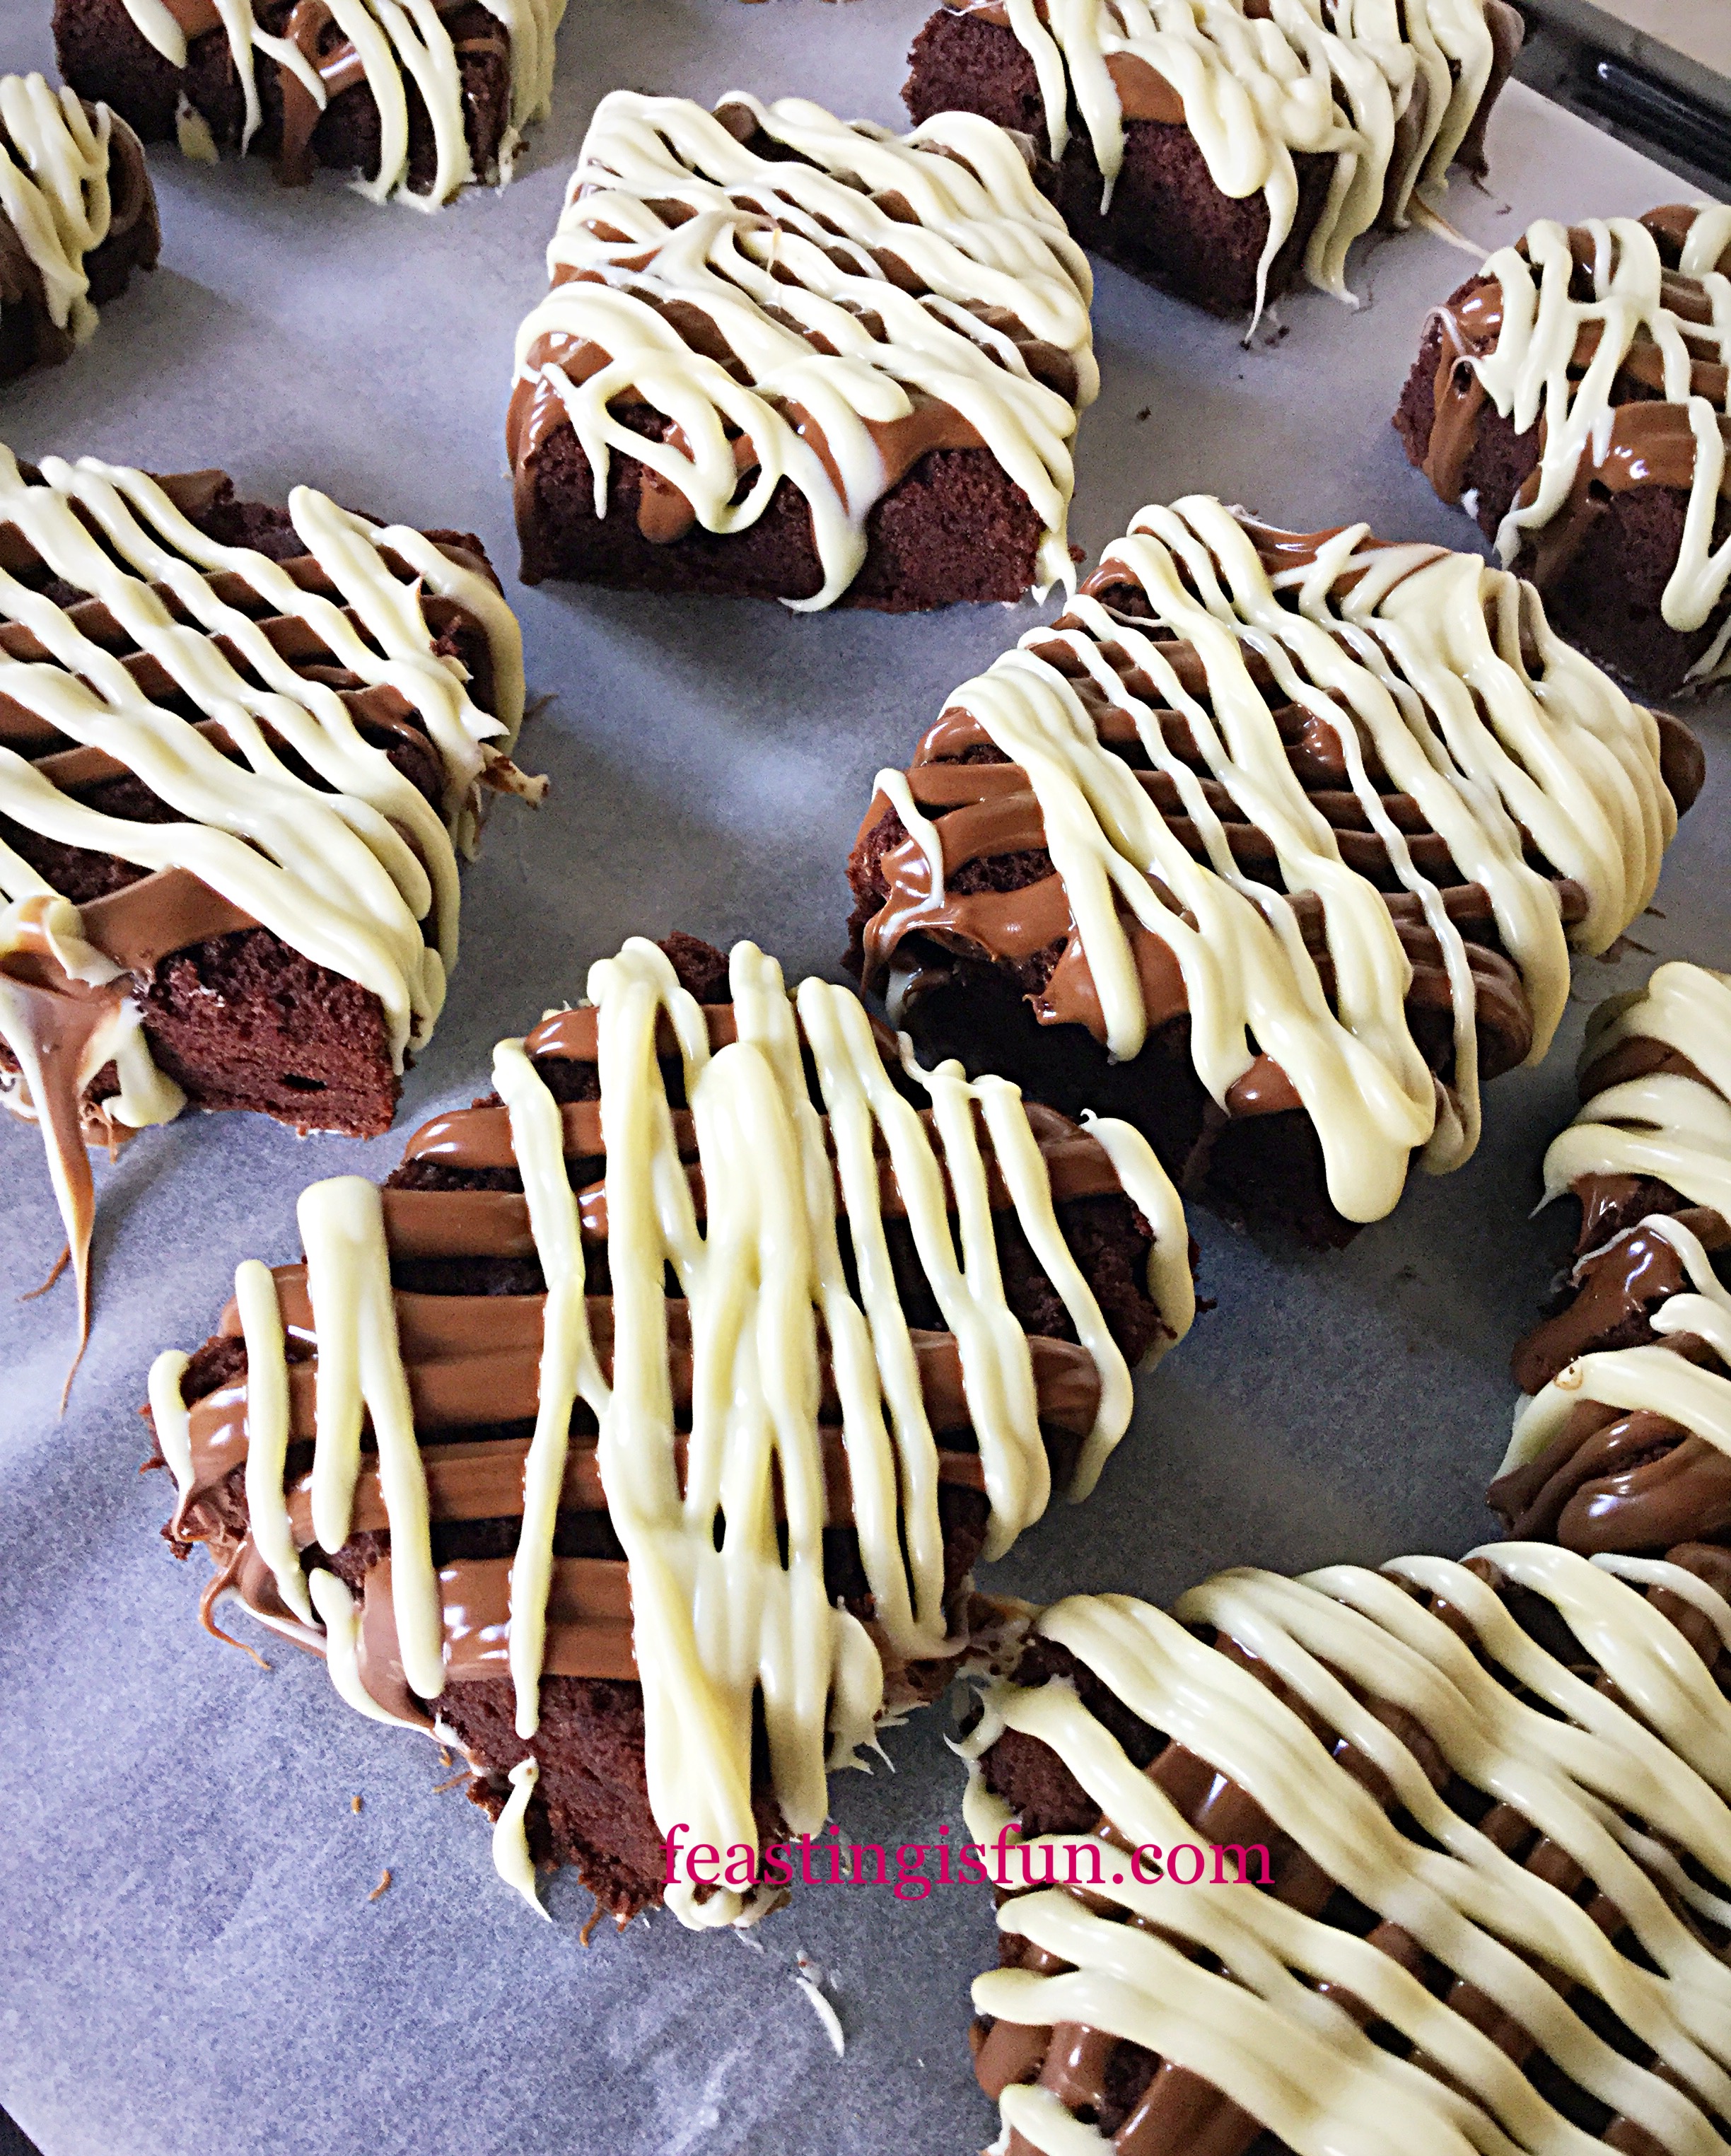
Start with the milk chocolate, snip the very end of the piping bag off leaving a small hole. Pipe in a zigzag pattern across all of the chocolate cake squares.
Turn the baking tray and pipe as before, except you will now be piping across the chocolate milk, forming a criss-cross pattern.
Allow the chocolate to partially set and then transfer the chocolate squares to a clean piece of baking parchment, on a tray and leave to one side to set. Note – in warmer weather it may be necessary to place in the fridge for a few minutes to allow to set.
Store in a baking parchment lined container, using parchment to separate layers.
These Chocolate Drizzle Cake Squares will last up to 4 days in an airtight container.
Chocolate Drizzle Cake Squares perfect to serve with Afternoon Tea.
Different types of cake provide a beautiful setting and greater sense of variety.
Steamer Trading Host Mother’s Day Afternoon Tea
Finally Remember
While the tableware and homemade goodies look beautiful set out for Aternoon Tea, here are some added little touches that take it to the next level.
Doillies – in contrasting and complimenting colours.
Fresh flowers – placed in large and/or small vases. Clean jam jars make inexpensive vases and flowers picked from the garden can look beautiful.
Rose petals – one rose had a limping flower head. Break off the petals and scatter around the table.
Bowls of fresh fruit. Strawberries are always popular and provide balance to the cake and scones.
Cellophane bags of truffles, tied with a complimenting ribbon, add an extra wow factor.
Complimentary bags of truffles enhance the look of the table.
Lastly, don’t panic. Relax, enjoy yourself and your Mum will too. And, if you can’t bake then buy the cakes. Afternoon Tea on Sunday 26th March is about celebrating Mother’s. Your Mum, important female figures in your life, will be thrilled and honored that you took the time to celebrate them, with Steamer Trading helping you to Host Mother’s Day Afternoon Tea.
Afternoon Tea
I hope that you have enjoyed Steamer Trading Host Mother’s Day Afternoon Tea, here are some recipes you may also enjoy:
So, whatever you make, bake and create to celebrate Mother’s Day, have fun enjoying you feast.
Sammie xx
Steamer Trading gifted me the five items directy linked to their site. All opinions, views, content and photography are my own. I was not paid for writing this post. Please see my Disclosure Policy.
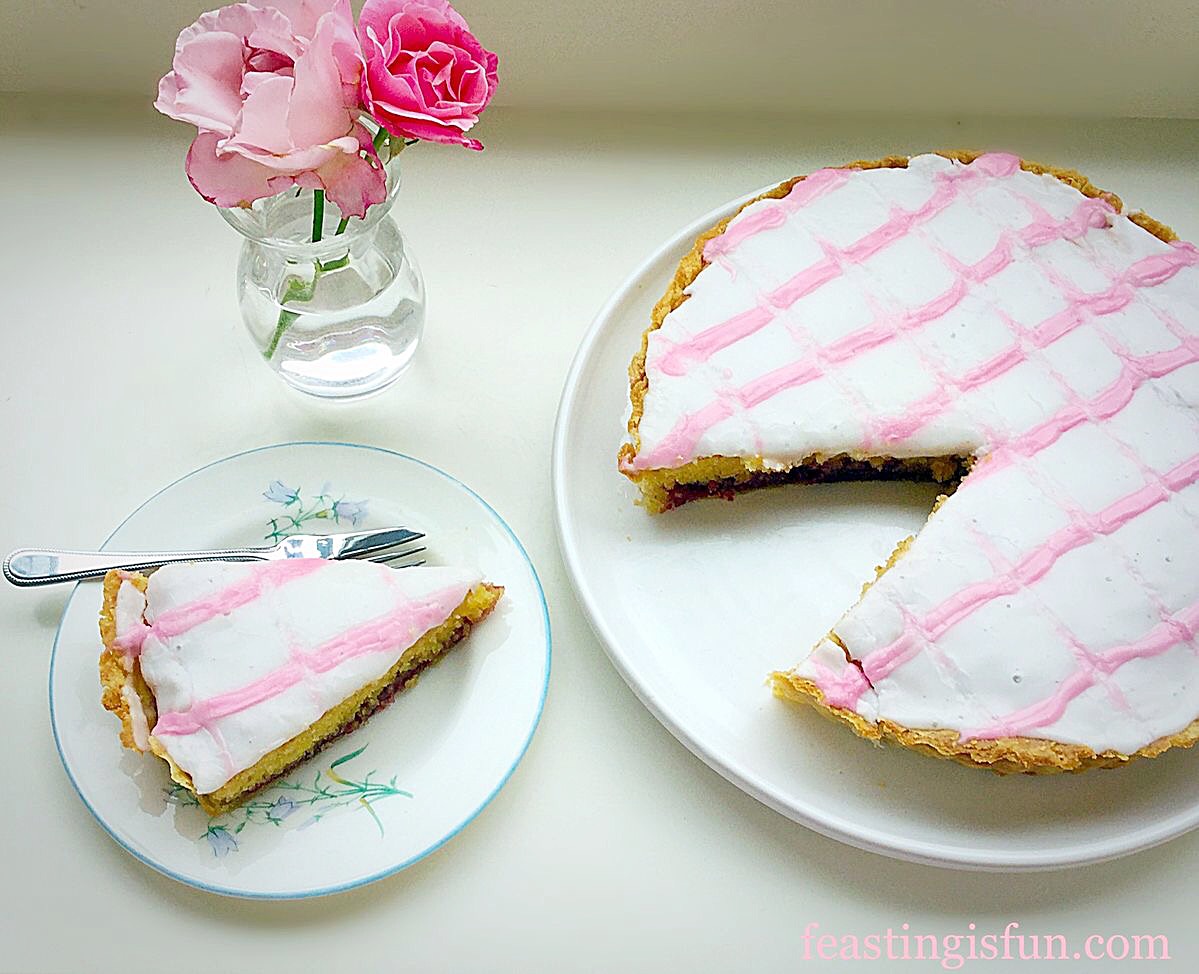
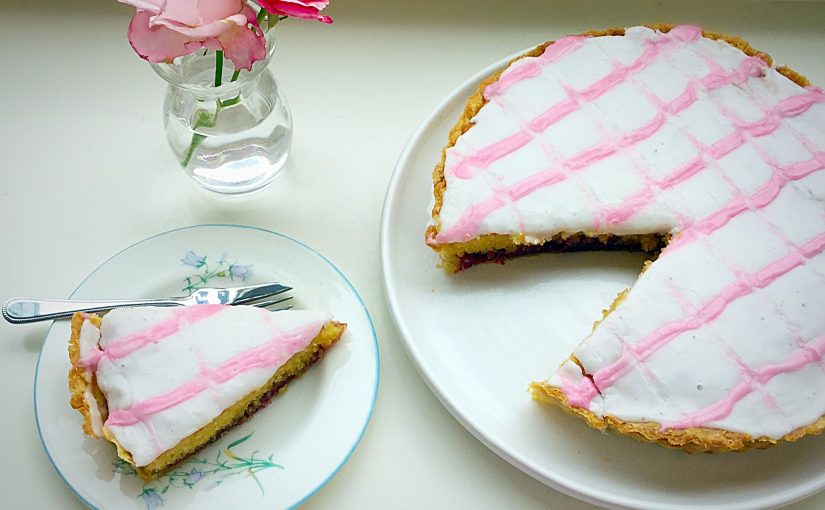
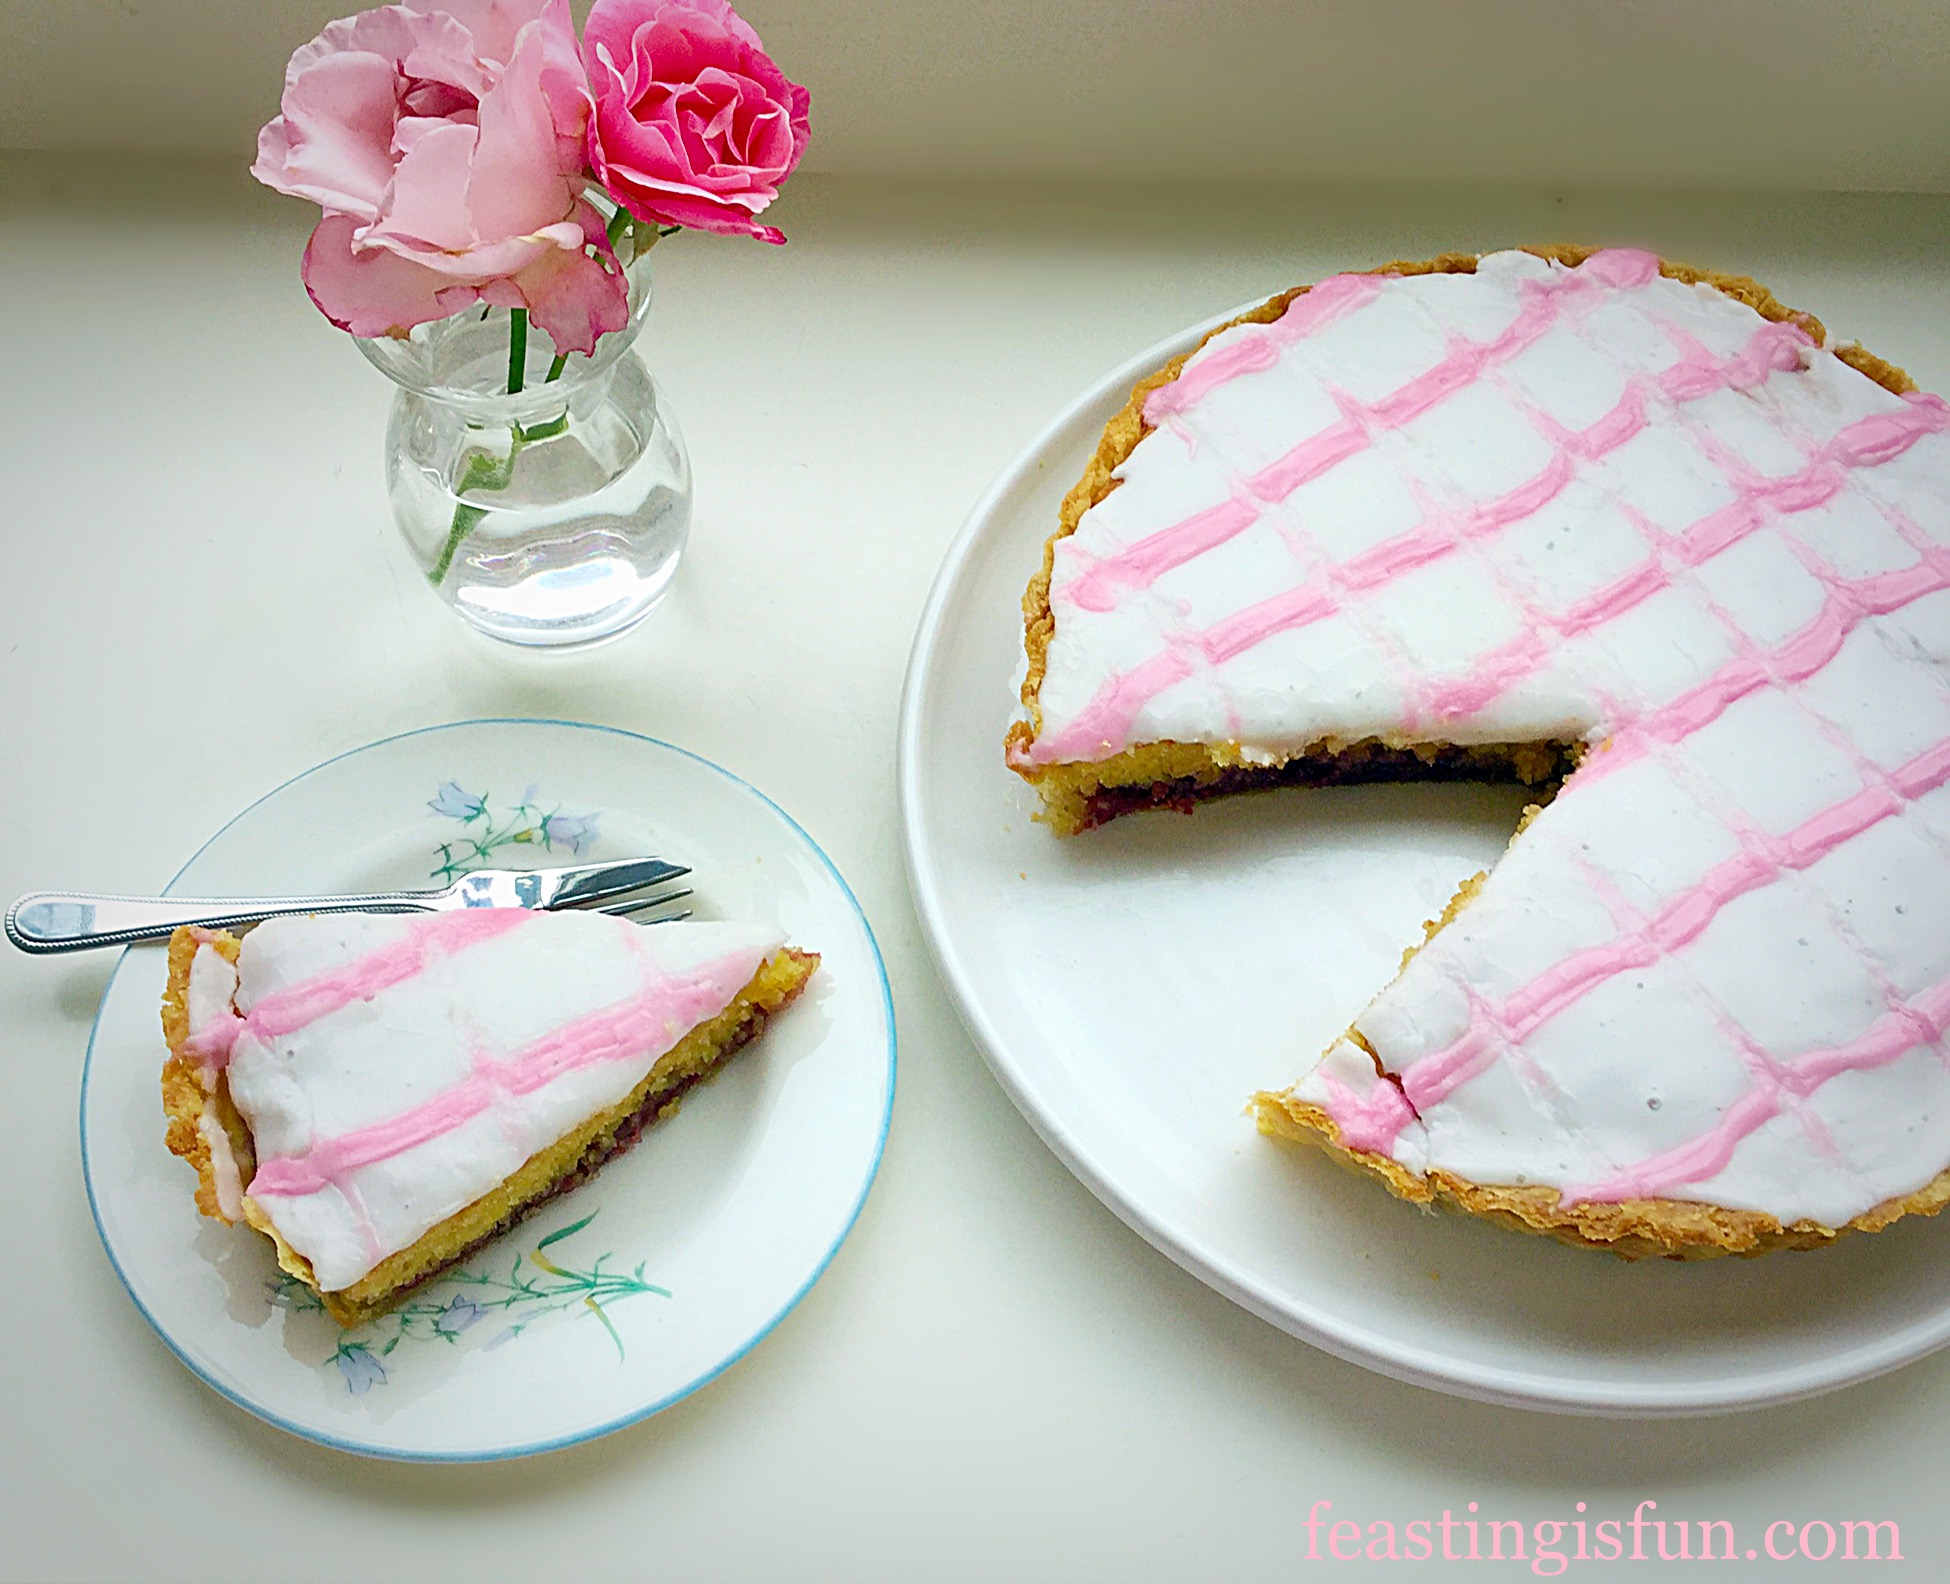
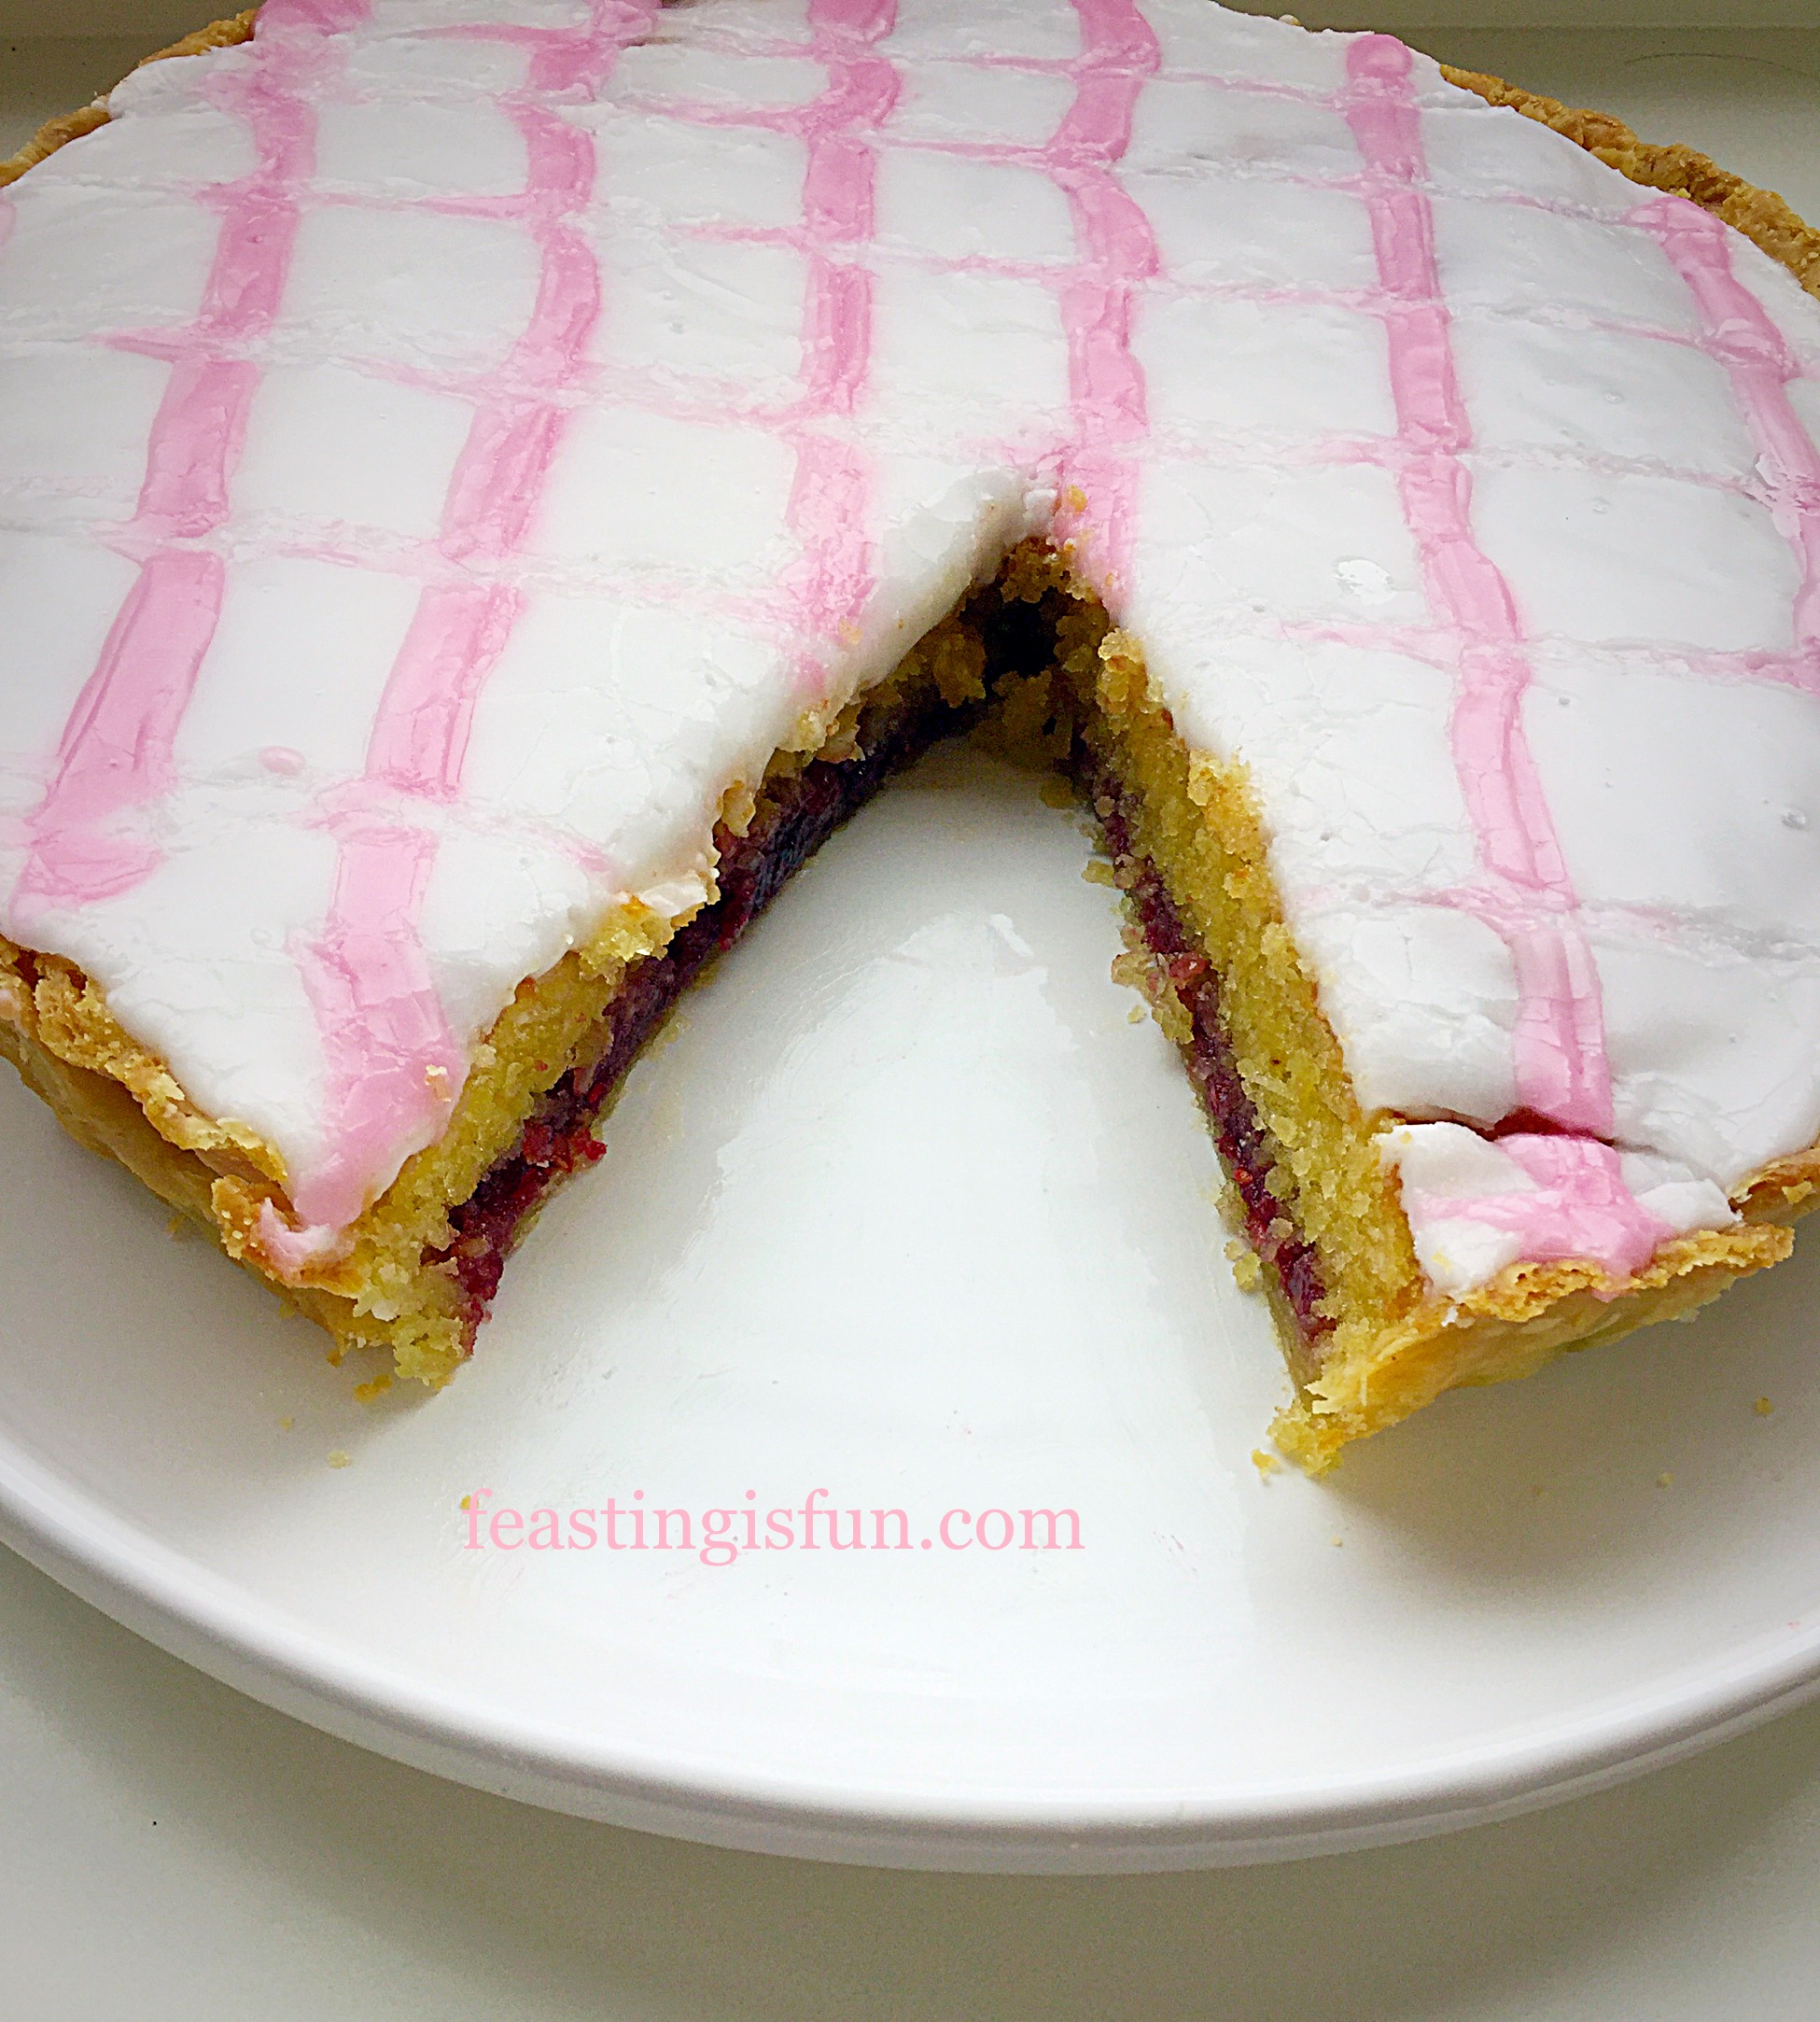
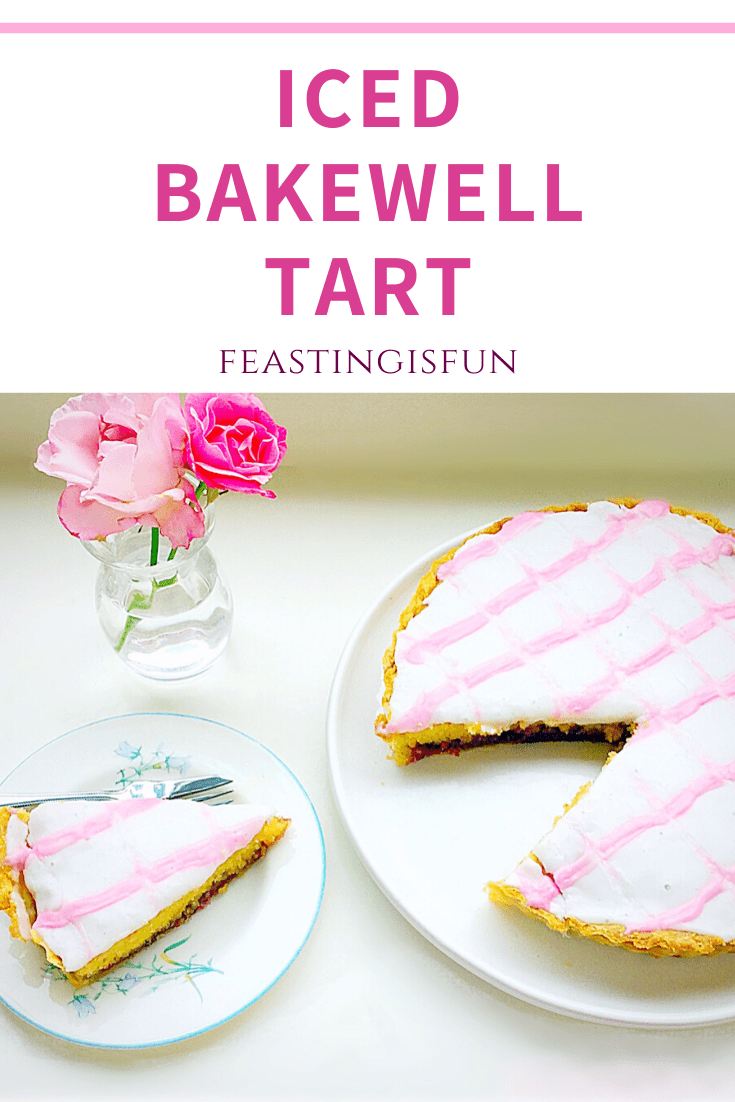
I adore Bakewell Tart. Especially the layers of pastry, raspberry jam and almond sponge combined, taste utterly delicious to me. Because I love the flavours so much I have a few ‘Bakewell’ recipes on here. Usually I am content to leave the top of the sponge covered in almond flakes. While following Mary Berry’s pretty iced tart last week, on the Great British Bake Off programme, I decided to try it out. Resulting in this Iced Bakewell Tart.
Everything you see on and in this tart is homemade, including the raspberry jam. Which, just happens to be my favourite and is incredibly easy to make, for the recipe please see HERE . I’ll put that into a separate post, otherwise this ones going to be miles too long, we just want to get to the part where we can eat this Iced Bakewell Tart!
Adding Fresh Flowers To Enhance The Photography
Having spotted a couple of open blooms open on my rose bush, I couldn’t resist cutting them and placing the vase next to the tart. They give the photos a romantic, afternoon tea look, echoing the pink icing on the top of the tart.
As much as I enjoy coming up with new recipes and testing them to ensure they will work as well for you as they do me, I’ve also grown to enjoy the photography side of my blog. Sometimes adding a single item can transform the ‘feel’ of a photograph. My slightly wind ravaged rose has added an element of beauty, but also imperfection, which I really like. Especially as I feathered the icing all in the same direction, more on that later!!!
Iced Bakewell Tart a delicious raspberry and almond treat for any special occasion.
The Importance Of Sharing A Meal
With Feasting is Fun, my aim is to make each meal, recipe or bake a feast. What I mean by that is this; when time is taken to prepare good, homemade food, it should be enjoyed and the atmosphere as we feast together should be fun. Conversation across the dinner table can be one of the most important parts of the day. People relax, enjoy their meal and open up about their day.
Sitting together as a family, at least one day a week, I believe is incredibly important for the health and well being of us all. Sharing a meal more regularly is preferable, however, my hubby doesn’t get in until late some nights and I realise we are not unique in that aspect of family life.
I honestly believe, that from sharing family time, over a meal, our 3 children have grown to enjoy the same foods and meals as us, their parents. Of course they all have their preferences and there are certain ingredients they do not eat. What we enjoy is sitting with a curry, or a couple of pizza’s and some homemade coleslaw, at the weekend, feasting both on the food and each other’s company.
Iced Bakewell Tart skimping on the raspberry jam simply shouldn’t happen!
Weekend Baking And Afternoon Tea
That’s why I love the idea of afternoon tea. Usually at the weekends when we tend to eat our evening meal a bit later. Mid afternoon the kettle will go on, teapot filled and we’ll feast on whatever ‘mum’s’ been making that morning. Truthfully, most of what I make on those occasions doesn’t make it to this blog. I want to enjoy the company of my family. That said on occasions when I am taking photos, once I’ve said that it’s ok for everyone to help themselves it still amazes me how quickly a cake can disappear!
I take this as a good sign that it tastes great 😉.
This tart was baked in an 25cm/10″ x 5cm/2″ deep loose bottom tart tin, the same one I use for my quiches, see here.
Recipe: Iced Bakewell Tart serves 10-12
400g Shortcrust Pastry – in my opinion the Iced Bakewell Tart is sweet enough without using sweetened shortcrust pastry, see my pastry recipe here
Alternatively for an un-iced finish you will need 25g flaked almonds
Method : Preheat the oven to 220C/200C fan, gas mark 7, 425F
Just a quick note about the pastry case – usually I trim any excess pastry from the tin, chill for 30 minutes in the fridge and then bake. When I baked this tart I was really pushed for time, so baked with an overlapping of pastry which was them trimmed after baking. I would thoroughly recommend trimming the pastry prior to baking for a neater edge. I also had a couple of problems with the pastry sticking right near the top.
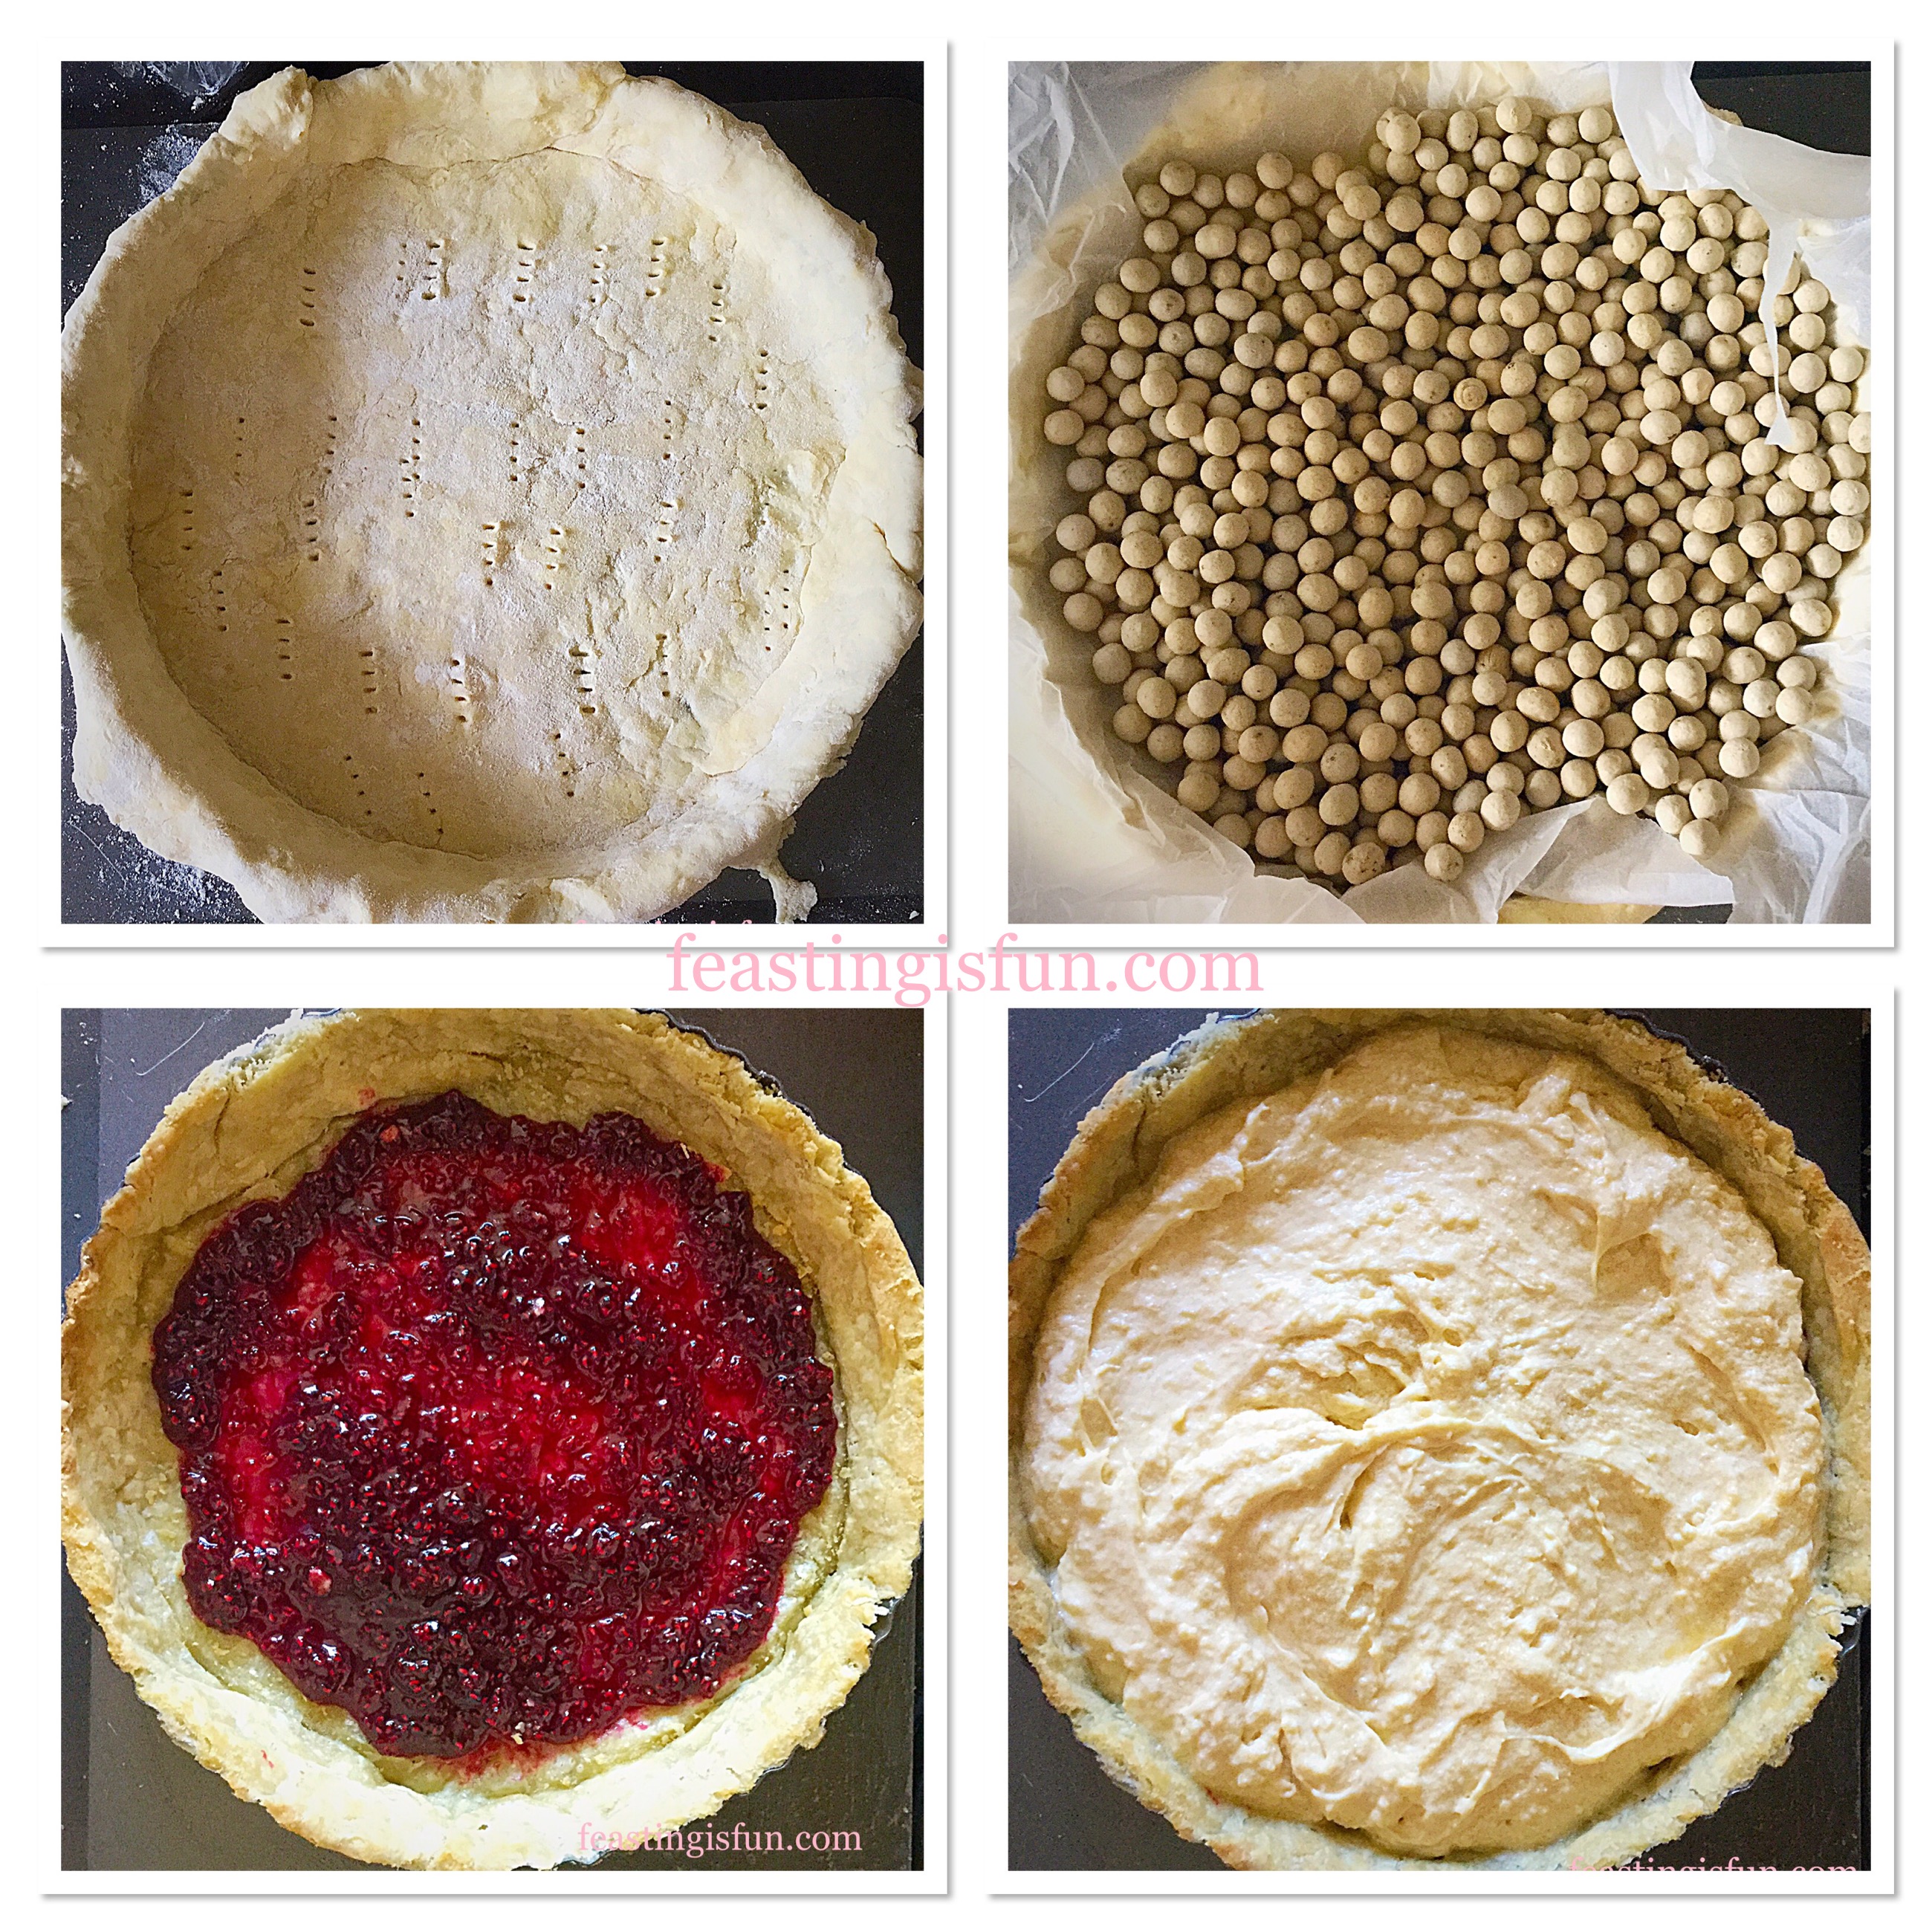
Making And Blind Baking The Shortcrust Pastry Tart Shell
Roll the pastry fairly thinly, about the depth of a £1 coin and line the tart tin – note when using homemade pastry I never grease the tart tin, however if you are unsure of how non stick your tin is brush lightly with some cooled melted butter.
Dock the bottom of the pastry case with a fork to keep it flat during baking.
Cut a large piece of baking parchment, screw it into a ball and then line your pastry tart case with it and fill with baking/ceramic beans.
Place in the middle of the oven and ‘blind bake’ for 15 minutes.
After 15 minutes baking has elapsed, remove the tart from the oven. Lift out the baking beans using the baking parchment and place the tart back into the oven for a further 10 minutes, until it is golden and cooked on the base.
Making The Almond Cake Layer
In a large bowl whisk/beat together the butter, sugar and salt until it is very pale and creamy.
Add in the almond and vanilla extract and whisk/beat until incorporated.
Next add all 3 eggs and whisk/beat for a minute.
Remove the whisk, add in the flour, baking powder and ground almonds. Using a large spoon fold these ingredients into the mix until they are just combined.
Assembling And Baking The Bakewell Tart
Once the baked tart case has cooled slightly, spoon the raspberry jam into the centre and spread it, using the back of the spoon, so that it almost reaches the rim.
Now spoon over the almond sponge, starting from the outside and working towards the centre. The almond sponge will cover and seal the jam in. Thus stopping the jam from leeching out the side and on to the top of the sponge.
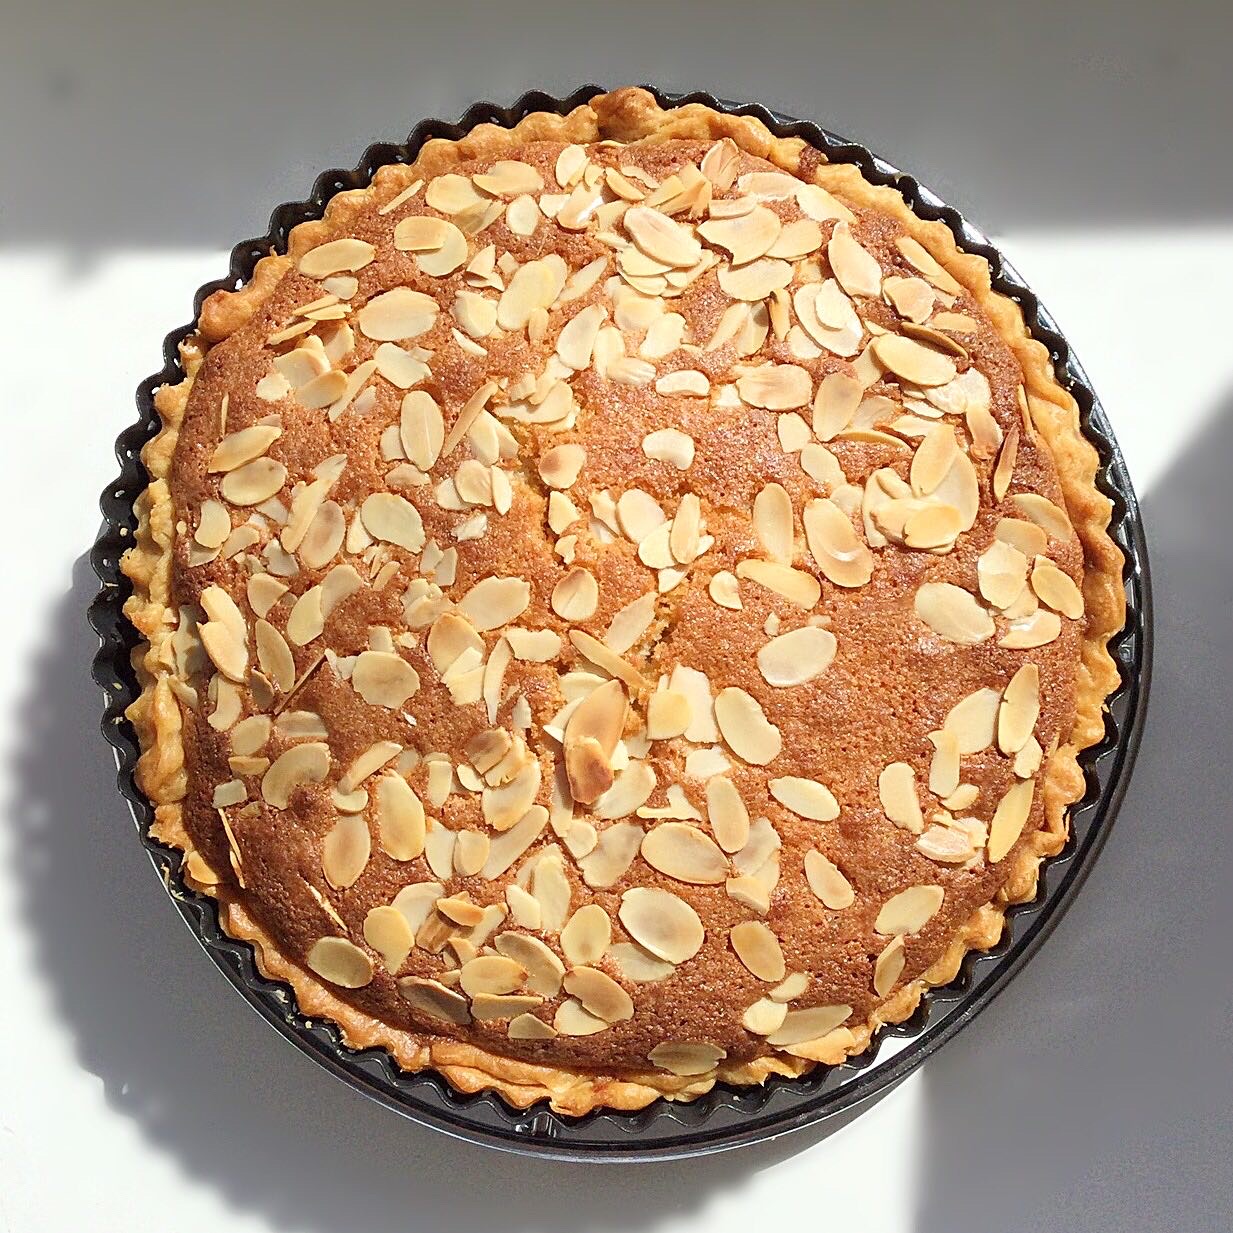
If you are baking an un-iced tart sprinkle the top with flaked almonds.
Lining, baking and filling the baked tart case.
Reduce the oven heat to 190C/170C fan, gas mark 5, 375F.
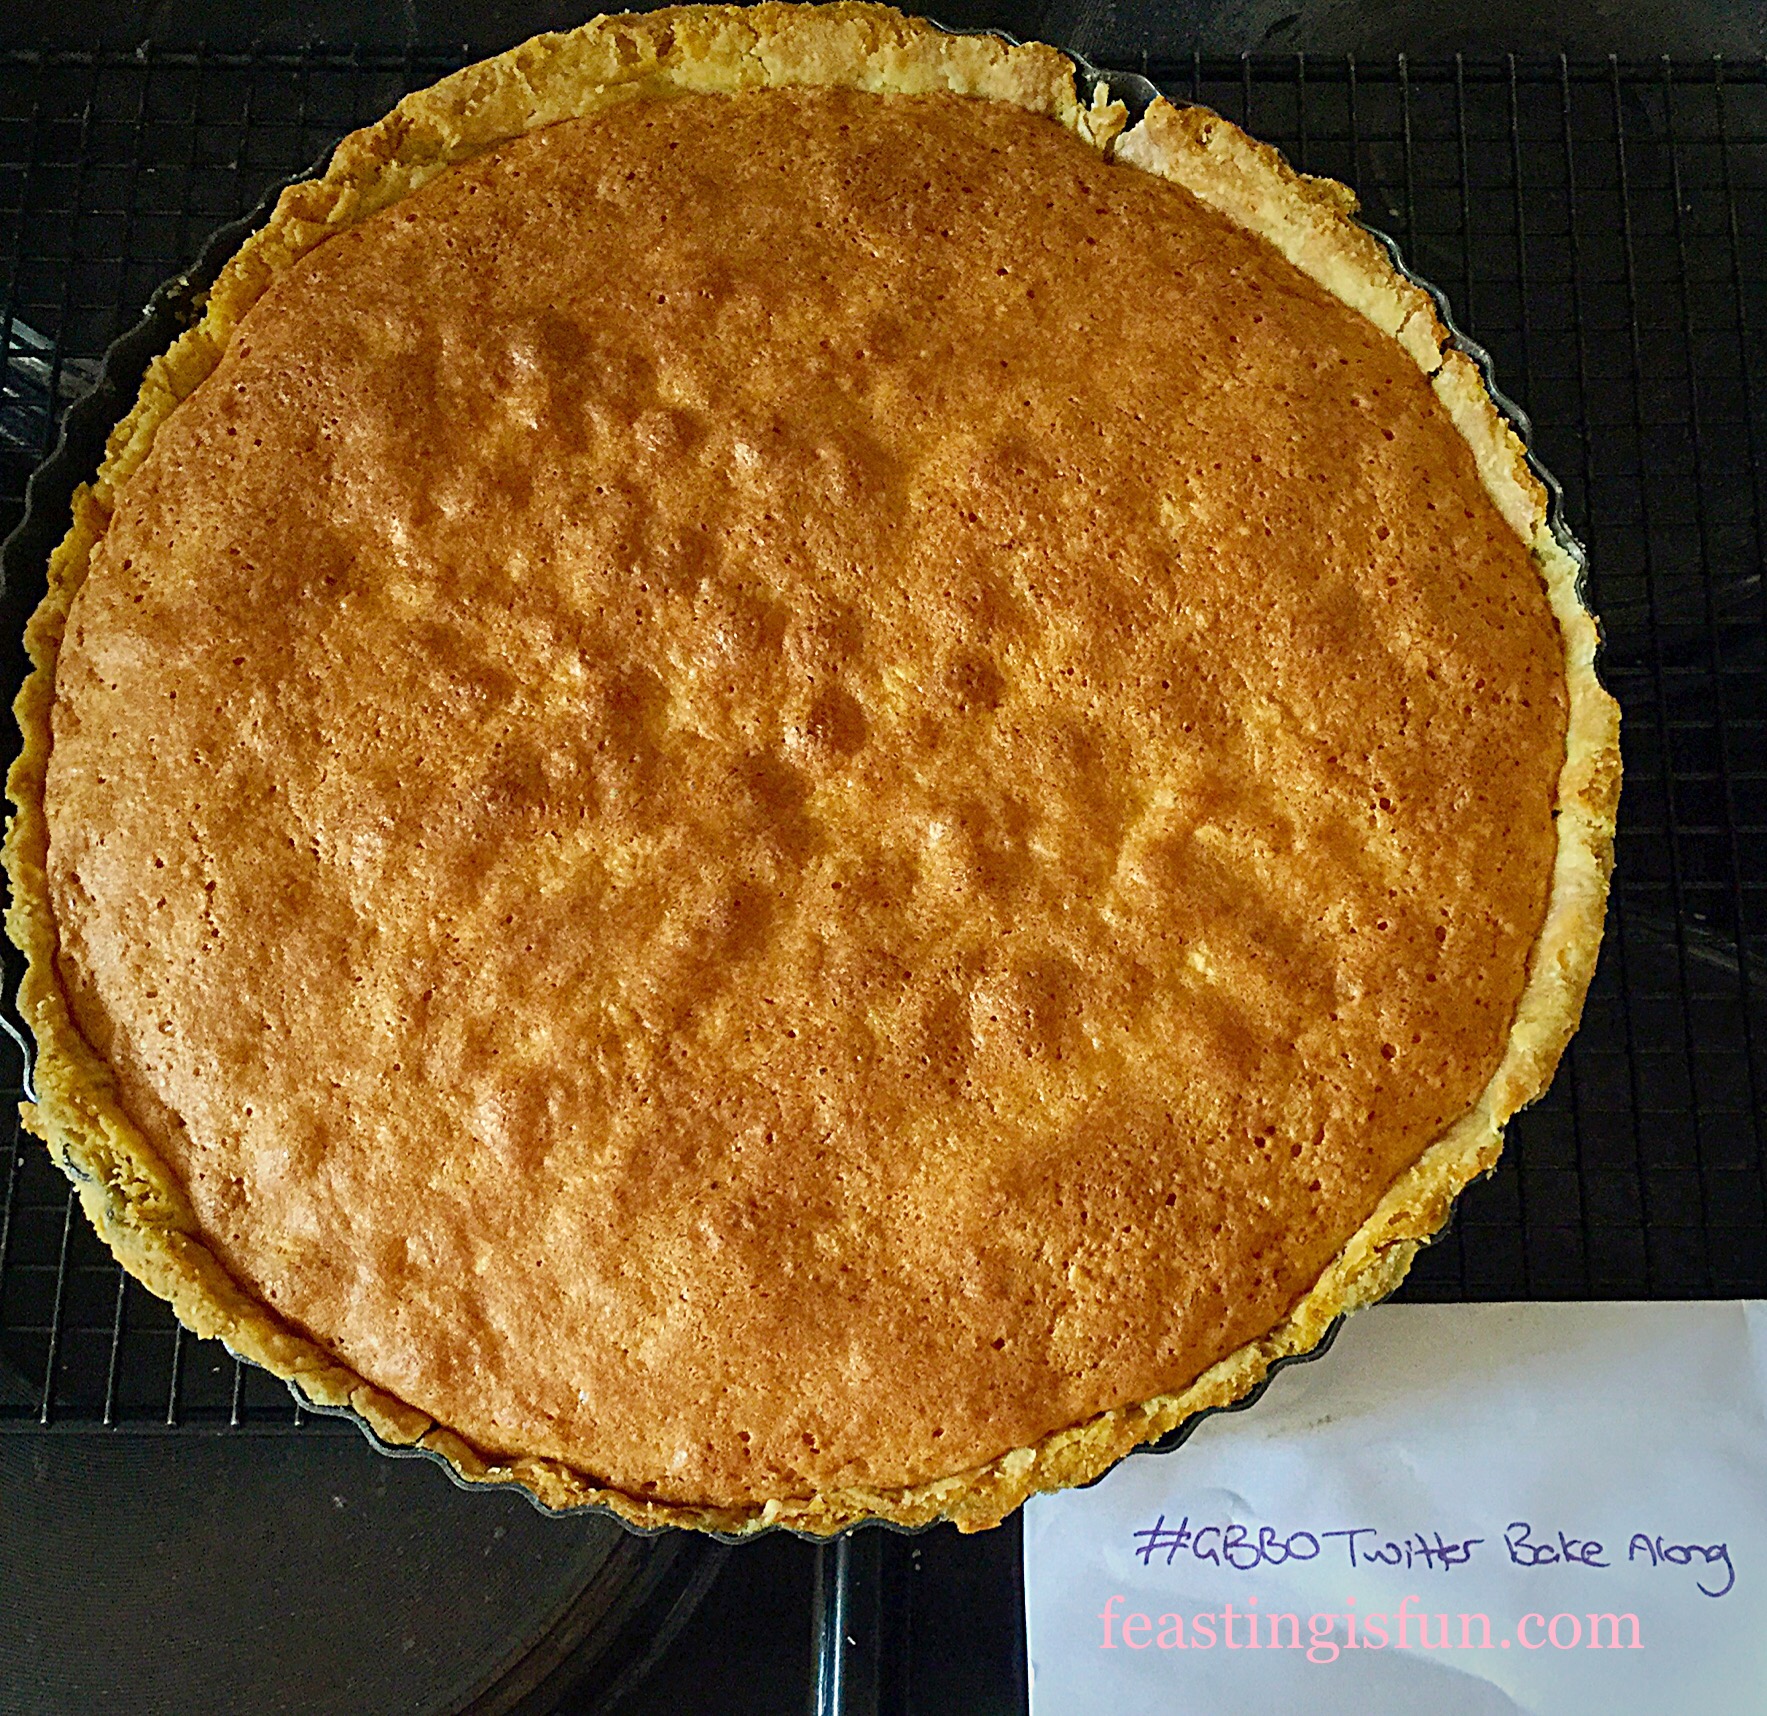
Place the jam and almond sponge filled tart back into the middle of the oven and bake for 45-50 minutes, until the sponge is golden and firm to the touch, without wobbling in the centre – mine took 45 minutes.
As soon as the tart is baked remove from the oven and allow to cool.
Beautifully Golden this cooked Tart was quickly snapped with the #GBBOTwitterBake Along in case I ran out of time!
Baked un-iced Bakewell Tart topped with flaked almonds.
Icing The Bakewell Tart
Sift the icing sugar into a bowl. Add the almond extract and enough water, I used approximately 30mls, to form a thick but pourable paste, once stirred together.
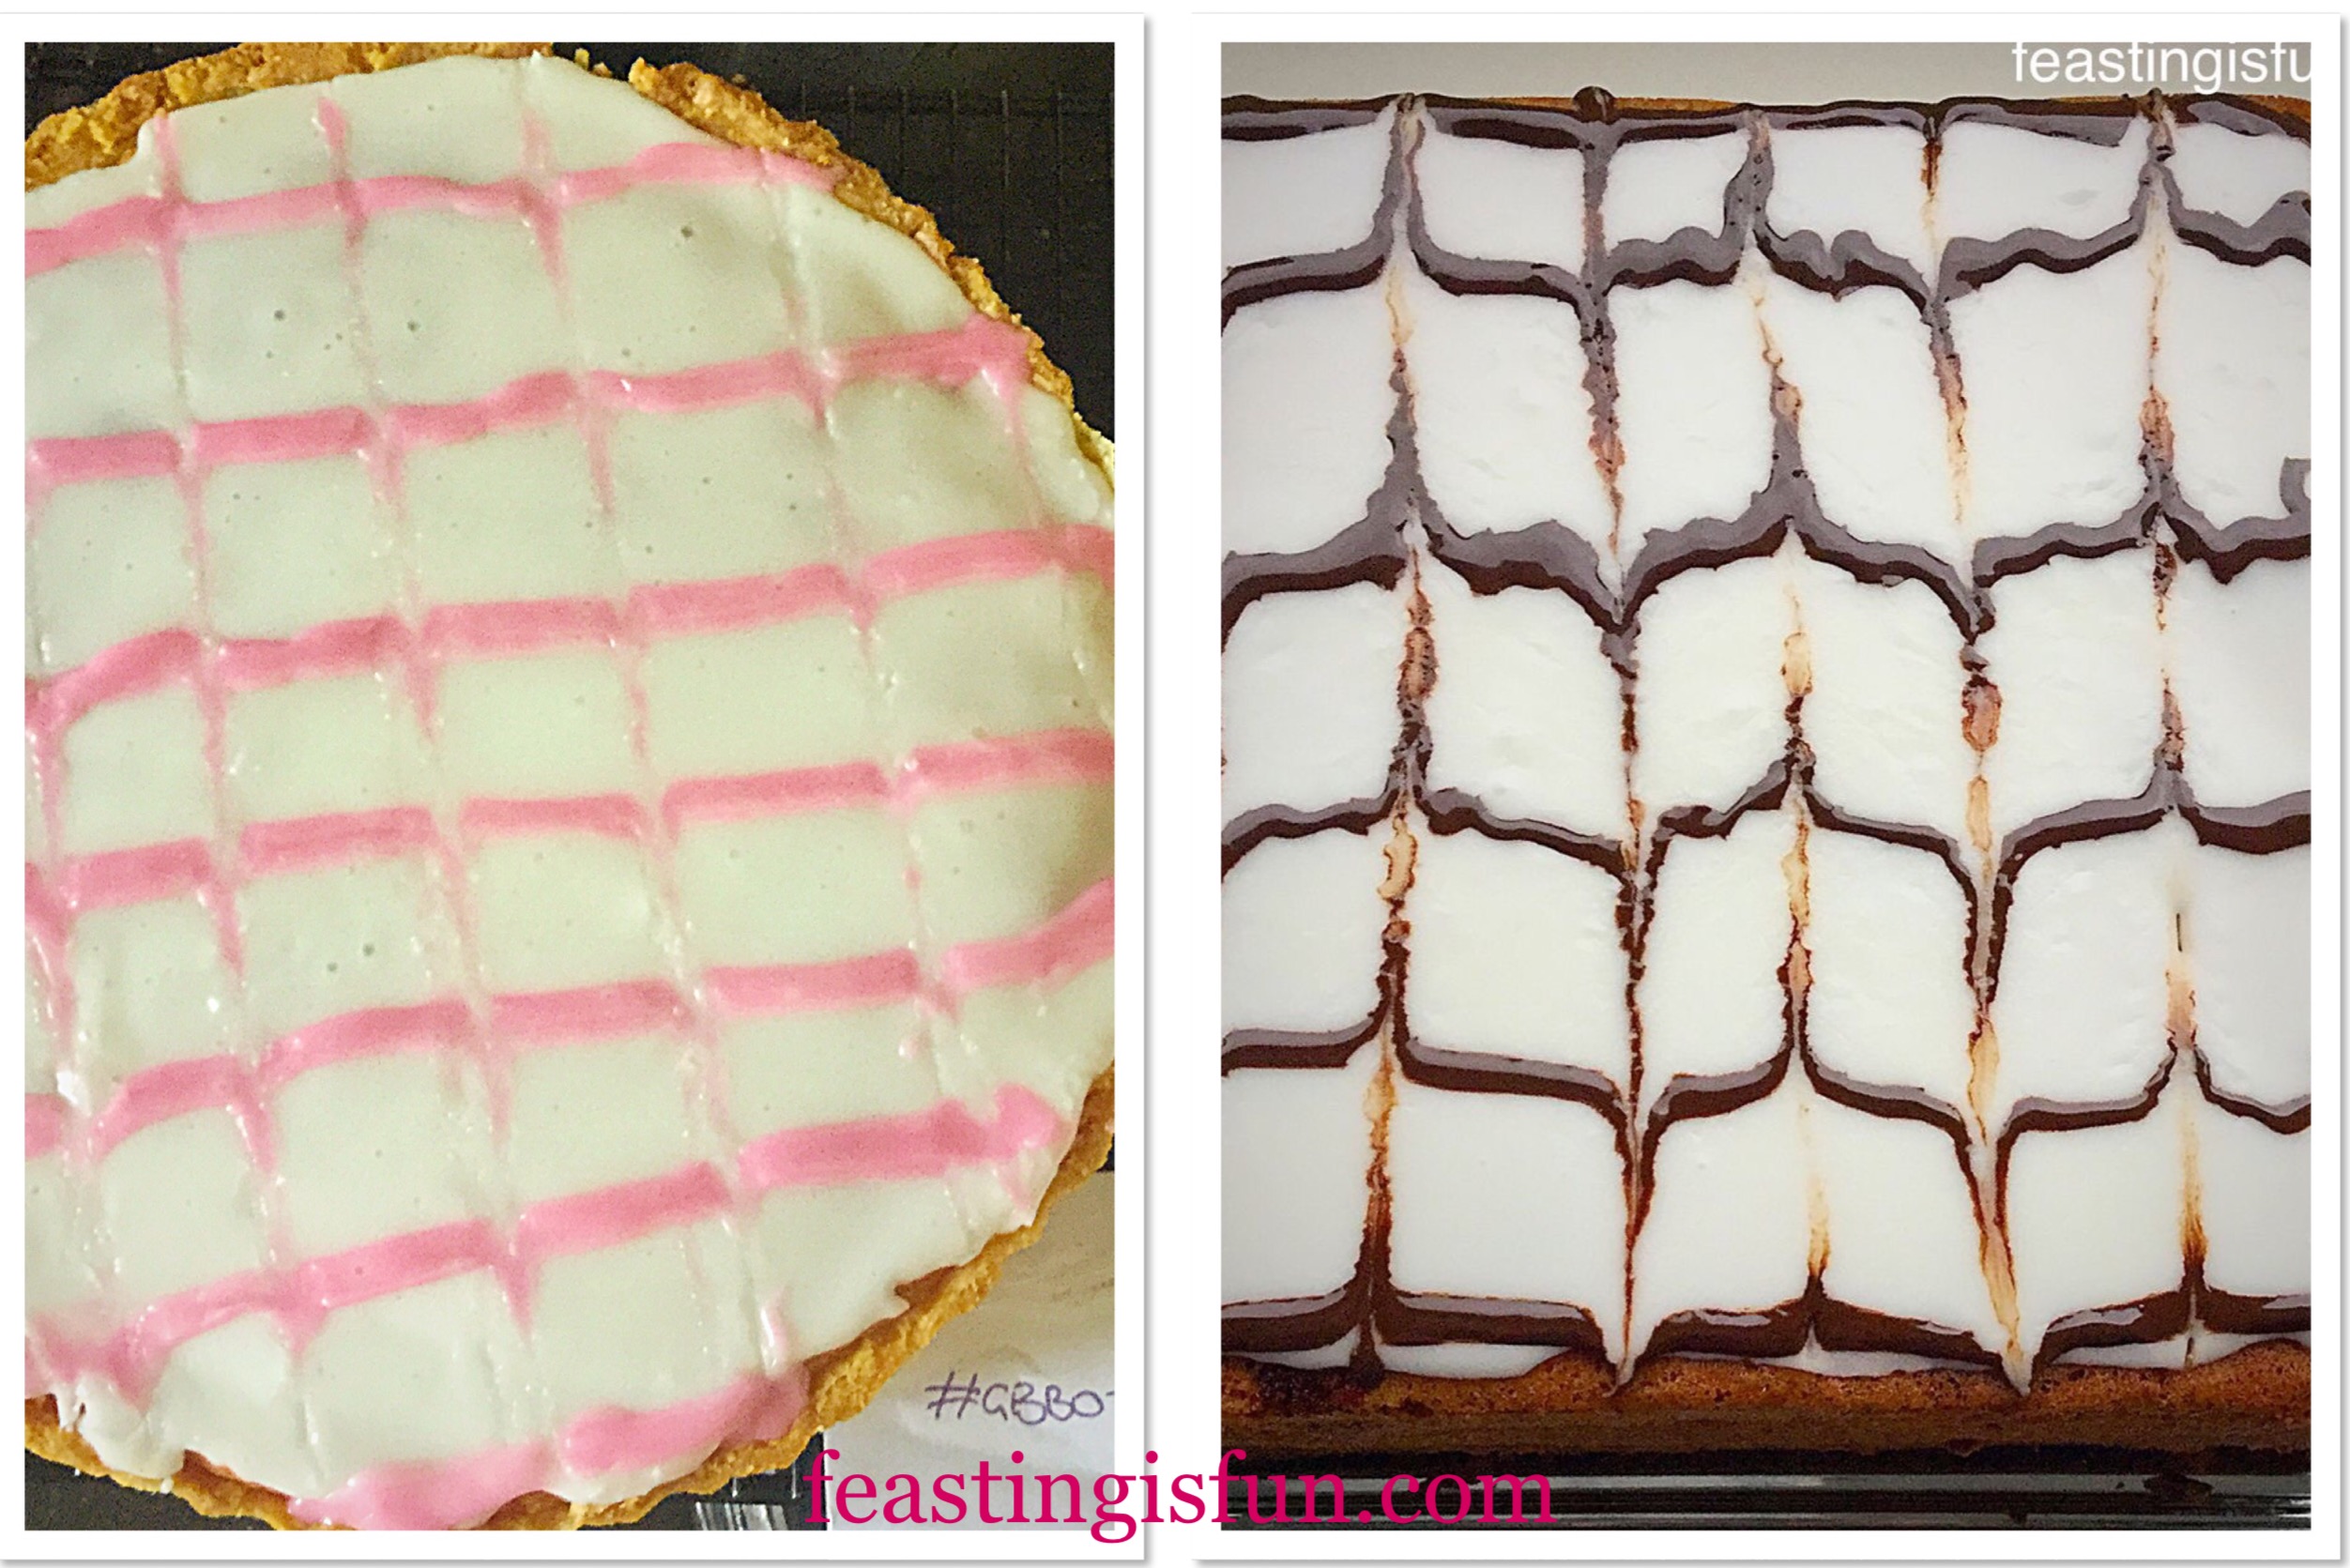
Remove 2tbsp of icing to a small bowl, add the tip of a cocktail stick, that has been dipped in pink gel icing and stir. Aim for a pale pink colour, however if you’d like a deeper pink, go for it! Place your coloured glacé icing into a small piping bag.
Keeping the 2 icings very separate, pour the pure white icing over the tart. Start in the centre use an offset spatula to push it to the edges.
Snip the end off of the small icing bag and pipe horizontal lines of pink icing across the white icing, separated by 5cm/2″, from edge to edge. Work fairly quickly as you want both icings to still be unset when you drag through, with a cocktail stick.
Feathering Piping Effect
Using a cocktail stick, again with a spacing of 5cm/2″, place the tip of the skewer at the top of the icing and drag it through to the bottom. Reversing from bottom to top next time. You can see, during the rush to complete my tart on time, I pulled my icing all in the same direction. Oh the pressure!
Below is a photo of my tart with my one directional feathering (if it can be called that) compare with the accurate feathering of my Cherry Almond SandwichCake.
You can see hire effective proper 2 directional feathering is here.
As the glacé icing is quite thick, leave for a good 2-3 hours before serving.
Place your Iced Bakewell Tart on a pretty plate or stand and serve with a drink of your choice. Mid morning with a steaming mug of coffee or a pot of tea mid afternoon.
Iced Bakewell Tart perfect at anytime.
If you enjoy the flavour of almonds and raspberry together, this Iced Bakewell Tart is really worth making.
If you have enjoyed this recipe for Iced Bakewell Tart you may also like these:
While talking about family time and feasting together, my intention certainly is not to preach. In truth, I eat far too many meals away from my family, in bed, due to my health. Rather what I’m trying to say I say, is, that when you have the opportunity, make the most of it!
Whatever you are making, baking and creating in your kitchens, have fun remembering times spent and times to come feasting with friends and family.
Sammie xx
No part of this post may be reproduced or duplicated without the written permission of the owner. Please see my Disclosure Policy.
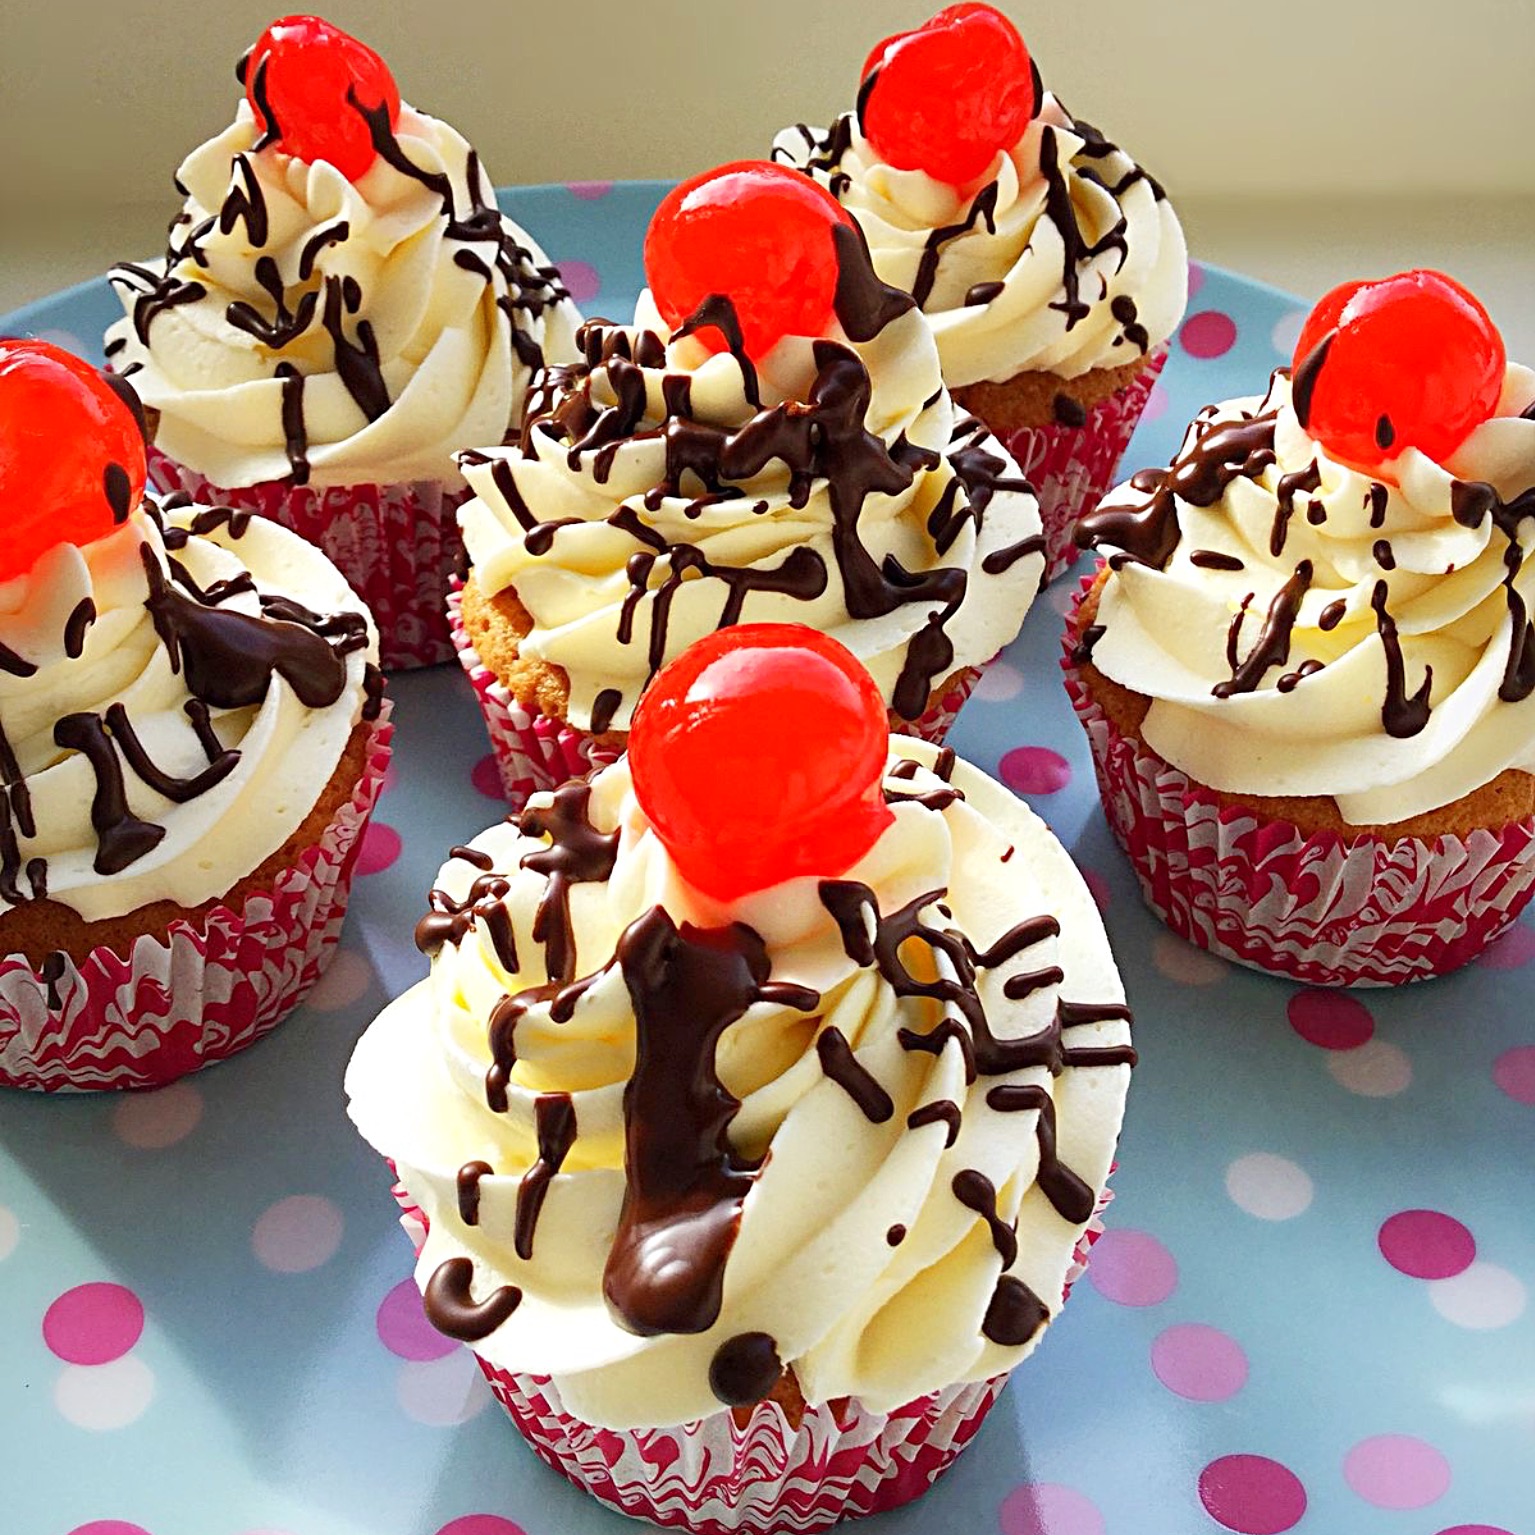
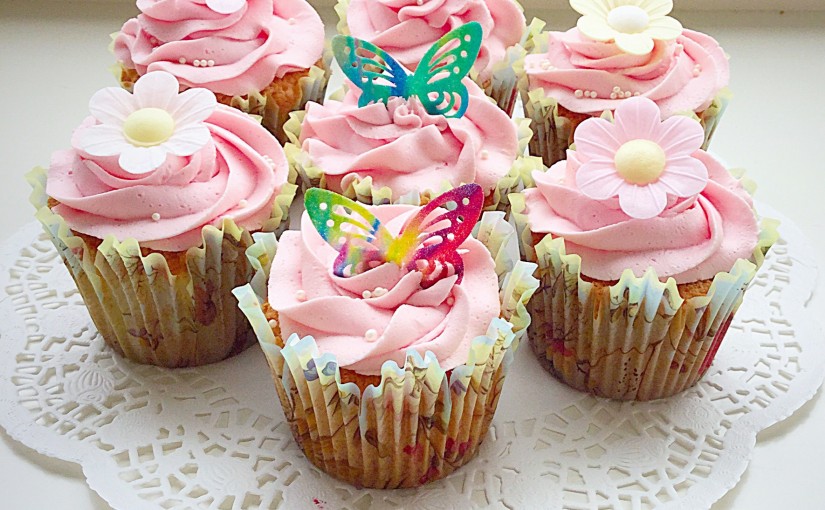
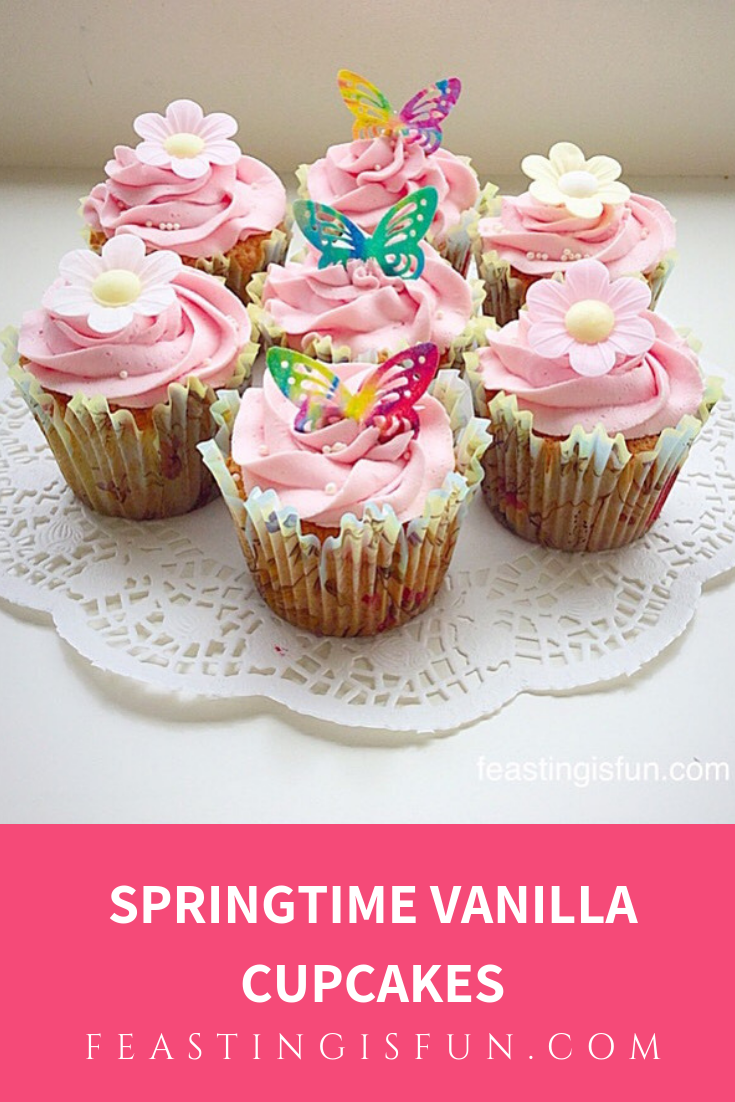
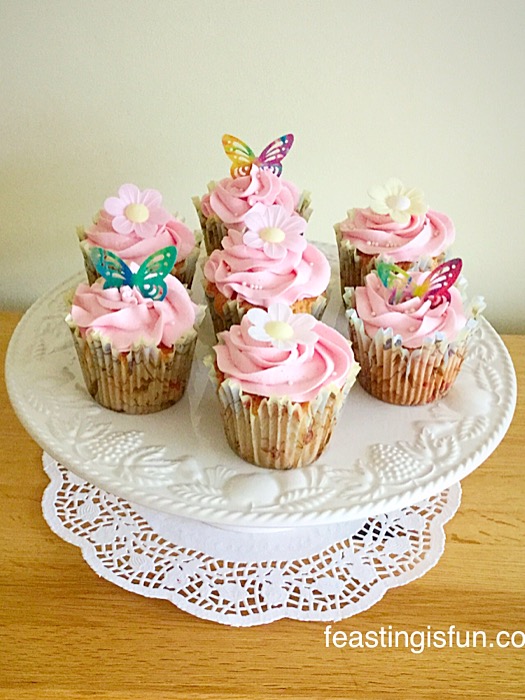
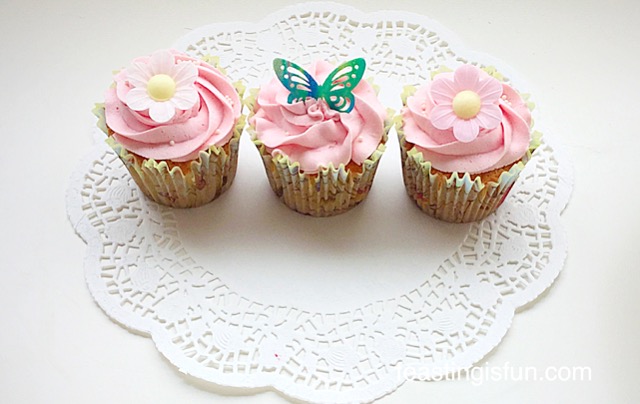
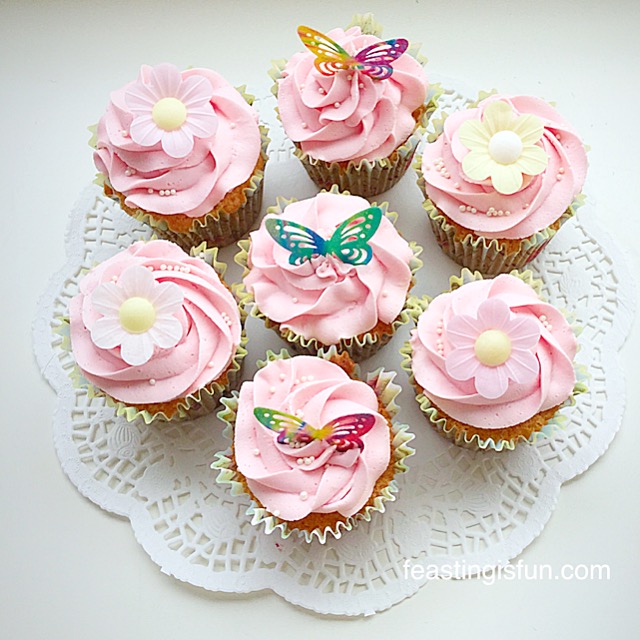
Wednesday this week was a truly dreary, dark and very cold day. All types of weather threw themselves at the ground; hail, snow, rain, sleet and it was windy too. Especially as it is March, I want to see evidence of Spring. Most of all flowers and lambs. Finally, I an attempt to cheer us all up I made these very pretty and extremely delicious Springtime Vanilla Cupcakes.
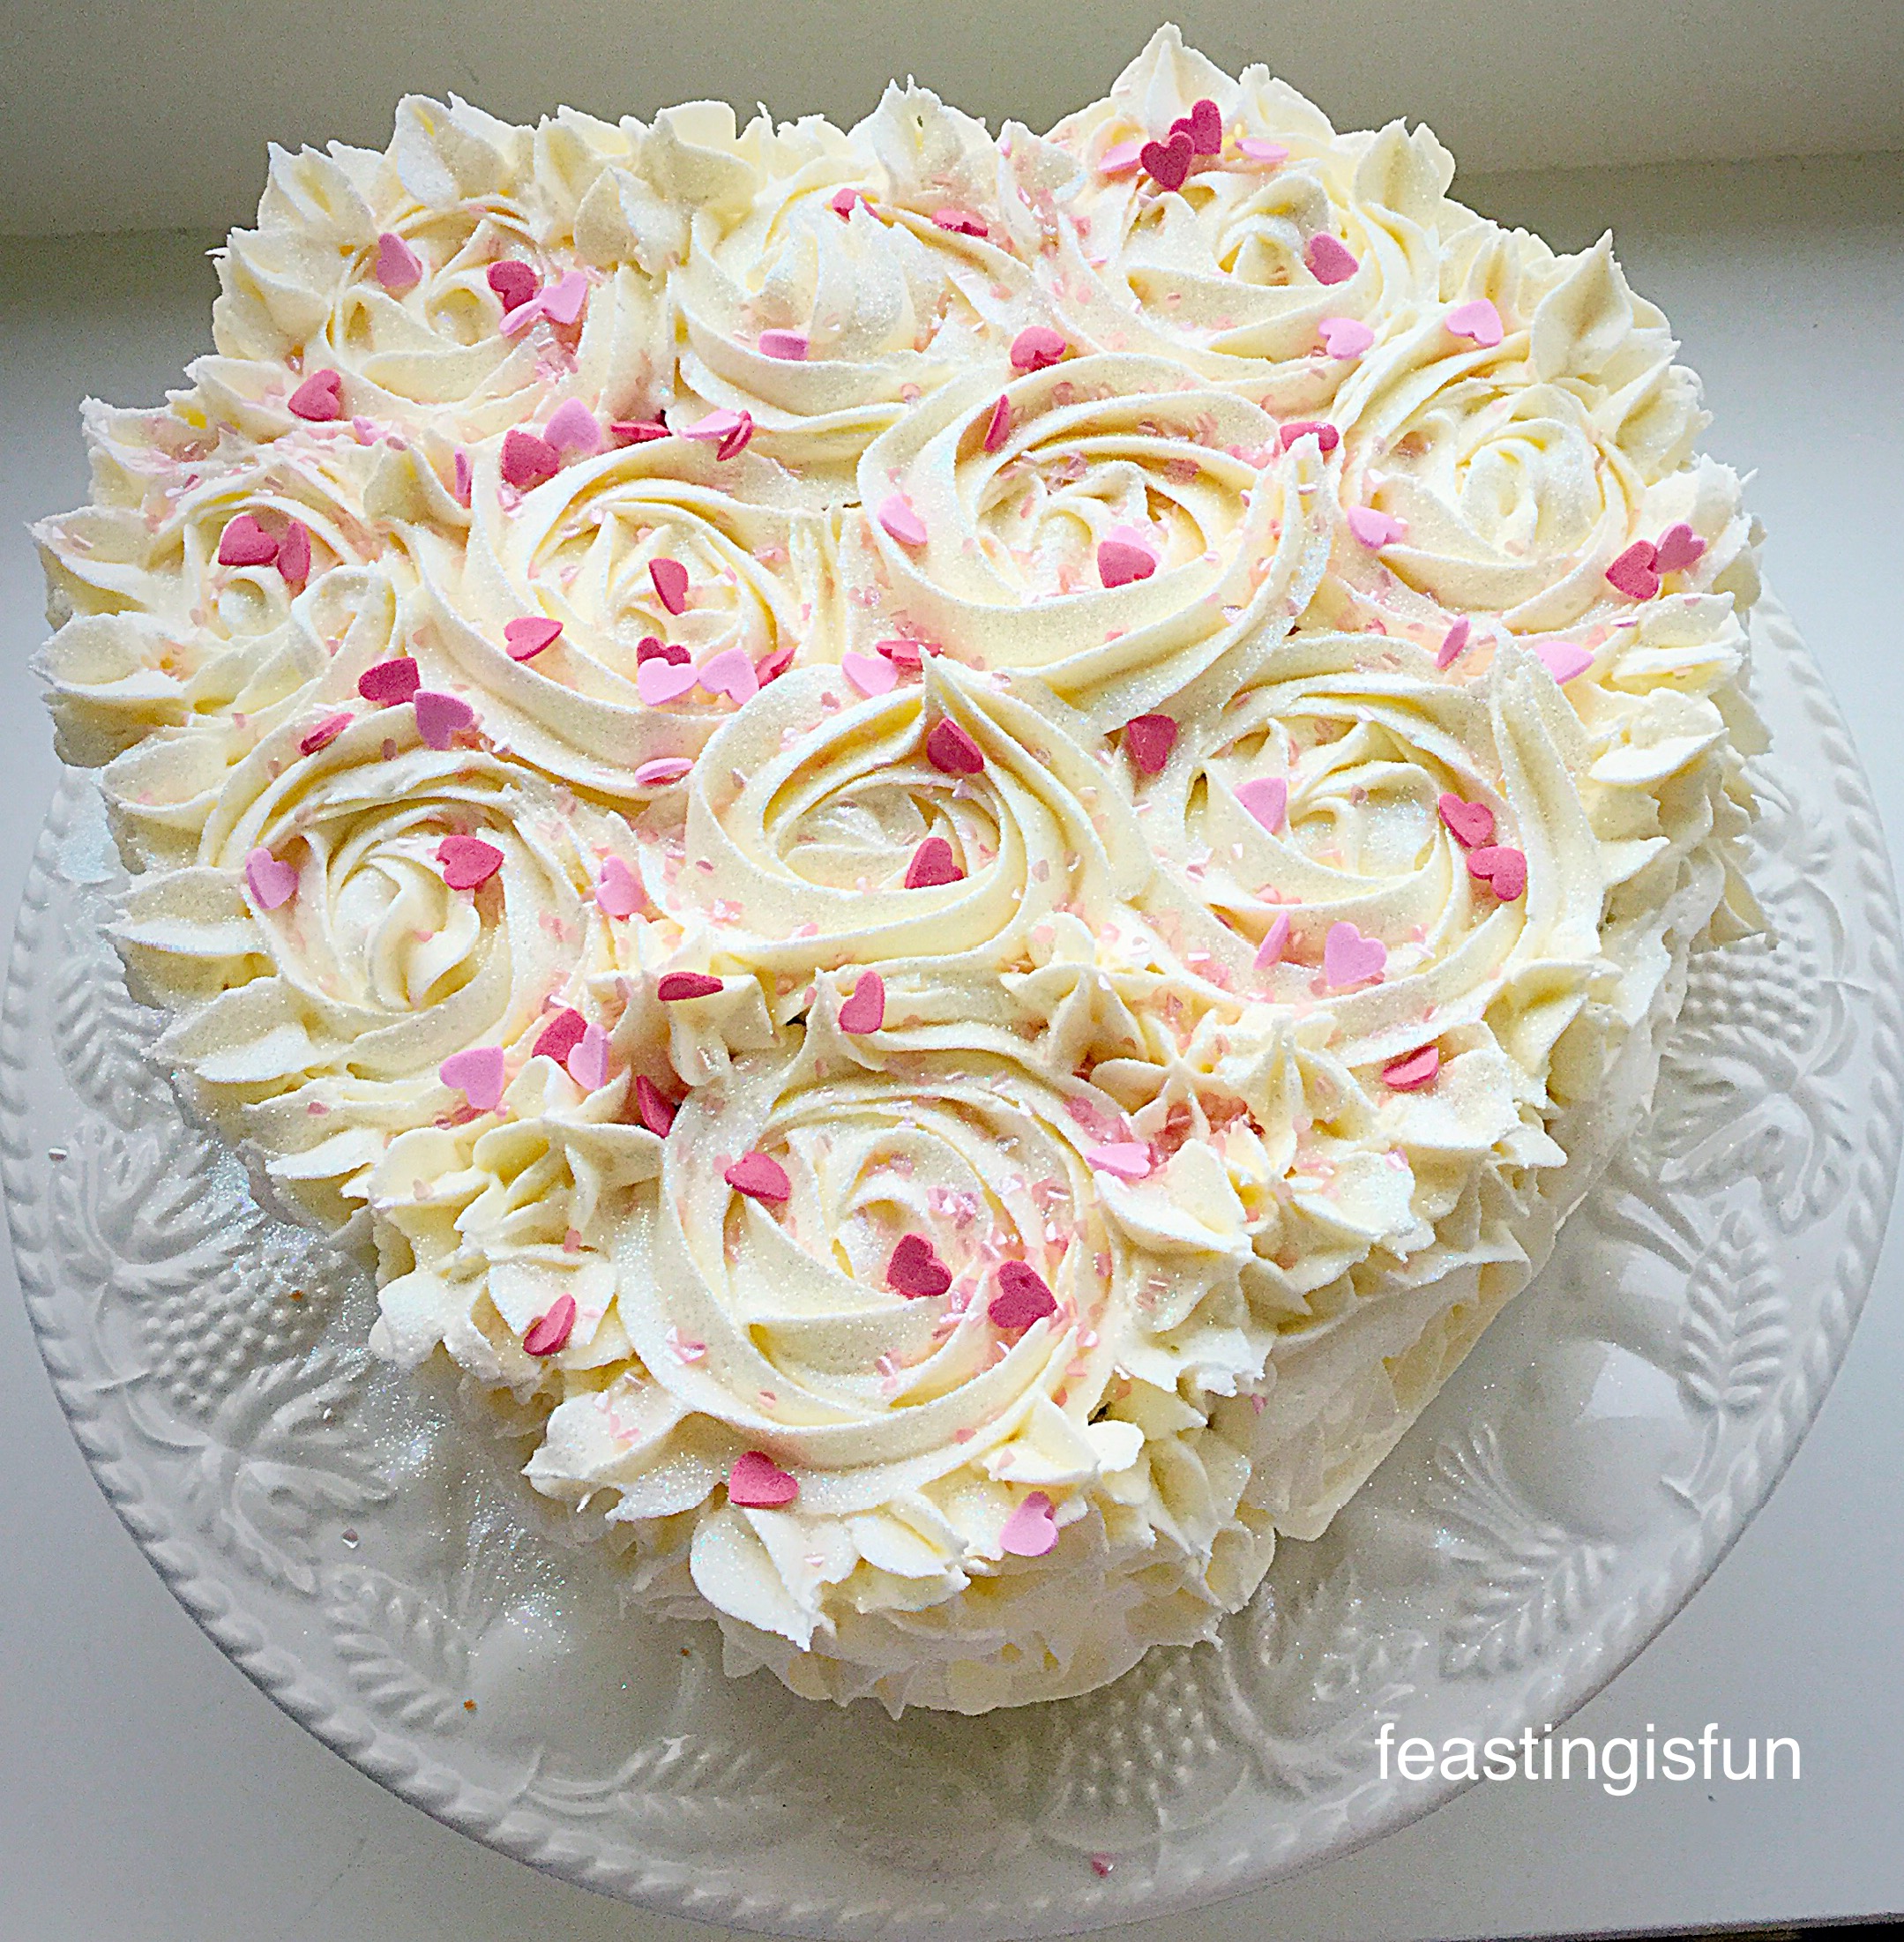
So, does the image of pink, raspberry buttercream topped cupcakes, adorned with large daisy flowers and butterflies cheer you up?
Springtime Vanilla Cupcakes
While the weather was so chilly and dreary, I was also feeling a little blue too, having just received news that a very close friend is extremely poorly. And so baking these cupcakes was therapeutic on both counts.
Do you find baking relaxing?
Springtime Vanilla Cupcakes
Using Naturally Flavoured Icing Sugar
Although these are called Springtime Vanilla Cupcakes, which is true, the cake part is flavoured with Nielsen – MasseyVanilla Extract, for the buttercream I have used a favourite flavoured icing sugar.
Sugar and Crumbssell an amazing range of naturally flavoured icing sugars. While making my Raspberry Ripple CupcakesI used their Raspberry Ripple flavoured icing sugar. Since the day that last cupcake was eaten, in Kylie’s own words “I just can’t get you outta my head” I have wanted more. Especially more of the delicious tasting buttercream and more cupcake to swirl it onto!!
And so these Springtime Vanilla Cupcakes were the perfect excuse to indulge my passion again.
Importantly, this time I wanted to leave the option of using flavoured buttercream as a choice. Also, if you do buy some flavoured icing sugar, you can choose to make the buttercream any flavour you want. Especially, as the vanilla sponge goes well with any flavoured frosting. Alternatively, if you want to stick with vanilla buttercream that tastes awesome as well.
Springtime Vanilla Cupcakes
Personally I think the pink icing, along with the decorations, really set these cupcakes apart. Although ‘Springtime’ was at the forefront of my mind whilst creating these beauties, with Mother’s Day being this coming Sunday, they would also make a perfect gift for any Mum.
Recipe: Makes 18 Large Springtime Vanilla Cupcakes
For the Cake:
175g/6oz Caster Sugar
175g/6oz Unsalted Butter at room temp.
1tsp Vanilla Bean Paste – or you can substitute for Vanilla Extract
350g12oz Icing Sugar – I used 250g Sugar and CrumbsRaspberry Ripple flavour and 100g/4oz Plain Icing Sugar. (Confectioners Sugar)
175g/6oz Unsalted Butter
Pink Food Colour – I used Wiltonpink food colouring gel (available from cake decorating shops, Amazon and similar from Lakeland UK)
2tbsp Very Hot Water
Dr Oetkerrice paper daisies, various sprinkles (available from most supermarkets)
Rice paper butterflies – from Amazon
Method: Preheat the oven to 170C/150C fan oven, gas mark 3, 325F
Making The Vanilla Cupcake Batter
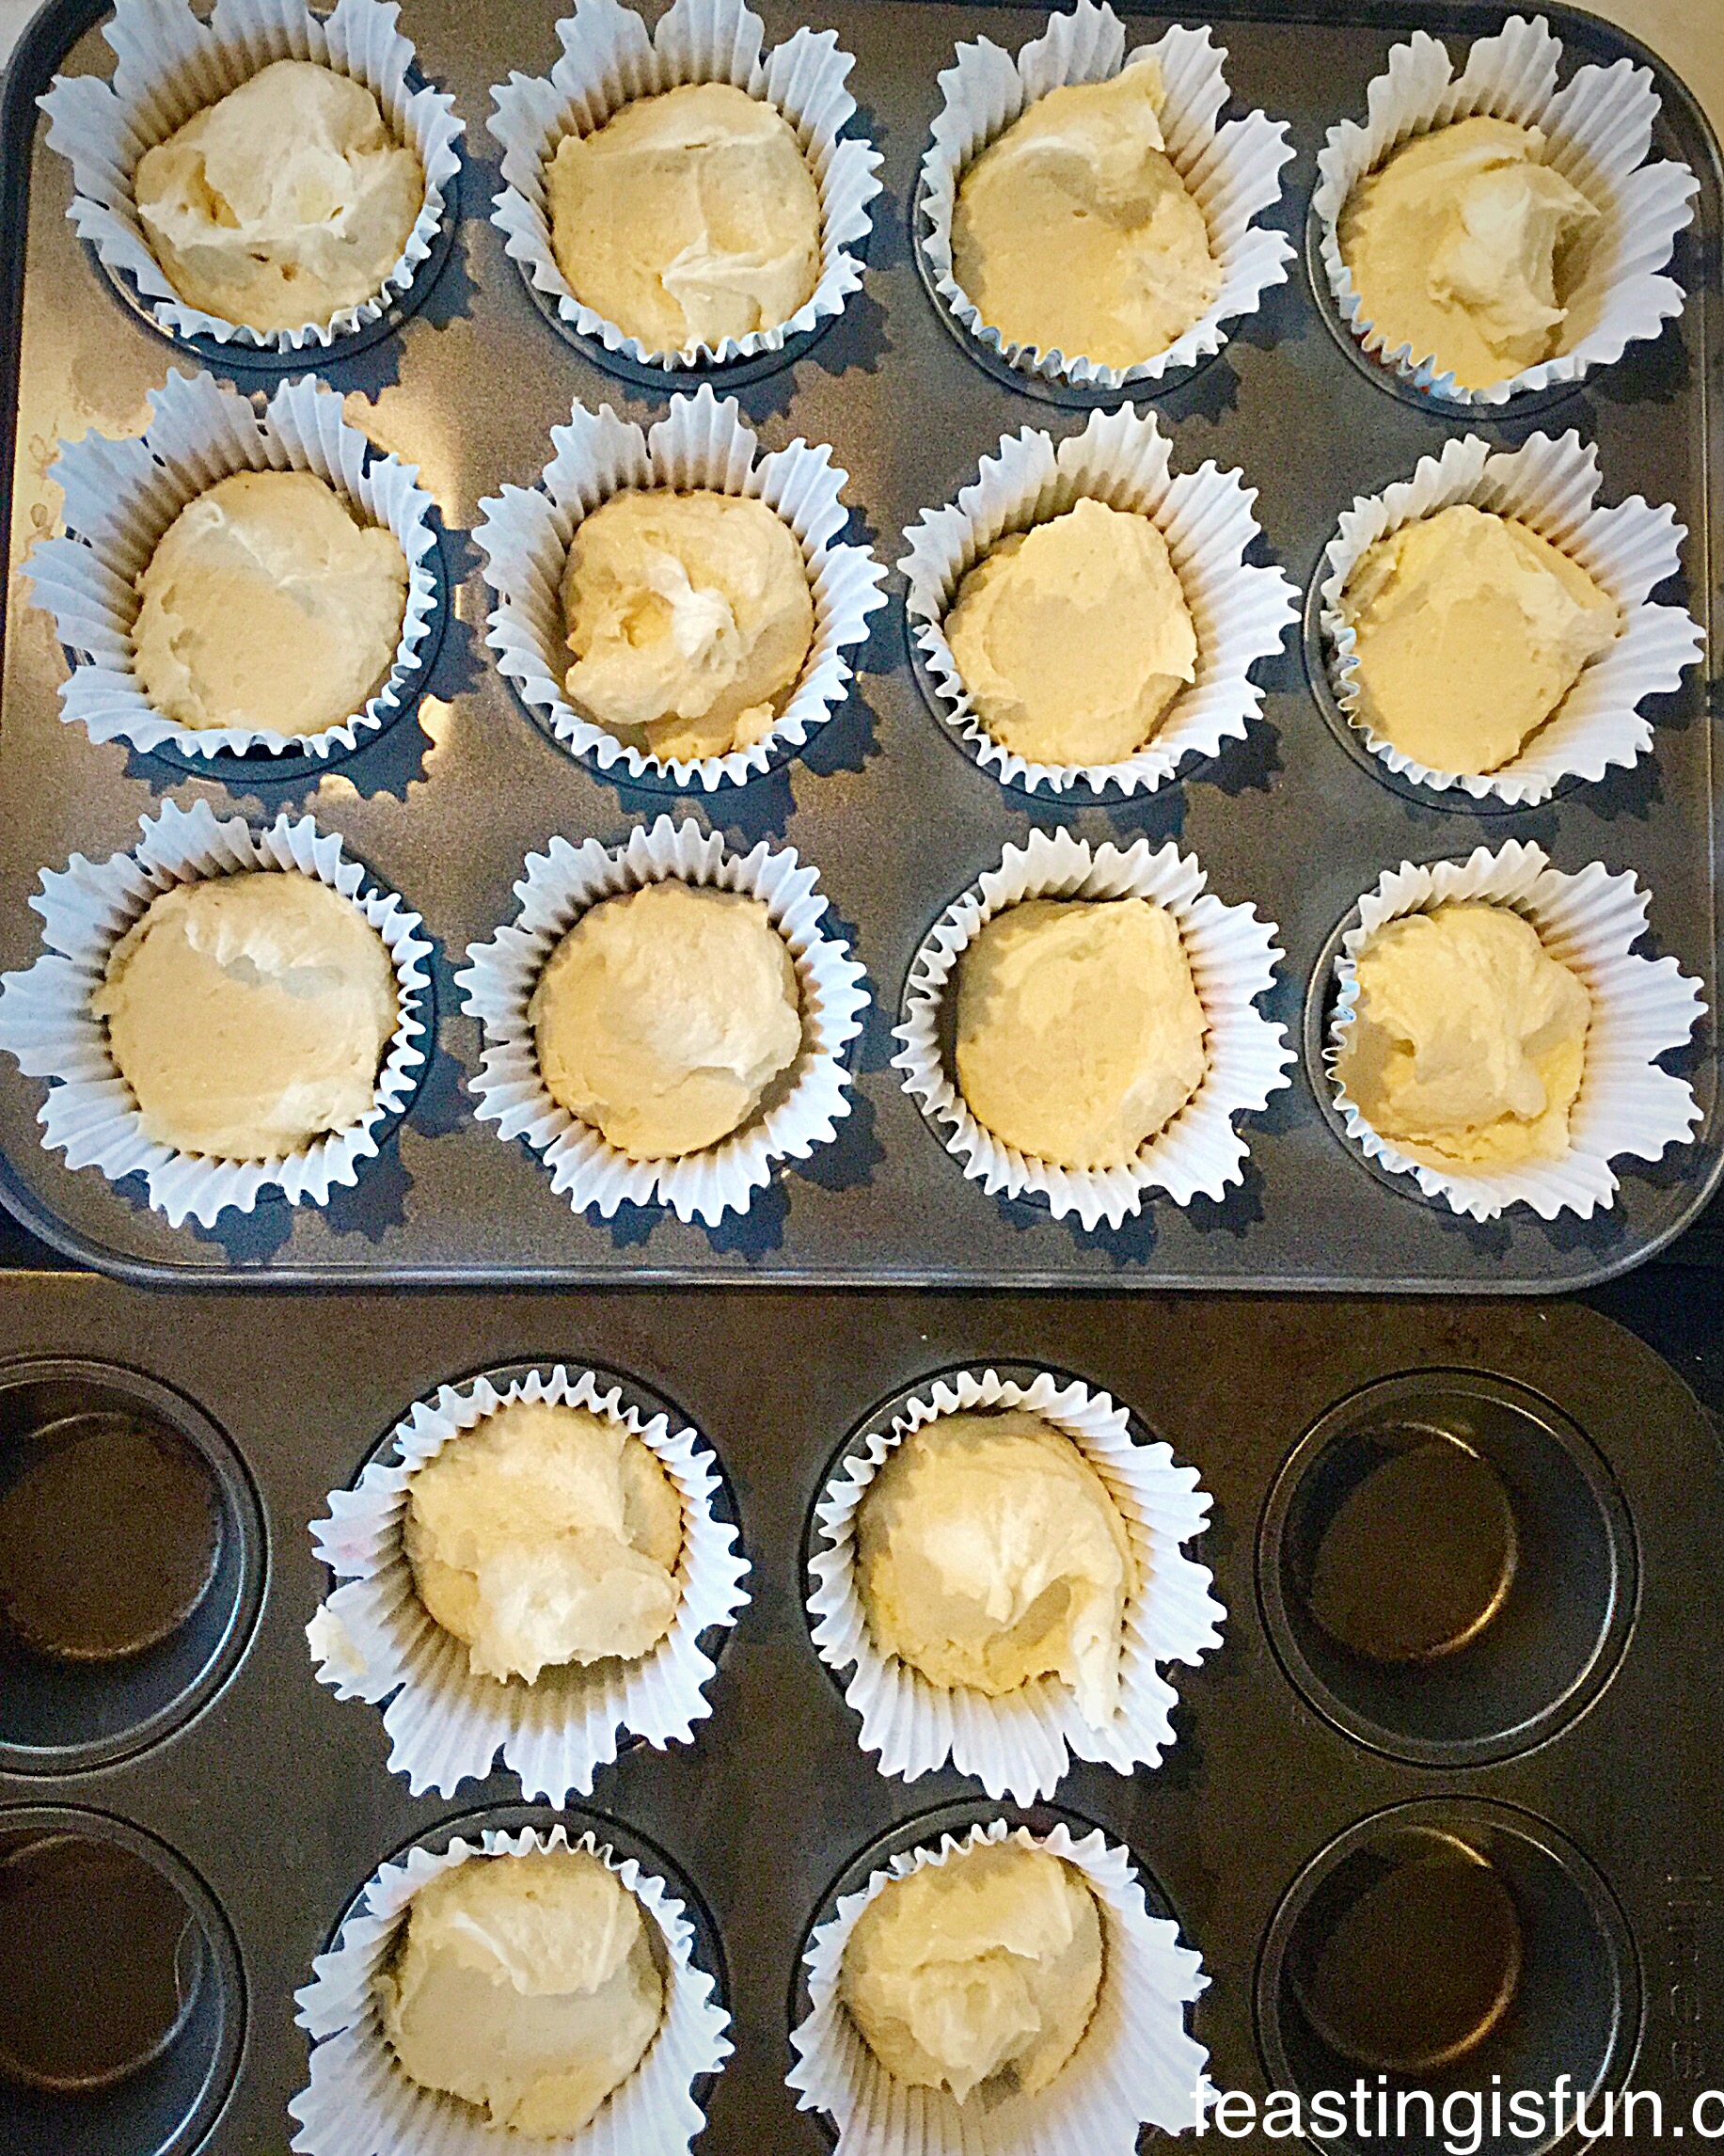
First of all, line 2 cupcake tins with 18 muffin or deep cupcake cases – the ones I used were a Christmas present from Lakeland.
Into a large bowl add your butter and sugar.
Whisk or beat until pale and creamy – approx 5 minutes.
Add 3 eggs, milk and Vanilla Bean Paste.
Sift into the bowl the flour, baking powder and salt.
Note: This is called the all-in-one method.
Whisk or beat until all of the ingredients are combined – take care not to over mix and this will make the cupcakes tough, not light and springy.
Place a heaped dessert spoonful of cake batter into each cupcake case.
Springtime Vanilla Cupcakes
Baking The Vanilla Cupcakes
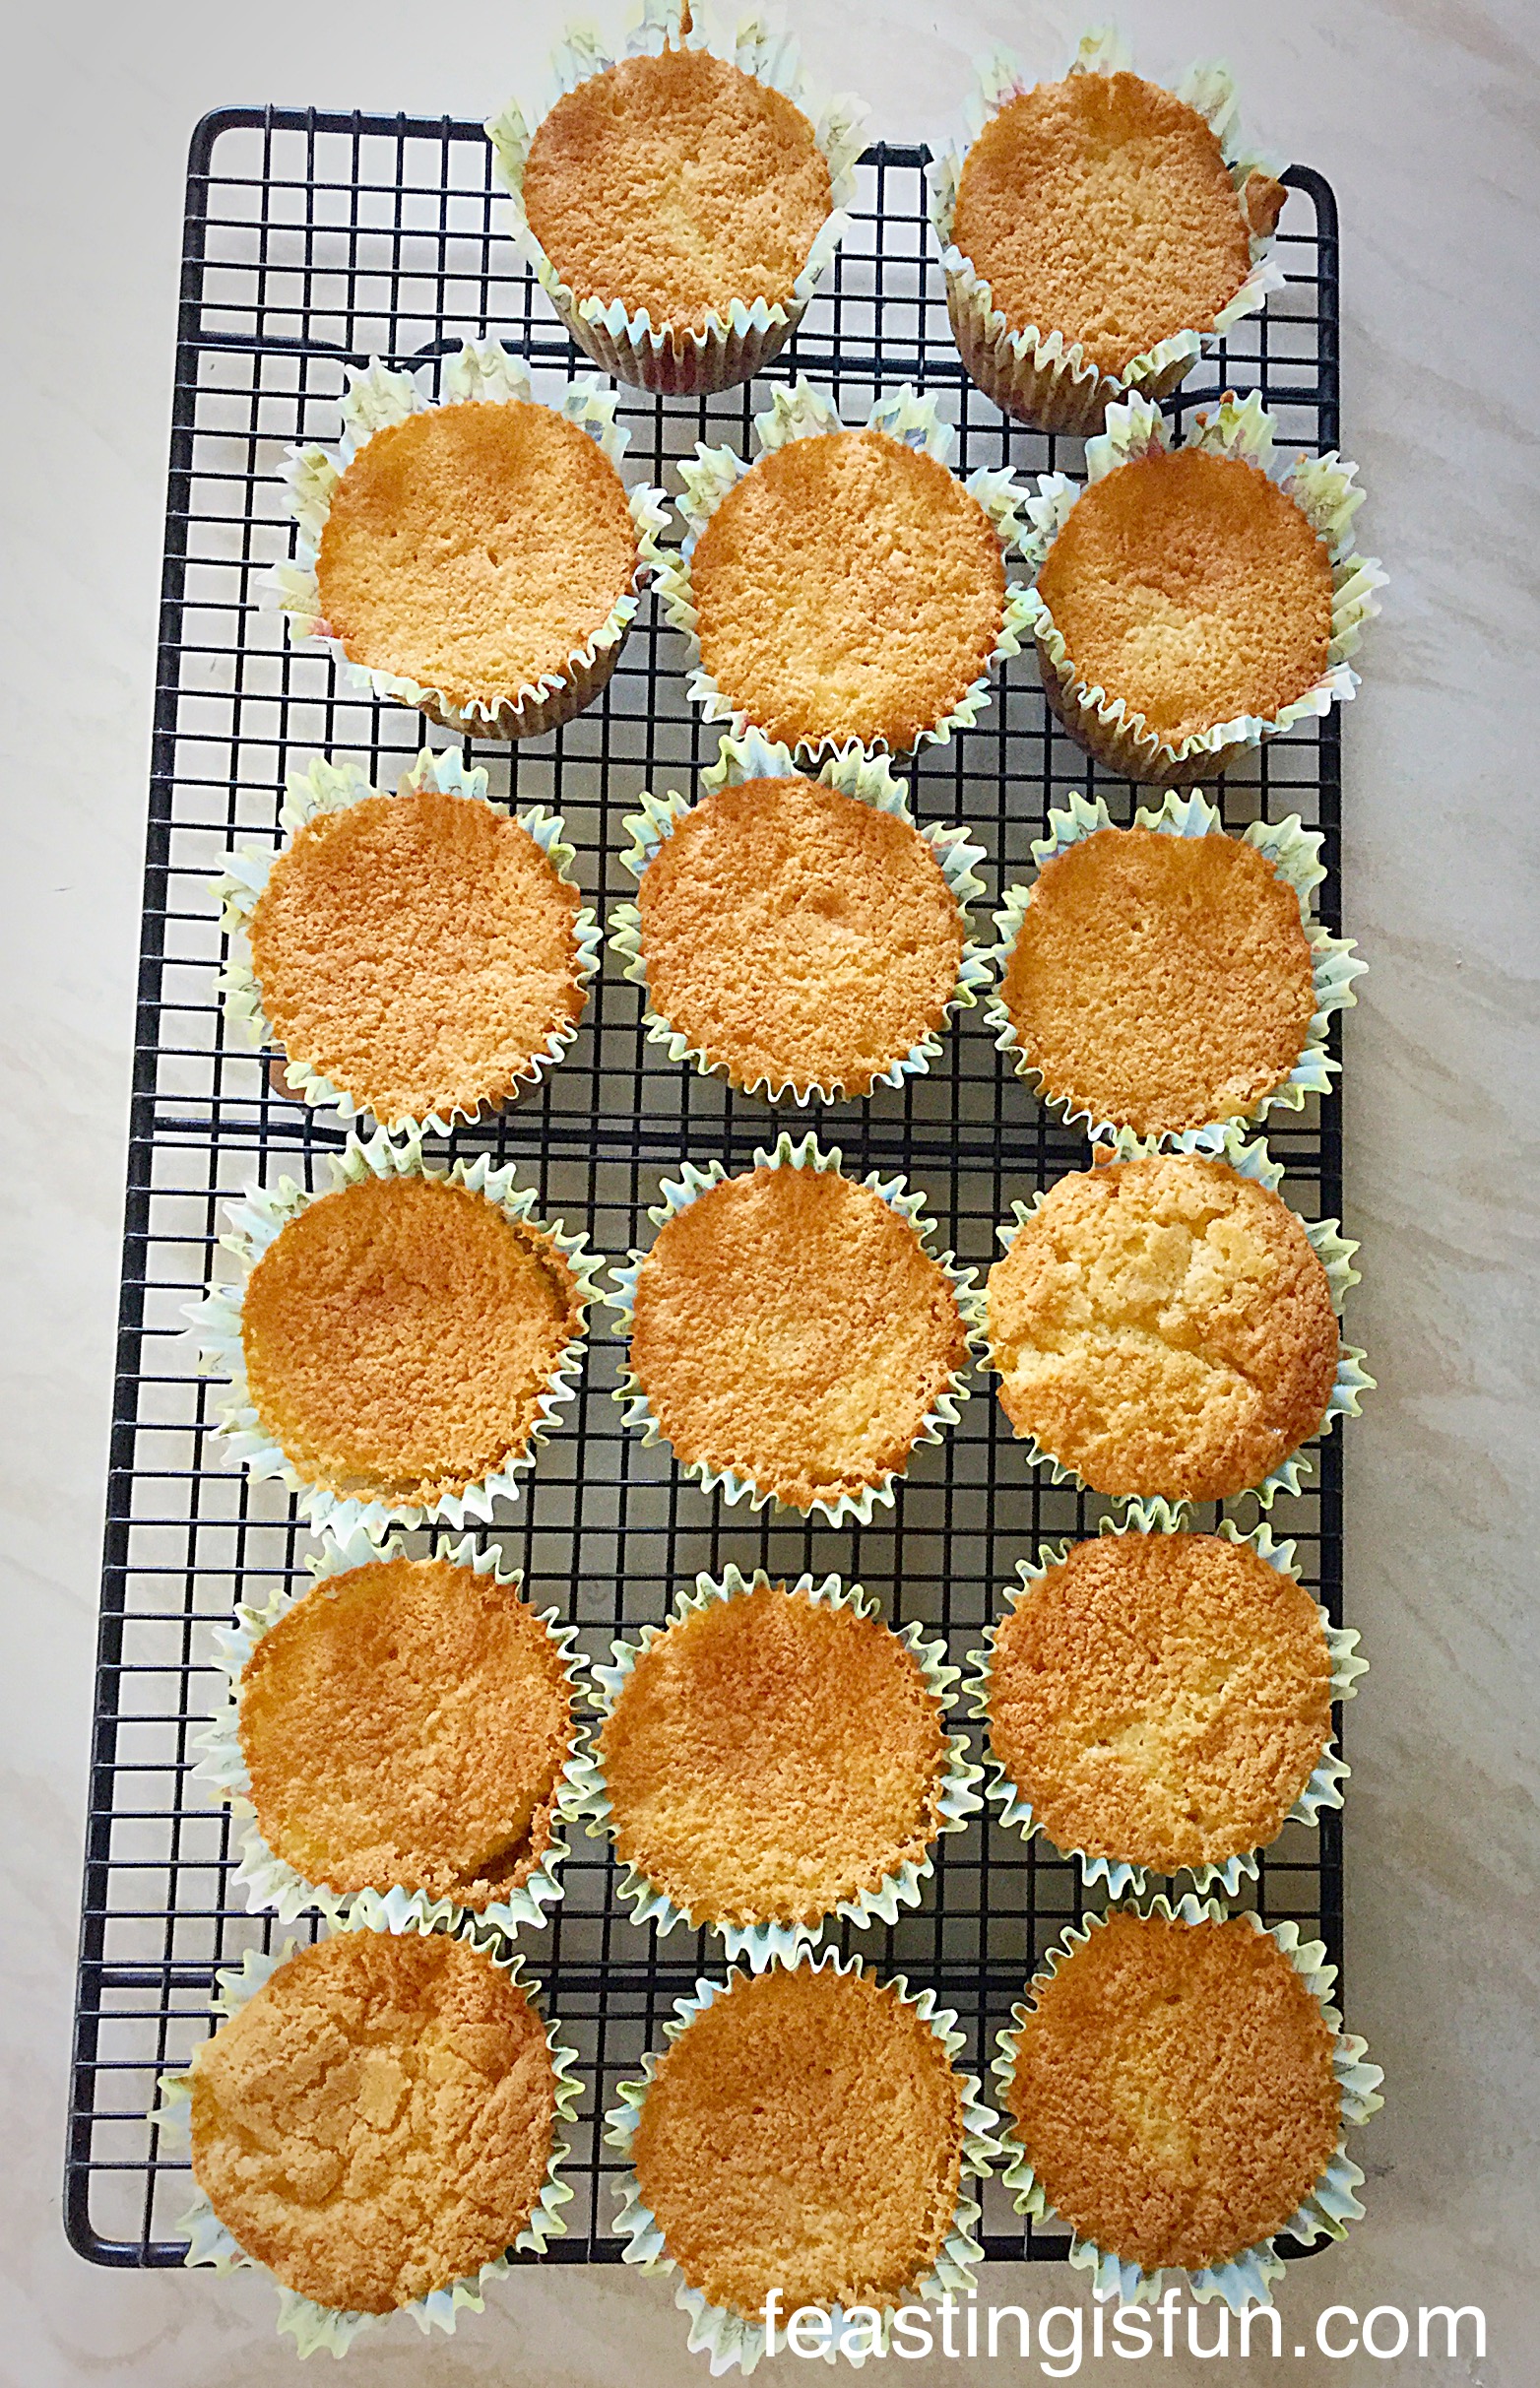
Place the cupcakes into the oven and bake for 20-30 minutes,
The cupcakes are baked when they have risen and are a golden colour. They should spring back when pressed lightly on the top.
As soon as the cupcakes are baked remove from the oven.
Allow to cool completely before icing.
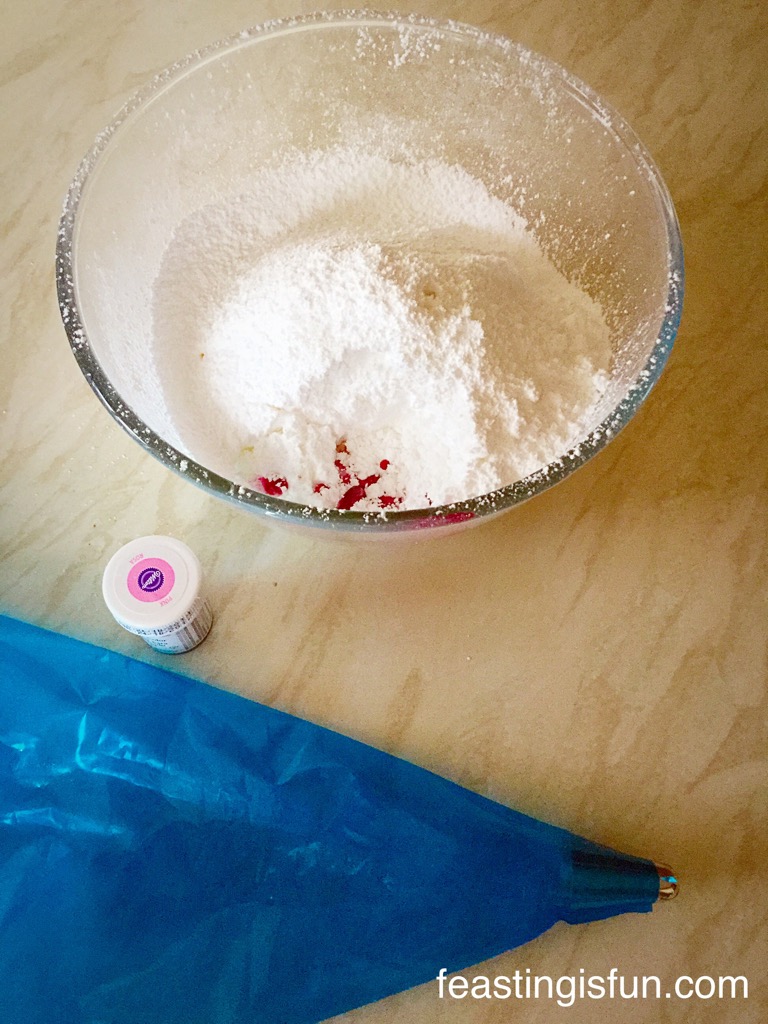
Making The Pink Buttercream
Place the softened butter into a large bowl.
Sift the icing sugar into the same bowl.
Add the 2 tablespoons of hot water.
Add the food colouring, I use a cocktail stick and simply insert the tip into the food colouring gel and then add to the bowl.
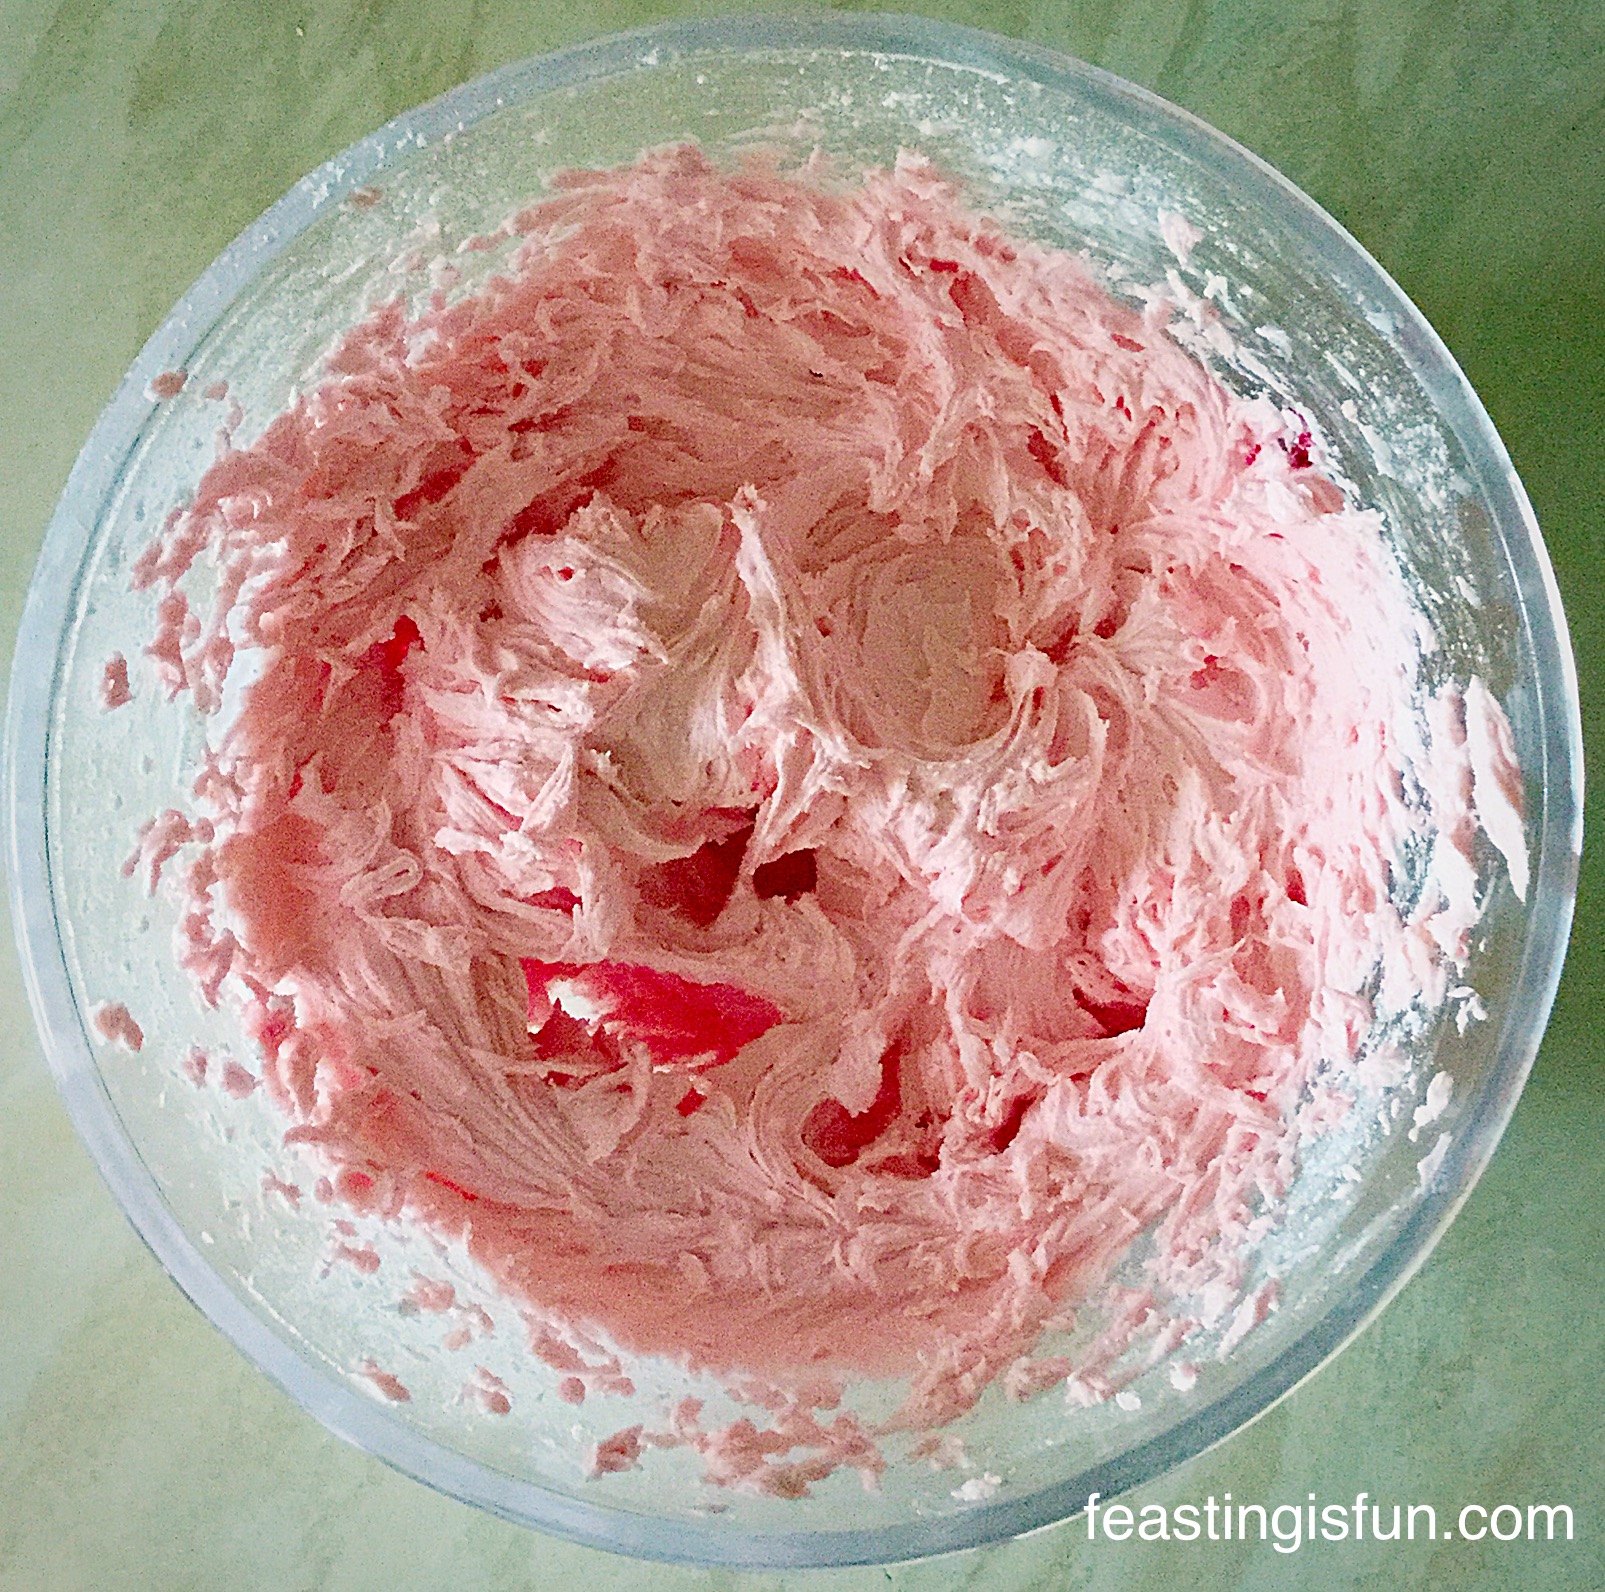
Start slowly, whisking the buttercream ingredients until light, creamy and uniform in colour.
Fit a piping bag with a large star tip.
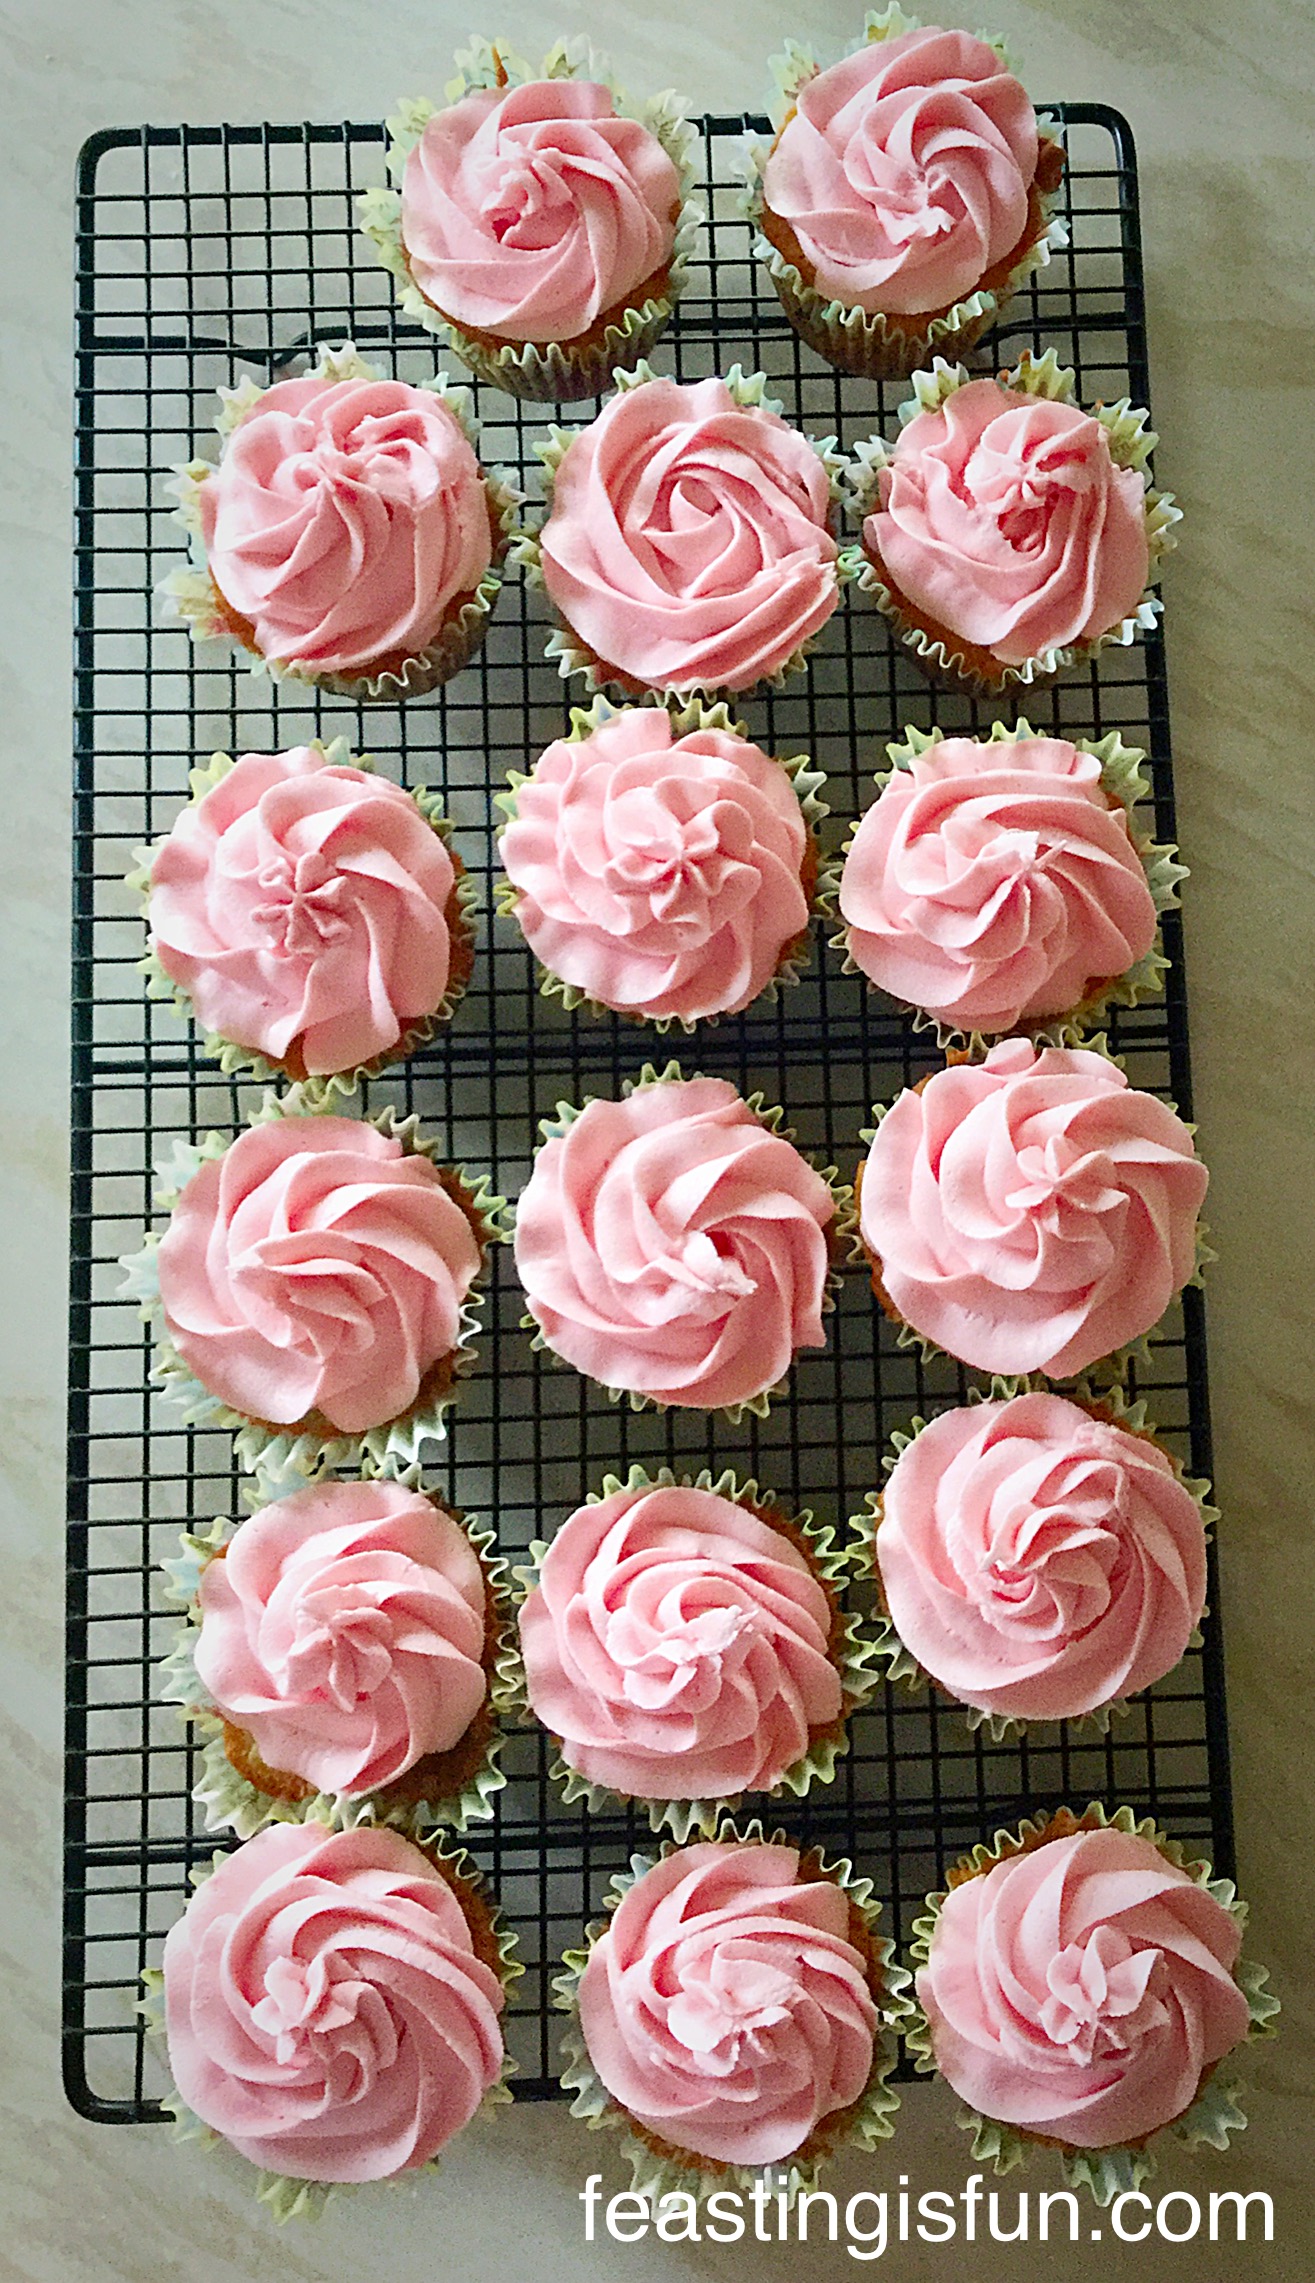
Piping Swirls Of Buttercream On To The Cupcakes
Place the icing bag into a tall sturdy container, I use a jug.
Use a spoon or spatula, fill the icing bag with all of the buttercream.
Practise on a plate, if piping for the first time.
Squeeze the bag so that all the buttercream is together.
Keep an even pressure with one hand squeezing the bag and using the other hand to guide the piping tip, pipe swirls onto the cupcakes.
Springtime Vanilla Cupcakes
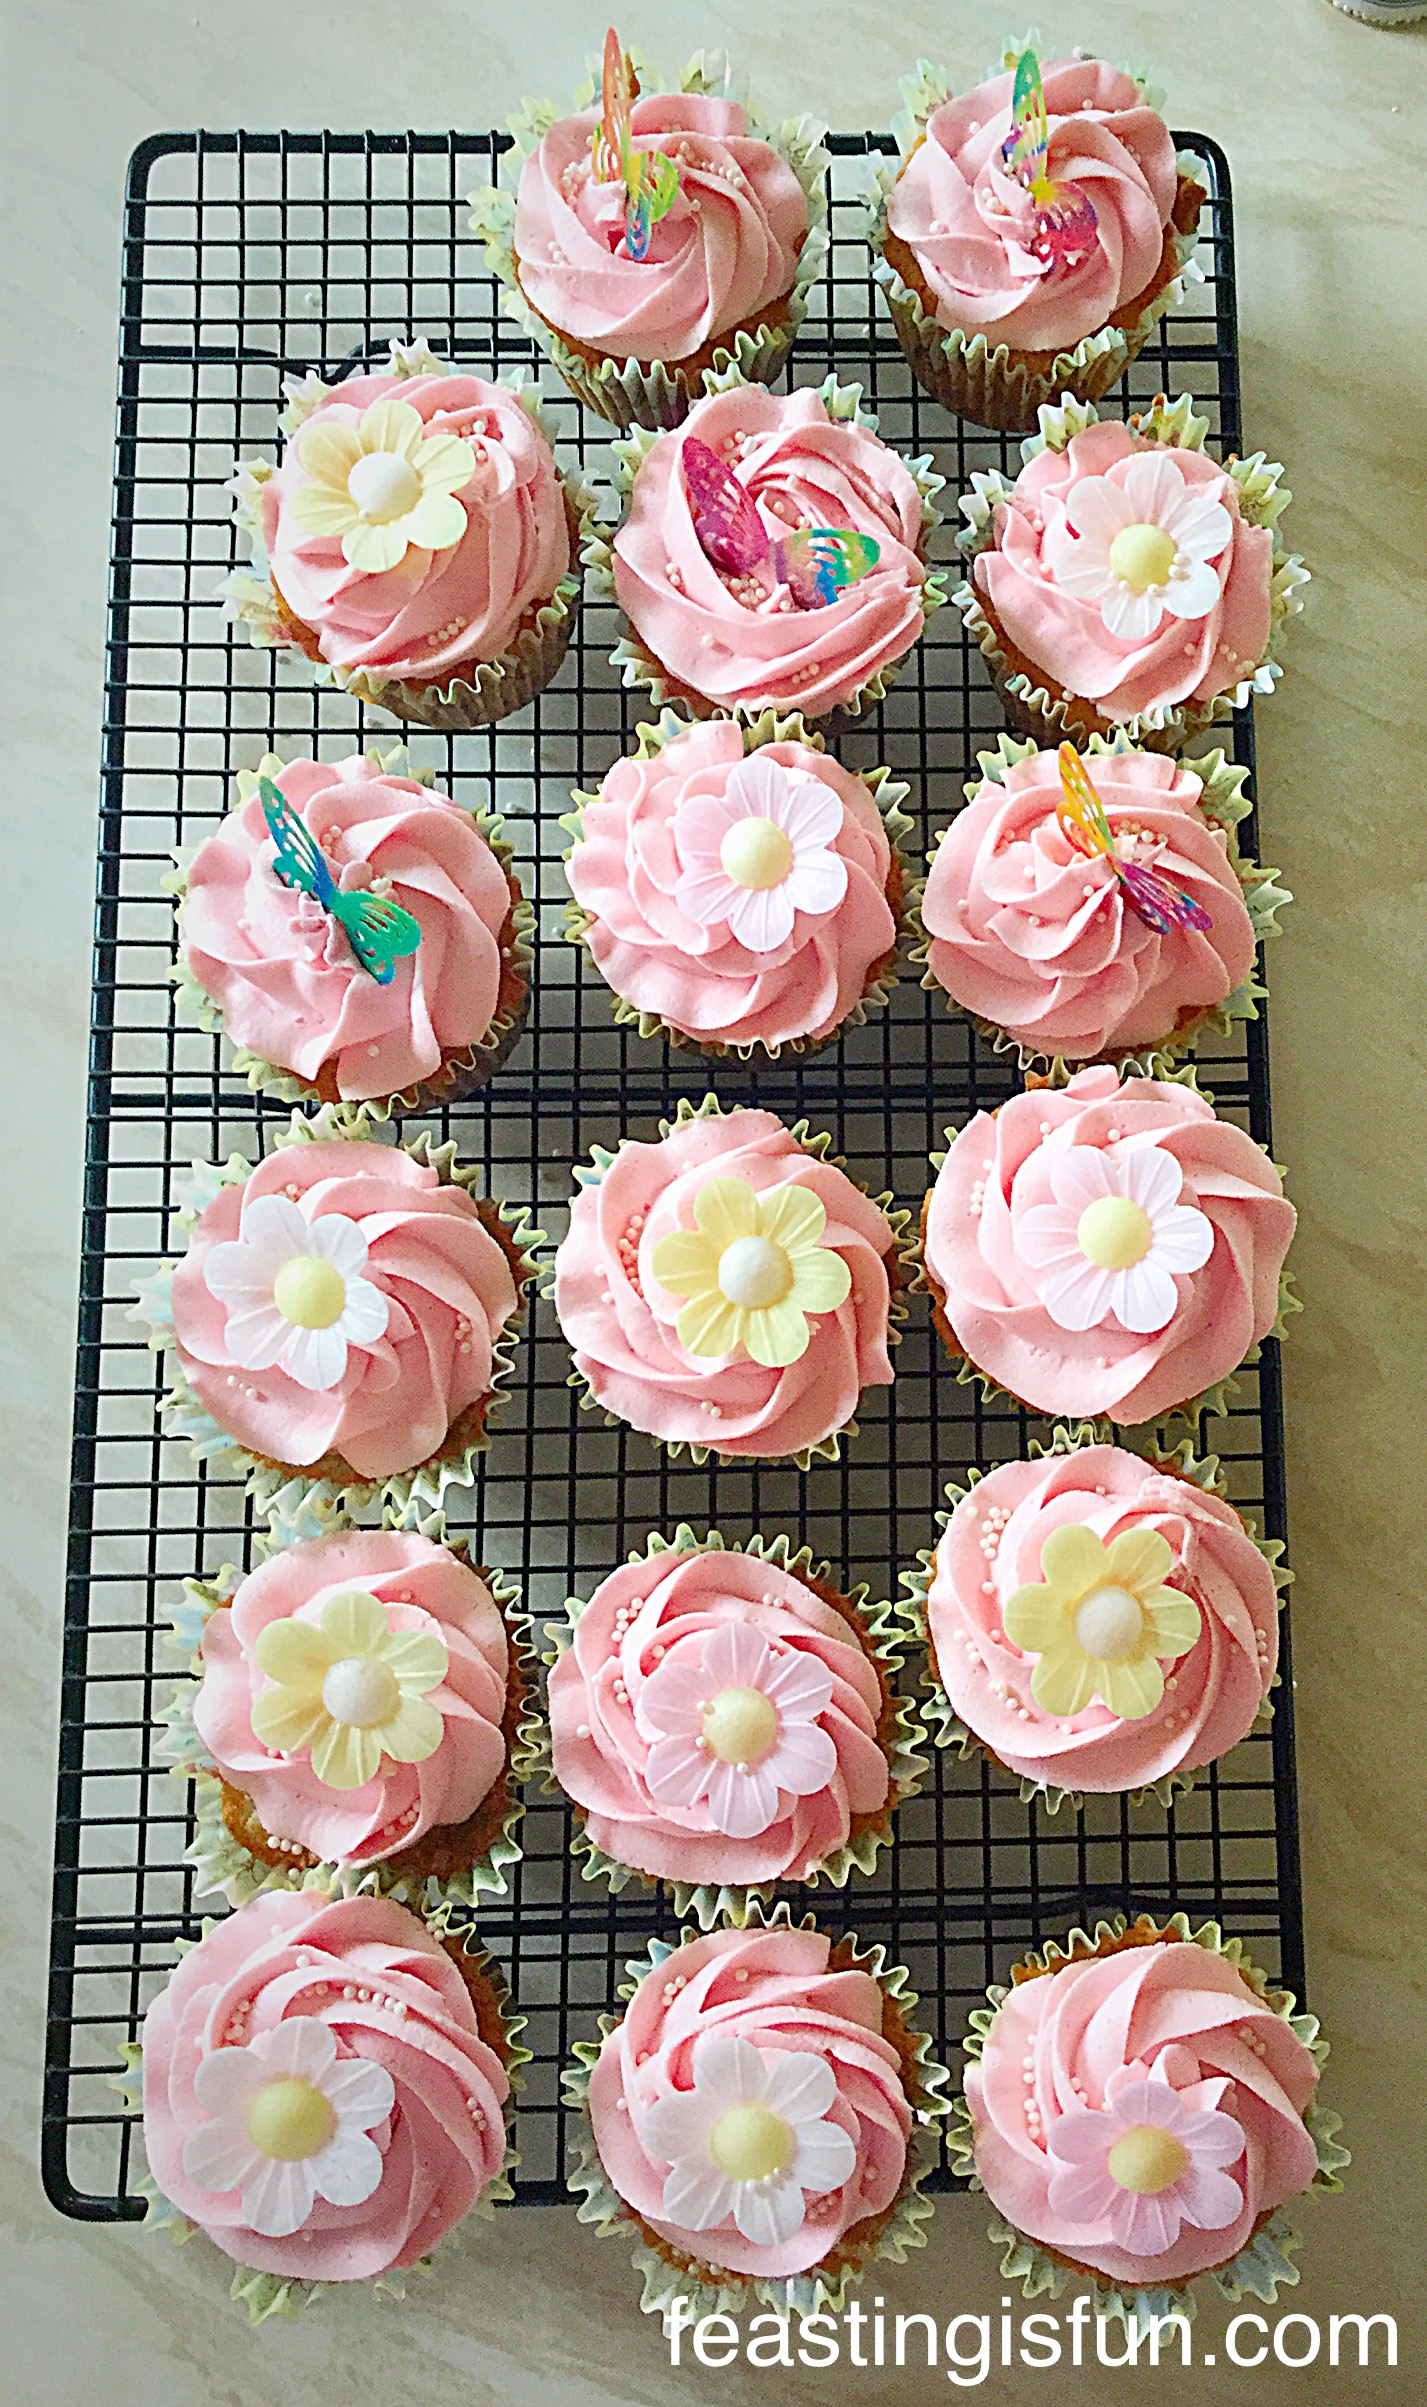
Finally add the decorations.
Springtime Vanilla Cupcakes
Gifting Springtime Vanilla Cupcakes
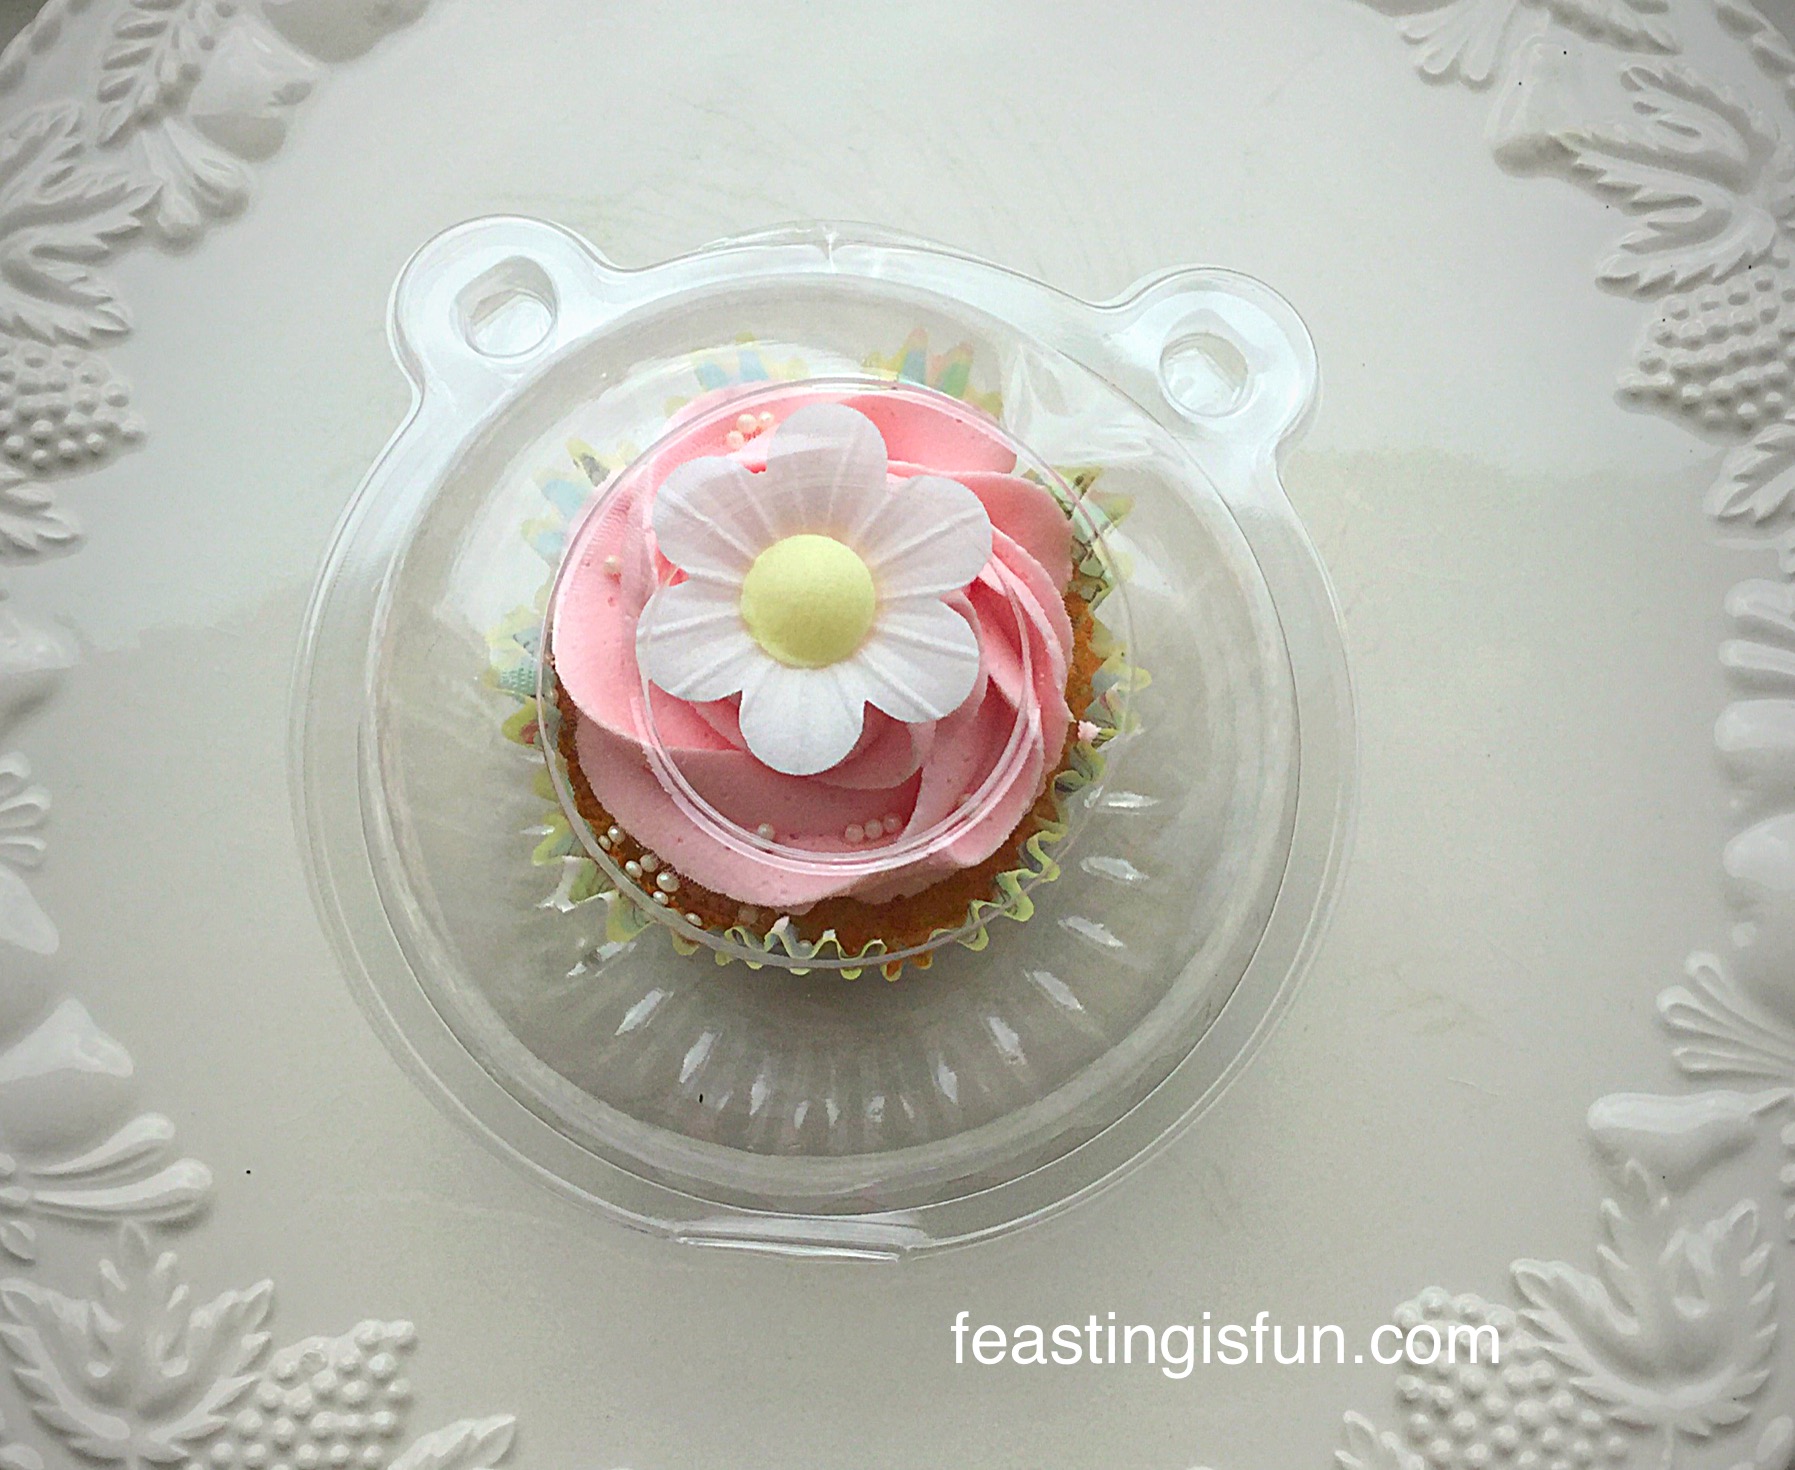
Because I like giving the food I make away, I bought some cupcake pods, little plastic containers, perfect for holding one cupcake in and a great way to give individual cupcakes away as a gift. Since they were from Amazon and work out to about 10 pence per pod. Also, they can be washed up and used again, which is great recycling and means you can share even more cupcakes with others!
Springtime Vanilla Cupcakes
Since piping the swirls onto the cupcakes gives them a beautiful, professional finish. means use whatever cupcake toppers and sprinkles that you have to hand. The beauty of these Springtime Vanilla Cupcakes is that they are individual to your own sense of taste and style.
Springtime Vanilla Cupcakes
If you like the Springtime Vanilla Cupcakes you will love these recipes: