Iced Cherry Coconut Loaf Cake

Share
Facebooktwitterpinterestlinkedintumblr

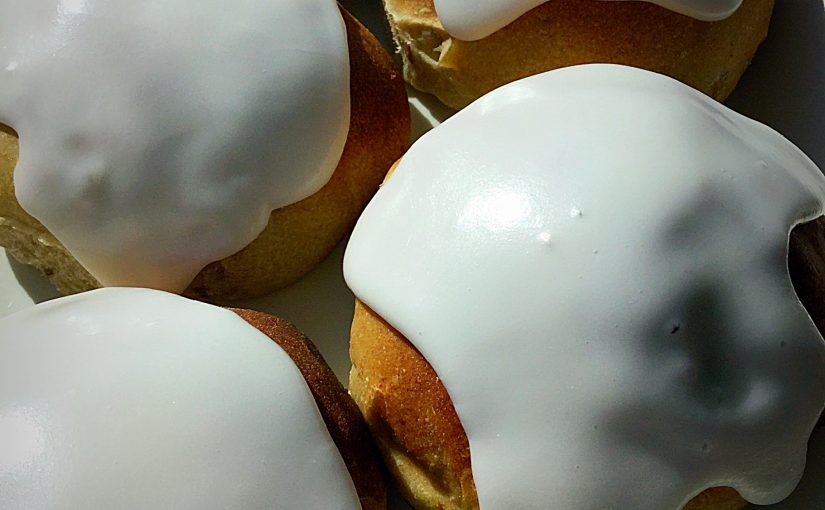
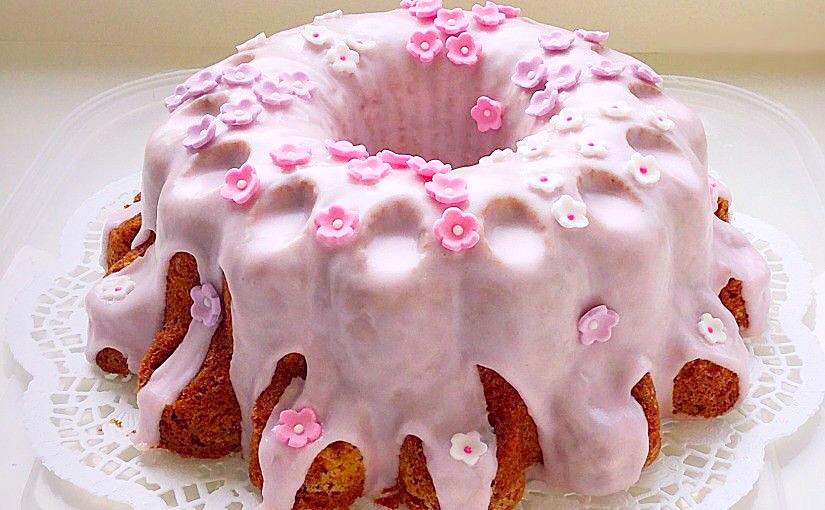
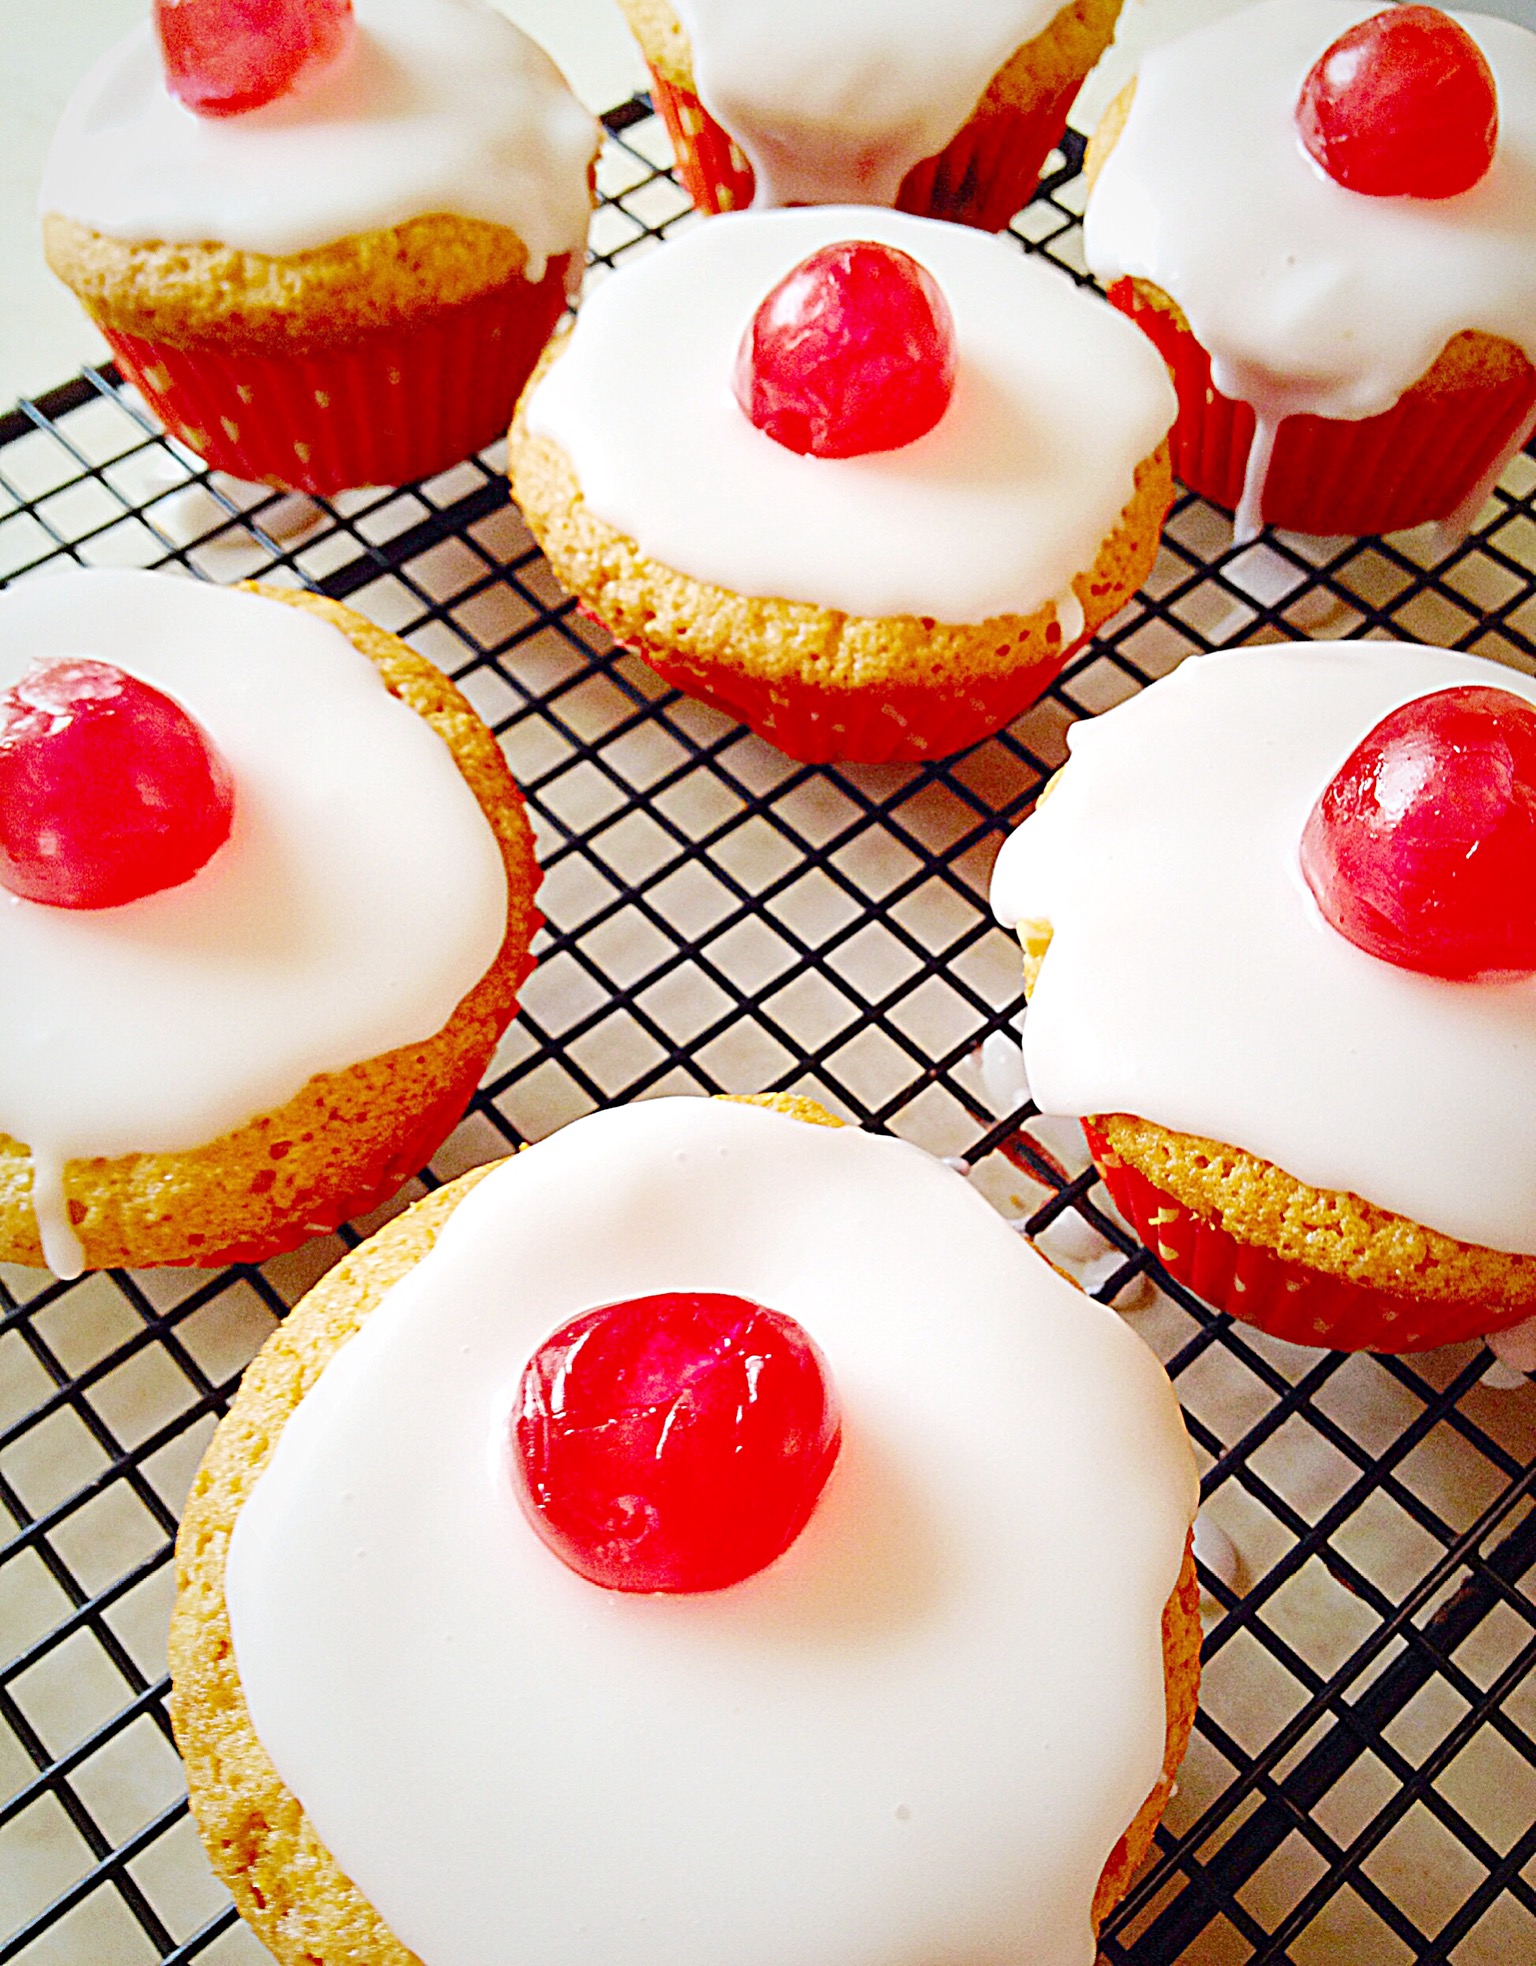
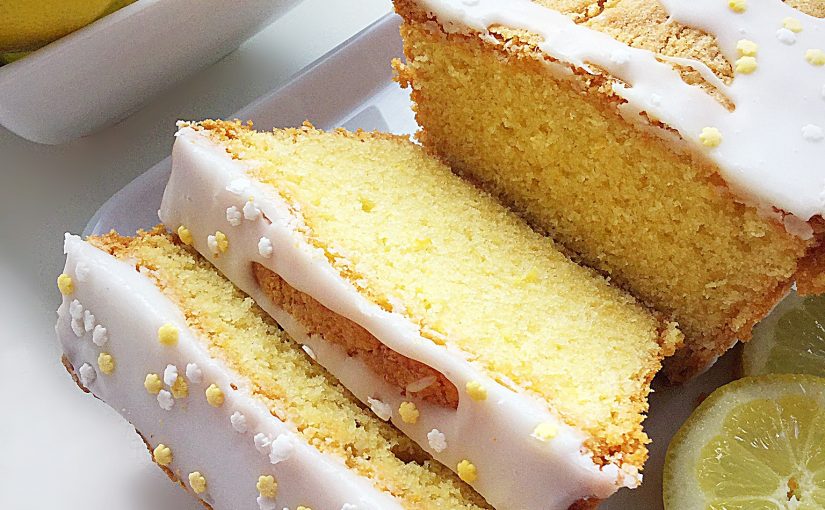
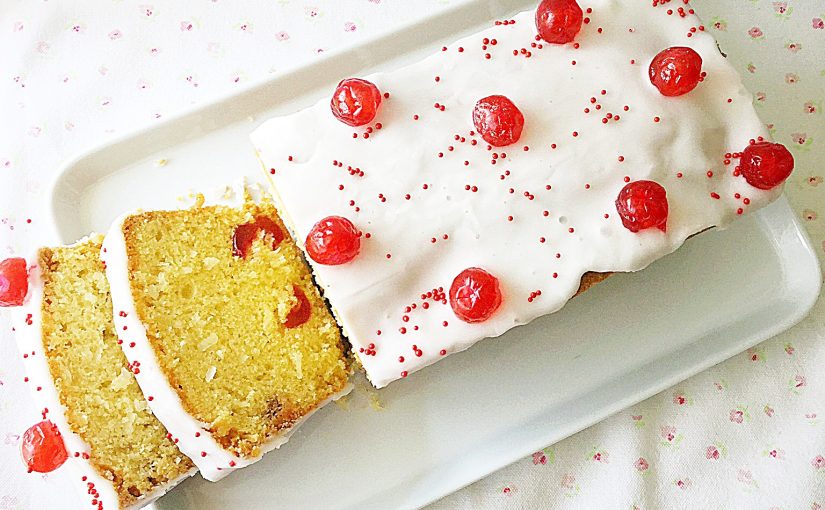
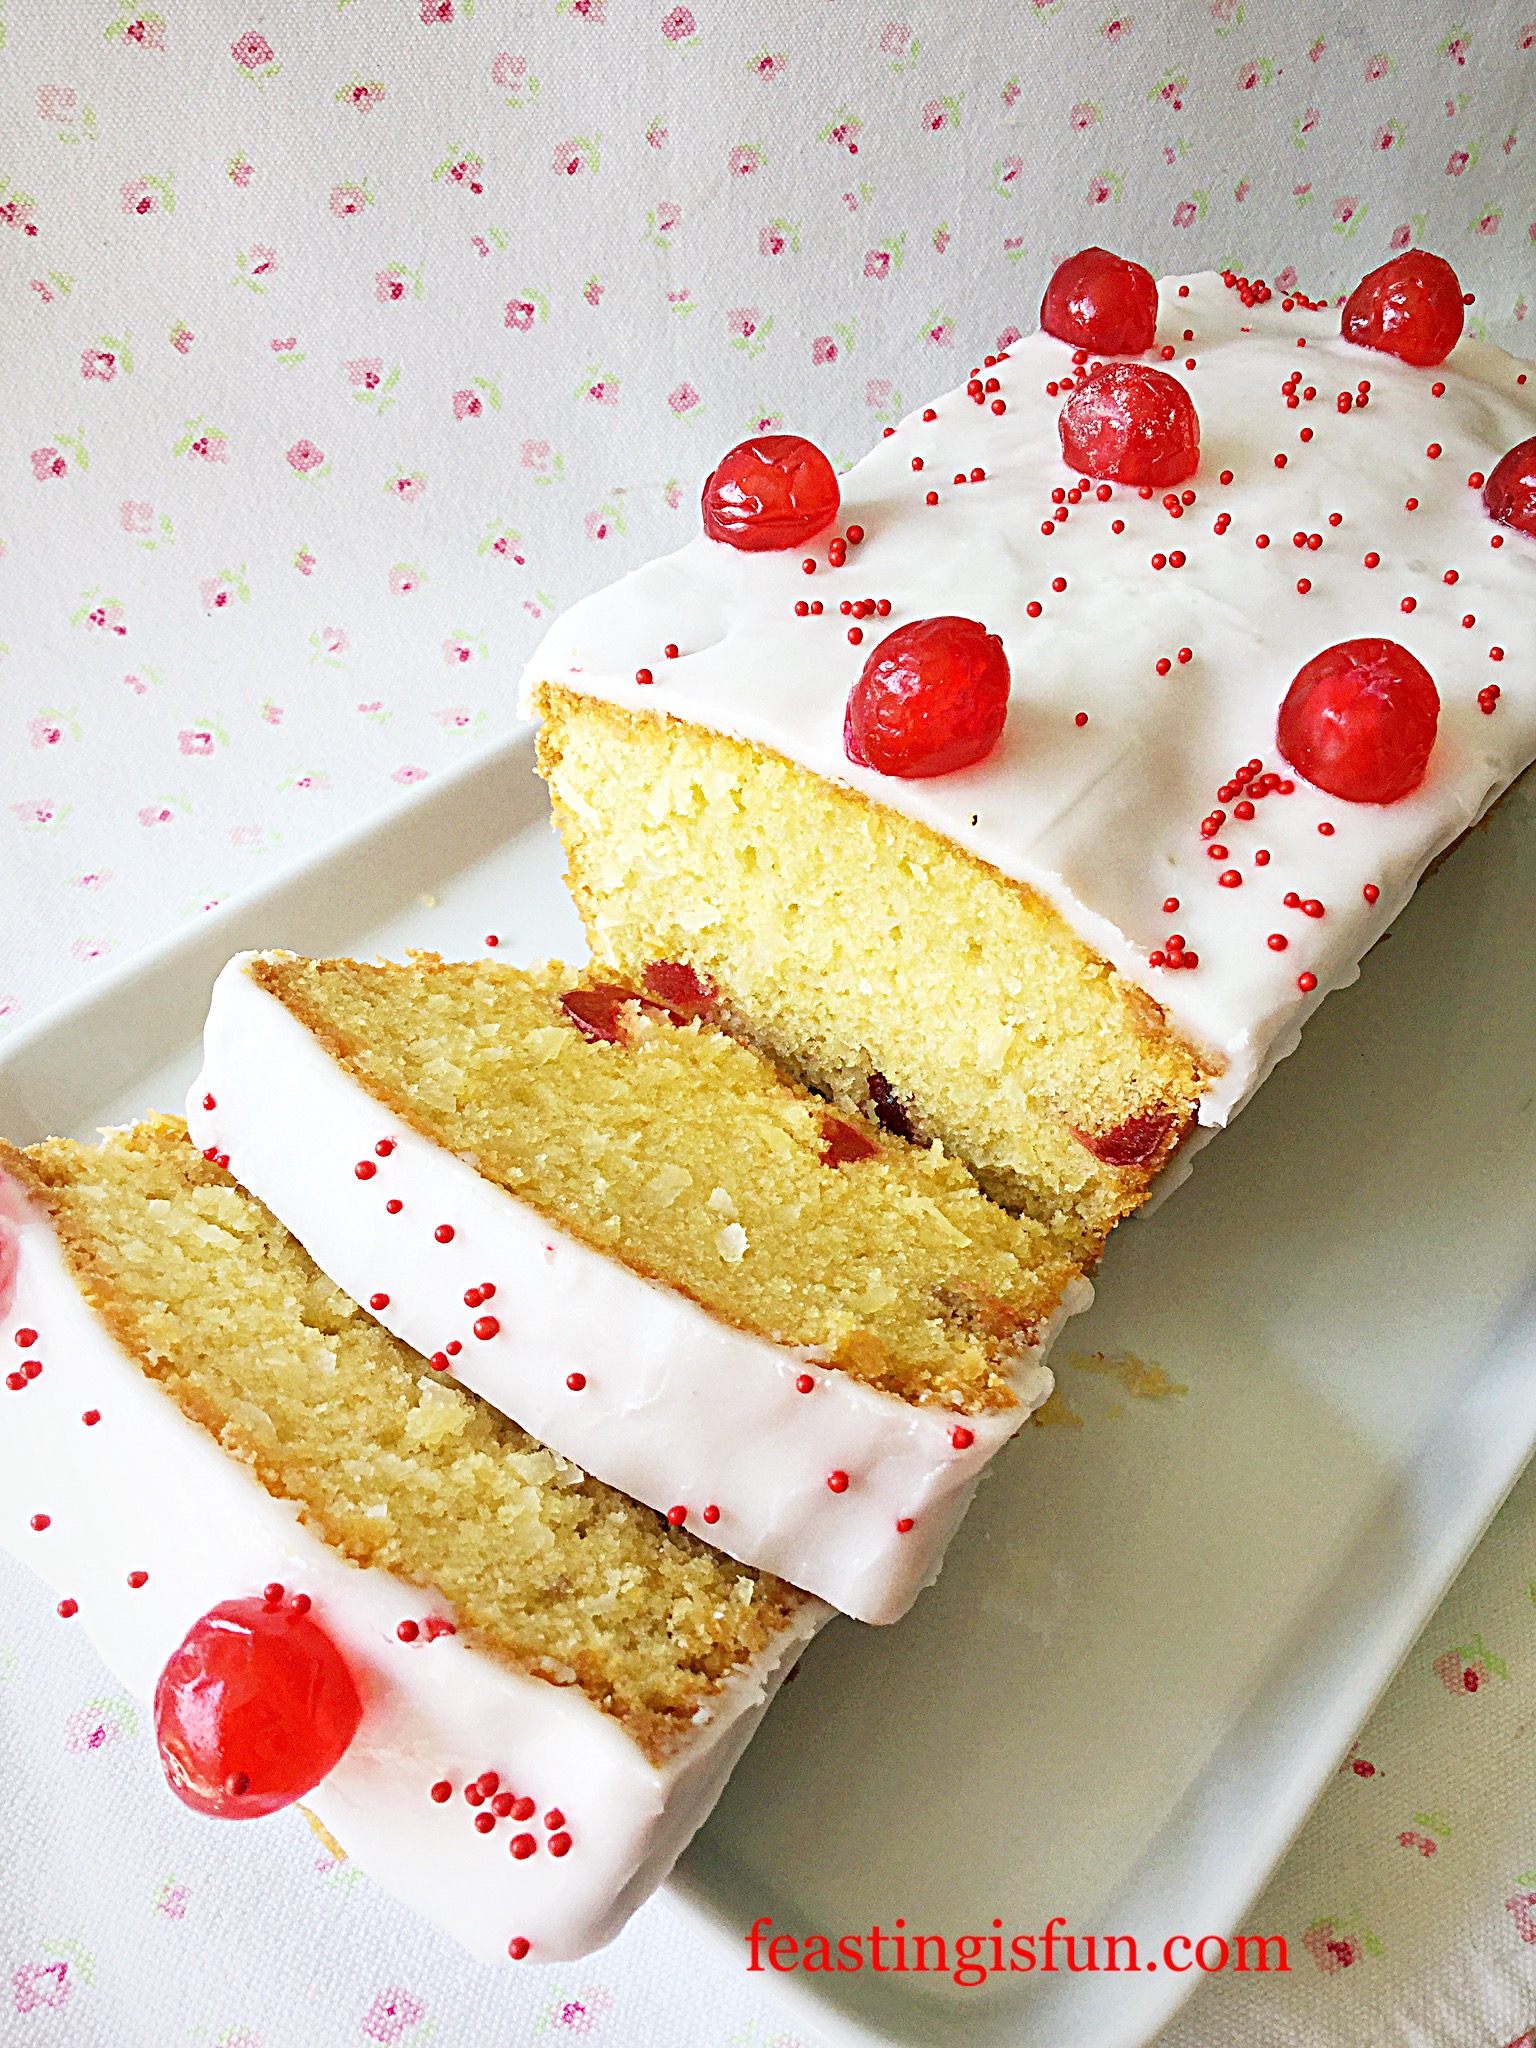
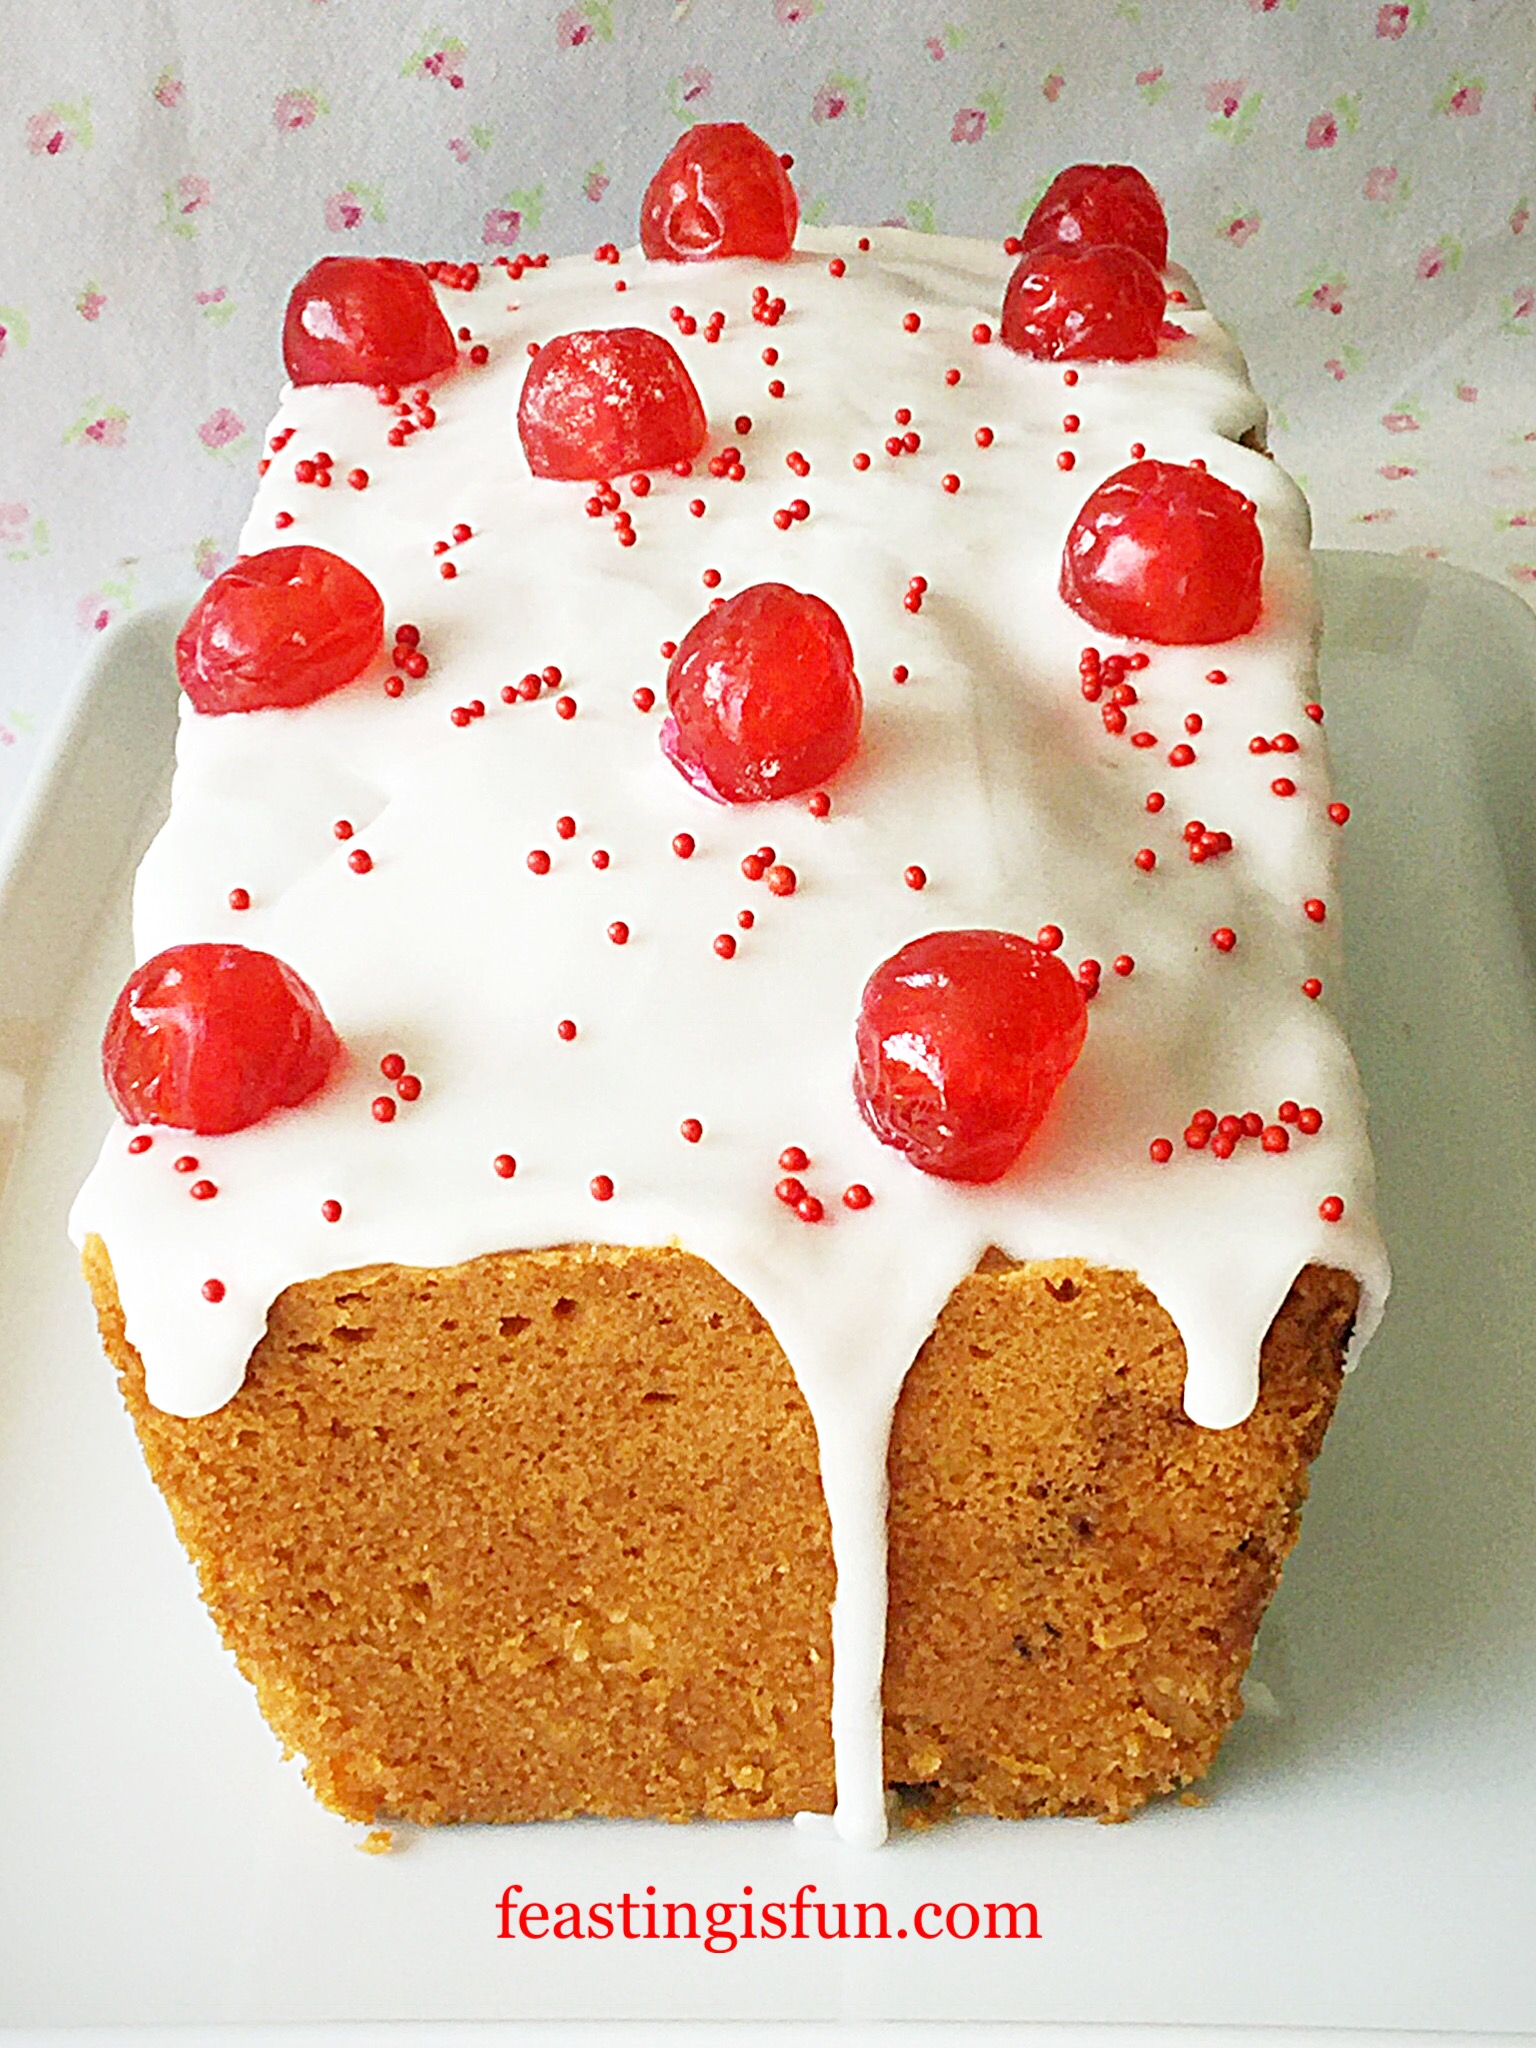
I adore pretty things. Whether it be polka dot plates, wild flowers in a jug, or brushing my hands on cow parsley while out for a walk. And given a choice my garden will always be full of old english roses and rambling honeysuckle, rather than neatly edged borders containing structural plants. Likewise, this relaxed approach is also reflected in my baking. Since a drizzle of icing here and there makes a cake not only beautiful, but shouts that it is homemade. Resulting in this Iced Cherry Coconut Loaf Cake that not only looks pretty but tastes pretty good too!

FF Uncut Iced Cherry Coconut Loaf Cake

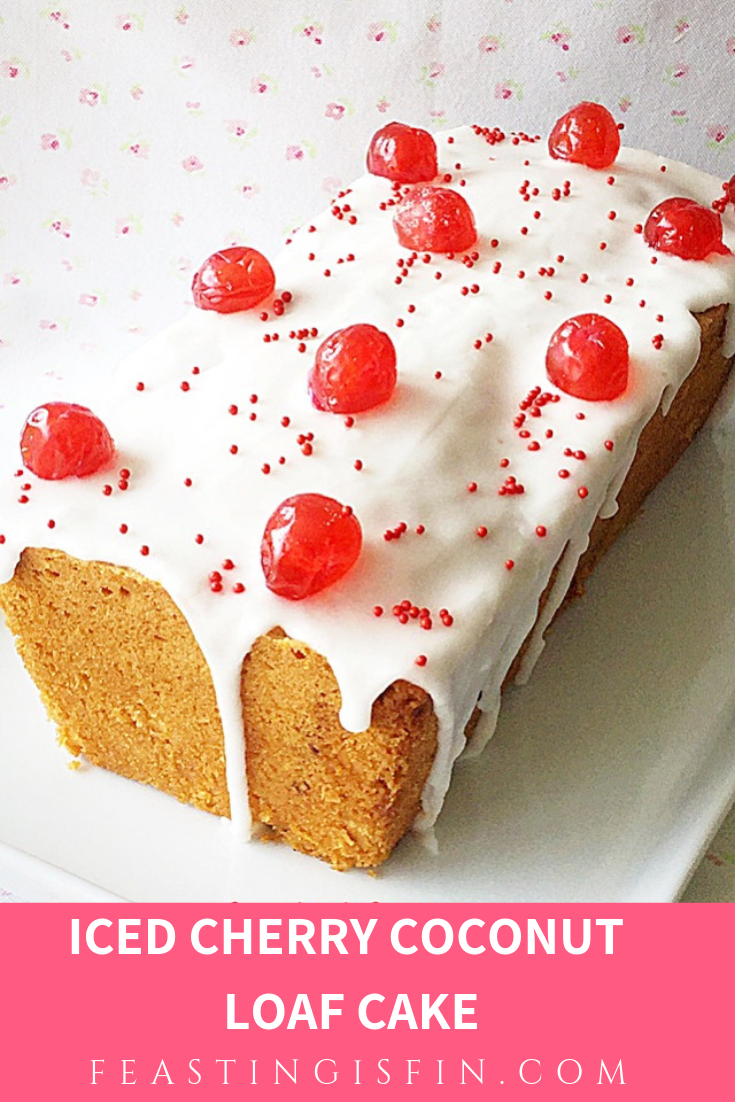
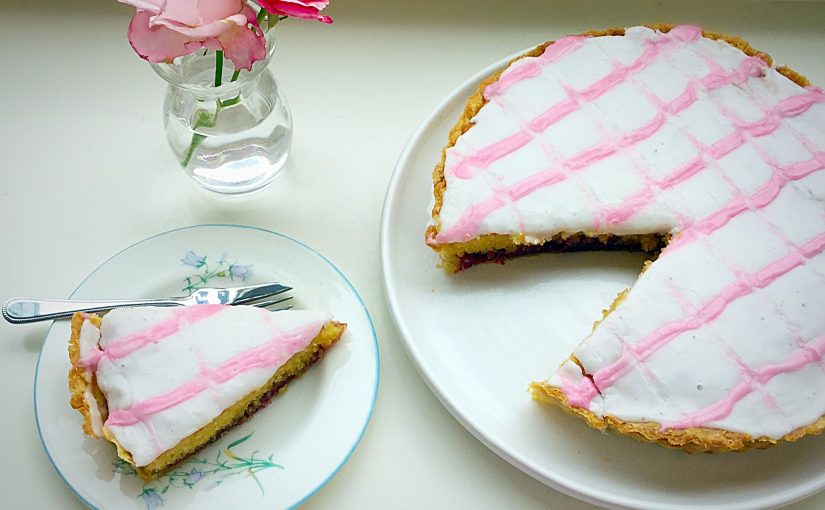
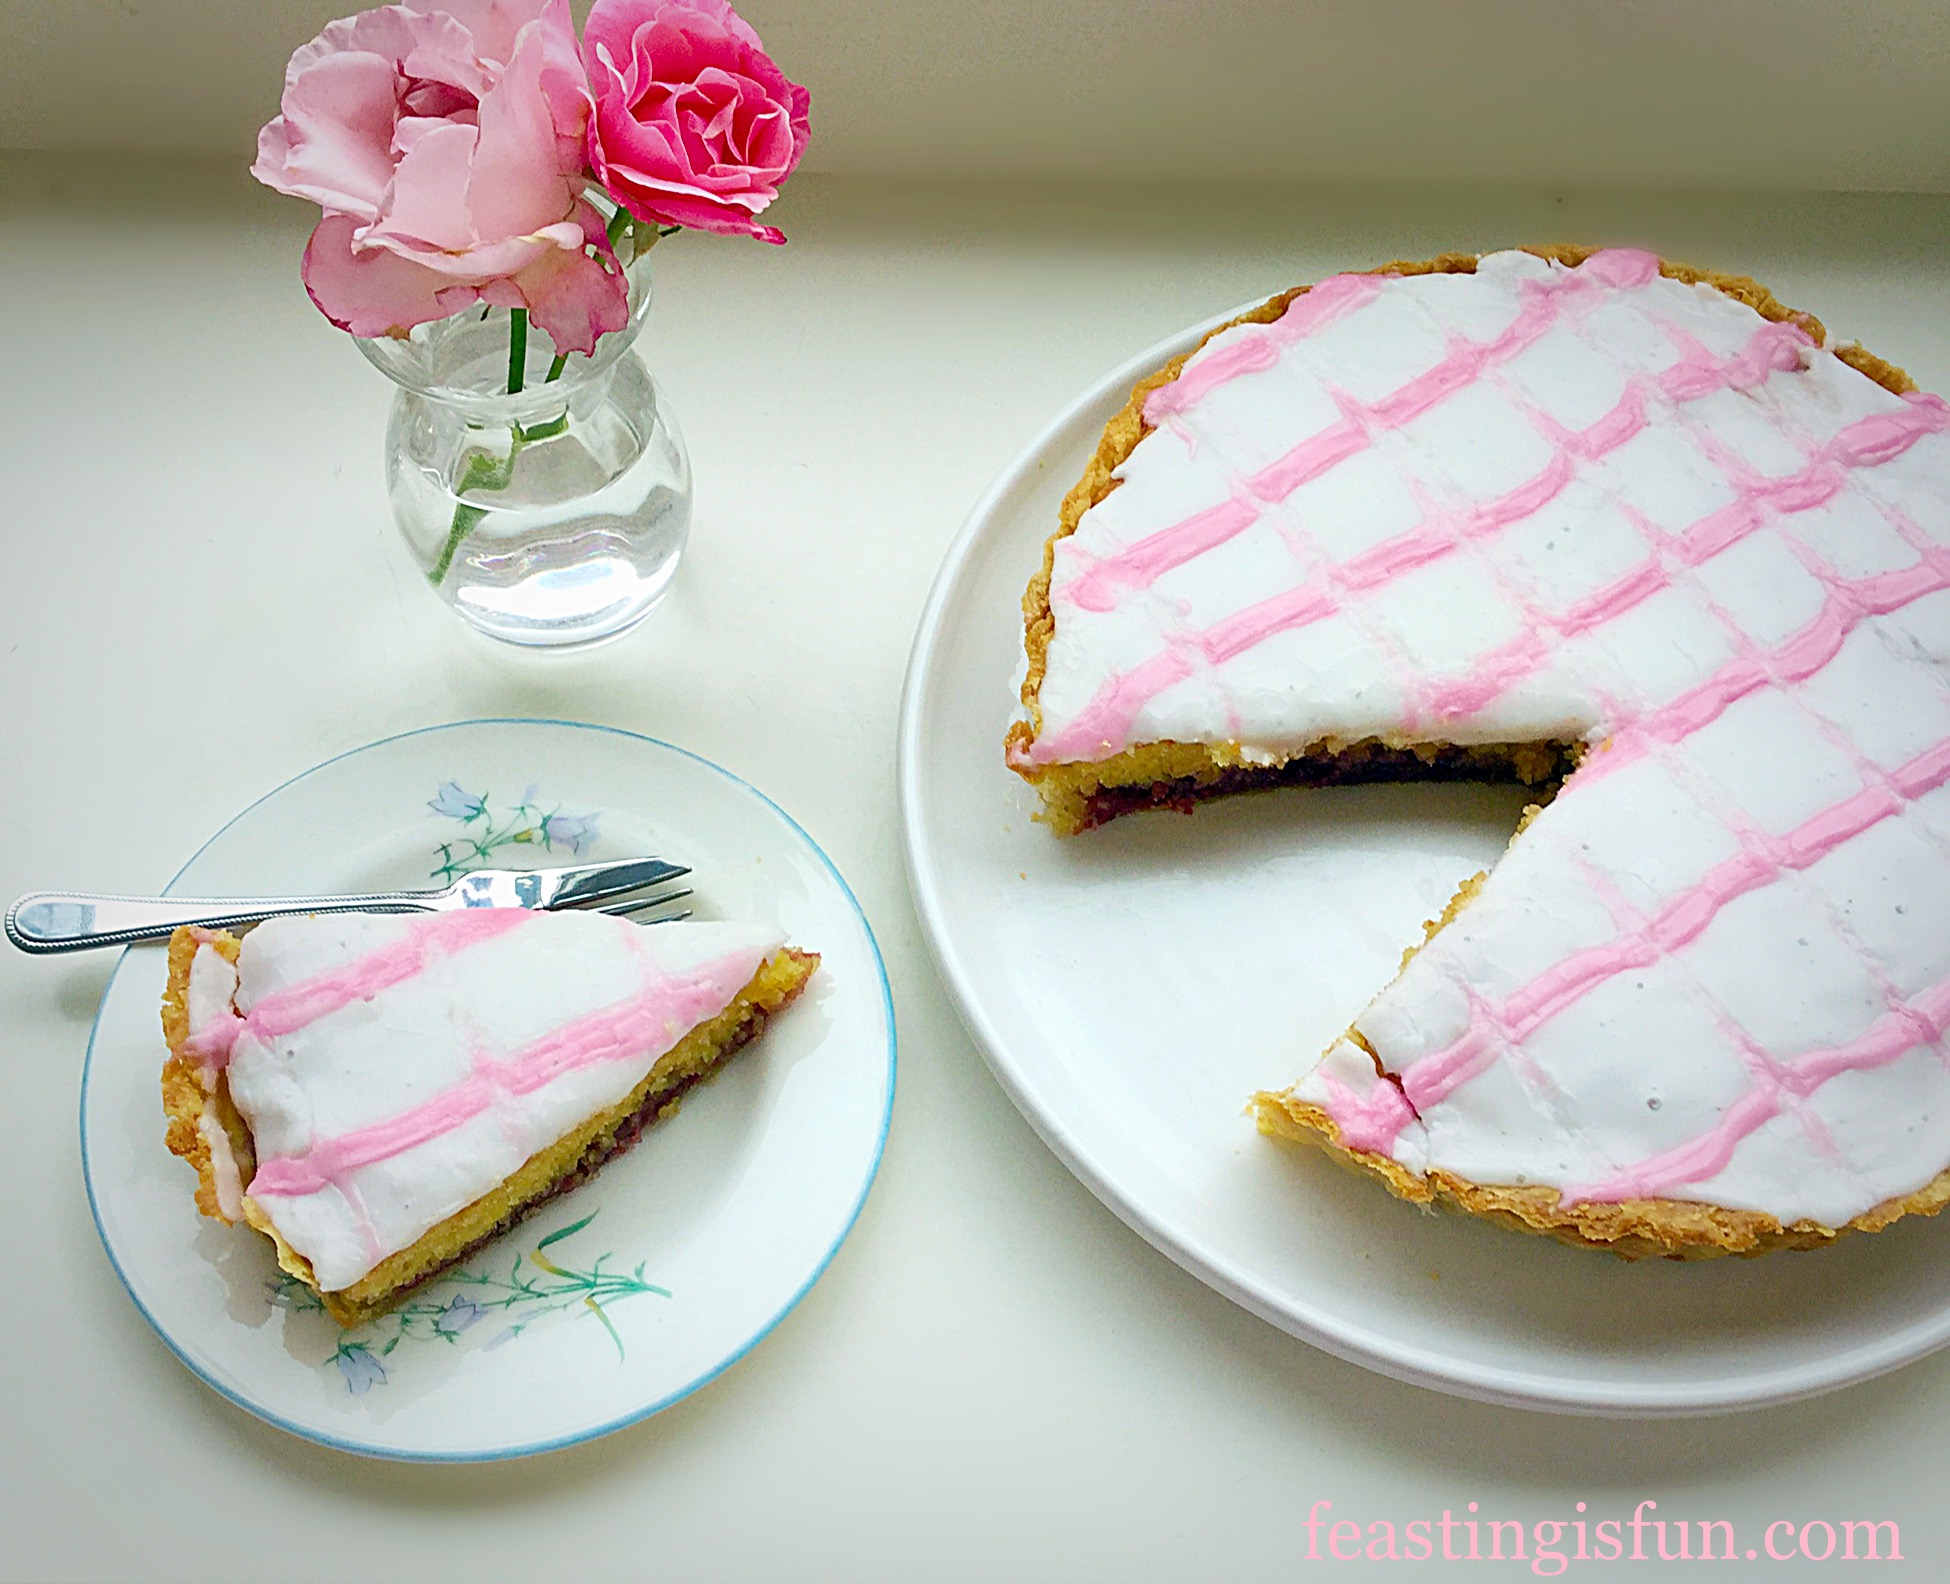
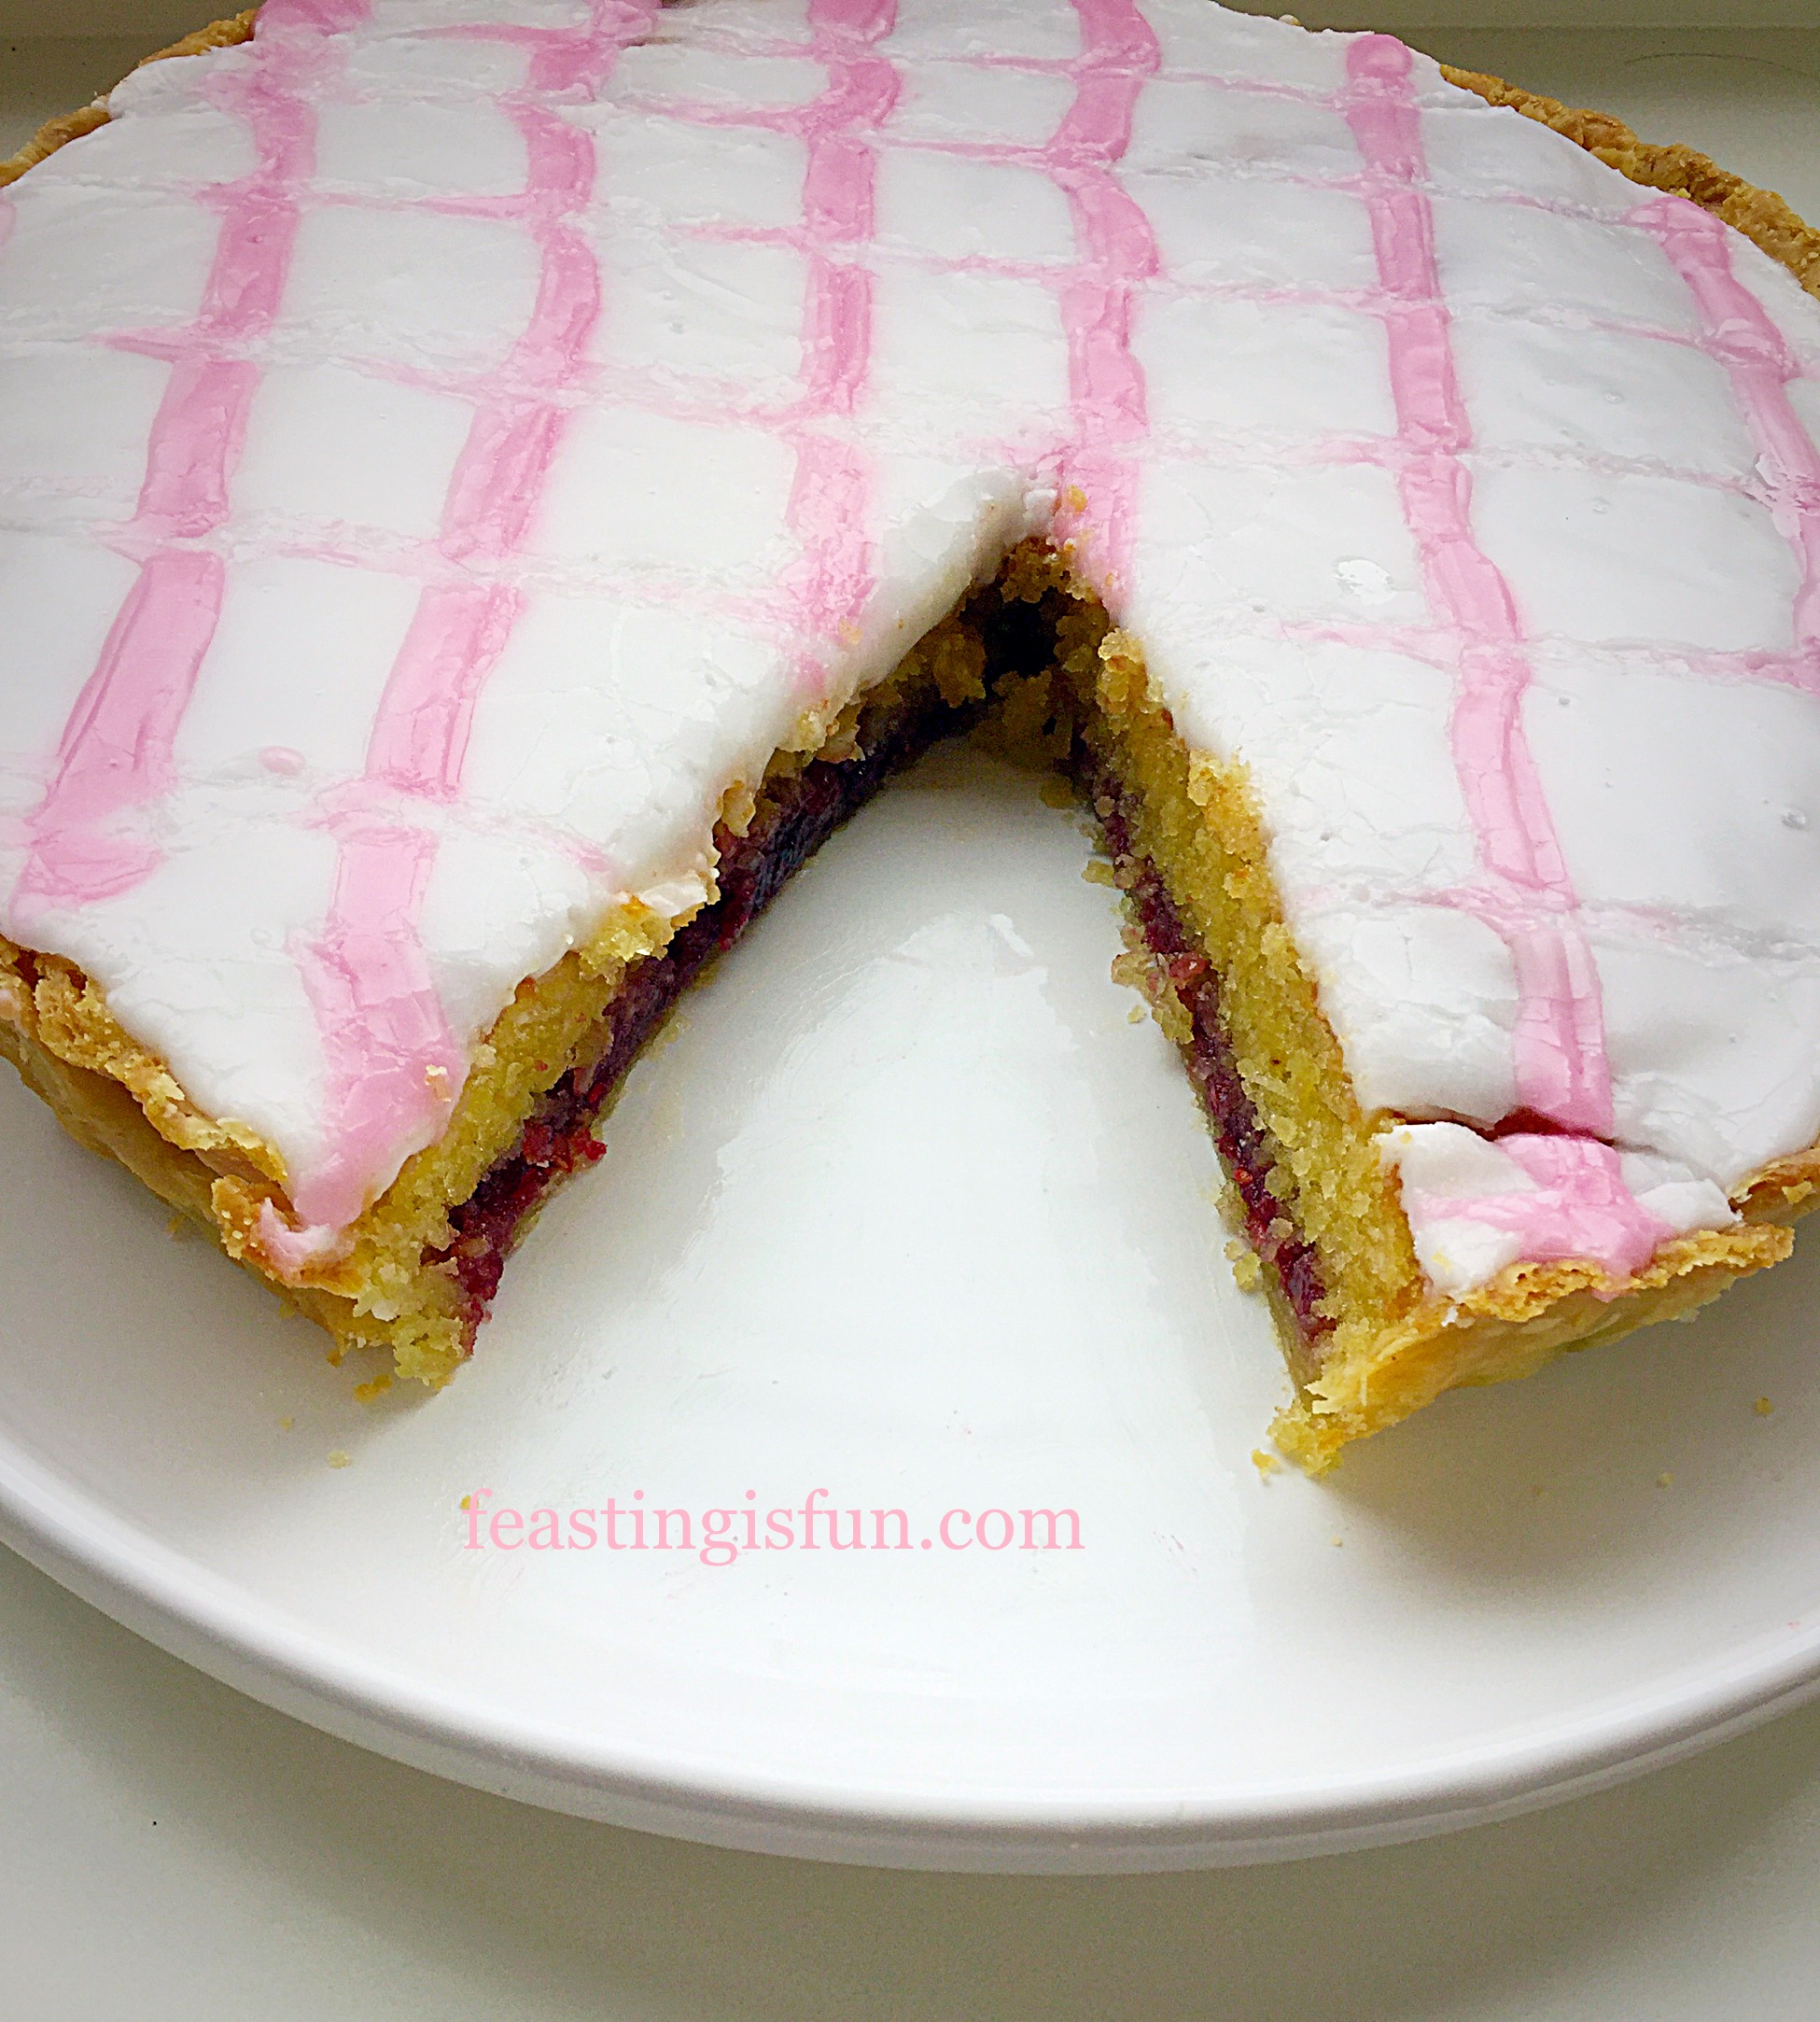
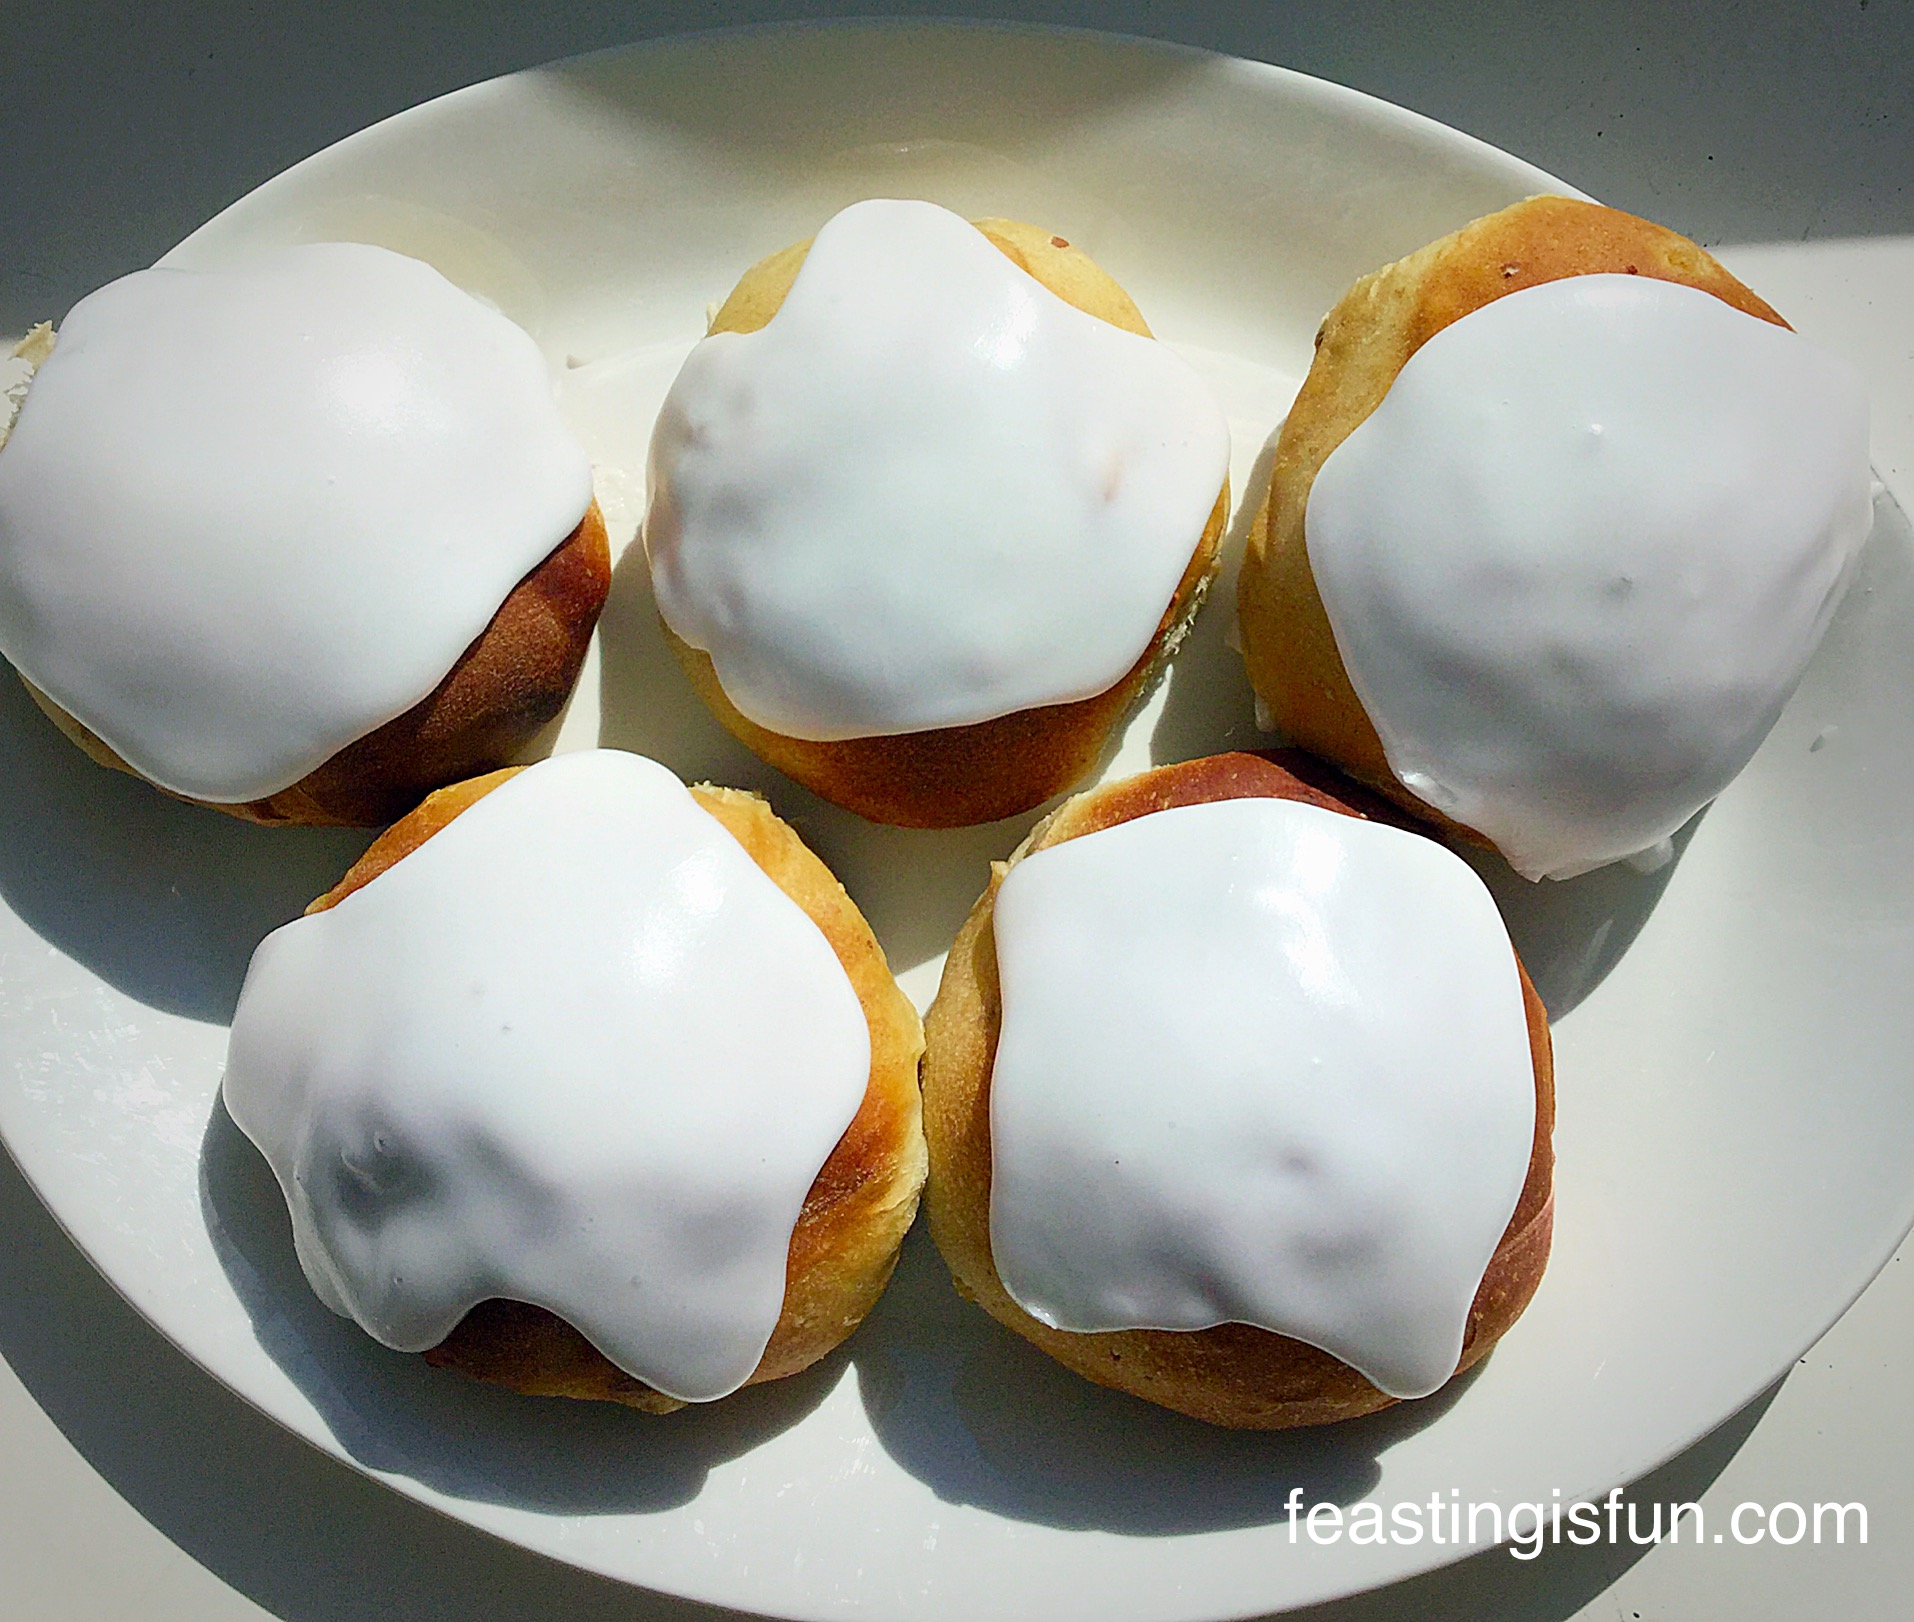
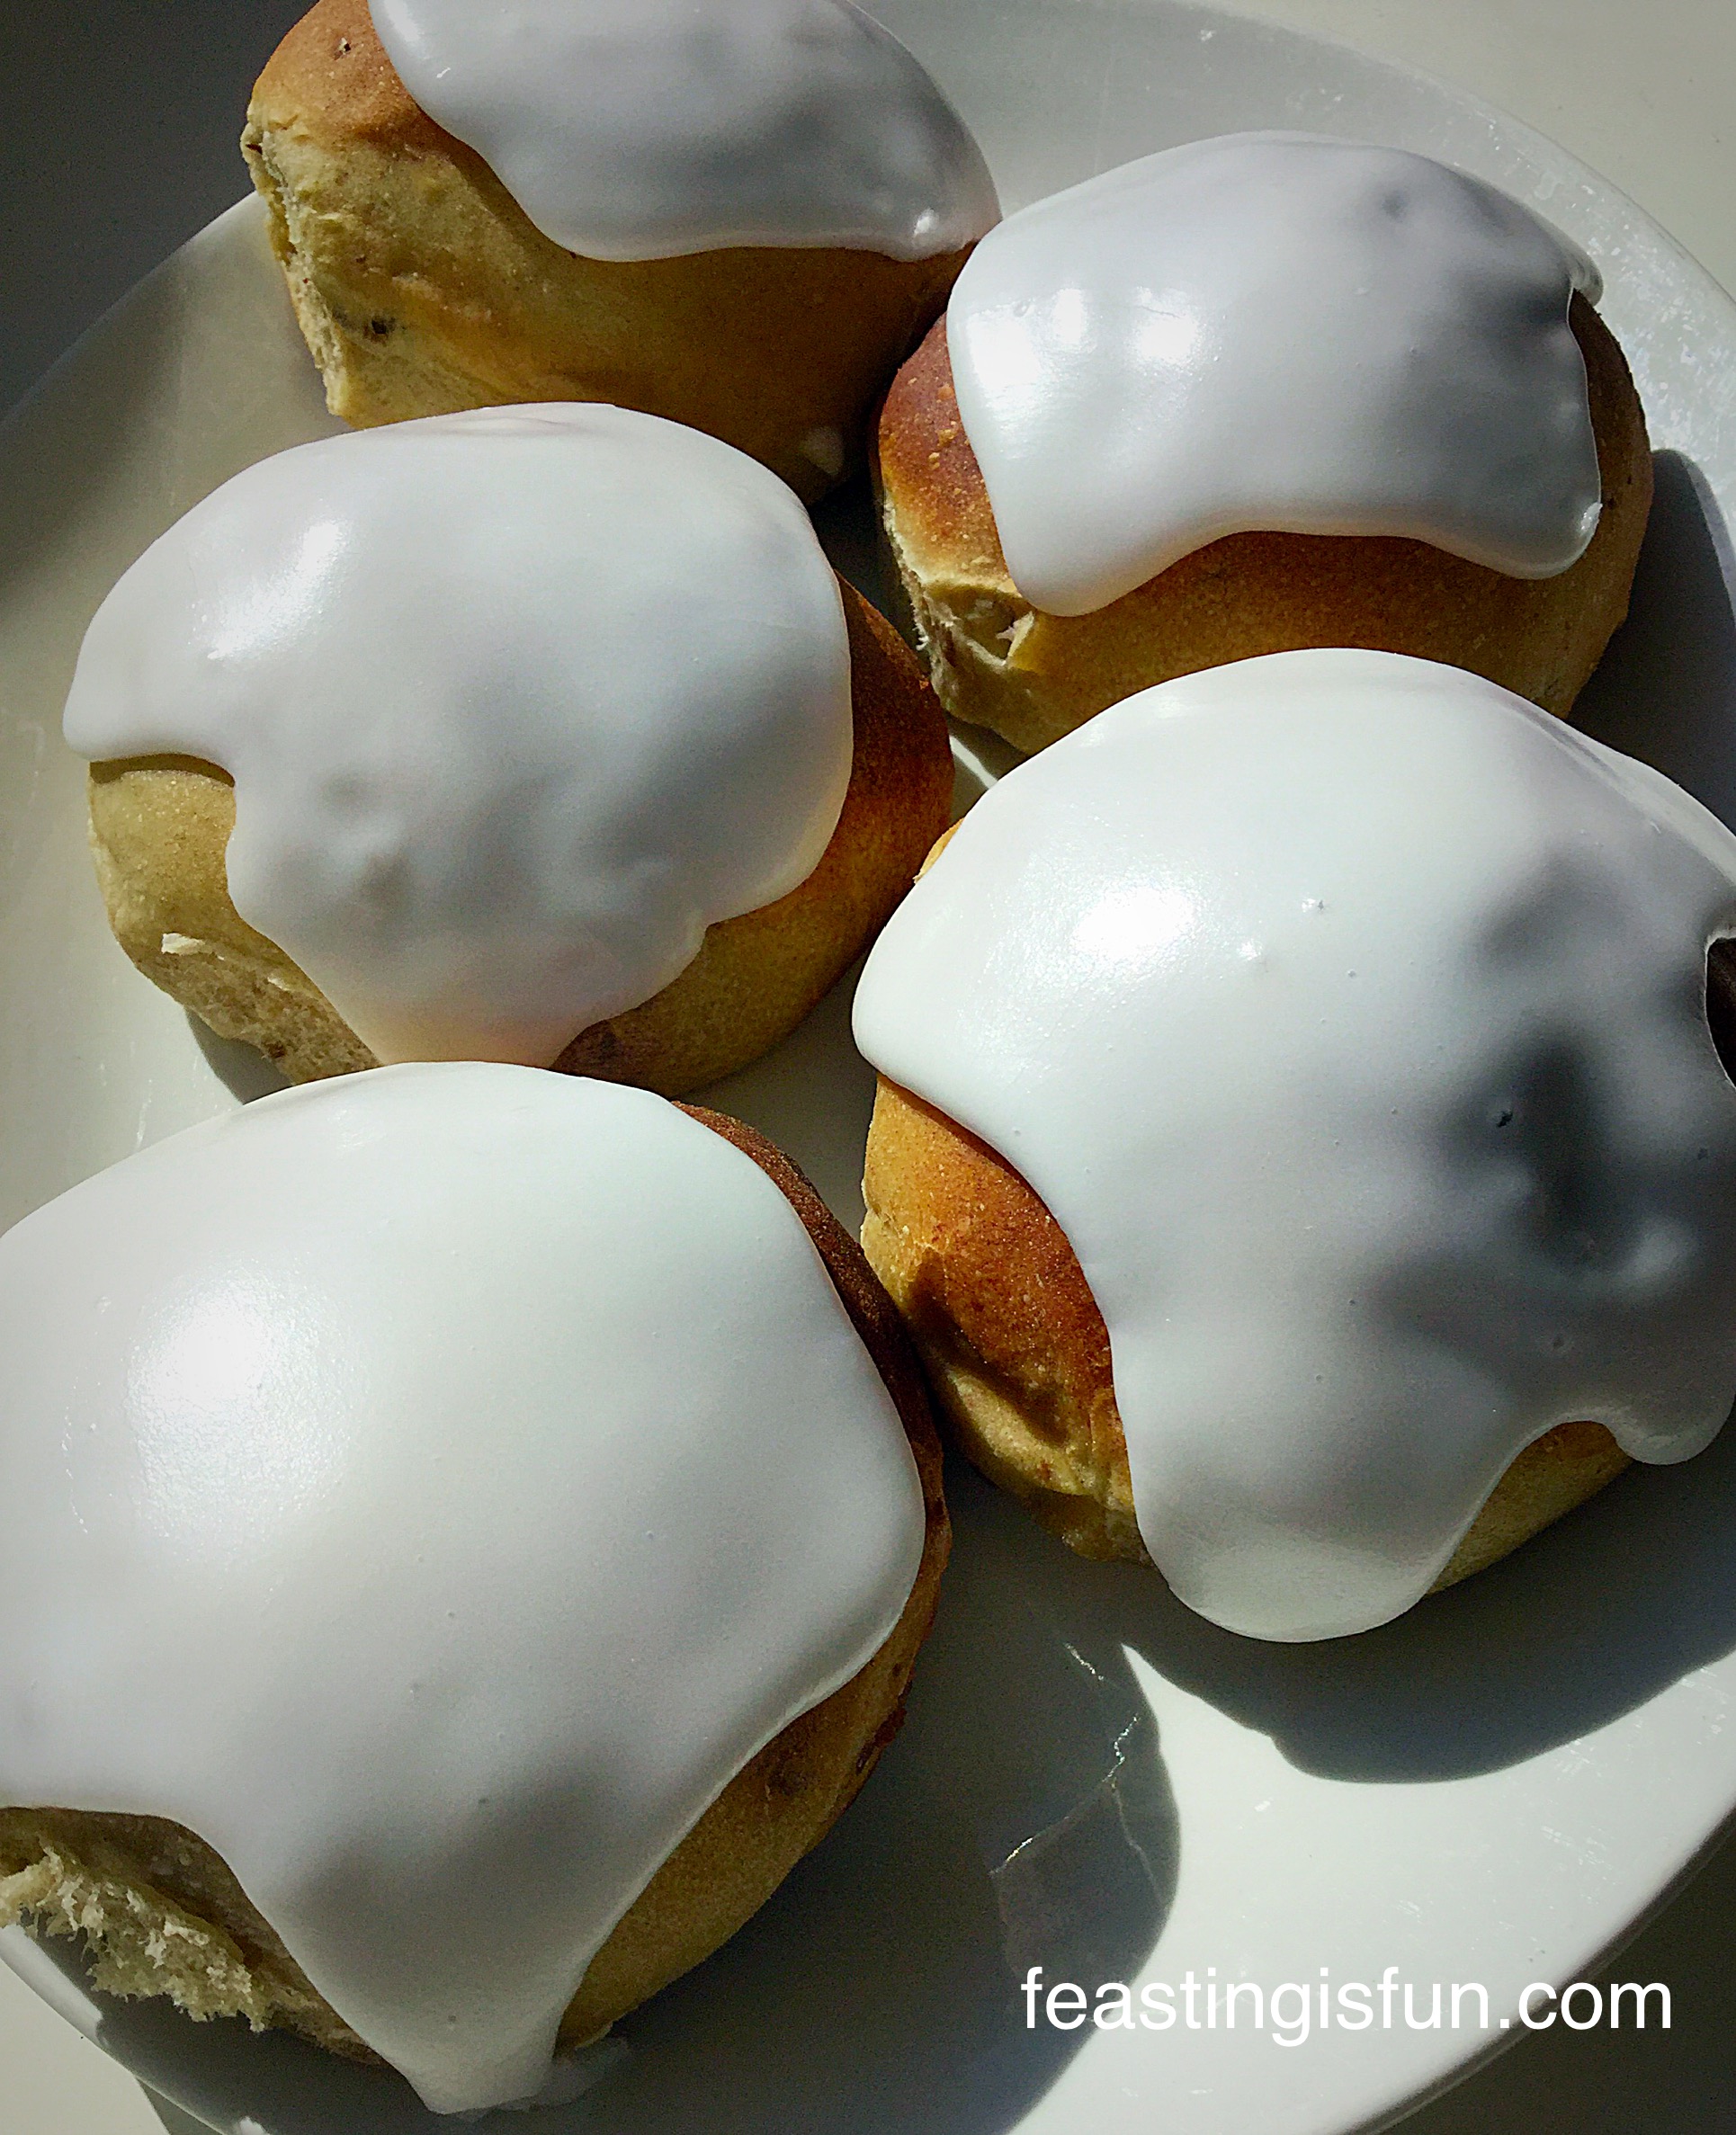
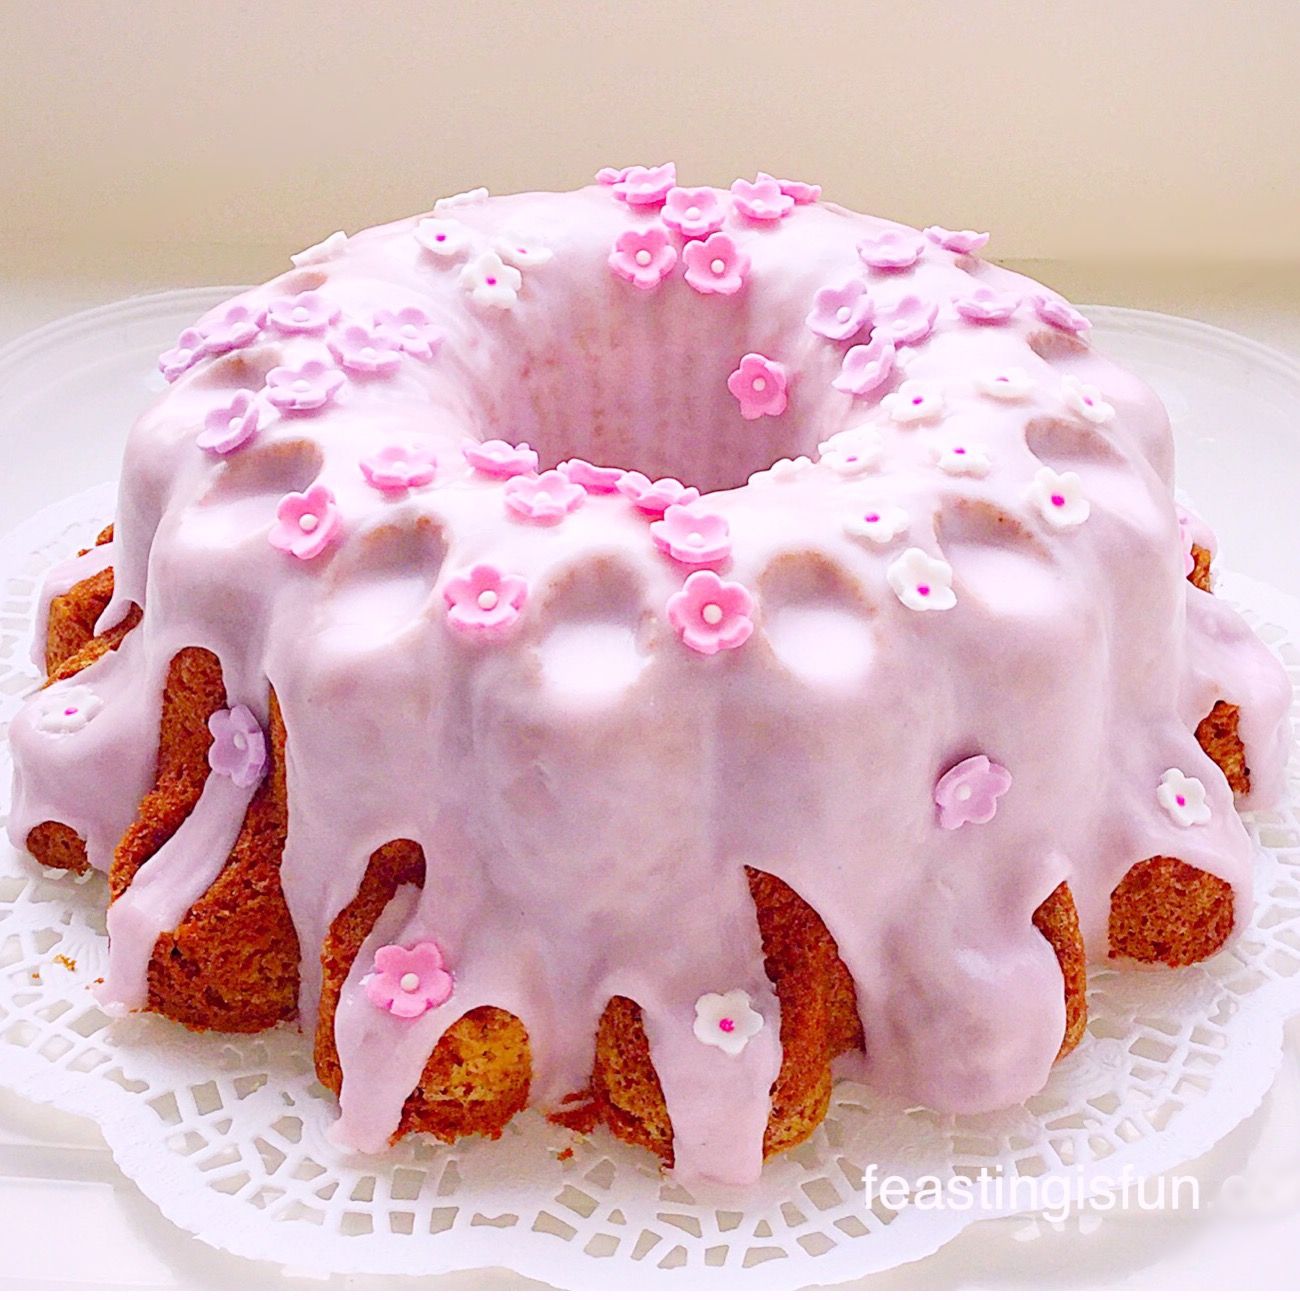
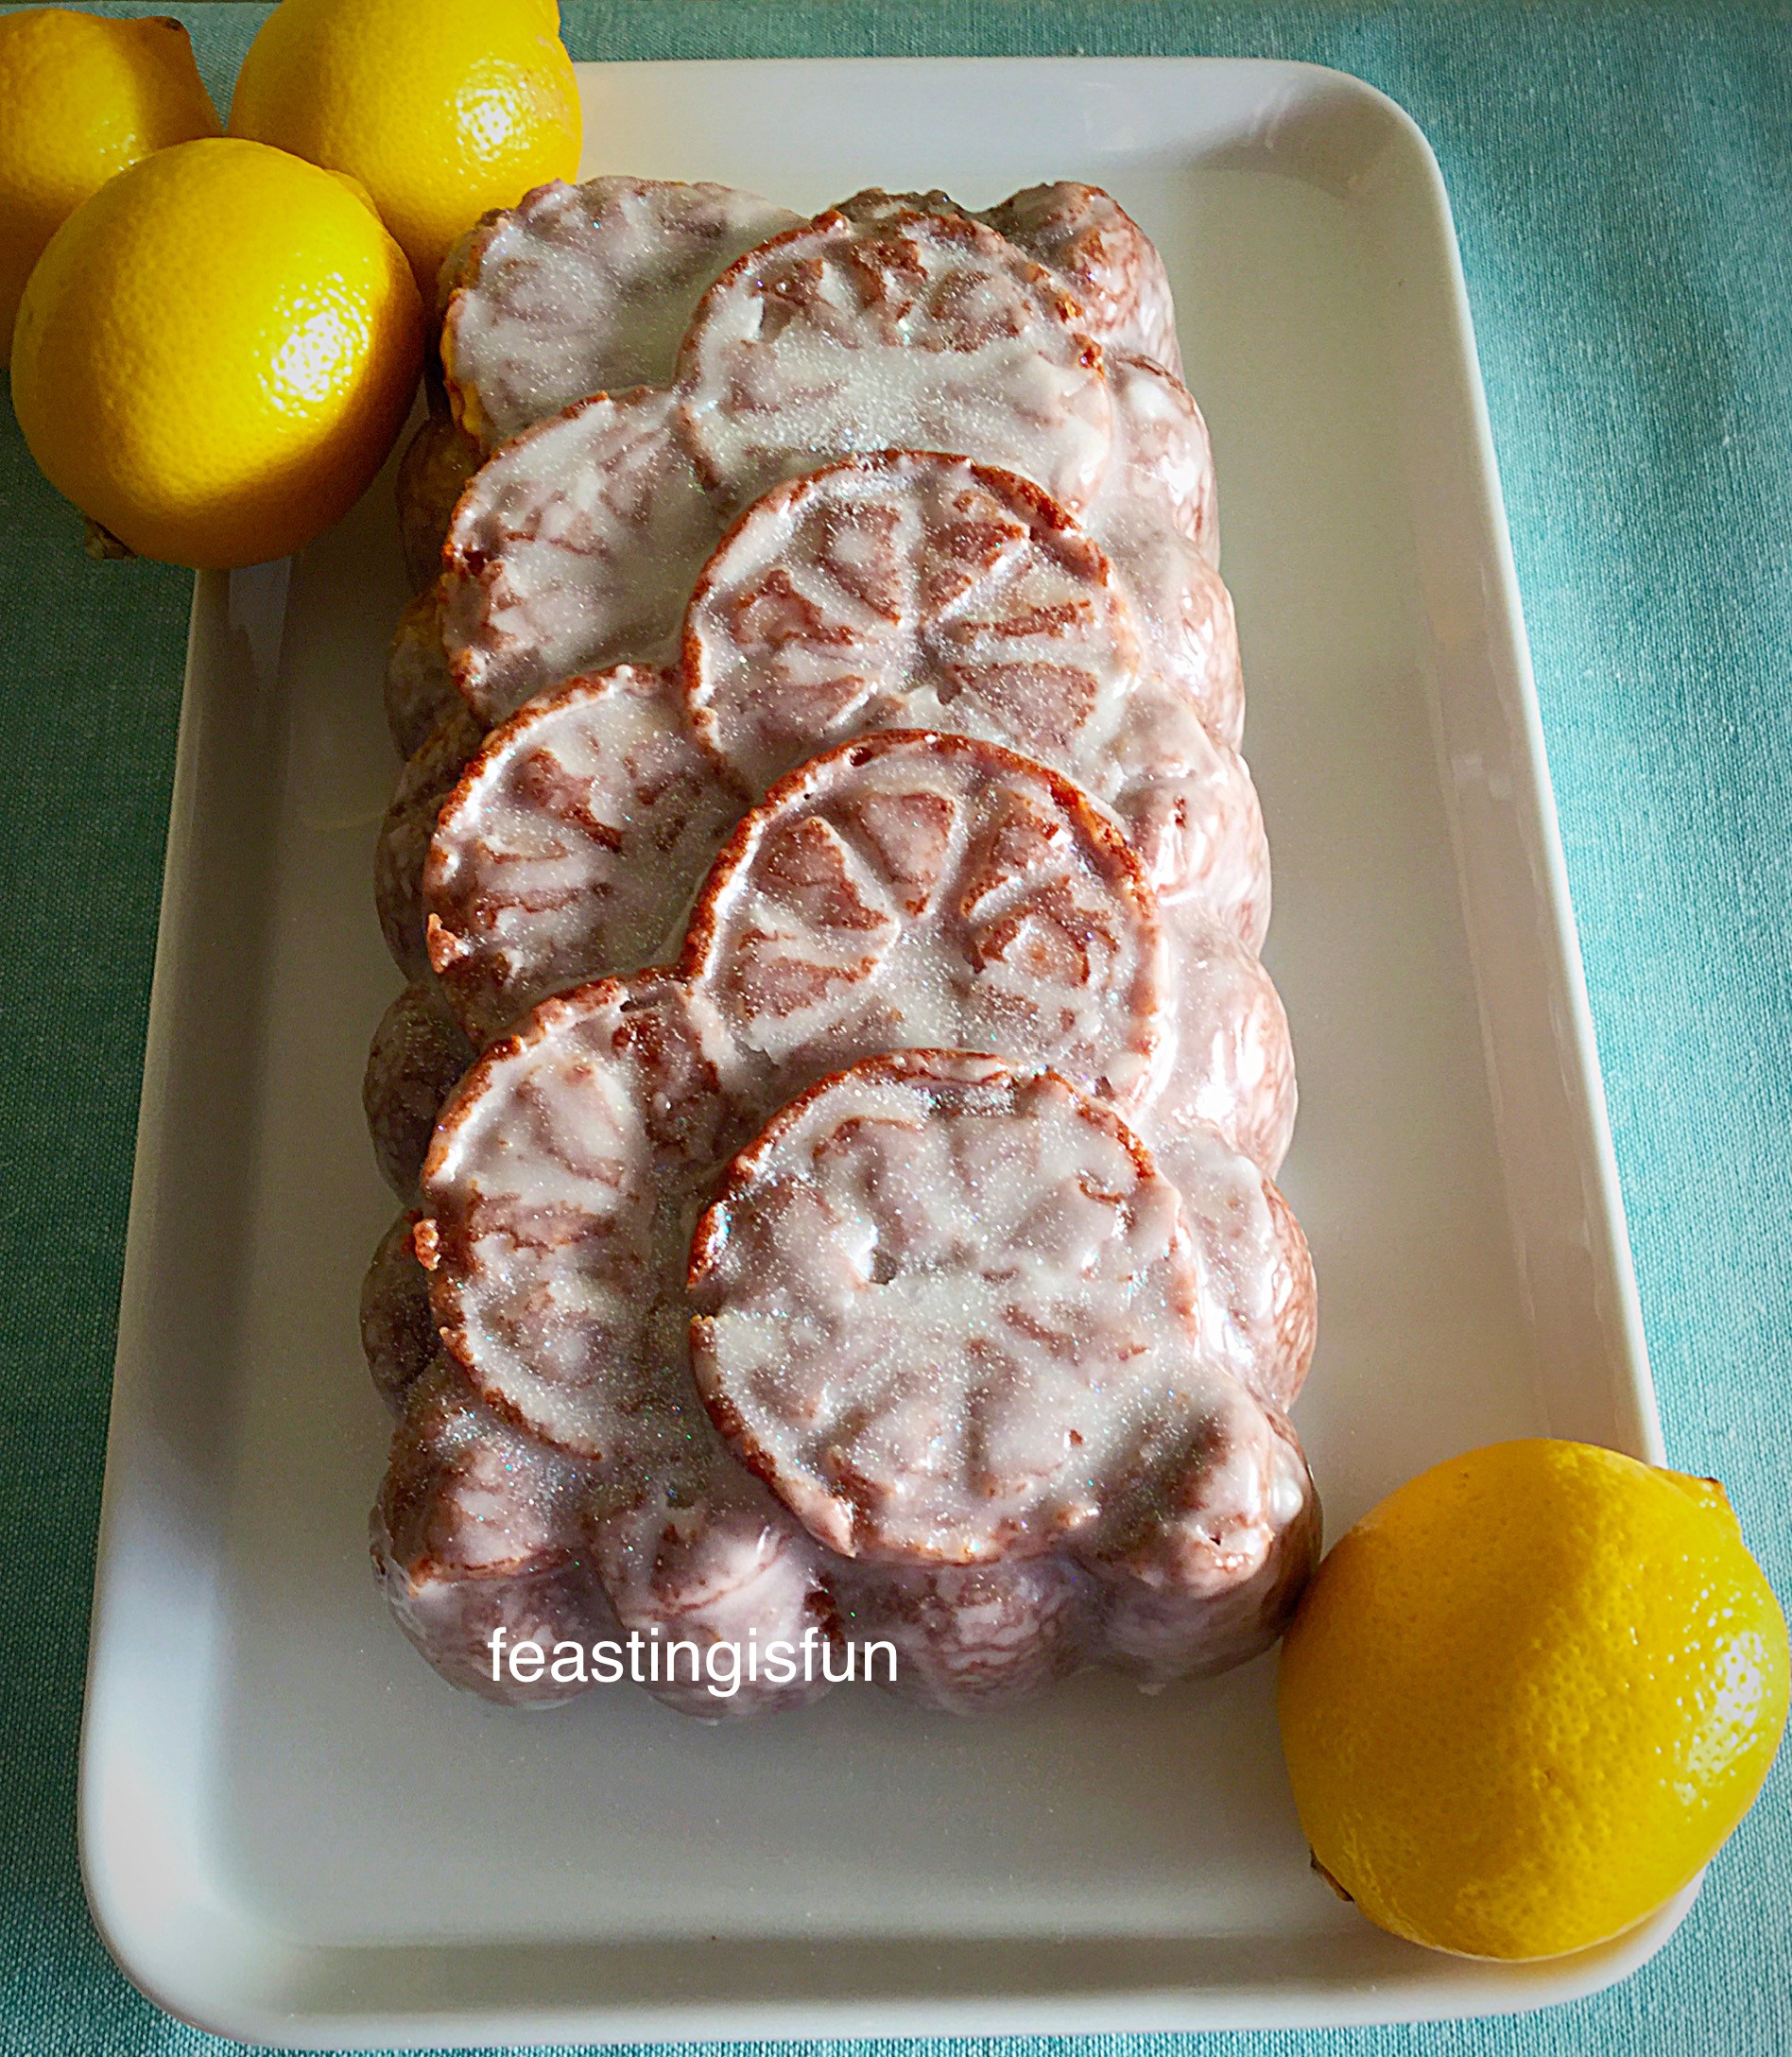
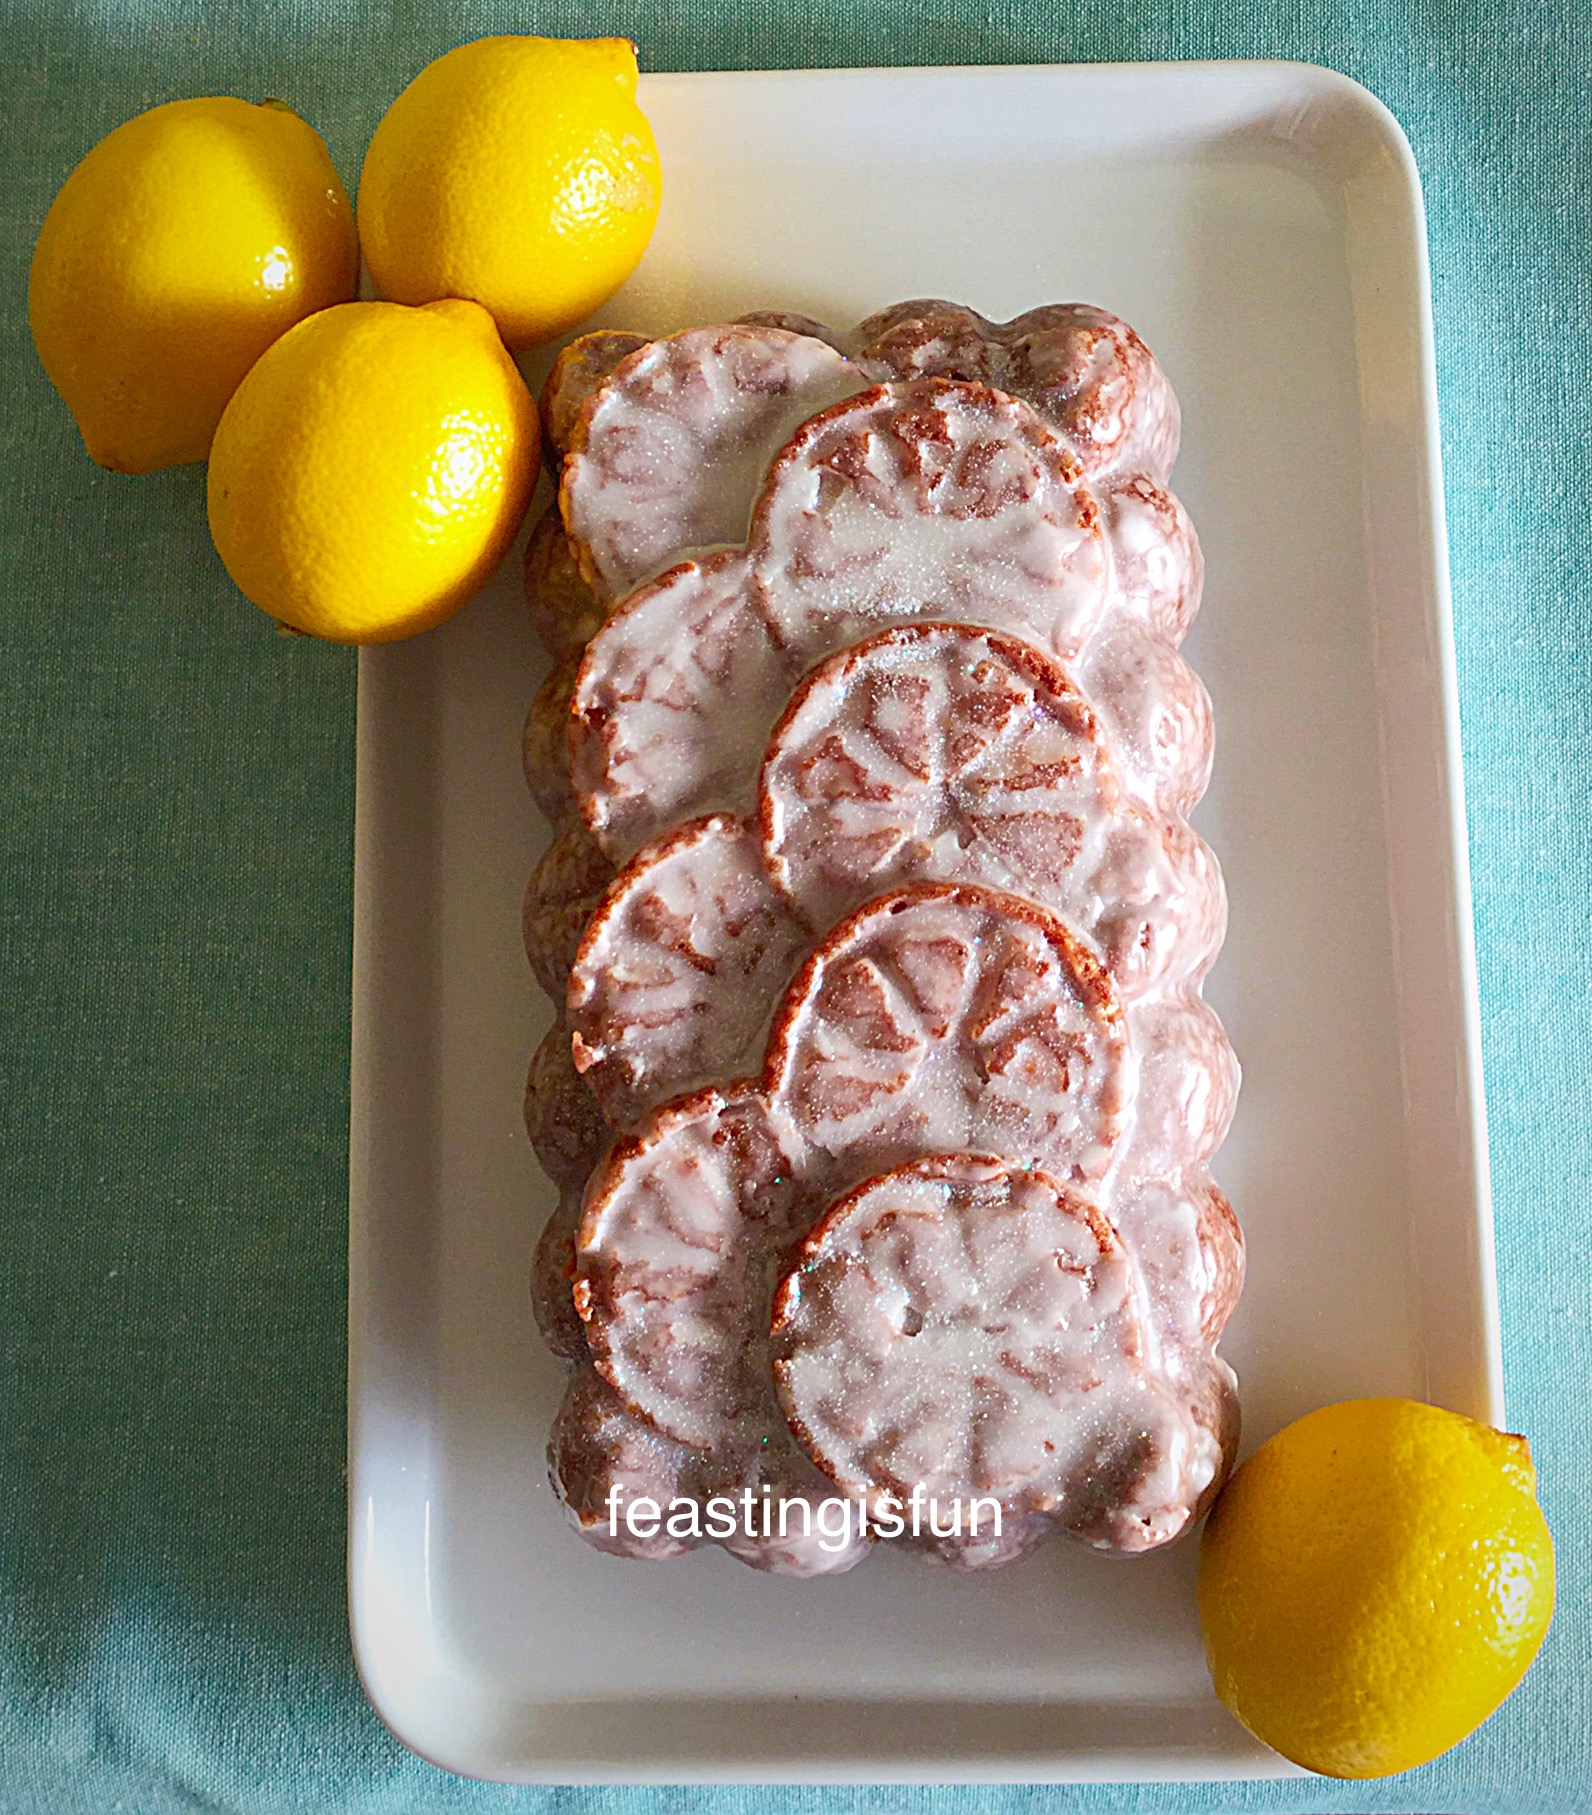
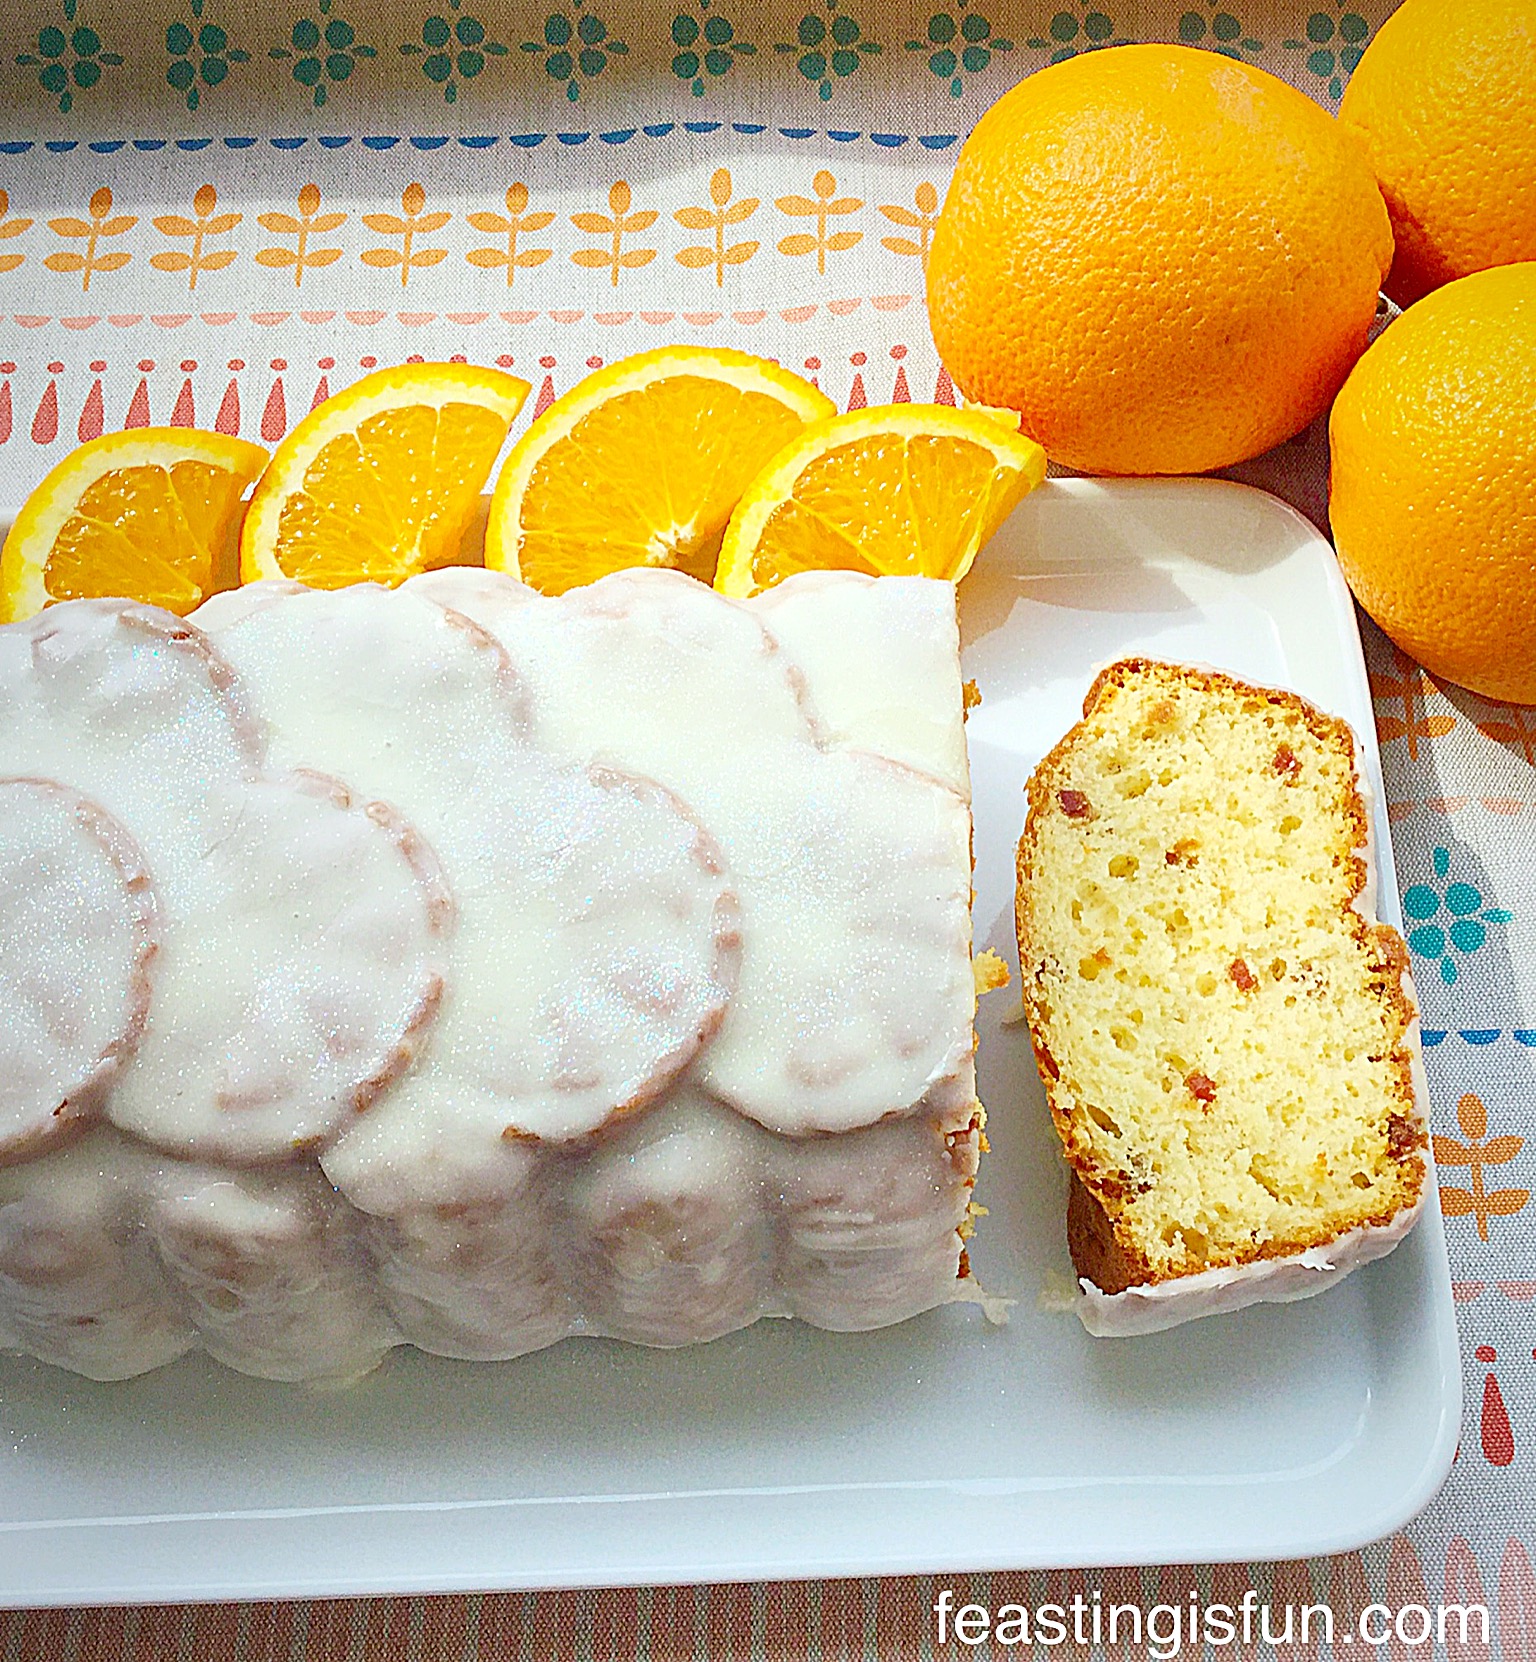
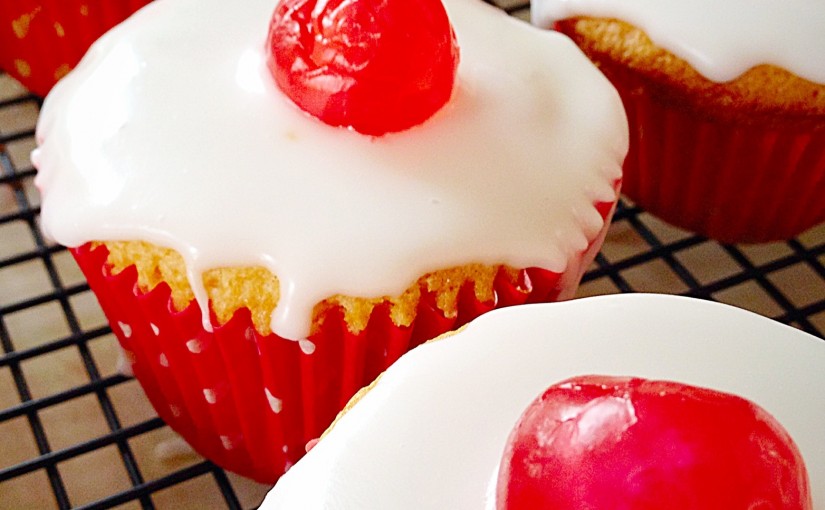
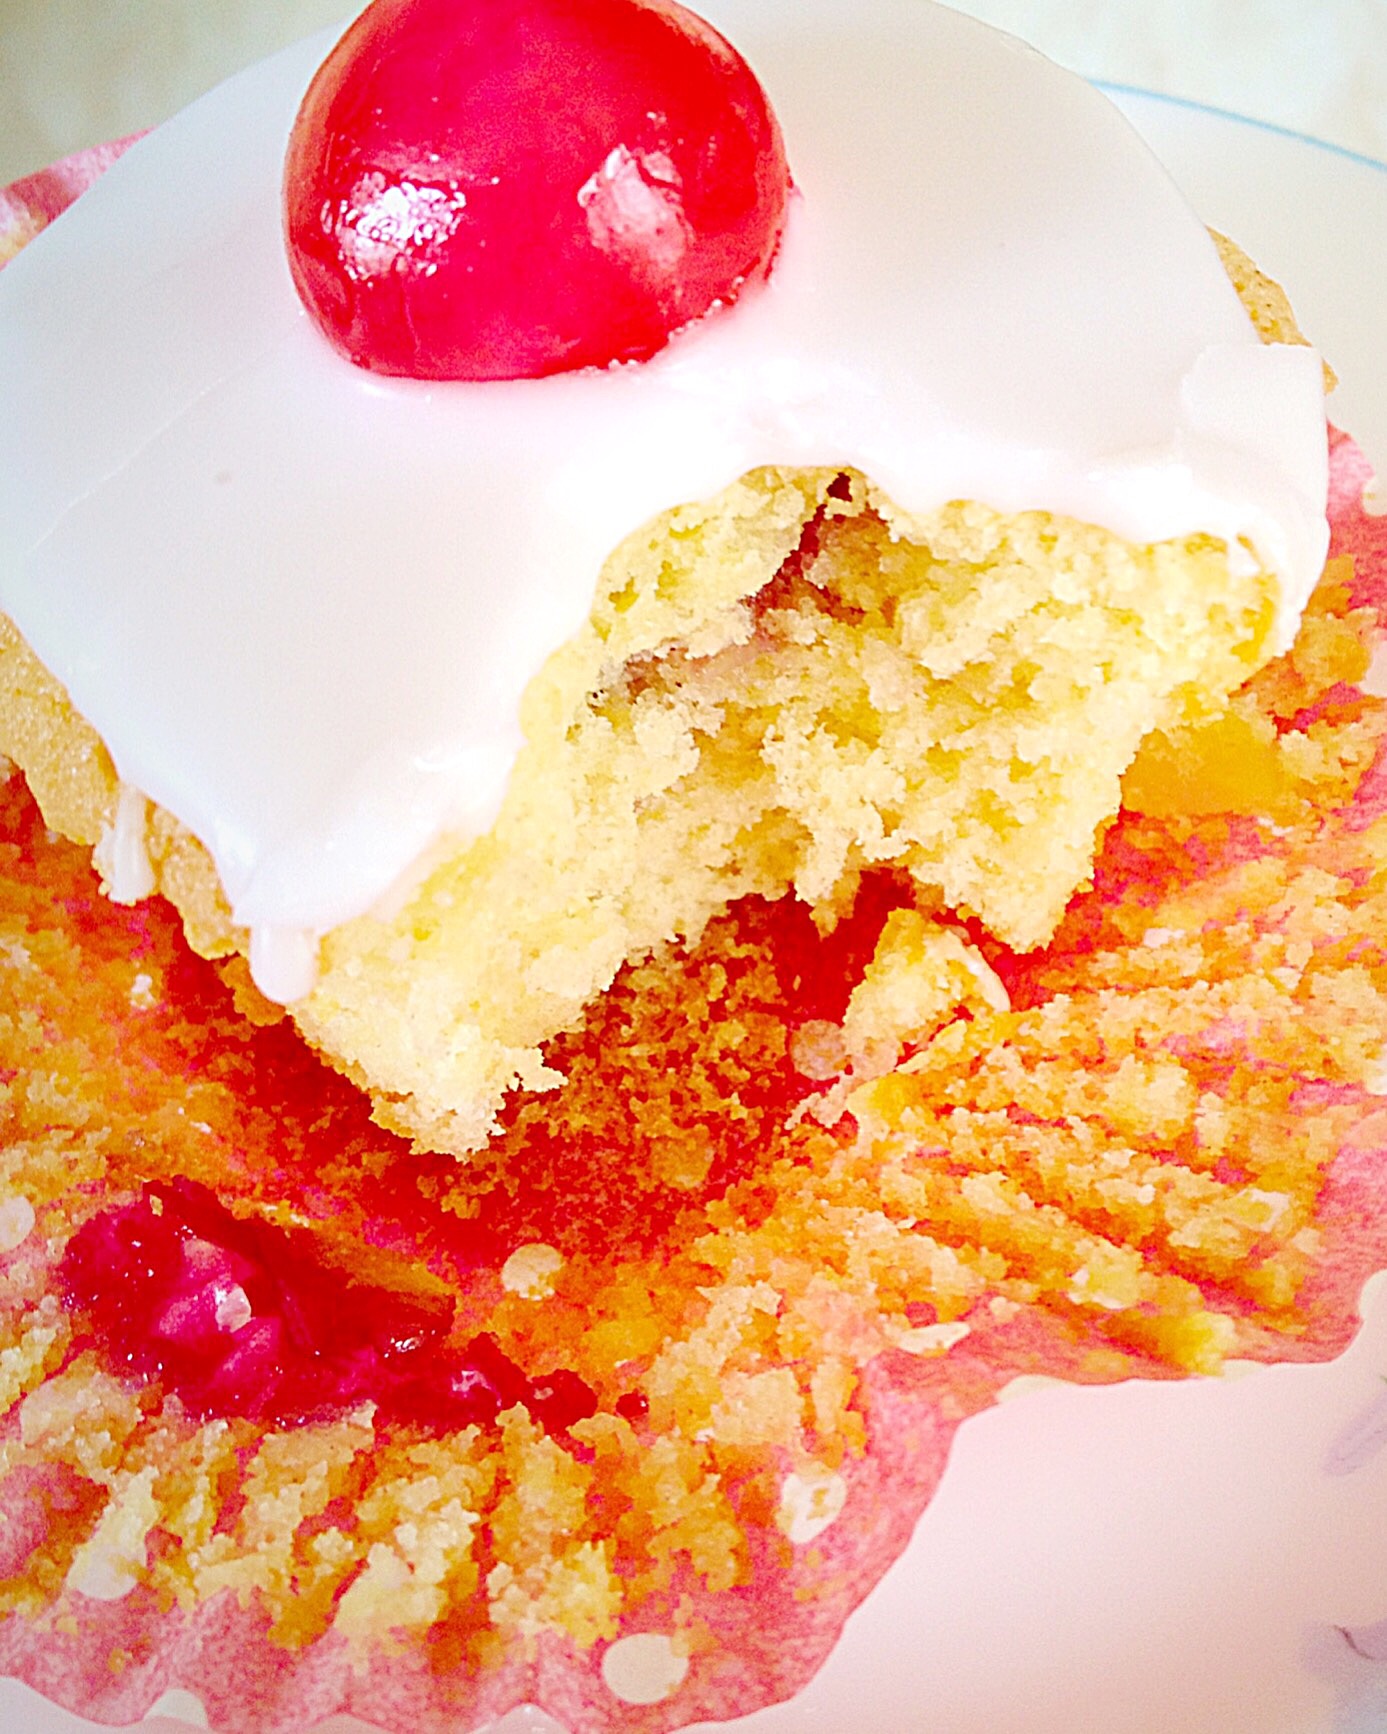
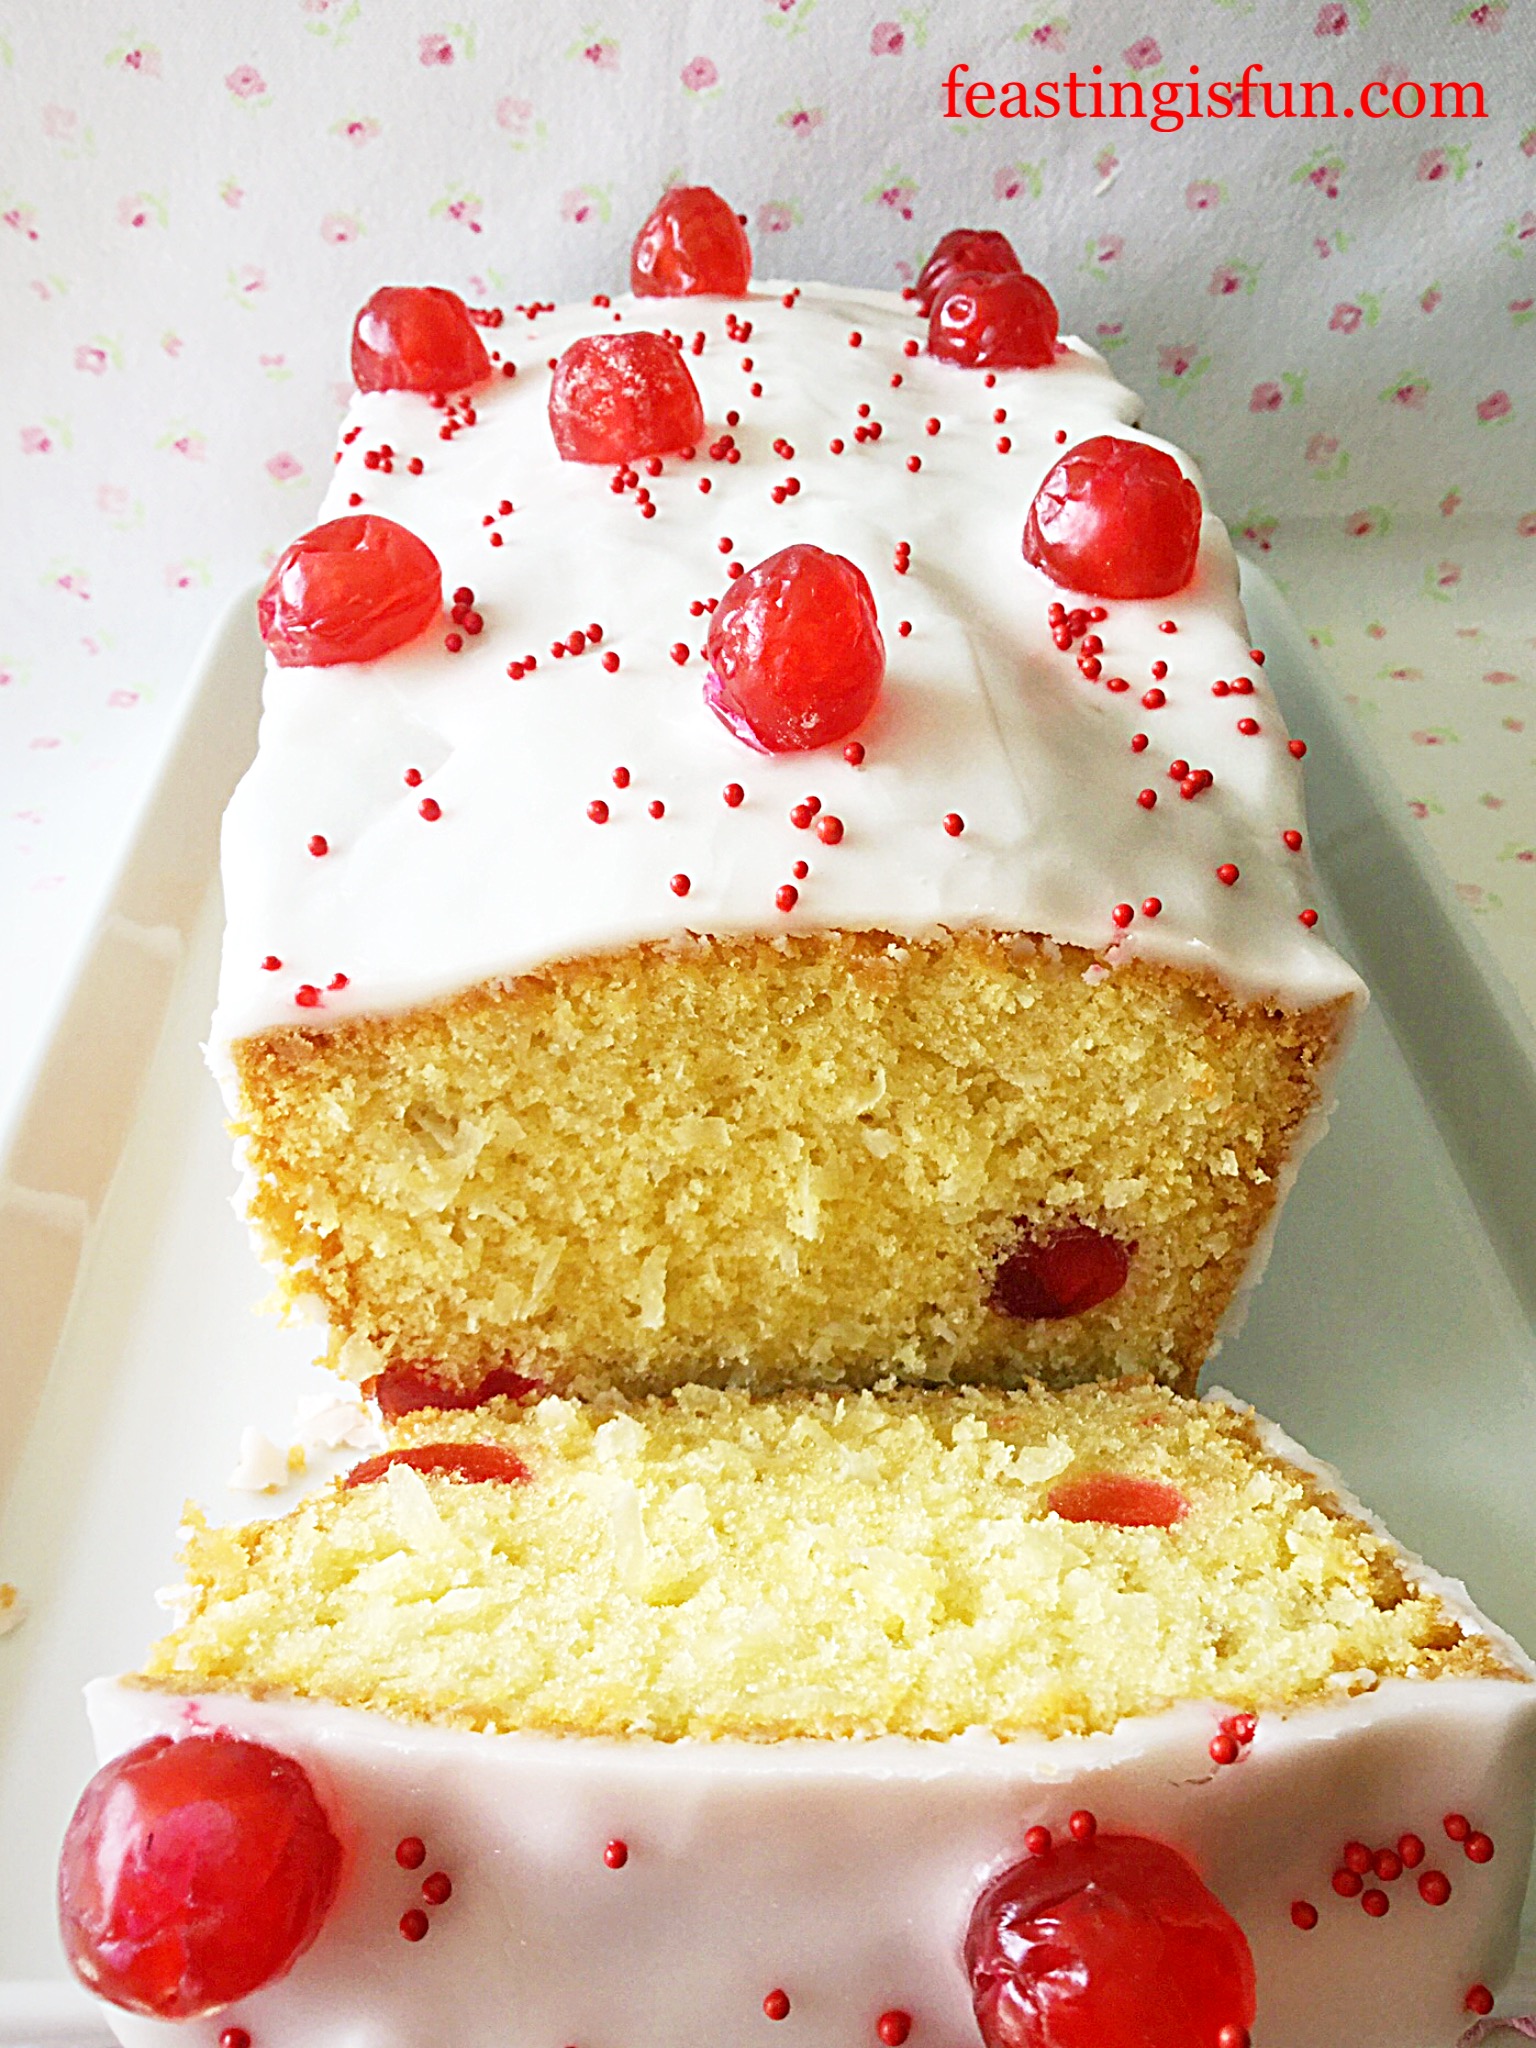
A rich buttery coconut cake, packed full of glacé cherries, simply decorated with glacé icing and more cherries. Yet it looks like an afternoon tea party. In fact this cake makes me want to get out my best china, string bunting everywhere and hold a garden party. Why? Because it is such a cheerful, pretty and delicious cake. Resulting in THE perfect cake to share.

FF Iced Cherry Coconut Loaf Cake
Iced Cherry Coconut Loaf Cake

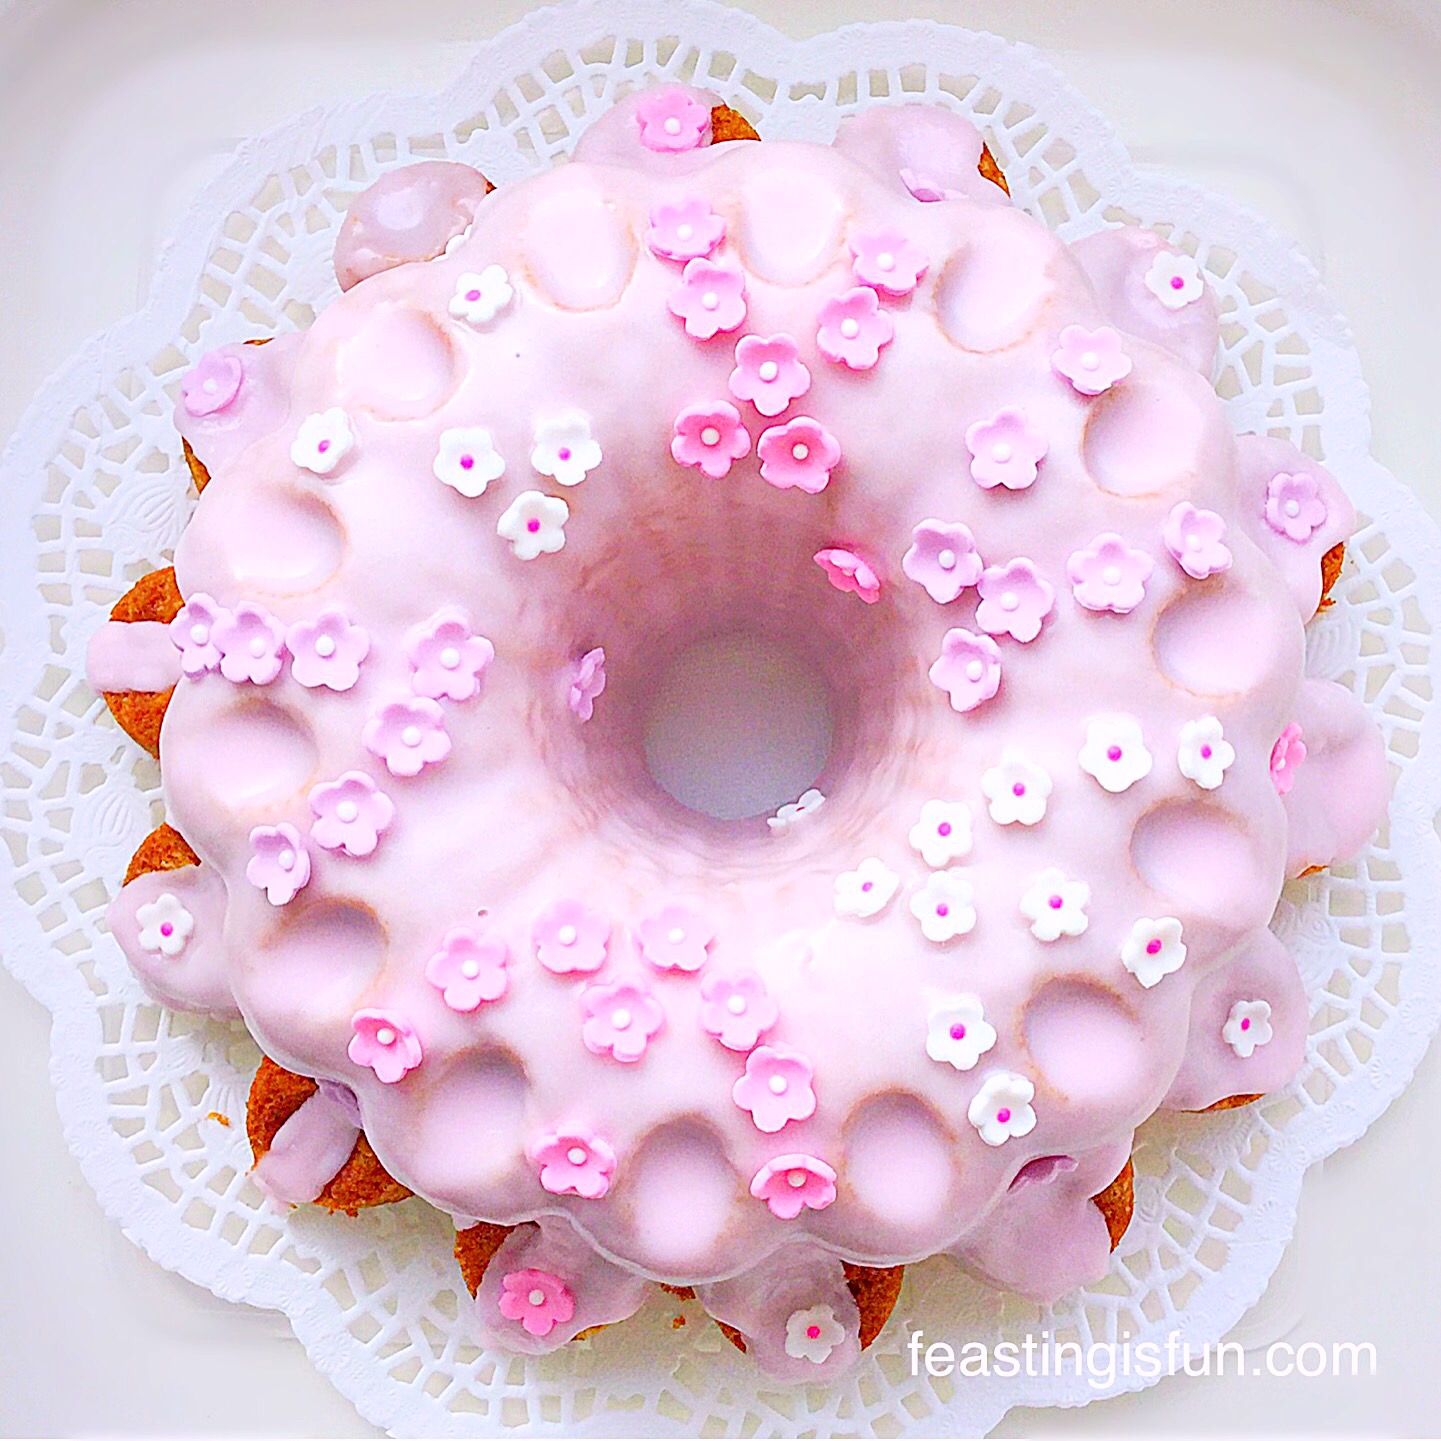
I rather enjoy baking loaf cakes such as this Mascarpone Topped Carrot Cake. Since the loaf tin makes them easy to slice and perfect for packing up and taking on a picnic. Also, should the cake need to be shared further than anticipated, each slice can easily be cut in half. So, when I look at photographs of this Iced Cherry Coconut Loaf Cake they make me smile. And any cake that does that is a winner in my book.

FF Iced Cherry Coconut Loaf Cake
Iced Cherry Coconut Loaf Cake.

Recipe: Iced Cherry Coconut Loaf Cake serves 8

For the cake:

200g/7oz Unsalted Butter at room temperature

200g/7oz Caster Sugar

1/4 tsp Sea Salt – I use Maldon halve quantity if using free flowing

1 tsp Vanilla Extract – I use Nielsen-Massey

4 Large Free Range Eggs

125/4.5oz Sweetend Shredded Coconut – such as Bakers available from Amazon alternatively use the equivalent weight of desiccated coconut and add 3 tbsp whole milk to the cake batter

100g/4oz Glacé Cherries halved

250g/9oz Plain White Flour

2 tsp Baking Powder

To decorate:

175g/6oz White Icing Sugar (Confectioners sugar)

2 Tbsp Tap Water

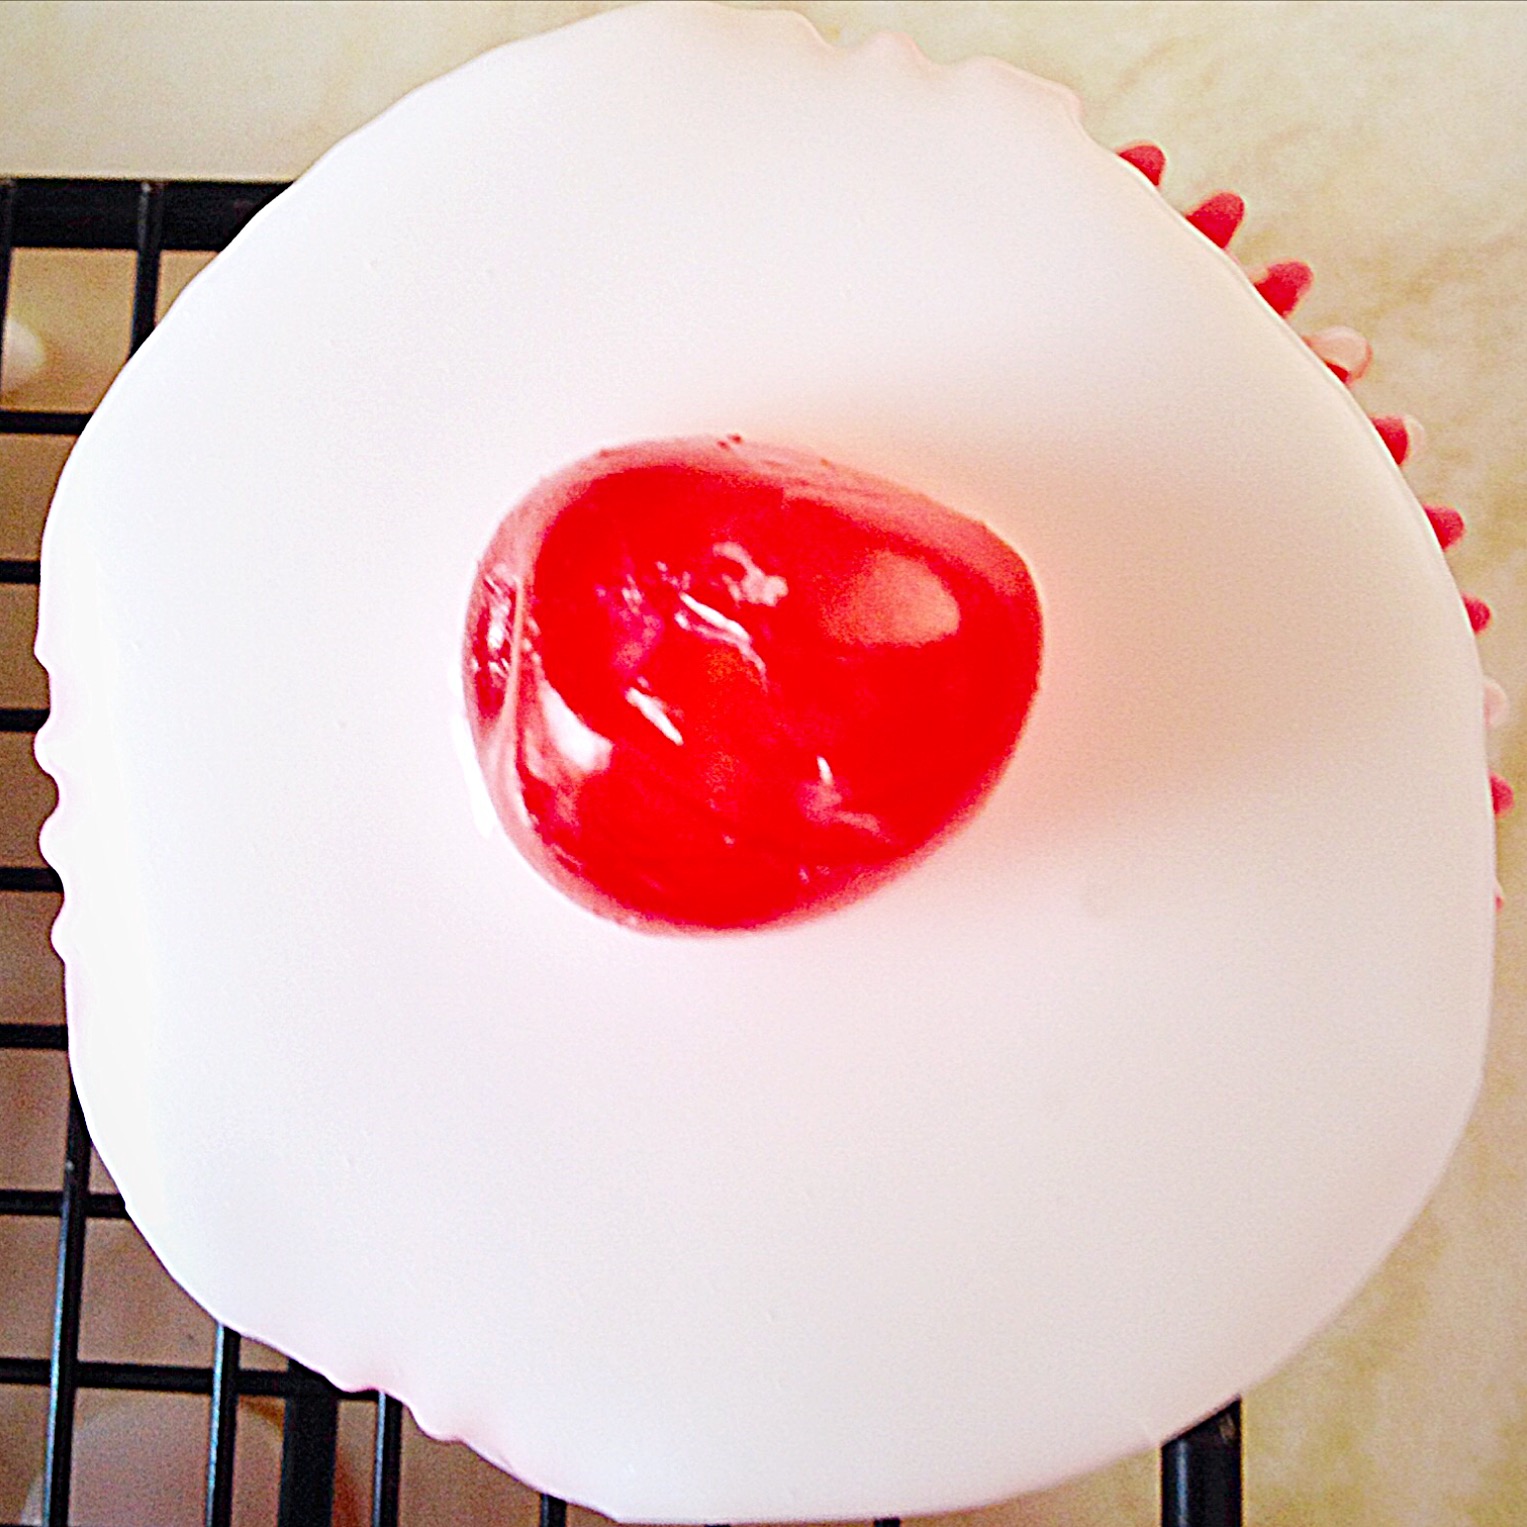
10 Whole Glacé Cherries

Small Red Sugar Balls approximately 1 tsp

Method: Preheat oven to 160C/140C fan, 325F, gas mark 3

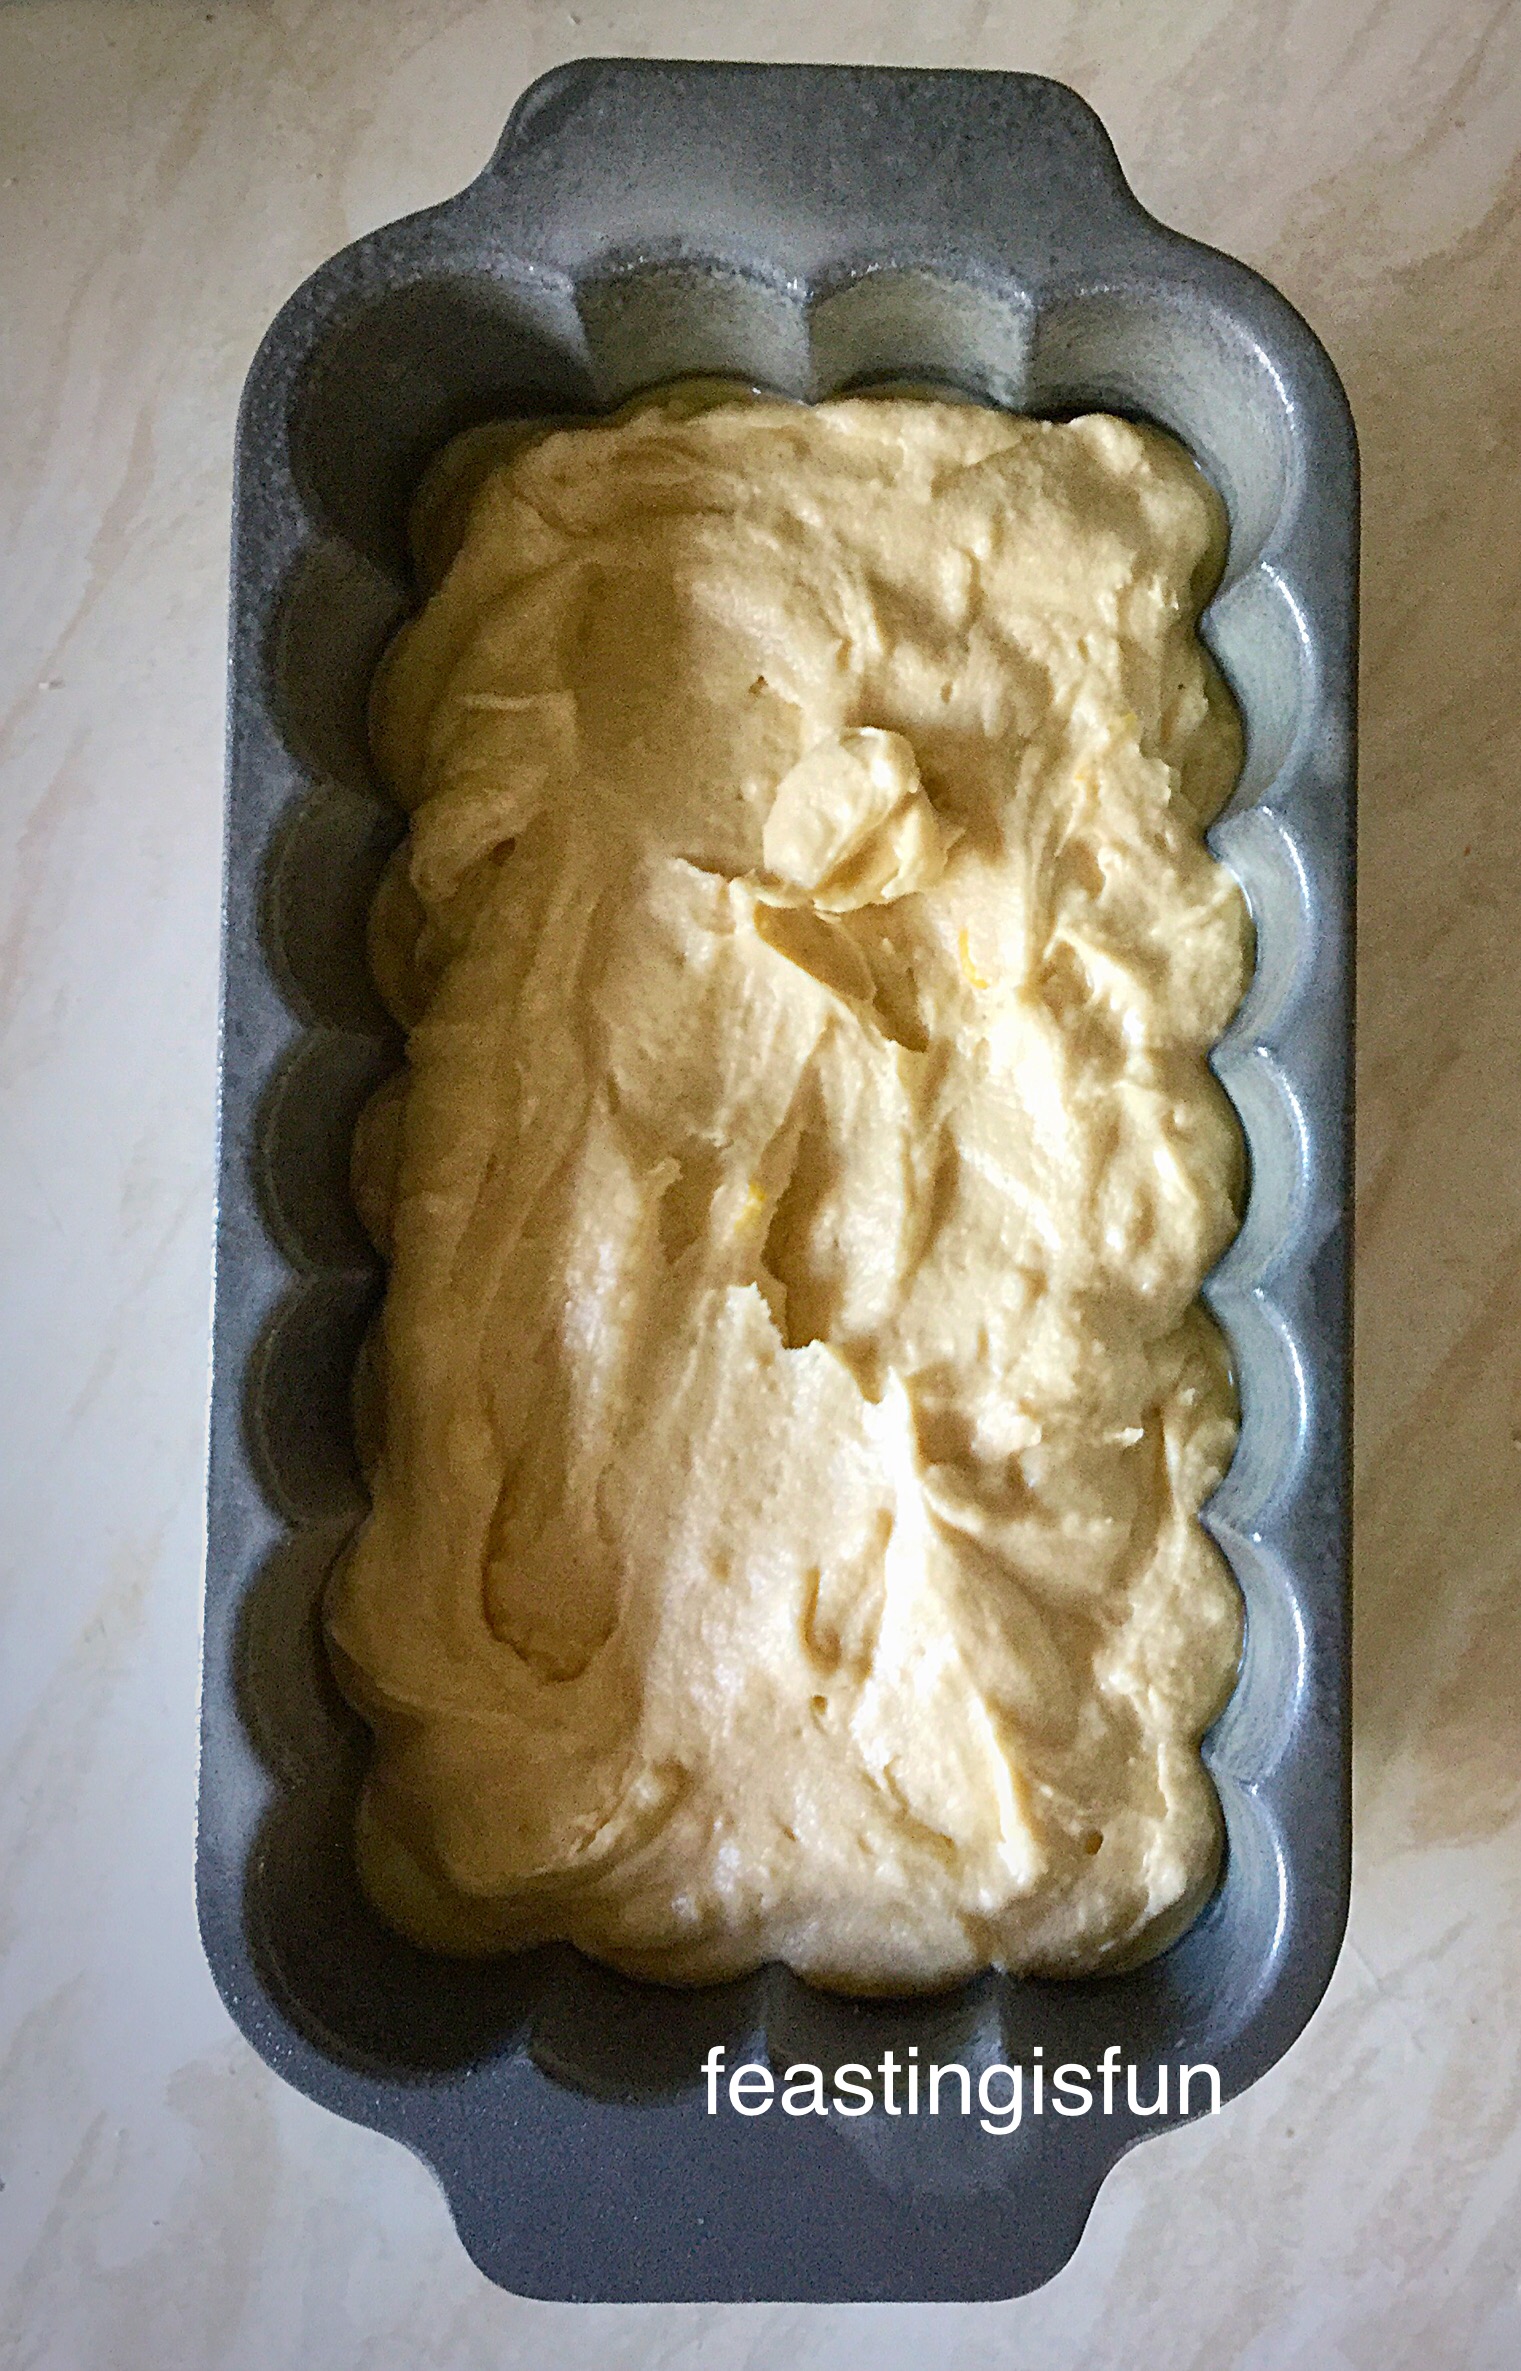
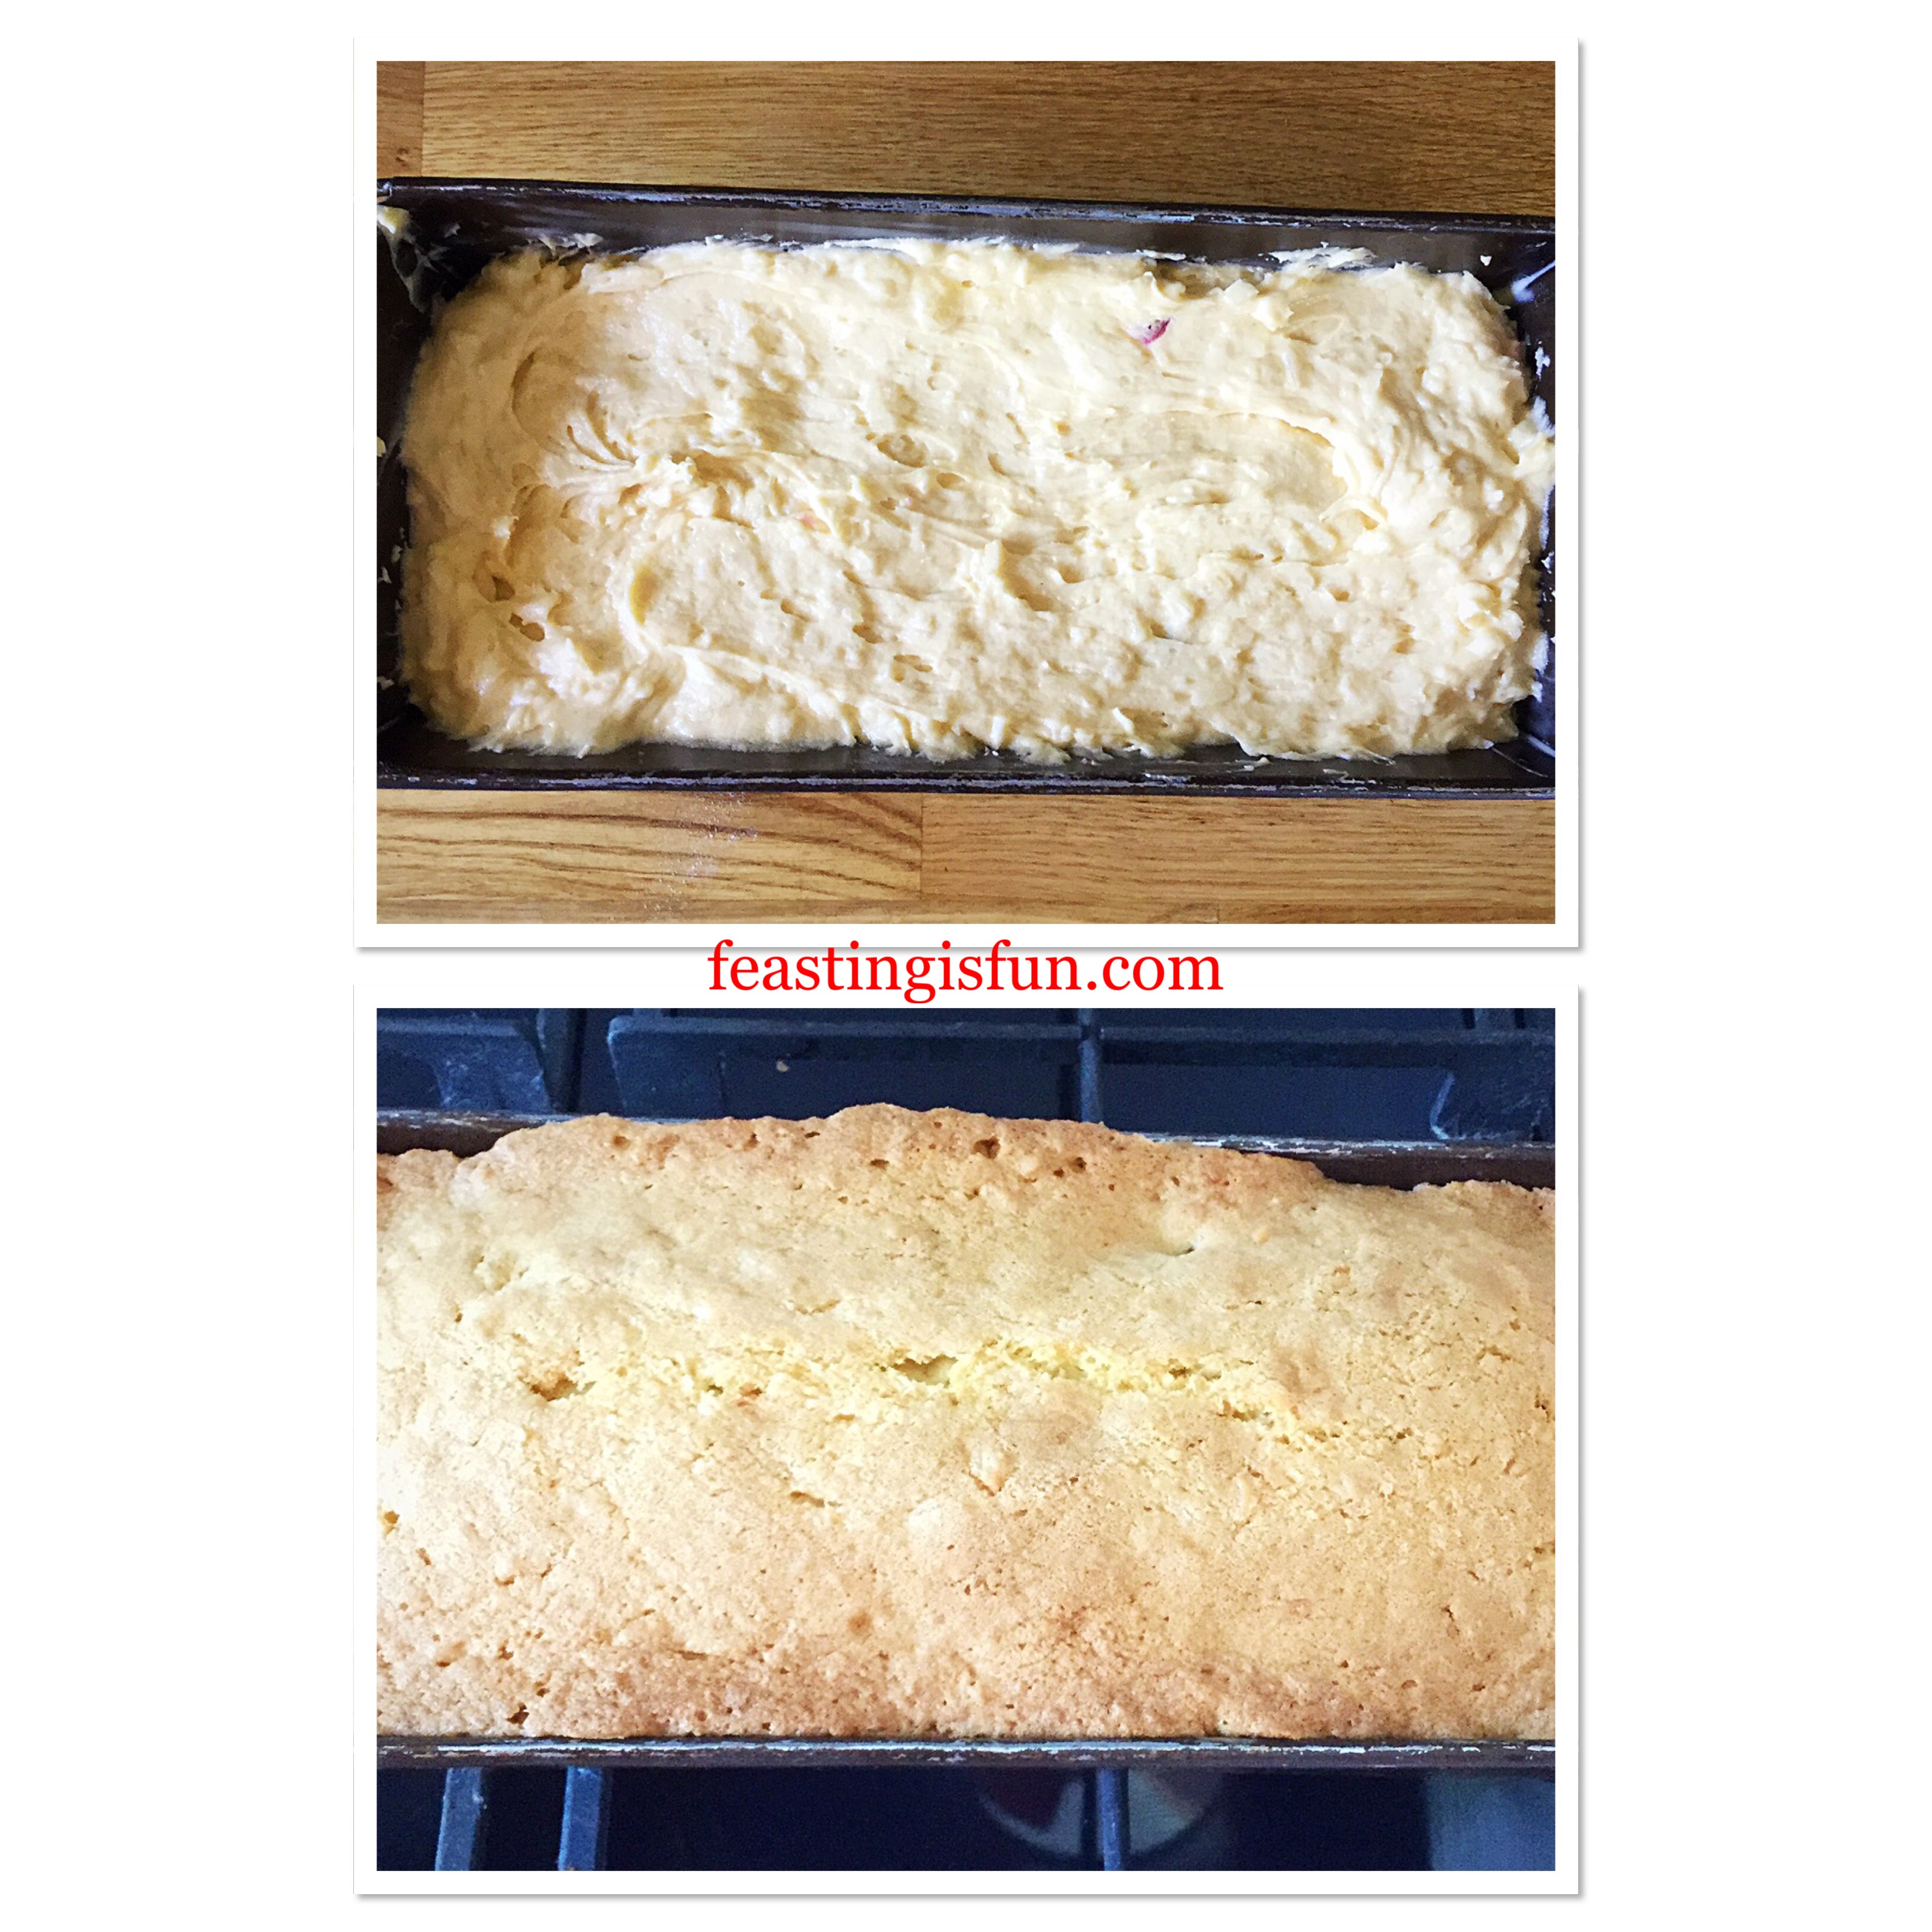
You will need approximately a 25cm x 11.5cm x 7.5cm (10” x 4.5” x 3”) 2lb loaf tin for this recipe. Grease with butter and line the base with baking parchment.

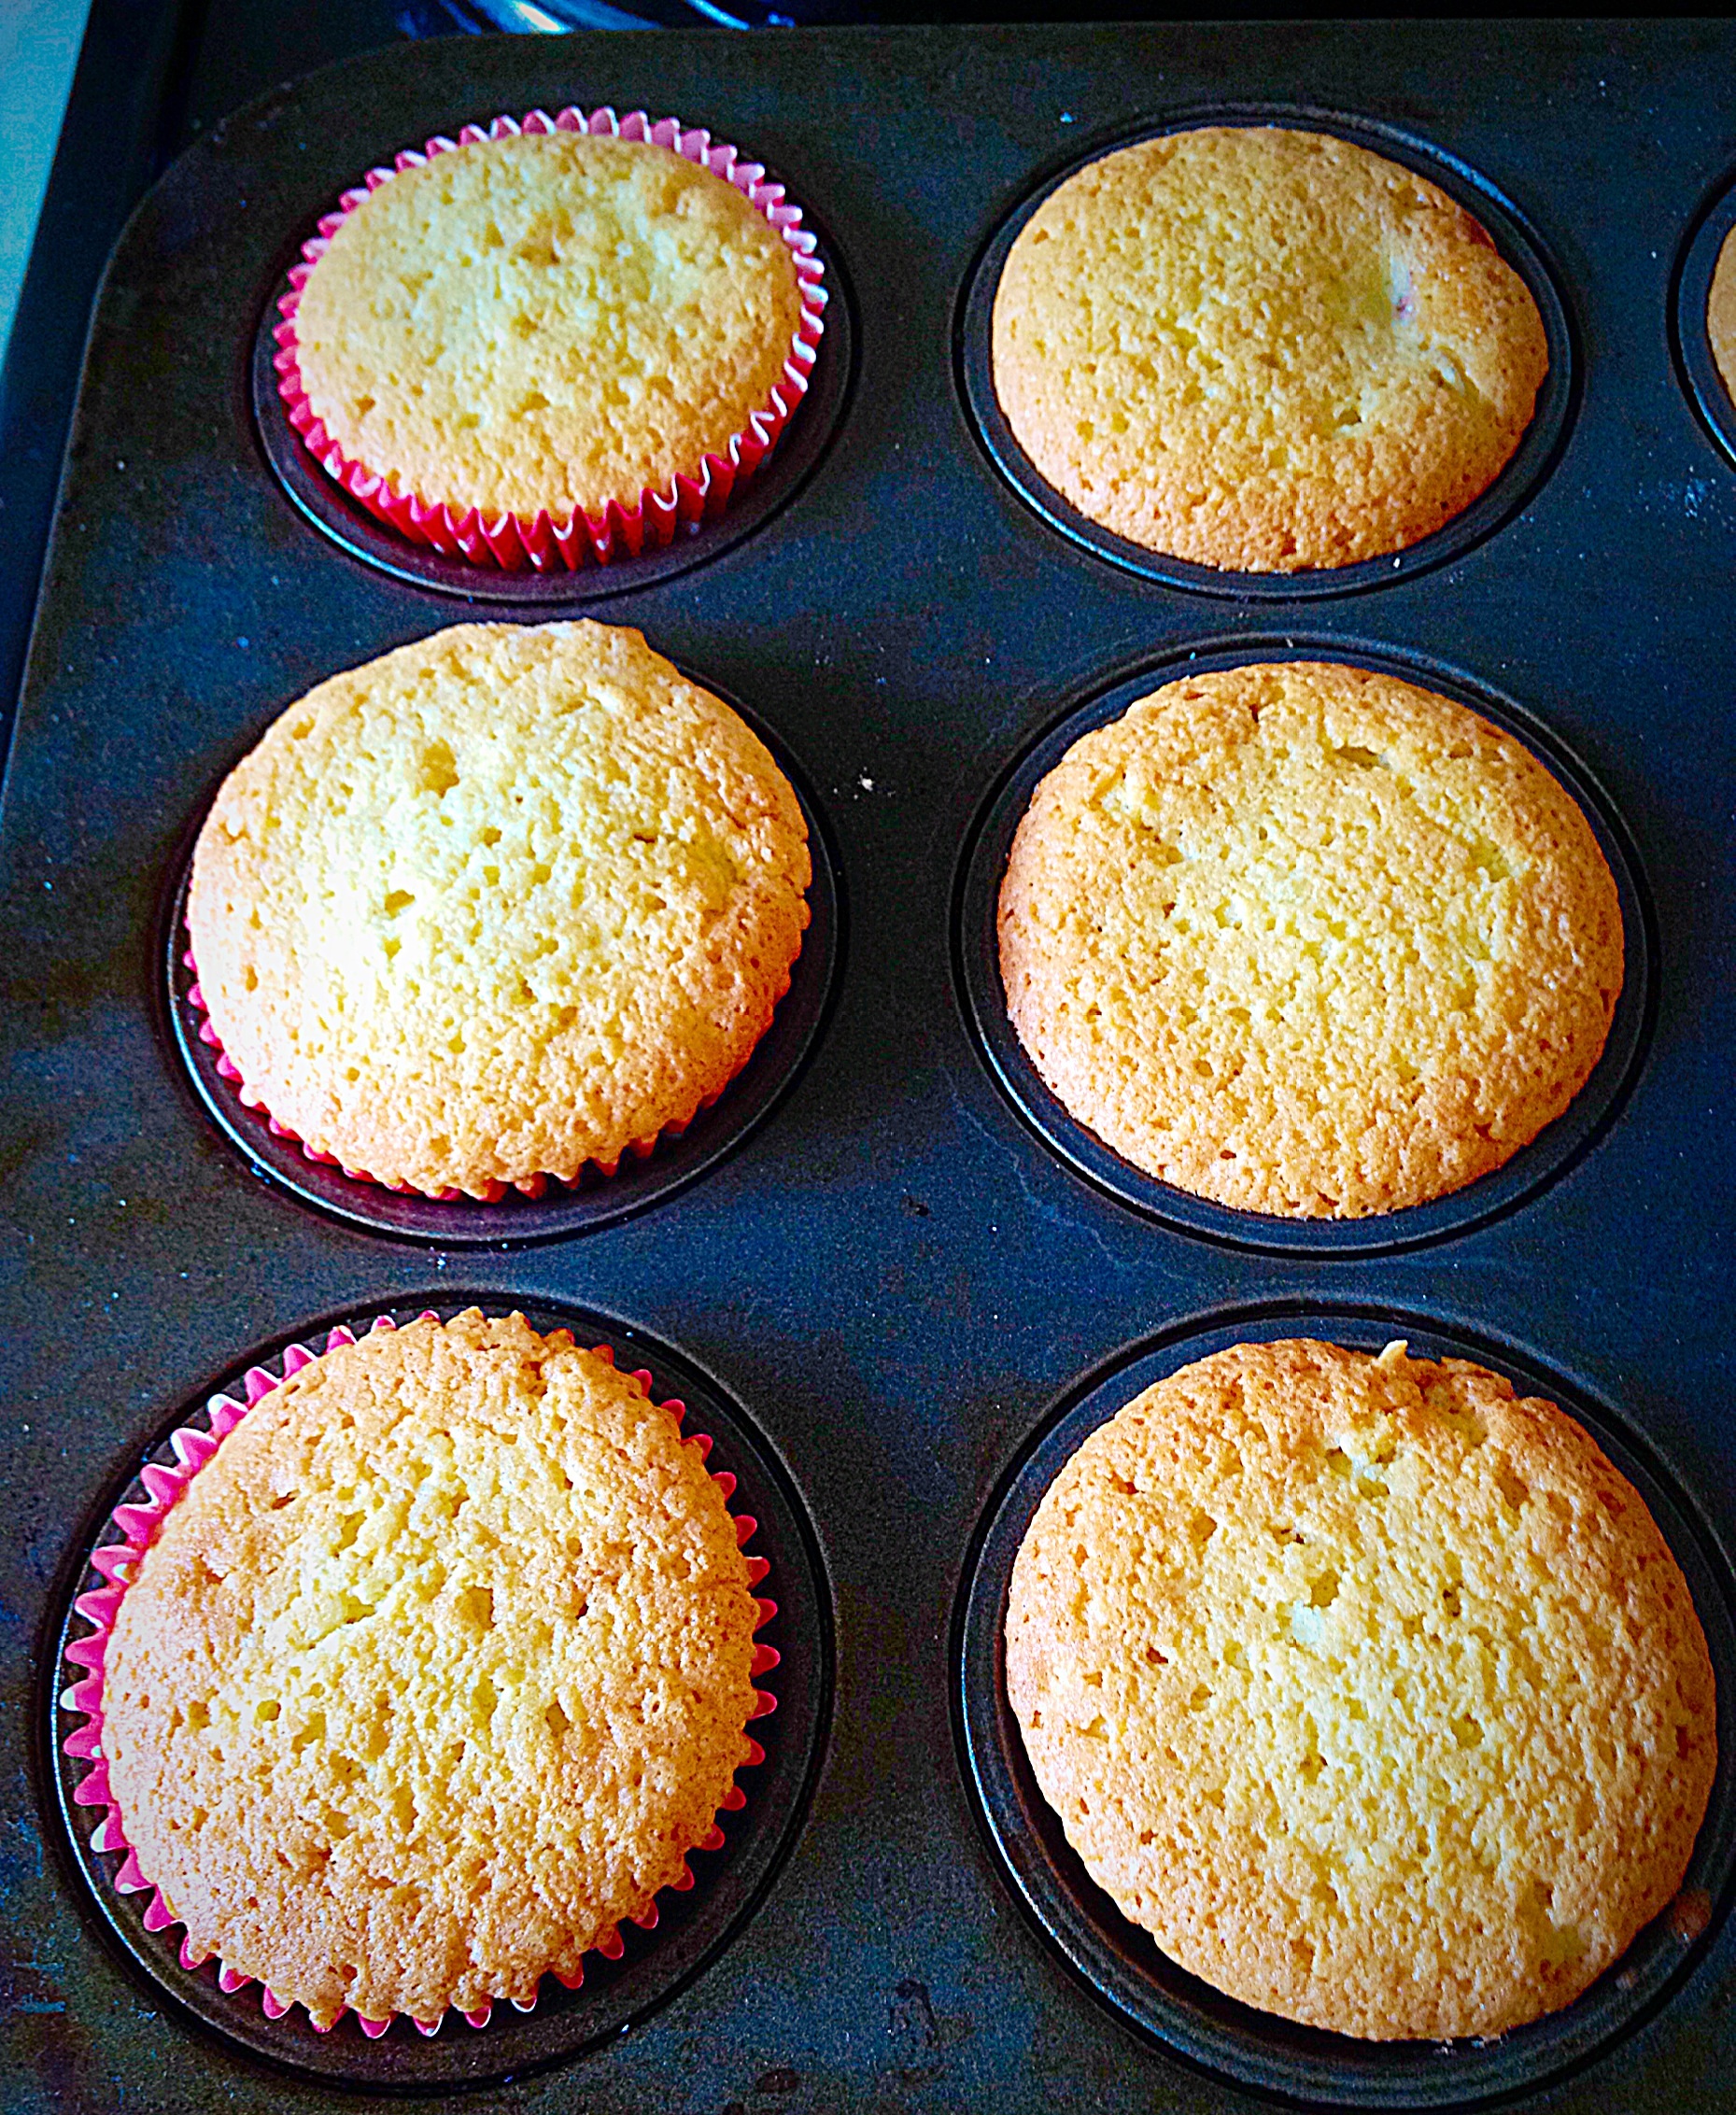
Making And Baking The Cherry Coconut Cake

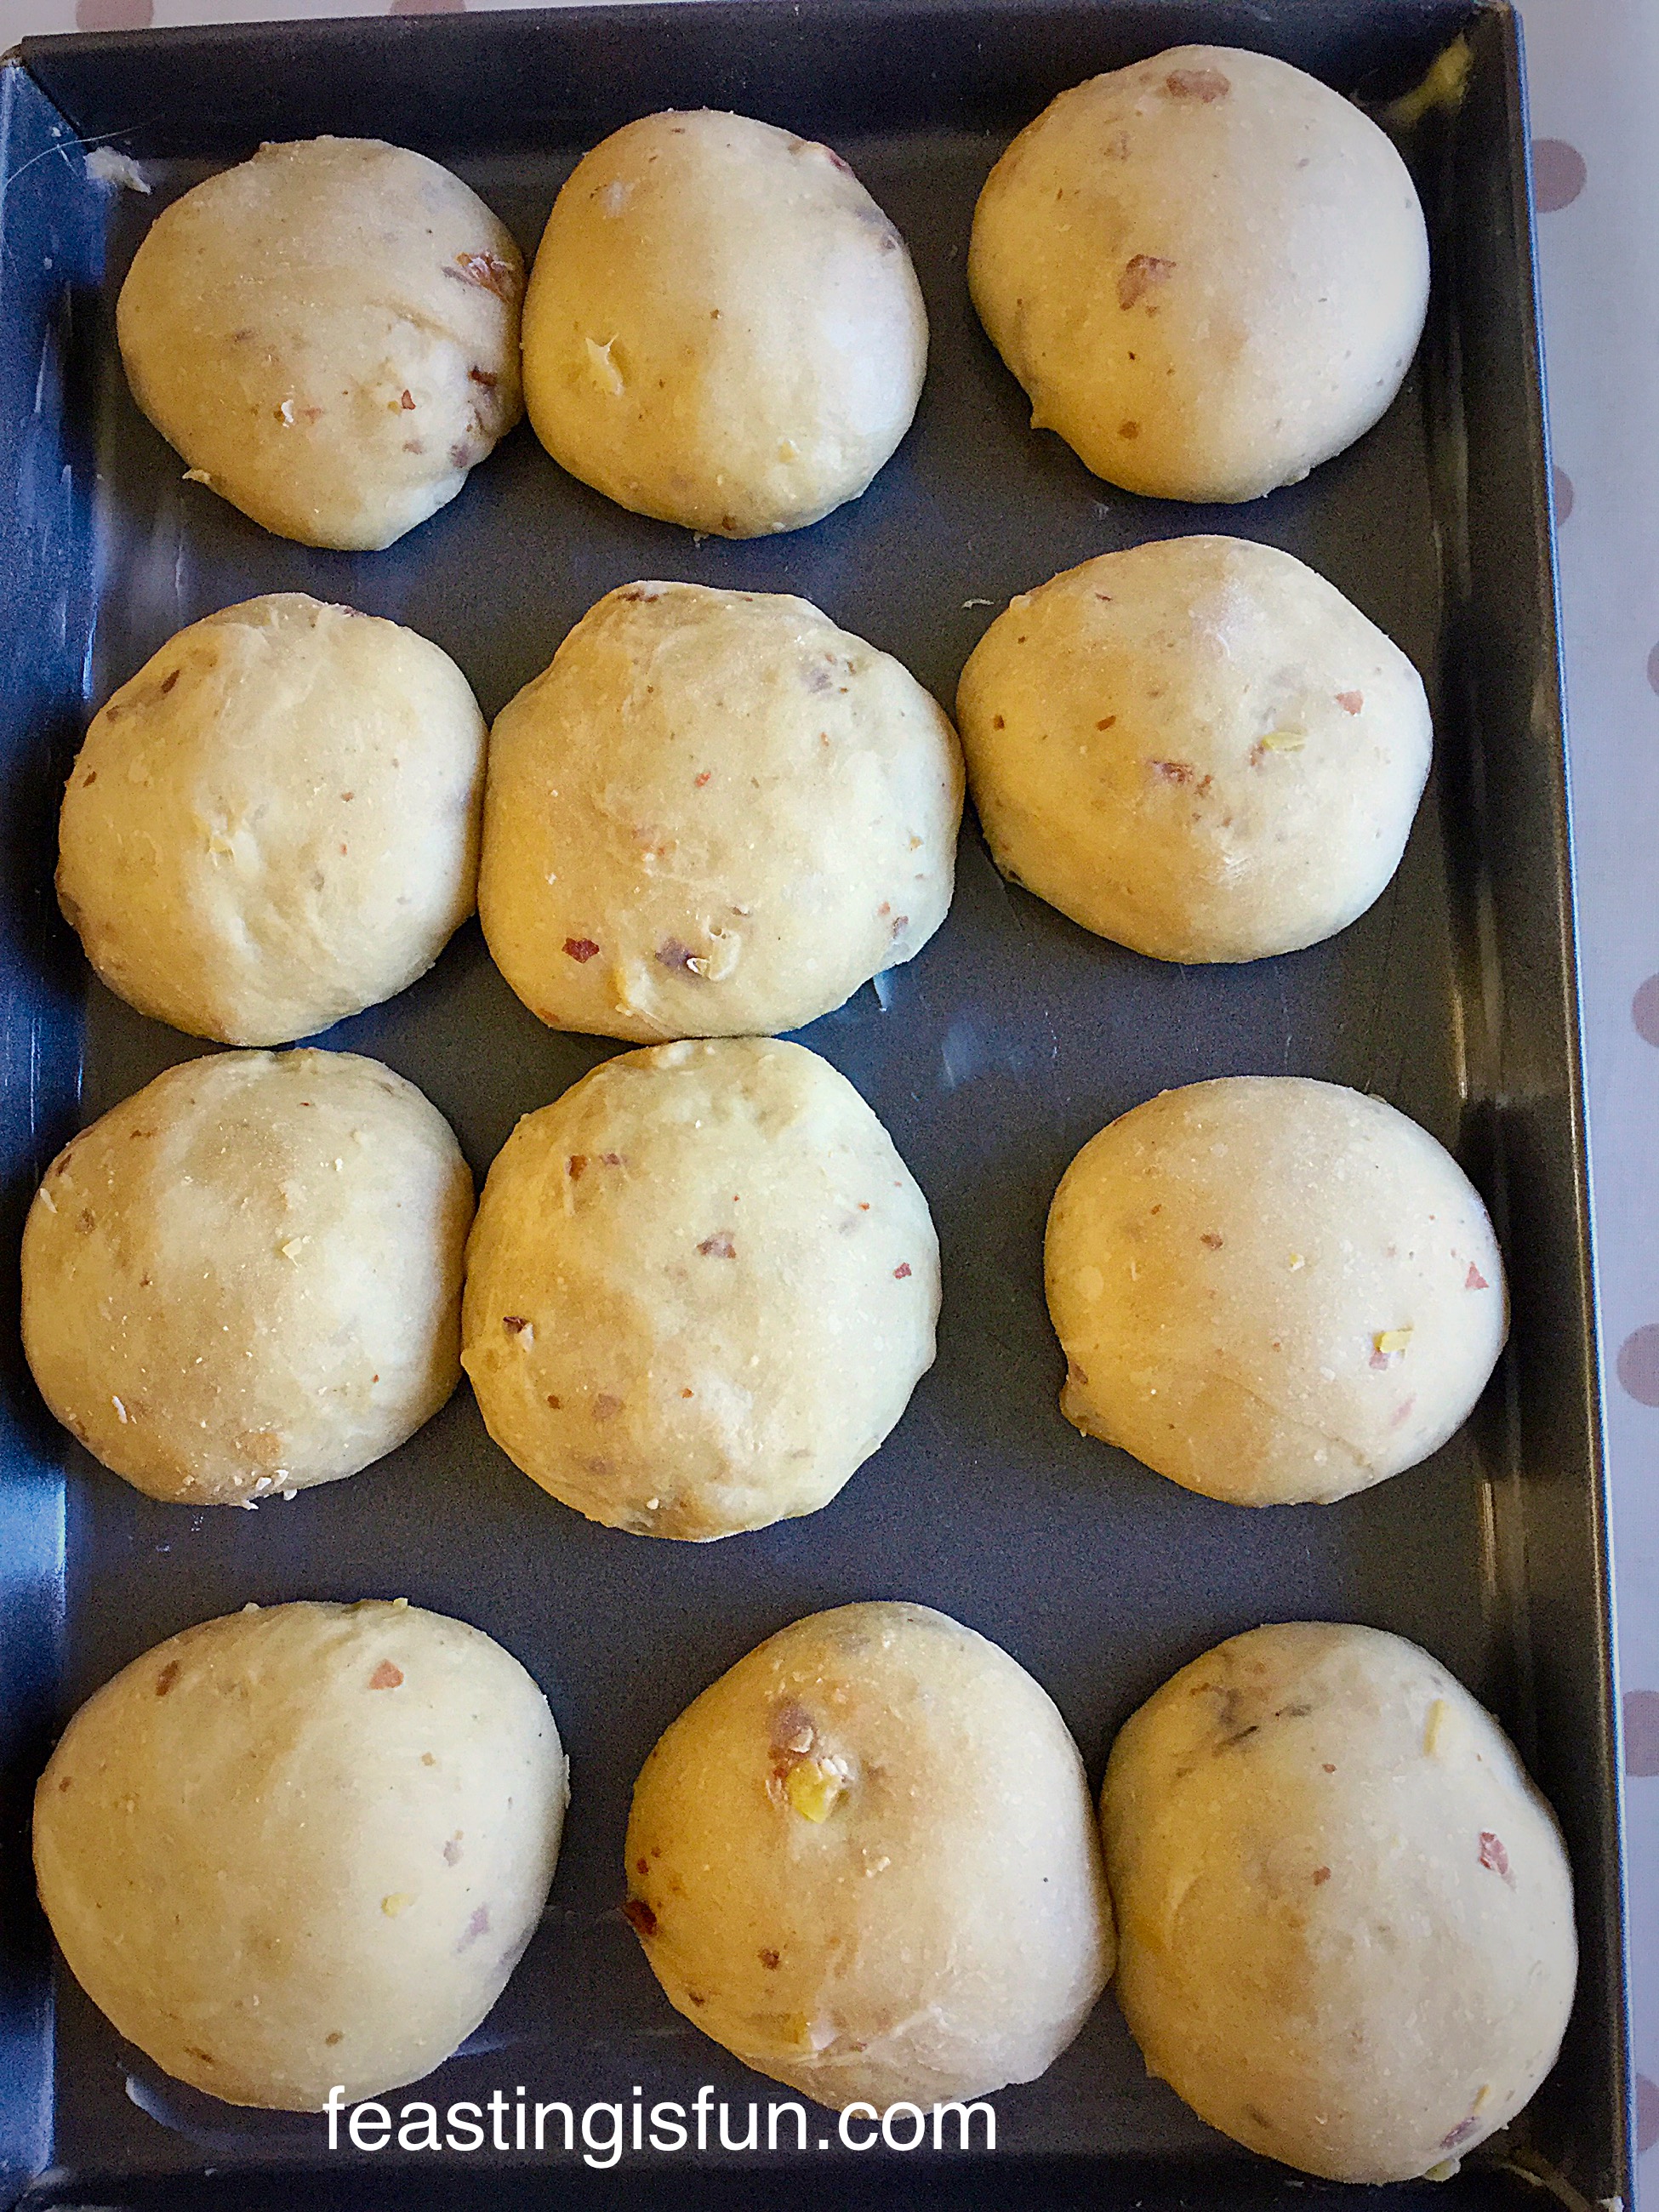
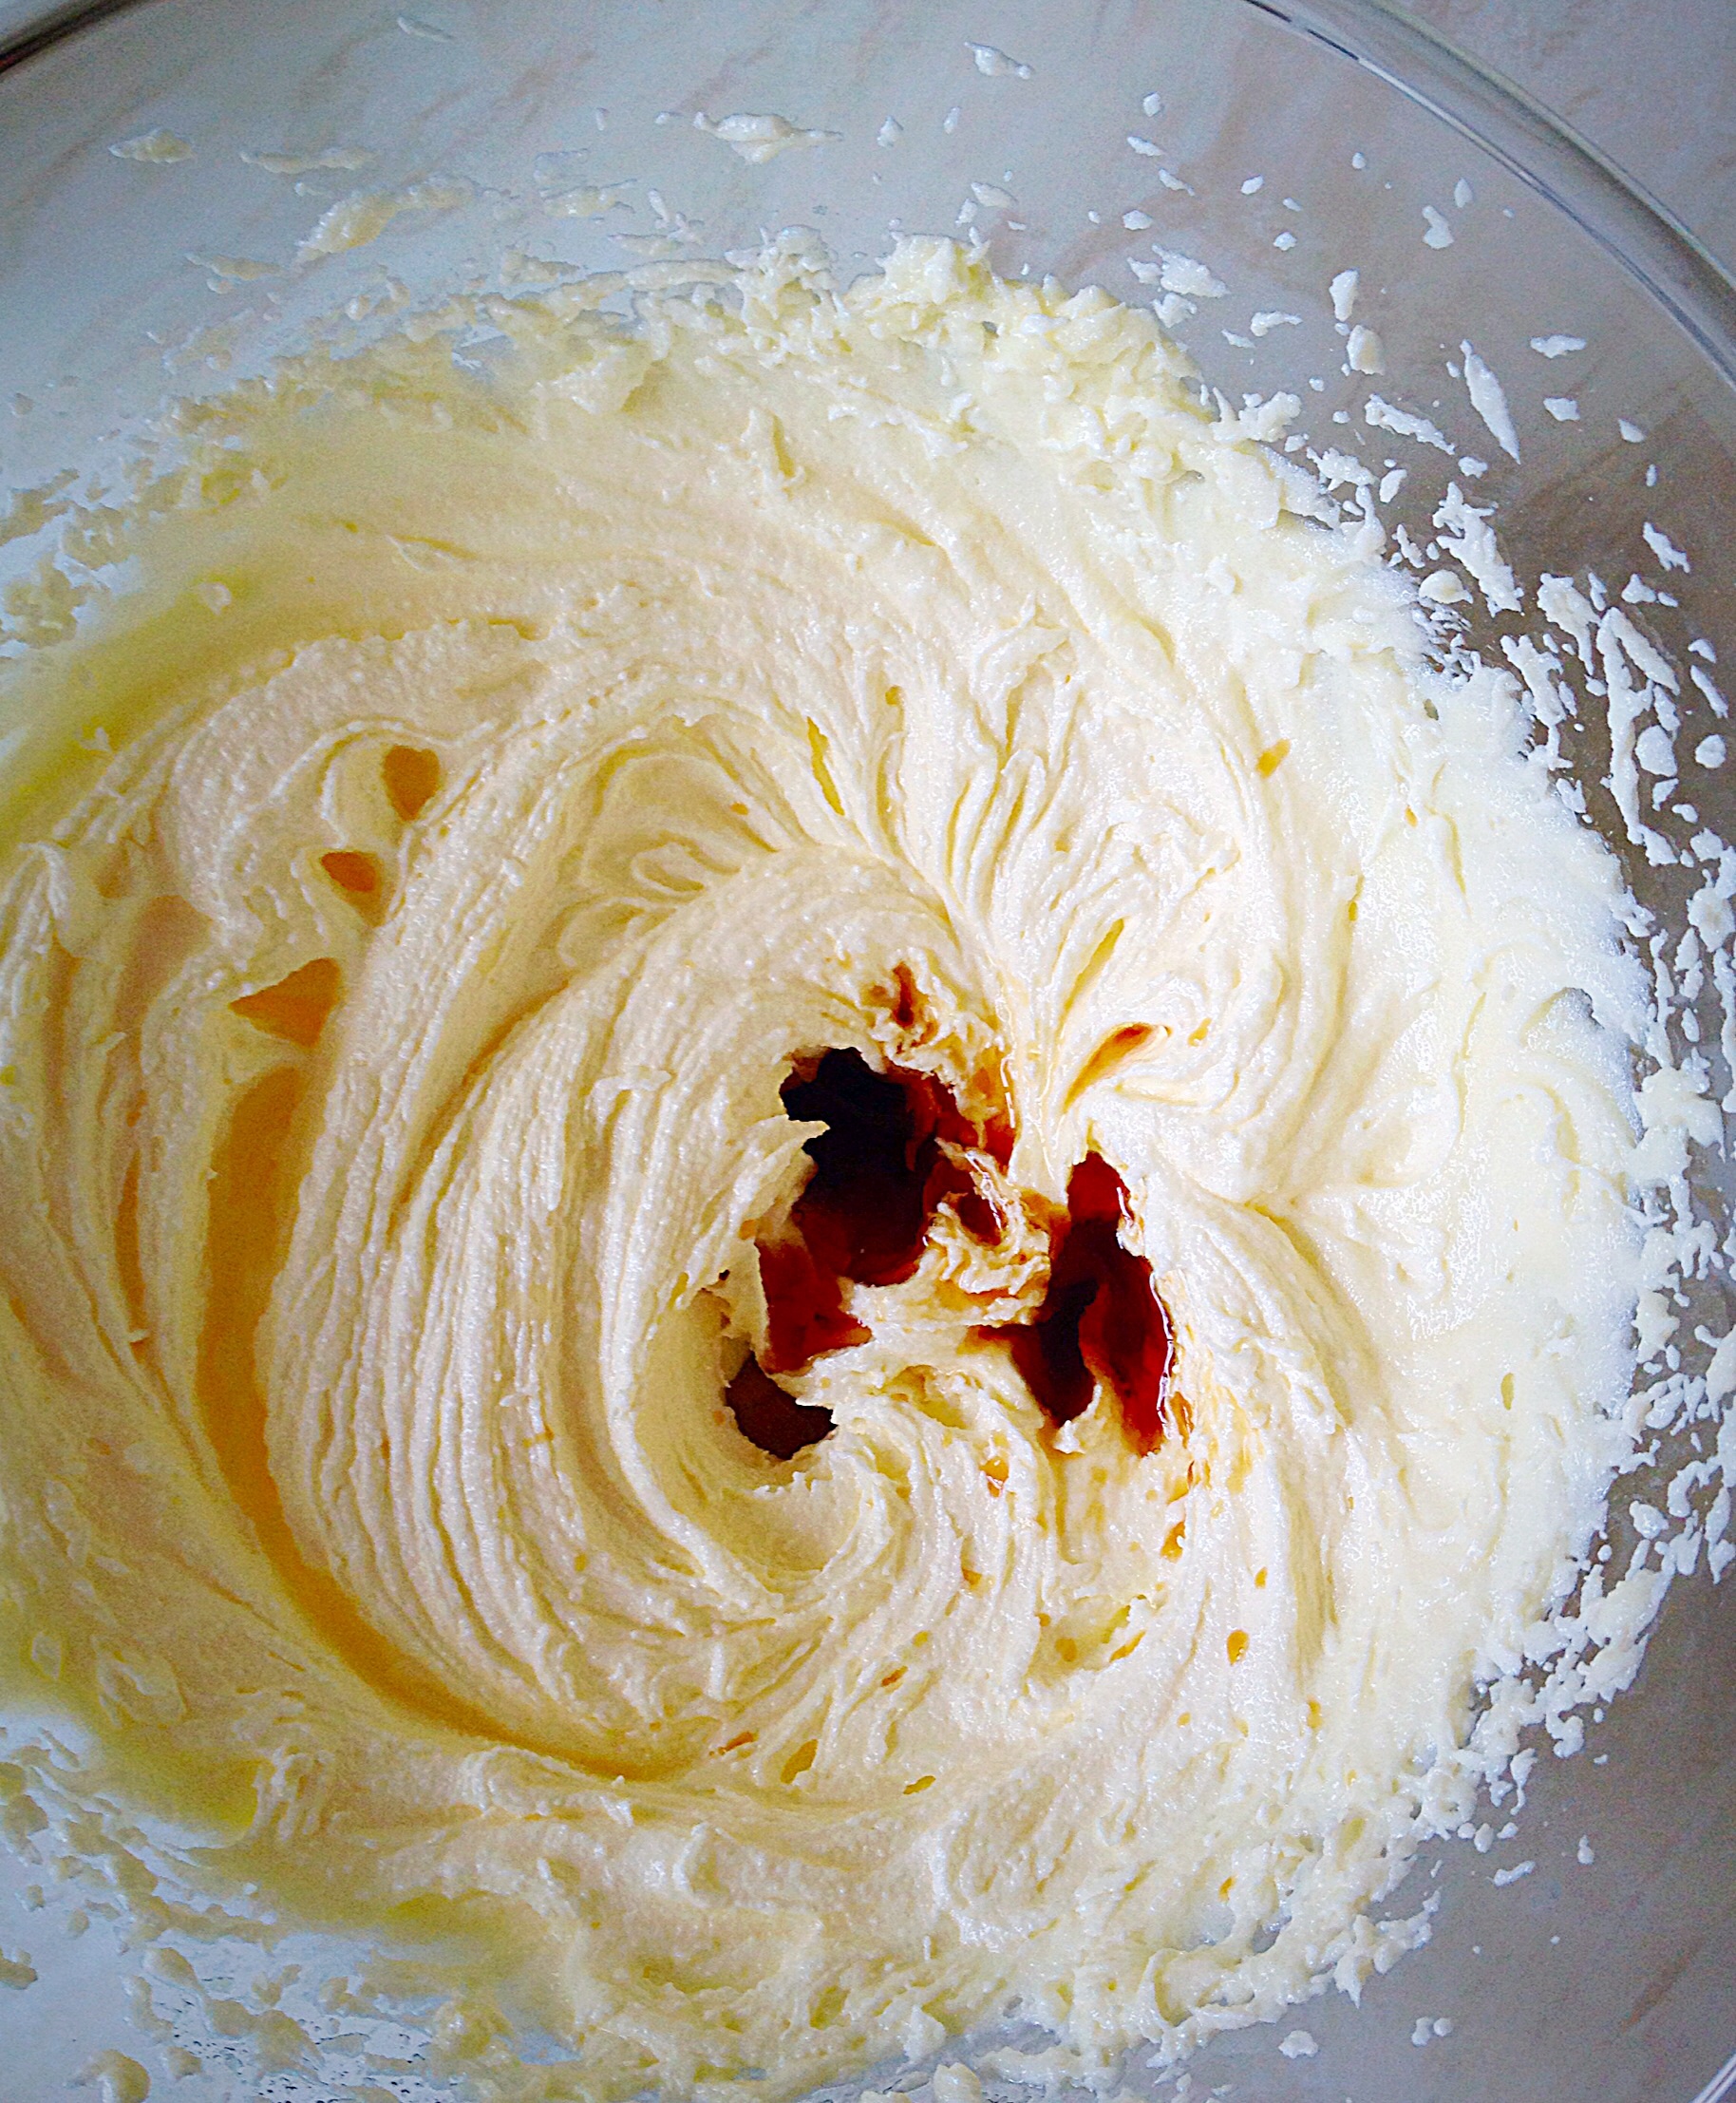
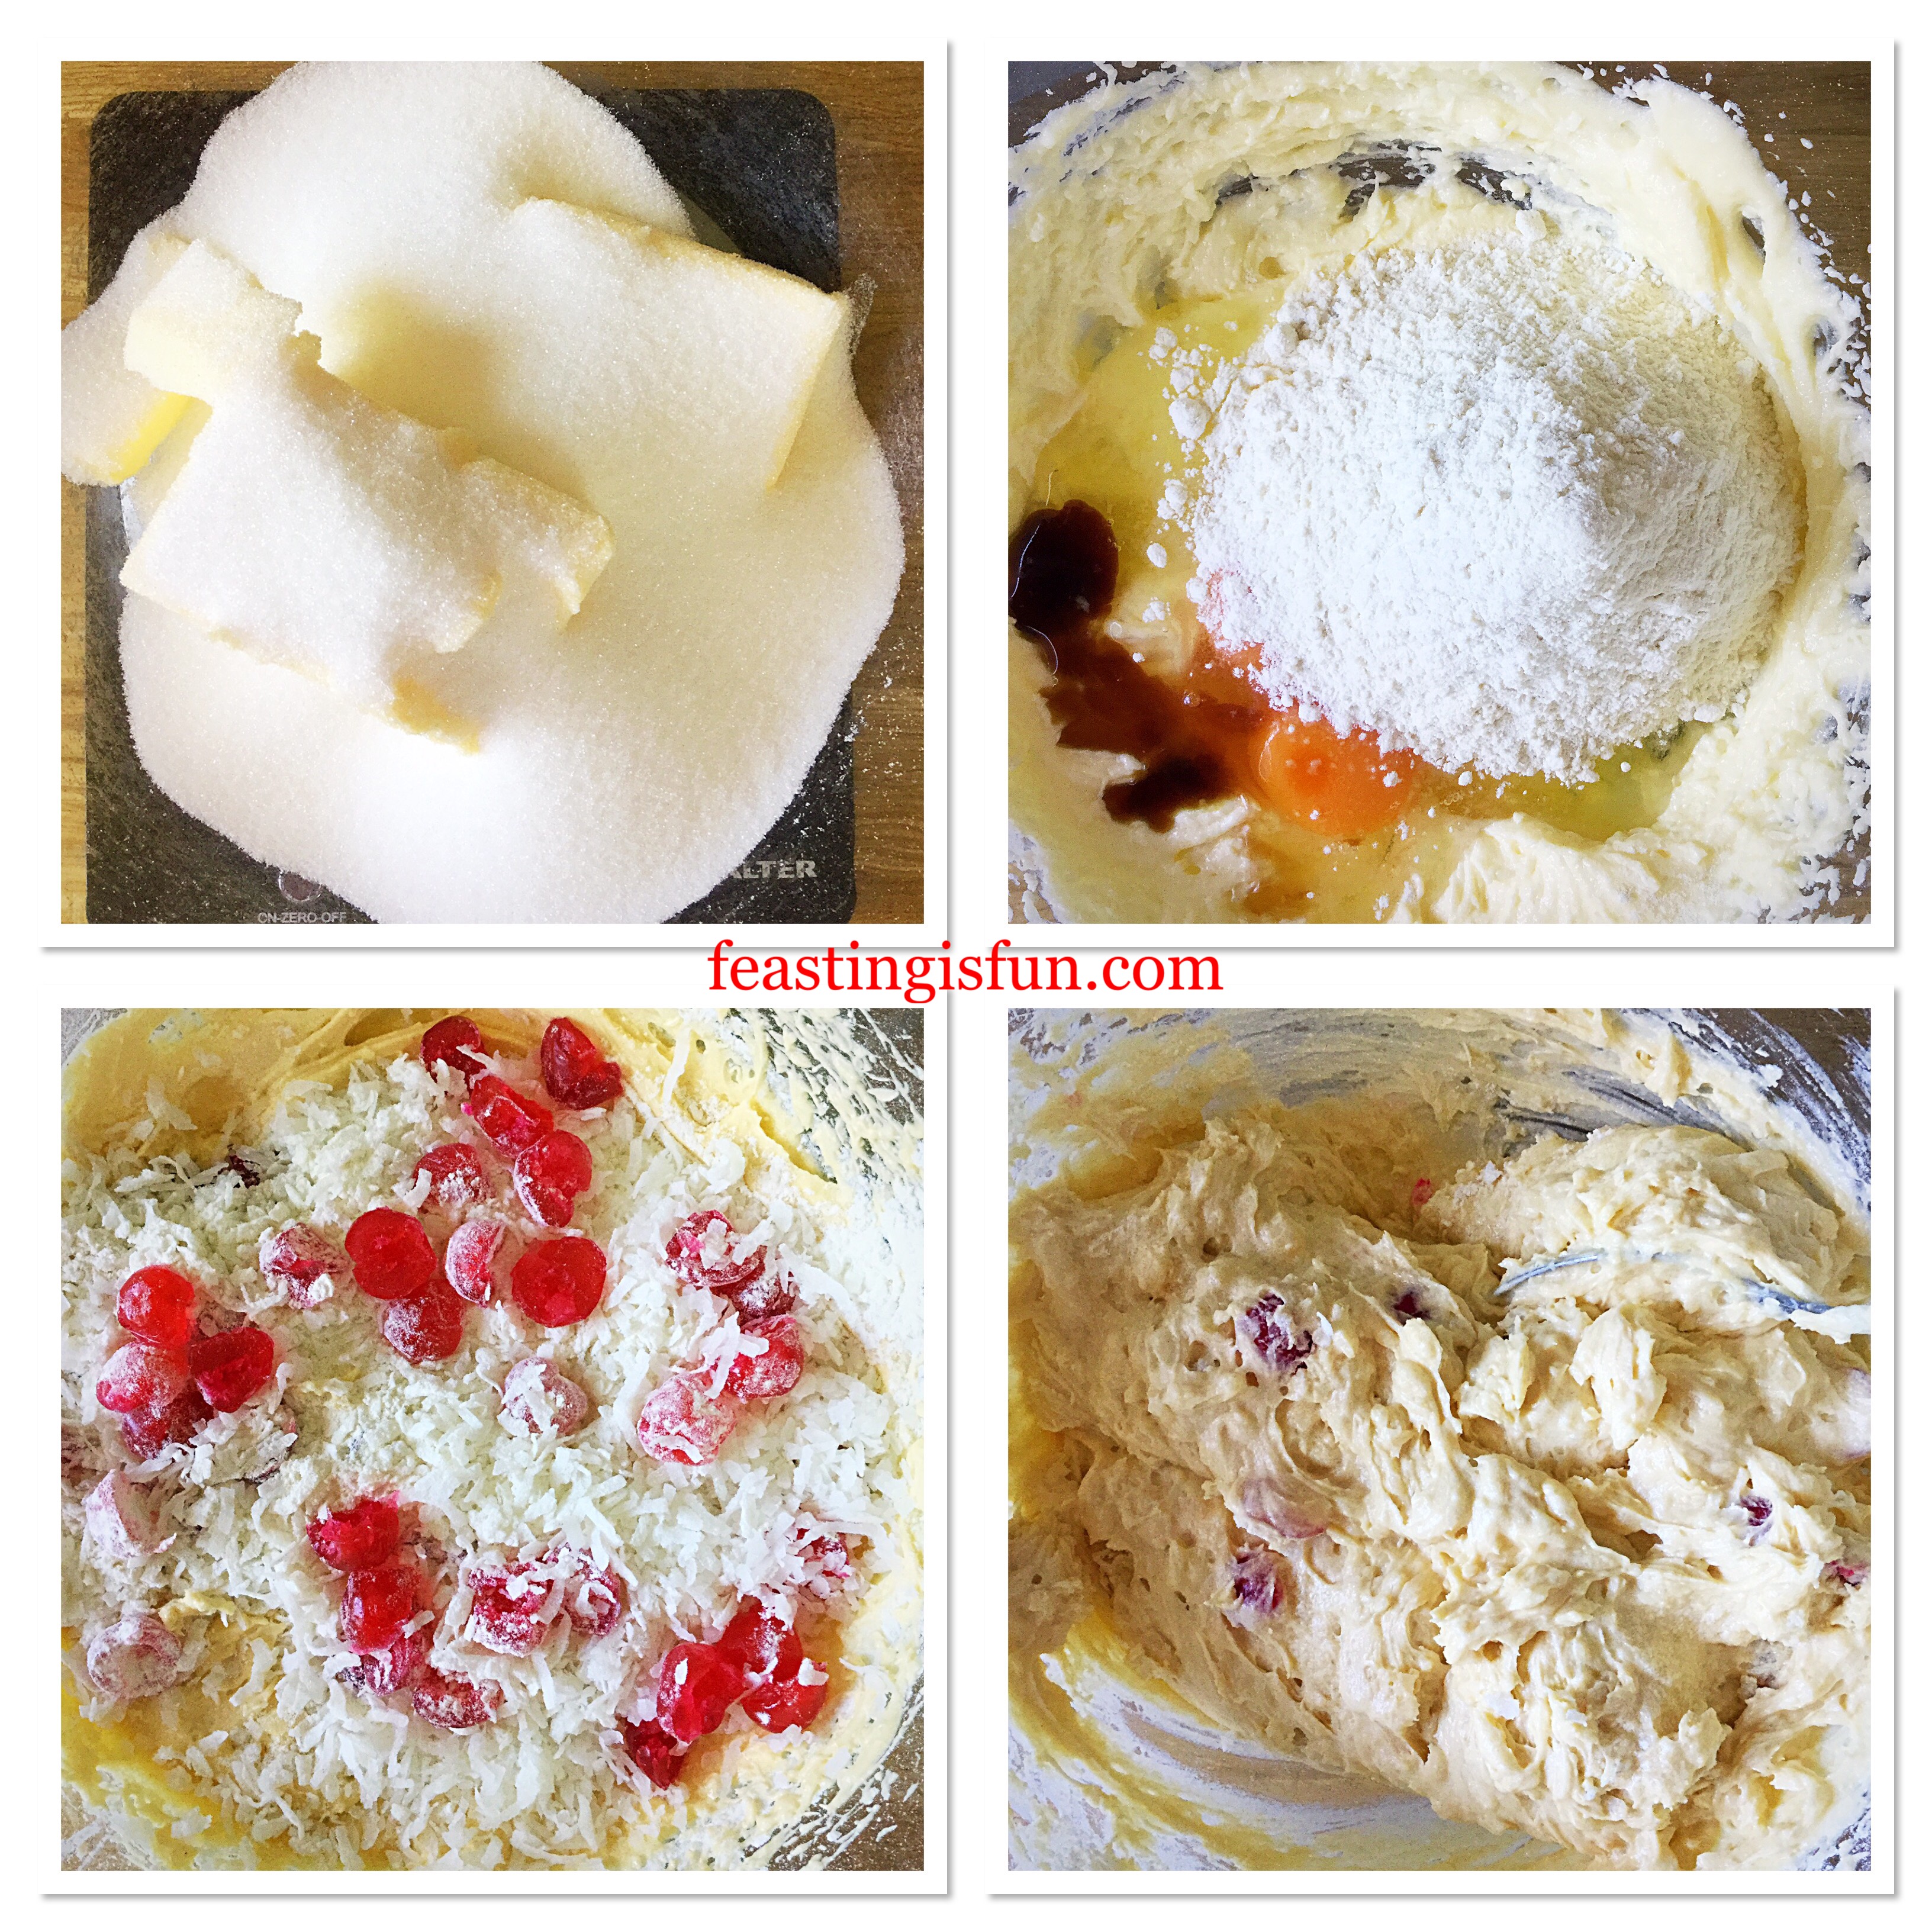
  • First of all add the butter, sugar and salt to a large mixing bowl. Whisk together until the ingredients are fully combined, pale and creamy.
  • Now add 2 eggs, half the flour and vanilla extract. Whisk together until just combined.
  • Add the last 2 eggs and whisk to incorporate.
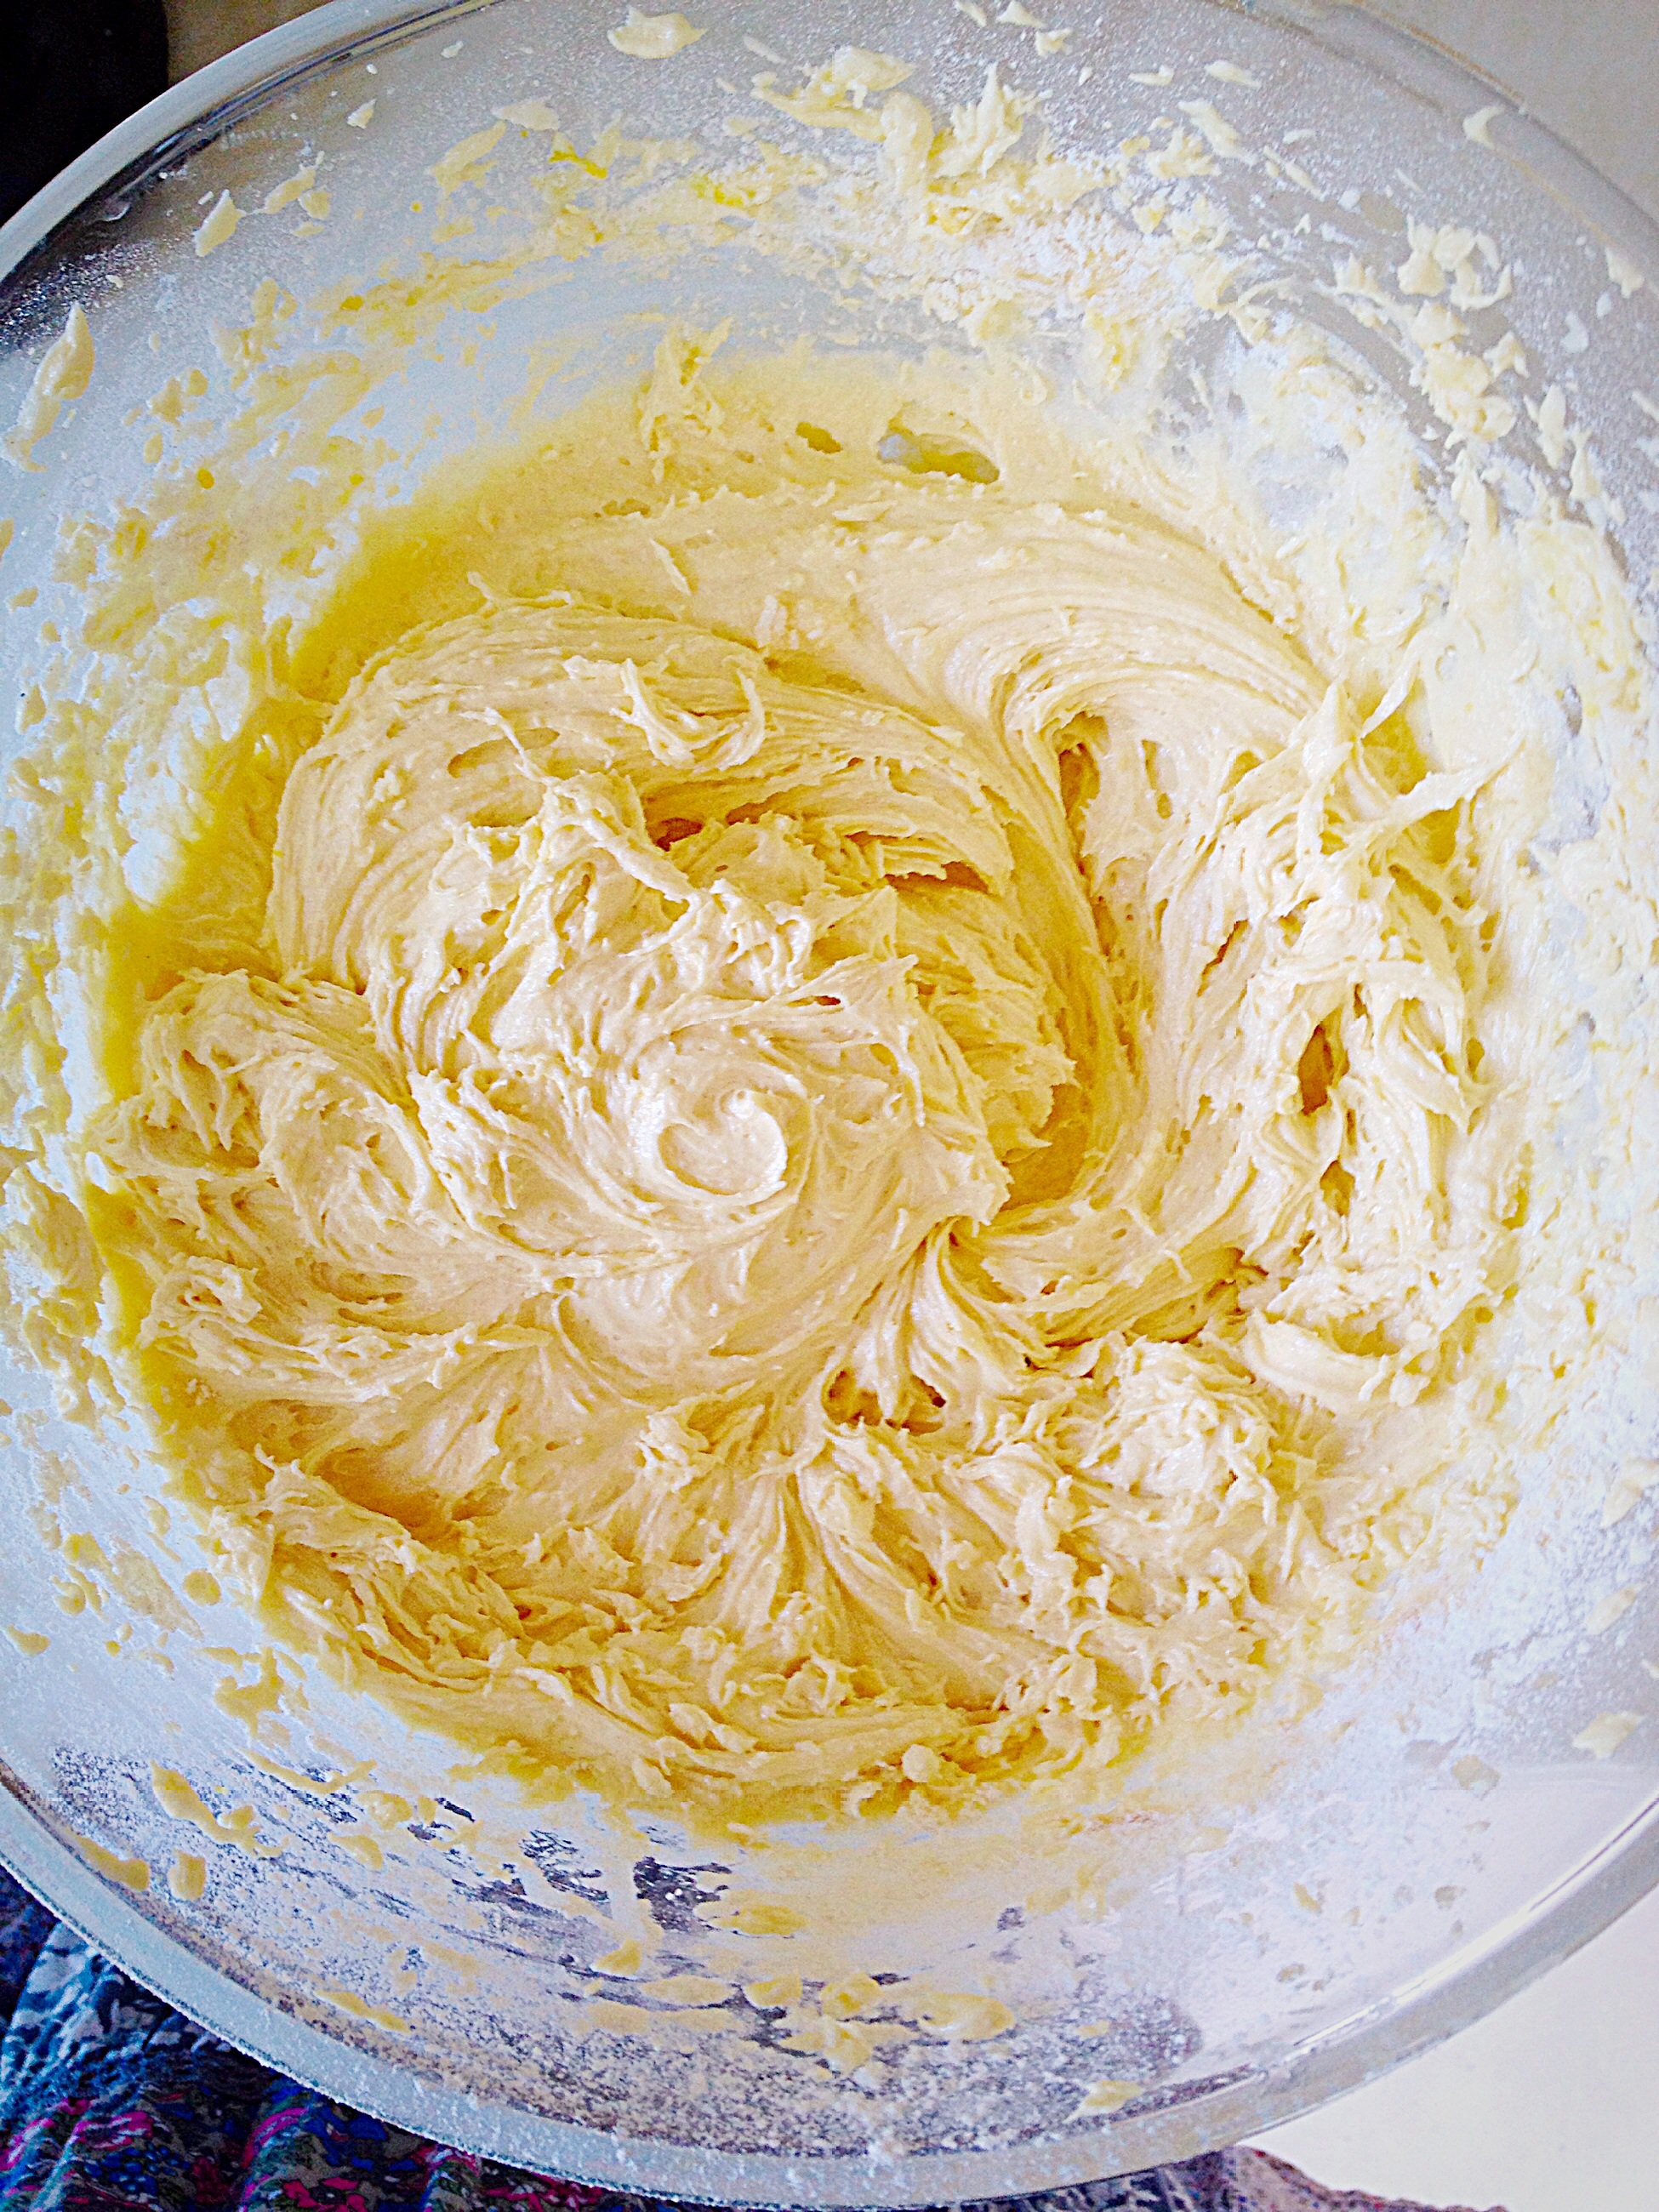
  • Finally add the remaining flour, baking powder, coconut and cherry halves. Toss the cherries in the flour, this will stop them sinking to the bottom of the cake during baking.
  • Fold all of the ingredients together (adding additional milk if using desiccated coconut) until they are combined.
FF Iced Cherry Coconut Loaf Cake
Making the cherry coconut cake batter.
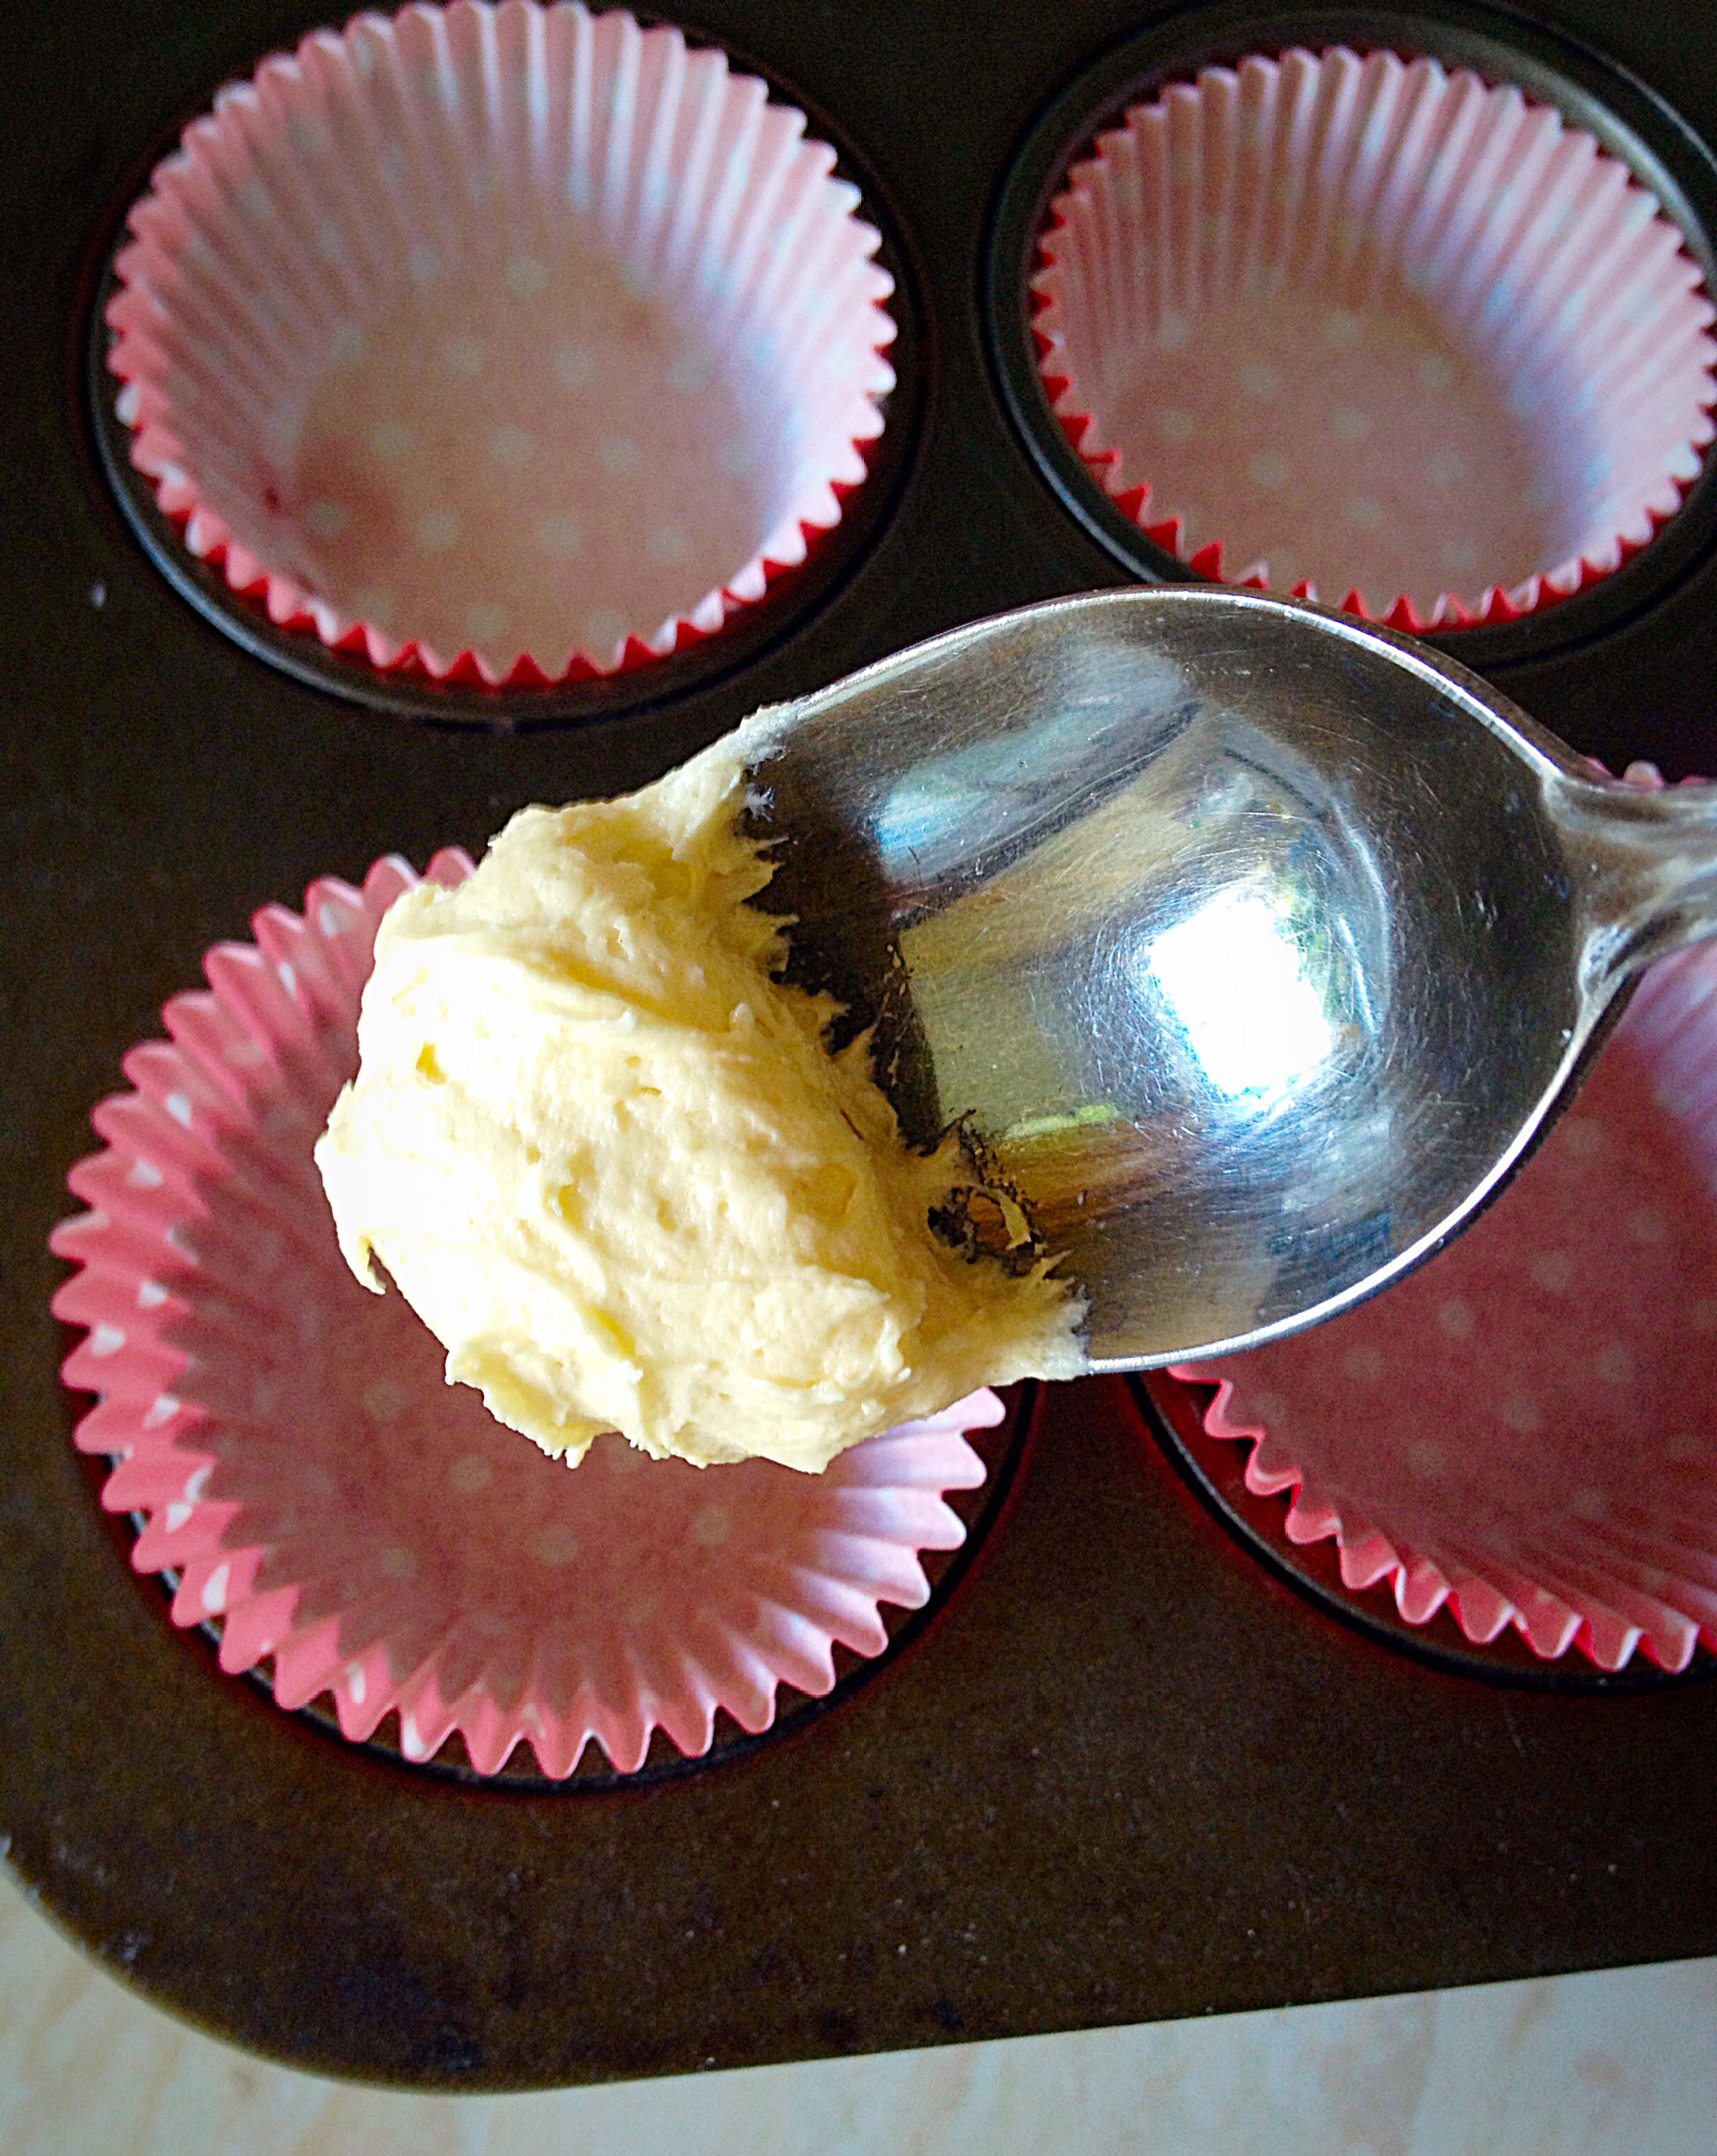
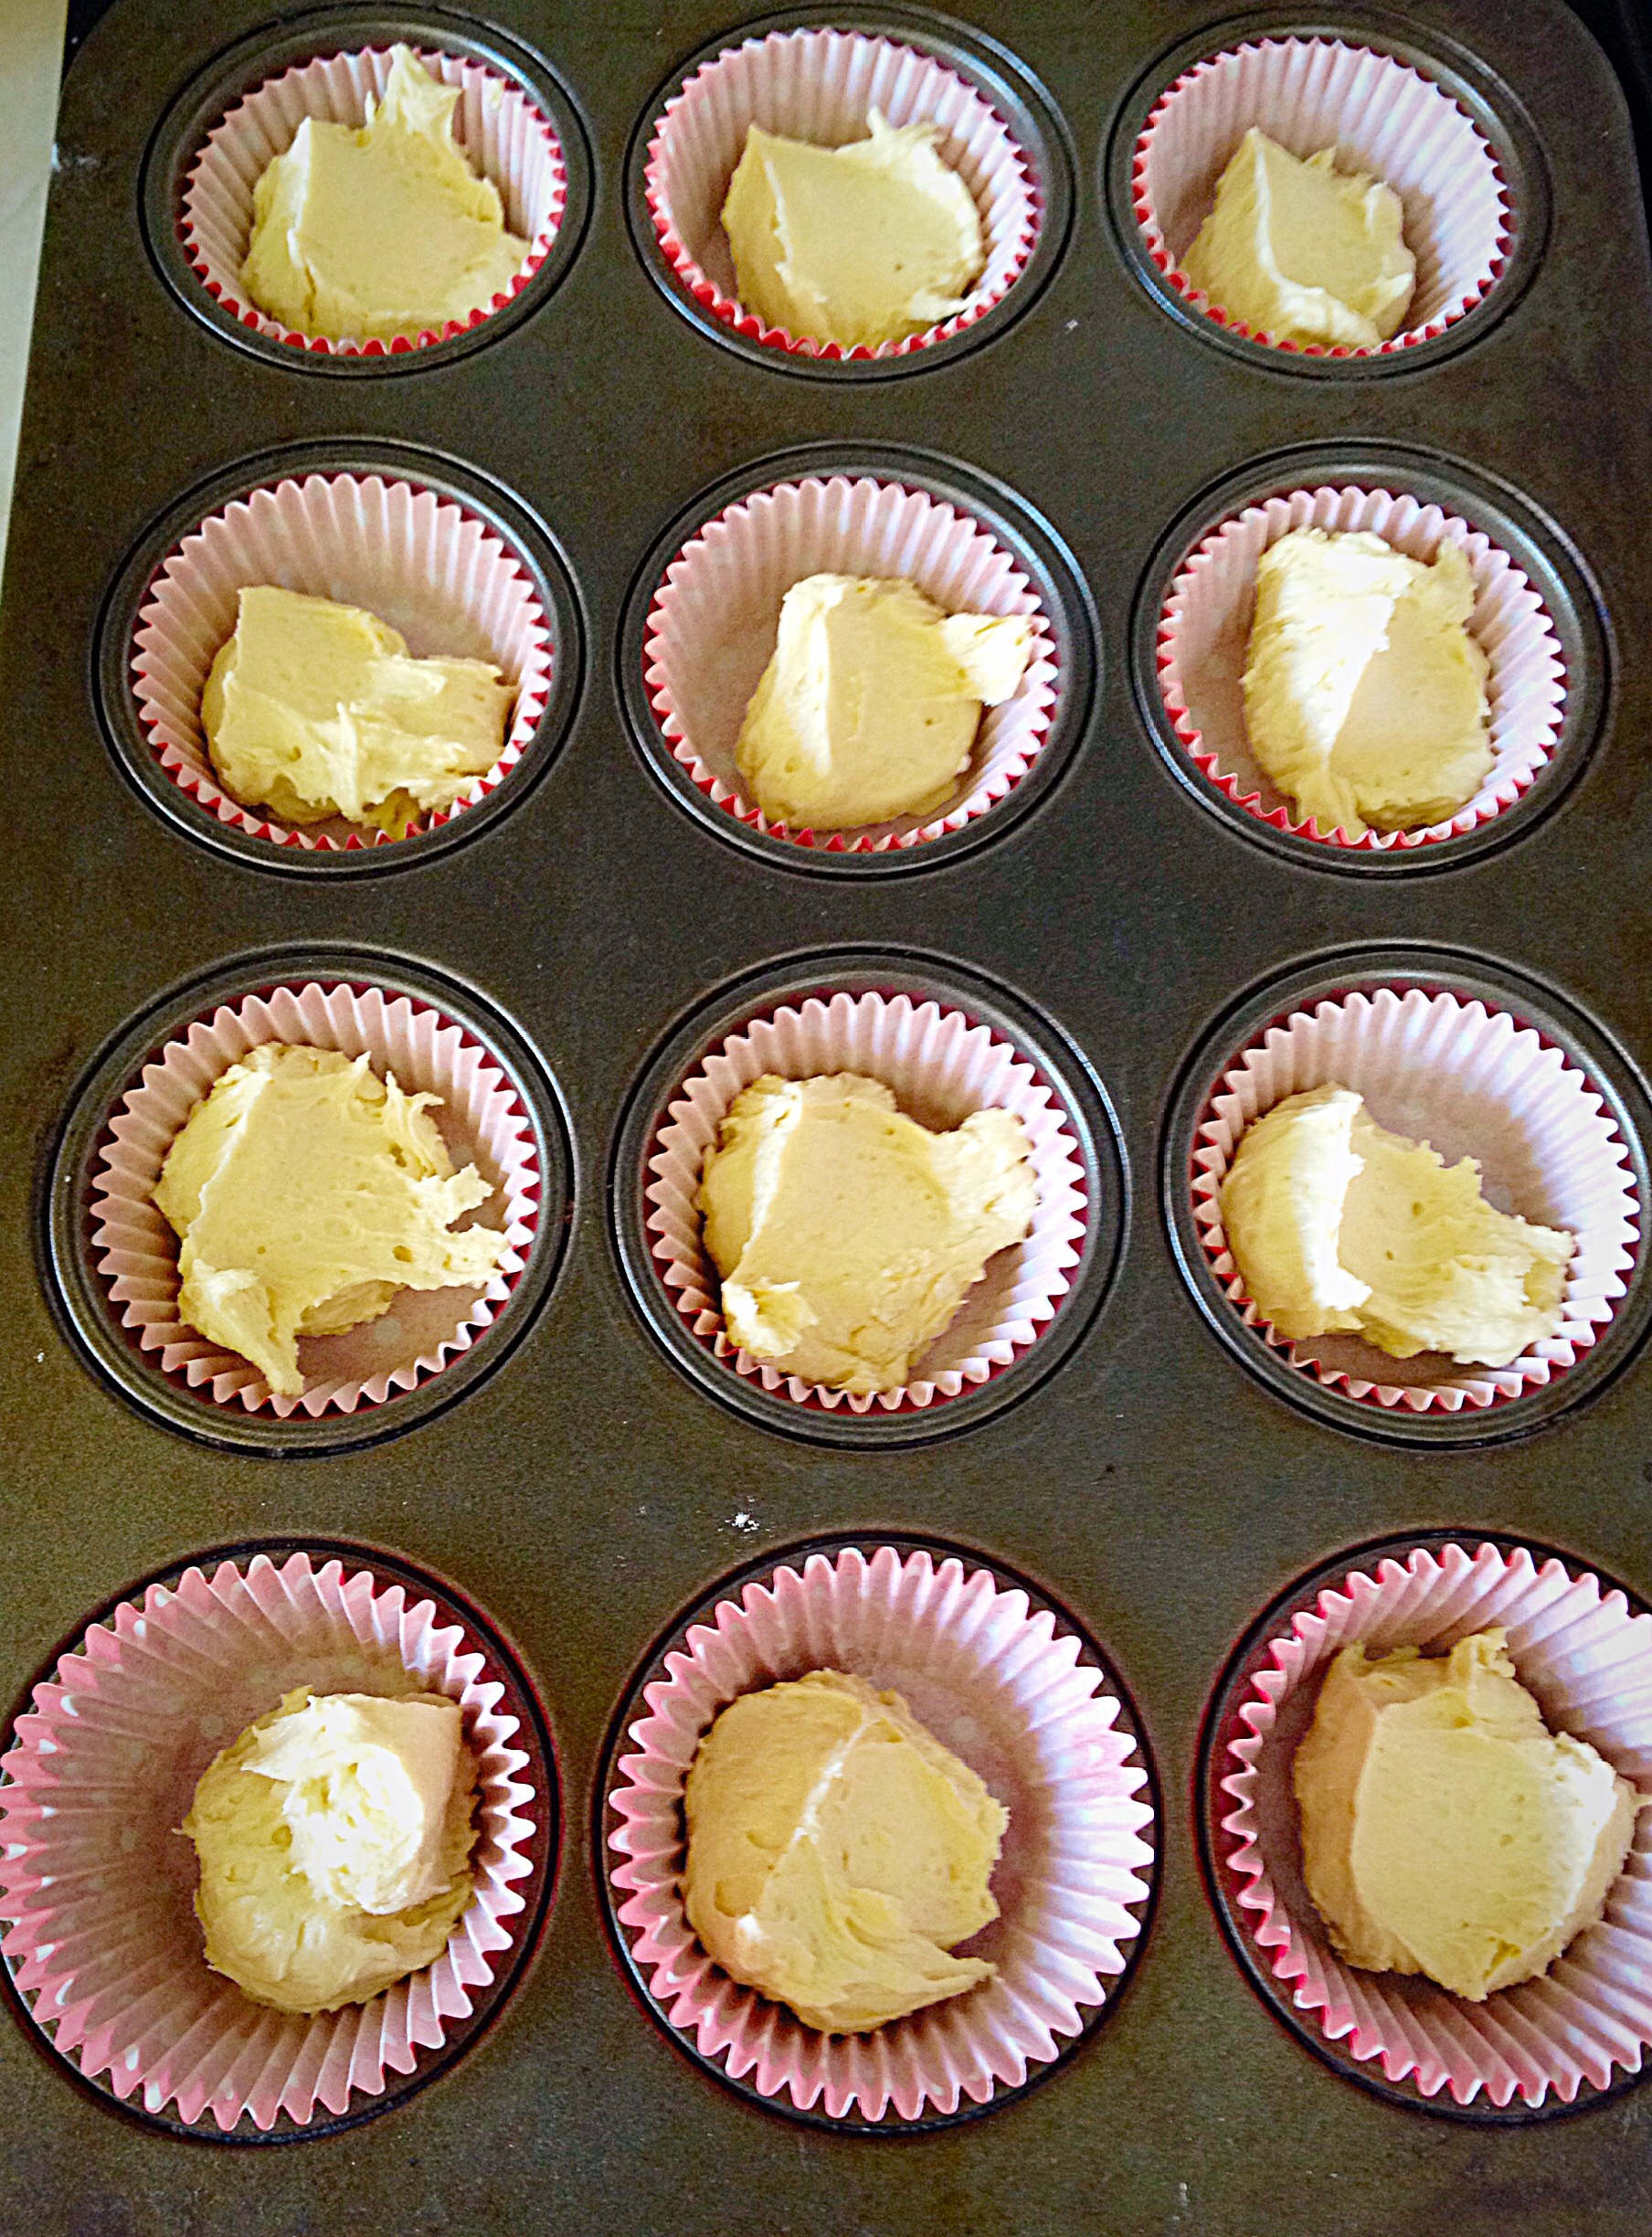
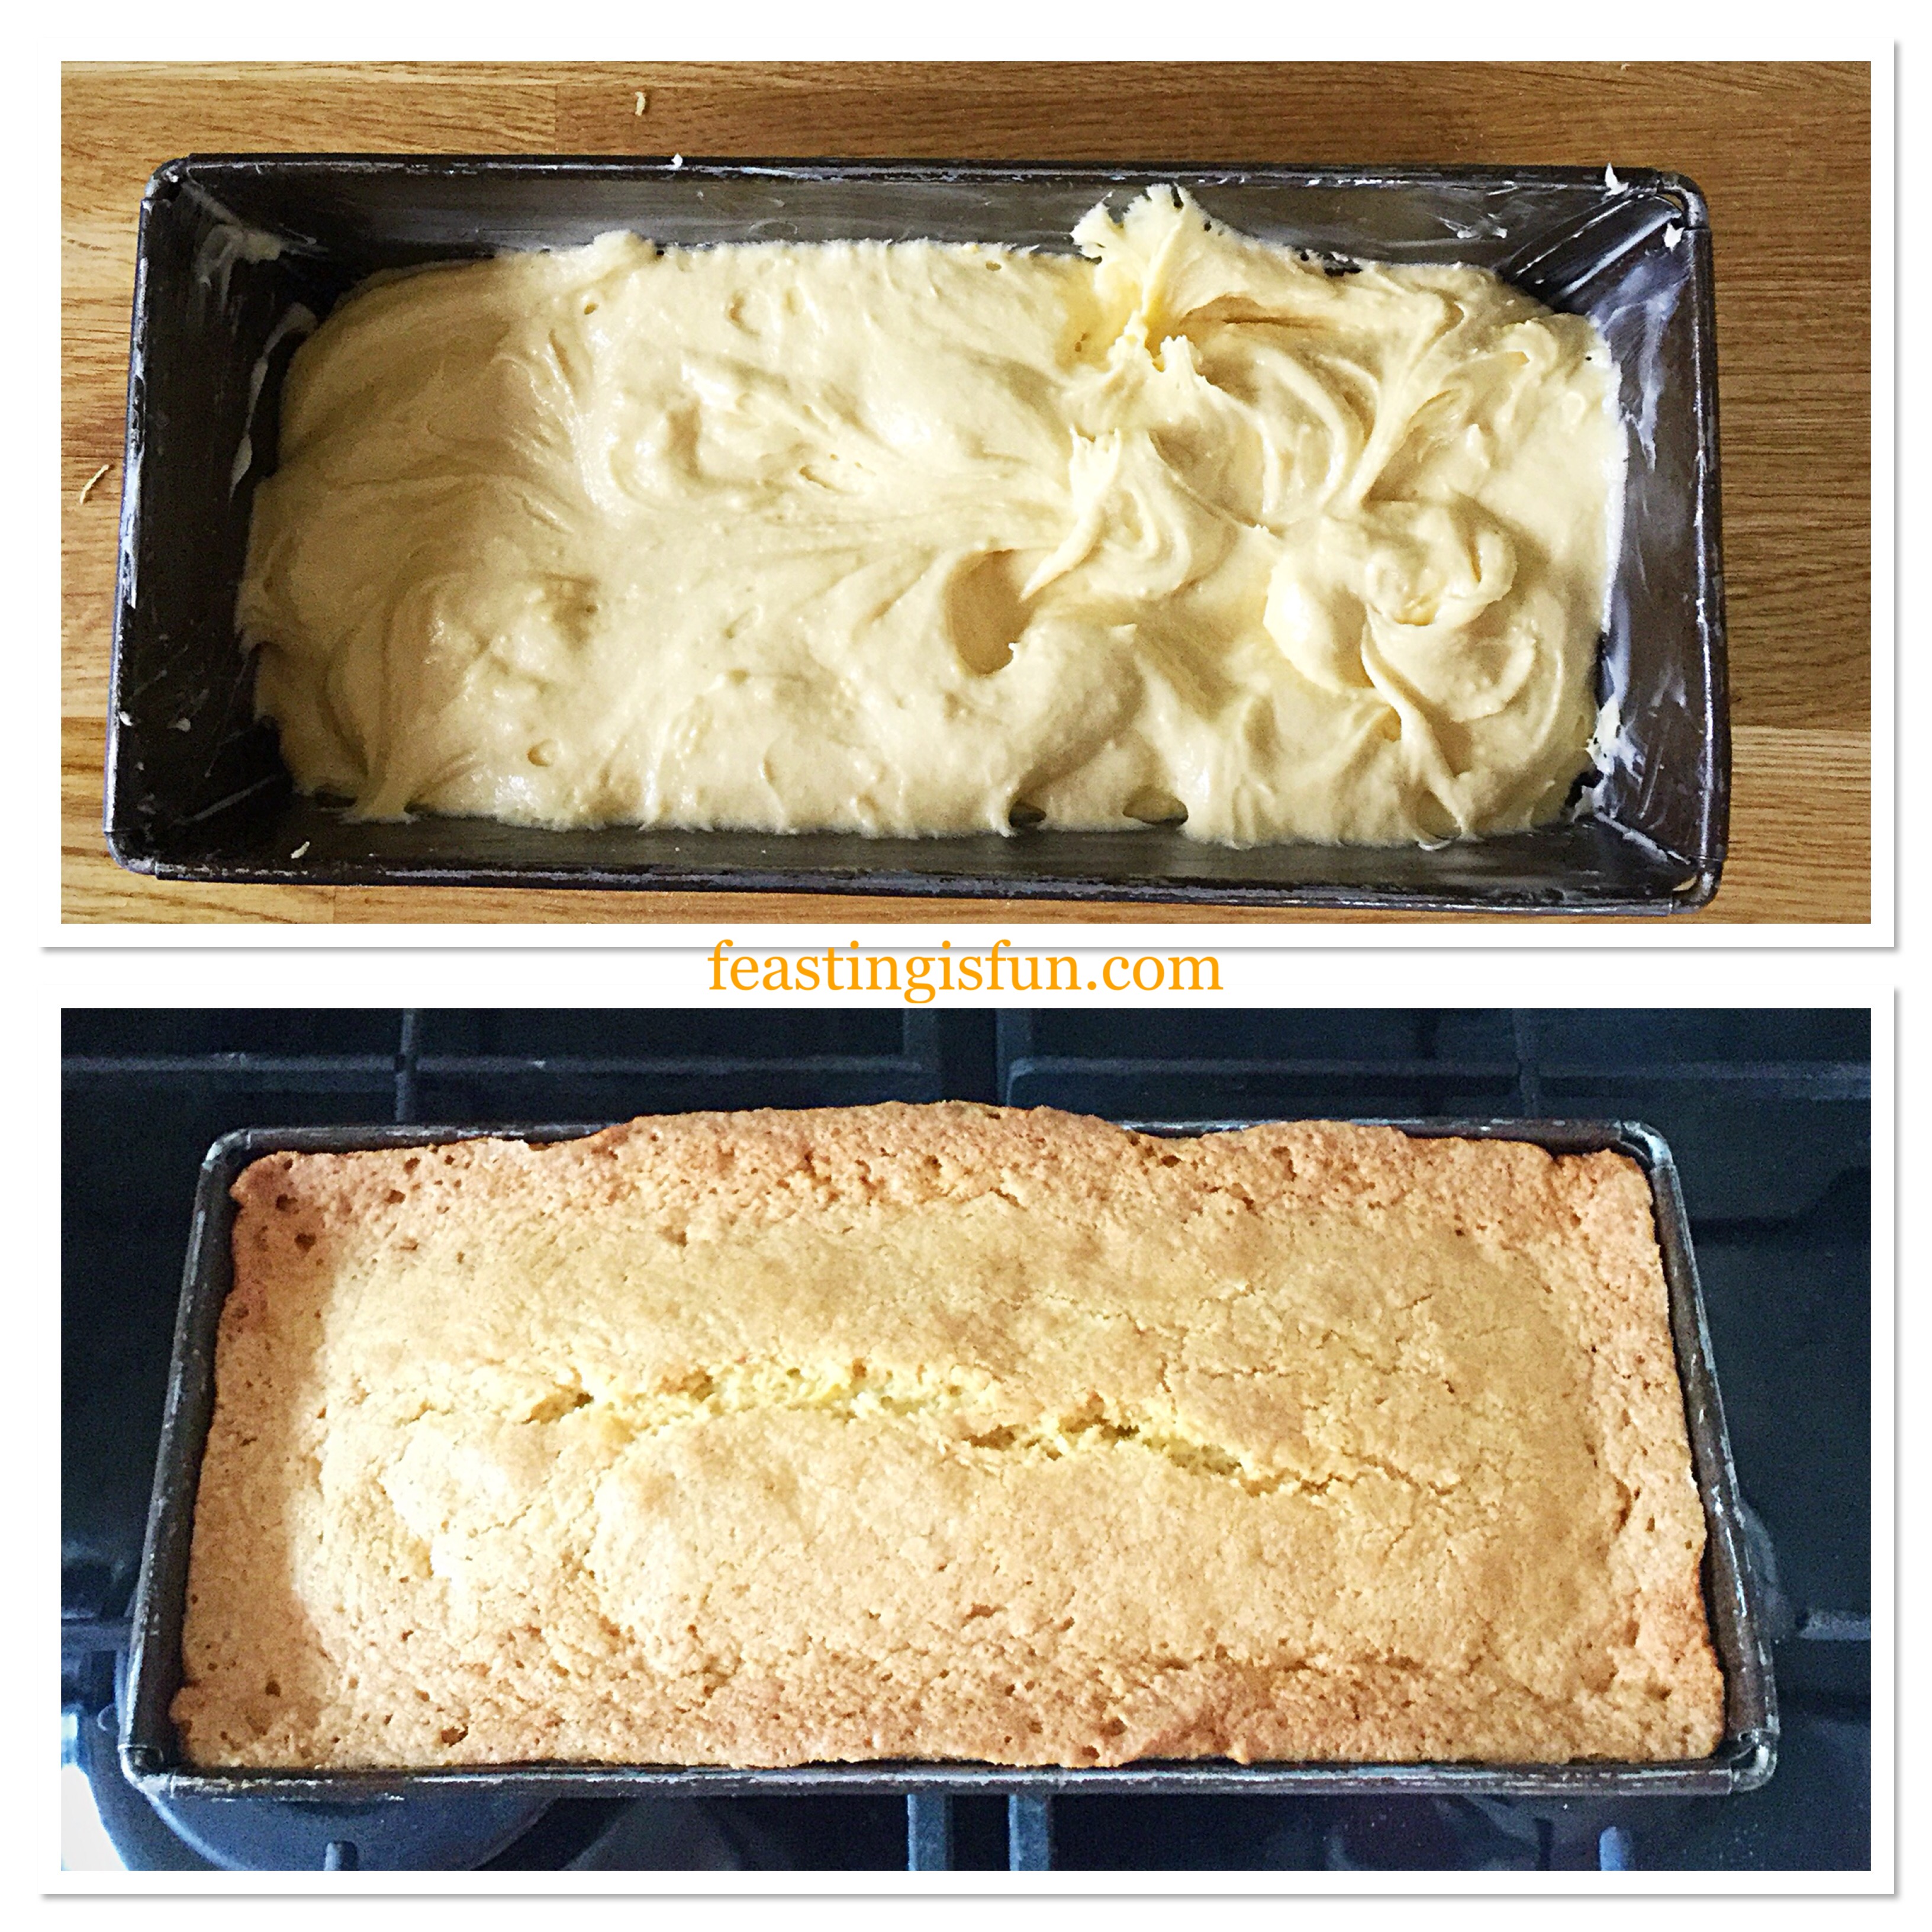
  • Spoon cake batter into the prepared tin making sure the top is level.
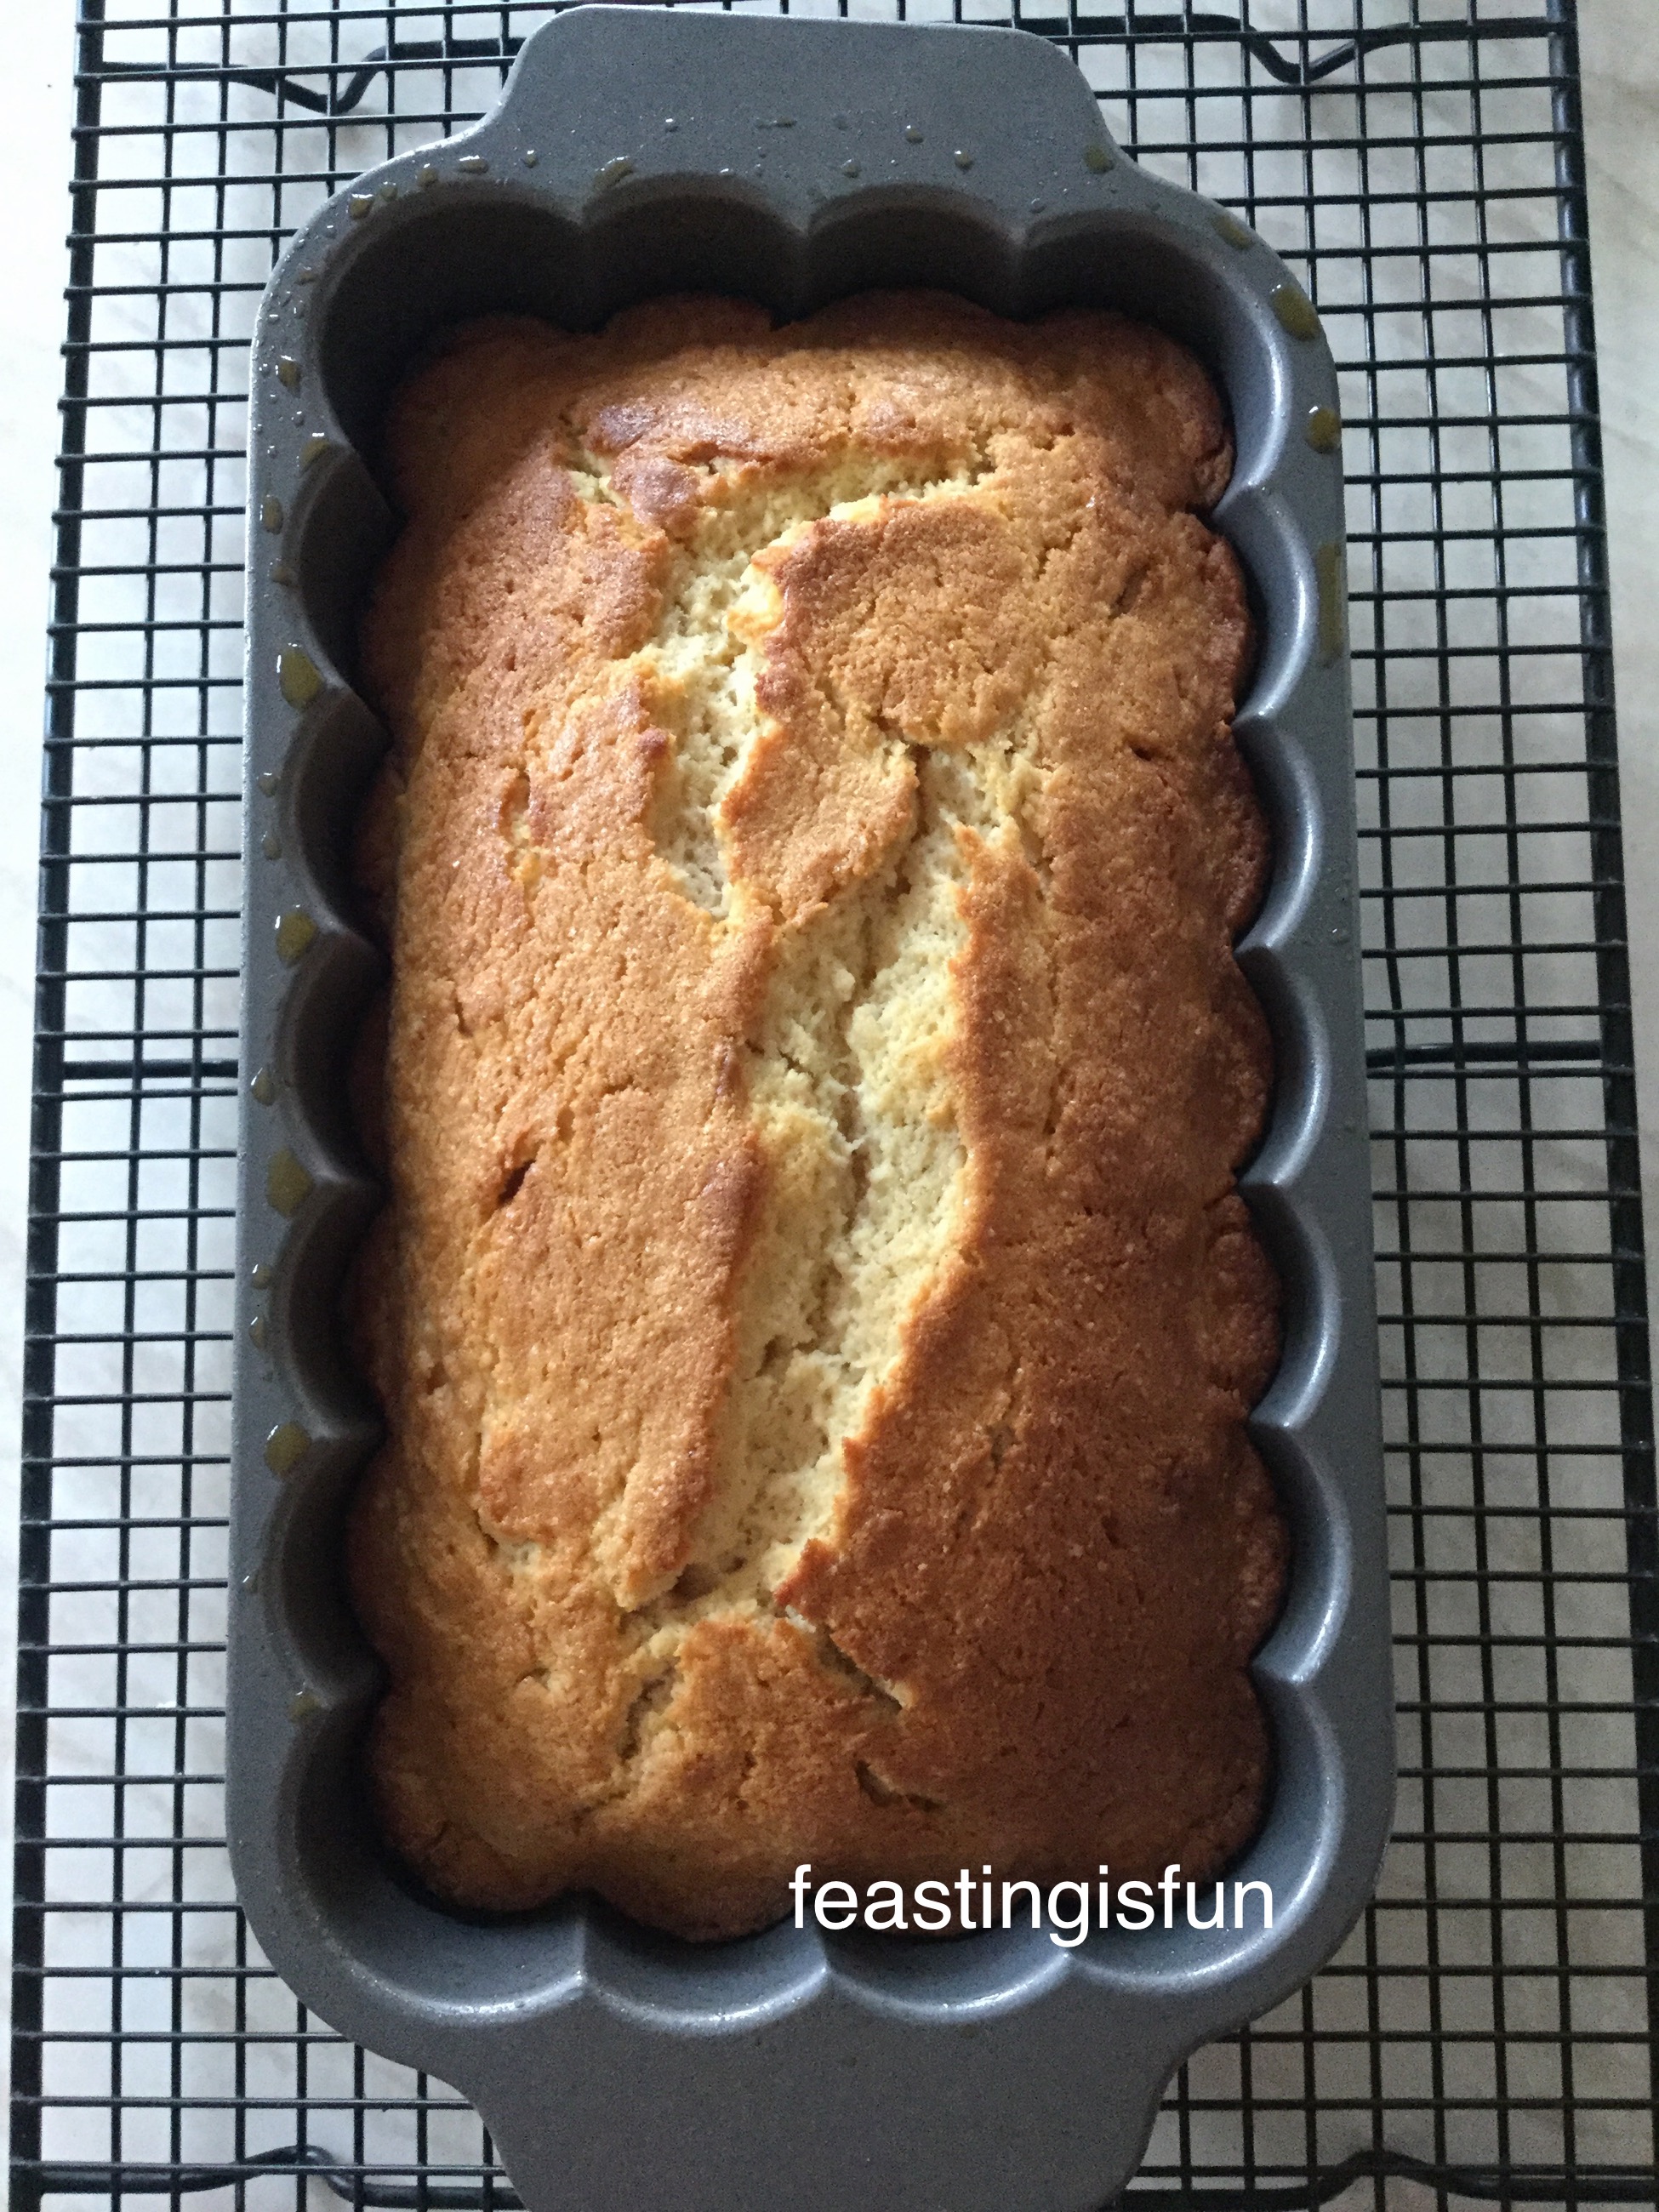
  • Place the cake tin into the middle of the oven and bake for 1 hour – 1 hour 15 minutes. My cake took 1 hour and 10 minutes to bake.
  • The cake is baked when golden brown and an inserted skewer comes out clean.
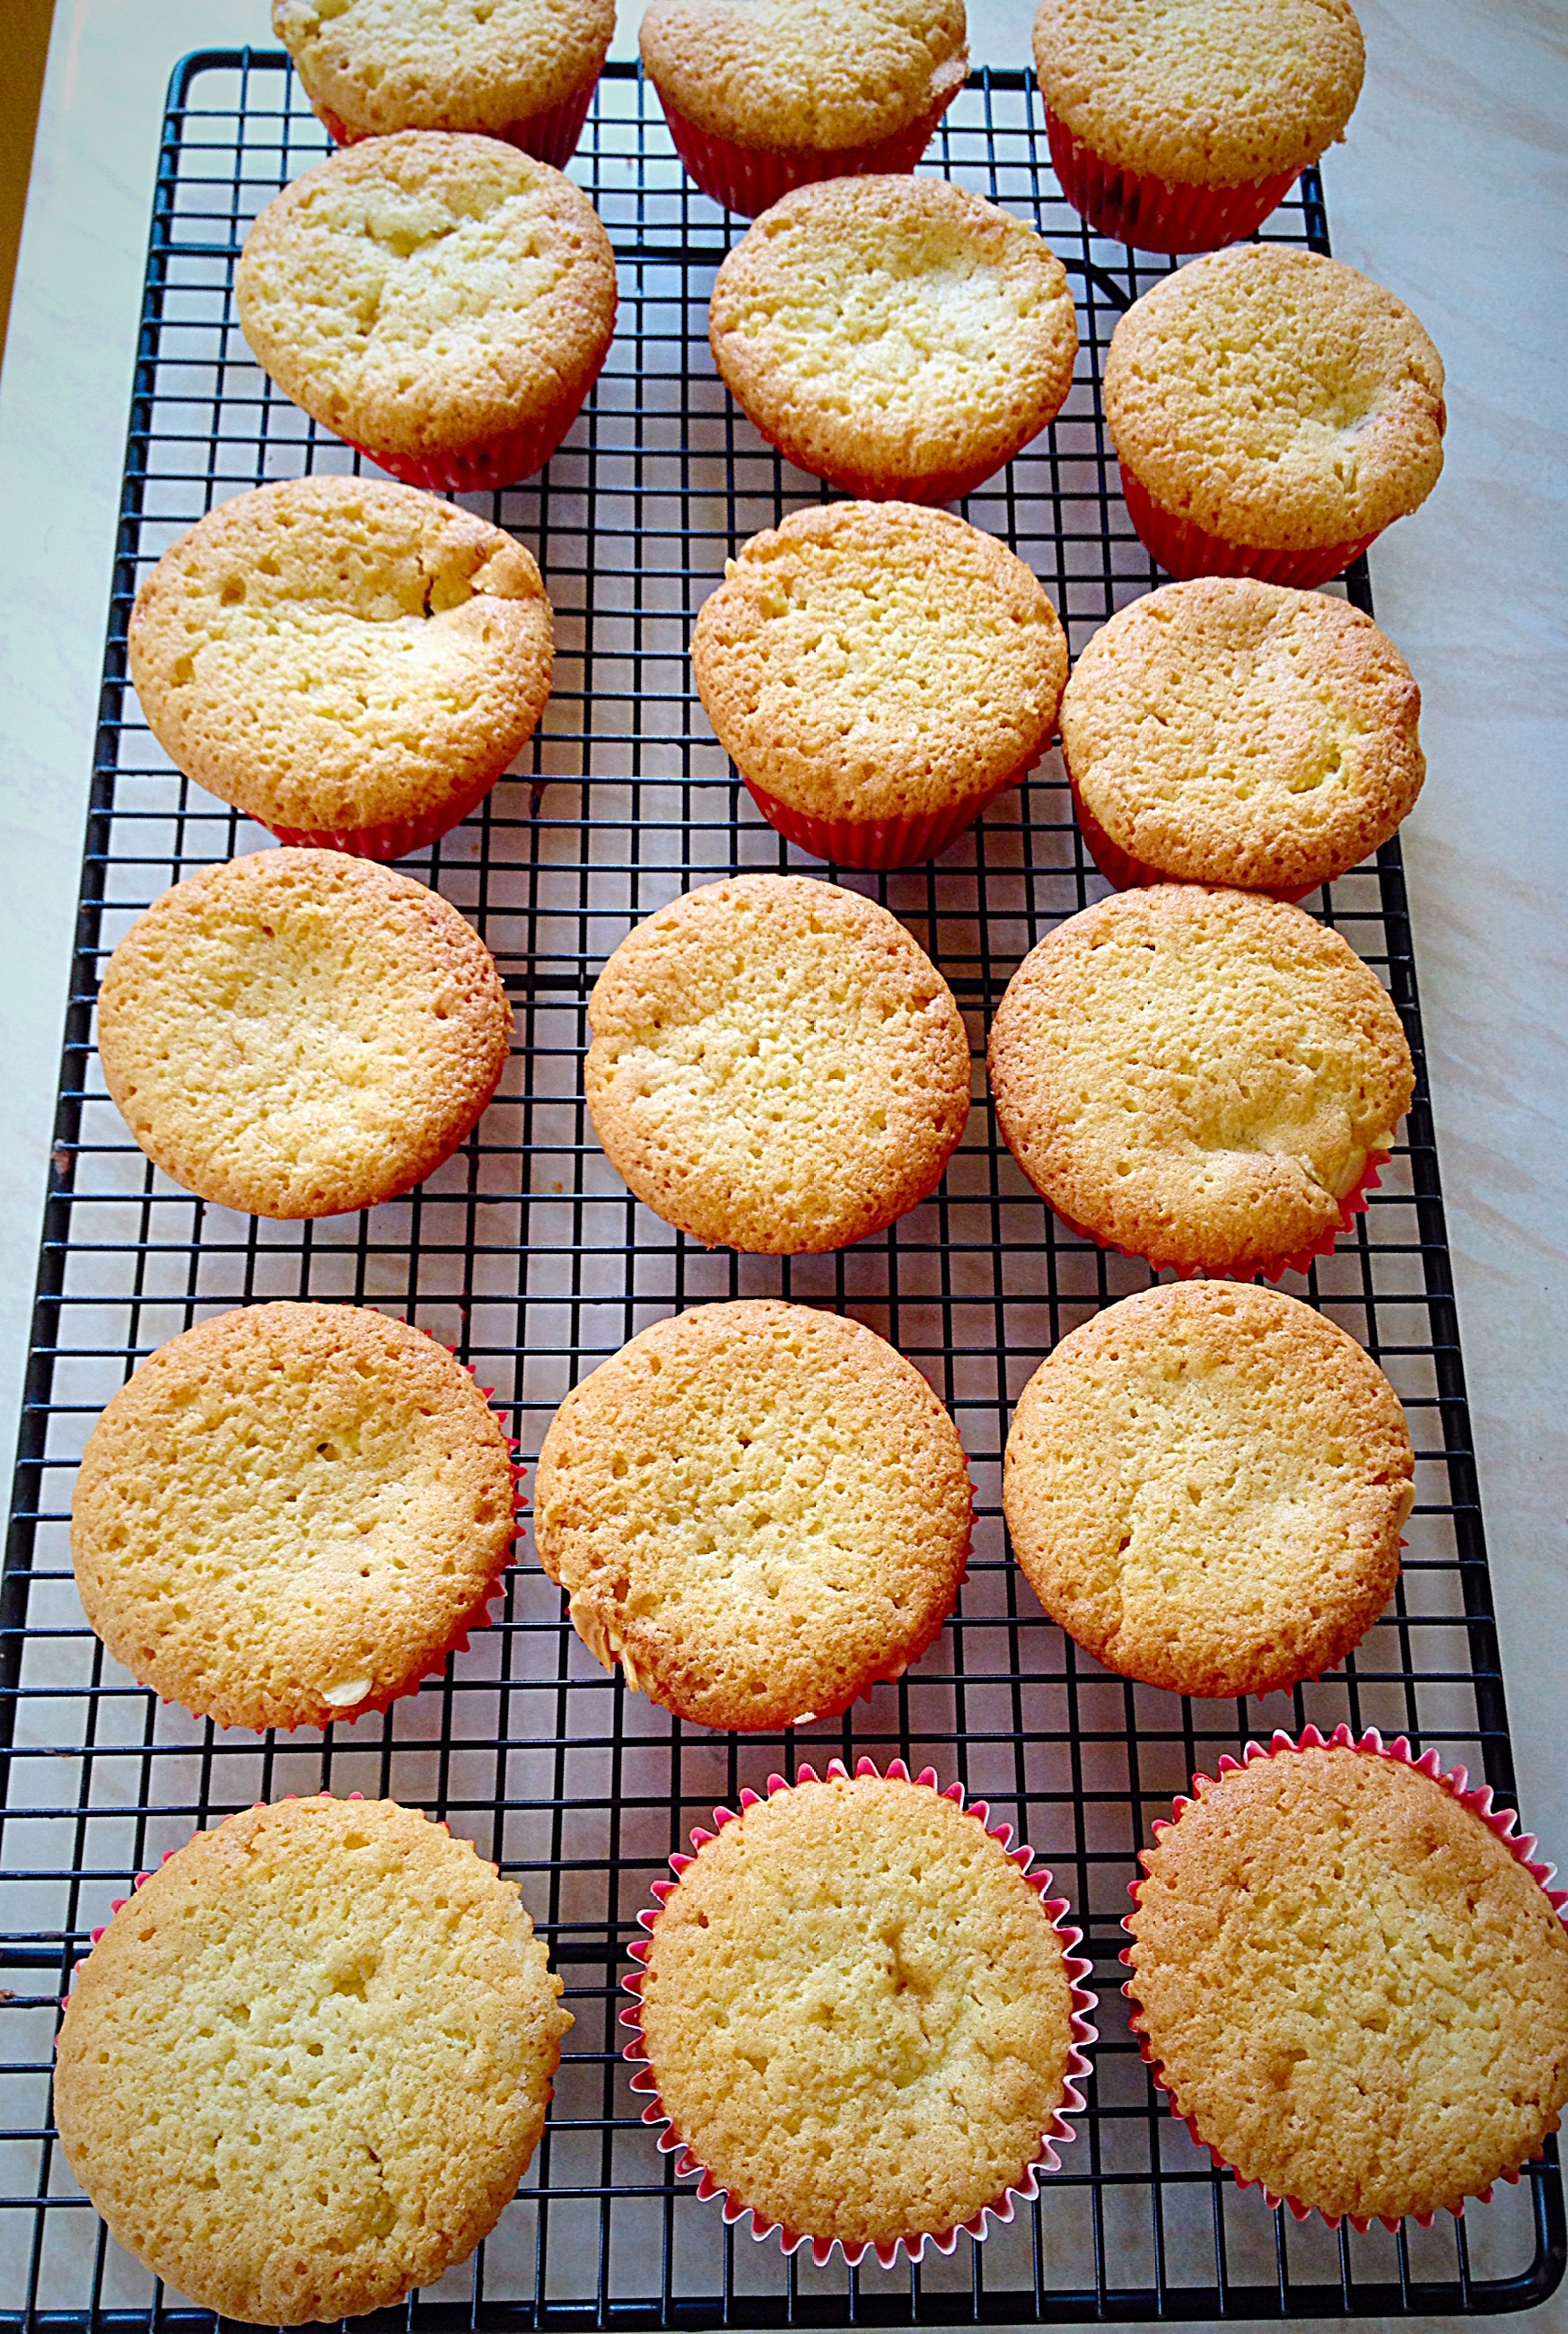
  • As soon as the cake is baked remove from the oven and allow to cool in the tin.
FF Iced Cherry Coconut Loaf Cake
Baking the cherry coconut loaf cake.
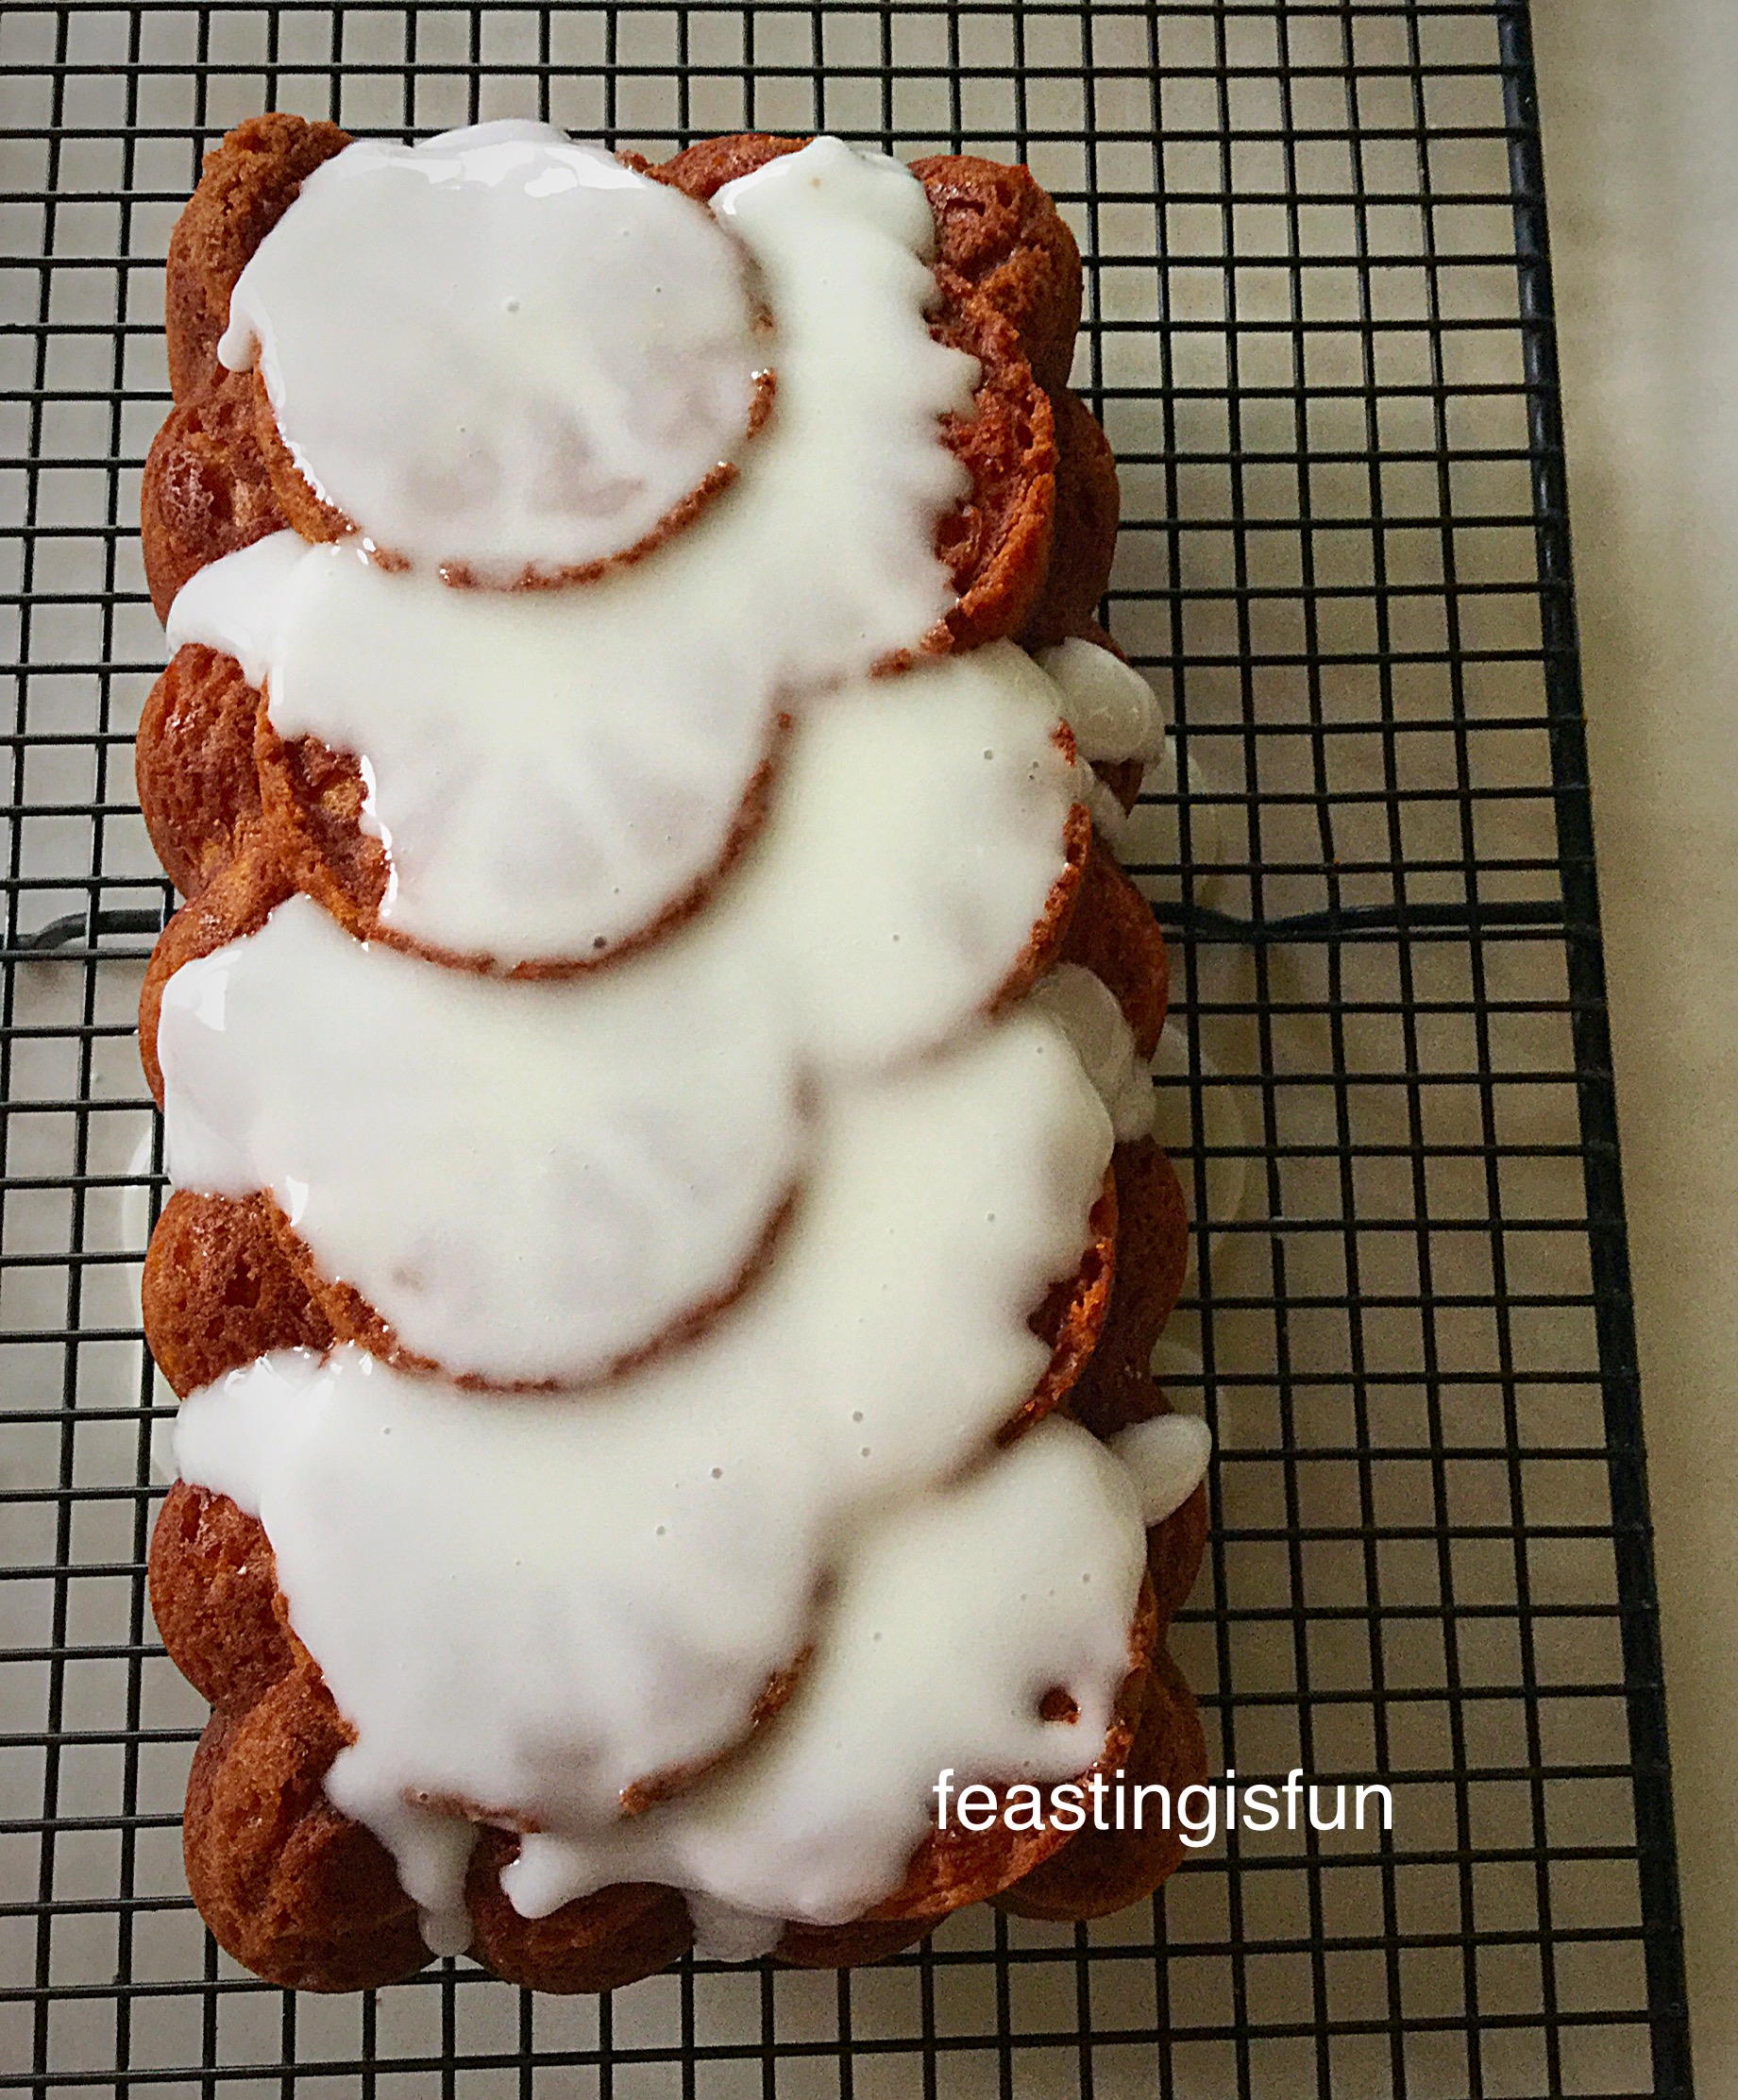
  • Once the cake has cooled run a palette knife around the inside of the tin. Turn out the cake, remove the baking parchment and place on a rack over a baking tray.

Decorating The Loaf Cake

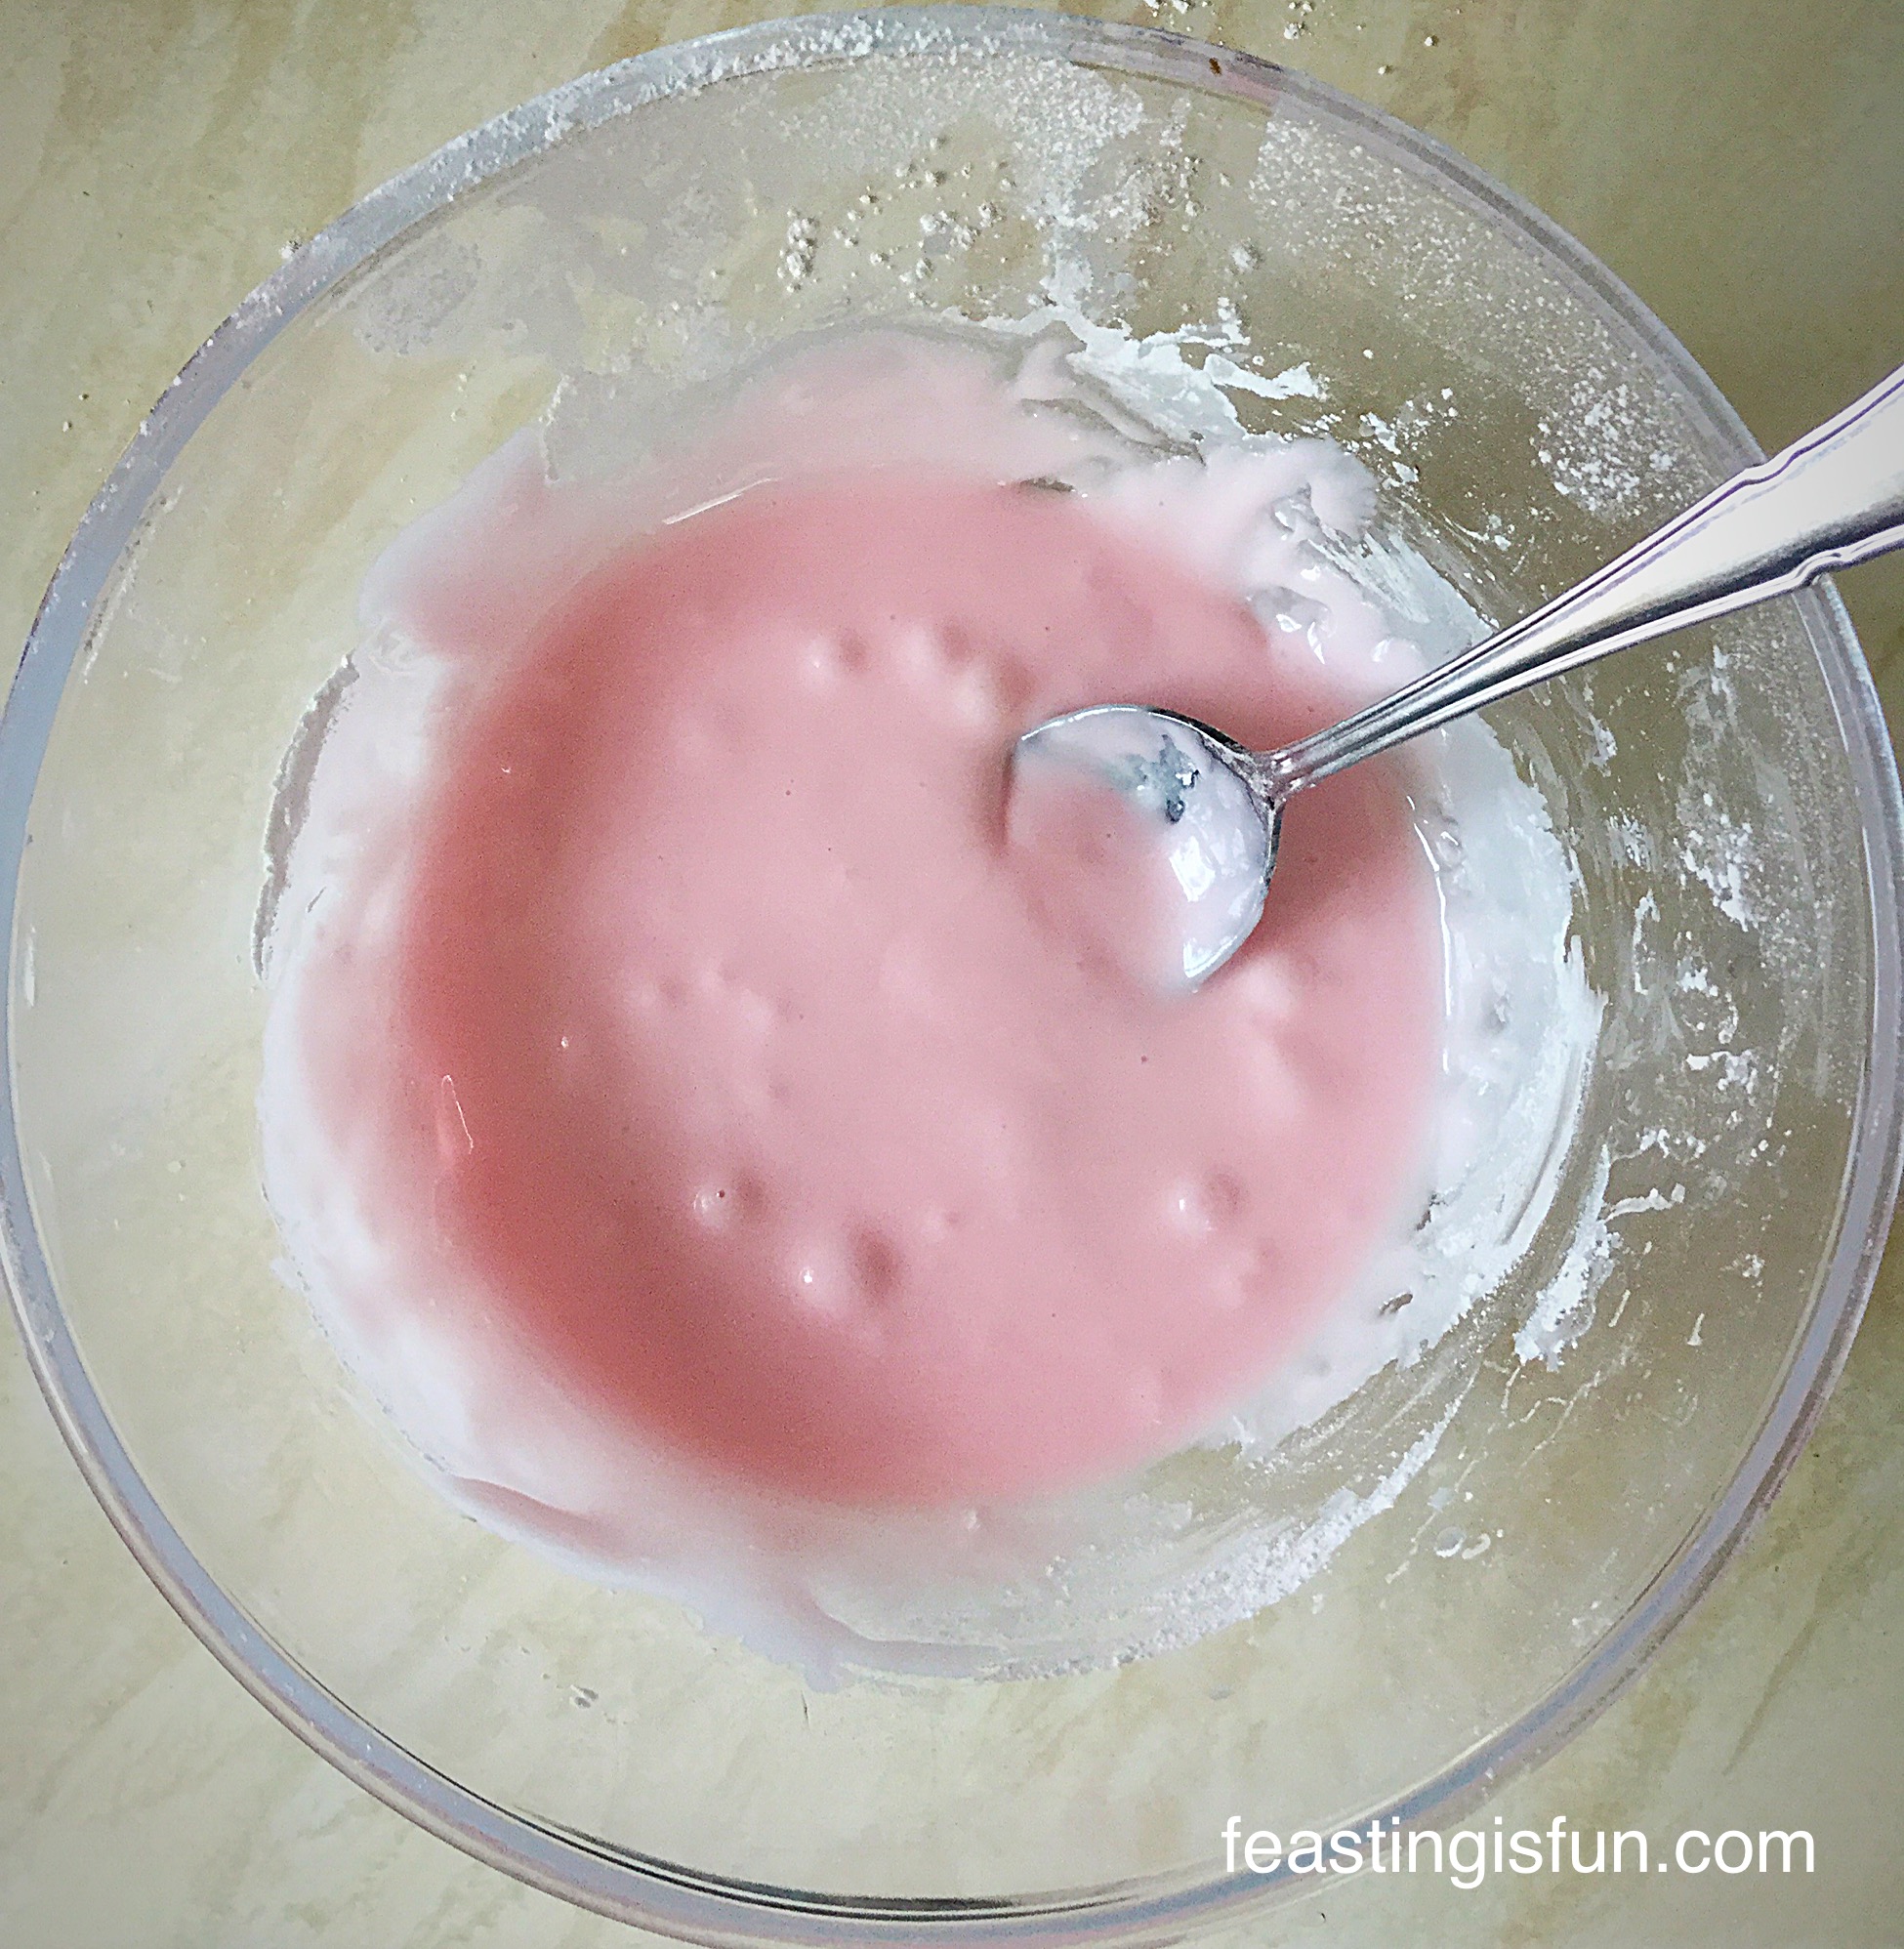
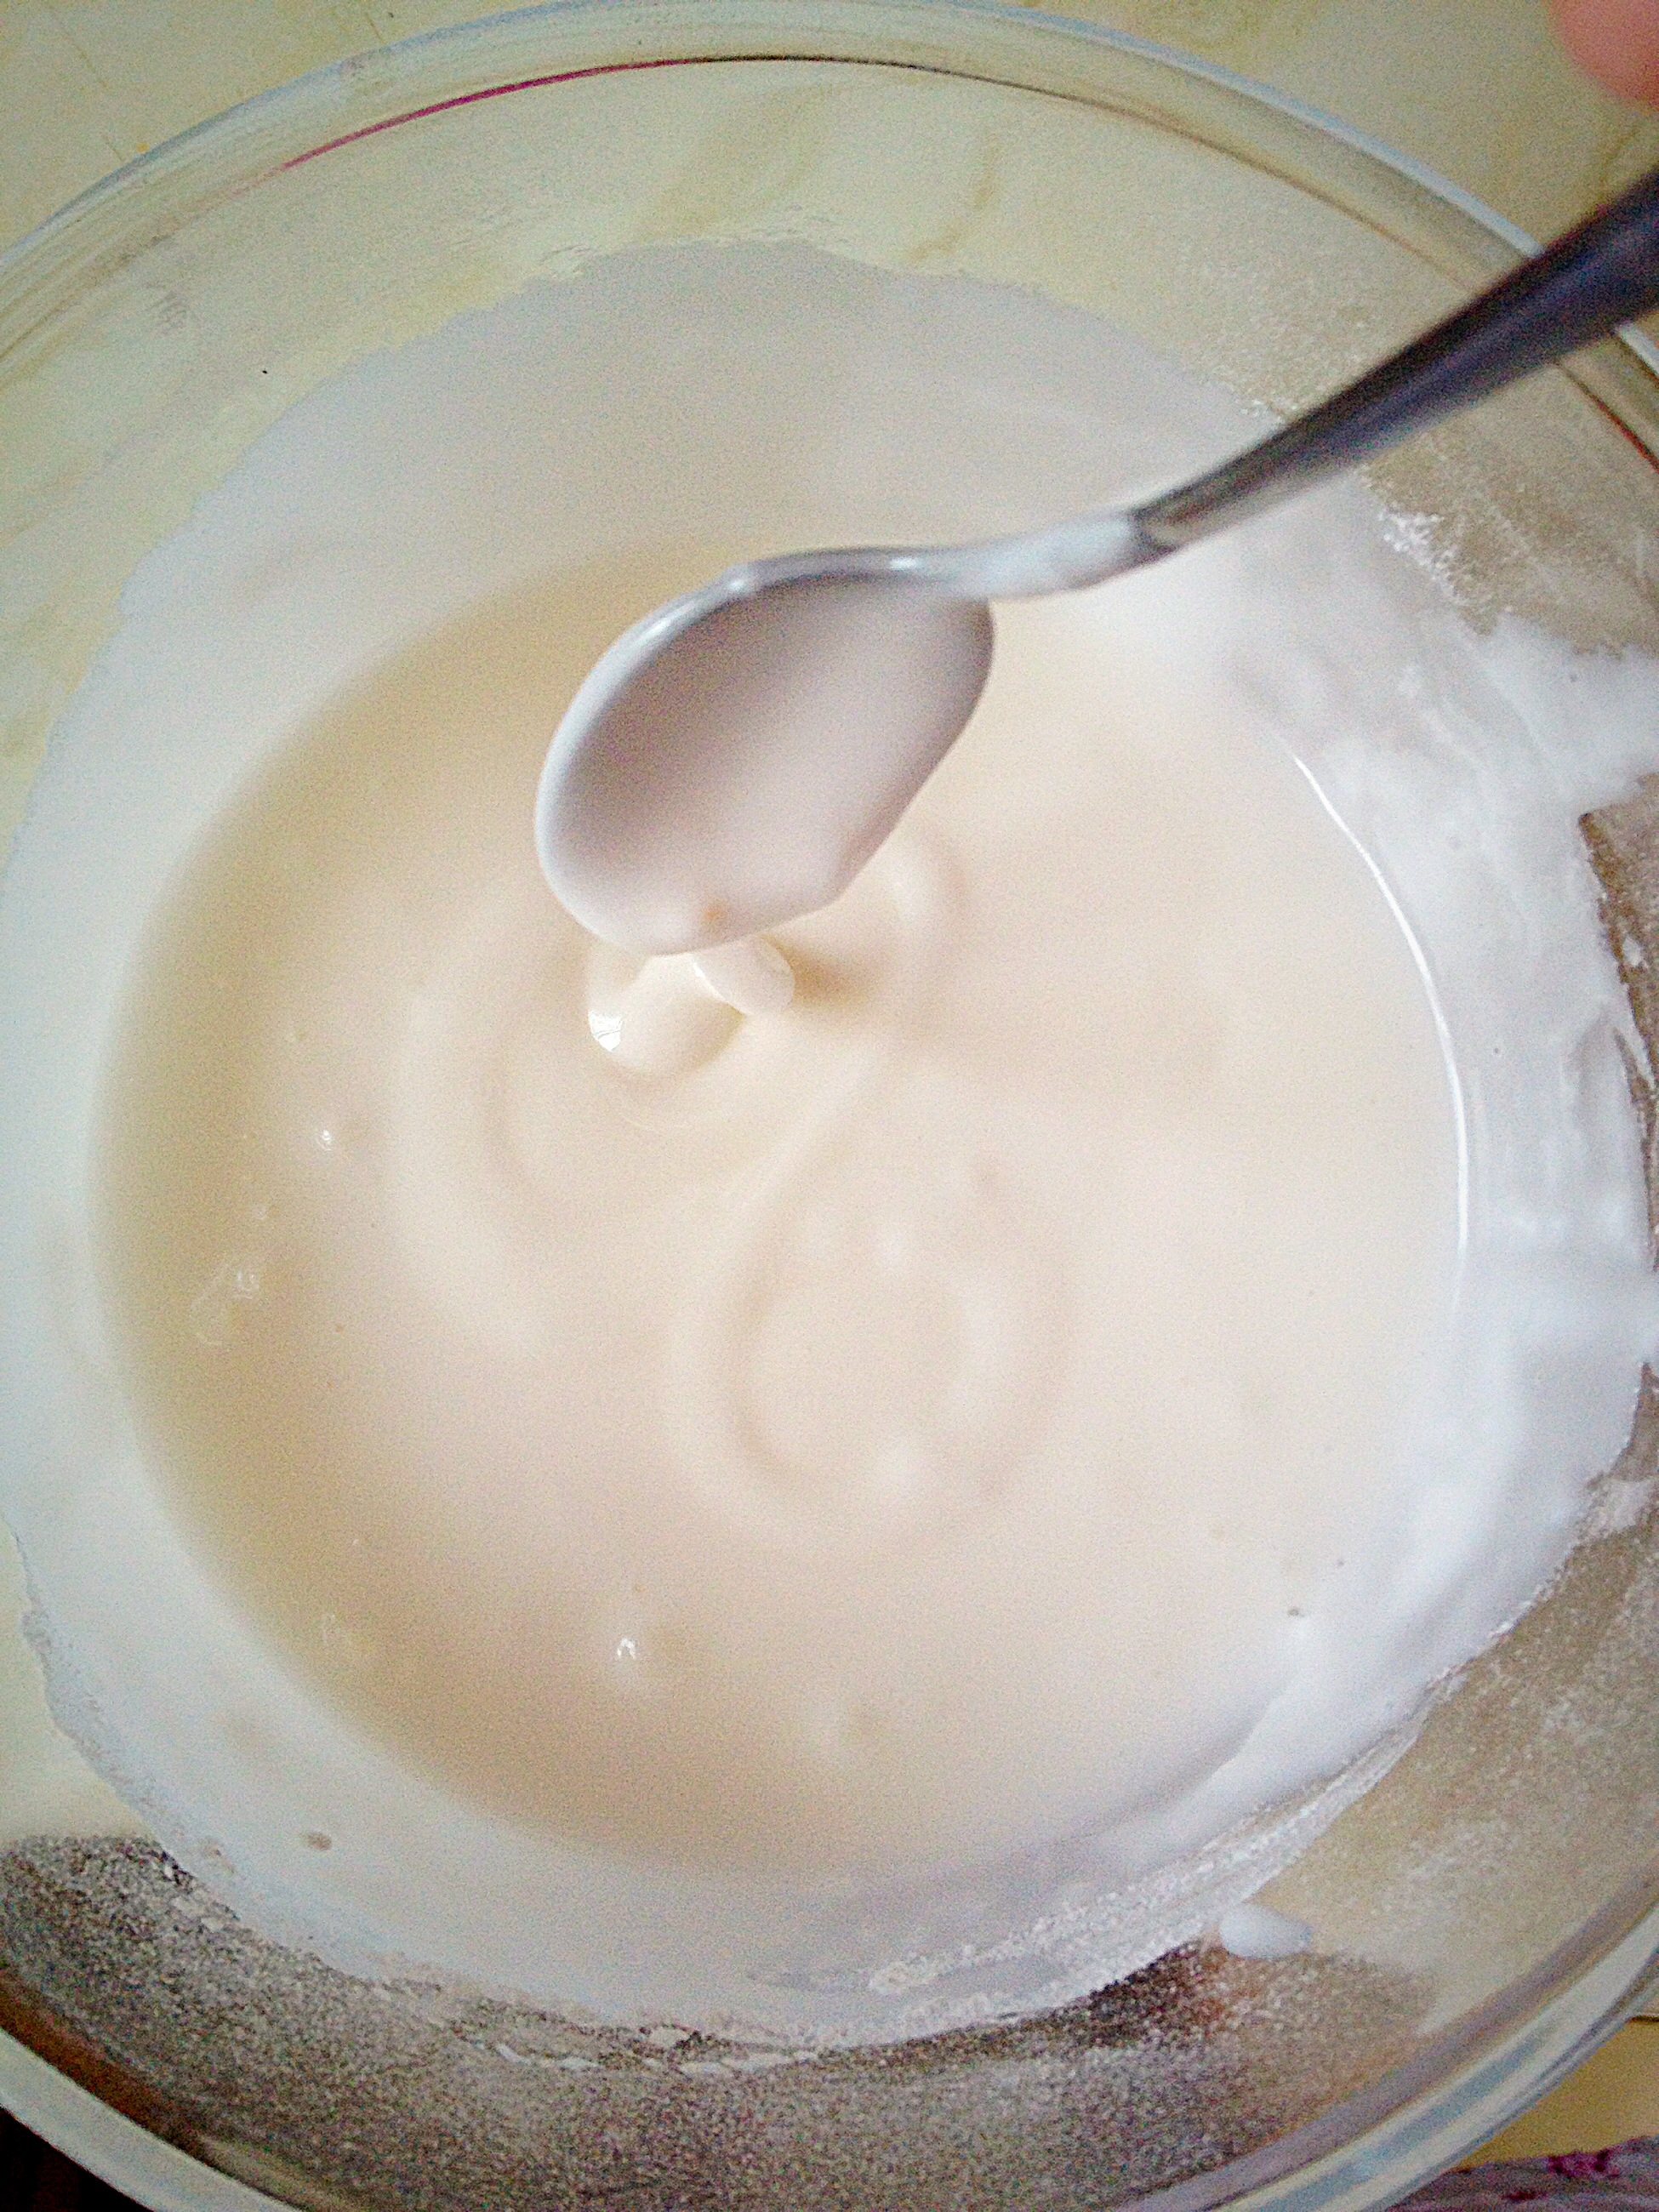
  • Use a whisk to mix the icing sugar and water.
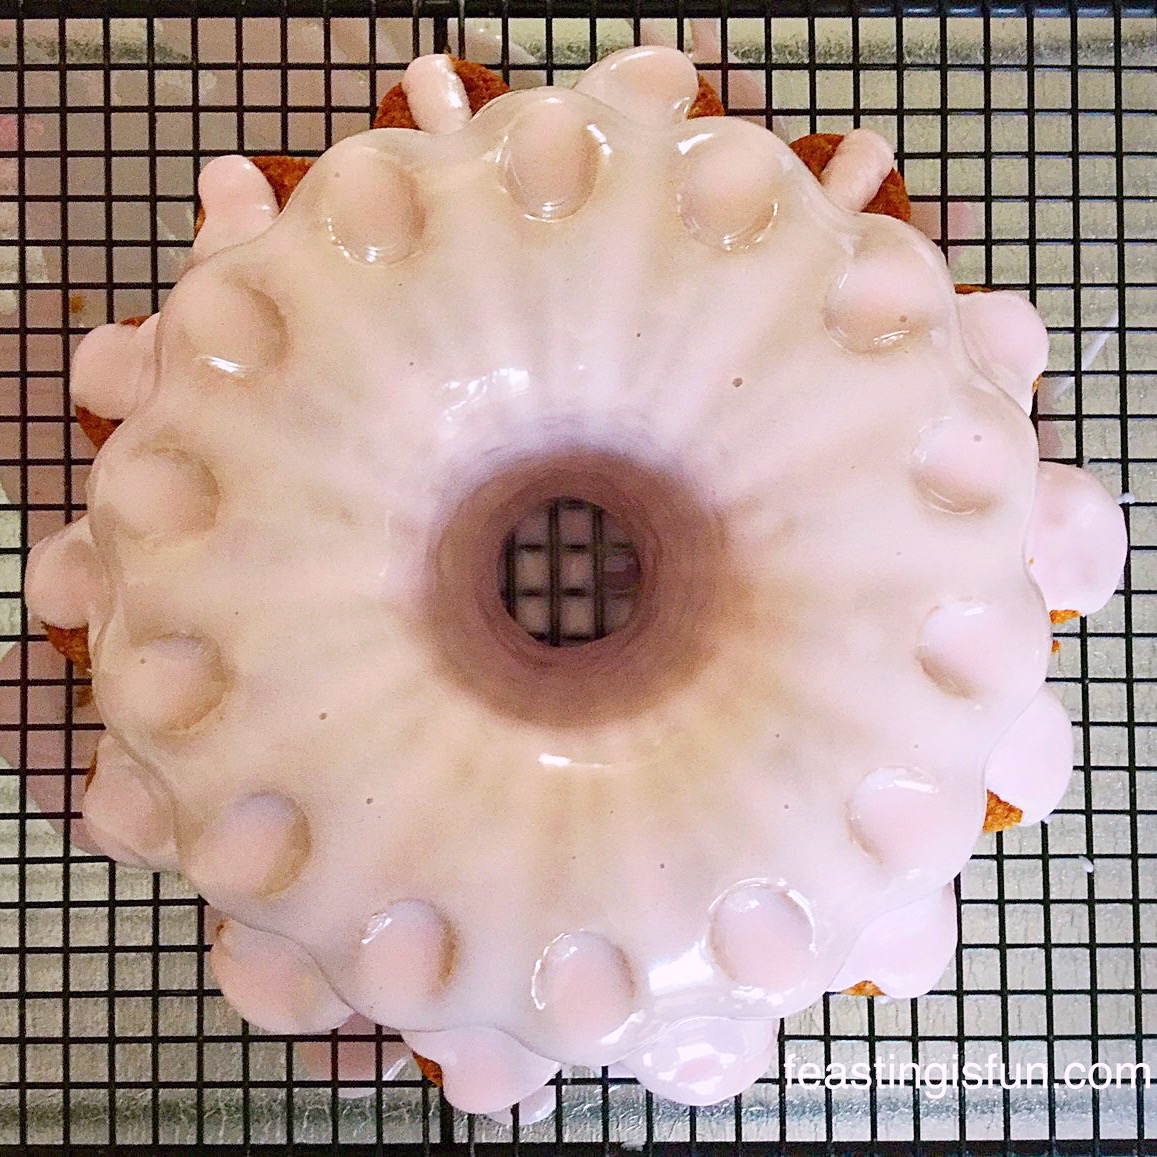
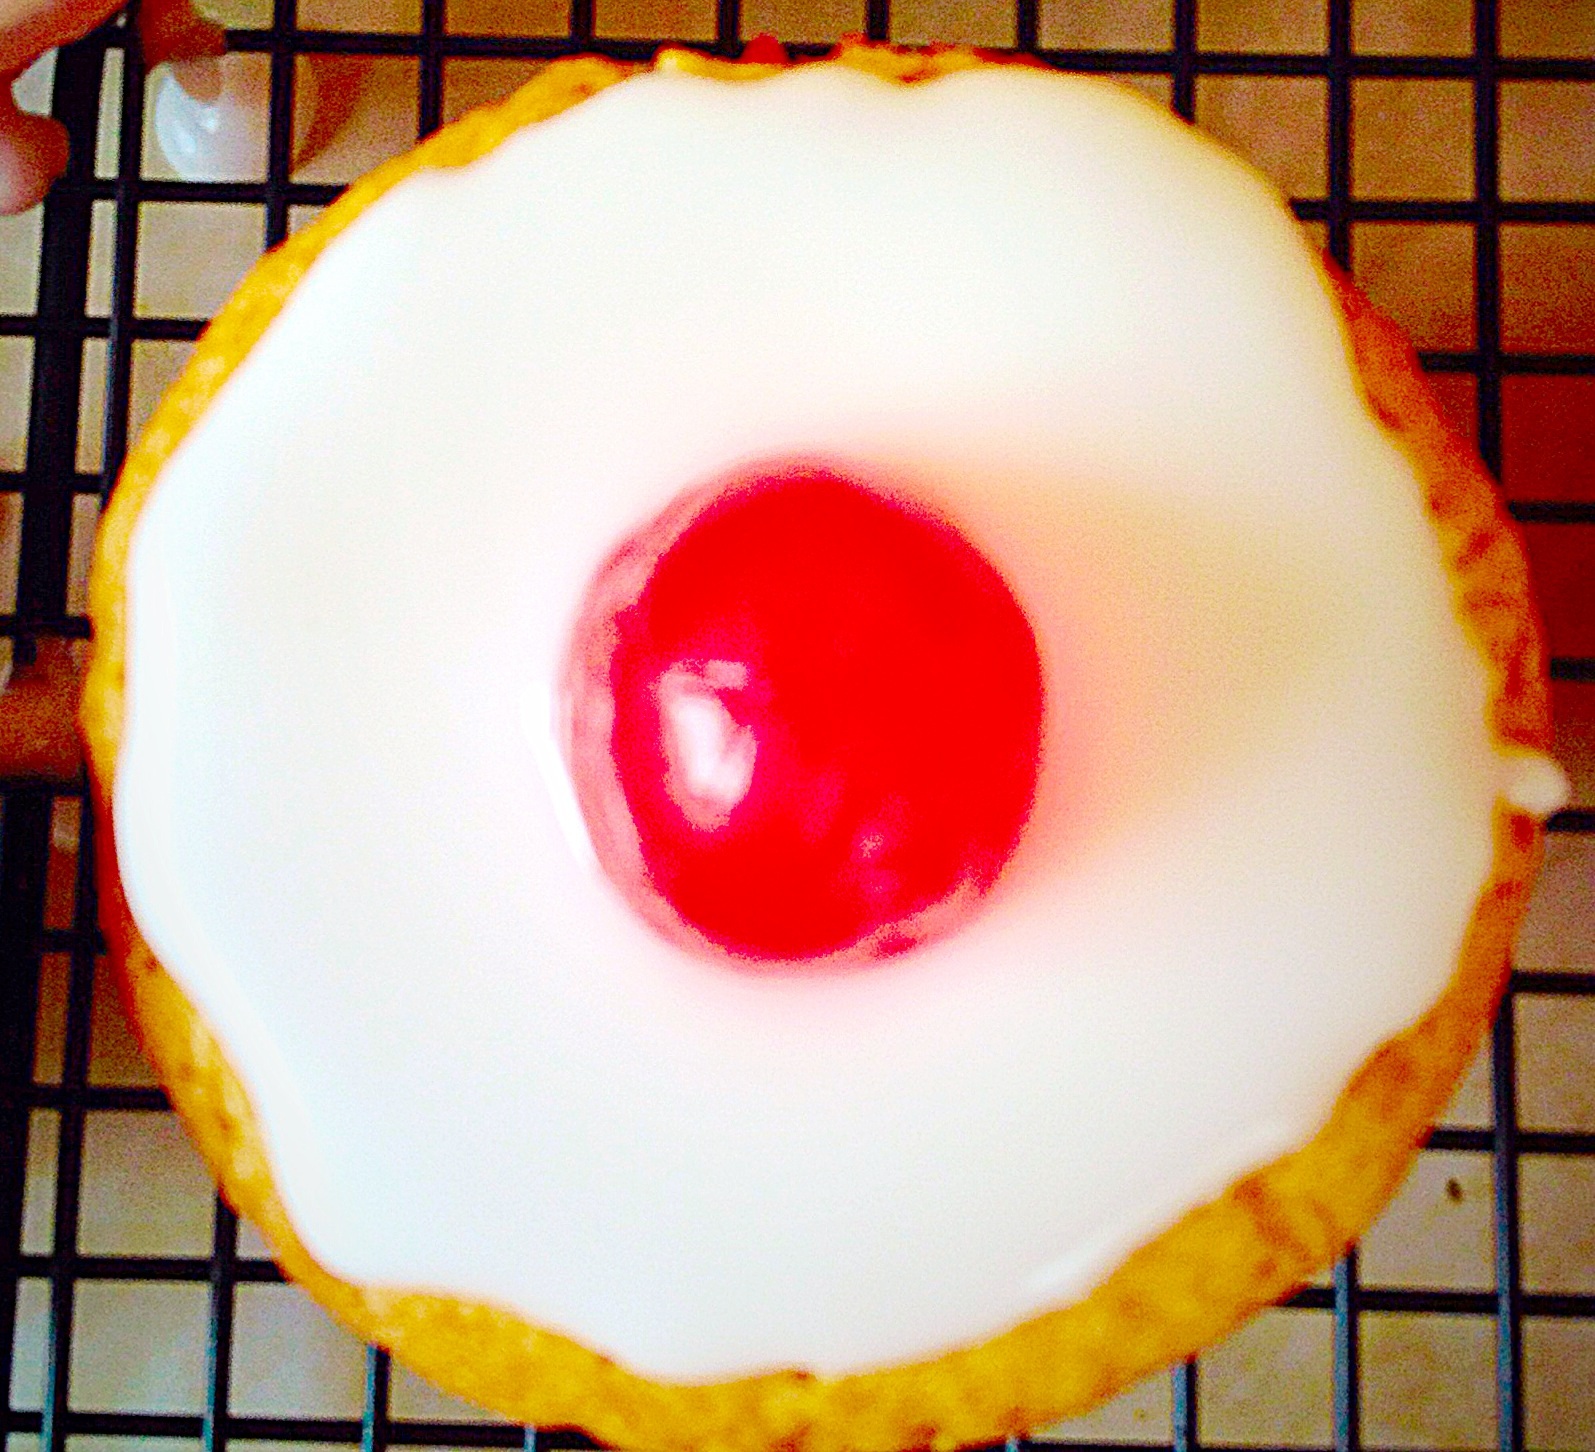
  • Spoon the thick glacé icing on to the top of the cake.
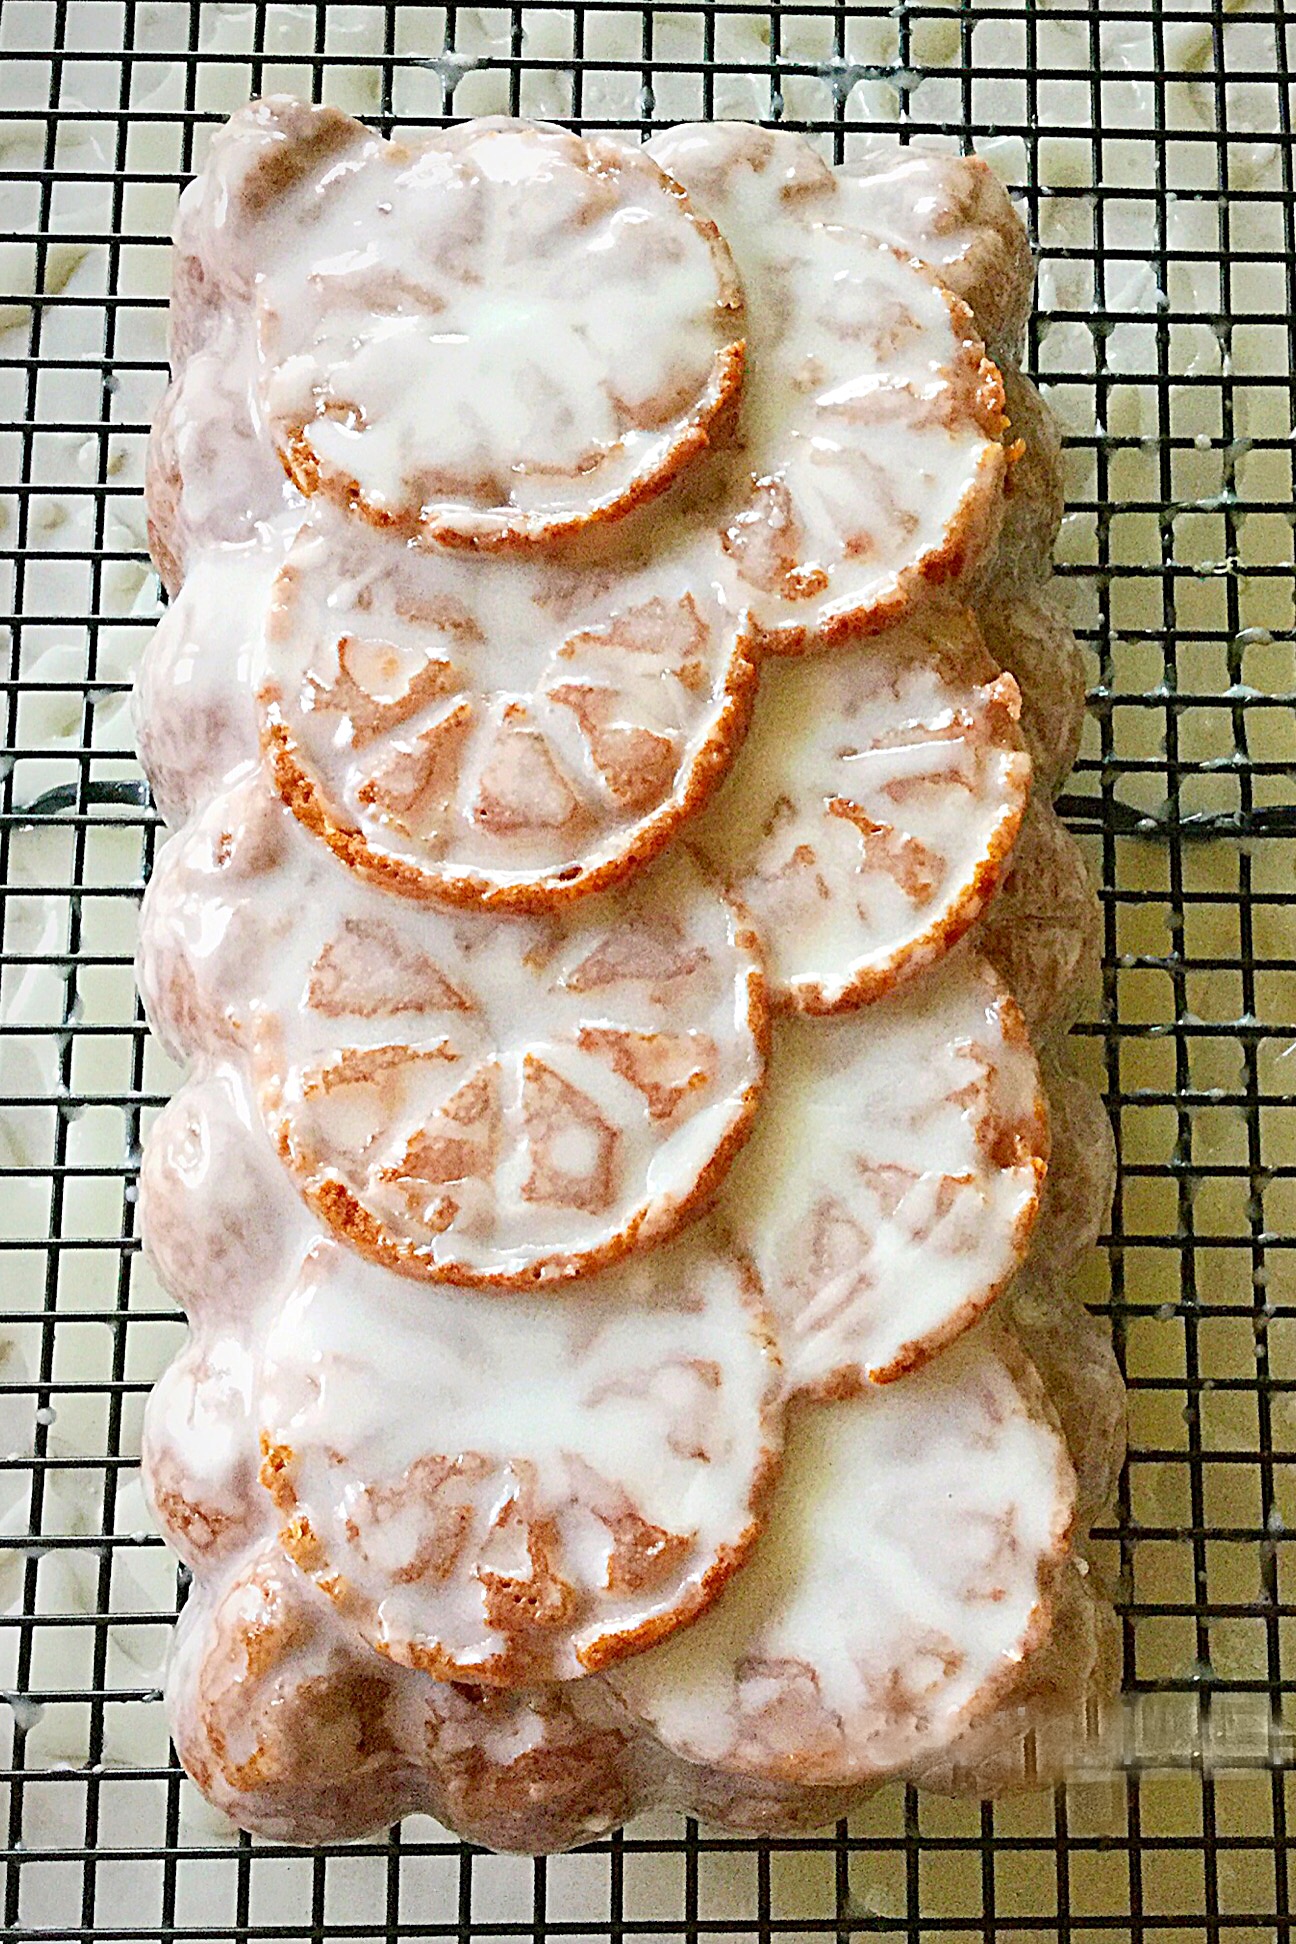
  • Add the glacé cherries to the iced cake.
FF Iced Cherry Coconut Loaf Cake
Decorating the Iced Cherry Coconut Loaf Cake.
  • Finally sprinkle over red sugar balls before the icing sets.
FF Iced Cherry Coconut Loaf Cake
The finished Iced Cherry Coconut Loaf Cake.
  • Put the cake to one side and leave to set.
FF Iced Cherry Coconut Loaf Cake
Iced Cherry Coconut Loaf Cake

Serve sliced and placed on your very best china, along with a freshly made pot of tea.

Store in an airtight container. Eat within 5 days.

If you have enjoyed this recipe for Iced Cherry Coconut Loaf Cake you may also like these:

Black Forest Cupcakes

FF Iced Cherry Coconut Loaf Cake
Black Forest Cupcakes

Iced Bakewell Tart

FF Iced Cherry Coconut Loaf Cake
Iced Bakewell Tart.

Strawberry Sweetheart Cake

FF Iced Cherry Coconut Loaf Cake
Strawberry Sweetheart Cake

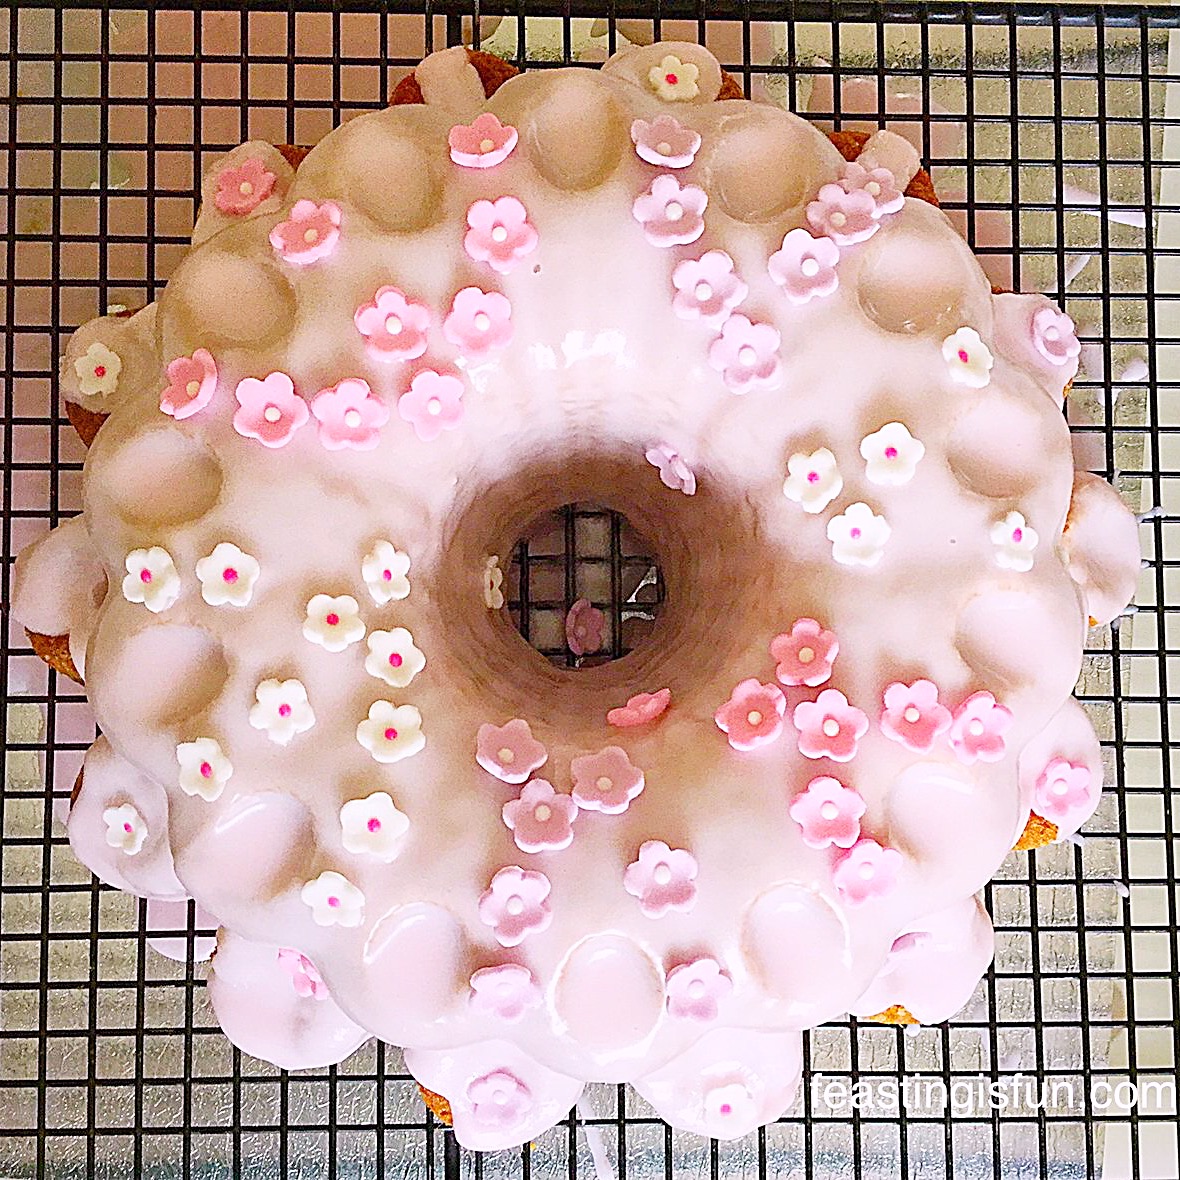
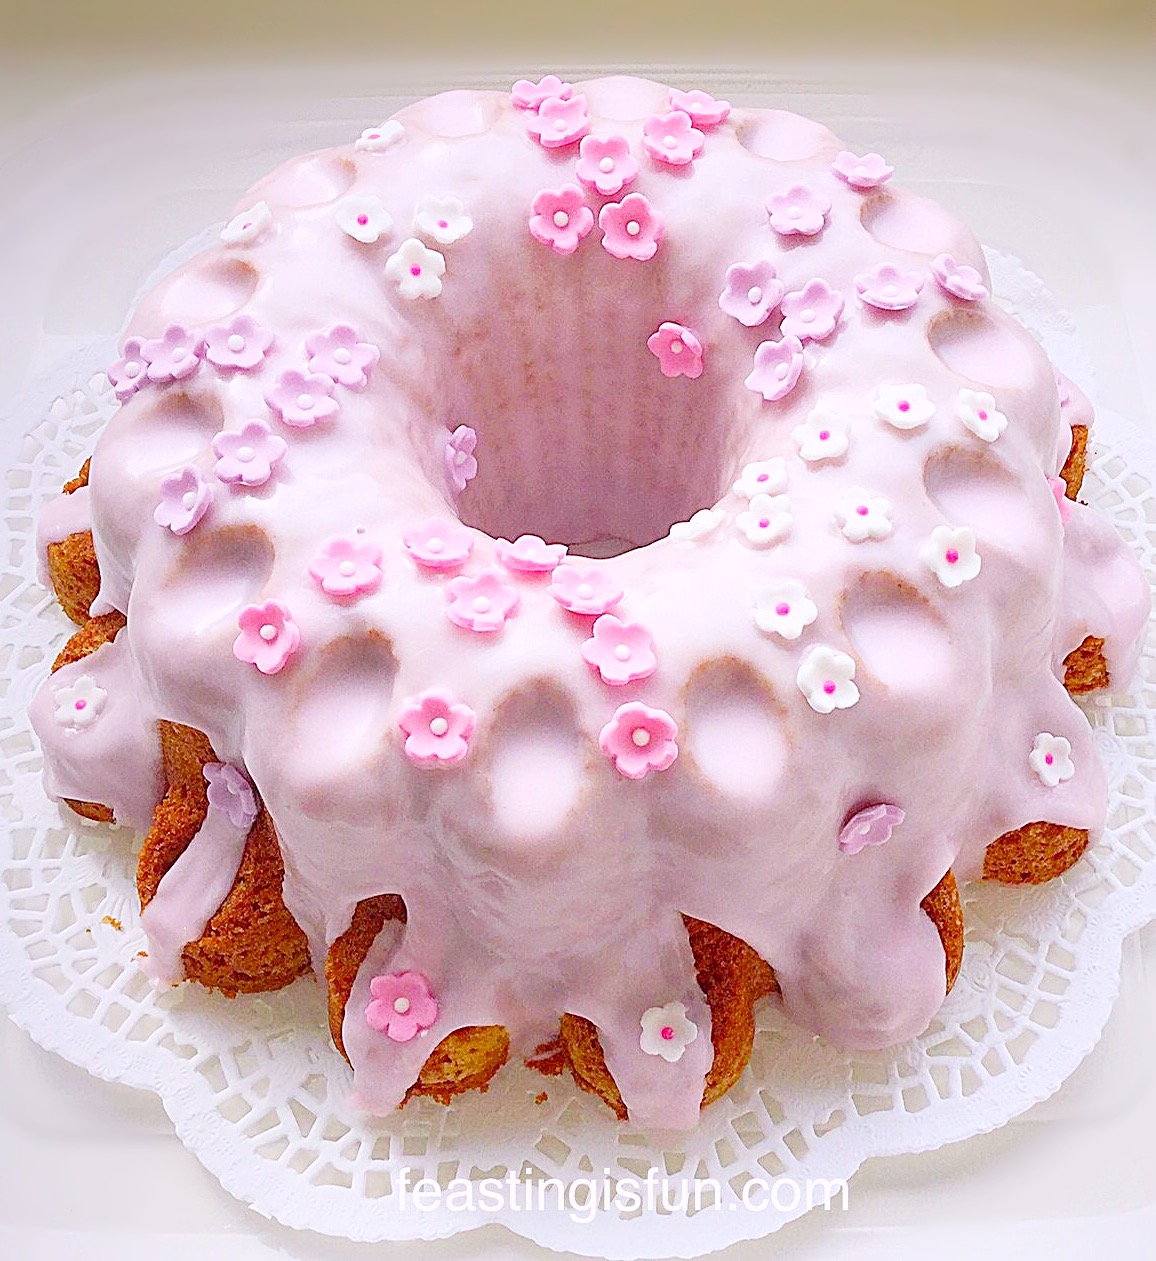
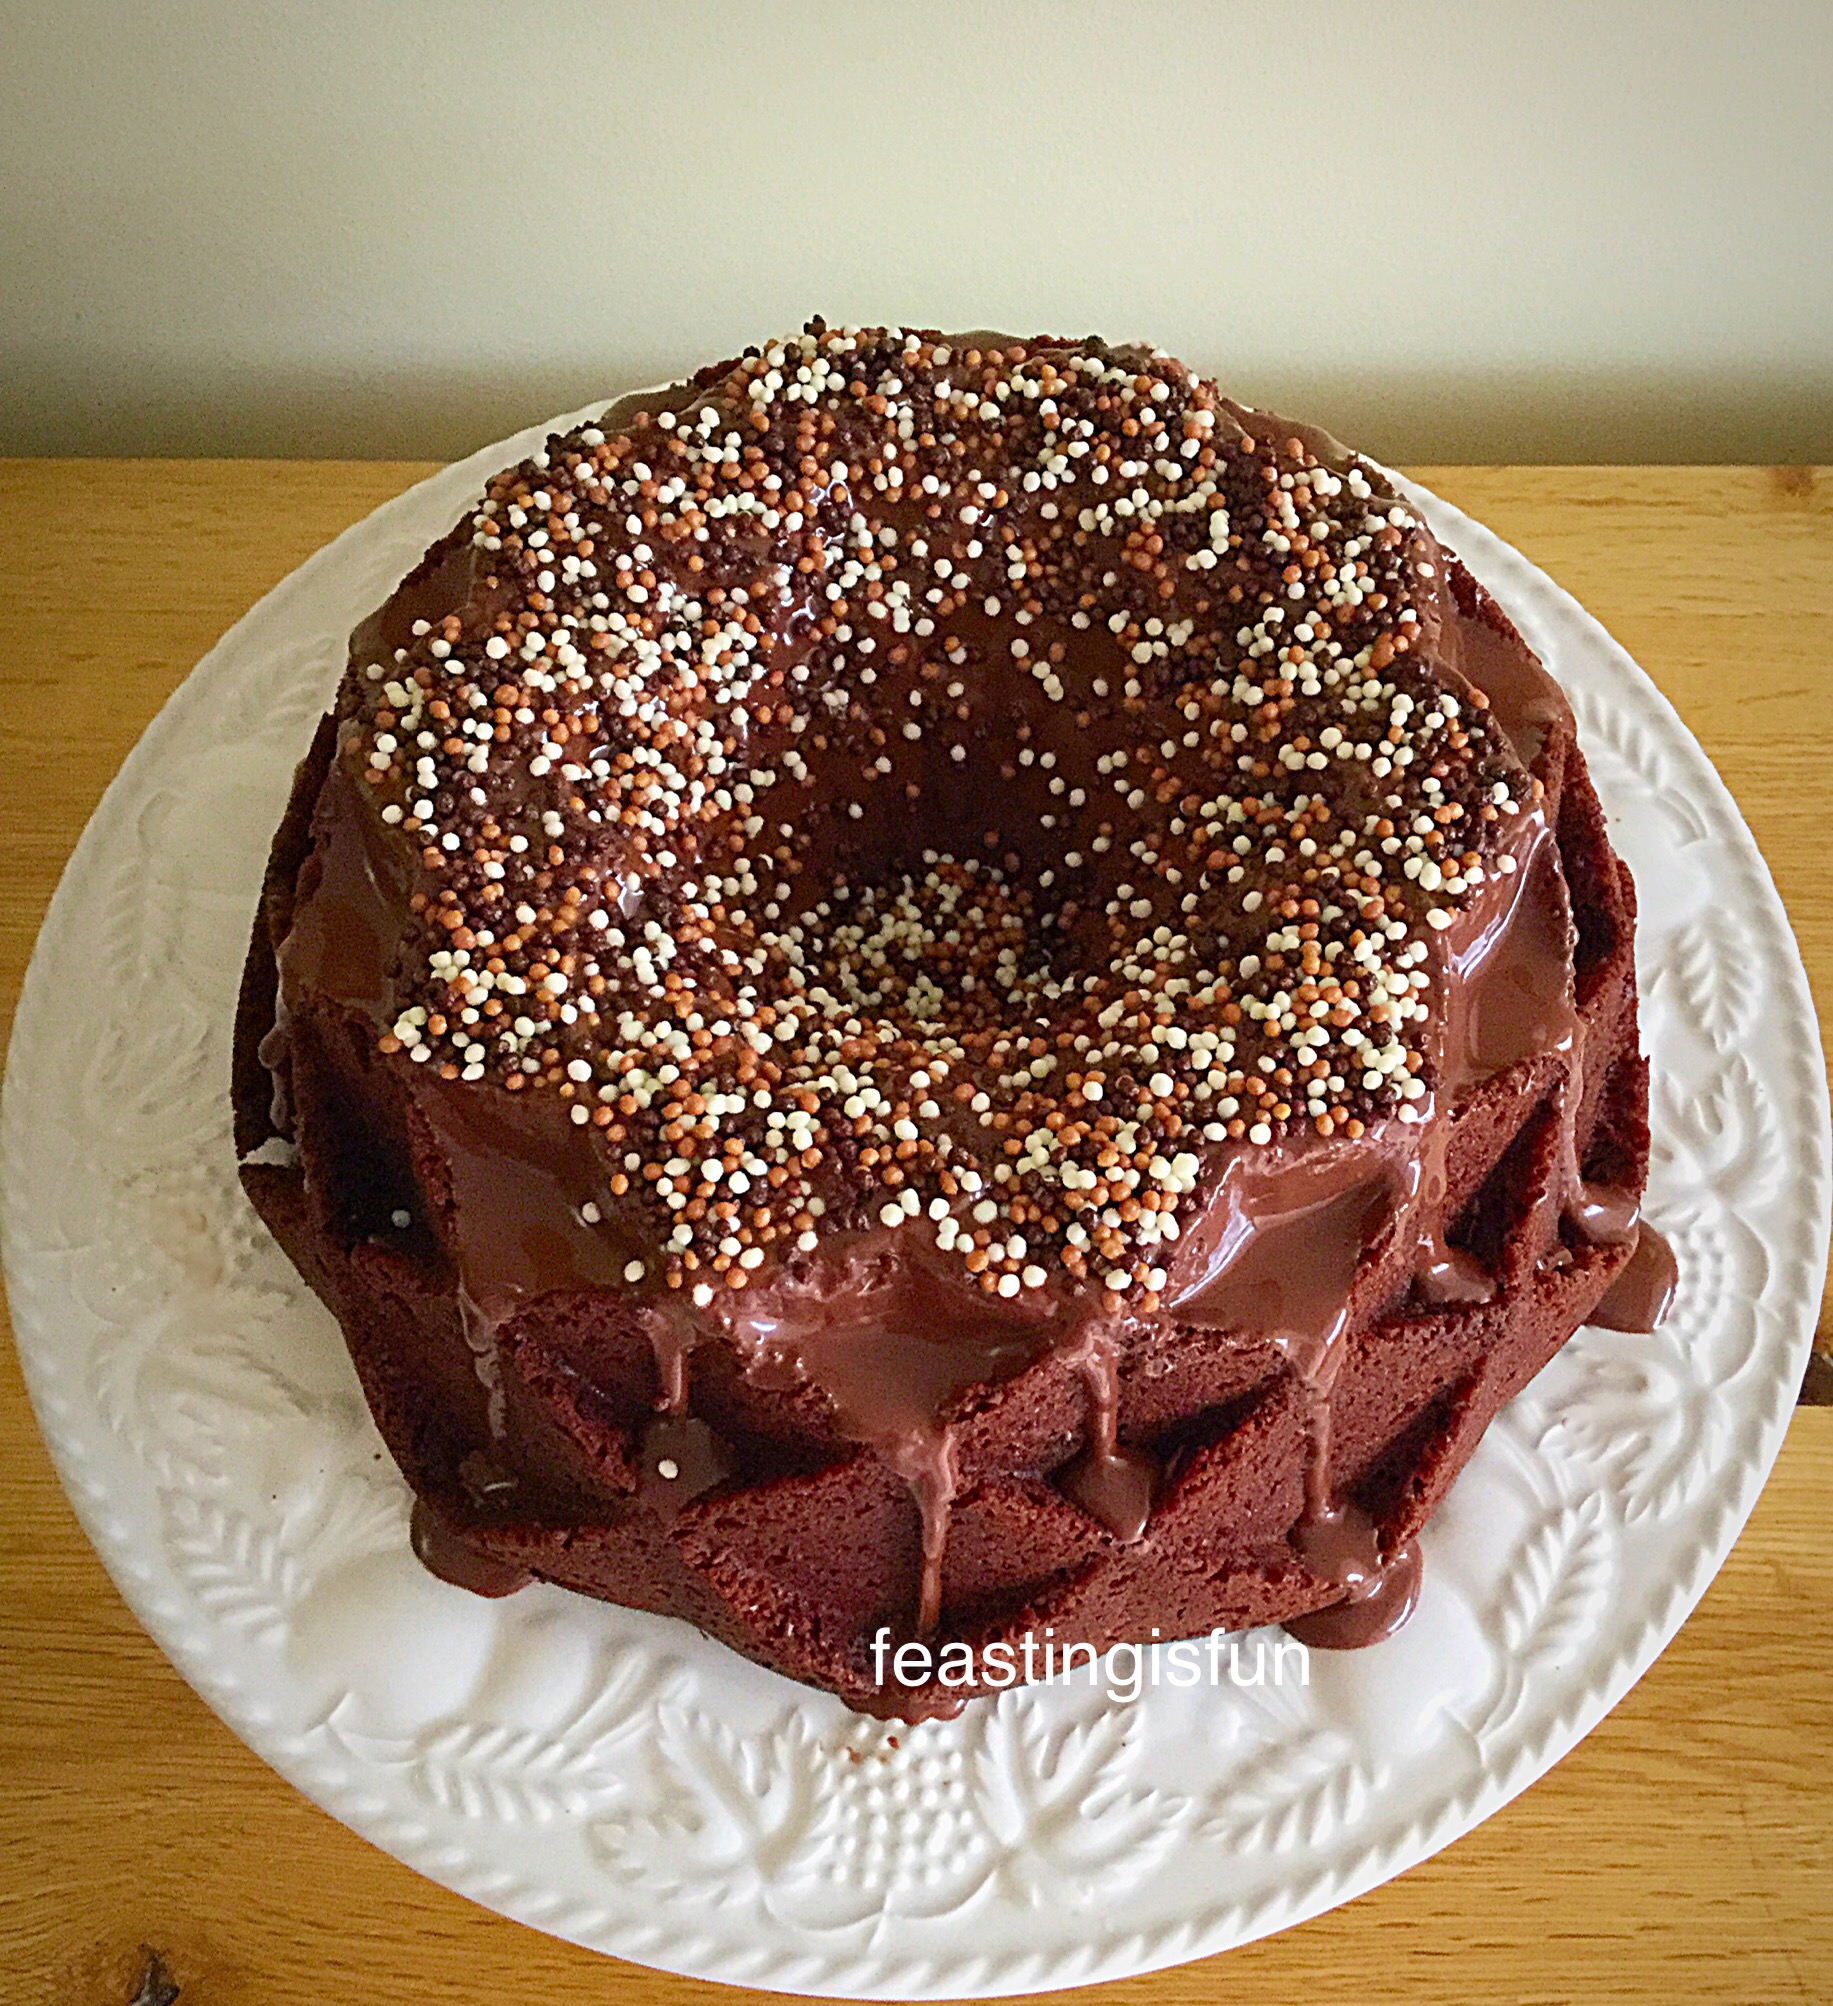
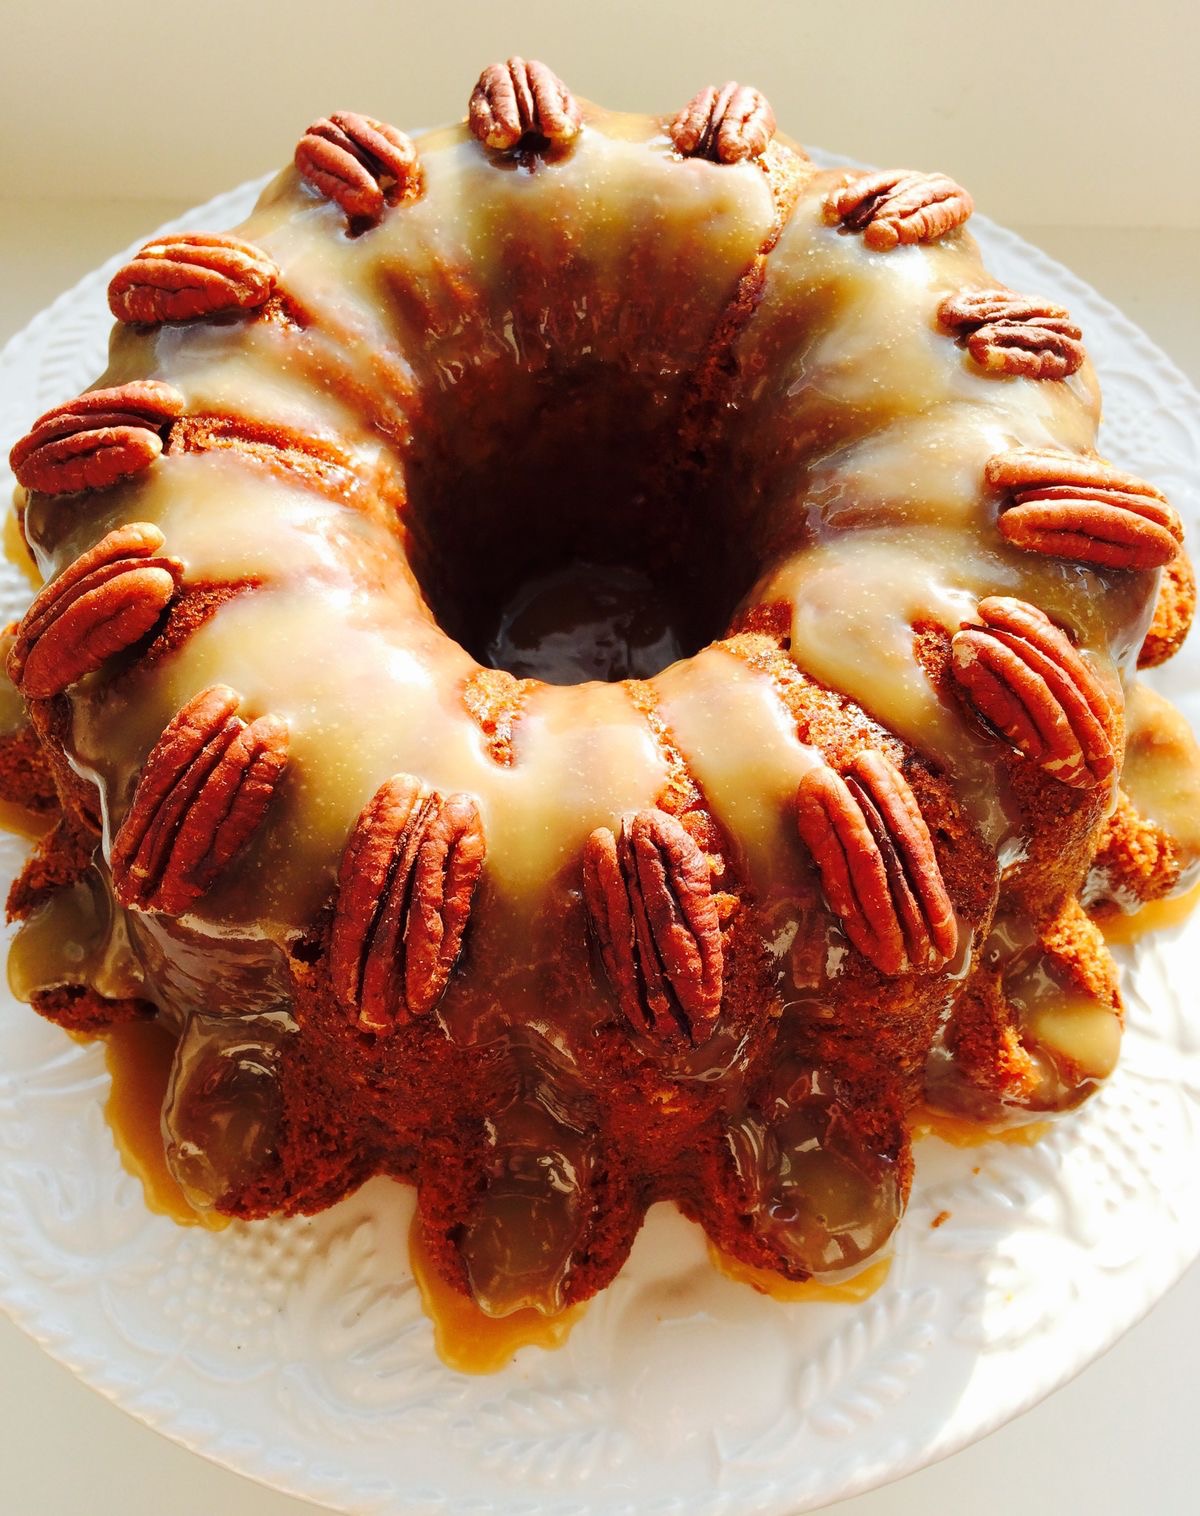
While I am not the world’s best cake decorator, I’ve developed several strategies for making the cakes I bake look presentable. Because we eat with our eyes first AND as I mentioned, I like pretty things, cakes being one of them. So, for inspiration I follow several bakers and cake decorators on Twitter and Instagram. And they are an invaluable source of tips, tricks and ideas. Likewise, Pinterest is also full of inspiration. Most importantly, nature is the greatest source of inspiration for me. None more so than my beautiful back garden.

What inspires you?

So, whatever you are making, baking and creating in your kitchens, have fun preparing and sharing your feast.

Sammie xx

No part of this post may be reproduced or duplicated without the written permission of the owner. Please see my Disclosure Policy.

Share
Facebooktwitterpinterestlinkedintumblr

Baked Lemon Drizzle Doughnuts

Share
Facebooktwitterpinterestlinkedintumblr

Winter is finally here and with it, all the coughs, colds and horrible bugs, that have been waiting for an opportunity to attack our immune systems. Perhaps that is a bit of an over statement. Still, with half the household coughing and sneezing, it gave me an idea of what to bake. Rich in Vitamin C, these Baked Lemon Drizzle Doughnuts are saturated in fresh, immune fighting, lemon juice, or so I like to believe! So, don’t let anyone tell you that cake’s not good for you.

Baked Lemon Drizzle Doughnuts

Lemon Love

These doughnuts are tangy and light, providing goodness in a fun way. Even our son’s tastebuds, dulled by the bug he is fighting off, tasted the tart lemon juice present in the lemon drizzle icing. While the crumb of the doughnut is tender enough not to aggravate his very sore throat. All in all, a complete hit, that produced a much longed for smile.

Baked Lemon Drizzle Doughnuts

Being re-introduced to the foggy, sleep deprived world, caused by administering medicine and love, throughout the night to a child, sent shockwaves throughout my body. Something I thought was well in my past! Being re-aquatinted with the hunger surge that comes, for me, from broken nights, means, these delicious doughnuts provide the perfect pick-me-up, mid afternoon, as the slump set in!

Baked Lemon Drizzle Doughnuts

Much as I hope that you can enjoy these Baked Lemon Drizzle Doughnuts for the delicious delights that they are, it is also nice to know that they are a good for you treat!

How To Bake Doughnuts

A quick note about the recipe – do not over fill the doughnut pan with batter. You should fill the rings to two thirds of their depth. Also, ensure that you grease the doughnut pan well. I use Wilton cake release. Because, the pans were not greased for the first attempt, even though they are non stick, the doughnuts stuck firm. There are two reasons for this, firstly, I overfilled them and secondly, the buttermilk in the recipe caused the doughnuts to stick.

The pan I use is a Wilton 6 hole doughnut pan. I have two as they are so good and I highly recommend them.

FF Baked Lemon Drizzle Doughnuts
Wilton 6 hole non stick doughnut pan.

Recipe: Baked Lemon Drizzle Doughnuts makes approximately 15-18

For The Doughnuts

175g/6oz Unsalted Butter softened

175g/6oz Caster Sugar

1/4tsp Salt- I use Maldon

3 Large Free Range Eggs

1.5tsp Lemon Extract or finely grated zest of 1 Whole Lemon – I use Nielsen-Massey  lemon extract

75g/3.5tbsp Buttermilk

200g/7oz Plain White Flour

2tsp Baking Powder

For the Drizzle:

200g/7oz Icing Sugar – sifted

Juice of 1 Whole Lemon

Yellow/White sprinkles for decoration

Making And Baking The Doughnuts

Preheat the oven to 180C/160C fan, gas mark 4, 350F 

  • First of all prepare the doughnut pans. Thoroughly brush the inside of the doughnut rings with either cake release, or melted butter.
  • Next, into a large bowl add the butter, sugar and salt. Whisk the ingredients together until they are pale and creamy.
  • Now add the eggs, lemon extract/zest and the buttermilk. Sift the flour and baking powder on top of these ingredients.
  • Whisk everything together until it is completely combined.
  • Finally, use a silicone spatula to stir the batter through a couple of times.
  • Fill a large piping bag, fitted with a circle piping tip (if using), with the doughnut batter. Snip the end of the disposable bag off, so that it it approximately 1cm wide.
  • Carefully pipe circles into the doughnut pan, taking care not to overfill.
  • Once the pan is piped place in the centre of the preheated oven and bake for 12-15 minutes.
  • The doughnuts are baked when they are a golden colour and firm to touch – a pressed finger should not leave any indentation.
FF Baked Lemon Drizzle Doughnuts
Preparing, piping and baking the doughnuts.
  • As soon as the doughnuts are baked remove them from the oven.
  • Tip the doughnuts out on to a cooling rack.
  • Wash up, dry and re-grease the doughnut pan and continue as before, unto all of the batter is used.

Decorating The Doughnuts With Lemon Drizzle

  • While the doughnuts are cooling the lemon drizzle icing can be made.
  • Into the bowl of sifted icing sugar add the juice of one lemon. Stir thoroughly to mix, ensuring there are no lumps. The icing should be fairly thick, but still be able to pour, ensuring it can be drizzled.
  • Fill a small piping bag with the icing. Snip the end of the bag off to create a very small hole. Alternatively, you can use a teaspoon to drizzle over the icing.
  • First, place the cooling rack over a baking tray to catch any drips.
  • The doughnuts should be completely cooled before icing.
  • Keeping an even pressure on the piping bag, pipe back and forth, across each doughnut, until they are all iced.
  • While the icing is still wet scatter over sprinkles.
  • Place the doughnuts to one side to allow the icing to set.
FF Baked Lemon Drizzle Doughnuts
Cooling, piping and decorating the doughnuts.

Thinking of sneaking a doughnut to ‘taste test’? I won’t tell 😉.

Baked Lemon Drizzle Doughnuts

As these doughnuts are so yummy, don’t expect them to hang around for long. They will keep in an airtight container for up to 3 days, however, they are at their best within the first 24 hours.

A sunny, refreshing treat, that is perfect served at anytime of the year.

If you have enjoyed the recipe for these Baked Lemon Drizzle Doughnuts you may also like these:

Lemon Ripple Ice Cream

Lemon Ripple Ice Cream scoops served in a glass bowl.
Lemon Ripple Ice Cream

Mini Lemon Drizzle Bundt Cakes

Mini lemon drizzle Bundt cakes on a white cake stand with fresh lemons.
Mini Lemon Drizzle Bundt Cakes.

Baked Pumpkin Spiced Doughnuts

FF Baked Lemon Drizzle Doughnuts
Baked Pumpkin Spiced Doughnuts


As well as creating a treat that can help boost the immune system, these Baked Lemon Drizzle Doughnuts brought smiles to faces that were suffering. While not advocating these as a health food, there is something to be said for the power of feeling good. Rather than simply accepting things as they are and waiting for them to pass, small presents, or treats can make the process more bearable.

Whatever you are making, baking and creating in you kitchens, I wish you a happy, healthy and fun 2017.

Sammie xx

No part of this post may be reproduced or duplicated without the written permission of the owner. Please see my Disclosure Policy.


Share
Facebooktwitterpinterestlinkedintumblr

Iced Bakewell Tart

Share
Facebooktwitterpinterestlinkedintumblr

I adore Bakewell Tart. Especially the layers of pastry, raspberry jam and almond sponge combined, taste utterly delicious to me. Because I love the flavours so much I have a few ‘Bakewell’ recipes on here. Usually I am content to leave the top of the sponge covered in almond flakes. While following Mary Berry’s pretty iced tart last week, on the Great British Bake Off programme, I decided to try it out. Resulting in this Iced Bakewell Tart.

FF Iced Bakewell Tart

Everything you see on and in this tart is homemade, including the raspberry jam. Which, just happens to be my favourite and is incredibly easy to make, for the recipe please see HERE . I’ll put that into a separate post, otherwise this ones going to be miles too long, we just want to get to the part where we can eat this Iced Bakewell Tart!

Adding Fresh Flowers To Enhance The Photography

Having spotted a couple of open blooms open on my rose bush, I couldn’t resist cutting them and placing the vase next to the tart. They give the photos a romantic, afternoon tea look, echoing the pink icing on the top of the tart.

As much as I enjoy coming up with new recipes and testing them to ensure they will work as well for you as they do me, I’ve also grown to enjoy the photography side of my blog. Sometimes adding a single item can transform the ‘feel’ of a photograph. My slightly wind ravaged rose has added an element of beauty, but also imperfection, which I really like. Especially as I feathered the icing all in the same direction, more on that later!!!

FF Iced Bakewell Tart
Iced Bakewell Tart a delicious raspberry and almond treat for any special occasion.

The Importance Of Sharing A Meal

With Feasting is Fun, my aim is to make each meal, recipe or bake a feast. What I mean by that is this; when time is taken to prepare good, homemade food, it should be enjoyed and the atmosphere as we feast together should be fun. Conversation across the dinner table can be one of the most important parts of the day. People relax, enjoy their meal and open up about their day.

Sitting together as a family, at least one day a week, I believe is incredibly important for the health and well being of us all. Sharing a meal more regularly is preferable, however, my hubby doesn’t get in until late some nights and I realise we are not unique in that aspect of family life.

I honestly believe, that from sharing family time, over a meal, our 3 children have grown to enjoy the same foods and meals as us, their parents. Of course they all have their preferences and  there are certain ingredients they do not eat. What we enjoy is sitting with a curry, or a couple of pizza’s and some homemade coleslaw, at the weekend, feasting both on the food and each other’s company.

FF Iced Bakewell Tart
Iced Bakewell Tart skimping on the raspberry jam simply shouldn’t happen!

Weekend Baking And Afternoon Tea

That’s why I love the idea of afternoon tea. Usually at the weekends when we tend to eat our evening meal a bit later. Mid afternoon the kettle will go on, teapot filled and we’ll feast on whatever ‘mum’s’ been making that morning. Truthfully, most of what I make on those occasions doesn’t make it to this blog. I want to enjoy the company of my family. That said on occasions when I am taking photos, once I’ve said that it’s ok for everyone to help themselves it still amazes me how quickly a cake can disappear!

I take this as a good sign that it tastes great 😉.

This tart was baked in an 25cm/10″ x 5cm/2″ deep loose bottom tart tin, the same one I use for my quiches, see here.

Recipe: Iced Bakewell Tart serves 10-12

400g Shortcrust Pastry – in my opinion the Iced Bakewell Tart is sweet enough without using sweetened shortcrust pastry, see my pastry recipe here

3-4 heaped tablespoons Raspberry  Jam

175g/6oz Unsalted Butter

150g/5.5oz Caster Sugar

1/8th tsp Salt – I use Maldon

1tsp Vanilla Extract – I always use Nielsen-Massey extracts

1/2tsp Almond Extract

3 Large Free Range Eggs

100g/4oz Ground Almonds

75g/3oz Plain White Flour

1 tsp Baking Powder

For the icing:

350g White Icing Sugar

1/2 tsp Almond Extract

Alternatively for an un-iced finish you will need 25g flaked almonds

Method : Preheat the oven to 220C/200C fan, gas mark 7, 425F

Just a quick note about the pastry case – usually I trim any excess pastry from the tin, chill for 30 minutes in the fridge and then bake. When I baked this tart I was really pushed for time, so baked with an overlapping of pastry which was them trimmed after baking. I would thoroughly recommend trimming the pastry prior to baking for a neater edge. I also had a couple of problems with the pastry sticking right near the top.

Making And Blind Baking The Shortcrust Pastry Tart Shell

  • Roll the pastry fairly thinly, about the depth of a £1 coin and line the tart tin – note when using homemade pastry I never grease the tart tin, however if you are unsure of how non stick your tin is brush lightly with some cooled melted butter.
  • Dock the bottom of the pastry case with a fork to keep it flat during baking.
  • Cut a large piece of baking parchment, screw it into a ball and then line your pastry tart case with it and fill with baking/ceramic beans.
  • Place in the middle of the oven and ‘blind bake’ for 15 minutes.
  • After 15 minutes baking has elapsed, remove the tart from the oven. Lift out the baking beans using the baking parchment and place the tart back into the oven for a further 10 minutes, until it is golden and cooked on the base.

Making The Almond Cake Layer

  • In a large bowl whisk/beat together the butter, sugar and salt until it is very pale and creamy.
  • Add in the almond and vanilla extract and whisk/beat until incorporated.
  • Next add all 3 eggs and whisk/beat for a minute.
  • Remove the whisk, add in the flour, baking powder and ground almonds. Using a large spoon fold these ingredients into the mix until they are just combined.

Assembling And Baking The Bakewell Tart

  • Once the baked tart case has cooled slightly, spoon the raspberry jam into the centre and spread it, using the back of the spoon, so that it almost reaches the rim.
  • Now spoon over the almond sponge, starting from the outside and working towards the centre. The almond sponge will cover and seal the jam in. Thus stopping the jam from leeching out the side and on to the top of the sponge.
  • If you are baking an un-iced tart sprinkle the top with flaked almonds.
FF Iced Bakewell Tart
Lining, baking and filling the baked tart case.
  • Reduce the oven heat to 190C/170C fan, gas mark 5, 375F.
  • Place the jam and almond sponge filled tart back into the middle of the oven and bake for 45-50 minutes, until the sponge is golden and firm to the touch, without wobbling in the centre – mine took 45 minutes.
  • As soon as the tart is baked remove from the oven and allow to cool.
FF Iced Bakewell Tart
Beautifully Golden this cooked Tart was quickly snapped with the #GBBOTwitterBake Along in case I ran out of time!


An in-iced Bakewell tart finished with flaked almonds.
Baked un-iced Bakewell Tart topped with flaked almonds.

Icing The Bakewell Tart

  • Sift the icing sugar into a bowl. Add the almond extract and enough water, I used approximately 30mls, to form a thick but pourable paste, once stirred together.
  • Remove 2tbsp of icing to a small bowl, add the tip of a cocktail stick, that has been dipped in pink gel icing and stir. Aim for a pale pink colour, however if you’d like a deeper pink, go for it! Place your coloured glacé icing into a small piping bag.
  • Keeping the 2 icings very separate, pour the pure white icing over the tart. Start in the centre use an offset spatula to push it to the edges.
  • Snip the end off of the small icing bag and pipe horizontal lines of pink icing across the white icing, separated by 5cm/2″, from edge to edge. Work fairly quickly as you want both icings to still be unset when you drag through, with a cocktail stick.

Feathering Piping Effect

  • Using a cocktail stick, again with a spacing of 5cm/2″, place the tip of the skewer at the top of the icing and drag it through to the bottom. Reversing from bottom to top next time. You can see, during the rush to complete my tart on time, I pulled my icing all in the same direction. Oh the pressure!
  • Below is a photo of my tart with my one directional feathering (if it can be called that) compare with the accurate feathering of my Cherry Almond Sandwich Cake.
FF Iced Bakewell Tart
You can see hire effective proper 2 directional feathering is here.
  • As the glacé icing is quite thick, leave for a good 2-3 hours before serving.

Place your Iced Bakewell Tart on a pretty plate or stand and serve with a drink of your choice. Mid morning with a steaming mug of coffee or a pot of tea mid afternoon.

FF Iced Bakewell Tart
Iced Bakewell Tart perfect at anytime.

If you enjoy the flavour of almonds and raspberry together, this Iced Bakewell Tart is really worth making.

If you have enjoyed this recipe for Iced Bakewell Tart you may also like these:

Raspberry Almond Cream Cake

Raspberry Almond Cream Cake

Bakewell Shortbread Bars

Bakewell Shortbread Bars
Bakewell Shortbread Bas

Cherry Bakewell Cookies


Cherry Bakewell Cookies

While talking about family time and feasting together, my intention certainly is not to preach. In truth, I eat far too many meals away from my family, in bed, due to my health. Rather what I’m trying to say I say, is, that when you have the opportunity, make the most of it!

Whatever you are making, baking and creating in your kitchens, have fun remembering times spent and times to come feasting with friends and family.

Sammie xx

No part of this post may be reproduced or duplicated without the written permission of the owner. Please see my Disclosure Policy.


Share
Facebooktwitterpinterestlinkedintumblr

Camp Coffee Walnut Cookies

Share
Facebooktwitterpinterestlinkedintumblr

Today I have a delicious cookie recipe for you. While it’s flavours are based on the classic coffee and walnut cake, there is also an added twist. So these Camp Coffee Walnut Cookies with a mocha drizzle are the perfect accompaniment to your morning, afternoon, anytime, cup of coffee.

FF Camp Coffee Walnut Cookies

So, do you remember Camp Coffee?

While I used to have a splash of it in hot milk when I was younger, other than that I can’t remember seeing it around for the last 20 years or so. Although maybe I just wasn’t looking!

FF Camp Coffee Walnut Cookies
Camp Coffee Walnut Cookies

Camp coffee is made using chicory extract. So the leaves that you add to your salad are also used to make this product. Another added benefit is that it contains 4% coffee extract, which means although not caffeine free, it has lower levels than regular coffee, without compromising flavour.

    FF Camp Coffee Walnut Cookies Camp Coffee Walnut Cookies

Because it is already in liquid form, Camp coffee is very easy to use, as a coffee substitute in many recipes. Including cookies, cakes, this Camp Coffee Ice Cream and different types of icing.

While Camp Coffee Walnut Cookies are very crisp, you can confidently bite into one without the cookie crumbling apart. And the mocha drizzle adds just the right amount of chocolate/coffee sweetness, however, you can easily leave it off if you are watching your sugar intake.

Camp Coffee Walnut Cookies

Since the recipe makes approximately 10 cookies I strongly suggest making a double batch. And take them in to work, to share with your colleagues over morning coffee. Also you can ask if anyone remembers the, oh-so-familiar bottle?

Recipe: Makes 10 Camp Coffee Walnut Cookies

100g/4oz Unsalted Butter – softened to room temperature

75g/3oz Caster Sugar

1/8tsp Salt – I use Maldon

1/2tsp Camp Coffee  widely available from supermarkets, grocery shops and on line

1/2tsp Vanilla Extract – I use Nielsen-Massey

100g/4oz Plain White Flour

40g/2.5oz Walnuts processed to a ground almond consistency

30g small walnut pieces

Drizzle:

150g/5oz Icing Sugar sifted

10g/0.5oz Cocoa Powder sifted

1/4 tsp Camp Coffee alternatively dissolve 1/2 tsp instant coffee in 1 tsp hot water and allow to cool

1/4 tsp Vanilla Extract

Approx 25mls water

Method: Preheat the oven to 190C/170C fan, gas mark 5, 375F

Making The Coffee And Walnut Cookie Dough

  • First of all line 2 baking trays with non stick silicone mats or baking parchment.
  • In a medium size bowl add the butter, sugar and salt.
  • Whisk/beat until pale and creamy.
  • Add the Camp coffee and vanilla extract. Whisk/beat to combine.
  • Process the 40g of walnuts either in a food processor or mini chopper, until they are finely ground and resemble ground almonds.
  • Add the flour, ground walnuts and walnut pieces to the bowl.
FF Camp Coffee Walnut Cookies
The ground walnuts really add to the nutty flavour and crisp texture of this cookie.
  • Use a spoon to stir and bring all the ingredients together.
  • Divide the mixture into ten and roll into balls.
  • Place the cookie dough balls on to the baking tray.
  • Press down to flatten the balls into discs.
FF Camp Coffee Walnut Cookies
Camp Coffee Walnut Cookies ready for the oven.

Baking The Cookies

  • Place the baking trays evenly spaced apart in the oven and bake for 13-15 minutes.
  • Turn the baking trays around halfway through baking.
  • The Camp Coffee Walnut Cookies are baked when they are crisp and golden.
  • As soon as the cookies are baked remove the baking trays from the oven and allow them to cool on the trays.
FF Camp Coffee Walnut Cookies
Camp Coffee Walnut Cookies freshly baked and they smell wonderful 😉

Making the Mocha Drizzle

  • Sift the icing sugar and cocoa into a bowl.
  • Add the Camp coffee and vanilla extract.
  • Next add 20mls of water and stir with a spoon adding the extra water, if needed, to make a thick icing that can be drizzled.
  • Place all of the cookies on a cooling rack that is placed over a large baking tray.
  • Spoon the drizzle into a small disposable piping bag, alternately you can drizzle the icing over the cookies with a spoon.
  • Snip the very end off of the piping bag and pipe zig zag lines across the cookies.

FF Camp Coffee Walnut Cookies

Finally, serve these delicious Camp Coffee Walnut Cookies, once the icing has set, with a drink of your choice. I am especially thrilled that these cookies withstand gentle ‘dunking’. Because in my house, dunking cookies makes them hat extra bit special.

In addition to my family our post lady enjoyed one of these cookies when she delivered a parcel late this morning. I can see these disappearing fast, so next time I’ll make a double batch! Because we encourage sharing here at home baked treats can disappear quickly. And it’s always nice to surprise delivery people with a quick snack.

    Camp Coffee Walnut Cookies

If you have enjoyed this recipe for Camp Coffee Walnut Cookies here are some others you might like too:

Apricot Oat Crumble Cookies

FF Camp Coffee Walnut Cookies
Apricot Oat Crumble Cookies

Oat Chocolate Chip Cookies

FF Camp Coffee Walnut Cookies
Oat Chocolate Chip Cookies

Caramac Caramel Cookies

FF Camp Coffee Walnut Cookies
Caramac Caramel Cookies

Since I start everyday with a cup of tea and a cookie/biscuit (same difference!) these cookies are ideal. And with just enough sweetness to kickstart my body and not too much caffeine to overload my system.

Since we I am a self confessed Cookie Monster, constantly trying new recipes. Although my preference is always for something nutty or with oats, so these Camp Coffee Walnut Cookies are perfect.

Do you have a set way to start your day?

So, whatever you are making, baking and creating in your kitchens, have fun preparing and sharing your feast.

Sammie xx

 Camp Coffee Club provided me with the Camp Coffee to make this recipe. All views, opinions, content and photographs are my own and may only be reproduced with my permission. Please see my Disclosure Policy.

Share
Facebooktwitterpinterestlinkedintumblr

Swirl Lime Drizzle Cake

Share
Facebooktwitterpinterestlinkedintumblr

If you love cake, especially the fruity citrus types, then you must try this Swirl Lime Drizzle Cake. A light, slightly tingly-on-the-tongue cake treat that is perfect for sharing!

FF Swirl Lime Drizzle Cake
Swirl Lime Drizle Cake utterly beautiful and equally delicious.

This cake is so pretty, I really cannot stop looking at. Light sponge, flavoured with the juice and zest of fresh limes, draped in a tangy lime glaze and finished with sugar flowers.

When Is A Cake Pan A Bundt Pan?

I adore Bundt pans. Their beautifully detailed moulding creates a beautiful cake without the need for excessive decoration. I have the Heritage Bundt pan from Nordic Ware, which is very similar to this swirl silicone cake mould.

Nordic Ware own the trademark name ‘Bundt’ in this country. So although this beautiful Swirl Lime Drizzle Cake may look similar to a traditional Bundt pan, technically it cannot be called a Bundt cake.

The name of this creation – Swirl Lime Drizzle Cake – accurately describes exactly what this cake it. Yet only a bite can really covey the tongue tingling, luscious lime flavours, locked within it’s beauty.

Alternatively, this cake can be bake in a greased and lined 2lb loaf pan. Baking times may vary.

FF Swirl Lime Drizzle Cake
Swirl Lime Drizzle Cake full of zesty citrus flavour.

Citrus Flavours

Although Lemon Drizzle Cake is one of my favourite cakes, I have fallen in love with the lime flavour in this swirl cake. In contrast to the sharp, tangy lemon this Swirl Lime Drizzle Cake delivers a great, fresh, citrus flavour, that is softer on the palette. Lime has a rounder, less sharp flavour than lemon with added floral notes to it. Resulting in each bite of cake being gently filled with luscious flavour.

Because fresh lime juice is added to the drizzle glaze your tastebuds are immediately awakened on biting into a slice of this cake. And then golden, buttery sponge with a hint of lime and visible flecks of lime zest throughout the cake, give a pleasant rounded cake flavour.

FF Swirl Lime Drizzle Cake
Swirl Lime Drizzle Cake the silicone mould creates the beautiful shape.

The beautiful mould that was used to bake this cake was from the Bake Box. A monthly box full of baking equipment, recipe cards and instructions.

FF Swirl Lime Drizzle Cake
A monthly subscription that will expand you baking knowledge and teach you new techniques.

Bake Box Review

Each box contains:

  • Inspirational theme
  • 6-8 bespoke bakeware items
  • 1 Specialist colour, dust or glitter
  • Unique recipes with a creative twist
  • 6 Full colour recipe cards

Each box is available on a monthly subscription at £14.99 (rrp £40). Personally I think this Bake Box is a great way to learn new techniques and at an amazing price. Also I am considering buying this as a subscription for my daughter’s birthday. So, why not a look at their website, Bake Box 3 has a back to nature theme!


FF Swirl Lime Drizzle Cake
Swirl Lime Drizzle Cake baked with the mould from Bake Box 1.

Recipe: Swirl Lime Drizzle Cake serves 8

225g/8oz Caster Sugar – plus 2tbsp butter for greasing the mould

225g/8oz Unsalted Butter – at room temperature

5 Large Free Range Eggs

225g/8oz Plain White Flour- sifted

2tsp Baking Powder

1/4tsp Sea Salt – I use Maldon

2 Fresh Limes

250g Icing Sugar

Optional – sugar flowers and coloured sprinkles

Method: Preheat the oven to 160C/140C fan oven, gas mark 3, 325F.

Preparing The Silicone Mould And Making The Cake Batter

  • First of all, melt 2 tablespoons of butter. Brush the inside of the mould with butter, ensuring every part of the cake mould is buttered. Set to one side.
  • Place the sugar, butter and salt into a large bowl and whisk/beat until pale and creamy.
  • Add 1/3 of the sifted flour and 2 eggs. Whisk/beat until just combined.
  • Repeat the last step.
  • Sift the last of the flour and baking powder into the bowl. Add the last egg, the finely grated zest of 2 limes and the juice of half a lime.
  • Mix gently until everything just combines.
  • Spoon the mixture into the prepared cake mould and fill no more than two thirds full.
FF Swirl Lime Drizzle Cake
Swirl Lime Drizzle Cake ready for the oven.

Baking The Swirl Cake

  • Place the filled cake mould on to a baking tray and place in the middle of a preheated oven
  • Bake for an hour. The cake is baked when an inserted skewer comes out clean.
  • As soon as the cake is baked remove from the oven.
FF Swirl Lime Drizzle Cake
Swirl Lime Drizzle Cake a beautiful even bake.
  • Allow the cake to cool until just warm, in the silicone cake mould.
  • When just warm carefully turn the cake out onto a cooling rack.
FF Swirl Lime Drizzle Cake
Swirl Lime Drizzle Cake the mould gives the cake such a beautiful pattern.

Preparing The Lime Drizzle And Decorating The Cake

  • Sift 250g of plain icing sugar into a bowl.
  • Add enough lime juice, squeezed from the zested limes, to produce a thick, yet just dripping, paste.
  • Ensure you have a clean baking tray under the cooling rack.
  • Carefully spoon over the lime drizzle, scooping drizzle from the tray underneath by sliding the cooling rack along, until the entire cake is completely covered in lime drizzle icing.
  • Add little sugar flowers and/or sprinkles, whilst the icing is still tacky.
  • Set aside to allow the icing to set.
FF Swirl Lime Drizzle Cake
Swirl Lime Drizzle Cake sure to impress everyone as it tastes as good as it looks!

Perfect for afternoon tea, or a celebration. This Swirl Lime Drizzle Cake certainly stands out, both for its swirl shape and delightful soft, lime flavour.

Because of the slightly softer flavour that lime has, it works beautifully in this cake. A beautiful Spring cake that can be eaten throughout the year. And the only rule is, this cake must be shared. Since it is too good to keep it all to yourself!

If you have enjoyed this Swirl Lime Drizzle Cake here are some other recipes you may like to try:

Glazed Lemon Bundt Cake

FF Swirl Lime Drizzle Cake
Glazed Lemon Bundt Cake

Mini Lemon Drizzle Bundt Cakes

FF Swirl Lime Drizzle Cake
Mini Lemon Drizzle Bundt Cakes

Lemon Blueberry Bundt Cake

FF Swirl Lime Drizzle Cake
Lemon Blueberry Bundt Cake

I hope that you’ll agree, Bundt style cake moulds and genuine Bundt Pans really do produce beautifully patterend cakes, without any extra work from the baker.

That had got to be a good thing – right??

So, whatever you are making and baking in your kitchens, be sure to have lots of fun and create a feast worth sharing, As food always tastes better when it is shared.

Sammie xx

Bake Box provided me with box 1 from their monthly subscription, for the purposes of review. All opinions, views, content and photographs are my own. Please see my Disclosure Policy.

Share
Facebooktwitterpinterestlinkedintumblr

Date Ginger Iced Buns

Share
Facebooktwitterpinterestlinkedintumblr

Easter seems such a long time ago now and yet I still find myself missing the adventure of creating new hot cross bun flavours. So, instead I took one of my favourite flavour combinations this year, the Ginger Date Hot Cross Bun and played around with it. The result is these utterly yummy Date Ginger Iced Buns.

FF Date Ginger Iced Buns
Date Ginger Iced Buns full of fruit and flavour.

A sweet yeasted bun packed with medjool dates, stem ginger and freshly grated nutmeg. Baked until golden brown and then slathered with thick glacé icing.

These Date Ginger Iced Buns are sticky, not overly sweet, finger licking portions of loveliness.

I adored the flavour combination when I made the hot cross buns, but knew I needed to vamp up the recipe. When toasting hot cross buns, the heat enhances the flavour, as these buns were to be eaten cold I knew I’d have to pack more flavour in. After making these three times I am finally happy with the recipe.

FF Date Ginger Iced Buns
Date Ginger Iced Buns with a hint of nutmeg.

Playing around with recipes is part of the fun of being a food blogger. When Waitrose ran a competition on Twitter for new hot cross bun flavours I was absolutely in my element and went on to make a couple of my suggestions, including the Cherry Bakewell Hot Cross Buns.

Over the recent months, experimenting in the kitchen with new recipes, carrying out reviews and writing this blog, has really helped me. My body is still completely messed up, with me having around sixty seizures a week, yet focusing on my blog, although not easy at times, has definitely given me a sense of accomplishment.

It is hard not to become frustrated and I frequently do, that is when I re-read all of the lovely comments you leave. Today I am really struggling with pain, which means it’s hard to concentrate on writing these words – yet this recipe is so good, so delicious, that I really want to share it with you so that you can make the Date Ginger Iced Buns over the weekend.

I write this not to elicite sympathy from you, simply to explain what my reality is – see Adapting to a new normal. Sometimes life isn’t all sunshine and roses. Usually the kitchen is my retreat, somewhere to escape to as a distraction, yet today my bed is my sanctuary.

On a more positive note, one of the most enjoyable reviews has been using the delicious medjool dates from The Medjool Date Co. This recipe has used the last of the dates, sob. They are completely addictive and utterly divine. I might have made more recipes had I not snaffled so many whilst cooking and baking with them!

I will definitely be getting more of these delicious medjool dates. Their sticky, not overly sweet flavour is so versatile in cooking/baking and they are wonderful to snack on too. I highly recommend them.

Recipe: Makes 12 Date Ginger Iced Buns

550g/1lb 4oz Strong White Bread Flour

160ml Whole Milk – warmed to body temperature

120ml Tepid Water

2 Large Eggs – I use free range

1tbsp Honey

10g/1.5 Sachet Fast Acting Dried Yeast

10g/ approx 1tsp Salt

50g/2oz Unsalted Butter

200g/8oz Medjool Dates – pitted and chopped to medium dice

3 Balls of Stem Ginger – removed from the syrup and finely diced

1/2tsp Freshly Grated Nutmeg

For the glace icing:

400g/14oz  Icing Sugar

2tbsp Syrup from the stem ginger jar

Method:

This method is for use with a bread maker or stand mixer, if you wish to make by hand please do, the quantities are the same, make sure you knead the dough for 10 minutes before adding the fruit.

The ‘bowl’ refers to the bowl of a stand mixer or the mixing compartment of a bread maker.

  • Add both the milk and water to the bowl.
  • Next add both eggs, the honey and yeast.
  • Swish about with clean fingers to mix.
  • Now add the flour on top of the liquid mixture.
  • Place the salt and butter on top of the flour.

For a bread maker, set the cycle to dough and press start. When prompted by the machine, or 5 minutes before mixing stops, add the chopped dates, finely diced stem ginger and nutmeg. Allow the bread maker to complete the dough cycle.

When the bread maker has completed the dough cycle, ensure the dough has doubled in size, if not wait until it has. Then re start the dough cycle for 2 minutes, this will ‘knock back’ the dough for you.

For a stand mixer attach the dough hook. Start mixing on a low speed. Once the contents of the bowl resemble dough continue to mix on medium/slow speed for 5 minutes. Stop the mixer. Scrape all the dough, from the hook, into the bowl. Add the chopped dates, finely diced stem ginger and nutmeg . Lower the dough hook and mix on medium speed for a further 5 minutes.

After the 5 minutes mixing is complete, stop the mixer. Scrape all the dough back into the bowl, it will be very sticky – don’t worry. Cover with a damp cloth and leave in a draught free place until doubled in size – 1 – 1 1/2 hours.

Once the stand mixer dough has doubled in size, lower the dough hook and mix on medium speed for 2 minutes, this will ‘knock back’ the dough for you.

Shaping the buns:

  • Tip the dough out on to a clean, floured surface.
  • Divide the dough in half and then divide each half into 6 portions. You can use scales if you want to be absolutely accurate.
  • Flour your hands well, this dough is sticky.
  • Form each portion of dough into a ball shape.
  • Place on to a buttered baking tray, leaving space in between each bun to allow it to rise.
  • When all the buns are shaped cover the baking tray with a clean tea towel. Leave in a draught free place until the buns are doubled in size – approx 1 hour.
  • When the buns are almost doubled, preheat the oven to 200C/180C fan, gas mark 6.
FF Date Ginger Iced Buns
Beautifully risen buns ready for the oven.
  • When the buns have doubled in size place the baking tray into the centre of the oven and bake for 20-25 minutes.
  • Enjoy the smell of these delicious buns baking in your oven. There’s a reason, during the build up to Easter, that you smell Hot Cross Buns as soon as you walk into a supermaket!!!
  • The buns are baked when they are golden brown and sound hollow whe rapped on the base with you knuckle.
  • Once baked remove the buns from the oven and immediately transfer them to a cooling rack.
FF Date Ginger Iced Buns
Golden baked, fruit filled buns.
  • Leave the date and ginger buns to cool completely before icing.

To make the glace icing:

  • Sift the icing sugar into a bowl and add the syrup from the stem ginger jar.
  • Add just enough water 2-3tsp to the bowl to make a very thick, but still spoonable paste.
  • Using a dessert spoon, carefully swirl some of the thick icing on to each of the buns. The icing will drip very slightly.
  • Allow the Date Ginger Iced Buns to set on the cooling rack.

Now it’s time to put the kettle on as all of your neighbours will soon be knocking at your front door, drawn in by the tantalising aroma of freshly baked fruit buns!!

FF Date Ginger Iced Buns
Date Ginger Iced Buns sweet fruit filled delights that you want to bite!

A quick tip, if these aren’t all to be snaffled straight away, is to pop half of them into a freezer bag – un-iced. They can be frozen for up to a month. Defrost fully before icing, or skip the icing and enjoy the buns toasted. with lashing of butter.

The freshly iced buns will keep for 24 hours in an airtight container. I use an old biscuit tin.

FF Date Ginger Iced Buns
Date Ginger Iced Buns perfect for afternoon tea!

Do let me know if you try this recipe. I love getting feedback on my recipes.

If you have enjoyed these yummy Date Ginger Iced Buns you may also like these other recipes using dates:

Coconut Almond Date Flapjacks

VC Coconut Almond Date Flapjacks
Coconut Almond Date Flapjacks a slow release energy bar wherever you are.

Ginger Date Hot Cross Buns

RT Ginger Gate Hot Cross Buns
Ginger Date Hot Cross Buns a complete taste sensation.

Morrocan Lamb Stew

FF Morrocan Lamb Stew
Morrocan Lamb Stew flavored with middle eastern spices and medjool dates.


The Medjool Dates were truly a feast in themselves, yet I also found them so versatile in the kitchen. Keep your eyes open for more delicious date recipes on Feasting is Fun!

Whatever you make or bake in your kitchens this weekend,I reallythat hope you have fun and enjoy sharing your feast with others.

Sammie xx

The Medjool Date Company provided me with the dates for this recipe. All views, opinions and content contained within this post are my own. Please see my Disclosure Policy.


Share
Facebooktwitterpinterestlinkedintumblr

Flower Vanilla Bundt Cake

Share
Facebooktwitterpinterestlinkedintumblr

I have some wonderful news to share. One of my very best friends had her beautiful daughter Florrie, a little early, but mum and baby are doing so well. I am an adopted Auntie again! So, I simply had to make something to celebrate this gorgeous bundle of joy that has been brought into our lives. Resulting in Florrie’s Flower Vanilla Bundt Cake.

Flower Vanilla Bundt Cake

As the new mum is nursing her wonderful baby daughter, I kept everything in this cake as natural as possible. As whatever mummy eats, Florrie will have too and I want her to learn to love Auntie Sammie’s cakes, right from the start.

New babies bring such joy and pleasure into our lives. Since we have three wonderful children, I absolutely knew my friend would very much appreciate a little food hamper. A freshly baked Farmhouse White Loafsimple dinners, pre-portioned so that mummy just has to pop them in the oven, like my Best Beef Casserole and of course a little something sweet, Florrie’s Flower Vanilla Bundt Cake.

Flower Vanilla Bundt Cake

A New Mum And I Need Cake

I remember clearly when I became a new mum for the first time. While I had a safe delivery and the maternity suite at the hospital was brand new, there was one thing I craved – food! Although, all that seemed to be on offer was salad.

And salad alone, is not what a nursing mother needs!

This mummy needed carbs and lots of them. Had the salad been in a thick, carb rich sandwich I would have been fine. Fortunately I wasn’t in hospital for very long and I remember my husband making me the most unbelievably satisfying, bacon muffin with tomato ketchup, the first morning waking up in our own home, with our new baby girl. And to this day it is one of my favourite treats. Although now that I am no longer nursing, it has to remain just that, a treat.

Flower Vanilla Bundt Cake

I have alway been called ‘practical and sensible’ by my lovely Mother-in-law. I consider this to be a huge compliment and a true reflection of how I see myself. So when a new baby comes along, I’m not the type of person to go baby clothes shopping, or to send flowers. Both of which are wonderful gifts to receive, I may add.

Rather than gifts, my first thought is, how can I help?

How We Can Help New Mums

If you have spent time reading this blog, you will be aware that I have various health issues (see Living With Seizures). As a result this limits how I can help out with an adorable new baby, in a practical way. Usually, for me that means food! Since I can make bread easily, I had been cooking slightly extra, so that a single portion of Sausage and Bean Casserole (made without the addition of any alcohol), could be frozen for when it was needed. This is my way of helping.

When I am making a Chicken Lasagne it is so easy for me to pop a couple of individual portions, in foil containers and place them in the deep freeze. And this way I gradually build up enough meals for a food hamper, that can be delivered and make my friend’s life a little easier.

Being a new mum is hard enough, but when you are on your own you need all the support you can get! Plus my lovely friend is a big fan of my cooking and has been an ‘unofficial’ taste tester for many years now. So, let’s hope Florrie will grow to love good, homemade meals and delicious cake, like her Flower Vanilla Bundt Cake.

Recipe: Makes 1 Flower Vanilla Bundt Cake 

Cake release spray – I use Wilton’s perfect for Bundt cakes

225g/8oz Unsalted Butter – at room temperature

225g/8oz Caster Sugar

1tsp Vanilla Bean Paste – I use Nielsen-Massey

1/4tsp Salt – I use Maldon

5 Large Free Range Eggs

225g/8oz Plain White Flour

2tsp Baking Power

For the glaze:

400g/14oz Icing Sugar

1/2tsp Almond Extract – I use Nielsen-Massey

Pink gel food colouring

Flower decorations

Making And Baking The Bundt Cake

Preheat the oven to 170C/150C fan, gas mark 3, 325F.

  • First of all, place  the butter and caster sugar into a large bowl and whisk, or beat for 5 minutes until pale and creamy.
  • Add the Vanilla Bean Paste and whisk/beat to incorporate.
  • Sift in 1/3 of the flour, baking powder and salt.
  • Add 2 eggs.
  • Whisk gently until just combined.
  • Repeat the last 2 steps twice more, adding only 1 egg on the last time.
  • Spray, or brush the Bundt tin liberally with cake release over the sink.
  • Spoon the cake batter into the Bundt tin pressing down on the batter as you fill the tin.
  • Ensure the cake batter fills the Bundt tin no more than two thirds full.
  • Place the Bundt tin in the middle of a preheated oven and bake for 50-55 minutes.
  • The cake is baked when it is golden in colour, is coming away from the sides of the Bundt tin and an inserted skewer comes out clean.
  • As soon as the cake is baked remove from the oven.
  • Place the tin on a cooling rack and allow the cake to cool for 10 minutes in the Bundt tin.
Florries Flower Vanilla Bundt Cake
Flower Vanilla Bundt Cake leave to cool for 10 minutes.
  • After cooling for 10 minutes turn the cake out onto a cooling rack. Wear oven gloves as the Bundt tin will still be very hot.
  • Allow the cake to cool completely before decorating.
Florries Flower Vanilla Bundt Cake
This Flower Vanilla Bundt Cake turned out beautifully.

Decorating The Cake

To make the glaze, sift the icing sugar into a large bowl. Add enough water to make a thick paste, that still slightly drips. Add a tiny amount of pink food gel colouring to the icing and mix thoroughly.

Flurries Flower Vanilla Bundt Cake
Beautiful baby pink, almond flavoured icing.

Place a tray underneath the cooling rack on which the Bundt cake sits. Since, this tray will catch any icing that drips through.

Using a dessert spoon thickly drizzle the top of the cake with the icing. Ensure the entire top and the internal hole of the cake of the cake are completely covered in icing. Any leftover icing can be used to add to the drizzle effect on the cake.

Decorating a Bundt cake with glacé icing.
The excess icing drips into the tray beneath the cake.
Using sugar flowers to decorate a cake.
Add sugar flowers to your Flower Vanilla Bundt Cake.

Allow the cake to set before serving and eating.

Flower Vanilla Bundt Cake

The observant among you may have noticed that this beautiful Flower Vanilla Bundt Cake has been photographed on the lid of a plastic box. So, being practical (and in all honesty completely out of cake boxes!) as this cake is not very large or heavy, placing on the inside lid of a large box keeps the cake fresh.

Finally, once safely transported to my friend, the cake can be moved to an airtight container of her own. Most importantly, I only advise using this technique for very light cakes and definitely do not cut the cake whilst it is sitting on the lid.

So, do you like the idea of making someone a food hamper?

If you have enjoyed making this Flower Vanilla Bundt Cake you may like these recipes:

Glazed Lemon Bundt Cake 

Florries Glazed Lemon Bundt Cake
Glazed Lemon Bundt Cake – I used a thinner glacé icing to completely gaze this cake.

Chocolate Fudge Bundt Cake 

Flurries Chocolate Fudge Bundt Cake
Put the kettle on and enjoy every single bite of this Chocolate Fudge Bundt Cake.

Lime Coconut Blossom Bundt Cake 

Florries Coconut Lime Blossom Bundt
Coconut Lime Blossom Bundt Cake

Crazy Caramel Carrot Cake 

Florries Crazy Caramel Carrot Cake
Crazy Caramel Carrot Cake utterly delicious.

Since I absolutely love seeing photographs of your bakes, please tag me in on your Twitter and Instagram posts? Also, I’m available throughout the day on Twitter, most days, to answer any ‘mid-bake’ questions or worries. While not an expert, I am part of group of bakers on Twitter and between us there’s not usually a question that goes unanswered! Likewise, you can also leave a question in the comment section of this post. Either way, it’s a great way to interact and get to know my lovely readers.

So, whatever you are making, baking and creating in your kitchens, have fun preparing and sharing your feast.

Sammie xx

No part of this post may be reproduced or duplicated without the written permission of the owner. Please see my Disclosure Policy.


Share
Facebooktwitterpinterestlinkedintumblr

Glazed Lemon Bundt Cake

Share
Facebooktwitterpinterestlinkedintumblr

I adore lemons. Their fragrance, flavour and vibrant, sunny colour. So, I have put them to delicious use and made this Glazed Lemon Bundt Cake for you.

Glazed Lemon Bundt Cake

Yet Glazed Lemon Bundt Cake is an entirely different recipe to my Lemon Drizzle Cake.

Yes it still has strips of lemon zest and juice in the batter, making sure you keep topped up on your Vitamin C. In contrast, this cake is more akin to a Madeira Cake, being slightly denser than a sponge. And this is most definitely a good thing.

Also, buttermilk is added in this recipe and it ensures a moist crumb, bursting with lemon flavour.

Glazed Lemon Bundt Cake
The definition from the Bundt pan is stunning on this Glazed Lemon Bundt Cake

In Love With Lemons

So, please can we talk about the glaze for a minute?

Since it is literally TO-DIE-FOR, which I realise is slightly over dramatic, just wait till you taste it!

Because lemon juice when mixed with icing sugar becomes the most wonderful glaze. And that glaze is what we use to cover this cake.

Intensely lemony, not lip puckering though as it is forms the thinnest crust.

The lemon glaze is what first hits your tongue, waking your tastebuds up and alerting them to the buttery, lemon cake that follows. Finally, this cake is lemon through and through.

Glazed Lemon Bundt Cake
Glazed Lemon Bundt Cake look how it sparkles!

So, for all you lemon lovers out there, this is the cake you have been waiting for.

Please don’t worry if you don’t own a Bundt tin, this cake can be baked in an 8″ round tin, or a 2lb loaf tin.

Glazed Lemon Bundt Cake
Look at the fantastic detail on this Citrus Loaf Tin.

The Beauty Of Bundt Tins

I would urge you to invest in a Bundt tin. Since they take any cake batter and turn it into the most beautiful baked cake without you having to do anything. That’s got to be a good thing, right?

All my Bundt tins are by Nordic WareThere are various stockists in the UK so it’s worth shopping around, for both variety and price.

The Citrus Loaf Bundt Tin I used for this cake was bought in the sales from Lakeland for half the retail price. I know they have sold out online now, but it’s worth checking your local branch.

Also Amazon, eBay, TK Max and other retailers,  frequently have Bundt tins at lower prices.

Have I convinced you?

Recipe: Makes 1 Glazed Lemon Bundt Cake – serves 8-10

Cake Release Spray – I use Wilton’s (or melted butter for greasing the tin)

175g/6oz Unsalted Butter –  at room temperature

175g/6oz Caster Suger

200g/7oz Self Raising White Flour (if using Plain flour use 2tsp baking powder not 1/2tsp as stated below)

1/2tsp Baking Powder

1/4tsp Sea Salt – I use Maldon

3 Large Eggs – I use free range

1tsp Vanilla Extract

100ml/4fl oz Buttermilk – left out of the fridge for 1 hour prior to use

2 Lemons – washed

200g Icing Sugar – sift

Optional – white edible glitter

Making The Lemon Cake

Preheat the oven to 180C/160C fan oven, gas mark 4, 350F.

Note: If using melted butter to grease your tin, do so now, ensuring every part of the tin is covered in butter by using a pastry brush. Alternatively Spray your Bundt tin thoroughly with cake release (I do this over the sink).

  • First of all, into a large bowl whisk the butter and sugar together until pale and fluffy.
  • Into a jug add the 3 eggs, buttermilk and vanilla extract. Mix to combine.
  • Zest one of the lemons using a grater or lemon zester.
  • Cut the lemon in half.
  • Add 2tbsp of flour to the bowl, then add the egg/buttermilk mixture from the jug.
  • Whisk until thoroughly combined.

Note: The 2tbsp of flour should stop the mixture from curdling. If it does curdle please don’t worry, it will come back together in the next step.

  • Add the rest of the flour, salt, lemon zest and juice from half a lemon to the bowl.
  • Using a metal spoon gently mix all the ingredients together, until you have a smooth cake batter.
  • Spoon the cake batter into the Bundt tin, lightly pressing to ensure the batter is in every part of the tin.
Glazed Lemon Bundt Cake
Always ensure the Bundt tin is never more than 3/4 full with cake batter.

Baking The Cake

  • Place the tin into the preheated oven and bake for 50-60 minutes.
  • The cake is baked when golden, slightly shrinking away from the sides and an inserted wooden skewer comes out clean.
  • As soon as the cake is baked remove from the oven.
Glazed Lemon Bundt Cake
Place the Bundt tin onto a cooling rack and allow to cool for 10 minutes.
  • After 10 minutes cooling invert the tin onto the cooling rack and leave for 5-10 minutes.
  • Gently lift the tin away from the cake.
Glazed Lemon Bundt Cake
Ta-dah one not yet Glazed Lemon Bundt Cake.
  • Allow the cake to cool completely before glazing.

Making The Glaze And Decorating The Cake

  • Place a tray or a large piece of baking parchment under the cooling rack.
  • Sift the icing sugar into a bowl.
    Juice the remaining lemon half and the other lemon. You need 60mls exactly of lemon juice. If you do not have quite enough top up with tap water.
  • Add the lemon juice to the icing sugar and mix thoroughly until you have a very smooth consistency.
Glazed Lemon Bundt Cake
Slowly spoon the glaze over the top of the cake.
  • Allow the glaze to drip down the sides and then spoon more glaze over uncovered parts of the cake. Taking the excess glaze from the tray underneath and re-spooning it over the cake until it is completely covered.

  • When the glaze has set sprinkle lightly with white edible glitter.

Move the cake onto a serving plate.

Glazed Lemon Bundt Cake
Delicious Glazed Lemon Bundt Cake.

Give yourself a pat on the back for making such a stunning cake!

Yes, alright I know the Bundt tin did most of the work, so why wouldn’t you want to get one??

Enjoy this cake with friends, family, work colleagues, anyone who loves lemon cake. Food tastes infinitely better when shared.

If you have loved baking this Glazed Lemon Bundt cake, here are a few more you might like to try:

Glazed Orange Bundt Cake

Glazed Orange Bundt Cake

Marbled Chocolate Bundt Cake

Marbled Chocolate Bundt Cake


Mini Lemon Drizzle Bundt Cakes

Mini Lemon Drizzle Bundt Cakes

Sammie xx

No part of this post may be reproduced or duplicated without the written permission of the owner. Please see my Disclosure Policy.


Share
Facebooktwitterpinterestlinkedintumblr

Bakewell Cupcakes

Share
Facebooktwitterpinterestlinkedintumblr

Hello people, do I have the perfect picnic Cupcake for you to make and enjoy this sunny day here in the UK today? I think so. So, let me introduce these delicious Bakewell Cupcakes. All the yumminess of a Bakewell Tart in Cupcake form.

Bakewell Cupcakes topped with white icing and a red glacé cherry.
Bakewell Cupcakes

Since I love Bakewell Tart, the raspberry jam layer, enveloped in an almond  sponge or frangipane, so I set about turning one of my favourite tarts into a cupcake. Resulting in the creation of these Bakewell Cupcakes.

A cooling rack packed with red cherry topped Bakewell Cupcakes.
Bakewell Cupcakes

While you have to admit, these cupcakes even look cheerful. Maybe it’s the bright red cherry on top of the almond glaze? And when you bite into these Bakewell Cupcakes your mouth is filled with an assortment of tastes and textures.  Since the hidden raspberry jam and almonds flakes in the centre are a wonderful surprise.

A Bakewell Cupcake with a bite taken out of it.
Bakewell Cupcakes layers of flavour.

Also, the use of flaked almond in the centre is two-fold, firstly they provided a delightful crunch, secondly they stop the Raspberry jam from sinking to the bottom of the cupcake. So, when you bite through the glorious almond glaze into the moist cupcake sponge, your mouth is then filled with tart raspberry jam and crunchy almond flakes. Resulting in the perfect cupcake flavour and texture balance.

Finally, enough of me telling you how scrummy these are, let’s get on with how to make them!

Recipe :  Bakewell Cupcakes makes 18

For the cupcakes:

18 Cupcake Cases

225g/8oz Unsalted Butter – at room temperature

225g/8oz Caster Sugar

1/4tsp Salt – I use Maldon

4 Large Free Range Eggs

1 tsp Vanilla Extract

1/2tsp Almond Extract – I use Nielsen-Massey 

225g/8oz Self Raising White Flour

1/2 Jar Raspberry Jam

175g/6oz Flaked Almonds

For the topping:

400g/14oz Icing Sugar

1/2tsp Almond Extract

18 Red Glacé Cherries

Making The Cupcake Batter

Preheat Oven to 180C/160C (fan), gas Mark 4, 350F.

First of all line the muffin tins with the cupcake cases.

Add the butter, sugar and salt to a large bowl.

Whisk together until light and fluffy. Then add the Vanilla and Almond Extract. Whisk to combine.
Add half the flour and 2 eggs, whisk together to combine.

Add the remaining flour and eggs, whisk until combined.

Light, fluffy, Almond flavoured cake batter.
Place approx 1 teaspoonful of the batter into the bottom of each cupcake case.
I used the end of a desert spoon as it was easier! Continue until each case has cake batter in the bottom.
Add a good pinch of flaked Almonds to each case, pressing the cake batter flat as you add them.
Place 1/2 a teaspoon of raspberry jam on top of the Almonds.
When the jam has been added then place a heaped teaspoon of cake better on top.
The batter will naturally spread out during the cooking process, sealing in the hidden jam centre!


Baking The Cupcakes

Place the Bakewell Cupcakes into a preheated oven and bake for 15-20 mins, until the top is golden brown and springs back when lightly pressed.

Remove from the oven and allow to cool for 10 minutes in the tin before transferring them to a cooling rack.
Allow to cool completely before icing.

Making The Almond Glacé Icing

To make the icing, sift the icing sugar into a bowl, add 1/2tsp of Almond Extract and enough water to make a thick, fluid icing. It should be able to hold a figure of eight.

Almond flavour glaze that's just the right consistency.
Almond flavour glaze that’s just the right consistency.

Decorating The Cupcakes

Use a teaspoon to cover the top of the cupcakes with the icing.
Now pop a cherry on top and leave to set for a couple of hours - if you can wait that long??
Now pop a cherry on top and leave to set for a couple of hours – if you can wait that long??


Bakewell Cupcakes are not only pretty and delicious, they also make perfect, portable, picnic food. Likewise, they are ideal for sharing with friends, family or someone you know, who needs a little pick-me-up!

If you have enjoyed this recipe for Bakewell Cupcakes you may also like these:

Iced Bakewell Tart

FF Bakewell Cupcakes
Iced Bakewell Tart

Bakewell Shortbread Bars 

FF Bakewell Cupcakes
Bakewell Shortbread Bars

Cherry Bakewell Cookies 

FF Bakewell Cupcakes
Cherry Bakewell Cookies


Because I adore the combination of flavours found in a traditional Bakewell Tart I am always looking to incorporate them in other bakes. Since creating these cupcakes I have also made Cherry Bakewell Hot Cross Buns which have been featured in The Guardian newspaper! Also, I’ve made these very delicious Cherry Bakewell Rocky Road Bars which are a great no bake treat. So, if you enjoy all things Bakewell, be sure to check out my other recipes.

Whatever you are making, baking and creating in your kitchens, have fun preparing and sharing your feast.

Sammie xx

No part of this post may be reproduced or duplicated without the written permission of the owner. Please see my Disclosure Policy.

Share
Facebooktwitterpinterestlinkedintumblr

Lemon Drizzle Cake

Share
Facebooktwitterpinterestlinkedintumblr

Lemon Drizzle Cake has to be one of my all time favourite cakes. While there are a gazillion recipes on the internet and in books, I wanted to add my own. Firstly because hopefully this blog will become a go-to resource for our children as they continue on their cooking and baking journey. Also, I like my lemon drizzle a certain way. That is, with a fresh lemon glacé icing draped and drizzled over the top. I hope that you enjoy my take on this classic cake?

FF Lemon Drizzle Cake

Since there are various ways to make a lemon drizzle cake, I thought I’d explore them. Traditionally a lemon sugar syrup is made and poured over the top of the cake, creating a crunchy, sugar crust as it cools. For my take on this version see these Mini Lemon Drizzle Bundt Cakes.Perfect individual portions of sunshine.

FF Lemon Drizzle Cake
Lemon Drizzle Cake

Lemons And Their Versatility In The Kitchen

Lemons are a must-have ingredient in my kitchen. Used in both sweet and savoury recipes they are essential in my Tangy Lemon Potato Salad where the un-waxed, scrubbed lemons are cut so thinly they are eaten as part of the dish. Also they are used to thin down mayonnaise for my Crunchy Homemade Coleslaw.Whether halved and added to the cavity of a roasting chicken, or simply squeezed over baked salmon, they add a burst of flavour that lifts each dish.

FF Lemon Drizzle Cake
Lemon Drizzle Cake

While lemon extract is available and I confess sometimes is used in my recipes, nothing is quite as good as using the real thing. During lemon season I buy un-waxed lemons as they tend to be slightly under ripe. However, I have had many a mouldy lemon lurking in the fridge! So, if buying waxed lemons, simply scrub under hot water with a nail brush. As a note, I lightly scrub un-waxed lemons as well if using the zest.

You will need a 25cm x 11cm x 7.5cm (10” x 4.5” x 3”) 2lb loaf tin,

Recipe: Lemon Drizzle Cake serves 8-10

225g/8oz  Unsalted Butter at room temperature

225g/8oz Caster Sugar

4 Large Free Range Egg

250g/9oz Plain White Flour

1 tsp Vanilla Extract – I use Nielsen-Massey 

2 tsp Baking Powder

1 Whole Lemon – finely zested and juiced

1/4 tsp Sea Salt – I use Maldon Sea Salt, halve quantity if using free flowing

175g/6 oz Icing Sugar

Optional – White and Yellow Sprinkles – mine are from Waitrose

Method: Preheat oven to 160C/140C fan, 325F, gas mark 3.

Making And Baking The Lemon Cake

  • Place butter, caster sugar and salt into a large bowl and whisk until pale and creamy.
  • Sift the flour and baking powder into a separate bowl.
  • Add 2 eggs, the vanilla extract and half of the sieved flour to the creamed butter and sugar. Whisk until just combined.
  • Now add the last 2 eggs, remaining flour and lemon zest.
  • Stir the ingredients together with a metal spoon until thoroughly combined.
  • Spoon the lemon cake batter into the prepared tin ensuring the top is level.
  • Place the cake into the centre of the oven and bake for 1 hour 10 minutes – 1 hour 20 minutes. My cake took 1 hour 15 minutes.
  • The cake is baked when it is golden in colour, firm to touch and an inserted skewer comes out clean.
  • As soon as the cake is baked remove from the oven and allow to cool for 20 minutes in the tin.
FF Lemon Drizzle Cake
Lemon Drizzle Cake before and after baking.
  • While the cake cools make the glacé icing.

Making The Fresh Lemon Icing And Decorating The Cake

  • Sieve the icing sugar into a bowl and add the lemon juice. Stir until thickly combined and completely lump free. If the icing is too thick add a few drops of water.
  • After 20 minutes cooling, run a palette knife around the outside edge of the cake. Turn the cake out – take care it will still be warm. Peel back the parchment paper from the base and discard.
  • Place the cake on to a cooling rack which is then place over a tray or plate.
  • Using a spoon drizzle the lemon icing over the cake, encouraging it to drip down the sides in places.
  • Finally scatter over some yellow and white sprinkles and leave the cake to cool completely.
FF Lemon Drizzle Cake
Freshly iced Lemon Drizzle Cake in the Spring sunshine.

Once cooled this cake is easily sliced. Serve with lemon tea for extra lemon flavour.

Keep the cake in an airtight container and eat within 5 days. Refrigerate during warmer weather.

If you have enjoyed this recipe for Lemon Drizzle Cake you may also like these:

Iced Cherry Coconut Loaf Cake

FF Lemon Drizzle Cake
Iced Cherry Coconut Loaf Cake

Raspberry Lemon Celebration Layer Cake

FF Lemon Drizzle Cake
Raspberry Lemon Celebration Layer Cake

Pomegranate Lemon Drizzle Bundt Cake

FF Lemon Drizzle Cake
Pomegranate Lemon Drizzle Bundt Cake

Since this cake is so delicious, it’s good to know that I have successfully doubled the recipe and baked two cakes at the same time. It is my firm belief that all food tastes better when shared. So, whether you are baking this cake for yourself, or alternatively as a gift, it’s definitely worth making two. In fact why not give both cakes away?

Whatever you are making, baking and creating in your kitchens, have fun preparing and sharing your feast.

Sammie xx

No part of this post may be reproduced or duplicated without the written permission of the owner. Please see my Disclosure Policy.

Share
Facebooktwitterpinterestlinkedintumblr