Wilko Gardening Product Review

Share
Facebooktwitterpinterestlinkedintumblr

Welcome to a new section of this blog called GROWING YOUR OWN FEAST IS FUN! Bob, my son and I are planning to grow vegetables, salads, herbs and flowers, mainly in containers, in our garden. So to kick off this new addition to my blog I’d like to invite you to my Wilko Gardening Product Review.

FF Wilko Gardening Product Review
Wilko Gardening Product Review planters and transplanters.

Having carried out a bakeware review before – see Wilko Product Review. I was excited to review a different aspect of Wilko’s, so I agreed to a Wilko Gardening Product Review.

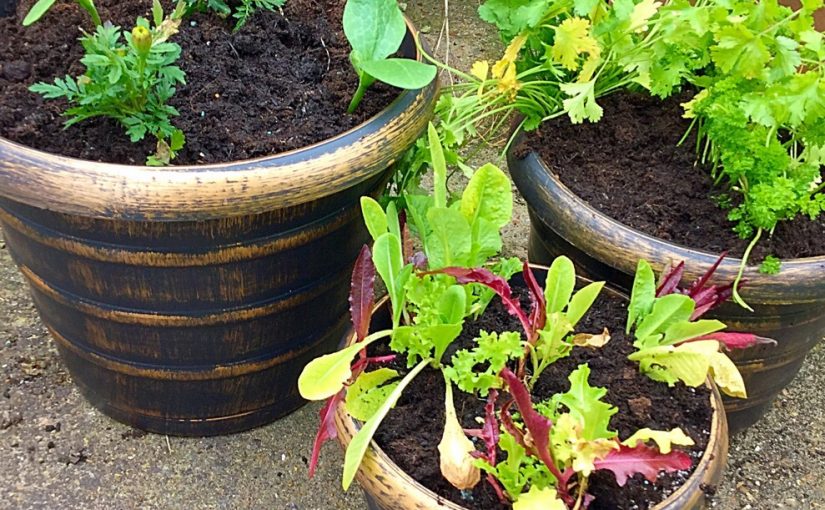
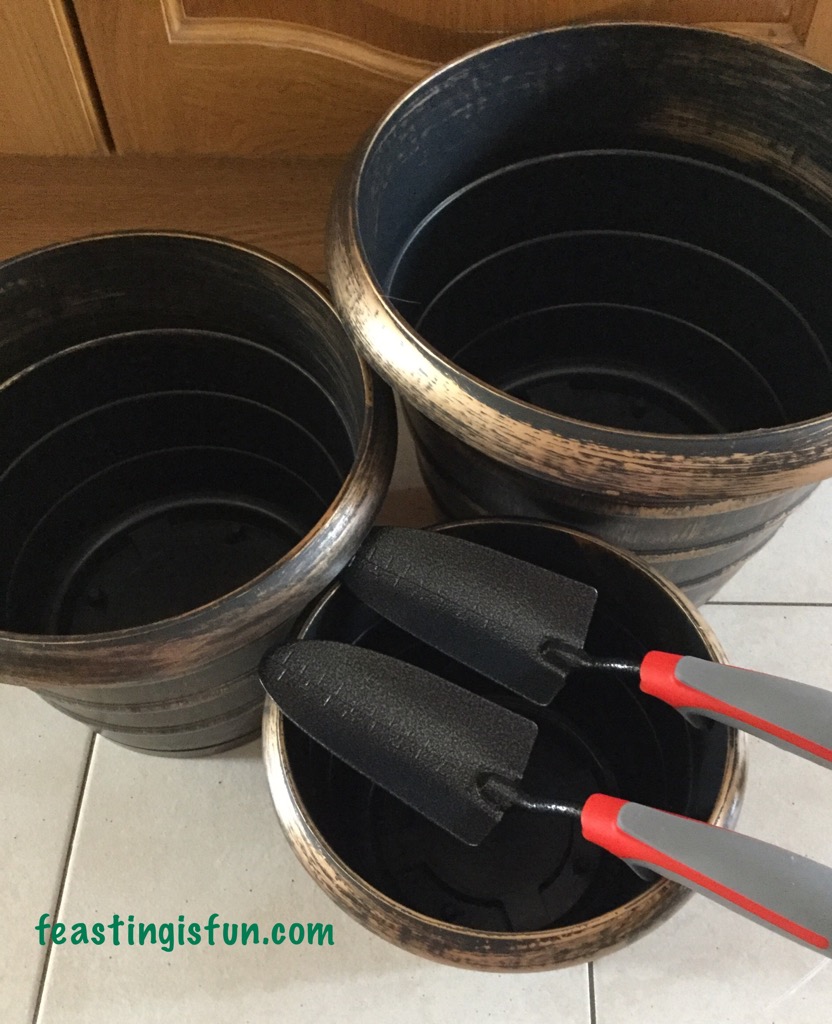
I was asked to choose 3 items from a list sent to me, the set of 3 Bee Hive Plastic Planters immediately caught my attention. With drip trays underneath, all that I needed to do was punch through the drainage holes in the base, which I did easily with a screwdriver.

Next I asked for a transplanter trowel, because honestly, any gardener will tell you that you can never have too many of these. Fortunately for me the garden sign that was my third choice, must have been out of stock as I received 2 transplanters. This was so thrilling as it meant Bob and I could have one each.

FF Wilko Gardening Product Review.
Time to get planting, I find it’s best to have everything to hand.

I ordered compost and some Dahlia tubers from Wilko. No lugging heavy bags of compost home, for a small fee order on line and have everything delivered!

As you can see from the photograph above, the base of each Bee Hive Plastic Planter was filled with some broken polystyrene. As we have our meat delivered, the polystyrene boxes themselves make useful planters and the lids are great for breaking up. This adds drainage to the base of the container and helps the plants grow better. You can also use broken terracotta pots, however, polystyrene is light and means the pots can be easily moved.

FF Wilko Gardening Product Review.
Adding water retaining crystals and slow release plant food granules ensure the plants are feed and watered even during dry spells.

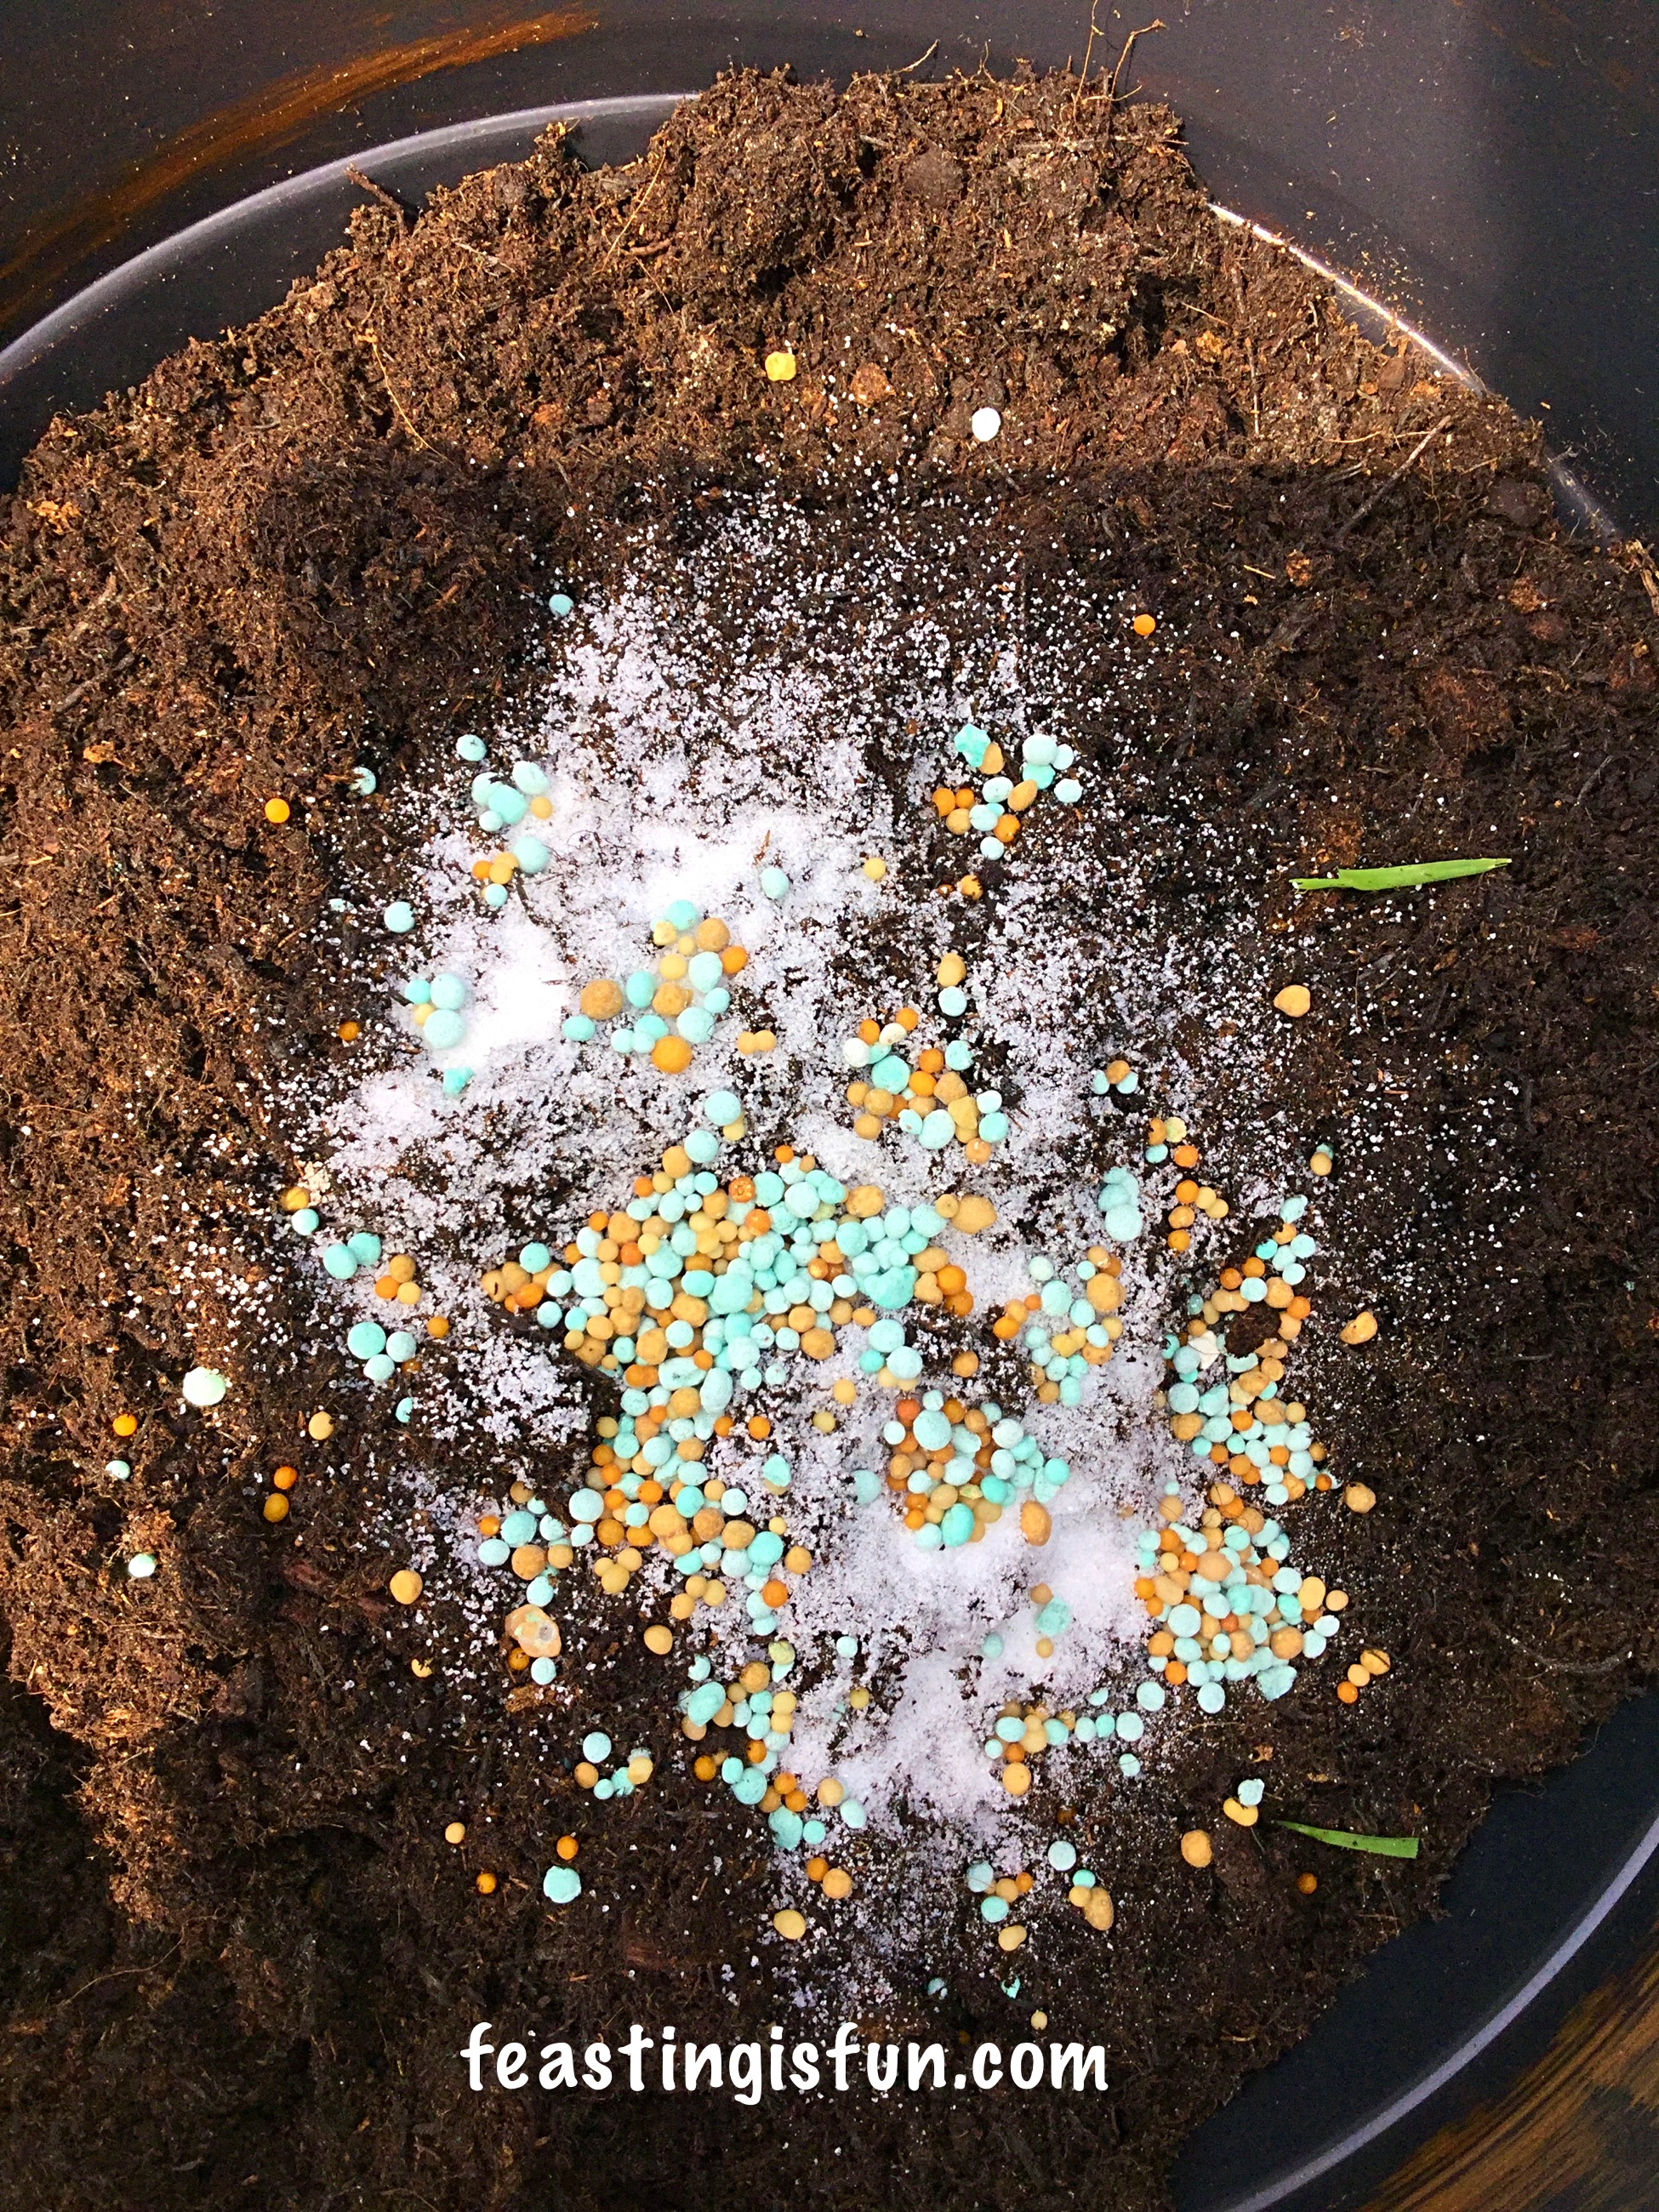
On top of the drainage fill the pots, almost full with compost. I then added some water retaining crystals and slow release plant food granules. These are then mixed throughout the compost in the pot.

By adding water retaining granules, even on really hot days, when the tubs have been watered first thing in the morning, the roots will not dry out. Similarly adding slow release plant food granules ensures that after 6 weeks, when the natural nutrients in the compost have been used up, plant food and nutrients are still slowly being released.

During the long Summer and Autumn growing season, I will not have to worry about feeding the Bee Hive Planters provided for the Wilko Gardening Product Review!

FF Wilko Gardening Product Review
Wilko Gardening Product Review I wanted Pretty and Productive.

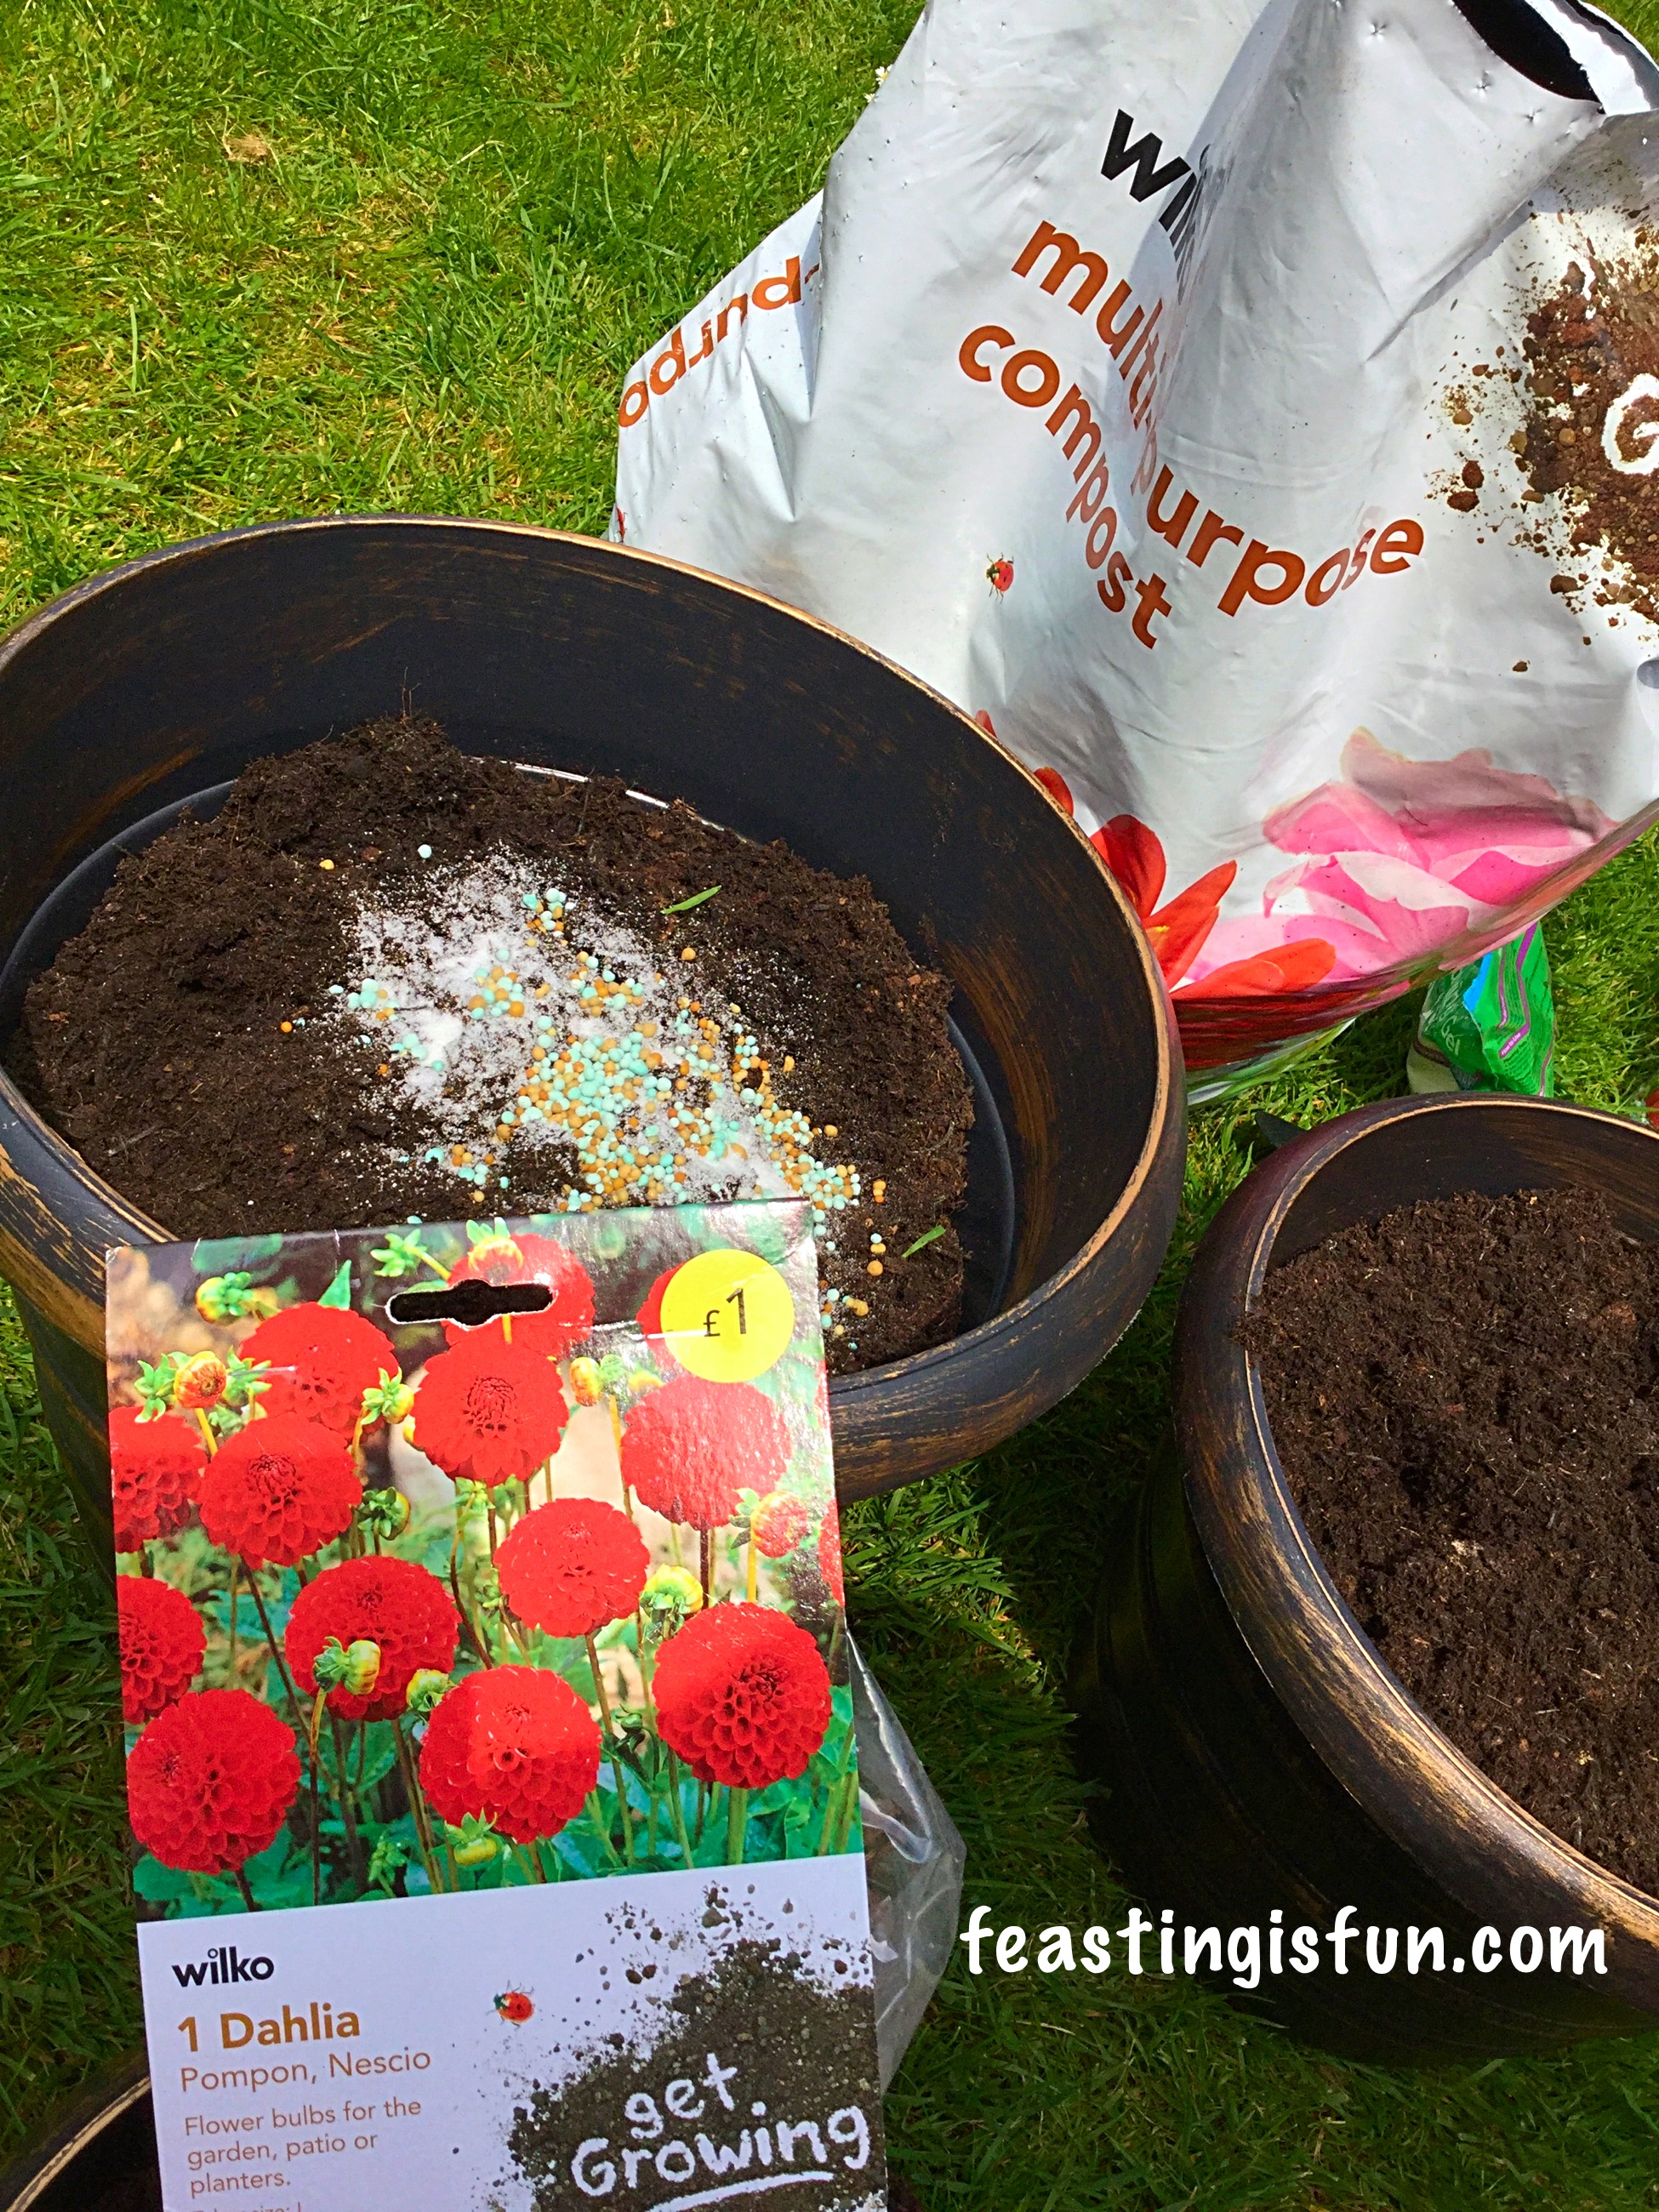
Whilst Bob and I want to grow lots of different salads and vegetables, I still want the garden to look pretty. So I added some Dahlia tubers, that will grow up through the courgette plants to give height to the planters. We will also be sowing and growing companion plants and flowering plants that will attract pollinators.

Making a deep well in the largest planter I spread out the Dalia tubers and planted them so that the dried stem, at the top of the bulbous tubers, was level with the top of the compost. Then I planted two courgette plants either side. The courgettes will spread and hang over the side of the planter. Growing courgettes in containers has many advantages, the courgettes are free from the soil and predators, such a slugs and snails. Although growing French marigolds will attract pollinating bees, it also makes hand pollination possible – something I will address in future posts.

FF Wilko Gardening Product Review
Whilst the Bee Hive Planter may look a little bare, the courgettes will soon fill out and the Dahlia will grow above the lower vegetable leaves.

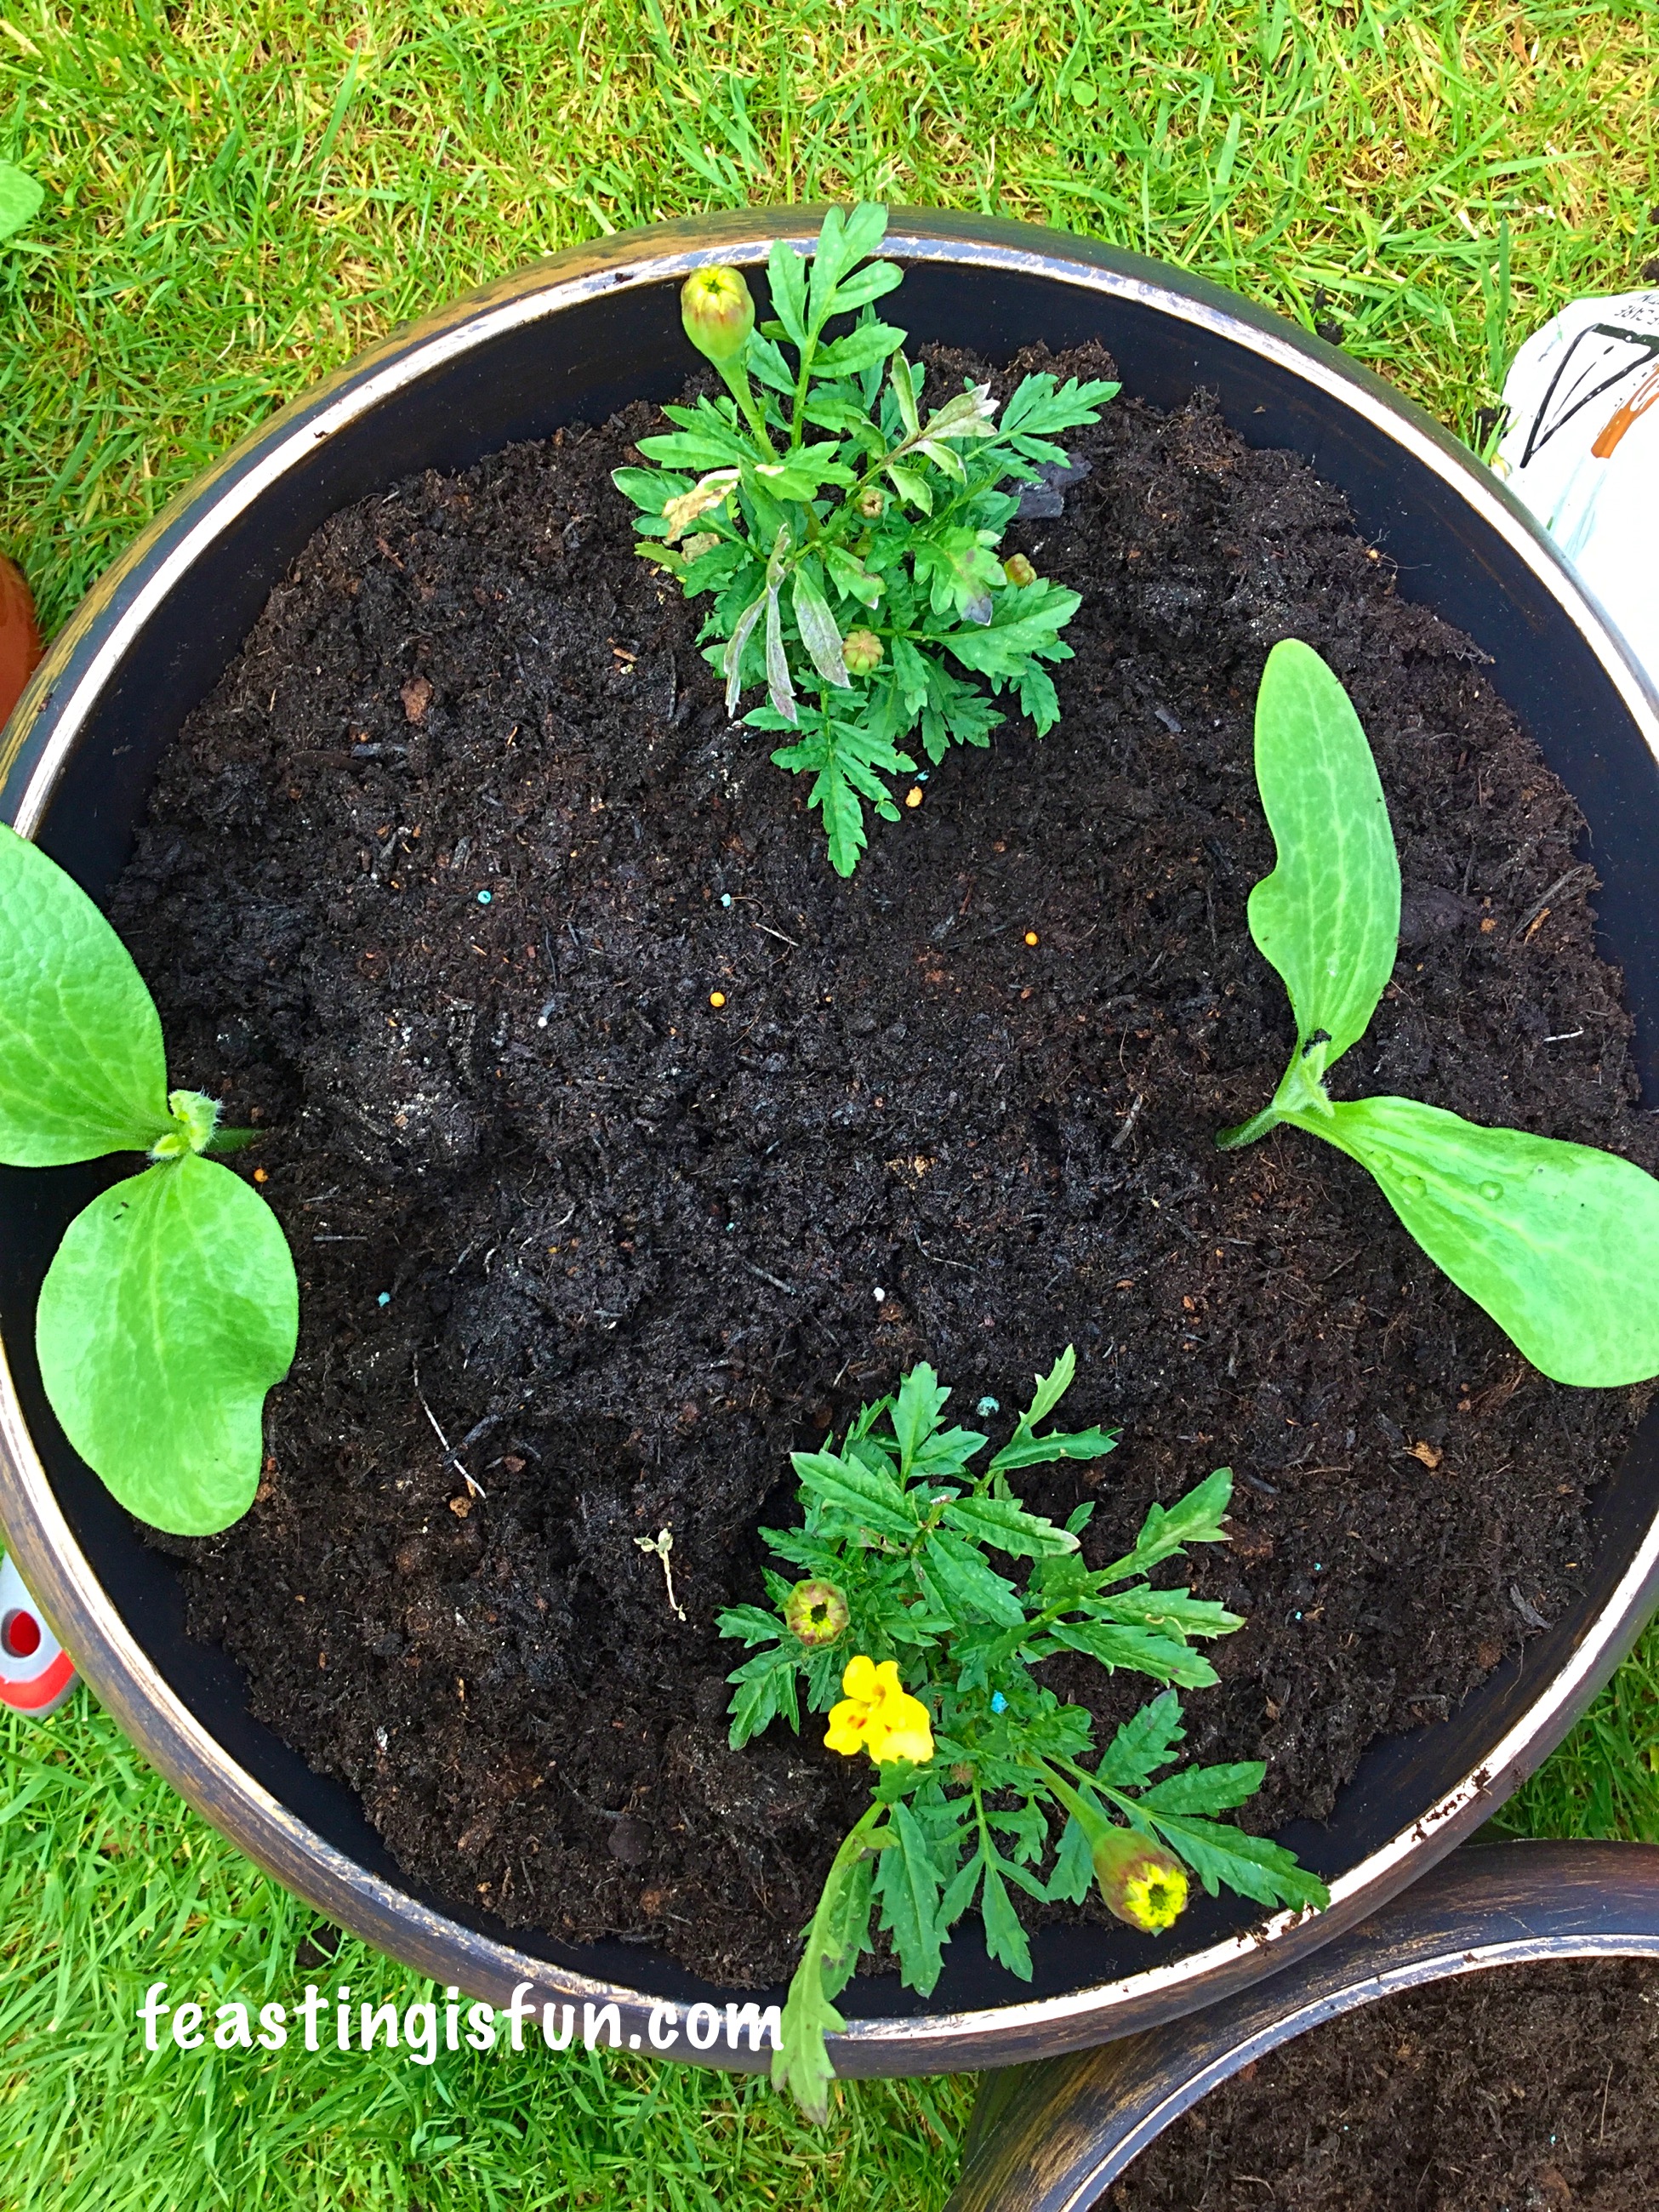
This planter’s compost top will be completely covered within a couple of weeks and a few weeks later we should be harvesting our own, homegrown courgettes. Perfect for kebabs, stir fries, sliced thinly in salads. Courgette flowers are also edible, small and raw, or covered in batter and deep fried. There will be plenty of new and interesting recipes coming from GROWING YOUR OWN FEAST IS FUN.

FF Wilko Gardening Product Review
Wilko Gardening Product Review all three containers planted.

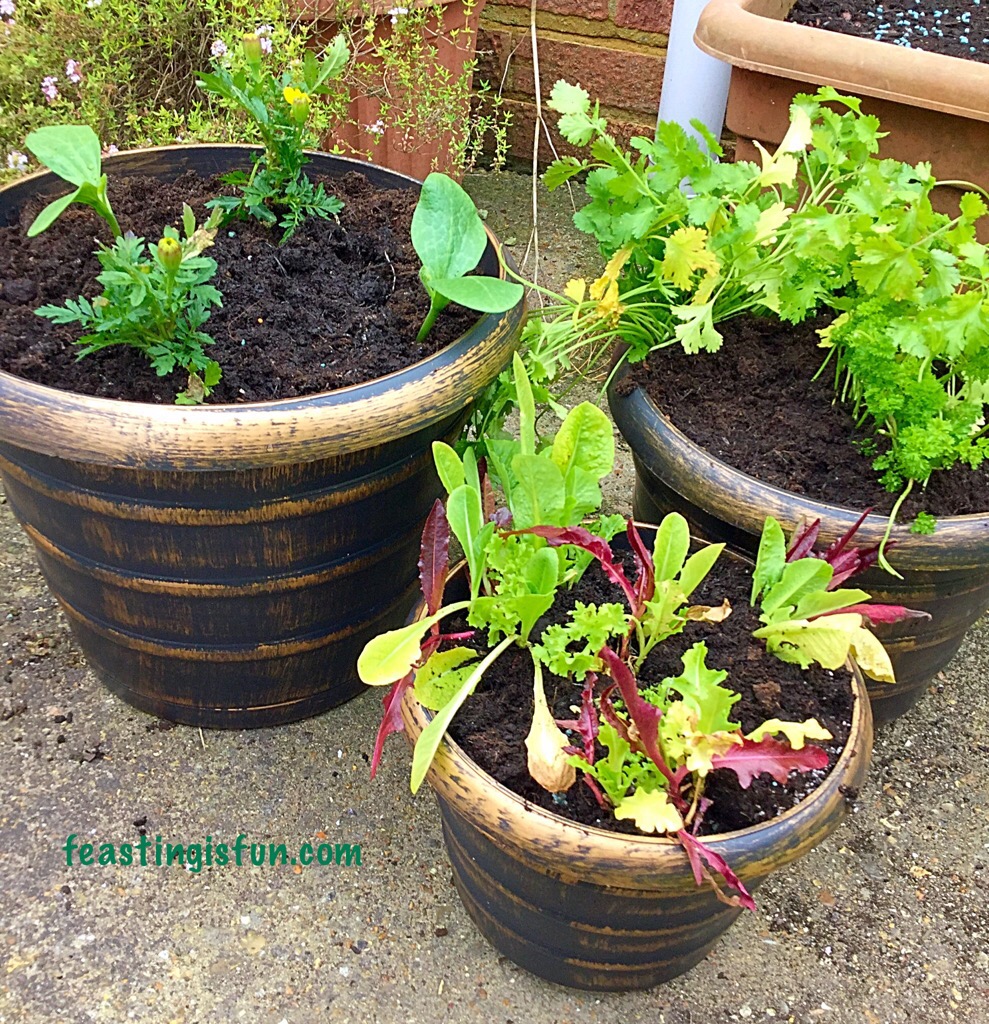
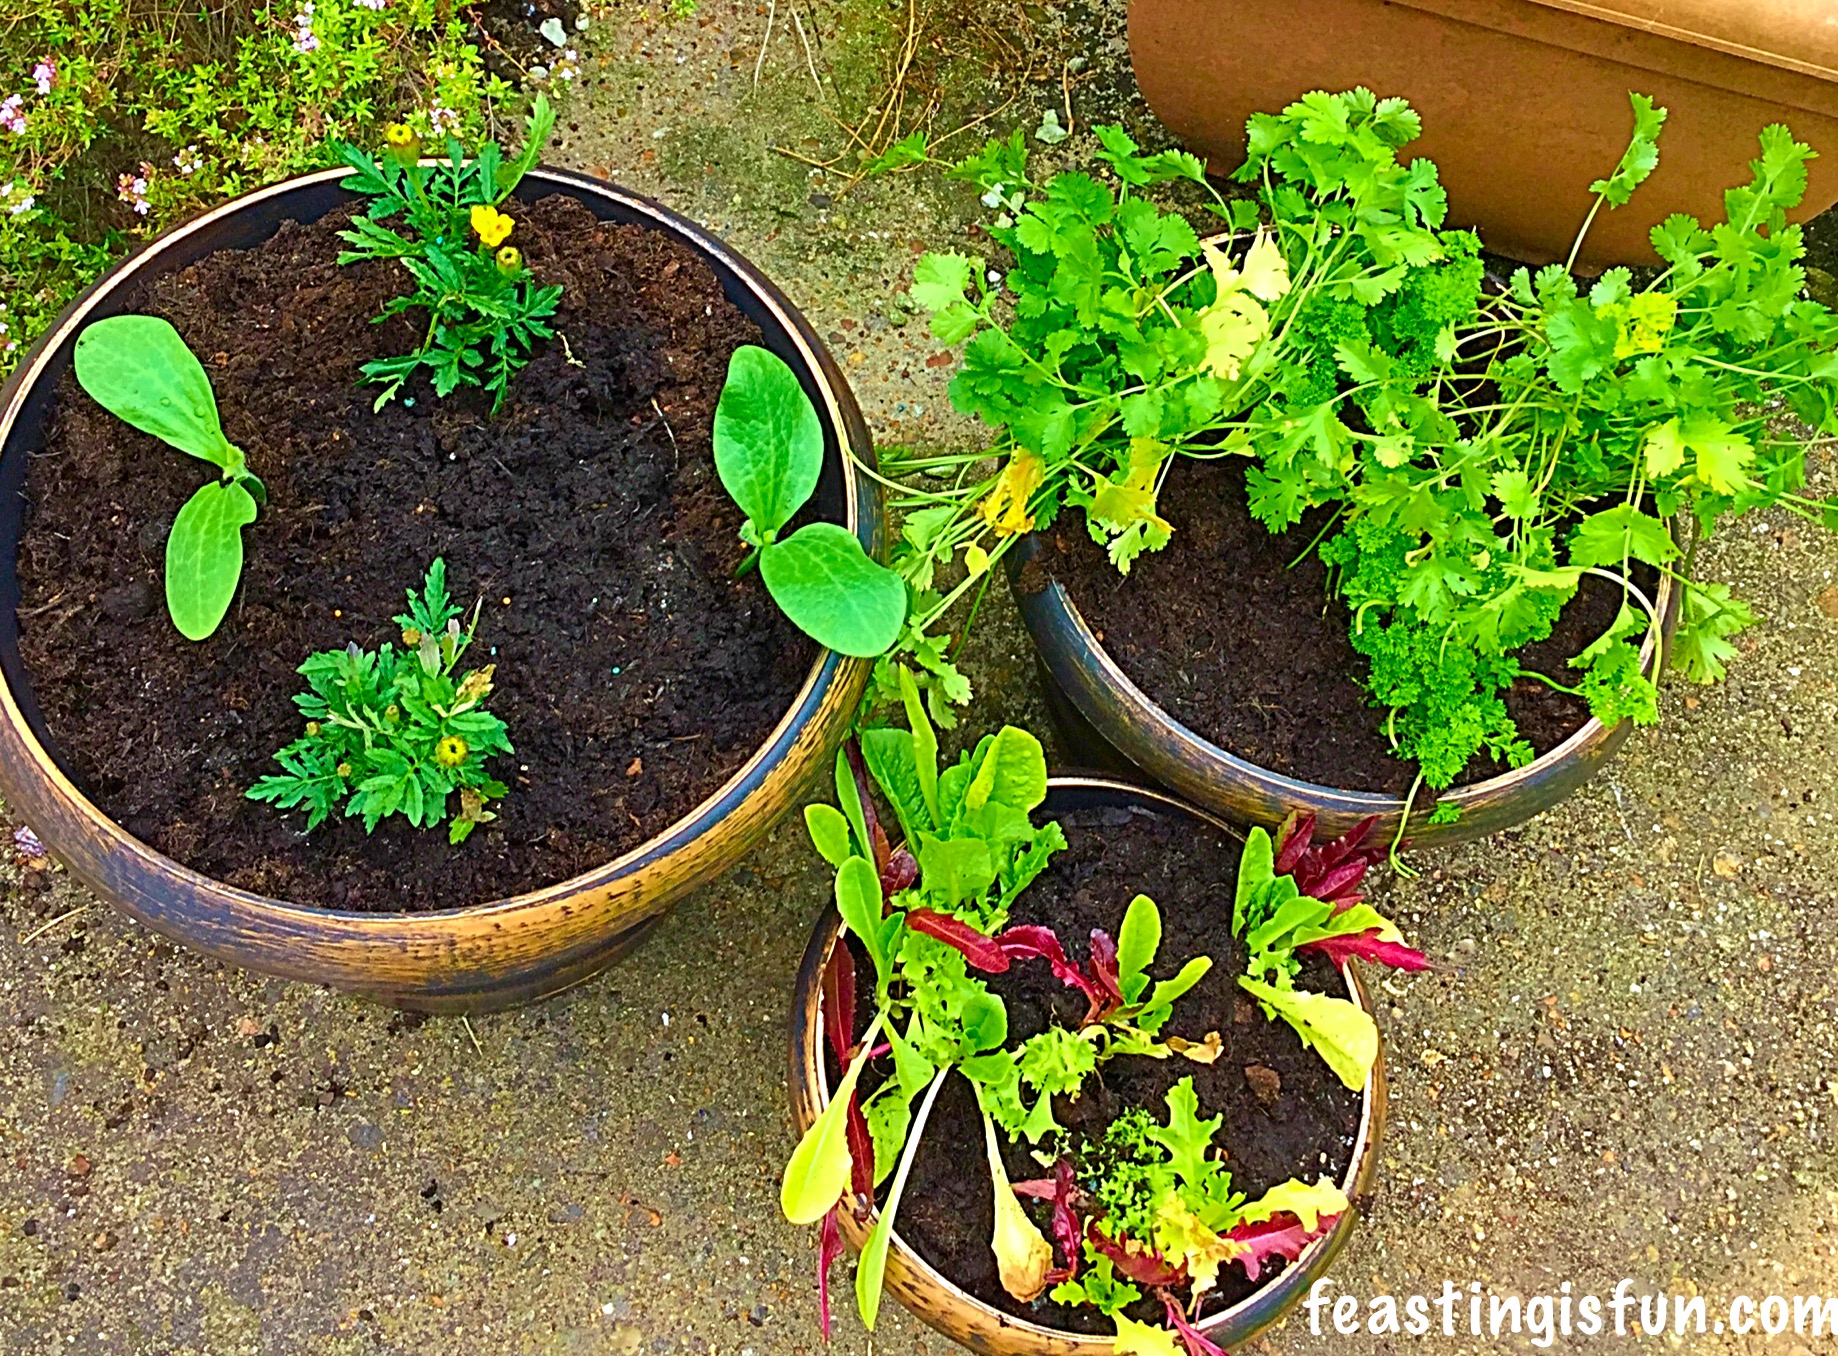
The second largest Bee Hive Planter was planted with herbs bought with my shopping from the supermarket. Both Coriander and Curly Parsley. I split the shop bought herbs in half and planted the parsley and coriander around the edges. Although a little bedragled, within a couple of days they had settled in and perked up.

Using the transplanter trowel for this Wilko Gardening Product Review made life very easy. Planting the smallest Bee Hive Planter with small, mixed lettuce leaves, the transplanters moved the soil and transplanted the pre-grown mixed lettuces into their holes. Pressing gently with my hands, around the planted lettuce, herbs, marigolds and small courgettes settles and firms them into place.

FF Wilko Gardening Product Review
Wilko Gardening Product Review time to give these planters a good soak.

Finally give the Bee Hive Planters a gentle but thorough soaking.

They have been placed in an area of partial sunlight as all the plants suit this condition. Daily watering and snail and slug patrol are important. Placing Vaseline around the tops of the containers will help deter slugs and snails. Also placing the planters on some wire mesh works as a deterrent.

I am really impressed with the size and decoration of the beehive planters. The transplanters are sturdy and very comfortable to hold. I look forward to seeing our produce and flowers flourish, with regular watering there really shouldn’t be anything else to take care of, except for picking courgettes and cutting herbs and salad leaves as they grow.

FF Wilko Gardening Product Review.
1 week update on the Wilko planters already the herbs have filled out and the courgettes are growing fast.

Wilko sell a wide range of gardening products. I have a nemesia, that I bought from Wilko many years ago and it still blooms with tiny pink flowers ever year.

I hope this post has given you the basics on how to plant containers and encouraged you to try growing a few of your own herbs and vegetables.

Whilst I am by no means an expert, I have been gardening for as many years as I have cooked and baked. So if you have any relevant questions, please either leave a comment or send me a tweet and I will do my best to help.

Bob and I hope you enjoy GROWING YOUR OWN FEAST IS FUN and the journey we have started together?

Sammie xx

Wilko sent me the Bee Hive Planters and transplanters for the purpose of review. All other items mentioned were purchased by me. I was not paid to write this blog, all content, photographs, views, opinions and advice are my own. I do not take responsibilty for anyone acting on the advice gien in this post. Please see my Disclosure Policy.

Share
Facebooktwitterpinterestlinkedintumblr

Twisted Fruity Jam Tarts

Share
Facebooktwitterpinterestlinkedintumblr

Who loves the idea of eating jam tarts for breakfast? I certainly do. My Twisted Fruity Jam Tarts are a fun way to start the day.

Since being inspired yesterday by a conversation on Twitter and with a spare packet of ready rolled, all butter pastry in the fridge, I challenged myself to come up with a twist on the regular jam tart. Literally! So I set about creating a tart that as well as being easy to pick up and eat, also has the filling covered.

Resulting in these Twisted Fruity Jam Tarts, that taste rather like a Danish pastry. While being easy to make, the golden pastry hides an apricot half and strawberry jam. Follow with a final sprinkling of demerara sugar over the egg washed pastry, a quick bake and the result is a delicious, fruity, flaky pastry delight!

FF Twisted Fruity Jam Tarts
Twisted Fruity Jam Tarts so easy to make and easier to eat 😉

Having never tried to bake something like this before, I was unsure how they would turn out. I couldn’t have been more thrilled. Each twist is strong enough to hold the entire tart by, which makes them ideal as picnic and finger food.

Also, the demerara sugar caramelises on the pastry, nudging each twist into a sweeter flavour sensation. Combining apricots with strawberry jam was utter flavour heaven. While the bake softened, tart apricots are offset by the sweet strawberry jam. Most importantly, for the very best flavour, use all butter puff pastry when making these tarts.

Unusual shaped fruit pastry on a plate with a mug of tea to one side.
Twisted Fruity Jam Tarts

Making these Twisted Fruity Jam Tarts was one of those moments in the kitchen when everything goes to plan and turns out better than I could of ever hoped for. And if I can make these, then so can you!

Recipe: Makes 6 Twisted Fruity Jam Tarts

320g Ready Rolled All Butter Puff Pastry – I used Just Rol

6 Apricot halves – I used tinned ones from Waitrose

2-3tbsp Good Quality Strawberry Jam- I used Hartleys Best Strawberry Jam

1-2tbsp Demerara Sugar -I used Billingtons

1 Medium Free Range Egg

Method: Preheat the oven to 210C/190C fan, gas mark 6, 425F.

Assembling The Fruit Tarts

  • Unroll the puff pastry ensuring that you have a baking tray that fits the size of the pastry. Trim the paper that the pastry has been wrapped up in so that it fits within the tray, as you will be using it to bake the tarts on.
  • Use a sharp knife to cut the pastry into 6 equal squares.

FF Twisted Fruity Jam Tarts

    This photo shows how to cut the squares.
  • Cut diagonally from each corner towards the centre two thirds of the way. See the photograph above.
  • Crack the egg into a small bowl and whisk. This is the egg wash.
  • Brush each of the squares with the egg wash.
  • Place a scant teaspoon of strawberry jam in the centre of each tart.
  • Put half an apricot, flat side down, over the top of the jam.
FF Twisted Fruity Jam Tarts
Twisted Fruity Jam Tarts 
  • Take the right hand point of the triangle at the front and place it over the apricot. Pressing down to secure the fold.
  • Next take the left hand point of the opposite triangle and do the same.

FF Twisted Fruity Jam Tarts

  • Continue for each tart, placing a cocktail stick through the pastry and apricot in the centre to secure it while baking.
  • Next take the top right hand point of the triangle on the right of the tart and fold it so it is on top of the other point of the triangle.
  • Work in the opposite direction for the left hand triangle.
FF Twisted Fruity Jam Tarts
Each tart has an X type shape.
  • Brush the tarts with egg wash again and sprinkle over liberally with demerara sugar.

Baking The Tarts

  • Place the Twisted Fruity Jam Tarts in the preheated oven for 25-30 minutes and bake until they are puffed and golden.
  • As soon as the tarts are baked remove from the oven and transfer to a cooling rack.

The portion size of these fun and delicious tarts is perfect. And not having to transfer the tarts from a floured board to baking parchment really does make these so easy to whip up. Although I haven’t tried it, I suspect these Twisted Fruity Jam Tarts would also freeze well, for up to one month. Defrost overnight in the refrigerator and then refresh by reheating in a moderate oven for 10 minutes.

Twisted Fruity Jam Tarts

In future I will definitely make a double batch, as these tart have proved very popular here at home.

Also, I need to make these again soon as I am sure they would be delicious served warm with a scoop of my Very Vanilla Ice Cream

So there you go easy peasy jam tarts, with a twist!

If you have enjoyed this recipe for Twisted Fruity Jam Tarts you may also like these:

Blackberry Nectarine Tart

FF Twisted Fruity Jam Tarts
Blackberry Nectarine Tart 

Spicy Sausage Rolls

FF Twisted Fruity Jam Tarts
Spicy Sausage Rolls 

Perfect All Butter Shortcrust Pastry

FF Twisted Fruity Jam Tarts
Perfect All Butter Shortcrust Pastry 

Pastry is such a wonderfully versatile baking medium. I always have a stash of all butter puff pastry in the freezer. Because it is so handy when a quick meal, dessert, or even a decision to go out for the day tomorrow, as the weather looks good picnic!

If you try these Twisted Fruity Jam Tarts please let me know how you get on? I love reading your comments and appreciate you taking time to write them. Also, I love seeing your makes and bakes on Twitter and Instagram. And if you tag me in and I will be sure to give you a shout out and retweet.

So, whatever you are making, baking and creating in your kitchens, have fun preparing and sharing your feast.

Sammie xx

No part of this post may be reproduced or duplicated without the written permission of the owner. Please see my Disclosure Policy.


Share
Facebooktwitterpinterestlinkedintumblr

Chocolate Orange Ice Cream

Share
Facebooktwitterpinterestlinkedintumblr

Finally, Summer is finally here. And I hope the sun shines throughout the day and any necessary rain falls at night! I’m loving using my new Which Best Buy Andrew James Ice Cream Maker  to create as many different flavoured ice creams as I can think of. Because there are lots and lots of them. This Chocolate Orange Ice Cream is my son’s idea of food heaven.

Pinterest sized image with descriptive graphics.

Our not so little man, more teenage strapping lad, adores Jaffa Cakes, so when Sugar and Crumbs sent me some of their Jaffa Twist Icing Powder as a gift, with an order I’d placed, I knew exactly what I was going to make with it. Can you imagine how great it felt to have my son hug me and say “Mum this ice cream tastes just like Jaffa Cakes”?

He had absolutely no idea what ingredients I’d used, which is rare as he loves being in the kitchen cooking alongside me. So 10 out of 10 for Sugar and Crumbs in the flavour department. Also, I used a Lindt Intense Orange Chocolate Bar to create a chocolate ganache ripple that runs through the Chocolate Orange Ice Cream.

Pinterest sized image.
Chocolate Orange Ice Cream

Why An Ice Cream Maker Is Worth The Space In Our Kitchens

Making the chocolate orange custard was simple, I simply switched the caster sugar for Jaffa Twist Icing Sugar. Churning the Chocolate Orange Ice Cream in an ice cream maker ensures that the finished product is silky smooth, the result of smaller ice crystals forming during the churning process. For around £25 it really is a worthwhile investment.

I am thrilled with the Which Best Buy Ice Cream Maker from Andrew James. It’s really straightforward to use & more importantly, from past experience, clean! It’s actually faster at freezing the ice cream than my old model & the freezing bowl takes up very little space in our freezer. If you are looking to purchase an ice cream machine, I thoroughly recommend this one.

FF Chocolate Orange Ice Cream
Chocolate Orange Ice Cream elegant enough for entertaining.

If you wanted to add a splash – tablespoon or two of your favourite orange liquer, the result would be a slightly softer set ice cream that is perfect served in pretty bowls, for dessert, when entertaining. Or alternatively you could reserve the chocolate ganache and pour whilst still warm over the cold Chocolate Orange Ice Cream. See with homemade ice cream the possibilities really are limitless!


Scoops of ice cream in a decorative glass bowl.
Chocolate Orange Ice Cream

Served in bowls or scooped into cones this Chocolate Orange Ice Cream is sure to be a huge hit with all Chocolate Orange lovers.

Recipe: Makes 750ml Chocolate Orange Ice Cream

400ml Double Cream

300ml Milk – whole or semi-skimmed

4 Large Free Range Egg Yolks – the whites can be frozen for 1 month – ideal to make my Lemony Strawberry Pavlova

6tbsp Jaffa Twist Icing Sugar by Sugar and Crumbs alternatively use 6tbsp of caster sugar (super fine sugar) and add 3tbsp Cocoa Powder  1/2tsp orange extract

1tsp Corn Flour – I use Doves Farm as it is certified gluten free

1/2tsp Vanilla Extract – I use Nielsen-Massey

100g Bar Lindt Intense Orange Chocolate Bar

Method: Place the freezing compartment of your ice cream maker into the freezer 24 hours prior to making this recipe.

Note: For photographic step by step instructions please see Very Vanilla Ice Cream

Making The Chocolate Orange Ice Cream Base

  • In a large heavy bottomed saucepan add the milk, 300mls of the double cream and the vanilla extract. Heat on medium until the milk is scalded – it has not yet boiled and little bubbles appear around the rim – remove from the heat at this stage.
  • In a large bowl whisk together the egg yolks, flavoured icing sugar (or cocoa powder and orange extract) and corn flour, until pale and thickened.
  • As soon as the cream mixture has reached scalding point, pour the hot cream slowly down the side of the bowl, with the whisk on, into the egg mixture. Continue whisking until everything is combined. This is now a custard base for the ice cream.
  • Pour the custard base back into the saucepan and heat on low, stirring continuously until the custard has thickened and coats the back of a wooden spoon.
  • Remove the saucepan from the heat and pour the custard, through a sieve into a large bowl.
  • Cover the custard with with cling film to stop the surface forming a skin.
FF Chocolate Orange Ice Cream
Chocolate Orange Ice Cream made with Jaffa Twist icing sugar.
  • Set the custard to one side to cool and then place in the fridge to chill completely.

Making The Chocolate Orange Ganache

  • Set a small saucepan with 5cm/1″ of water on to a medium heat.
  • In a heatproof bowl add 100mls of double cream and the chocolate orange bar, broken into pieces.
  • Place the bowl on top of the saucepan ensuring that the base of the bowl does not come into direct contact with the water – this is called a double boiler.
  • Stir the chocolate and cream continuously until the chocolate has completely melted and mixed in with the cream.
  • Remove the bowl from the saucepan and set to one side to cool.
FF Chocolate Orange Ice Cream
Chocolate orange ganache – the chocolate bar has bits in it which add texture to the finished ice cream.

Churning The Ice Cream Using Andrew James Ice Cream Maker

  • Set your ice cream maker up according to it’s instruction booklet.
  • With the Andrew James Ice Cream Maker, as with my previous model, the machine must be started prior to pouring the custard in – this prevents a thick layer of un-churned ice cream immediately freezing on contact with the freezer container.
  • Transfer the custard to a jug and then, with the mixer stirring pour through the open spout.
FF Chocolate Orange Ice Cream
Pouring the custard through the spout into the churning ice cream maker.
  • Churn the ice cream until it is a thick, but still slightly soft ice cream.
FF Chocolate Orange Ice Cream
Chocolate Orange Ice Cream ready to be decanted into a freezer container.
  • Turn the power off on the machine and at the plug. Remove the cover and then the paddle, scape as much ice cream off of the churning paddle as you can and then lick the rest off 😉.
  • Using a soft silicone spatula transfer the ice cream to a suitable, freezer proof tub.

Adding The Chocolate Orange Ganache

  • Pour over the cooled chocolate ganache.
FF Chocolate Orange Ice Cream
Chocolate Orange Ice Cream ready to be rippled!
  • Using the handle of a wooden spoon, or indeed the other end of the silicone spatula ripple the ganache through the Chocolate Orange Ice Cream.
  • Pop the lid on, label and place in the freezer to finish freezing.
Chocolate Orange Ice Cream a delicious dessert.

Remove the ice cream from the freezer 20 minutes prior to serving. Because there aren’t any artificial additives, homemade ice cream takes a little while to soften, ready to be scooped.

Serve scooped into bowls or cones. This is one very delicious and creamy ice cream, that should be savoured.

If the children are noisy during the summer holidays, give them a scoop full of this Chocolate Orange Ice Cream, not forgetting 2 scoops for yourself and buy yourself 10 minutes peace and quiet. Honestly nobody makes a sound when savouring this delicious treat.

Also, being homemade, you know exactly what ingredients have gone into your ice cream. In a consumer society that is increasingly interested in what goes into our food, making ice cream yourself removes any worries.

If you have enjoyed this Chocolate Orange Ice Cream Recipe, here are some others you may like too:

Strawberry Ripple Ice Cream

Strawberry ripple ice Cream in a cone.
Strawberry Ripple Ice Cream – also gluten free

Blackberry Chocolate Chunk Ice Cream

Blackberry chocolate chunk ice cream scoops in a glass bowl.
Blackberry Chocolate Chunk Ice Cream – also gluten free

Very Vanilla Ice Cream

Very Vanilla Ice Cream in a cone and a cookie sandwich.
Very Vanilla Ice Cream

Ice Cream is such a wonderful year round treat, yet during the Summer heat it is also very cooling. When it is very hot I quite often have just a cone with a couple of scoops of homemade ice cream. Knowing I have used fresh produce, including fruit, I am happy with my choice.

I have never believed in ‘good’ and ‘bad’ food. Preferring a balanced diet, with a heavy emphasis on homemade food, has ensured that over the years, not withstanding medication, my weight has always been fairly stable.

Do you struggle with guilt about food? I know a lot of people do and I am absolutely not here to judge you.

So, whatever you are making, baking and creating in your kitchens, have fun preparing and sharing your feast.

Sammie xx

Andrew James provided me with this ice cream maker for the purposes of a review. All opinions, views, content and photography is my own. Sugar and Crumbs sent me a free sample of their Jaffa Twist Icing Sugar with an order that I paid for. I have not been paid or reimbursed for writing this post, please see my Disclosure Policy.

Share
Facebooktwitterpinterestlinkedintumblr

Chilli Lime Chicken Kebabs

Share
Facebooktwitterpinterestlinkedintumblr

During warm Summer evenings, sitting in our garden, listening to the birds chatter and chirp, the delicious smell of barbecue often fills the air. Yet I’m never going to be a cheap sausages and cheap burgers girl. Good sausages yes. Burgers that are traceable back to their origin, definitely. For me though, kebabs are the way to go. I made these Chilli Lime Chicken Kebabs last year for our daughters birthday. With a slight change to the recipe, all for the better, I now can show them to you.

FF Chilli Lime Chicken Kebabs
Chilli Lime Chicken Kebabs perfect cooked on the grill or in the oven.

Since I’d been sent some KanKun Mexican Chilli Sauce to try, I was eager to see how the jalapeño chilli sauce would work with the kebabs I had made for last year’s birthday barbecue.

Oh wow. They are so good!

The jalapeño chilli sauce infuses a warmth into the chicken pieces without over powering them with heat. Also the lime and garlic in the marinade infuses the chicken pieces with incredible flavour as well as tenderising them with the lime juice. I love that these Chilli Lime Chicken Kebabs can be both cooked in the oven or on the barbecue. S

FF Chilli Lime Chicken Kebabs
Chilli Lime Chicken Kebabs tasty, tender chicken.

I wasn’t able to grill the on the barbecue, but the smokey, charred, flavour added by grilling them means that I will as soon as possible. Another alternative, maybe when the weather isn’t up to grilling would be to stir fry the chicken. Add in the ingredients from the vegetable kebabs and you have a quick, easy meal.

As our children ate these Chilli Lime Chicken Kebabs with us I didn’t add too much sauce. While you can certainly use it as a condiment if you want to kick the heat up a notch!

FF Chilli Lime Chicken Kebabs
KanKun Mexican Chilli Sauce range – the jalapeño sauce used for this recipe is in the middle.

I love chilli’s and am, at present growing some from seed. As soon as they are big enough I will then be transfer them  to the front garden. Since that is the driest bed and gets the most sun. Chilli’s like to be treated a bit mean whilst they are growing, although I add the odd splash of tomato food, once the chilli’s are forming does them the world of good.

For those of you who cannot or do not want to grow your own chilli’s, KanKun have a range of 3 bottles of chilli sauce – Chipotle, Habanero and Jalapeño. Each can be used in cooking (keep an eye out for my upcoming Chipotle Pulled Pork Fajita’s), or as a condiment. Just make sure that any sauce that has been in contact with raw meat is disposed of and not reused.

FF Chilli Lime Chicken Kebabs
Chilli Lime Chicken Kebabs delicious served alongside vegetable kebabs.

Recipe: Makes 5 Chilli Lime Chicken Kebabs

650g/1.5lb Skinned Boneless Chicken Breast – preferably Free Range or Organic – I buy ours from Graig Farm

2tbsp Olive Oil

Juice of 1 Lime

1tbsp Mexican Jalapeño Sauce from KanKun Sauce

2 Cloves of Garlic – crushed or minced

1 Small Chilli or 1/2 Jalapeño Chilli –  sliced (seeds removed if preferred)

1/4tsp Sea Salt – I use Maldon

1/4tsp Freshly Ground Black Pepper

1 large resealable plastic food bag.

Method: Preheat the oven to 200C/180C fan, gas mark 6 or cook over a medium hot barbecue grill.

Note – Especially when handling raw meat, including chicken, ensure all utensils, work tops and hands are thoroughly washed before and after use.

  • First of all open the resealable bag and turn down the sides. This makes it easier to add things to the bag.
  • Pour in the olive oil, jalapeño sauce, juice of 1 lime and then add the crushed garlic, sliced chilli, salt and pepper.
  • Cut the chicken breast into 3cm chunks and add to the bag. I actually use sharp kitchen scissors to snip the chicken straight into the bag.
  • Seal the bag and with clean hands smoosh the chicken about in the bag, ensuring every piece is covered in the marinade. I have to admit to this being something I always enjoy, a bit of smooshing!
  • Label the bag and place in the bottom of the fridge for 30 minutes to 2 hours. Alternatively, prepare at the start of the day, before work and have a smile on your face knowing dinner is sorted when you finally return home!
FF Chilli Lime Chicken Kebabs
Label the bag so that others are aware that it contains raw meat.
  • While the chicken is marinating, soak the wooden skewers in cold water – so they don’t catch fire on the barbecue!
  • Cover a large baking tray with aluminium foil – this really helps with the clean up process.
  • Carefully thread 5-7 pieces of chicken on each skewer. Since the chicken takes the same amount of time to cook as the vegetable kebabs, I also add sliced courgette, cherry tomatoes and red/yellow peppers to separate skewers. Alternatively I would place whole jalapeños, chunks of red onion or shallots on to skewers as well.
  • Place the Chilli Lime Chicken Kebabs on to the foil covered tray and pour over any excess marinade.
  • Cook in the top of the oven for 30 minutes, turning halfway through the cooking time.
  • If grilling on the barbecue these Chilli Lime Chicken Kebabs should take no longer than 20 minutes on a medium/hot barbeque grill, turing halfway through cooking.
  • To check if the chicken is cooked all the way through, slide off a thicker chunk and cut in half – there should not be any pink colour, the chicken should be opaque all the way through.
  • As soon as the kebabs are cooked remove them from the oven/barbecue.
FF FF Chilli Lime Chicken Kebabs
Chilli Lime Chicken Kebabs beautifully cooked in the oven.

Serve the Chilli Lime Chicken Kebabs in warmed pitta bread with fresh salad and extra Jalapeño Sauce, or as I have done, with herb basmati rice and vegetable kebabs.

However you serve these delicious kebabs they are sure to be thoroughly enjoyed. The lime, garlic and jalapeño chilli give them a warming, fresh, vibrant flavour. For real chilli fans, serve with extra slices of jalapeño chilli’s to up the heat factor.

While I love the heat that chilli imparts to a dish, I never want to compromise on flavour. This Mexican Jalapeño Chilli Sauce is so delicious and perfectly blends with the other flavours in these Chilli Lime Chicken Kebabs.

FF Chilli Lime Chicken Kebabs
Chilli Lime Chicken Kebabs the perfect feel good meal.

If you like to add a little heat to your meals like me, try adding a dash or two of KanKun Mexican Jalapeño Sauce!

If you have enjoyed this recipe for Chilli Lime Chicken Kebabs here are some others you may like:

Easy Tex Mex Chicken

FF Chilli Lime Chicken Kebabs
Easy Tex Mex Chicken perfect to make ahead.

Chunky Chilli

FF Chilli Lime Chicken Kebabs
Chunky Chilli perfect for colder days.

Lemon Thyme Roast Chicken

FF Chilli Lime Chicken Kebabs
Lemon Thyme Roast Chicken spice up your leftovers with some KanKun Sauce!

I love the Summer months. Having the back door open, sunlight streaming in through open windows, longer daylight hours. Let’s all make the most of this Summer. Eat outdoors, dust off the BBQ, invite friends and family round, for feasting, fun and the obligatory (in our house) water fight in the garden.

Let us all enjoy the warmth of the sun, good company, great food and having fun.

Sammie xx

KanKun Sauce sent me a pack of three of their sauces to try. All content, recipes, photographs, views and opinions are my own. I was not paid for this post. Please see my Disclosure Policy.


Share
Facebooktwitterpinterestlinkedintumblr

Lemon Drizzle Cake Bars

Share
Facebooktwitterpinterestlinkedintumblr

It is no secret that I love lemon. Whether it be in a glass of Franklin’s tonic water with clinking ice and a slice of lemon, cut into quarters as part of savoury Lemon Thyme Roast Chicken recipe, or even in a sweet bake such as my Lemon Blueberry Bundt Cake. Lemons are very versatile. And they bring sunshine into the kitchen on the dullest day’s. So let me introduce my Lemon Drizzle Cake Bars.

FF Lemon Drizzle Cake Bars

While a sturdy, yet delicious oat biscuit base covered in lemon curd and then topped with the lightest lemon sponge ensures these bars are easy to handle. And a  drizzle of fresh lemon juice icing ensures your tastebuds wake up with a zing. Resulting in a tasty bar that keeps you feeling full for longer because of the oats.

FF Lemon Drizzle Cake Bars
Lemon Drizzle Cake Bars

Especially ideal for picnics, packed lunches, or just as a mid morning or afternoon snack to keep you going until meal time.

Although I really do need to get around to making my own lemon curd, for this recipe I used Waitrose own luxury lemon curd. Because using a good quality lemon curd makes all the difference to the overall flavour.

Lemon Drizzle Cake Bars

Recipe: Makes 16  Lemon Drizzle Cake Bars

For the Oat Biscuit Base:

225g/8oz Unsalted Butter

125g/4.5oz Caster Sugar

1/8tsp Salt – I use Maldon

1tsp Vanilla Extract – I use Nielsen-Massey

1 Large Free Range Egg Yolk

100g/4oz Rolled Oats – not quick cook

125g/4.5oz Plain White Flour

3tbs Lemon Curd – use the best quality one that you can afford

For the Lemon Sponge Layer:

125g/4.5oz Unsalted Butter

100g/4oz Caster Sugar

1/8tsp Salt

1/2tsp Vanilla Extract

2 Large Free Range Eggs

125g/4.5oz Plain White Flour

1tsp Baking Powder

Finely grated zest of 1 Lemon – reserve the juice for the icing

For the Lemon Drizzle Icing:

100g/4oz Icing Sugar

Juice of 1 Lemon

Method: Preheat the oven to 200C/180C fan, gas mark 6, 400F.

Making the Oat Biscuit Base:

  • First of all, line a 28cm x 20cm x 5cm (12″x 8″x 2″) Swiss roll tin with baking parchment. I have found that I am able to line mine without greasing, however, lightly grease the tin if it is easier to keep the parchment in place.
  • In a large bowl beat/whisk together the butter, cream and salt until pale and creamy.
  • Add the vanilla extract and egg yolk and continue to beat/whisk until combined.
  • Add the oats and flour and stir together until combined.
  • Place the biscuit mixture into the lined tin and press into place using clean fingers.
  • Place the tin in the fridge and chill the biscuit mixture for 30 minutes.
  • As soon as it is chilled place the Swiss roll tin in the centre of the oven and bake for 20 minutes.
  • Remove after the 20 minutes has elapsed and turn down the oven temperature to 160C/140C fan, gas mark 3.
  • Spoon the lemon curd on to the hot biscuit base and spread so that it covers and almost reaches the edges.
FF Lemon Drizzle Cake Bars
This tangy lemon curd layer makes all the difference to the finished bake.

Making the Sponge Layer:

Note: This can easily be made whilst the oat biscuit base is baking.

  • In a large bowl whisk/beat the butter, sugar and salt together until they are pale and creamy.
  • Add the 2 whole eggs and vanilla extract. Whisk/beat until light and foamy.
  • Sift in the flour and baking powder. Add the finely grated zest of 1 lemon.
  • Fold all the ingredients together, using a spoon, until they are just combined.
  • Spoon the mixture over the lemon curd coated biscuit base.
FF Lemon Drizzle Cake Bars
Spoon the cake batter evenly over the base.
  • Spread the cake batter using the back of a spoon, or an offset spatula, until it covers almost all of the biscuit base.
FF Lemon Drizzle Cake Bars
The lemon cake batter will spread to completely cover the biscuit base whilst baking.
  • Place the Swiss roll tin in the centre of the preheated oven and bake for 30 minutes.
  • The sponge is baked when it springs back from a light touch and is a light golden colour. Don’t worry if it is paler than you expect, the lower baking temperature stops it browning as much as you may be used to.
  • As soon as the sponge is baked remove the tin from the oven, place on a cooling rack and allow the entire bake to cool in the tin.
FF Lemon Drizzle Cake Bars
The entire slab of sponge topped biscuit cooling in it’s tin.
  • When the bake is completely cooled, lift out of the tin, using the baking parchment and a palette knife and place on to a board.
  • Peel back the sides of the baking parchment and tuck them underneath.

Making the Lemon a Drizzle Icing:

  • Sift the icing sugar into a small bowl.
  • Add the juice of one lemon.
  • Mix until you have a smooth, slightly runny paste.
  • Using a spoon, drizzle the lemon icing over the top of the cake/biscuit slab. I prefer a line style drizzle, but you can drizzle your icing however you wish. Let your creative juices flow! Although I do advise against pools of icing gathering on top of the bake.
  • Set your Lemon Drizzle Cake Bars bake to one side to allow the icing to set.
FF Lemon Drizzle Cake Bars
Lemon Drizzle Cake Bars the tart lemon icing gives these a professional finishing touch.
  • Once set you may cut your slab into individual bars.
  • Cut down the length of the bake in the middle.
  • Next cut across the width of the bake, creating four quarters.
  • Cut each quarter into four individual bars.
FF Lemon Drizzle Cake Bars
Lemon Drizzle Cake Bars gloriously tempting in the sunshine.

Because of the sturdy and delicious oat biscuit base, these Lemon Drizzle Cake Bars are the perfect, portable food.

Store in an airtight tin (I use old biscuit tins, usually from Christmas), separating layers with pieces of baking parchment and eat with 5 days.

I had one of the Lemon Drizzle Cake Bars with a cup of tea for a rather late lunch and it was incredibly tasty and refreshing. While using good quality Lemon Curd ensures the right balance of tartness within the bar, as does using fresh lemon juice in the drizzle icing. So I highly recommend these delightfully tangy Lemon Drizzle Cake Bars!

FF Lemon Drizzle Cake Bars
Lemon Drizzle Cake Bars perfect for Afternoon Tea.

If you have enjoyed this recipe for Lemon Drizzle Cake Bars, here are a few more you may like too:

Bakewell Shortbread Bars

FF Lemon Drizzle Cake Bars
Bakewell Shortbread Bars

Macadamia Apricot Flapjacks

FF Lemon Drizzle Cake Bars
Macadamia Apricot Flapjacks

Double Cherry Drizzle Oat Bars

FF Lemon Drizzle Cake Bars
Double Cherry Drizzle Oat Bars

Since my family love having something homemade to take to school or work in their packed lunches these bars are ideal. Also I hope I have inspired you to try these delicious Lemon Drizzle Cake Bars. Alternatively, why not bake a batch and take them into the office as a Friday, or mid-week treat for everyone?

Finally, whatever you are making, baking and creating in your kitchen, have fun preparing and sharing your feast.

Sammie xx

No part of this post may be reproduced or duplicated without the written permission of the owner. Please see my Disclosure Policy.

Share
Facebooktwitterpinterestlinkedintumblr

Feta Red Onion Marmalade Quiche

Share
Facebooktwitterpinterestlinkedintumblr

I love chutneys, relish, chilli jam, savoury marmalade. So when I saw the varieties that Hawkshead Relish make and sell I was in my element. And challenged to use the jellies and marmalade as an ingredient, I immediately thought of quiche. So I set about making this delicious Feta Red Onion Marmalade Quiche.

FF Feta Red Onion Marmalade Quiche.
Feta Red Onion Marmalade Quiche a delightful combination of flavours.

Perfect Shortcrust Pastry

First of all, however, I set about creating a foolproof all butter shortcrust pastry recipe, for both sweet and savoury bakes. You can find it here – Perfect All Butter Shortcrust Pastry.Also, you will find another quiche recipe using Hawkshead Relish Ale Jelly as an ingredient!

So, with a reliable, consistent pastry recipe, that has been tested and retested, I was then able to let my creative imagination run wild.

FF Feta Red Onion Marmalade Quiche
Feta Red Onion Maramalade Quiche delicious layers of flavour.

Flavour Inspiration

We have some tea rooms near us that are joined to a local artists gallery and a wonderful shop that stocks local pottery, glass and a million other things. Going to the tea rooms is truly a treat day out. In the tea rooms they serve a range of dishes, from light lunches to hearty meals. One of my favourites is their Quiche Lorraine, particularly as it is always served with chutney and onion marmalade in separate little pots.

And this memory sparked my idea was to have the red onion marmalade inside the quiche. Then I needed to decide what to pair it with. A recent love affair with crumbly, salty, Greek Feta Cheese provided the answer. Finally, topped with freshly sniped chives from the garden this Feta Red Onion Marmalade Quiche is so much more than the sum of it’s separate parts.

FF Feta Red Onion Marmalade Quiche
Feta Red Onion Marmalade perfect for picnics and buffets.

Quiche Indulgence

The chives provide a beautiful top to the quiche and indeed echo the onion flavour from the marmalade. While the feta cheese mellows in the eggy custard providing the perfect balance to the warm red onion marmalade. The difference that a small amount of heat adds to the base layer of this quiche is quite dramatic.

If you enjoy Red Onion Marmalade with your cheese and crackers, using it as an ingredient in a dish lifts it to a whole different level. Since the sweet/sour caramelised onion flavours come alive on your tongue. It is pure heaven!

Recipe: This makes one deep Feta Red Onion Marmalade Quiche serves 2-3, baked in a loose bottom tart tin.

For a larger quiche, double the recipe.

1/3 Quantity All Butter Shortcrust Pastry

50g/2oz Feta Cheese

2-3tbsp Red Onion Marmalade from Hawkshead Relish

4 Large Free Range Eggs

2tbsp/30ml Whole Milk

1/4tsp Sea Salt I use – Maldon

1/4tsp Freshly Ground Black Pepper

1tsp Chopped Fresh Chives

Making And Baking The Feta Red Onion Marmalade Quiche

Method: Preheat the oven to 200C/180C fan, gas mark 6, 400F

  • Prepare the pastry and blind bake according to the instructions given for Perfect All Butter Shortcrust Pastry.
  • Reduce the oven temperature to 180C/160C fan, gas mark 4, 375F.
  • Spoon 2-3 tablespoons of Red Onion Marmalade into the bottom of the pastry tart shell.
FF Feta Red Onion Marmalade Quiche
A delicious layer of red onion marmalade at the base of the quiche.
  • Crumble the feta cheese on top.
FF Feta Red Onion Marmalade Quiche
Salty feta crumbled on top of the savoury marmalade.
  • Crack the eggs into a jug. Add the milk and seasoning. Whisk to combine.
  • Carefully pour the egg mixture into the tart shell, taking care not to overfill it. Better to have some egg mixture left over, than over fill the tart case.
FF Feta Red Onion Marmalade Quiche
Leave about 1cm of the pastry unfilled.
  • Place the quiche carefully into the centre of the preheated oven.
  • Bake for 35-40 minutes until the egg is set in the middle. It should be firm and not wobble.
FF Feta Red Onion Marmalade Quiche
Feta Red Onion Marmalade Quiche golden with bright green flecks from the chives.

Leave to cool slightly before serving.

I personally like this Feta Red Onion Marmalade Quiche best when it is warm. Served with a crisp, green salad, my Tangy Lemon Potato Salad and an extra spoonful of the delicious Red Onion Marmalade.

FF Feta Red Onion Marmalade Quiche
Feta Red Onion Marmalade Quiche absolutely delicious.

Perfect to take in your packed lunch as a change from sandwiches. Once cooled, wrap in cling film and store in the fridge. Also, this quiche freezes successfully for up to one month. Remove from the metal tart tin and wrap in cling film and then foil.

I found this really handy when I was recipe testing and made 6 quiches over one weekend!

If you have enjoyed this Feta Red Onion Marmalade Quiche recipe, here are a few others you may also like:

Spicy Sausage Rolls

FF Feta Red Onion Marmalade Quiche
Spicy Sausage Rolls these have a warming bite to them!

Quiche Lorraine

FF Feta Red Onion Marmalade Quiche
Quiche Lorraine delicious chunks of ham and strong cheddar in an egg custard.

Sausage Plait With A Twist

FF Feta Red Onion Marmalade Quiche
Sausage Plait with a delicious twist.

I was so thrilled with the outcome of this particular recipe. Because it had honestly never occurred to me before to use savoury chutneys and marmalades as ingredients. And look out for the upcoming Hawkshead Relish Review where there will be other tasty recipes using their products as ingredients.

The flavour and texture of the Red Onion Marmalade is very different from traditional, sticky onion marmalade. Since this marmalade has a chunky, more chutney texture and the flavour is delicious. Sweet, caramelised onions, with a very slight sour vinegar flavour that works to balance the whole taste experience.

Has this encouraged you to try using condiments as ingredients?

Thank you for sharing all of your makes and bakes with me on Twitter and Instagram. I not only enjoy seeing you bake my recipes, but whatever you make inspires me. Please keep the comments coming. Not only do I really enjoy reading them, but I’ve been told other readers also enjoy reading them too.

So, whatever you are making, baking and creating in your kitchens, have fun preparing and sharing your feast.

Sammie xx

Hawkshead Relish provided me with a sample of their Red Onion Chutney. All recipes, content, photography, views and opinions are my own. Please see my Disclosure Policy.


Share
Facebooktwitterpinterestlinkedintumblr

Black Forest Giant Doughnut

Share
Facebooktwitterpinterestlinkedintumblr

Today is #NationalDonutDay. While I can only assume from the spelling that it applies to those in the United States and yet here I am baking a Black Forest Giant Doughnut. Because any reason to eat doughnuts is good enough for me!

FF Black Forest Giant Donut

Making a Black Forest Gateaux has been on my list of bakes for a while. Finally I took the opportunity of making a Black Forest Giant Doughnut. Alternatively, if you do not have doughnut moulds – mine were from Lakeland are were very reasonably priced – I see no reason why this recipe shouldn’t work using 7-8″ sandwich tins.

Since this has the lightest of chocolate sponges I opted to add a little Kirsch (cherry liquer).

Cherries And Chocolate Sponge

When in season fresh cherries, that have been macerated in a little liquer and sugar will be used. Because they aren’t quite in season yet, I opted for tinned cherry pie filling. Alternatively, morello cherry jam would work well here. Since this is a very adaptable recipe, use whatever you have to hand, or can easily get hold of.

FF Black Forest Giant Doughnut.
Black Forest Giant Doughnut deliciously easy to make and assemble.

Although this is a giant doughnut I would happily bring it out for dessert after dinner, or serve with afternoon tea on a sunny day in the garden. Most importantly I encourage you to share this delicious bake. Because it is simply too good to be kept hidden away.

Recipe: Makes one Black Forest Giant Doughnut serves 8

200g/7oz Unsalted Butter –  plus a little extra for greasing the moulds

200g/7oz Caster Sugar

Scant pinch of salt – no more than 1/4 tsp

1 tsp Vanilla Extract – I use Nielsen-Massey

6 Large Free Range Eggs

75g/3oz Cocoa Powder

125g/4oz Plain White Flour

1.5 tsp Baking Powder

For the filling/topping:

200ml/8fl oz Double Cream

1 x 410g Tin Cherry Pie Filling – note morello cherry jam and fresh cherries can be used instead.

Optional – 1tbs Kirsch

Method: Preheat the oven to 160C/140C fan, gas mark 3, 325F

Making And Baking The Chocolate Doughnut Halves

  • First of all, grease the inside of both doughnut moulds well with soft butter.
  • In a large bowl add the butter and sugar.
  • Whisk/beat until pale and creamy. Approx 5 minutes, this helps create a very light sponge.
  • Add all 6 eggs and the vanilla extract to the bowl – I always crack my eggs into a separate bowl first.
  • Sift the flour, salt, cocoa powder and baking powder into the bowl.
  • Whisk/beat on a slow speed until all the ingredients have come together.
  • Using a large spoon give the chocolate sponge mix a good stir to ensure all the ingredients are well combined.
  • Divide the cake batter in half and spoon into each of the 2 doughnut moulds.
FF Black Forest Giant Doughnut
Two halves of a giant doughnut ready to be baked.
  • Place the doughnut moulds on to a baking tray, ensuring they don’t squash each other (I actually switched trays after this photo was taken).
  • Put the tray into the centre of the oven and bake the doughnut halves for 30-40 minutes.
  • The doughnut halves are baked when they spring back from a light touch.
  • As soon as the doughnut halves are baked remove  from the oven.
FF Black Forest Giant Doughnut
Each half of the giant doughnut is beautifully baked.
  • Carefully place each silicone mould on to a cooling rack.

Adding A Kick Of Kirsch

  • If adding Kirsch carefully prick each mould lightly with a cocktail stick, being careful not to puncture the silicone mould.
FF Black Forest Giant Doughnut
Lightly prick the sponge all over so that the Kirsch can be absorbed.
  • Spoon half a tablespoon of Kirsch over each half of the doughnut sponge whilst it is still hot.
  • Leave to cool for 5 minutes and then turn each of the sponges out onto the cooling rack. Cool fully before decorating.

Decorating The Black Forest Giant Doughnut:

  • In a medium bowl add the double cream and whip until it holds a firm peak.
  • Fill a piping bag with a large star tip (I use Wilton #1M) with the whipped cream).
  • Place one half of your doughnut, flat side up on a cake stand or plate.
  • Reserve 8 whole cherries to decorate the top, spoon the remaining cherry pie filling on to the bottom half of the doughnut – DO NOT over fill.
FF Black Forest Giant Doughnut
Spoon slightly less filling than I have, this splurged a bit when the top was put on!
  • Pipe the cream in a swirl pattern on top of the cherries.

FF Black Forest Giant Doughnut

  • Place the top of the doughnut on to the base. Wipe away any excess cherry syrup – notice that in my finished photos there isn’t a doilie.
  • Pipe 8 swirls evenly around the top of the doughnut and top each with a reserved cherry.
  • Pipe stars around the outside of the middle of the doughnut, this creates a tidy, professional finish.
FF Black Forest Giant Doughnut
Black Forest Giant Doughnut 

Serve the Black Forest Giant Doughnut cut into generous slices, with a smile and a lovely hot drink!

FF Black Forest Giant Doughnut
Black Forest Giant Doughnut a real treat.

While growing up I had Black Forest Gateaux every year, for my birthday. So taking a classic recipe and turning it into an amazing giant doughnut was fun.

Finally this is a stunning, yet easy to accomplish bake. Since a slice of Black Forest Giant Doughnut is bound to evoke memories of the retro gateaux and break out smiles once tasted and devoured!

If you have enjoyed this Black Forest Giant Doughnut Recipe here are some others you may like to try:

Raspberry and Cream Giant Doughnut

FF Black Forest Giant Doughnut
Delicious Raspberry and Cream Giant Doughnut

Black Forest Cupcakes

FF Black Forest Giant Doughnut
Black Forest Cupcakes

Lemon Blueberry Cupcakes

FF Black Forest Giant Doughnut
Lemon Blueberry Cupcakes 

While this recipe can be made using sandwich tins I recommend buying the silicone doughnut moulds. Because they create a beautiful rounded doughnut shape, are incredibly easy to use and inepensive to buy. Alternatively add them to your birthday or Christmas list!

Sammie xx

Share
Facebooktwitterpinterestlinkedintumblr

Toffee Apple Crumble

Share
Facebooktwitterpinterestlinkedintumblr

So it is June 1st 2016 today. If you were expecting an ice cream recipe, or a light, summery pavlova, sorry folks. It’s been pouring with rain since yesterday, with very little let up and it’s cold. Instead I have a wonderfully comforting pudding for you, Toffee Apple Crumble.

FF Toffee Apple Crumble
Toffee Apple Crumble tart Bramley apples topped with a toffee crumble mix.

The perfect combination of flavours. Tart, just cooked slices of Bramley apple, covered in a light crumble with more than a hint of toffee flavour.

FF Toffee Apple Crumble
Toffee Apple Crumble a delightfully comforting pudding.

Toffee Apple Crumble came about as the result of a need for something warm and comforting, that was also not too labour intensive to make. Whatever the reason; tiredness, pain, just-can’t-be-bothered, it’s been a long day, this recipe is quick and easy to make. Bake in the oven, whist you relax and you have yourself a top notch pudding that feels like a warm blanket is being wrapped around you as you eat.

I will also confess an extra cheat. I had 2 x 300g packets of ready prepared, frozen Bramley apple slices, from  Waitrose in the freezer. Some days I just have to use ready prepared and I’m good with that.

FF Toffee Apple Crumble
Toffee Apple Crumble extra yummy when served with homemade custard.

Now, in all honesty, I wouldn’t describe myself as a ‘pudding’ person. In most instances I’d rather have cheese and biscuits…….. Thought I’d give you all a moment there to digest that fact (my puns are getting worse!!!).

However strange it may seem, I do actually like a proper pudding instead of a meal. Yesterday, when I made this Toffee Apple Crumble, I actually ate it for lunch. Quite often, for example over Christmas, I’ll have Christmas pudding and cream for lunch or supper. So I do enjoy puddings, just on their own, as a meal in itself!

I know I am in the minority and that there is such a thing as a ‘pudding tummy’ where, once you have finished your main meal there is ALWAYS room for something a little sweet to round off the meal. I applaud you, I really do. When I’m full, well, that’s me finished. No pudding or cheese and biscuits.

Oh how I wish I could eat as much as I did when I was younger and competing in every sport I could!!!

FF Toffee Apple Crumble
Toffee Apple Crumble a tasty twist on a classic dessert.

Oddly, I really enjoy making puddings. My hubby is definitely a pudding man. Upon receiving a microwave as a wedding present, it took him under 30 seconds to find the recipe for lemon sponge! Something I still have yet to make for him. Oops!

I think it is the joy of seeing someone’s face, full of pleasure, as they tuck in and devour a well made, tasty pudding, that gives me so much pleasure. My wonderful hubby’s face when he saw the Toffee Apple Crumble, was absolute pleasure. Married twenty years this year and I still enjoy cooking for him as much as I always have.

Recipe: Toffee Apple Crumble serves 6 real pudding lovers!

250g/9oz Plain White Flour

1/2tsp Baking Powder

175g/6oz Unsalted Butter – cold and cut into cubes

1/2 packet  Wright’s Baking  Toffee Cake Mix – TIP make double the amount of crumble topping add a whole bag of Toffee Cake Mix and freeze half in a freezer bag for up to 3 months!

2 tablespoons Demerara Sugar

600g Peeled Sliced Bramley Apples – peeled weight – start with approx 1kg of apples

1 teaspoon Corn Flour

1 teaspoon Cinnamon

1 tablespoon Granulated Sugar

Method: Preheat the oven to 180C/160C fan, gas mark 4

  • Place the flour and baking powder in a large bowl, add the cold, cubed butter.
  • Use either a pastry cutter to cut the butter into the flour see Perfect All Butter Shortcrust Pastry, or rub the butter into the flour until it resembles breadcrumbs.
  • Add the toffee cake mix into the bowl and thoroughly mix.
  • Place the Bramley apple slices in a deep pie dish.
  • Add the corn flour, sugar and cinnamon and toss the apple slices, to coat them with clean hands.
  • Cover the apple slices with the toffee crumble mix and then sprinkle over the demerara sugar for extra crunch and an added toffee flavour.
FF Toffee Apple Crumble
Toffee Apple Crumble ready for the oven.
  • Place the Toffee Apple Crumble dish onto a baking tray and place in the centre of a preheated oven.
  • Bake for 1 hour, or until the top is golden and the apples underneath are softened.
  • Once baked remove from the oven and allow to sit for 15 minutes before serving. I’ve found that letting a crumble sit for a while stops the topping from falling apart as I dish it up.
  • Serve with homemade custard (recipe coming soon), cream, vanilla ice cream, or on it’s own. If it hadn’t been so cold and wasn’t raining, I would absolutely have gone out to the garage and had  Very Vanilla Ice Cream with my custard!
FF Toffee Apple Crumble
Toffee Apple Crumble and homemade custard.

Toffee Apples are traditionally associated with Autumn, when apples are in abundance. My Toffee Apple Crumble brings those flavours together in a dessert that is perfect, whenever a warm, comforting pudding is needed.

If you have enjoyed this Toffee Apple Crumble recipe here are a few others you may also like:

Amazing Apple Pie

FF Amazing Apple Pie
Amazing Apple Pie with a delicious pie crust

Blackberry Nectarine Tart

FF Blackberry Nectarine Tart
Blackberry Nectarine Tart quick and easy with puff pastry.

Almond Blackberry Pear Crumble

FF Almond Blackberry Pear Crumble
Almond Blackberry Pear Crumble another fast ic crumble recipe.

Do you have a ‘pudding tummy’?

Do you choose your dessert first, when out for a meal?

I love hearing what your eating habits are, as weird as that sounds. I’m not talking peculiar flavour combinations, simply which foods you prefer and those you try to avoid.

Thank you again for all the kind comments that you leave here on the blog and on Instagram and Twitter. Please keep them coming along with the gorgeous photos of your makes and bakes.

I hope the weather is beautiful wherever you are and you can enjoy feasting and haing fun in the sun!

Sammie xx

Wright’s Baking sent me some cake mixes to try. I was not paid for writing this post and as always, all pictures, content, opinions and views are my own. Please see my Disclosure Policy.

Share
Facebooktwitterpinterestlinkedintumblr