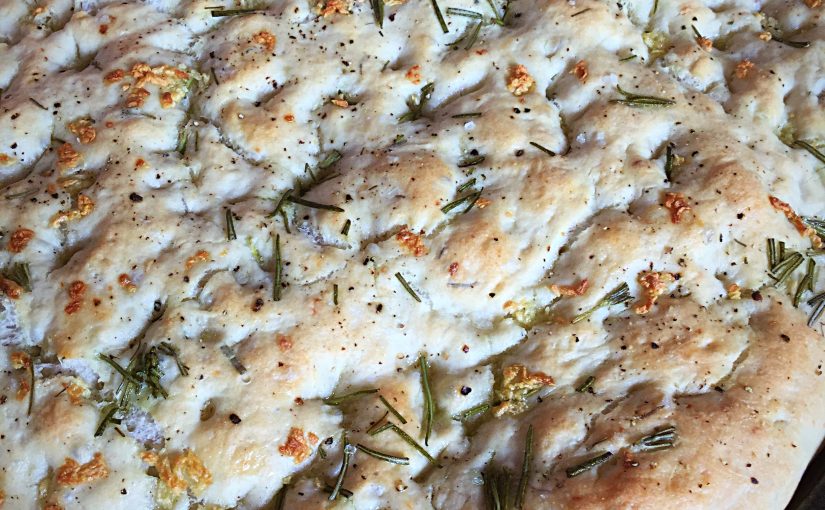
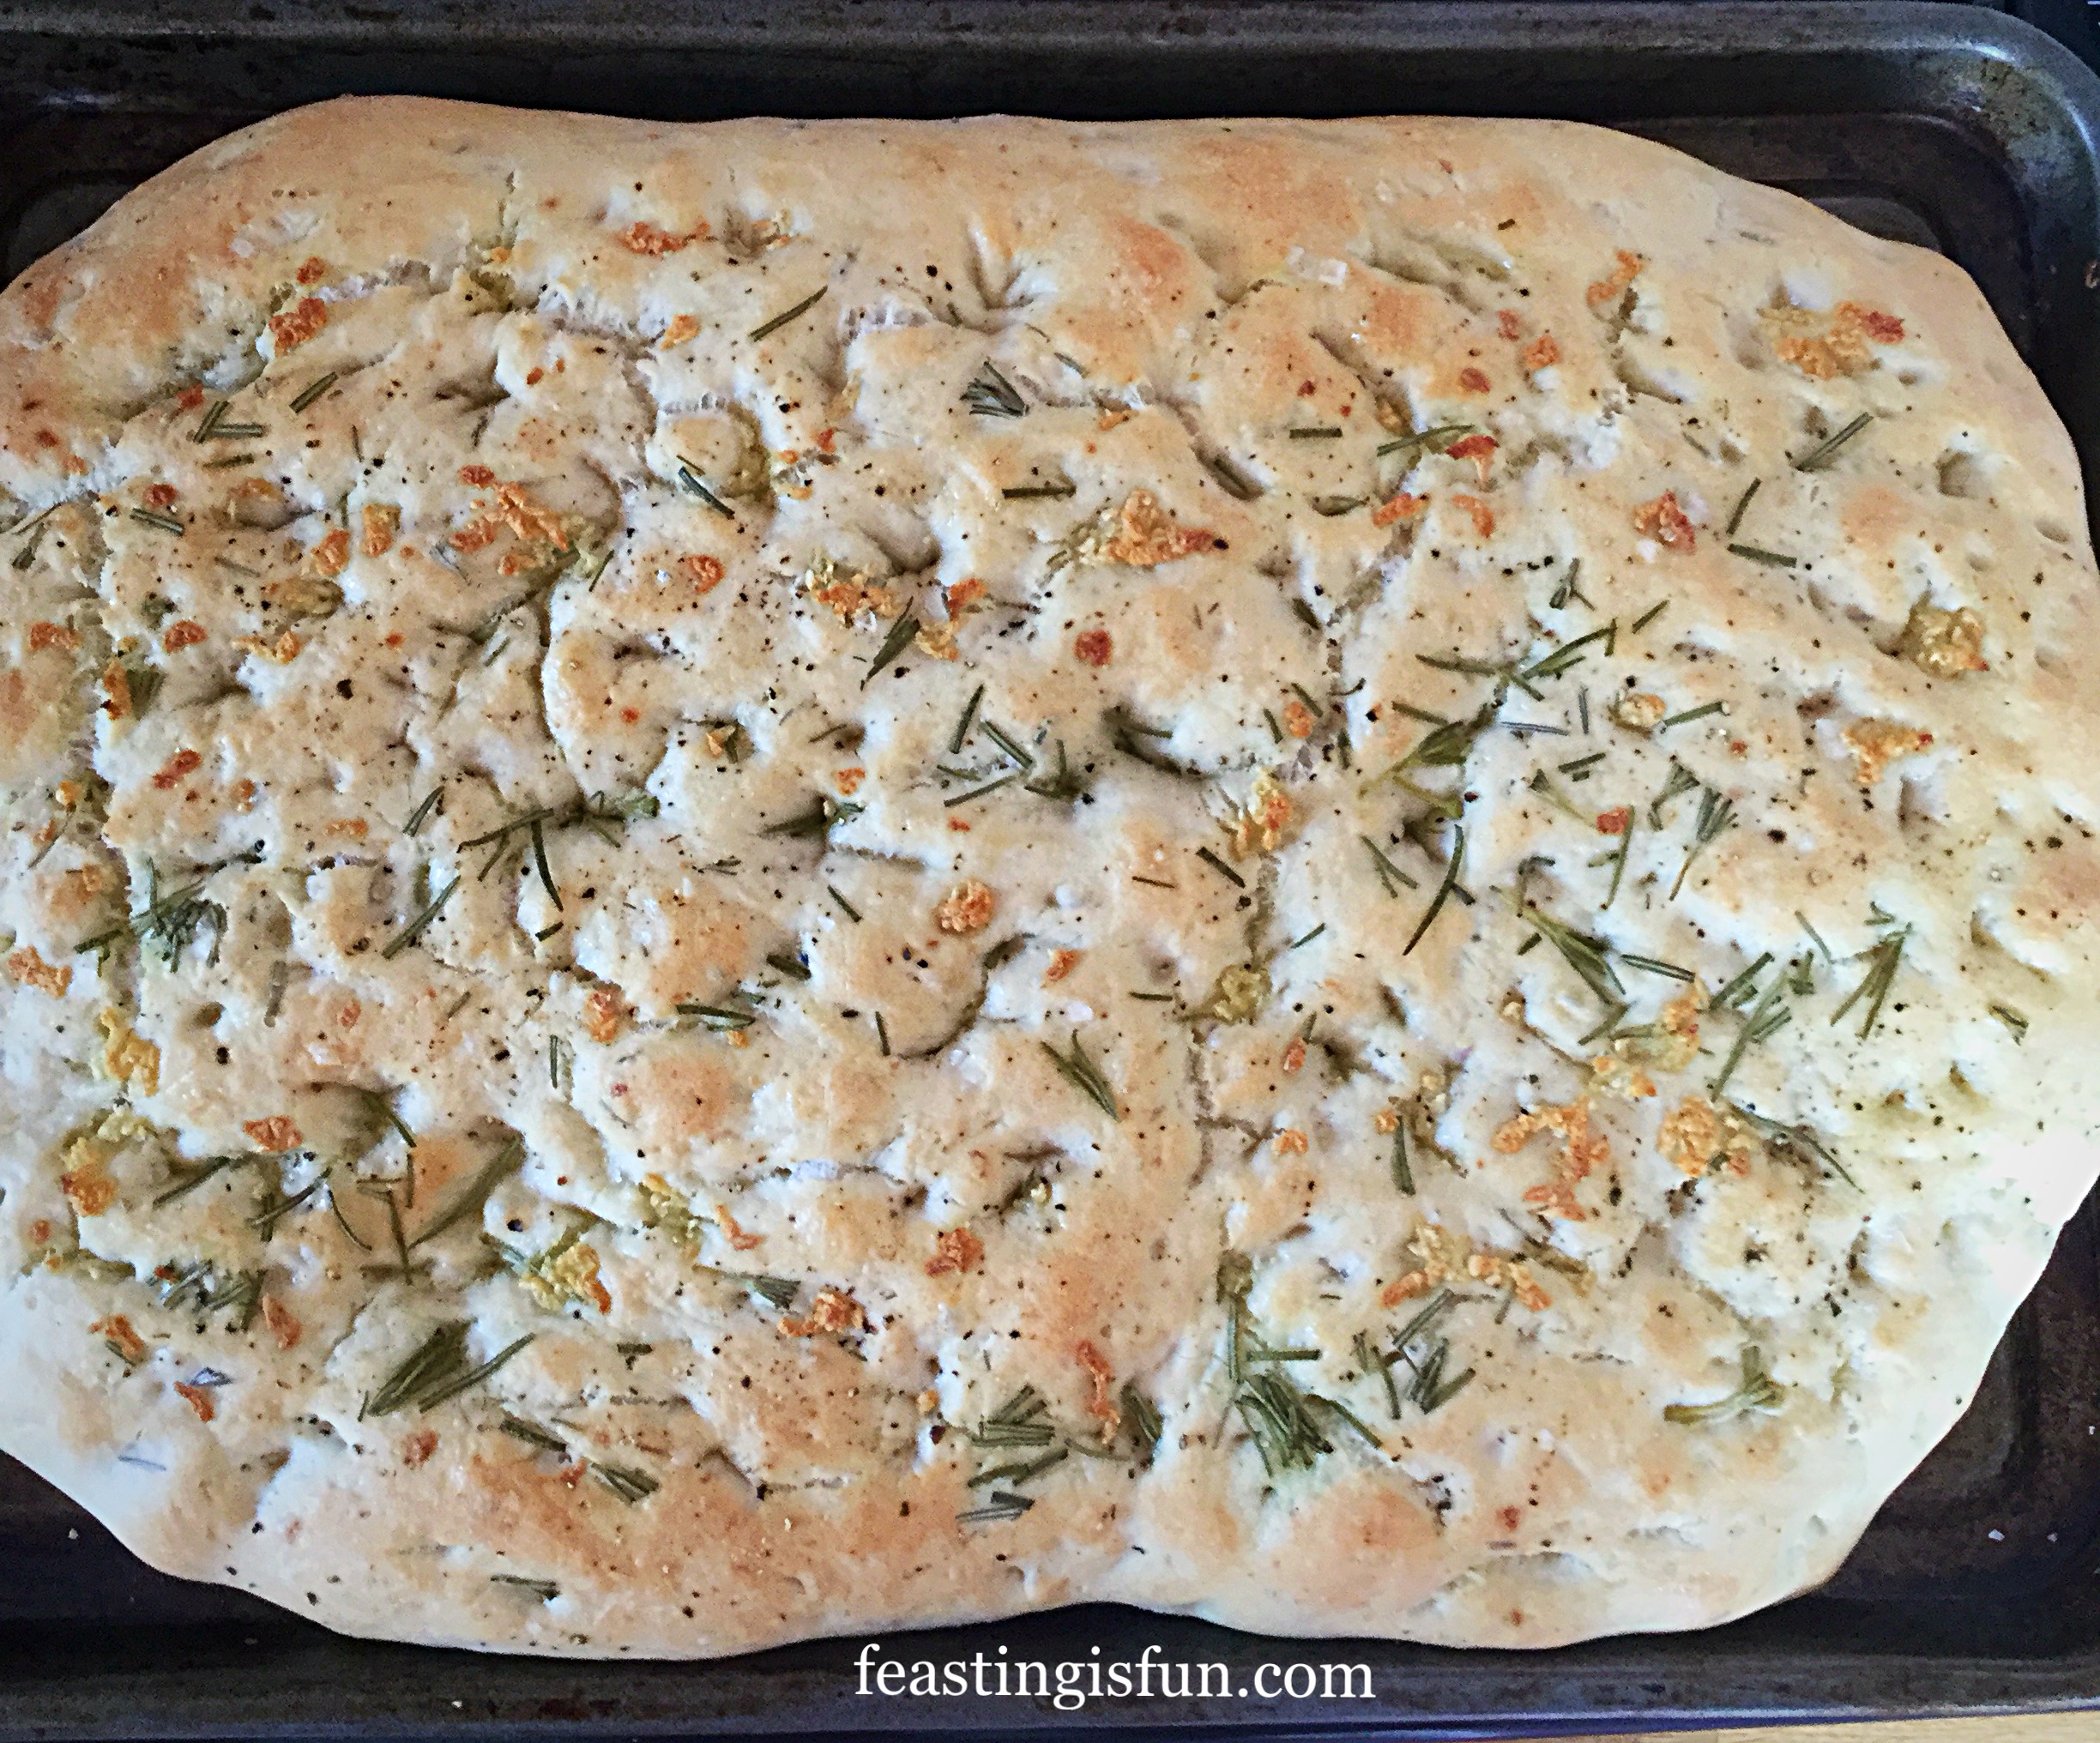
Bread is something that I really enjoy making. Flour, yeast, salt and water, combined and worked, create a bread with real taste. Add in a few extra flavours and the possibilities are endless. Garlic Rosemary Focaccia Bread is an incredibly easy, yet packed with flavour bread. Perfect for making at home.
Garlic Rosemary Focaccia Bread.
This week in our house is all about birthdays. Our Lil Man will be 12 this week, it’s also my Sister’s birthday in the same week. Definitely time for Feasting, Celebrating and Fun! Covert baking operations during the day – ready for surprises on their special days. Ooh I love a celebration – well that is as long as I’m not the center of attention!
Fortunately, shyness is not something our son could ever be accused of having. His enthusiasm and passion for life is infectious and wonderful to see. He waits all year for his birthday and the night before, without fail, he reaches ‘ready to explode’ status!Christmas is the same for him, times a gazillion!I adore his passion & zest for life, even if at times it can be exhausting and overwhelming.
So, to make life a bit easier on myself today, I grabbed a previously, made and frozen Chicken and Four Cheese Lasagne from the freezer last night and left it to defrost in the fridge overnight. Yes, I confess to feeling a tiny little bit smug.
Since I have a bread maker that makes my life (in the world of bread baking), so much easier, I decided to whip up a couple of these GARLIC ROSEMARY FOCACCIA BREAD. Also, as this is such a reliable and easy recipe, I decided to share it with you.
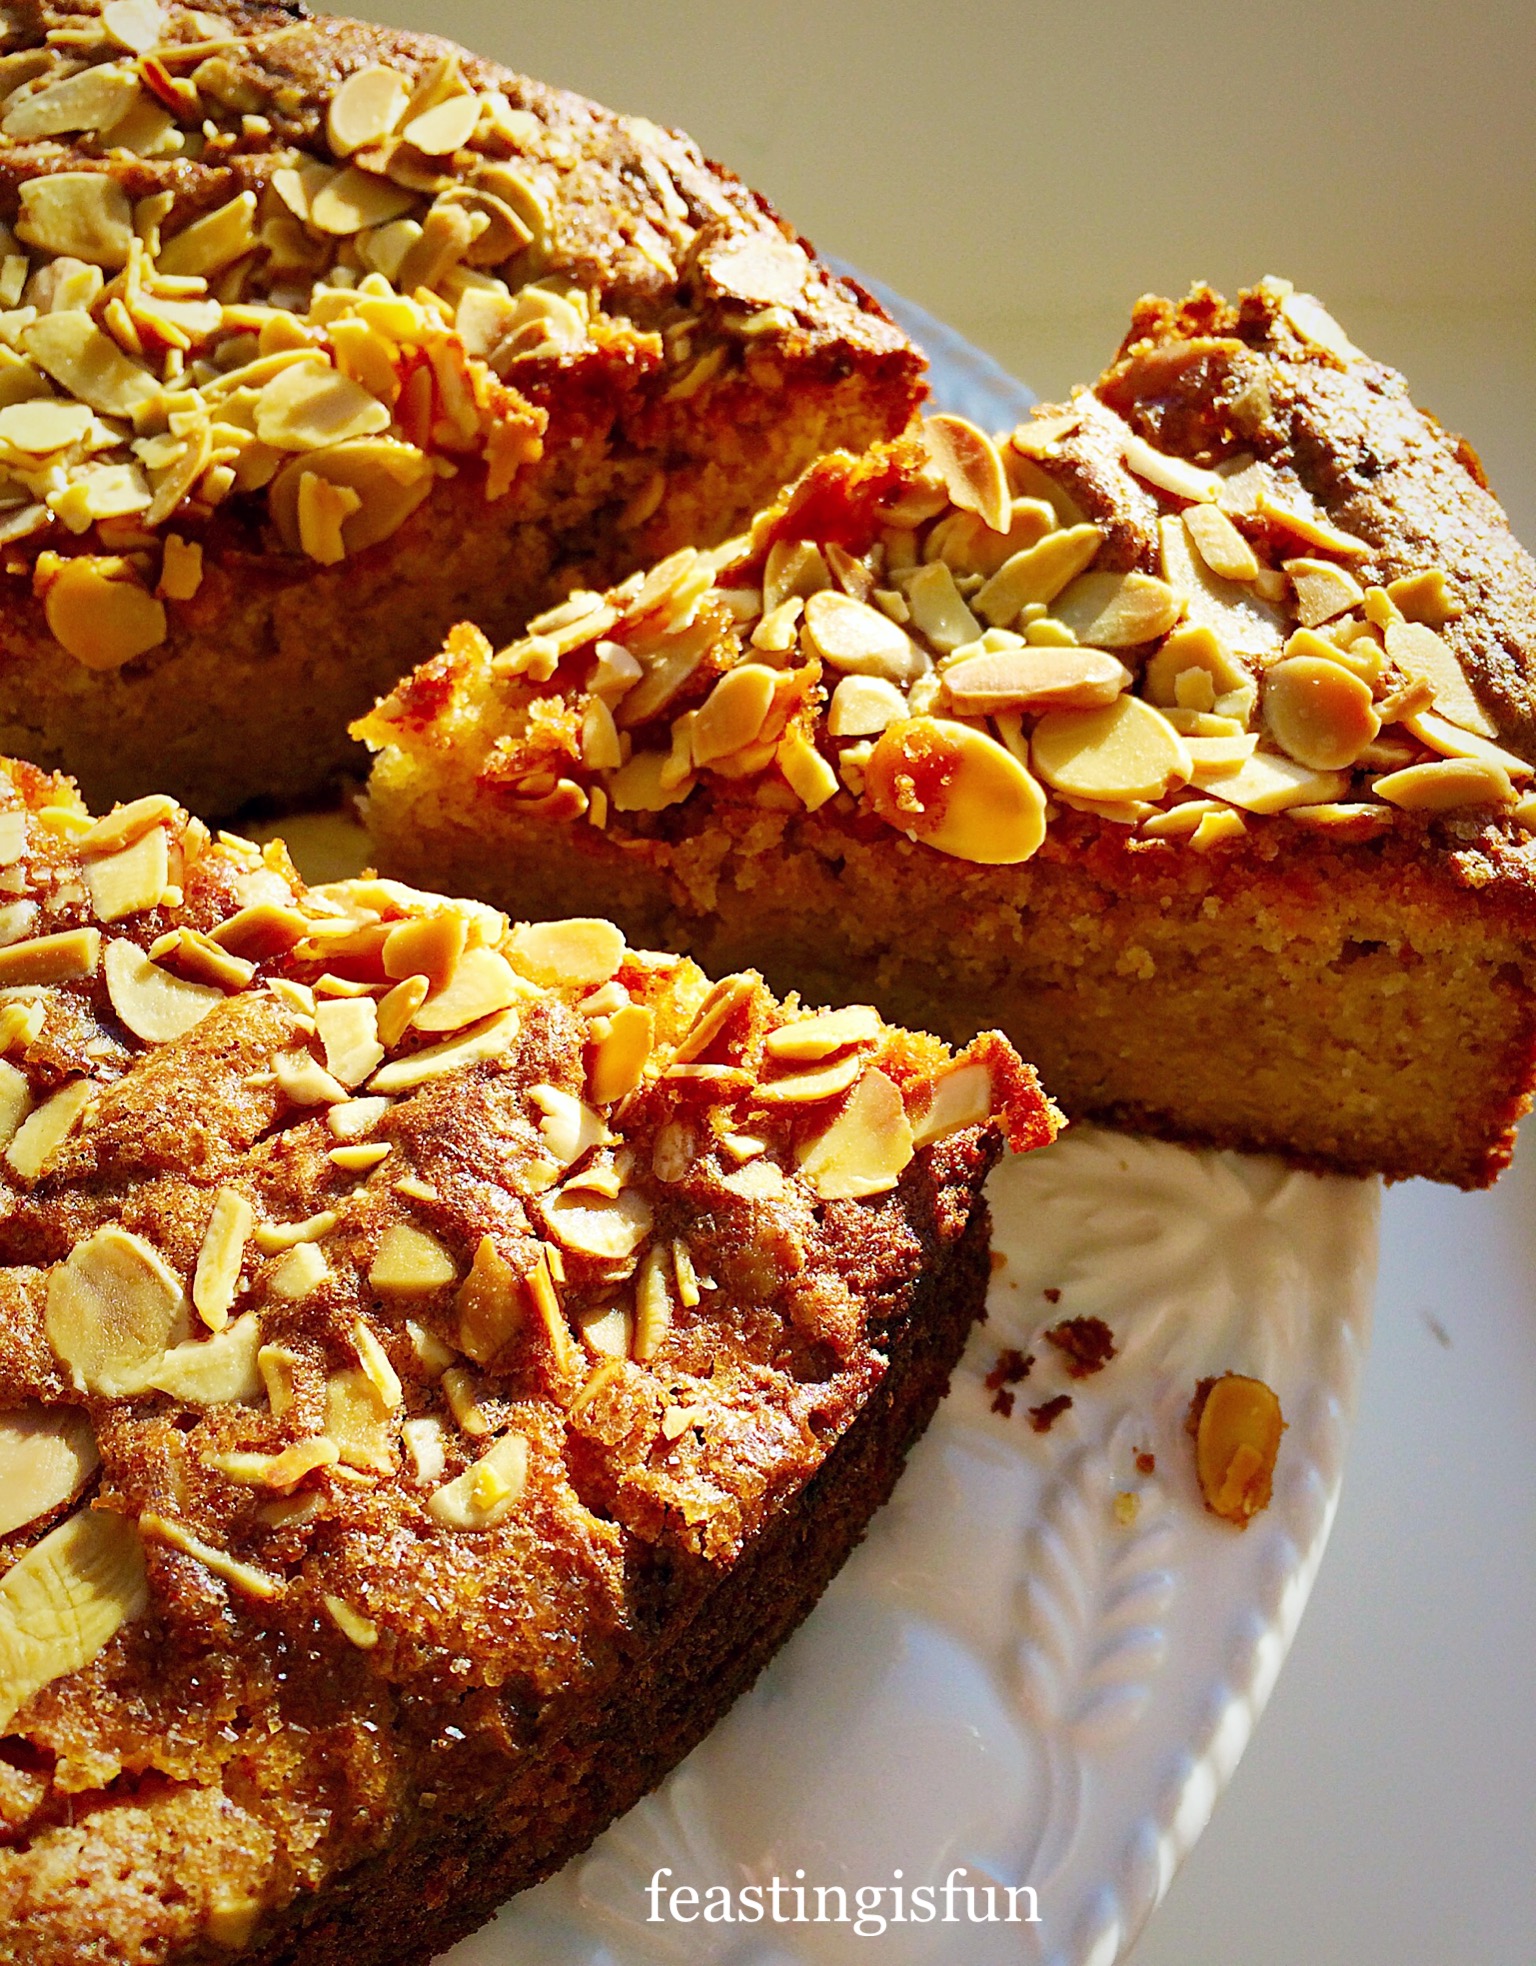
Even with 4 Garlic bulbs added to the bread mixture & the same sprinkled on top, this Focaccia only has a mild Garlic taste.
GARLIC ROSEMARY FOCACCIA BREAD: makes 2 loaves.
You will need 2 x lightly oiled 8×8″ square tins ( with at least 2″ depth), or – 1 larger oiled baking tray (2″ deep) to bake one large focaccia.
Sea salt flakes and freshly ground black pepper for top of the bread
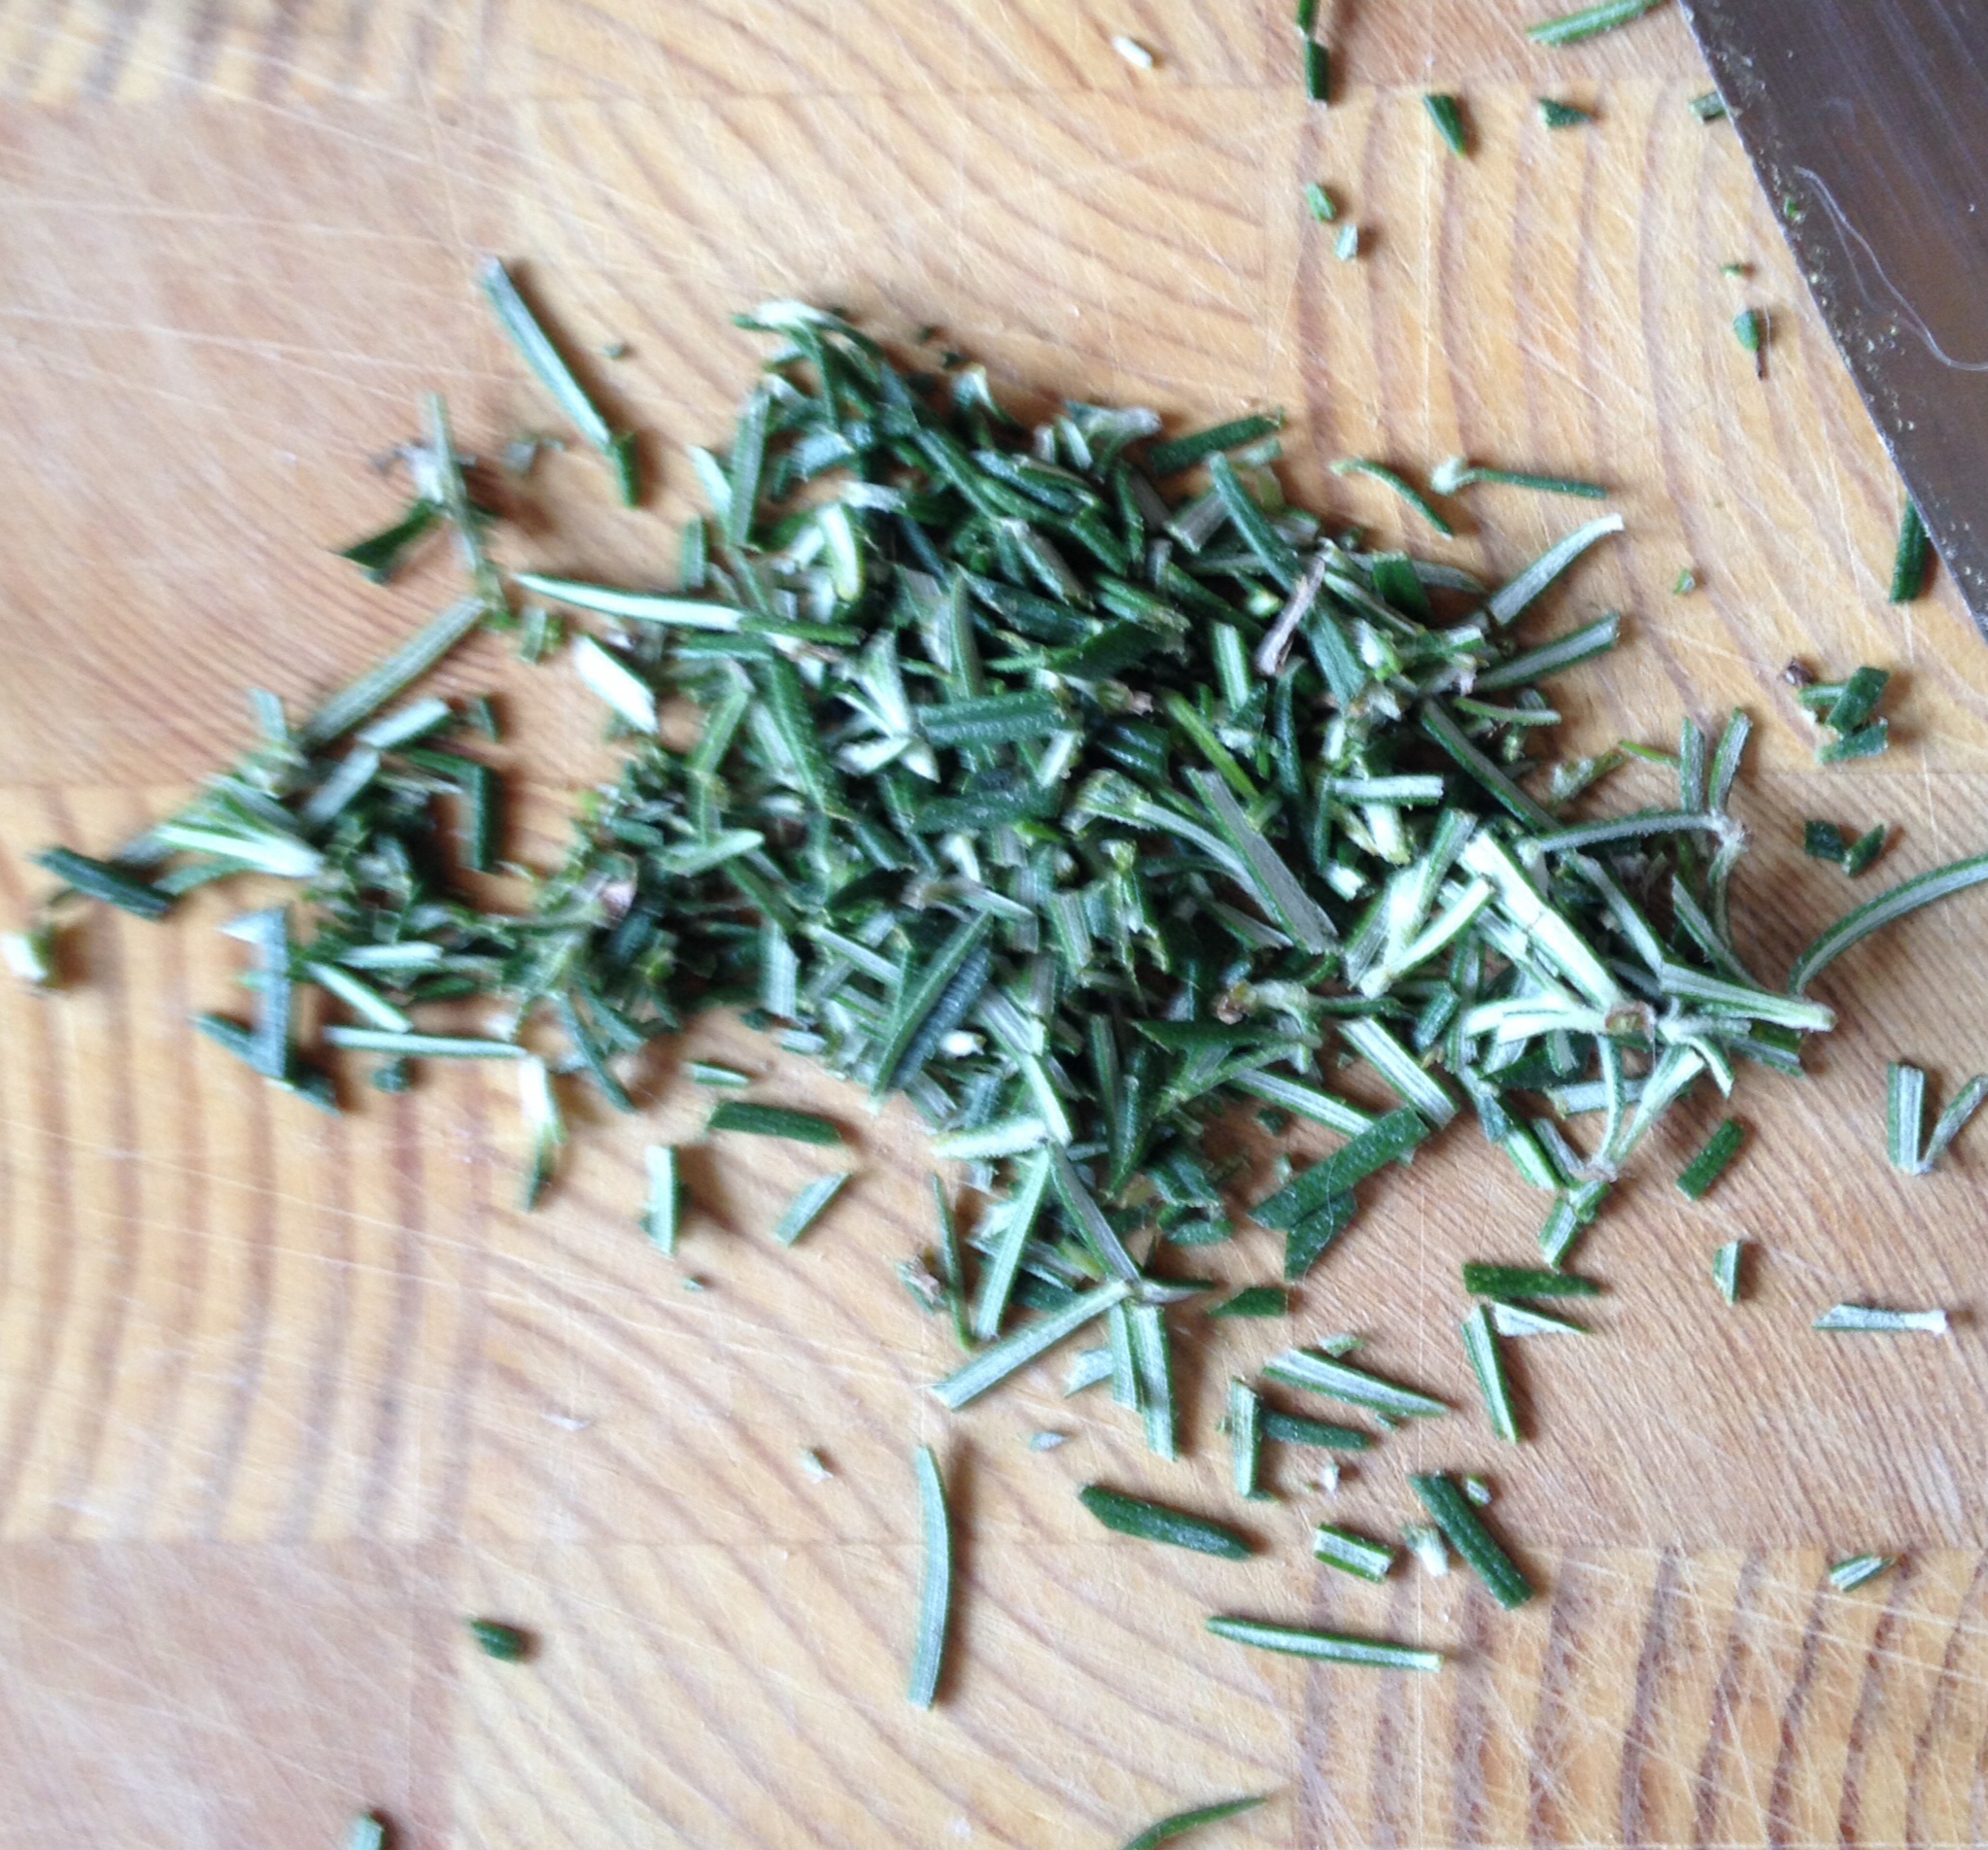
2 tbs Fresh Rosemary – finely chopped
8 Garlic Bulbs (4 for bread mixture, 4 for topping the bread).
Method: Preheat oven to 220C/200C fan, gas mark 7
When using a bread maker or stand mixer:
Place the warm water into the pan or bowl of the device you are using, making sure the dough hook is attached to the stand mixer.
Sprinkle over the sachet of dried, activated yeast and swish about with clean fingers to mix.
Next place the flour on top of the liquid mixture. Add the oil and salt.
Now add 1 tbs of the finely chopped Rosemary and salt.
Mince most of the Rosemary finely, allowing a few whole & half leaves to remain so they can be seen in the bread!
Add in four minced bulbs of garlic. I’m a very big fan of my garlic press (no peeling or chopping), but you may chop, process, squish with the back of your knife. Please don’t write in with other methods for finely mincing garlic, just be happy that you’re innovative.
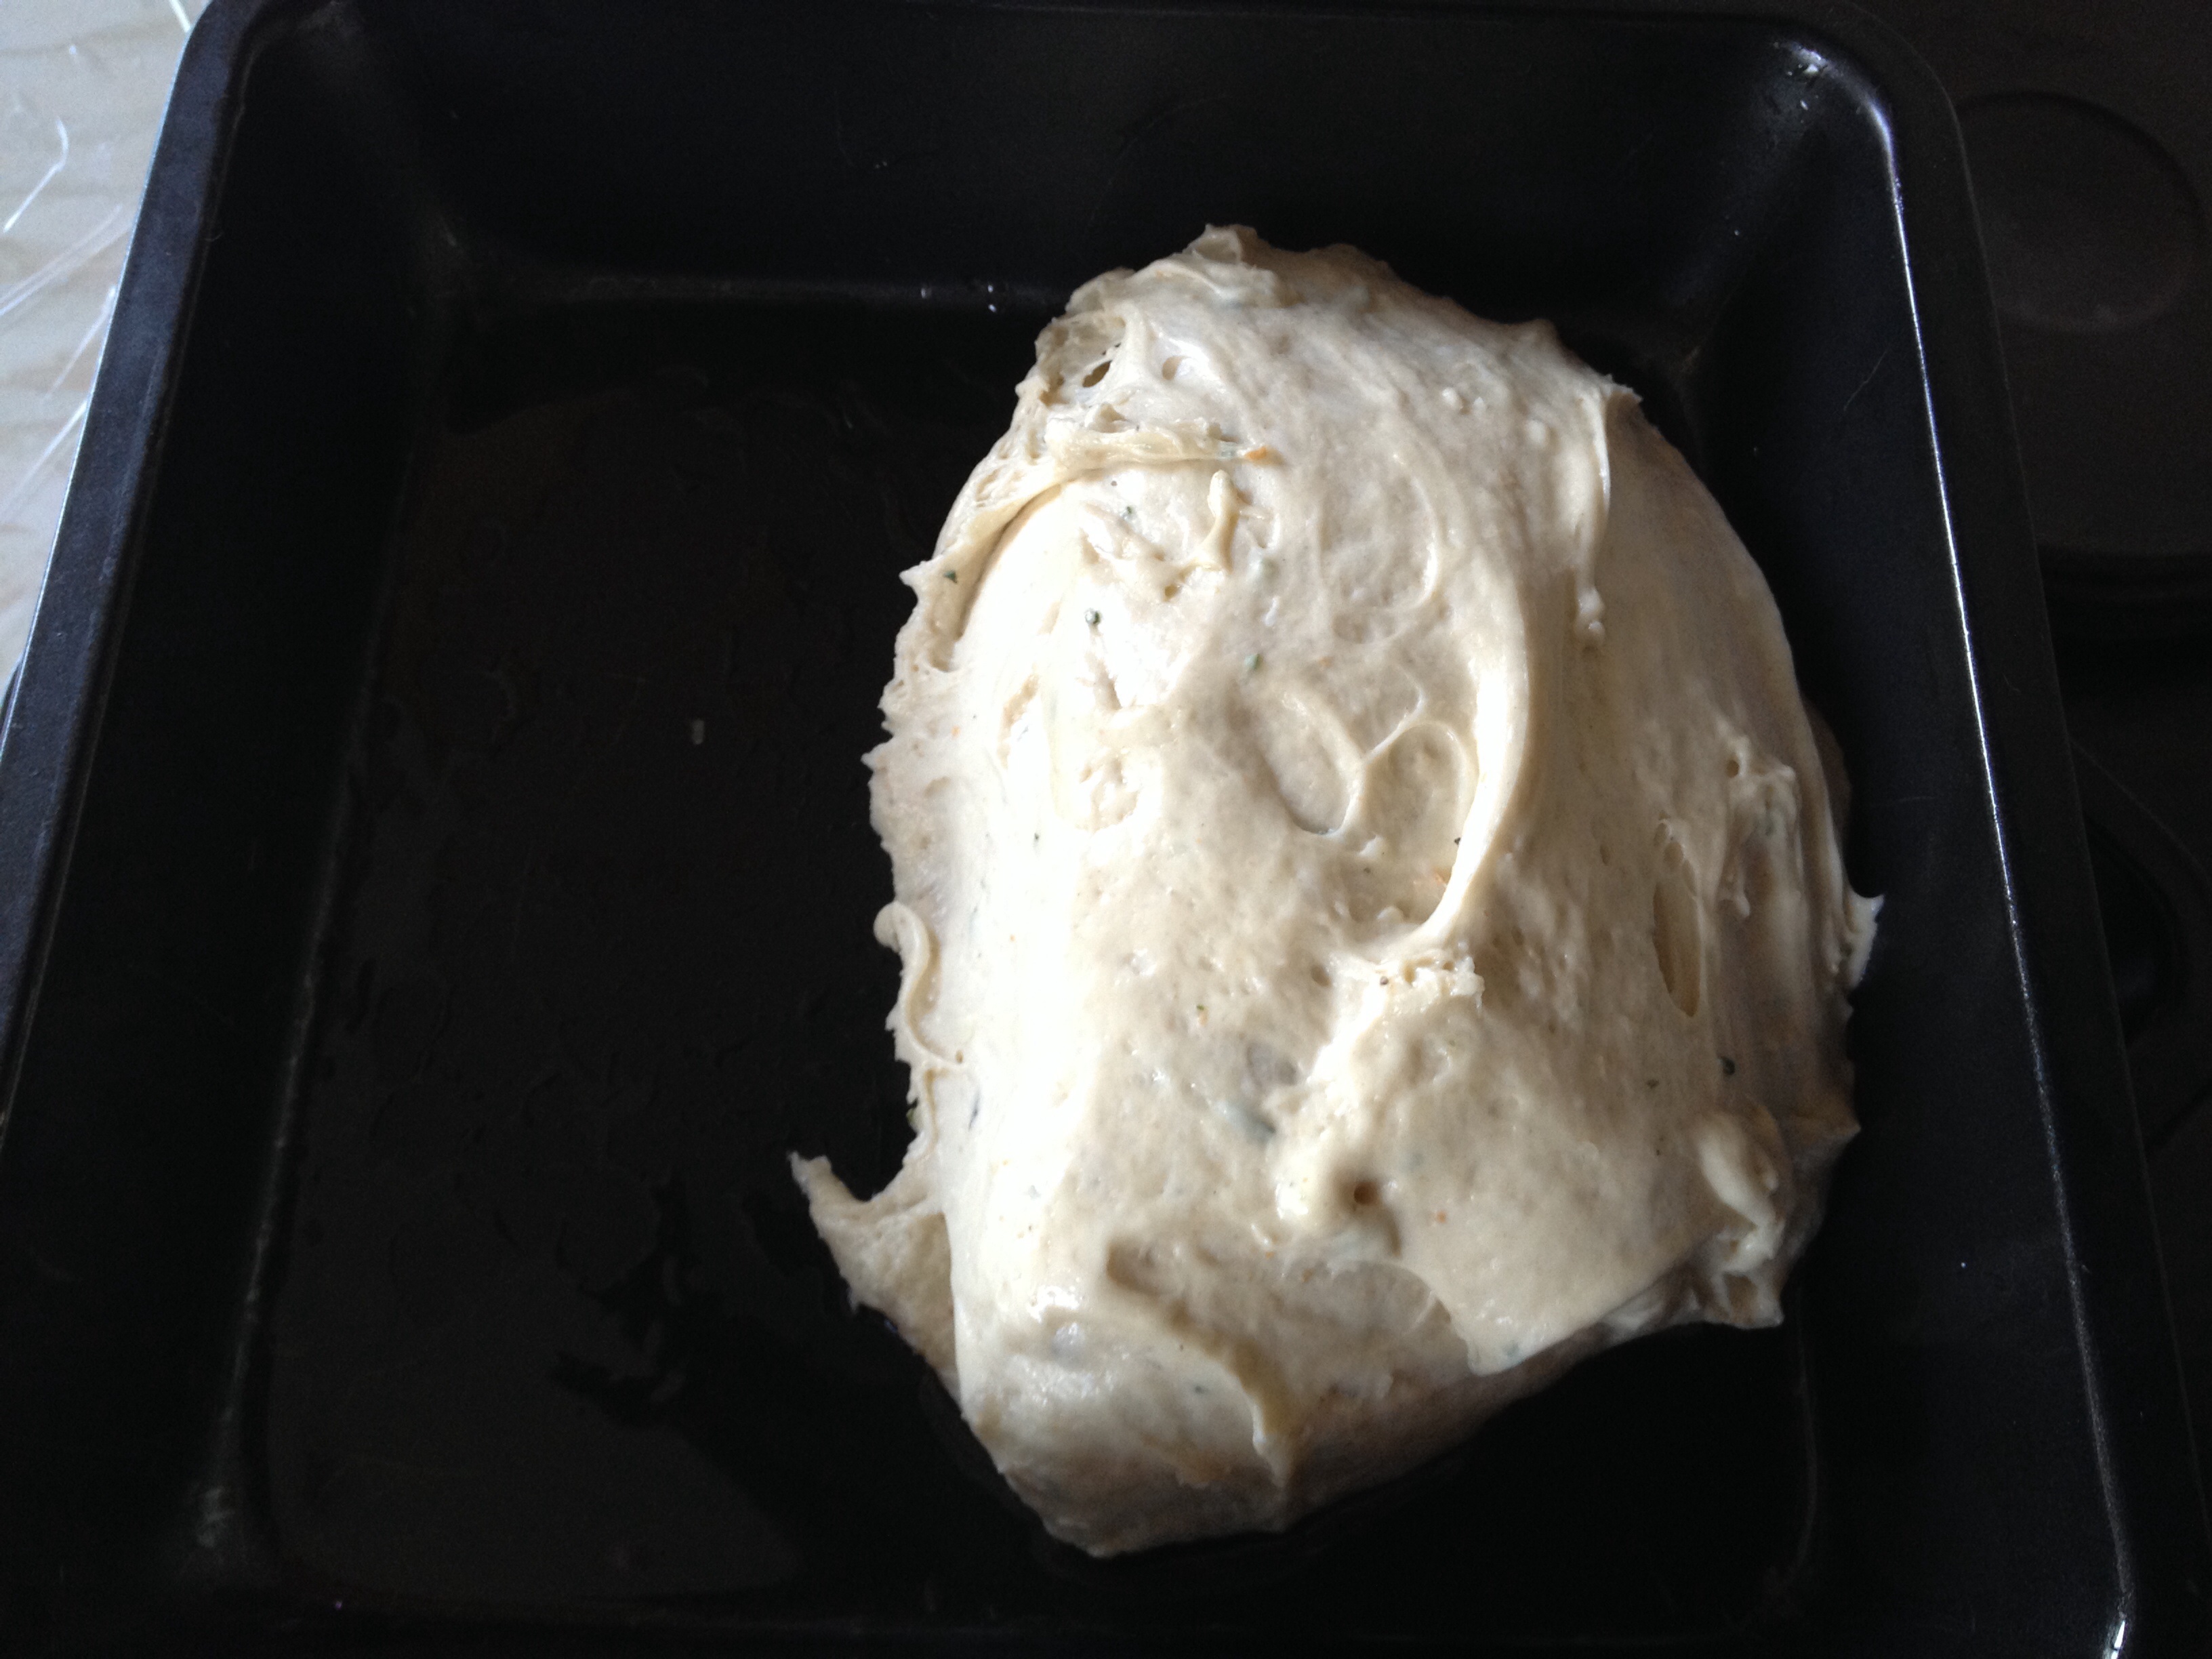
Now mix & prove (if using a bread maker). With a stand mixer, attach the dough hook & mix for 8-10 minutes, until the dough has a silky, stretchy, elasticity about it.
If kneading by hand, bring all the ingredients together and work (knead) the dough until you can feel the change, when the dough again stretches easily and feels silky to touch – a good way to check that the dough has been worked enough is that it should be hard to tear.
Shape the dough into a ball and place into an oiled bowl, then turn the ball over, so the top has an oily layer & cover tightly with cling film. Place in a warm draught free place until doubled in size (about an hour).
Prepare the baking tins (or large tin if only using one) by placing some oil in the tin (approx 1tsp for a smaller tin). Then using your fingers or a piece of kitchen towel completely cover the inside of the tin with a light slick if oil. When doing this by hand, your nails also benefit from a cuticle treatment.
Talking of fingers, if you have long nails it’s probably easier to apply the oil with the kitchen cloth. It also probably means you look after your hands and nails may not need a quick, olive oil cuticle treatment. Just saying, I NEED the treatment.
If using a bread machine switch on to knead cycle to knock the dough back for a minute. With the dough in the bowl, remove the cling film & gently punch down (enjoy the soft enveloping feeling!)the dough to knock out the air bubbles and gently knead by hand for 2 minutes.
Half the focaccia dough.
Divide the dough in two (or leave whole if making a larger Focaccia) using a sharp knife or a dough cutter.
Place half the dough into each tin (or all into one tin).
NOW is the absolutely BEST thing about making this type of bread. If you loved making mud pies when you where younger, or maybe still do, you’re going to LOVE this next bit.
Using your the heel of your hand, gradually press the dough out until it reaches the edges of the tin and is roughly the same thickness across the tin.
Check out my dimples!!!!
Next using your fingers, have great fun making lots & lots & lots of dimples in the dough – to give it the classic focaccia look.
Can you tell how much I really love that part? So much fun!
Drizzle a little olive oil, sprinkle some sea salt flakes, the rest of the finely minced Rosemary, a grinding of pepper and the rest of the garlic. Split over 2 tins if making 2 Focaccia loves.
Lightly oil some cling film: TOP TIP: Using a clean wet cloth wipe some of your work surface so that it is damp. When laying your cling film over the top it will lay flat and not attempt to attach itself to itself, you, or random kitchen objects. You can then easily spread a light coating of oil over the cling using your hands, or a pastry brush.
I know there’s oil in the dough, the tin has been oiled, you’ve just drizzled oil on top of the focaccia – JUST TRUST ME!
Most of the time you could get away with not oiling the cling, but and it’s happened to me, it WON’T EVER STICK if you oil the cling!
The risen dough does lose some of the dimply effect – so if you want more dimples, repeat the process!!!!
Cover the top of the tin with the oiled cling (so it’s airtight) and leave in a warm, draught free place until doubled in size. Alternatively, place the dough in the fridge. While it will take longer to rise, the bread will develop a lovely flavour, due to the slow prove. It’s your dough, so, do whatever you fancy.
ANOTHER IMPORTANT TIP – I have successfully risen the dough slowly in the fridge, completely forgotten about it, so it quadruples in size. Knock it back by recreating the dimpled effect, as before, left to rise and it’s turned out fine.
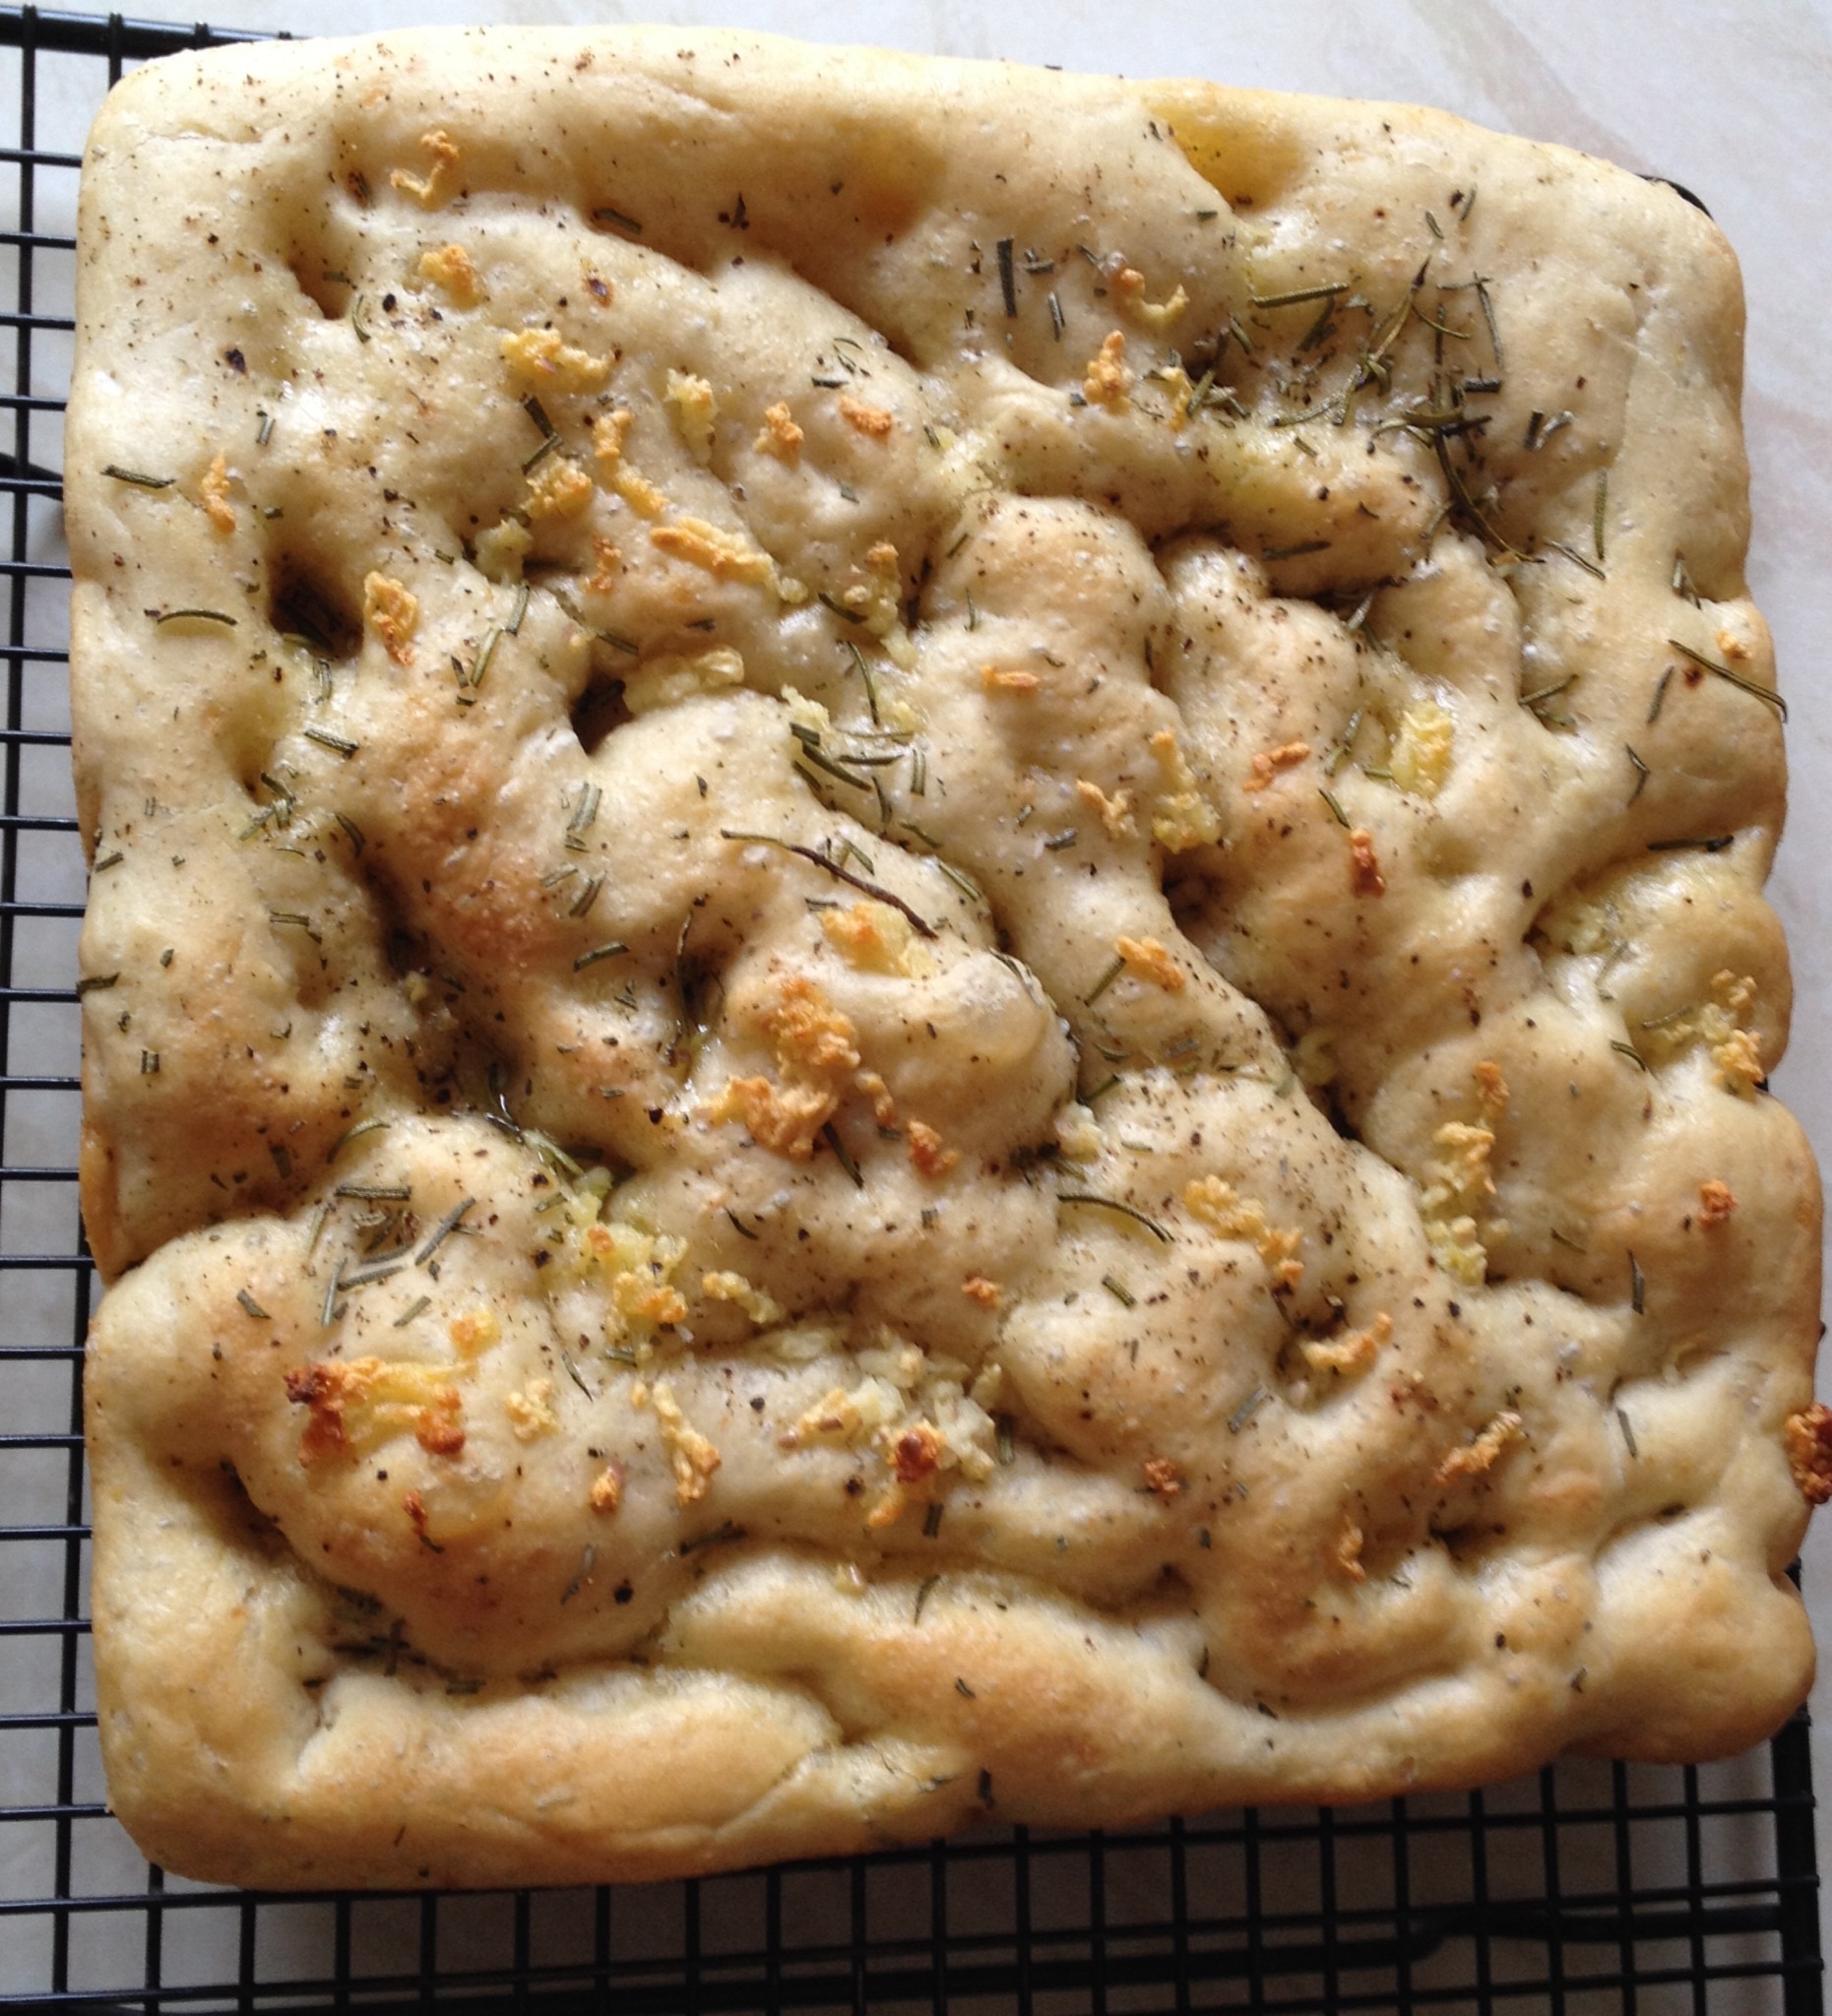
Bake the focaccia in a preheated oven for 15 – 20 minutes, until a golden colour and still quite soft. The base should sound hollow when rapped with a knuckle.
Once baked, remove from the oven, take a deep breath, the smell is intoxicating. Leave to cool for 10 minutes in the tin, run round the outside with a palette knife until you can feel the loaf easing from the tin. Turn the bread out and place on to a cooling rack. Repeat with second tin.
Please dunk me in some scrummy soup, pasta sauce or sausage casserole?
The Garlic Rosemary Focaccia Bread will be marshmallowy soft & is fine to serve warm as is. Or cool, wrap in foil and freeze for up to one month.
If you prefer a slight crust to your focaccia, 10 mins before serving, place the bread directly on to the rack of a preheated oven (as for baking the dough) for 5 – 10 minutes, depending on how crusty you like it.
Because this bread is thinner than a loaf, you can cut or tear the bread whilst still warm.
Garlic Rosemary Focaccia Bread baked as a whole.
This bread goes with any dish you would normally serve garlic bread with. It also goes fantastically well with soup. Spicy vegetable, leek and potato are especially good with this bread. It is ideal for dunking!
One Garlic Rosemary Focaccia Bread is plenty for our family of five, so I wrap in foil and freeze the other one.
If you have enjoyed this recipe for Garlic Rosemary Focaccia Bread you may also like these:
I really hope you give this recipe a try. You can vary the herbs. I’ve used Thyme, Oregano and SHOCK/HORROR dried mixed herbs. Ooh I’m such a rebel! But seriously, it works better with the woodier herbs (rather than parsley/fennel) mentioned. Since I find that soft herbs are better mixed with butter and oil, then slathered into a baguette/ciabatta (part bake baguettes work well for this!).
Until next time, I hope you have fun giving this recipe a go and enjoy feasting with whoever you share it with.
See you soon. Sammie xx
No part of this blog post may be replicated without written permission of the owner. Please see my Disclosure Policy.
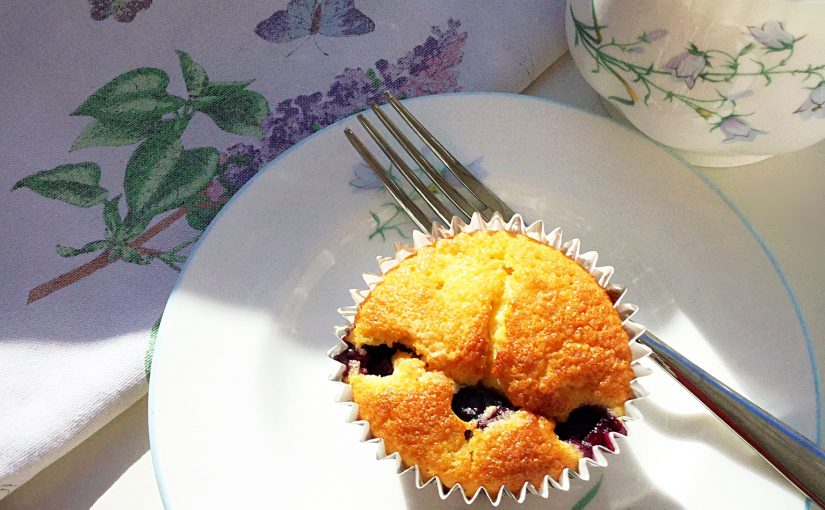
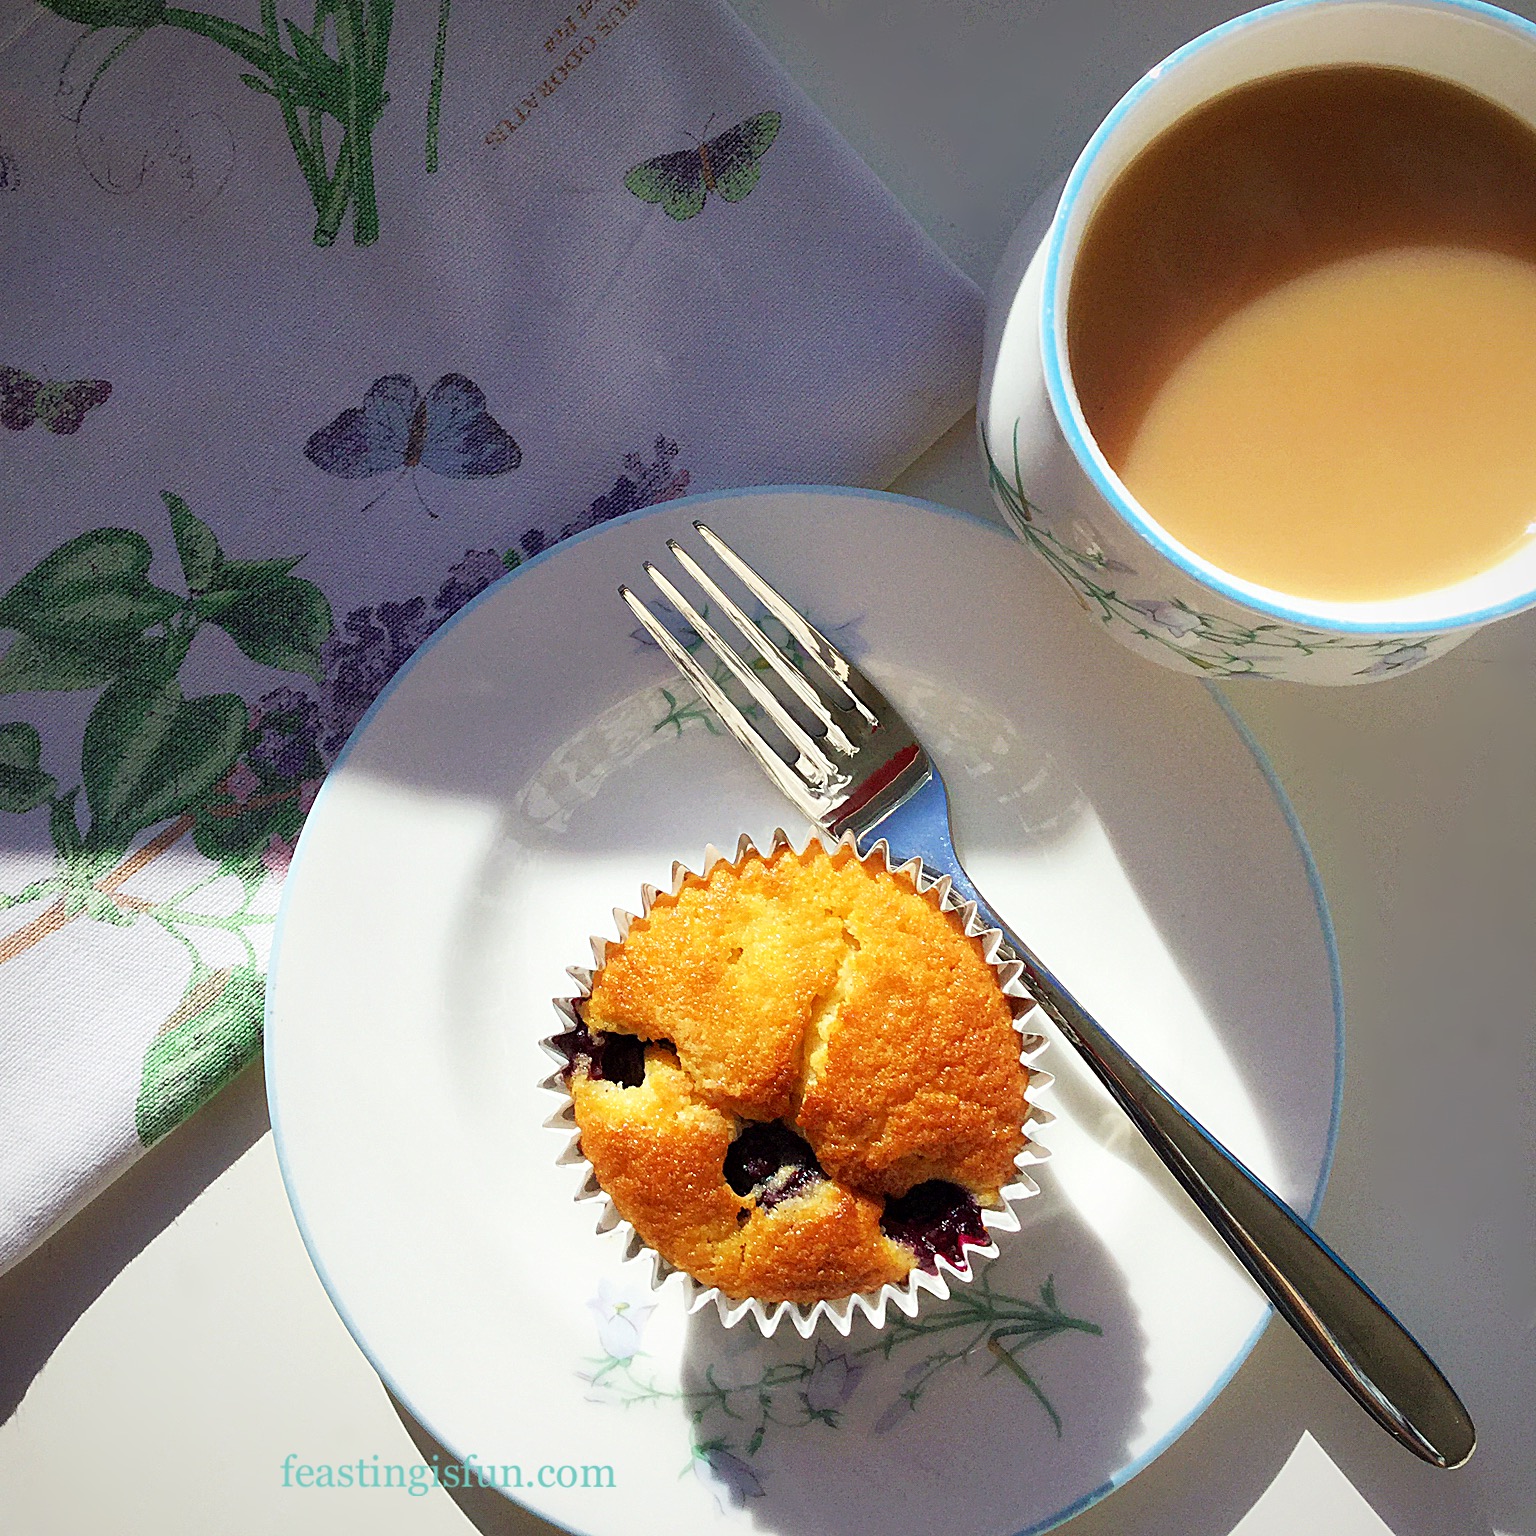
Welcome to Feasting is Fun and these fruity Blueberry And Lemon Muffins. Made using a whole lemon, zest and juice and packed full of blueberries. Ideal for packed lunches, picnics or afternoon tea. Most importantly these muffins are perfect eaten any time of the day. Although, as always, they taste better when shared.
Blueberry And Lemon Muffins
Since I’ve been thinking about the names that different foods are given, for example, Buffalo wings, the name totally confuses me. Because Buffalos don’t have wings, well not the ones I’ve ever seen on television or in books. Now wait for it, this is going to come as a massive surprise, they are in fact Chicken Wings. Also, as far as I’m aware, Moussaka doesn’t have Moose in it or Mousse! Bell peppers don’t go ding a ling a ding, when shaken. Likewise, I’m pretty sure Horseradish doesn’t have horse in it. Such is the English language, if you think of any more please post them in the comments box?
Blueberry And Lemon Muffins
Well I can guarantee that these Blueberry And Lemon Muffins definitely have both Lemon and Blueberries in them. Now although I call these muffins, they aren’t proper muffins in the strictest sense, but they’re not cupcakes either. So I settled on muffins, you know that whole thing with the English Language? It doesn’t really matter, all you need to know is that they are good.
So good in fact that place two Blueberry Lemon Muffins in a bowl, whilst still warm and slather with custard, or cream, or both. Then dig in!
1 Unwaxed Lemon zest and juice – zest first and then squeeze out the juice
175g/6oz Plain White Flour
1 tsp Baking Powder
Method : Preheat the oven to 190C/170C fan, 375F, gas mark 5
Making The Muffin Batter
First of all place 12 large muffin cases into a deep muffin tin.
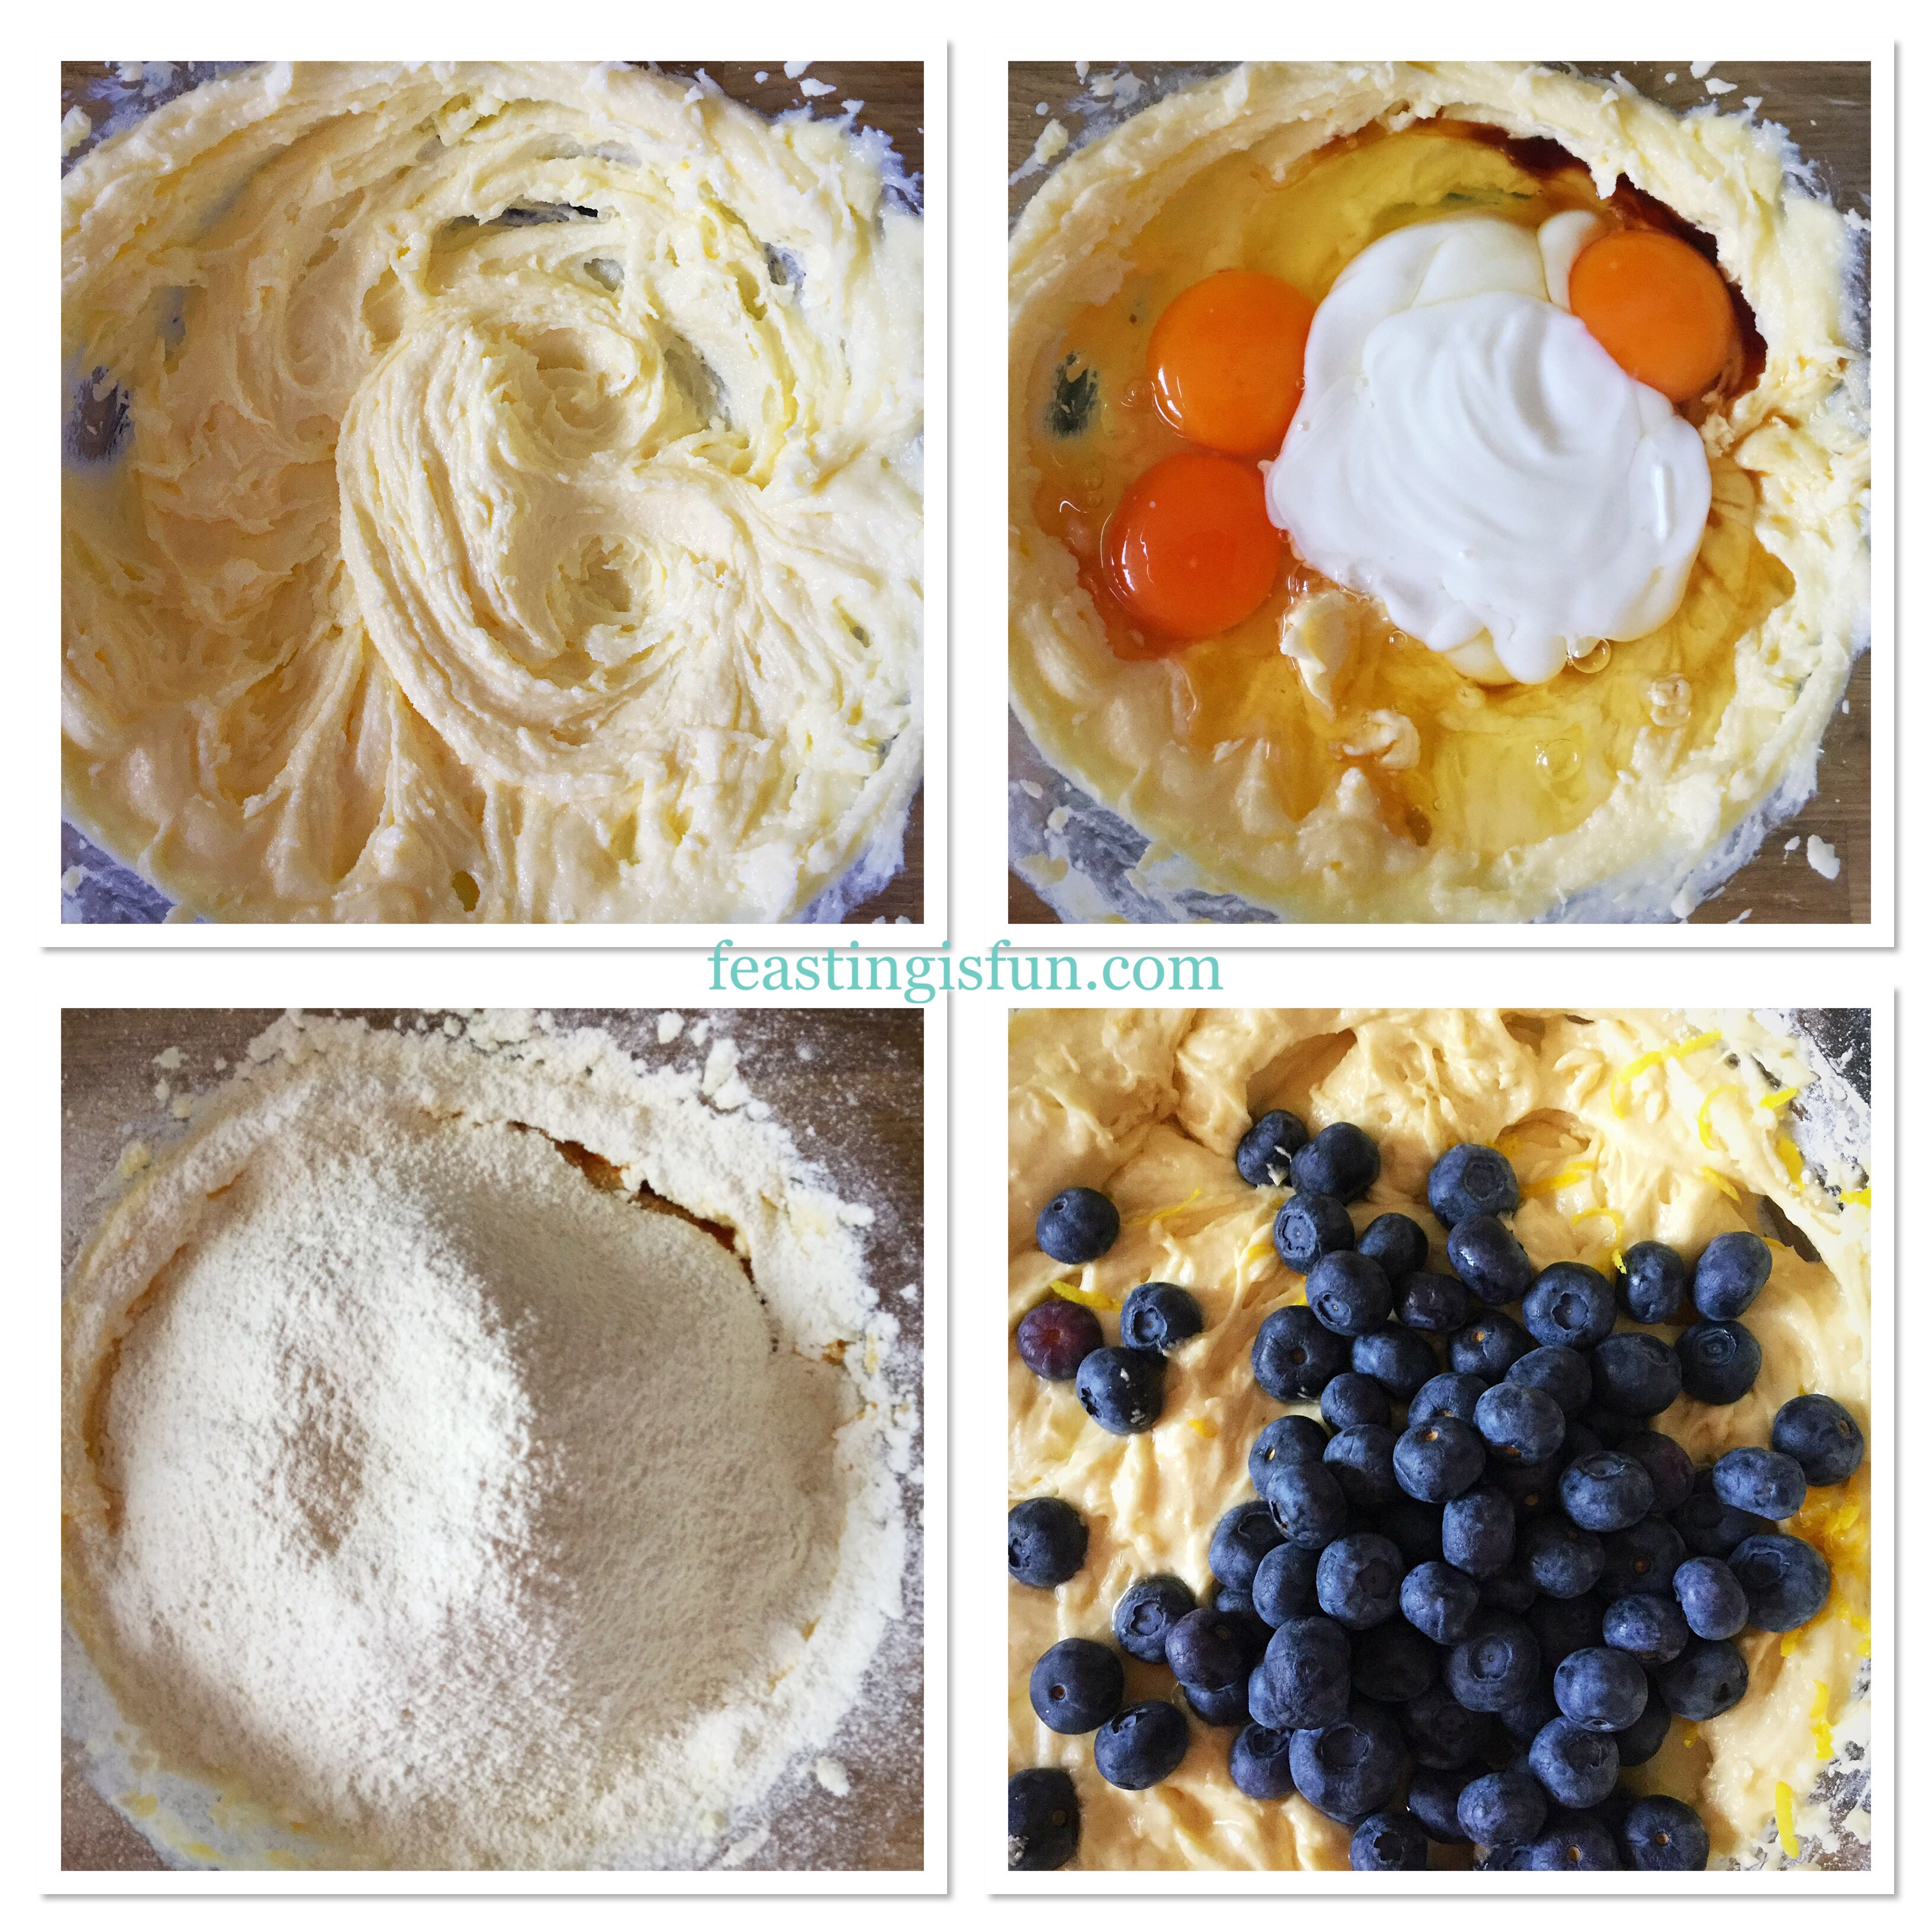
Place the sugar, salt and butter into a large bowl and whisk together until pale and creamy.
Add the eggs, vanilla extract, buttermilk and juice of one lemon.
Sift the flour and baking powder into the same bowl.
Whisk together until just combined. Over mixing will cause the muffins to be tough.
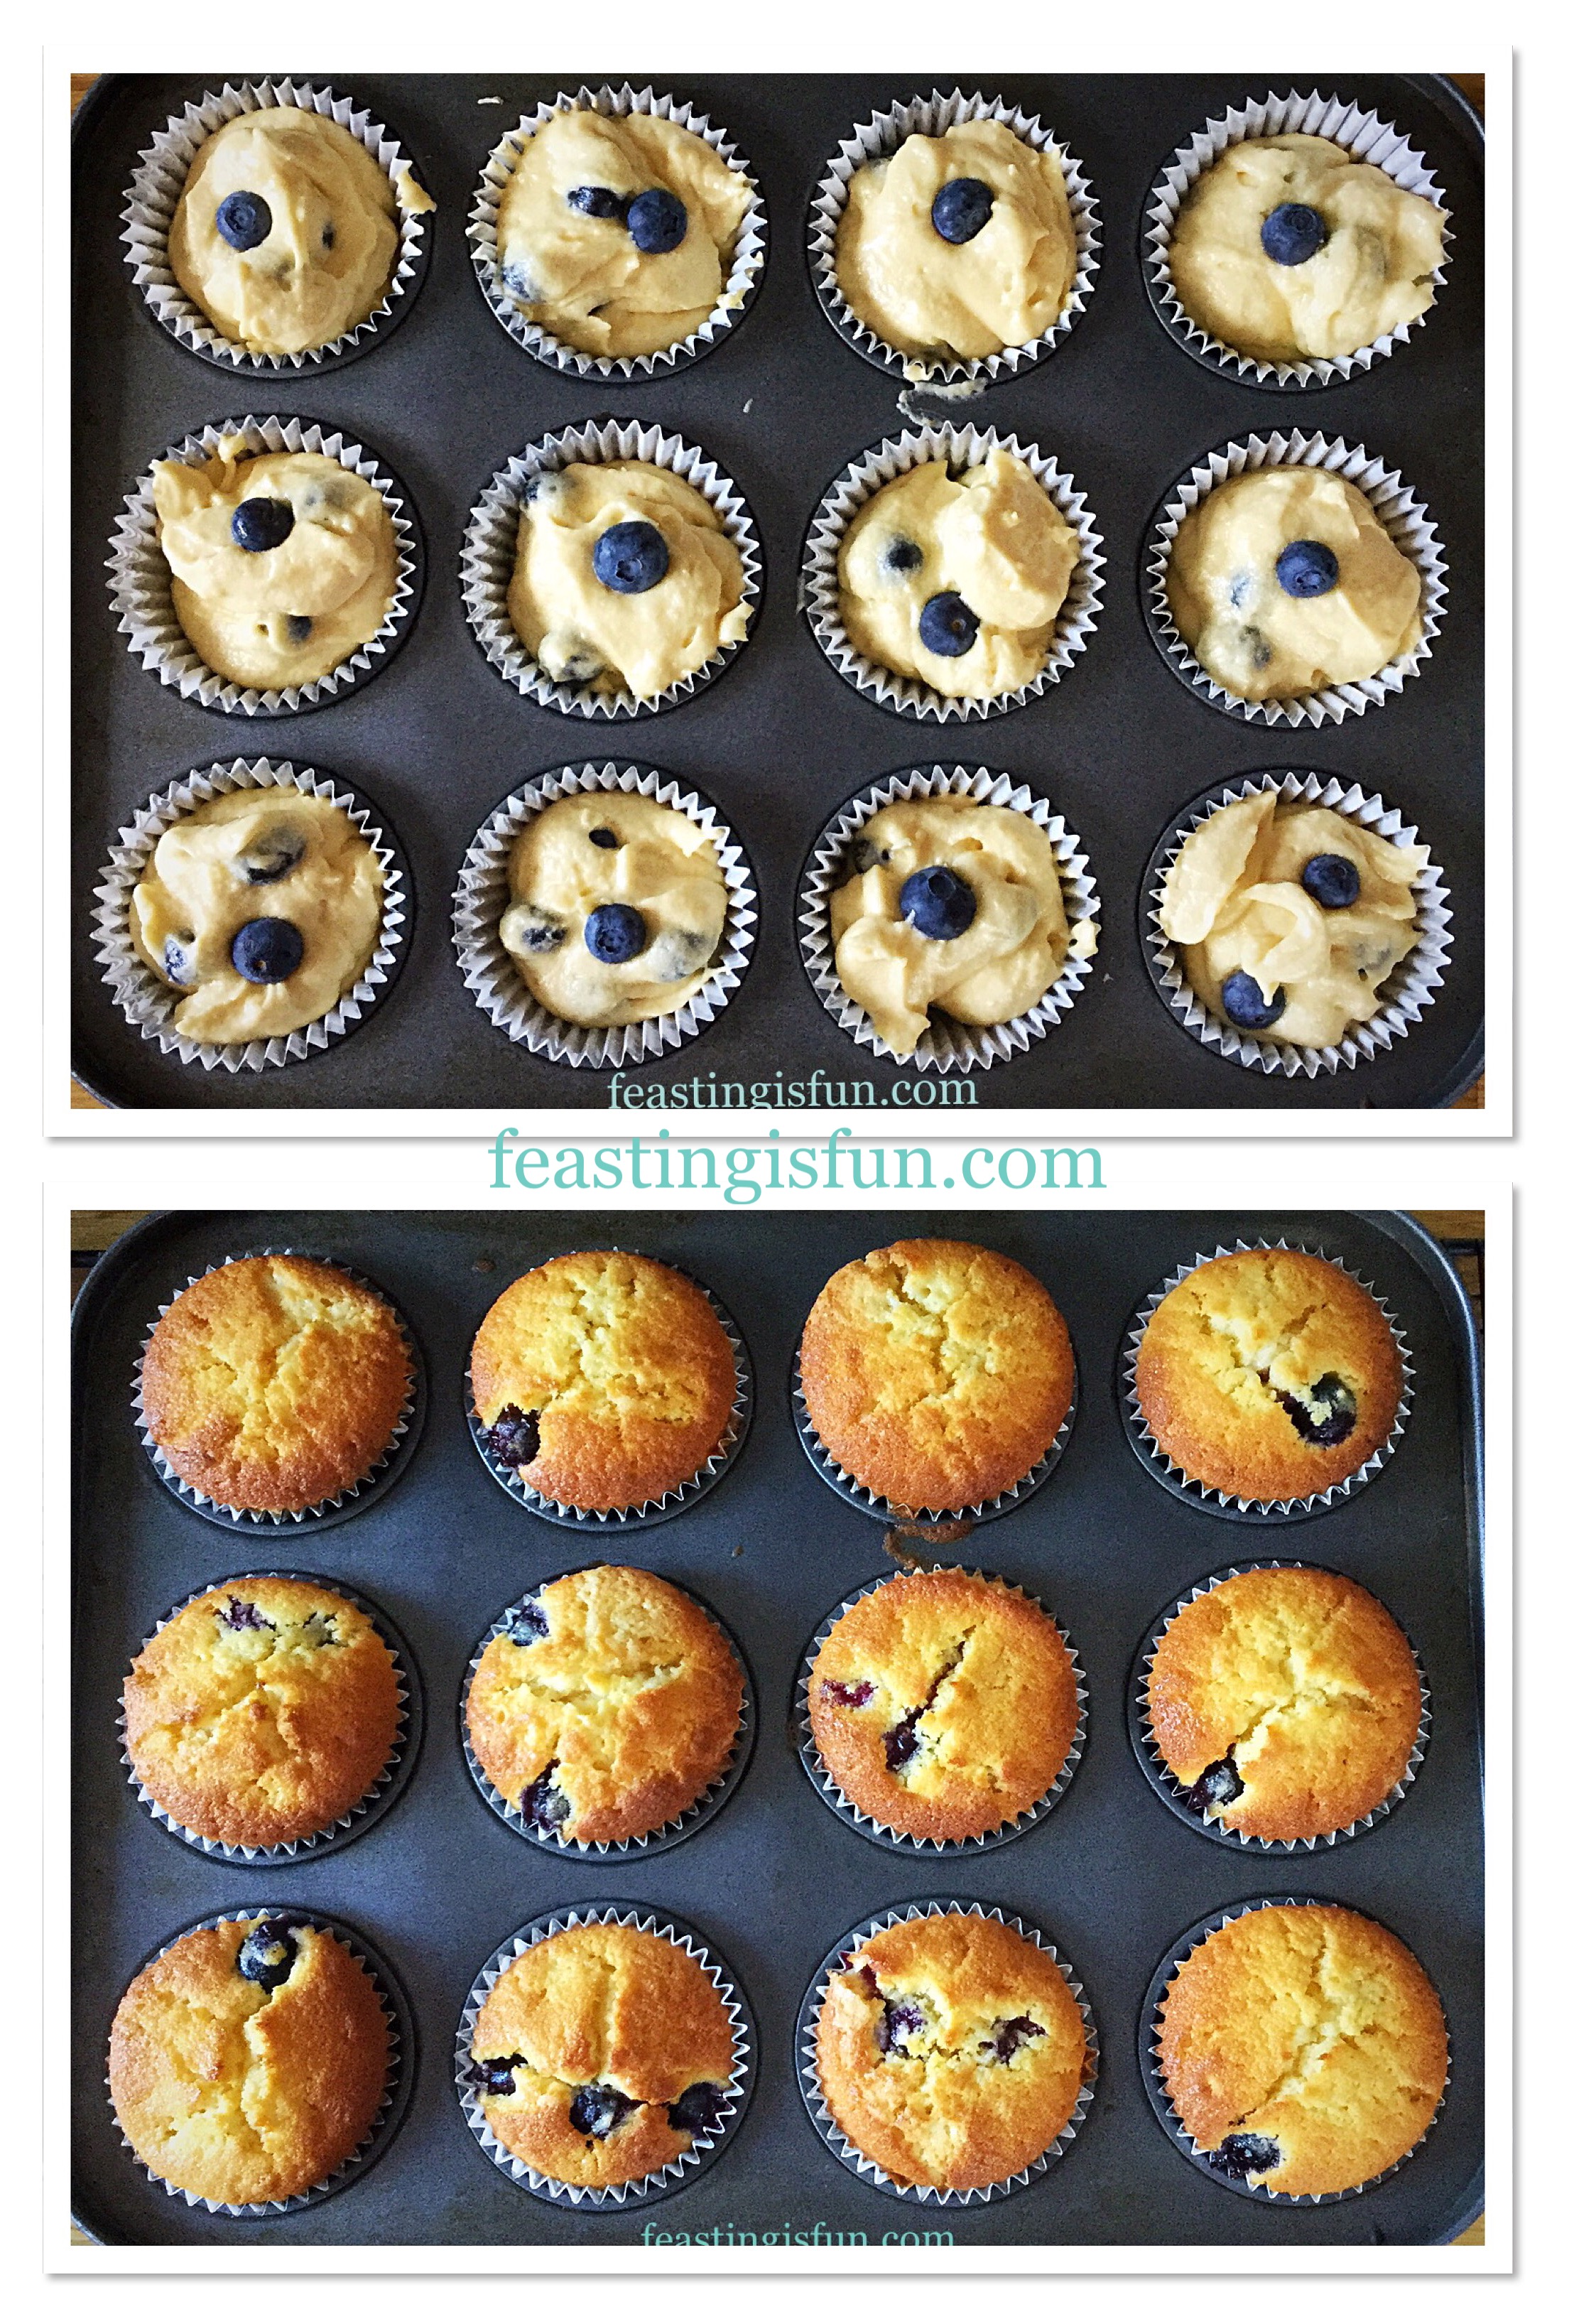
Keep back 12 blueberries for topping the muffins.
Add the lemon zest and remaining blueberries to the batter and fold in gently using a large metal spoon.
Making the Blueberry And Lemon Muffin batter.
Spoon the batter into the muffin cases, dividing equally.
Top each muffin with a fresh blueberry.
Baking The Muffins
Place the muffin tin into the oven centre and bake for 20-30 minutes.
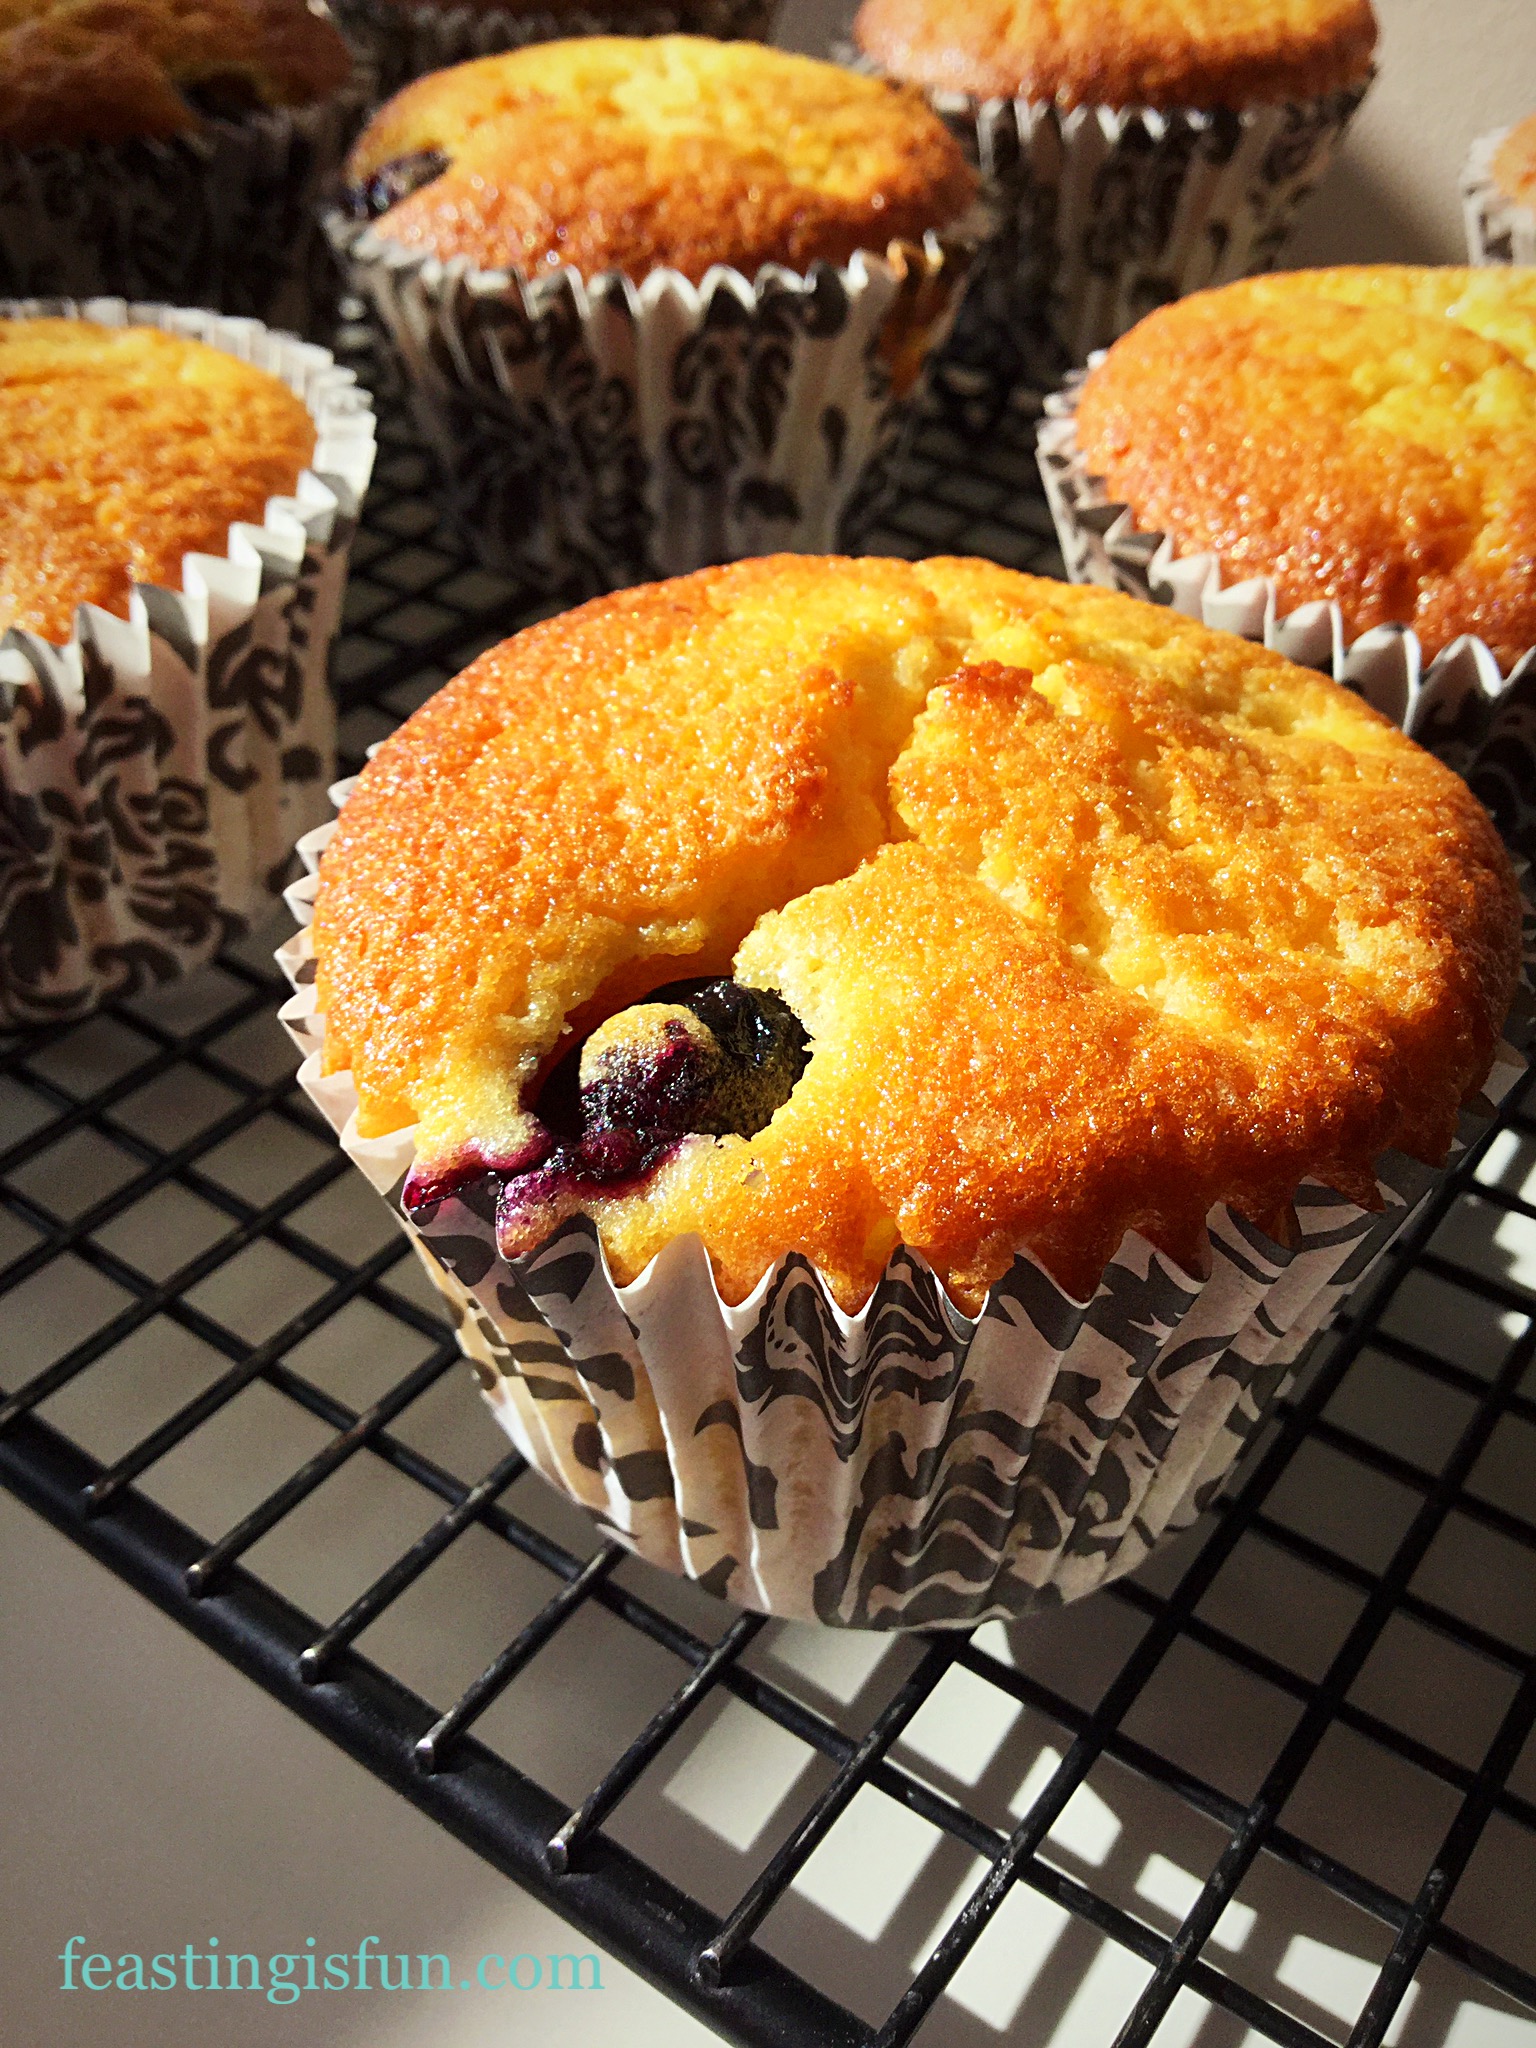
The muffins are baked when golden and spring back from a light touch. An inserted skewer will come out clean of batter, with some blueberry juices attached.
Filling the muffin cases and baking them.
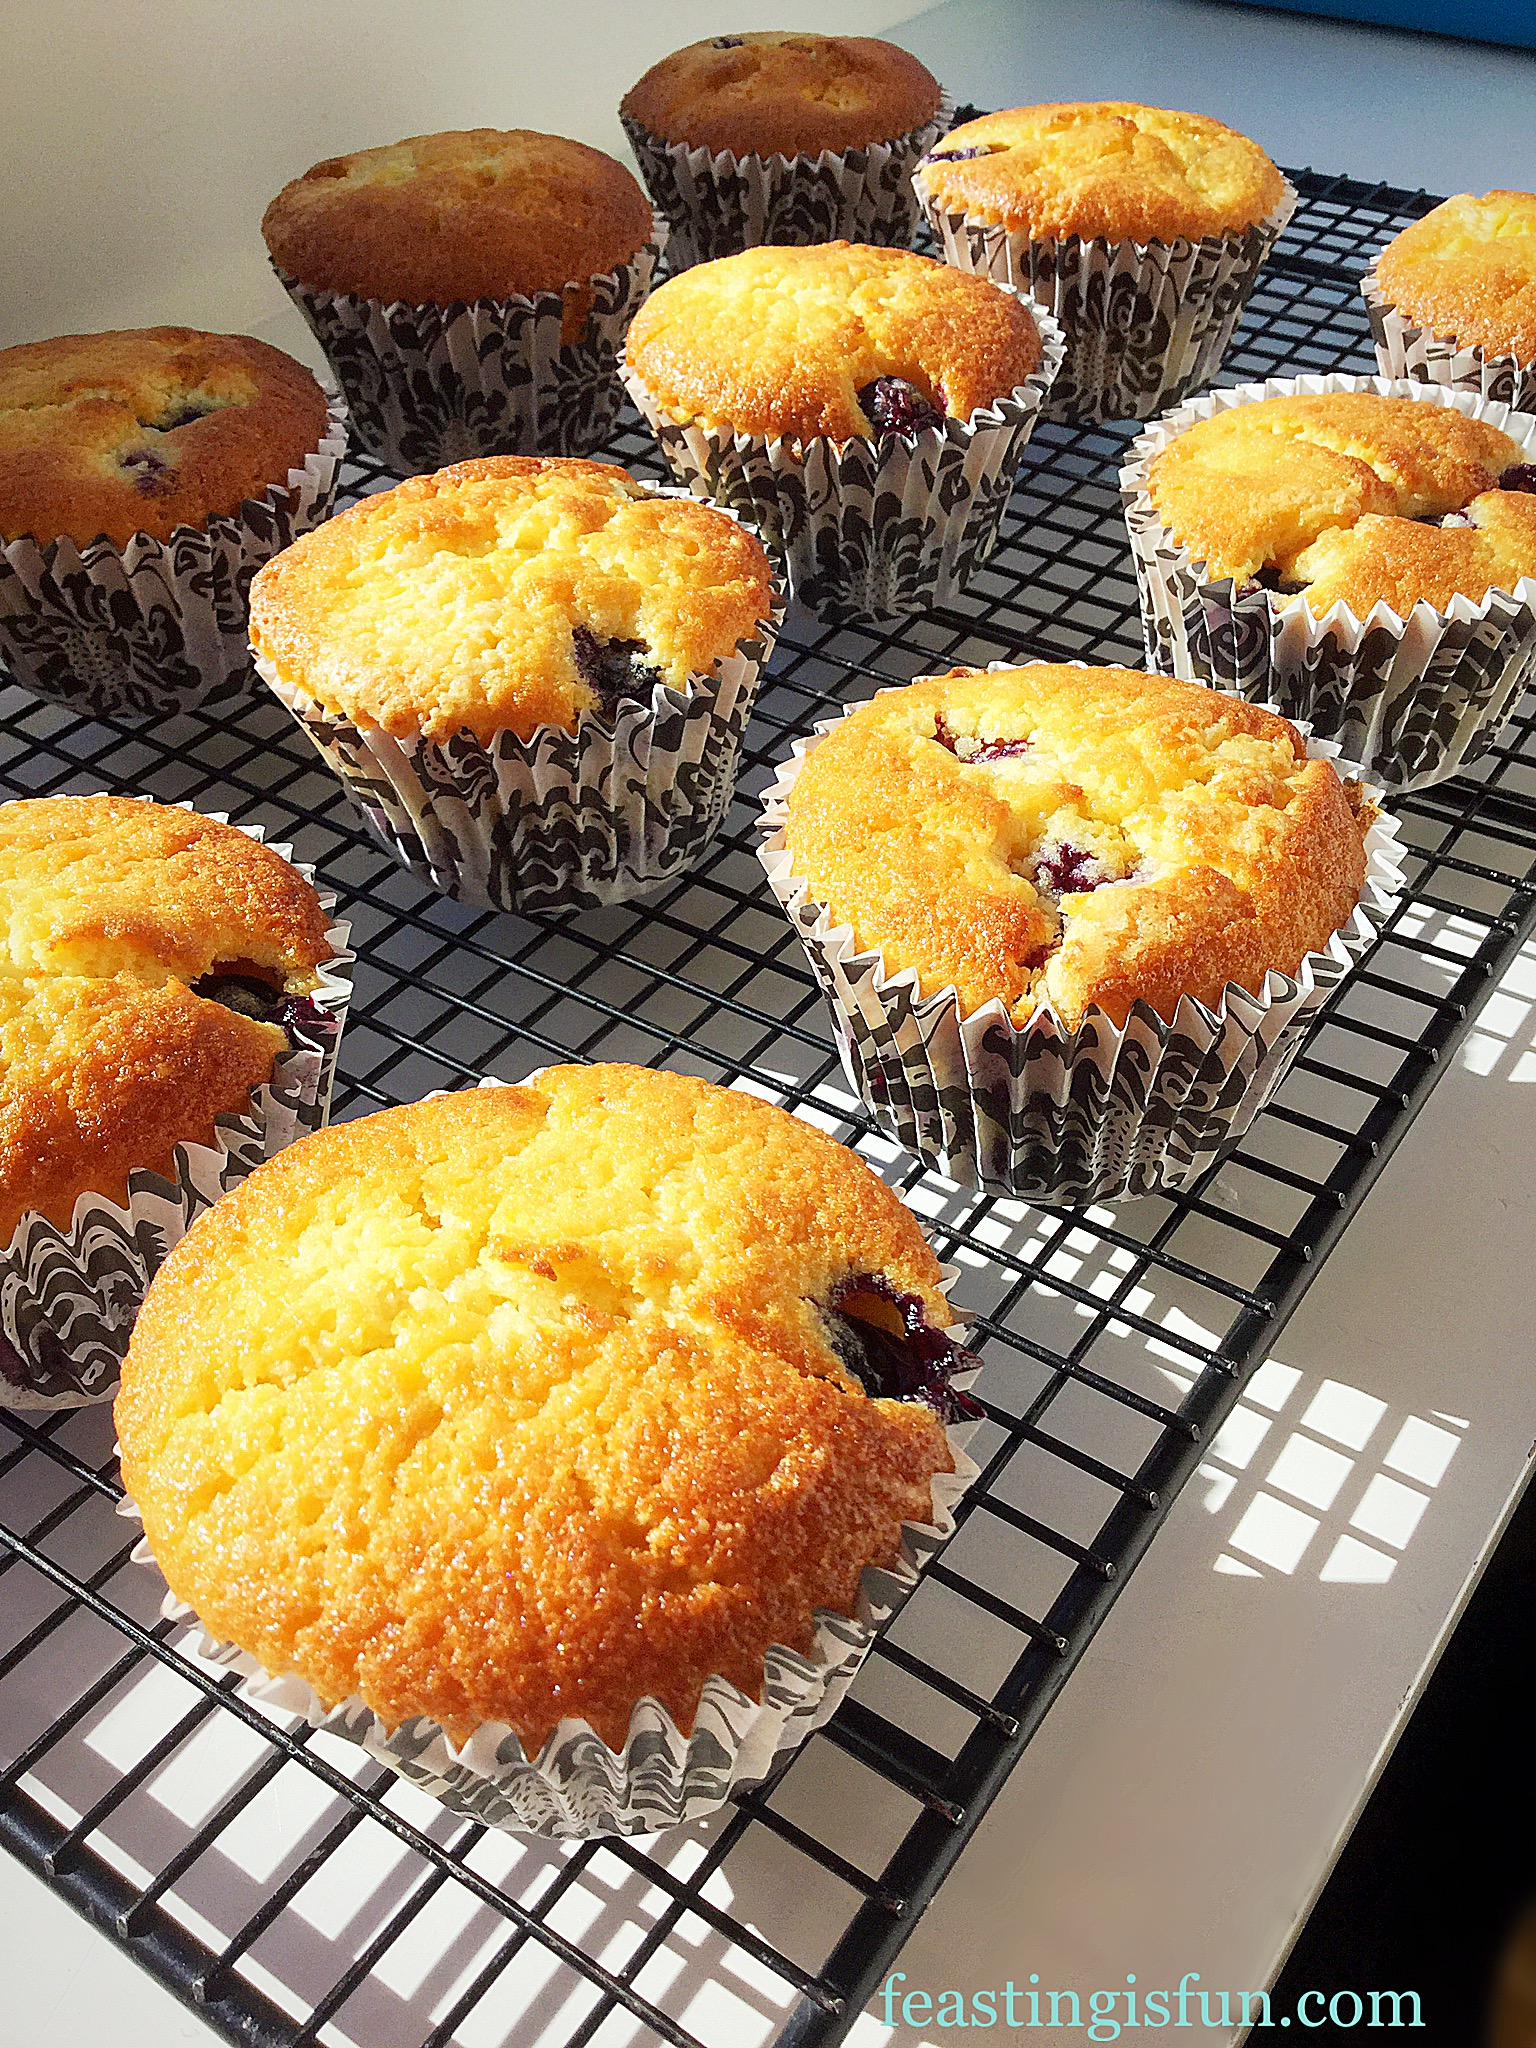
As soon as the muffins are baked remove from the oven and leave to cool in the tin for 10 minutes.
Remove from the tin and place on to a cooling rack.
Leave to cool completely, or until just warm.
Blueberry And Lemon Muffins
Now arrange nicely and take a photo. Email this photo to five friends, put the kettle on and see who arrives!
Blueberry And Lemon Muffins
These muffins are at their best, just warm. Since each blueberry, when cooked forms it’s own little pod of jam throughout the muffin. Seriously yummy and very hard to stop at one, two, three….. Remember they’re for sharing.
Enjoy. While reminding yourself that blueberries are a ‘super food’ and there’s a whole lemon in the recipe, happily kid yourself that the feast before you is good for you. Since it is packed with Vitamin C.
Store cold muffins in an airtight container and eat within three days.
If you have enjoyed this recipe for Blueberry And Lemon Muffins then you may also like these:
A fantastic recipe to make with children who will wolf them down as quick as they are cool enough to eat. With big jammy, smiling faces and wide eyes begging you to make another batch for them to share at school. Go on – it’s fun!
Whatever you are making, baking and creating in your kitchens, have fun preparing and sharing your feast.
Sammie xx
No part of this post may be reproduced or duplicated without the written permission of the owner. Please see my Disclosure Policy.
Today it is Sunday, traditionally the day of rest. Since not everyone gets to stay at home, I have a treat for you. Either to make for your family and loved ones when then come in from work, any day of the week, or just because it is so delicious. A dessert that will make you want to go for a brisk walk afterwards, or snuggle up on the sofa and have a nap. Here is my Amazing Apple Pie.
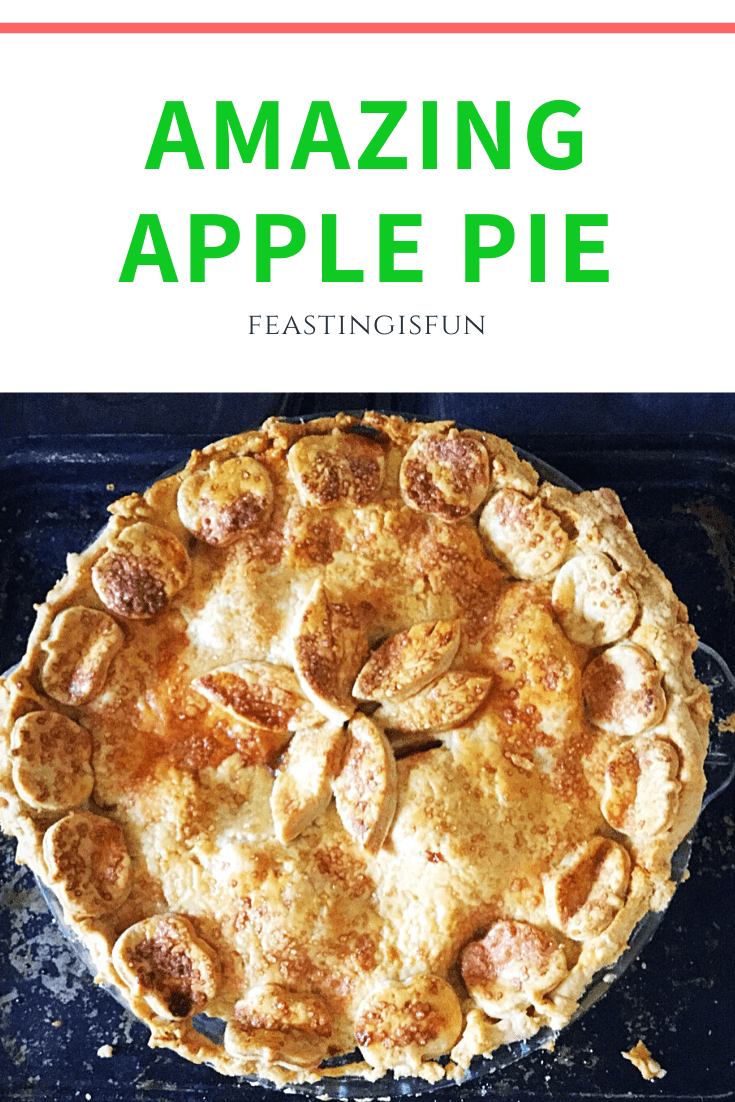
Amazing Apple Pie
A Time To Rest
Rest and relaxation is so important. More so nowadays in our 24/7 world. While life, with work/children/DIY/etc. can sometimes feel as though we are chasing our tails. It is important to take time to stop and rest. Turn off our electrical devices, mentally switch off from all the tasks still to be ‘done’ and simply be. Whether that be playing a board game, reading a book or going for a walk. Rest is good for our mind, body and soul.
I will let you into a secret, once you’ve finished your list of things that MUST be done, guess what? More ‘jobs’ will miraculously appear! So if we take a few hours, or even a whole day to chill out, rest, or spend time doing something, that in itself is relaxing, we will feel soo much better. And be ready to face the world and all the demands that are placed on us.
We were created to work and be fruitful (no pun intended on the Amazing Apple Pie) but also to rest.
Amazing Apple Pie
Not Forgetting The Workers
Obviously I’m aware many, many people cannot rest on a Sunday. Our Doctors and Nurses, who do such a fantastic job of treating and looking after sick people, don’t just down tools and stop because it’s Sunday. There are millions of people who, without their commitment to providing our security, ensuring our power supplies continue, indeed run our government and many, many more dedicated professions who work around the clock. Far too many to mention here – who ensure the smooth running & care of the population of our Great United Kingdom. To them I give my heartfelt thanks. Just think, Vicars don’t get Sunday off.
Baking And Gardening – My Ways To Relax
Rest doesn’t have to mean just plopping down in front of the telly, although if that’s how you chill out, go for it! Personally I love gardening, gentle gardening, pottering. Planting a few bulbs, deadheading, a little light pruning, nothing that causes me to beak out in a sweat and lands me on the sofa for 3 days, simply because I’ve overdone it. That is not rest, I’ve learned the hard way!
Baking is right up there with gardening as a form of relaxation for me. Gentle pastry making, not frenetic mid-week meal cooking, followed by mums taxi running one child to piano, my lil man to scouts, not to mention the impossible task of getting a filthy rugby kit washed, dried, ironed and ready by the next day. I don’t even own a tumble drier!
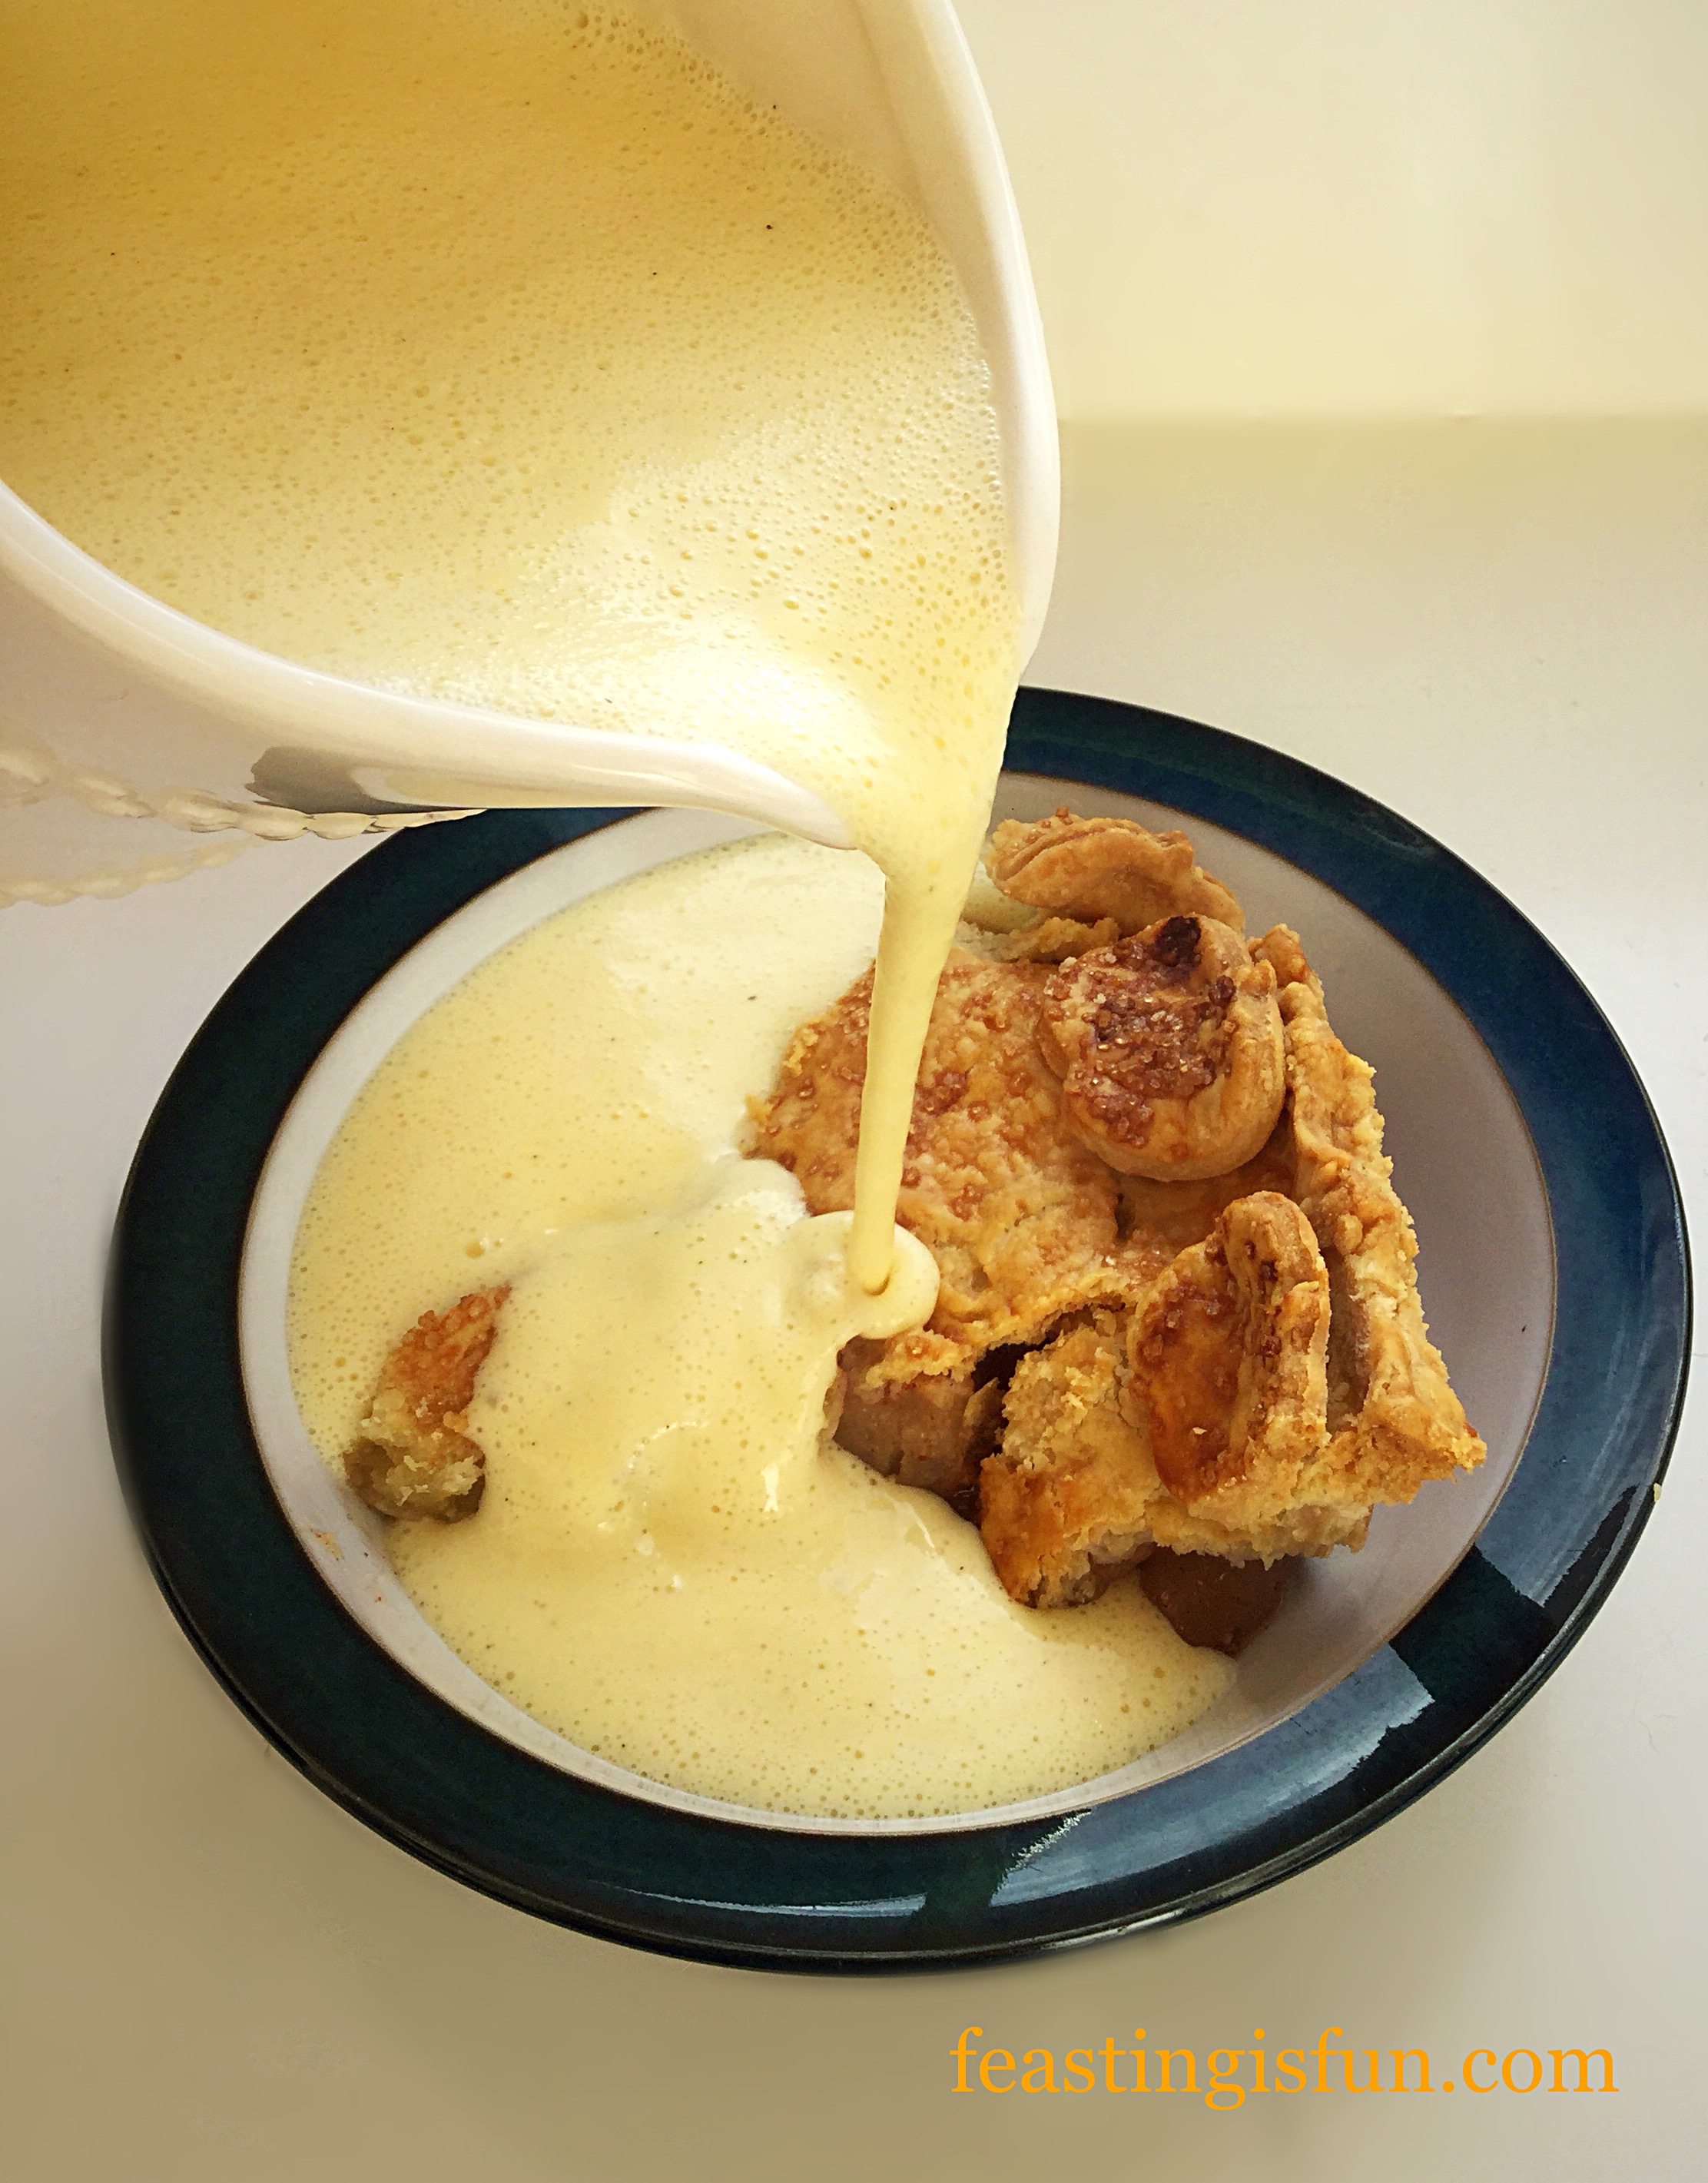
Amazing Apple Pie served with Luxury Homemade Vanilla Bean Custard.
So to my recipe for scrumptious Amazing Apple Pie: am I stressed Noooo. I find the whole process relaxing – if you find that strange – that’s ok. You do what you must to relax, I bake or garden!
You will need a 9-10″ glass pie dish ( the glass really does make a difference – the bottom of the pie doesn’t go soggy – don’t know why – but glass seems to conduct the heat better, resulting in a pie that is baked evenly on the bottom as well as the top! Anyhow it works!!!
600g/1lb 4oz weight of peeled Apples – Tart varieties (such as Granny Smiths, or cooking apples such as Bramleys) are best, but windfalls of any variety can be used
Method: Preheat oven to 200C/180C fan, 400F, gas mark 6
Making The Pastry
Place all the ingredients into a bowl (of stand mixer if using, with paddle attachment), using a pastry cutter, or your fingers, quickly rub/cut/blend the fat into the flour until the mixture resembles lumpy breadcrumbs – pea sized pieces of fat should still be visible.
Add enough cold water – 1 tbs at a time until the pastry JUST comes together, stirring with a butter or palette knife. Just as the mixture starts to clump go in with your hands and gently and quickly bring the clumps together into a ball.
Place the pastry onto some cling film, pat out to form a disc & then cut the disc in half, reshape each half back into a disc. Wrap each half in cling and place in the fridge for at least 30 mins to allow the pastry to relax.
NOTE : Whilst the pastry is resting you can prepare the filling – see below.
As soon as the pastry has rested remove it from the fridge and place 1 disc on a clean floured surface. With a lightly floured rolling pin start rolling, using even outward motion and turning the disc, adding small amounts of flour so that the pastry doesn’t stick.
When the circle looks wide enough to fill the pie dish, will a small amount of over lap, place the pastry into the UNGREASED pie dish, so that the excess pastry drapes slightly over the edges of the pie dish.
Please don’t worry, if you have followed the recipe and are using a glass pie dish IT DOES NOT need greasing. There is enough fat in the pastry for it not to stick. If you have used a different type of pie dish I would play it safe and butter it first.
Preparing The Apple Pie Filling
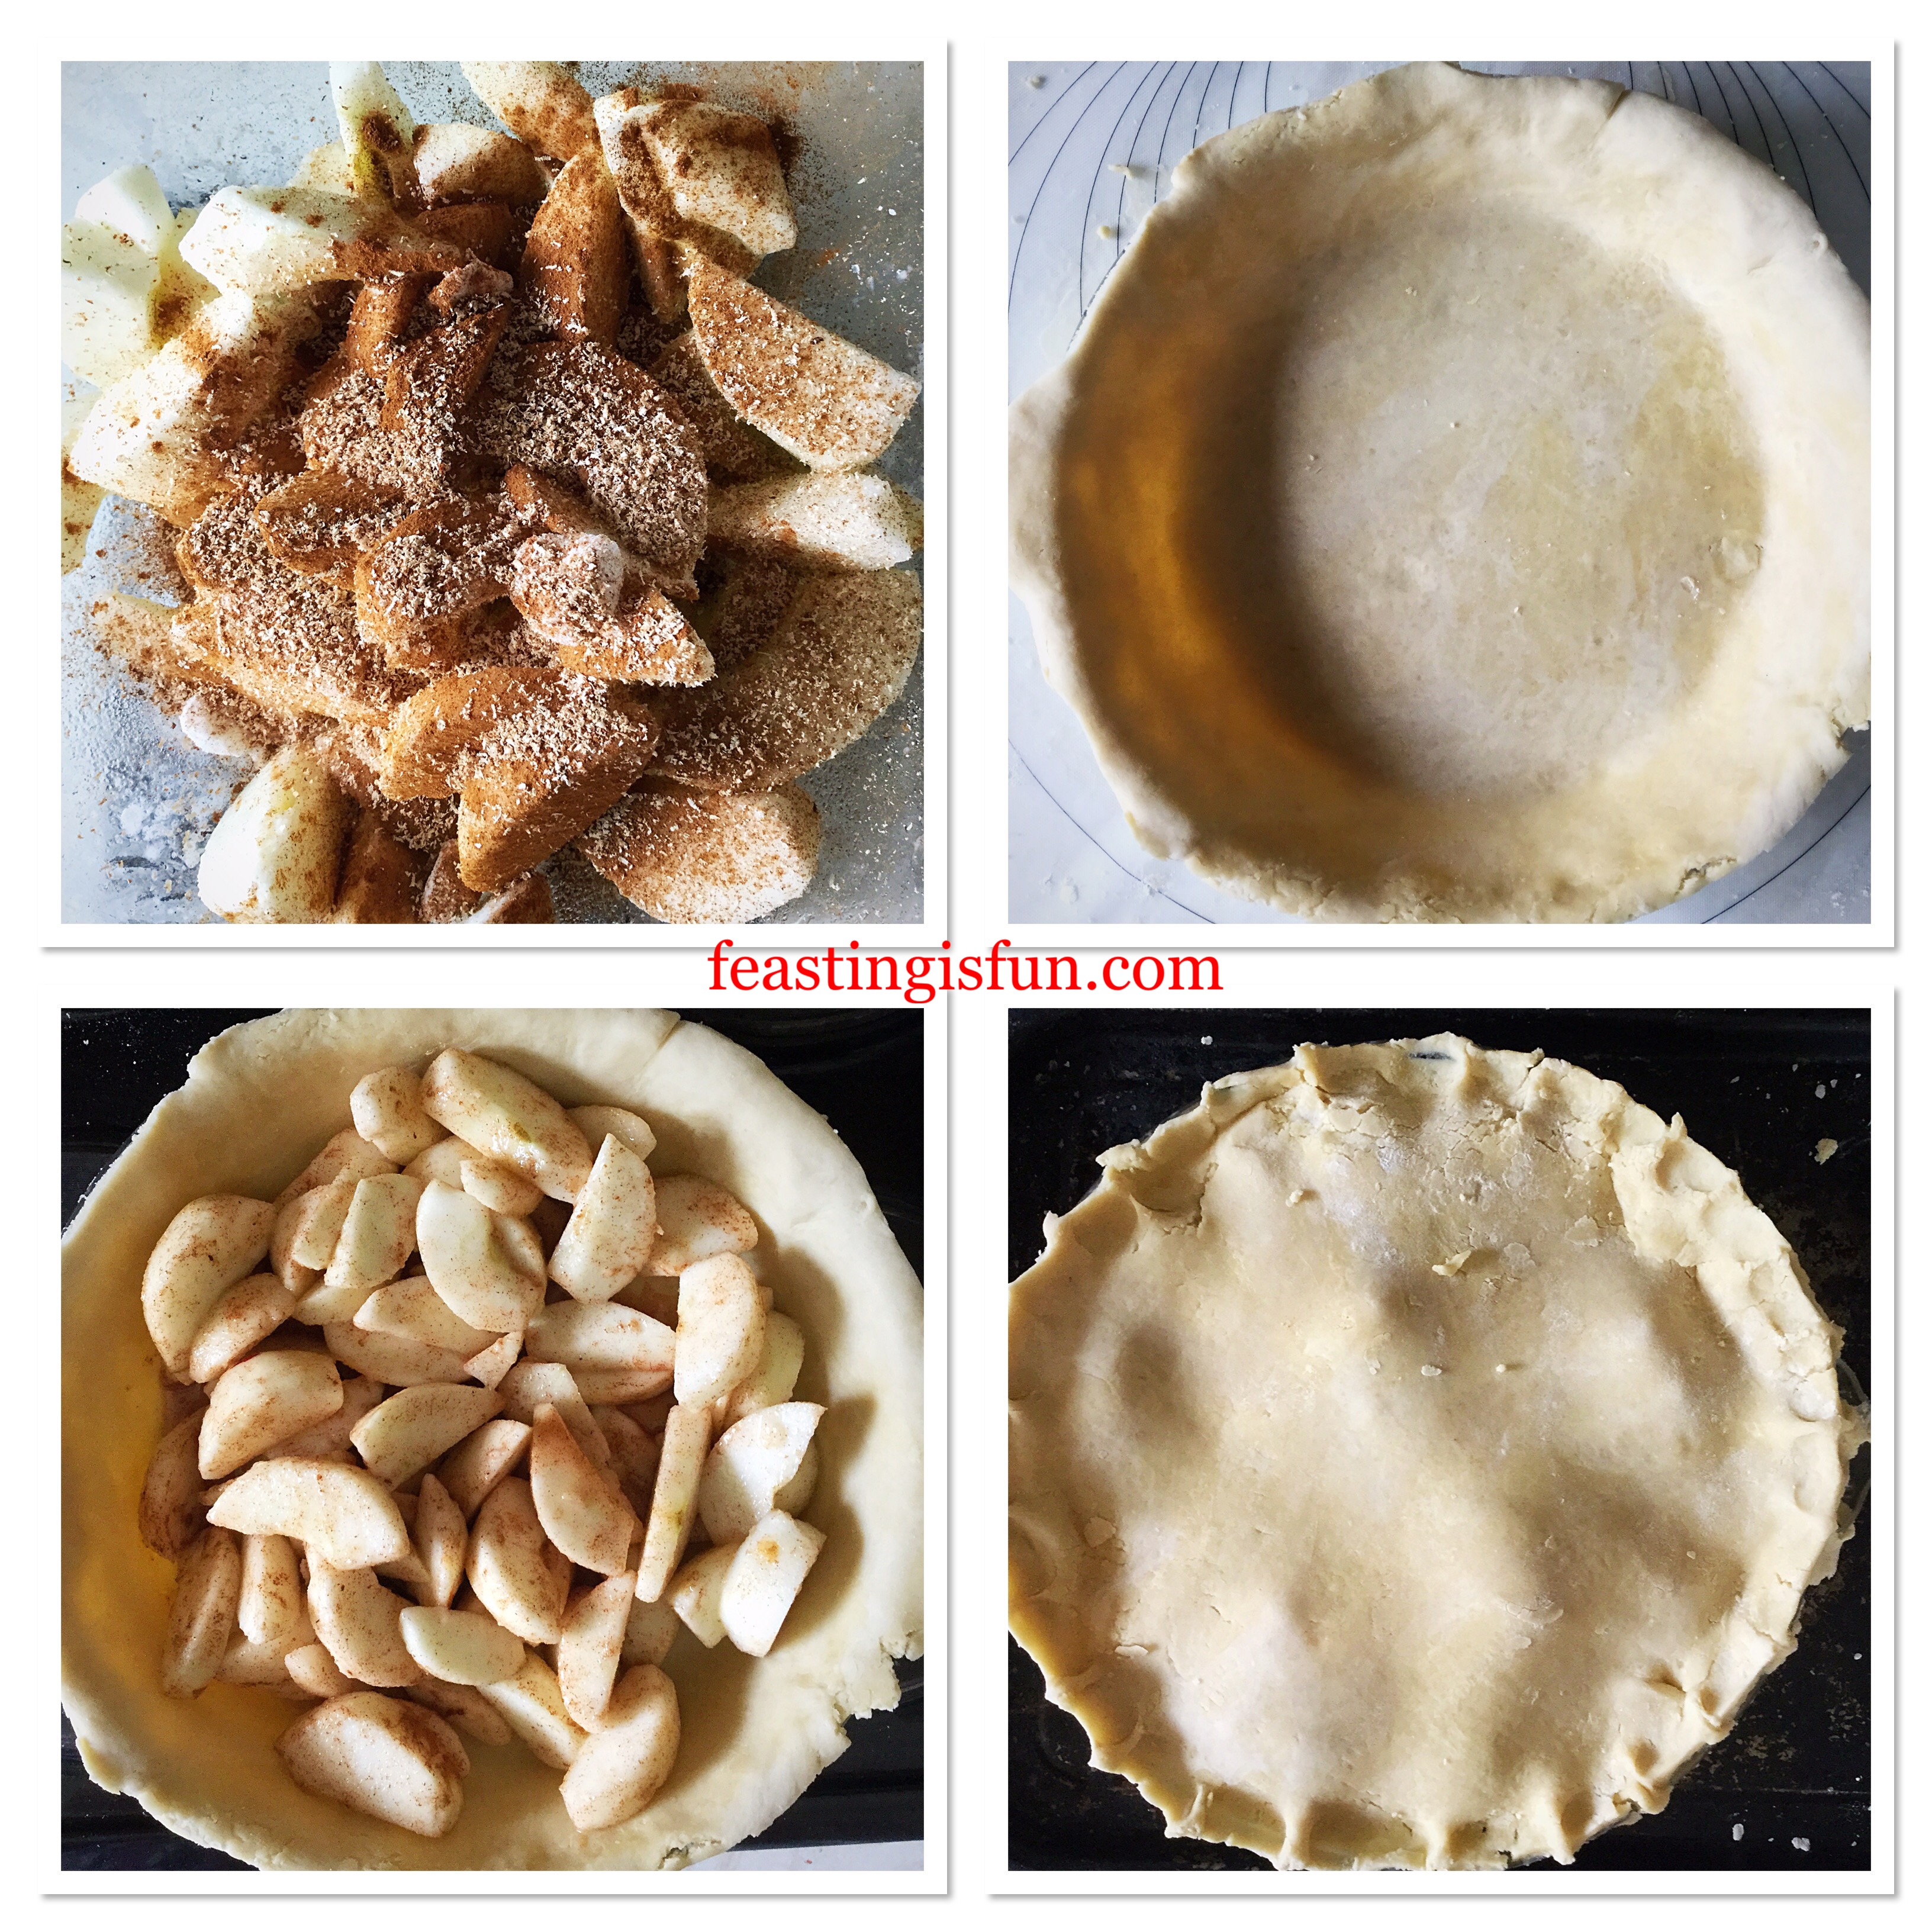
Peel, core and quarter the apples. Slice the quarters into 3.
Place the prepared apples into a bowl and pour over the lemon juice, cornflour, sugar and spices. Using clean hands toss the apples so that each piece is covered in the lemony, gooey mixture.
Place the apple mixture onto the pastry base.
Using a pastry brush lightly brush the outside edge of the pastry with egg wash.
Remove the 2nd pastry disc and roll out as before, ensuring when placed on top, the circle of pastry slightly overlaps the top of the pie.
Using a sharp knife carefully trim the excess pastry. Either use a fork or your forefinger and thumb and press the lid of the pastry to seal it around the rim to the bottom layer.
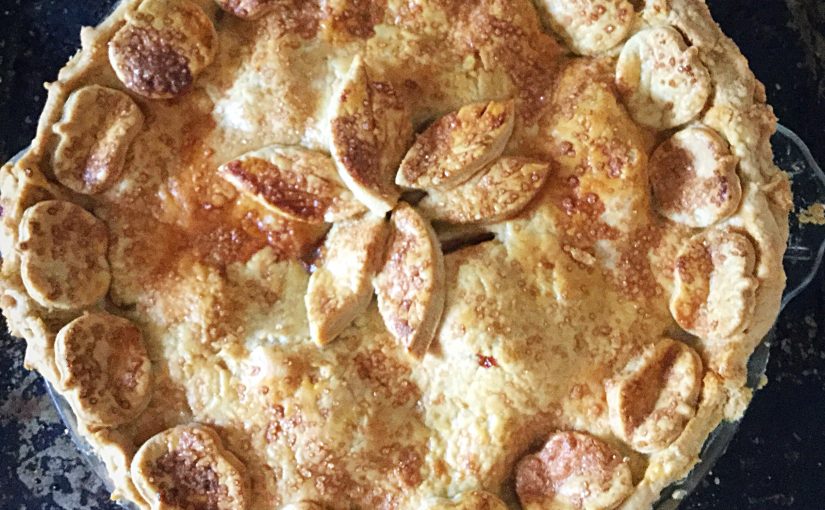
Creating an Amazing Apple Pie
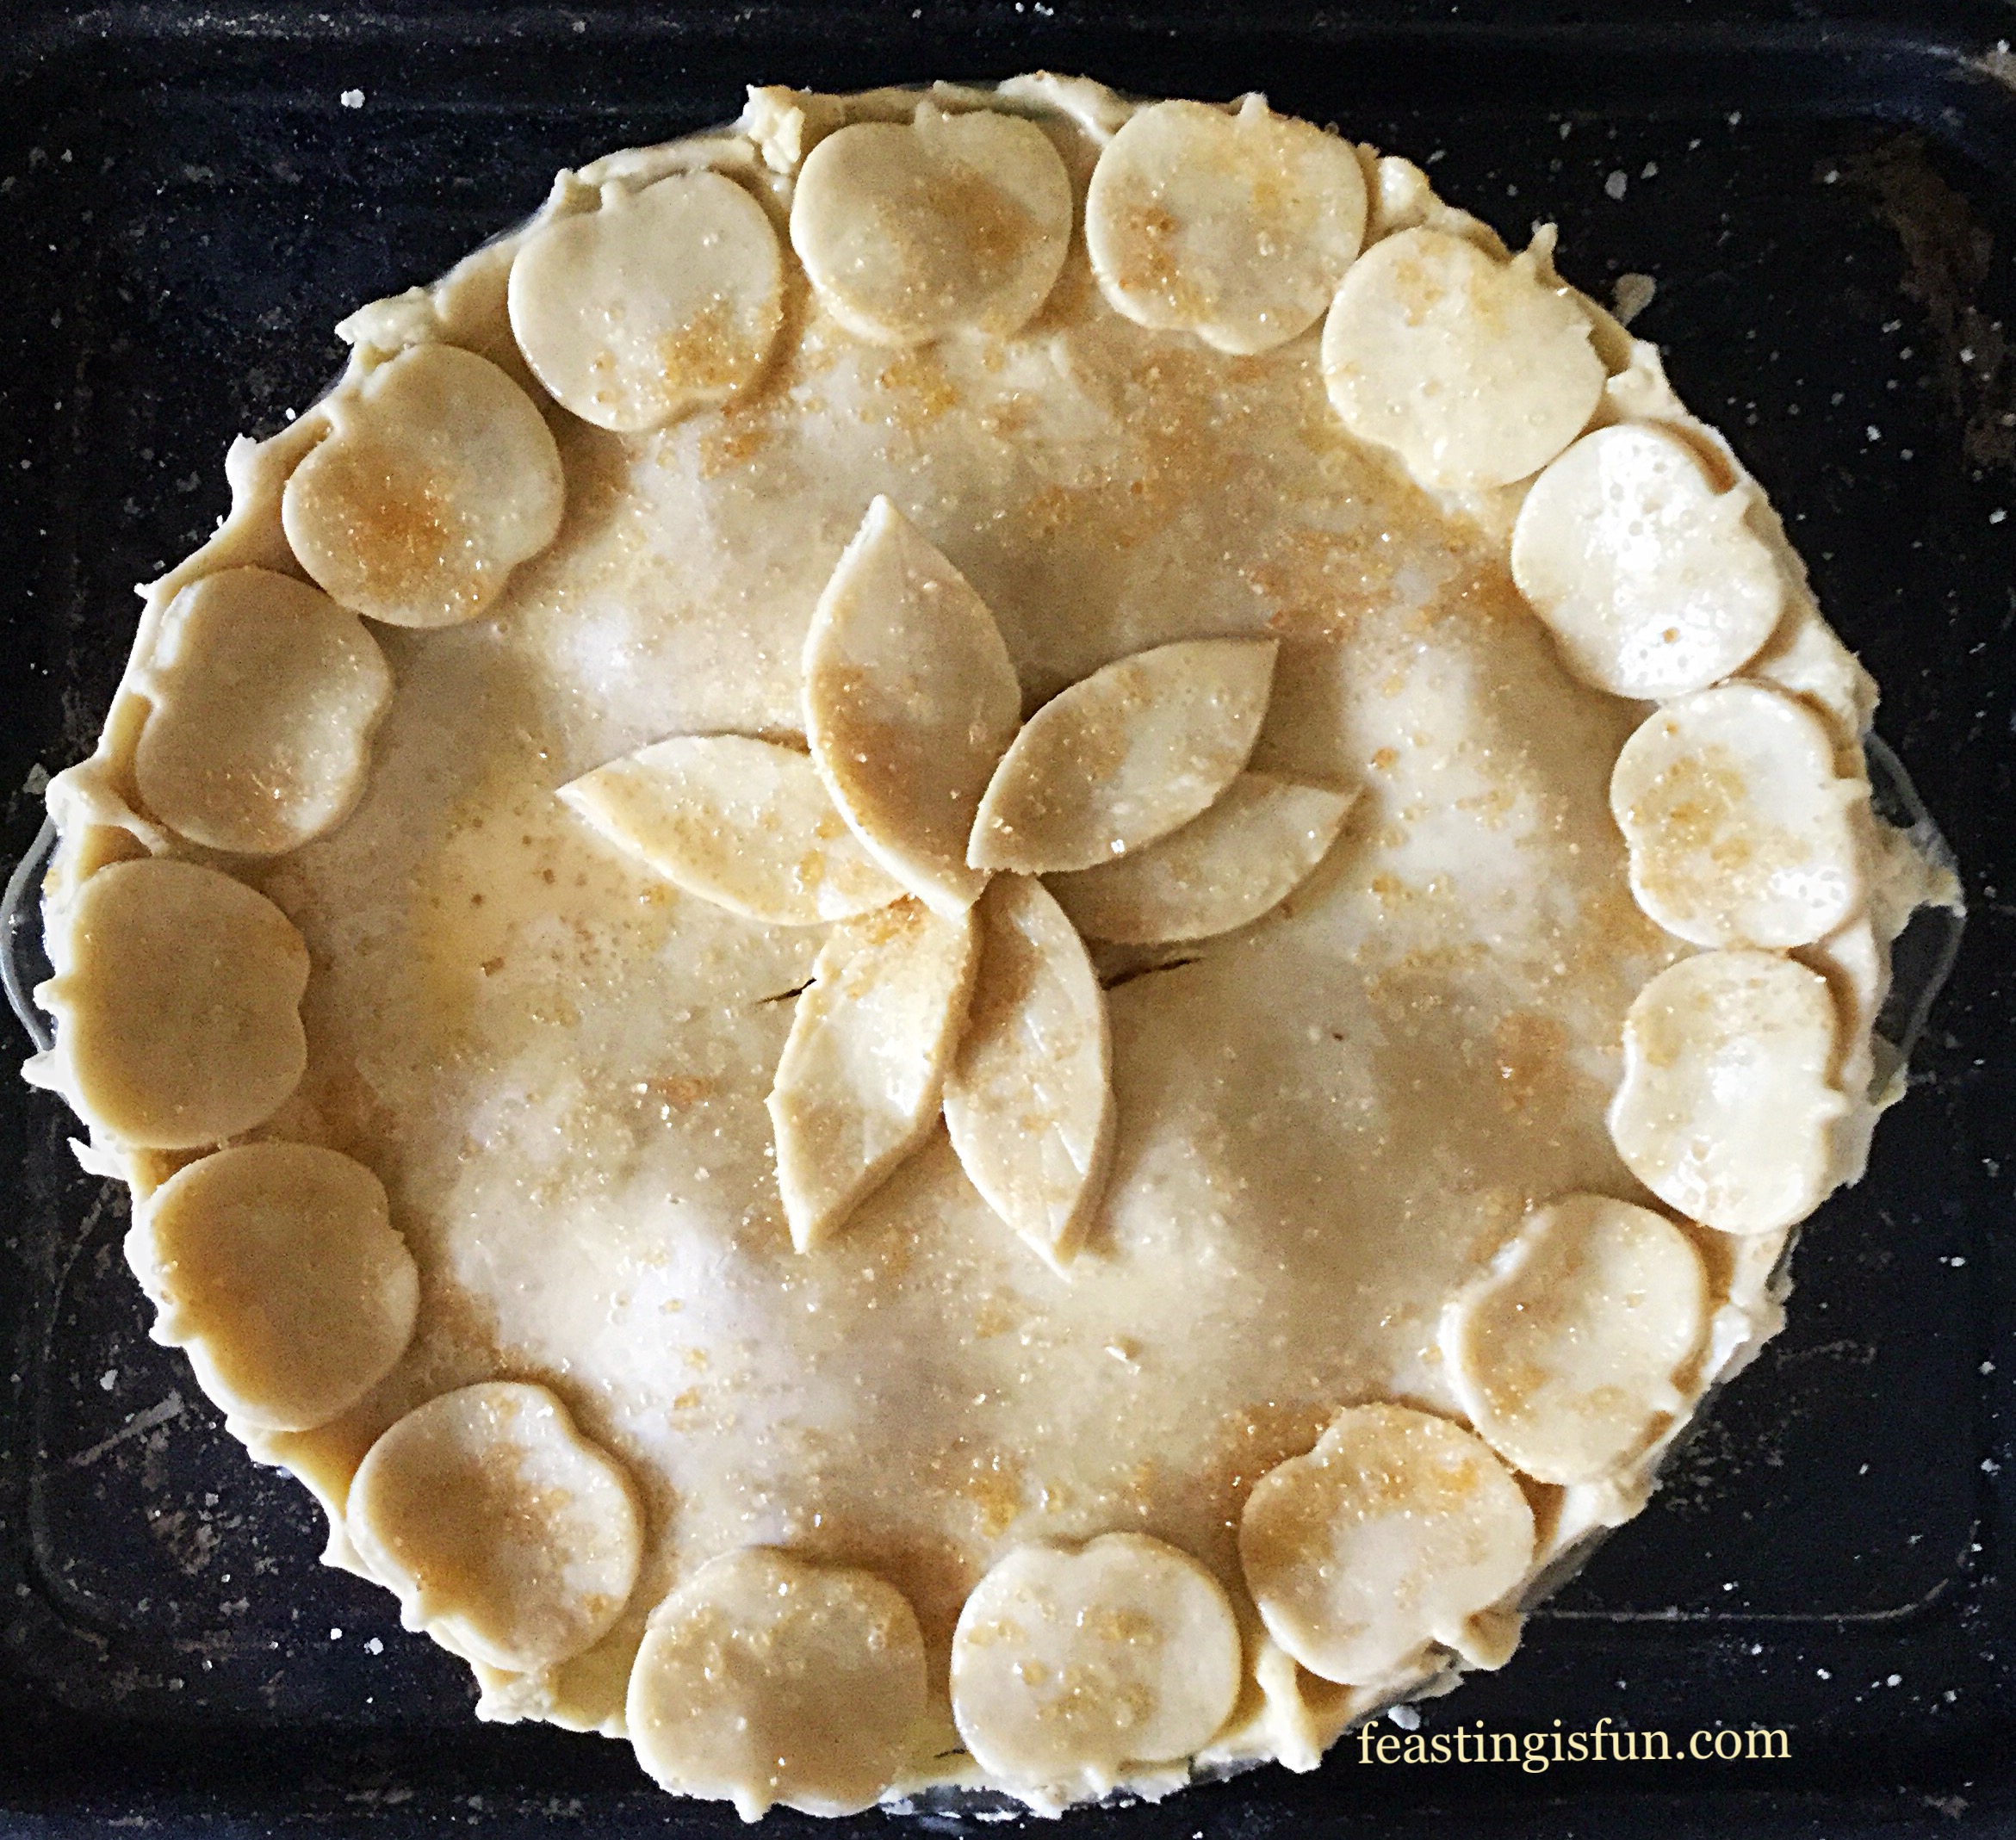
Make a few snips in the top of the pastry, to allow any steam to escape.
Creating A Decorative Pie Lid
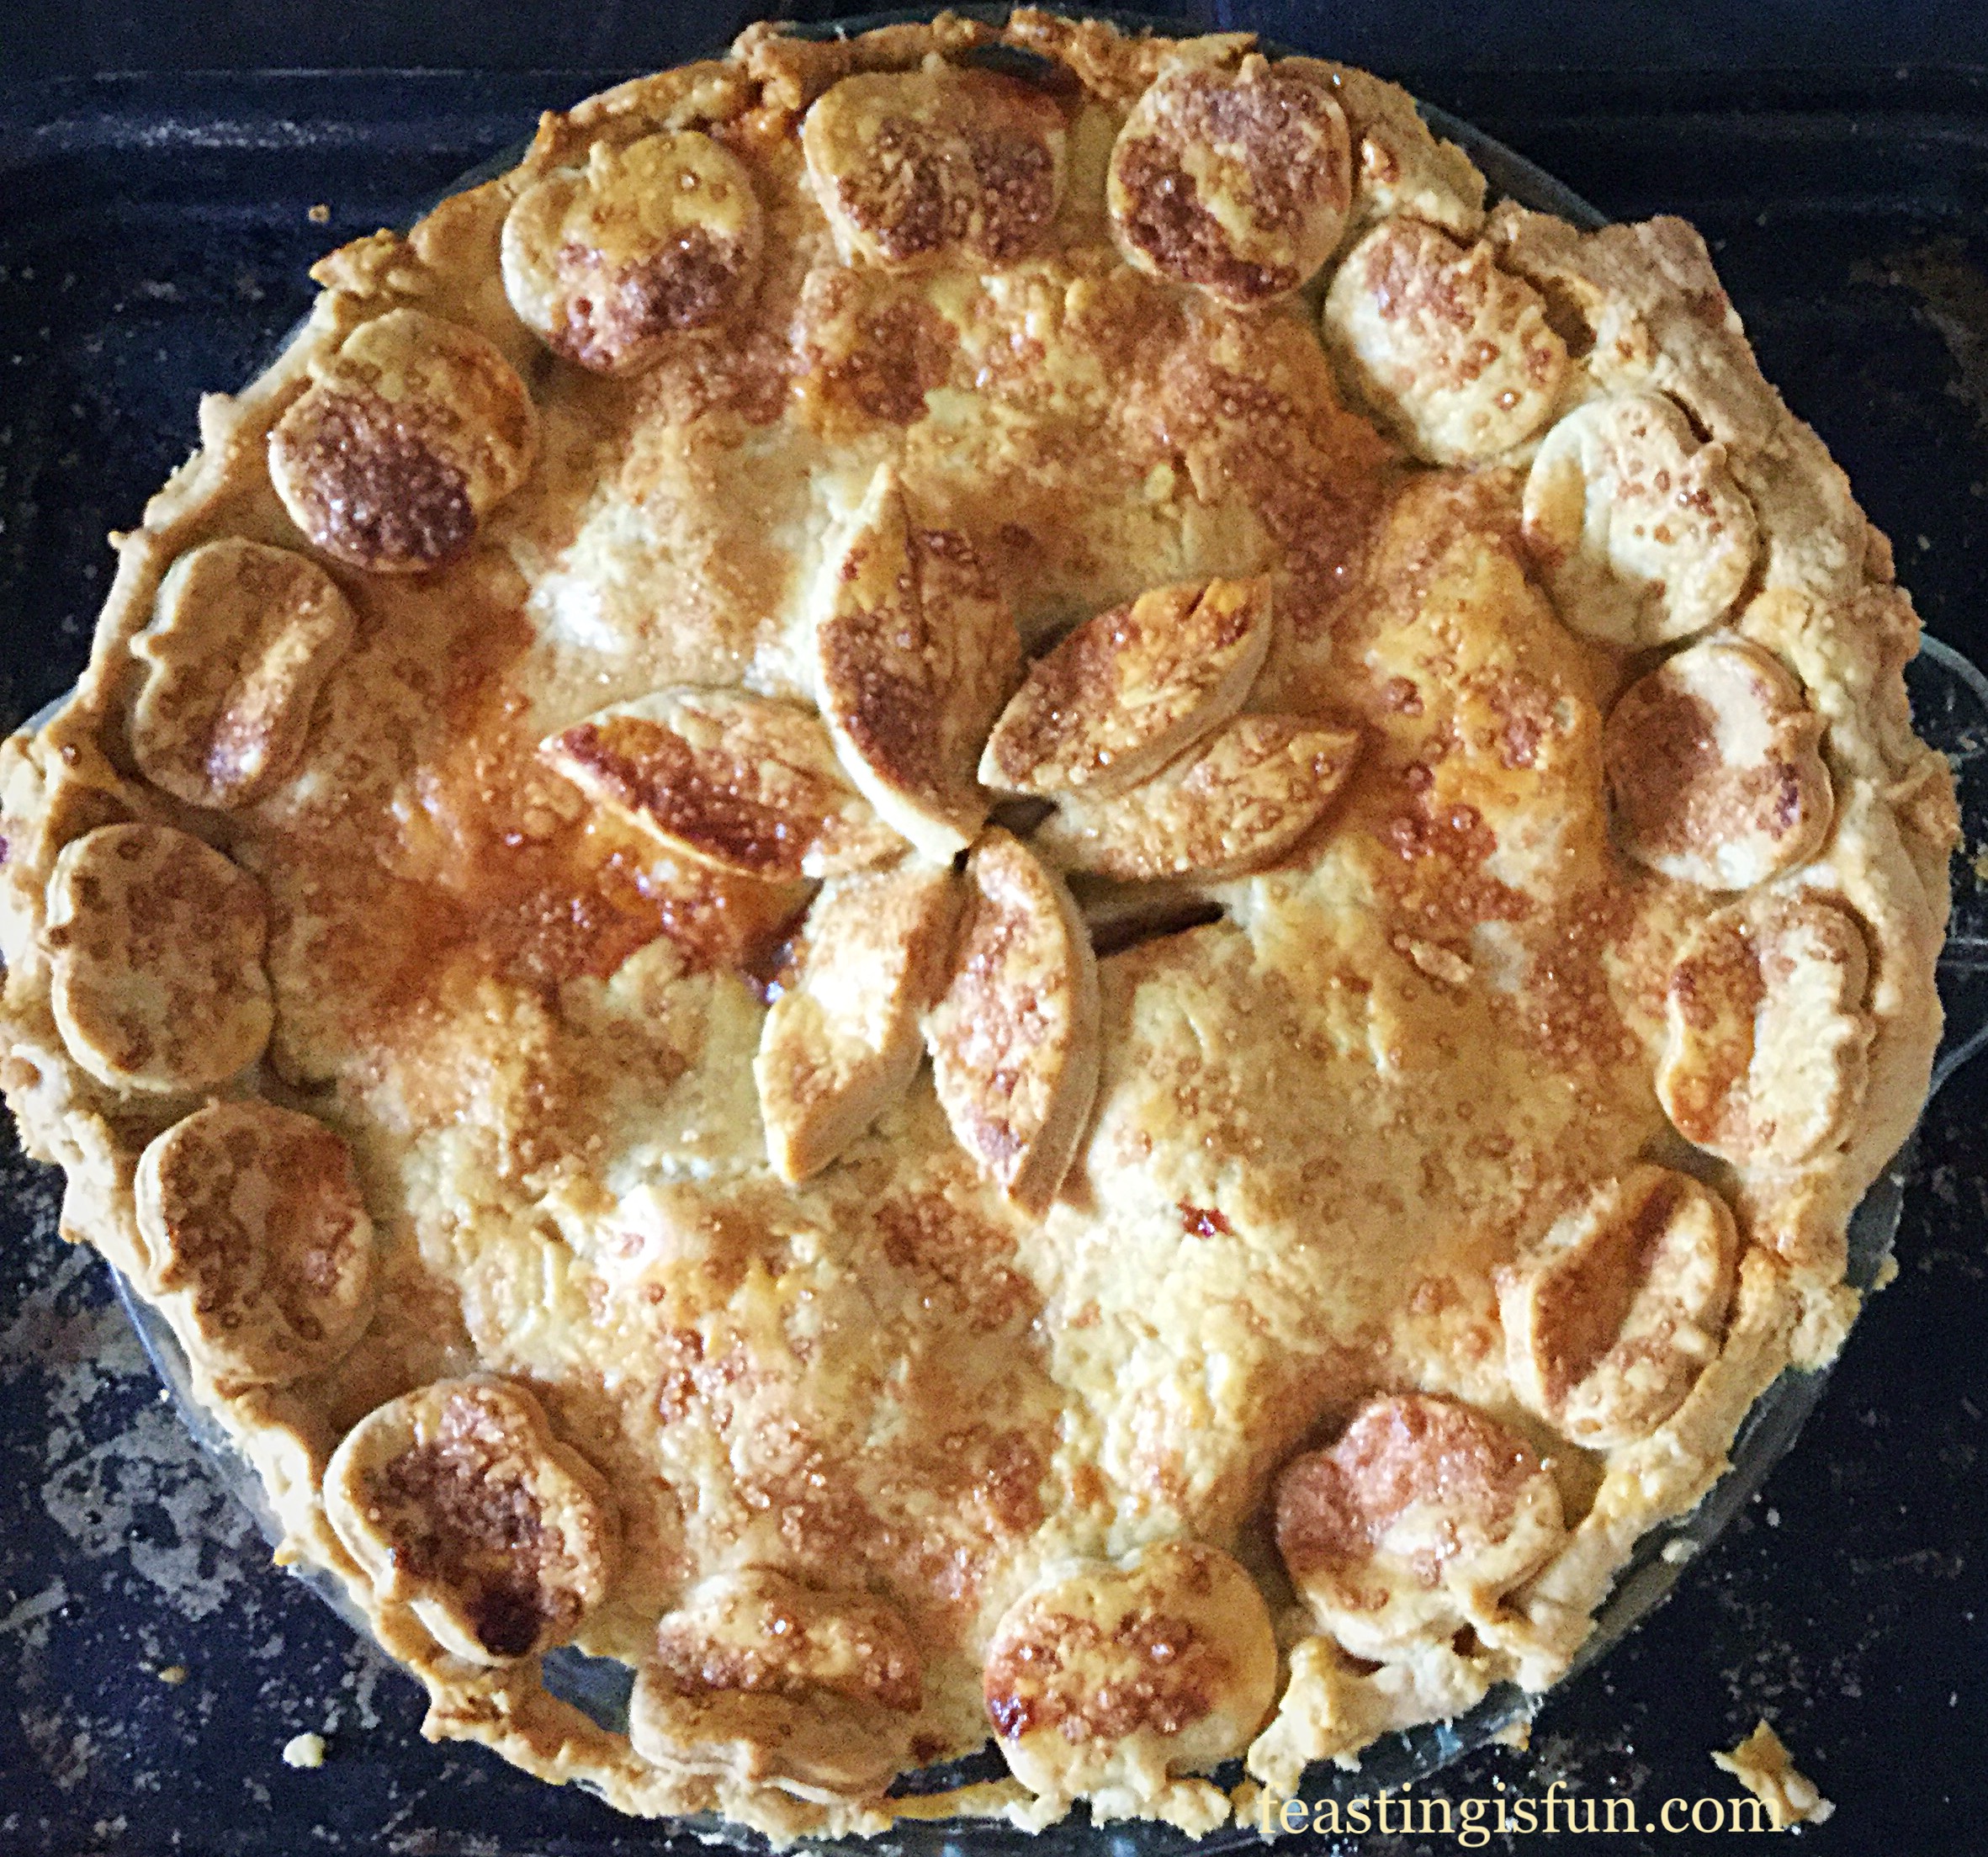
If you want to be creative, make leaves, berries, whatever you want to decorate the top of the pie, making sure you don’t cover the slits in the pastry up. I just happen to have a mini apple shaped cutter that I couldn’t resist using on this pie.
Decorated with Pastry apples and leaves, this Amazing Apple Pie is ready for the oven.
Baking The Amazing Apple Pie
Brush the top of the Amazing Apple Pie with egg wash and then sprinkle the Demerera Sugar over the top of the pie. This adds an extra crunch and very mild toffee flavour. Put the pie dish onto a baking sheet and place in a preheated oven. Bake for 50-60 minutes. The pie is cooked when it is a gorgeous golden colour, on top and underneath.
Remove from the oven and let the pie rest for 15 minutes, this will make it easier to slice.
Amazing Apple Pie
Serve this Amazing ApplePie with Luxury Homemade Vanilla Bean Custard, cream, vanilla ice cream (or all of them!) and a big smile. Wait and in that moment of the first mouthful being eaten, you will become the most popular, loved person in the room.
If you have enjoyed this recipe for Amazing Apple Pie you may also like these:
This pie cries out to be shared with family, friends and loved ones alike. Also why not pop across the road to the gentleman who recently lost his wife and share a slice of pie with him?
Sometimes, when we are stumped by what to say, our actions can convey more than words ever could.
Until next time, challenge yourself to share with someone who is outside of your comfort zone. You may just make somebody else smile?
Sammie xx
No part of this post may be reproduced or duplicated without the written permission of the owner. Please see my Disclosure Policy.
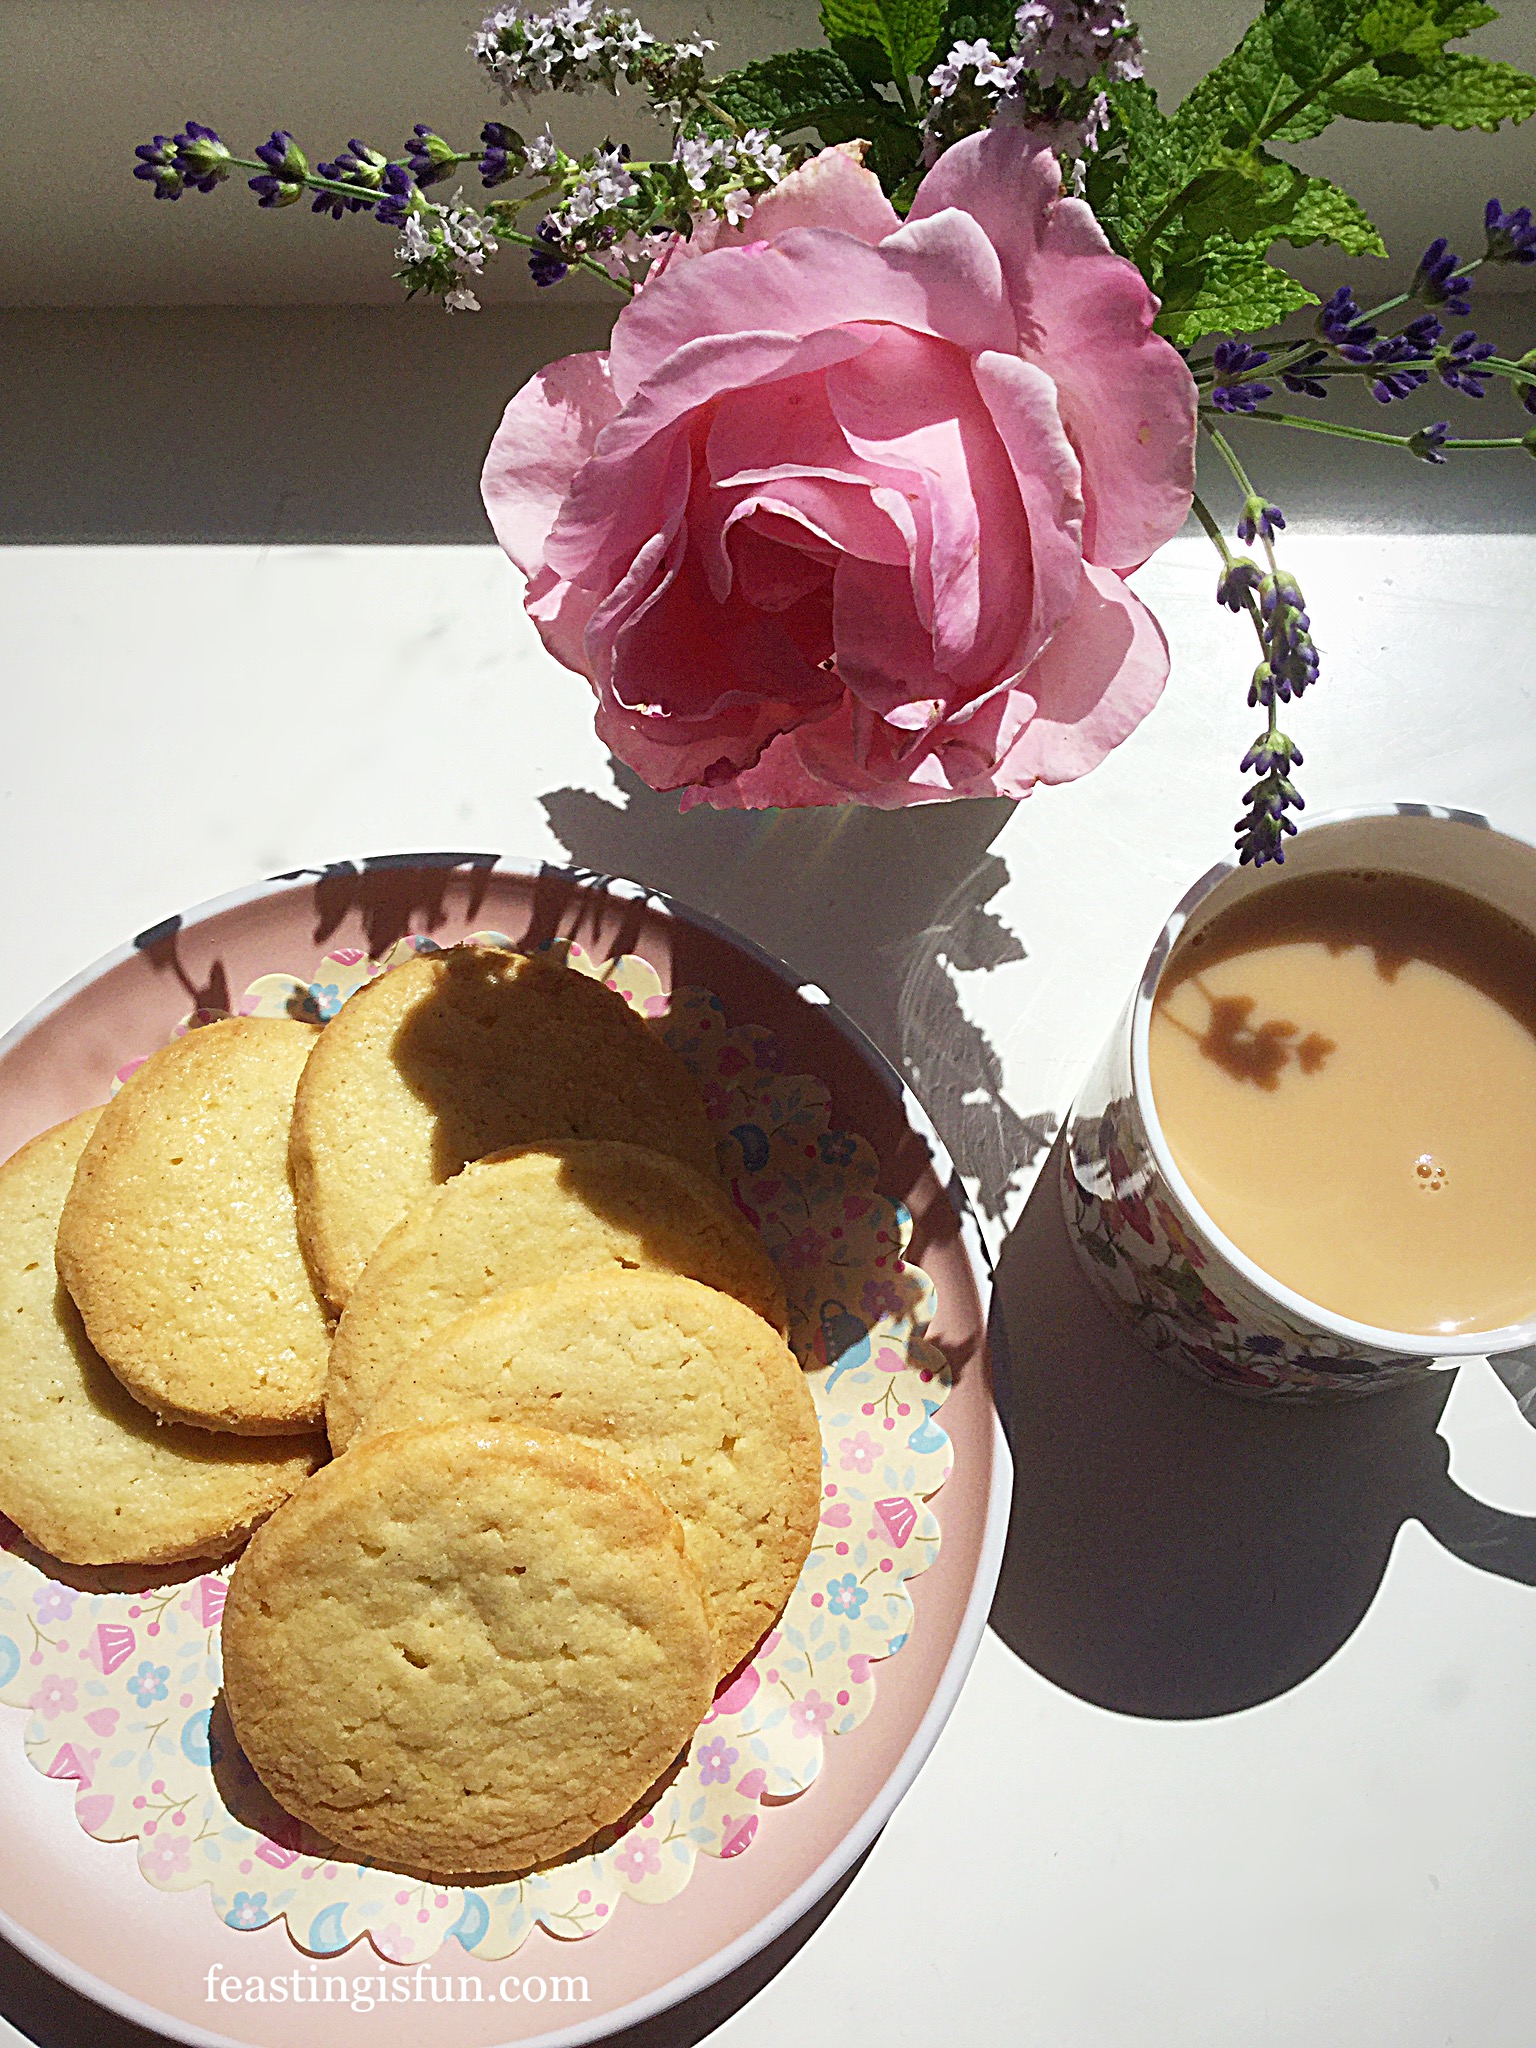
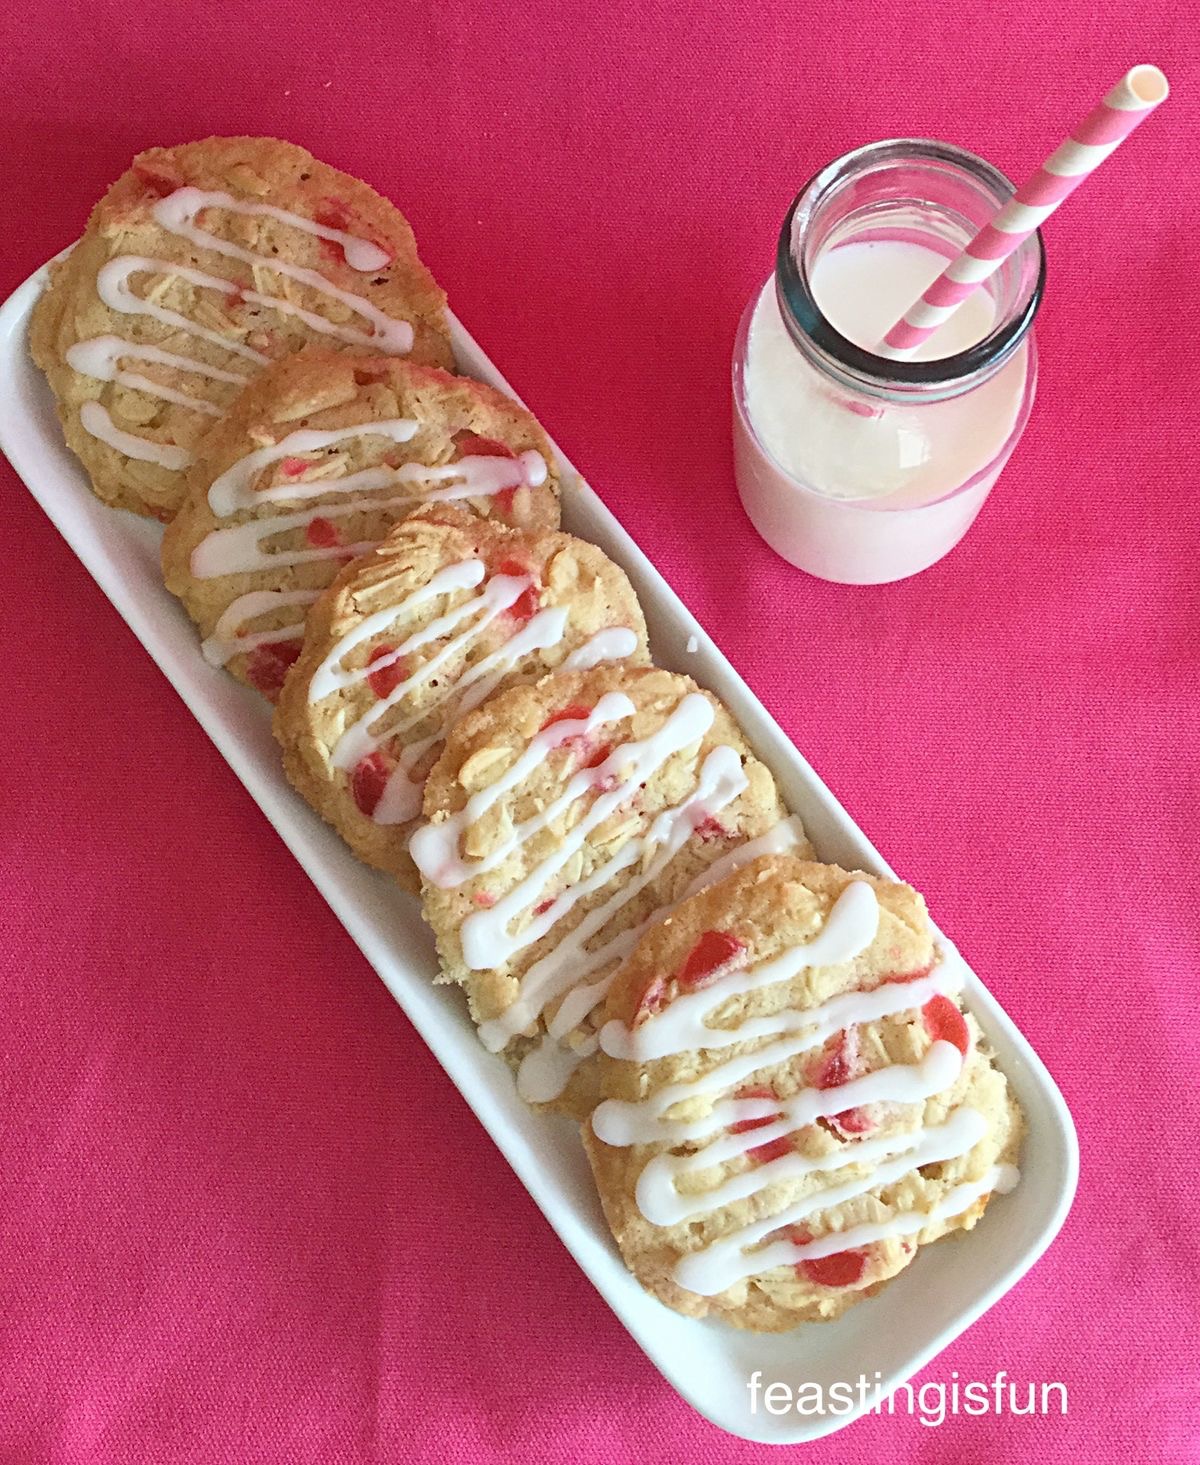
Hello again. I’m really enjoying this blogging lark, I hope you are enjoying my thoughts and recipes too? Please leave a comment if you try any. I’d love to hear how you got on. So, today let me bring you my Super Easy Shortbread Cookies.
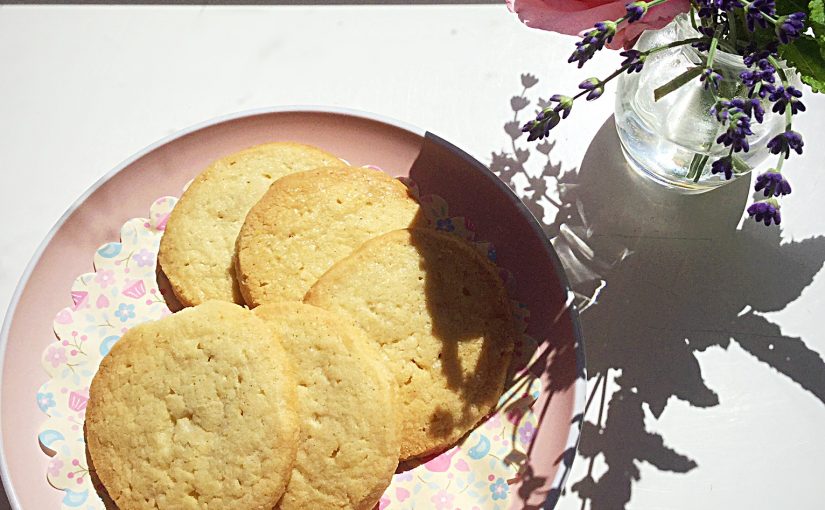
Super Easy Shortbread Cookies
Today is the day…..all the children back at school. My mind is buzzing with all the possibilities that today holds! All the things I put off during the summer holidays to spend time with our 11, 13 and 15 year old children.
Time To Bake Cookies
I love having them home, they all get along pretty well (not bad for 2 older girls and my boy) and I shall miss their music/chatter/mess… Well maybe not the mess. But they do fill our home with energy and fun. Still tomorrow is the weekend, so today I shall enjoy the peace knowing chaos is only a day away.
Super Easy Shortbread Cookies
Hmmm there’s jam to be made, not really in the mood for that, tidying – but it’ll only need doing again on Monday. Cookies! I have nothing really against shop bought biccies but you really can’t beat homemade and these are a doddle.
You will need:
2 x baking sheets with parchment paper on them.
Cling film (I’ll explain later)
Make sure all your ingredients are at room temperature : it really makes a difference.
Recipe: Super Easy Shortbread Cookies makes 20-24
150g/5 oz Caster Sugar (plus 2 tsp for sprinkling on top)
1 tsp Vanilla Bean Paste, or 1 tsp Vanilla Extract – I use Nielsen-Massey
1 Large Free Range Egg Yolk – the white can be frozen for up to one month, perfect for Pavlova
225g/8 oz Plain White Flour
50g/2 oz Corn Flour – corn starch
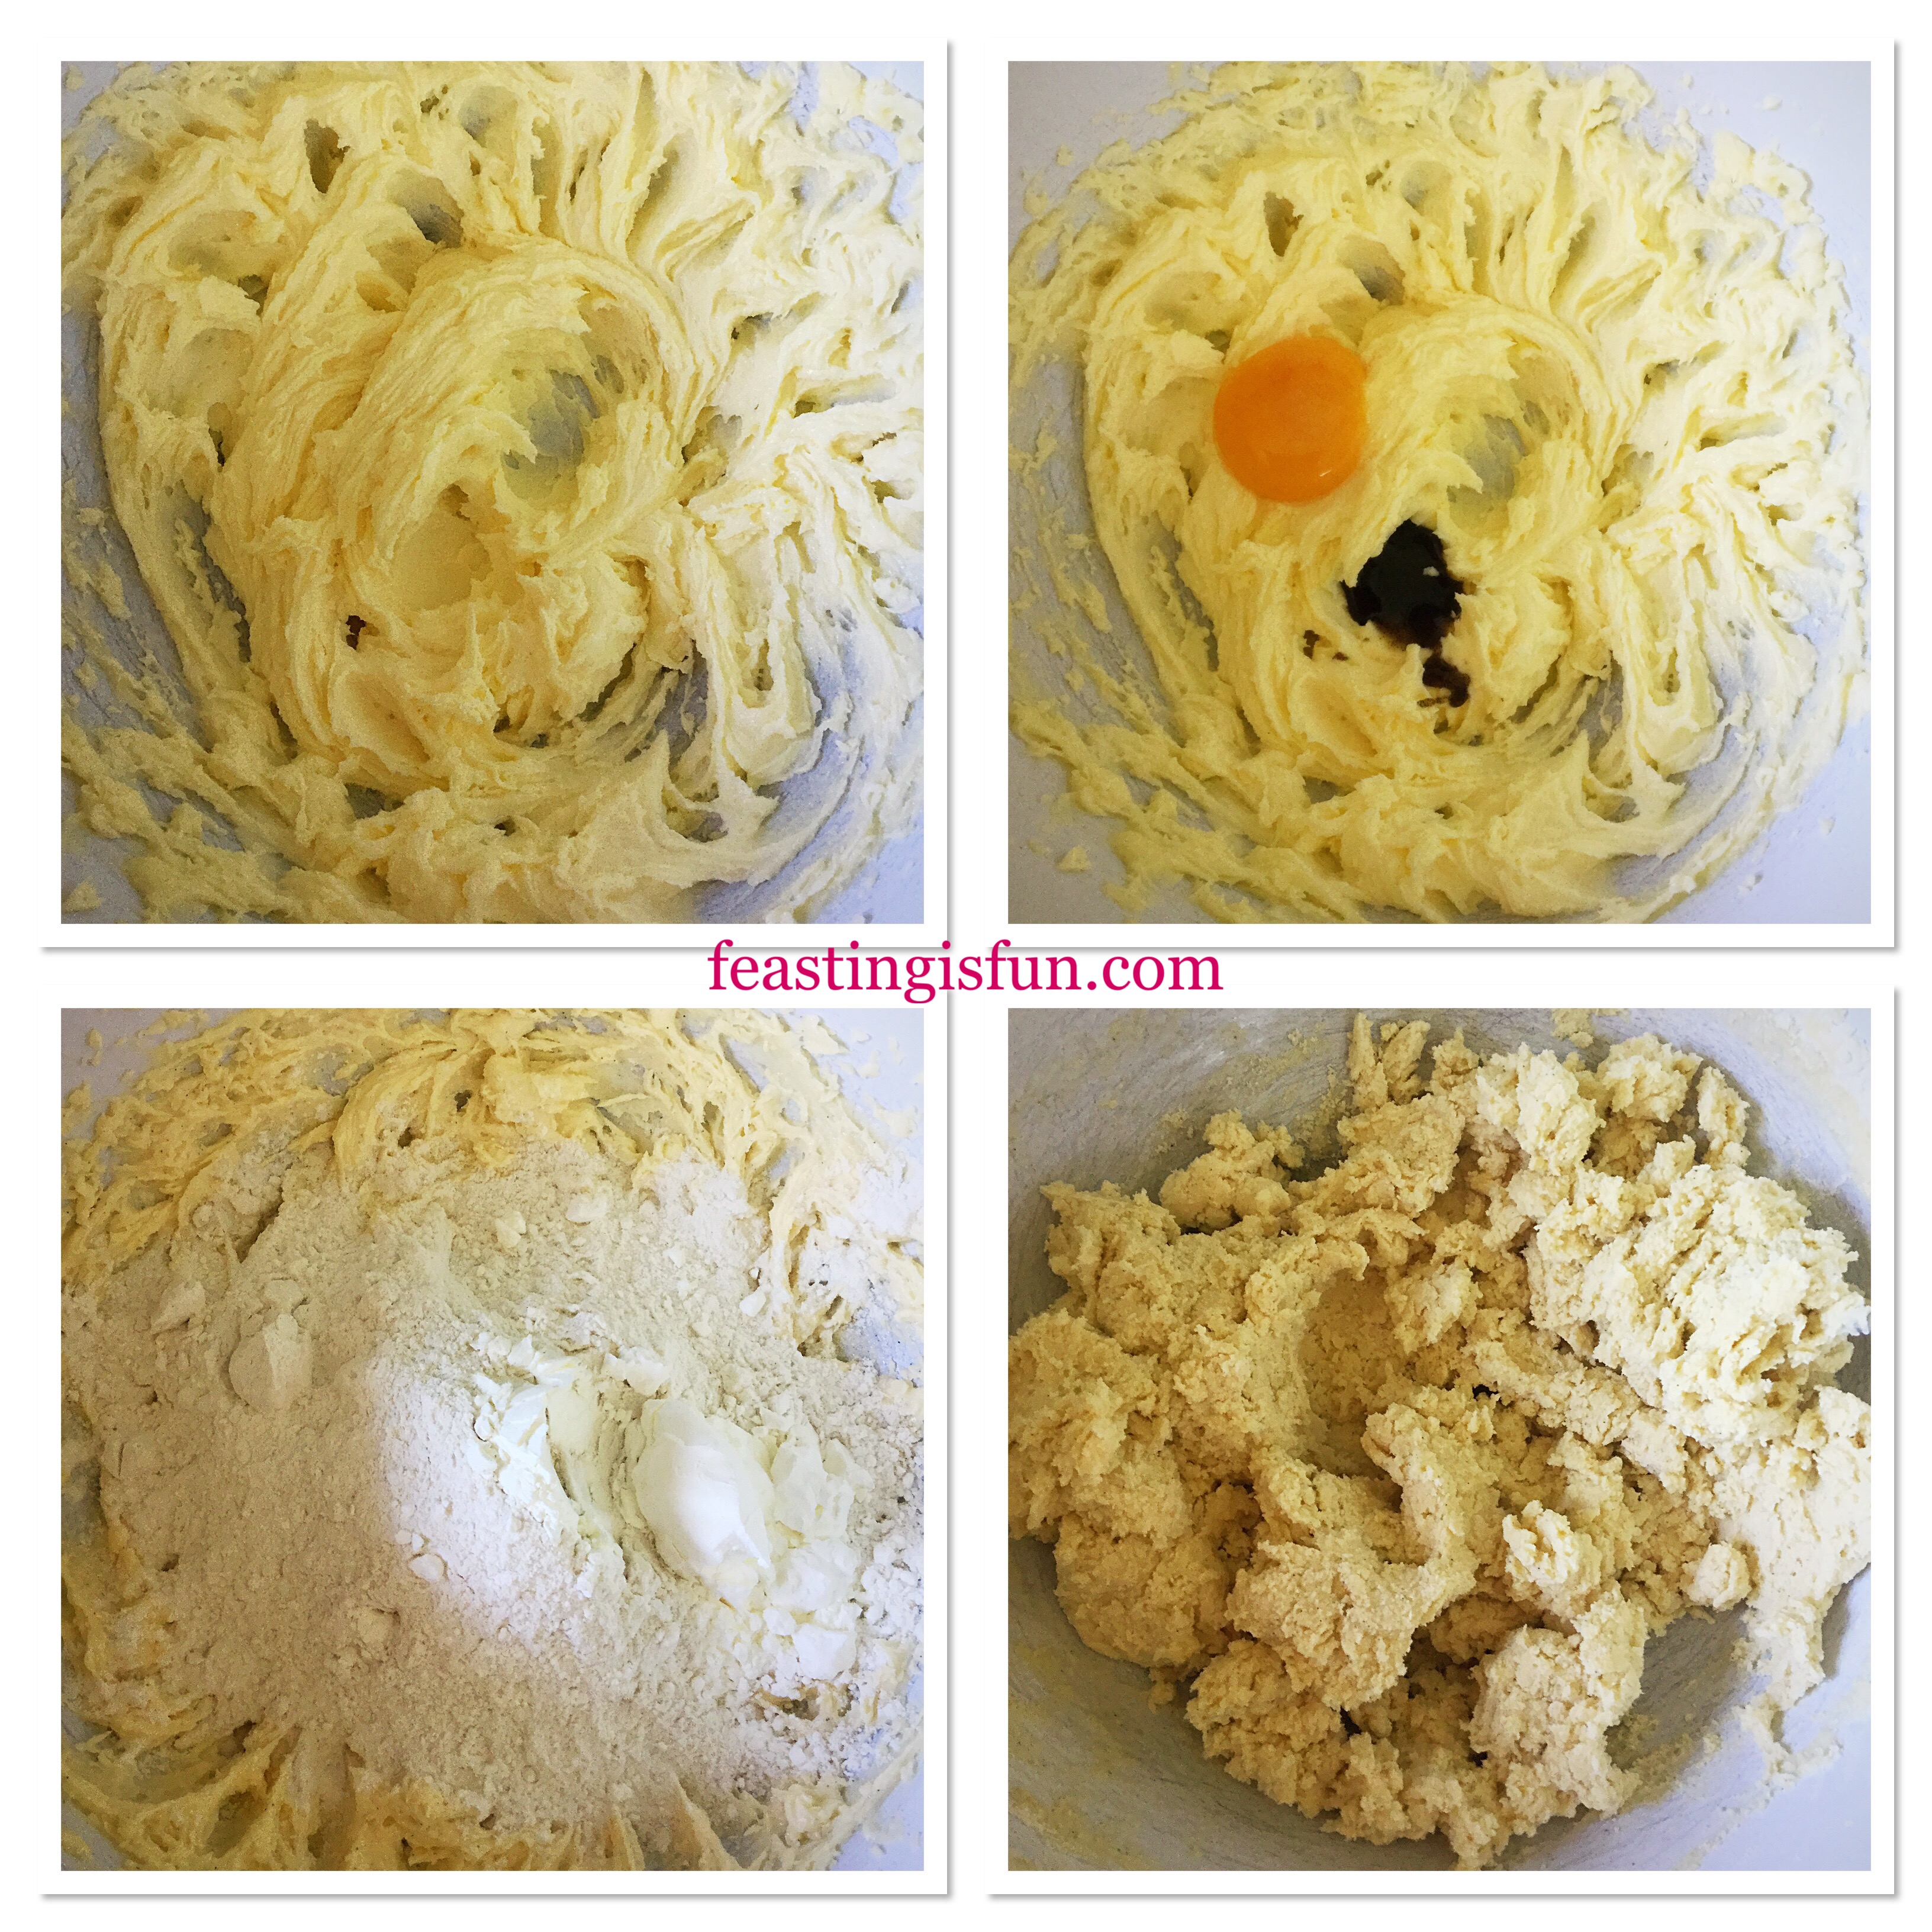
Making The Shortbread Cookie Dough
Place butter, sugar and salt into a large bowl.
Whisk or beat (using a wooden spoon) together until the mixture is very pale yellow.
Now mix in the egg yolk and vanilla paste/extract.
Sift in the flour and corn flour.
Mix thoroughly, but gently until all the ingredients are combined.
Now take a big, deep breath. The smell is scrummy and will help you recognise later when the Super Easy Shortbread Cookies are nearly cooked!
Making the cookie dough.
Shaping And Chilling The Cookie Dough
Set the mixture to one side so that you have a clear work top in front of you. You will need a clear space in front of you. Wipe this space with a clean, slightly wet, dish cloth.
Taking the clung film unwrap about 12 inches (30cm) lay it over the damp work surface as you do so. Magically the cling will lay flat and not become a tangled mess!
Place half of your cookie dough on the cling film in a rough log shape.
Using your hands and the cling mould the dough into a log, with a diameter of approx 1 1/2″ (7cm)
Wrap tightly making sure the cookie dough is as even as possible along the log.
Carefully transfer this to the fridge laying it on a flat surface (the dough will still be quite squishy – I usually lay it lengthways across my palm).
Repeat this process with the rest of the cookie dough. Leave the dough to rest and harden up for at least 2-3 hours.
Creating the cookie dough log, chilling and slicing the cookies.
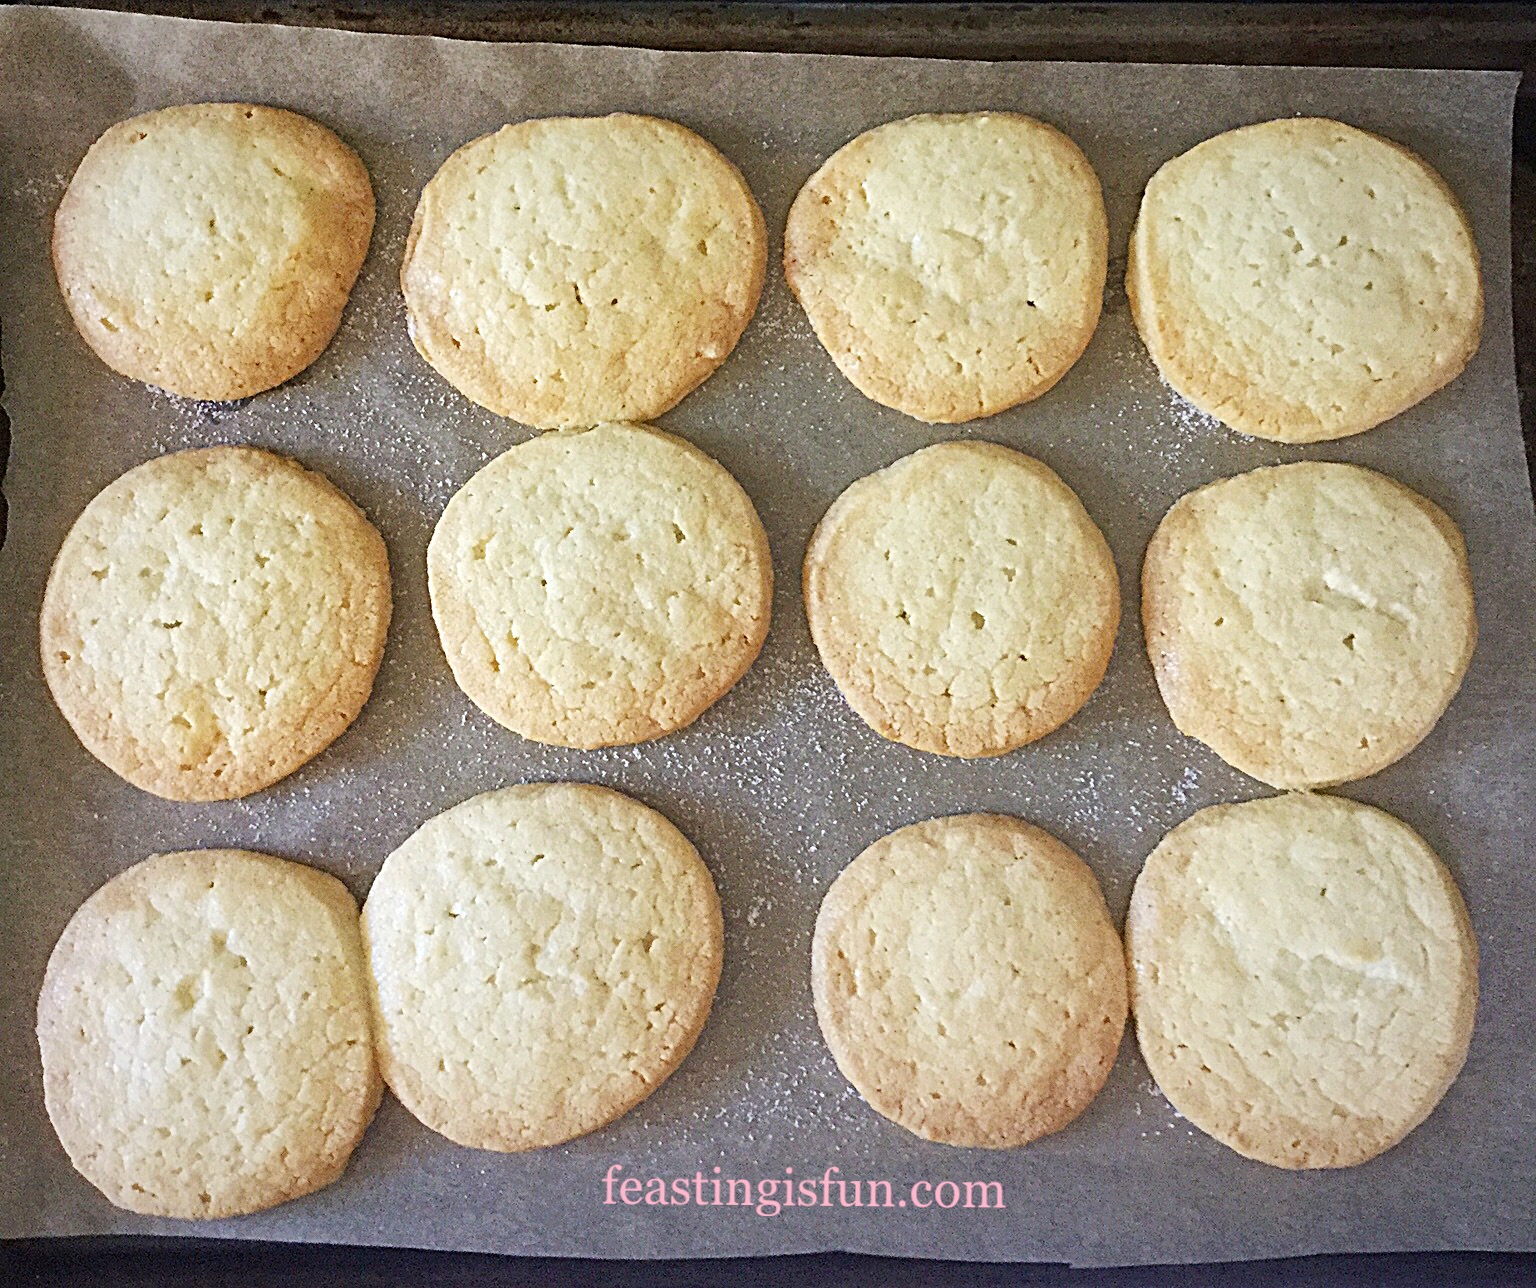
Slicing And Baking The Shortbread Cookies
Preheat oven to 180C/160C fan, 350F, gas mark 4, just before you remove the cookie dough log from the fridge.
Remove 1 log from the fridge and leave to warm slightly for 5 minutes (I find leaving it for this time makes the dough easier to cut and not crack).
Using a sharp knife cut regular discs approx 1/4″ (1/2cm) wide.
You should end up with 10-12 cookie discs.
Place these on the parchment paper lined baking sheets, making sure there is at least 1″/2.5cm gap each way between the discs.
Sprinkle each cookie with a little sugar.
Place the baking trays in the centre and lower part of the oven
Bake the Super Easy Shortbread Cookies for 14-17 minutes.
The cookies are baked when they are a light golden colour.
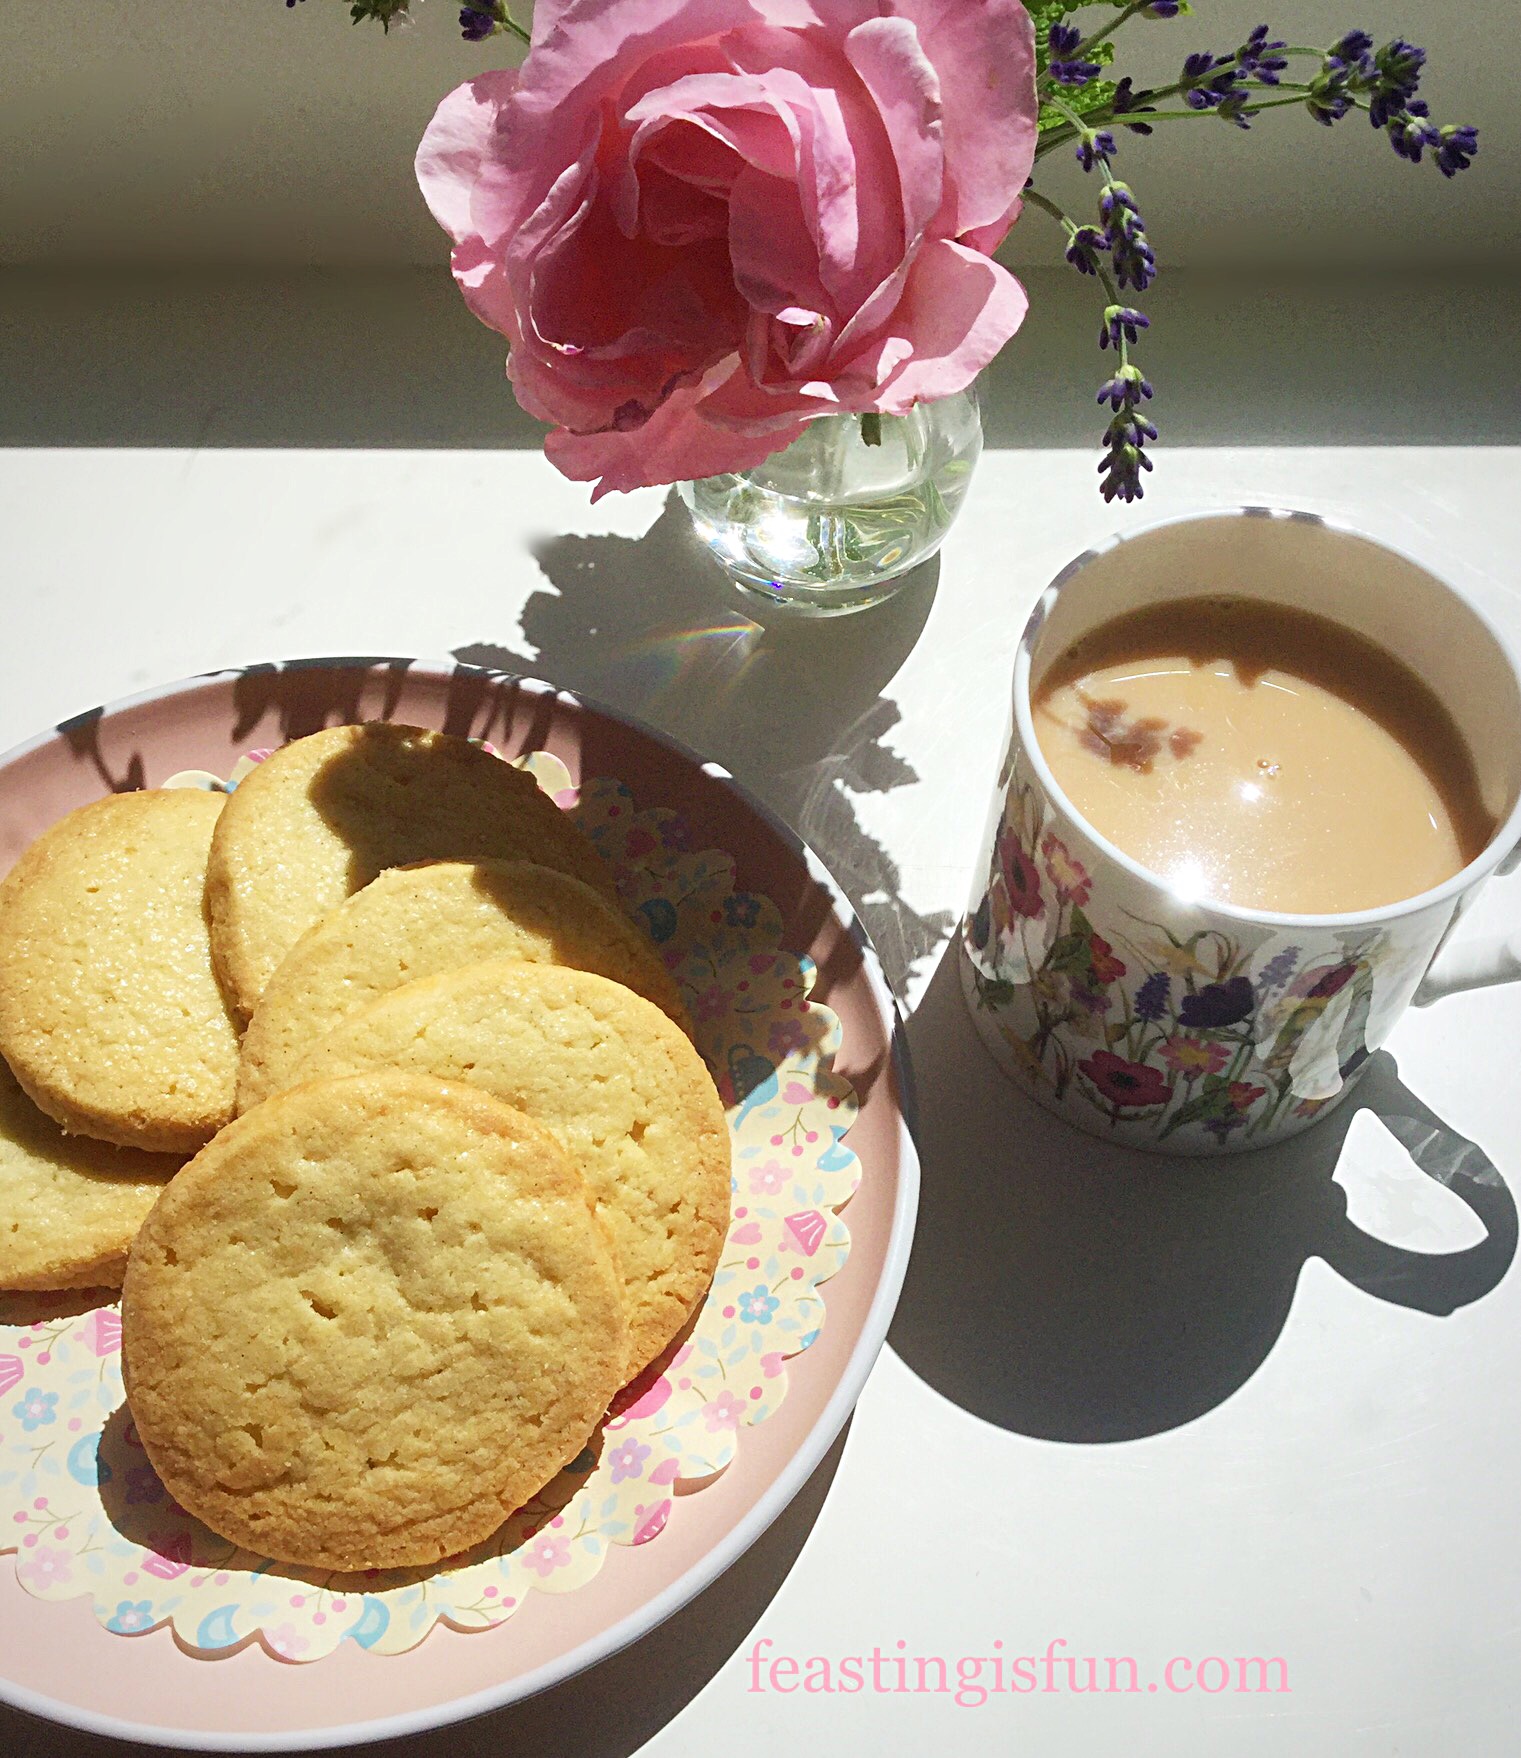
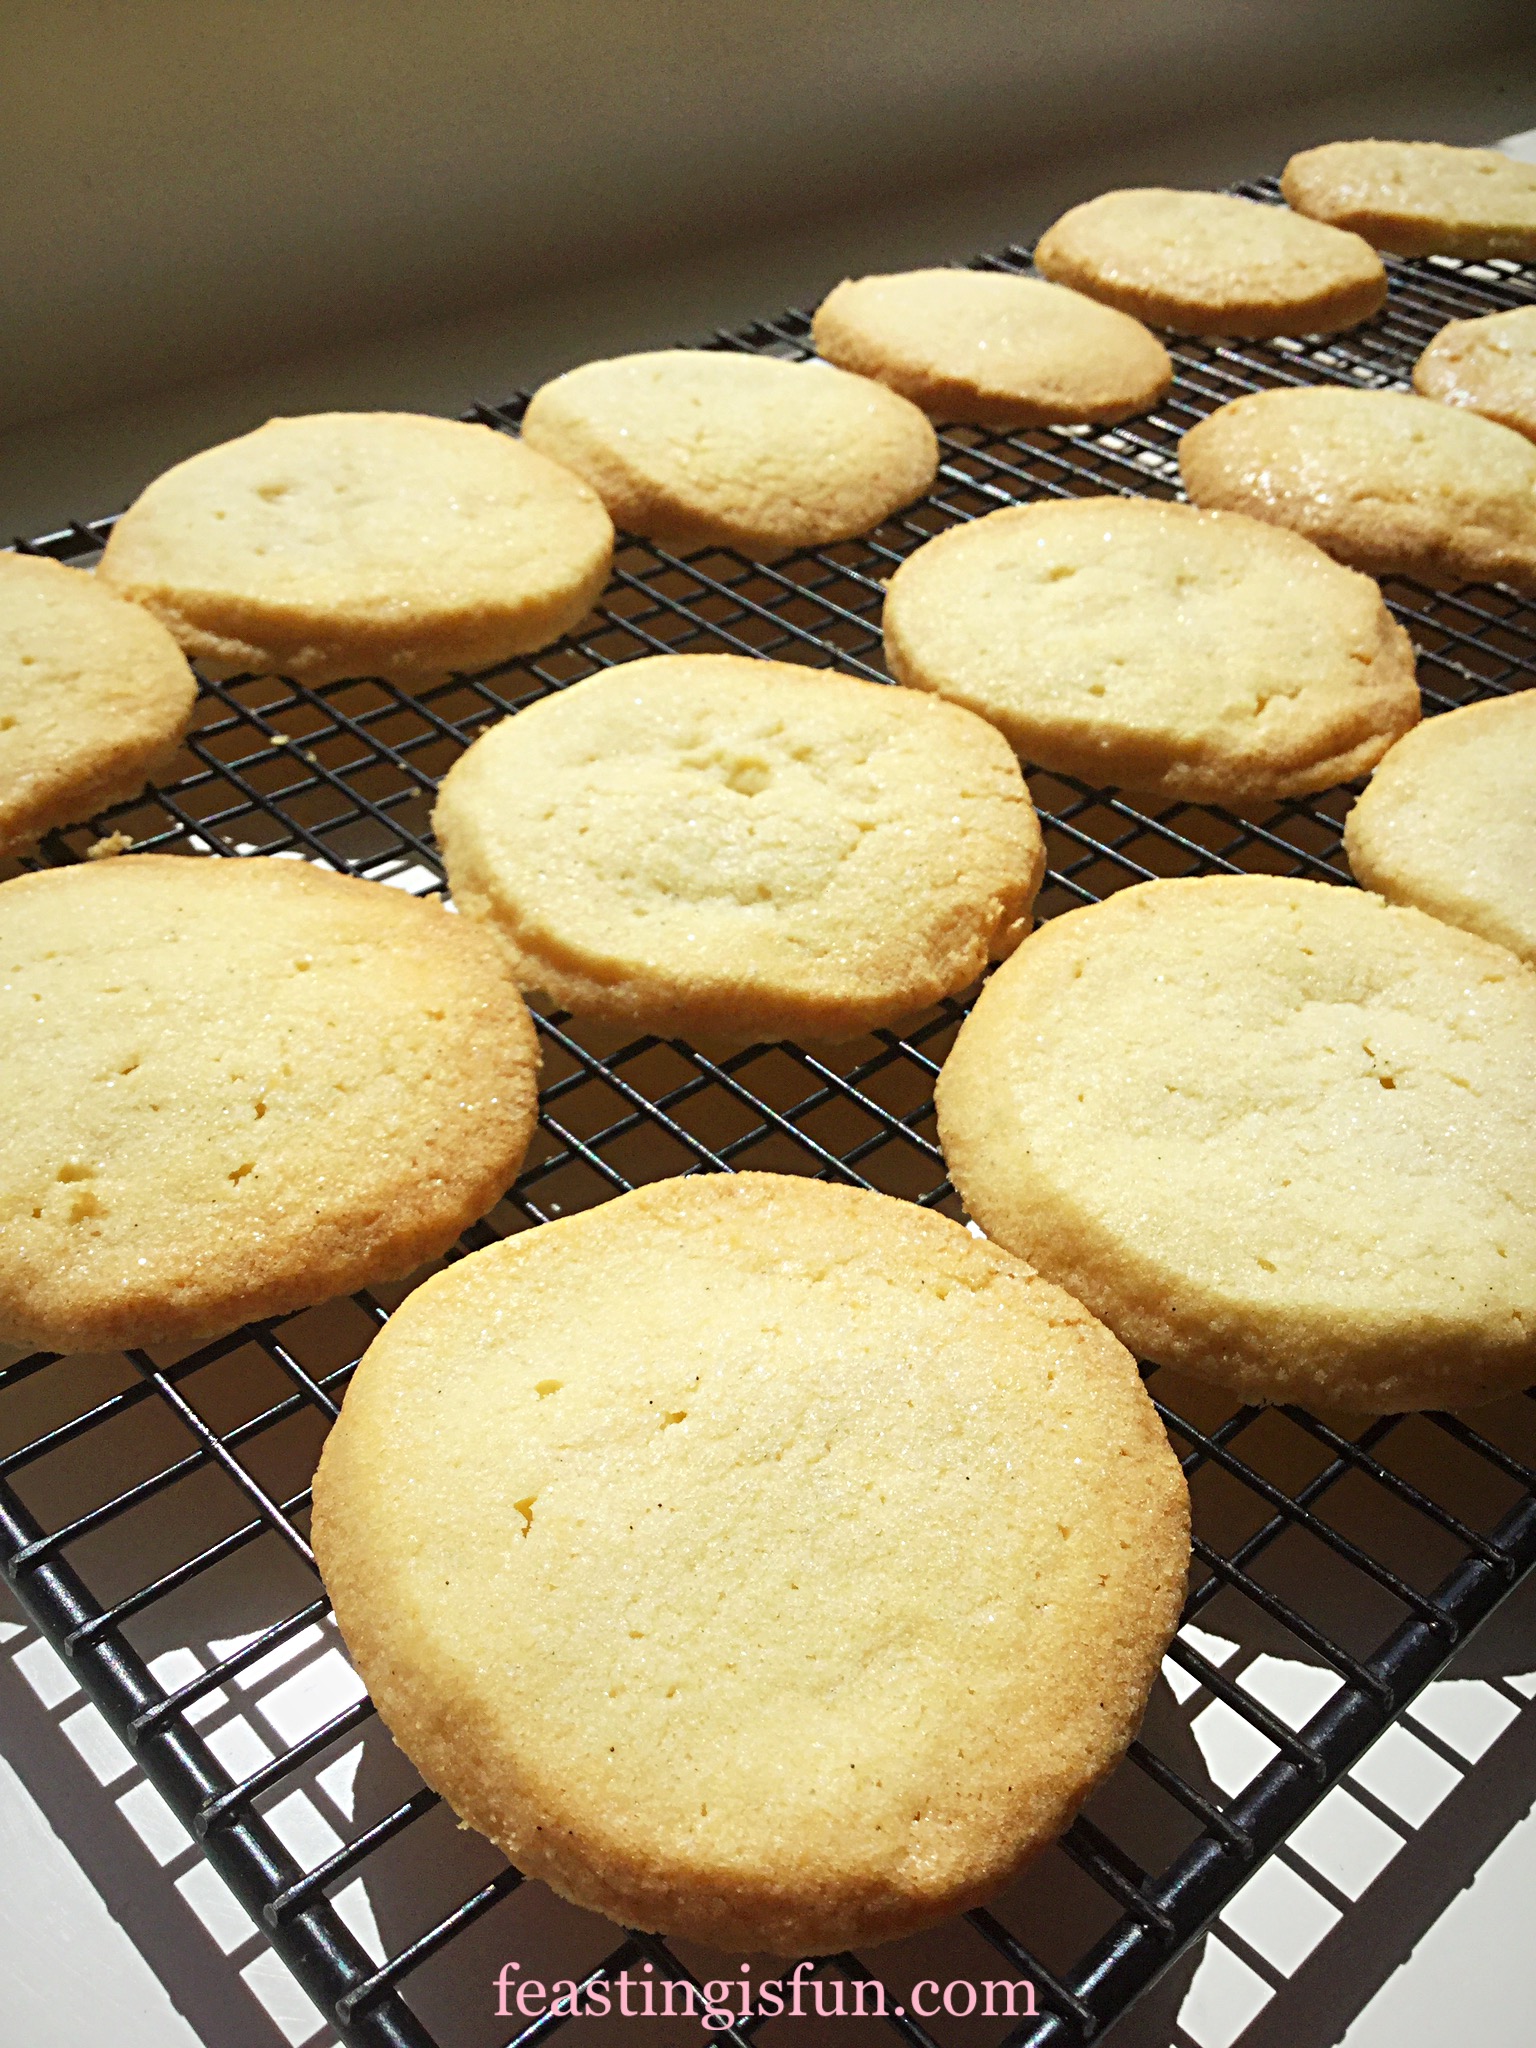
Super Easy Shortbread Cookies
When you start to smell the scrumptious buttery, vanilla smell it’s time to check on your cookies. DON’T PROD THEM – however tempting! They will still be soft and firm up on cooling. These cookies are cooked when they turn a light golden colour.
As soon as they are baked remove from the oven, careful they are hot!
Leave the cookies on the baking tray to cool completely.
Super Easy Shortbread Cookies
The sprinkle of sugar added just before baking gives the cookies a sparkling sheen once baked.
Pop the kettle on and try one, just to make sure they’re good. These cookies travel well and I like to pop some in cellophane bags tied with pretty ribbon and pass them on to friends andfamily. They are also scrummy when shared with a close friend over a cuppa and a heart to heart chat.
If you have enjoyed this recipe for Super Easy Shortbread Cookies you may also like these:
Since I am a self confessed Cookie Monster, I assume that others are too. Baking fresh cookies, ready to share, is one way of showing my friends and family how much I love them. I mean I’m giving away cookies! Whether it’s cookies, cakes or other bakes, I have never had anyone turn down the gift of a homemade treat.
If you want to see more of my recipes, or show me your bakes you can find me on Twitter/Instagram/Pinterest – @sammiefeasting
Sammie xx
No part of this post may reproduced or duplicated without the written permission of the owner. Please see my Disclosure Policy.
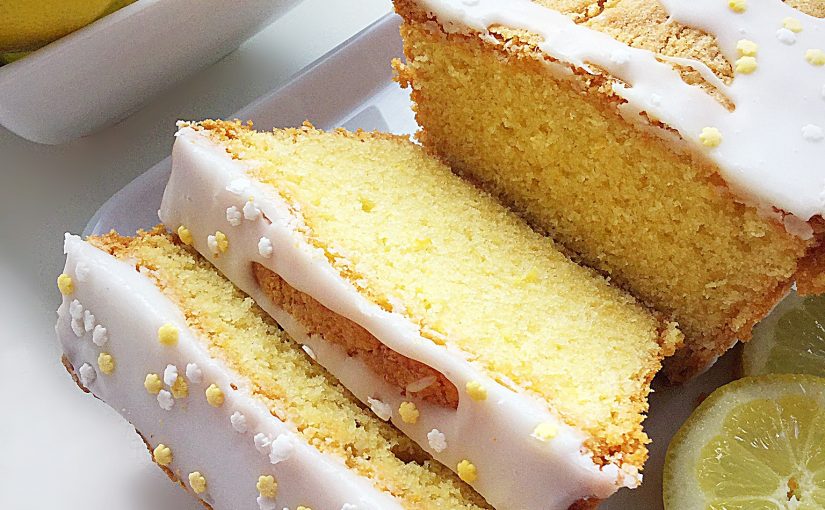
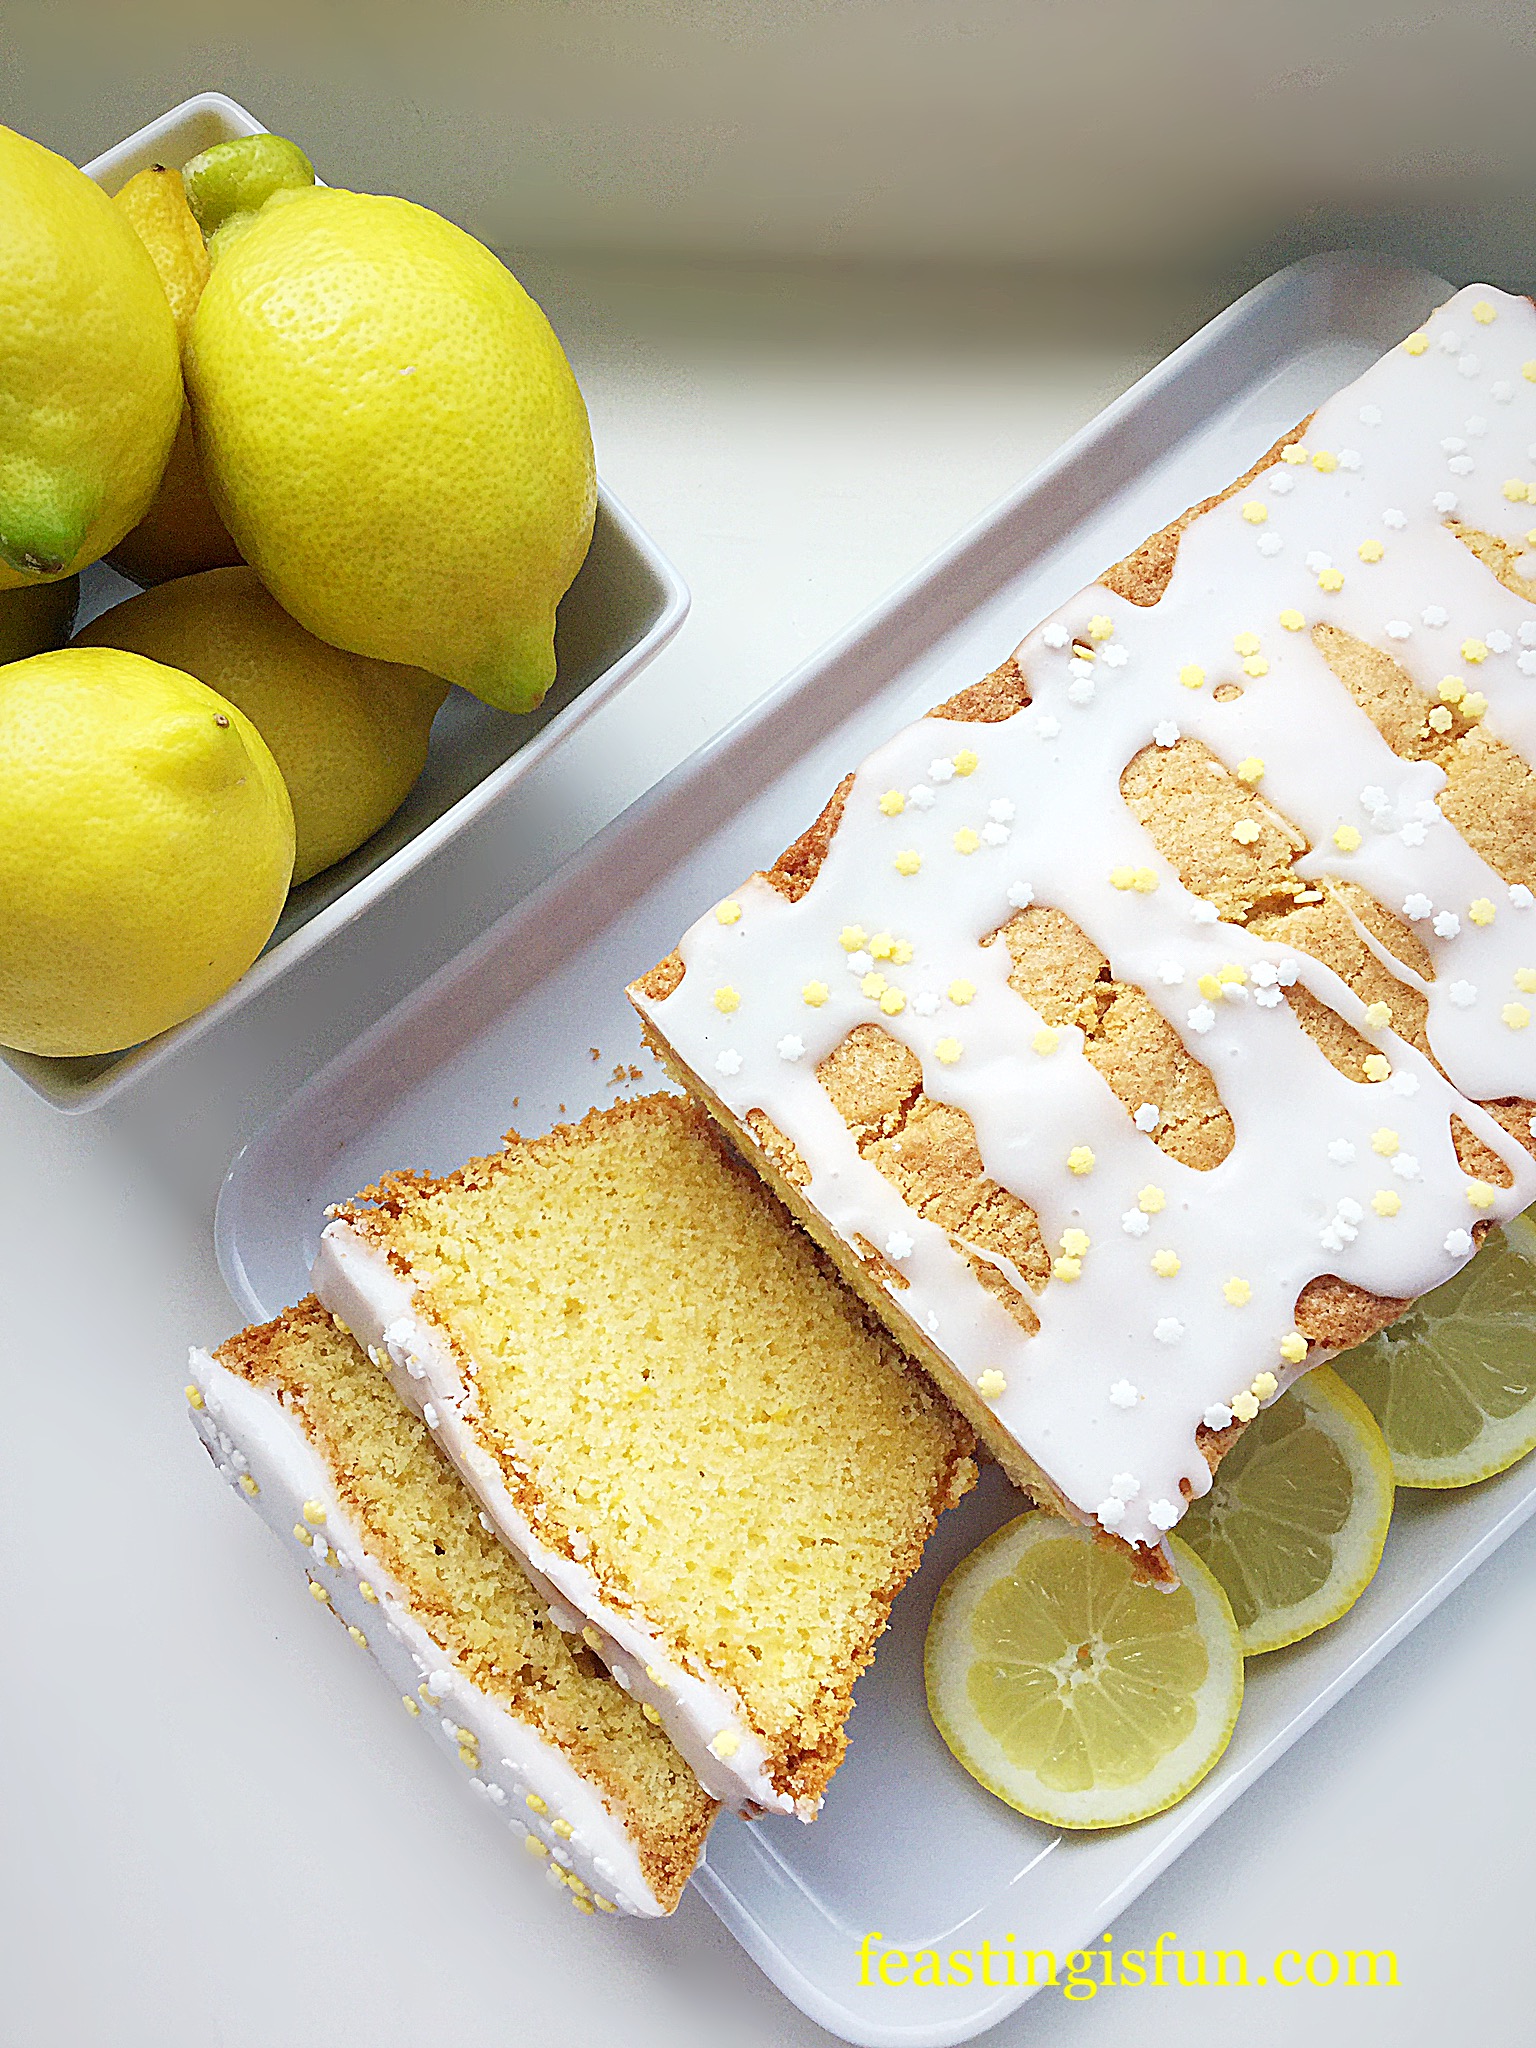
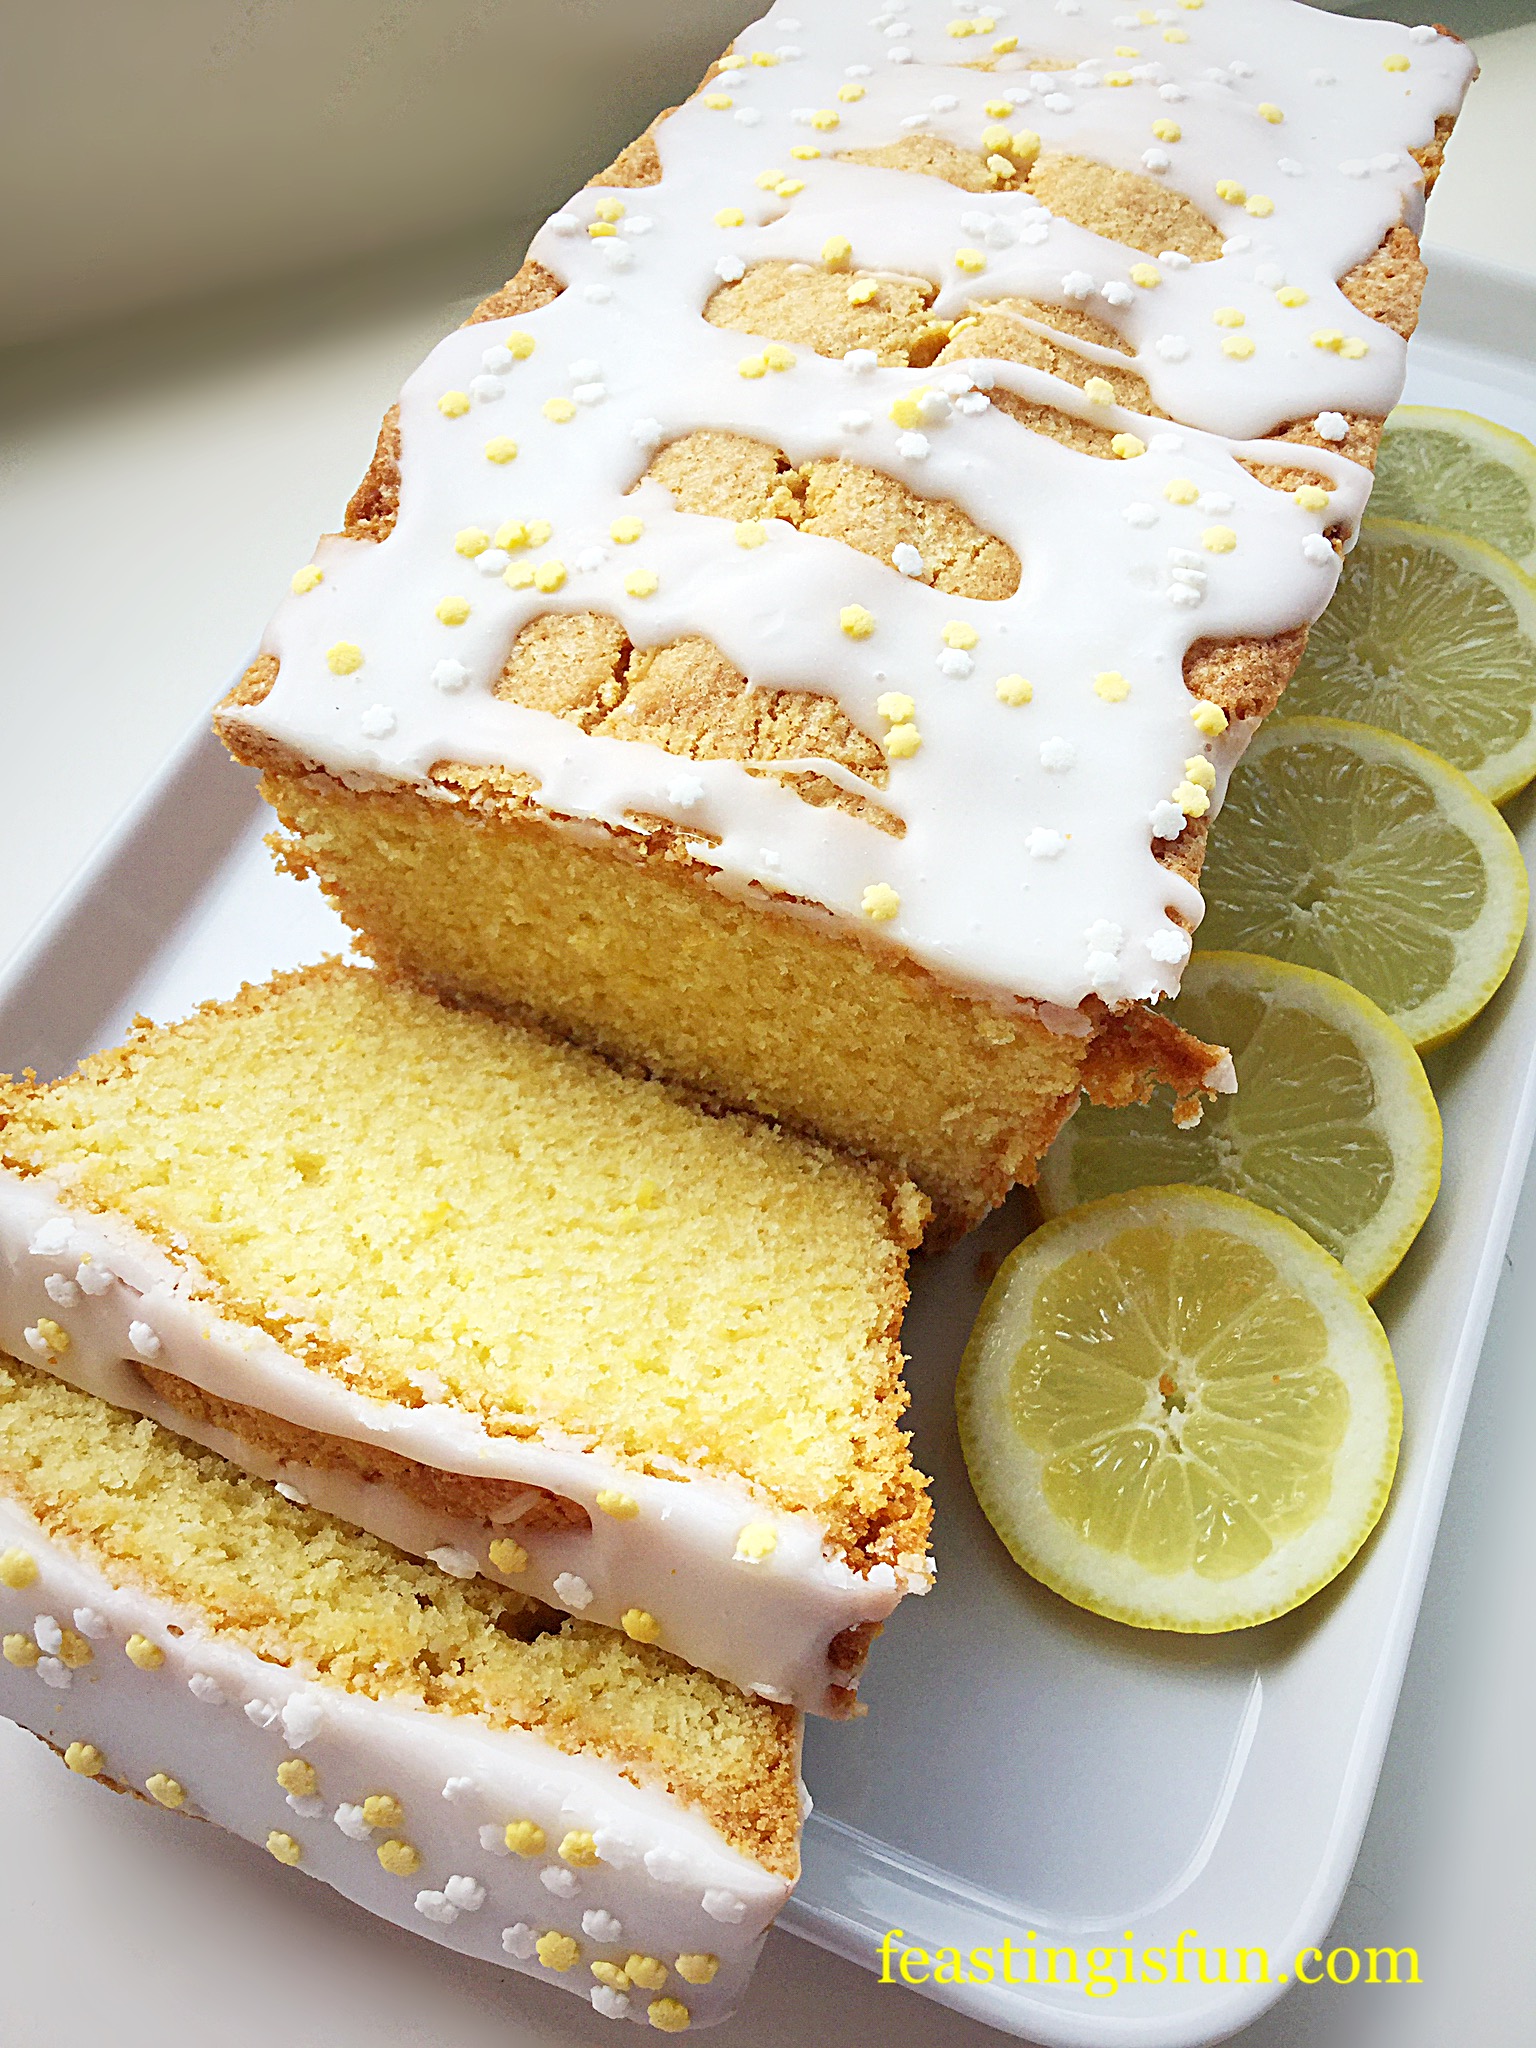
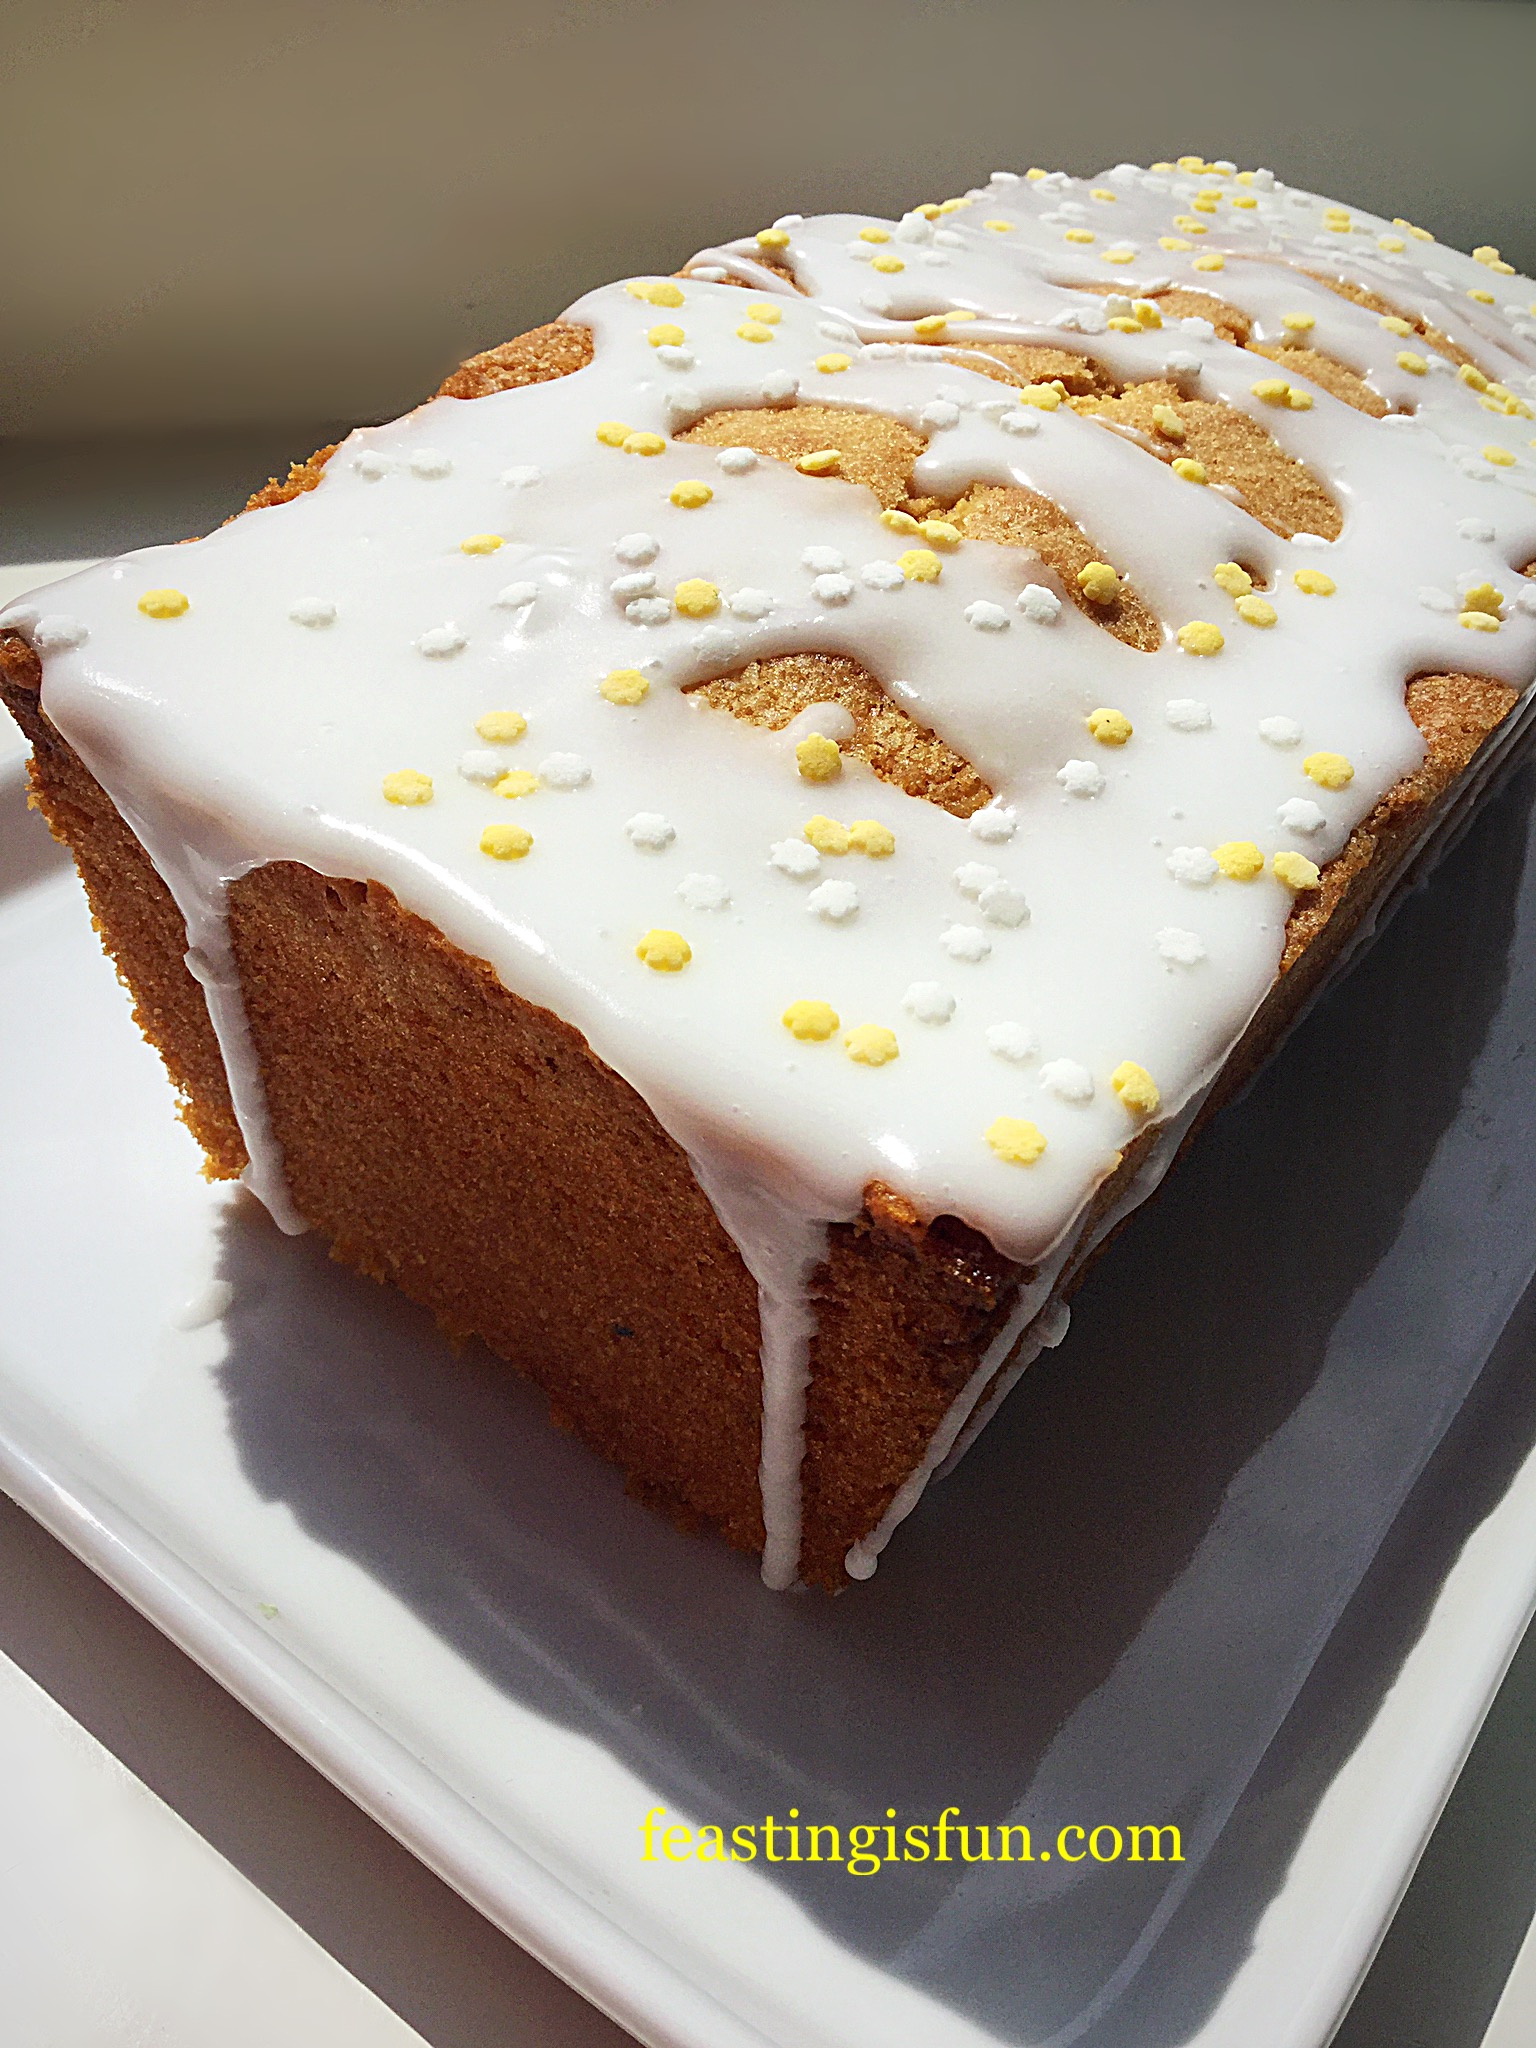
Lemon Drizzle Cake has to be one of my all time favourite cakes. While there are a gazillion recipes on the internet and in books, I wanted to add my own. Firstly because hopefully this blog will become a go-to resource for our children as they continue on their cooking and baking journey. Also, I like my lemon drizzle a certain way. That is, with a fresh lemon glacé icing draped and drizzled over the top. I hope that you enjoy my take on this classic cake?
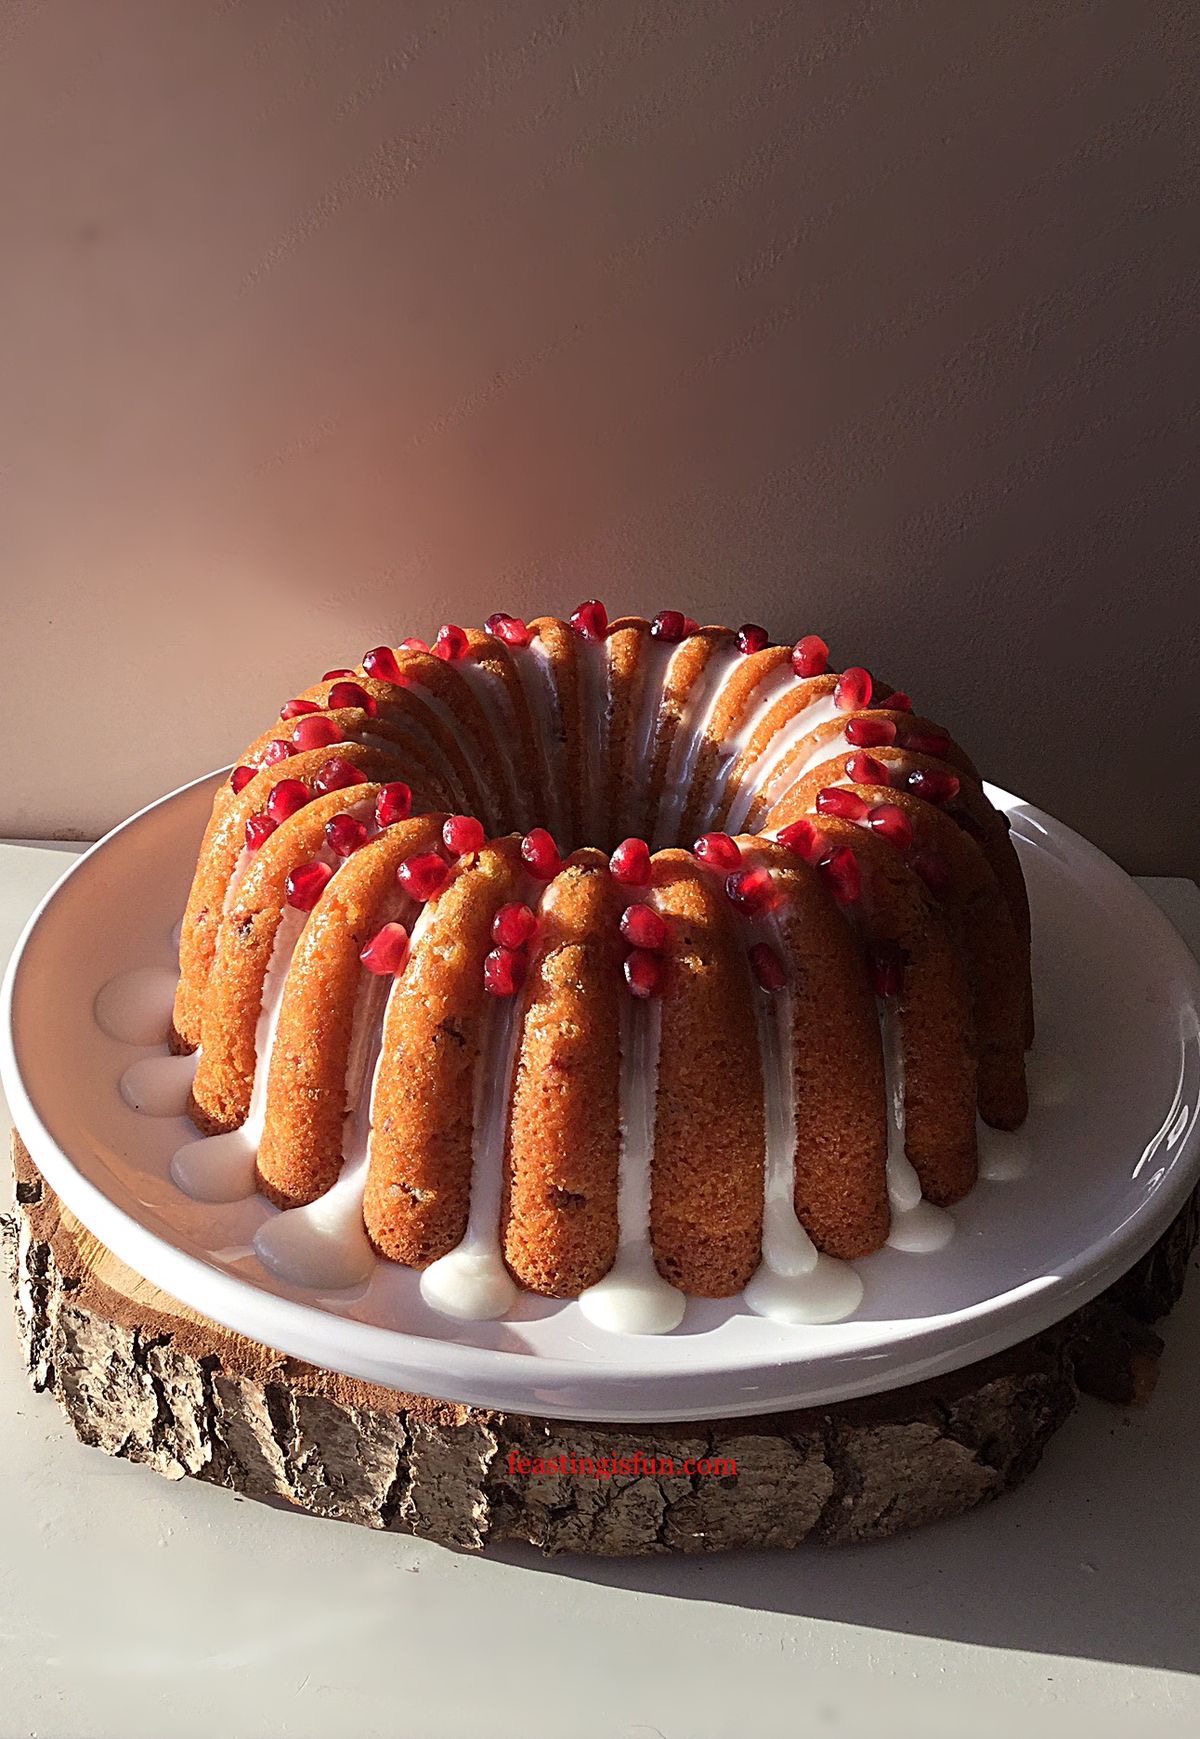
Since there are various ways to make a lemon drizzle cake, I thought I’d explore them. Traditionally a lemon sugar syrup is made and poured over the top of the cake, creating a crunchy, sugar crust as it cools. For my take on this version see these Mini Lemon Drizzle Bundt Cakes.Perfect individual portions of sunshine.
Lemon Drizzle Cake
Lemons And Their Versatility In The Kitchen
Lemons are a must-have ingredient in my kitchen. Used in both sweet and savoury recipes they are essential in my Tangy Lemon Potato Salad where the un-waxed, scrubbed lemons are cut so thinly they are eaten as part of the dish. Also they are used to thin down mayonnaise for my Crunchy Homemade Coleslaw.Whether halved and added to the cavity of a roasting chicken, or simply squeezed over baked salmon, they add a burst of flavour that lifts each dish.
Lemon Drizzle Cake
While lemon extract is available and I confess sometimes is used in my recipes, nothing is quite as good as using the real thing. During lemon season I buy un-waxed lemons as they tend to be slightly under ripe. However, I have had many a mouldy lemon lurking in the fridge! So, if buying waxed lemons, simply scrub under hot water with a nail brush. As a note, I lightly scrub un-waxed lemons as well if using the zest.
You will need a 25cm x 11cm x 7.5cm (10” x 4.5” x 3”) 2lb loaf tin,
1/4 tsp Sea Salt – I use Maldon Sea Salt, halve quantity if using free flowing
175g/6 oz Icing Sugar
Optional – White and Yellow Sprinkles – mine are from Waitrose
Method: Preheat oven to 160C/140C fan, 325F, gas mark 3.
Making And Baking The Lemon Cake
Place butter, caster sugar and salt into a large bowl and whisk until pale and creamy.
Sift the flour and baking powder into a separate bowl.
Add 2 eggs, the vanilla extract and half of the sieved flour to the creamed butter and sugar. Whisk until just combined.
Now add the last 2 eggs, remaining flour and lemon zest.
Stir the ingredients together with a metal spoon until thoroughly combined.
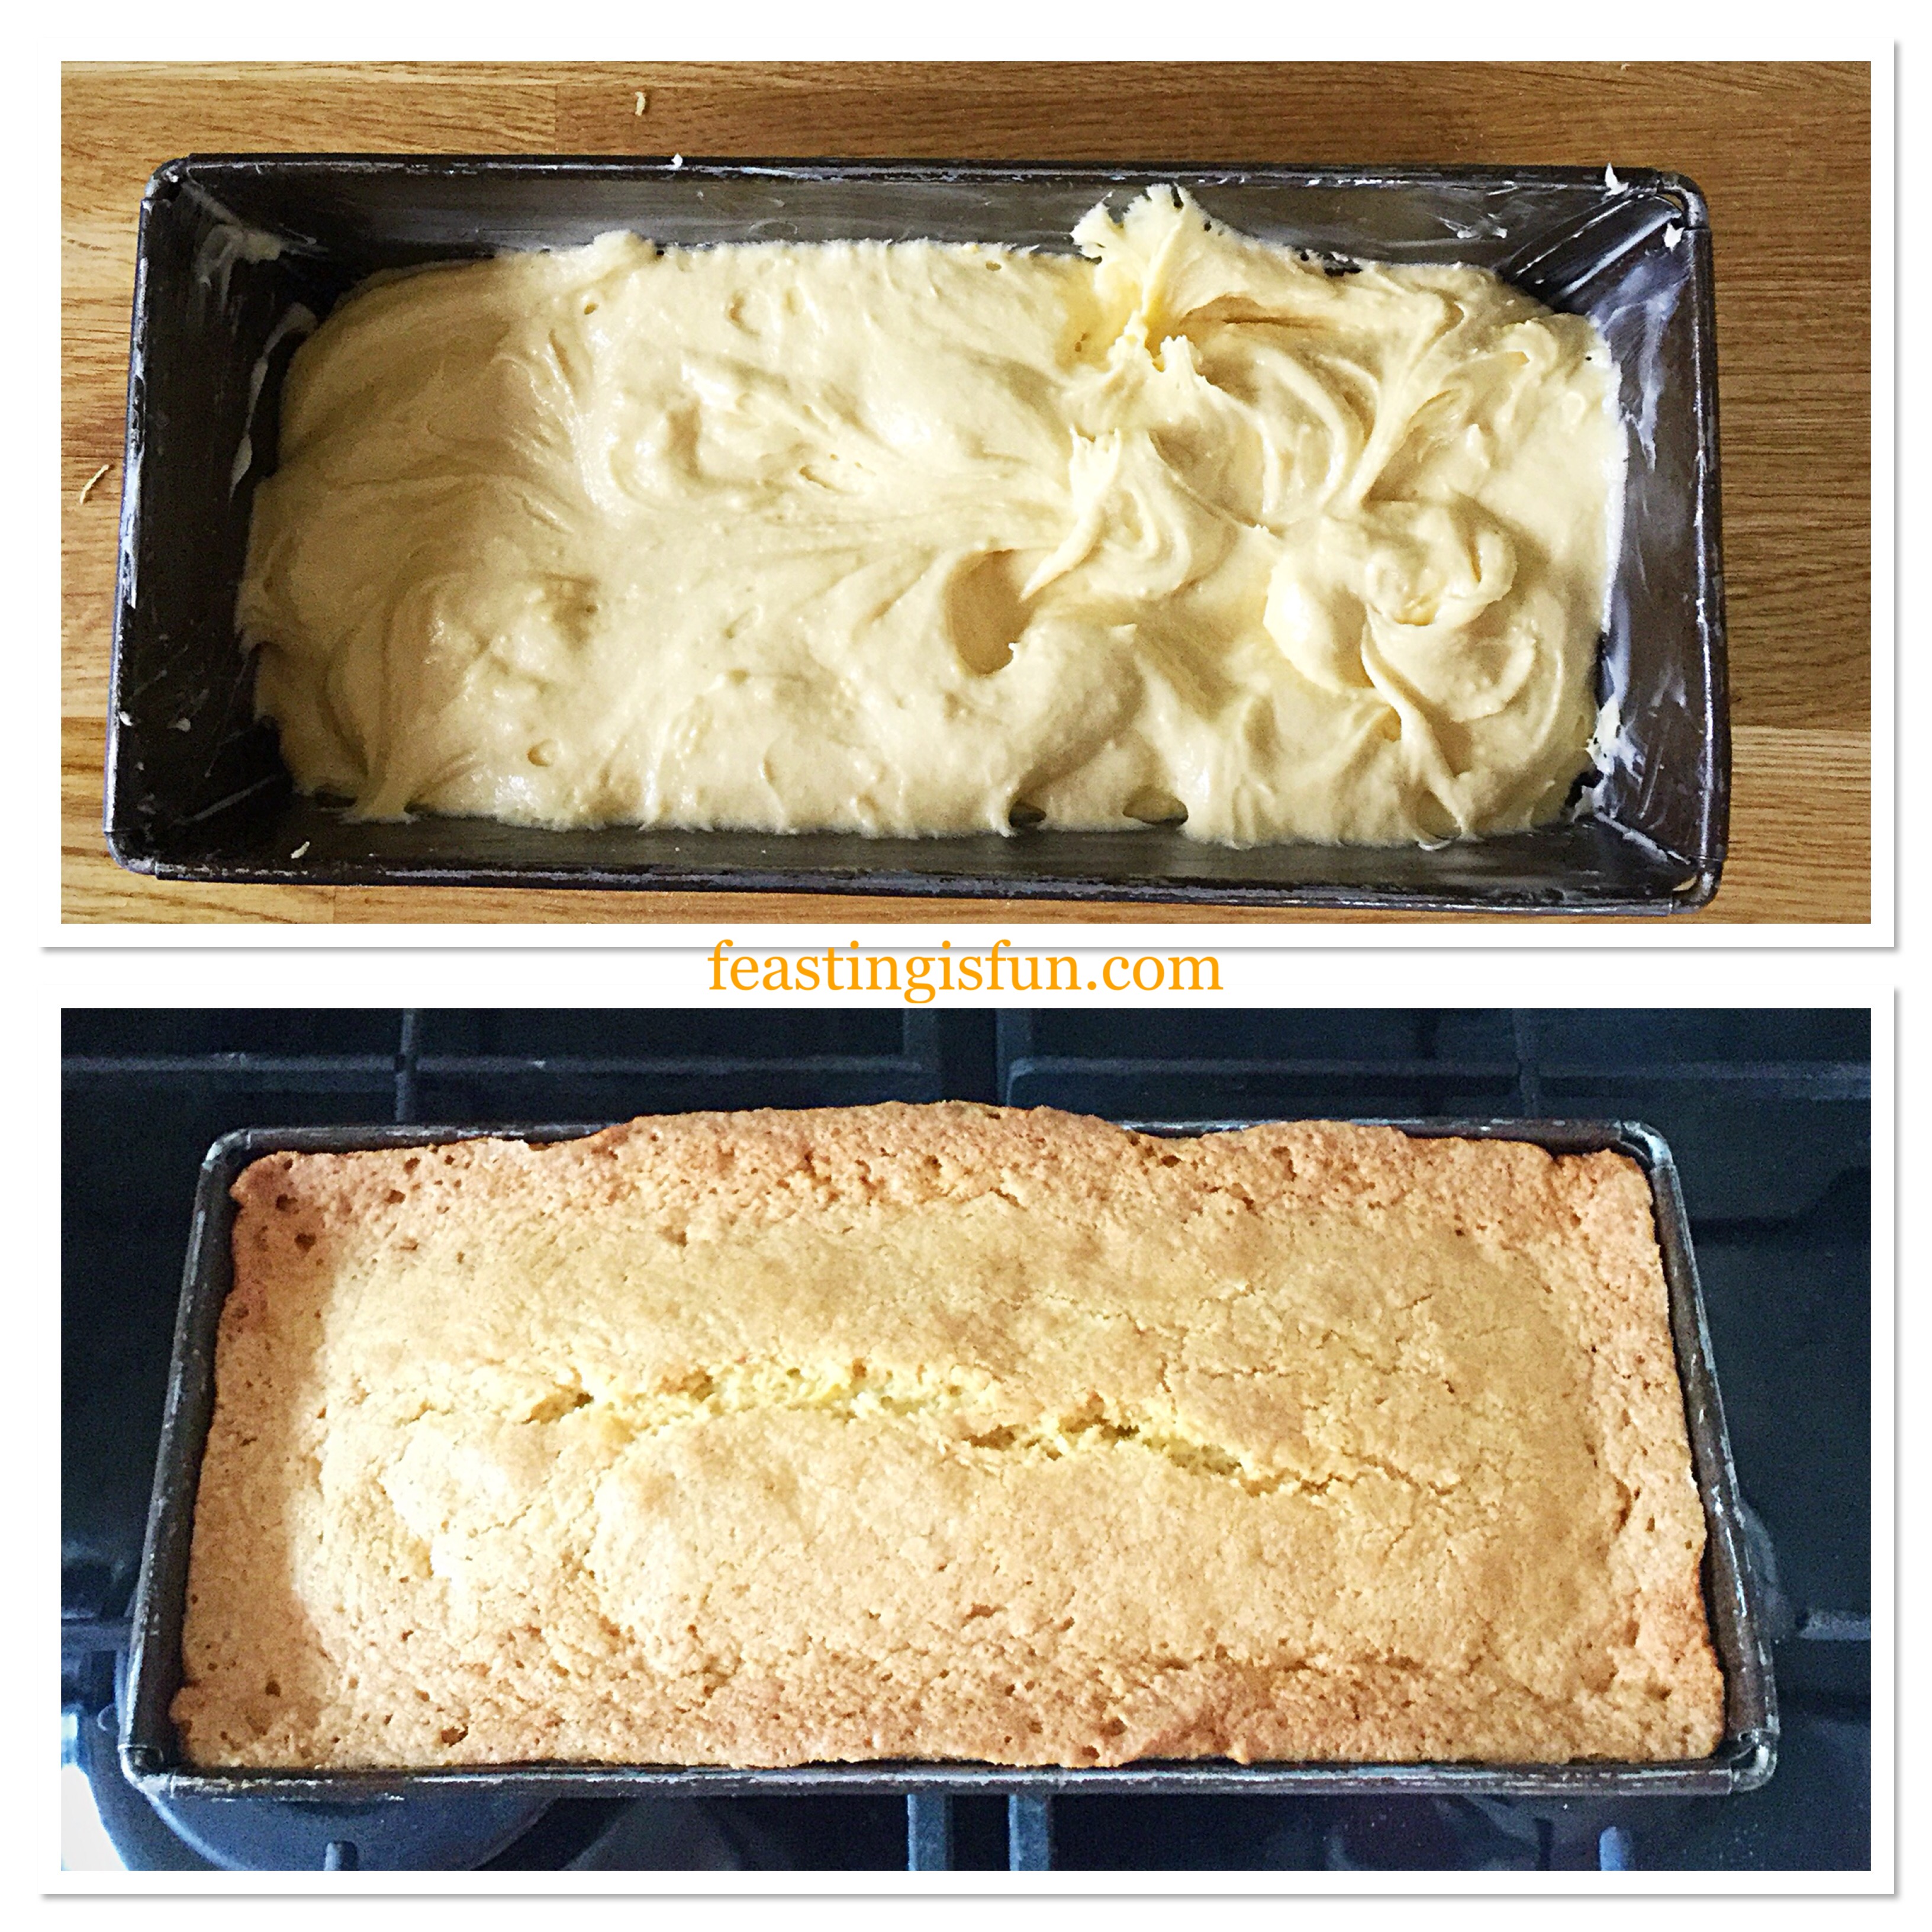
Spoon the lemon cake batter into the prepared tin ensuring the top is level.
Place the cake into the centre of the oven and bake for 1 hour 10 minutes – 1 hour 20 minutes. My cake took 1 hour 15 minutes.
The cake is baked when it is golden in colour, firm to touch and an inserted skewer comes out clean.
As soon as the cake is baked remove from the oven and allow to cool for 20 minutes in the tin.
Lemon Drizzle Cake before and after baking.
While the cake cools make the glacé icing.
Making The Fresh Lemon Icing And Decorating The Cake
Sieve the icing sugar into a bowl and add the lemon juice. Stir until thickly combined and completely lump free. If the icing is too thick add a few drops of water.
After 20 minutes cooling, run a palette knife around the outside edge of the cake. Turn the cake out – take care it will still be warm. Peel back the parchment paper from the base and discard.
Place the cake on to a cooling rack which is then place over a tray or plate.
Using a spoon drizzle the lemon icing over the cake, encouraging it to drip down the sides in places.
Finally scatter over some yellow and white sprinkles and leave the cake to cool completely.
Freshly iced Lemon Drizzle Cake in the Spring sunshine.
Once cooled this cake is easily sliced. Serve with lemon tea for extra lemon flavour.
Keep the cake in an airtight container and eat within 5 days. Refrigerate during warmer weather.
If you have enjoyed this recipe for Lemon Drizzle Cake you may also like these:
Since this cake is so delicious, it’s good to know that I have successfully doubled the recipe and baked two cakes at the same time. It is my firm belief that all food tastes better when shared. So, whether you are baking this cake for yourself, or alternatively as a gift, it’s definitely worth making two. In fact why not give both cakes away?
Whatever you are making, baking and creating in your kitchens, have fun preparing and sharing your feast.
Sammie xx
No part of this post may be reproduced or duplicated without the written permission of the owner. Please see my Disclosure Policy.