Boozy Lemon Drizzle Bundt Cake

Share
Facebooktwitterpinterestlinkedintumblr

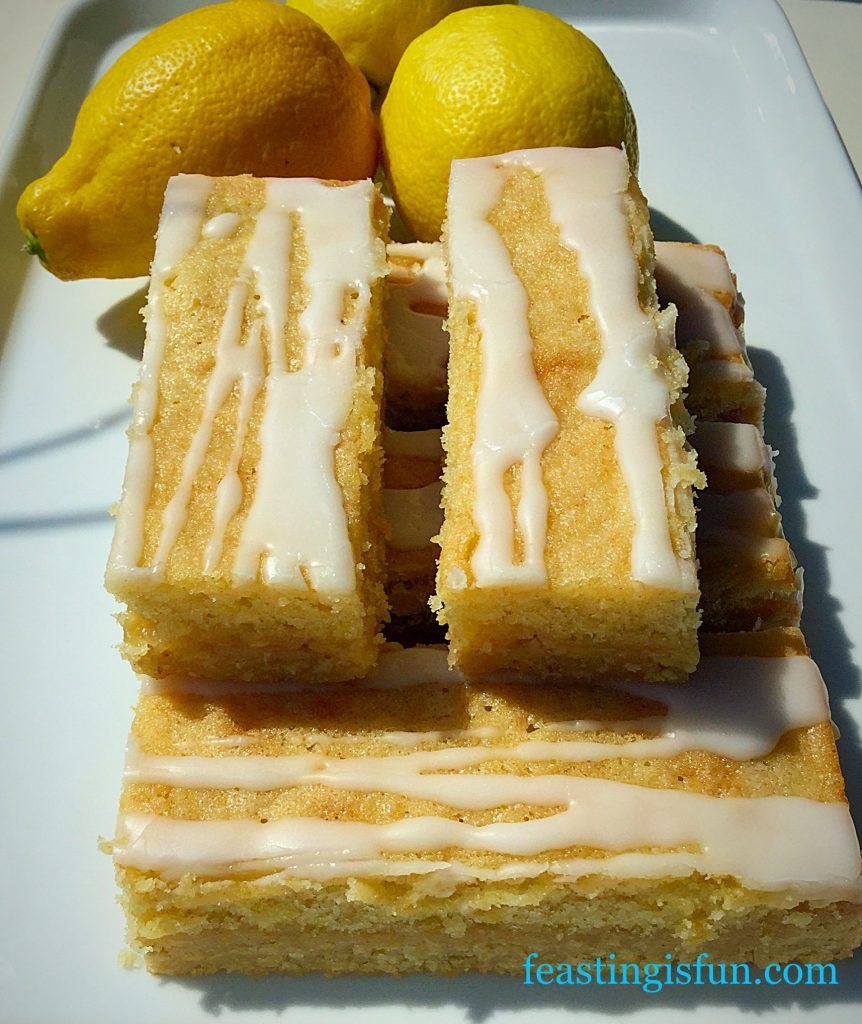
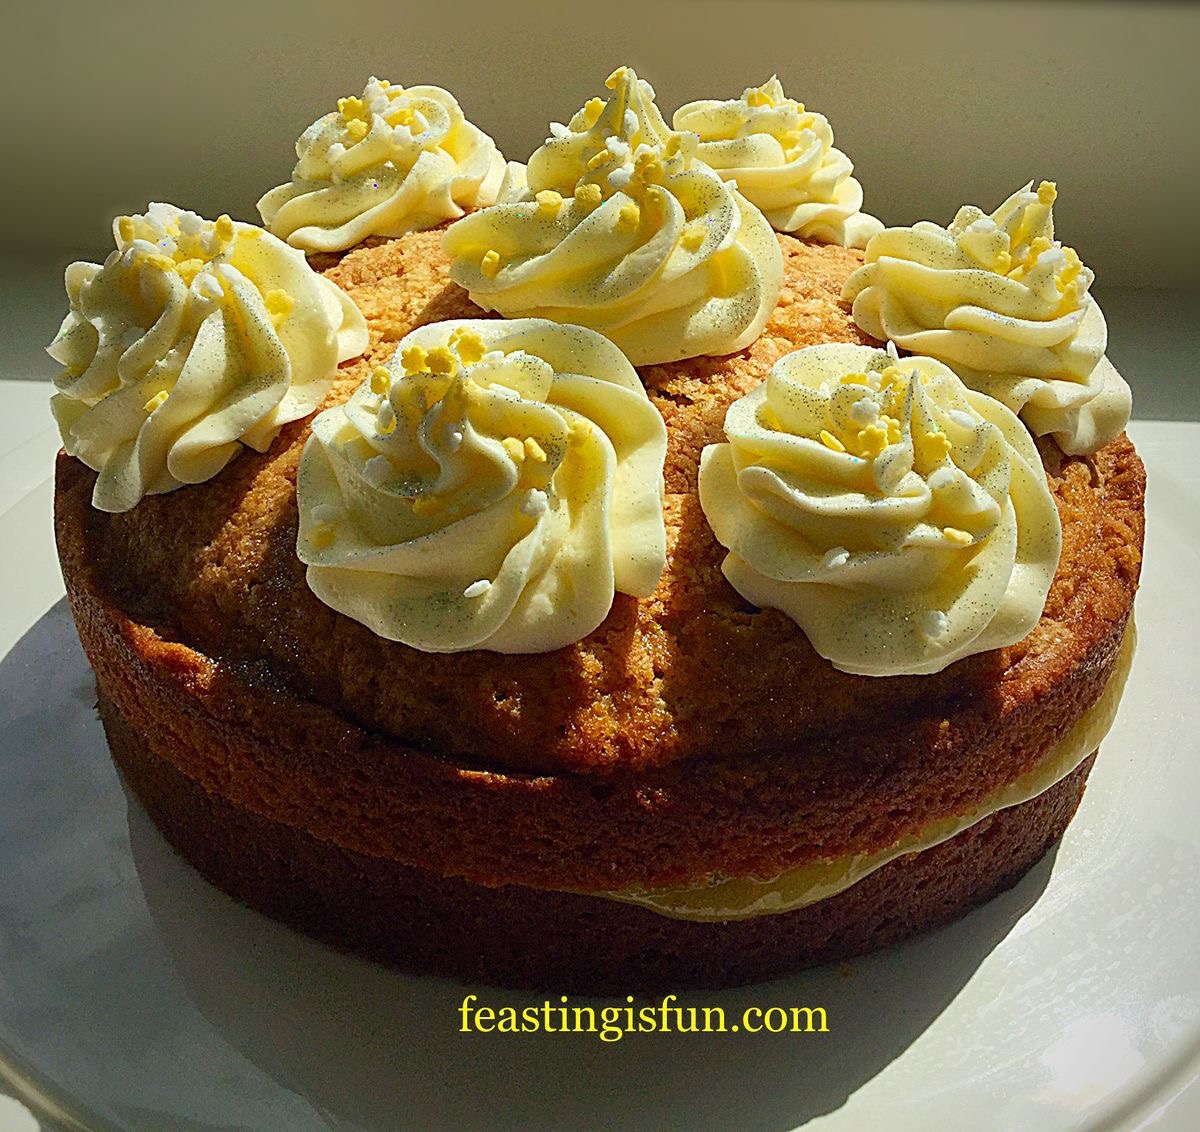
I adore lemons. They are used in both sweet and savoury cooking in my kitchen. So, in honour of our eldest daughter’s birthday and inspired by last week’s first Great British Bake Off episode, I bring you my 100% gluten free Boozy Lemon Drizzle Bundt Cake.

FF Boozy Lemon Drizzle Bundt Cake
Boozy Lemon Drizzle Bundt Cake moist, light with a great lemon tang.

This gluten free cake tastes no different to a regular cake made with ‘wheat’, which I am really pleased about, as it means more people can make and eat this delicious treat!

That said this Boozy Lemon Drizzle Bundt Cake can be made with regular, plain white flour if you do not need to make it gluten free.

FF Boozy Lemon Drizzle Bundt Cake
Boozy Lemon Drizzle Bundt Cake as beautiful to look at as it is to eat.

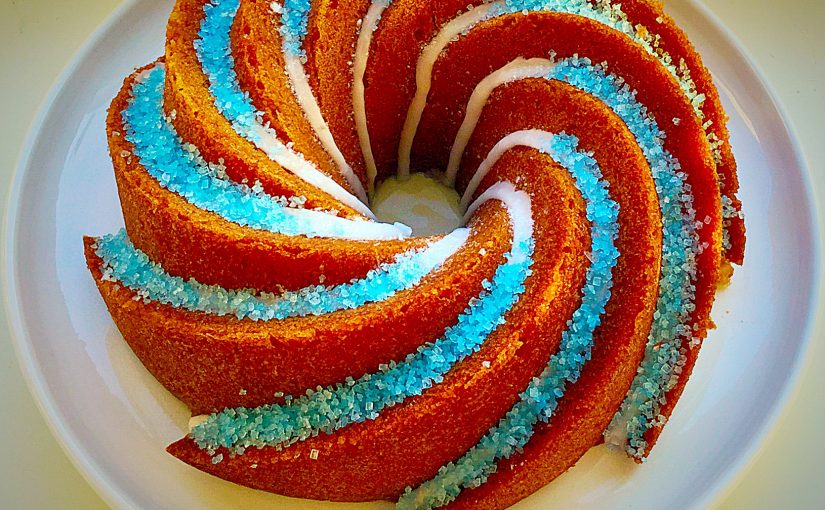
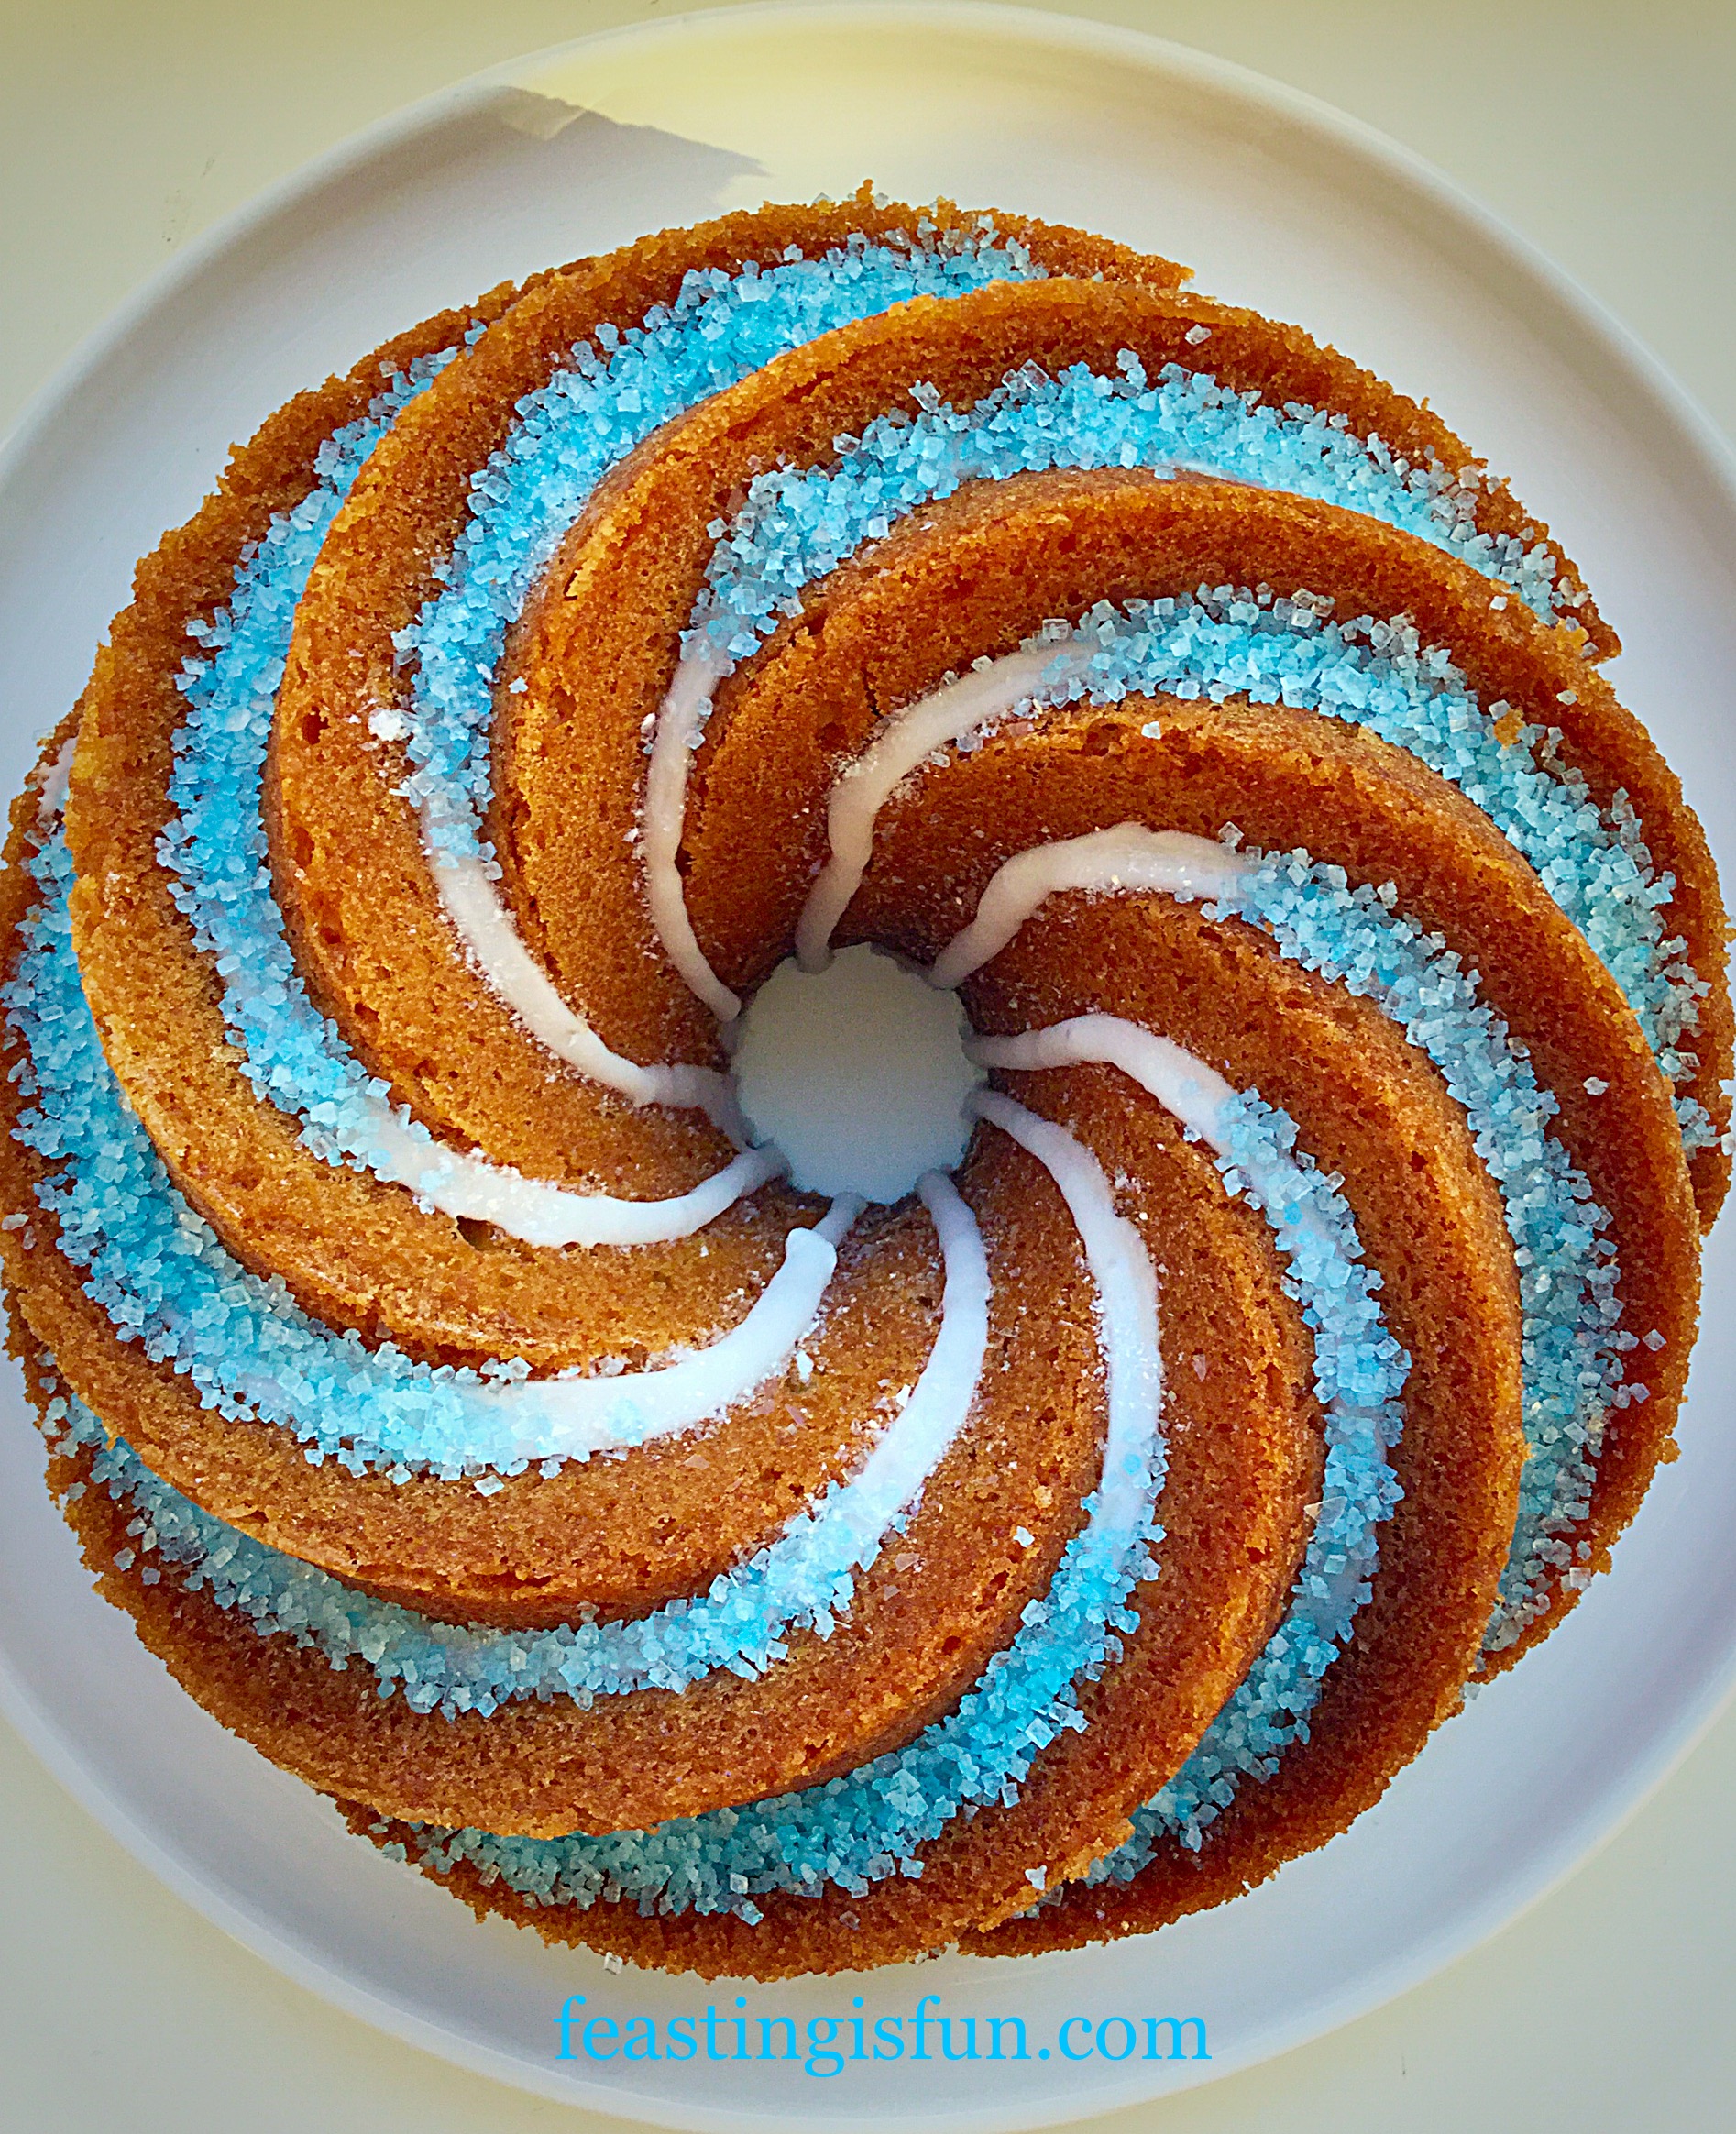
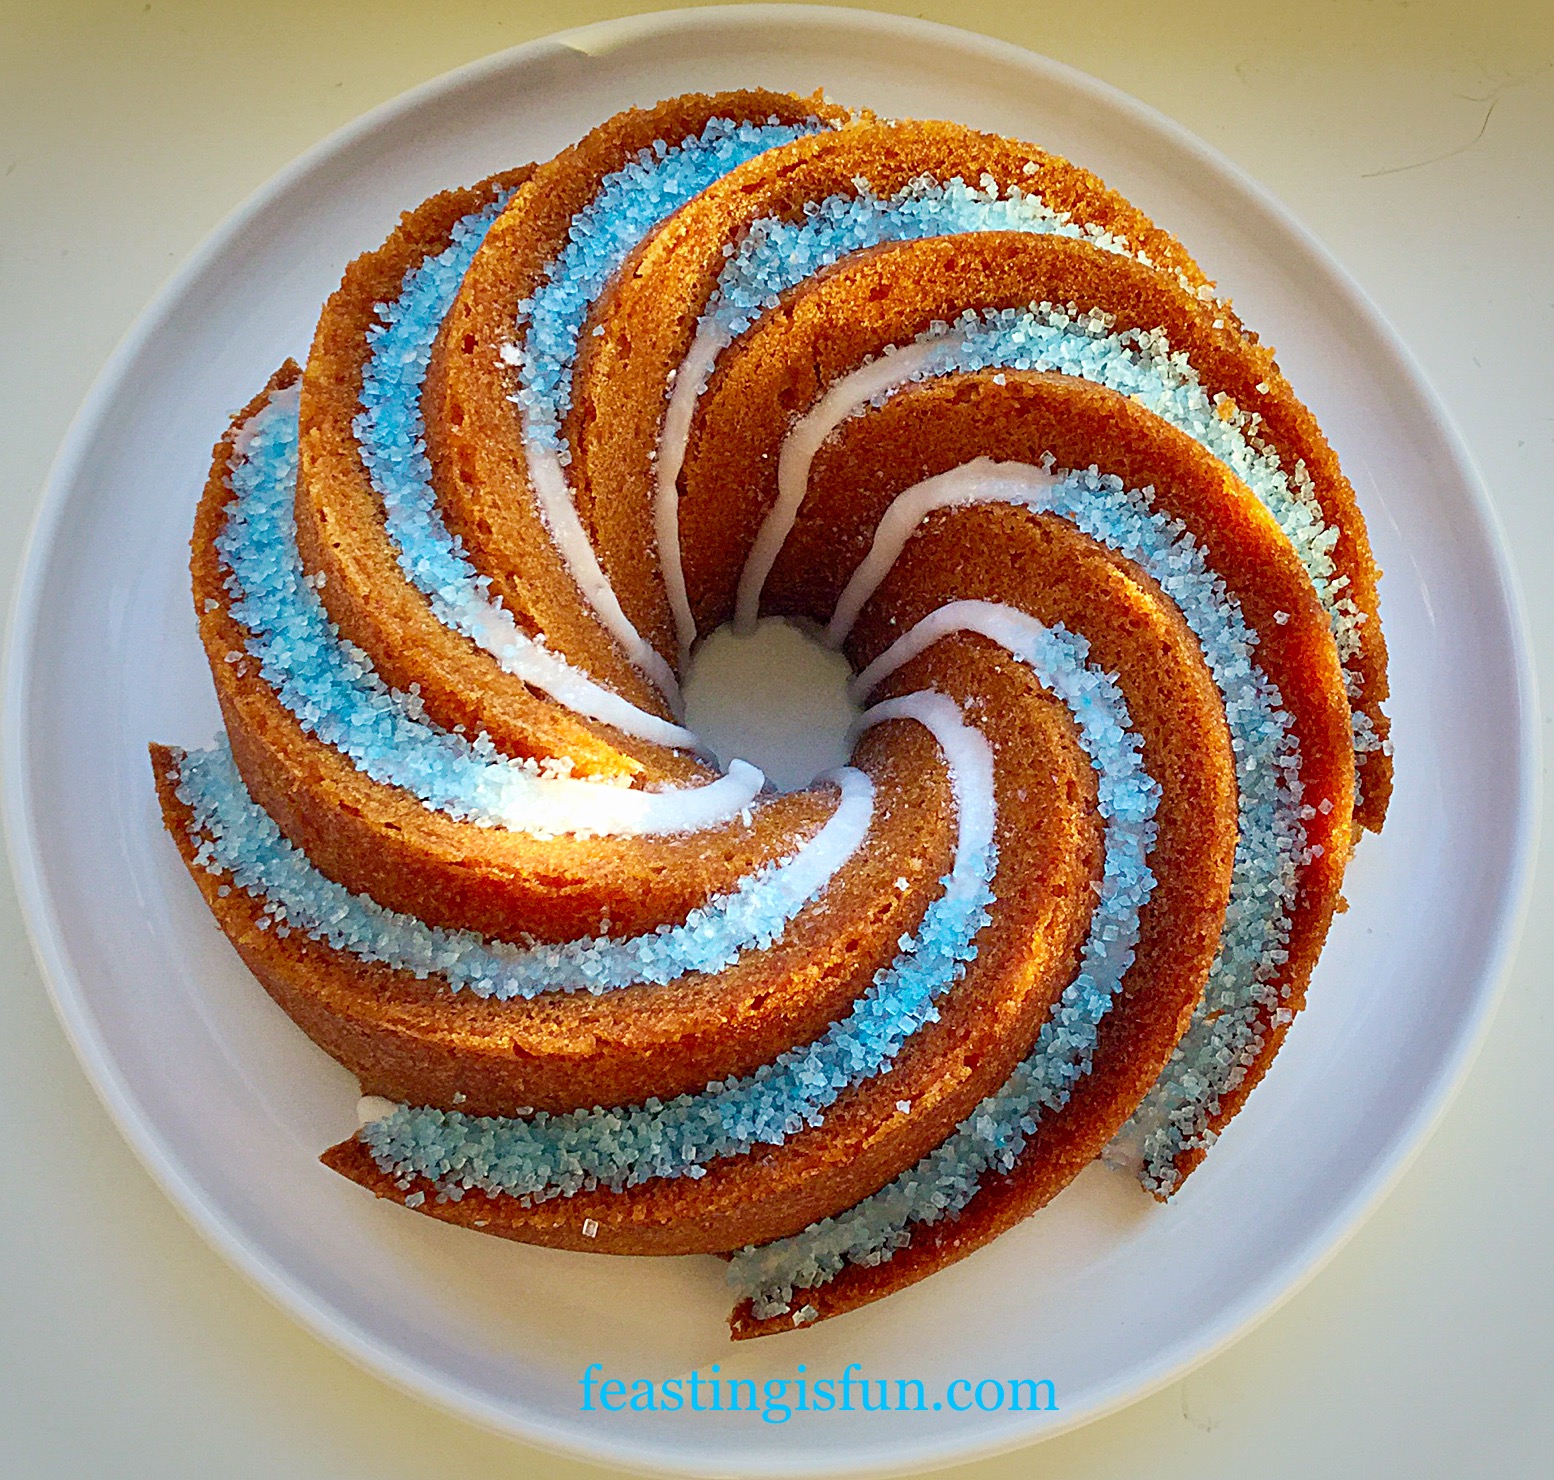
Such a delightfully light, moist cake, with the tang of limoncello spiked drizzle soaked through the entire cake.

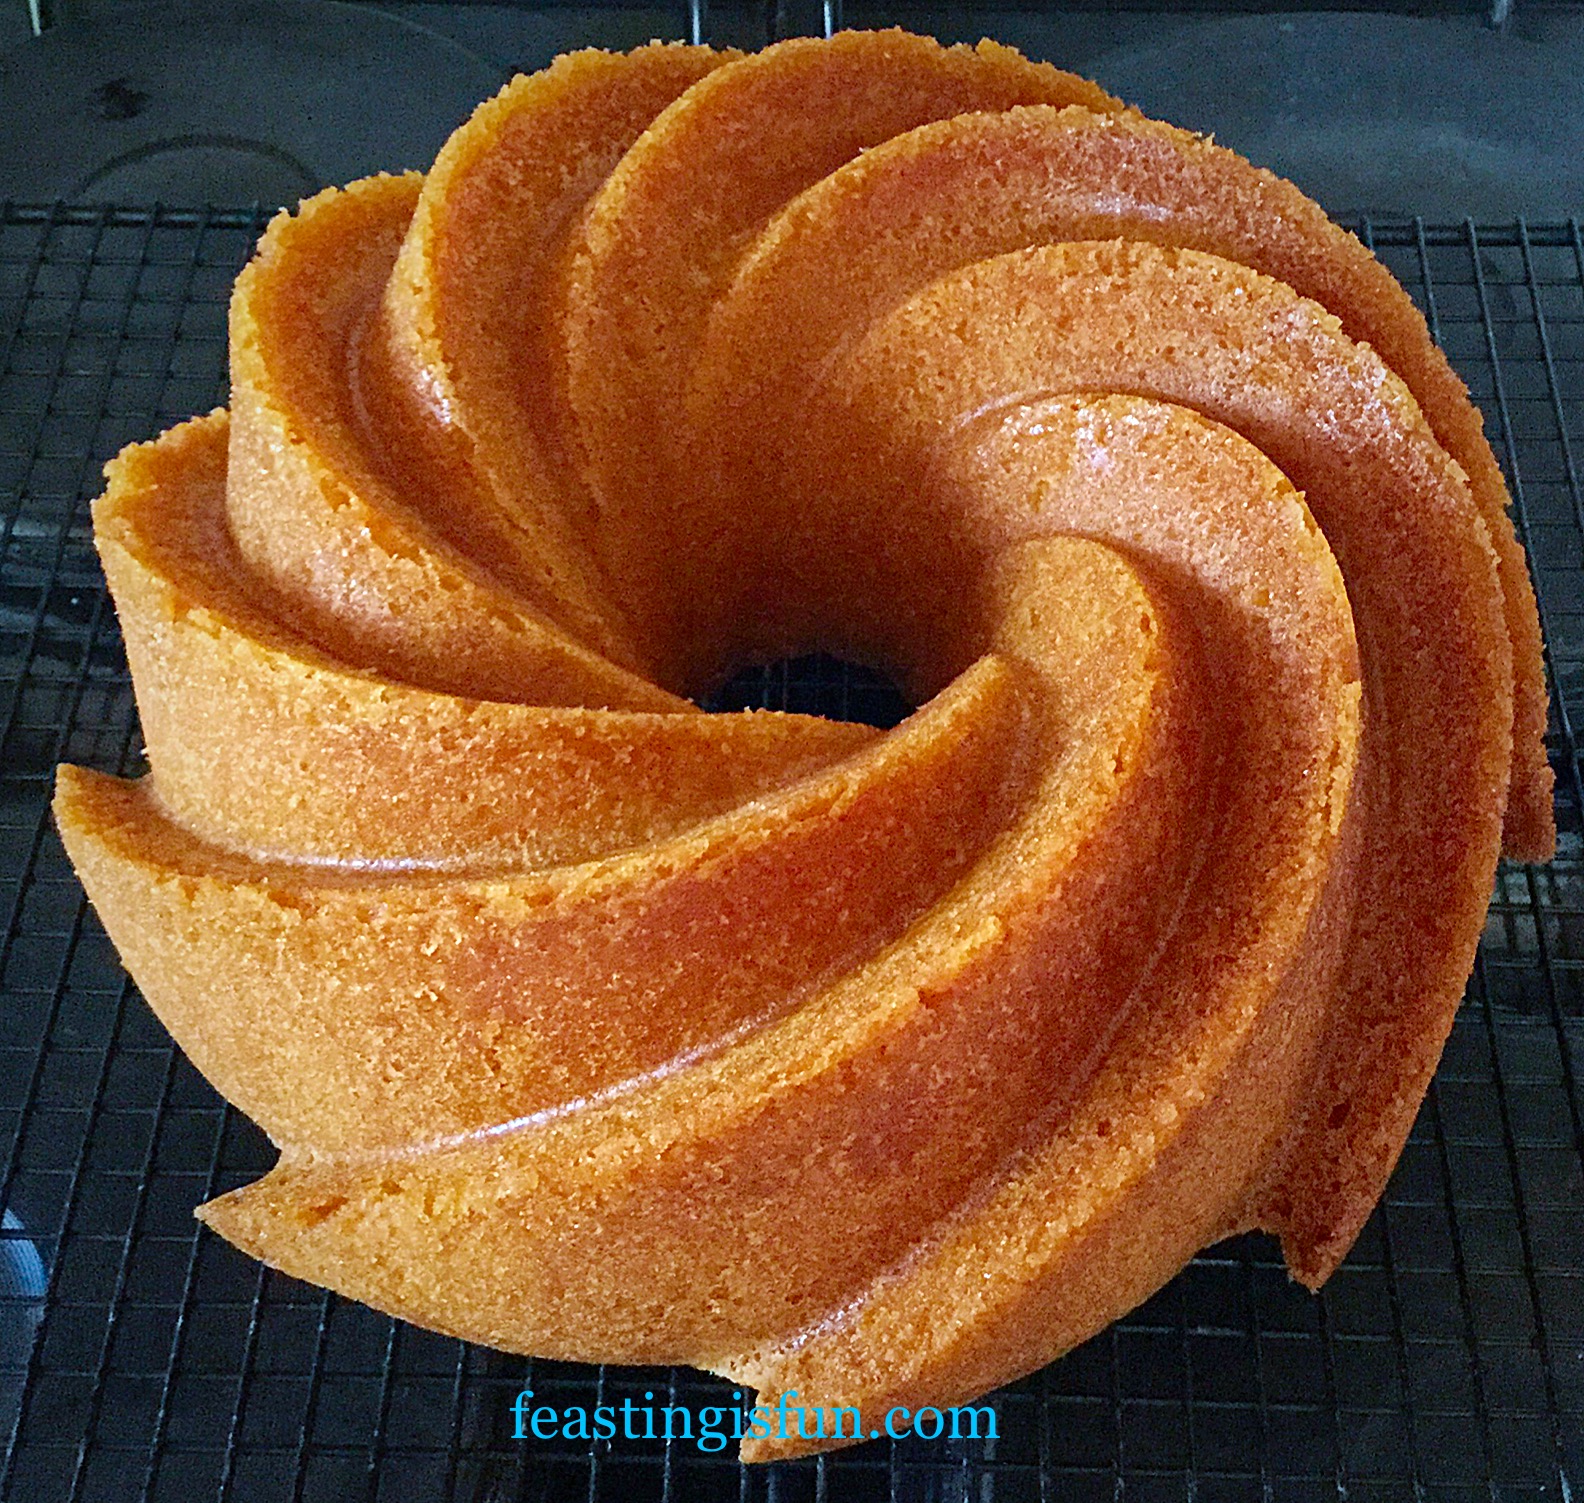
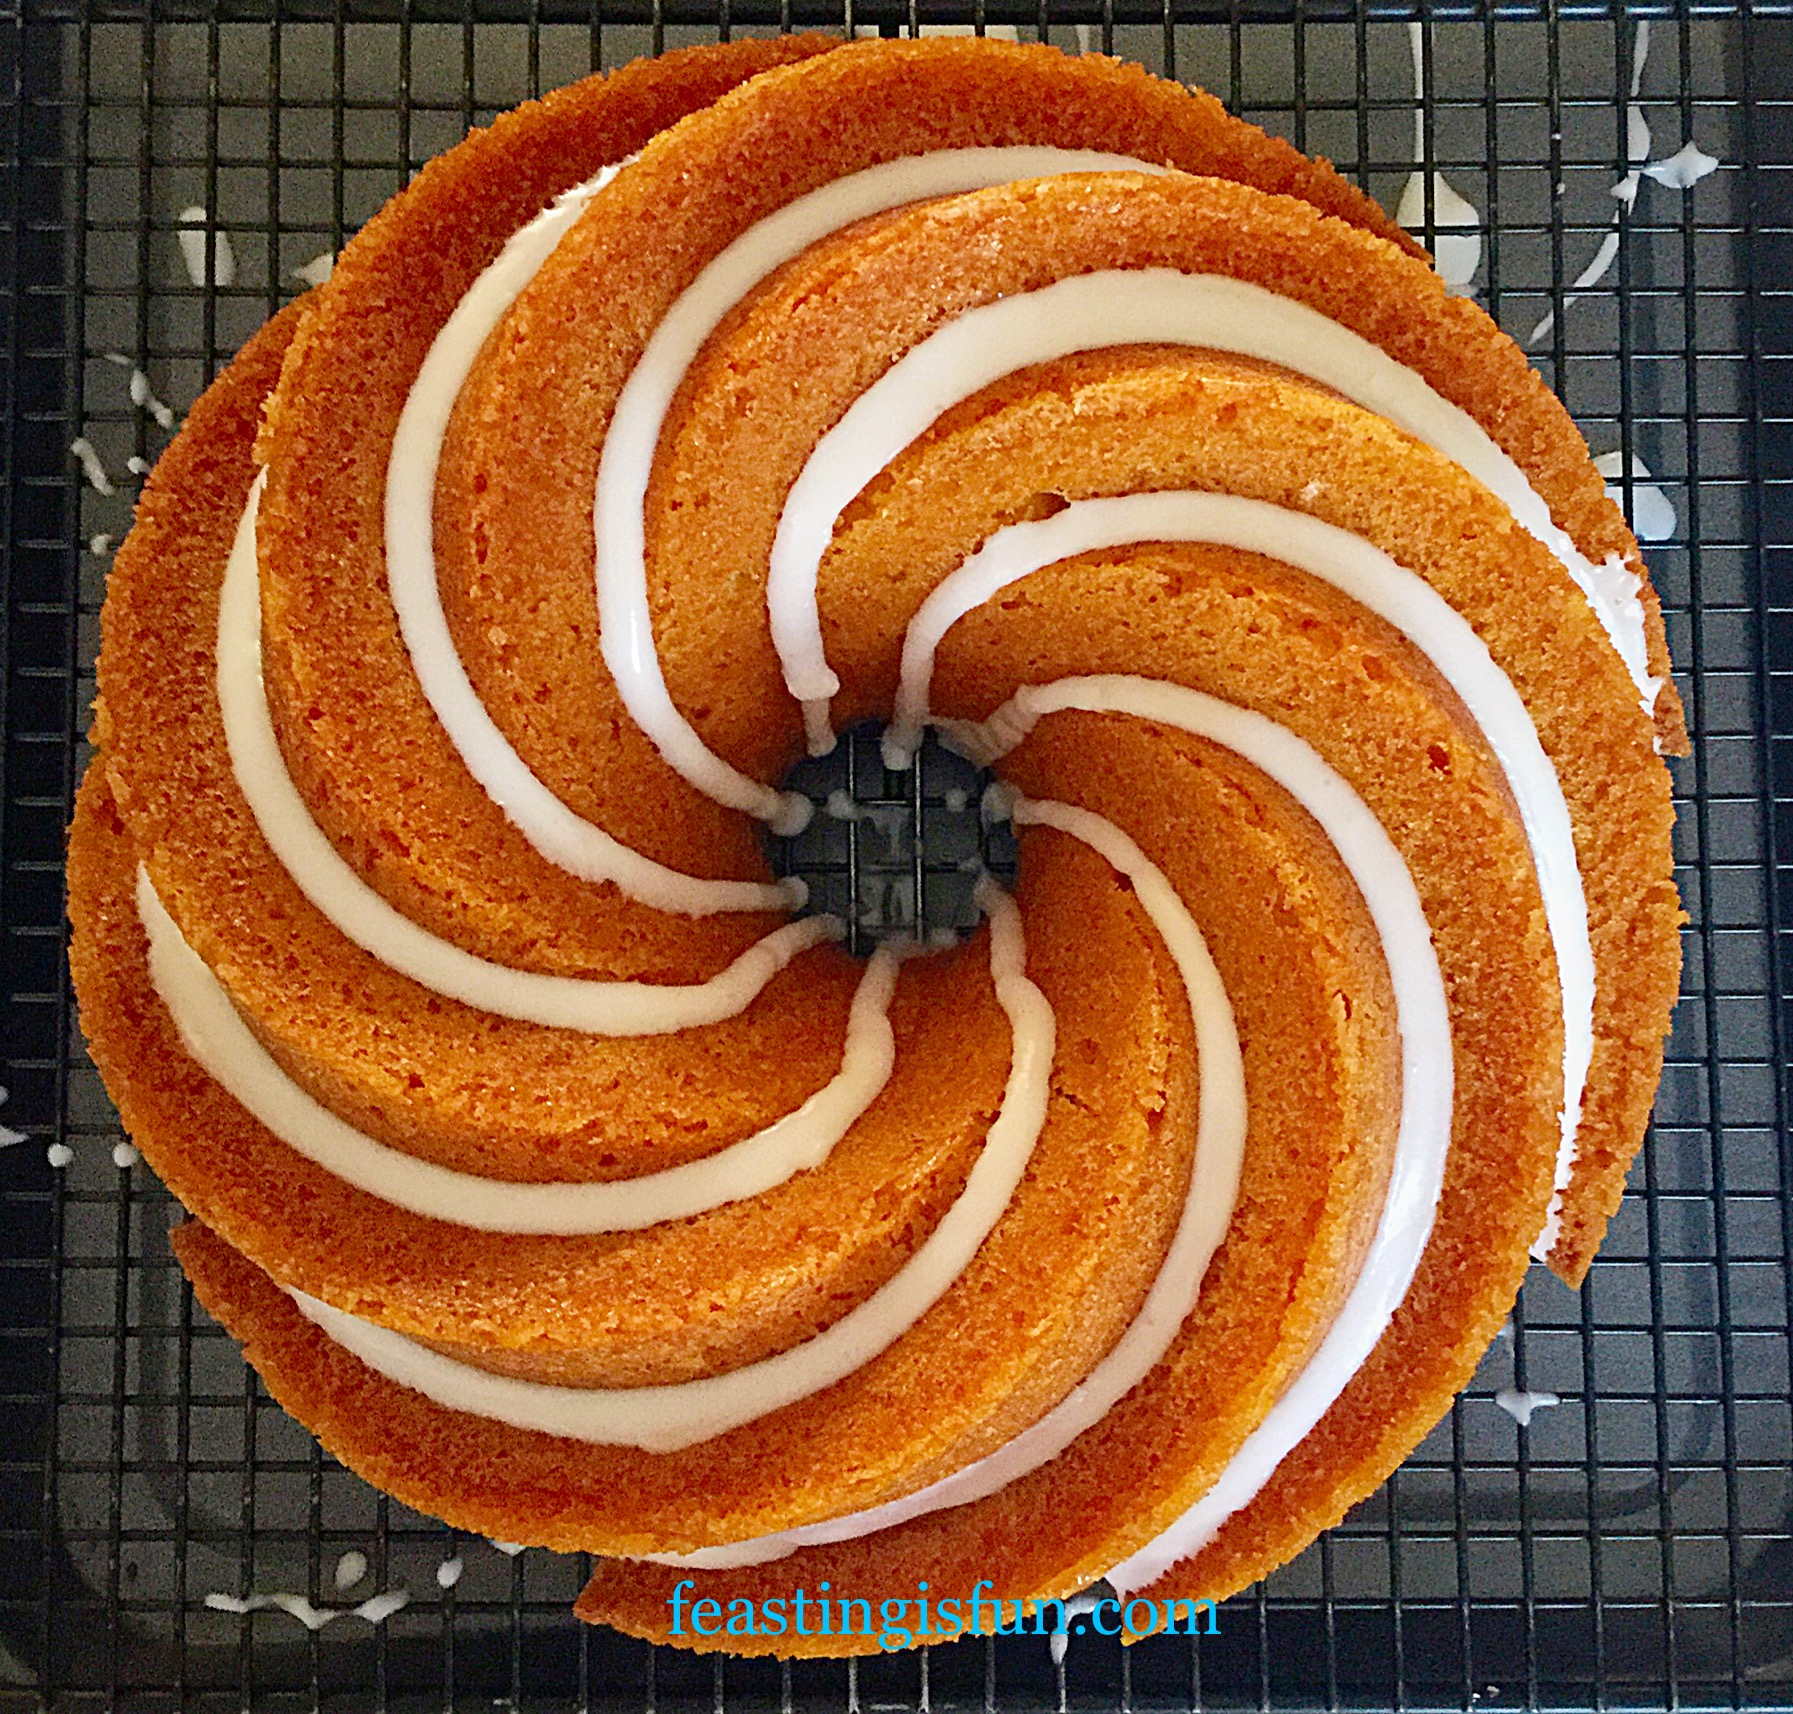
My Boozy Lemon Drizzle Bundt Cake, is a true lemon drizzle cake, in the sense that it has hot lemon syrup poured over a skewer spiked cake. Using a Bundt pan means that the syrup soaks from the bottom to the top, creating a fabulously flavoured cake.

FF Boozy Lemon Drizzle Bundt Cake
Boozy Lemon Drizzle Bunt Cake such a stunning design.

As this cake was made for my daughter, to be shared with family and friends, I was very restrained when it came to adding the limoncello. For adults you could easily double, or triple the amount stated. Remember though it is the lemon flavour that needs to hit the palette first. Don’t knock everyone out with too much vodka 😉.

FF Boozy Lemon Drizzle Bundt Cake
Boozy Lemon Drizzle Bundt Cake with a damp, drizzled crumb.

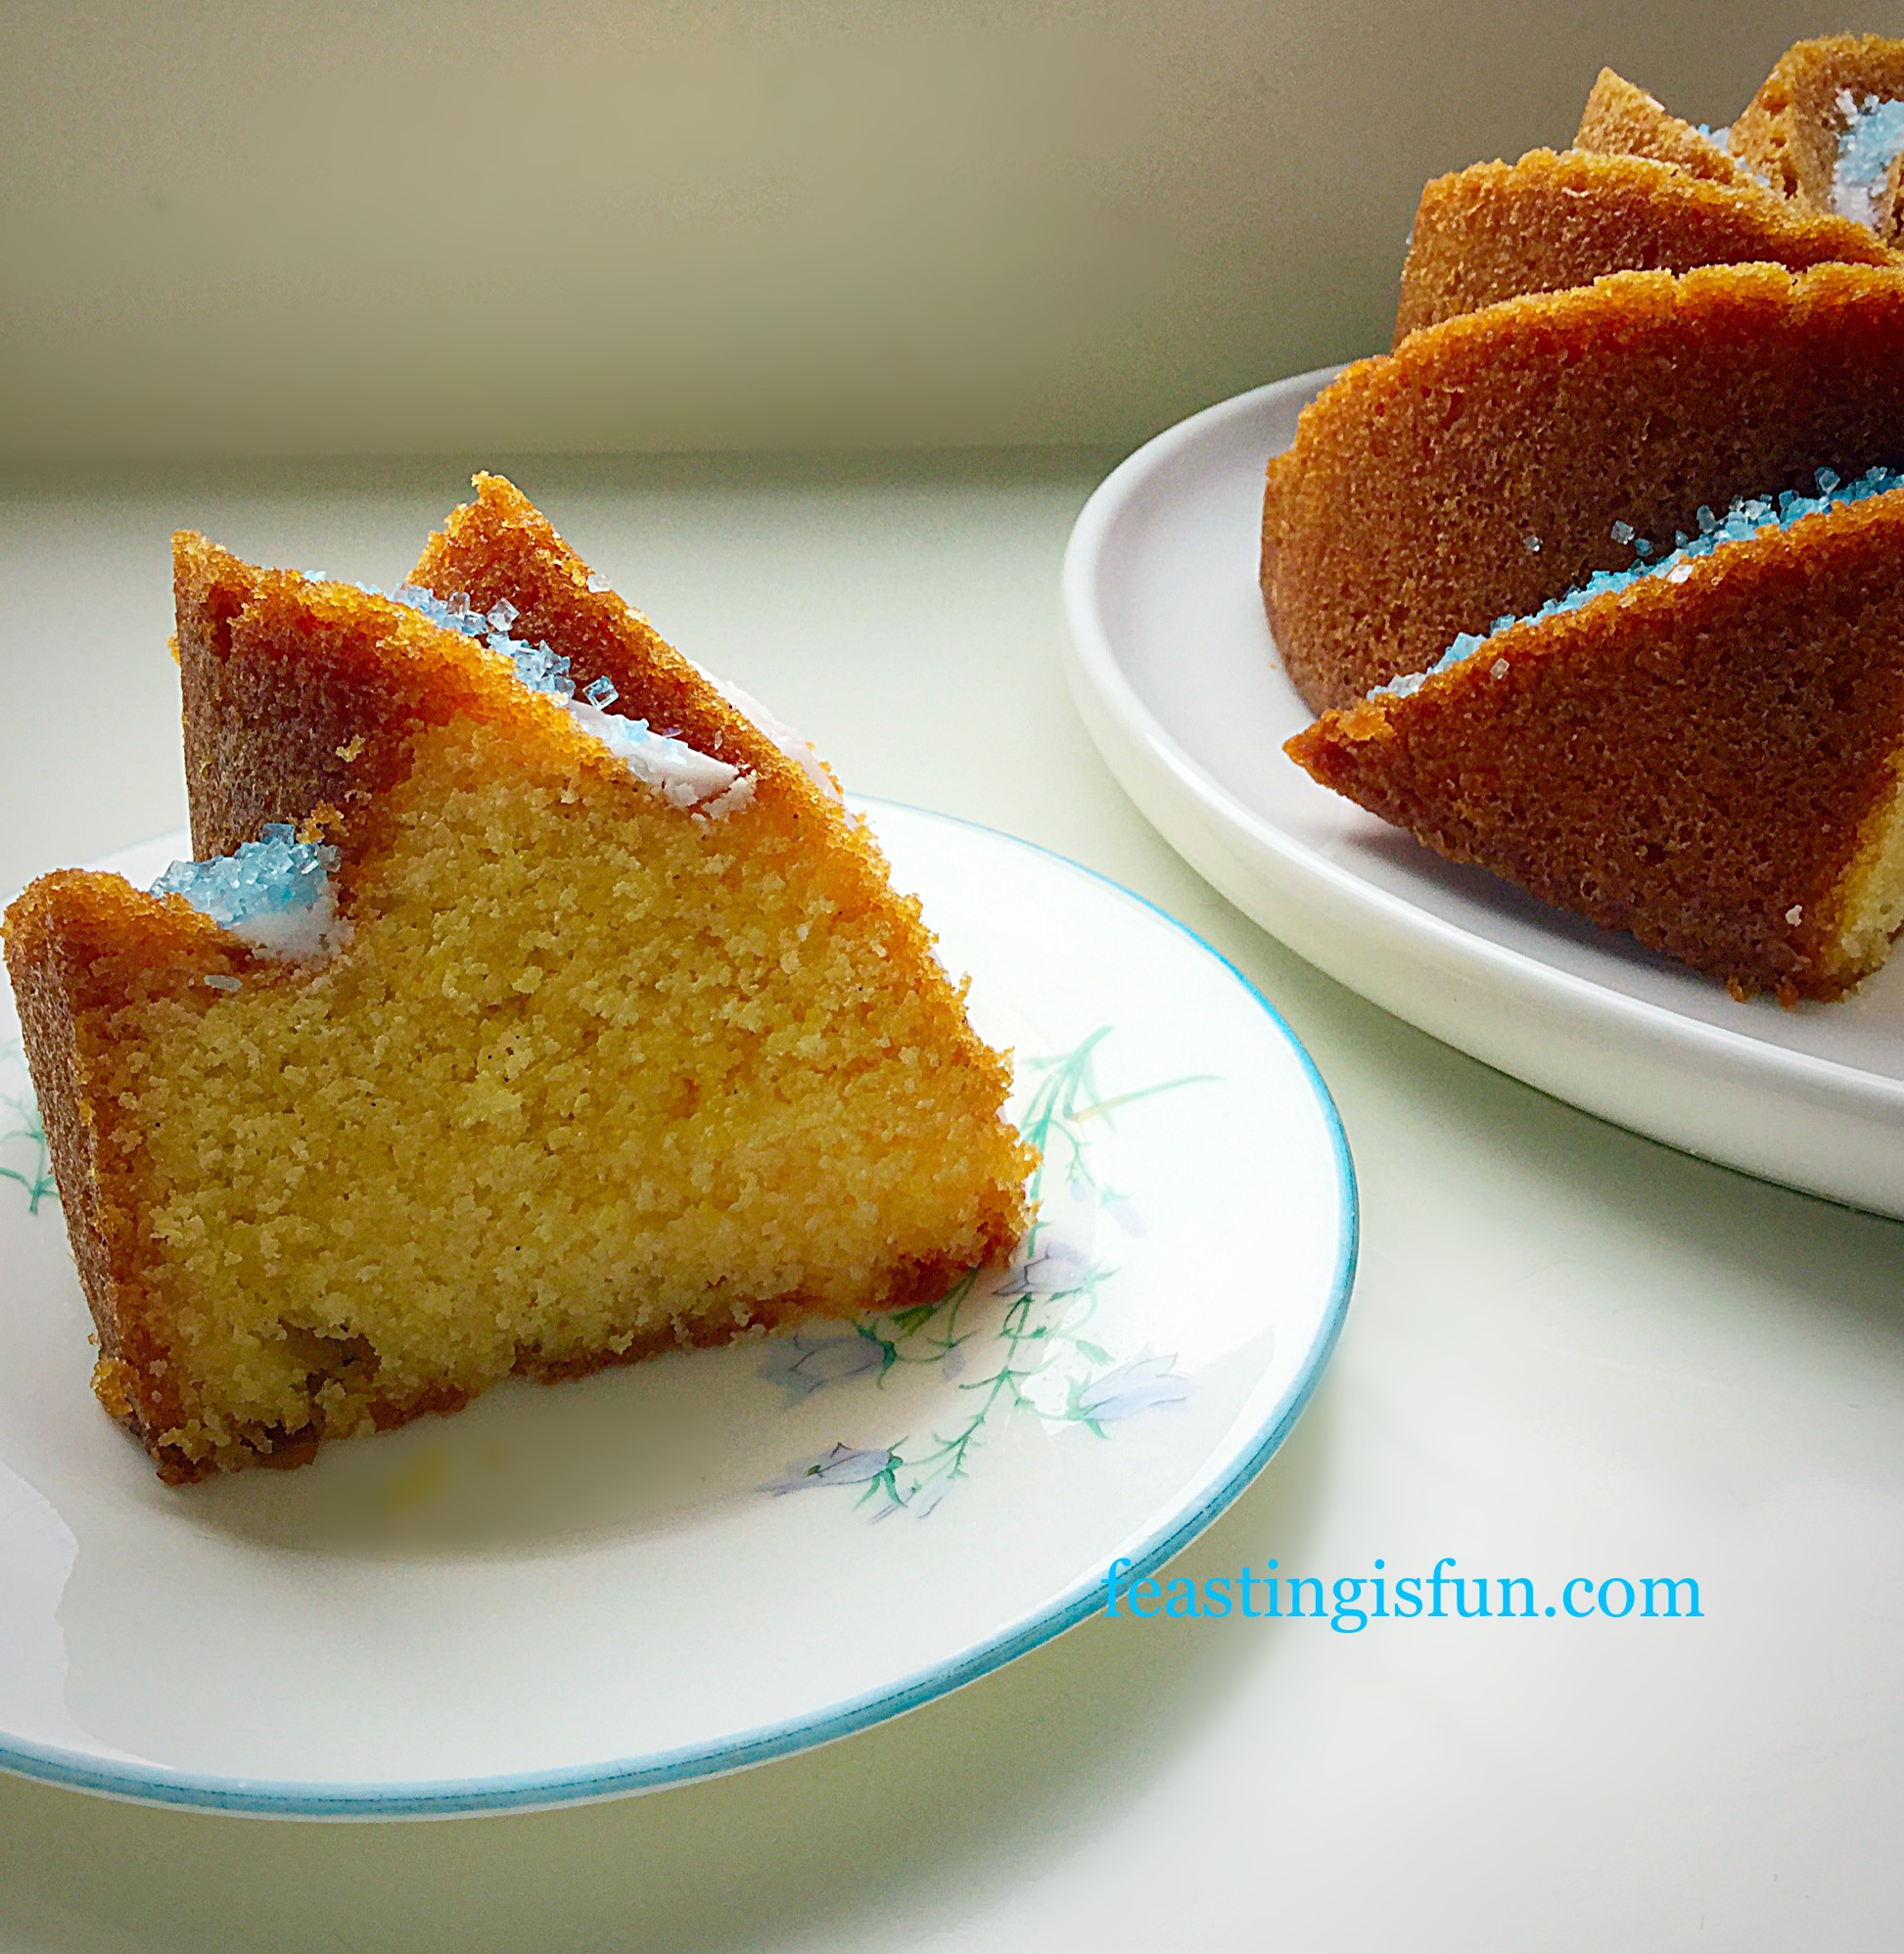
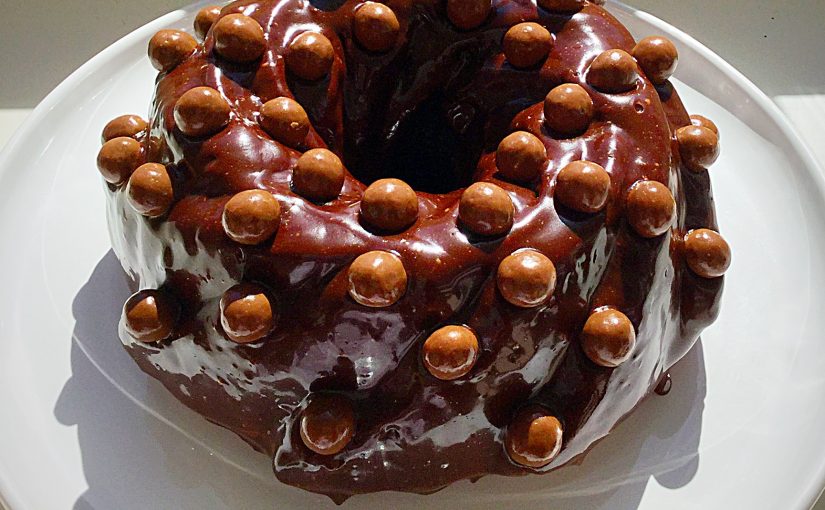
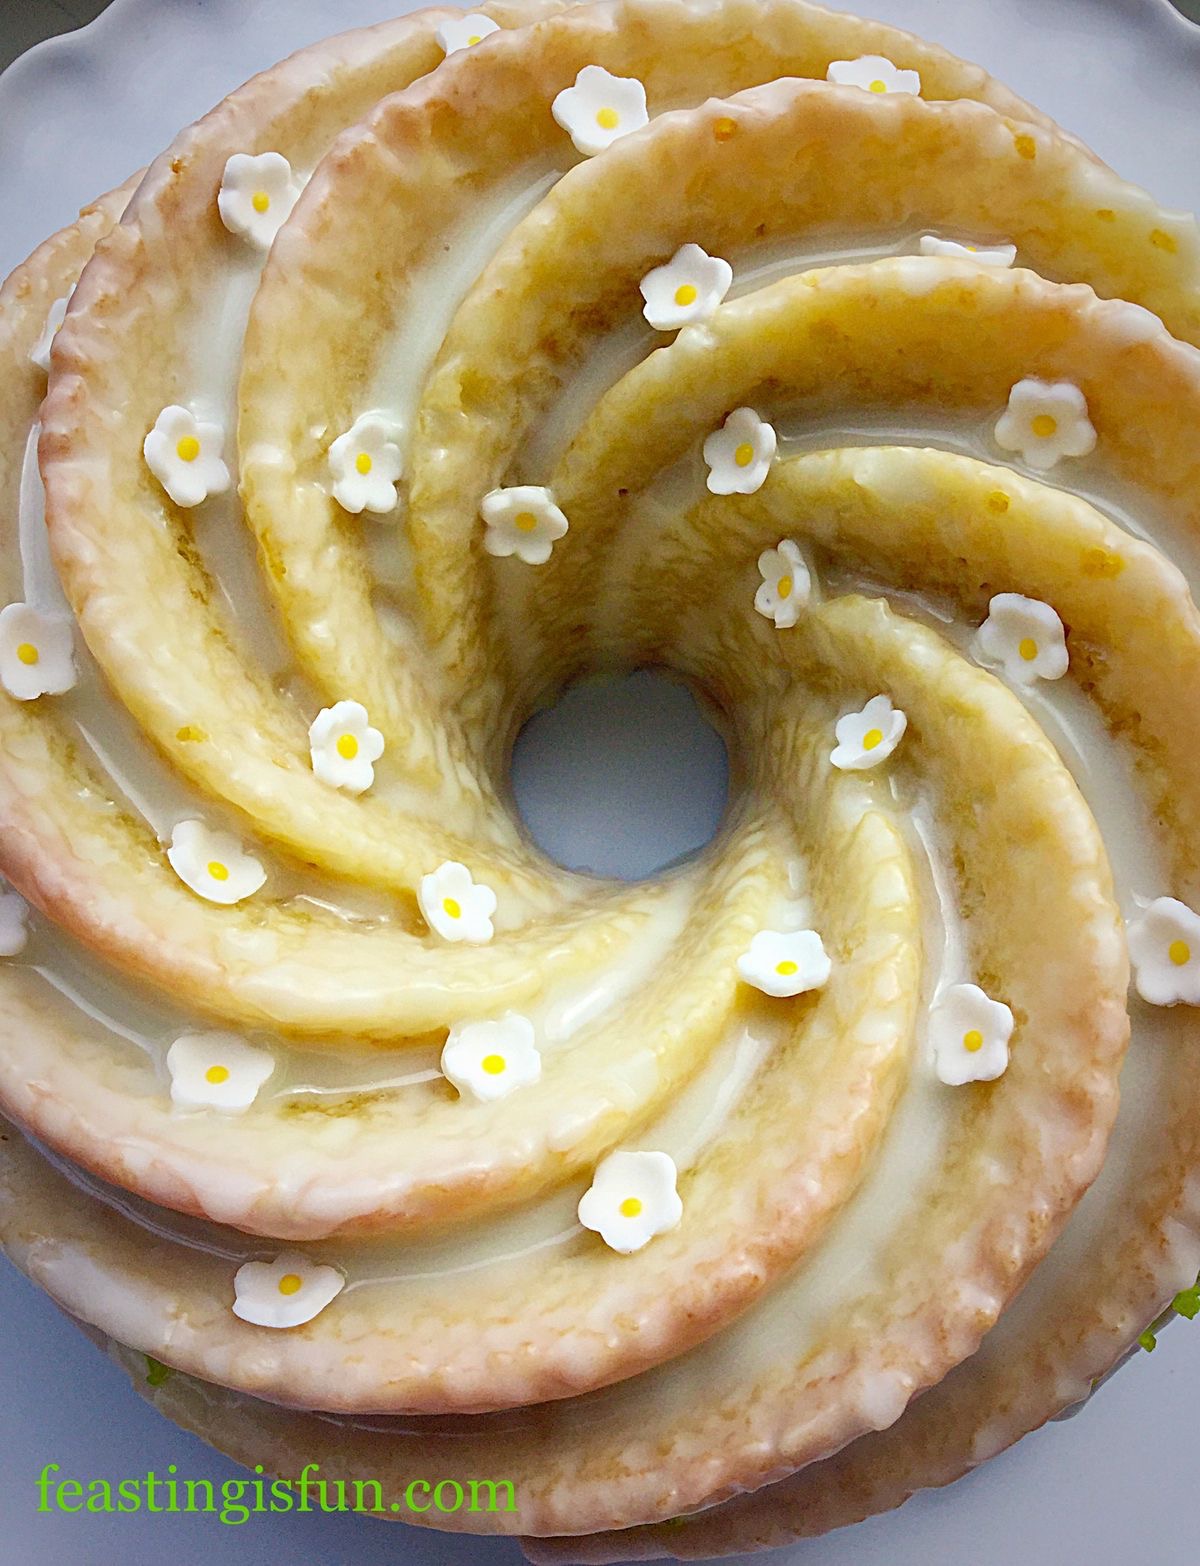
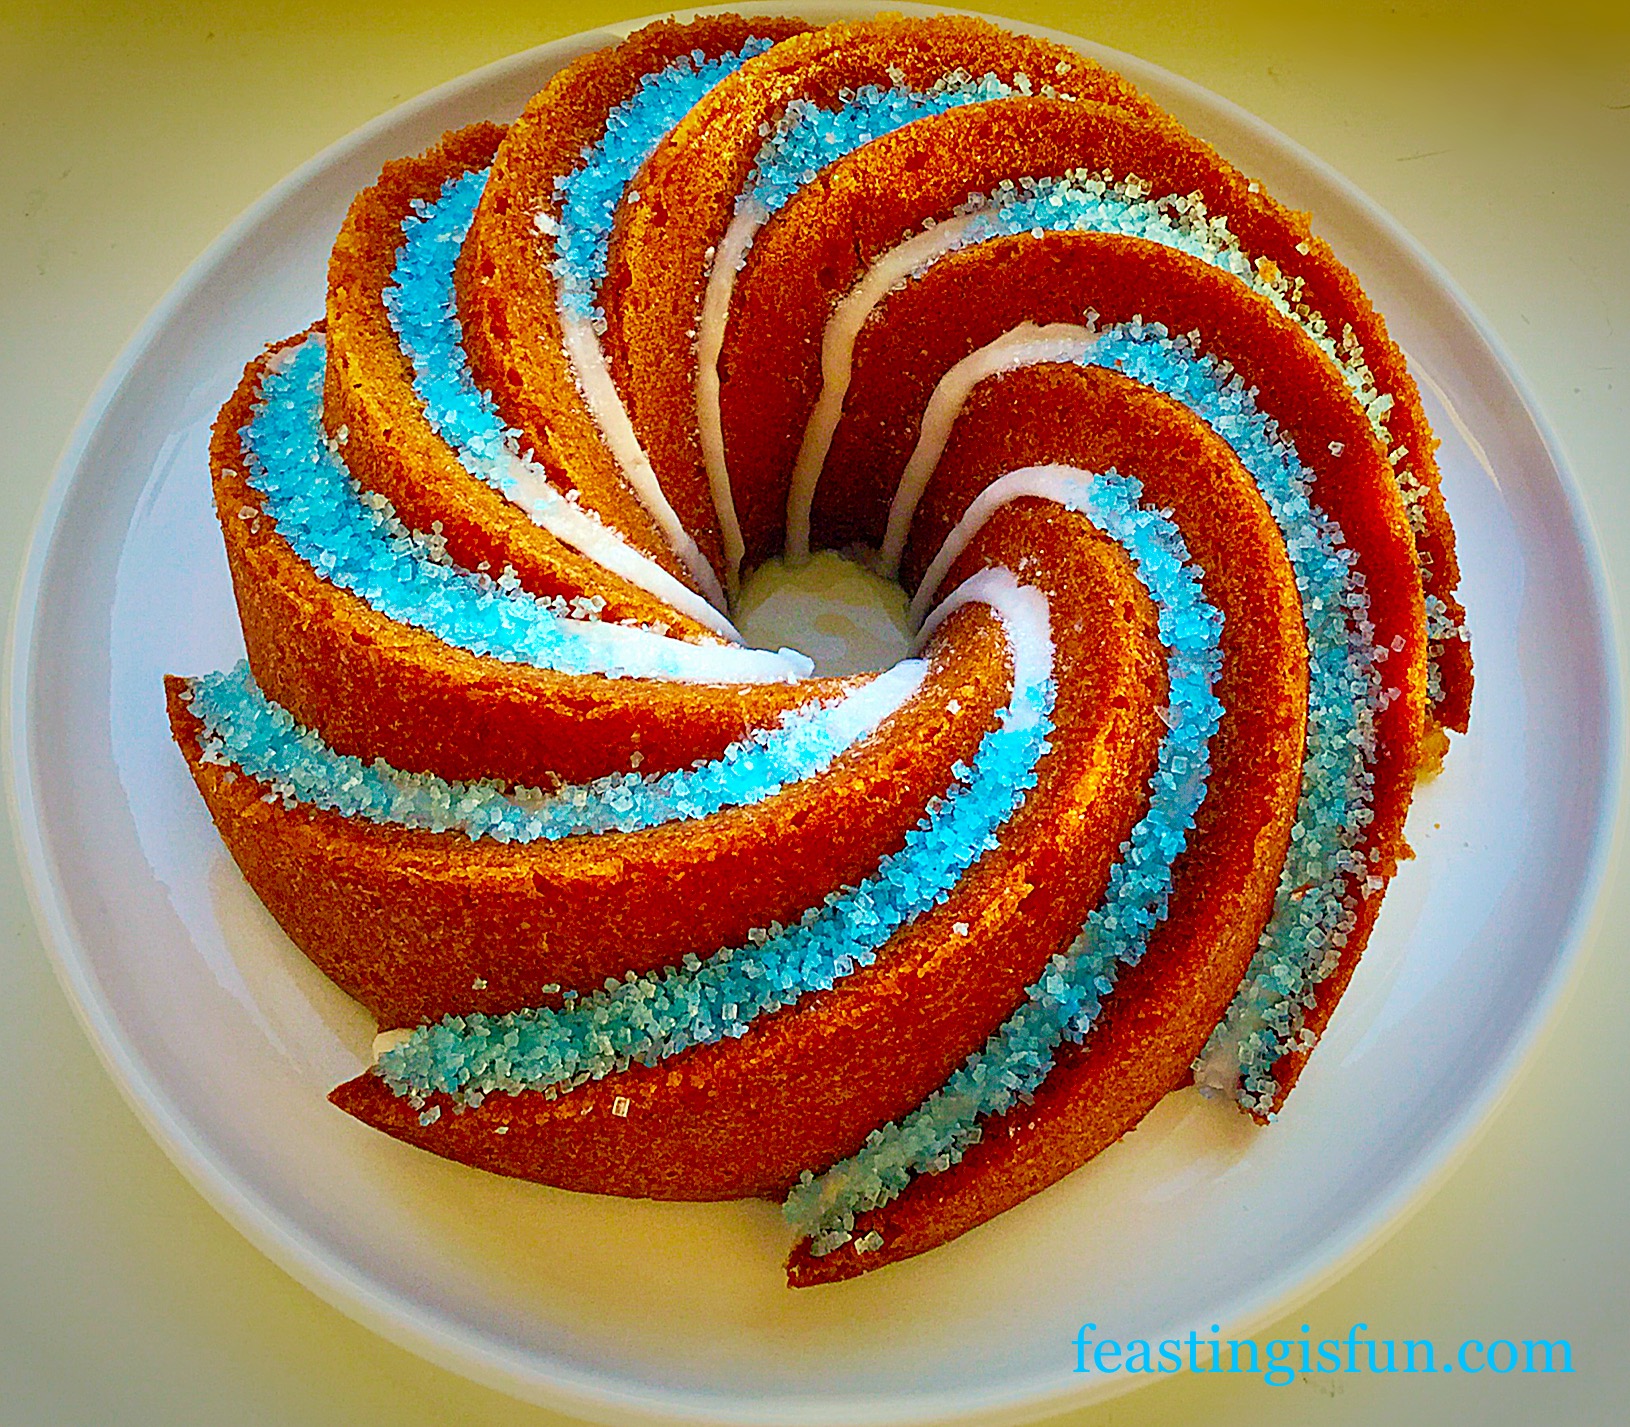
The colours used to decorate this cake are simply her favourite. I piped a line of thick, lemon icing along each ridge of the cake and then added sky blue sugar sparkles, pressing them in gently to the icing so they would stay. A finial dusting of white, edible glitter in the centre adds the necessary sparkle, even if it doesn’t show up in all of the photographs.

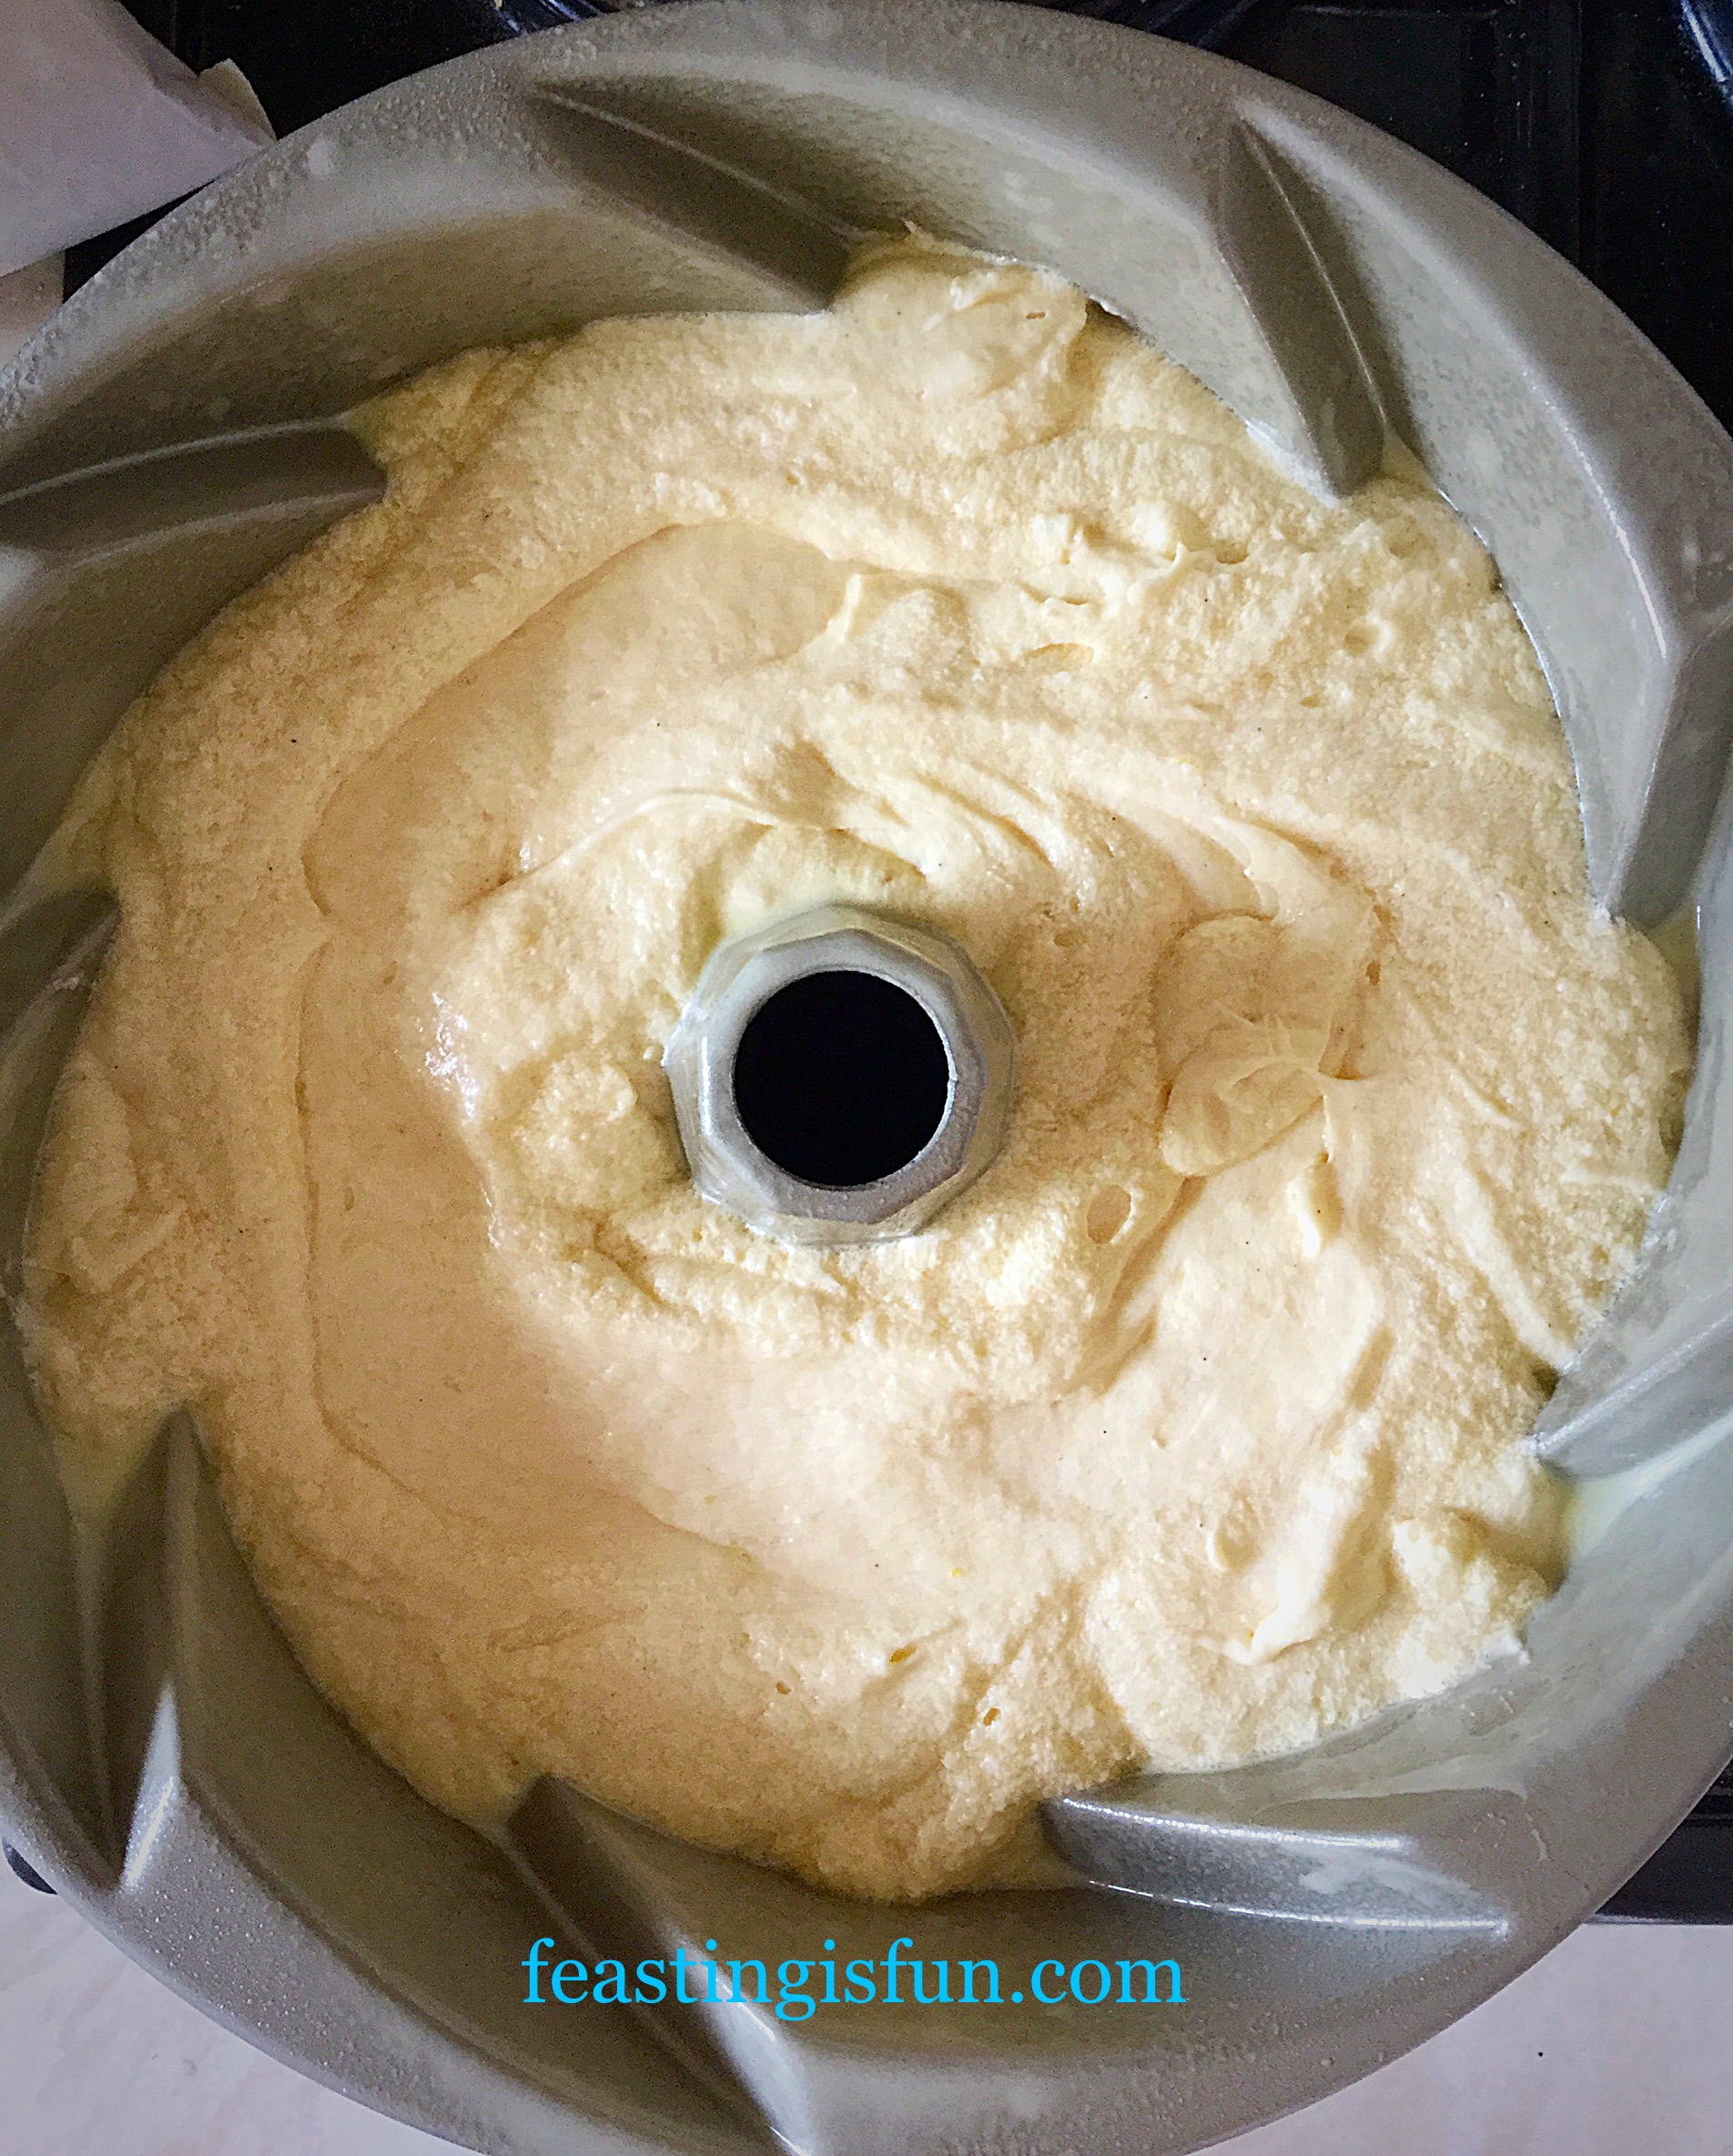
I chose to use the Heritage Bundt Pan by Nordicware.

Recipe: Boozy Lemon Drizzle Bundt Cake serves 10-12

I highly recommend Wilton cake release spray to grease the Bundt pan, alternitavely use melted butter and brush every part of the inside of the pan, then add 1 tablespoon of gluten free flour, tip the pan around until it is completely covered and tip out any excess flour – I cannot guarantee the same sharp edges using the butter/flour method.

For the Cake

275g/10oz Unsalted Butter softened to room temperature

275g/10oz  Caster Sugar

1/4tsp Salt – I use Maldon Sea Salt

275g/10oz Certified Gluten Free Flour – I use Doves Farm

2tsp Baking Powder – I use Waitrose as it is gluten free

1tsp Vanilla Extract – I use Nielsen-Massey extracts

1tsp Lemon Extract or juice of half a lemon

Zest of one lemon

6 Large Free Range Eggs

For the Drizzle

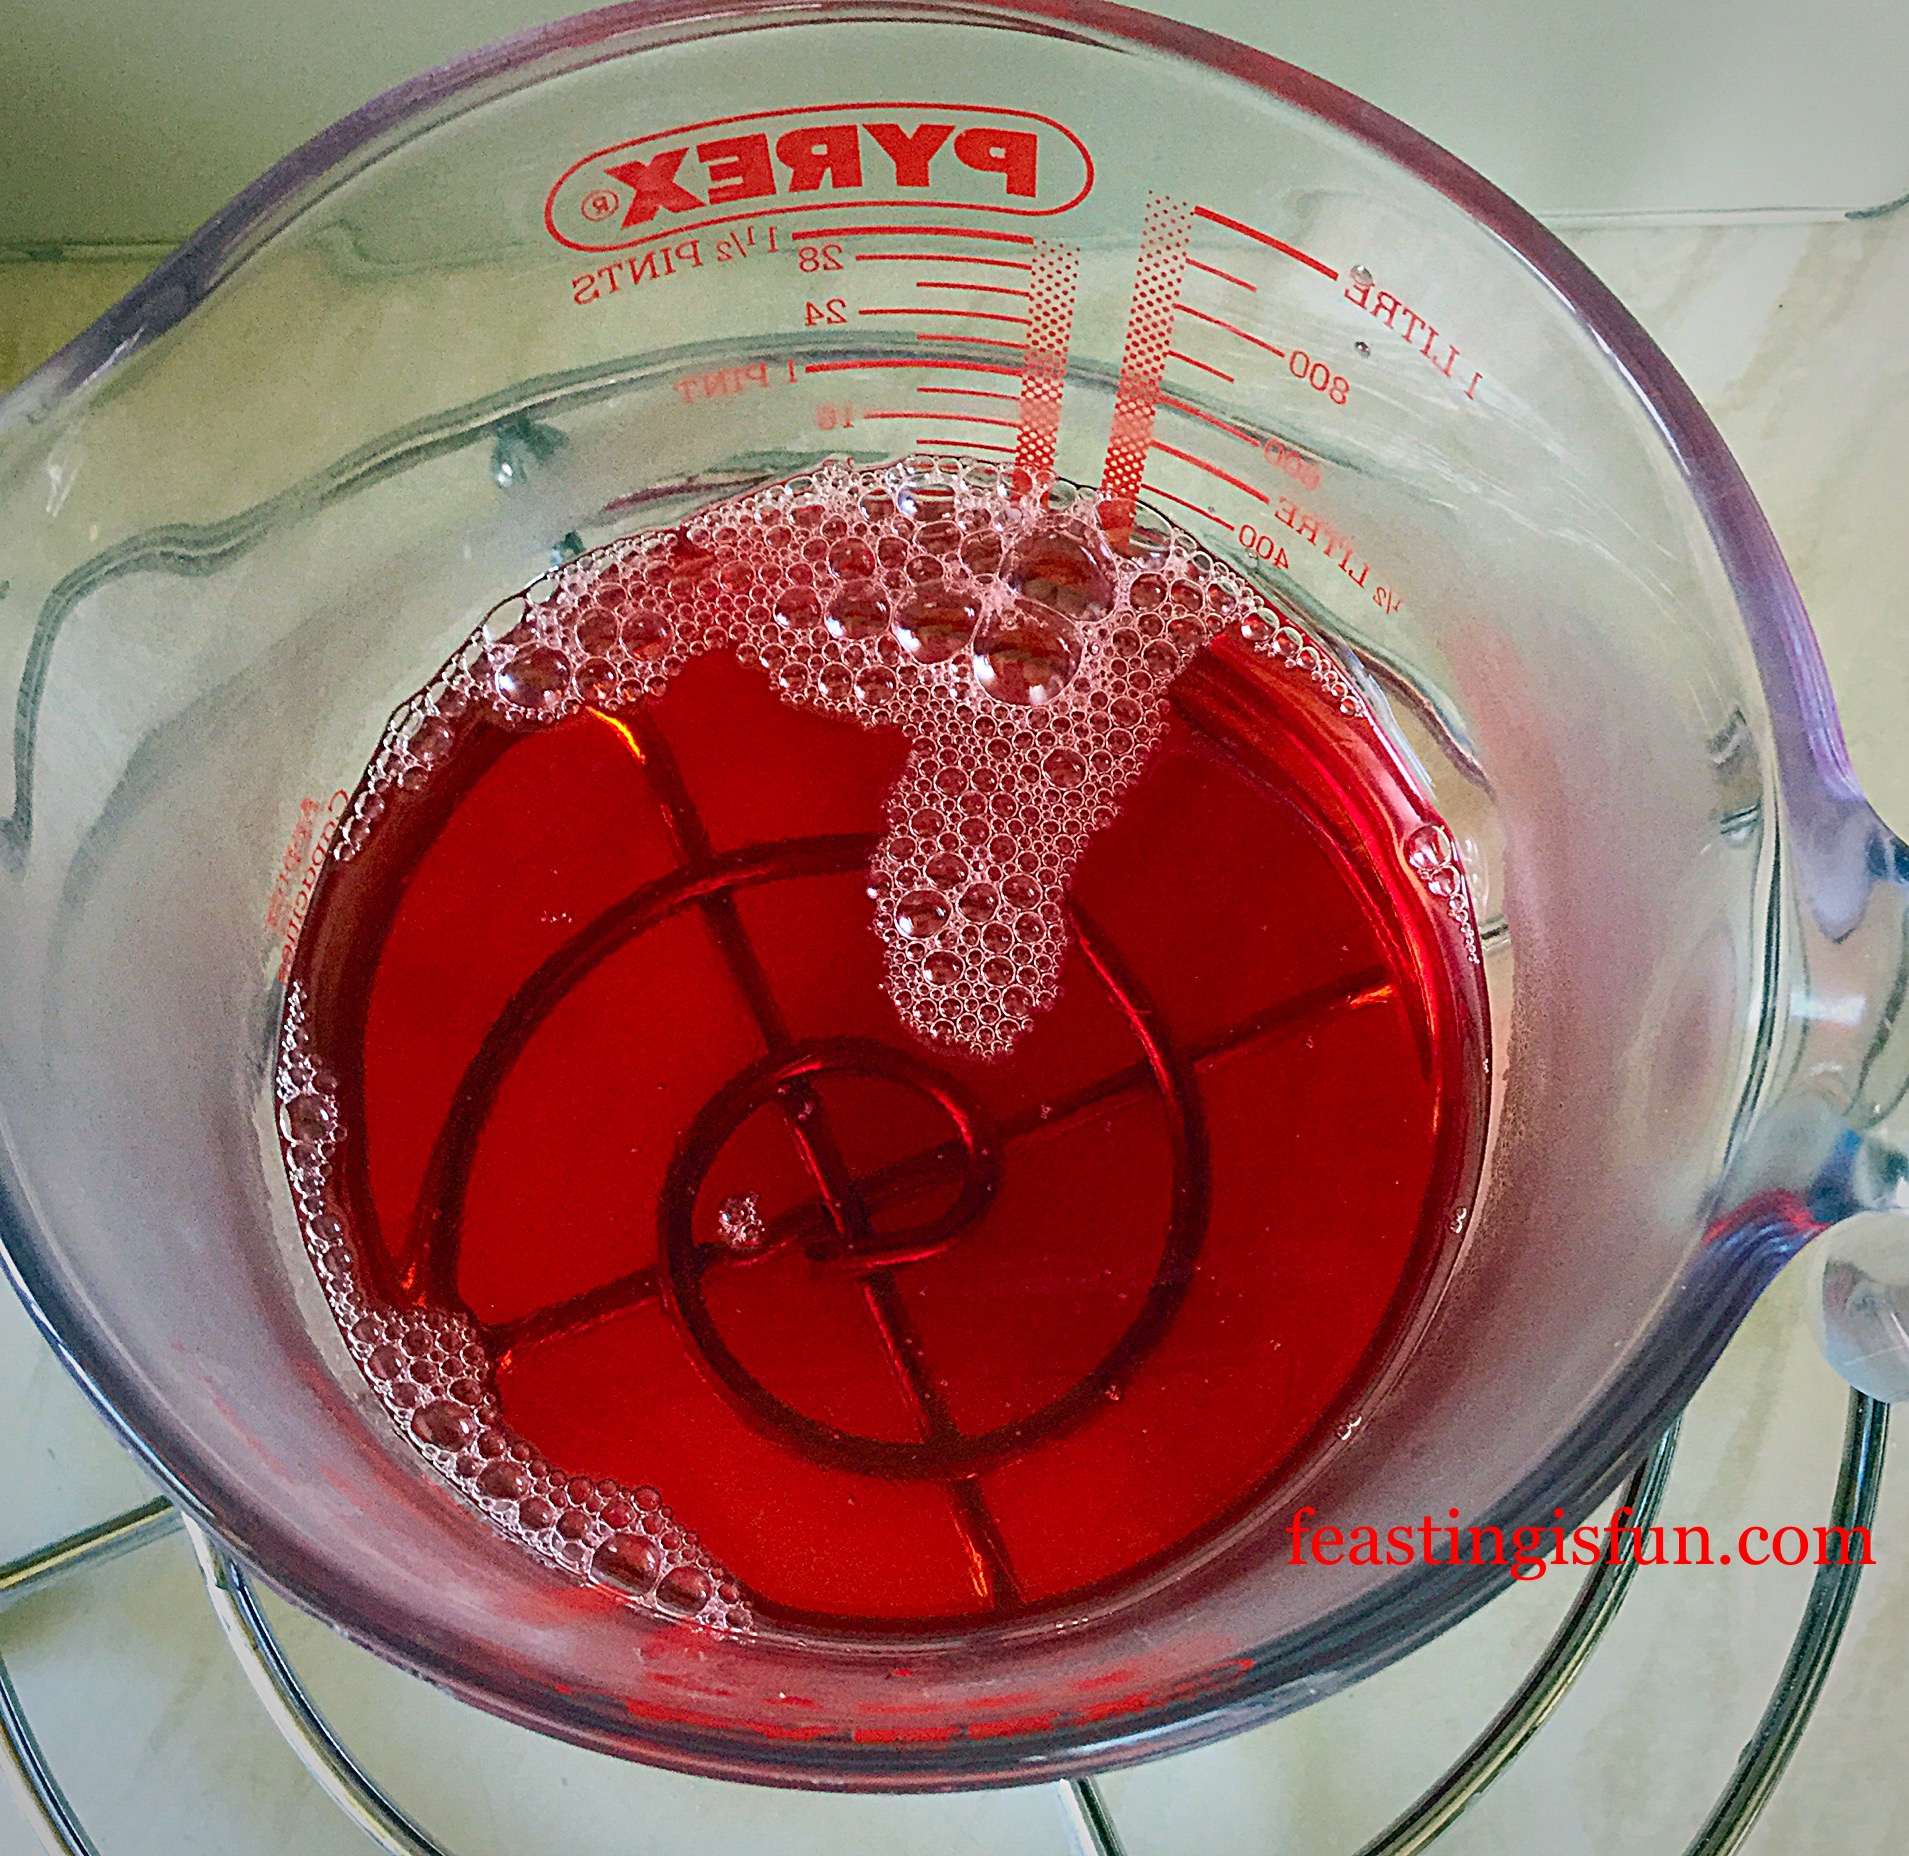
Approx 50ml Freshly Squeezed Lemon Juice – juice of 2 lemons

Approx 50ml of tap water to make up to 100ml with the lemon juice

100g/4oz Caster Sugar

2tbsp Limoncello – more can be added for a pronounced flavour if desired

Icing to Decorate the Cake

200g/7oz White Icing Sugar

Juice of one whole lemon – approx 30mls, make up to volume with water if needed

Optional – sprinkles and edible glitter – ensure they are gluten free

Method: Preheat the oven to 170C/150C fan, gas mark 3.5

  • Prepare the Bundt pan by spraying or brushing on cake release, ensuring every part of the inside of the pan is covered.
  • Into a large bowl add the butter, sugar and salt. Whisk/beat until pale and creamy.
  • Weigh the gluten free flour and sift into a separate bowl with the baking powder.
  • Add the 6 eggs to the butter/sugar mixture and 2 tablespoons of the pre weighed, sifted flour – this will stop the mixture from splitting, which can lead to a denser cake. Whisk/beat the eggs into the butter and sugar until you have a fully combined, light mix.
  • Add the rest of the flour/baking powder, the lemon extract, vanilla and lemon zest.
  • Using a metal spoon fold all the ingredients together until they are fully combined.
  • Spoon the cake batter into the prepared Bundt pan.
FF Boozy Lemon Drizzle Bundt Cake
Boozy Lemon Drizzle Bundt Cake ready for the oven.
  • Place the Bundt pan in the centre of the preheated oven and bake for 50-60 minutes.
  • Whilst the cake is baking make the drizzle:
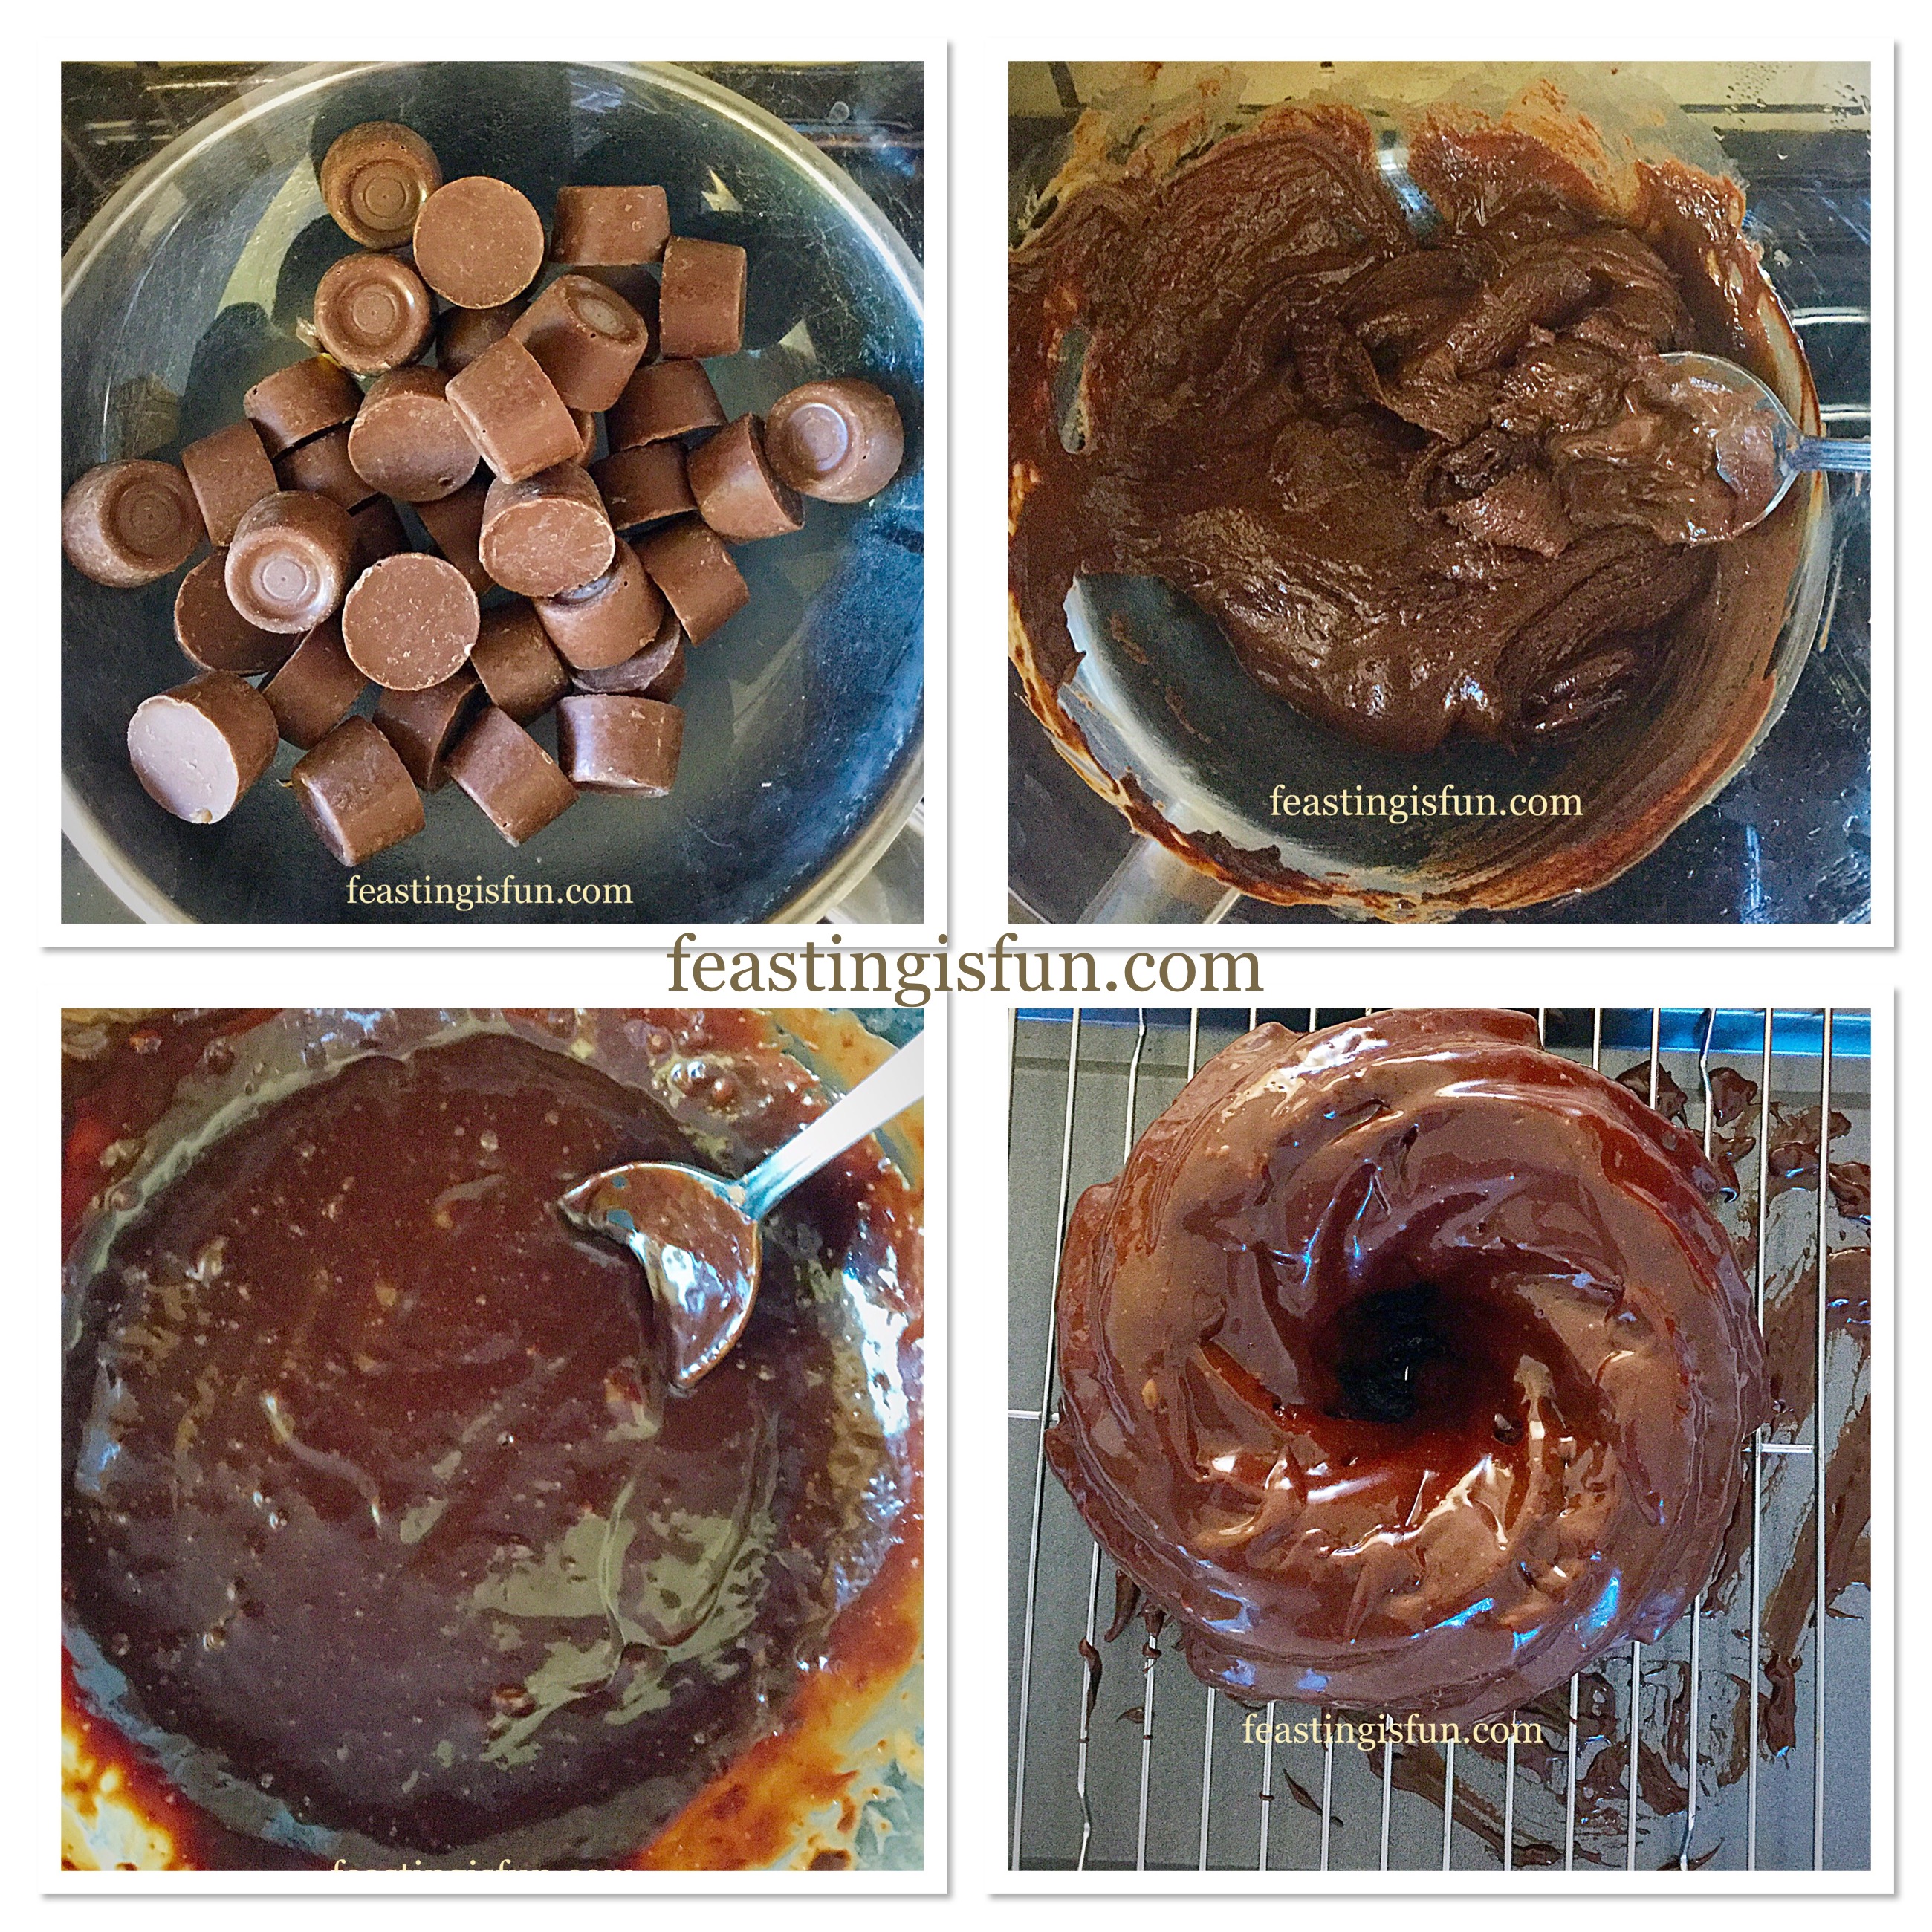
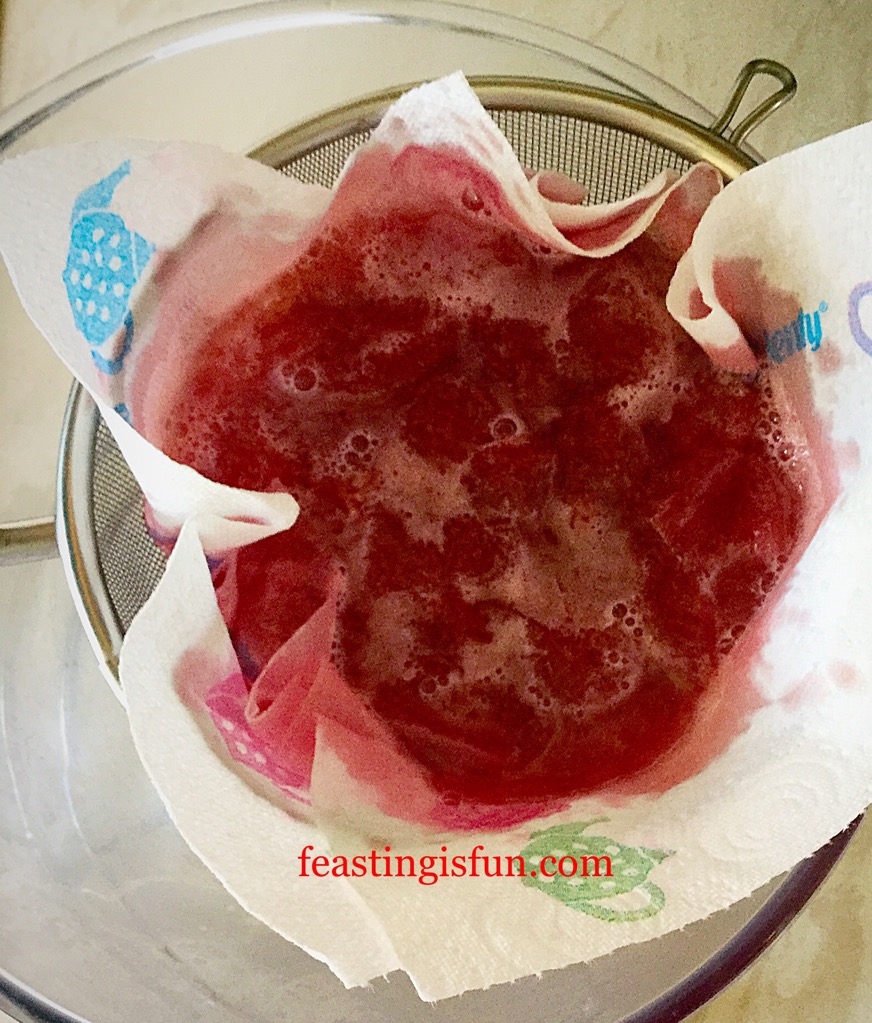
  • Squeeze the strained juice of 2 lemons into a measuring jug, make the volume up to 100ml with tap water. Place 100g of sugar into a small saucepan and add the lemon juice liquid to it. Swirl to mix and place over a medium heat. Do not stir! Swirl occasionally, until the sugar is fully dissolved and the liquid starts to bubble. Remove the saucepan from the heat. Add your desired amount of limoncello and place a lid on the saucepan.
  • The cake is cooked when it is golden in colour, coming away from the sides of the pan and an inserted skewer comes out clean.
  • Once baked remove the cake from the oven. Allow the cake to cool for 10 minutes in the Bundt pan.
  • After 10 minutes use a wooden skewer to create holes right through the cake. I poked approximately 25 holes in the cake, this will allow the syrup to moisten the entire cake, not just the bottom – remember the Bundt cake is upside down.
  • Drizzle over the warm, boozy, lemon syrup, making sure you cover the entire base of the cake.
FF Boozy Lemon Drizzle Bundt Cake
Piercing holes with a wooden skewer that allow the boozy lemon drizzle to soak through.
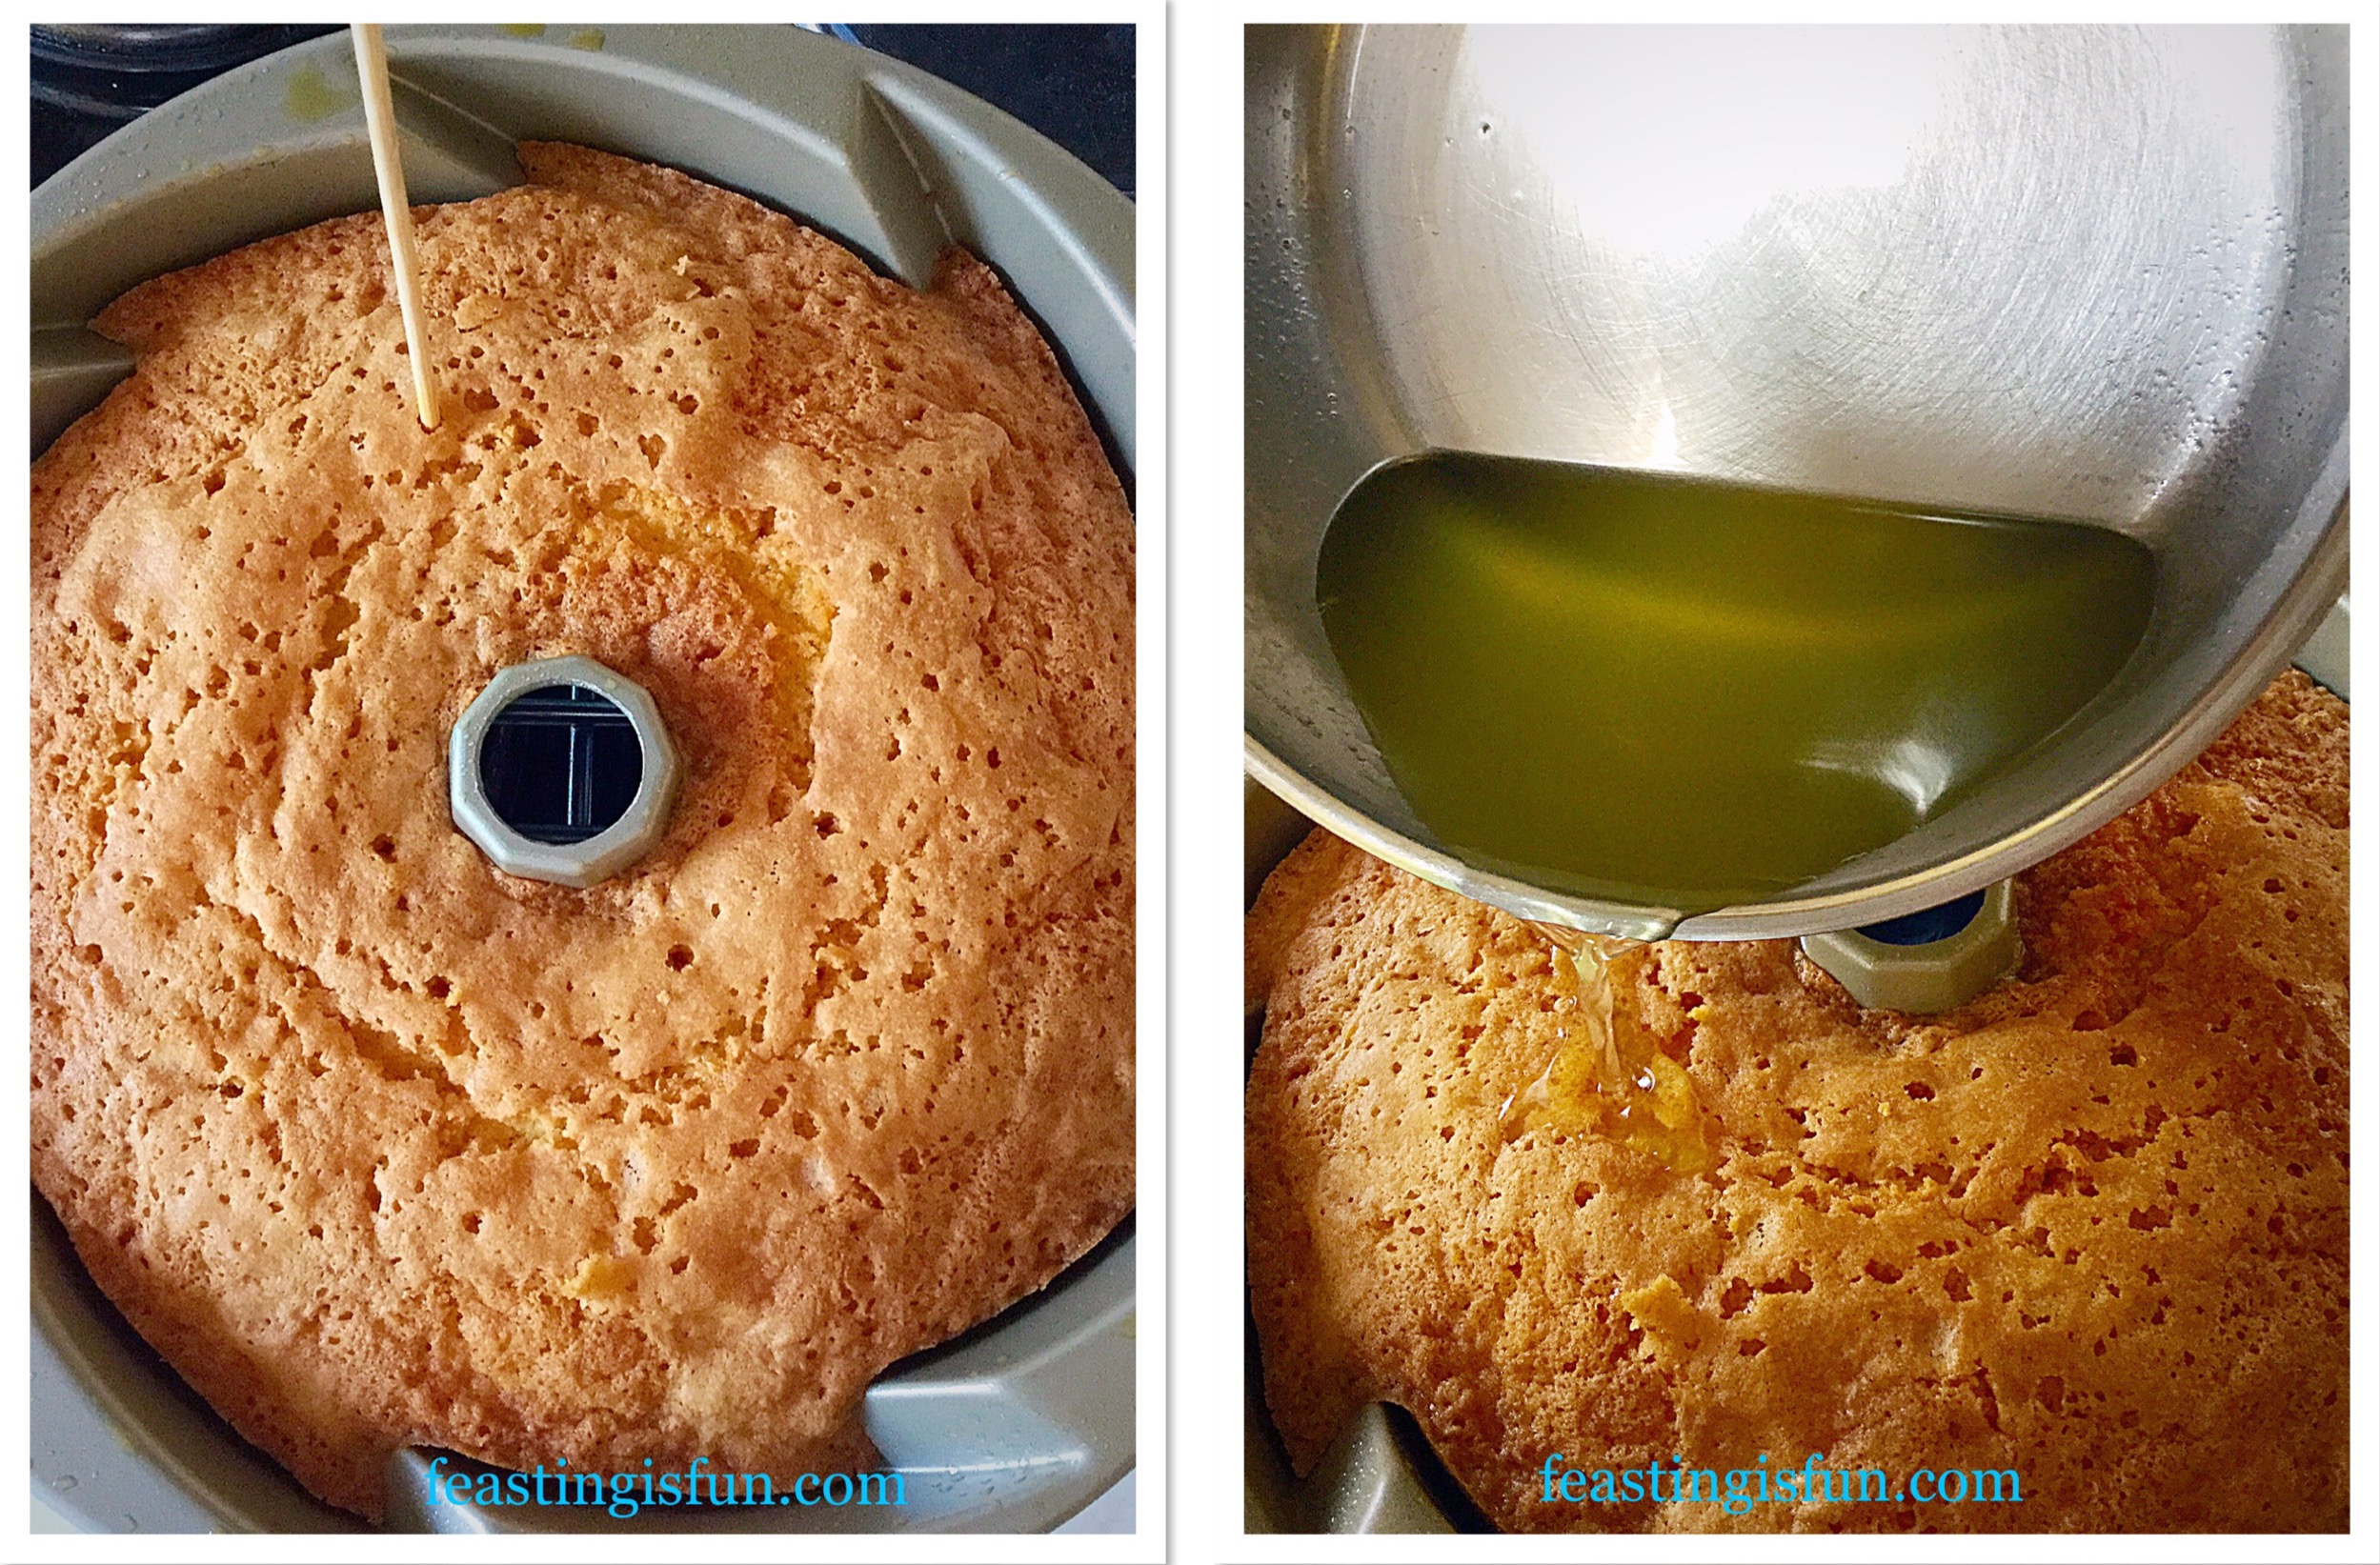
  • Leave the cake for a further 5 minutes in the pan, to allow the drizzle to soak right through to the top of the cake.
  • Now turn the Boozy Lemon Drizzle Bundt Cake out on to a cooling rack and allow to cool completely.
FF Boozy Lemon Drizzle Bundt Cake
Beautifully moist cake with clean, deep, swirling lines.

To Decorate the Boozy Lemon Drizzle Bundt Cake:

  • Sift the icing sugar into a bowl. Add 30mls of lemon juice and stir.
  • Add extra water to create a thick icing, that can still be piped.
  • Spoon the thick icing into a disposable piping bag (or piping bag fitted with a 3-4mm piping nozzle). Snip the end off of the disposable bag to leave a 3-4mm opening.
  • Place the cooling rack over a large baking tray – this will catch all the drips.
  • Starting from inside of the Bundt hole pipe the icing, following the lines of the swirl.  Keep the pressure steady and pipe into the groove of the swirl, finishing when you reach the edge. Pull the bag away from the cake and any excess icing will drip through the cooling rack.
  • Continue working around each swirl until the cake is completed.
FF Boozy Lemon Drizzle Bundt Cake
Boozy Lemon Drizzle Bundt Cake looks perfect just like this.
  • If adding sprinkles, either follow my design, adding them just away from the centre of the cake, or let your imagination take over and create your own design!
  • Finally add a dust of (I used) white edible glitter, to give your cake some added sparkle.
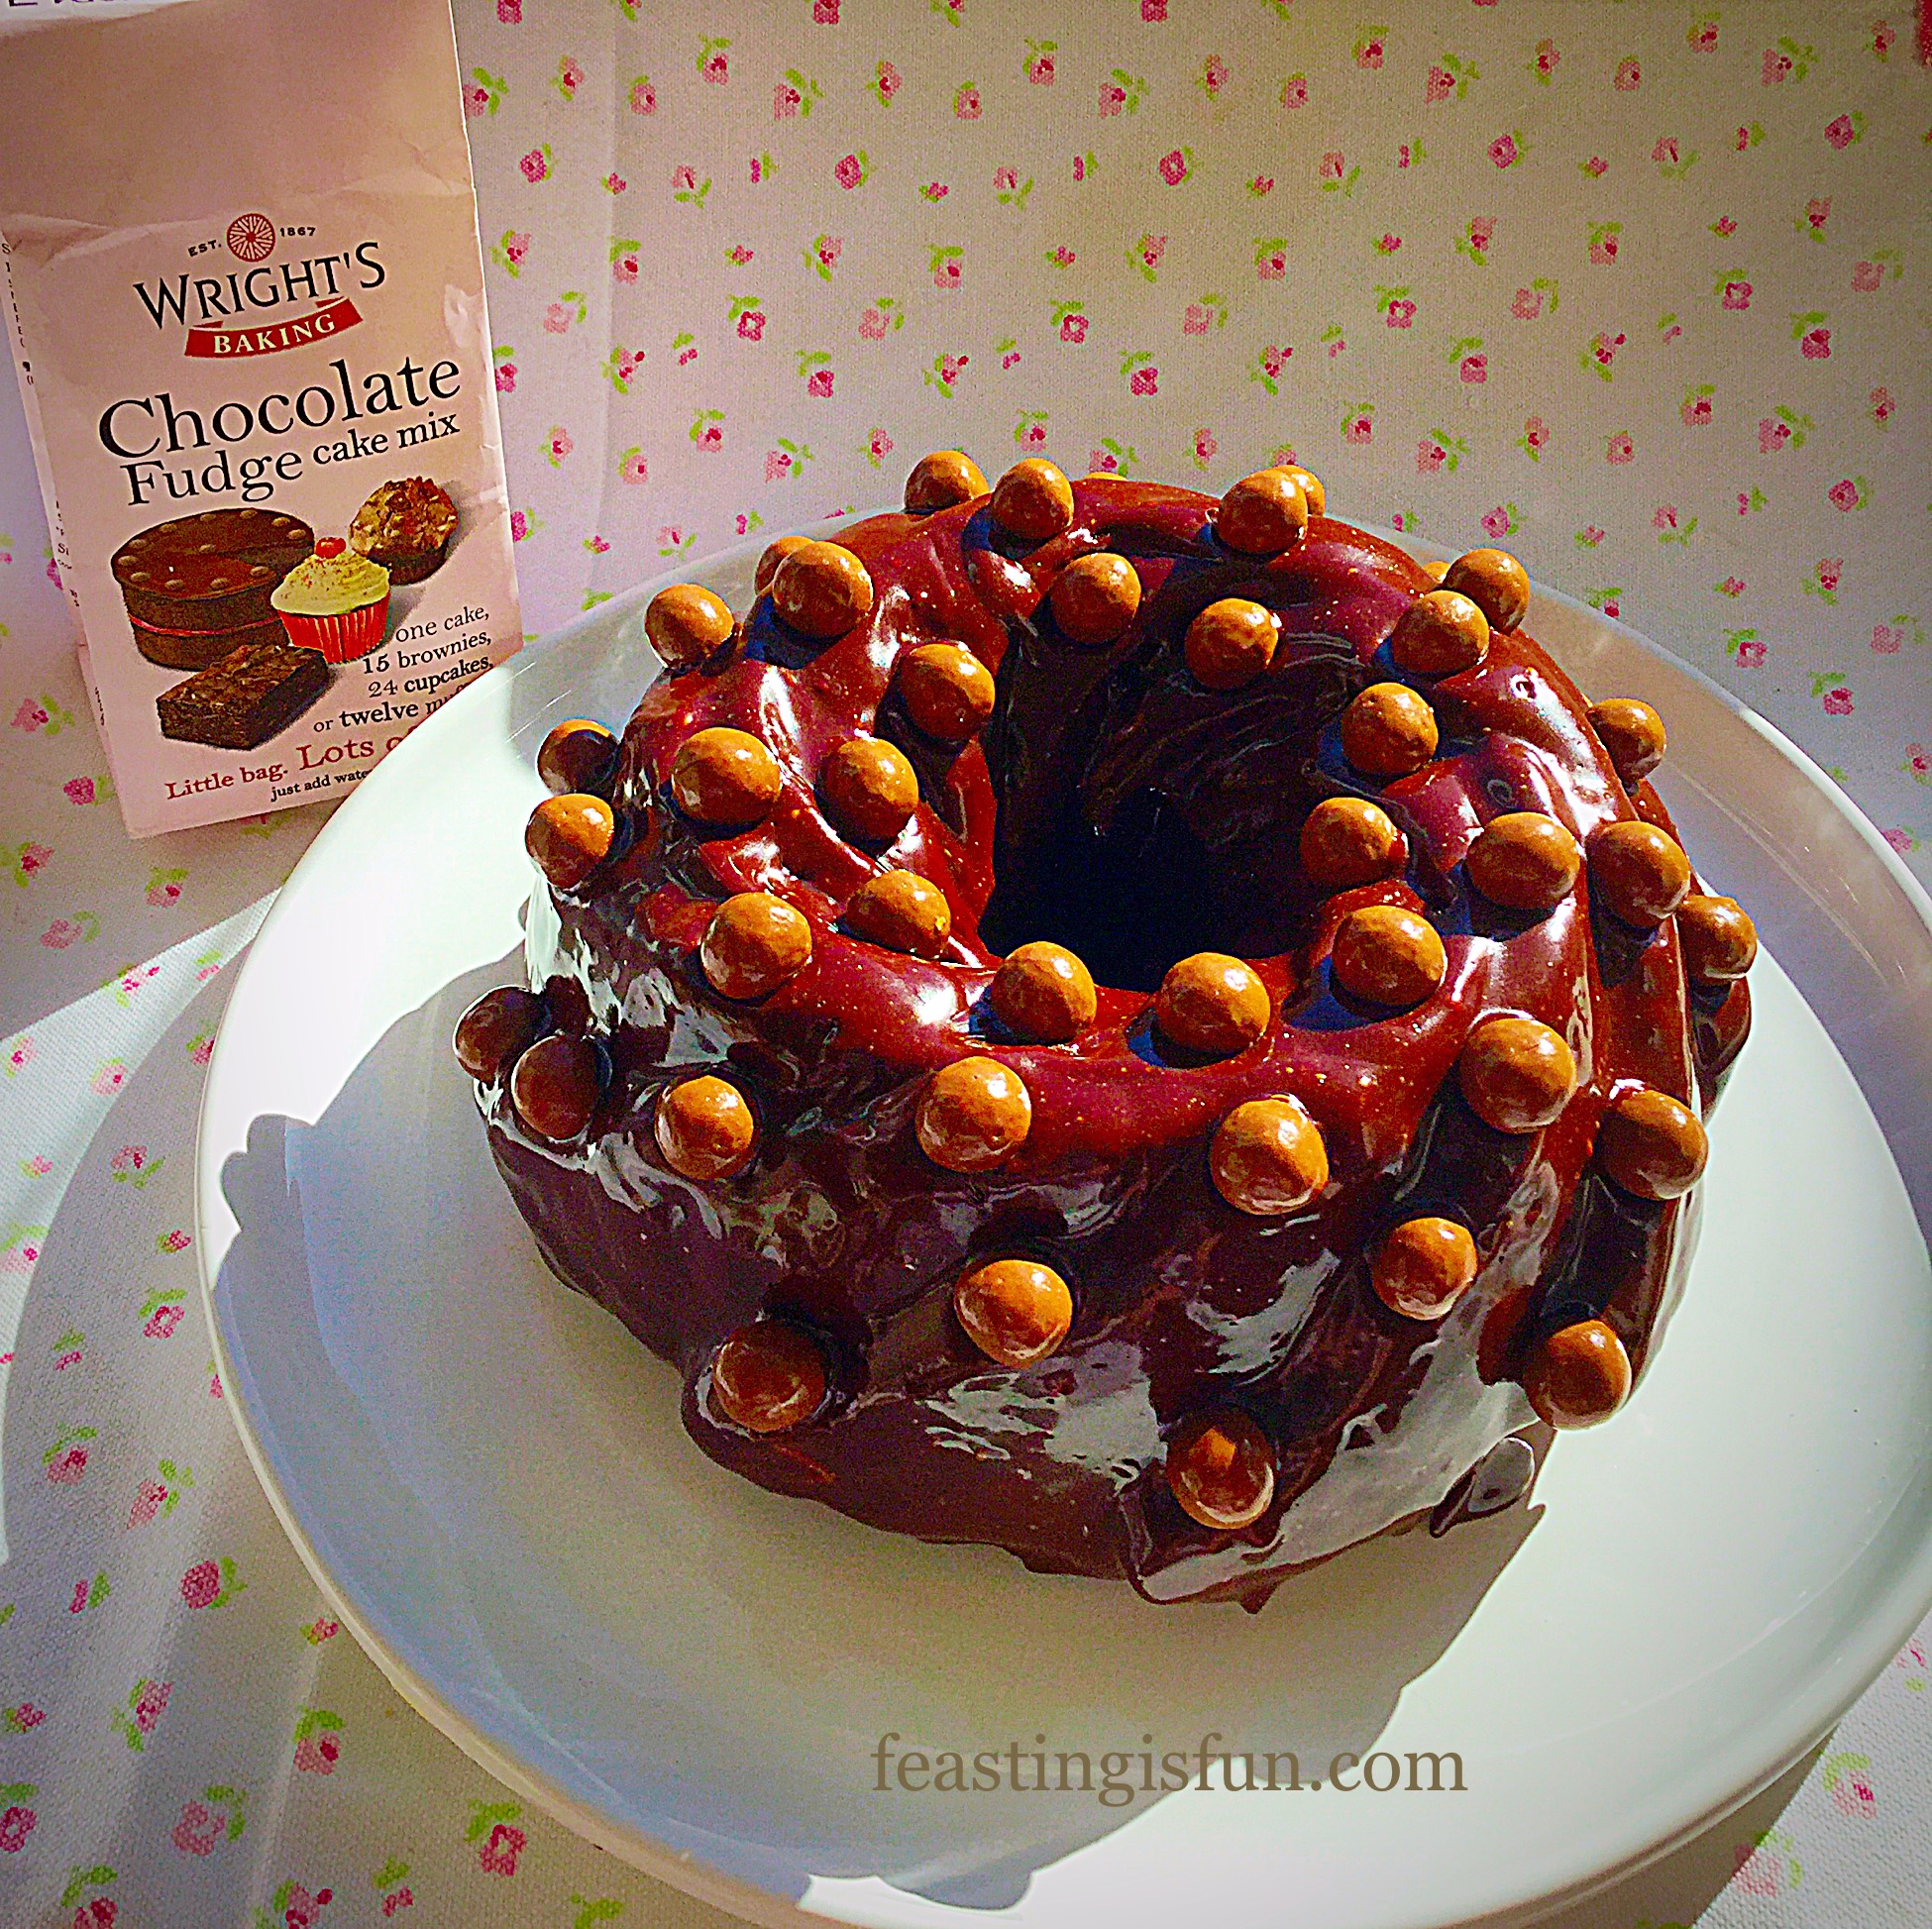
  • Carefully transfer the cake to a board/stand/plate.
FF Boozy Lemon Drizzle Bundt Cake
Boozy Lemon Drizzle Bundt Cake simply stunning to look at!

Take photos of your beautiful creation.

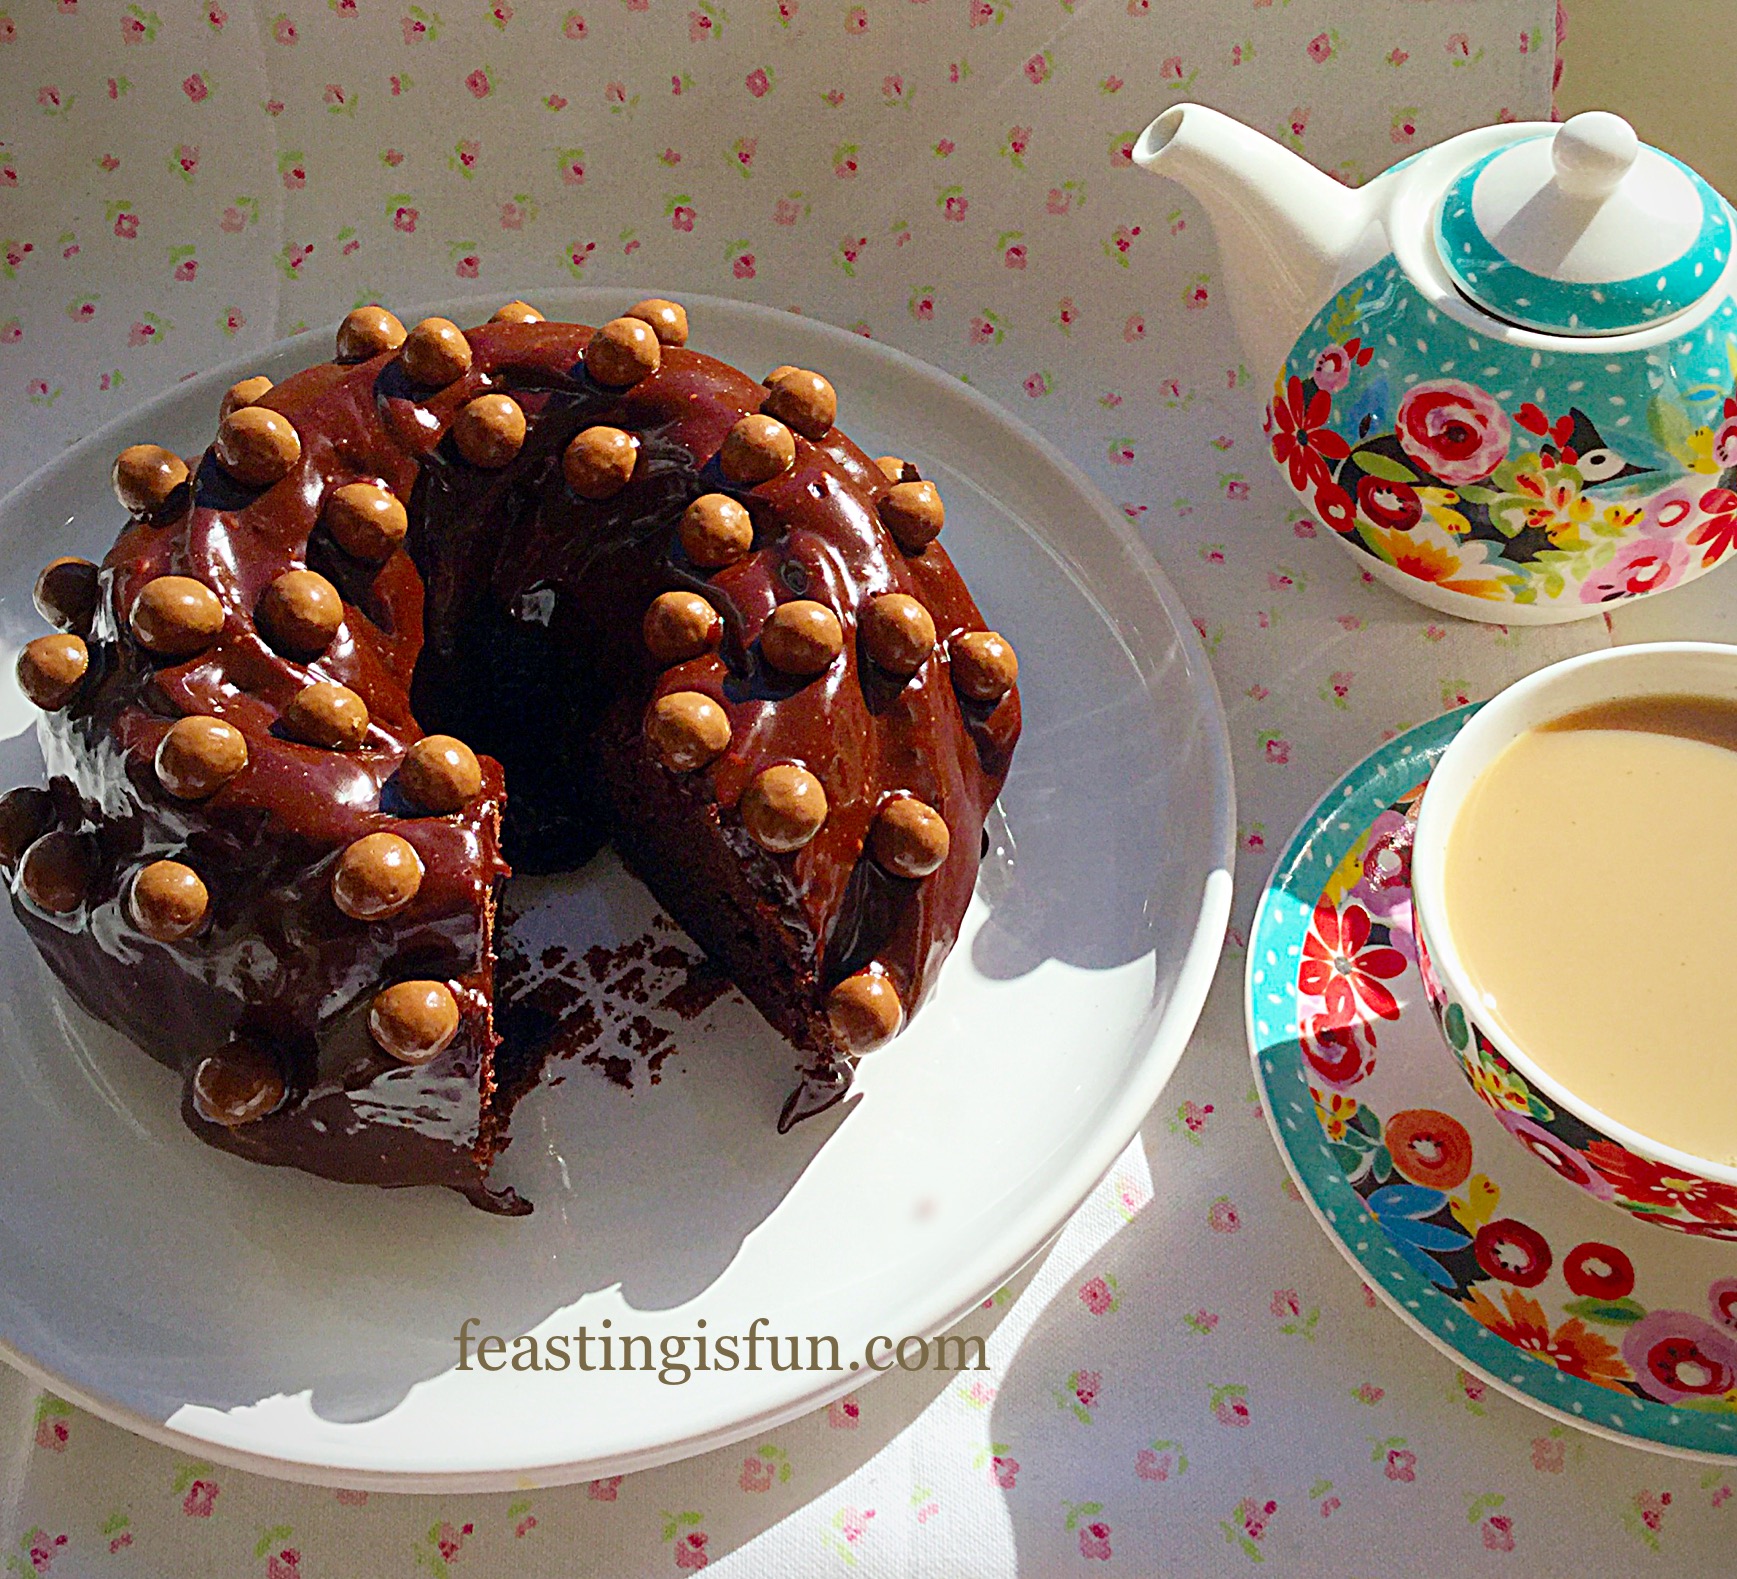
Then serve it sliced with a cup of tea or coffee, or if it’s adults only, a shot of limoncello alongside 😉.

FF Boozy Lemon Drizzle Bundt Cake
Boozy Lemon Drizzle Bundt Cake definitely made for sharing.

I am so pleased our daughter chose the light blue sprinkles for this cake. To be honest, it isn’t a colour I would put with a lemon cake and yet it looks so beautiful. She has a brilliant eye for design and I regularly ask her opinion on colour schemes/layouts and photographs for Feasting is Fun.

Thank you Star and very happy birthday.

If you have enjoyed this recipe for Boozy Lemon Drizzle Bundt Cake you may also like these:

Lemon Blueberry Bundt Cake

FF Boozy Lemon Drizzle Bundt Cake
Lemon Blueberry Bundt Cake.

Lemony Strawberry Pavlova

FF Boozy Lemon Drizzle Bundt Cake
Lemony Strawberry Pavlova also gluten free.

Swirl Lime Drizzle Cake

FF Boozy Lemon Drizzle Bundt Cake
Swirl Lime Drizzle Cake

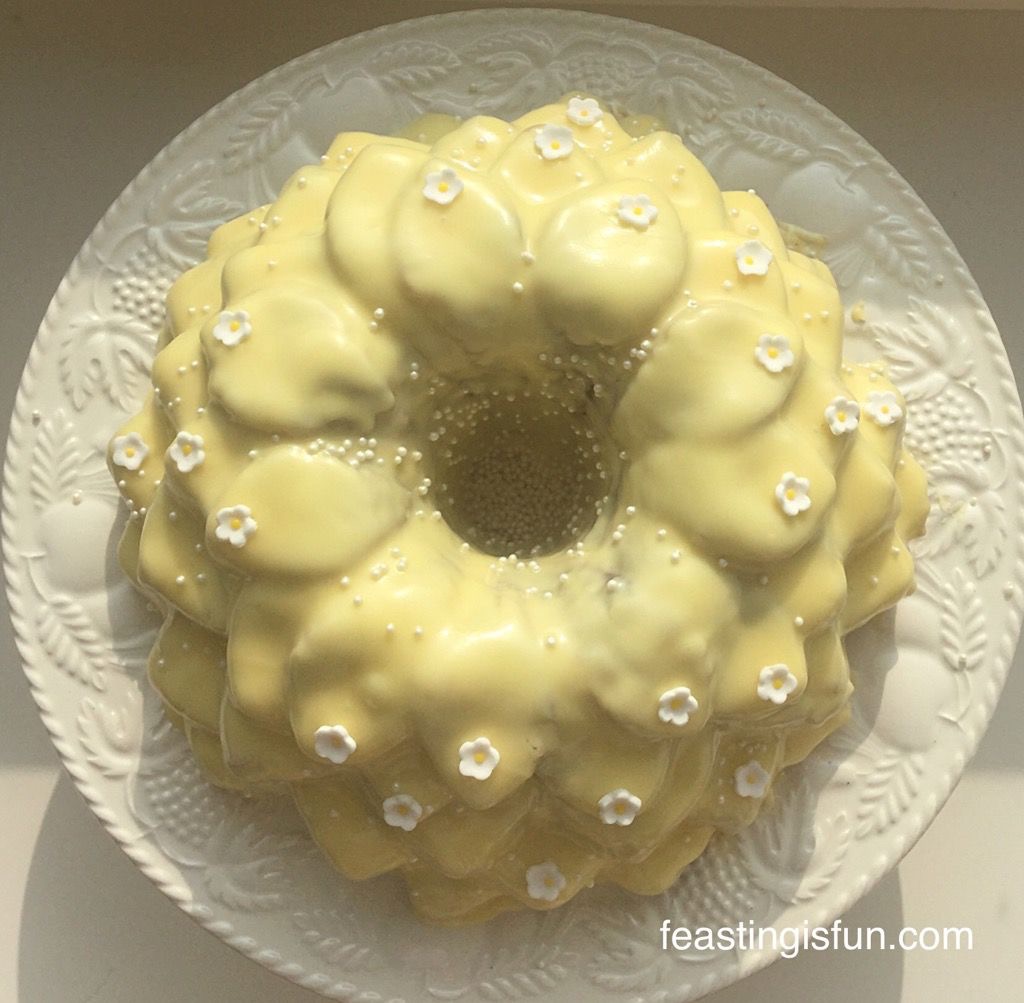
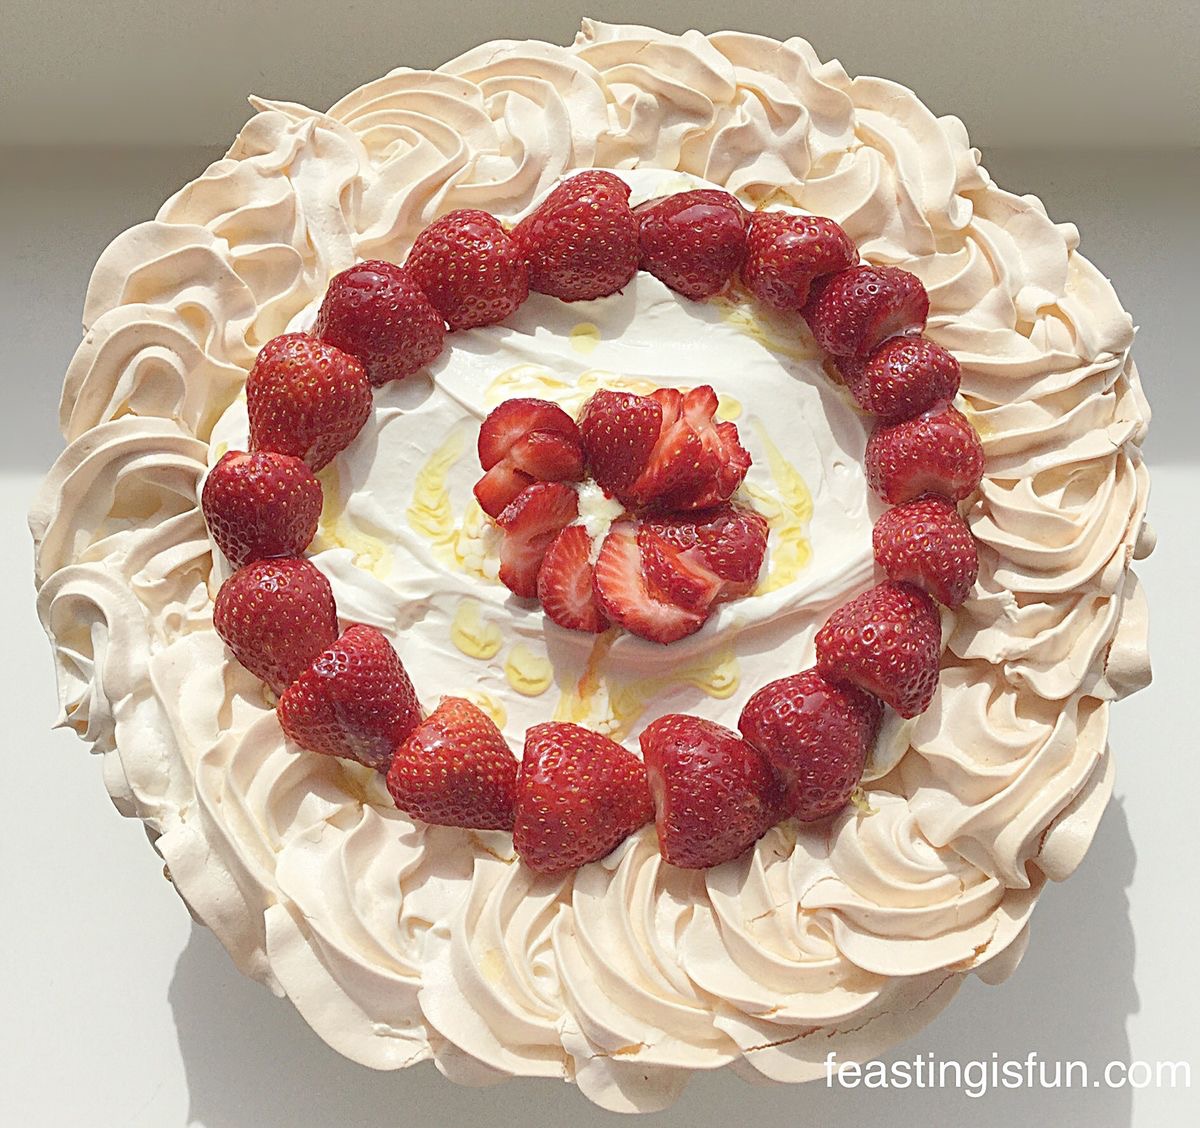
I have other gluten free cake recipes such as my Marshmallow Frosted Mango Cupcakes and my Strawberry Whipped Cream Giant Doughnut.

My aim is to make as many recipes as possible gluten free. Obviously this is going to take some time to retest recipes and make adjustments as needed.

Next on the agenda is cracking gluten free pastry. I’ve been asked many times for a recipe, so I will be working on that over the coming weeks.

Whatever you are making, baking and creating in your kitchens, remember food always tastes better when it’s shared. So why not invite your neighbours round for a cup of tea and a slice of something delicious?

Sammie xx

My Boozy Lemon Drizzle Bundt Cake has also been submitted for this weeks #GBBOTwitterBakeAlong on Twitter. Click on the hashtag on Twitter and join in the Baking Community fun!


Share
Facebooktwitterpinterestlinkedintumblr

Fruity Orange Waffles

Share
Facebooktwitterpinterestlinkedintumblr

Today is National Waffle Day – as if we need a special day to eat delicious waffles – right 😉? So in the true spirit of Feasting is Fun, I decided to test Wright’s Baking new Orange Cake Mix out in my waffle maker. Oh boy are you going to be glad I did. These Fruity Orange Waffles are simply amazing!

FF Fruity Orange Waffles
Fruity Orange Waffles delicious with ice cream.

Not only are they an absolute whizz to make – literally 2 minutes and you’ve got Fruity Orange Waffles batter ready to go, they cook beautifully in the waffle maker.

FF Fruity Orange Waffles
Fruity Orange Waffles an easy, delicious treat!

We had these for brunch this morning and I was so pleased I didn’t have to cook. Ok I switched the waffle maker on see Andrew James Waffle Maker Review, but it didn’t take long to cook 9 waffles from one packet of mx. Plenty for the four of us, oh and with a tub of homemade Very Vanilla Ice Cream, fresh oranges and strawberries. We had a Feast!

FF Fruity Orange Waffles
Fruity Orange Waffles perfect any time of the year.

It is now 30C outside – at least!

We may well be having waffles for dinner if the house gets any hotter!!

Recipe: Fruity Orange Waffles makes 8-10

1 Orange Cake Mix Packet from Wright’s Baking

100g Melted Unsalted Butter – cooled

200mls Tap Water

Method: Prepare your waffle maker according to it’s manufacturer’s instructions.

  • With my waffle maker I brush the cold waffle plates with cooled, melted butter, prior to heating, hence the additional butter in the recipe.
  • Switch the waffle maker on and allow to fully heat, until the ready light comes on.
  • Whilst the waffle maker is heating up, in a medium bowl add 200mls of water and 60mls of melted butter.
  • Next add the Orange Cake Mix and stir until the batter appears smooth – note, the cake batter has pieces of fruit in it so there will be small lumps, that is normal.
FF Fruity Orange Waffles
This is how the waffle/cake batter will look.
  • When the waffle maker is ready, remembering to protect your hands with oven gloves, open it and spoon a dessert spoon (like the spoon in the picture above) in the centre of each waffle plate.
  • Close the waffle maker and cook for exactly 4 minutes. It really is worth setting a timer, especially if in four minutes you get little jobs done in the kitchen! Just sayin’ I’ve not burnt a waffle yet – for a reason 😉.
  • After 4 minutes open the waffle maker (again protect yourself with gloves). The waffles will be fully cooked but not hard.
FF Fruity Orange Waffles
Fully cooked Fruity Orange Waffles ready to be removed from the waffle maker.
  • I use a wooden spatula to gently lift the waffle from the waffle maker. The Fruity Orange Waffles harden slightly on cooling and can easily be picked up by hand – just in case you want to try it dunked in your coffee/hot chocolate 😉.
  • Repeat the process of spooning batter on to the waffle plates until it is all used up.
  • Top Tip: I would much rather have a waffle with slightly frilled edges, where not quite enough batter has been added, than a perfectly square one with waffle batter oozing out of the side of the waffle maker. I got lucky with the waffles I made, cleaning gooey, stuck waffle batter is no fun!
FF Fruity Orange Waffles
Fruity Orange Waffles add ice cream, fresh fruit and your imagination!

These delicious Fruity Orange Waffles can be served warm or cold. They will keep for up to 3 days in an airtight container and can be popped in the toaster to warm up.

I like to serve these with cold vanilla ice cream and plenty of fresh fruit. You choose how to serve yours. They are deliciously light with delightful pieces of fruit that lend texture and extra flavour. If you like waffles you will love these.

If you have enjoyed the recipe for Fruity Orange Waffles you may also like these:

Toffee Banoffee Waffles

FF Fruity Orange Waffles
Toffee Banoffee Waffles also made using Wright’s Toffee Cake Mix.

Chocolate Dunking Waffles

FF Fruity Orange Waffles
Chocolate Dunking Waffles everyone should try these at least once in their lives.

Vanilla Bean Waffles

FF Fruity Orange Waffles
Vanilla Bean Waffles so delicious and versatile.

Waffles are such an amazingly fun food. They can be sweet or savoury and topped with a myriad of different things. Let your imagination run wild and make waffles. Not just because it is National Waffle Day, but because they are so much fun and so tasty!!

Sammie xx

Wright’s Baking  provided me with the cake mix to make these waffles. All opinions, views, content and photography are my own. I was not paid to write this post please see my Disclosure Policy.

Share
Facebooktwitterpinterestlinkedintumblr

New Berry Fruits Ice Cream

Share
Facebooktwitterpinterestlinkedintumblr

Tutti fruity. Does anyone else remember that ice cream flavour? Or am I showing my youth 😉. Well that’s what I was aiming for when I created this New Berry Fruits Ice Cream, except……….. it is so much better than I ever remember. The jelly sweets have a true, intense, fruity flavour, that doesn’t diminish when frozen AND they stay chewy!

Win Win.

FF New Berry Fruits Ice Cream
New Berry Fruits Ice Cream so intensely fruity and delicious.

Each 100g box of New Berry Fruits contains 8 individual jelly sweets with a liquid centre and a crunchy, sugary coating.

FF New Berry Fruits Ice Cream
New Berry Fruits beautifully packaged and incredibly tasty.

These jelly fruits with the liquid centre are unbelievably good. Intensely fruity, chewy, hidden nectar in the centre. If you love sweets, you really need to try these.

As I am allergic to orange, I left them out of the ice cream. If you love orange they will totally work with all the other New Berry Fruits in the ice cream base that I’ve created.

FF New Berry Fruits Ice Cream
New Berry Fruits Ice Cream 2 Scoops and it was all mine 😉

To make this recipe you will need 2 boxes of New Berry Fruits. We are very honest here at Feasting is Fun, it is acceptable for one or three jellies to ‘go missing’ during the making of this New Berry Fruits Ice Cream. That’s all part of the fun and the ice cream will taste just as good.

You will also need both lemon and rose extract. You only need a little bit of each, however, they are what give this fruity ice cream it’s fantastic background flavour. I have other recipes that use the extracts, so it really is worth buying them. I only use Nielsen-Massey extracts and they are available in most major supermarkets as well as online.

FF New Berry Fruits Ice Cream
New Berry Fruits Ice Cream it may be worth making a double batch as it is soo good!

Time to show you how to make this cooling, fruity treat.

Recipe: New Berry Fruits Ice Cream makes 750ml approx.

2 Boxes of New Berry Fruits

300ml/ 1/2pint Double Cream

300ml/ 1/2pint Milk – Whole or Semi Skimmed

1/4tsp Lemon Extract

1/4tsp Rose Extract

1tsp Vanilla Extract

4 Large Free Range Egg Yolks – the whites can be frozen for up to 1 month

1tsp Corn Flour – also known as corn starch

4tbsp Caster Sugar

Method: Ensure the cooling ‘bowl’ of your ice cream maker has been in the freezer for at least 8 hours, ideally overnight, or as per manufacturer’s instructions.

Note: For photographic step by step instructions on how to make the custard base for the ice cream please see Very Vanilla Ice Cream.

  • Pour the milk and cream into a heavy bottomed saucepan over a medium heat.
  • Bring the liquid to scalding point – this is just before it boils, there will be a ring of bubbles that appear around the edge of the liquid. Once the bubbles appear remove from the heat.
  • Whilst the milk/cream is heating, into a large bowl add the egg yolks, corn flour, sugar and vanilla extract. Whisk until pale, thick and creamy.
  • With the mixer on slow, slowly add the scalded cream mixture to the egg mix, constantly mixing.
  • Tip the contents of the bowl back into the saucepan, over a low heat.
  • Stir until the custard ice cream base has thickened and coats the back of a wooden spoon. The base is now cooked.
  • Pour the custard base through a sieve into a clean bowl – I generally quickly wash up the original bowl that I was using.
  • Cover the top of the custard base with cling film, so that it is in direct contact. This stops a skin from forming.
FF New Berry Fruits Ice Cream
The custard base is cooling ready for it’s extra flavour boost!
  • Allow the custard base to cool slightly and then chill in the fridge.
  • Once chilled add 1/4 teaspoon of both lemon and rose extract. Stir to mix.
  • Set up your ice cream maker and then pour in the custard base and switch the machine on.
  • Whilst the ice cream is churning and freezing, chop each New Berry Fruit into 4 pieces.
FF New Berry Fruits Ice Cream
Chopped up New Berry Fruits ready to add to the frozen ice cream.
  • When the ice cream is thickly frozen, switch off the machine, remove the top and paddle and using a silicone spatula scoop the fruity flavoured ice cream into a freezer proof tub.
  • Add the chopped New Berry Fruits and stir with a spoon to distribute evenly throughout the ice cream.
FF New Berry Fruits Ice Cream
New Berry Fruits Ice Cream mixing in the delicious jellies.
  • Pop an air tight lid on to the tub and place in the freezer until frozen solid.
  • To serve remove the ice cream from the freezer 10-15 minutes prior to scooping this will allow it to soften a little.

This is a fun ice cream so scoop your New Berry Fruits Ice Cream into cones or waffle cups and enjoy the amazing flavours and chewy jellies.

FF New Berry Fruits Ice Cream
New Berry Fruits Ice Cream fruity luscious fun.

Oh this New Berry Fruit Ice Cream is so berry, berry good! The fabulous fruity background flavour of the ice cream works beautifully with the intense bursts of fruity, chewy flavour.

New Berry Fruits are widely available online and at Waitrose.

If you have enjoyed this recipe for New Berry Fruits Ice Cream you may also enjoy these:

Lemon Ripple Ice Cream

FF New Berry Fruits Ice Cream
Lemon Ripple Ice Cream

Strawberry Ripple Ice Cream

FF New Berry Fruits Ice Cream
Strawberry Ripple Ice Cream

Refreshing Tropical Fruit Sorbet

FF New Berry Fruits Ice Cream
Refreshing Tropical Fruit Sorbet

Fruity, delicious, homemade ice creams and sorbet. You know exactly what has gone into each batch you make. Perfect for those following a gluten free diet, just ensure that your corn flour is certified gluten free. Whilst the sorbet it is both gluten and dairy free.

If you haven’t ever tried making your own ice cream at home, I hope I’ve encouraged you to have a go. It is so much fun coming up with new flavour combinations. I really wouldn’t be without my Andrew James Which Best Buy, ice cream maker. I’ve said before that an appliance has to earn it’s place in my kitchen. This summer alone I must have made 30 plus new ice cream recipes. Not all are on here – yet 😉!

Sammie xx


Share
Facebooktwitterpinterestlinkedintumblr

Dreamy Chocolate Fudge Cake

Share
Facebooktwitterpinterestlinkedintumblr

Dreamy Chocolate Fudge Cake, the softest chocolate fudge cake, draped in a chocolate fudge icing and adorned with chocolate caramel biscuit balls.

Do you ever dream of chocolate? I do! While making and then tasting this recipe there was only one name that fitted the incredible flavour, taste and texture experience, that is this Dreamy Chocolate Fudge Cake.

FF Dreamy Chocolate Fudge Cake
Dreamy Chocolate Fudge Cake every bit as good as it looks.

So, this incredibly tasty cake was made using  Wright’s Baking Chocolate Fudge Cake Mix. Alternatively, there’s a link in the recipe below for a great chocolate cake made from scratch.

Also, I love to have a few Wright’s Baking Mixes on hand, especially for days like today.

FF Dreamy Chocolate Fudge Cake
Dreamy Chocolate Fudge Cake

Getting Back To Baking

Having just spent 2 whole days, floored by the monster of all migraines, today I was able to get up. So, if you too suffer with migraines, you may find this helpful Migraine Not Always Sunshine And Roses.

My therapy, comfort and pleasure is to bake and cook. Yet baking a cake, from scratch today was beyond me. So instead I used my trustworthy packet mix to create this Dreamy Chocolate Fudge Cake.

And yes, you may thinks I’m nuts, wanting to bake after spending the weekend in pain, in bed, with the curtains closed. For me though, being in the kitchen is freeing. Since my creativity is allowed to run wild. And for the record I had absolutely no idea if I could pull off the icing, yet that’s part of the thrill. If it hadn’t of worked I’d have switched to plan B.

FF Dreamy Chocolate Fudge Cake
Dreamy Chocolate Fudge Cake

A Dreamy Chocolate Cake

Ooh this cake is good.

Really, really good.

So, if you have a boyfriend/girlfriend and you want to impress them, I mean I’m not guaranteeing a marriage proposal, but, this is the cake you need to make them, or anyone you know who loves really good chocolate cake, that you simply want to treat.

And as I have said it before and I’ll say it again the Wright’s Baking Mixes that I’ve used taste like homemade. In fact I’m already wondering how I can make a cake this delicious from scratch, because at the moment I don’t have a recipe to match this. Probably the closest recipe, would be my Chocolate Fudge Bundt Cake.

FF Dreamy Chocolate Fudge Cake
What you’ll need for this Dreamy Chocolate Fudge Cake.

So I found these new McVities Digestive Caramel Nibbles and they work perfectly on the cake. The contrast between soft fudgey cake/icing and crunchy biscuit balls is fabulous, however, if you can’t get hold of them I’d suggest Malteser’s or Minstrel’s. Since both would work well with the flavour of the cake and give that additional crunch!

Recipe: Dreamy Chocolate Fudge Cake serves 8-10

Oil or melted butter to grease the tin -approx 2 tablespoons – I used melted butter

1 Packet Chocolate Fudge Cake Mix from Wright’s Baking  – alternatively use this recipe for Chocolate Fudge Bundt Cake

60ml Melted Butter or Vegetable Oil – I use melted unsalted butter

200ml Water

For the Chocolate Fudge Icing:

4 Packets of Rolo’s

100g Dark Chocolate

100ml Double Cream

To Decorate:

1 Packet Digestive Caramel Biscuit Balls from McVities 

Alternatively use Maltesers, chocolate sprinkles, or whatever you fancy!

Method: Preheat the oven to 160C/140C fan gas mark 3, 325F

Making The Cake Batter

I use a silicone Bundt style mould, you can use a standard 20cm/8″ round cake tin.

  • First of all, grease your mould/tin well. I prefer to use melted butter and apply it with a pastry brush.
  • Place the silicone mould on to a baking tray for stability.
  • In a large bowl add the water, oil and cake mix and whisk according to the packet instructions.
  • Pour the smooth, chocolate cake batter into the prepared mould/tin, wiping away any splashes or spills.
FF Dreamy Chocolate Fudge Cake
Dreamy Chocolate Fudge Cake ready for the oven.

Baking The Chocolate Cake

  • Place the cake into the middle of the oven and bake for 50-60 minutes.
  • Check the cake at 45 minutes. The cake is baked when an inserted skewer comes out clean. My cake took 50 minutes to bake.
  • As soon as the cake is baked remove from the oven an allow to cool in the mould/tin for 10 minutes.
  • Turn the cake out onto a cooling rack and allow to cool completely.
FF Dreamy Chocolate Fudge Cake.
Dreamy Chocolate Fudge Cake cooled and ready to be iced.

To make the Chocolate Fudge Icing:

  • Place a small saucepan with an inch of water in the bottom over a medium heat.
  • Place a heatproof, I use Pyrex, bowl on top of the saucepan ensuring that the bottom of the bowl doesn’t touch the water.
  • Add the Rolo’s, chocolate and cream to the bowl.
  • Stir until you have a melted, glossy chocolate fudge icing.
FF Dreamy Chocolate Fudge Cake
Steps showing the chocolate fudge icing being made and then covering the cake.

Covering The Cake In Icing

  • Place the cake on a rack that fits over a clean baking tray. The idea being that as the icing drips through to the tray it can be scooped up with a spoon and poured back over the cake.
  • Start at the centre of the cake, evenly spooning the thick, fudgey icing around the middle and gradually turning the cake to ensure little air holes, that appear, are covered.
  • Continue spooning the icing around the cake – I actually turn the whole tray/rack around so that I can get a clear view.
  • When all the icing from the bowl has been used the cake should be 3/4 covered.
  • Scoop the remaining icing from the tray underneath the cake – you should be able to slide the cooling rack along the tray – spooning the remaining icing over the last remaining parts of exposed cake.
  • Allow the cake, once covered to sit on the rack for 10 minutes, you’ll be surprised how the definition of the swirls become visible again.

Decorating The Cake

  • Use 2 flat implements, for example a fish slice and palette knife, to transfer the cake to a plate or cake board.
  • Again, starting in the centre and take care to keep to the symmetry of the mould, add the caramel biscuit balls. Since I prefer to complete the centre then decorate each swirl.
FF Dreamy Chocolate Fudge Cake
Dreamy Chocolate Fudge Cake beautiful and delicious.

Finally, the cake is ready to serve straight away, although it can also be chilled for a thicker, denser ganache finish. Although I wasn’t prepared to wait! While the only thing this cake needs is a good cup of tea to accompany it, ooh and preferably the love of your life, or family and friends to share it with.

Unless you’ve had a really, really bad day!

FF Dreamy Chocolate Fudge Cake
Dreamy Chocolate Fudge Cake, who will you share it with?

If you have enjoyed this recipe for Dreamy Chocolate Fudge Cake then you may like these:

Swirl Lime Drizzle Cake

FF Dreamy Chocolate Fudge Cake
Swirl Lime Drizzle Cake

White Chocolate Swirl Fudge Cake

FF Dreamy Chocolate Fudge Cake
White Chocolate Swirl Fudge Cake

Black Forest Giant Doughnut

FF Dreamy Chocolate Fudge Cake
Black Forest Giant Doughnut

I love how making a cake feels like a feast. Because it always feels like a celebration, even if you are having it for Afternoon Tea on a Sunday.

Whatever you are making, baking and creating in your kitchens, have fun and remember food always tastes better when it is shared!

Sammie xx

Wright’s Baking provided me with the mix to make this cake. All content, views, opinions, photographs and recipes are my own. I was not paid to write this post. Please see my Disclosure Policy.

Share
Facebooktwitterpinterestlinkedintumblr

Franklin’s Drinks Review

Share
Facebooktwitterpinterestlinkedintumblr

Franklin’s Drinks Review, a thorough honest look at Franklin & Son’s soft drinks and mixers, with a fabulous mocktail and boozy sorbet recipe included.

FF Franklin's Drinks Review
Franklin’s Drinks Review Sicilian Lemonade with Elderflower so refreshing.

Firstly, I really need to say that this was one of the best reviews I’ve ever undertaken.

Carrying out the Franklin’s Drinks Review has been an absolute pleasure. Not only were the company a delight to deal with their product completely wipes out the competition in terms of taste, variety and drink-ability.

FF Franklin's Drinks Review
Franklin’s Drink Review who remembers Dandelion and Burdock from their childhood?

Gone are the sticky, sickly sweet soft drinks that line supermarket aisles. In their place we have a company founded by three brothers in 1886, creating soft drinks and mixers using real fruit juice. Each soft drink and mixer easily drinkable on it’s own, or with the mixers a multitude of cocktails, classics and creative new possibilities abound.

Franklin & Son’s is a British Company producing the very best drinks using natural ingredients. No artificial additives, preservatives or colours are allowed into their drinks and they taste all the better for it.

FF Franklin's Drinks Review
Franklin’s Drinks Review the perfect G & T with Franklin’s Natural Tonic Water.

I was sent 5 different flavours of soft drink and 3 different mixers. It should be noted before I go any further that, I have never liked tonic water – until now!

Franklin’s Soft Drinks:

Sicilian Lemonade and Elderflower with crushed juniper – ooh if you like lemonade you will love this. The juniper hits your nose as you breath in the tantalising aroma. Once sipped, the tart lemon, which in my humble opinion should be how all lemonade is made, immediately awakens your tastebuds. Mellowed and softened by the hint, I could detect no more, of elderflower, creating an incredibly refreshing drink. I imagine, this drink alone would make a wonderfully balanced sorbet. Just how lemonade should taste, a firm 9.5 out of 10.

Dandelion and Burdock with star anise – the drink of my childhood, the reason I wanted to carry out this review. Unlike any other drink, dandelion and burdock has a unique, fruity, spicy flavour. This drink has a deeper, more complex flavour than the others with layers of flavour lingering on the palette as it is drunk. The slight anise flavour from the star anise could be too overpowering, yet again, the balance is perfect. Exceptionally delicious, not too sweet, not too spicy. I cannot find fault, not that I’d want to, so a firm 10 out of 10.

Ginger Beer with malted barley and a squeeze of lemon – this is the ginger beer of old. Intense, throaty, warming as you drink it and yet refreshing at the same time. Although not a mixer, I could see this pairing with a really good rum. Likewise, as the weather turns cooler, I have reserved a bottle for making ginger pudding with. True ginger in taste, the barley adds a slight softness, although it was hard to detect any lemon. This drink does not disappoint. A firm 9.5 out of 10.

Apple and Rhubarb with cinnamon – my personal favourite. This very more-ish drink reminds me slightly of the rhubarb in rhubarb and custard sweets, without any artificial flavour coming through at all. The balance of apple and rhubarb is exquisite. A very faint hint of cinnamon is present when the drink is poured, although I could not detect any specific cinnamon flavour on my palette. If I had to pick one drink, that I had to drink for a whole year, this would win. Again the freshness of the fruit flavour, without being lip puckeringly tart is perfect. A very easy 10 out of 10.

Strawberry and Raspberry with a twist of black pepper – oh my, this drink is utterly delicious. Freshly poured the smell of cracked, black pepper hits your nose and lends a spicy aroma to the strawberry and raspberry. When drinking, the perfect fruit combination is balanced by the black pepper and the lack of over sweetness. A beautiful drink both in appearance and taste, this gets a firm 9.5 out of 10.

FF Franklin's Drinks Review
Franklin’s Drinks Review my personal favourite Apple and Rhubarb.

During this Franklin’s Drinks Review not one single soft drink disappointed. The fruit juice and complementing flavours, even if I couldn’t detect them, meant they were extremely well balanced.

I thoroughly recommend Franklin & Son’s Soft Drinks, for their natural flavour achieved without an ingredient list as long as your arm. The truth is in the taste. No obscure chemical after taste was present in any of these drinks.

FF Franklin's Drinks Review
Franklin’s Fruity Summer Drink perfect to drink all day long.


Why not see how I made this Franklins Fruity Summer Drink, using Franklin’s Soft Drinks. It’s alcohol free but tastes suspiciously like another, famous, British Summer drink!

Franklin’s Mixers:

To say I felt vastly under qualified to review a drink I didn’t even like, would be an understatement. I am of course, talking about tonic water – or so I thought.

I received 3 mixers to try, Sicilian Lemon Tonic, Natural Tonic Water and Light Tonic Water. I won’t be giving them scores out of 10 as I feel that would be a little unfair, simply my views on their taste.

It took one glass on Natural Tonic Water, over ice to convert me! Such a refreshing drink, especially with a slice of lime or lemon. Maybe more importantly it made THE BEST gin and tonic, my new favourite tipple.

The Light Tonic Water, was just that, lighter in flavour, however, I was just as happy to drink it in a G & T, or over ice with a slice!

Sicilian Lemon Tonic, oh how I wish there had been more bottles of this in the box I received. Utterly delicious, it is key to giving the Franklin’s Fruity Summer Drink just the right balance of flavour.

I shall be ordering more soft drinks and mixers, especially as I want to try Franklin’s signature drink 1886 a mix of sloe gin and their Sicilian tonic water. Perfect for warm summer evenings, or cool Autumn nights.

Me being me I wanted to try and create a sorbet using Franklin’s Natural Tonic Water. I decided to make my own Fresh Strawberry Simple Syrup add a couple of measures of good gin and see if it would work!

FF Franklin's Drinks Review
Franklin’s Drinks Review Strawberry Sorbet with Gin & Tonic.

This Strawberry Sorbet with Gin & Tonic was an absolute success. Perfect as a grown up dessert, or let it melt a little and you have a rather yummy, adult slushy!

To Make Strawberry Sorbet with Gin & Tonic:

600mls Natural Tonic Water – from

200mls Fresh Strawberry Simple Syrup – see here

Double measure of Gin – I used Bloom Gin

  • Pour the tonic water into a jug and allow to sit for a couple of hours, until almost flat.
  • To the flat tonic water add the strawberry simple syrup and gin. Stir to mix.
  • Churn in an ice cream machine until the mixture has a slushy-like consistency.
  • Pour the sorbet into a freezer proof tub, pop on a lid and place in the deep freeze overnight.
FF Franklin's Drinks Review
Strawberry Sorbet with Gin & Tonic ready for the freezer.
  • To serve, remove the tub from the freezer 10-20 minutes before serving. This allows the sorbet to soften slightly.
  • Scoop balls of sorbet and serve in a martini glass for an elegant dessert. Alternatively, you could wait a little longer and serve the sorbet as an adult slushy in double shot glasses!

I have had so much fun carrying out this Franklin’s Drinks Review. Not only will I be ordering more delicious drinks, I have plans to keep experimenting with them too!

If you have enjoyed this Franklin’s Drinks Review you may also like these:

Refreshing Tropical Fruit Sorbet

FF Franklin's Drinks Review
Refreshing Tropical Fruit Sorbet

Mr Sherick’s Milkshake Review

FF Franklin's Drinks Review
Mr Sherick’s Milkshake Review

Whatever you do this weekend, remember it’s not a party unless there are Franklin’s Soft Drinks available. Perfect for those who cannot, or choose not to drink alcohol.

Sammie xx

Franklin’s and Son’s sent me a selection of drinks to review. All opinions, views, content and photographs are my own. I was not paid to write this review, please see my Disclosure Policy.

Share
Facebooktwitterpinterestlinkedintumblr

Fresh Strawberry Simple Syrup

Share
Facebooktwitterpinterestlinkedintumblr

I came up with the idea of making a Fresh Strawberry Simple Syrup, that could be used as a mixer in drinks, or to provide a base for a sorbet!

This Fresh Strawberry Simple Syrup is so easy and quick and adds a crazy amount of fresh strawberry flavour to whatever you add it too.

FF Fresh Strawberry Simple Syrup.
Fresh Strawberry Simple Syrup used here in a delicious sorbet.

Also this Strawberry Sorbet with Gin and Tonic is an elegant adult dessert, that is also very refreshing, see Franklin’s Drinks Review

Recipe: Makes 300ml Fresh Strawberry Simple Syrup

400g Strawberries

300g Sugar

500ml Water

Method:

  • First of all remove the green hull and cut the strawberries in halves or quarters, depending how big they are.
  • Place the strawberries into a large, heavy based saucepan and cover with water.
  • Add the sugar and place the saucepan on a high heat.
FF Fresh Strawberry Simple Syrup
Gorgeous ruby red strawberries.
  • Allow the strawberries to come to a boil and then reduce the heat to medium.
  • Cook the strawberries for a further 20 minutes until the volume is almost halved.
  • Remove the saucepan from the heat.
  • Line a sieve with muslin cloth or kitchen towels (ones that won’t disintegrate – like Plenty) and place on top of a large bowl.
  • Pour the strawberry mixture through the sieve.
  • Especially IMPORTANT – do not push or stir the mixture in the sieve, this will cause it to become cloudy, we want a beautiful, clear, red rose coloured syrup.
FF Fresh Strawberry Simple Syrup
Allow the juice to naturally drip through to the bowl.
  • As soon as all the juice has dripped through, remove the sieve from the bowl. The strawberries are very tasty as a breakfast topping to plain yoghurt.
  • Pour the beautifully clear, red liquid into a jug.
FF Fresh Strawberry Simple Syrup
Beautifully clear Fresh Strawberry Simple Syrup.

Store the Fresh Strawberry Simple Syrup in a bottle with a lid, in the fridge.

FF Fresh Strawberry Simple Syrup
Fresh Strawberry Simple Syrup with sparkling water.

Finally, enjoy the beautiful, intense flavour of fresh strawberries in this syrup.

Sammie xx

Share
Facebooktwitterpinterestlinkedintumblr

Chocolate Vanilla Viennese Finger Biscuits

Share
Facebooktwitterpinterestlinkedintumblr

Chocolate Vanilla Viennese Finger Biscuits sandwiched together with a light, white chocolate ganache. These light, melt in your mouth biscuits are perfect for an Afternoon Tea or morning coffee treat.

FF Chocolate Vanilla Viennese Finger Biscuits

The first time I made Chocolate Dipped Viennese Fingers was an experience, shall we say. It was relatively early on in my blog and in my wisdom I decided to set the dipped Viennese biscuits on a cooling rack!

Most of them stuck. Badly.

Resulting in a kitchen full of broken biscuits where I  managed to salvage just enough for a decent photograph. So, learning my lesson I did not make the same mistake when making these delicious, finger biscuits.

FF White Chocolate Ganache Filled Viennese Sandwich Biscuits
Chocolate Vanilla Viennese Finger Biscuits

These light, meltingly delicious Chocolate Vanilla Viennese Finger Biscuits are so yummy and are a favourite of my husbands.

Starting my day right

Now we all know I am a self confessed Cookie Monster. So are my whole family. When I was younger my Grandad would bring my youngest Auntie, my sister and I a cup of tea, in bed, every morning. And, no one can make tea like my Grandad did. Anyway, we would always get three biscuits, which we would swap so that we had our favourites. I still cannot understand the appeal of custard creams, but each to their own.

Chocolate Vanilla Viennese Finger Biscuits

Since I was little, staying in the comfort and security of my grandparents home having biscuits with my morning tea was my routine. It still is. I can miss breakfast and lunch, so long as I’ve had a cup of tea and a biscuit or cookie first thing in the morning. And, it is the one thing I would choose to never give up. It is part of my morning routine, so much so, that when I was in hospital last year see here, I would save my packet of 3 biscuits given out with the hot chocolate in the evening, so that I could have them with my morning tea.

Why Homemade Biscuits Are Best

While growing up, although my Grandma was an accomplished cook, I cannot recall her making biscuits. Yet for me, it was the very first skill I mastered in my kitchen. Although these days I tend towards lazy cookies rolled into balls, or scooped with an ice cream scoop. So, to actually pipe biscuits, make a ganache and sandwich them together is a first for me (not the piping), I’ve definitely never made sandwiched biscuits.

I made and baked one batch of my Chocolate Dipped Viennese Fingers and then tweaked the recipe to make a chocolate version. There’s a tiny bit more icing sugar in the chocolate finger biscuits as I wanted to offset any bitterness from the cocoa.

Chocolate Vanilla Viennese Finger Biscuits

Tomorrow morning, I will have a luxury start to my day. A Chocolate Vanilla Viennese Finger Biscuit to accompany my morning cup of tea!

Recipe: Makes 18-24 Chocolate Vanilla Viennese Finger Biscuits

200g/7oz Very Soft Unsalted Butter

60g/5.2oz Icing Sugar – sifted

Pinch 1/8tsp Salt – I use Maldon

1tsp Vanilla Extract – I use Nielsen-Massey

15g Corn Flour – approx 1tbsp

50g/2oz Cocoa Powder

100g/4oz Self Raising White Flour

50g/2oz Plain White Flour

100g/4oz White Chocolate – for dipping the ends of the biscuits

100g/4oz Dark Chocolate – for dipping the ends of the biscuits

For the white chocolate ganache:

100g/4oz White Chocolate

100mls Double Cream

Method: Preheat the oven to 180C/160C fan, gas mark 4, 350F.

Making And Piping The Viennese Biscuit Dough

  • First of all line 2 baking trays with non stick silicone mats or baking parchment.
  • Whisk the butter until it is very soft and pale – approx. 5 minutes.
  • Add the sifted icing sugar and vanilla extract and continue whisking for 2 minutes.
  • Next sift in the cocoa powder. Whisk for a further 2 minutes until the mixture is a dark, chocolatey brown colour.
  • Sift the corn flour, plain and self raising flour into the bowl.
  • Using a metal spoon mix the ingredients together until the are just combined, with no visible white streaks present.
  • Fit a large piping bag with a large, Wilton #1M star tip.
  • Fill the piping bag with the soft, chocolate biscuit dough.
  • Pipe 3″/7-8cm lengths of biscuit dough on to the lined baking tray.
FF Chocolate Vanilla Viennese Finger Biscuits
Piped Chocolate Vanilla Viennese Finger Biscuits ready for the oven.

Baking The Biscuit Halves

  • Place both trays of piped biscuits in the centre and lower part of the oven.
  • Bake the biscuits for 12 minutes. They will be firm to touch and may have spread a little.
  • As soon as the biscuits are baked remove from the oven and allow to cool completly on the tray.
FF Chocolate Vanilla Viennese Finger Biscuits
Chocolate Vanilla Viennese Finger Biscuits beautifully baked.

Making The White Chocolate Ganache Filling

  • While the biscuit fingers are cooling make the  chocolate ganache that will be piped on the underside of the fingers for sandwiching together.
  • In a heatproof, microwaveable jug add the white chocolate and double cream.
  • Zap for 1 minute on medium power.
  • Remove from the microwave and stir. If there are still lumps of unmelted chocolate, pop it back in for a further 30 seconds on medium.
  • Stir the ganache until the melted white chocolate is fully mixed into the cream.
  • Whisk the ganache to cool it and continue whisking until the ganache thickens and becomes airy – today it was so warm that I wasn’t able to get the ganache to solidify.
FF Chocolate Vanilla Viennese Finger Biscuits
Whisk the ganache until it is cool and thickened.
  • If the weather is cool the thickened ganache can be scooped into a piping bag with a medium round tip fitted – I poured the ganache into a disposable piping bag, which I then sealed with an elastic band and I placed it into the coldest part of the fridge until it had thickened.

Decorating And Filling The Chocolate And Vanilla Viennese Sandwich Biscuits

  • While the ganache was cooling I melted both the dark and white chocolate in small heatproof, microwaveable bowls.
  • Dip the chocolate fingers into the white chocolate and the vanilla fingers into the dark chocolate. Lay the dipped biscuit fingers on to anon stick silicone mat or baking parchment.
  • Not all of the biscuit fingers will be dipped in chocolate, that’s fine it is nice to have a variety.
  • When the ganache has firmed up to piping consistency, think buttercream, then you are ready to assemble your biscuits.
  • Pipe a line of white chocolate ganache down the length, flat side upper, of one biscuit.
  • Place a similar sized biscuit on top and set aside.
  • Continue until all of the biscuits are sandwiched together.
FF Chocolate Vanilla Viennese Finger Biscuits
Chocolate Vanilla Viennese Finger Biscuits sandwiched together with ganache.
  • NOTE: Due to the fragile, melting nature of the Viennese biscuits, it is inevitable that some will break. I thoroughly enjoyed ‘taste testing’ the few breakages with our 2 daughters!
  • I ended up with 18 perfectly sandwiched biscuits.
  • Due to the heat I popped all the filled biscuits on to a baking tray and placed them back into the fridge to set, before taking the photographs.

To store place the Chocolate Vanilla Viennese Finger Biscuits into a shallow tin and put in the fridge. With temperatures set to rise over the next few days, assuming they last that long 😉, they will keep for up to 4 days in the fridge.

FF Chocolate Vanilla Viennese Finger Biscuits
Chocolate Vanilla Viennese Finger Biscuits ooh I bet you go back for seconds!

Serve on a pretty plate, adorned with flowers from the garden. These Chocolate Vanilla Viennese Finger Biscuits are perfect with afternoon tea, or morning coffee.

If you have enjoyed these Chocolate Vanilla Viennese Finger Biscuits here are some other recipes you may like:

Apricot Oat Crumble Cookies

FF Chocolate Vanilla Viennese Finger Biscuits
Apricot Oat Crumble Cookies

Bakewell Shortbread Bars

FF Chocolate Vanilla Viennese Fingers Biscuits
Bakewell Shortbread Bars

Lemon Drizzle Cake Bars

FF Chocolate Vanilla Viennese Finger Biscuits
Lemon Drizzle Cake Bars

Sitting together with friends over a mid morning coffee, or with family for afternoon tea, doesn’t have to be a formal occasion. Yet when a little extra effort is made, for example, adding the rose to the centre of the plate, it really lifts the occasion.

All food should be feasted on and enjoyed, not just eaten for the sake of it (unless circumstances, for example illness, dictate otherwise). Food shared, tastes better and eating with company can be more fun.

Make the most of what’s left of the summer to eat outside. Watching the butterflies, listening to the birds, bees and ruffling leaves of the trees, adds an extra element of fun to our feasting.

Sammie xx

Share
Facebooktwitterpinterestlinkedintumblr

Mascarpone Topped Carrot Cake

Share
Facebooktwitterpinterestlinkedintumblr

Mascarpone Topped Carrot Cake, moist, cinnamon spiced carrot cake, with added walnuts for crunch and sultanas for sweetness. Finished with a lemon scented mascarpone cream cheese and walnuts.

FF Mascarpone Topped Carrot Cake
Mascarpone Topped Carrot Cake perfect for Afternoon Tea

What To Do When A Cake Craving Hits

When I crave cake, I really, really C R A V E it!

There are two important points to note:

First of all I rarely crave cake, maybe once or twice a year – but when I do I have to have it.

Secondly, without exception it HAS to be homemade. Too often I have been let down by supermarket copies, or bakery flops. And the only way to satisfy my craving is to bake the cake myself!

FF Mascarpone Topped Carrot Cake

Yesterday, the craving hit for carrot cake. I’d been struggling with a migraine all day and wanted to snuggle under the duvet until the pain had passed. Yet during a brief respite in the afternoon I whipped up this Mascarpone Topped Carrot Cake in less than 10 minutes.

FF Mascarpone Topped Carrot Cake
Mascarpone Topped Carrot Cake beautiful simplicity.

I have dozens of cookbooks and even have a Crazy Caramel Carrot Cake recipe on here, but in all honesty I didn’t have the patience to trawl through them deciding which cake to make. Because I knew the flavours I wanted to taste in my head I created the recipe as I went along. Fortunately having baked a lot of cakes I did have a rough idea of proportions.

Creating This Mascarpone Topped Carrot Cake Recipe

From memory I recalled baking a carrot cake with our youngest daughter, following a school recipe book method. Except all I could remember was that the recipe used oil! And because I love the flavour that butter imparts to a moist cake, I added both!

FF Mascarpone Topped Carrot Cake
Mascarpone Topped Carrot Cake

The need for walnuts, both flavour and crunchy texture was prevailent, so I made some walnut flour to boost the nutty flavour within the cake. It’s so easy, just toast the walnuts to bring out their flavour and either pulse in a food processor or use a mini chopper to achieve the desired result. Think ground almonds and you’re spot on.

One of the big problems I find with shop bough carrot cakes is that they are simply too sweet. I’m not talking the frosting or icing, the actual cake itself. Carrots are an inherently sweet vegetable, sultanas plump up and provide natural sweetness, why dump loads of extra sugar in the recipe? Don’t get me wrong there is sugar in this cake. It is there to add sweetness in balance with the other ingredients.

Can you tell that I’m really picky about my carrot cake 😉

FF Mascarpone Topped Carrot Cake
Mascarpone Topped Carrot Cake the perfect cake?

Recipe: Mascarpone Topped Carrot Cake serve 8-10

100g/4oz Unsalted Butter plus a little extra for greasing the tin.

50g/2oz Sunflower Oil

1tsp Vanilla Extract – I use Nielsen Massey

150g/5oz Light Soft Brown Sugar

1/4tsp Salt – I use Maldon

3 Large Free Range Eggs

150g/5oz Plain White Flour

50g/2oz Walnut Flour – walnuts chopped in a food processor or mini chopper until flour like consistency

2tsp Baking Powder

2tsp Cinnamon

150g/5oz Grated Carrot

50g/2oz Walnut Pieces – plus extra halves for topping the cake (approx 10)

75g/3oz Sultanas

375g Mascarpone Cheese

2tbsp Icing Sugar – sifted

1/2tsp Lemon Extract – Vanilla Extract can be substituted

Method: Preheat the oven at 180C/160C fan, gas mark 4, 350F.

Making And Baking The Carrot Cake

  • Grease and line the base of loaf tin with baking parchment.
  • Place all of the walnuts into a dry frying pan over a medium heat. Shake the pan occasionally and remove from the heat when you can smell the walnuts – approx 3-5 minutes. Tip the walnuts on to a tray so they can cool.
  • In a large bowl add the butter and microwave on low until just melted.
  • Add in the sunflower oil, sugar, salt and vanilla extract. Whisk for 5 minutes.
  • Next add all 3 eggs. Continue whisking on high for a further 2 minutes. You want the liquid mixture to be very light and frothy.
  • Prepare the 50g of walnut flour by chopping in a mini chopper, or pulsing in a food processor.
  • Add the walnut flour, plain flour, cinnamon and baking powder to the bowl.
  • Next add the grated carrots, sultanas and 50g of walnut pieces to the bowl.

FF Mascarpone Topped Carrot Cake

  • Using a metal spoon fold all of the cake ingredients together until they are fully mixed, taking care not to over mix the batter.
  • Tip the cake batter into the prepared loaf tin and smooth the top.
FF Mascarpone Topped Carrot Cake
Mascarpone Topped Carrot Cake ready for the oven.
  • Place the cake tin in the centre of the oven and bake for approximately 1 1/2 hours, or until an inserted skewer comes out clean.
  • As soon as the cake is  baked remove from the oven and allow to cool in the tin for 20 minutes.
  • Gently go around the outside rim of the cake with a palette knife to ensure no part of the cake has stuck to the tin.
  • Tip the cake out, removing the base layer of baking parchment and allow to fully cool on a cooling rack.
FF Mascarpone Topped a Carrot Cake
Beautifully scented carrot cake cooling.

Making the Mascapone Topping

  • In a bowl add the mascarpone cream cheese, sifted icing sugar and lemon extract (vanilla if you do not have lemon).
  • Whisk on a high speed for 3 minutes until the mascarpone is light and fluffy.
  • Dollop the mascarpone cheese on top of the cold carrot cake.
  • Using a palette knife spread the mascarpone so that it evenly covers the top of the cake. you can leave the topping smooth or create a pattern with the palette knife.
FF Mascarpone Topped Carrot Cake
Mascarpone Topped Carrot Cake next walnuts!
  • Adorn the top of the cake with the saved walnut halves and your Mascarpone Topped Carrot Cake is complete.
FF Mascarpone Topped Carrot Cake
Mascarpone Topped Carrot Cake ready to serve.

How To Enjoy This Cake At It’s Best

My suggestion for serving, is, to chill the cake in the fridge for 30 minutes – somehow it just seems to pull the cake together as one and set it – if you can’t wait, don’t worry.

Slice and enjoy with a delightful cup of afternoon tea, preferably made in a pot, it gives the leaves time to release their flavour as well as colour.

FF Mascarpone Topped Carrot Cake
Mascarpone Topped Carrot Cake my absolute favourite.

I love this pretty tea-for-one set that my hubby bought me for our anniversary. It really does turn a simple slice of cake and cup of tea into a sumptuous afternoon feast.

The Mascarpone Topped Cream Cake absolutely satisfied my cravings. The tiny hint of lemon in the mascarpone is very subtle and works with the nutty, fruity, spiced cake. This may very well be one of THE very best recipes I have come up with so far!

No I’m not egotistical, in fact the very opposite. So many recipes do not make it on to Feasting is Fun as they aren’t good enough. Also considering I wasn’t at my best, physically, this cake hits all the right spots. Spiced, crunchy, moist, fruity without tasting like a fruit cake.

If you have enjoyed the recipe for this Mascarpone Topped Carrot Cake you may also enjoy these:

Classic Coffee & Walnut Cake

FF Mascarpone Topped Carrot Cake
Classic Coffee & Walnut Cake

Double Chocolate Chip Loaf Cake

FF Mascarpone Topped Carrot Cake
Double Chocolate Chip Loaf Cake

Loveliest Lemon Curd Cake

FF Mascarpone Topped Carrot Cake
Loveliest Lemon Curd Cake

Any of these delicious cakes would make a wonderful gift to new neighbours, friends who have moved home, even bereaved families. Although taking cake to those struggling with grief isn’t necessarily for them to eat. Rather it’s likely  they will have endless visitors wishing to pay their respects. And a slice of cake, that someone has thoughtfully made, served with a cup of tea, may just make the visits more bearable.

The walnuts used in this recipe come from a a very dear friend who has a walnut tree in her garden. Sadly my dearest friend passed away a few months ago. Yet making this cake, or cooking using either things she bought me, or those her family have kindly given me, has, in some way, made her passing easier.

Everytime I use her cutters, cake stand, dragee balls or a myriad of other everyday kitchen items, I feel close to her. Whether it’s the memory of her laugh, tinkling across the gardens mid afternoon, or how we finished each other’s sentences. And she truly was the very best of people who lived her life to the full, despite becoming a widow at too young an age. Pat was the Green Goddess, my chief taste tester.

So this post is dedicated to her and the love she had for people. Because life is not about what we do. It is not about who we love. Rather it is indeed about those whose hearts we touch. How much we are loved in return. Please see Important Stuff.

Sammie xx

Share
Facebooktwitterpinterestlinkedintumblr

Monster Mint Chocolate Cookies

Share
Facebooktwitterpinterestlinkedintumblr

This this week just happens to be National Afternoon Tea Week. Not that we need an excuse to enjoy a good cup of tea with a little something on the side, however, I decided to get into the spirit of things and make these Monster Mint Chocolate Cookies.

FF Monster Mint Chocolate Cookies
Monster Mint Chocolate Cookies perfect for Afternoon Tea.

Afternoon Tea is traditionally served with dainty finger sandwiches, delicate pastries, intricately decorated cakes and the like. I seem to have stamped all over tradition with these Monster Mint Chocolate Cookies!

I do not apologise for this.

For one simple reason, these cookies are really, really good.

FF Monster Mint Chocolate Cookies
Monster Mint Chocolate Cookies packed full of crunchy dark chocolate mint crisps.

I seem to have got out of my regular cookie baking. There was a time when I made almost all of our biscuits and cookies along with our bread. I’m still keeping up with the bread making see here, but have been remiss with baking cookies.

Sometimes I think it is good to be reminded just HOW much better homemade food is. Instead of ripping open a packet of bourbon biscuits I made these cookies this morning. Boy am I glad I did!

Deep chocolate biscuit, flavoured with peppermint extract and chunks of Elizabeth Shaw Dark Mint Chocolate Crisps throughout, make these cookies an unforgettable experience. The crunch from the mint crisps only serves to add to the variety of textures from soft cookie, melted chocolate and crisp, crunchy mint pieces.

Yep. These are pretty much Mint Chocolate Cookie perfection in plus size.

FF Monster Mint Chocolate Cookies
Monster Mint Chocolate Cookies perfect with a cup of tea.

You could of course make these smaller, but I think you’d lose the thickness and density these cookies need to conceal their hidden mint chocolate delights. Besides having one Monster cookie simply stops you going back for a second one!

FF Monster Mint Chocolate Cookies
Monster Mint Chocolate Cookies with a little help from Elizabeth Shaw Chocolates.

Recipe: Makes 14 Monster Mint Chocolate Cookies

225g/8oz Unsalted Butter softened to room temperature

150g/5oz Light Soft Brown Sugar

1 Large Free Range Egg Yolk

1tsp Vanilla Extract

1/4tsp Salt – I use Maldon

1tsp Peppermint Extract – I use Nielsen-Massey

50g/2oz Cocoa Powder – I use Callebaut

225g/8oz Plain White Flour

1 box Elizabeth Shaw Mint Crisp Dark Chocolates – unwrapped and broken into quarters

Method: Preheat the oven to 180C/160C fan, gas mark 4

  • Line 3 large baking trays with baking parchment or a non stick silicone mats.
  • In a large bowl add the butter, sugar, salt, vanilla and peppermint extract.
  • Whisk/beat for a good 5 minutes until the mixture is pale and very creamy.
  • Add the egg yolk and continue to beat for a further 2 minutes.
  • Next sift in the cocoa and flour.
  • Add the broken mint crisp chocolates.
FF Monster Mint Chocolate Cookies
Monster Mint Chocolate Cookies in the making.
  • Mix by hand using a large spoon until everything is combined – don’t over mix or you’ll end up with tough cookies (which make be a good personality traight but not so pleasant to eat 😉).
  • Using a large, spring loaded ice cream scoop, scoop out mounds of delicious mint chocolate cookie dough on to lined baking trays.
  • Using a damp hand press lightly to flatten the cookie.
FF Monster Mint Chocolate Cookies
Monster Mint Chocolate Cookies ready for the oven.
  • Place all three baking trays in the oven, rotating them twice during the 20 minutes baking time.
  • Remove from the oven after 20 minutes and allow the Monster Mint Chocolate Cookies to cool on the baking trays.
FF Monster Mint Chocolate Cookies
Monster Mint Chocolate Cookies cooling.

Once the Monster Mint Chocolate Cookies are cooled, make yourself a proper cup of tea and enjoy.

FF Monster Mint Chocolate Cookies
Monster Mint Chocolate Cookies perfect for sharing.

I have to confess, deeply chocolate cookies are not my favourite kind. In general I prefer oat/fruit combinations. These cookies though, with their refreshing, lingering minty aftertaste are utterly scrumptious. Even on a hot, Summer’s afternoon, I felt thoroughly refreshed after my tea and cookie.

I like pushing myself outside of my comfort zone. Making a cookie that isn’t necessarily my ‘cup of tea’ for the children. This time they’ll have to watch out for mum raiding the cookie jar 😉

If you have enjoyed the recipe for these Monster Mint Chocolate Cookies, here are some others you may also like:

Cherry Bakewell Cookies

FF Monster Mint Chocolate Cookies
Cherry Bakewell Cookies.

Oat Chocolate Chip Cookies

FF Monster Mint Chocolate Cookies
Oat Chocolate Chip Cookies

Caramac Caramel Cookies

FF Monster Mint Chocolate Cookies
Caramac Caramel Cookies

I am known as a bit of a Cookie Monster. The cookies mentioned are but a small representation of the recipes on my site. Type cookies into the search bar and see what else you may like to make.

Thank you for you photos on Instagram and Twitter. It really makes my day to see you having fun making my recipes. I also love reading your comments.

Is there a cookie recipe that you would like to see on Feasting is Fun?

Would you like to share a favourite family recipe that has been passed down through the generations?

Let me know and I’ll do my best to create cookies for you to share and feast on.

Sammie xx

Elizabeth Shaw provided the chocolates used in this recipe. All opinions, views, content and photography is my own. Please see my Disclosure Policy.

Share
Facebooktwitterpinterestlinkedintumblr

Refreshing Tropical Fruit Sorbet

Share
Facebooktwitterpinterestlinkedintumblr

The smell of Summer. Sun tan lotion, seaside air and luscious seasonal fruits. Ok, I accept that the fruits in this Refreshing Tropical Fruit Sorbet are not necessarily grown in this country, although they are cheaper and more readily available during the summer.

FF Refreshing Tropical Fruit Sorbet
Refreshing Tropical Fruit Sorbet so good.

Making your own Refreshing Tropical Fruit Sorbet is so worth it. Forget about the adverts telling you that ‘you’re worth it’ this is a delicious, good for you treat, that tastes of fruit heaven!

FF Refreshing Tropical Fruit Sorbet
Refreshing Tropical Fruit Sorbet will make your tastebuds come alive!

The marriage between the flavours will make your tastebuds sing in harmony.

FF Refreshing Tropical Fruit Sorbet
Refreshing Tropical Fruit Sorbet a delicious alternative to ice cream.

There are a couple of steps needed to prepare the fruit for this sorbet, but they are absolutely worth it to extract every drop of flavour from the fruit.

Once the fruit is prepped it is then cooked for a short time. This breaks down the pineapple and separates the passionfruit seeds from their surrounding juice. The cooked fruit mixture is then sieved, to remove the very crunchy seeds. A quick whizz with an immersion blender, or liquidiser, cool and your sorbet is ready to be churned.

FF Refreshing Tropical Fruit Sorbet
Refreshing Tropical Fruit Sorbet so worth making.

This sorbet tastes of Summer. Light, intensely fruity, sweet – but not overly so and with a colour to brighten the dullest of days.

A light dessert or a delightful palette cleanser between courses for a more formal meal.

The mangos I bought for this recipe spent a few days on our sunny lounge window ledge ripening up, in fact they were warm when I prepared them. The passionfruit were smooth skinned when bought and ripened to a prune-like wrinkling of the skin. To test if a pineapple is ripe I suggest smelling it. If it smells of pineapple then it’s ripe.

Recipe: Makes 1L Refreshing Tropical Fruit Sorbet

6 Passion Fruit

2 Large Mango

1 Medium Pineapple

400mls Water

100g/4oz Sugar

Optional – see note at the end – Orange Blossom Water 1/4tsp – I suggest Nielsen-Massey

Method: Ensure the frozen compartment of your ice cream maker has been in the deep freeze overnight or according to manufacturers instructions.

  • Scoop the contents of the 6 passion fruit into a large heavy based saucepan. Squeezing the empty skins to ensure every drop of precious juice is used.
  • Next prepare the mangos. Cut down either side of the central stone, you will have three pieces. Take a fleshy side of the mango and score into three pieces using a sharp knife. With the blade flat to the skin, run the knife along each third, releasing a long slither of juicy, ripe mango. Repeat for the other side. Place the mango slices into the saucepan. Hold the central flesh and skin covered stone over the saucepan and squeeze as hard as you can. Scrape all of the pulp and juice from your hand into the pan.
  • Prepare the pineapple by cutting off the green spiky top and the flat base. Cut the pineapple into half and then divide each half into 3 sections. Cut down the outside of the central hard core – it will be the point of the pineapple. As with the mango, lay the blade flat between the fruit and the skin and slice to separate the two. Chop the pineapple into large chunks and add to the saucepan. Squeeze the skin and the hard core pieces over the saucepan to extracte as much juice as possible.
  • Pour the water over the fruit.
  • Add the sugar and turn the heat on to high under the pan.
FF Refreshing Tropical Fruit Sorbet
Refreshing Tropical Fruit Sorbet
  • Once the contents of the pan have started to bubble reduce the heat to medium, keep an eye on the fruit to ensure it doesn’t boil over.
  • Continue cooking for 20 minutes.
  • Carefully remove a spoonful of liquid from the saucepan, allow to cool and taste. The flavour should be pure fruit, not watered down and not super sweet – just as if you had eaten a slice of ripe mango. If the flavour is a little weak, continue cooking for a further 10 minutes and taste again.
  • When you are happy with the tropical fruit flavour, remove the saucepan from the heat.
  • Place a sieve over a large bowl.
  • Carefully pour the hot fruit mixture into the bowl through the sieve.
FF Refreshing Tropical Fruit Sorbet
This is going to become the most Refreshing Tropical Fruit Sorbet.
  • Using a strong dessert spoon press all of the fruit through the sieve. Occasionally clearing the underside of the sieve with a clean spoon, so that all the fruit pulp and juice goes into the bowl below.
  • This takes about 10 minutes to get it to this stage.
FF Refreshing Tropical Fruit Sorbet
Pips and pulp left in the sieve, all the flavour is in the bowl.
  • I did taste the remaining pulp and although crunchy it was pretty flavourless, that said you could still have it swirled through yoghurt for breakfast.
  • If you have an immersion blender or liquidiser, blend the resulting lumpy liquid until velvety smooth.
  • Place the bowl on a trivet, to aid cooling air circulation and cover with a net food tent, or cling film to stop flies having a taste!
FF Refreshing Tropical Fruit Sorbet.
Refreshing Tropical Fruit Sorbet cooling.
  • Allow the sorbet liquid to cool and then place in the fridge to chill.
  • Once chilled set up your ice cream maker according to manufacturers instructions.
  • Transfer the sorbet liquid to a jug, this makes pouring the liquid into the frozen chamber much easier.
  • With the machine churning pour the sorbet liquid into the ice cream maker and churn until slushy like.
  • Stop the machine, remove the paddle and scoop/pour the slushy mixture into a freezer proof, resealable tub.
FF Refreshing Tropical Fruit Sorbet
Refreshing Tropical Fruit Sorbet so full of fruity flavour.
  • Pop the lid on and place in the deep freeze, generally I leave ice creams and sorbets overnight, until frozen through.

To serve, remove the sorbet from the freezer 15-20 minutes to allow to soften slightly.

FF Refreshing Tropical Fruit Sorbet
Refreshing Tropical Fruit Sorbet the perfect way to end a meal.

For me, this is the perfect dessert after a hot spicy meal such as a curry or my Chunky Chilli. The cool, fruity sorbet, soothing on your tastebuds.

This is the perfect sorbet to make if you happen upon marked down fruit in the market or shops. It will keep for 3 months in the deep freeze and brighten a dull Winter’s day.

If you have enjoyed the recipe for my Refreshing Tropical Fruit Sorbet here are some others you may also like:

Strawberry Ripple Ice Cream

FF Refreshing Tropical Fruit Sorbet
Strawberry Ripple Ice Cream

Dark Chocolate Chip Vanilla Ice Cream

FF Refreshing Tropical Fruit Sorbet
Dark Chocolate Chip Vanilla Ice Cream

Lemon Ripple Ice Cream

FF Refreshing Tropical Fruit Sorbet
Lemon Ripple Ice Cream


I love creating, experimenting, tasting and testing different recipes. If you love mangos but aren’t a fan of pineapple, add more mango and leave the pineapple out.

Being allergic to oranges, means I always have to double check when I buy anything labelled ‘tropical’. Making my own Refreshing Tropical Fruit Sorbet means I know exactly what has gone into it. By all means adjust the sugar quantity if your fruit is sweeter, or riper. That’s why it is important to taste the liquid from the pan, remembering all the flavours will be dulled slightly by the freezing process.

I hope I have inspired you to get creative in your kitchens. Cooking should be fun. Combining flavours, adding a little something here or there, I hope that you take my recipes, try them and then change them to suit your tastes. I very much suspect a drop or two of orange blossom water would work very well in this recipe. But then I’ll never know 😉

Sammie xx

Share
Facebooktwitterpinterestlinkedintumblr