Golden Egg Chocolate Sponge Cake

Share
Facebooktwitterpinterestlinkedintumblr

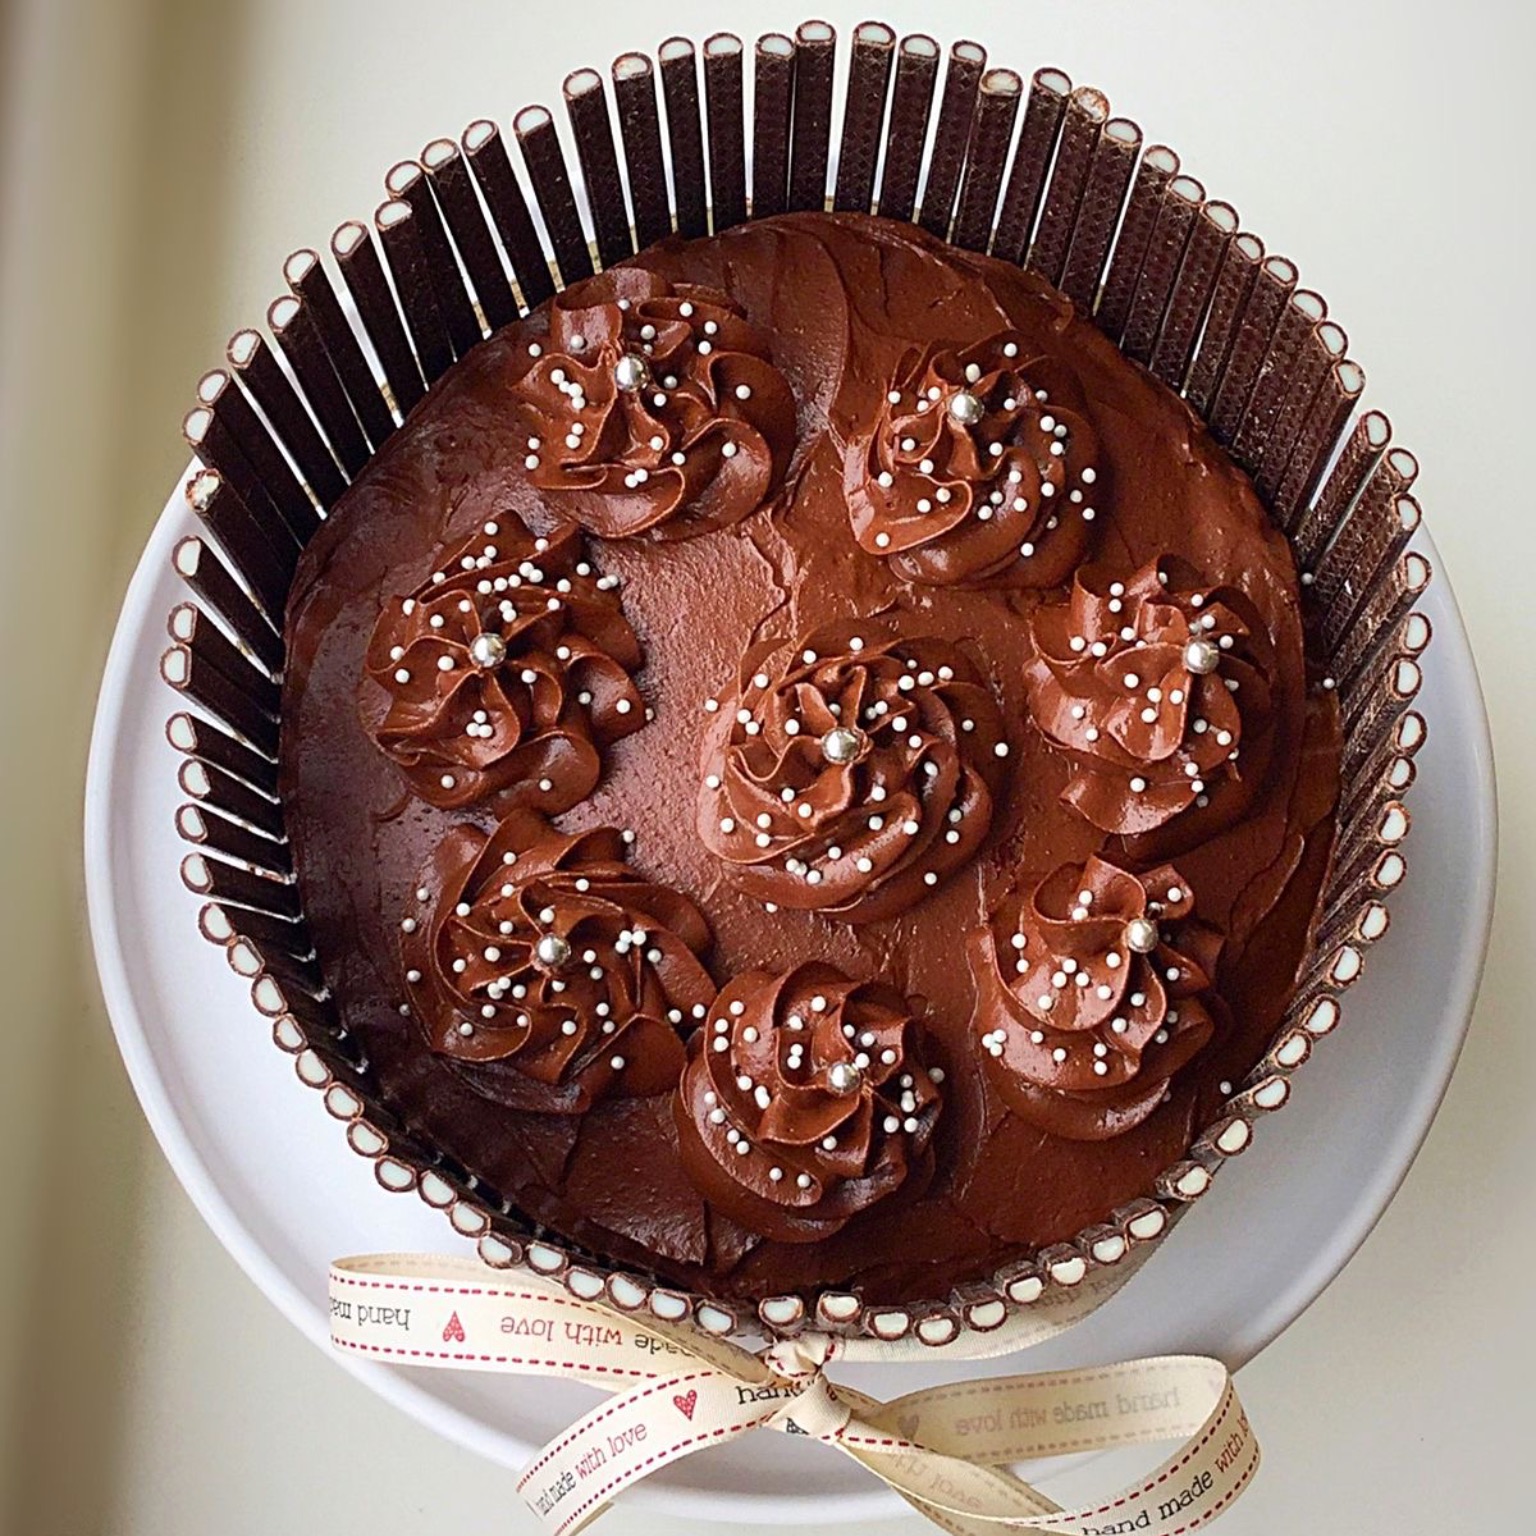
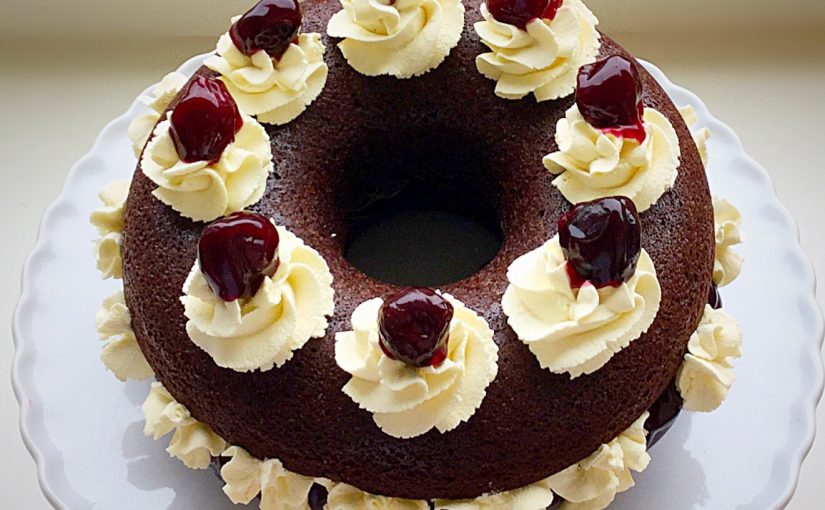
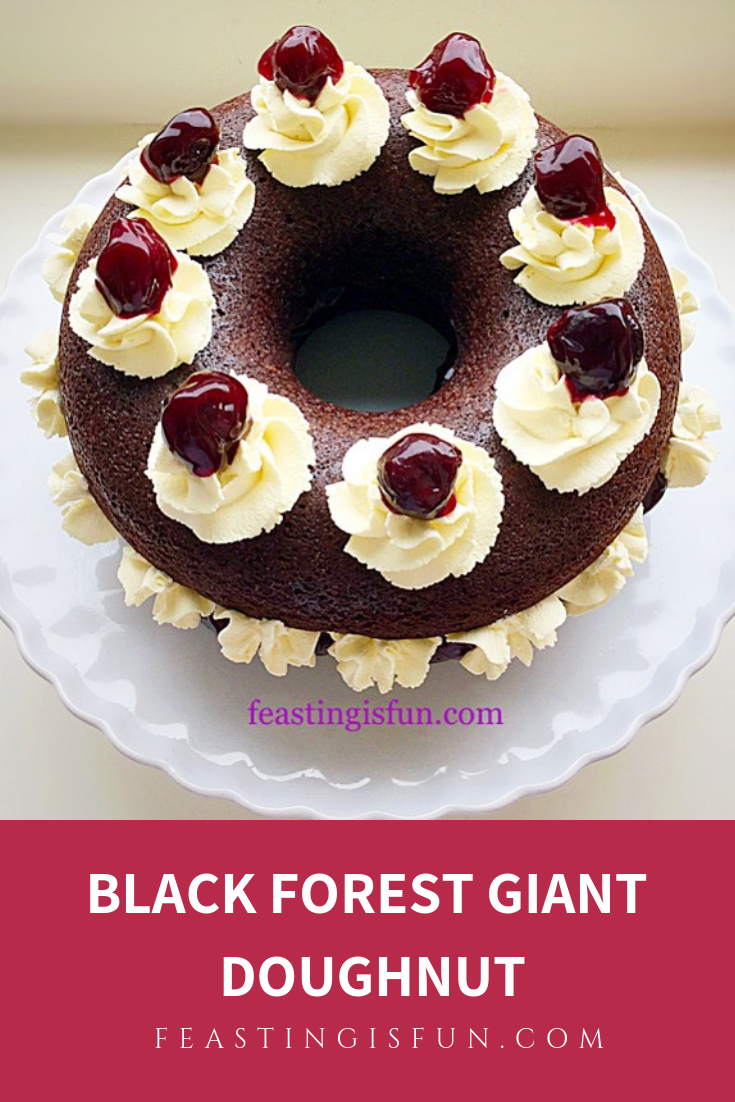
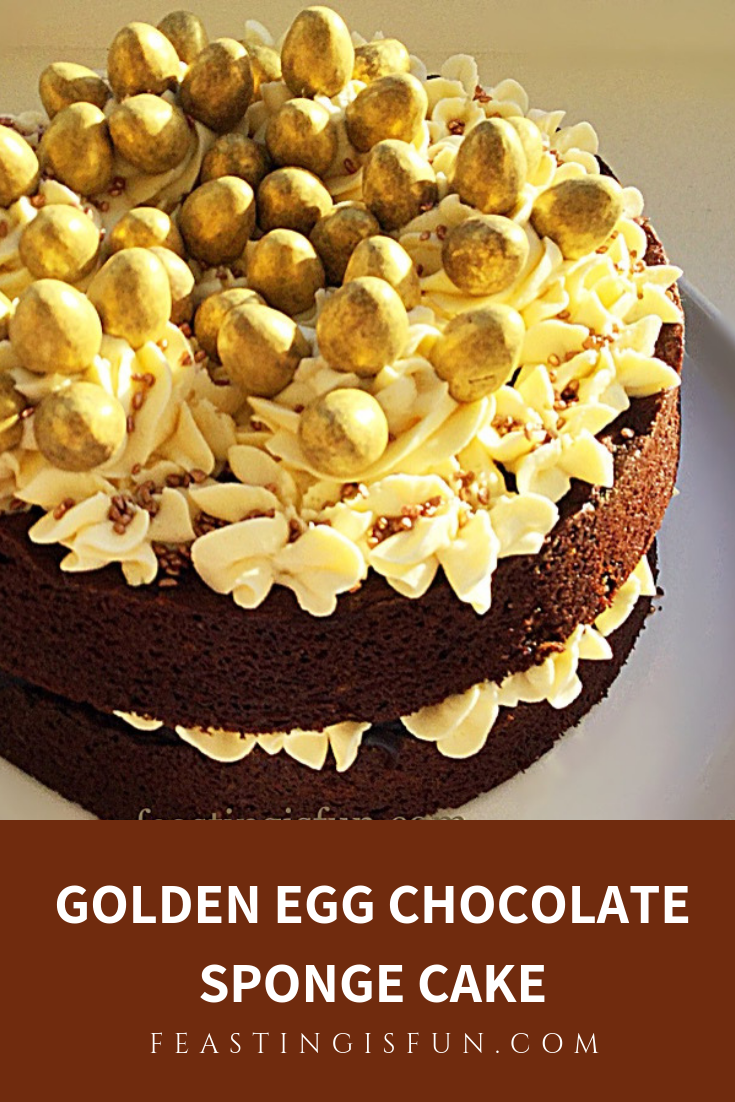
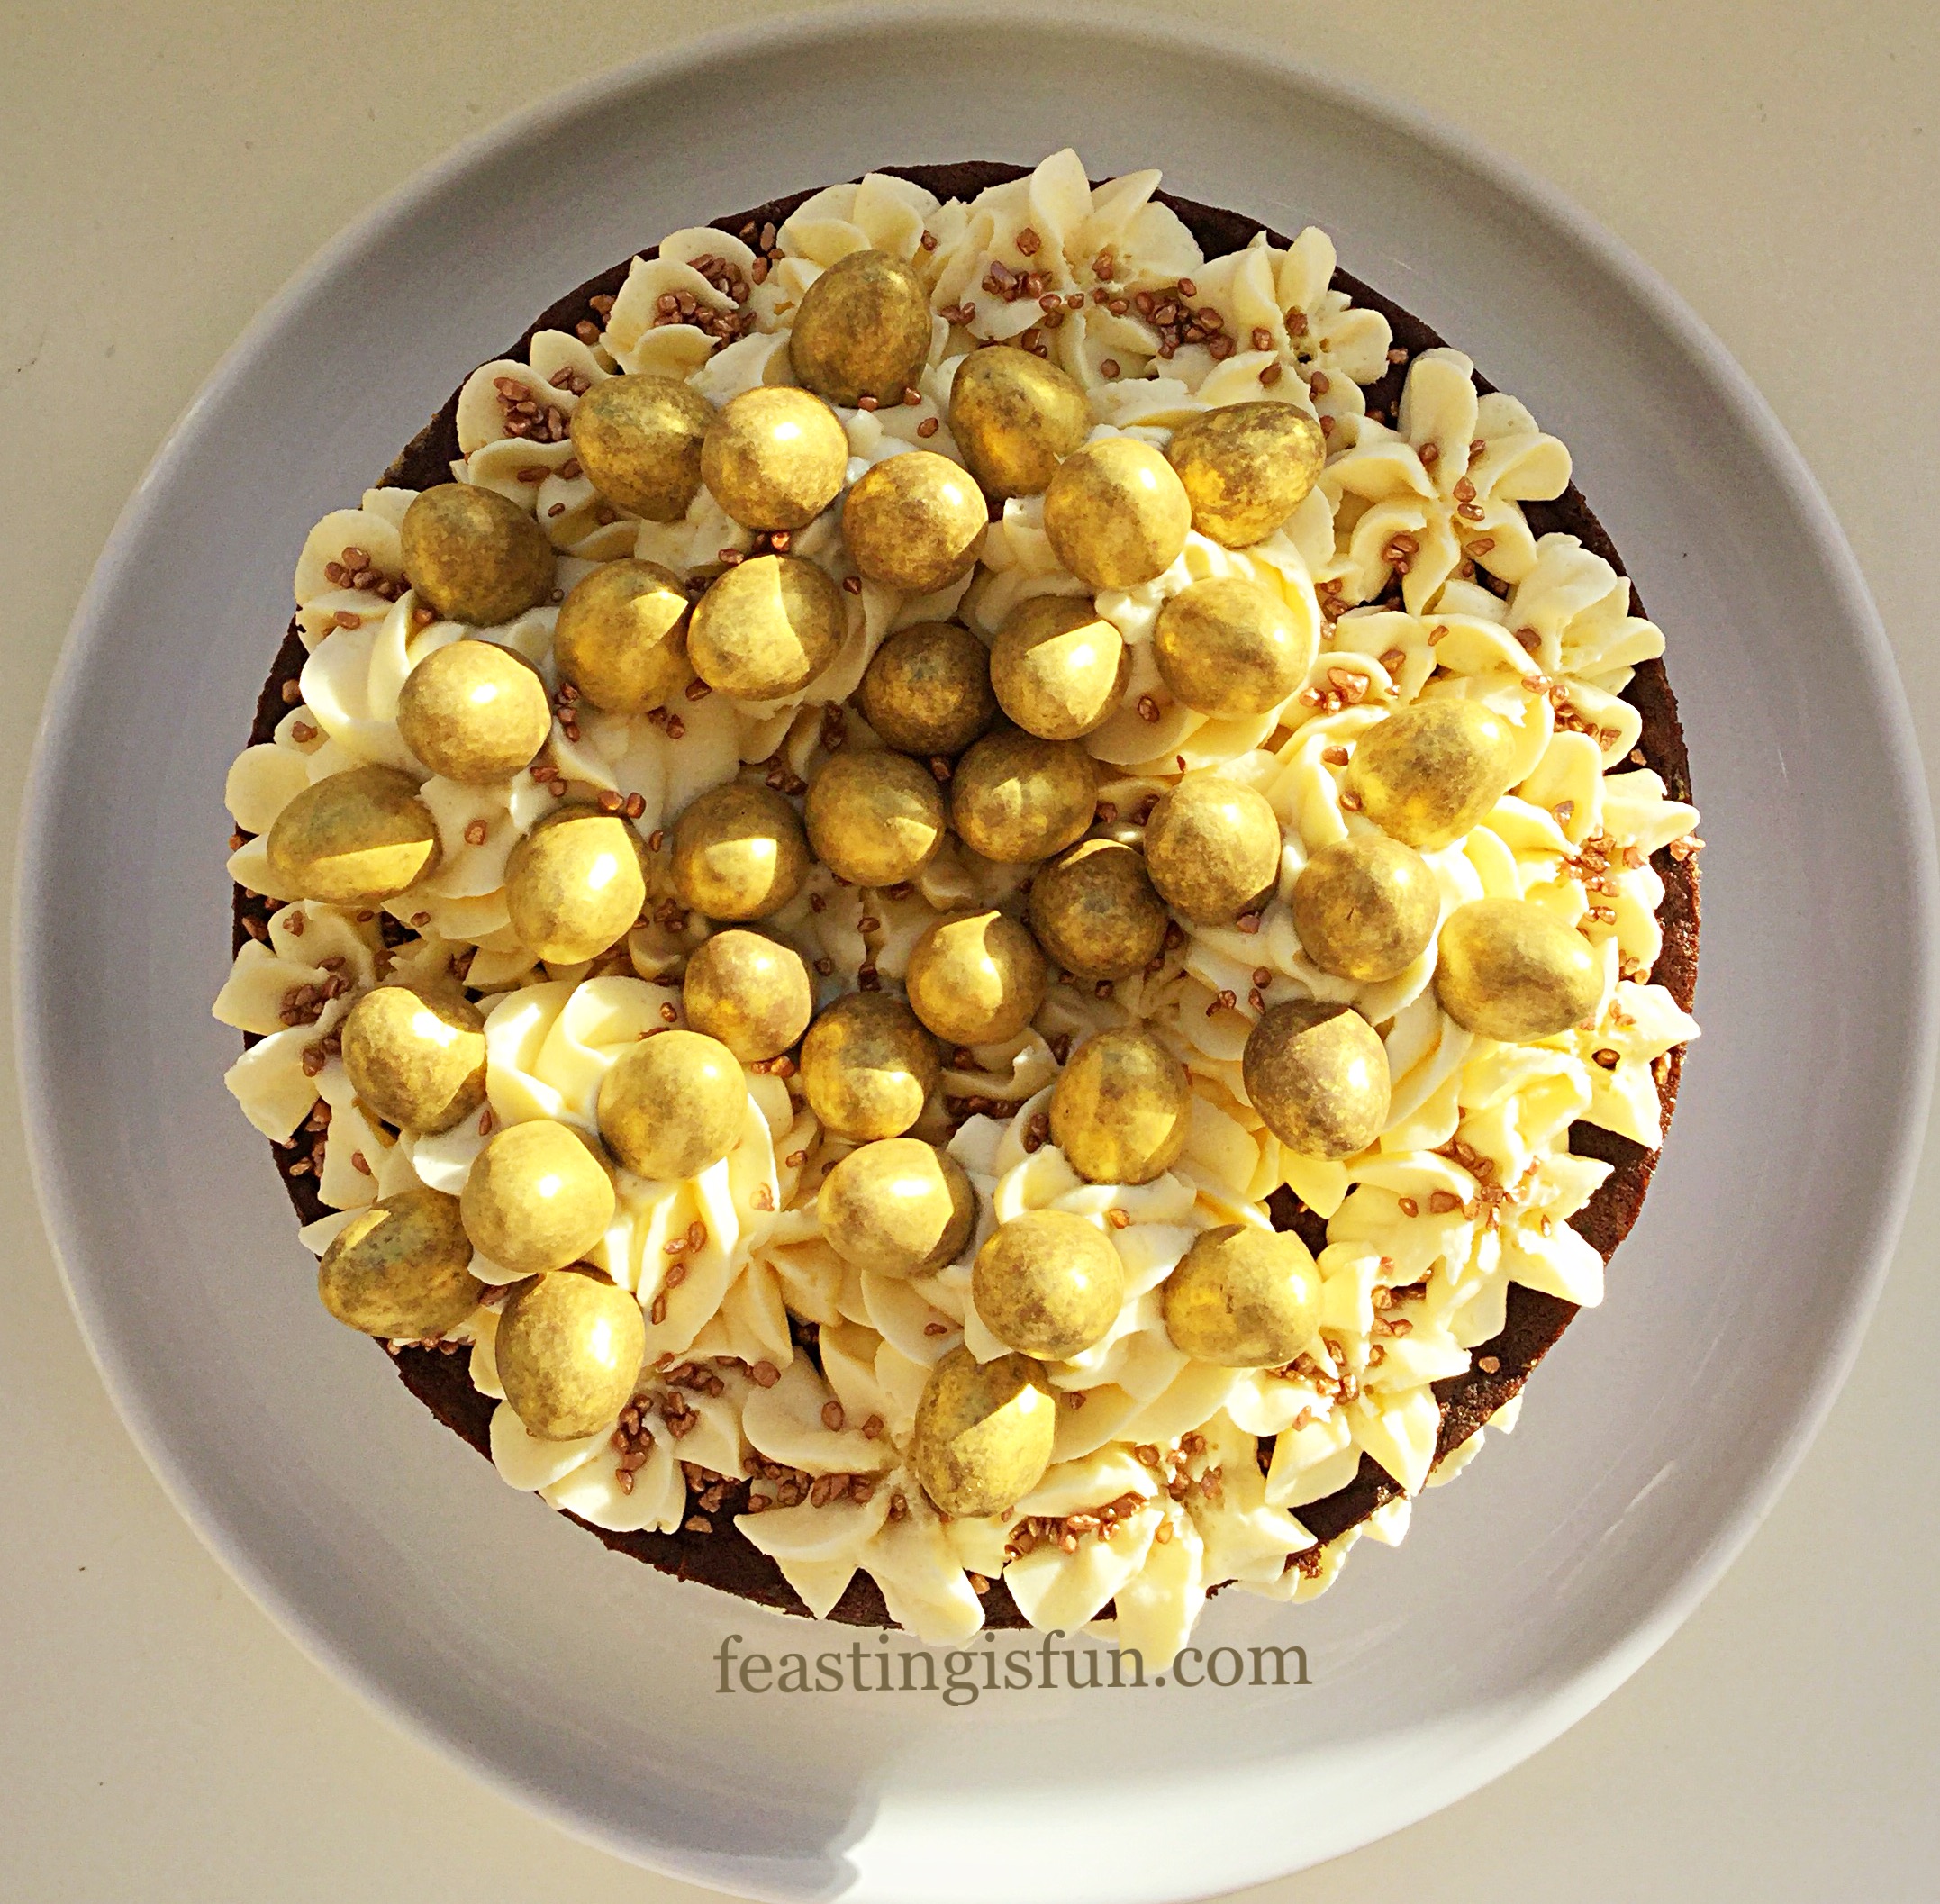
Easter is nearly upon us. Shops are filled with fluffy bunnies, chocolate chicks and all manner of chocolate eggs. While surveying the vast selection, I found Galaxy Chocolate Golden Mini Eggs. And they are perfect for decorating an Easter celebration cake. Especially my Golden Egg Chocolate Sponge Cake.

FF Golden Egg Chocolate Sponge Cake

The reason for Easter

Easter Sunday is the Christian celebration of new life. Although Jesus had died two days prior, hanging on a cross. Yet when His friends went to visit Him the following Sunday, the tomb where He had been placed was empty. Shocked and outraged, one of the women spoke to the gardener, wanting to know where He had gone. The response came “Why look for the living among the dead.”

As the prophecies had foretold, Jesus Christ, Son of the Living God, had risen from the dead. He had overcome death. Forever. So that we, may have life, in Him. Hence the chicks and eggs, bunnies and lambs in the shops, represent new life. Gold, for me on this cake, represents the King of Kings and Lord of Lords. Jesus. He who could not be contained by death. Even though He was brutally punished and died wearing a crown made from thorns. Is now alive, bearing the scars of death, yet as alive as you and I. Please see Important Stuff.

FF Golden Egg Chocolate Sponge Cake
Golden Egg Chocolate Sponge Cake

While celebrating over Easter, take a moment, to think about what it means to you. As you make and bake this cake, remember the love, His love, that He offers you. Even now, as Easter is treated as an extra holiday. Consider the real truth behind it. With Jesus their is always hope, without Him, who do you place your hope in?

FF Golden Egg Chocolate Sponge Cake
Golden Egg Chocolate Sponge Cake what does Easter mean to you?

Recipe: Golden Egg Chocolate Sponge Cake serves 8-10

225g/8oz Unsalted Butter softened

225g/8oz Light Brown Sugar

1tsp Vanilla Eaxtract – I use Nielsen-Massey

1/4tsp Salt -I use Maldon

5 Large Free Range Eggs

100ml Buttermilk

150g/5oz Plain White Flour

75g Cocoa Powder – I use Callebaut

2tsp Baking Powder

For frosting and decorating:

3-4tbsp Salted Chocolate Spread – I use Hawkshead Relish new MUDD spread

alternatively use a chocolate spread of your choice.

200g/7oz Unsalted Butter

400g/14oz Plain Icing Sugar

1tsp Vanilla Extract

2tbsp Hot Water – from a recently boiled kettle

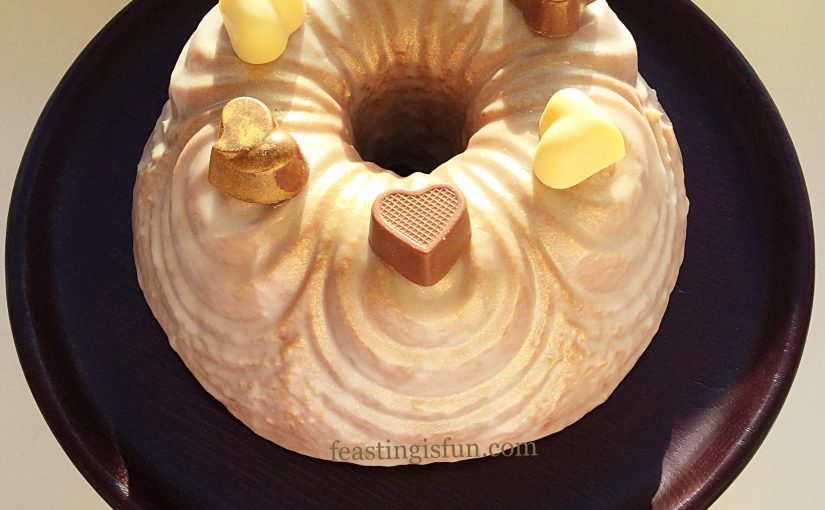
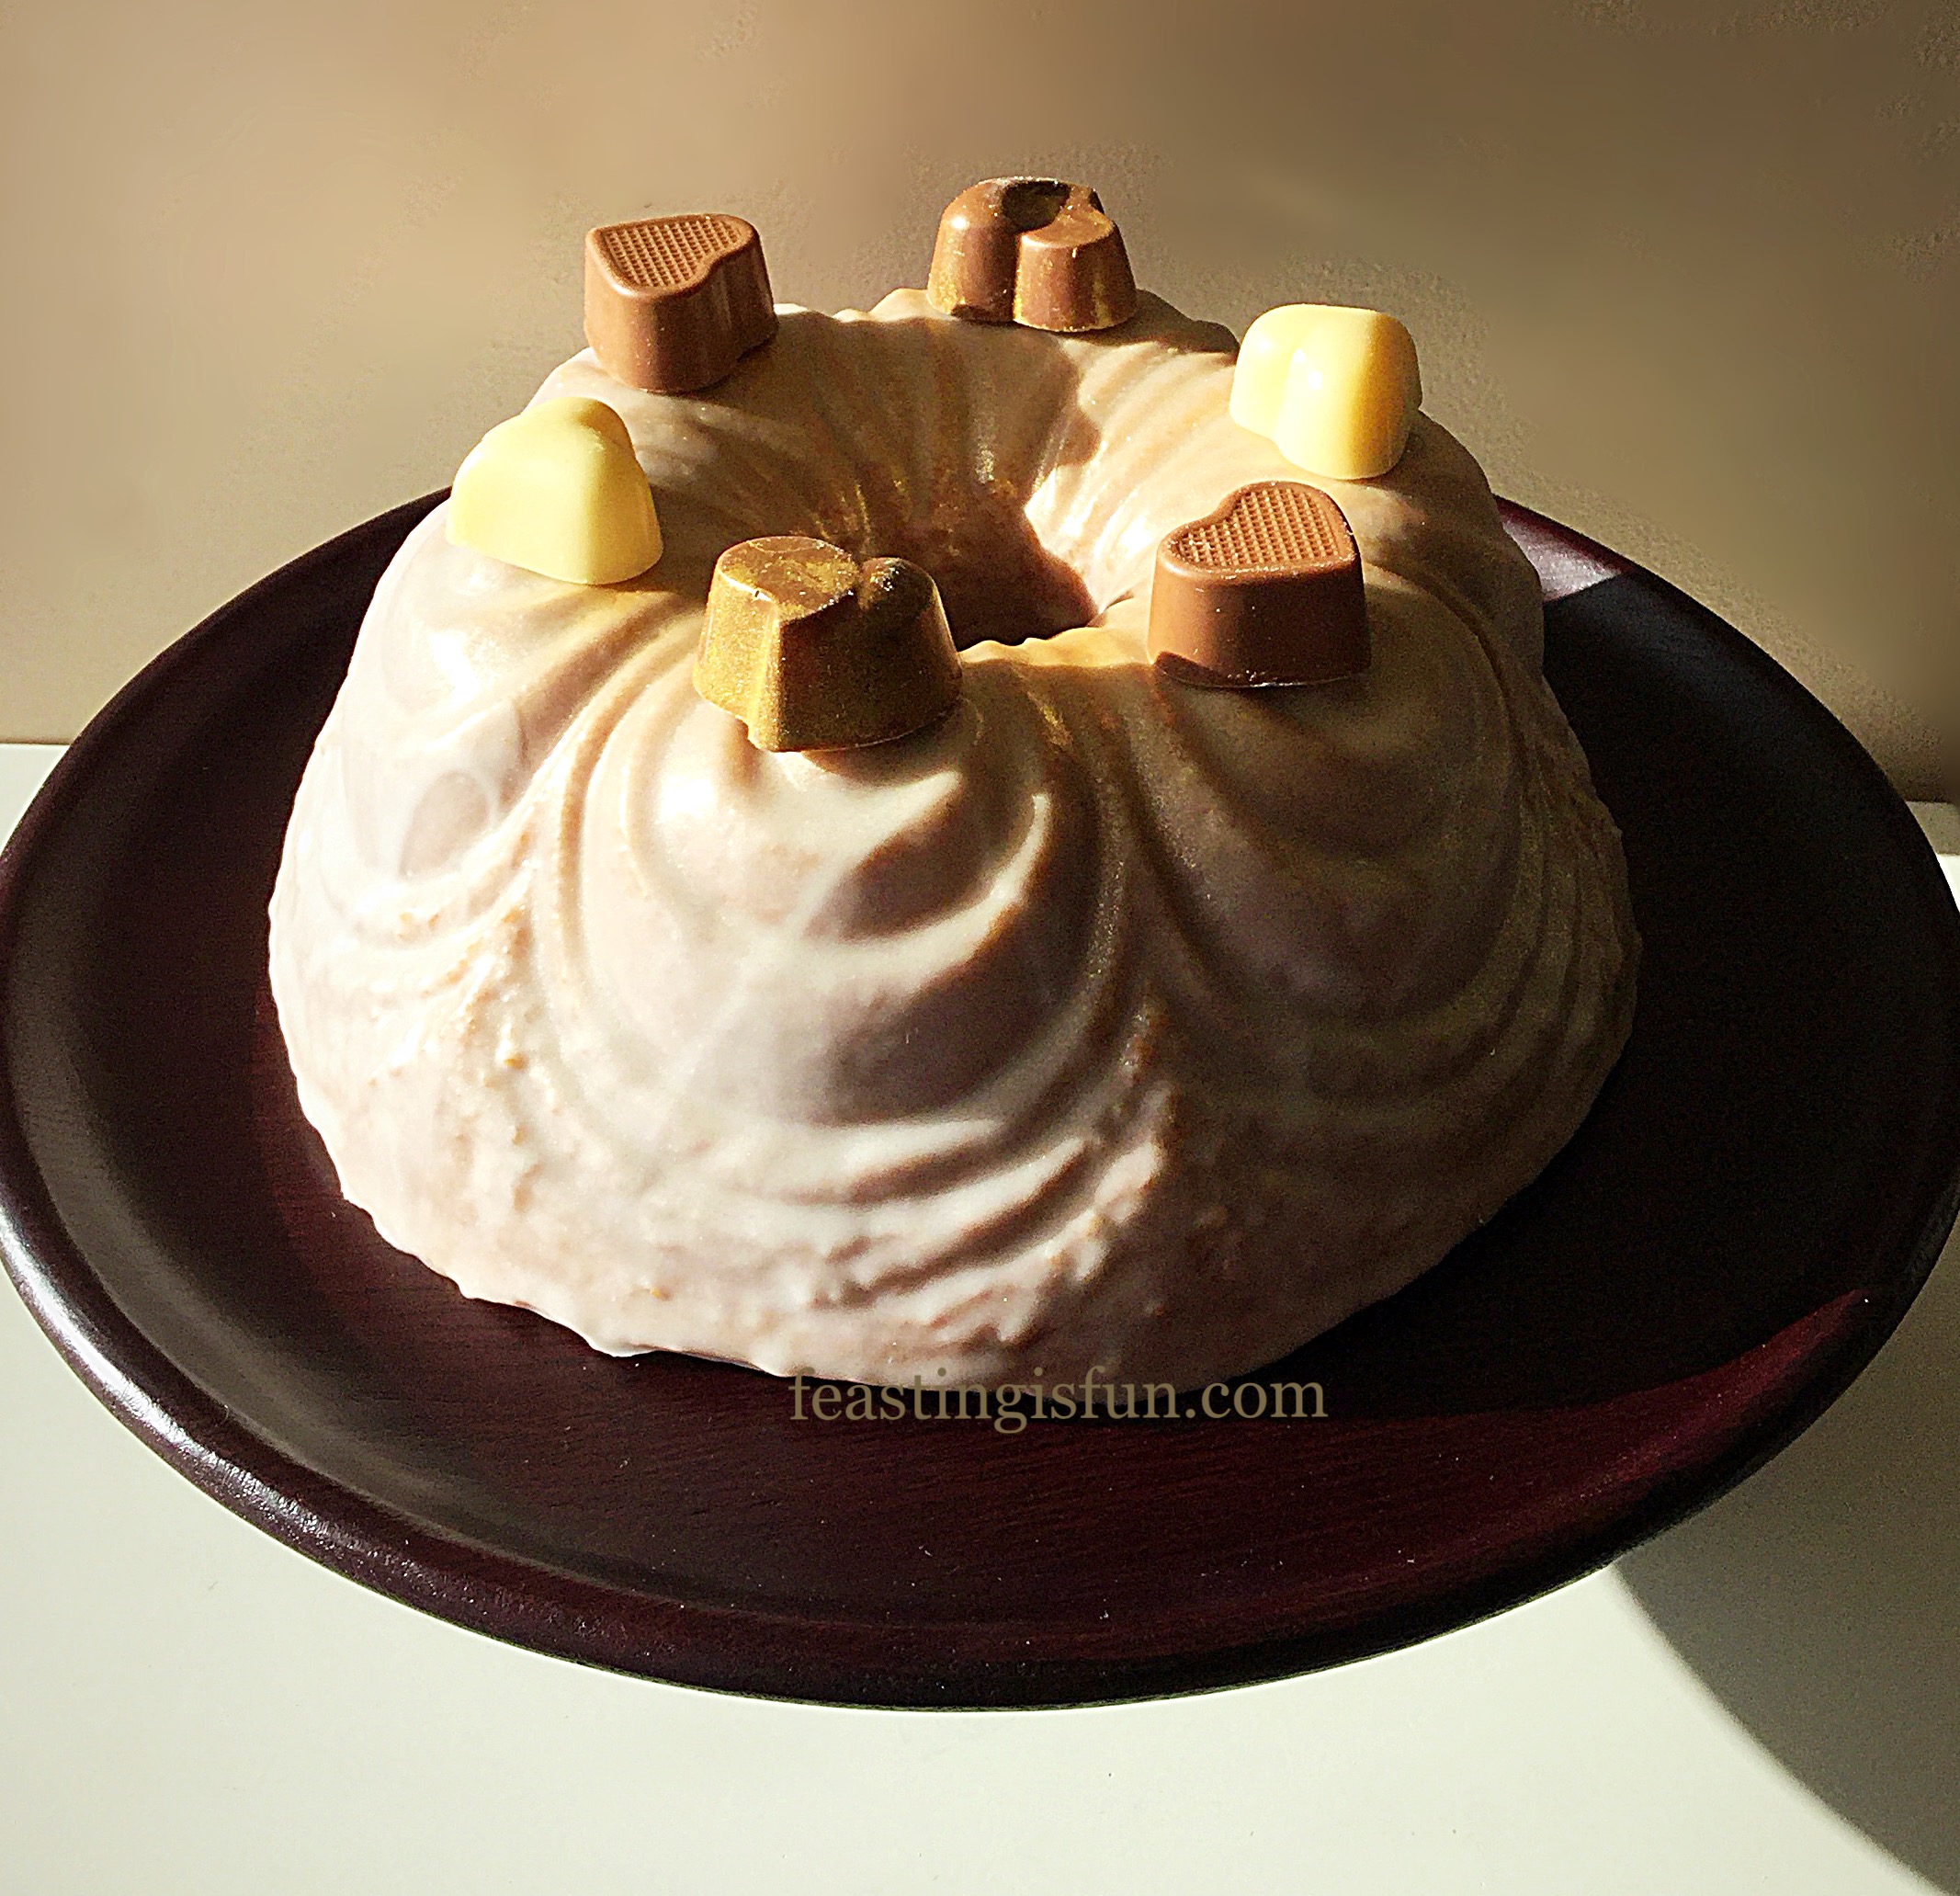
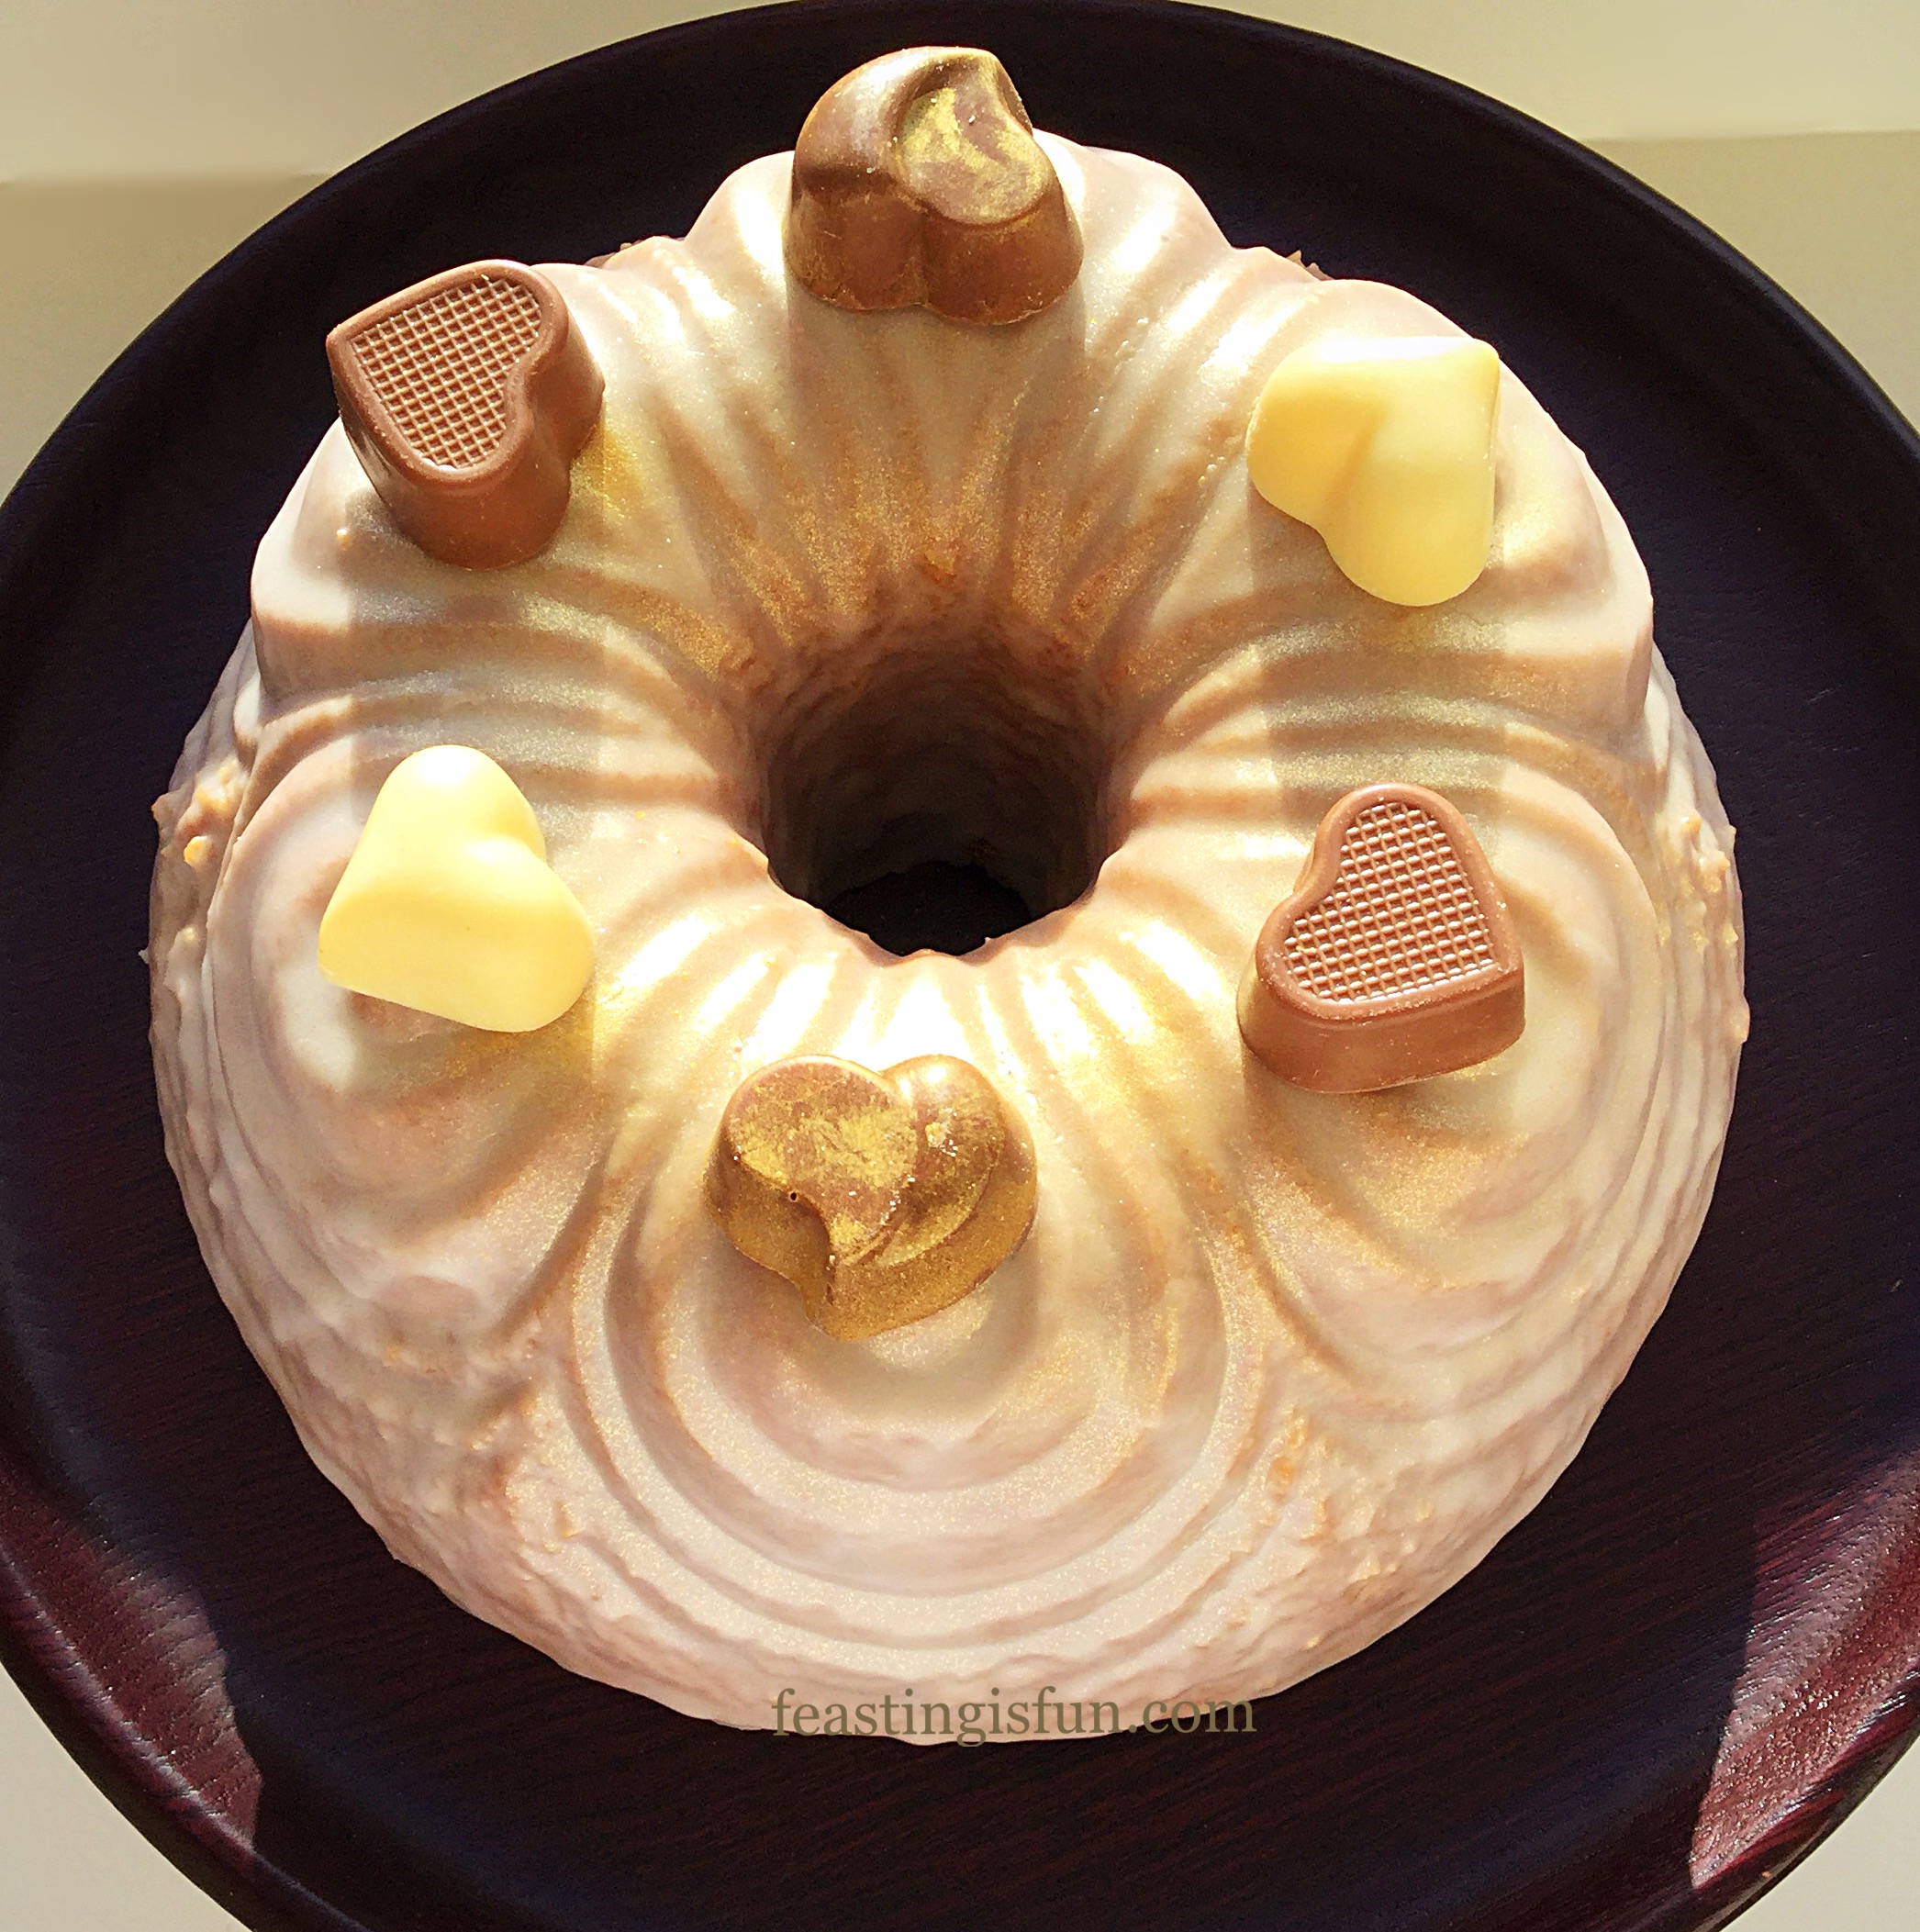
2 x 80g bags Galaxy Mini Golden Eggs

Optional – gold/copper sprinkles

Method: Preheat the oven to 160C/140C fan, gas mark 3, 325F

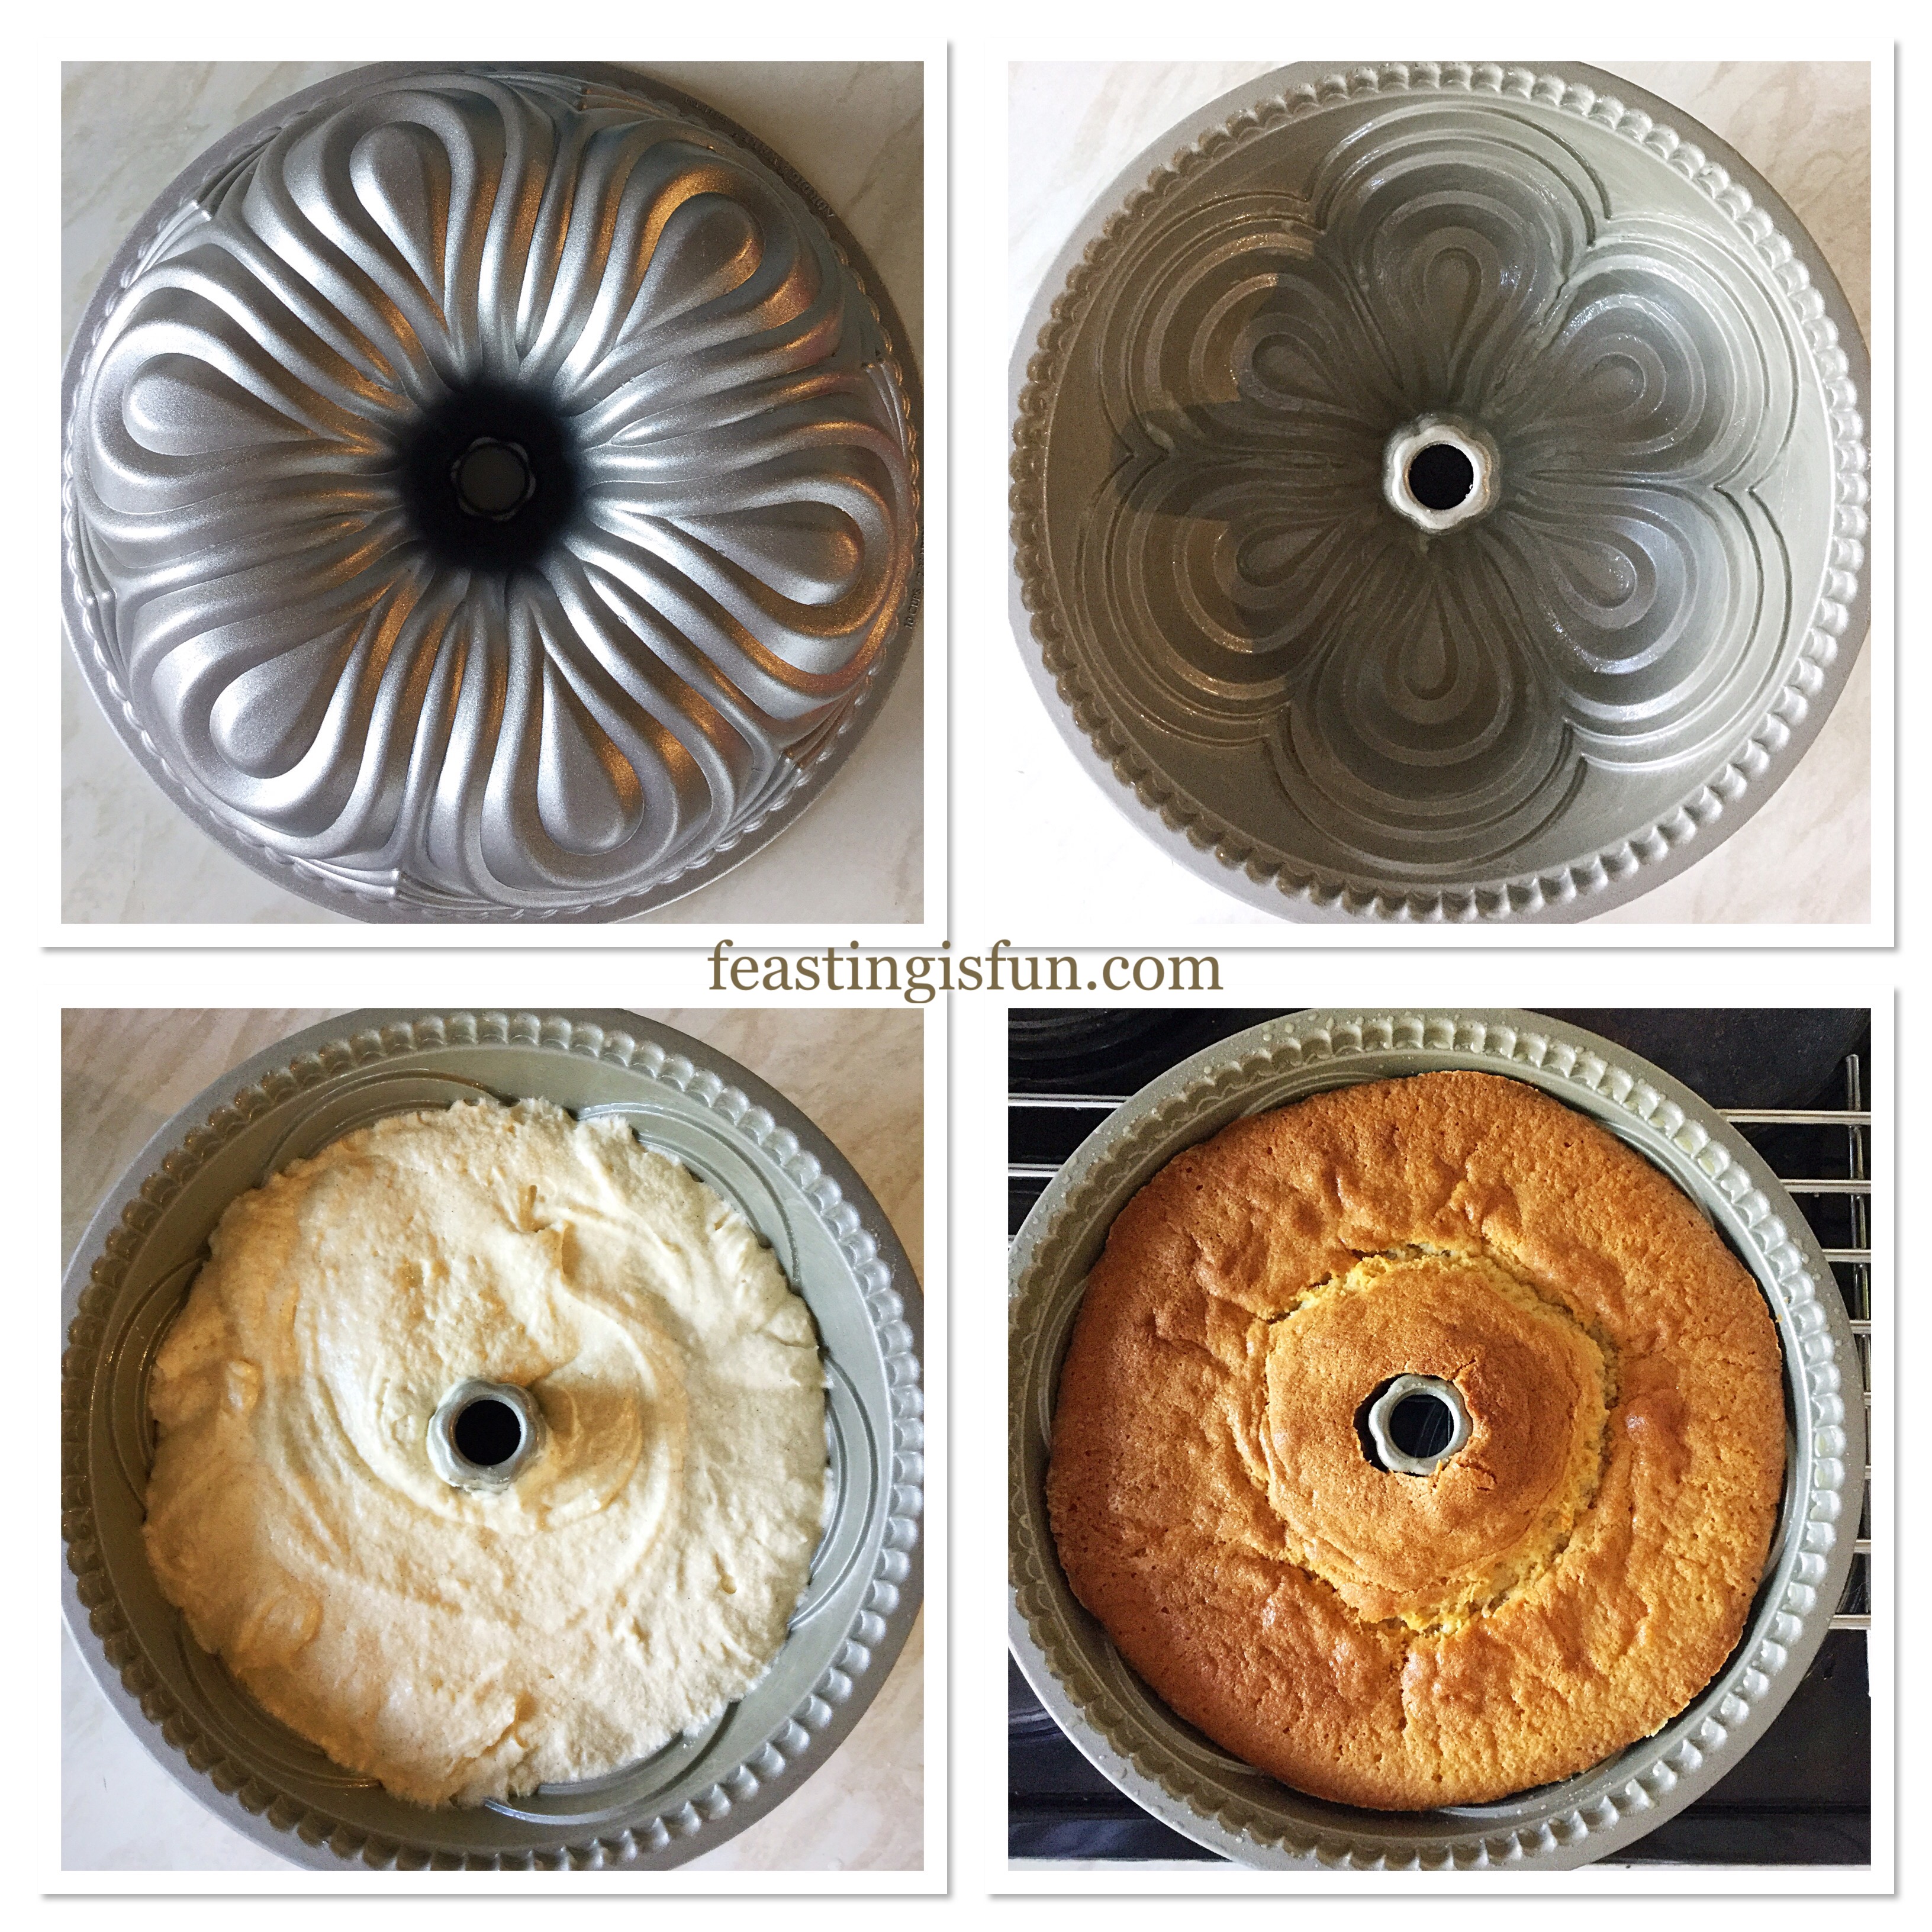
Grease 2 x 20cm/8″ sandwich tins with butter. Line the base of each tin with baking parchment.

Making and baking the chocolate sponge cakes

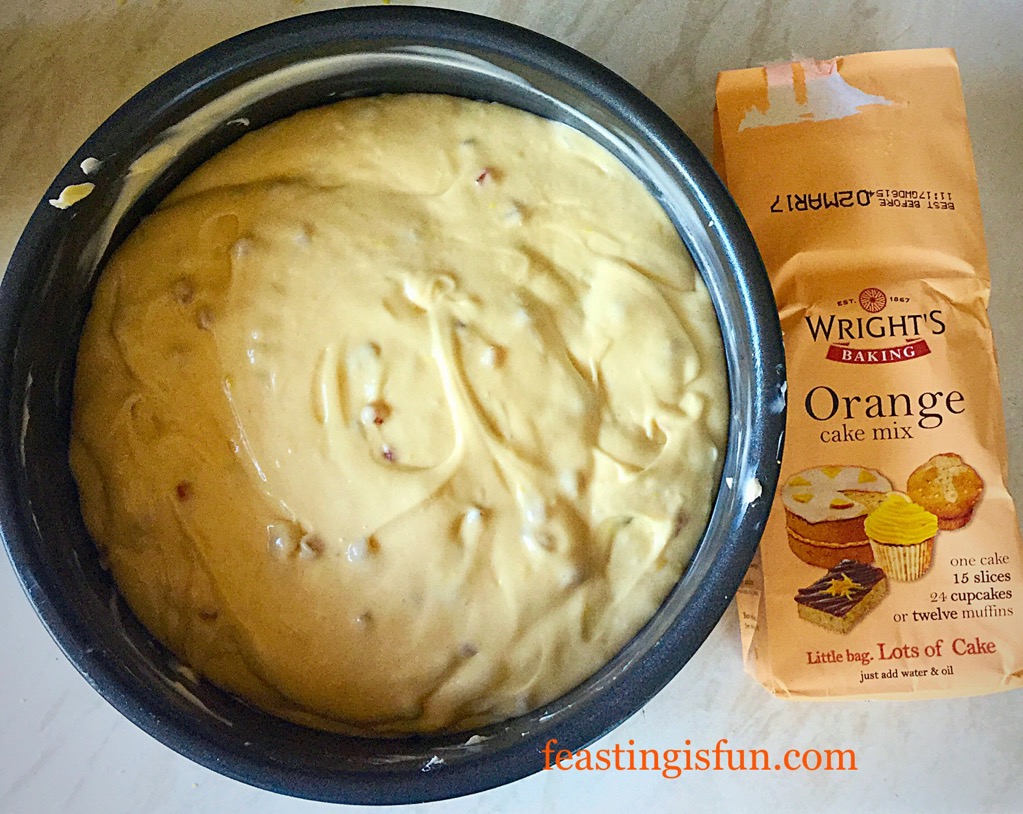
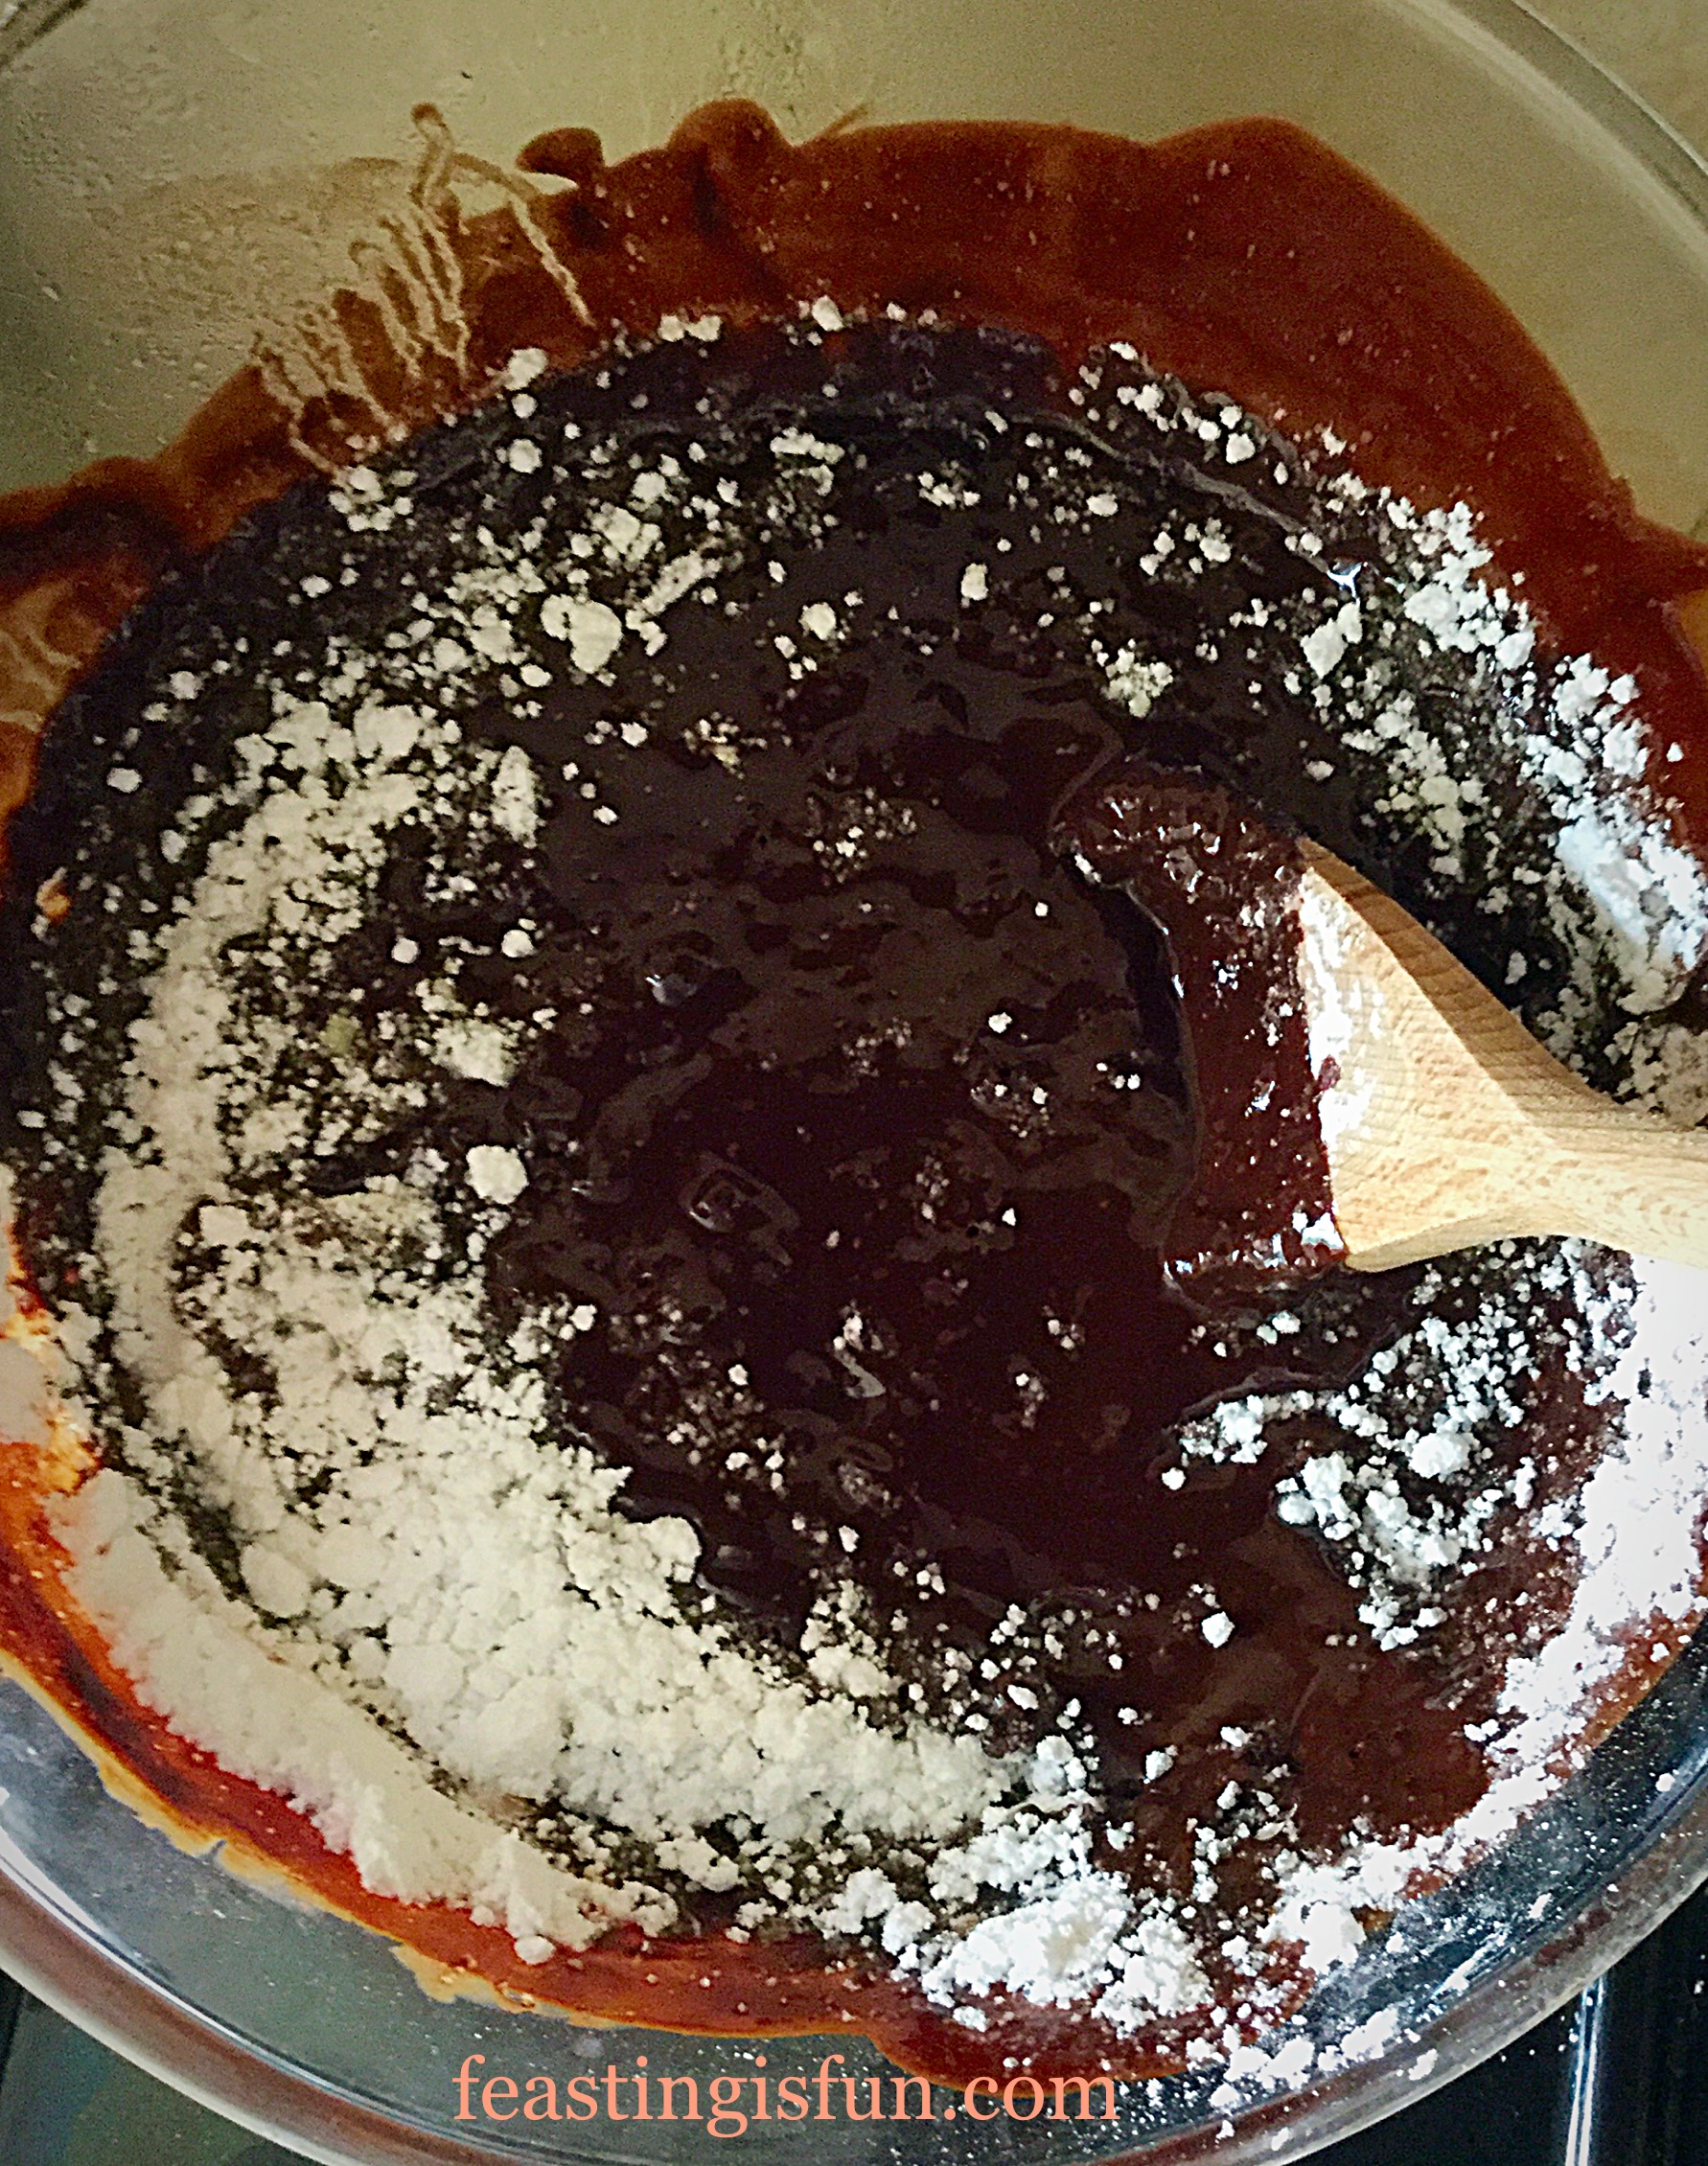
  • First of all, place a sieve over a bowl. Then sieve the flour, baking powder and cocoa powder into the bowl. Set the bowl to one side. Dry ingredients.
  • Next, place the eggs and buttermilk into a jug. Whisk lightly using a fork. Wet ingredients.
  • Place the butter, brown butter and salt into a large bowl. Beat until well combined and free from lumps.
  • Next add the vanilla extract. Continue to beat until incorporated.
  • Take the jug of wet ingredients and pour on to the butter mixture. Then add the sifted dry ingredients.
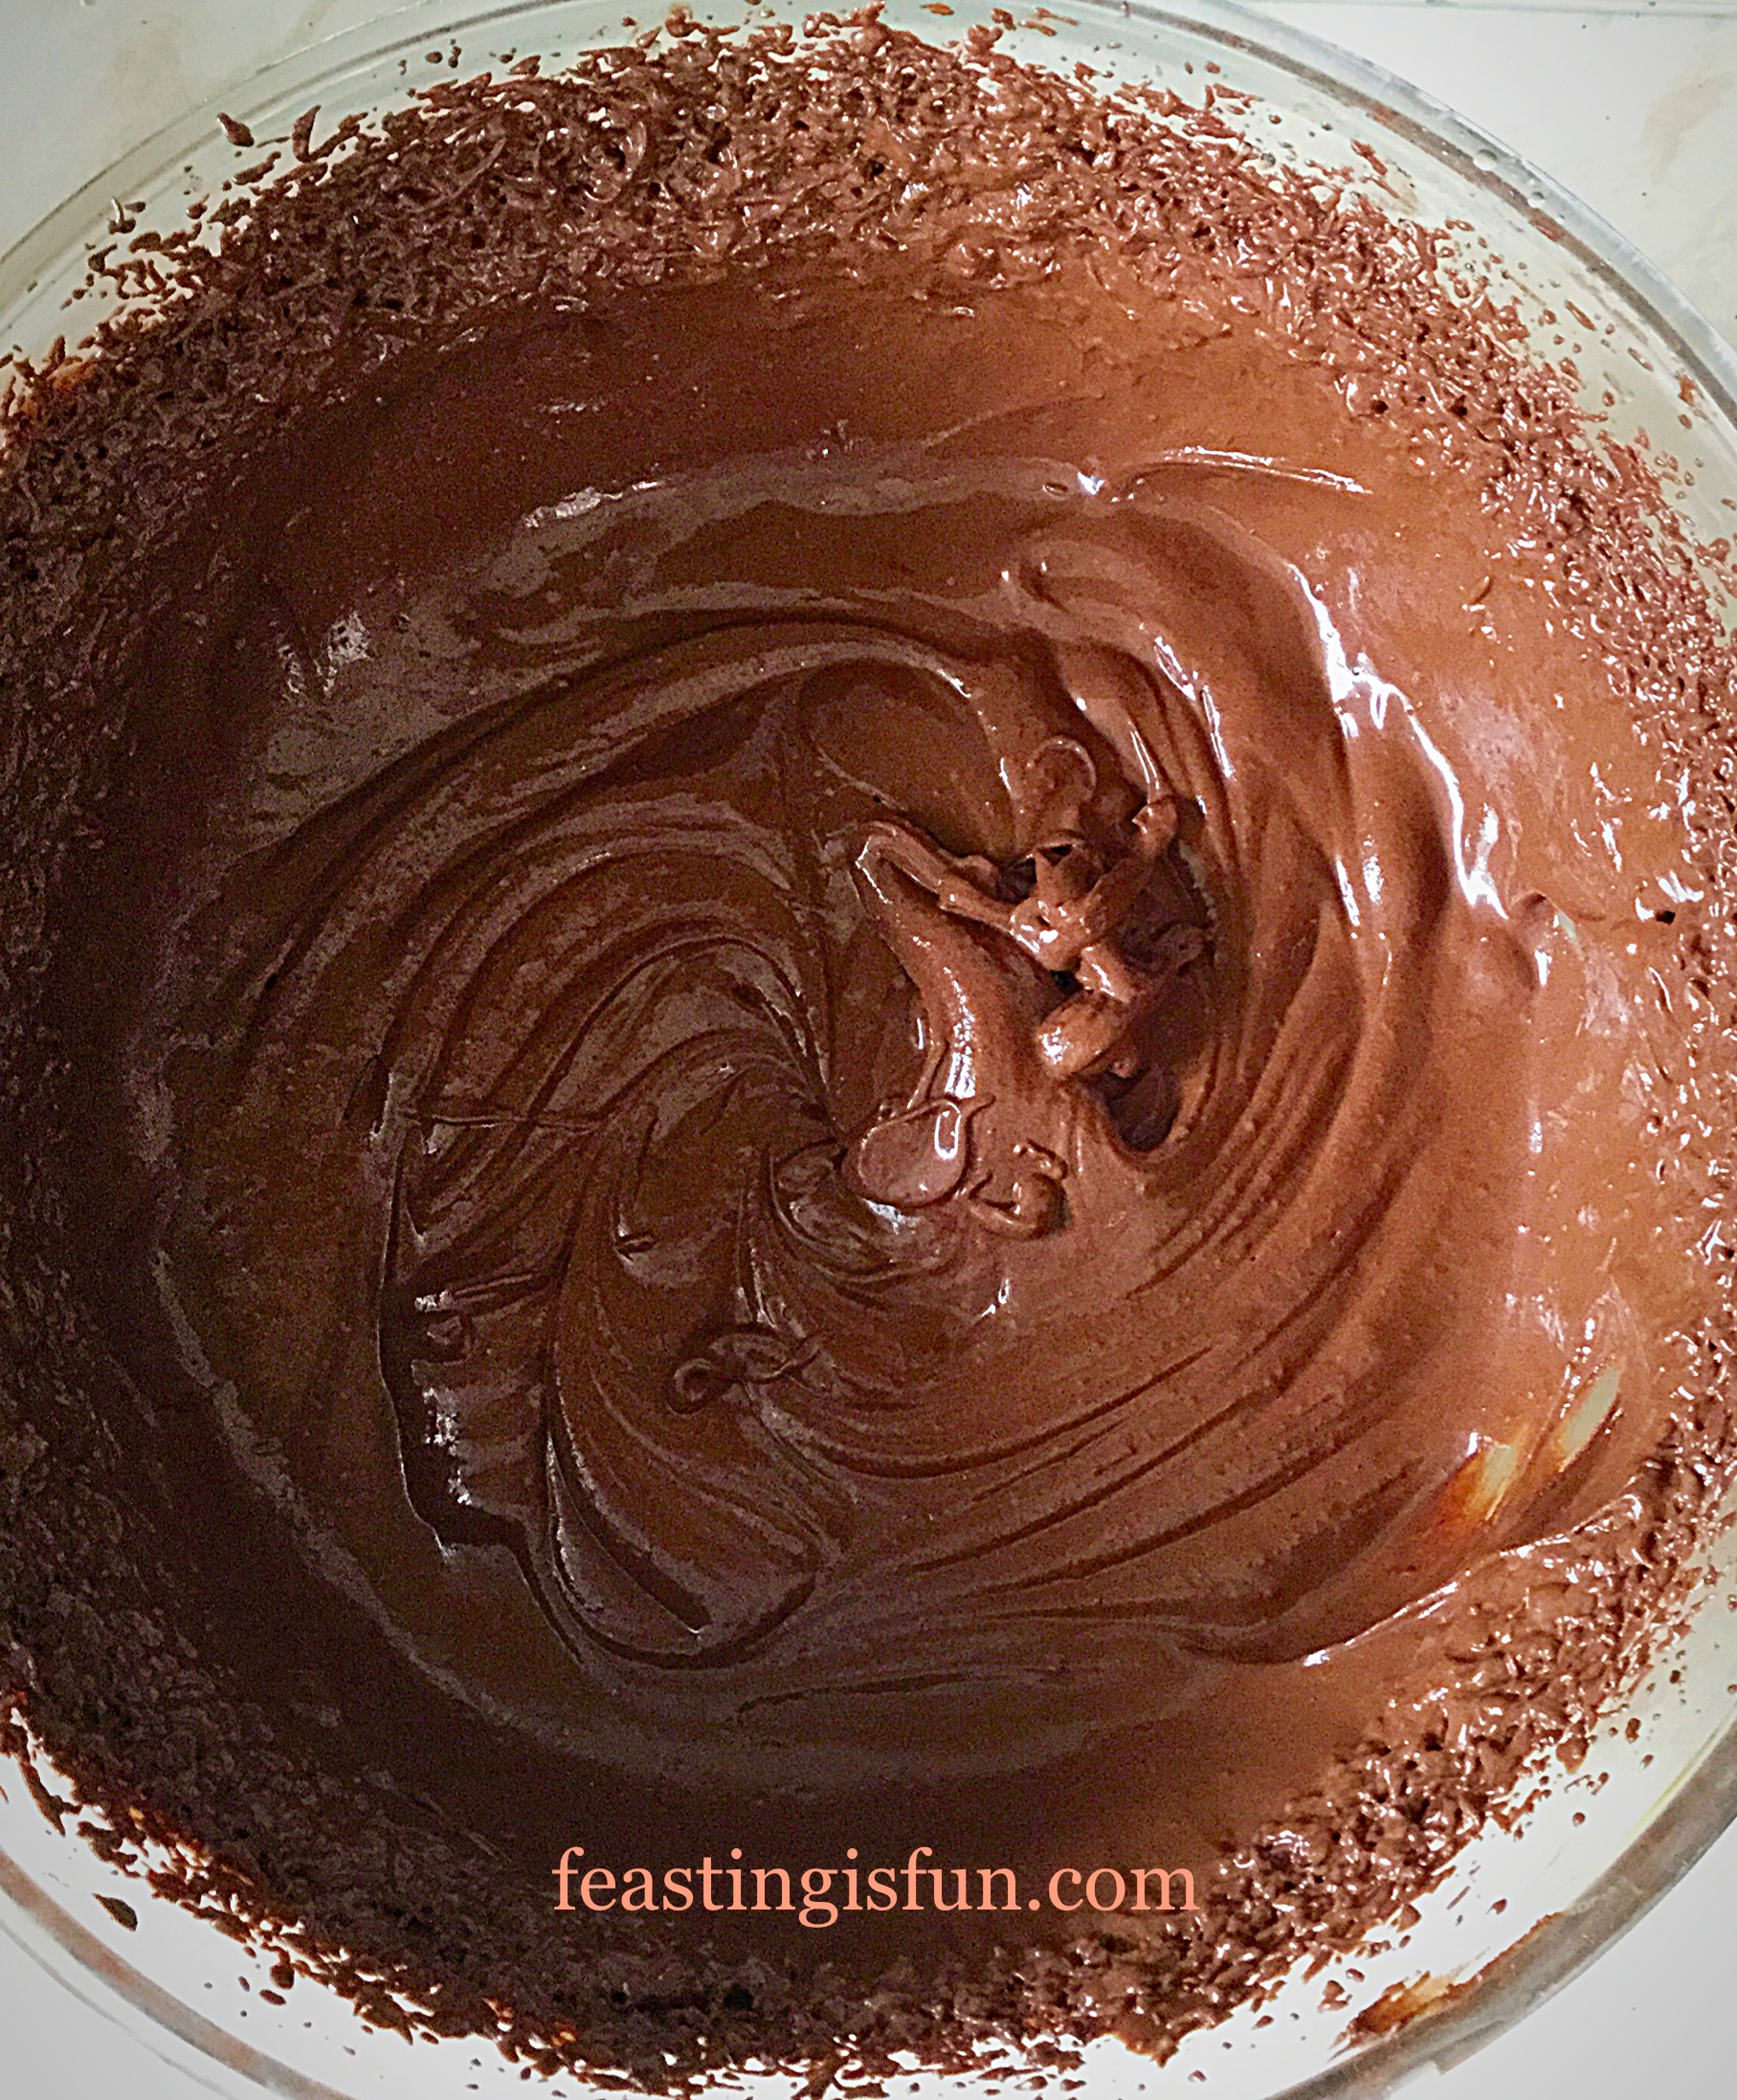
  • Beat the ingredients in the bowl gently, scraping down the sides of the bowl halfway through. Continue to beat the ingredients until fully combined.
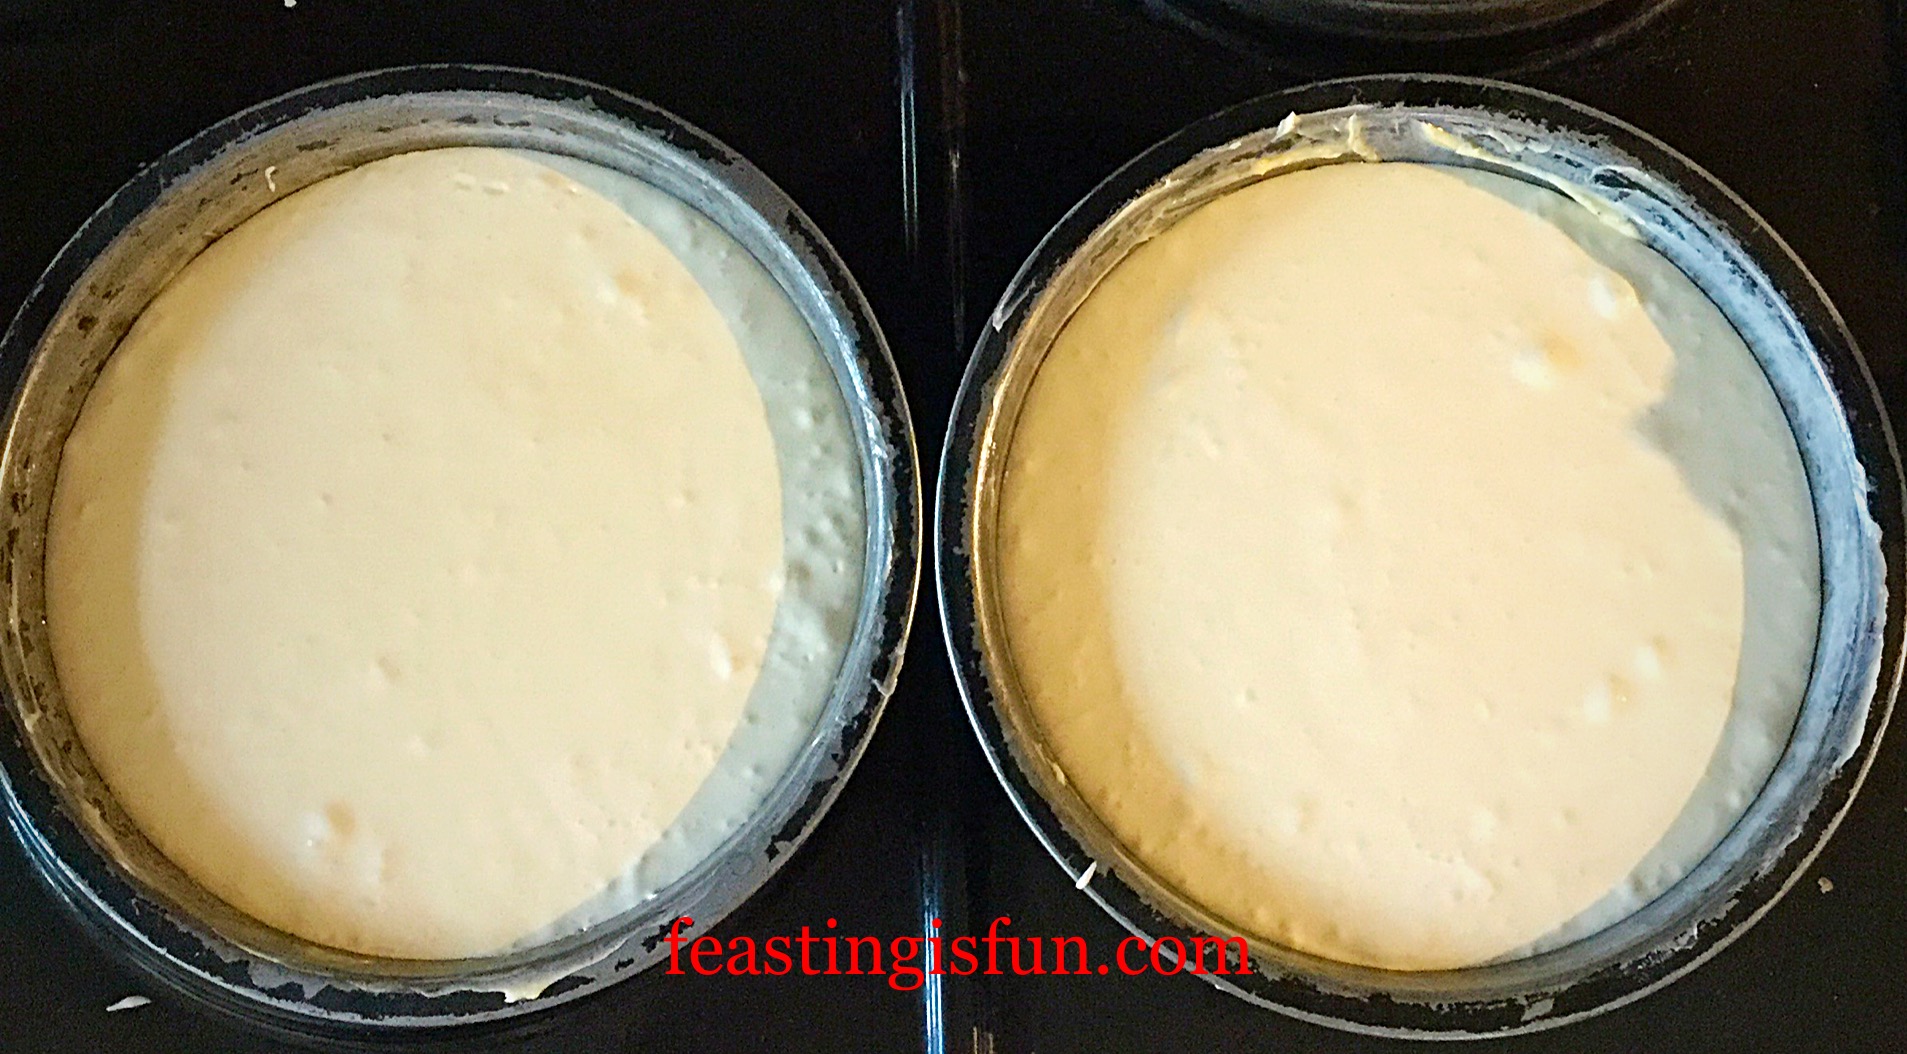
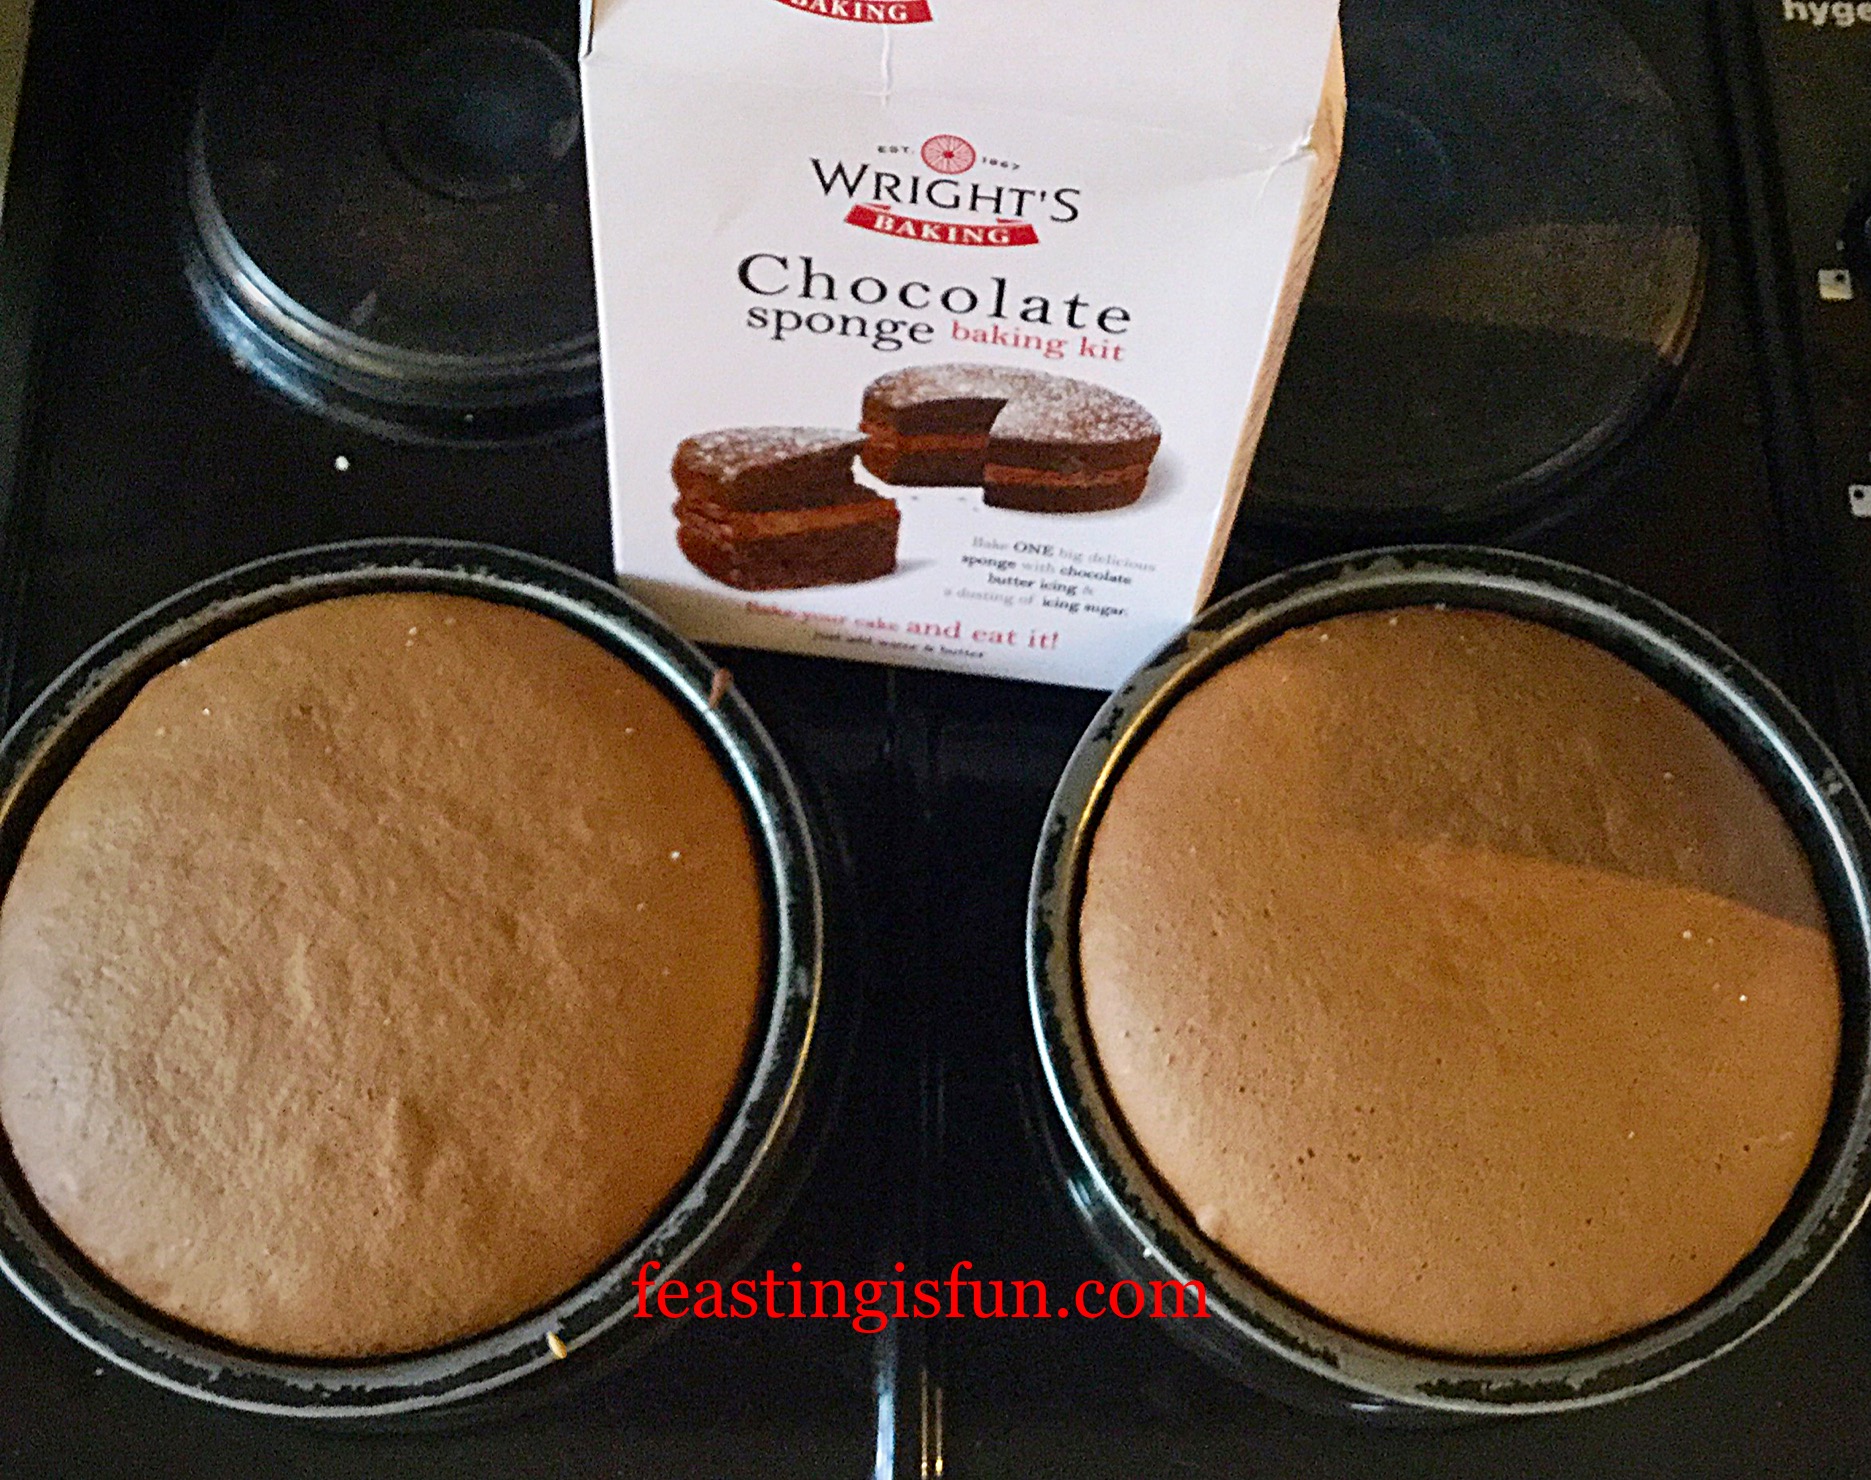
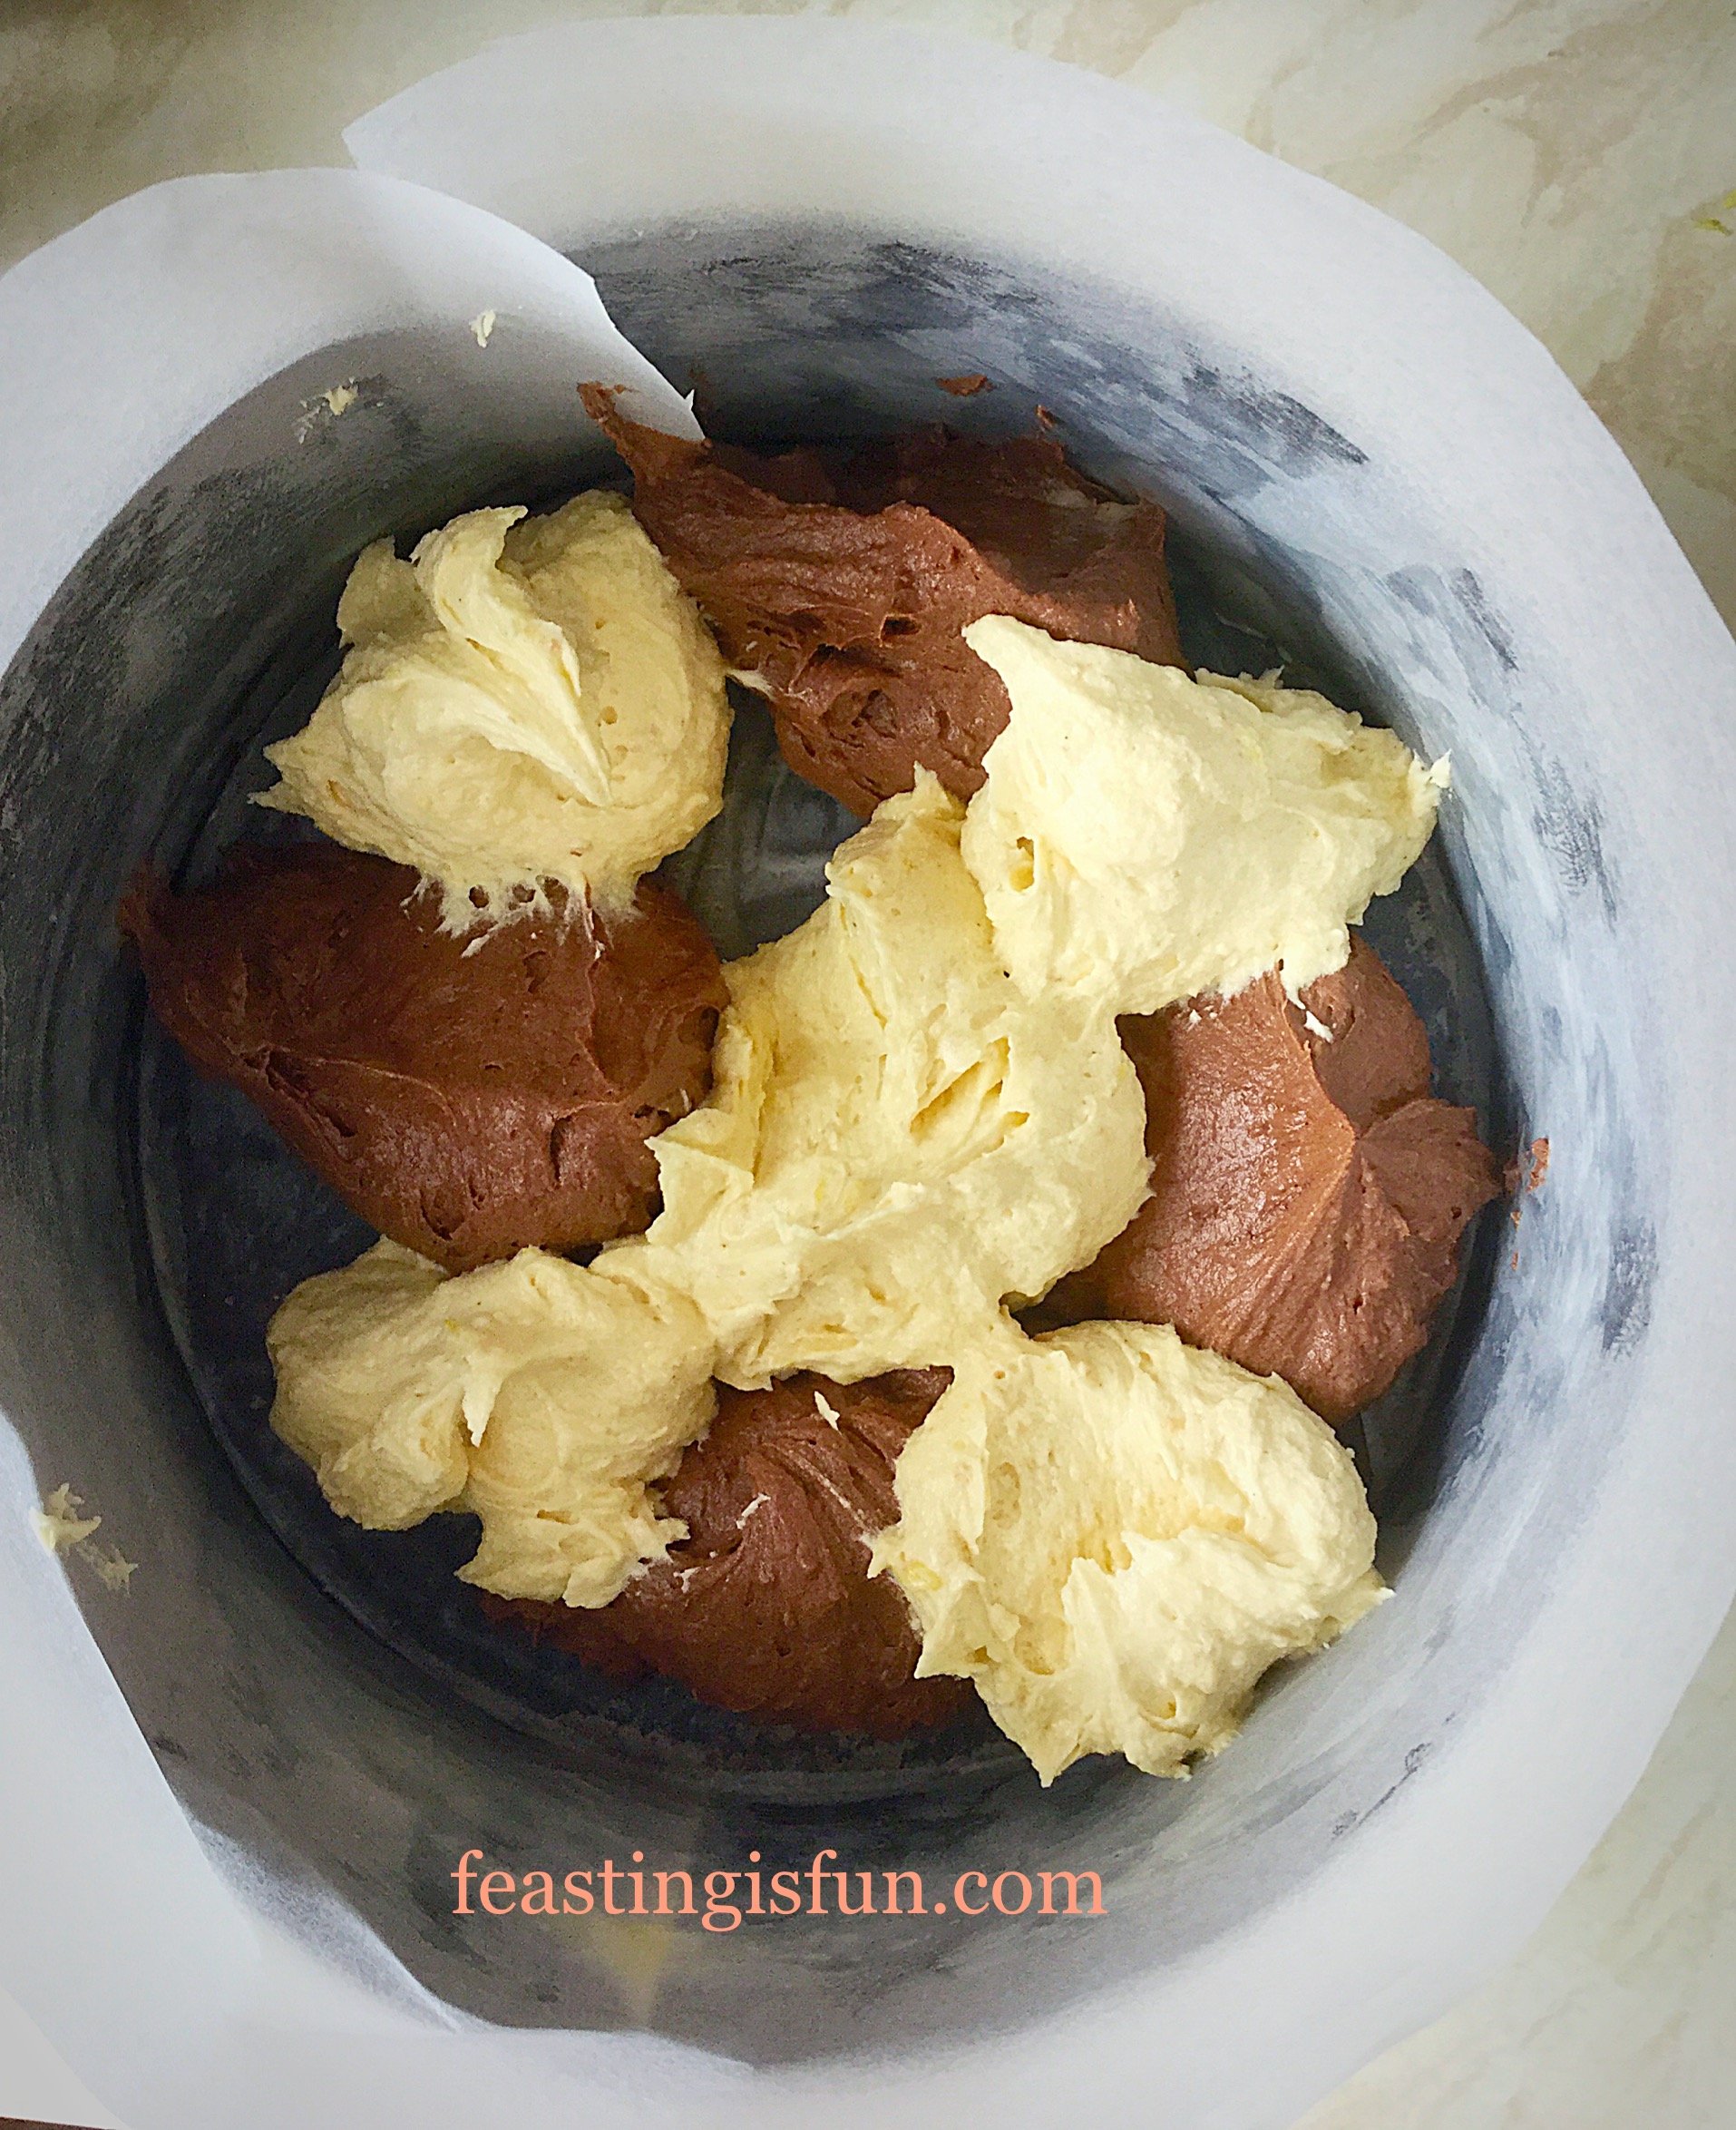
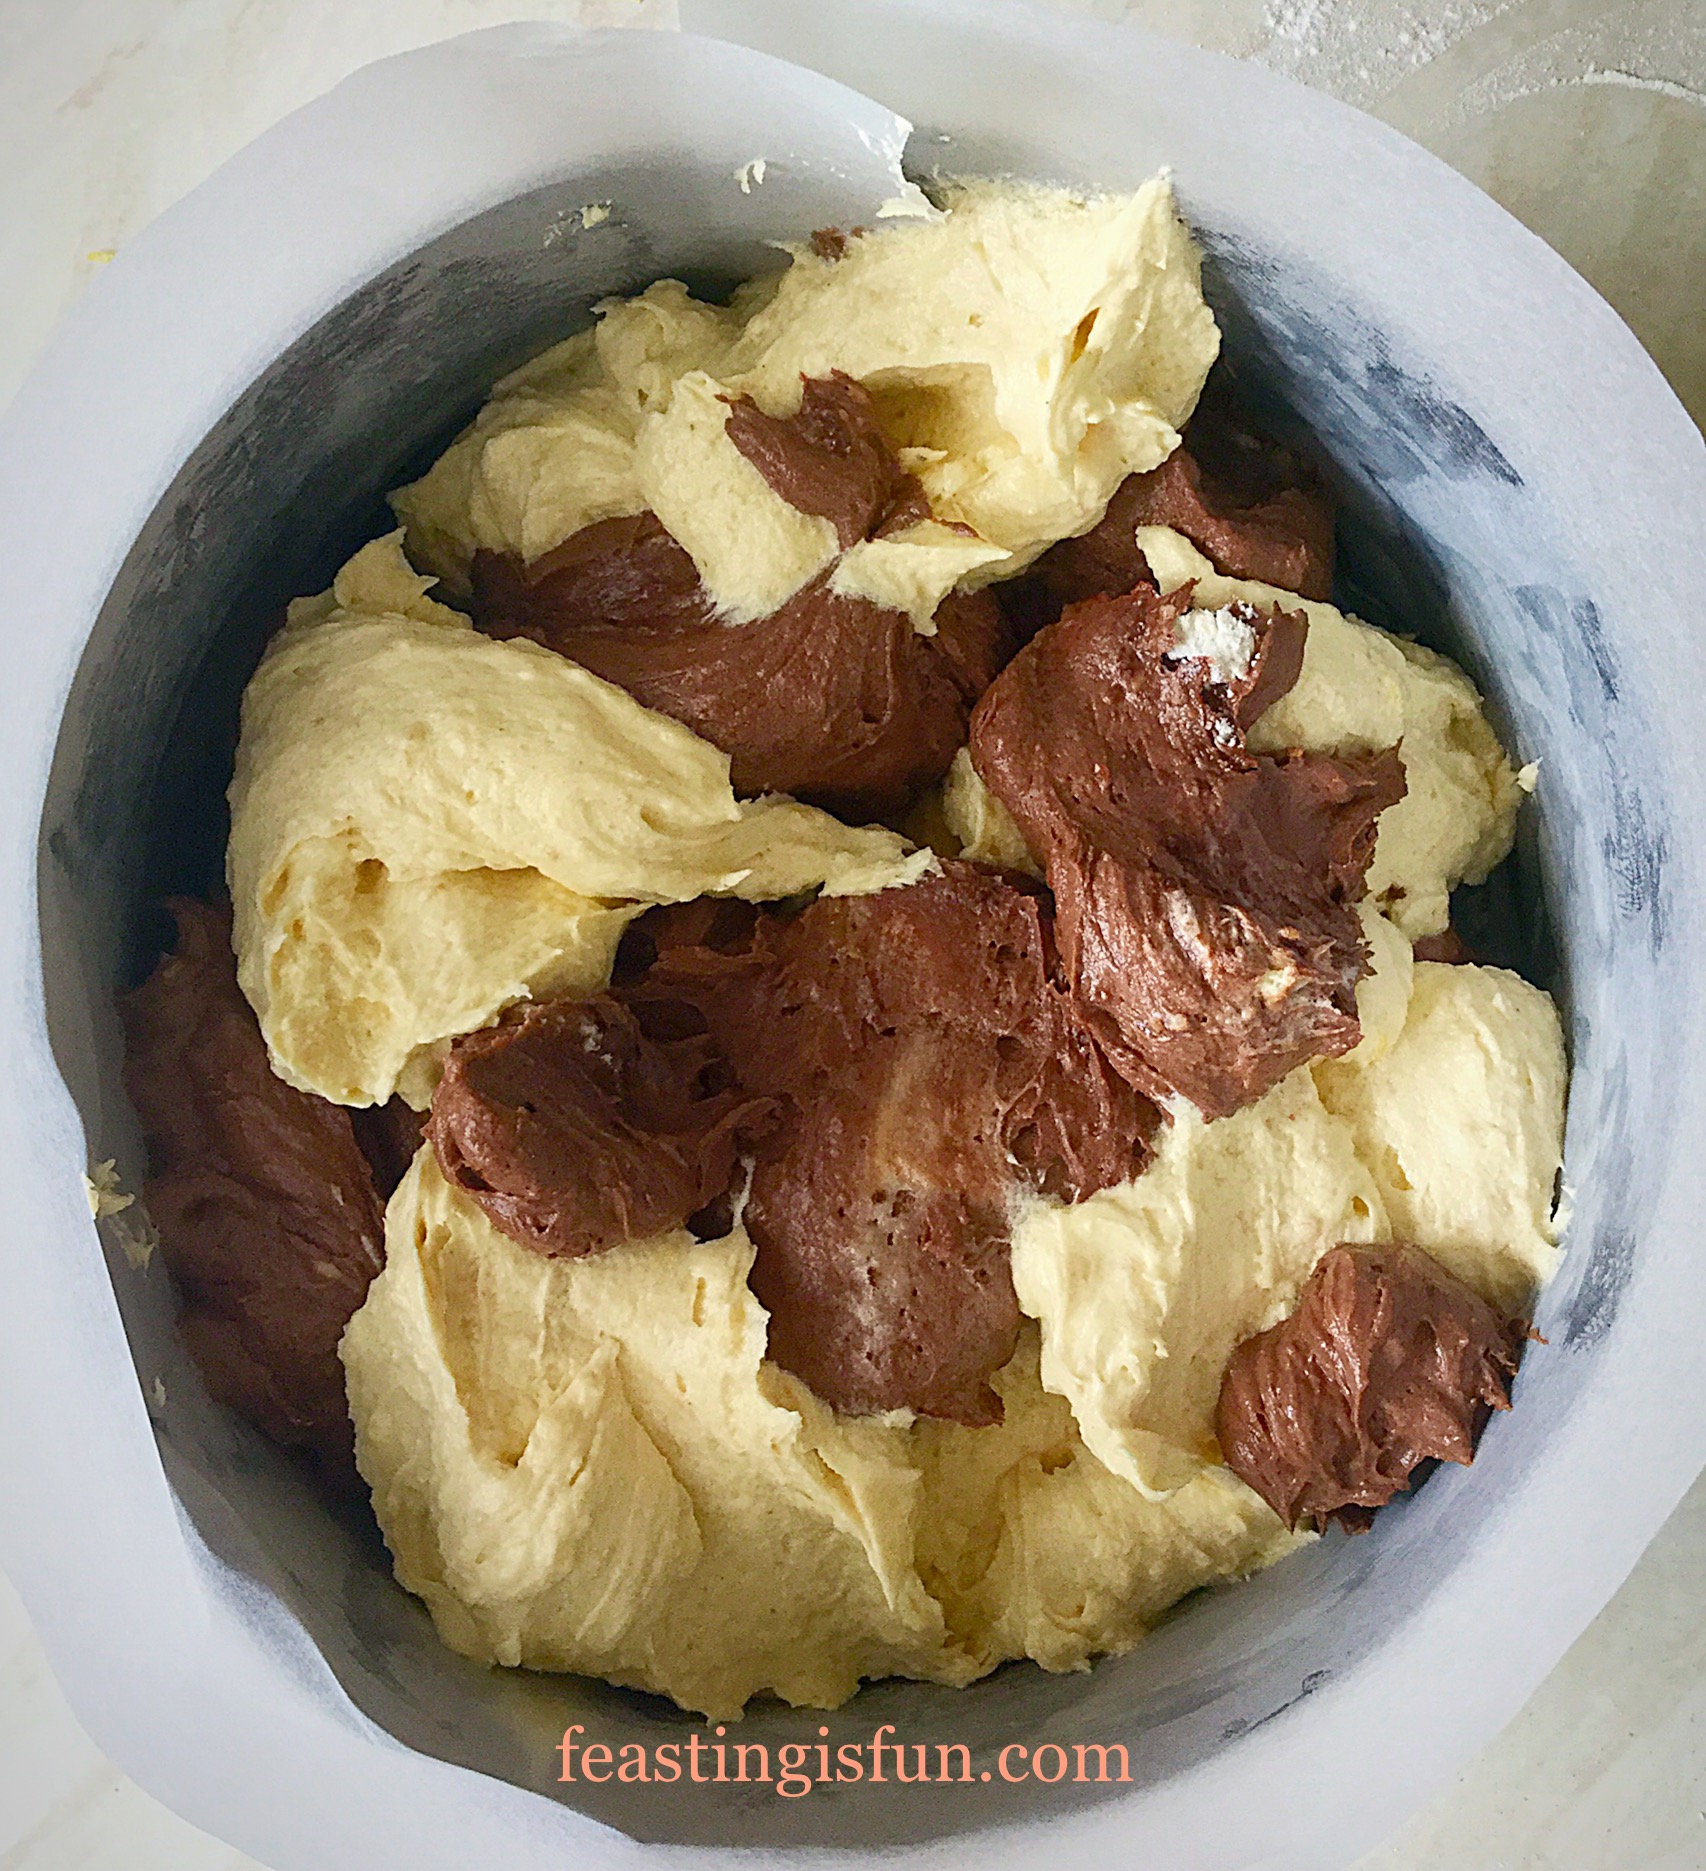
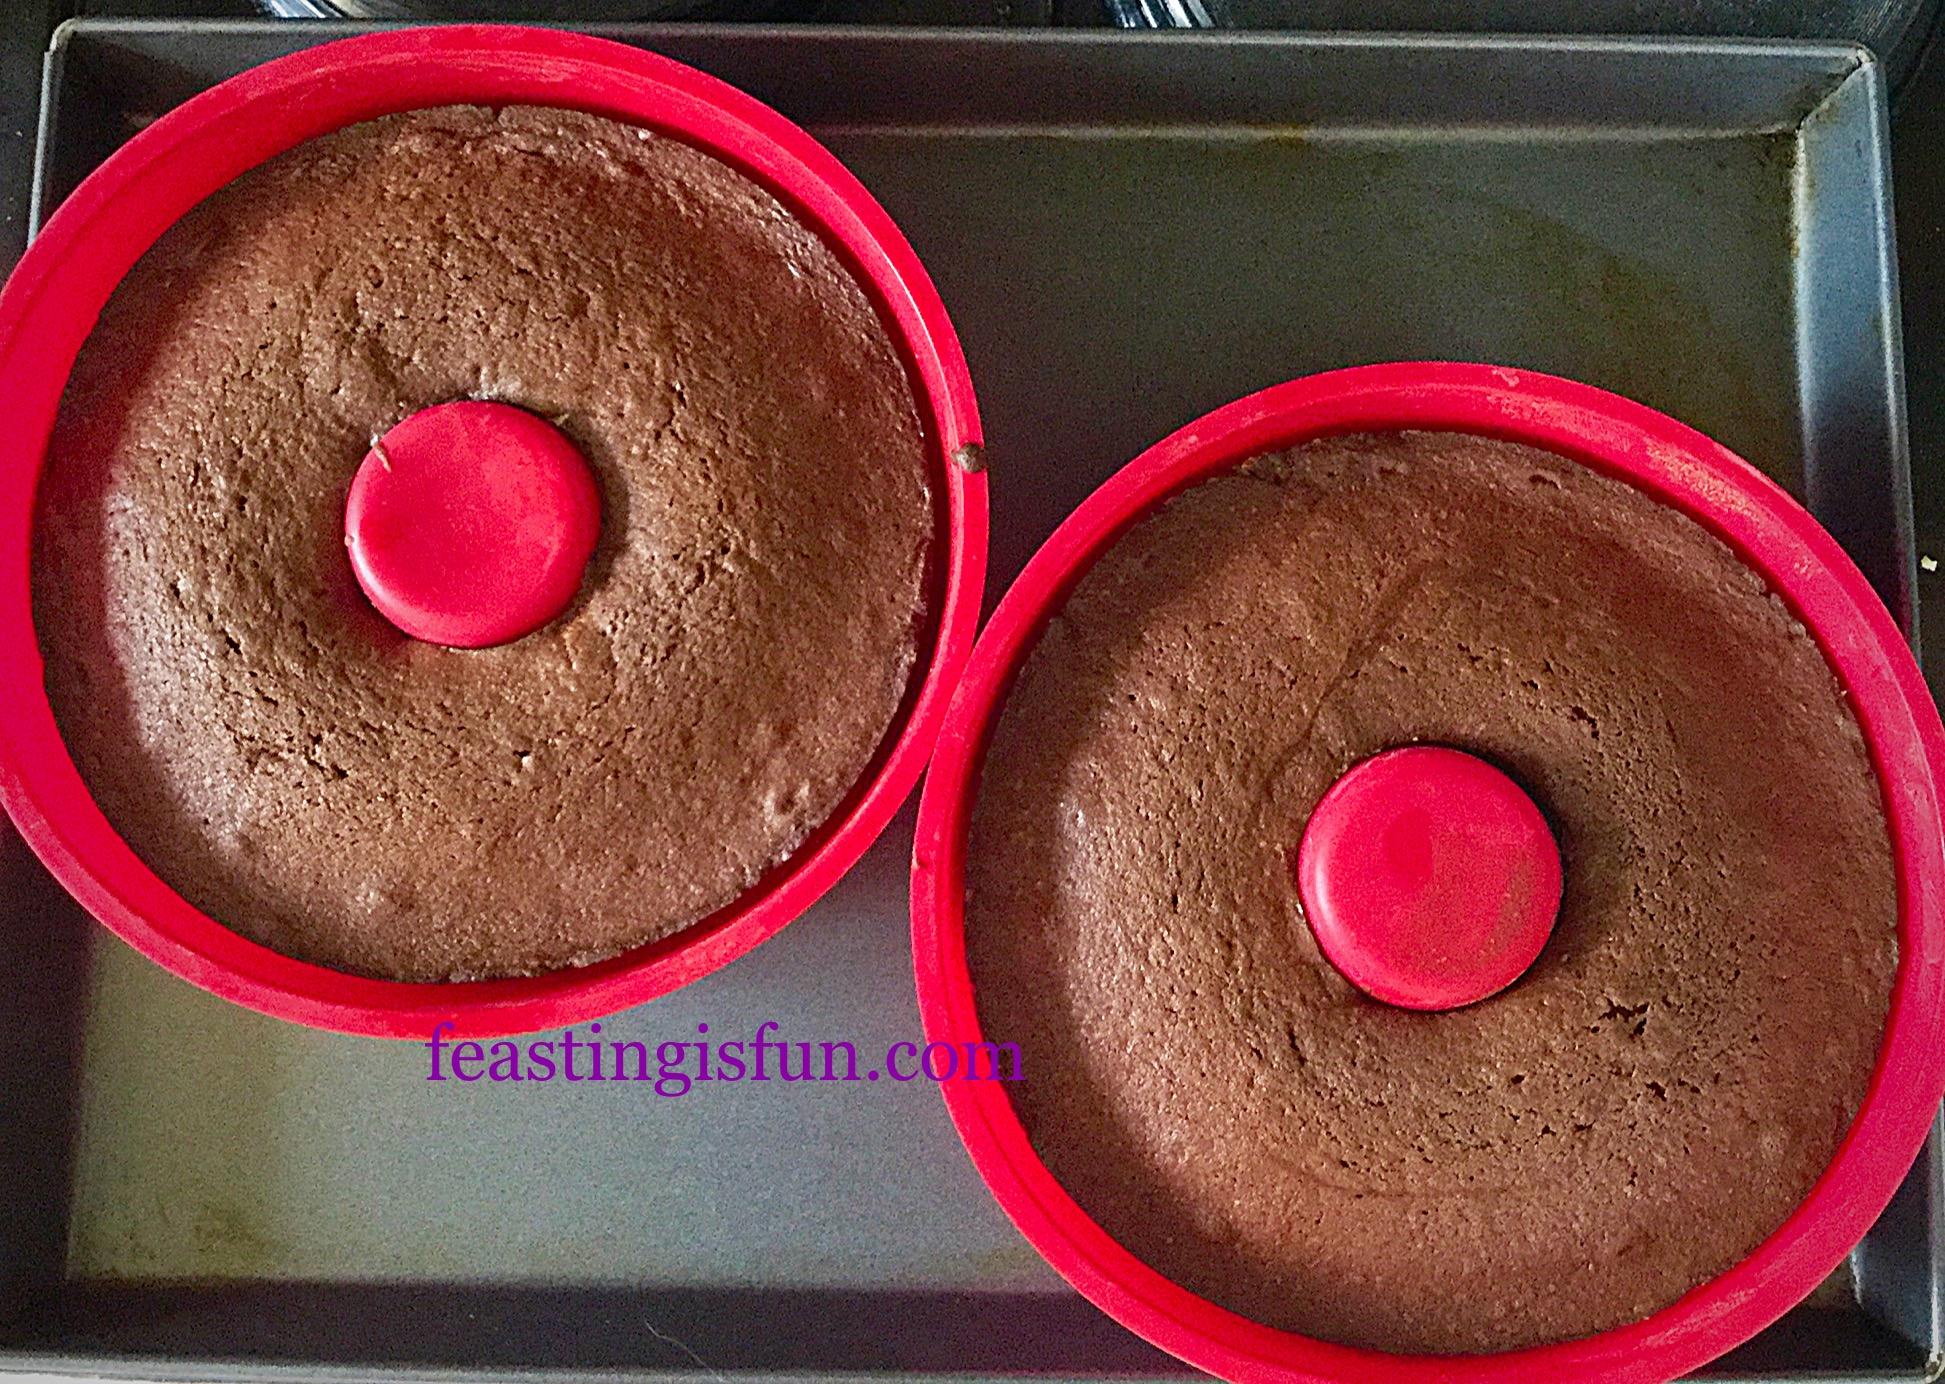
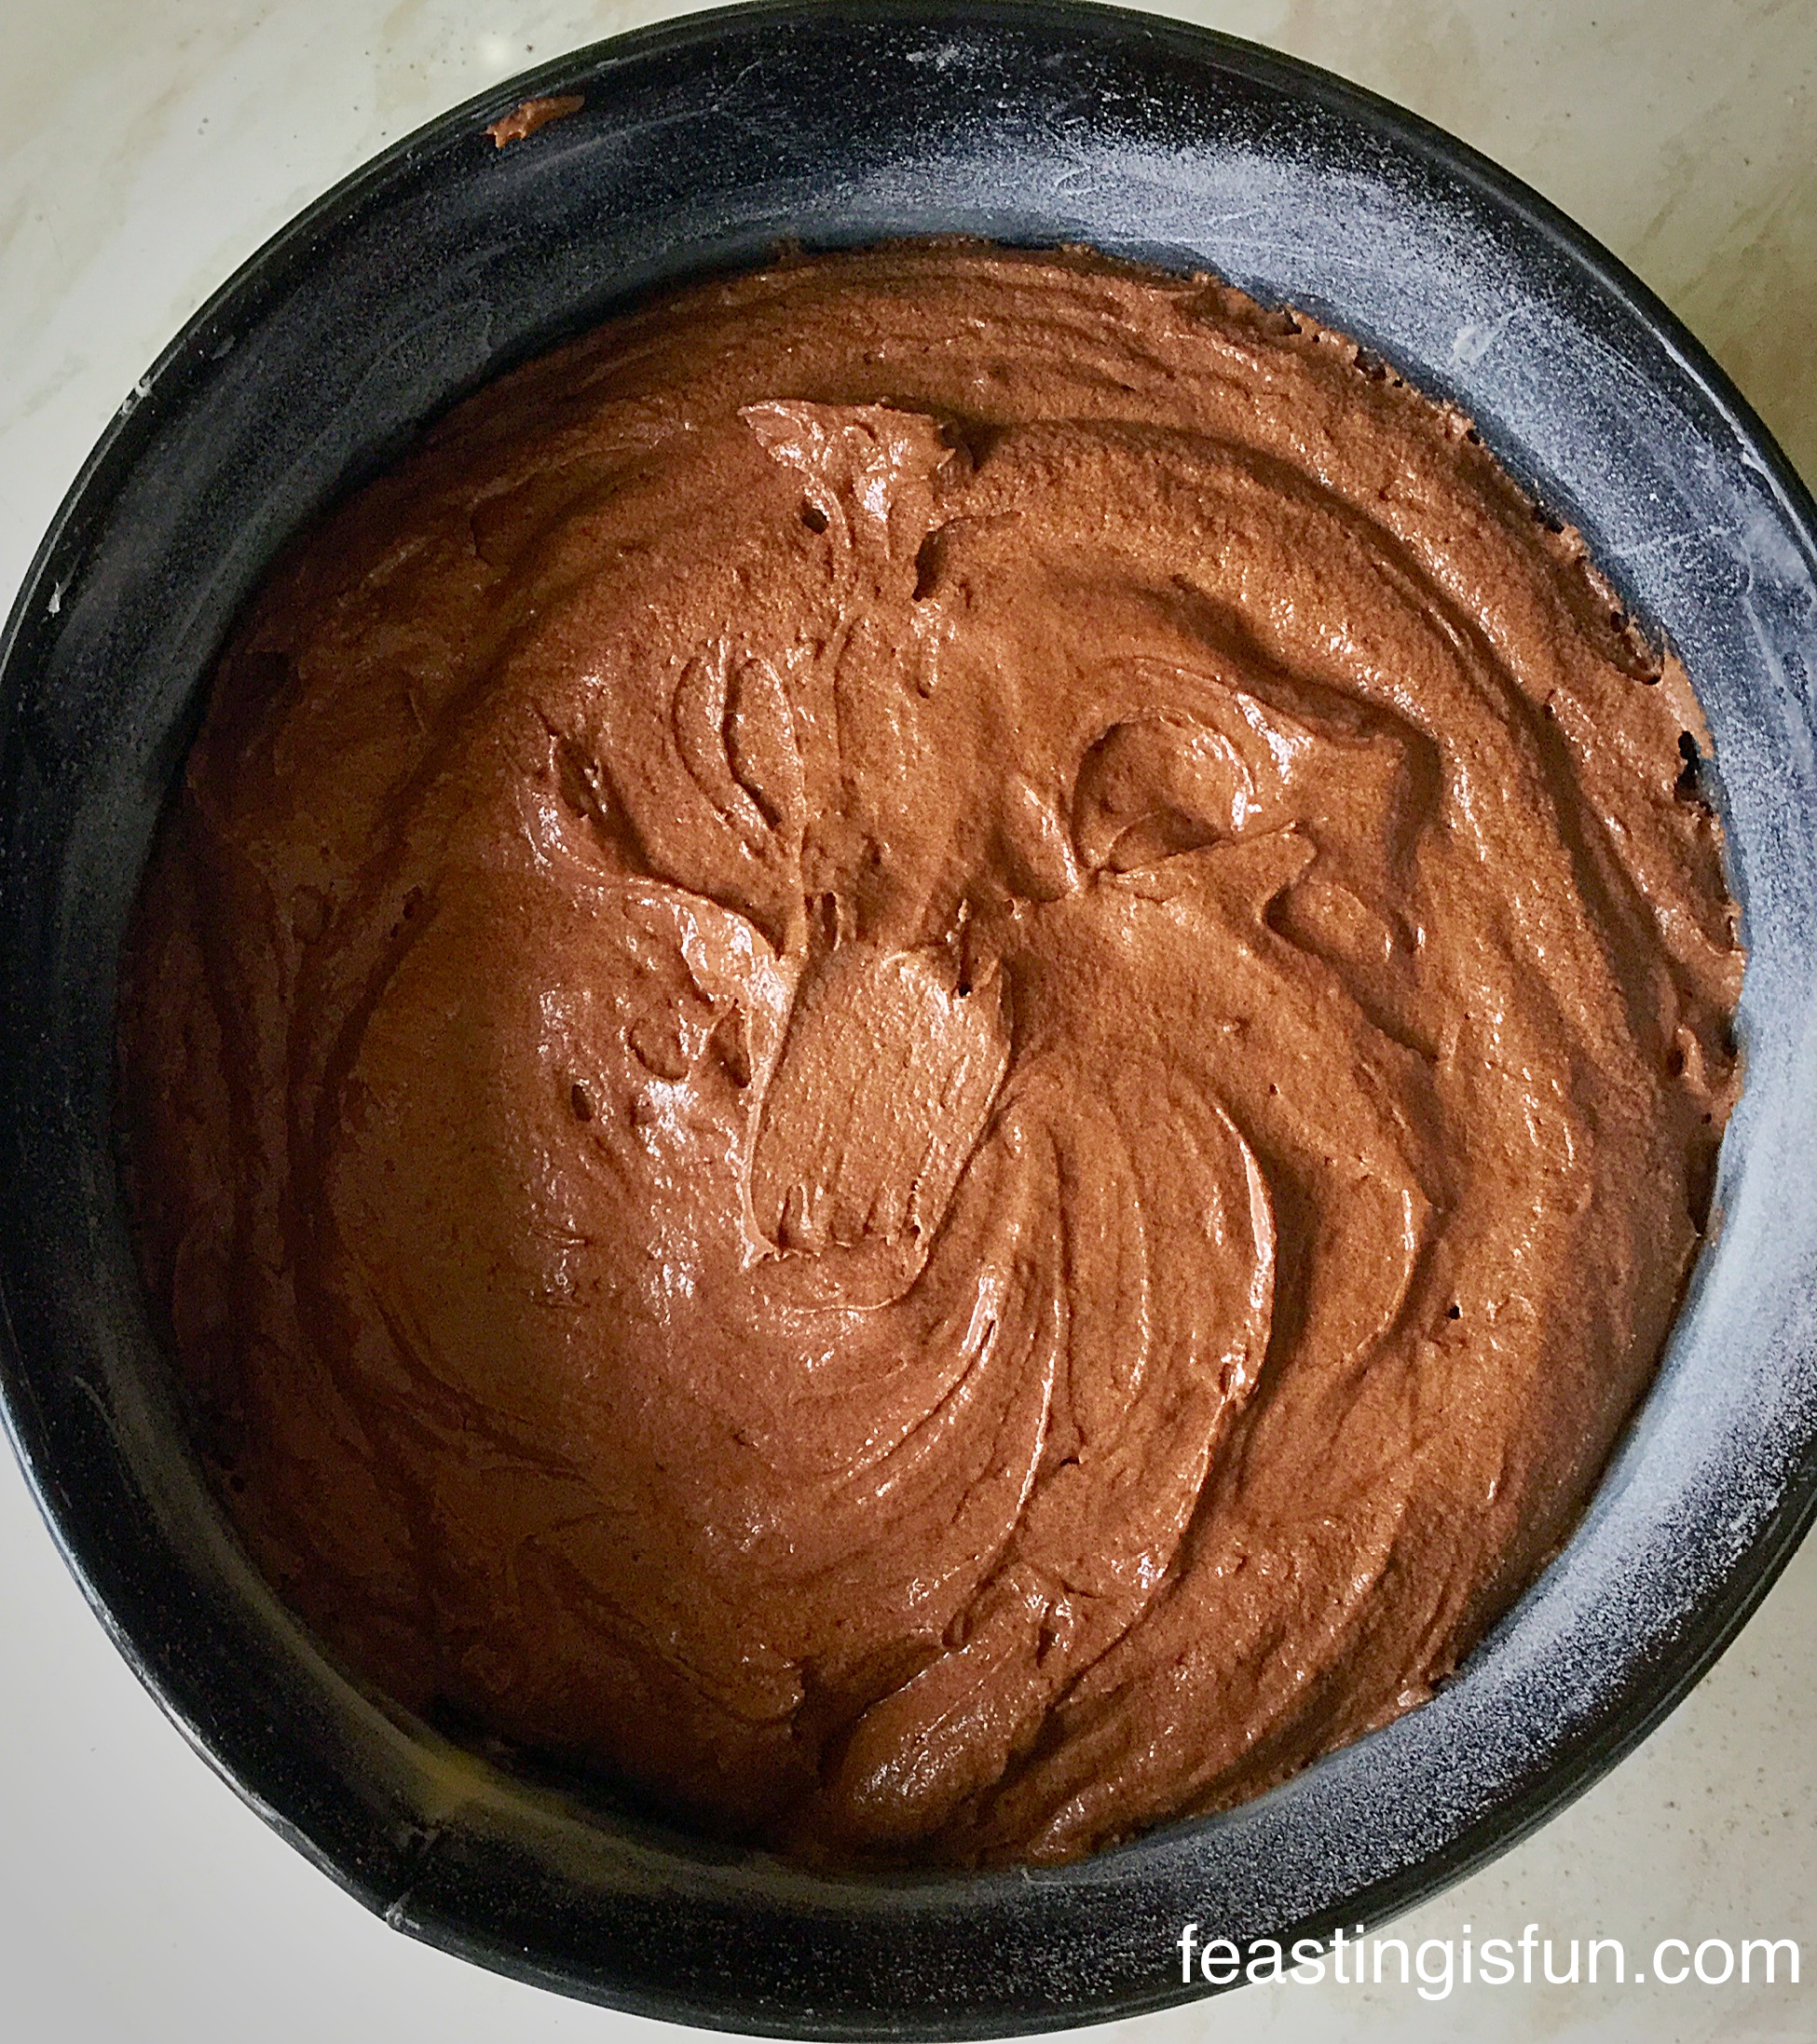
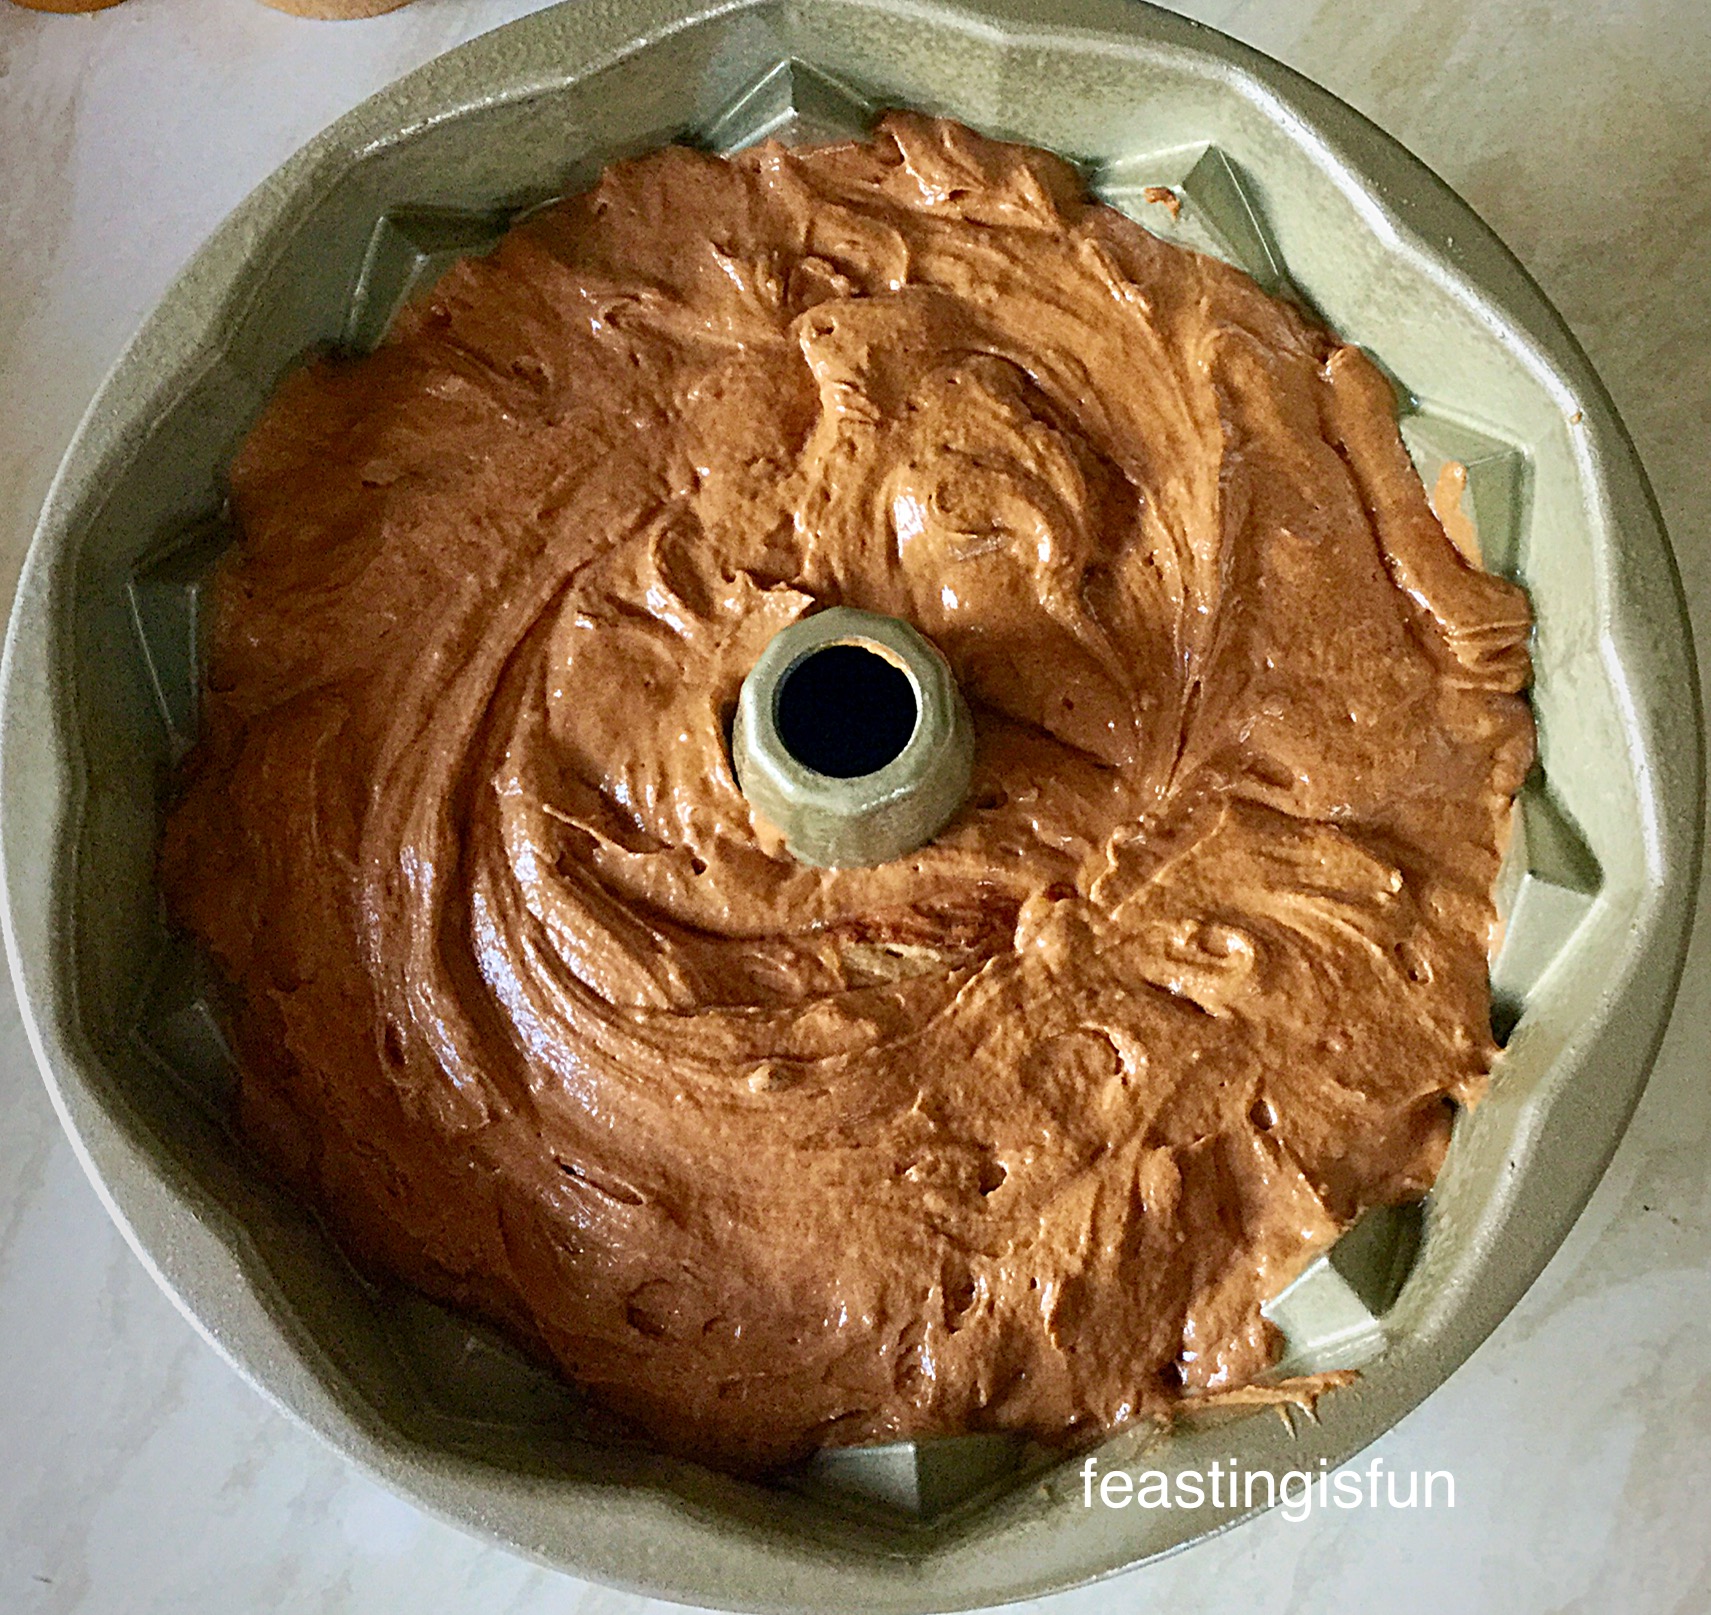
  • Divide the chocolate sponge batter equally between the two prepared cake tins.
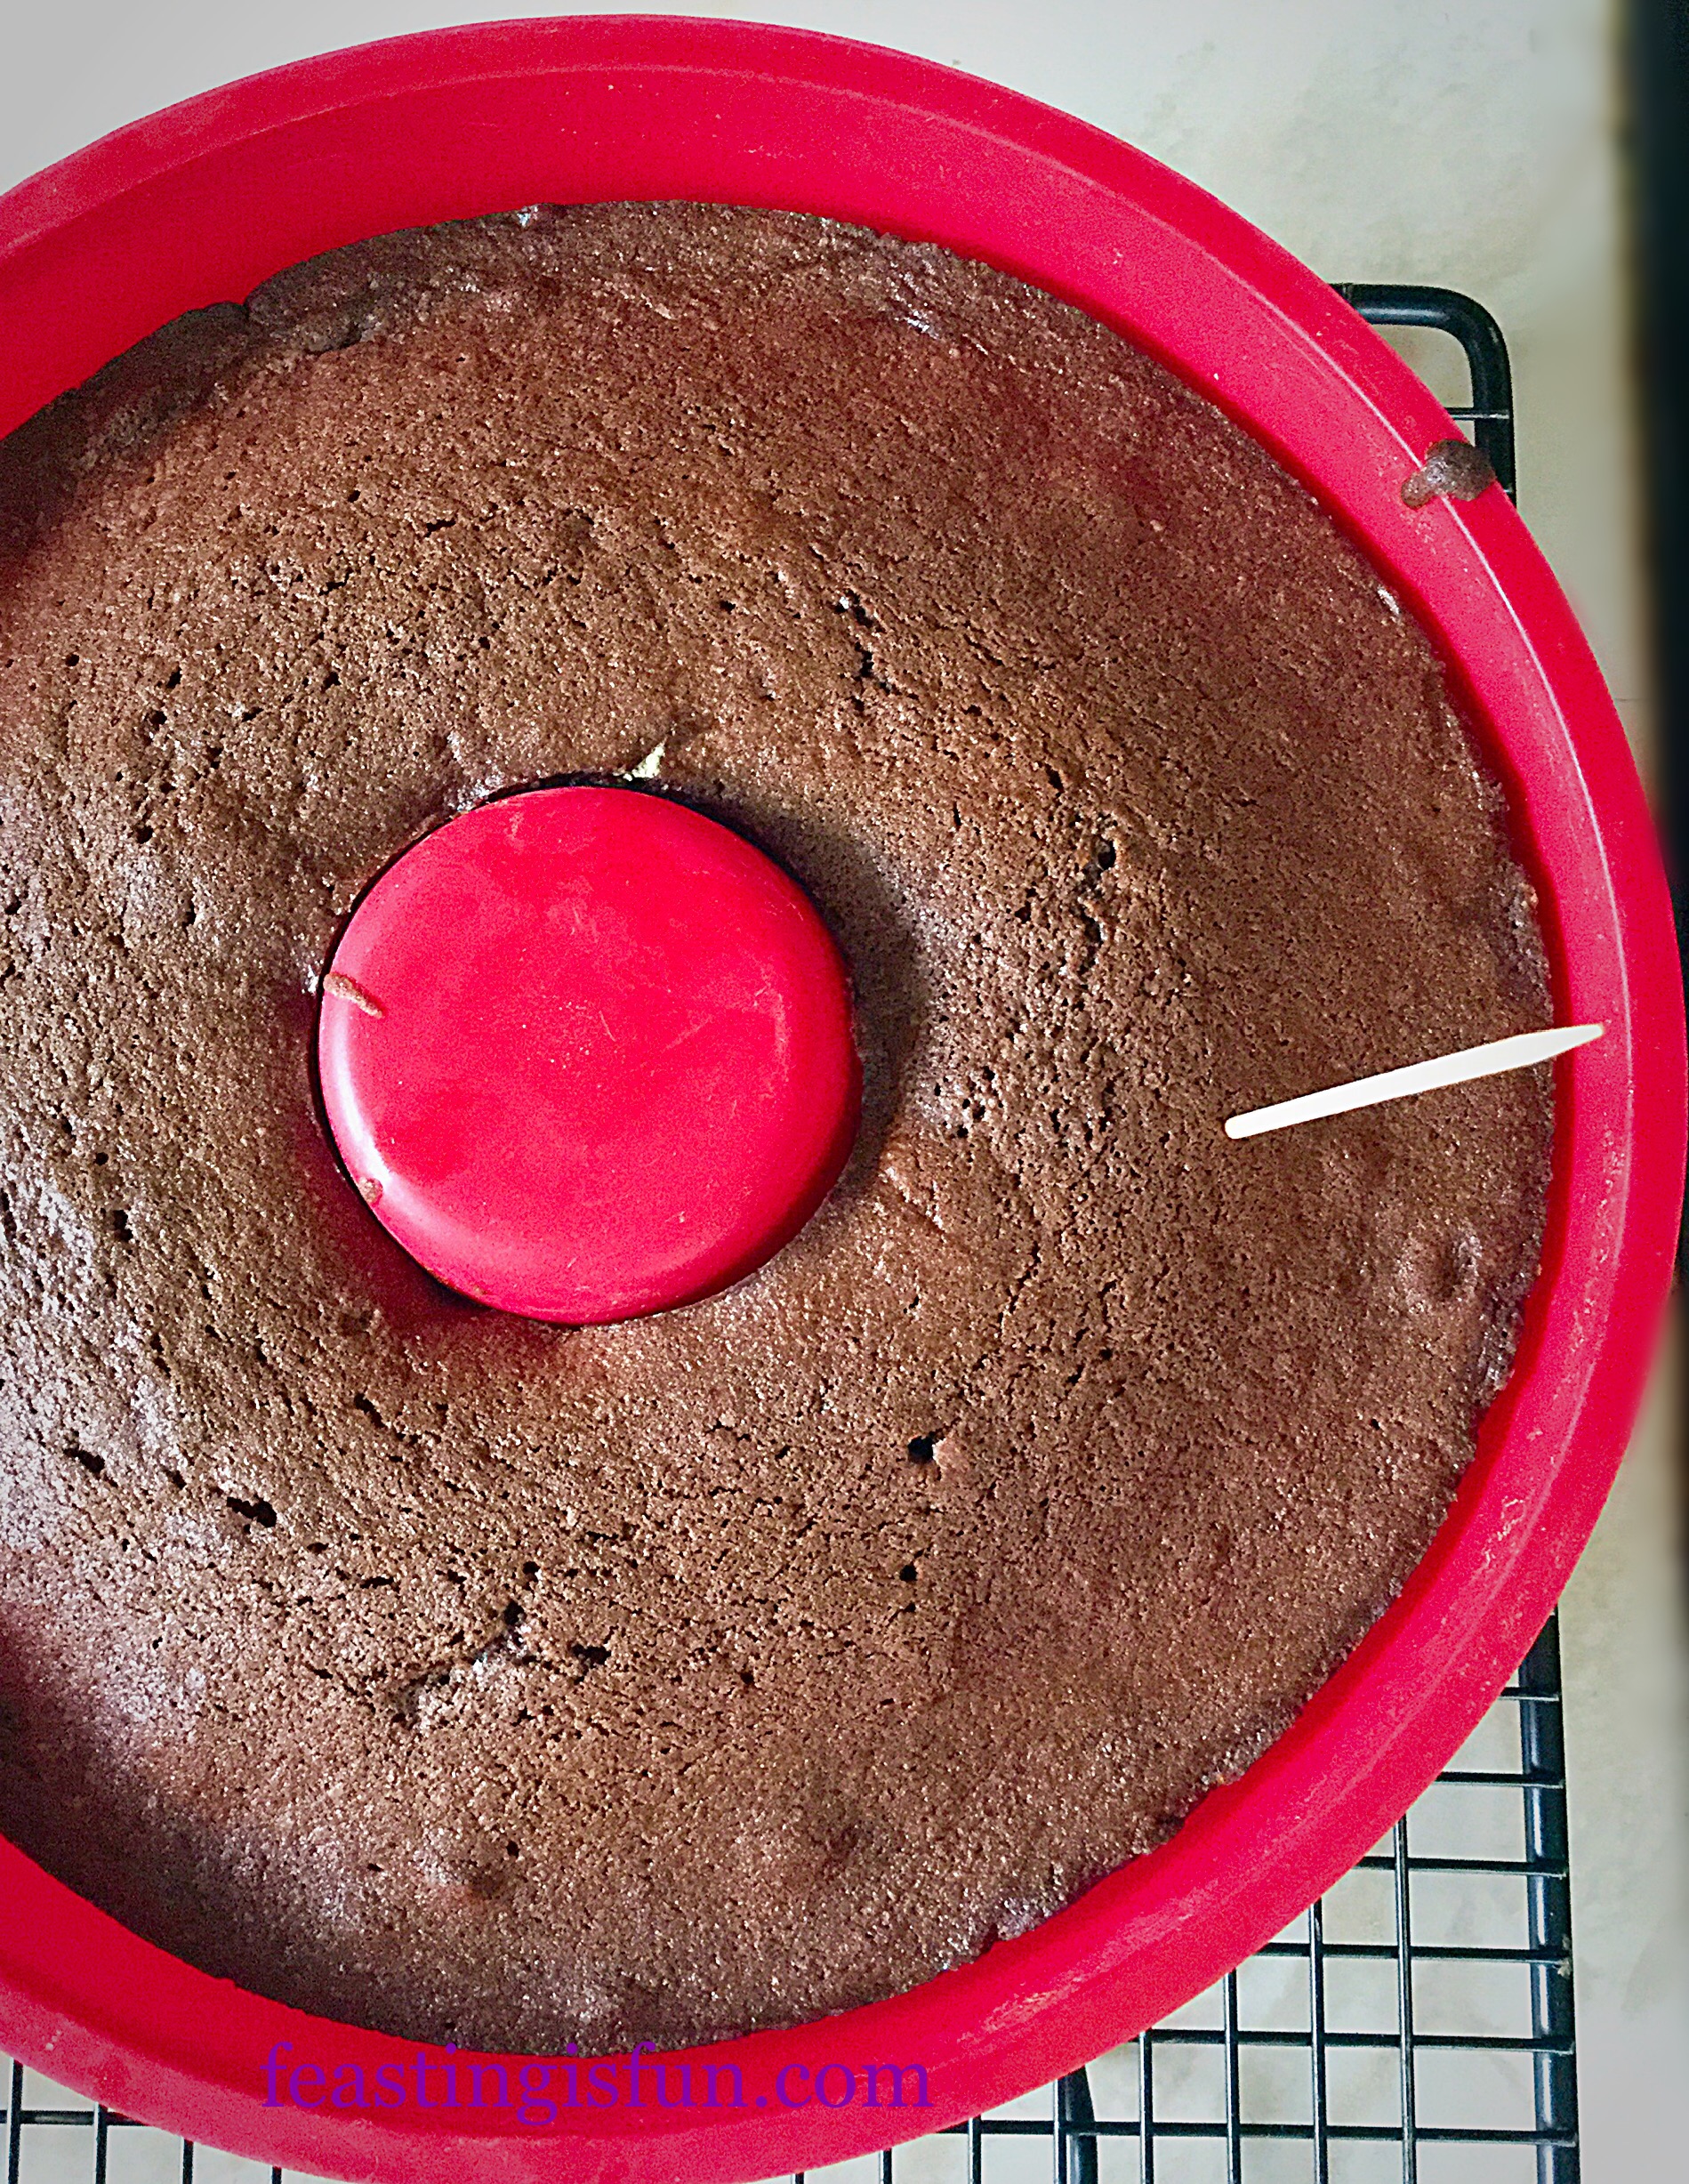
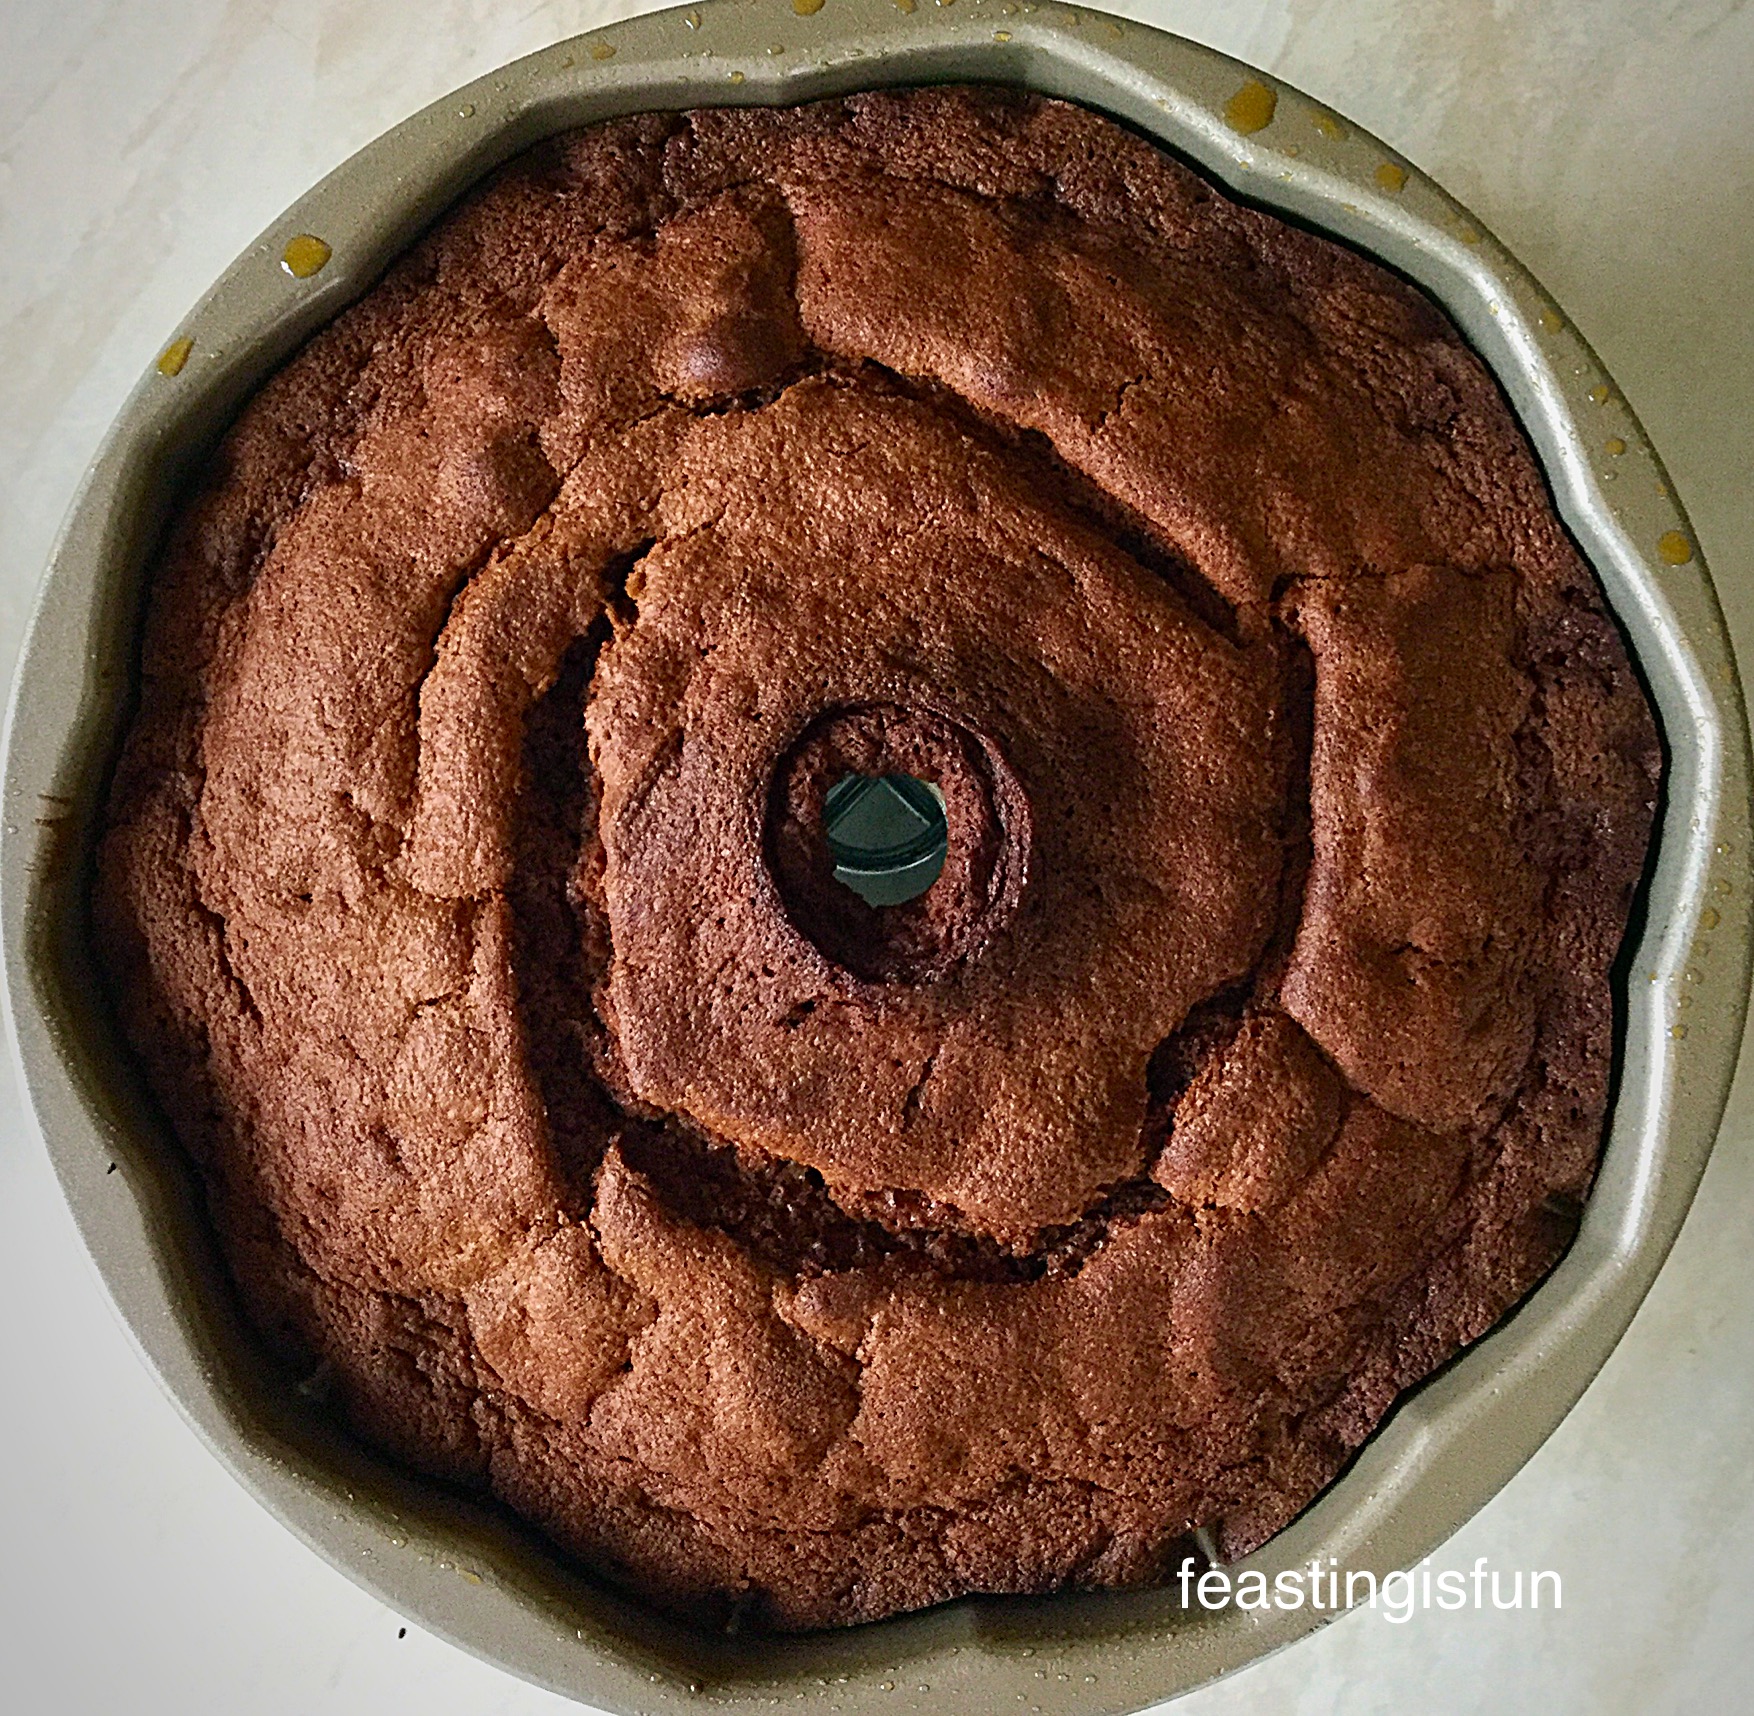
  • Place the cake tins into the centre of the preheated oven and bake for 40-50 minutes.
FF Golden Egg Chocolate Sponge Cake
Making and baking the chocolate sponge cakes.
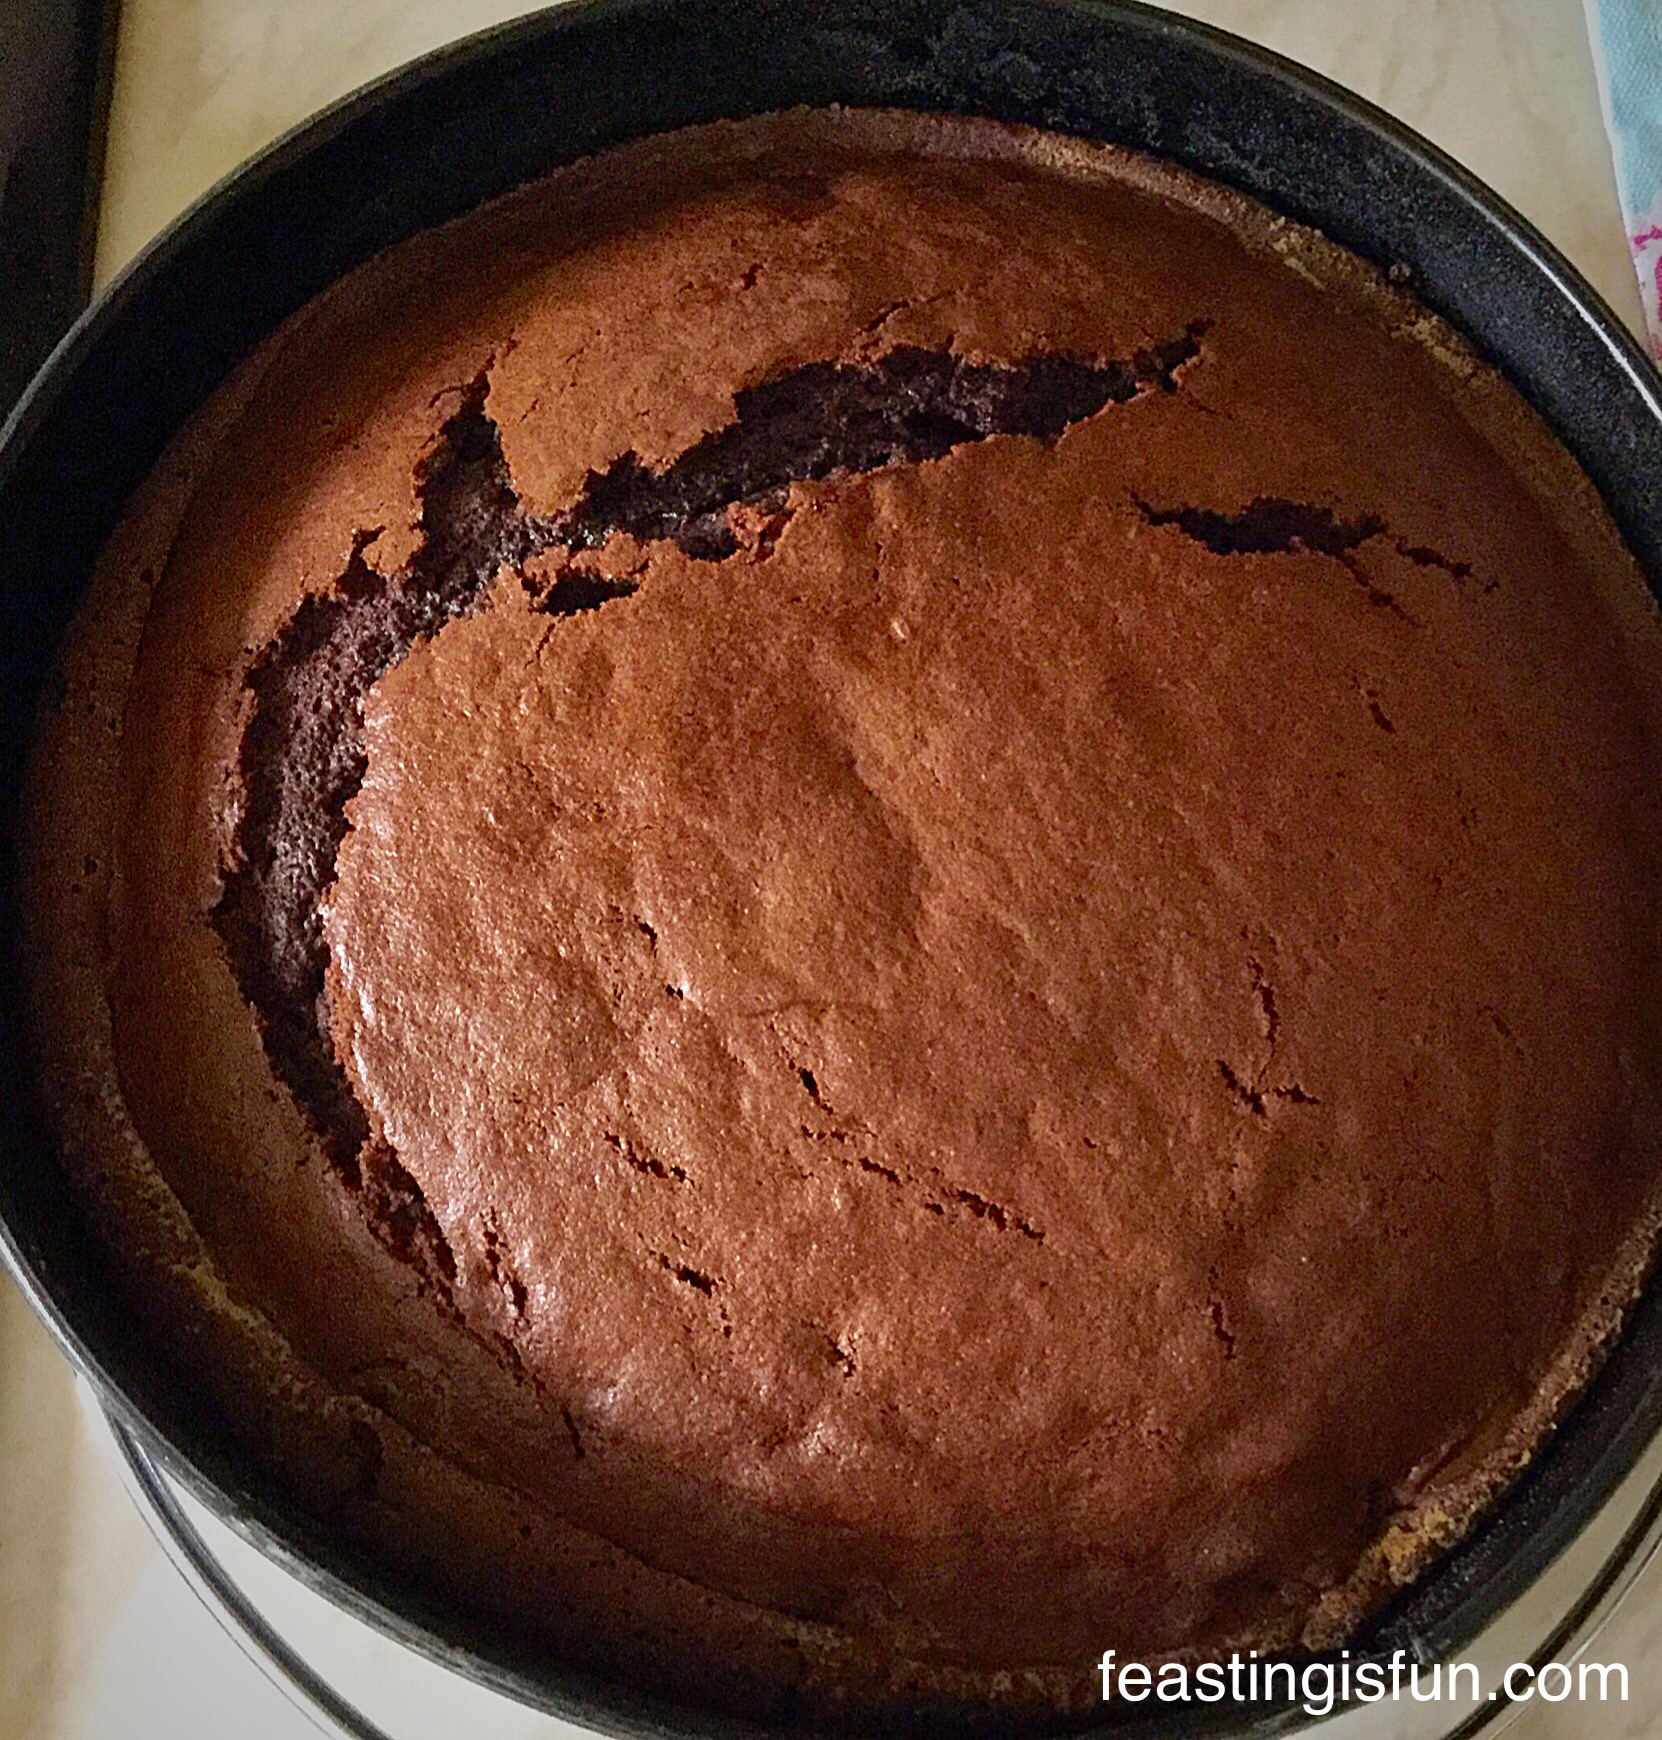
  • The cakes are baked when they spring back from a light touch and a cake tester comes out clean.
  • As soon as the cakes are baked remove them from the oven.
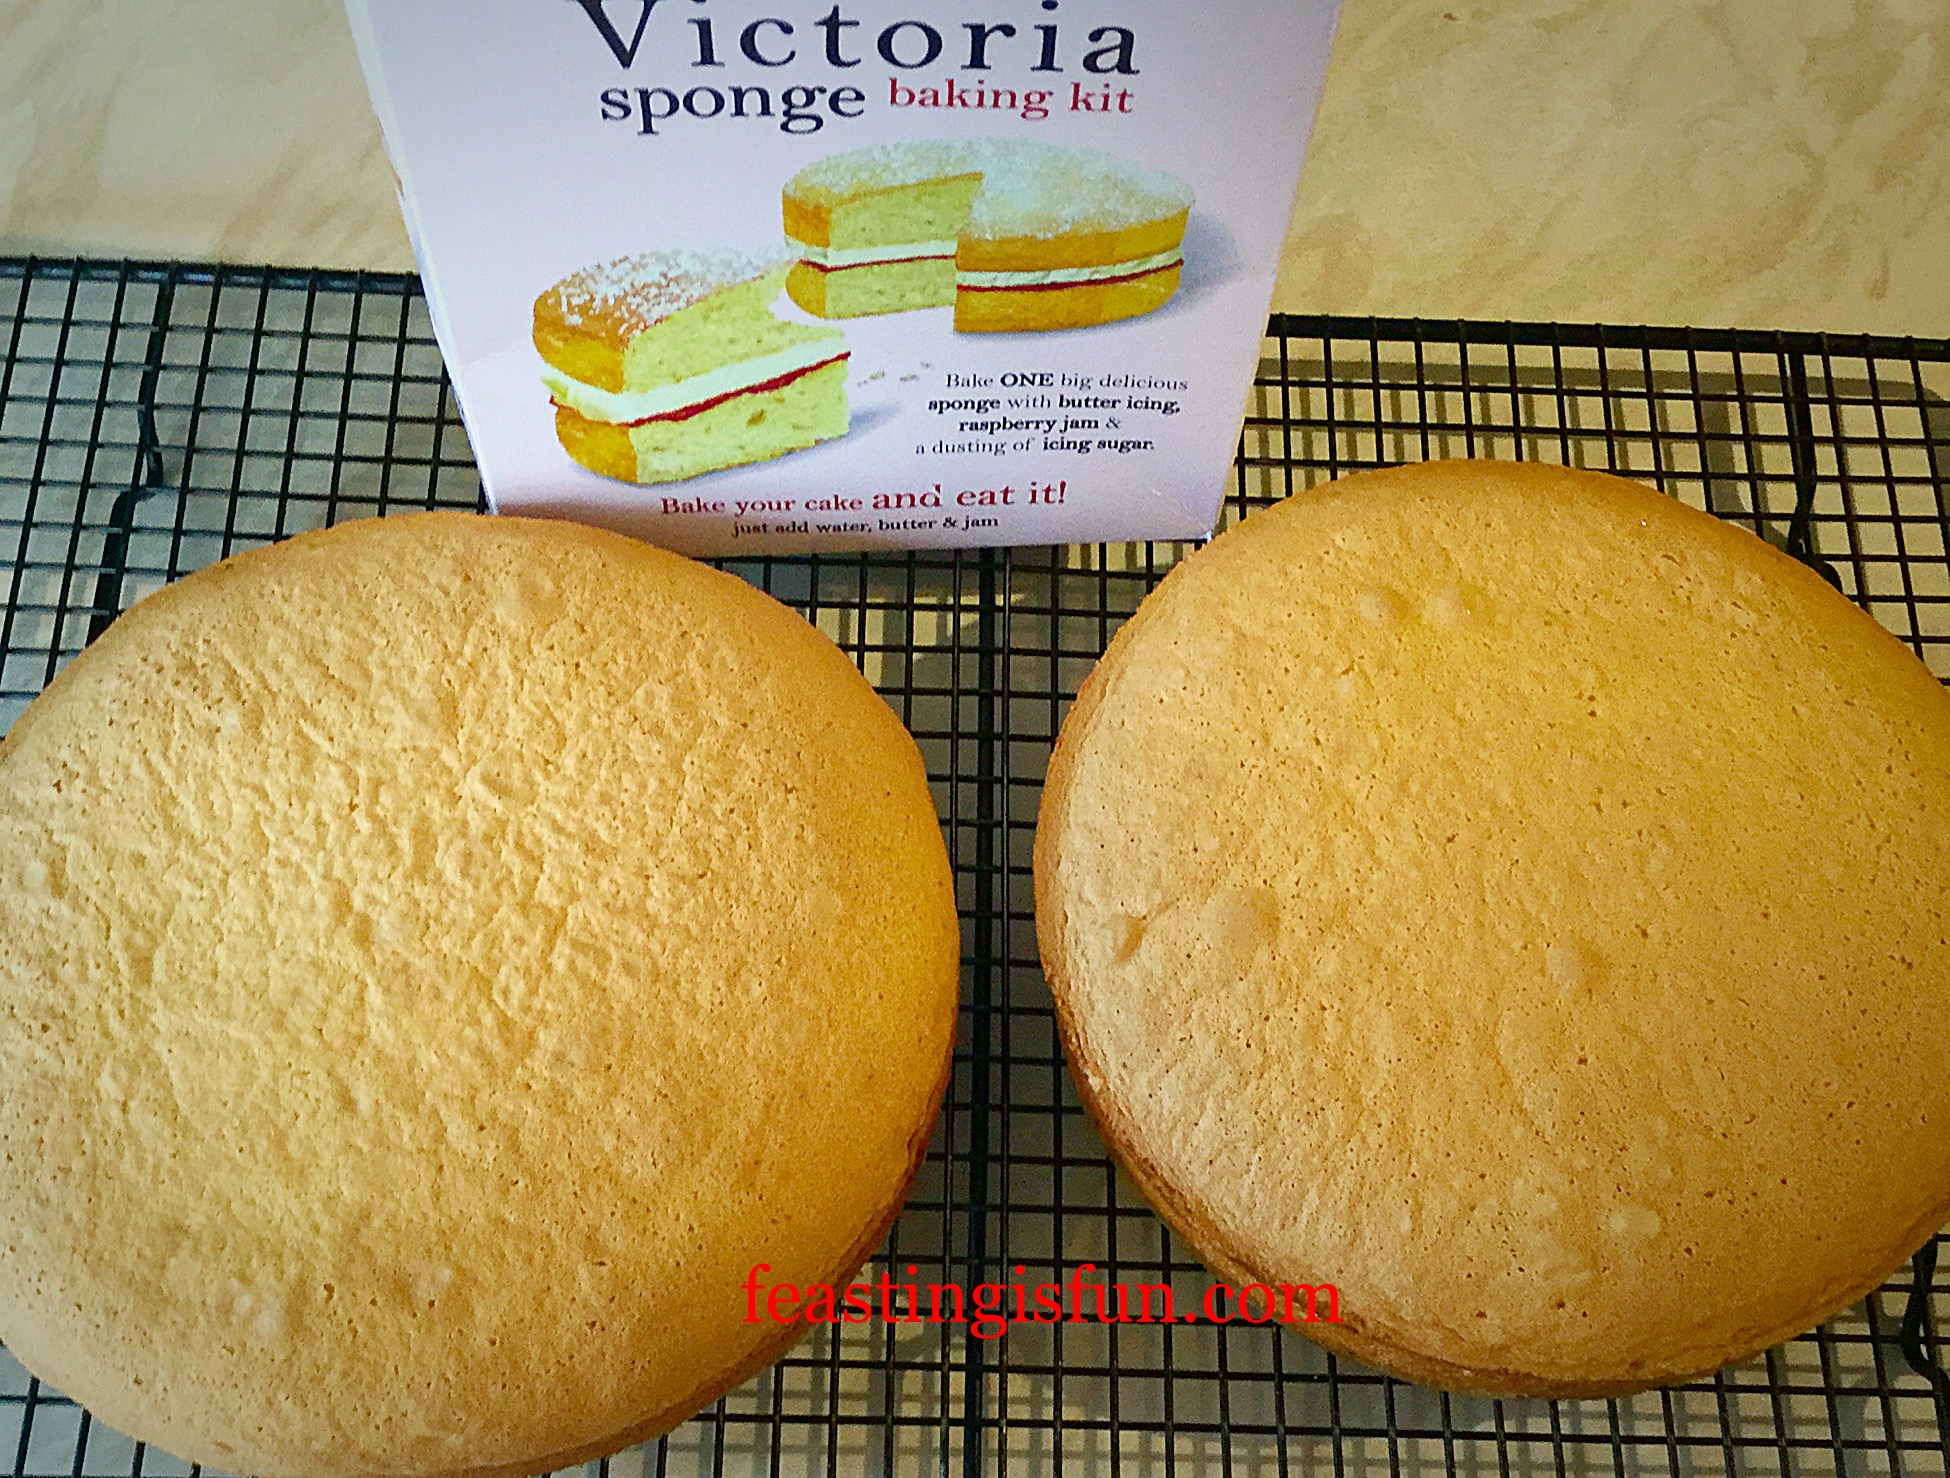
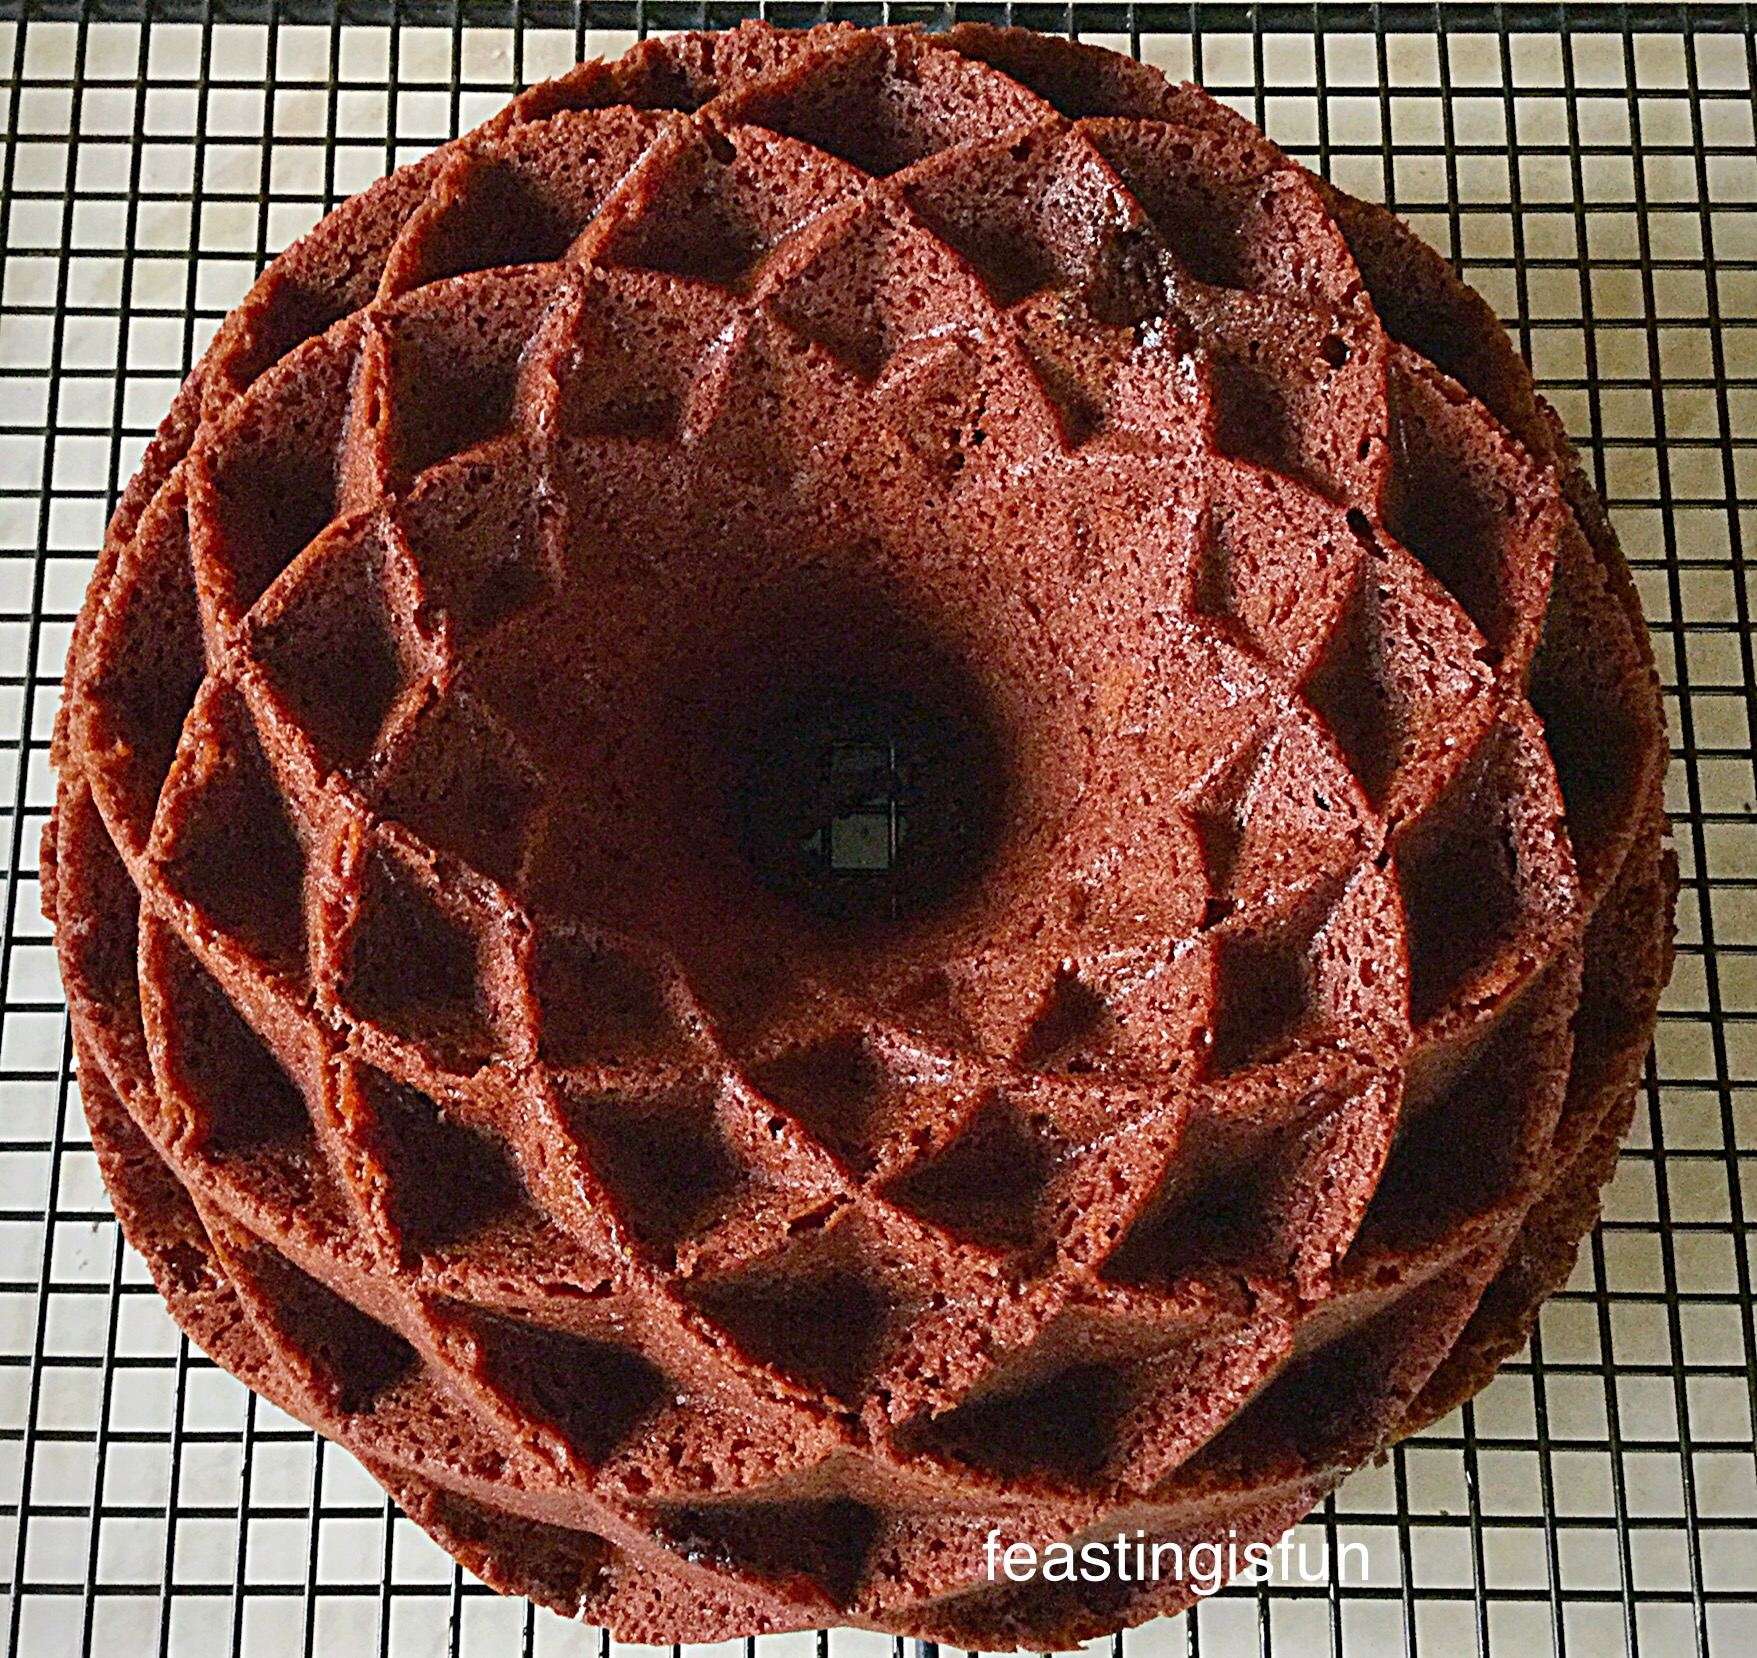
  • Allow the cakes to cool in the tin for 20 minutes and then tip them out on to a cooling rack.
  • Once cooled carefully remove the baking parchment from the base of each cake.

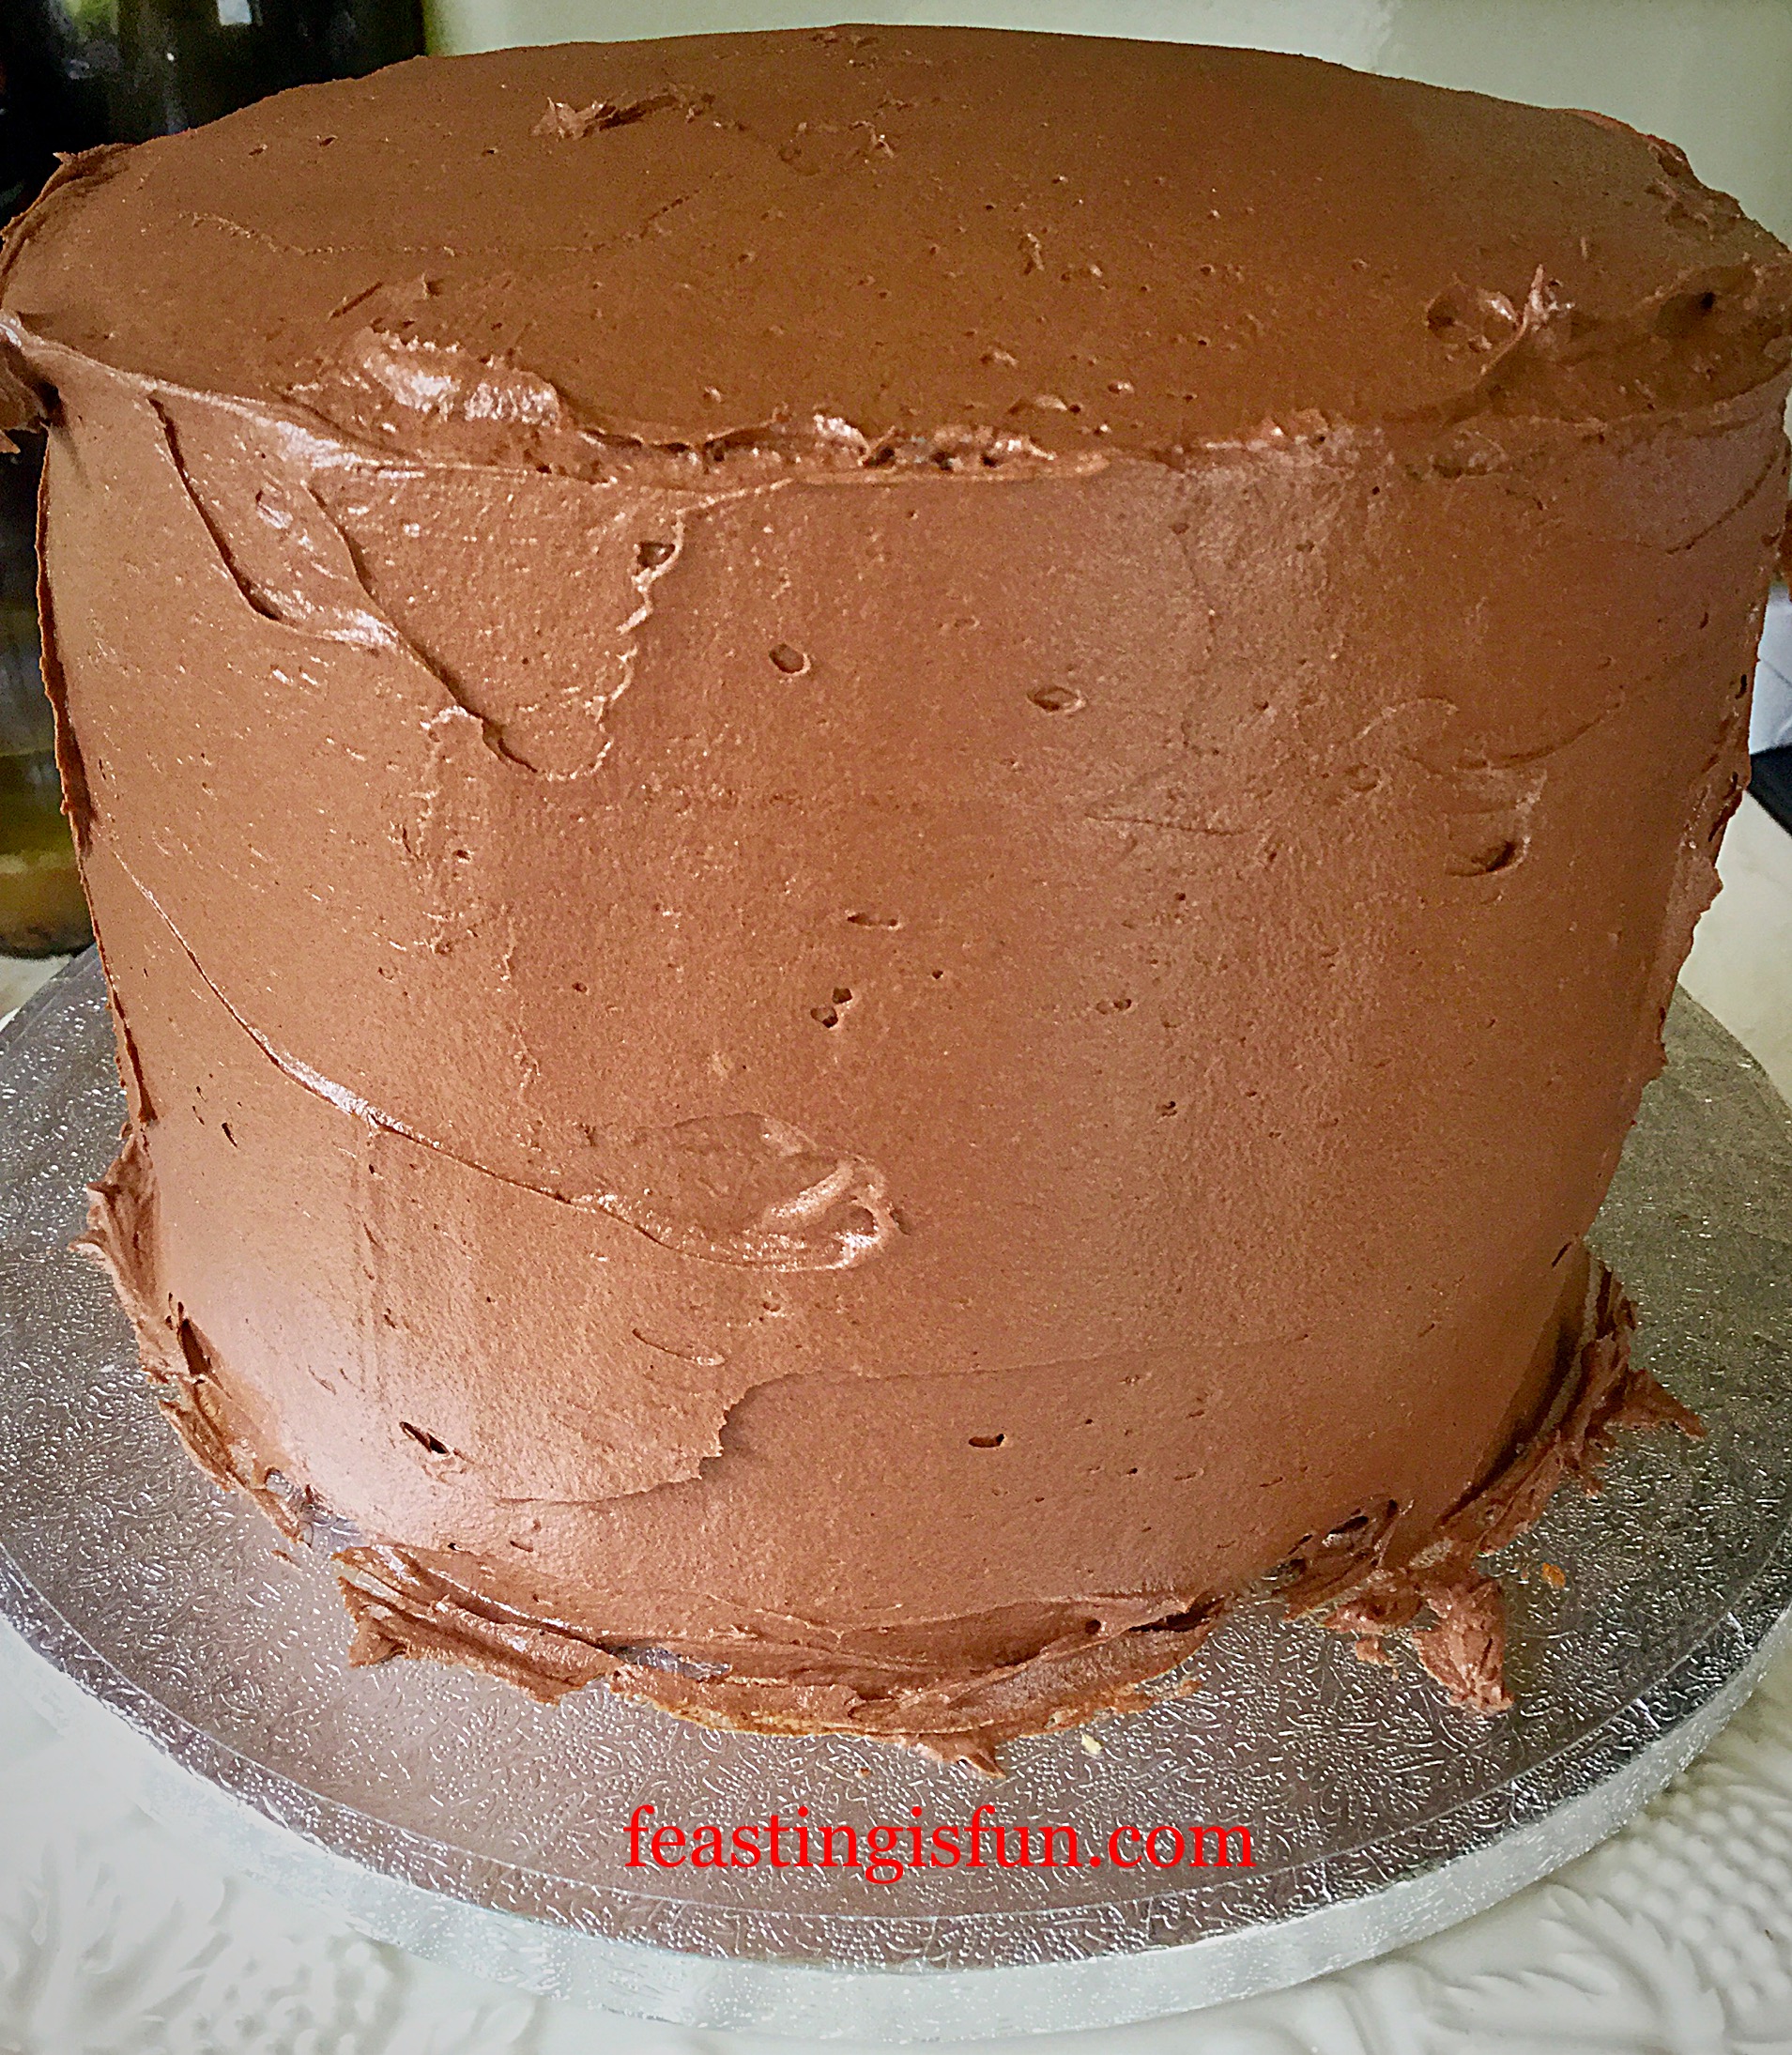
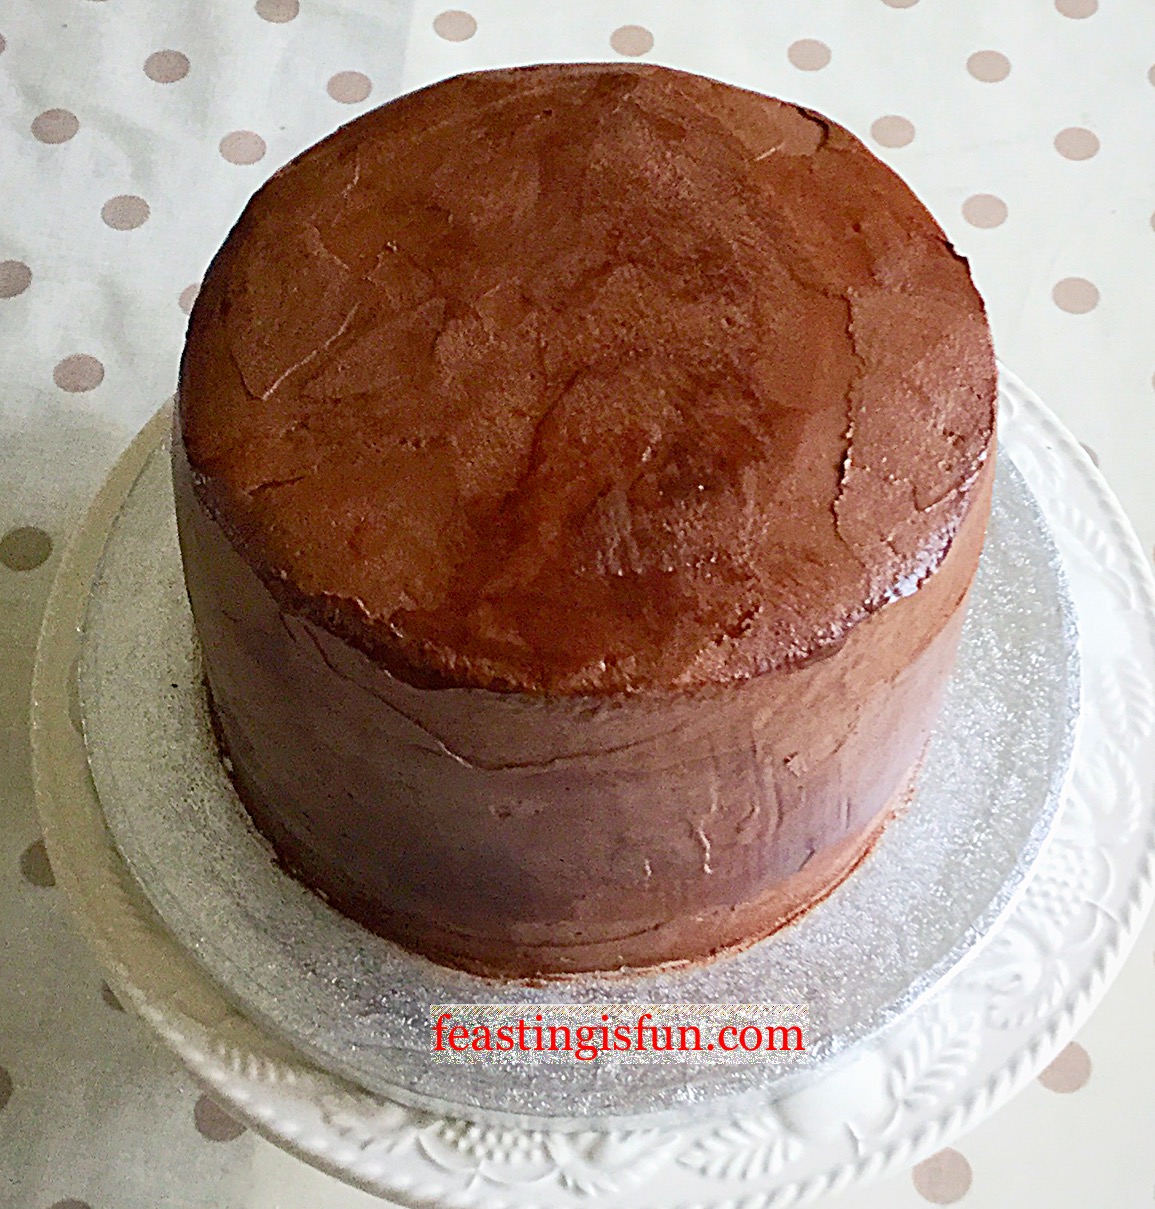
Making the frosting and decorating the cake:

  • While the cakes are cooling the buttercream frosting can be made.
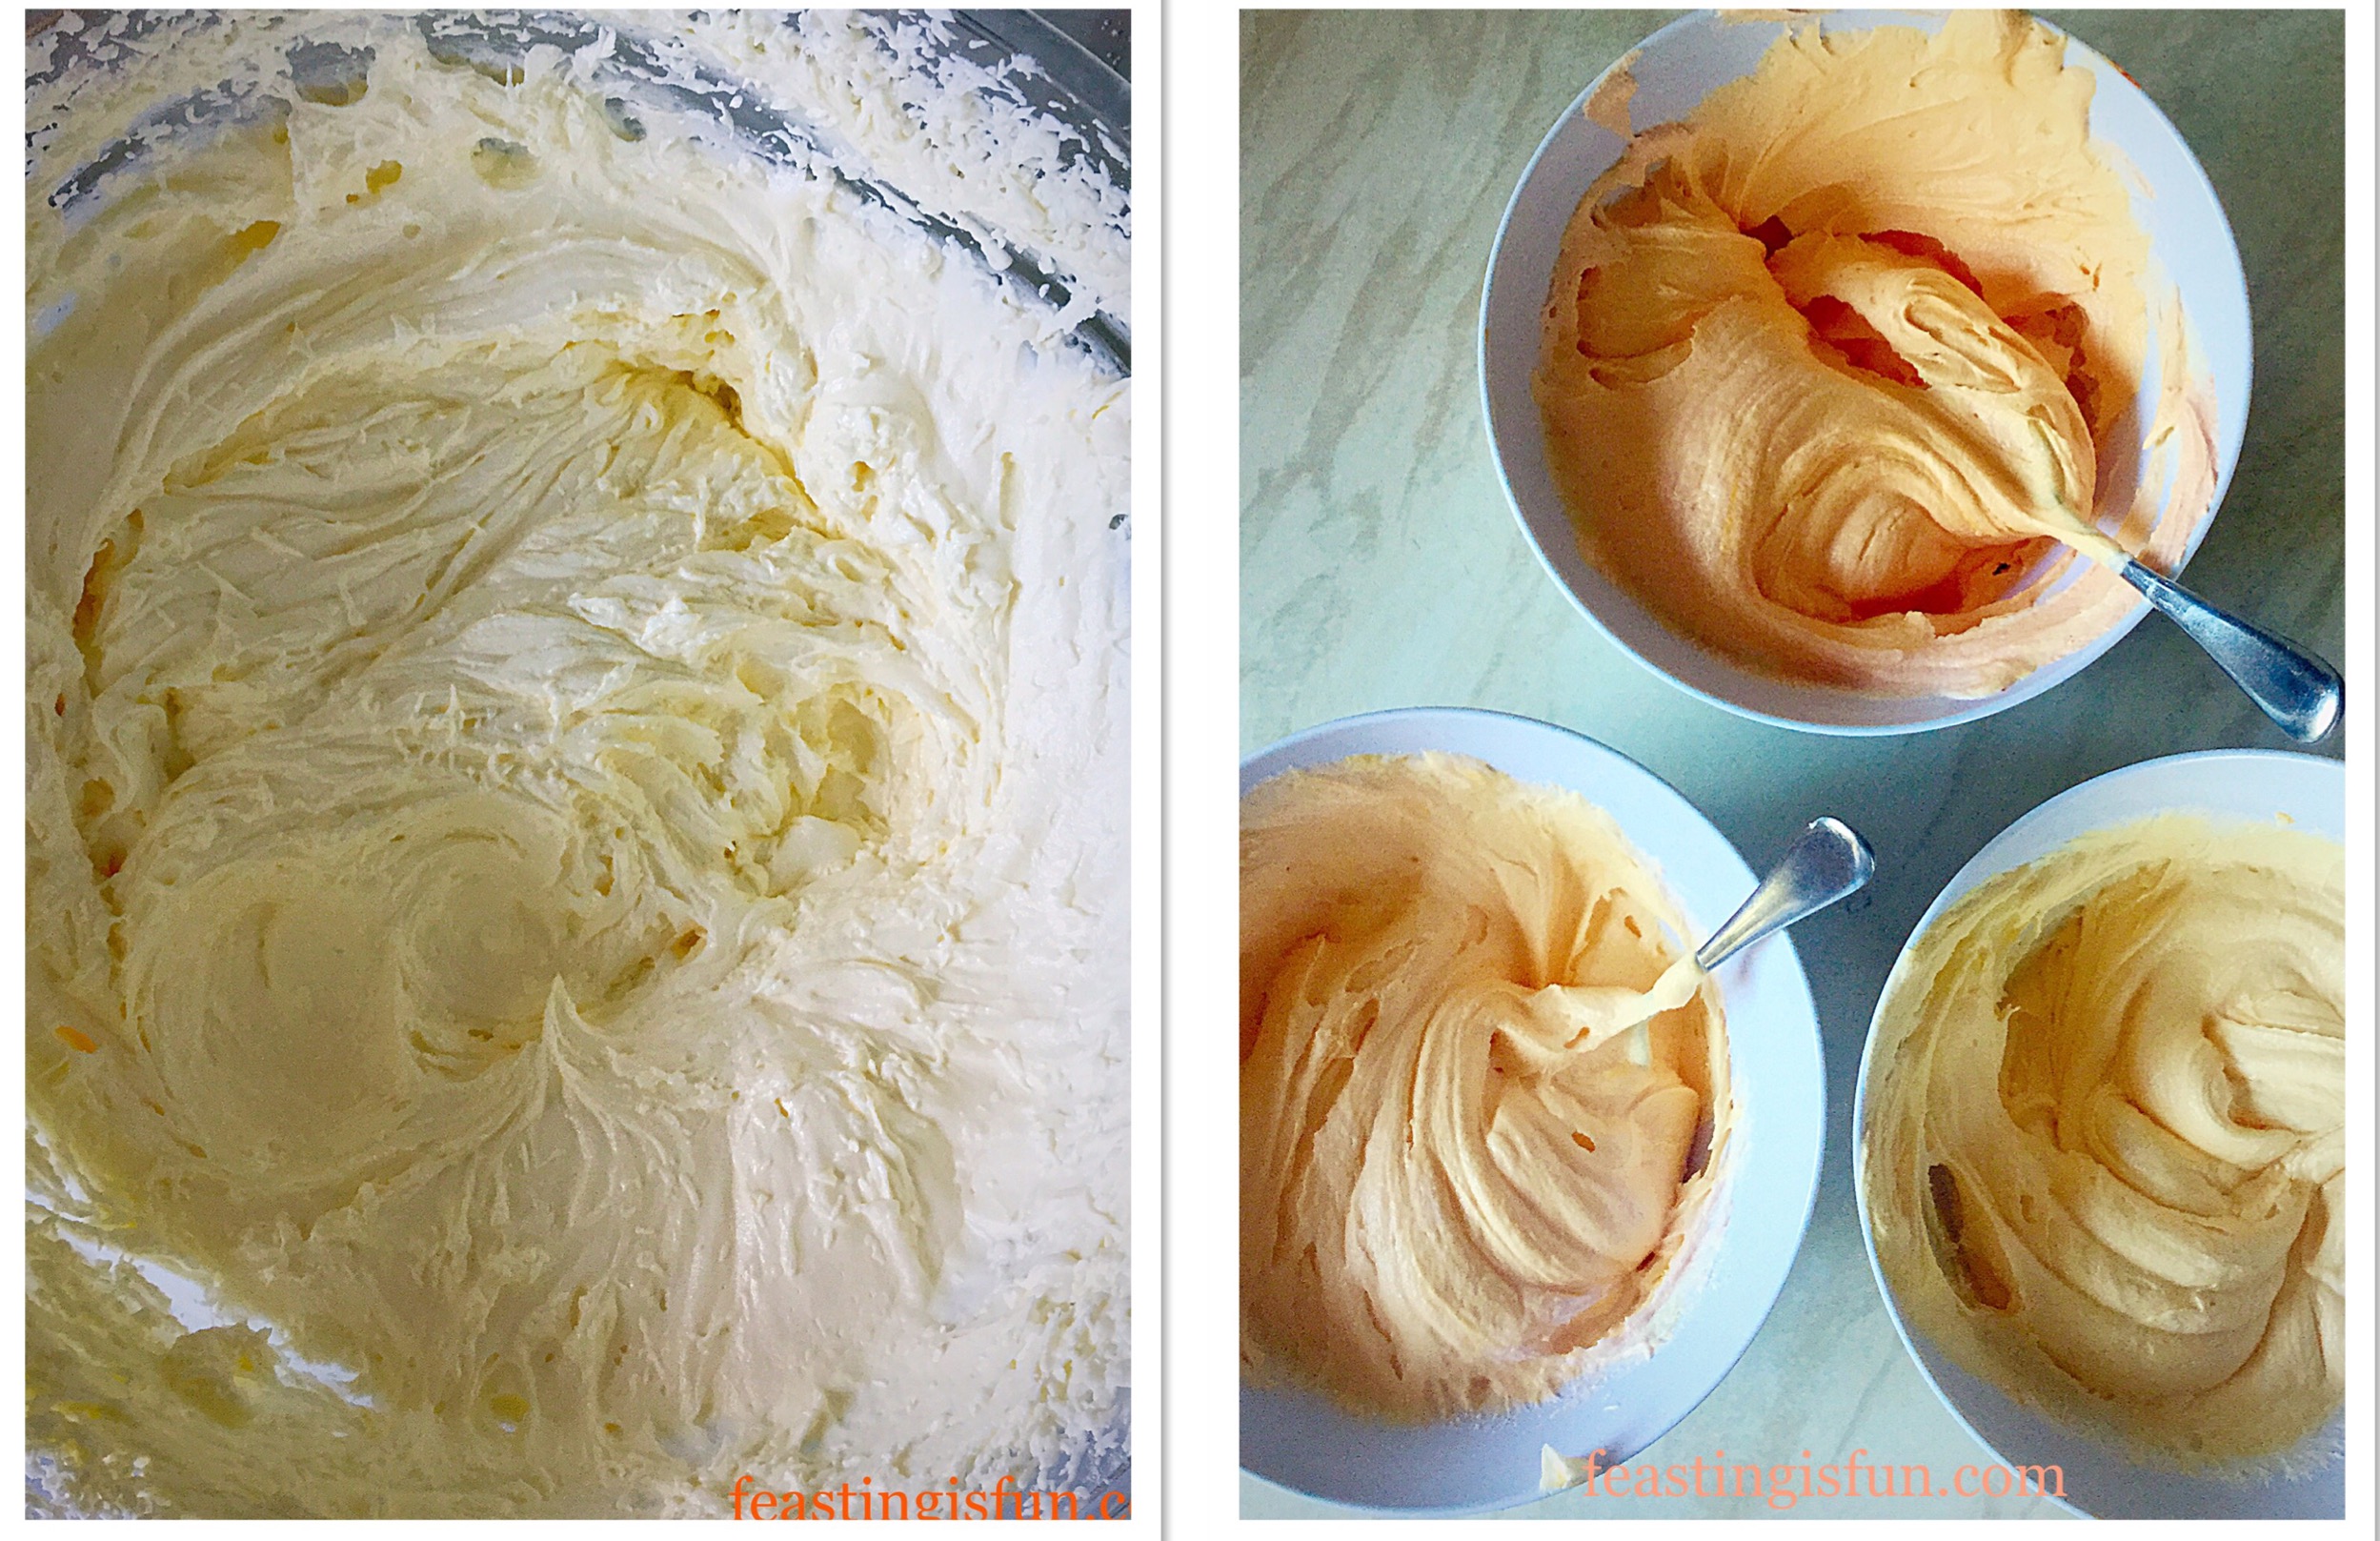
  • Place the butter into a large bowl, or the bowl of a free standing mixer with paddle attachment.
  • Next add 1 teaspoon of vanilla extract.
  • Now whisk or beat the butter until it is softer and pale.
  • Add all of the icing sugar to the bowl and 2 tablespoons of very hot water.
  • Start mixing very slowly and then as the butter and icing sugar start to combine increase the mixing speed. Continue until the frosting is light and fluffy.
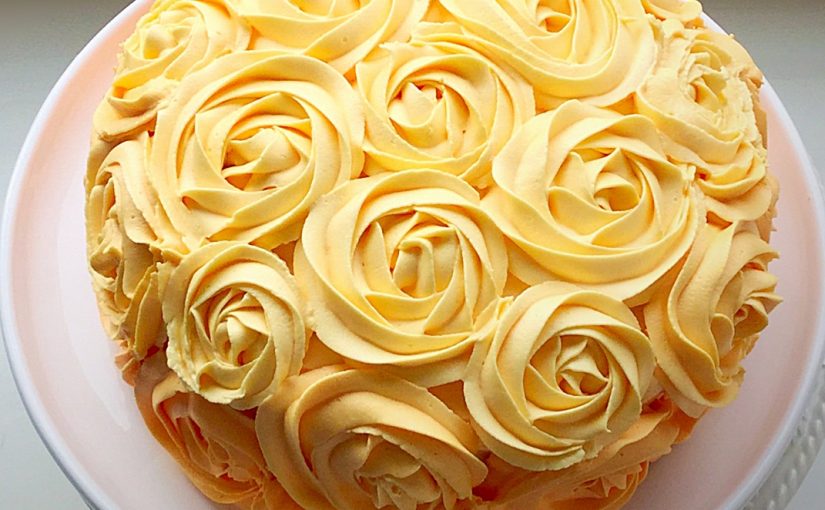
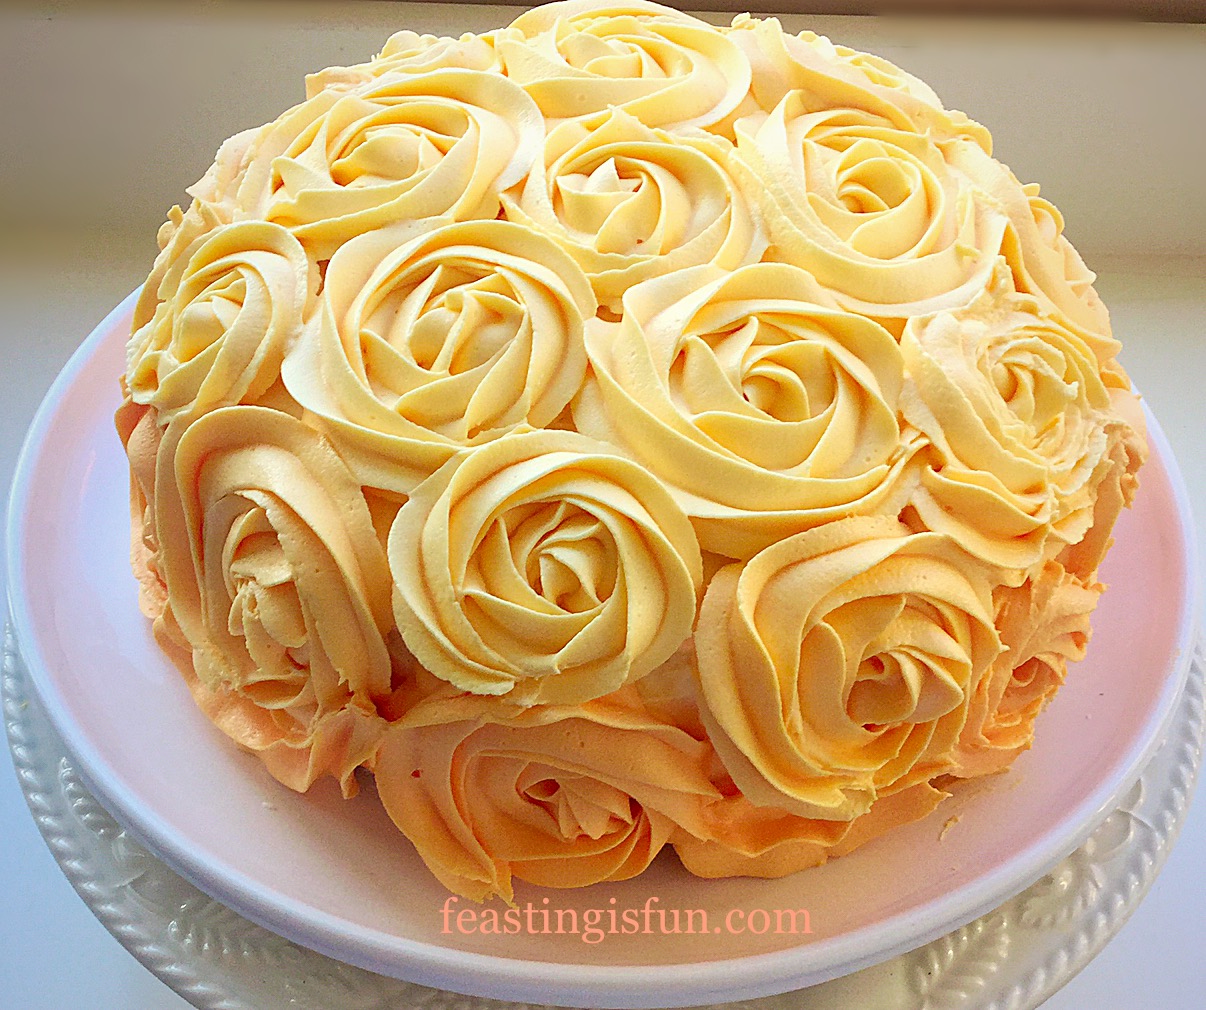
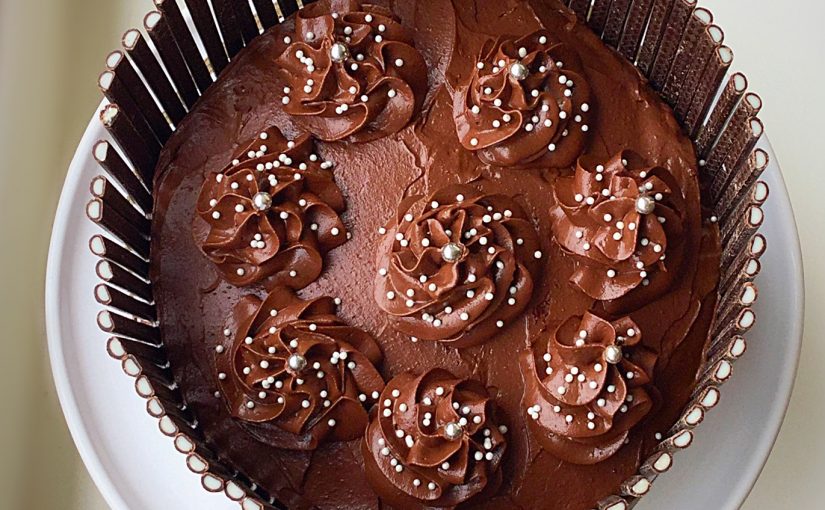
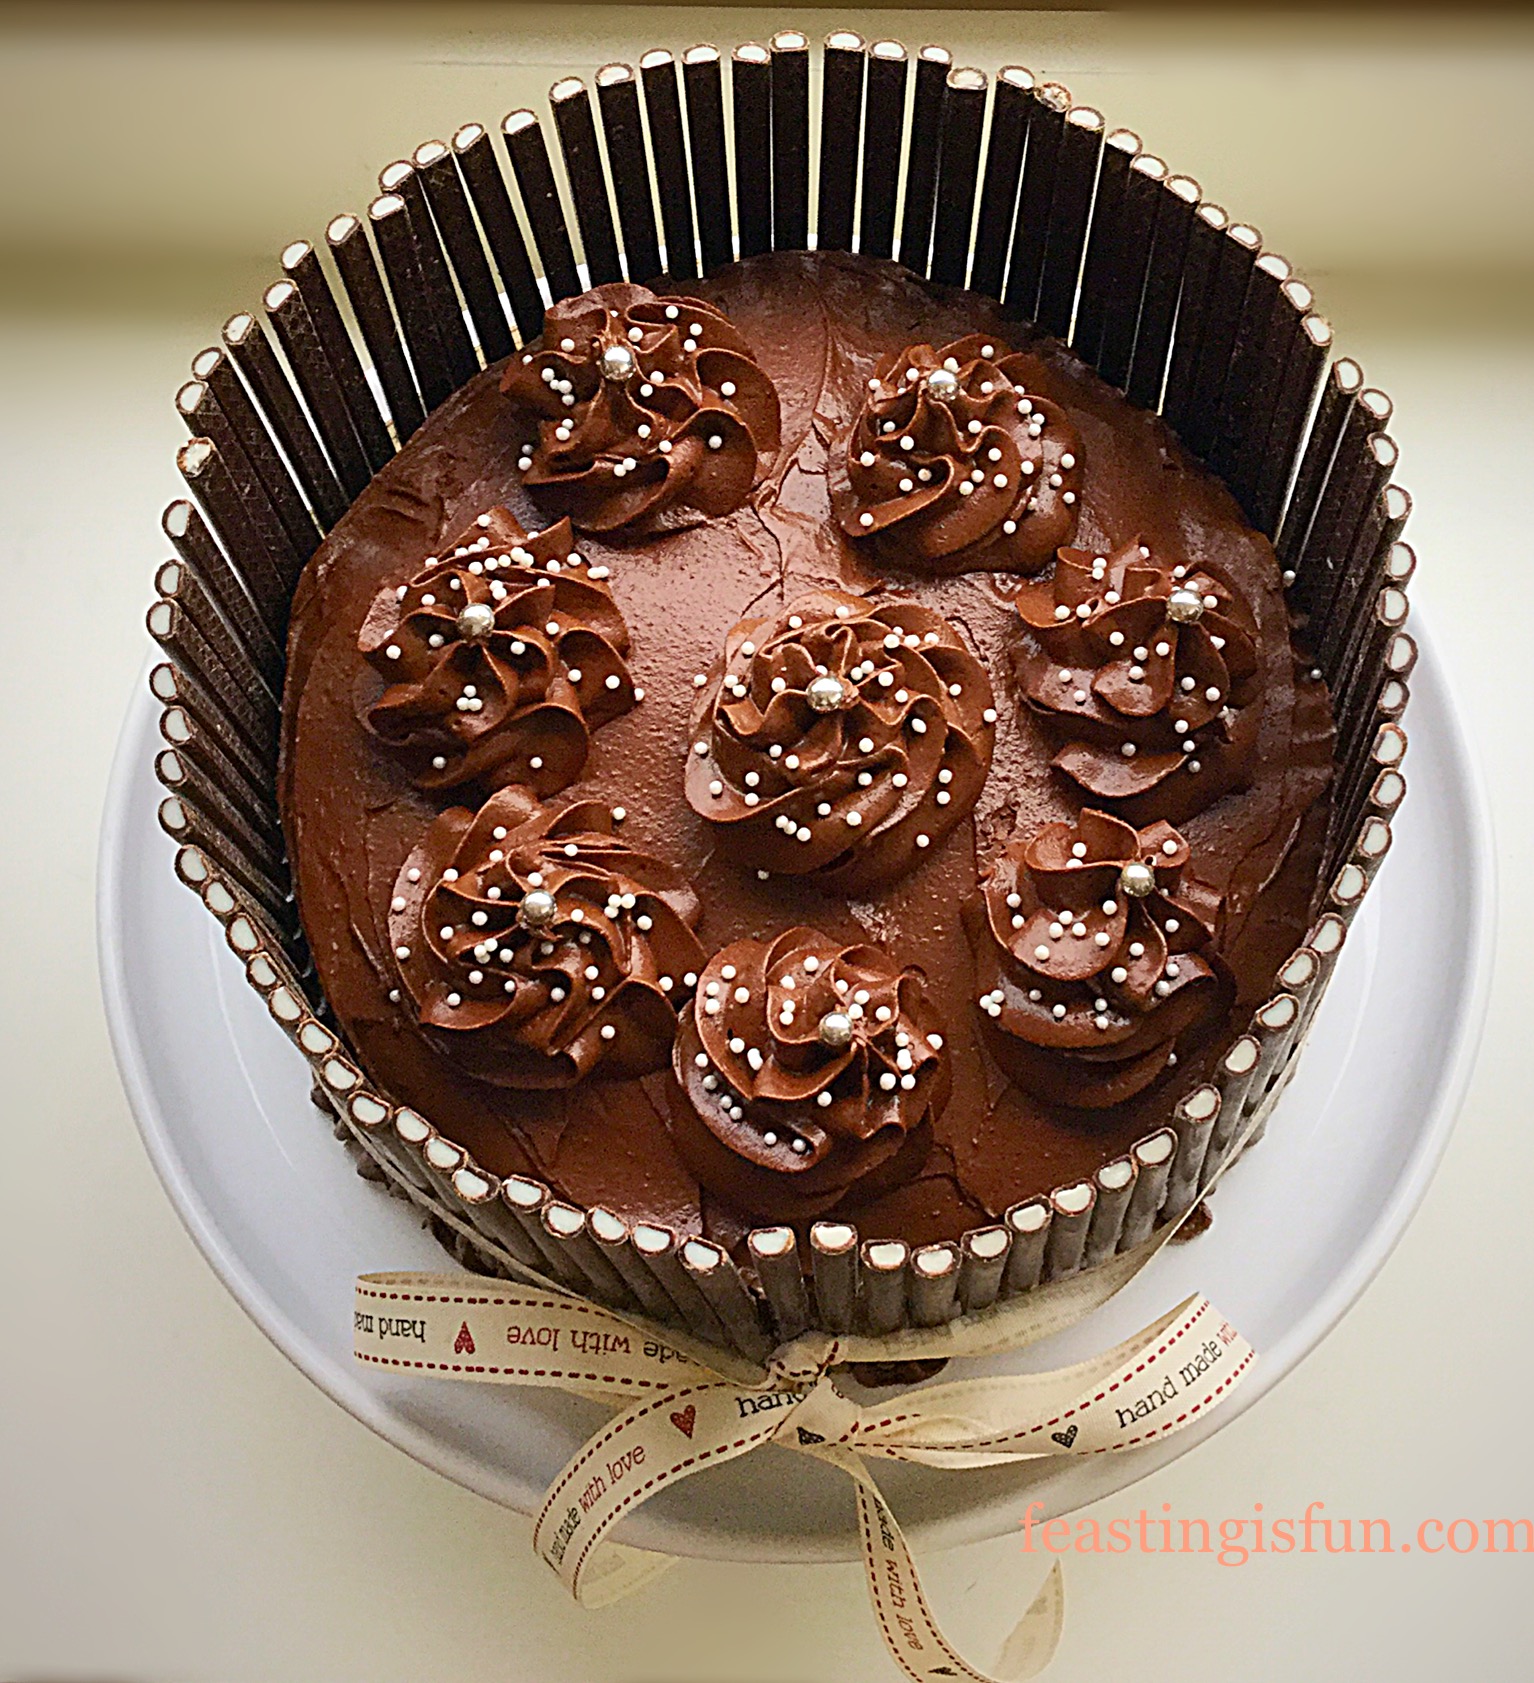
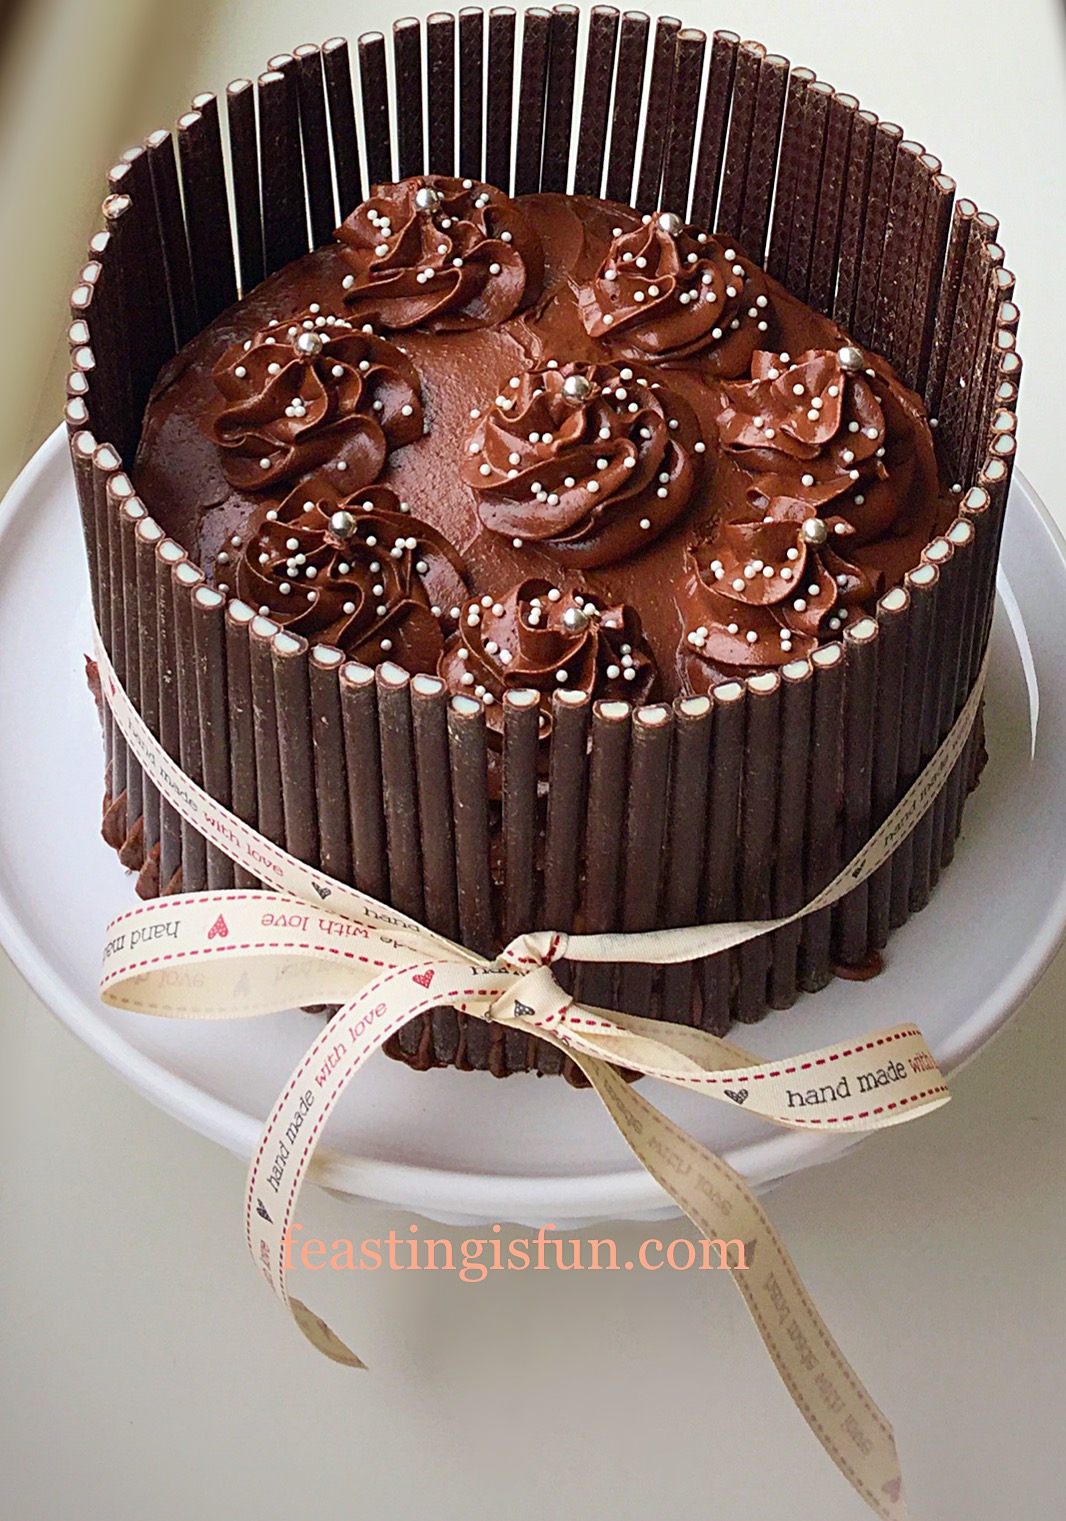
  • Fit a large icing bag with a large closed star, or drop flower piping nozzle. I have a Wilton  #2D piping nozzle.
  • Fill the piping bag with the whipped buttercream.
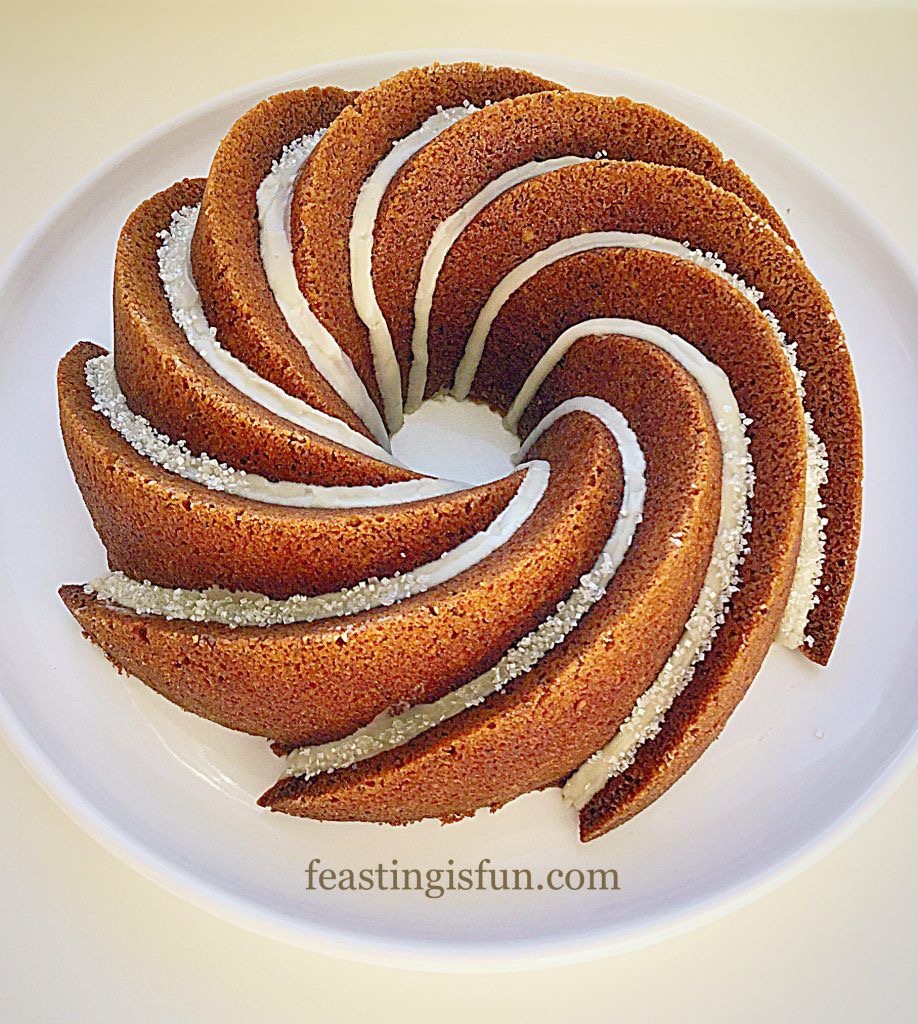
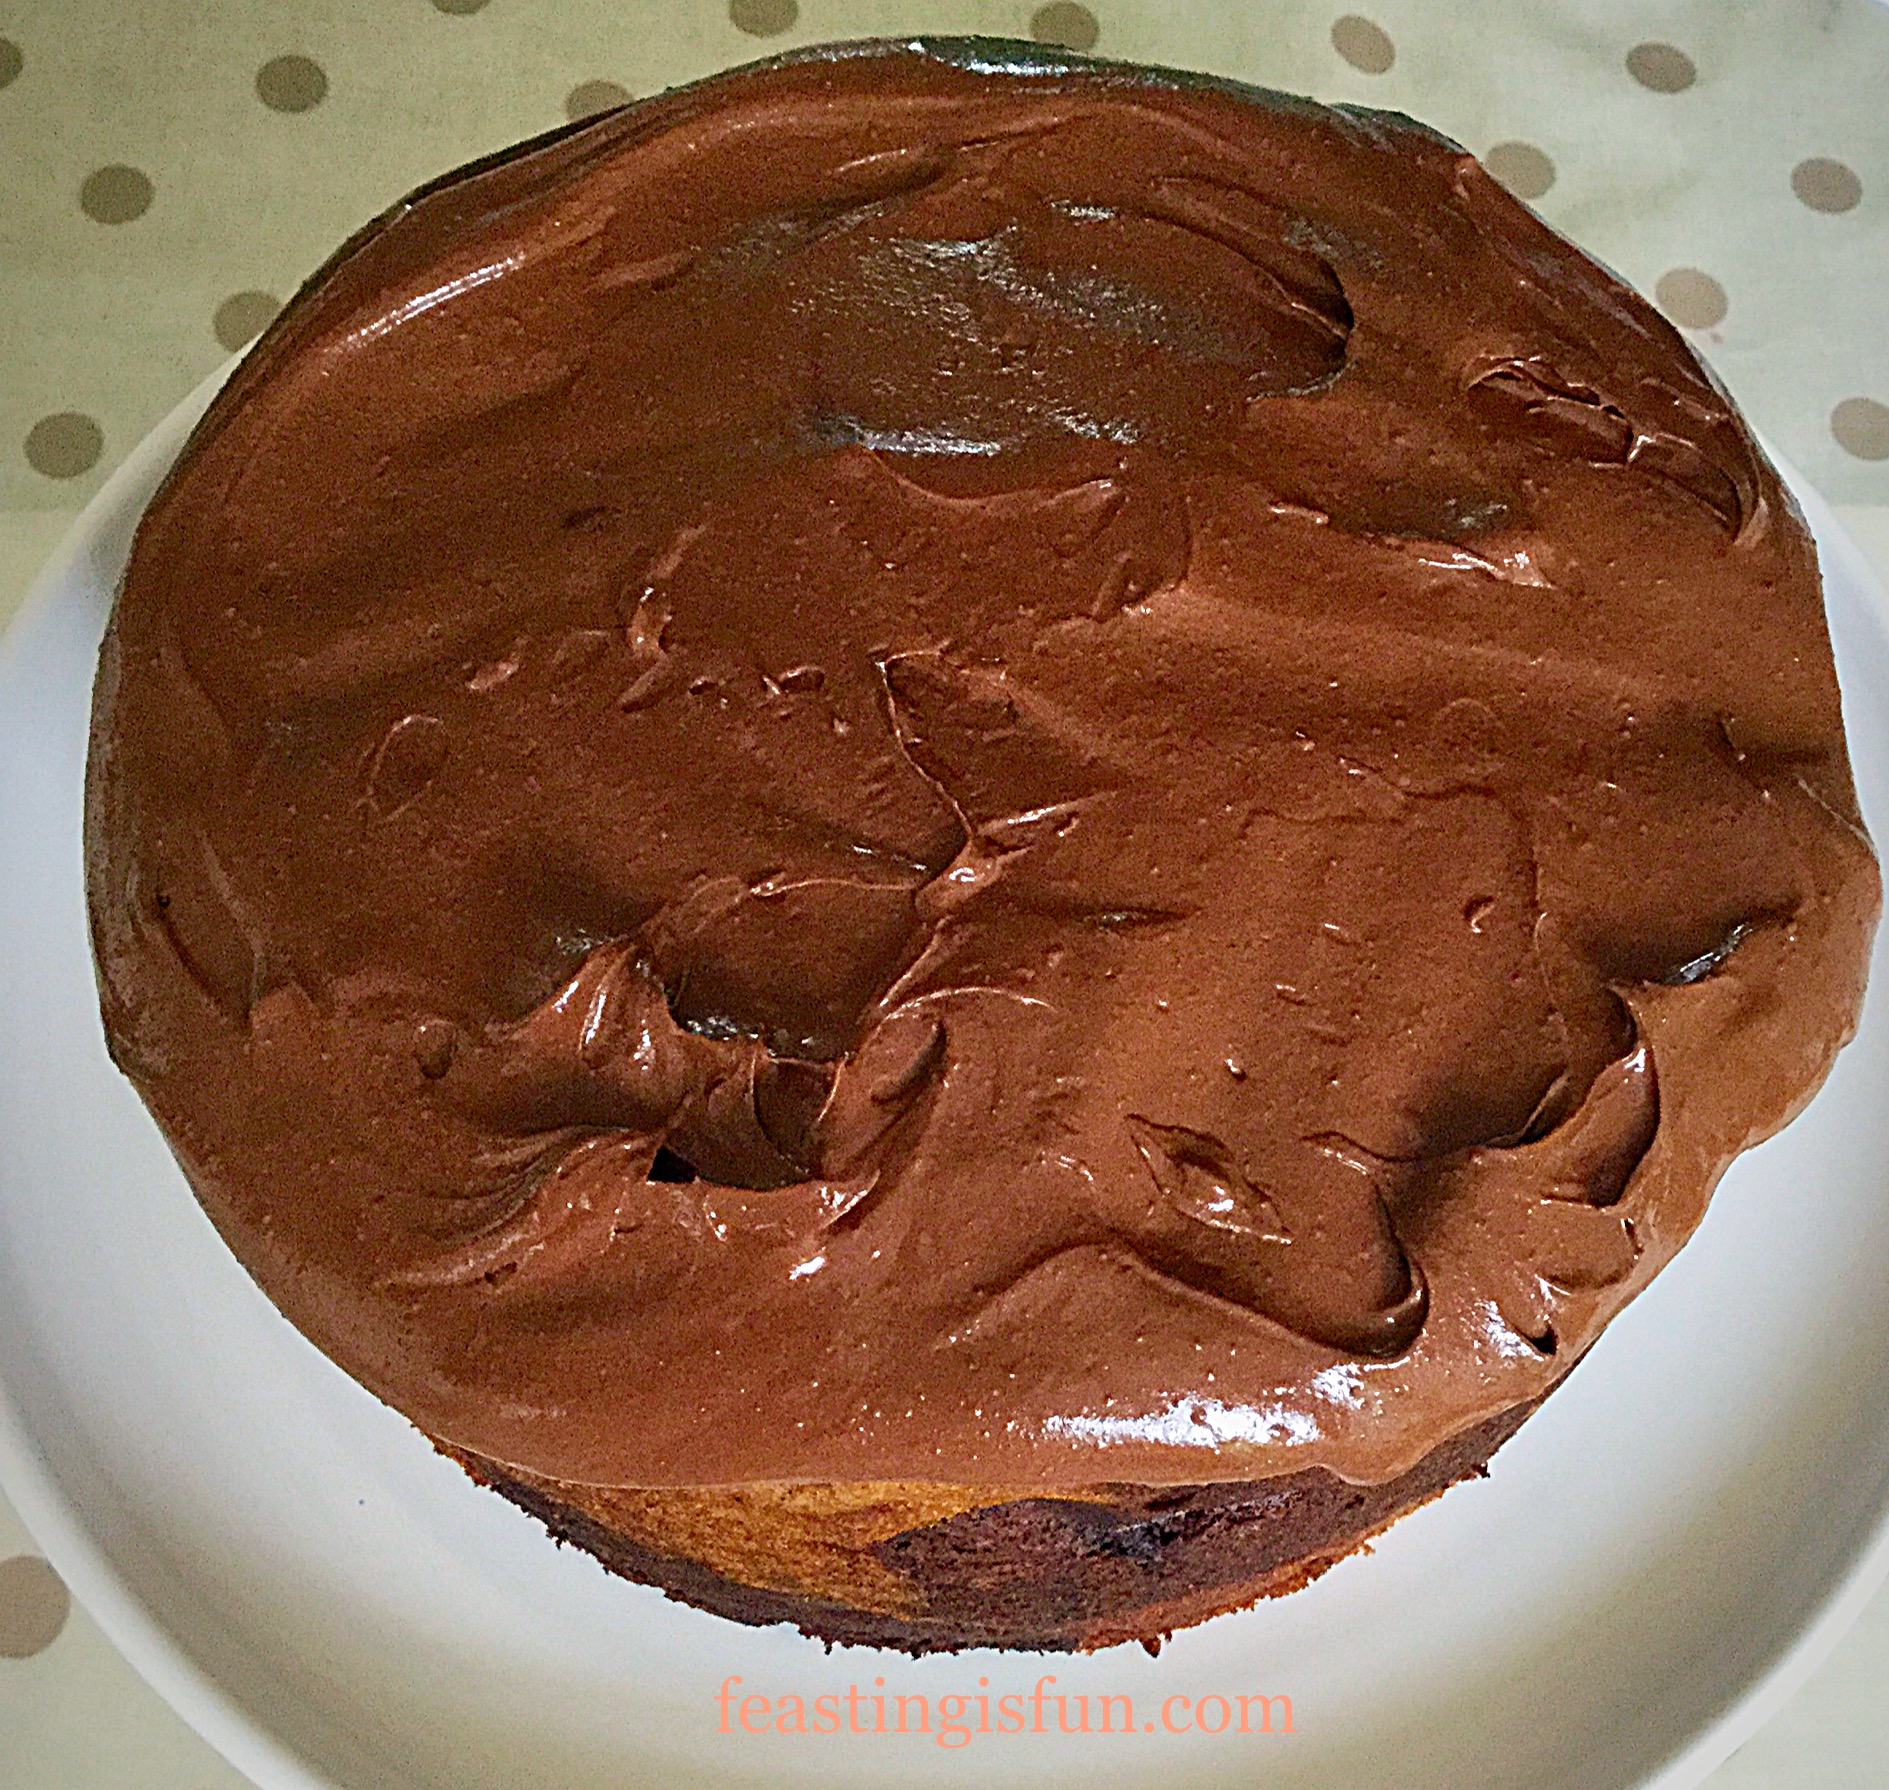
  • Place the bottom of the cake on to a plate.
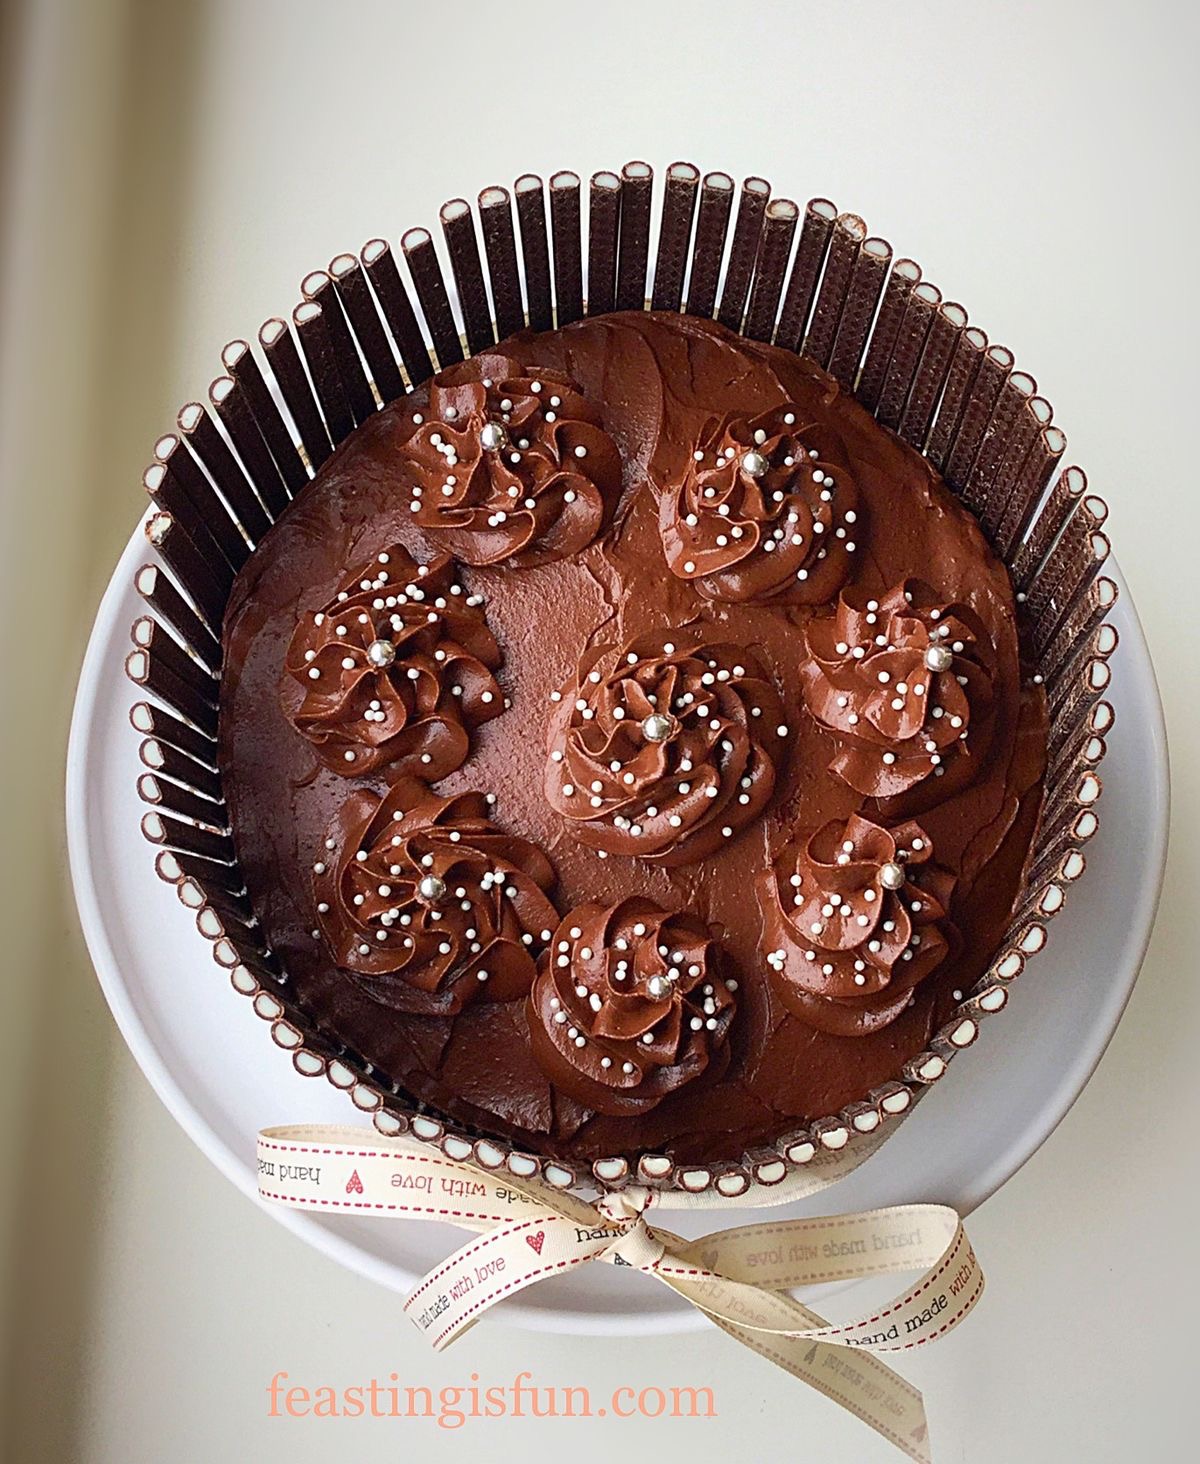
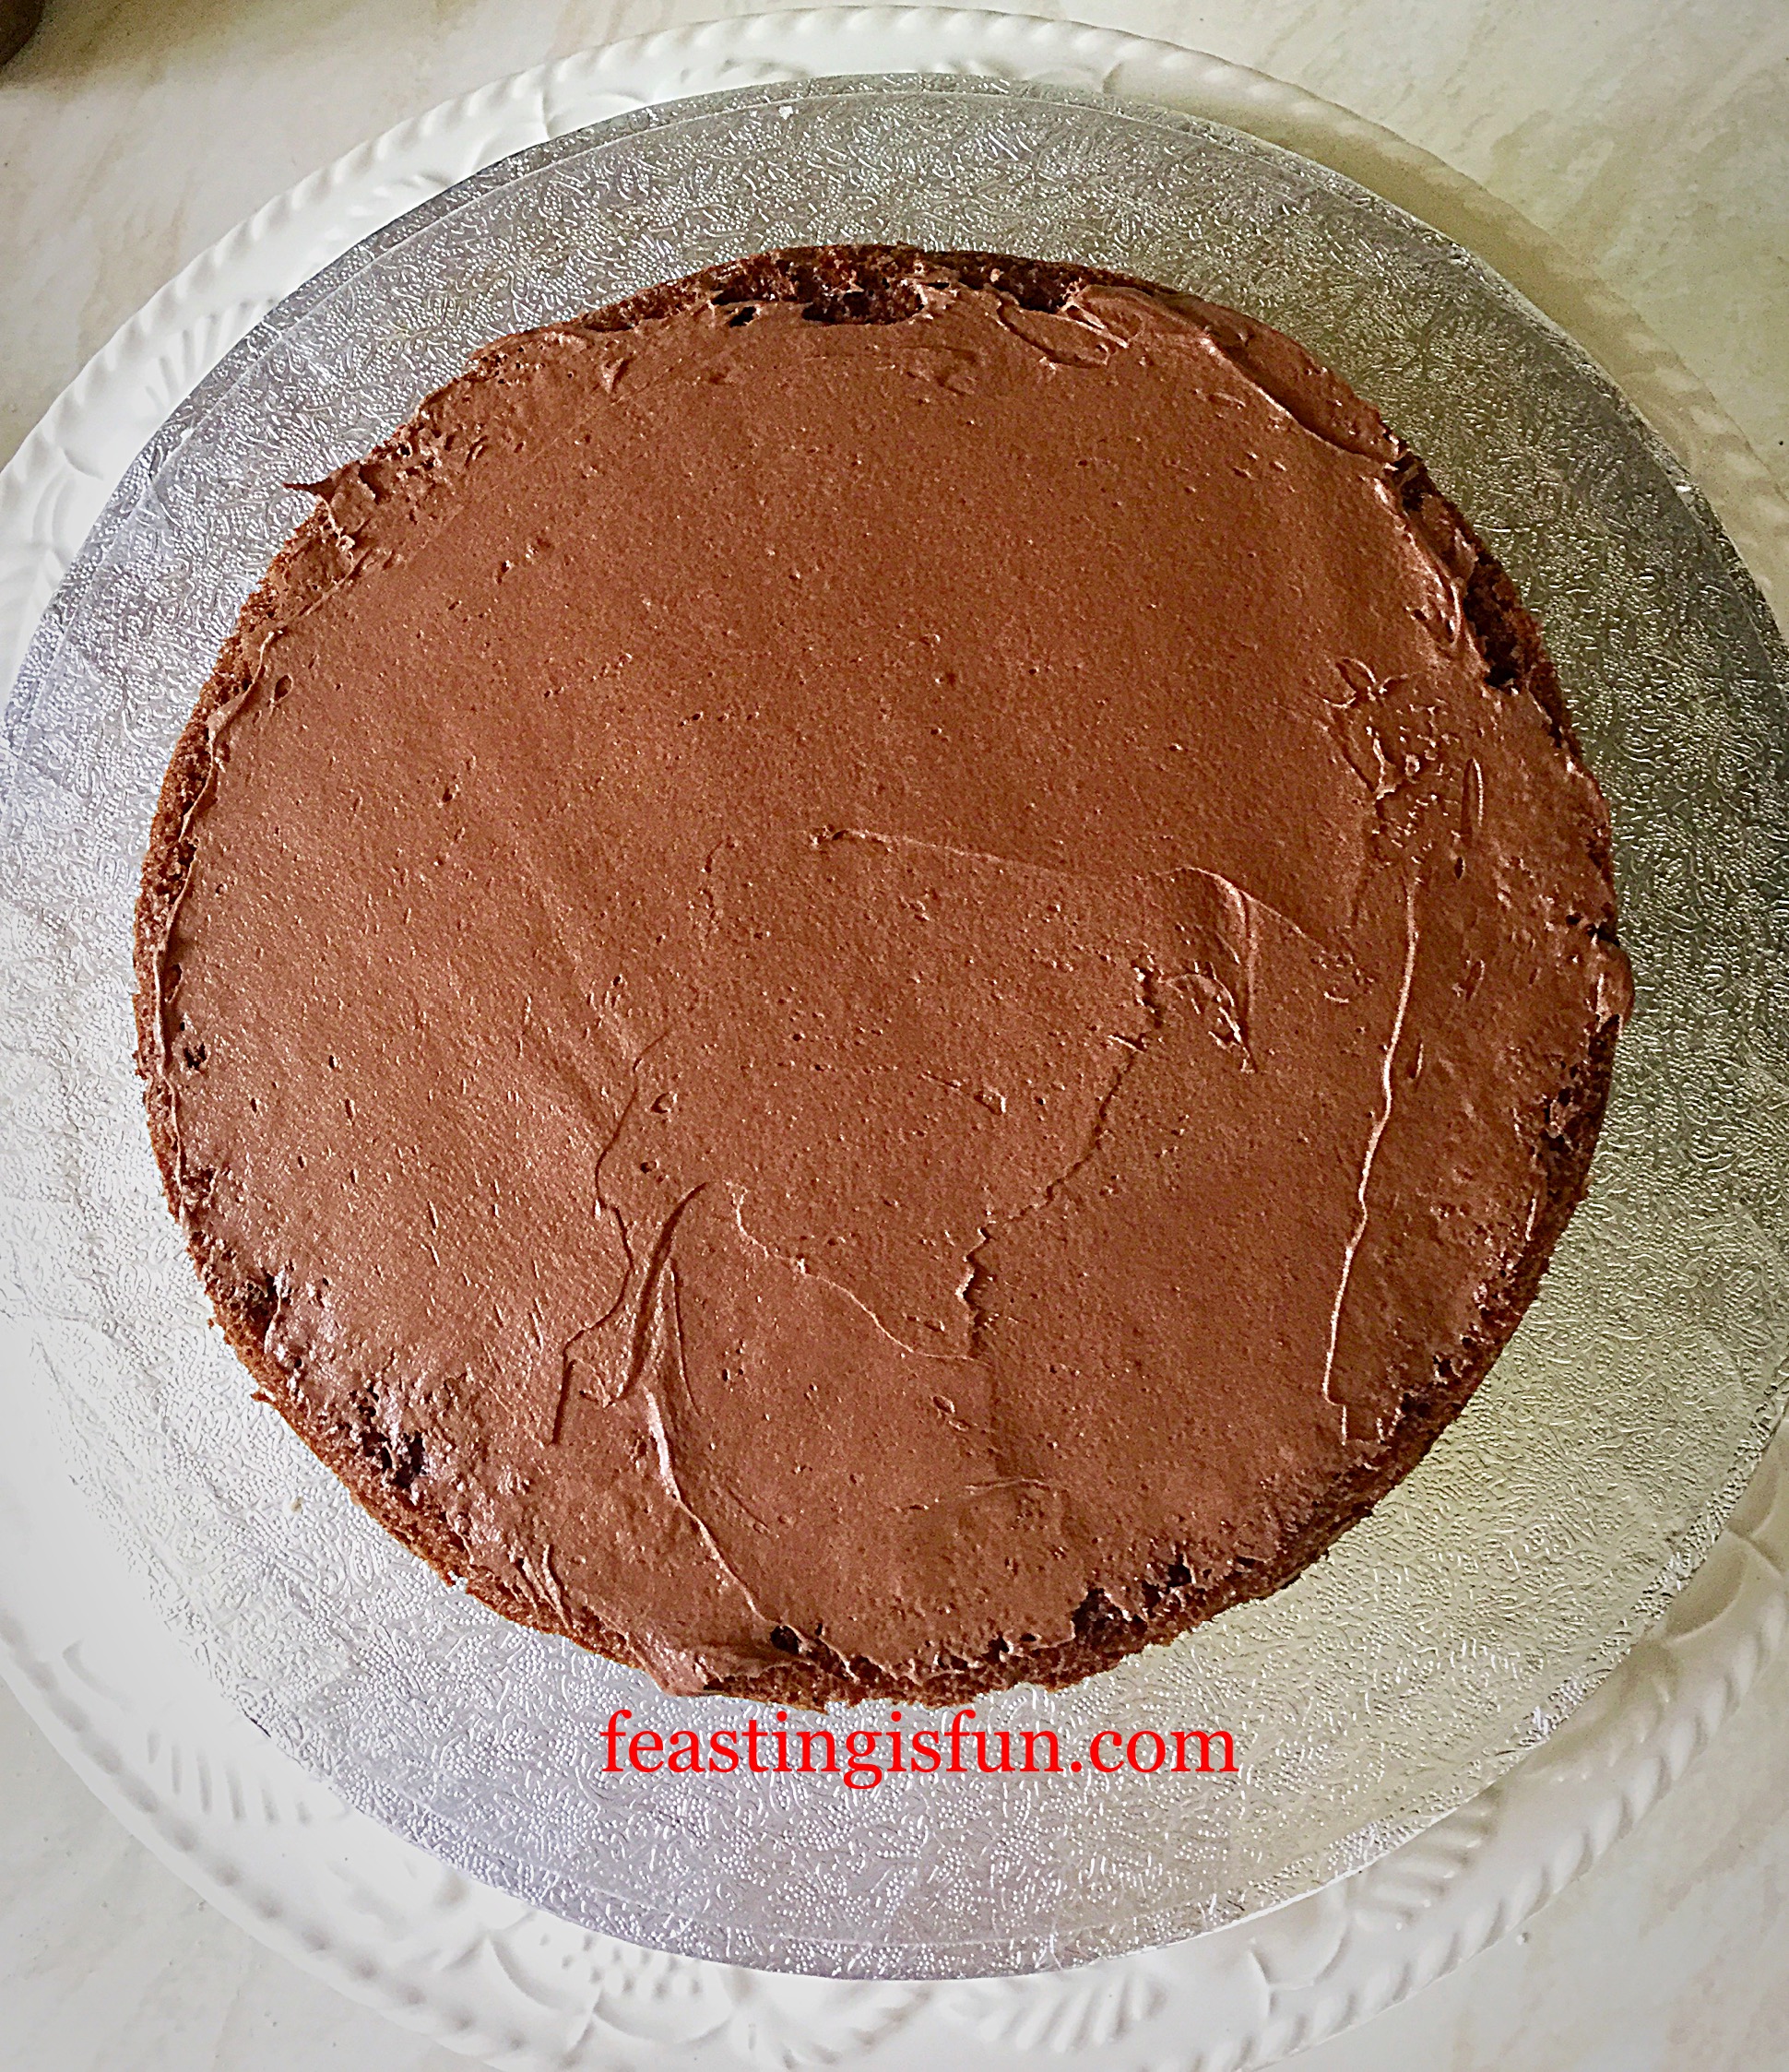
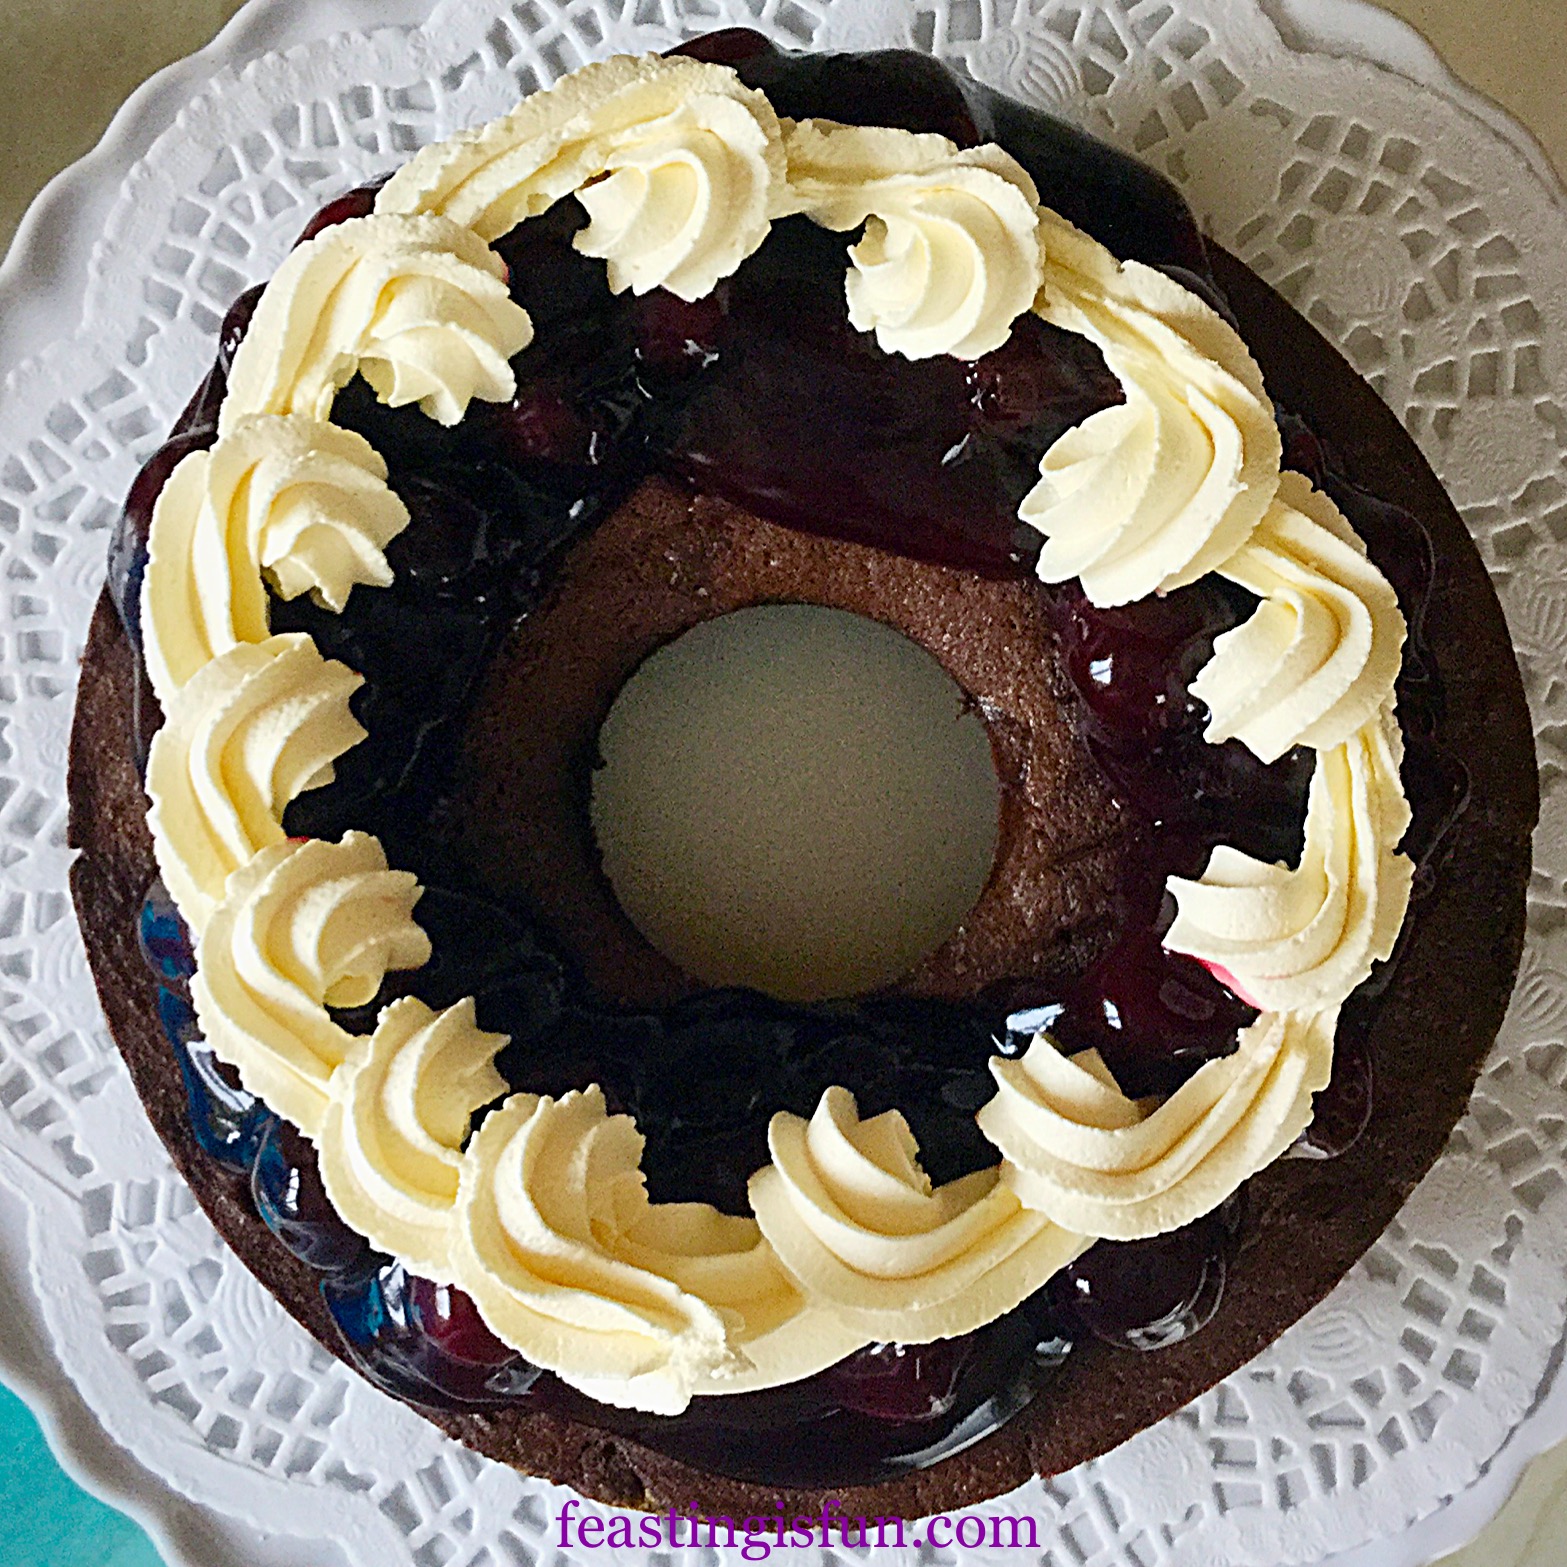
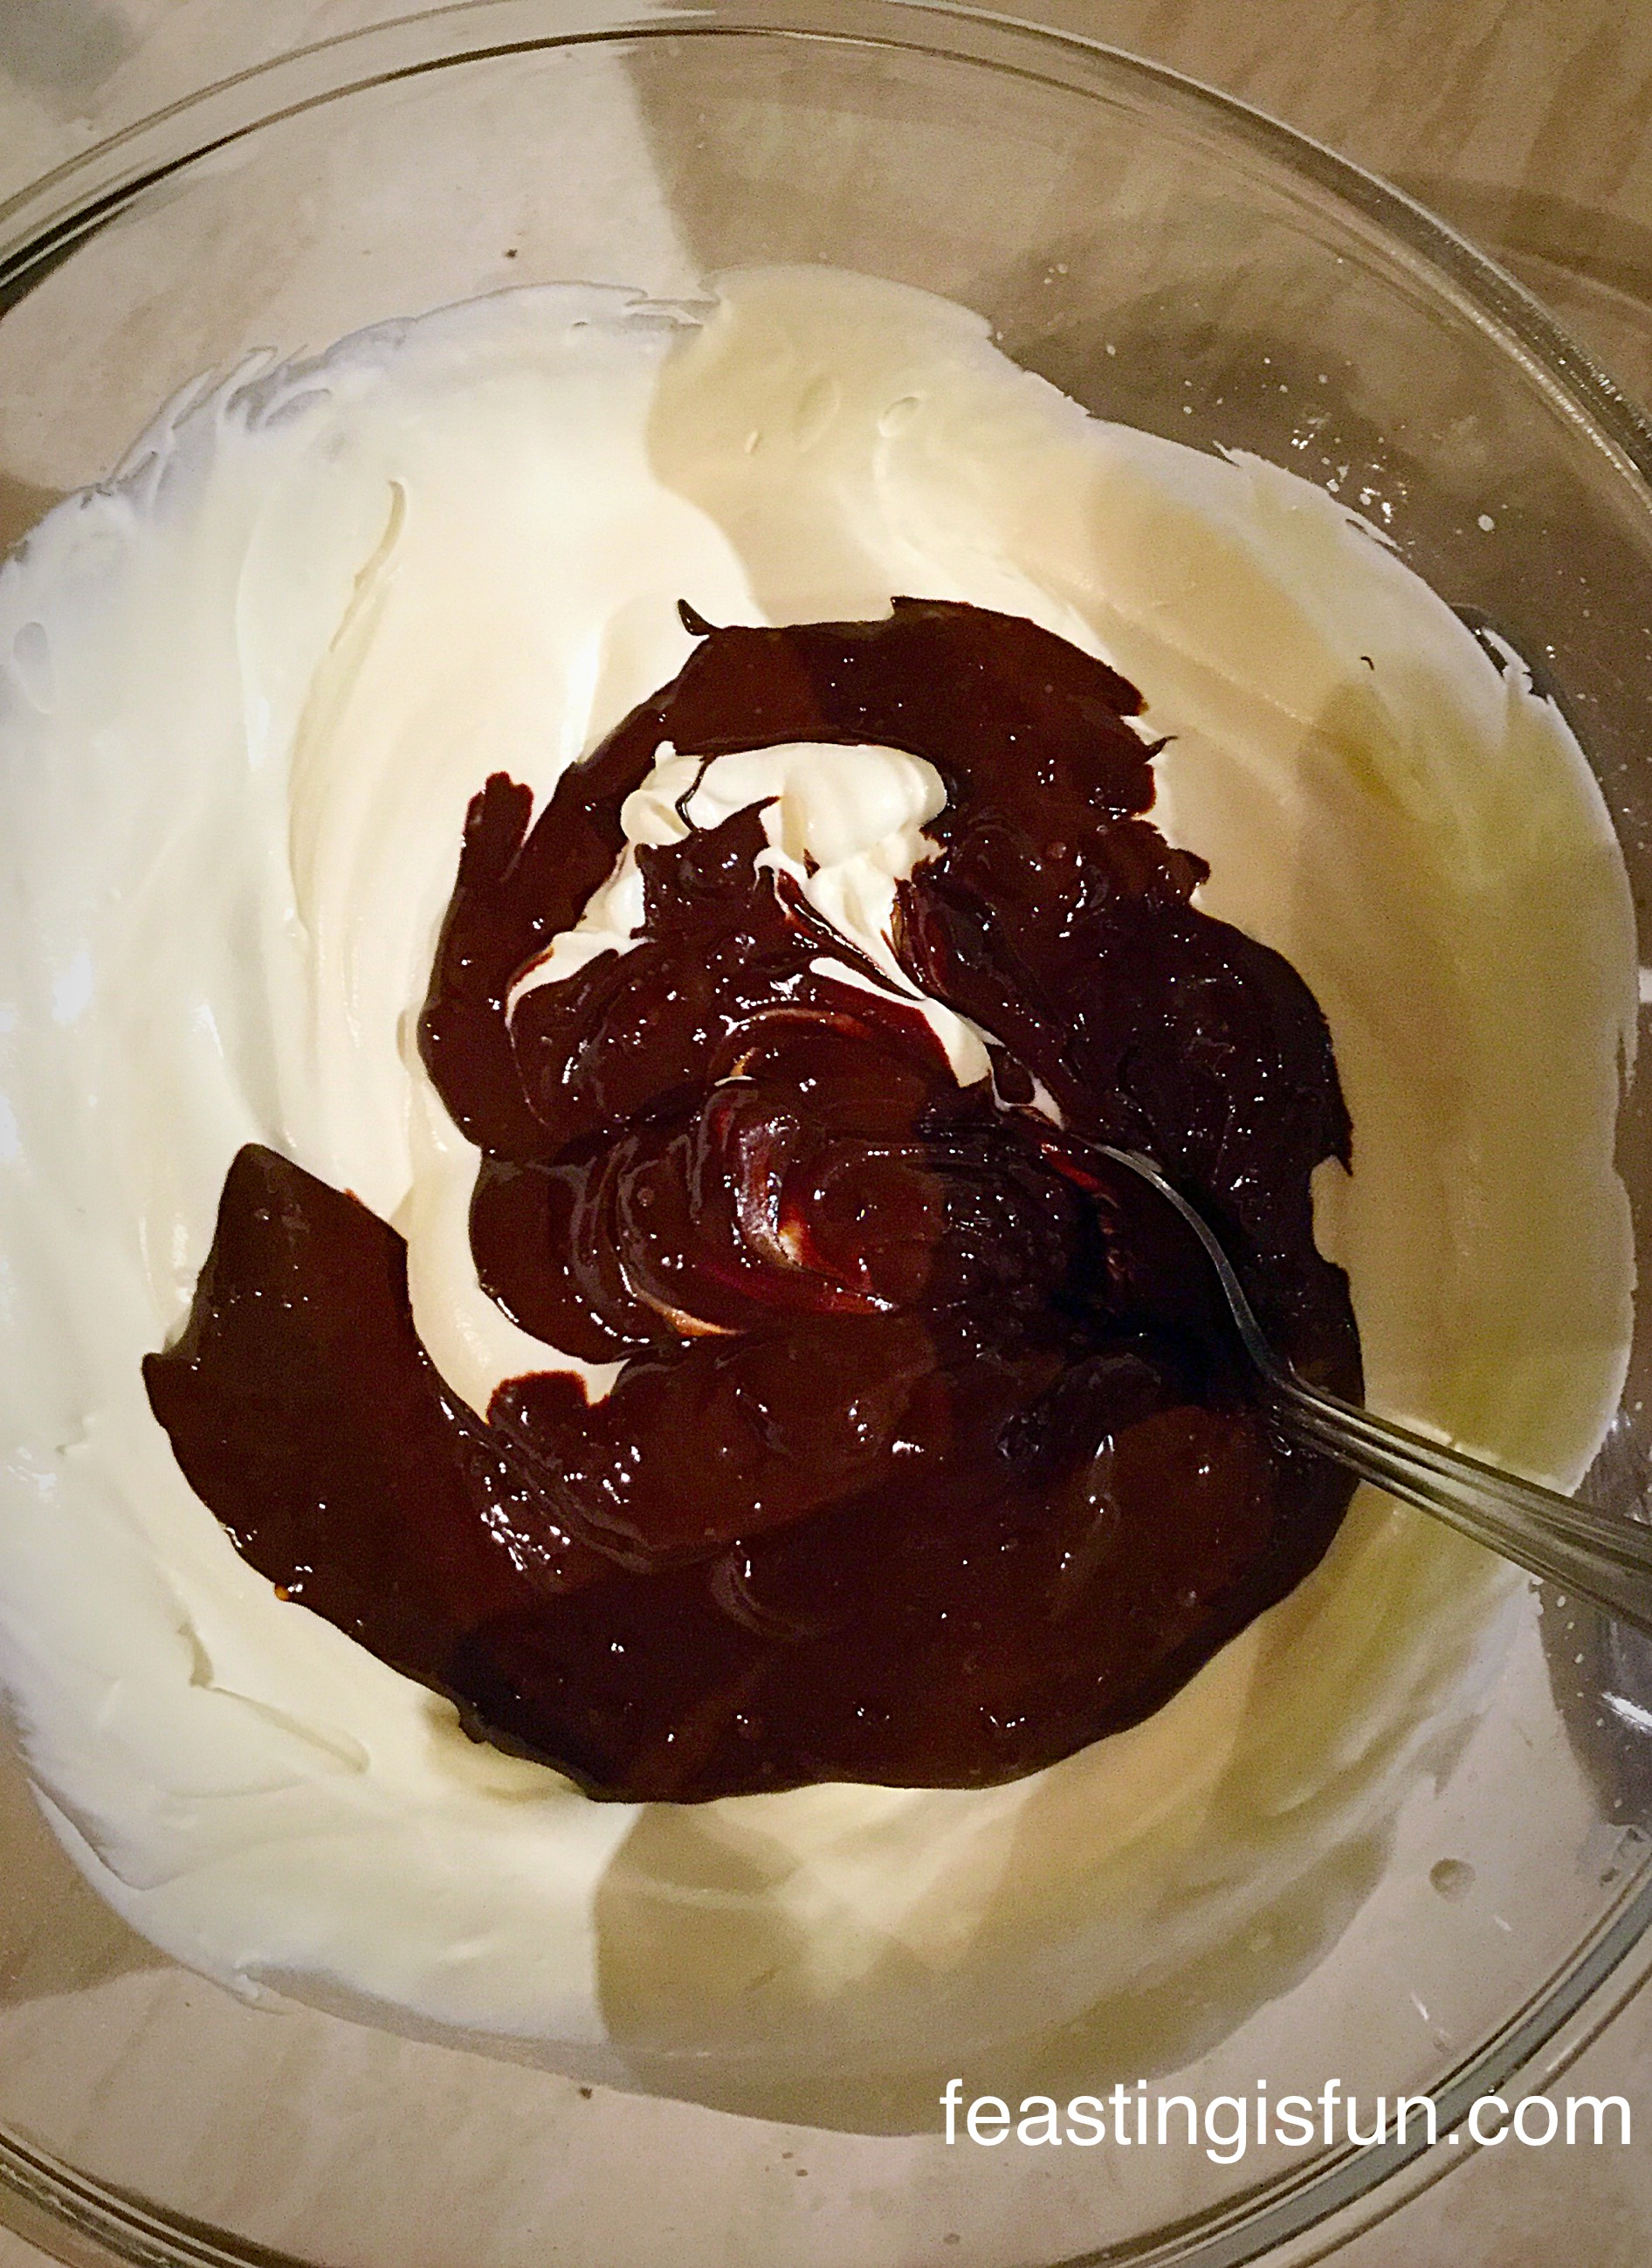
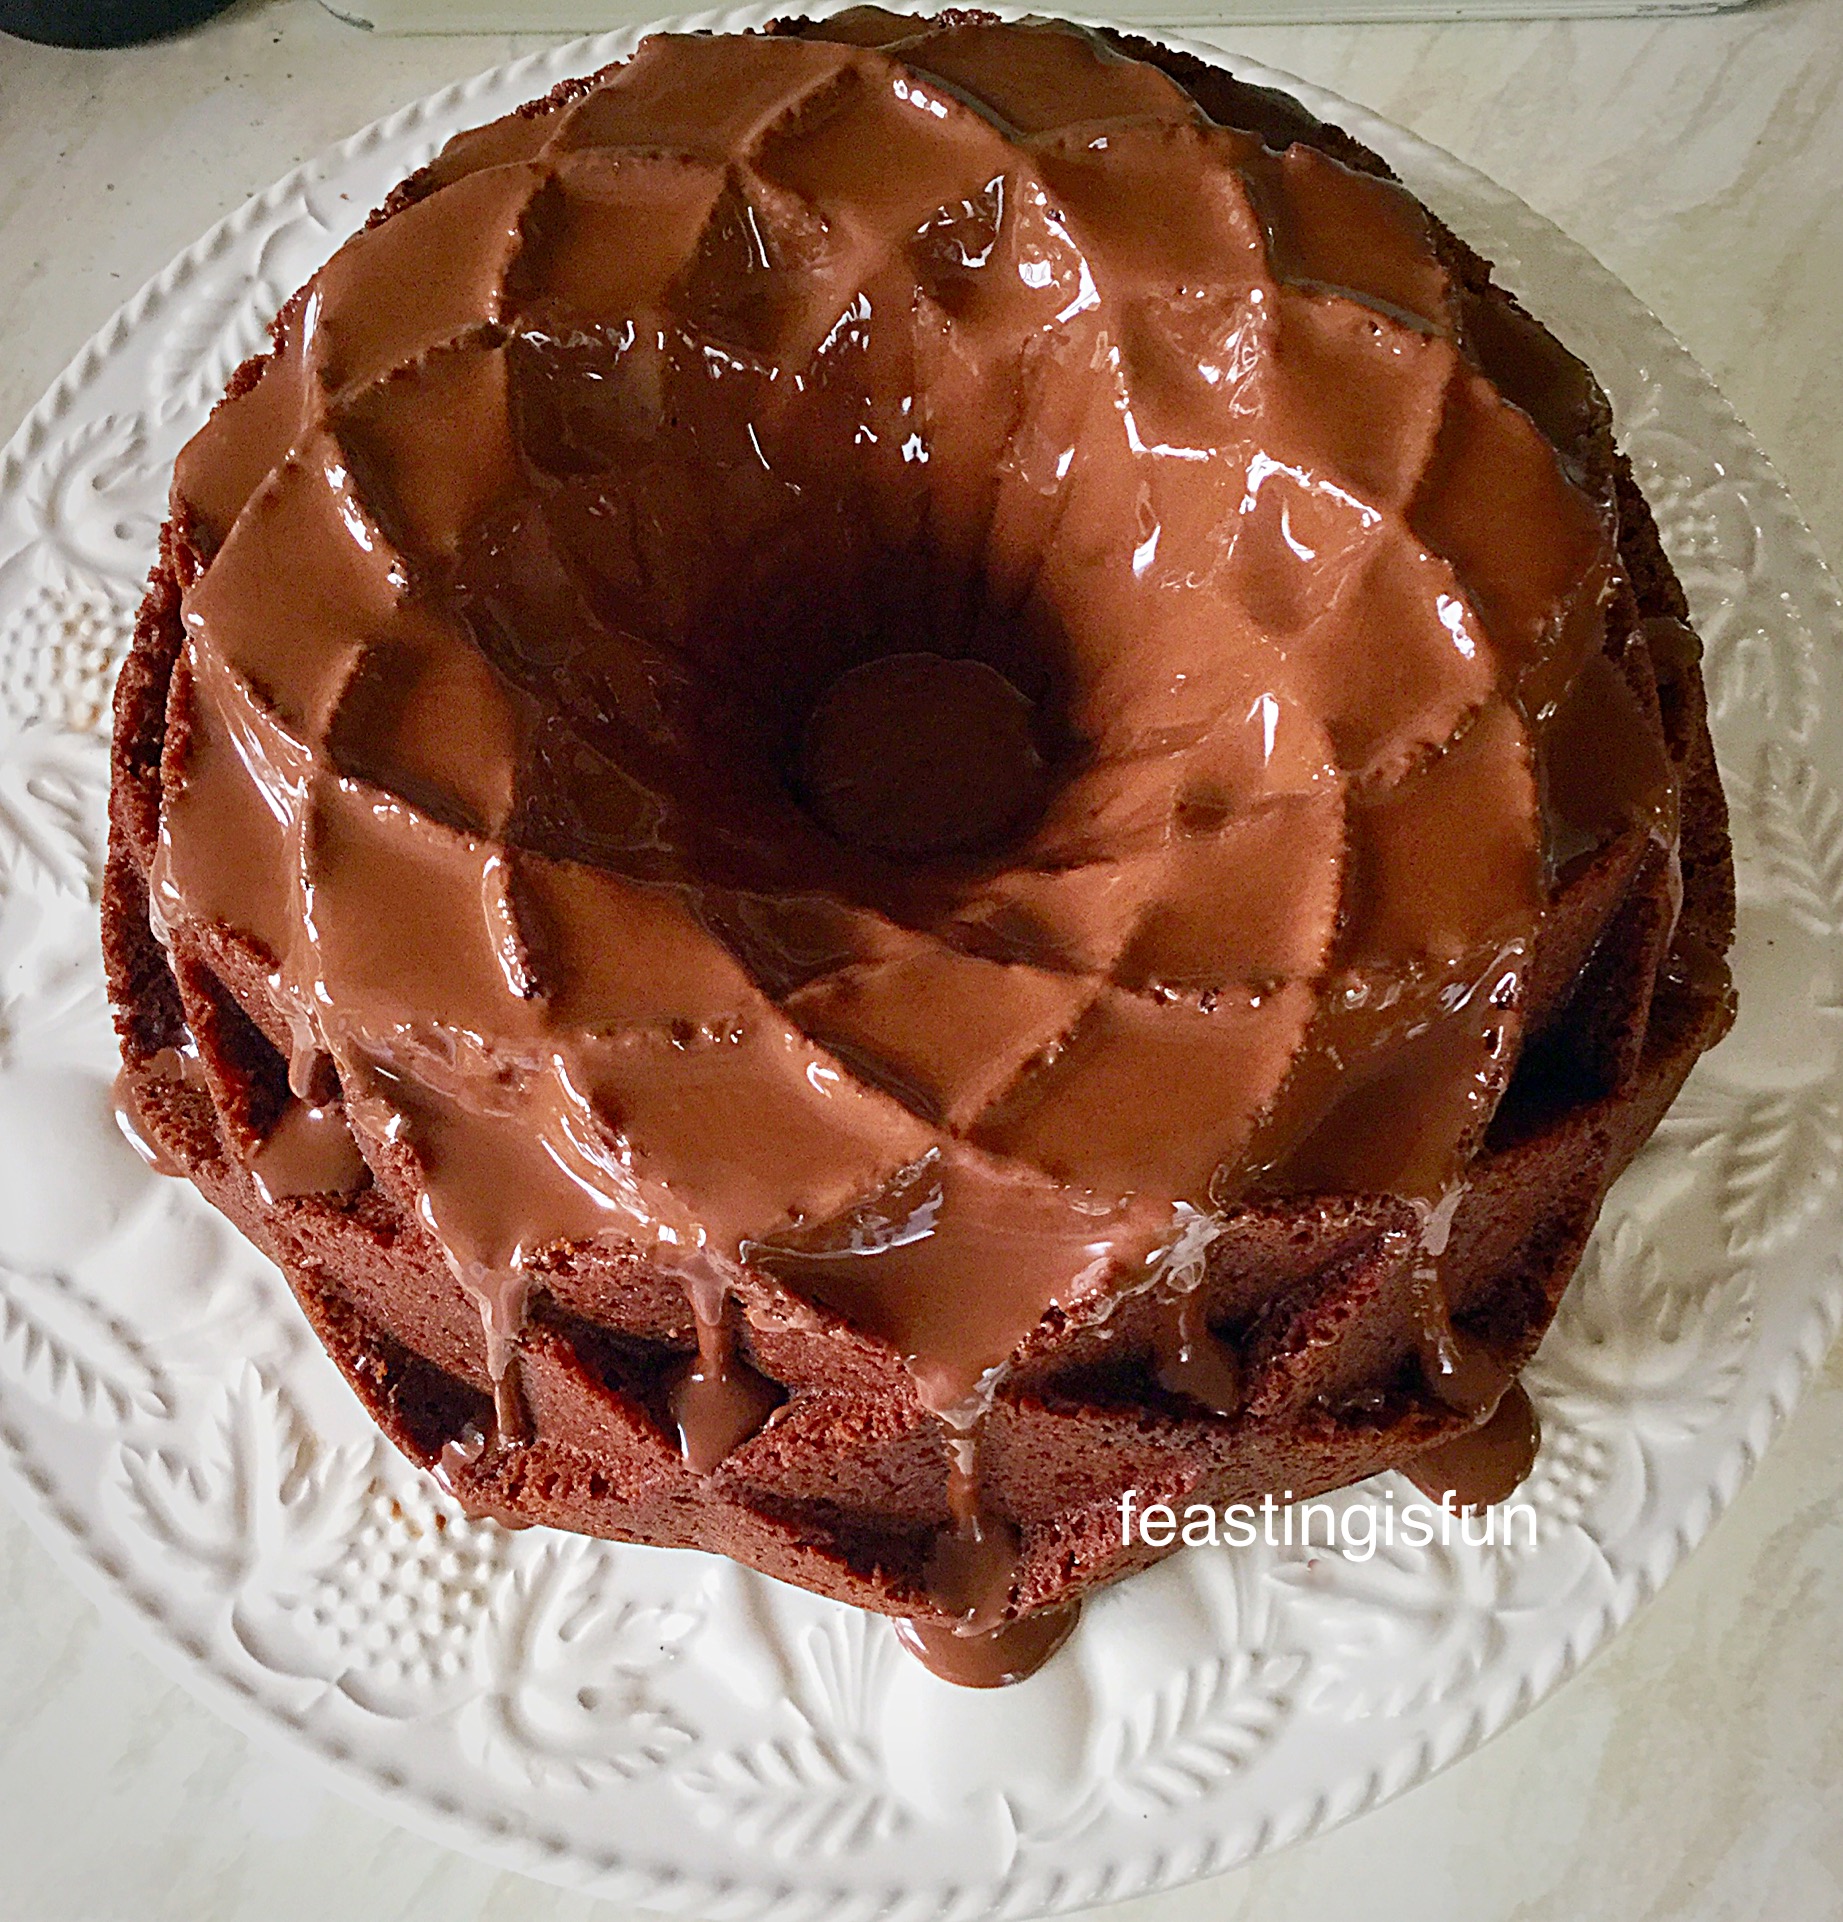
  • Spread the Salted Chocolate Spread over the cake. Follow by piping the buttercream so that it covers the spread. Start at the outside edge of the cake, piping in circles until the centre is reached.
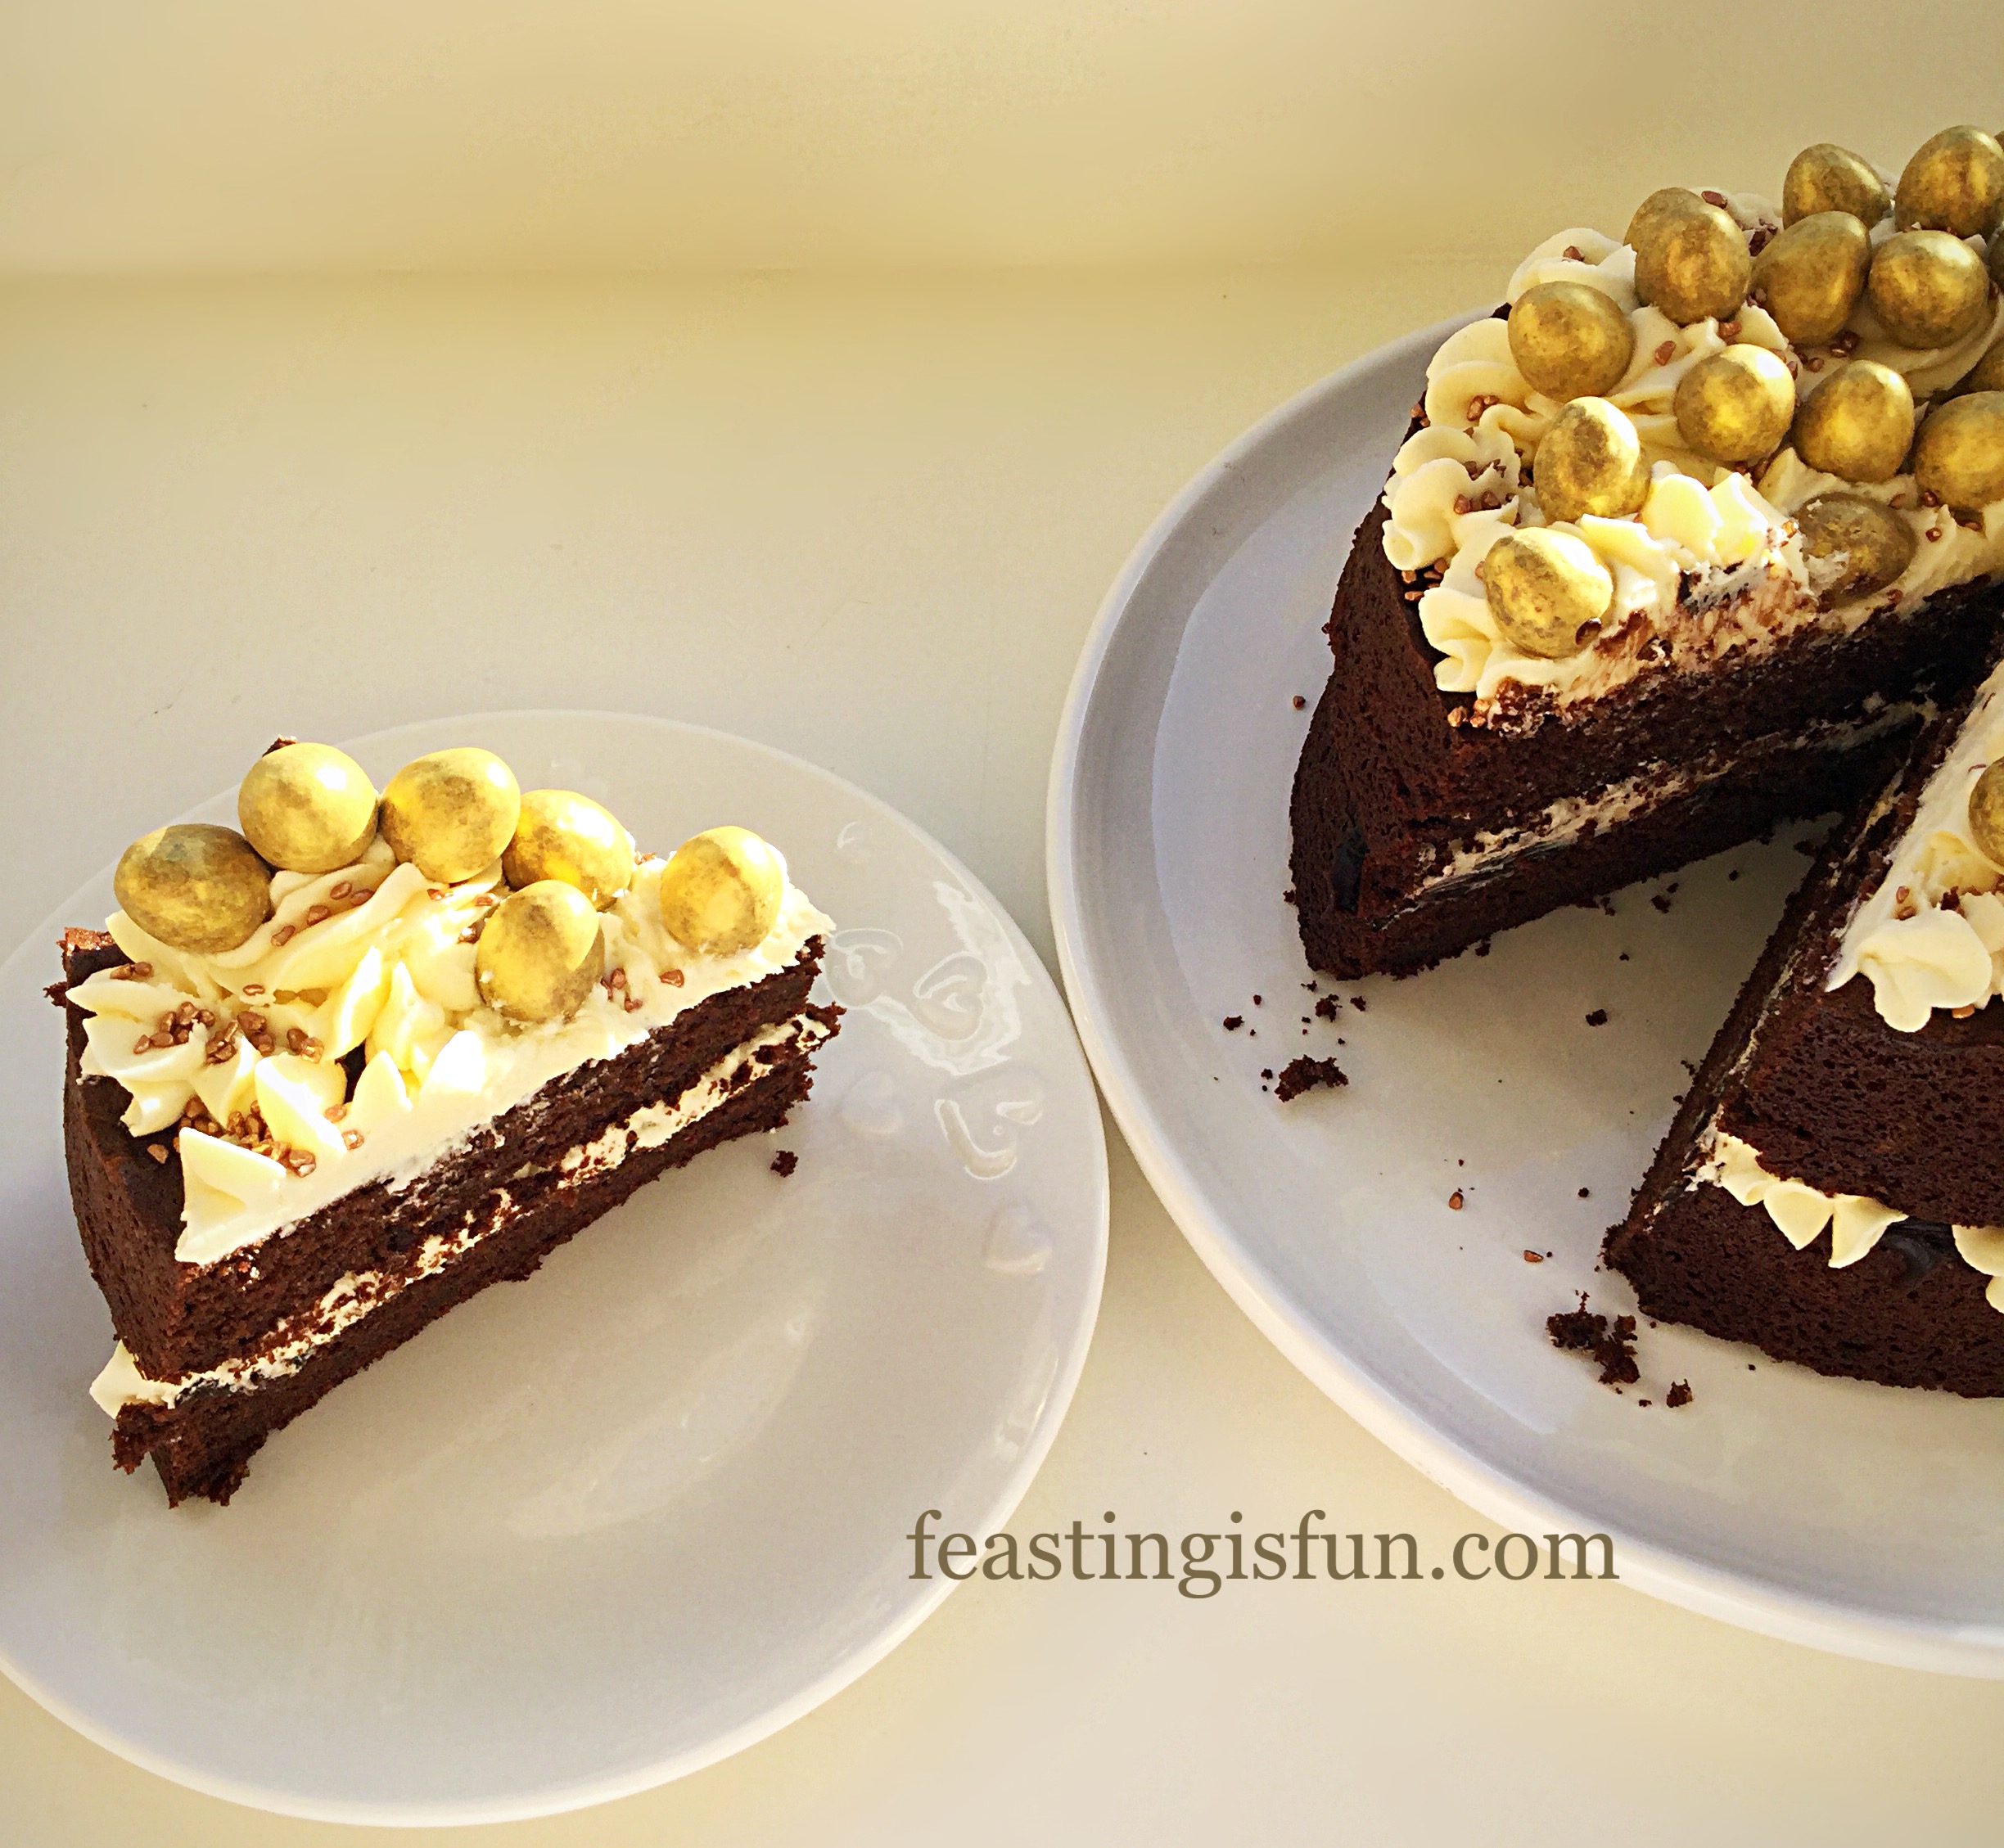
  • Place the top of the cake evenly on to the bottom.
FF Golden Egg Chocolate Sponge Cake
Filling and frosting the cake.
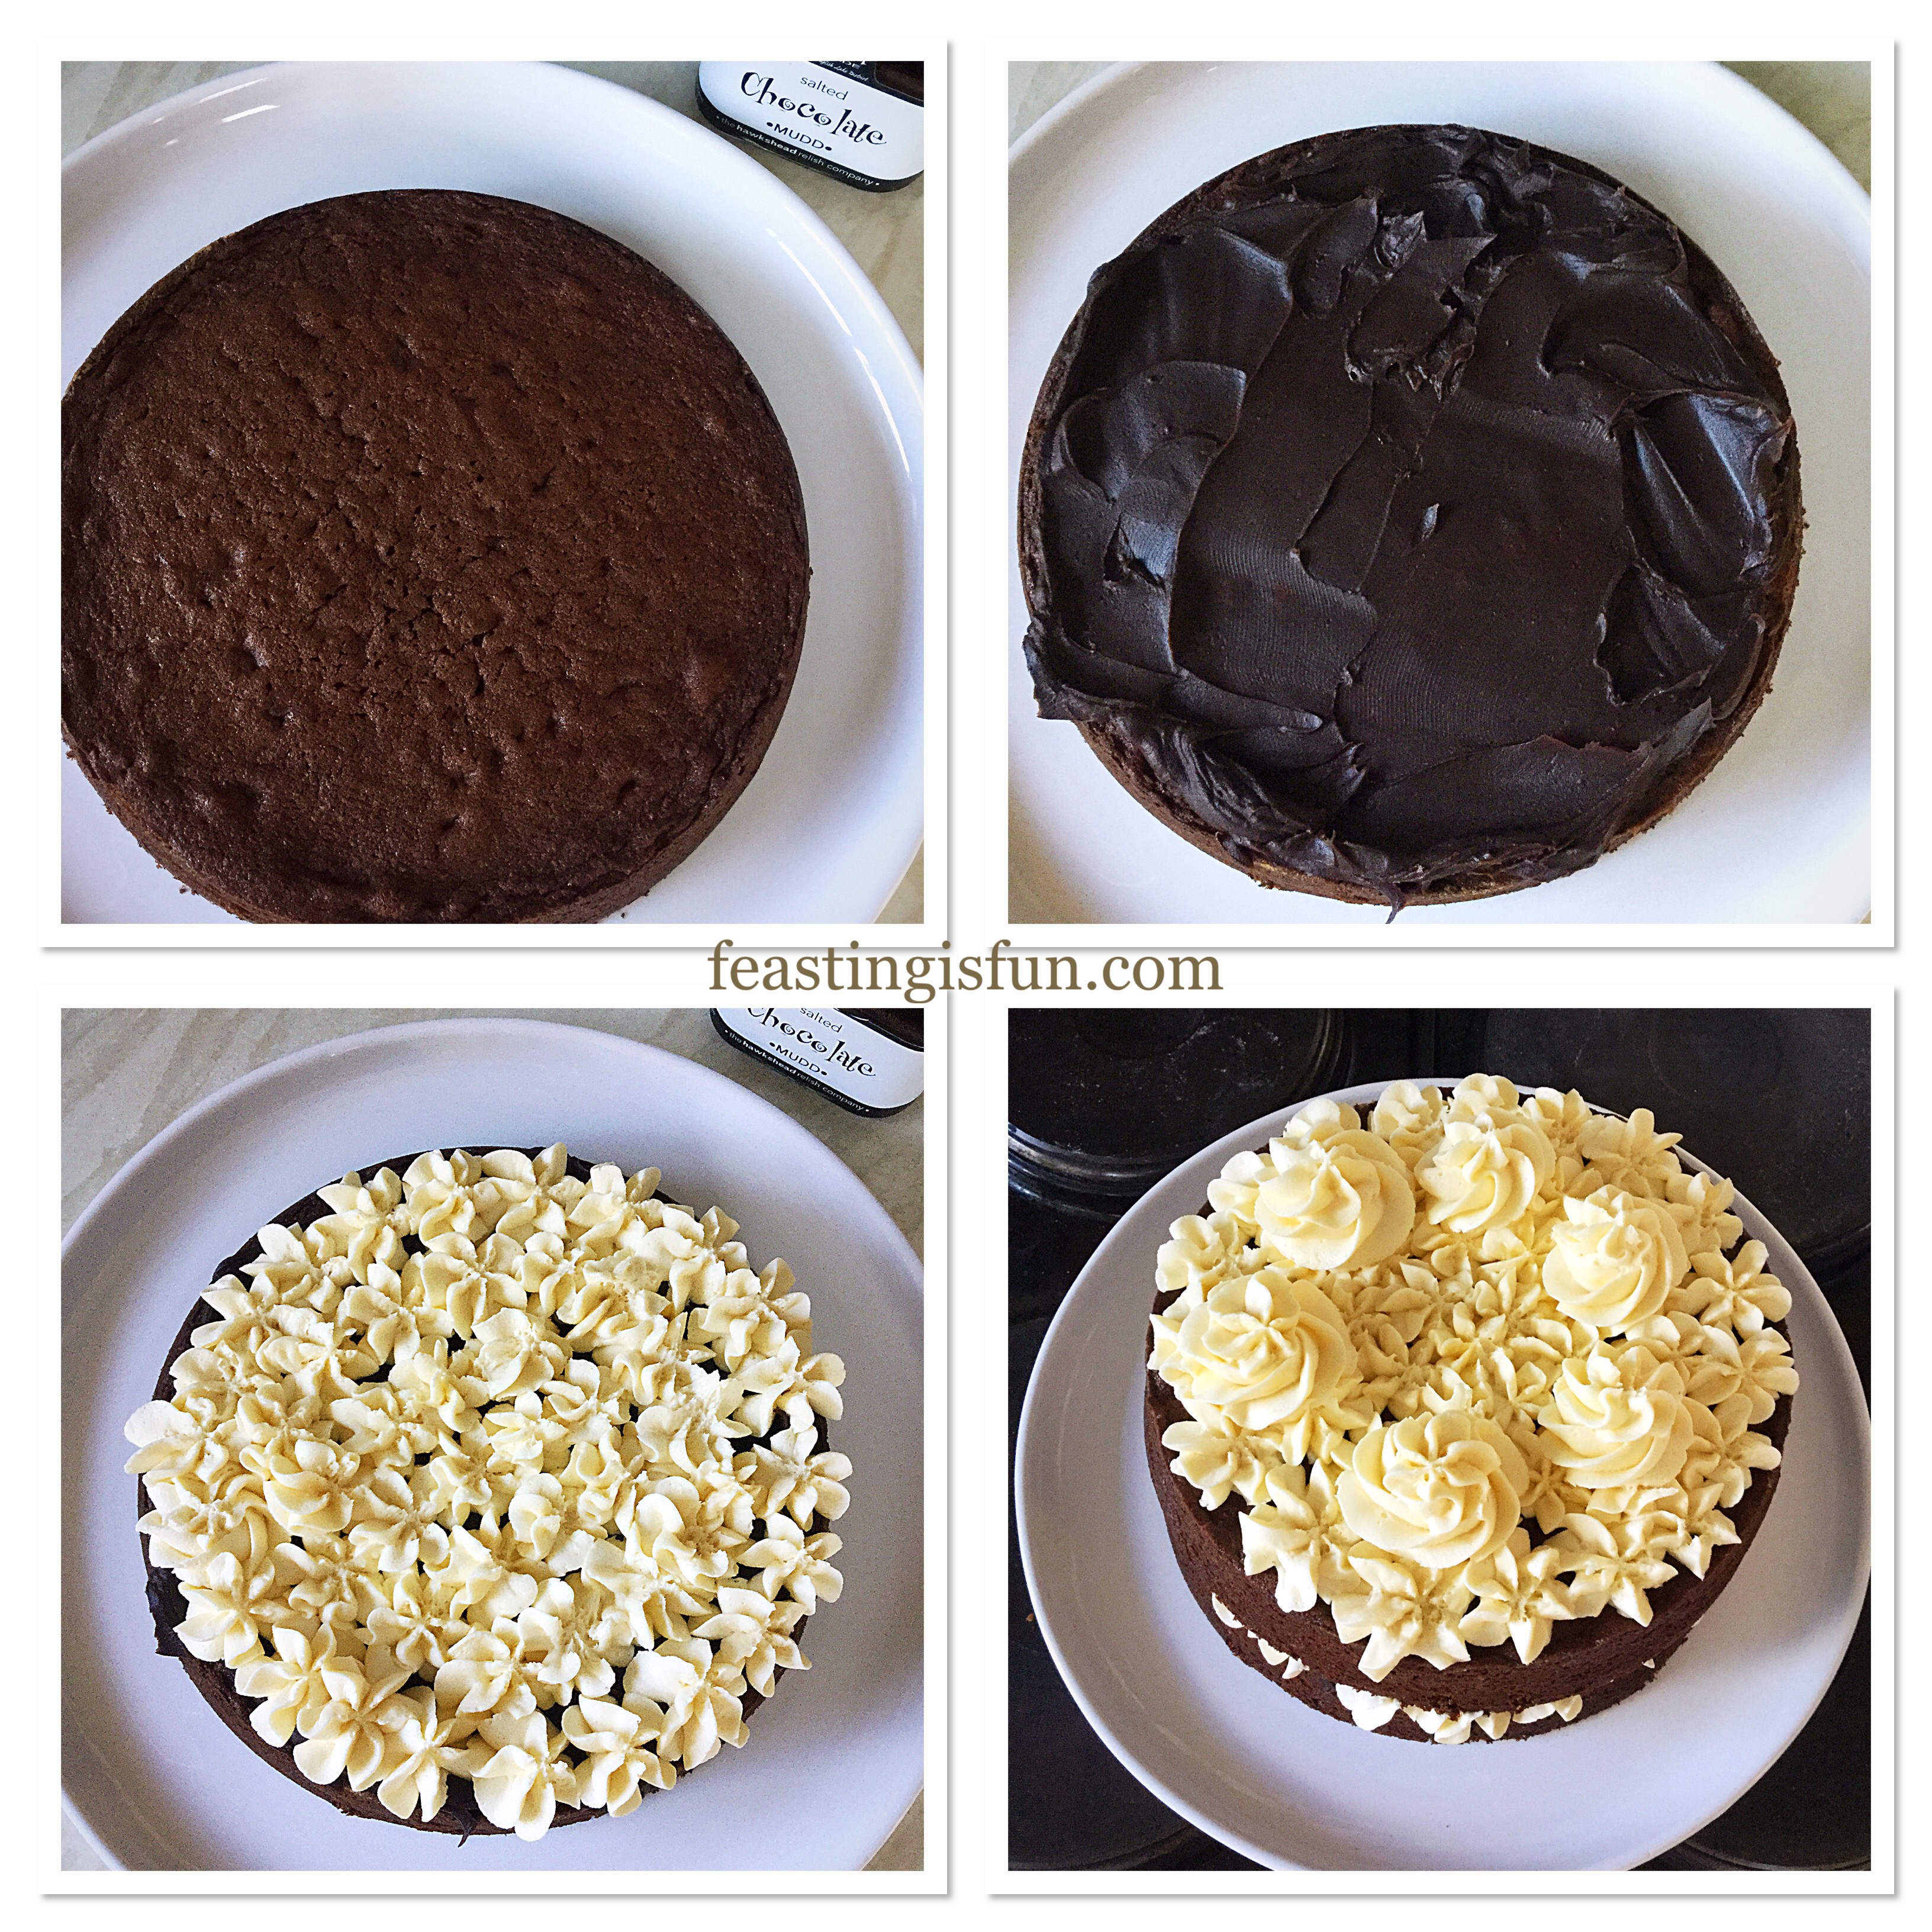
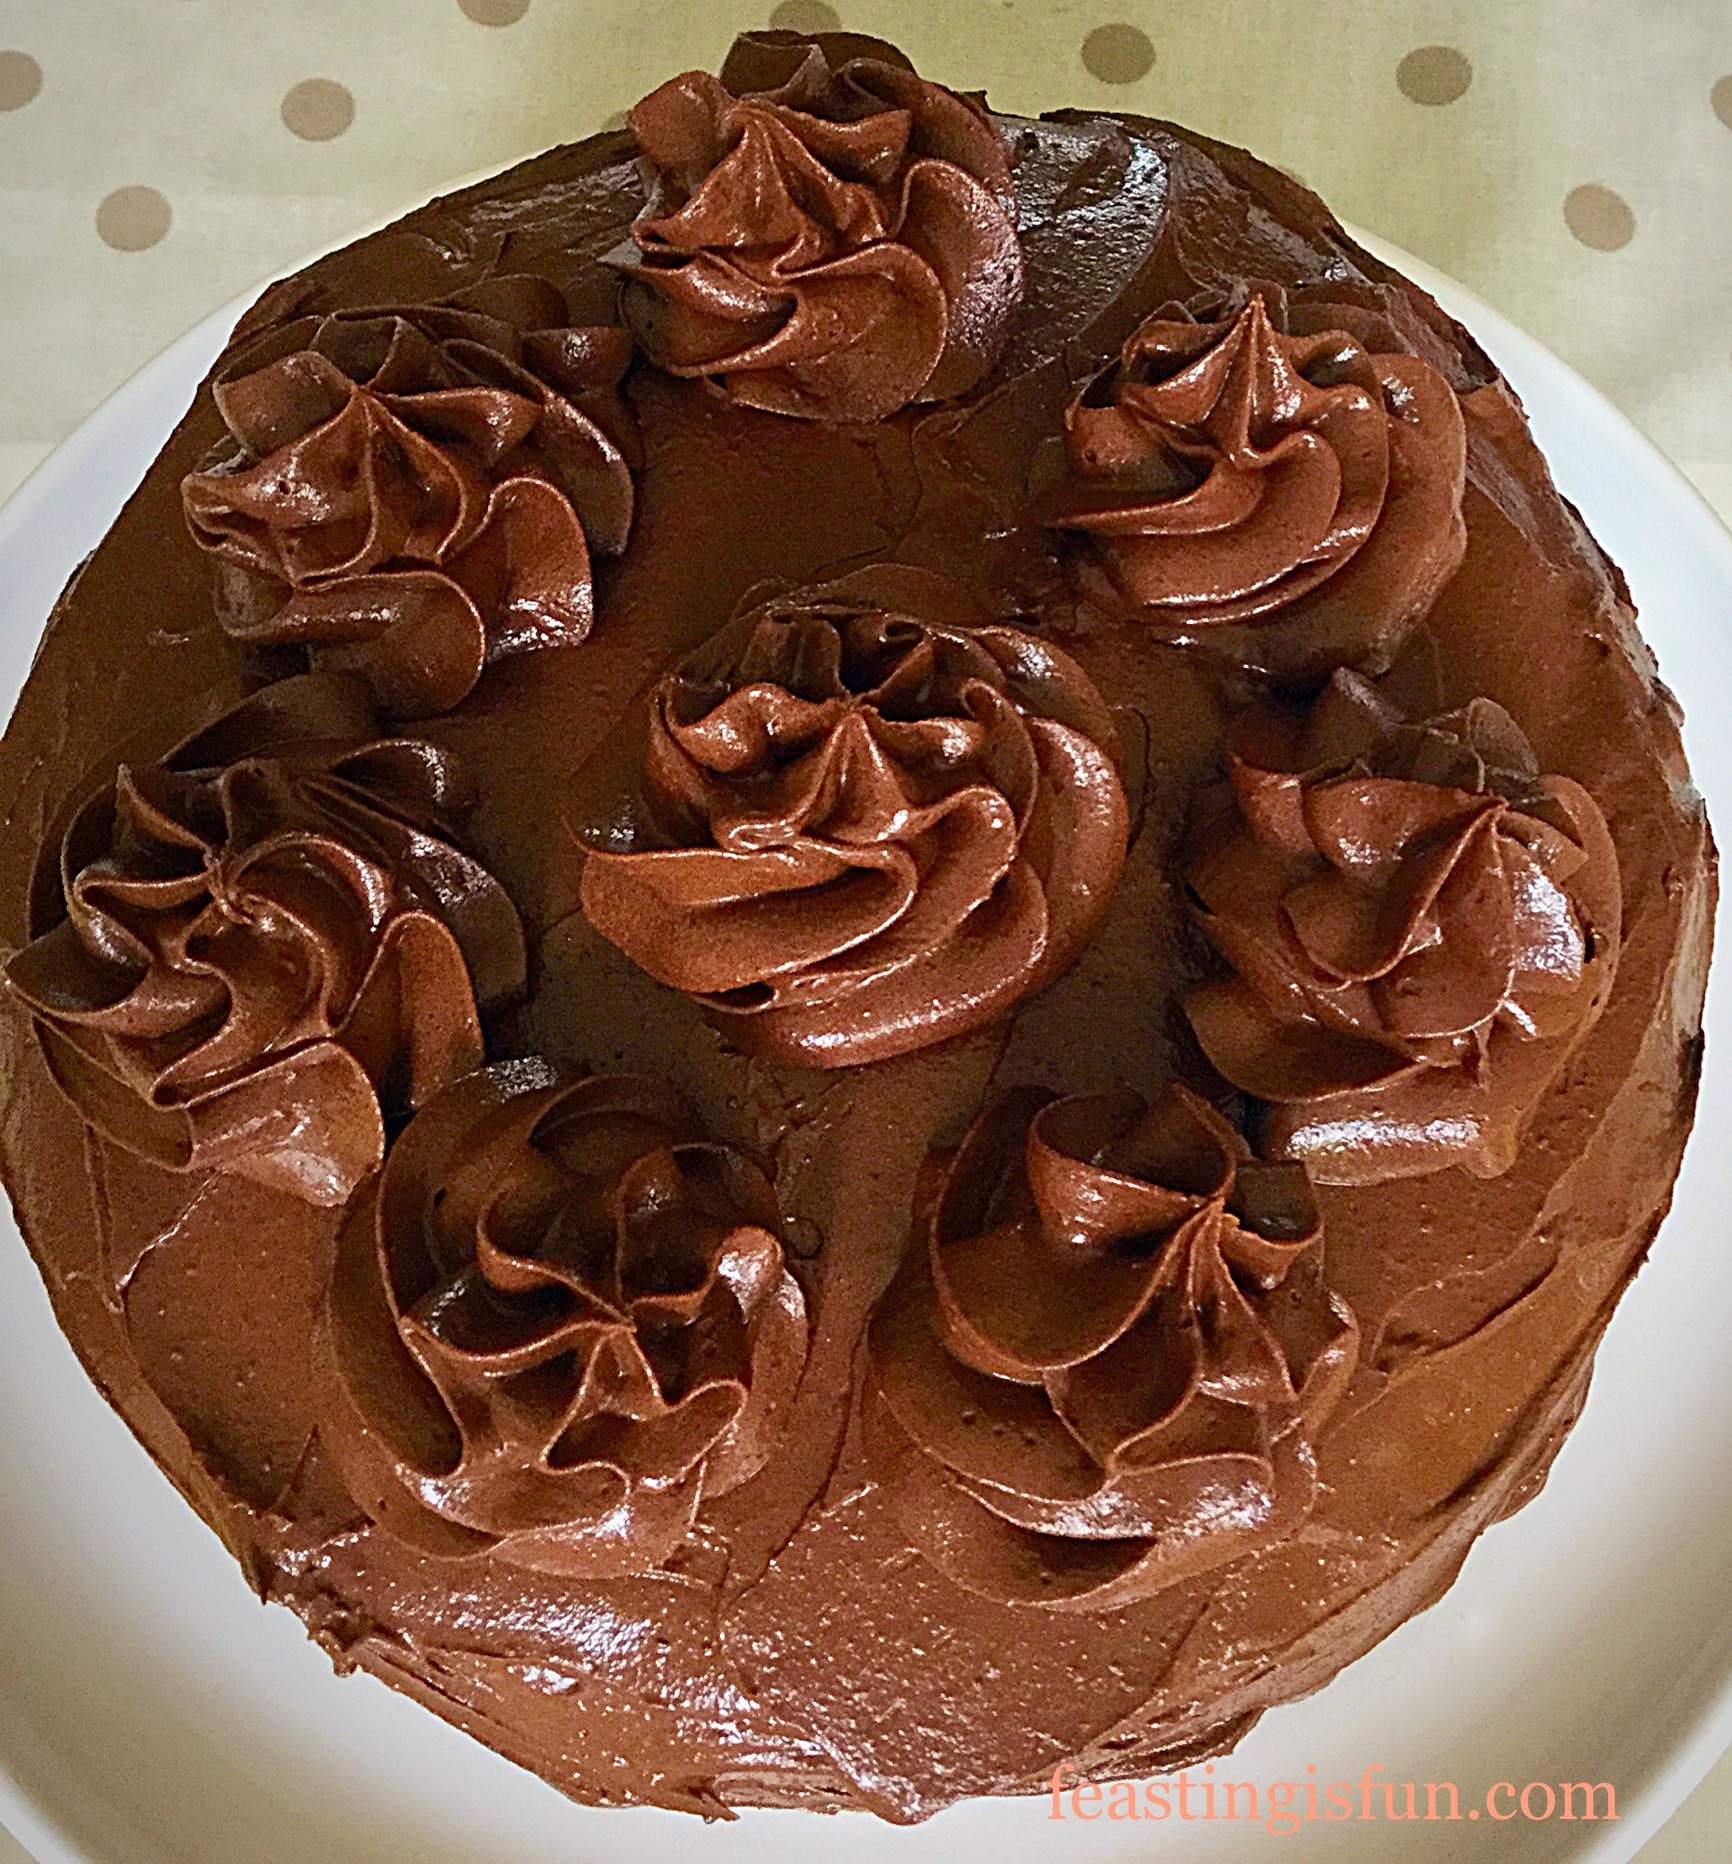
  • Pipe buttercream on to the top of the cake, in the same way the base was covered.
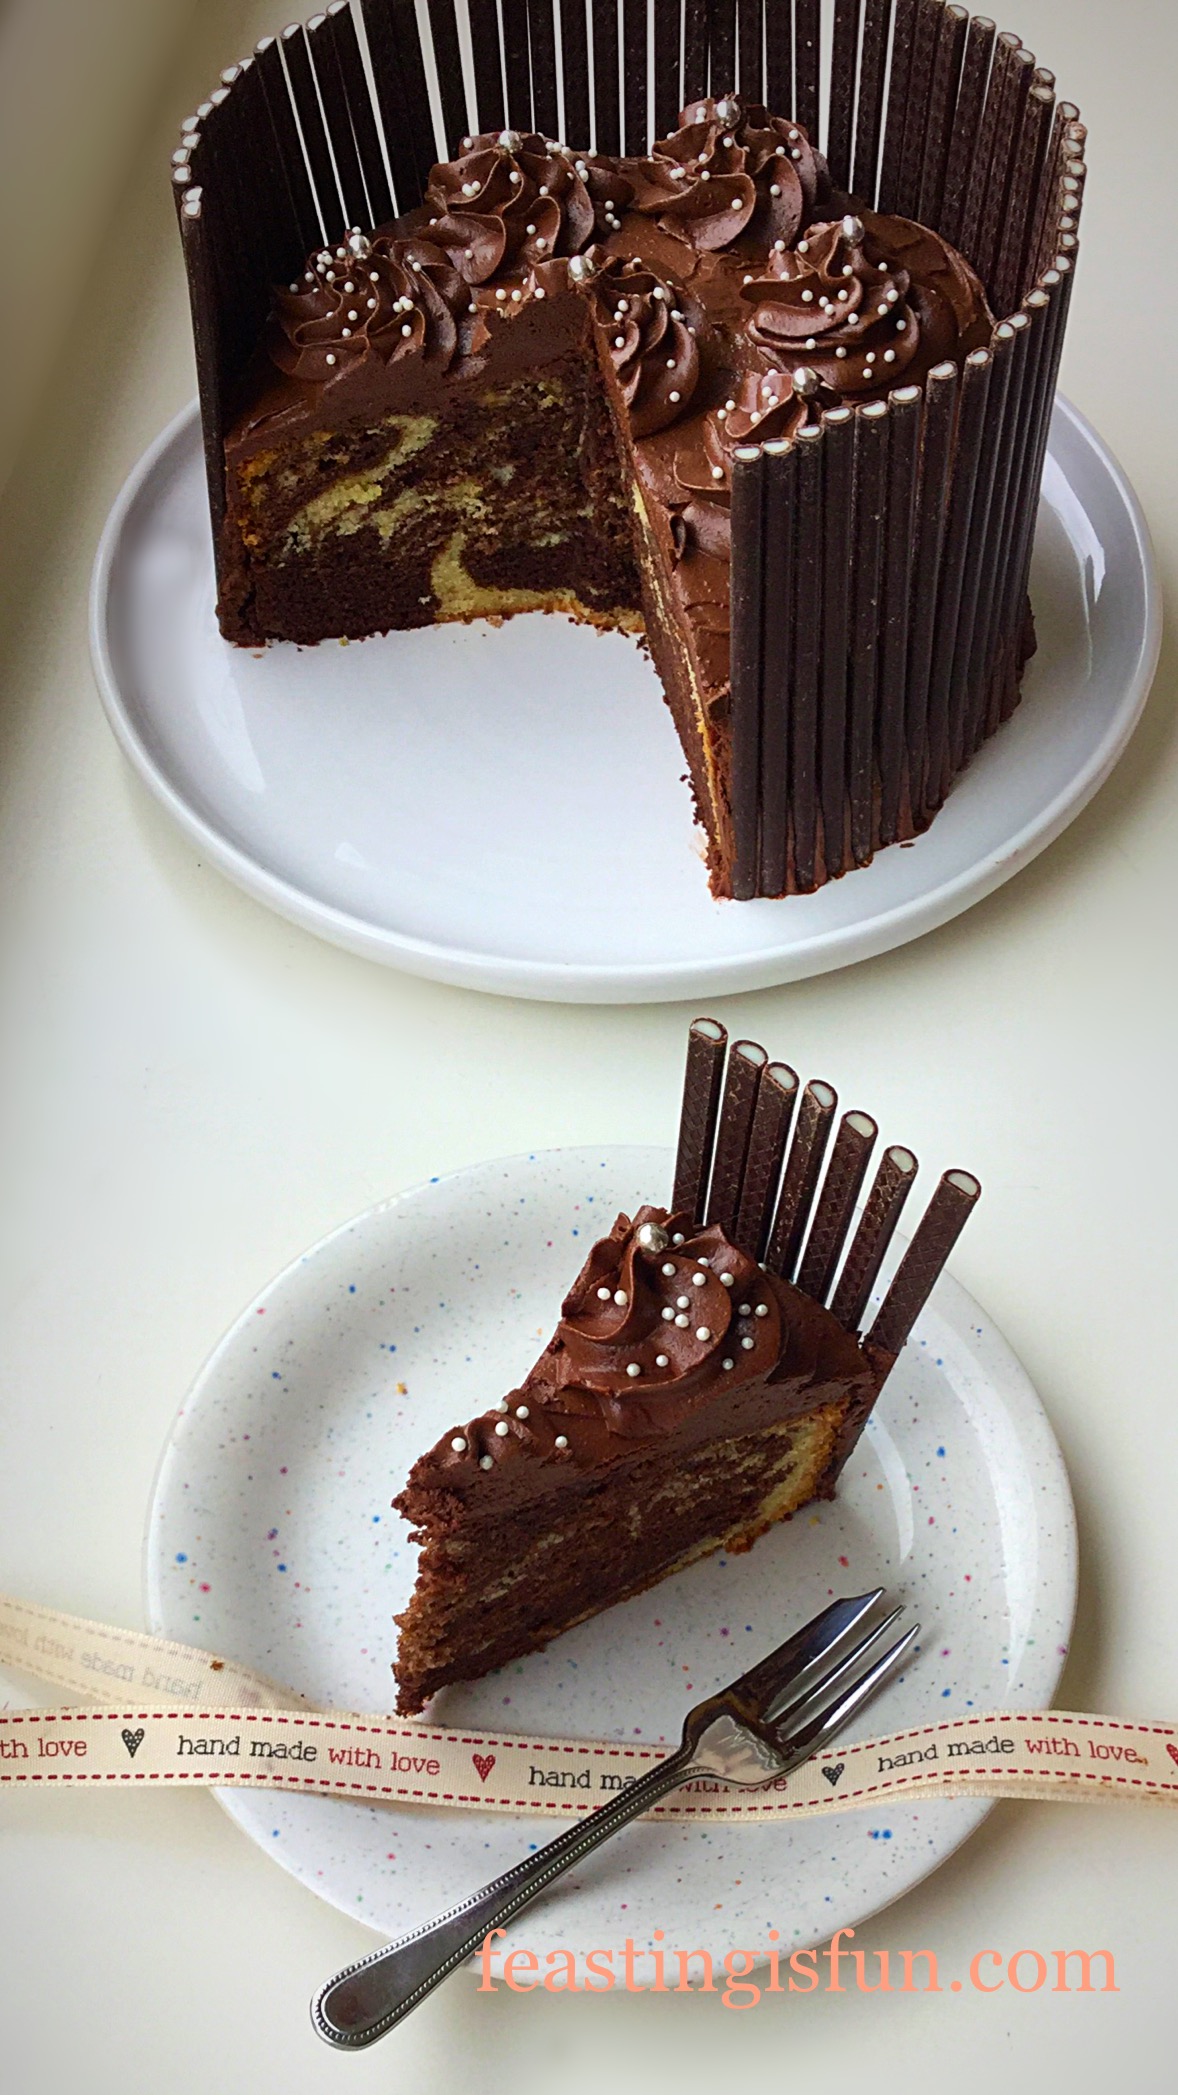
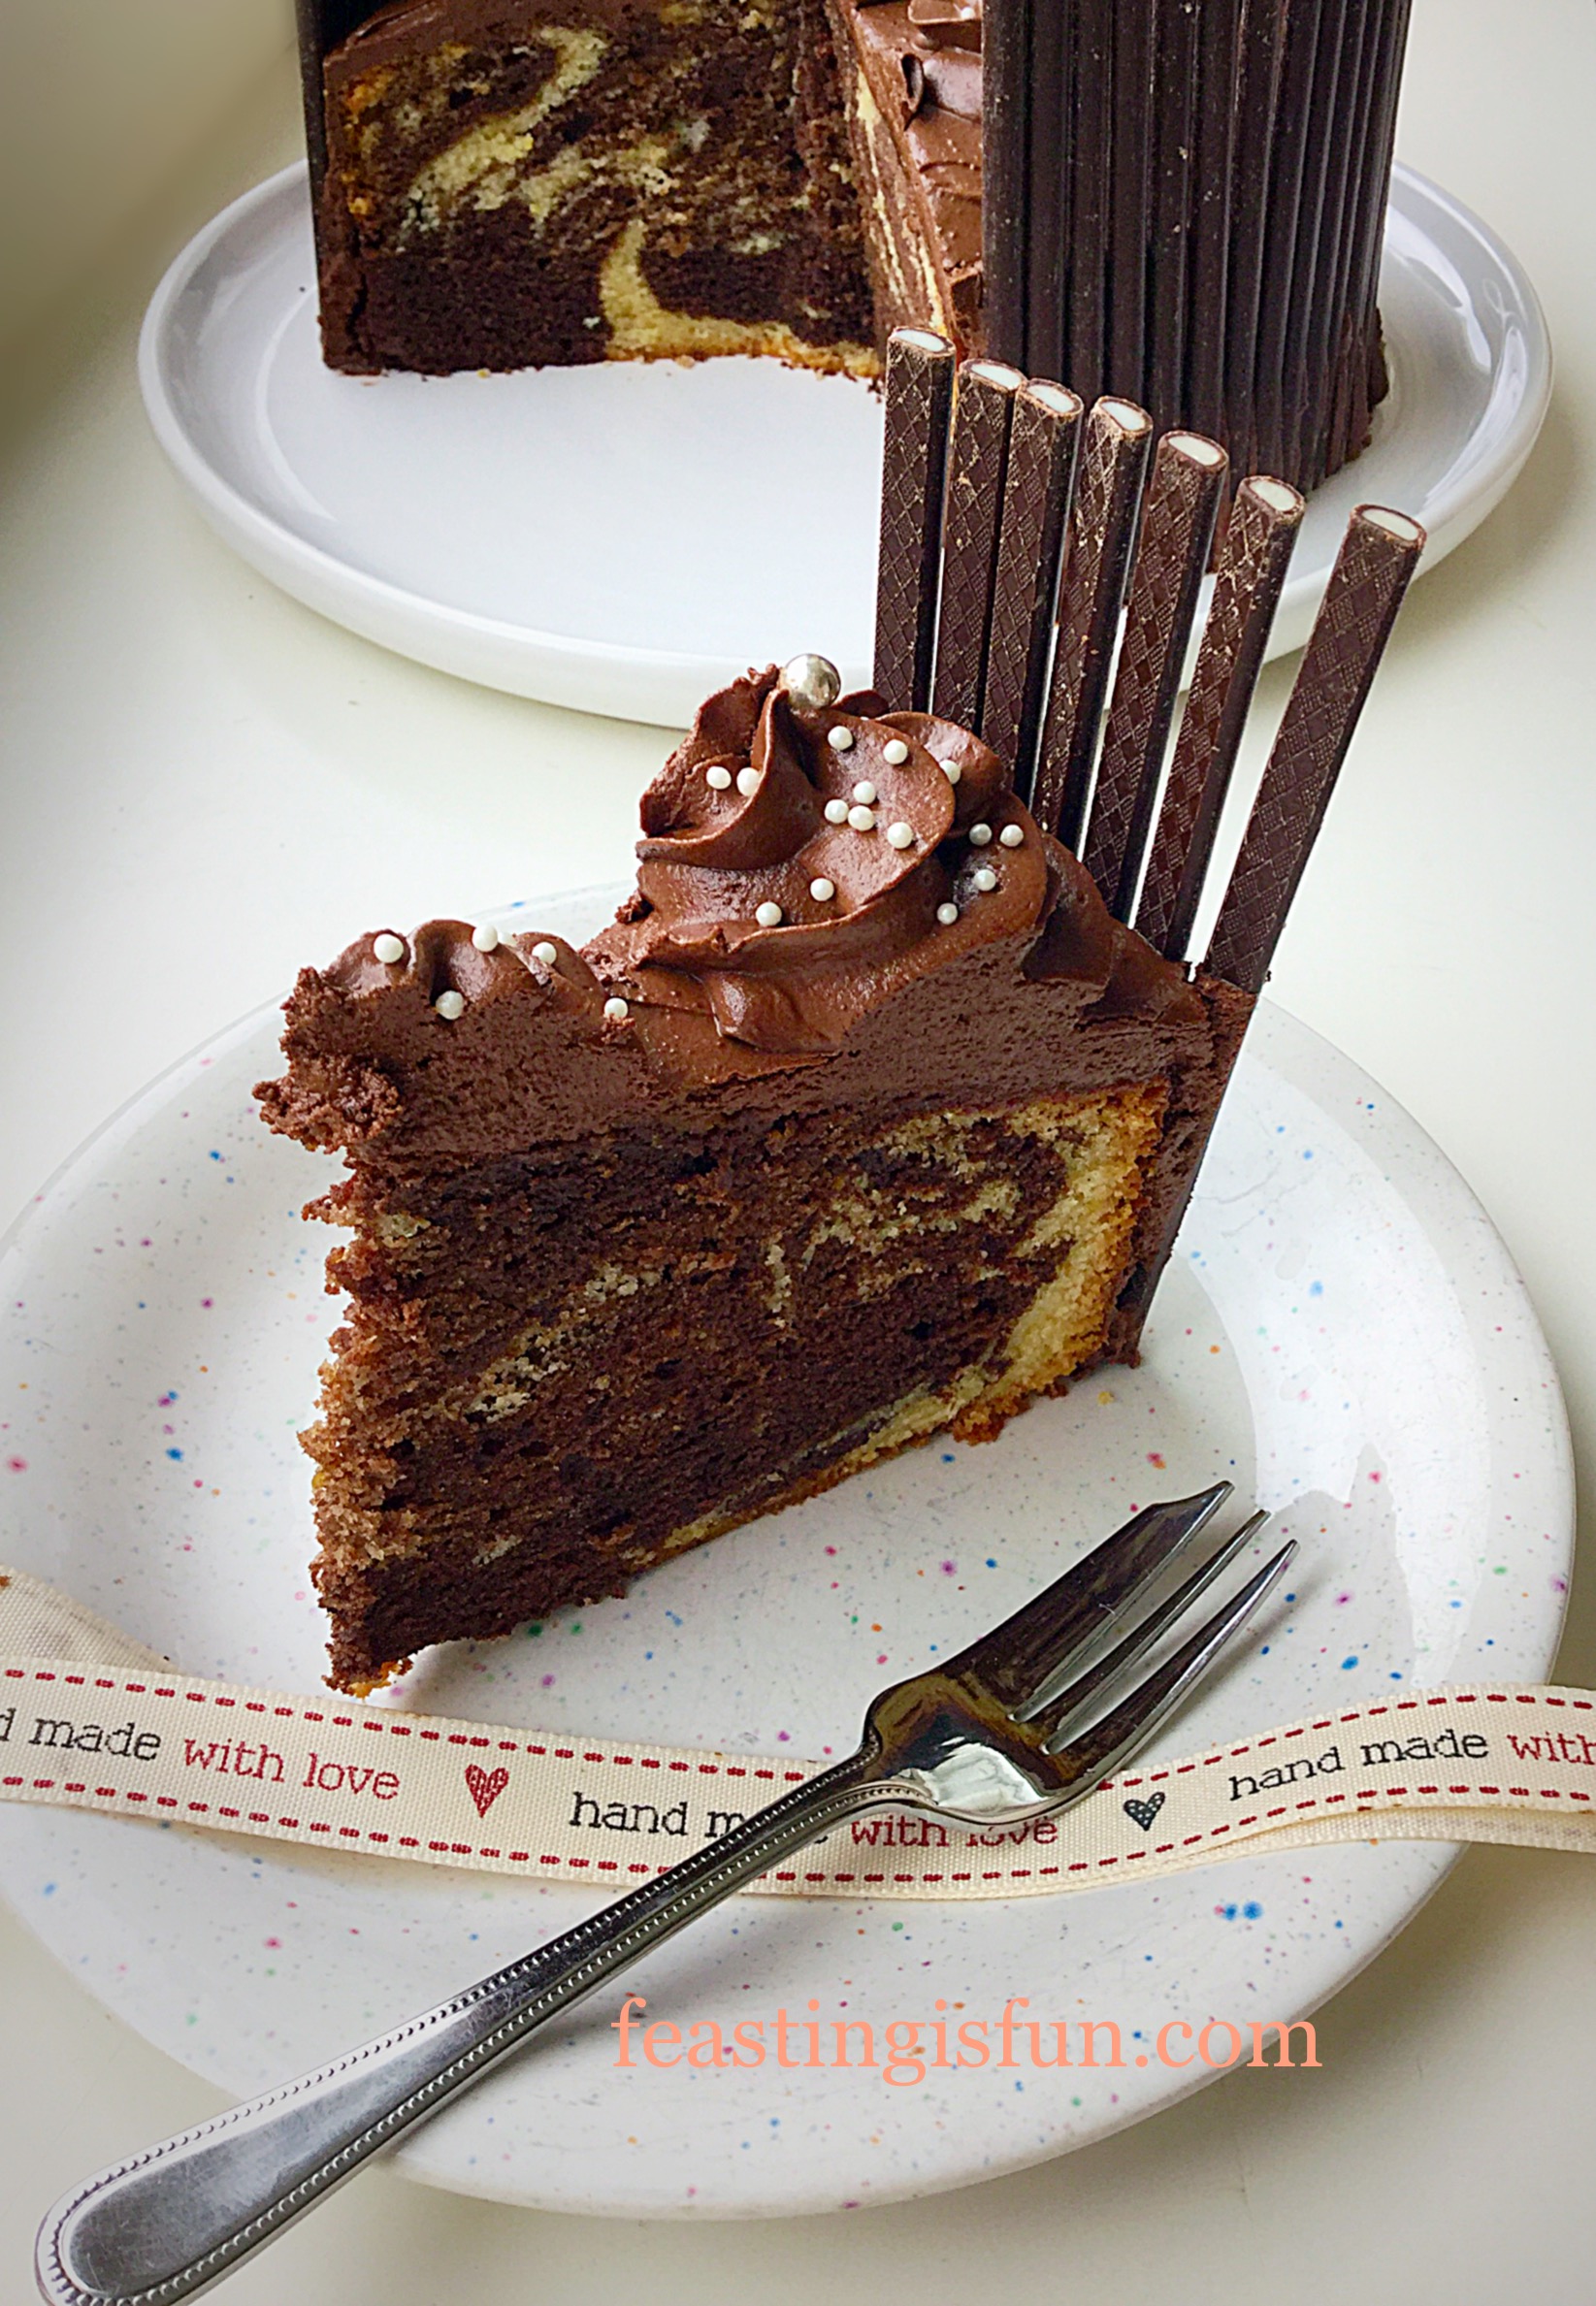
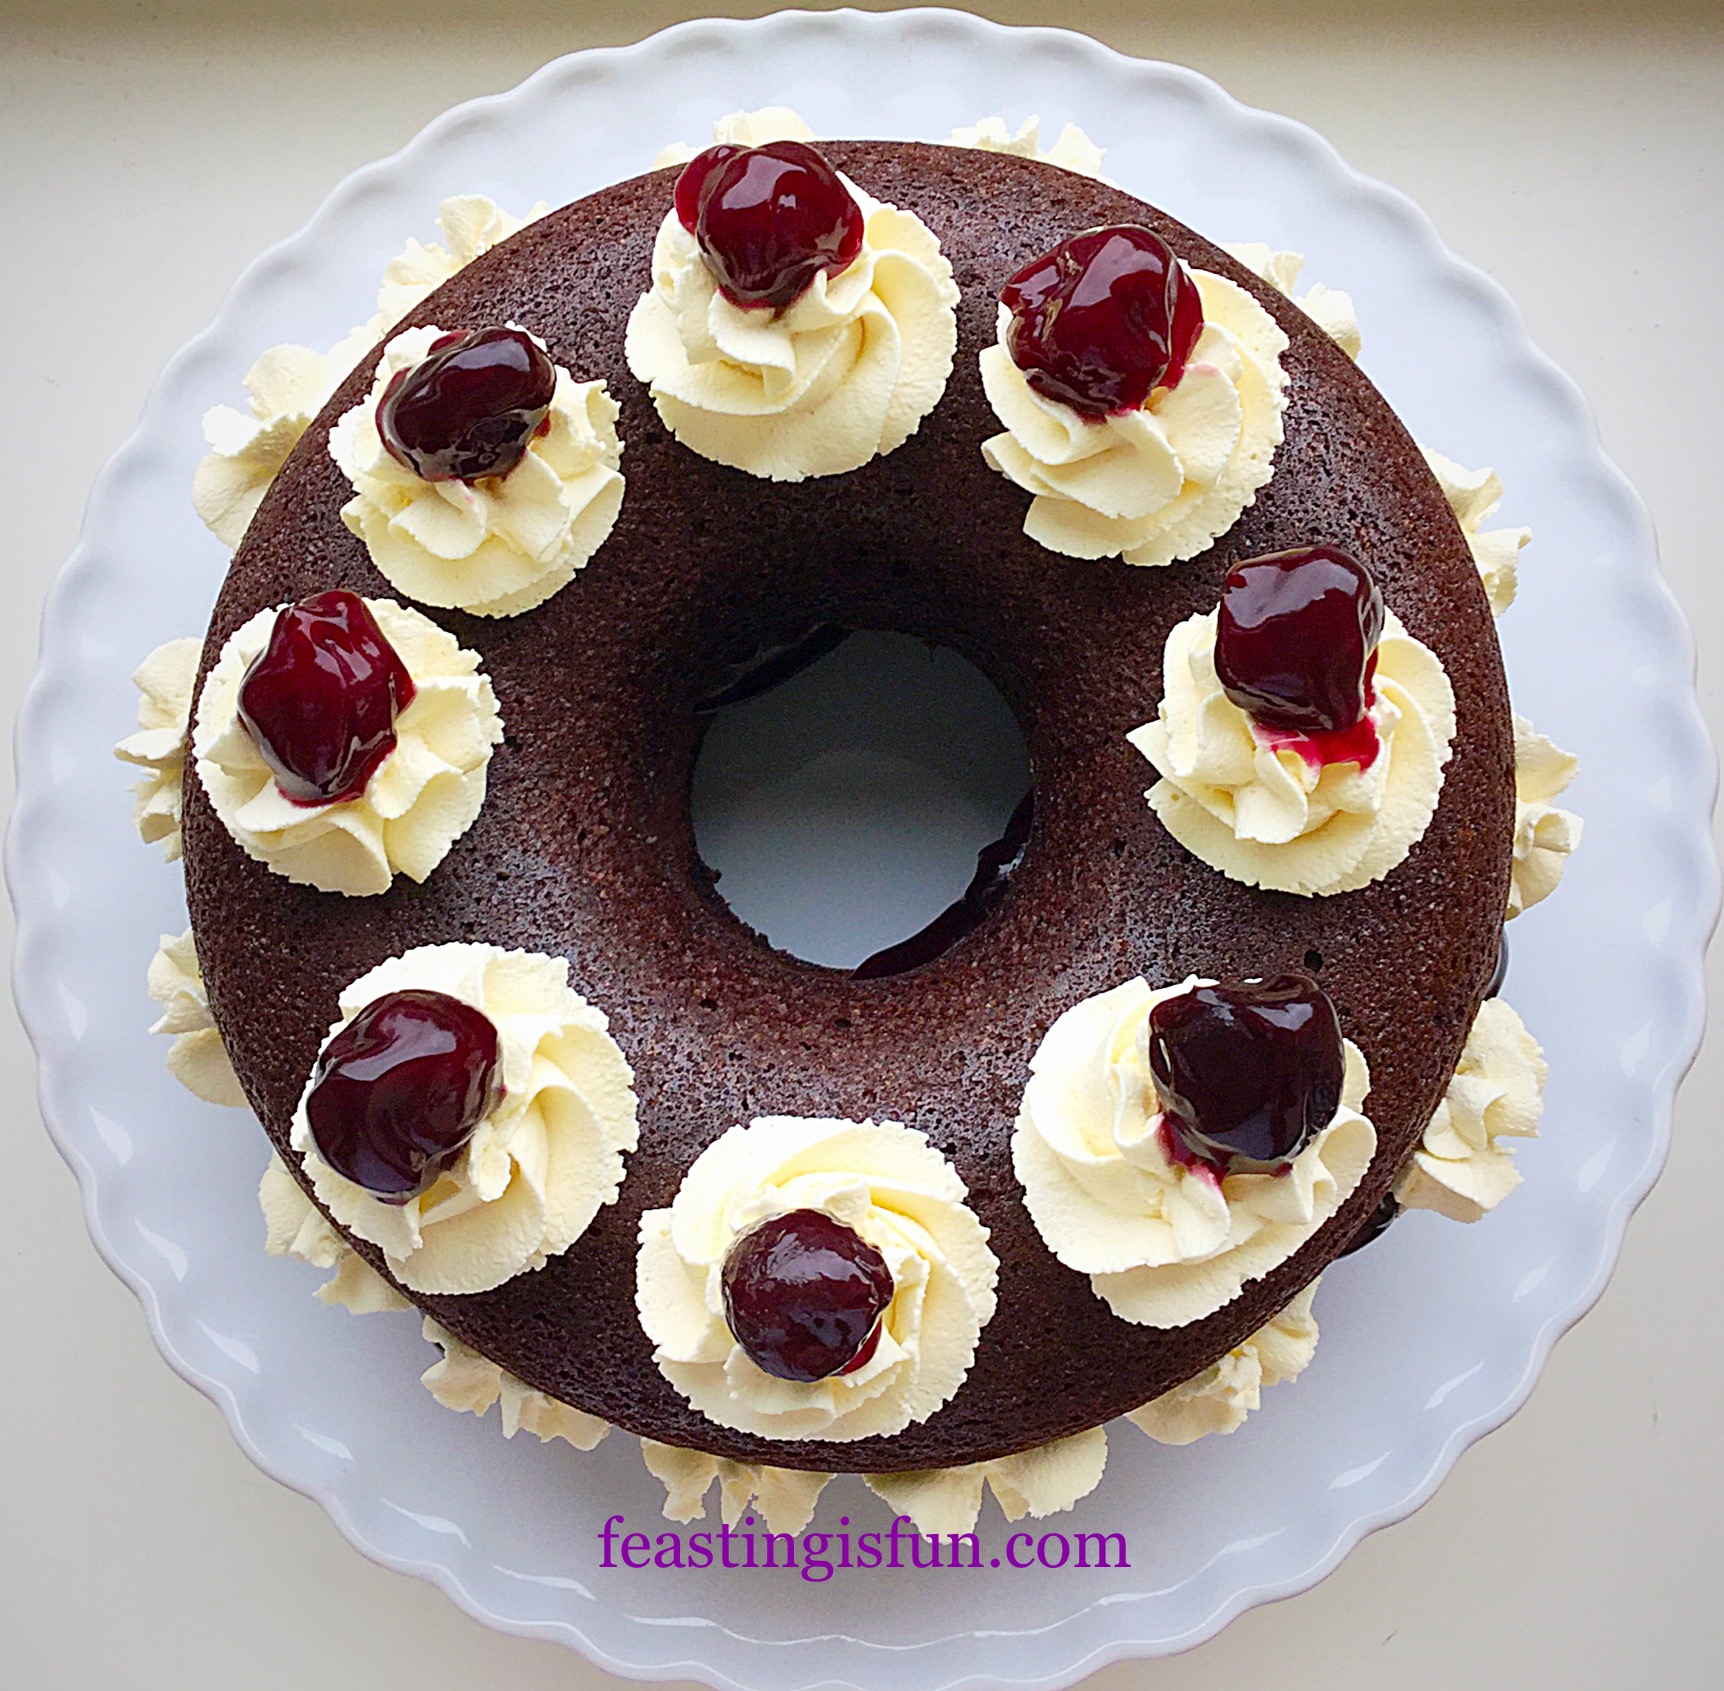
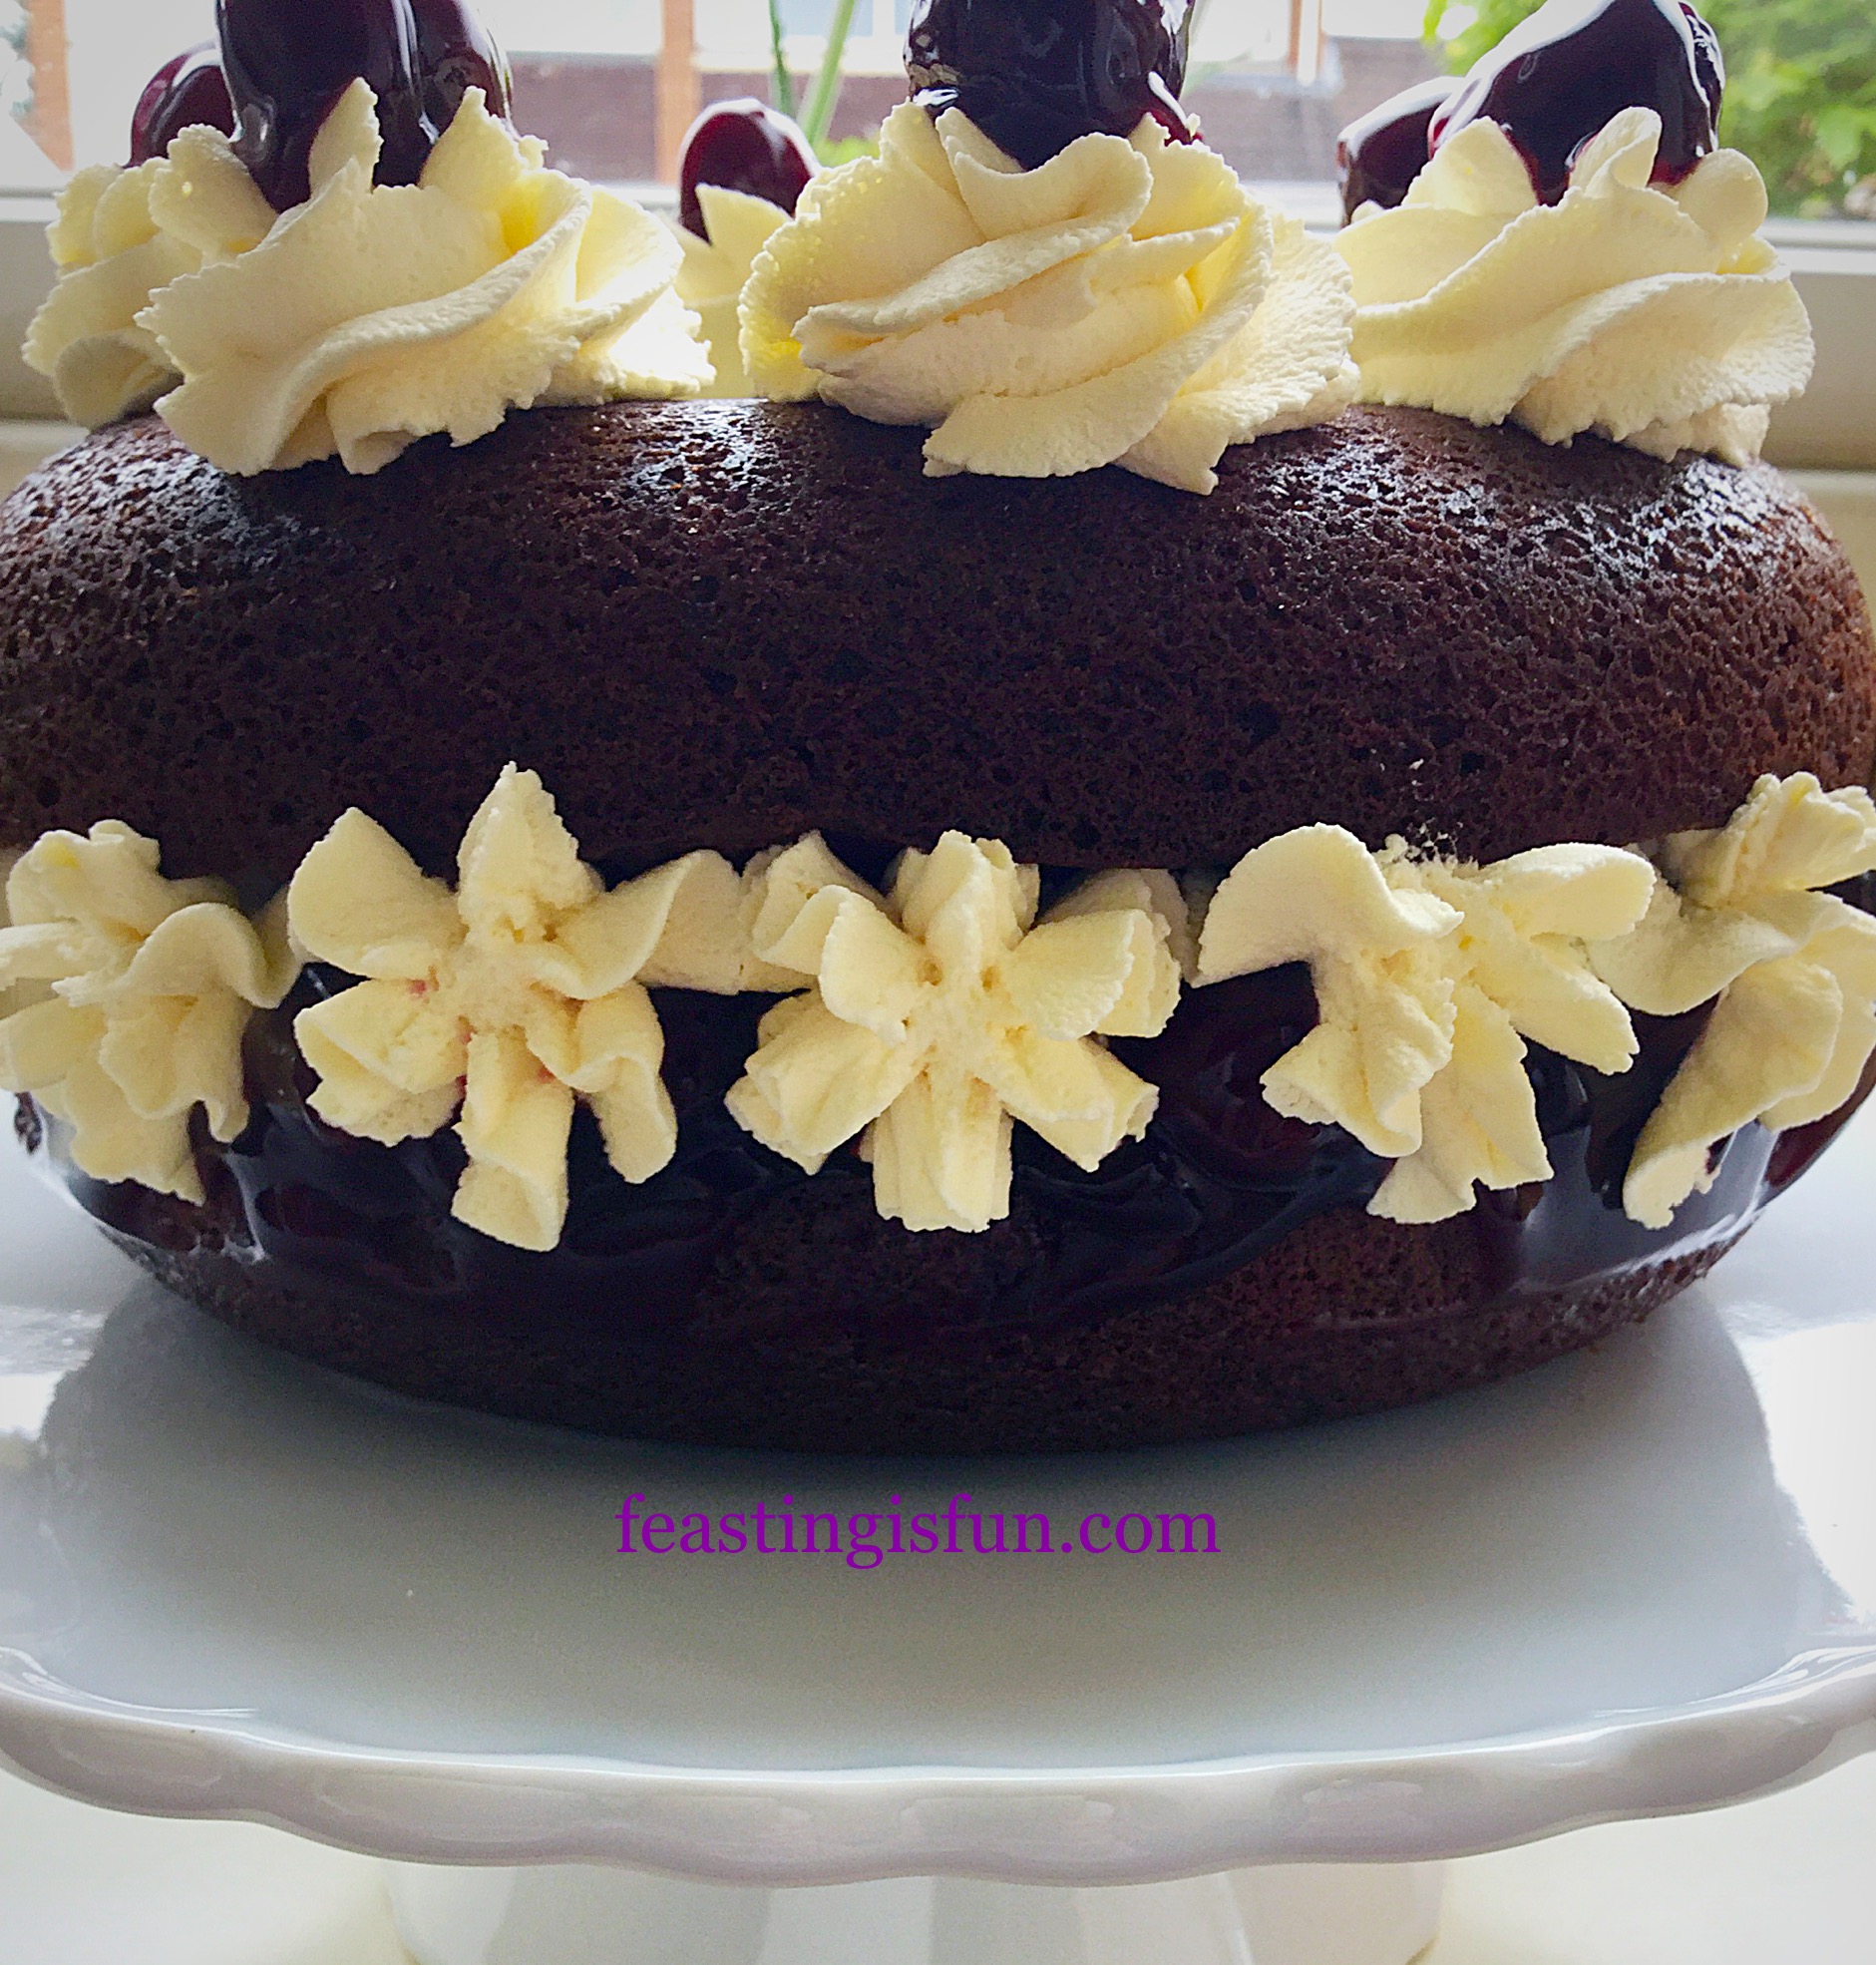
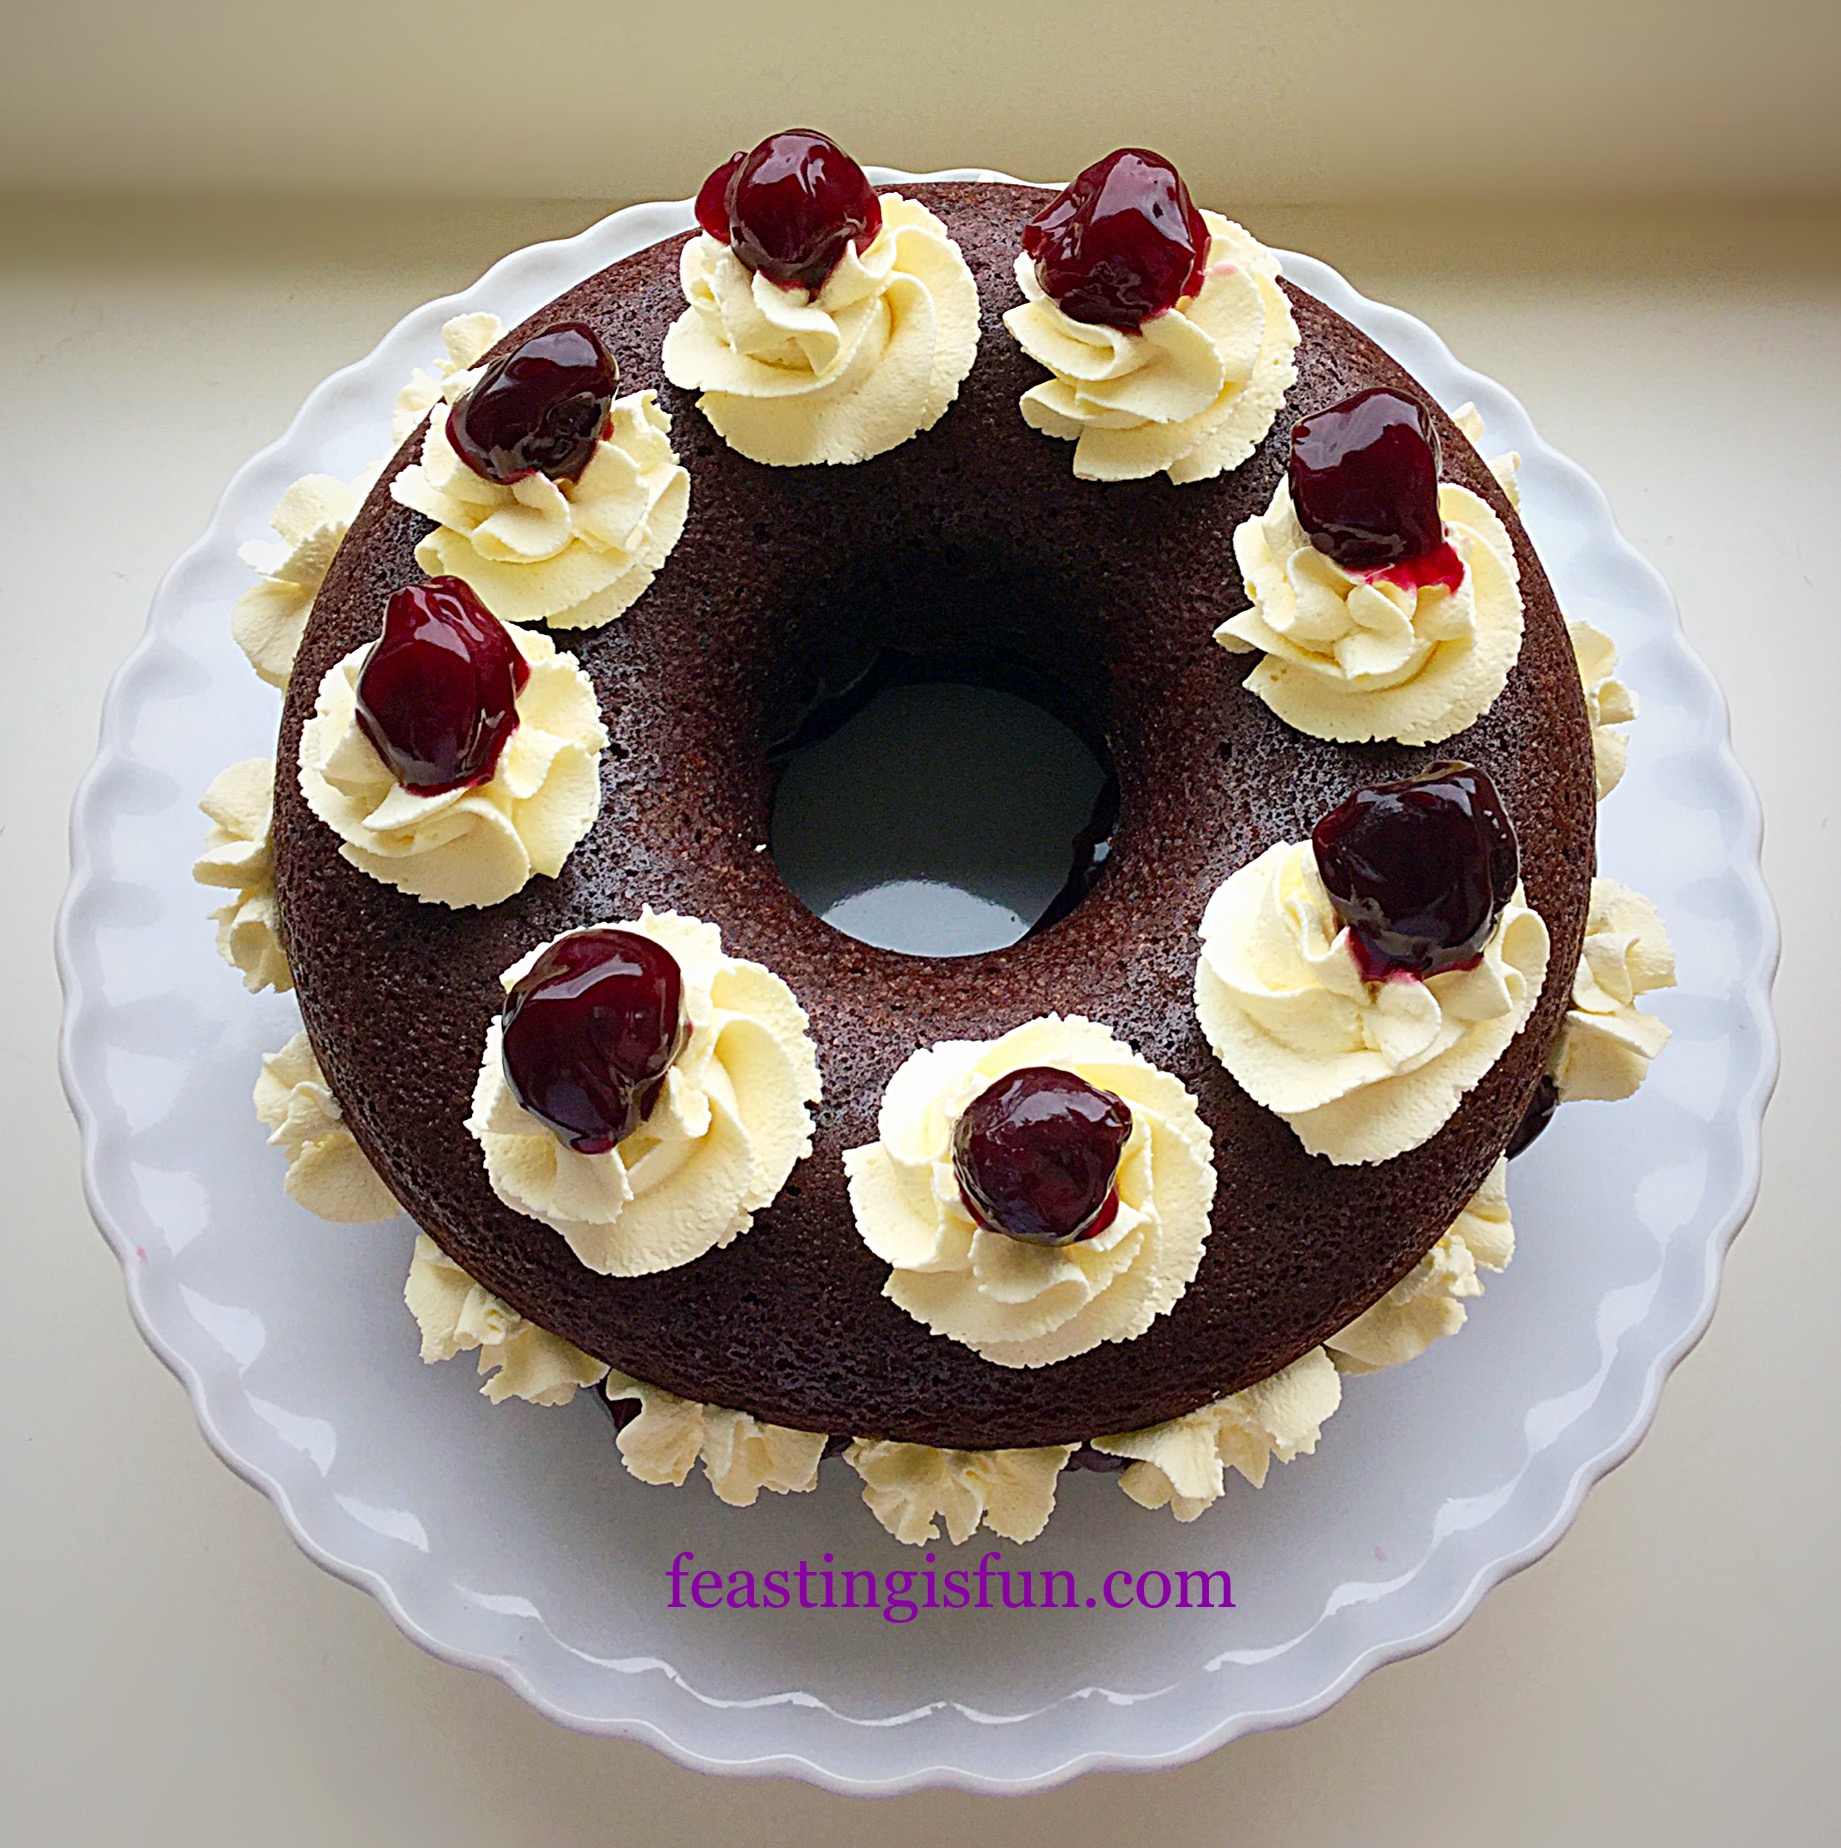
  • And then pipe 6 swirls, slightly set in from the edge of the cake. See the photograph below.
FF Golden Egg Chocolate Sponge Cake
Golden Egg Chocolate Sponge Cake fully decorated.
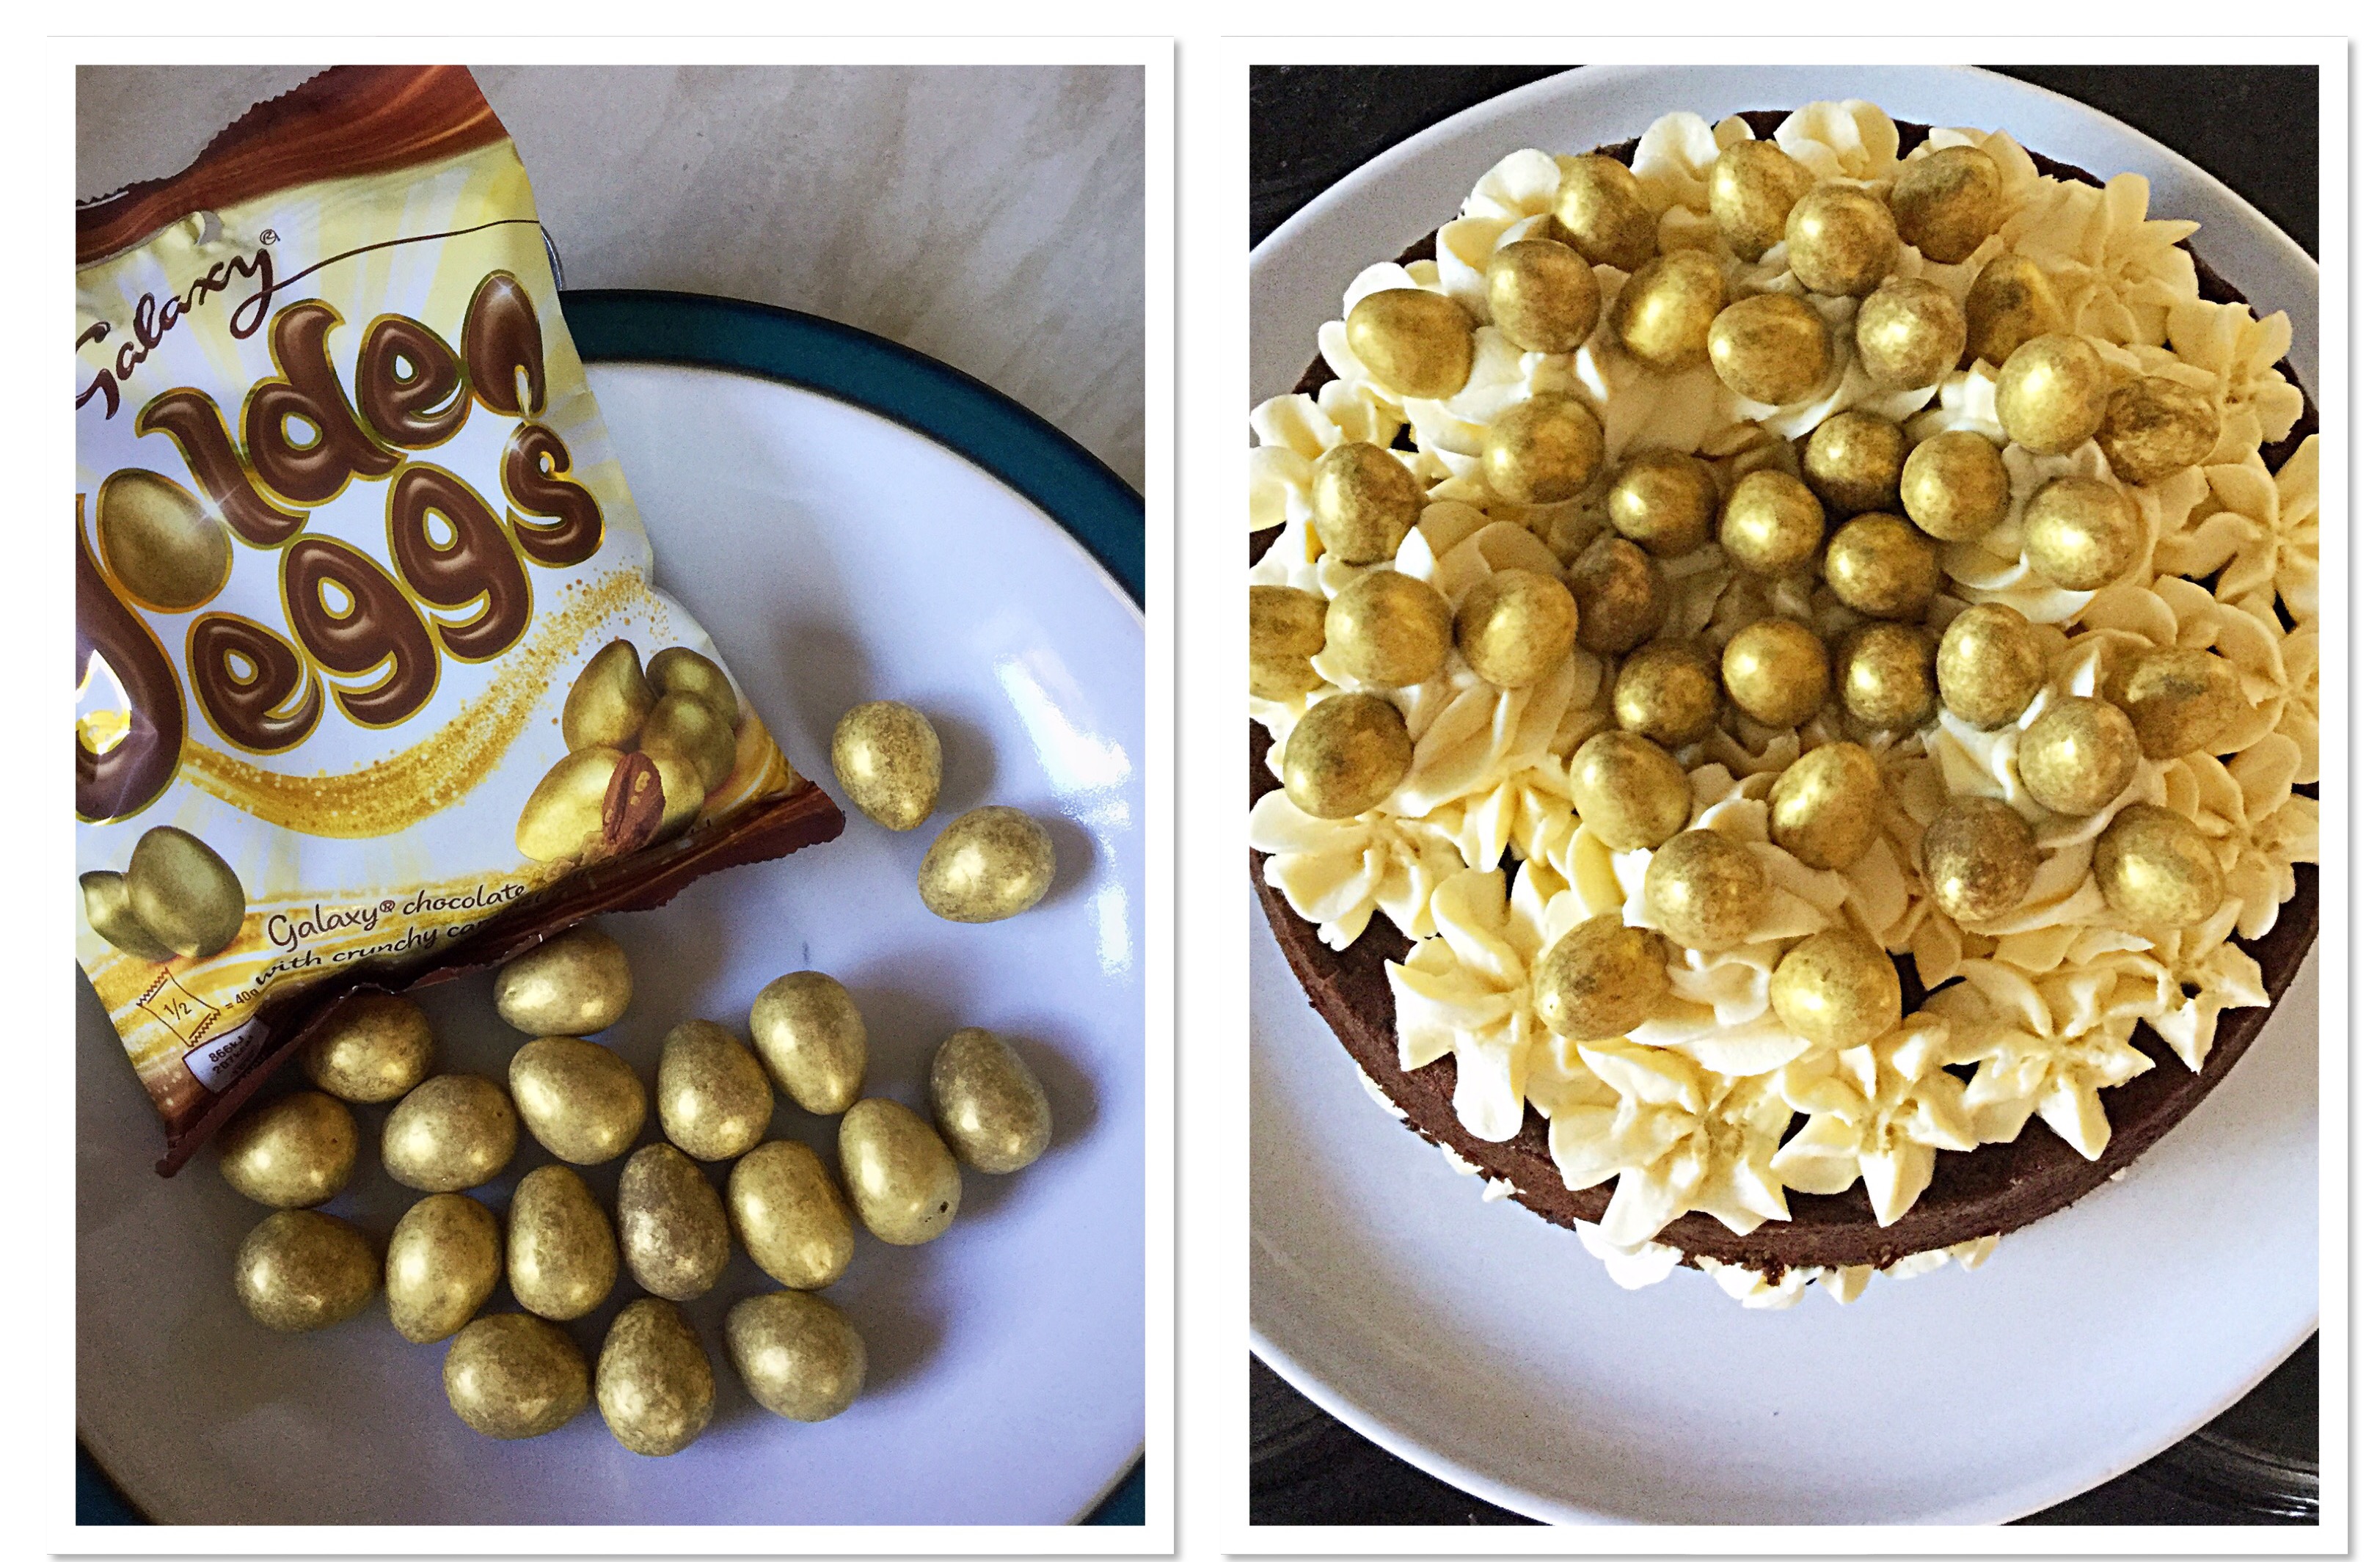
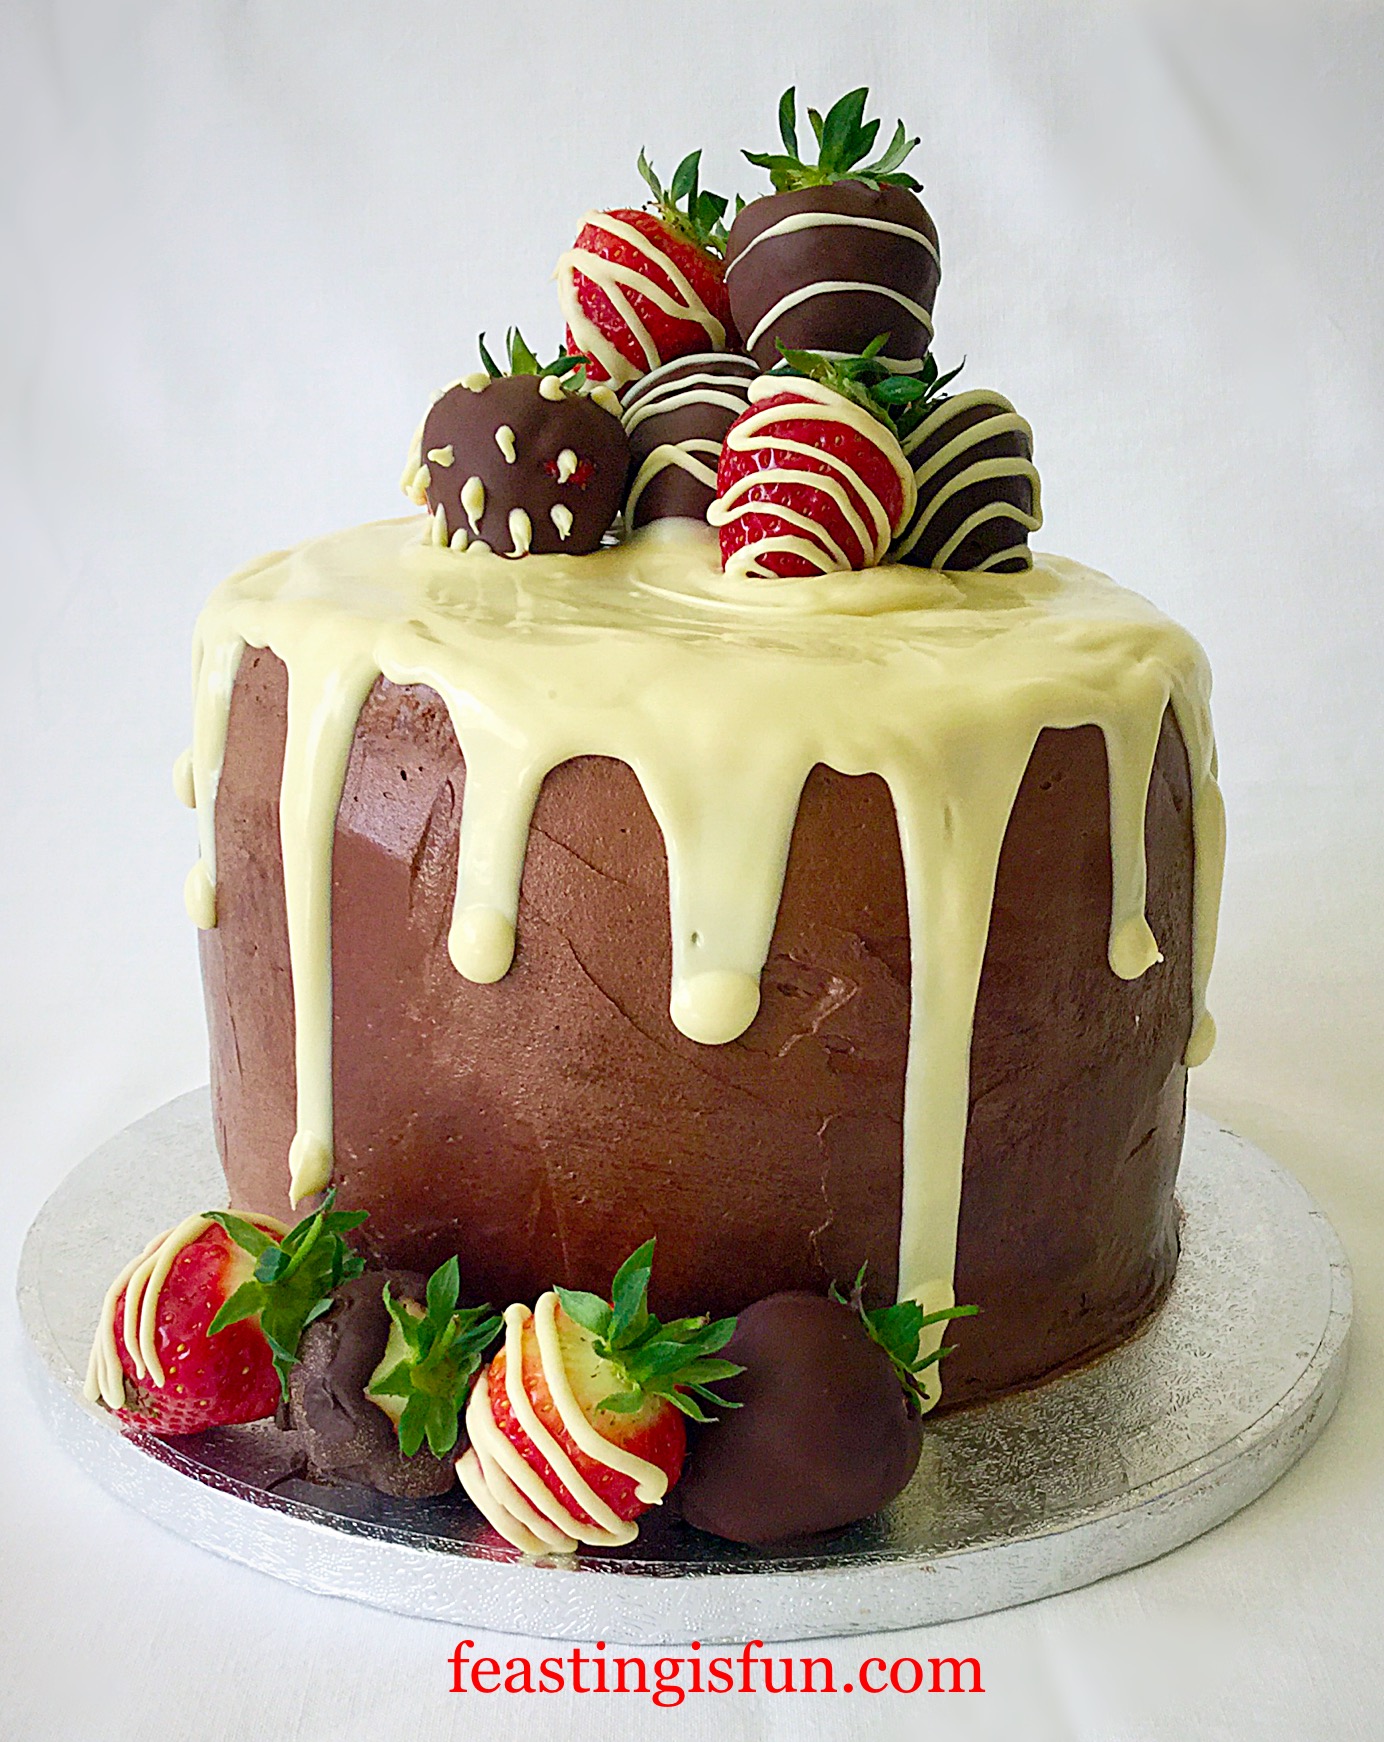
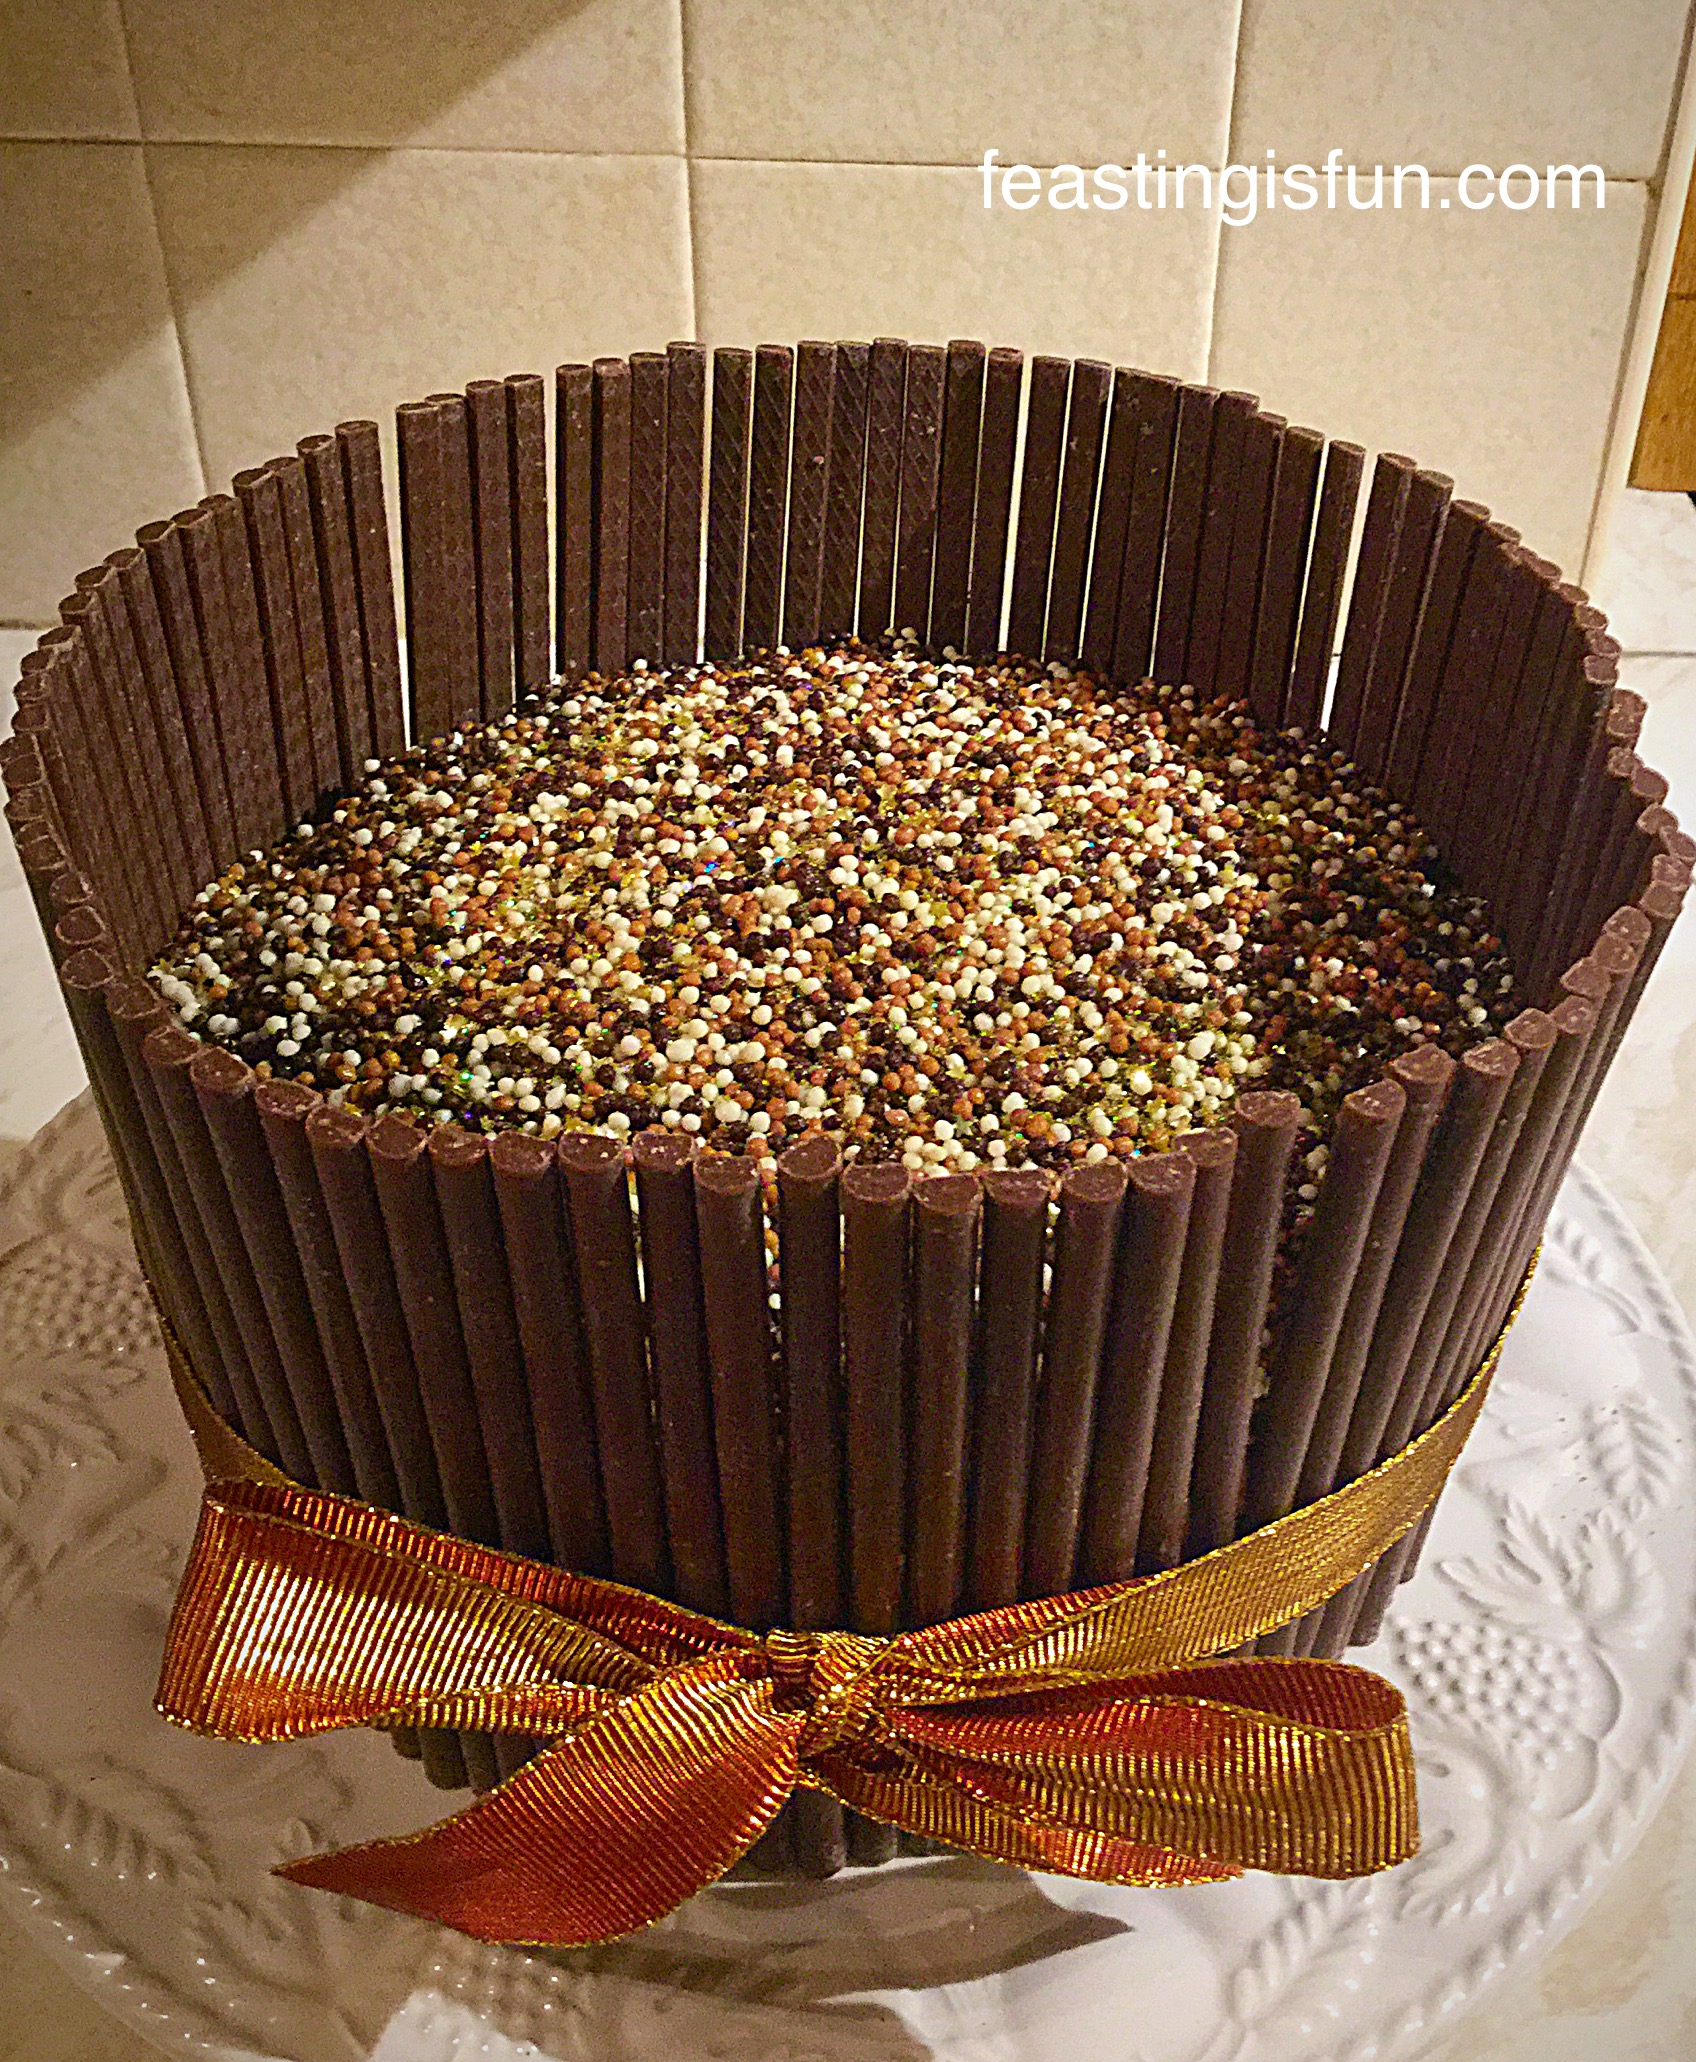
  • Finally, decorate the top of the cake with the mini golden eggs and sprinkles.
FF Golden Egg Chocolate Sponge Cake
Golden Egg Chocolate Sponge Cake

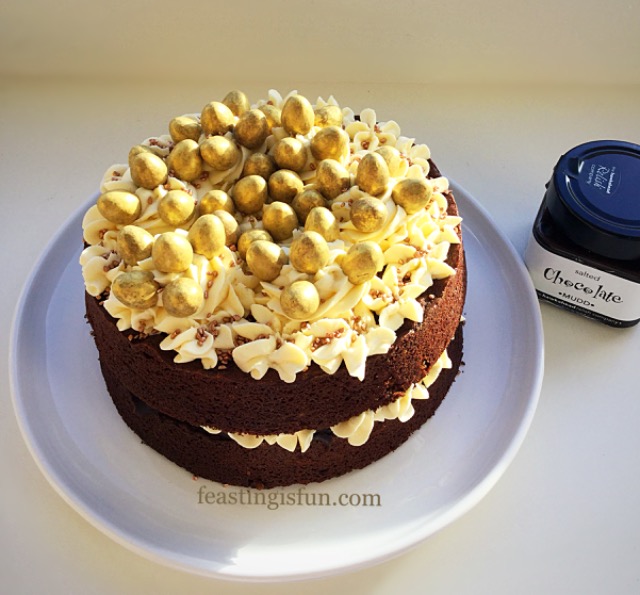
And the cake is now ready to be served.

Serve with a smile to friends and family. Alternatively gift the cake to someone special.

This cake will keep in an airtight container for up to 5 days. Refrigerate is the weather is hot.

If you have enjoyed this Easter recipe for Golden Egg Chocolate Sponge Cake you may also like these:

Vanilla Mini Nest Egg Cupcakes

FF Golden Egg Chocolate Sponge Cake
Vanilla Mini Egg Nest Cupcakes

Hot Cross Buns

FF Golden Egg Chocolate Sponge Cake
Hot Cross Buns easy and delicious to make at home.

Chocolate Monster Mini Egg Cookies

FF Golden Egg Chocolate Sponge Cake
Chocolate Monster Mini Egg Cookies

While celebrating Easter is especially important to me, having a real, everyday relationship with Jesus is more important. Rather than dealing with life on my own, He is always there. Because of what He endured on the cross and in His life, Jesus  understands. So as well as being my Saviour, He is also my friend.

So, whatever you are making, baking and creating in your kitchens, have fun preparing and sharing your feast.

Sammie xx

Hawkshead Relish gifted a jar of Salted Chocolate Spread to me. This is not a sponsored post. All views, opinions, content including photographs are my own. The entire content of this post is covered by Copyright and I.P. laws. Please see my Disclosure Policy.

Share
Facebooktwitterpinterestlinkedintumblr

Chocolate Heart Topped Rose Bundt Cake

Share
Facebooktwitterpinterestlinkedintumblr

Valentine’s Day is nearly upon us and whether you subscribe to red hearts, roses and all things lovey-dovey, or not, walk down any high street and you can’t fail to avoid it. For me, each day is about expressing my love to those around me. Most importantly my hubby, our children and then my beautiful sister and her amazing family. Whether you celebrate February 14th as a specific day to show people your love, or choose other days, every single day, this Chocolate Heart Topped Rose Bundt Cake is sure to be well received.

FF Chocolate Heart Topped Rose Bundt Cake
Chocolate Heart Topped Rose Bundt Cake shimmering in the sunlight.

Love, for me is about showing someone I’ve thought of them. It can be a small act of making a cup of tea and a kiss, or it can be a grander gesture, such as buying theatre or concert tickets. One way I like to show loved ones that I’ve thought of them is to bake or cook for them. Making their favourite meal, baking cookies such as these Chocolate Heart Cookies, all adds to the love in our home.

FF Chocolate Heart Topped Rose Bundt Cake
Chocolate Heart Topped Rose Bundt Cake says “I love you”.

Something absolutely guaranteed to win most people round is chocolate. Having been sent a beautiful selection of chocolates from Lloyd’s Chocolatiers, I wanted to show them off. As the chocolate hearts are filled with delicate whipped creams, caramel, praline or divine caramel, they provide the perfect decoration to this lightly flavoured cake. Easily removed when served, they create a stunning addition to any plate.

FF Chocolate Heart Topped Rose Bundt Cake
An elegant dessert plate accessorised with heart chocolates.

Made with love. Served with love. These beautiful and varied chocolate hearts create a stunning dessert plate. This definitely says “I love you”.

FF Chocolate Heart Rose Bundt Cake
Chocolate Heart Topped Rose Bundt Cake

While baking a chocolate cake may seem an obvious choice, I instead decided to choose a flavour to compliment the chocolates. Keeping the rose flavour subtle within the cake also stops it from overpowering the chocolates. Since the aim is, that each should compliment the other. Finishing with an un-flavoured glaze and dust of glitter, takes this cake from pretty to elegant.

Recipe: Chocolate Heart Topped Rose Bundt Cake serves 8-10

For the cake batter:

275g/10oz Unsalted Butter softened

275g/10oz Caster Sugar

1/4tsp Salt – I use Maldon

2tsp Vanilla Bean Paste – or Vanilla Extract

6 Large Free Range Eggs

1tsp Rose Extract – I use Nielsen-Massey

300g/11oz Plain White Four

2tsp Baking Powder

100g Full Fat Natural Yoghurt- I use Yeo Valley

For the icing and decoration:

450g/1lb White Unflavoured Icing Sugar

100mls Cold Tap Water

Edible Glitter – I use My Cake Decor gold glitter pump spray

Chocolate Hearts

Method: Preheat the oven to 160C/140C fan, gas mark 3

First of all, ensure the Bundt pan is clean and dry. Shake the can or bottle well. Spray, or brush Wilton cake release thoroughly using a soft pastry brush. Note – if the weather is cold the liquid in the bottle may be difficult to squeeze out and brush. Stand the bottle in a jug of hot water for 10 minutes, shake well and use.

  • Making the cake batter: Into a large bowl add the softened butter, sugar and salt.
  • Whisk/beat together until well combined, pale and creamy.
  • Next, into a separate bowl, sieve the flour and baking powder together – dry ingredients.
  • Into the creamed butter bowl add the vanilla paste, rose extract and 2 eggs. Then add one third of the dry ingredients. Mix until just combined.
  • Add a further 2 eggs, another third of the dry ingredients and mix as before.
  • Finally, add the last 2 eggs, yoghurt and the last third of the dry ingredients. Mix until thoroughly combined, however take care not to over mix.
  • Spoon the cake batter into the prepared Bundt pan, pressing down as you do. Smooth the top of the batter with a spoon.
  • Place the Bundt pan in the centre of the oven and bake for 1hr – 1hr 15 minutes.
  • The cake is baked when it is golden in colour, shrinking away from the sides of the pan and an inserted skewer comes out clean.
  • Once baked remove the cake from the oven.
FF Chocolate Heart Topped Rose Bundt Cake
Preparing the Bundt pan, filling and baking the cake.
  • Allow the cake to cool in the tin for 10 minutes.
  • Now turn out the Bundt cake on to a cooling rack.
  • Leave the cake to cool completely before icing.
FF Chocolate Heart Topped Rose Bundt Cake
Beautiful definition from the Chiffon Bundt.
  • While the cake is cooling, make the glacé icing.
  • Sift the icing sugar into a bowl.
  • Add the water and stir thoroughly, until a smooth consistency is achieved.
  • When cool, place the cake on the cooling rack, over a clean baking tray. This will catch any excess icing drips.
  • Start to spoon the icing over the top of the cake, working your way around the cake.
  • Continue to spoon icing through the central hole and around the outside until the cake is fully covered.
  • Leave the icing to naturally drip from the cake and finally set.
  • If using, dust the cake with edible glitter.
  • Move the cake on to a serving plate or stand.
FF Chocolate Heart Topped Rose Bundt Cake
Covering the cake with icing and dusting with glitter.
  • Place the chocolate hearts on top of the cake, reserving some for serving alongside.
FF Chocolate Heart Topped Rose Bundt Cake
Chocolate Heart Topped Rose Bundt Cake adorned with delightful chocolates.

Serve with love and a smile.

The cake will keep in an airtight container for up to 5 days. If it lasts that long.

If you have enjoyed this recipe for Chocolate Heart Topped Rose Bundt Cake then you may also like these:

Maple Syrup Iced Coffee Bundt Cake

FF Chocolate Heart Topped Rose Bundt Cake
Maple Syrup Iced Coffee Bundt Cake

Strawberry Sweetheart Cake

FF Chocolate Heart Topped Rose Bundt Cake
Strawberry Sweetheart Cake

Lemon Blueberry Bundt Cake

FF Chocolate Heart Topped Rose Bundt Cake
Lemon Blueberry Bundt Cake

Nordic Ware have a range of different shapes and styles of Bundt Pans. Since they are not cheap they are an investment worth looking after. Especially, if like me, cake decorating isn’t your strongest point. Yet, if looked after properly, the detailed Bundt Pans will last you a lifetime. Because each cake baked has love stirred into it, nothing else can compare with the taste. Ultimately they pay for themselves, with magnificent cakes that aren’t bought from a bakery.

On Valentine’s Day and everyday, I wish you love, health, peace and happiness.

Sammie xx

LLoyds Chocolatiers sent me the chocolate hearts to try. All content, photography, views and opinions are my own. Please see my Disclosure Policy.


Share
Facebooktwitterpinterestlinkedintumblr

Maple Syrup Iced Coffee Bundt Cake

Share
Facebooktwitterpinterestlinkedintumblr

Baking for someone I love has to be one of my favourite things to do. Especially when the recipient is my wonderful Father-in-law. Even more so when it is to celebrate his birthday. While I usually make him a Coffee and Walnut Cake, however, this year I’ve kept all of his favourite flavours and baked them into this beautiful Maple Syrup Iced Coffee Bundt Cake.

FF Maple Syrup Iced Coffee Bundt Cake

Using the Heritage Bundt tin from Nordic Ware, this cake is literally a twist on a classic, popular cake. While the distinct mould of the tin creates an incredible, swirl shaped coffee cake, which is defined with the maple syrup icing. Resulting in a stunningly outstanding cake.

FF Maple Syrup Iced Coffee Bundt Cake
Maple Syrup Iced Coffee Bundt Cake mesmerising.

An incredibly moist and delicious cake, that includes walnuts, it is also lump free. Chopping the walnuts very finely ensures their nutty flavour mixes well with the coffee and spices. While the maple syrup icing adds another layer of flavour. Resulting in a light, not heavy sponge, that tastes fantastic.

FF Maple Syrup Iced Coffee Bundt Cake
Maple Syrup Iced Coffee Bundt Cake full of flavour.

My Father-in-law is a very special and incredibly talented man. Much loved and respected, I consider myself to be very blessed to be part of his family. He is a wonderful Dad and Grandad, with a gentle sense of humour. And our children love to hear stories of his past adventures which span many centuries. Especially those of his time as a Pirate!!

FF Maple Syrup Iced Coffee Bundt Cake
Maple Syrup Iced Coffee Bundt Cake dazzling.

No candles are needed to light up this dazzlingly, delicious cake.

Recipe: Maple Syrup Iced Coffee Bundt Cake serves 10-12

250g/9oz Unsalted Butter – softened to room temperature

250g/9oz Soft Light Brown Sugar

1/4tsp Sea Salt – I use Maldon

1tsp Vanilla Extract – I use Nielsen-Massey

2tsp Camp Coffee or 1.5tsp Instant Coffee – dissolved in 1tsp water

5 Large Free Range Eggs

100g/4oz Plain Natural Yoghurt

75g/3oz Walnut Halves or pieces – chopped or processed until they are very fine. Similar in texture to ground almonds

1/4tsp Freshly Grated Nutmeg

1/4tsp Cinnamon

200g/7oz Plain White Flour

3tsp Baking Powder

150g/5oz Icing Sugar

3tbsp Maple Syrup – I like Pure Maple

White, silver or golden sprinkles

Making And Baking The Bundt Cake

Preheat the oven to 160C/140C fan, gas mark 3, 310F.

Note: I always use Wilton cake release to guarantee a clean, sharp edged finish. Apply using a soft pastry brush, taking care to ensure every part of the Bundt tin is evenly covered. Alternately brush on melted butter in the same manner, followed by a light coating of flour.

  • First of all, prepare the Bundt tin as per the instructions above.
  • Whisk the softened butter, sugar and salt together in a large bowl for at least 5 minutes. The mixture should be light and creamy.
  • Add the vanilla extract and the eggs to the bowl. Continue whisking until all of the ingredients are well mixed.
  • Now add the yoghurt, but do not stir.
  • Next add the finely chopped walnuts, then sift in the flour, baking powder and spices.
  • Use a metal spoon to fold all of the ingredients together until they are fully combined.
  • Spoon the cake batter into the prepared Bundt tin, pressing down to ensure the tin does not have any air gaps. Smooth the top of the batter.
  • Place the Bundt tin into the centre of the preheated oven and bake for 50-60 minutes.
  • To test if the cake is fully baked, insert a wooden skewer. The cake is baked when the skewer comes out clean. Also the cake should spring back from a light touch and have shrunk away from the sides of the Bundt tin.
  • As soon as the cake is baked remove the from the oven. Leave the cake to cool in the tin for 5-10 minutes.
  • Finally, turn the Bundt cake out on to a cooling rack and allow to cool completely before icing.
FF Maple Syrup Iced Coffee Bundt Cake
Filling the tin, baking and turning out the Bundt Cake.

Adding The Decoration

  • First, sift the icing sugar into a bowl.
  • Add the maple syrup and stir well. And then add up to one tablespoon of cold, tap water. Stir well so that the icing is a smooth, fairly thick consistency.
  • Fill a small, disposable piping bag with the maple syrup icing.
  • To ice the cake, first place the cooling rack over a large baking tray. This will allow any excess icing to drip through.
  • Snip the very end of the piping bag off, leaving a 3-4mm hole.
  • With the cake in front of you, follow the line of one swirl and pipe the icing along it. Double back on yourself, piping over the original line to ensure an even finish.
  • Continue in the same manner until all of the swirls have been iced.
  • Finish the decoration by adding sprinkles on top of the icing. Start at the bottom and finish approximately two thirds of the way up the cake. Most importantly, make sure the sprinkles all finish at the same point.
FF Maple Syrup Iced Coffee Bundt Cake
First the icing, then add the sprinkles.

To serve, place the cake on to a plate or cake stand. Since I do not have a cake lifter, two palette knives, positioned either side of the cake, make easy work of moving the cake.

FF Maple Syrup Iced Coffee Bundt Cake
Maple Syrup Iced Coffee Bundt Cake ready to serve.

No waiting needed! Since the icing sets pretty quickly, simply slice and serve, with a smile. Especially if baking for a celebration. It has been said, a celebration without a cake is simply a meeting.

FF Cake baked in Heritage Bundt Pan
Maple Syrup Iced Coffee Bundt Cake

If you have enjoyed the recipe for this Maple Syrup Iced Coffee Bundt Cake then you may also like these:

Mascarpone Topped Carrot Cake

Mascarpone Topped Carrot Cake

Fluted Chocolate Lemon Marble Cake

Fluted Chocolate Lemon Marble Cake

Boozy Lemon Drizzle Bundt Cake

Boozy Lemon Drizzle Bundt Cake


Although shop bought cakes may be convenient, nothing compares to the taste of a home baked one. And supermarkets definitely do not bake love into a cake unlike cakes baked at home. Most importantly, when made with love and given with a smile, homemade cakes are unique gift.

So, whatever you are making, baking and creating in your kitchens, have fun preparing a feast. Finally, remember that food tastes better when it is shared.

Sammie xx

No part of this post may be reproduced or duplicated without the written permission of the owner. Please see my Disclosure Policy.


Share
Facebooktwitterpinterestlinkedintumblr

Orange Lemon Ombre Piped Rose Cake

Share
Facebooktwitterpinterestlinkedintumblr

Birthday season is upon us in the Feasting family. Cakes, bakes, canapés and celebration continue from now, right through to the New Year. Therefore, making this Orange Lemon Ombre Piped Rose Cake with family in mind, resulted in a beautifully decorated, delicious cake, perfect for guys and girls of all ages.

FF Orange Lemon Ombre Piped Rose Cake
Orange Lemon Ombre Piped Rose Cake delicious citrus flavours all the way through.

So the cake itself is made using Wright’s Baking Orange Cake Mix, to which lemon zest is added. Baked as a single cake, it is then sliced into three layers which are sandwiched back together using tart lemon curd. The result, a balanced citrus flavoured cake, that wakes up your tastebuds ready to party!

FF Orange Lemon Ombre Piped Rose Cake
Orange Lemon Ombre Piped Rose Cake full of hidden fruit.

In addition, the decision to decorate the cake with piped buttercream roses, shows an increase in confidence with regard to piping. Creating an ombré effect, from pale lemon swirls to deeper tangerine lends a modern finish to this cake.

FF Orange Lemon Ombre Piped Rose Cake
Orange Lemon Ombre Piped Rose Cake a stunning centrepiece perfect for celebrating.

Since piping this Heart Engagement Bundt Cake, crumb coating, covering the whole cake in a thin layer of buttercream, was not an option, it was a must. Resulting in a cake that looks much cleaner, more professional, as well as any gaps between the roses are already covered.

FF Orange Lemon Ombre Piped Rose Cake
Orange Lemon Ombre Piped Rose Cake my entry for #GBBOTwitterBakeAlong

While not absolutely necessary, the added edible violas give the finished cake an elegant, yet natural touch. Their presence hints at the floral, citrus flavoured cake hidden by the piped roses.

Recipe: Orange Lemon Ombre Piped Rose Cake serves 12-14

2 Packets Orange Cake Mix available from Wright’s Baking online shop you will need 1 1/2 packets of mix for this recipe

90ml Vegetable Oil – I use sunflower oil plus a little extra for greasing the cake tin

300ml Water

1 Large Free Range Egg

1tsp Lemon Zest – the zest of one regular lemon

Approx 1/2 jar Lemon Curd

For the ombre buttercream:

700g White Icing Sugar

350g Unsalted Butter – softened to room temperature

2tbsp Very Hot Water

Gel Food Colouring – Red and Yellow, or Orange – I use Wilton

1tsp Lemon Extract – I use Nielsen-Massey

Optional – pesticide free viola flowers

Method: Preheat the oven to 170C/150C fan, gas mark 3.5

You will need a 20cm/8″ diameter 8.5cm/3.5″ deep tin to bake this cake.

  • Starting with the cake tin, grease the entire tin and also line the base with parchment paper.
  • Into a large bowl add the water, egg, oil and one packet of the orange cake mix. Weigh the other packet of cake mix and divide in half. Add half of the packet contents to the bowl – it was approximately 260g. Please check the weight for yourself.
  • Whisk the ingredients together according to the instructions on the packet.
  • Finally add the finely grated zest of 1 lemon, approximately 1tsp, to the bowl. Whisk to distribute and combine.
  • Pour the citrus cake batter into the prepared tin.
FF Orange Lemon Ombre Piped Rose Cake
Cake batter in the tin and ready for the oven.
  • Place the cake tin in the centre of the oven and bake for 1 hour 30 minutes. Test the cake at 1 hour 20 minutes with a skewer. The cake is baked when an inserted skewer comes out clean.
  • As soon as the cake is baked remov from the oven, place on a rack and allow the cake to cool completely in the tin.

FF Orange Lemon Ombre Piped Rose Cake

    Breath in the rich, citrus, homebaked aroma.
  • When the cake has cooled turn it out of the tin. Also if necessary, run around the outer rim of the cake with a palette knife. Doing this will loosen any slight sticking, that said Wright’s cake mixes are excellent and always turn out of the tin easily.

Preparing the cake for decoration:

  • During baking the cake rose slightly more in the centre. The cause may have been the addition of an  egg to the cake mixture, or, baking at a slightly higher temperature.
  • First cut off any dome on the top of the cake. Having a small rise in the centre is an advantage with the finished cake.
  • Slice the cake evenly into 3 layers. A serrated knife cuts cleanly through the cake, minimising crumbs.
  • Place the bottom layer, cut side up, on a board or cake stand.
  • Spread the bottom layer with an even, thin layer of lemon curd, so that it almost reaches the edges.
  • Next, place the middle layer on top of the bottom layer, matching up the sides.
  • Again, spread a thin, even layer of lemon curd on to the cake, keeping just inside the edges.
  • Finally place the top of the cake on to the middle layer.
FF Orange Lemon Ombre Piped Rose Cake
Shaping, slicing and then reassembling the cake.

Preparing the cake:

  • Place the softened butter into a large bowl.
  • Sift the icing sugar into the same bowl.
  • Next add the very hot water and lemon extract.
  • Finally whisk the ingredients together, starting on a slow speed and increasing the speed, until you have a pale, fluffy, lump free, buttercream.
  • Remove 3 heaped tablespoons of the buttercream and set aside to crumb coat the cake. First place the buttercream on the top of the cake. Use an offset spatula to spread the icing across the top of the cake, gently pushing it over the sides. Rotating the stand, or board, gradually cover the sides of the cake with a thin layer of buttercream. Finish by dipping a palette knife into hot water, drying and running the hot knife over the cake, this will produce a smooth finish. Place the cake in the fridge for 30 minutes to allow the crumb coat to set slightly.

Colouring the buttercream:

  • Divide the remaining buttercream equally, between 3 bowls.
  • Use cocktail sticks, gel food colouring and a teaspoon to stir, start colouring the icing. It is easier to achieve the lightest colour, which is piped on to the top of the cake, first. Doing so sets the shade and tint of the icing.
  • Following on, add more colouring to the next bowl, until the shade is correct. Finishing with the last bowl and deepest colour, add extra red and yellow gel until the desired deeper colour is obtained.
  • To pipe the buutercream, fit 3 large, disposable piping bags with large star piping nozzles – Wilton #1M. Fill each bag with a separate shade of buttercream. Label the piping bags light, medium, dark, so they are distinguishable.
FF Orange Lemon Ombre Piped Rose Cake
Natural lemon flavoured buttercream and the 3 shades created for the ombré effect.

Decorating the Cake:

  • Starting right in the centre, on top of the cake, using the lightest shade, pipe the first rose. Begin in the centre of the rose, keeping pressure steady on the bag pipe a star, continuing into an e shape, then continuing round to form a rose swirl.
  • Continue working evenly around the centrally piped rose, piping more rose swirls. Carry on until the top of the cake is covered, or almost covered, in evenly piped rose swirls.
  • Following on, use the next shade darker, pipe rose swirls around and inbetween the lighter shade, then pipe evenly around the side of the cake.
FF Orange Lemon Ombre Piped Rose Cake
The image on the right shows the colour difference.
  • Complete the cake by piping the darkest shade around the base of the cake. The full ombré effect is then complete.
FF Orange Lemon Ombre Piped Rose Cake
Orange Lemon Ombre Piped Rose Cake very effective.
  • For the very best results place the piped cake into the fridge, or somewhere cold, for 30 minutes.
  • Just prior to serving add the edible violas.
FF Orange Lemon Ombre Piped Rose Cake
Orange Lemon Ombre Piped Rose Cake perfect with a Buck’s Fizz!

Beautifully baked, evenly distributed fruit, decorated with rose swirls, this Orange Lemon Ombre Piped Rose Cake demonstrates how easy it is to create a sensational cake using a mix.

Because of my health limitations, creating this cake from scratch would be too much for me. Of most importance, my aim, to show how the ombré piping effect is achievable, at home, with a little practice. Secure in the knowledge that the cake underneath is reliably good. A couple of badly piped roses were removed, using a butter knife and re-piped. Practice and making mistakes is how we learn to improve our skills.

If you have enjoyed the recipe for this Orange Lemon Ombre Piped Rose Cake you may also like these:

Strawberry Chocolate Vanilla Drip Cake

FF Orange Lemon Ombre Piped Rose Cake
Strawberry Chocolate Vanilla Drip Cake also uses Wright’s cake mixes.

Fluted Chocolate Lemon Marble Cak

FF Orange Lemon Ombre Piped Rose Cake
Fluted Chocolate Lemon Marble Cake.

Strawberry Sweetheart Cake

FF Orange Lemon Ombre Piped Rose Cake
Strawberry Sweetheart Cake

Beautiful cakes do not have to be difficult to create. Since I am most definitely not an accomplished cake decorator, I have learned a few decorating techniques that enable me to finish a cake to a good standard.

Most of all I hope you have been inspired to try out a new technique? Also homemade cakes taste infinitely better than their supermarket counterparts. While they are convenient, no amount of love, has, at any stage been added to the cake. Whereas baking at home creates a unique, delicious cake that will prompt huge smiles from the recipient and those who share in the celebration and cake!

Sammie xx


Share
Facebooktwitterpinterestlinkedintumblr

Boozy Lemon Drizzle Bundt Cake

Share
Facebooktwitterpinterestlinkedintumblr

I adore lemons. They are used in both sweet and savoury cooking in my kitchen. So, in honour of our eldest daughter’s birthday and inspired by last week’s first Great British Bake Off episode, I bring you my 100% gluten free Boozy Lemon Drizzle Bundt Cake.

FF Boozy Lemon Drizzle Bundt Cake
Boozy Lemon Drizzle Bundt Cake moist, light with a great lemon tang.

This gluten free cake tastes no different to a regular cake made with ‘wheat’, which I am really pleased about, as it means more people can make and eat this delicious treat!

That said this Boozy Lemon Drizzle Bundt Cake can be made with regular, plain white flour if you do not need to make it gluten free.

FF Boozy Lemon Drizzle Bundt Cake
Boozy Lemon Drizzle Bundt Cake as beautiful to look at as it is to eat.

Such a delightfully light, moist cake, with the tang of limoncello spiked drizzle soaked through the entire cake.

My Boozy Lemon Drizzle Bundt Cake, is a true lemon drizzle cake, in the sense that it has hot lemon syrup poured over a skewer spiked cake. Using a Bundt pan means that the syrup soaks from the bottom to the top, creating a fabulously flavoured cake.

FF Boozy Lemon Drizzle Bundt Cake
Boozy Lemon Drizzle Bunt Cake such a stunning design.

As this cake was made for my daughter, to be shared with family and friends, I was very restrained when it came to adding the limoncello. For adults you could easily double, or triple the amount stated. Remember though it is the lemon flavour that needs to hit the palette first. Don’t knock everyone out with too much vodka 😉.

FF Boozy Lemon Drizzle Bundt Cake
Boozy Lemon Drizzle Bundt Cake with a damp, drizzled crumb.

The colours used to decorate this cake are simply her favourite. I piped a line of thick, lemon icing along each ridge of the cake and then added sky blue sugar sparkles, pressing them in gently to the icing so they would stay. A finial dusting of white, edible glitter in the centre adds the necessary sparkle, even if it doesn’t show up in all of the photographs.

I chose to use the Heritage Bundt Pan by Nordicware.

Recipe: Boozy Lemon Drizzle Bundt Cake serves 10-12

I highly recommend Wilton cake release spray to grease the Bundt pan, alternitavely use melted butter and brush every part of the inside of the pan, then add 1 tablespoon of gluten free flour, tip the pan around until it is completely covered and tip out any excess flour – I cannot guarantee the same sharp edges using the butter/flour method.

For the Cake

275g/10oz Unsalted Butter softened to room temperature

275g/10oz  Caster Sugar

1/4tsp Salt – I use Maldon Sea Salt

275g/10oz Certified Gluten Free Flour – I use Doves Farm

2tsp Baking Powder – I use Waitrose as it is gluten free

1tsp Vanilla Extract – I use Nielsen-Massey extracts

1tsp Lemon Extract or juice of half a lemon

Zest of one lemon

6 Large Free Range Eggs

For the Drizzle

Approx 50ml Freshly Squeezed Lemon Juice – juice of 2 lemons

Approx 50ml of tap water to make up to 100ml with the lemon juice

100g/4oz Caster Sugar

2tbsp Limoncello – more can be added for a pronounced flavour if desired

Icing to Decorate the Cake

200g/7oz White Icing Sugar

Juice of one whole lemon – approx 30mls, make up to volume with water if needed

Optional – sprinkles and edible glitter – ensure they are gluten free

Method: Preheat the oven to 170C/150C fan, gas mark 3.5

  • Prepare the Bundt pan by spraying or brushing on cake release, ensuring every part of the inside of the pan is covered.
  • Into a large bowl add the butter, sugar and salt. Whisk/beat until pale and creamy.
  • Weigh the gluten free flour and sift into a separate bowl with the baking powder.
  • Add the 6 eggs to the butter/sugar mixture and 2 tablespoons of the pre weighed, sifted flour – this will stop the mixture from splitting, which can lead to a denser cake. Whisk/beat the eggs into the butter and sugar until you have a fully combined, light mix.
  • Add the rest of the flour/baking powder, the lemon extract, vanilla and lemon zest.
  • Using a metal spoon fold all the ingredients together until they are fully combined.
  • Spoon the cake batter into the prepared Bundt pan.
FF Boozy Lemon Drizzle Bundt Cake
Boozy Lemon Drizzle Bundt Cake ready for the oven.
  • Place the Bundt pan in the centre of the preheated oven and bake for 50-60 minutes.
  • Whilst the cake is baking make the drizzle:
  • Squeeze the strained juice of 2 lemons into a measuring jug, make the volume up to 100ml with tap water. Place 100g of sugar into a small saucepan and add the lemon juice liquid to it. Swirl to mix and place over a medium heat. Do not stir! Swirl occasionally, until the sugar is fully dissolved and the liquid starts to bubble. Remove the saucepan from the heat. Add your desired amount of limoncello and place a lid on the saucepan.
  • The cake is cooked when it is golden in colour, coming away from the sides of the pan and an inserted skewer comes out clean.
  • Once baked remove the cake from the oven. Allow the cake to cool for 10 minutes in the Bundt pan.
  • After 10 minutes use a wooden skewer to create holes right through the cake. I poked approximately 25 holes in the cake, this will allow the syrup to moisten the entire cake, not just the bottom – remember the Bundt cake is upside down.
  • Drizzle over the warm, boozy, lemon syrup, making sure you cover the entire base of the cake.
FF Boozy Lemon Drizzle Bundt Cake
Piercing holes with a wooden skewer that allow the boozy lemon drizzle to soak through.
  • Leave the cake for a further 5 minutes in the pan, to allow the drizzle to soak right through to the top of the cake.
  • Now turn the Boozy Lemon Drizzle Bundt Cake out on to a cooling rack and allow to cool completely.
FF Boozy Lemon Drizzle Bundt Cake
Beautifully moist cake with clean, deep, swirling lines.

To Decorate the Boozy Lemon Drizzle Bundt Cake:

  • Sift the icing sugar into a bowl. Add 30mls of lemon juice and stir.
  • Add extra water to create a thick icing, that can still be piped.
  • Spoon the thick icing into a disposable piping bag (or piping bag fitted with a 3-4mm piping nozzle). Snip the end off of the disposable bag to leave a 3-4mm opening.
  • Place the cooling rack over a large baking tray – this will catch all the drips.
  • Starting from inside of the Bundt hole pipe the icing, following the lines of the swirl.  Keep the pressure steady and pipe into the groove of the swirl, finishing when you reach the edge. Pull the bag away from the cake and any excess icing will drip through the cooling rack.
  • Continue working around each swirl until the cake is completed.
FF Boozy Lemon Drizzle Bundt Cake
Boozy Lemon Drizzle Bundt Cake looks perfect just like this.
  • If adding sprinkles, either follow my design, adding them just away from the centre of the cake, or let your imagination take over and create your own design!
  • Finally add a dust of (I used) white edible glitter, to give your cake some added sparkle.
  • Carefully transfer the cake to a board/stand/plate.
FF Boozy Lemon Drizzle Bundt Cake
Boozy Lemon Drizzle Bundt Cake simply stunning to look at!

Take photos of your beautiful creation.

Then serve it sliced with a cup of tea or coffee, or if it’s adults only, a shot of limoncello alongside 😉.

FF Boozy Lemon Drizzle Bundt Cake
Boozy Lemon Drizzle Bundt Cake definitely made for sharing.

I am so pleased our daughter chose the light blue sprinkles for this cake. To be honest, it isn’t a colour I would put with a lemon cake and yet it looks so beautiful. She has a brilliant eye for design and I regularly ask her opinion on colour schemes/layouts and photographs for Feasting is Fun.

Thank you Star and very happy birthday.

If you have enjoyed this recipe for Boozy Lemon Drizzle Bundt Cake you may also like these:

Lemon Blueberry Bundt Cake

FF Boozy Lemon Drizzle Bundt Cake
Lemon Blueberry Bundt Cake.

Lemony Strawberry Pavlova

FF Boozy Lemon Drizzle Bundt Cake
Lemony Strawberry Pavlova also gluten free.

Swirl Lime Drizzle Cake

FF Boozy Lemon Drizzle Bundt Cake
Swirl Lime Drizzle Cake

I have other gluten free cake recipes such as my Marshmallow Frosted Mango Cupcakes and my Strawberry Whipped Cream Giant Doughnut.

My aim is to make as many recipes as possible gluten free. Obviously this is going to take some time to retest recipes and make adjustments as needed.

Next on the agenda is cracking gluten free pastry. I’ve been asked many times for a recipe, so I will be working on that over the coming weeks.

Whatever you are making, baking and creating in your kitchens, remember food always tastes better when it’s shared. So why not invite your neighbours round for a cup of tea and a slice of something delicious?

Sammie xx

My Boozy Lemon Drizzle Bundt Cake has also been submitted for this weeks #GBBOTwitterBakeAlong on Twitter. Click on the hashtag on Twitter and join in the Baking Community fun!


Share
Facebooktwitterpinterestlinkedintumblr

Strawberry Chocolate Vanilla Drip Cake

Share
Facebooktwitterpinterestlinkedintumblr

Hello, I have an exciting recipe to share today. Since I first admiring the variety of Drip Cakes on Pinterest I have wanted to make one. This past weekend with the help of 2 Wright’s Baking cake mix kits, I did it (full recipe instructions for making this cake from scratch are included).  Finally, I have now made this Strawberry Chocolate Vanilla Drip Cake.

FF Strawberry Chocolate Vanilla Drip Cake
Strawberry Chocolate Vanilla Drip Cake

Had it not been for the cake mixes from Wright’s I honestly would not have had the energy to make this cake. Yet, I proved that with a little bit of patience and guidance anyone can make a drip cake using great packet mixes, plus some extra chocolate and strawberries.

The Chocolate and Victoria sponge mixes create cakes that are as light as clouds. I baked the cakes on Saturday and then assembled and decorated this gorgeous Strawberry Chocolate Vanilla Drip Cake on the Sunday.

FF Strawberry Chocolate Vanilla Drip Cake
Strawberry Chocolate Vanilla Drip Cake

You Too Can Make This Drip Cake :

If you have ever wanted to make a drip cake, yet been too scared or overwhelmed to try? Use the following step by step photographs and instructions to show you how. You need not be a proficient baker or cake decorator, yet you CAN make this Strawberry Chocolate Vanilla Drip Cake.

Taking you through every stage, you will learn how to achieve a stunning drip cake. Once you have learnt the basics you can create all different kinds of drip cakes. I wanted to keep my cake simple, yet elegant. The chocolate dipped strawberries add height and a pop of colour.

FF Strawberry Chocolate Vanilla Drip Cake
Strawberry Chocolate Vanilla Drip Cake

Above all, I never dreamt that my Strawberry Chocolate Vanilla Drip Cake would turn out so well.

Pushing Out Of My Cake Decorating Comfort Zone:

Because cake decorating isn’t my strongest skill, learning new techniques can be challenging. Also sometimes my hands can be really shaky, resulting fewer cake recipes making it on to the blog.

What I’m trying to say is, I’m just like you. Yes I’ve learnt to pipe roses with buttercream, but that really is the extent of my cake decorating knowledge. So my hope is to teach you how to create a show stopping cake and that, with a little patience you too can create one!

FF Strawberry Chocolate Vanilla Drip Cake
Strawberry Chocolate Vanilla Drip Cake

There’s No Shame In Using Great Quality Cake Mixes:

Starting with a good quality boxed cake mix from Wright’s meant that all my concentration could be used decorating the cake. I will be creating recipes with different flavours, colours and toppings in the future, but for my first drip cake, all I wanted to concentrate on was creating that iconic ‘drip’!

Chocolate and vanilla were chosen simply because the inside of the cake would then reflect the beautiful outside. The cake mixes are so easy to whip up and bake, plus the buttercream mixture is included in the box. All I needed to add was butter.

FF Strawberry Chocolate Vanilla Drip Cake
Strawberry Chocolate Vanilla Drip Cake

Note: in order to decorate this cake successfully you will need a large palette knife (not a small offset one – that I mention in some of my recipes). Also if making the cake using my recipes you will have ire than you need. Perhaps you could bake an extra layer?

Recipe: Strawberry Chocolate Vanilla Drip Cake serves 10-12

1 Chocolate Sponge Baking Kit – from Wright’s Baking

1 Victoria Sponge Baking Kit – also from Wright’s Baking

Alternatively use the  cake batter recipe for my Apricot White Chocolate Triple Sponge Cake

( Make the cake batter as instructed in the recipe. Use half of the vanilla batter to bake 2 plain sponges. Add 75g Cocoa powder and 2tbsp milk to the remaining batter, stir gently until the ingredients are fully incorporated. Bake the chocolate sponges as instructed.)

2tbsp Butter for greasing the sandwich cake tins

240g Unsalted Butter- softened to room temperature

200g White Chocolate – I use Waitrose Belgian white chocolate

100g Dark Chocolate minimum 70% Cocoa Solids

15 Good Quality Fresh Strawberries medium/large in size – if only very large strawberries are available you may want to use fewer.

Note: if making your own buttercream you will need 250g unsalted butter, 100g good quality cocoa powder (sifted) and 400g icing sugar (sifted), prepare as for the buttercream including the 2tbsp very hot water.

Method: Preheat the oven to 180C/160C fan, gas mark 4, 350F

Making And Baking The Sponge Cakes:

  • Grease 2 x 7″ (17.5cm) sandwich cake tins and line the base with baking parchment.
  • Make up one packet – I used the Victoria sponge mix first – according to the instructions on the box.
  • Divide the cake batter equally between the 2 tins.

FF Strawberry Chocolate Vanilla Drip Cake

  • Place the sponge tins in the centre of the oven and bake for 15- 20 minutes. The sponges are baked when they are a golden colour and spring back from a light touch. Mine took just under 20 minutes to bake. Also, baking times may vary slightly if making from scratch*.
  • As soon as the cakes are baked remove from the oven.
  • Allow the sponges to cool for 5 minutes, then run a palette knife around the outside rim of the cake.
  • Turn the cake out gently and place right side up on a cooling rack.

FF Strawberry Chocolate Vanilla Drip Cake

  • Wash up the sponge tins in warm soapy water, dry, grease and line the bases as before.
  • Make up the chocolate sponge mix according to the packet instructions.
  • Divide the cake batter equally between the 2 tins and bake in the middle of the oven, as before for 15 – 20 minutes. Mine were baked at 15 minutes.
  • As soon as the chocolate sponges are baked remove from the oven. See note * above.

FF Strawberry Chocolate Vanilla Drip Cake

  • After 5 minutes cooling run a palette knife around the outside of the cake, turn out gently and allow to cool on a rack.
  • Once cool your cake is ready to assemble and decorate.

Making The Frosting And Assembling The Cake:

  • Gently peel the parchment paper away from the base of each sponge.
  • Whisk/beat 240g of softened butter in a large bowl.
  • Add both packets of buttercream mix – chocolate and vanilla.
  • Slowly whisk until they are incorporated into the butter.
  • OPTIONAL – I always add 1-2 tablespoons of very hot water to any buttercream that I make. I added 2 tablespoons to the buttercream mixture. I would not advise adding water if you are using stork or other margarines.
  • Continue whisking until you have a smooth, glossy, chocolate buttercream.

FF Strawberry Chocolate Vanilla Drip Cake

  • I recommend using either a cake board or a flat plate placed on a cake stand, or cake decorating turntable. I used a cake board on top of my cake stand. This is so that once covered in buttercream, the cake, will fit into the fridge to chill.
  • First of all add a generous tablespoon of buttercream to the cake board, this helps anchor the cake whilst it is being assembled and decorated.
  • Place the first sponge flat side up on the centre of the board.
  • Using a palette knife thinly coat the upper, flat side of the sponge in buttercream.

FF Strawberry Chocolate Vanilla Drip Cake

  • Next add the second chocolate sponge, again flat side up and cover with a thin layer of buttercream.
  • Continue in the same manner with the vanilla sponges, leaving the last sponge without a covering of buttercream.

FF Strawberry Chocolate Vanilla Drip Cake

Covering The Cake With Buttercream Frosting:

  • Ensure that you have plenty of space to work around the cake. I moved mine to the dining room table where I was able to sit (better for my back) and cover the cake.
  • Add enough buttercream to cover the top of the cake evenly – approximately 0.5-1cm deep. Run the palette knife across the top to roughly smooth it.
  • Next add buttercream to the side of the cake near the top. Spread it with the palette knife so that it fills in the gaps between the sponges. I started at the top and rotated the cake stand, working my way down to the bottom of the cake as each sponge layer was covered. Always aim to keep the buttercream as even and smooth as possible, using a palette knife.

FF Strawberry Chocolate Vanilla Drip Cake

  • The whole cake is now covered in buttercream with a roughly smoothed top and sides.
  • Fill a large jug with very hot water and have some pieces of kitchen paper to hand.
  • Clean the palette knife and let it sit, immersed in the hot water for a minute.
  • Remove the palette knife and wipe dry with the kitchen paper.
  • Hold the flat side of the palette knife to the side of the cake and smooth the buttercream. Repeat by dipping the palette knife back into the hot water, drying and smoothing, rotating the cake stand as you do so. This may take a little practice but you’ll soon get the hang of it.
  • The buttercream becomes very glossy and smooth. Continue until the sides are as smooth as you can get them.
  • Next smooth the top of the cake in exactly the same way.

FF Strawberry Chocolate Vanilla Drip Cake

  • Use kitchen paper to gently go around the base of the cake and remove excess buttercream from the board. I remove any big lumps and then hold the kitchen paper to the board as I rotate the cake, gradually getting closer and closer to the cake.
  • Place the covered cake into the fridge to chill and set for 30 minutes.
  • When it is touch dry you may start to decorate it.

Decorating The Strawberries With Chocolate:

  • Break up the white chocolate into a heatproof microwaveable bowl.
  • Zap in the microwave for 30 seconds at a time, stirring in between each heating session. When the chocolate has half melted remove the bowl from the microwave and continue stirring until all of the chocolate is melted.
  • Set to one side to cool.
  • Meanwhile break up the dark chocolate and melt in exactly the same way as for the white chocolate.
  • Dip half of the strawberries into the dark chocolate, ensuring they are completely covered with only the green showing, use a teaspoon to pour the chocolate near the top of the strawberry. Set the strawberries on to a silicone mat or some baking parchment.
  • Remove 2 tablespoons of the melted white chocolate and place in a small, disposable piping bag. Snip the very end off leaving a small hole.
  • Pipe lines across the uncovered strawberries and over the chocolate covered strawberries. You can also experiment with piping little dots on to the strawberries. Leave the strawberries to set.

Creating The Drip Effect:

  • Finally, while the white chocolate is still pourable but cooled you can start creating your drips.

FF Strawberry Chocolate Vanilla Drip Cake

  • Using a spoon pour the cooled, melted chocolate around the edge of the cake encouraging drips to form by adding a little more chocolate in places. Aim for a variety of drip lengths around the outside of the cake.
  • Next spoon the remaining white chocolate on to the centre of the top of the cake. Use the spoon to spread it to meet the rim formed by the drips and then swirl with your spoon to give an attractive finish.

FF Strawberry Chocolate Vanilla Drip Cake

Adding Chocolate Strawberries For A Spectacular Finish:

  • Gently add some strawberries to the back of the cake, building height by laying them on top of each other. Also add a few strawberries around the base to create a stunning, professional finish.
FF Strawberry Chocolate Vanilla Drip Cake
Strawberry Chocolate Vanilla Drip Cake

Place the cake back into the fridge, especially during warmer weather, until it has set.

FF Strawberry Chocolate Vanilla Drip Cake
Strawberry Chocolate Vanilla Drip Cake

Now take lots of photographs as it is great to have a visual reminder that you have accomplished something so stunning.

Importantly, keeping some of the strawberries red, with just a little piped white chocolate really makes the whole cake pop. Having a burst of colour stops the cake from being all brown and cream, which is definitely not as fun as a spot of red here and there!

If you have enjoyed the recipe and tutorial for making this Strawberry Chocolate Vanilla Drip Cake here are others you may also like:

Chocolate Peanut Butter Drip Cake

FF Strawberry Chocolate Vanilla Drip Cake
Chocolate Peanut Butter Drip Cake

Black Forest Giant Doughnut

FF Strawberry Chocolate Vanilla Drip Cake
Black Forest Giant Doughnut a stunning effect with little effort.

Fluted Chocolate Lemon Marble Cake

FF Strawberry Chocolate Vanilla Drip Cake
Fluted Chocolate Lemon Marble Cake a great cheat at making an amazing looking cake.

Finally, while not being the world’s best cake decorator means I can learn. Baking and decorating cakes should be fun. And it can be with instructions and photos to guide you through the process. Above all, cakes are made for sharing with friends, family and even the Post Lady!

Have I inspired you to try a new cake decorating technique?

Have fun decorating, making and baking your feasts.

Sammie xx

Wright’s Baking provided me with the cake mix kits to try. All content, opinions, views and photographs are my own. Please see my Disclosure Policy. I am not a professional baker or cake decorator, any advice given is purely for guidance.

Share
Facebooktwitterpinterestlinkedintumblr

Fluted Chocolate Lemon Marble Cake

Share
Facebooktwitterpinterestlinkedintumblr

Since Father’s Day coming up this Sunday, here is an easy to make and decorate treat for Dad. Lemon and chocolate intertwined within every part of this stunning Fluted Chocolate Lemon Marble Cake. While I am using lemon in this cake, other flavours such as orange, coffee or perhaps a liqueur could also be considered.

F Fluted Chocolate Lemon Marble Cake
Fluted Chocolate Marble Cake perfect for any celebration. 

You can make this cake for Father’s Day, or as a special celebration cake. Since the blend of chocolate and lemon throughout every part of this cake is a taste sensation. And if you have never tried the two together then you need to trust me and make this cake.

FF Fluted Chocolate Lemon Marble Cake
Fluted Chocolate Lemon Marble Cake whoever receives this will be thrilled.

While orange and chocolate is a more common flavour pairing, I was inspired to make this cake when I discovered that Elizabeth Shaw Chocolates made Chocolate a Lemon Flutes. And having used the Amaretto flutes for my Chocolate Amaretto Cake I knew how stunning and yet simple they were to use.

FF Fluted Chocolate Lemon Marble Cake
Fluted Chocolate Lemon Marble Cake made with love.

So if you want to make this cake for your Dad this coming Sunday, or a special birthday cake I am right here to show you how to make this stunning Fluted Chocolate Lemon Marble Cake.

Homemade Gifts That Are Baked With Love

Nothing is quite as special as something that you have made yourself for someone. Putting the time, energy and love into baking a cake, for me truly shows someone that I love them. Especially if it is centered around their favourite flavours.

Elizabeth Shaw sell a range of flavoured flutes and you can easily tweak this recipe to fit the flavour of your choice. And adding the flutes around the edge, with the extra touch of a beautiful ribbon transforms a nice cake to a wow cake.

FF Fluted Chocolate Lemon Marble Cake
Fluted Chocolate Lemon Marble Cake plenty for sharing.

RecipeFluted Chocolate Lemon Marble Cake serves 10-12

Cake:

300g/11oz Unsalted Butter – plus a little extra for greasing the cake tin

300g/11oz Caster Sugar

6 Large Free Range Eggs

300g/11oz Self Raising Flour

1/4 tsp Salt

50g/2oz Cocoa Powder

2tbsp Milk

2 Whole Lemons – scrubbed under hot water if waxed

Frosting:

250g/5oz Dark Chocolate Minimum 70% Cocoa Solids

200g/7oz Unsalted Butter

100g/4oz Sifted Icing Sugar

Optional – 1tsp Lemon Extract – I use Nielsen-Massey 

Decorations:

4 Boxes Lemon Flutes – from Elizabeth Shaw Chocolates

Pearls, dragee balls, or sprinkles of your choice

Method: Preheat the oven to 180C/160C fan, gas mark 3, 350F.

Making The Marble Cake Batter

  • First of all, grease and line with baking parchment an 8″ or 18cm cake tin – that is also fairly deep – at least 4″/10cm. Ensure that the baking parchment is at least 2″/5cm higher than the sides of the cake. This will ensure a nice even rise and moist cake.
  • In a large bowl add the softened, room temperature butter and caster sugar.
  • Whisk/beat until pale and creamy.
  • Sift the flour into a medium sized bowl – you will need the bowl later.
  • Add 1/3 of the flour and 2 eggs to the butter mixture, mix slowly until just incorporated.
  • Repeat the last step.
  • Add the last 2 eggs, remaining flour and the zest of 2 lemons.
  • Use a large spoon or spatula to fold in all of the ingredients until combined – be careful not to overmix.
  • In the spare bowl (which had the flour in it) place half of the lemon flavoured cake mixture – I do this by eye but, use scales if you want to be exact.
  • Sift the cocoa into the mixture in the spare bowl and add the 2 tablespoons of milk. Fold in the cocoa powder until the mixture is combined. It will be a gorgeous chocolate colour.
  • In the othe bowl squeeze in the juice from half of a lemon. Stir until fully combined.

FF Fluted Chocolate Lemon Marble Cake

    Begin by alternating the cake mixes.
  • Spoon dollops of the chocolate cake mixture around the base of the tin, leaving a gap in between.
  • In the gaps spoon dollops (sorry but I love that word 😉) of the lemon cake mix.
  • Continue by layering spoonfuls of the chocolate cake mixture on top of the lemon and vice versa.
FF Fluted Chocolate Lemon Marble Cake
This is how the cake tin looks with all the cake batter added.

Creating The Classic Chocolate Marble Swirl With The Cake Batter

  • Now to get swirling! I always use the handle of a wooden spoon, as it won’t rip through the baking parchment.
  • With the upturned spoon in hand swirl through the cake mixture. I like making figures of eight!
  • You need the whole cake mix to be marbled NOT mixed.
FF Chocolate Lemon Marble Cake
One beautifully swirled marble cake and I stuck the overlapping parchment together with cake batter!
  • Please don’t worry if you think you’ve over or under swirled your cake. This is a gift for someone. They will love that you’ve taken the time to bake them a cake.

Baking The Marble Cake

  • Place the cake in the middle part of the oven and bake for 1 hour 30 minutes – 1 hour 45 minutes.
  • This is a long slow bake that ensures a moist, evenly coloured cake. Please trust me. If you cook at a higher temperature the outside will be baked before the middle and you are likely to end up with a dry cake.
  • The cake is baked when an inserted skewer comes out clean.
  • As soon as the cake is baked remove from the oven and place the tin on a cooling rack and allow the cake to cool in the tin. I made this cake the day before I decorated it, however, as long as it is cold it can be decorated on the same day.
FF Fluted Chocolate Lemon Marble Cake
Beautifully baked, don’t worry about any cracks they will settle and close as the cake cools.
  • If leaving overnight before decorating, remove the cooled cake from its tin and wrap in cling film.

Preparing the Chocolate Ganache Icing:

  • Break up the 250g of dark chocolate and add to a heatproof bowl that fits on top of a small saucepan. Add the butter to the chocolate.
  • Place 1-2 inches of water in the base of the saucepan and heat until just bubbling.
  • Place the bowl containing the chocolate/butter on top of the saucepan, ensuring the base of the bowl does not touch the water – this is called a double boiler.
  • Stir continuously until both the butter and chocolate have melted.
FF Fluted Chocolate Lemon Marble Cake
Glossy chocolate ganache.
  • Next add 1 teaspoon of lemon extract (if using) and the sifted icing sugar.
FF Fluted Chocolate Lemon Marble Cake
Stir in the icing sugar.
  • When the icing sugar is no longer visible remove the bowl from the heat and very gently, as this mixture will be hot, switch to a balloon whisk and stir, then whisk as the mixture cools, until all icing sugar has dissolved.
  • The best way to tell if the mixture is smooth is to rub a little between your finger and thumb, if it still feels gritty keep whisking – it took 5 minutes of gentle whisking until my ganache was smooth again.
FF Fluted Chocolate Lemon Marble Cake
Glossy, silky smooth chocolate lemon ganache.
  • Next switch to an electric mix and whisk gently, increasing in speed as the ganache starts to thicken.
  • Keep whisking until the mixture is still soft but will hold a figure of eight.
Fluted Chocolate Lemon Marble Cake
Thickened ganache that can hold its shape – but not stiff.

Covering The Marble Cake With Chocolate Ganache And Piping The Swirl Decorations

  • Place half of the ganache into a piping bag fitted with a large star. If it is a hot day cover the nozzle with cling film and place in the fridge.
  • Place your cake on a board or cake stand. I suggest placing the board on a cake stand as it makes the cake easier to decorate.
  • Spoon 3/4 of the remaining ganache on to the top of the cake.
  • Using an off set palette knife spread the mixture so that it covers the top of the cake.
FF Fluted Chocolate Lemon Marble Cake
It’s a thick coating don’t worry!
  • Spoon the rest of the ganache around the outside edge of the top of the cake.
  • Gently, with your palette knife encourage the icing to cover the side of the cake. Turning the cake stand as you go, working round until the sides are covered.
  • Hold your palette knife flat against the side of the cake and rotate the stand. This will give your sides a nice even edge.
  • Run your palette knife flat across the surface of the cake to achieve the same effect. Don’t worry if it’s not perfectly flat, as long as the icing is even it will look great.
  • Next pipe swirls around the edge of the cake and finish with one in the centre.
FF Fluted Chocolate Lemon Marble Cake
Look how beautiful your cake is!

Adding The Chocolate Flutes And Final Decoration

  • Have the flutes opened and ready. You will see that one side of the flute is flat.
  • Press the flat side of the flute against the base of the cake, the ganache will hold it in place.
  • Continue, placing one flute next to another, taking care to ensure they are straight, until the whole cake is surrounded.
  • Take your ribbon, place it halfway up the flutes – it is helpful if you have a spare pair of hands to hold it in place, if not use a pin to secure it at the back of the cake – wrap it around the cake and tie a bow at the front.
  • Place a silver dragee ball on the top of each swirl and add extra small, edible pearls to the swirls.
Fluted Chocolate Lemon Marble Cake
Fluted Chocolate Lemon Marble Cake simply stunning.

Serve your stunning Fluted Chocolate Lemon Marble Cake sliced with a cup of tea or coffee and a big smile.

FF Fluted Chocolate Lemon Marble Cake
Fluted Chocolate Lemon Marble Cake made with love.

This beautiful Fluted Chocolate Lemon Marble Cake, made with love and shared with your Dad, or friends and family for a special celebration is sure to wow and impress them with the delicious flavour combination!

If you have enjoyed the recipe for this Fluted Chocolate Lemon Marble Cake here are some others you may enjoy:

CLICK ON THE PHOTOS FOR LINK

Raspberry Vanilla Naked Celebration Cake

Vanilla buttercream covered sponge decorated with deep pink, fresh roses.
Raspberry Vanilla Naked Celebration Cake

Chocolate Amaretto Cake

Chocolate Amaretto Cake


Raspberry Lemon Celebration Layer Cake

FF Fluted Chocolate Lemon Marble Cake
Raspberry Lemon Celebration Layer Cake

This Fluted Chocolate Lemon Marble Cake is beautifully rich, decadent, full of flavour and so easy to make. So I hope that you enjoy the calming practise of baking and then decorating a cake. While I was not having the best of days yesterday yet, sitting decorating this cake, I became totally immersed in what I was doing. As a result, I felt a lot better and had accomplished something that I hadn’t done before. So I thoroughly recommend baking and cake decorating as a very therapeutic, calming practise. And even if you don’t feel any better at the end, your time will have been well spent.

So, whatever you are making, baking and creating in your kitchens, have fun preparing and sharing your feast.

Sammie xx

Although Elizabeth Shaw Chocolates gifted me the flutes to decorate this cake. I did not receive any payment for writing this post. So, all content, recipes, photographs and opinions are my own. Please see my Disclosure Policy.

Cleverly decorated sponge dessert that is easy to make. Sized for Pinterest with descriptive graphics.

Share
Facebooktwitterpinterestlinkedintumblr

Black Forest Giant Doughnut

Share
Facebooktwitterpinterestlinkedintumblr

Today is #NationalDonutDay. While I can only assume from the spelling that it applies to those in the United States and yet here I am baking a Black Forest Giant Doughnut. Because any reason to eat doughnuts is good enough for me!

FF Black Forest Giant Donut

Making a Black Forest Gateaux has been on my list of bakes for a while. Finally I took the opportunity of making a Black Forest Giant Doughnut. Alternatively, if you do not have doughnut moulds – mine were from Lakeland are were very reasonably priced – I see no reason why this recipe shouldn’t work using 7-8″ sandwich tins.

Since this has the lightest of chocolate sponges I opted to add a little Kirsch (cherry liquer).

Cherries And Chocolate Sponge

When in season fresh cherries, that have been macerated in a little liquer and sugar will be used. Because they aren’t quite in season yet, I opted for tinned cherry pie filling. Alternatively, morello cherry jam would work well here. Since this is a very adaptable recipe, use whatever you have to hand, or can easily get hold of.

FF Black Forest Giant Doughnut.
Black Forest Giant Doughnut deliciously easy to make and assemble.

Although this is a giant doughnut I would happily bring it out for dessert after dinner, or serve with afternoon tea on a sunny day in the garden. Most importantly I encourage you to share this delicious bake. Because it is simply too good to be kept hidden away.

Recipe: Makes one Black Forest Giant Doughnut serves 8

200g/7oz Unsalted Butter –  plus a little extra for greasing the moulds

200g/7oz Caster Sugar

Scant pinch of salt – no more than 1/4 tsp

1 tsp Vanilla Extract – I use Nielsen-Massey

6 Large Free Range Eggs

75g/3oz Cocoa Powder

125g/4oz Plain White Flour

1.5 tsp Baking Powder

For the filling/topping:

200ml/8fl oz Double Cream

1 x 410g Tin Cherry Pie Filling – note morello cherry jam and fresh cherries can be used instead.

Optional – 1tbs Kirsch

Method: Preheat the oven to 160C/140C fan, gas mark 3, 325F

Making And Baking The Chocolate Doughnut Halves

  • First of all, grease the inside of both doughnut moulds well with soft butter.
  • In a large bowl add the butter and sugar.
  • Whisk/beat until pale and creamy. Approx 5 minutes, this helps create a very light sponge.
  • Add all 6 eggs and the vanilla extract to the bowl – I always crack my eggs into a separate bowl first.
  • Sift the flour, salt, cocoa powder and baking powder into the bowl.
  • Whisk/beat on a slow speed until all the ingredients have come together.
  • Using a large spoon give the chocolate sponge mix a good stir to ensure all the ingredients are well combined.
  • Divide the cake batter in half and spoon into each of the 2 doughnut moulds.
FF Black Forest Giant Doughnut
Two halves of a giant doughnut ready to be baked.
  • Place the doughnut moulds on to a baking tray, ensuring they don’t squash each other (I actually switched trays after this photo was taken).
  • Put the tray into the centre of the oven and bake the doughnut halves for 30-40 minutes.
  • The doughnut halves are baked when they spring back from a light touch.
  • As soon as the doughnut halves are baked remove  from the oven.
FF Black Forest Giant Doughnut
Each half of the giant doughnut is beautifully baked.
  • Carefully place each silicone mould on to a cooling rack.

Adding A Kick Of Kirsch

  • If adding Kirsch carefully prick each mould lightly with a cocktail stick, being careful not to puncture the silicone mould.
FF Black Forest Giant Doughnut
Lightly prick the sponge all over so that the Kirsch can be absorbed.
  • Spoon half a tablespoon of Kirsch over each half of the doughnut sponge whilst it is still hot.
  • Leave to cool for 5 minutes and then turn each of the sponges out onto the cooling rack. Cool fully before decorating.

Decorating The Black Forest Giant Doughnut:

  • In a medium bowl add the double cream and whip until it holds a firm peak.
  • Fill a piping bag with a large star tip (I use Wilton #1M) with the whipped cream).
  • Place one half of your doughnut, flat side up on a cake stand or plate.
  • Reserve 8 whole cherries to decorate the top, spoon the remaining cherry pie filling on to the bottom half of the doughnut – DO NOT over fill.
FF Black Forest Giant Doughnut
Spoon slightly less filling than I have, this splurged a bit when the top was put on!
  • Pipe the cream in a swirl pattern on top of the cherries.

FF Black Forest Giant Doughnut

  • Place the top of the doughnut on to the base. Wipe away any excess cherry syrup – notice that in my finished photos there isn’t a doilie.
  • Pipe 8 swirls evenly around the top of the doughnut and top each with a reserved cherry.
  • Pipe stars around the outside of the middle of the doughnut, this creates a tidy, professional finish.
FF Black Forest Giant Doughnut
Black Forest Giant Doughnut 

Serve the Black Forest Giant Doughnut cut into generous slices, with a smile and a lovely hot drink!

FF Black Forest Giant Doughnut
Black Forest Giant Doughnut a real treat.

While growing up I had Black Forest Gateaux every year, for my birthday. So taking a classic recipe and turning it into an amazing giant doughnut was fun.

Finally this is a stunning, yet easy to accomplish bake. Since a slice of Black Forest Giant Doughnut is bound to evoke memories of the retro gateaux and break out smiles once tasted and devoured!

If you have enjoyed this Black Forest Giant Doughnut Recipe here are some others you may like to try:

Raspberry and Cream Giant Doughnut

FF Black Forest Giant Doughnut
Delicious Raspberry and Cream Giant Doughnut

Black Forest Cupcakes

FF Black Forest Giant Doughnut
Black Forest Cupcakes

Lemon Blueberry Cupcakes

FF Black Forest Giant Doughnut
Lemon Blueberry Cupcakes 

While this recipe can be made using sandwich tins I recommend buying the silicone doughnut moulds. Because they create a beautiful rounded doughnut shape, are incredibly easy to use and inepensive to buy. Alternatively add them to your birthday or Christmas list!

Sammie xx

Share
Facebooktwitterpinterestlinkedintumblr

Chocolate Amaretto Cake

Share
Facebooktwitterpinterestlinkedintumblr

Chocolate Amaretto Cake is the easiest, wow factor cake, you ever need to make. Delicious, moist, almond and chocolate sponge, covered in chocolate, Amaretto whipped cream and surrounded by Elizabeth Shaw amaretto flavoured chocolate flutes. Finally, tied together with a pretty ribbon!

Elizabeth Shaw Chocolate Amaretto Cake
Chocolate Amaretto Cake the perfect ‘wow factor’ cake for any celebration.

This delicious cake is subtly flavoured with Amaretto liquer. While the delicious Elizabeth Shaw amaretto flutes surround the whipped, chocolate cream, covered chocolate cake.

Following on from the beautifully piped Strawberry Sweetheart Cake I wanted to create a cake that anybody could make, regardless of their cake decorating ability. And with Mother’s Day being celebrated in only one weeks time, this is the perfect cake to make for your mum, as a surprise, a thank you for everything she has done for you.

Most importantly, I cannot think of a better gift for any mum to receive that is better than a homemade cake and this Chocolate Amaretto Cake is sure to wow any mum, or dad!

Elizabeth Shaw Chocolate Amaretto Cake
Chocolate Amaretto Cake where almonds and chocolate blend together in perfect harmony.

A Cake That Can Be Made By Anyone – no matter their skill level!

Look even though I am going to give you the recipe for this cake, I want you to absolutely KNOW, that you can create this knockout cake, without any culinary skills what-so-ever. So, just this once, if you feel more confident using a cake mix from a box, I’ll turn a blind eye.

Yes I did really give you permission to cheat. Because, everyone has to start somewhere and I’d rather you used a packet mix and gave this cake a go, than be too overwhelmed by the whole ‘baking’ process to even try.

Most importantly, make sure you bake the cake, whatever recipe/packet mix you use, in a deep 8 inch round cake tin and regardless of how much cake mixture you have, only fill the tin two thirds full. And use any spare cake batter up, by baking a few cupcakes, once the main cake is baked.

Elizabeth Shaw Chocolare Amaretto Cake.
Chocolate Amaretto Cake as delicious as it is beautiful.


Home Baked With Lots Of Love

As a mum myself, receiving home made gifts is always very special. I was given a three layered Victoria Sponge Cake a couple of years ago. So, following orders to keep out of my beloved kitchen, I returned home to a wonderful smelling house, but a very frazzled husband.

After baking two sponge layers with the children, followed by shopping for more self raising flour that ‘worked’, another two layers were baking beautifully in the oven. And then crisis point hit, when the children removed these from the oven and declared them a disaster.

Finally, I was allowed back into the kitchen to try and help. The sponges were perfect and had risen beautifully. The problem was simply that instead of using my 6 inch sponge tins, they had used my 9 inch spring form pans! So of course the cake batter spread further, but was still perfectly usable.

Since I’d declared the cakes edible our children immediately spread Nutella on one sponge and devoured it, purely for research purposes. I was then presented with a three layer sponge cake that I have to say, not only tasted fantastic, but meant more to me than anything they could have bought.

Elizabeth Shaw Chocolate Amaretto Cake
Look how this Chocolate Amaretto Cake Sparkles under the spotlights.

Any mum would be thrilled to be given this Chocolate Amaretto Cake for Mother’s Day, birthday, or just because I love you mum day!

Recipe: Makes one Chocolate Amaretto Cake serves 12

For the cake:

225g/8oz Soft Light a Brown Sugar

225g/8oz Unsalted Butter – at room temperature, plus a little extra for greasing the cake tin.

1tsp Vanilla Bean Paste – I use Nielsen-Massey 

1/2tsp Almond Extract

6 Large Free Range Eggs

200g7oz Plain White Flour – plus 1tbsp extra for dusting the cake tin

75g/3oz Cocoa Powder

1/4tsp Salt – I use Maldon Sea Salt

2.5tsp Baking Powder

50ml/2fl oz Whole Milk

For the frosting:

350ml/12 fl oz Double Cream

100g/4oz Dark Chocolate – I used Elizabeth Shaw Dark Chocolate Crunch Bar

1tbsp Amaretto Liquer – or 1tsp Almond Extract

For the chocolate edging and topping:

4 Packets of Elizabeth Shaw Amaretto Flutes

200g/7oz Chocolate Crispearls or one box of Elizabeth Shaw Sharing Crisp Assortment

Optional – Edible glitter – I used gold holographic as it toned with my colour theme.

Suitable length of ribbon to tie around your cake

Making The Cake

Preheat the oven to 170C/150C fan, gas mark 3, 325F.

  • Grease an 8 inch round cake tin with butter. Line the base with baking parchment cut to size. Add 1tbsp of flour to the cake tin and turning the tin on it’s side, over the sink, rotate the tin, tapping as you do, so that the flour coats the sides of the tin. Tip any excess flour out into the sink.
  • Place the sugar and butter into a large bowl.
  • Whisk for 5 minutes until creamy and smooth.
  • Add the vanilla bean paste/extract and almond extract.
  • Sift the flour, cocoa powder, baking powder and salt into a separate bowl – dry ingredients.
  • Add 1/3 of your dry ingredients and 3 eggs to the creamed butter/sugar mixture.
  • Mix slowly until the ingredients are combined.
  • Repeat the last 2 steps.
  • Add the milk and the last 1/3 of the dry ingredients to the bowl.
  • Mix slowly until nearly combined.
  • Switch to a metal spoon or a spatula and mix the cake batter by hand until thoroughly combined.
Elizabeth Shaw Chocolate Amaretto Cake
Chocolate Amaretto Cake batter in the tin ready for the oven.

Baking The Cake

  • Place the cake tin into the centre of the oven.
  • Bake for 50 minutes – 1 hour.
  • The cake is baked when an inserted skewer comes out clean.
  • As soon as the cake is baked remove from the oven.
Elizabeth Shaw Chocolate Amaretto Cake
Place the cake tin with the Chocolate Amaretto Cake onto a trivet or cooling rack.
  • Allow the cake to cool completely in the tin.
  • Don’t worry if the top has a small crack.
  • Once cooled turn the cake out onto a cake board or stand, so that the bottom of the cake is now the top.
  • Peel away the baking parchment carefully.

Making The Chocolate Amaretto Ganache

  • Break up the chocolate bar and place in a heatproof, microwaveable bowl.
  • Zap for 20 second bursts, in the microwave, stirring in between each zap, until the chocolate has melted. Set to one side to cool a little.
  • Pour the double cream into a large bowl and whisk until the cream just starts to thicken and hold it’s shape.
Elizabeth Shaw Chocolate Amaretto Cake
Pour the cooled melted chocolate onto the whipped cream.
  • Add the Amaretto liquer, or almond extract and mix until you have chocolate cream.

Covering The Cake With Whipped Ganache

Elizabeth Shaw Chocolate Amaretto Cake
Place 2/3 of the chocolate cream onto the top of the cake.
Elizabeth Shaw Chocolate Amaretto Cake
Using an offset palette knife spread the cream over the sides of the cake.
  • Add more of the chocolate cream, smooth using the offset palette knife, until you have an even cover of cream over the cake.
  • Hold the clean palette knife flat against the side of the cake and rotate the stand/cake board.
  • This last step ensures the covered sides of the cake are flat and even, ready for sticking the flutes to!
  • Gently wipe around the base of the cake with kitchen roll to remove any chocolate cream that may have fallen from the cake during the last step.

Decorating The Cake With Chocolate Flutes

  • Open the packages of flutes and tip the flutes out onto a plate.
  • You will notice that one side of the flute is flat. Press this flat side against the side of the cake, so that it is straight.
  • Repeat the last step, placing each flute as close as possible to the next, until the cake is completely surrounded with chocolate flutes.
  • Trust me you will have enough flutes – I had 4 left over!
  • Using both hands gently press around the sides of the cake to ensure each flute is evenly adhered, by the cream, to the Chocolate Amaretto Cake.
Elizabeth Shaw Chocolate Amaretto Cake
The chocolate flutes give this Chocolate Amaretto Cake a professional looking finish.
  • Tie the ribbon, midway up the cake (not the flutes) – I found I needed help from someone, putting their finger on the knot as I tied the bow.

Adding The Cake Topping Decoration

  • Next add your topping. I used Chocolate Crispearls with added holographic, gold, edible glitter! However the Elizabeth Shaw sharing crisp assortment would have looked beautiful, especially left unwrapped, as the colours would have worked beautifully with the ribbon I used.
  • Once you have filled the top of your cake, place in the fridge to firm up for at least an hour.
Elizabeth Shaw Chocolate Amaretto Cake
Chocolate Amaretto Cake a professional finish that anyone can achieve, using Elizabeth Shaw Chocolate Flutes.

I was absolutely thrilled with how well this Chocolate Amaretto Cake turned out.

Creating A Beautiful Cake With Minimal Skill

The only real skill needed to create a cake that looks this stunning is patience. I really believe anyone can make this cake. Yes young children may need some supervision and if they are going to be eating the cake I would definitely recommend using almond extract in the whipped cream, not alcohol!

Is there someone you know, who has a special occasion coming up and would be blown away if given a cake like this?

Elizabeth Shaw Chocolate Amaretto Cake
Chocolate Amaretto Cake the perfect ‘wow factor’ cake for any celebration.

If you do make this cake please send me a picture via Twitter/Instagram?

I hope, given the step by step instructions (and cheat if needed!) that you try making this cake. Elegant and professional are two words I use for this cake. You too can create a cake that is both elegant and professional looking.

If you have enjoyed making this Chocolate Amaretto Cake and want to make more, here are some recipes to try:

Chocolate Sparkle Cake

Chocolate Sparkle Cake

Raspberry Lemon Celebration Layer Cake 

Raspberry lemon celebration layer cake
Raspberry Lemon Celebration Layer Cake

Chocolate Heart Cake

Chocolate Heart Cake

So, whatever you are making, baking and creating in your kitchens, have fun preparing and sharing your feast.

Sammie xx

@sammiefeasting Twitter/Instagram/Pinterest

Elizabeth Shaw provided me with the Chocolate Flutes and Dark Chocolate Crunch Bar used in this post. All opinions, content and recipes are my own. Please see my Disclosure Policy.

Share
Facebooktwitterpinterestlinkedintumblr

Chocolate Fudge Bundt Cake

Share
Facebooktwitterpinterestlinkedintumblr

Hi, if you love chocolate, then you’re going to go crazy over this Chocolate Fudge Bundt Cake. With melted chocolate in the fudge cake and melted chocolate drizzled over. Finally, topped off with a generous sprinkle of Callebaut’s Chocolate Crispearls.

Chocolate Fudge Bundt Cake
Chocolate Fudge Bundt Cake drizzled with melted chocolate and topped with mini chocolate crispearls.

Bundt Pans Bake Beautiful Cakes

I love Bundt tins. I really do. Because they take a great cake batter and without any help from the baker, turn it into a beautiful cake. So that has to be a very good thing, right?

The tin I used for this Chocolate Fudge Bundt Cake is called the Jubilee Bundt made by Nordic Ware. 

So, I like to buy my Bundt tins in the sale, or where I see them on special offer. Since they can be a bit pricey, yet investing in one tin, like this Jubilee, will give you a lifetime of intricately patterned cakes.

Chocolate Fudge Bundt Cake
The Jubille Bundt Tin from Nordic Ware.

Can you imagine rocking up to a party with this gorgeous cake?

Yep, huge brownie points and that’s before anyone has tasted the cake!

Although I will warn you – Bundt tins are addictive. A year ago I had one, now I have ten!

Chocolate Fudge Bundt Cake
Put the kettle on and enjoy every single bite of this Chocolate Fudge Bundt Cake.

If you, or someone you know loves chocolate cake, then this is the cake to bake.

And because I appreciate not everyone owns this gorgeous tin, this Chocolate Fudge Bundt Cake can be baked in a 10″ springform pan!

Although technically it would no longer be a Bundt cake??

So you get to think a whole new name up for it too!

Confused?? Yep me too.

Chocolate Fudge Bundt Cake
The Crispearls give this moist Chocolate Fudge Bundt Cake a crunchy topping.

Just look at this beauty – definitely made for sharing.

Chocolate Crispearls

Now I love a sprinkle or two million.

And I was thrilled to be sent these Callebaut Chocolate Crispearls as a gift. Since they are part of Callebeaut’s hot chocolate decoration range, which also includes, dark chocolate blossoms and dark chocolate granite. Delicious, different types of chocolate to top steaming mugs of hot chocolate with.

Chocolate  Crispearls are exactly as their name suggests, chocolatey, crispy and three different flavours. White, milk and dark chocolate. Perfect for adorning a melted chocolate drizzled, fudgey, chocolate cake.

Finally, all I can say is, this cake was so good, half had been eaten before dinner.

Thats like breaking all the rules (kidding) in our house. Because life is too short to not have dessert before dinner on occasion! And yes, we like to push the boundaries in our house 😉.

Recipe: Makes 1 Chocolate Fudge Bundt Cake

Cake release spray – I use Wilton (available from Amazon, Lakeland, Hobbycraft)

350g/12oz Unsalted Butter – at room temperature

350g/12oz Dark Brown Muscavado Sugar

1tsp Vanilla Extract I use Nielsen-Massey

275g/10oz Plain White Flour

3tsp Baking Powder

1/4tsp Salt

5 Large Eggs – I always use free range

100ml/4fl oz Sour Cream – left out of the fridge for an hour

175g/6oz Plain Chocolate – approx 70% Cocoa – I use Callebaut

175g Milk Chocolate – I used a good quality 49% Cocoa chocolate, ordinary milk chocolate is fine

Sprinkles to top the cake with

Method: Preheat the oven to 180C/160C fan oven, gas mark 4, 350F.

Making The Chocolate Fudge Cake Batter

  • Break or chop the plain chocolate and place into a heatproof, microwaveable bowl. Heat for 30 seconds at a time, stirring the chocolate well. When the chocolate is almost melted, remove the bowl and keep stirring until you have smooth, molten chocolate. Set aside.
  • Into a large bowl add the butter and sugar. Whisk until fully combined, this will take a good 5 minutes.
  • Crack the eggs into a jug. Add the sour cream and vanilla extract and mix.
  • Sift in one third of the flour, baking powder and salt. Whisk or beat slowly.
  • While continuing to whisk, add half of the liquid contents from the jug.
  • Repeat the last two steps again.
  • Add the last of the sifted ingredients and gently mix until just combined.
  • Remove the beater or whisk.
  • Pour in the cooled, melted chocolate and immediately stir into the cake batter with a metal spoon. Continue until the batter is a uniform colour.
  • Spray the Bundt tin thoroughly with cake release.
  • Fill the Bundt tin 3/4 full with cake batter. Use a metal spoon to gently press the cake batter into the tin. DO NOT bang the Bundt tin on the work surface, as this could damage the tin.
  • NOTE: There may be a small amount of cake batter left – this can be used for a few cupcakes or bundtlettes.
Chocolate Fudge Bundt Cake
If the tin is filled more than 3/4 full the baked cake may not release and/or the look of the final cake may be spoiled.

Baking The Bundt Cake

  • Place the tin into the centre of the preheated oven. Bake for 50-55minutes.
  • The cake is baked when it springs back from a light tough and an inserted skewer (I use wooden ones) comes out clean.
  • As soon as the cake is baked remove it from the oven.
  • Leave the cake to cool in its tin for 10 minutes.
Chocolate Fudge Bundt Cake
Remove from the oven and allow to cool in the tin for 15 minutes.
  • Invert the Bundt tin onto a cooling rack. The cake should turn out immediately. If not leave to cool and the cake will release from the tin.
Chocolate Fudge Bundt Cake
One beautiful Chocolate Fudge Bundt Cake.

Decorating The Cake

  • Melt the milk chocolate as before (for the plain chocolate). Drizzle over the top of the cake using a spoon.
Chocolate Fudge Bundt Cake
I choose to completely cover the top of the cake with melted chocolate and have a small amount dripping down.
  • Take whatever sprinkles you are using and sprinkle away. I kept the Chocolate  Crispearls on the top of the cake.
Chocolate Fudge Bundt Cake
Chocolate Fudge Bundt Cake with Callebaut Chocolate Crispearls.

A stunningly beautiful cake, that also happens to deliver superbly on taste.

Who will you make this Chocolate Fudge Bundt Cake For?

Chocolate Fudge Bundt Cake
Cut a delicious slice of this Chocolate Fudge Bundt Cake and get ready to share.

Such a beautiful cake, it almost seems a shame to cut into it – almost!!!

If you have enjoyed this Chocolate Fudge Bundt Cake recipe here are some others you may also like:

Glazed Lemon Bundt Cake

Lemon loaf cake baked with intricate citrus slices on the top, with a lemon glaze and a sprinkle of glitter.
Glazed Lemon Bundt Cake

Marbled Chocolate Bundt Cake

Marbled chocolate bundt cake topped with both white and milk chocolate and mini gold stars.
Marbled Chocolate Bundt Cake

Sparkling Snowflake Cake

Vanilla cake in the shape of a snowflake.
Sparkling Snowflake Cake

Finally, if you have any questions about ‘baking with Bundts’ please either leave a comment, or Tweet me @sammiefeasting. Although I am by no means an expert, I will always do my best to answer your questions.

So, whatever you are making, baking and creating in your kitchens, have fun preparing and sharing your feast.

Sammie xx

No part of this post may be reproduced or duplicated without the written permission of the owner. Please see my Disclosure Policy.

Share
Facebooktwitterpinterestlinkedintumblr