Union Jack Sponge Cake

Share
Facebooktwitterpinterestlinkedintumblr

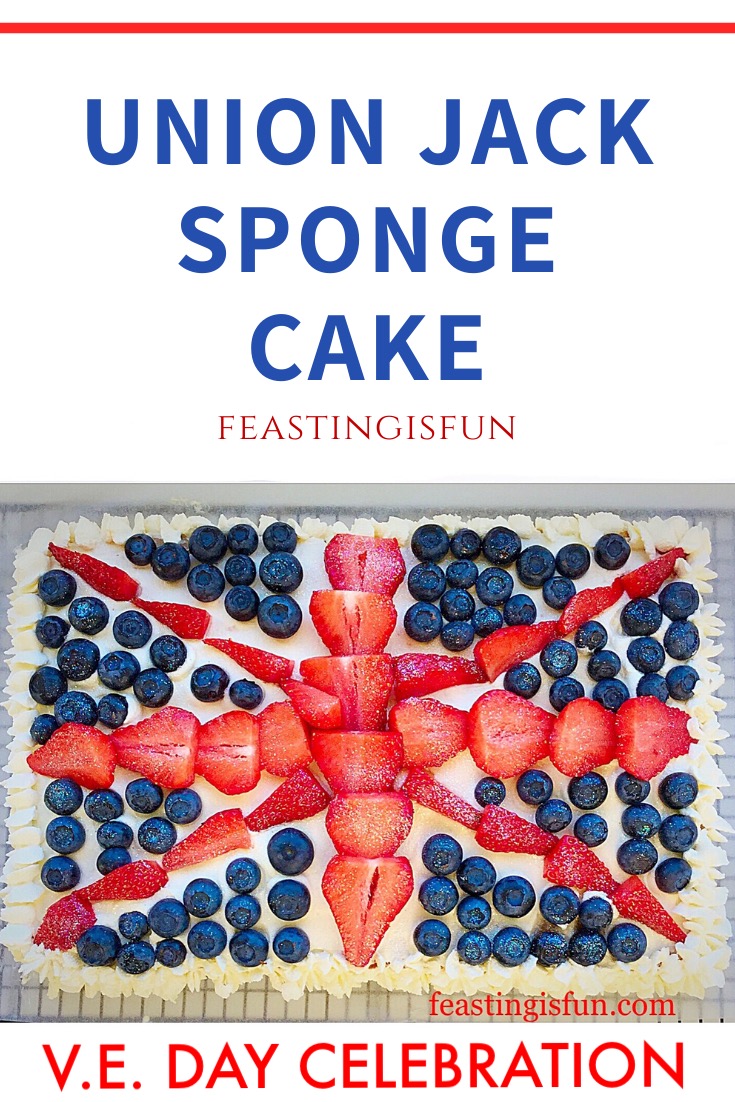
This Union Jack Sponge Cake is one of the simplest recipes I have made and yet it is also one of the most delicious cakes I’ve ever made.

FF Union Jack Sponge Cake
Union Jack Sponge Cake

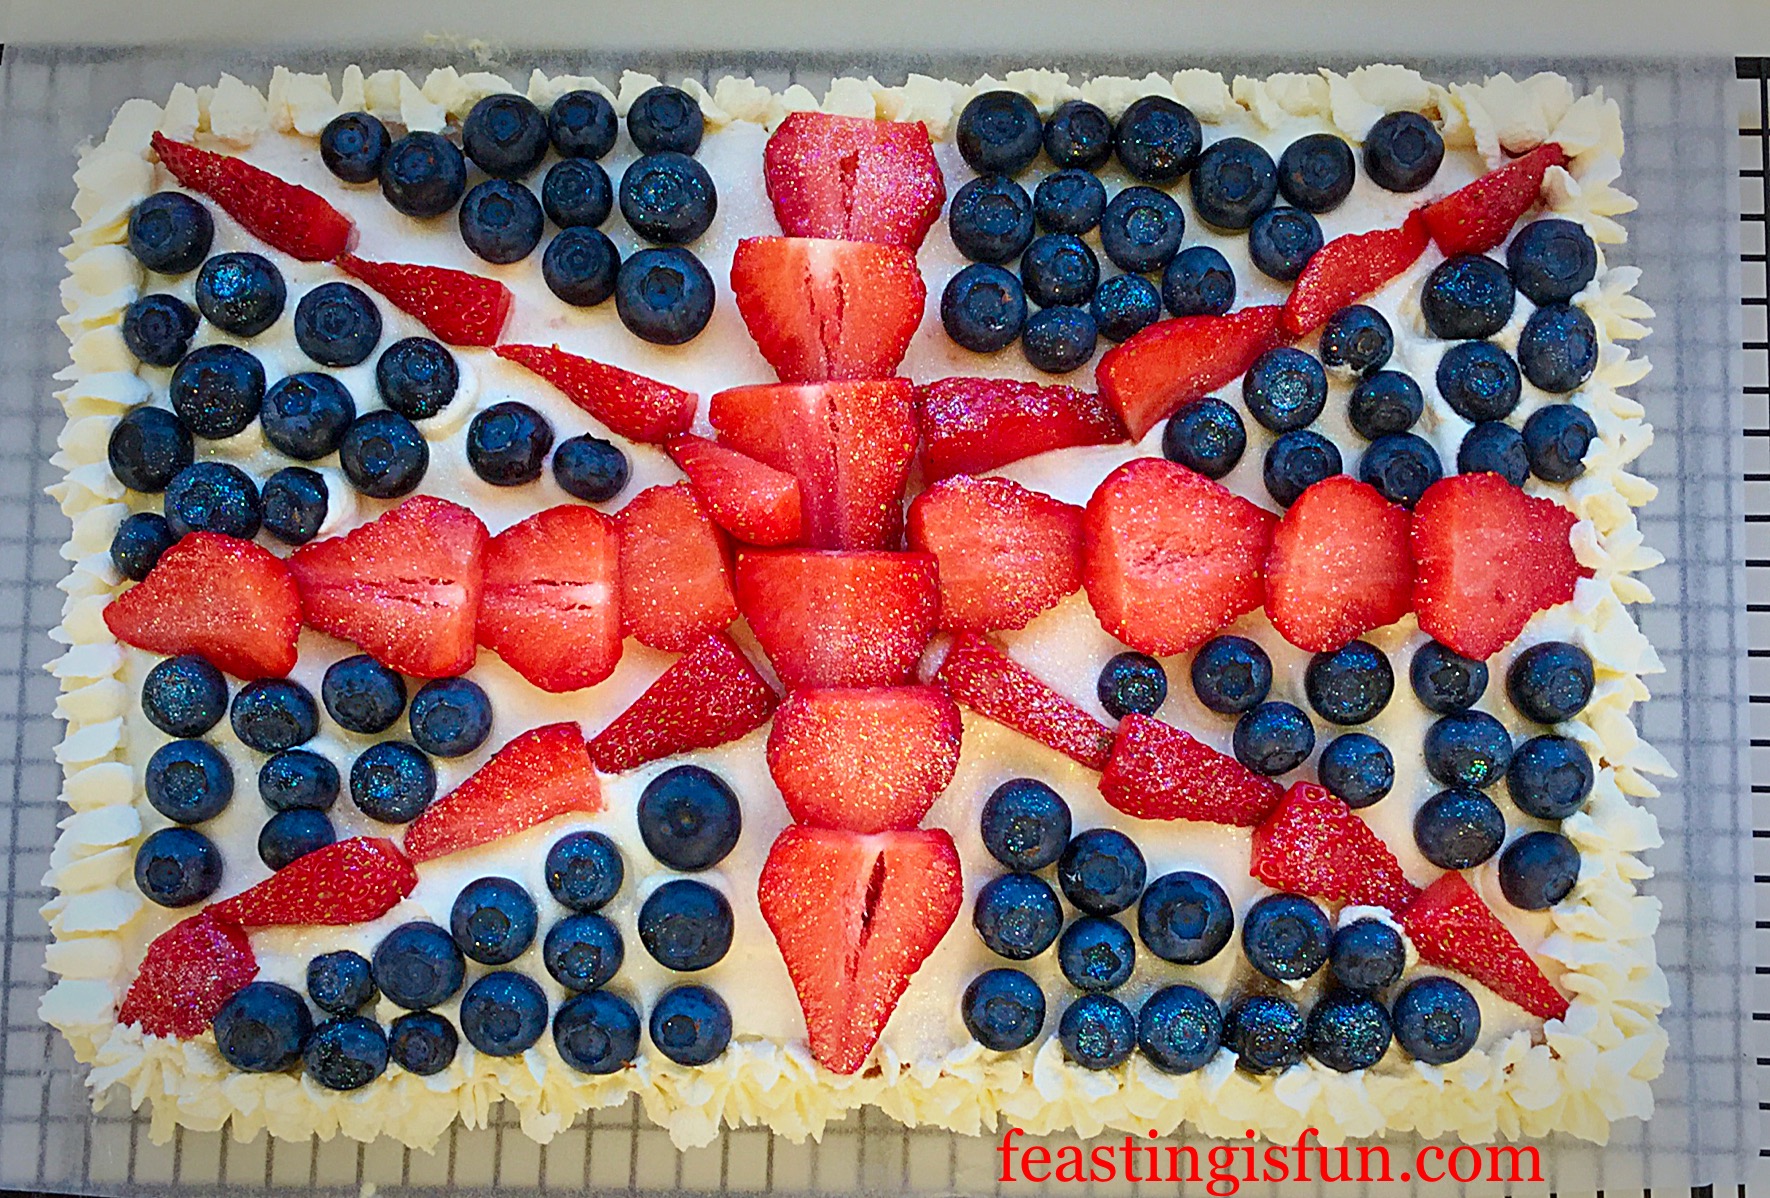
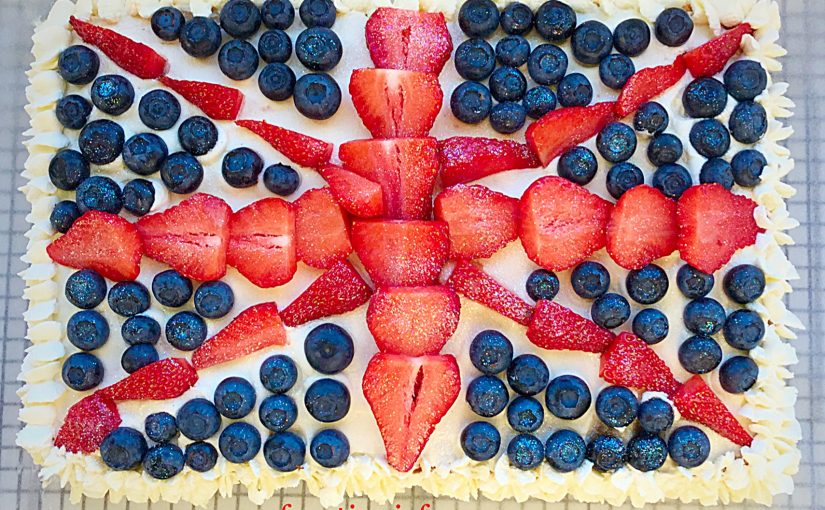
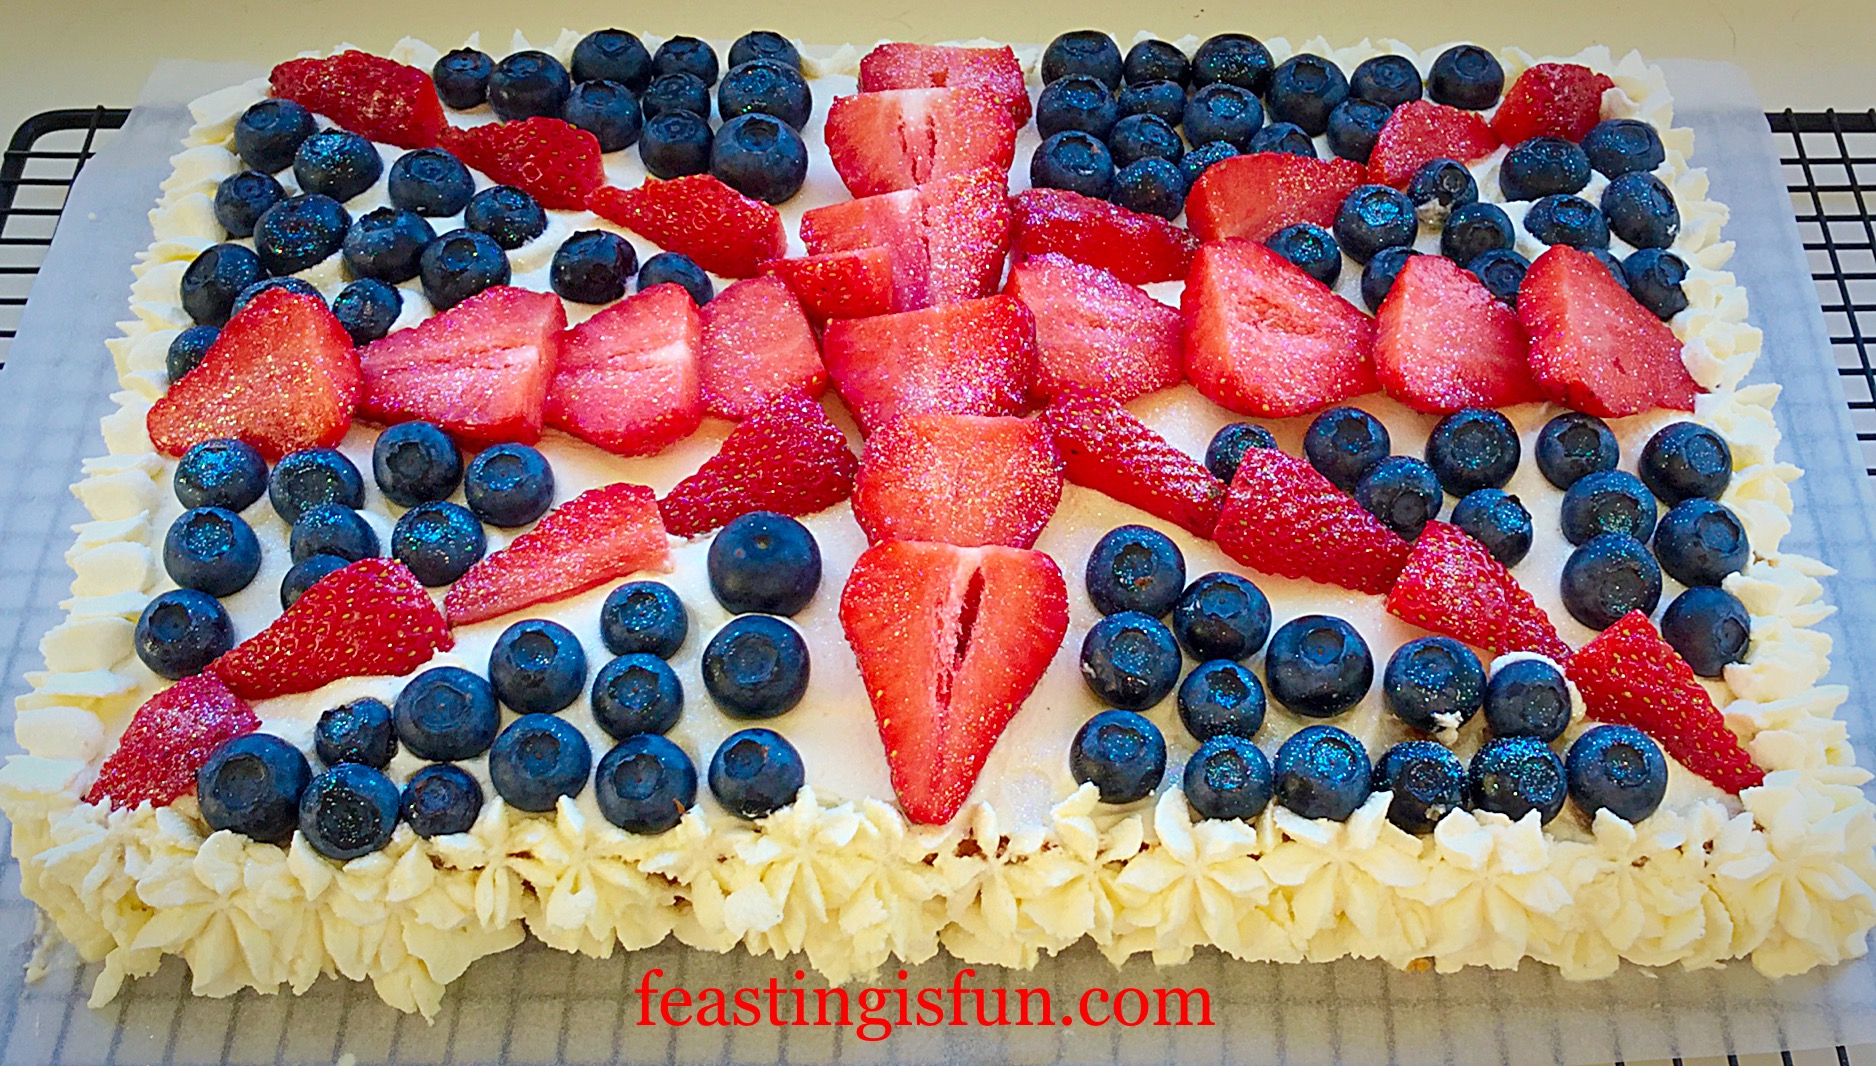
A light vanilla sponge base, covered and piped with freshly whipped cream and decorated with strawberries and blueberries. Finally, a sprinkle of caster sugar and glitter sets this cake off.

So, why bake a flag cake?

On Twitter there is a community run by two fabulous, fun women, called @SundayBakeClub, they were recently featured in the Telegraph newspaper. And each week they pick a different theme that challenges bakers to express their creativity, try news skills and most of all, have fun! Last Sunday’s theme was #GirlPower. So, the Spice Girls and our longest reigning monarch, Queen Elizabeth II, were my inspiration.

Resulting in this Union Jack Sponge Cake.

FF Union Jack Sponge Cake
Union Jack Sponge Cake with pretty piped cream edges.

Adapting The Bake To My Circumstances

To be completely honest my original idea was to make a cheesecake with a Union Jack design on it, however, I woke up on Sunday with a cracking migraine. As a result, I resigned myself initially to not being able to take part. Yet, later in the day the pain eased enough for me to get a sponge base made and baked. And then back came the pain. So I went back to bed!

After a couple of hours I was able to get up and decorate the cake. And I am really pleased that I saw this bake through. However, you have no idea how many times I start a recipe, only for me to be too unwell to complete, or photograph the results. So, on this occasion #GirlPower really did prevail.

FF Union Jack Sponge Cake
Union Jack Flag Cake my lunch portion the following day!

Sunday Bake Club – a community of bakers

I adore how the Sunday Bake Club is a community of bakers who inspire and help each other. Although, the main focus is to encourage people to get baking and stretch those who already bake often. Most importantly, the community engage in a completely non competitive and supportive way. While ‘Best Bits’ are chosen, by the organisers each week and posted on to their Blog, bakers can then vote for their favourite bake and a ‘winner’ is awarded a virtual golden spoon, just for fun!

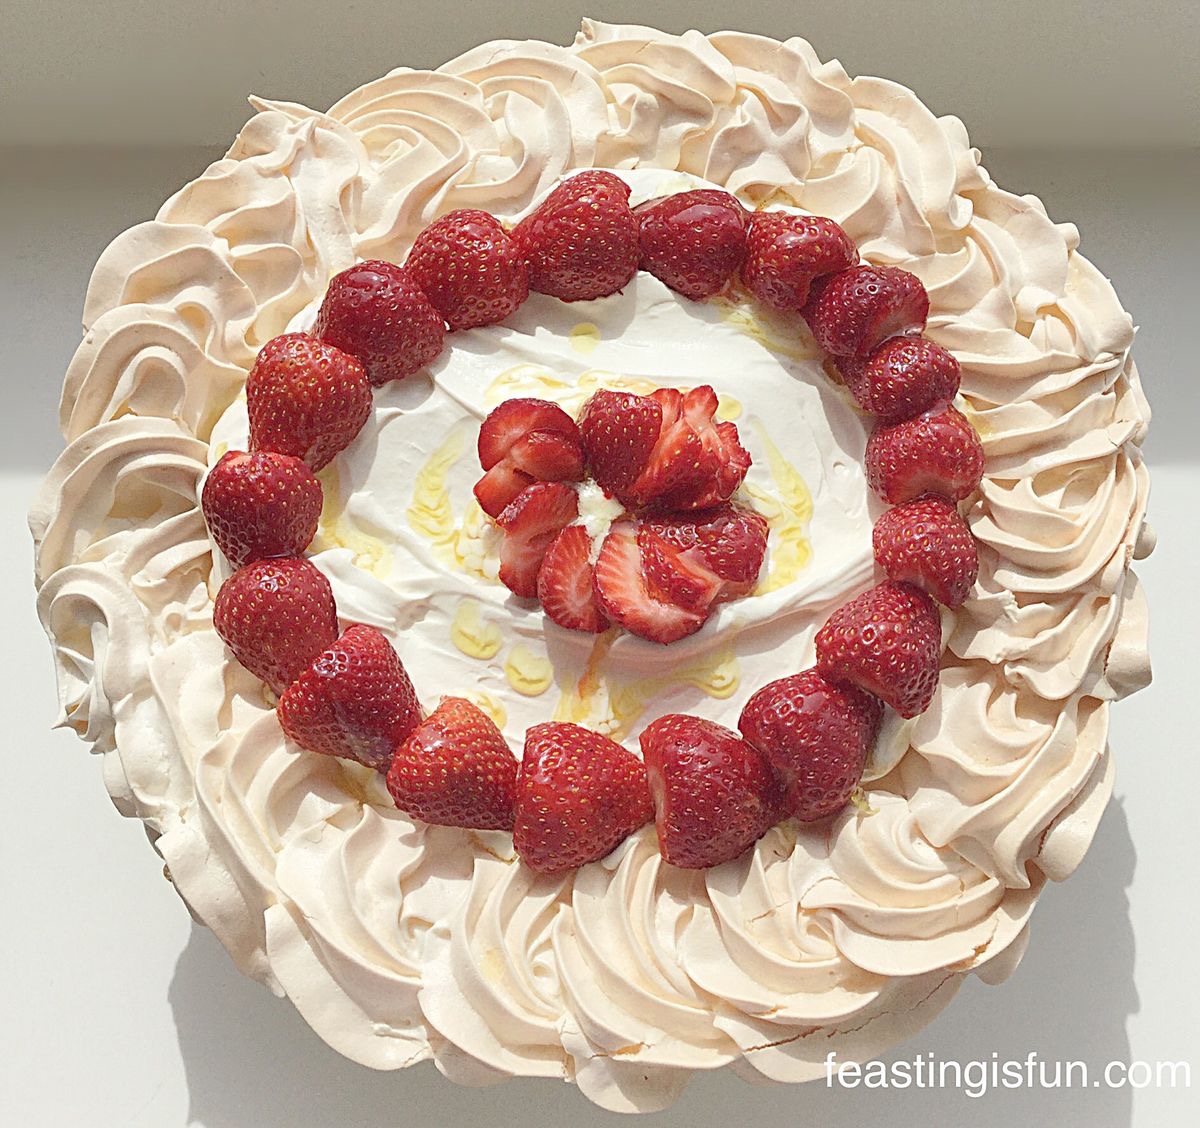
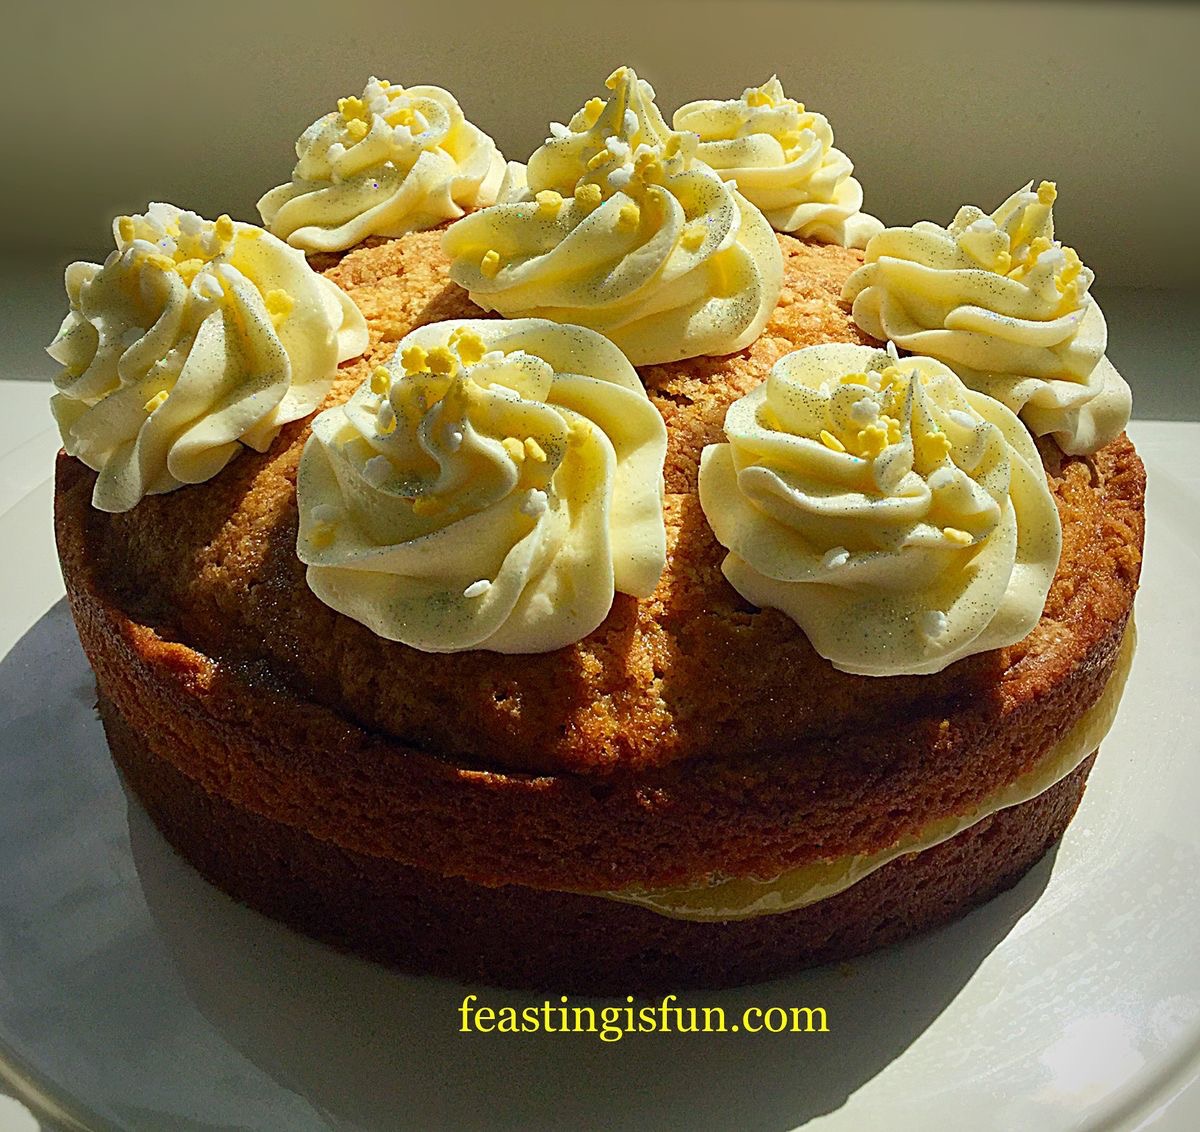
A few weeks ago I was very fortunate to be awarded a golden spoon for my Hazelnut Raspberry Vacherin, I promise to write it up and post it on here soon. It has three tiers of hazelnut meringue with whipped cream, raspberries and toasted hazelnuts in between and on top. While it was a real technical challenge for me the finished bake was worth my effort!

Back to the Union Jack Sponge Cake, you will need a 20cm x 28cm x 5cm (8″ x 11″ x 2″) Swiss roll tin to bake this flag cake.

Recipe: Union Jack Flag Cake serves 12

For the cake:

225g/8oz Unsalted Butter at room temperature – plus an extra tablespoon for greasing the tin

225g/8oz Caster Sugar

1/4tsp Salt – I use Maldon

2tsp Vanilla Bean Paste – I use Nielsen-Massey

4 Large Free Range Eggs

225g/8oz Plain White Flour – plus an extra tablespoon for dusting the tin, alternatively use self raising flour and leave out the baking powder.

2tsp Baking Powder

To decorate the cake:

400ml Double Cream

300g Fresh Blueberries

400g Fresh Strawberries

1tsp Caster Sugar

Optional – edible glitter or caster sugar

Preheat the oven to 160C/140C fan, gas mark 3, 325F.

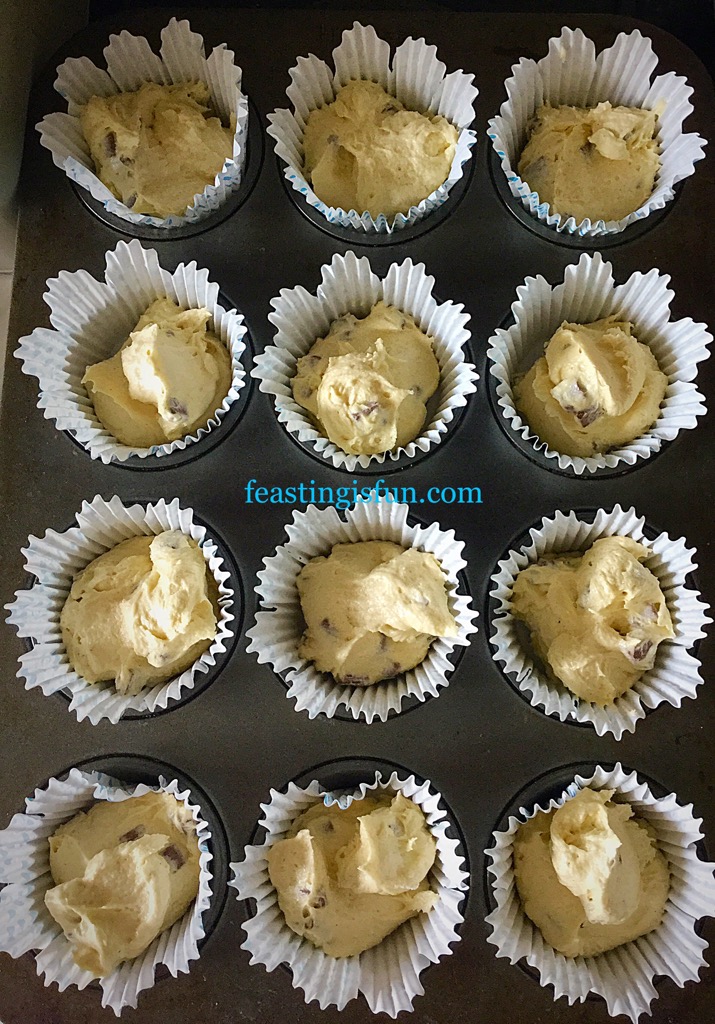
Making The Sponge Cake

  • First of all, thoroughly grease the Swiss roll tin using the extra 1 tablespoon of butter.
  • Next add one tablespoon of flour and tip it around the tin until the inside of the tin is completely coated. Tip any excess away into the bin.
  • In a large bowl add the butter, sugar and salt.
  • Whisk or beat together until pale and creamy.
  • Add 1 teaspoon of vanilla bean paste, all four eggs and the flour.
  • Whisk or beat slowly until everything is just combined. Finish mixing using a spatula or spoon to ensure all the ingredients are combined, taking care not to over mix as this can result in a heavy cake.
  • Tip the cake batter into the prepared tin and smooth out so that it fills each corner and is even.
FF Union Jack Sponge Cake
Delicious light vanilla cake batter ready for the oven.

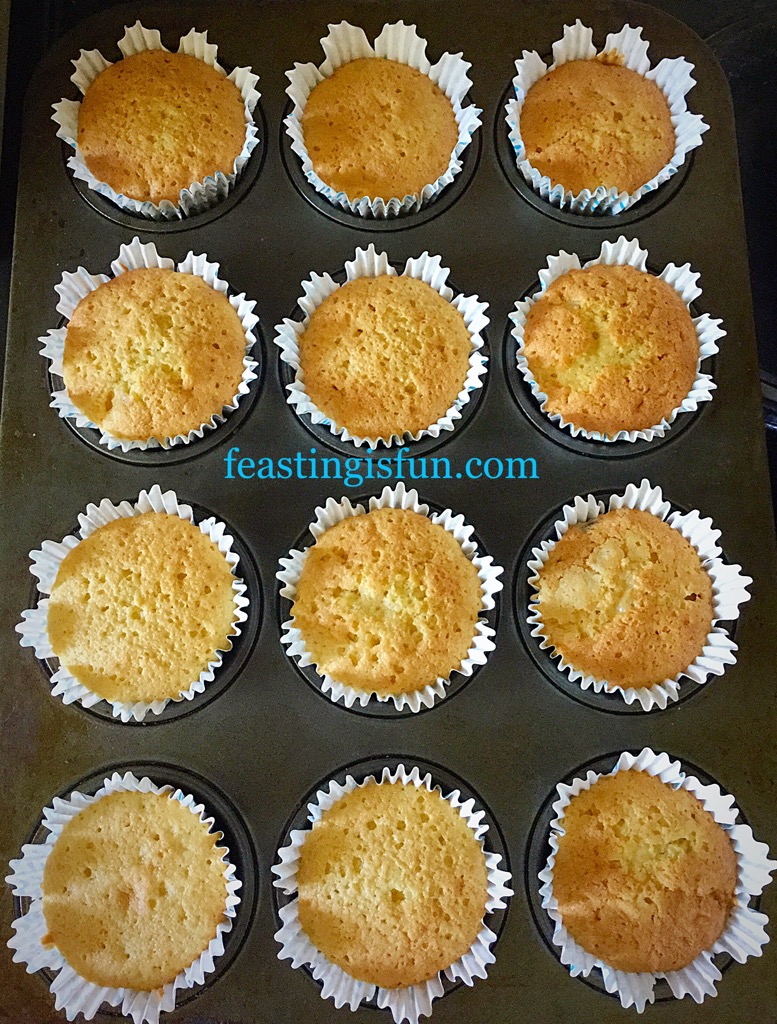
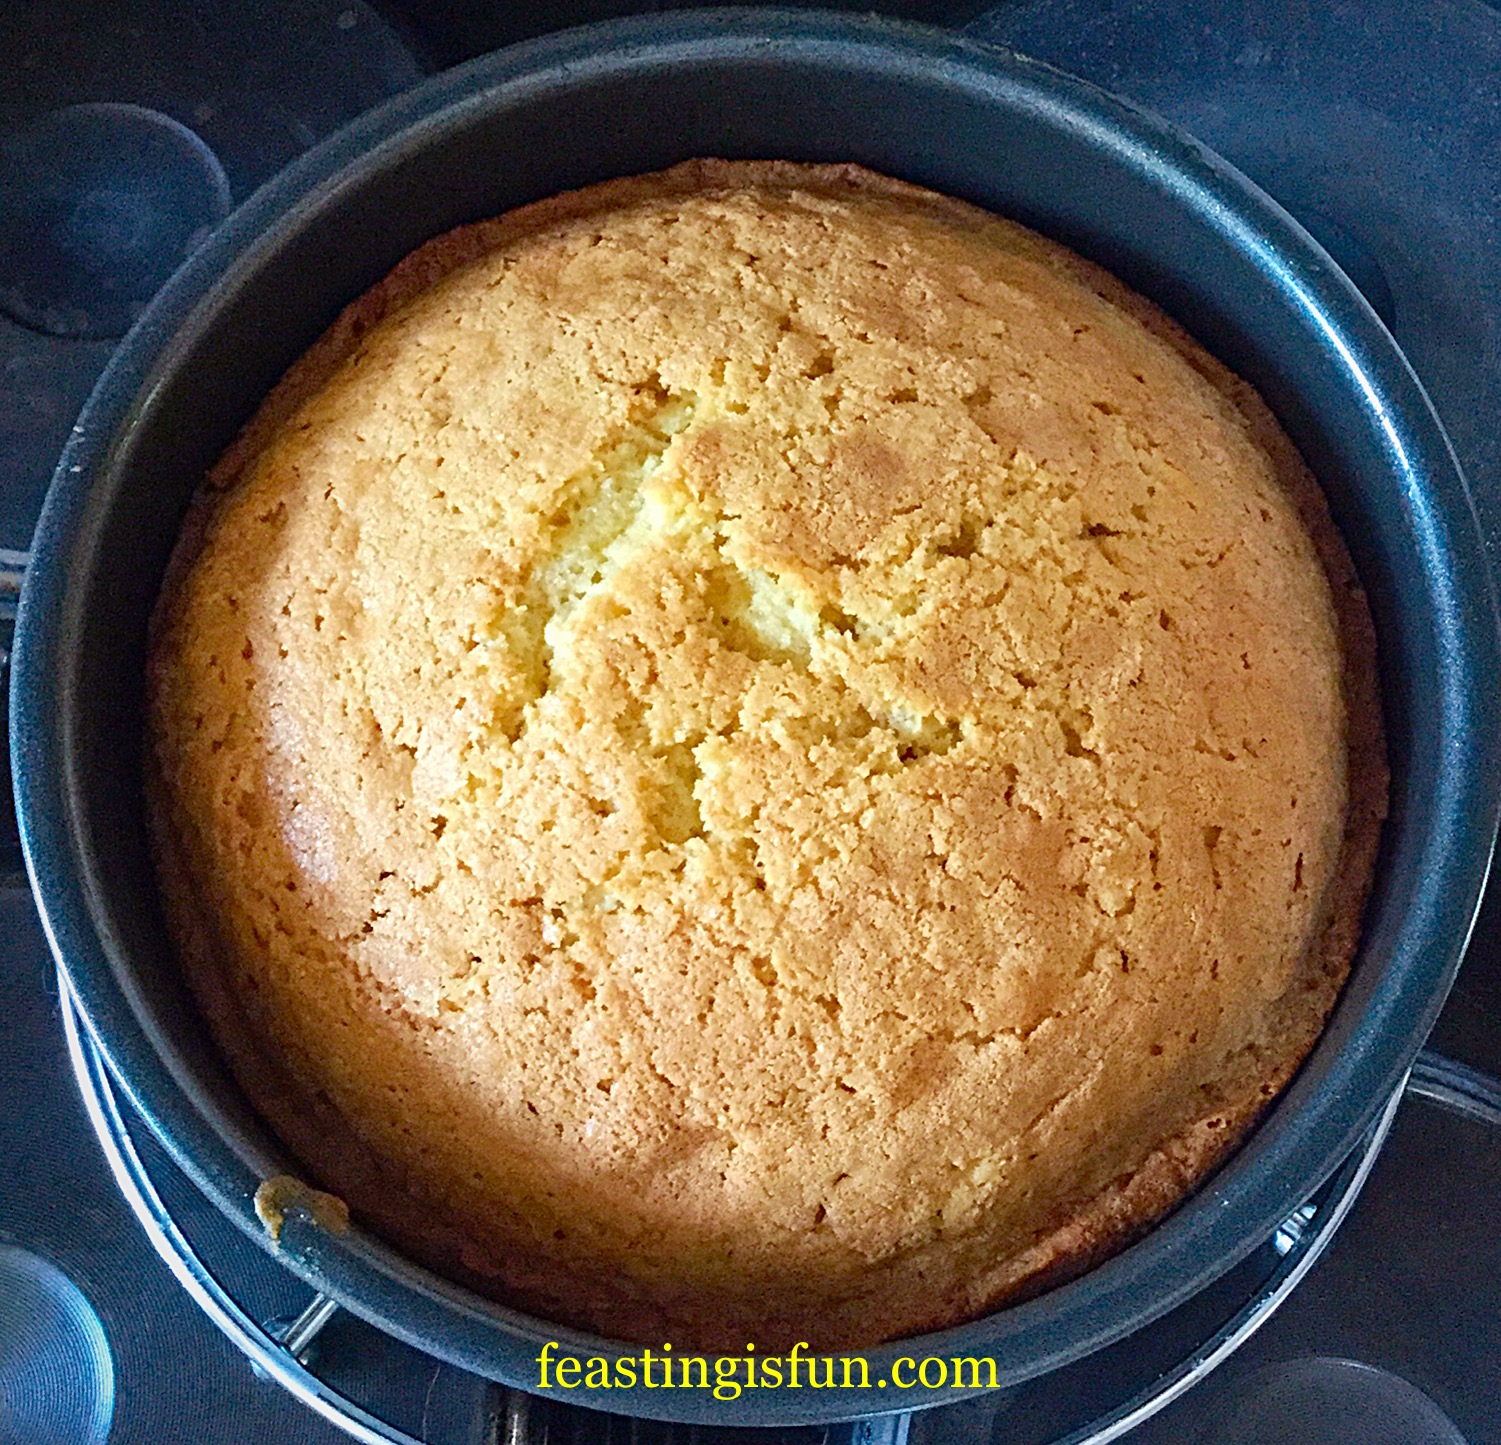
Baking The Sponge Cake

  • Place in the centre of the oven and bake for 30-40 minutes.
  • The sponge is baked when it is golden and springs back from a light touch.
  • As soon as the cake is baked, remove the tin from the oven and allow the cake to cool for 10 minutes in the tin.
FF Union Jack Sponge Cake
Beautifully golden baked sponge.
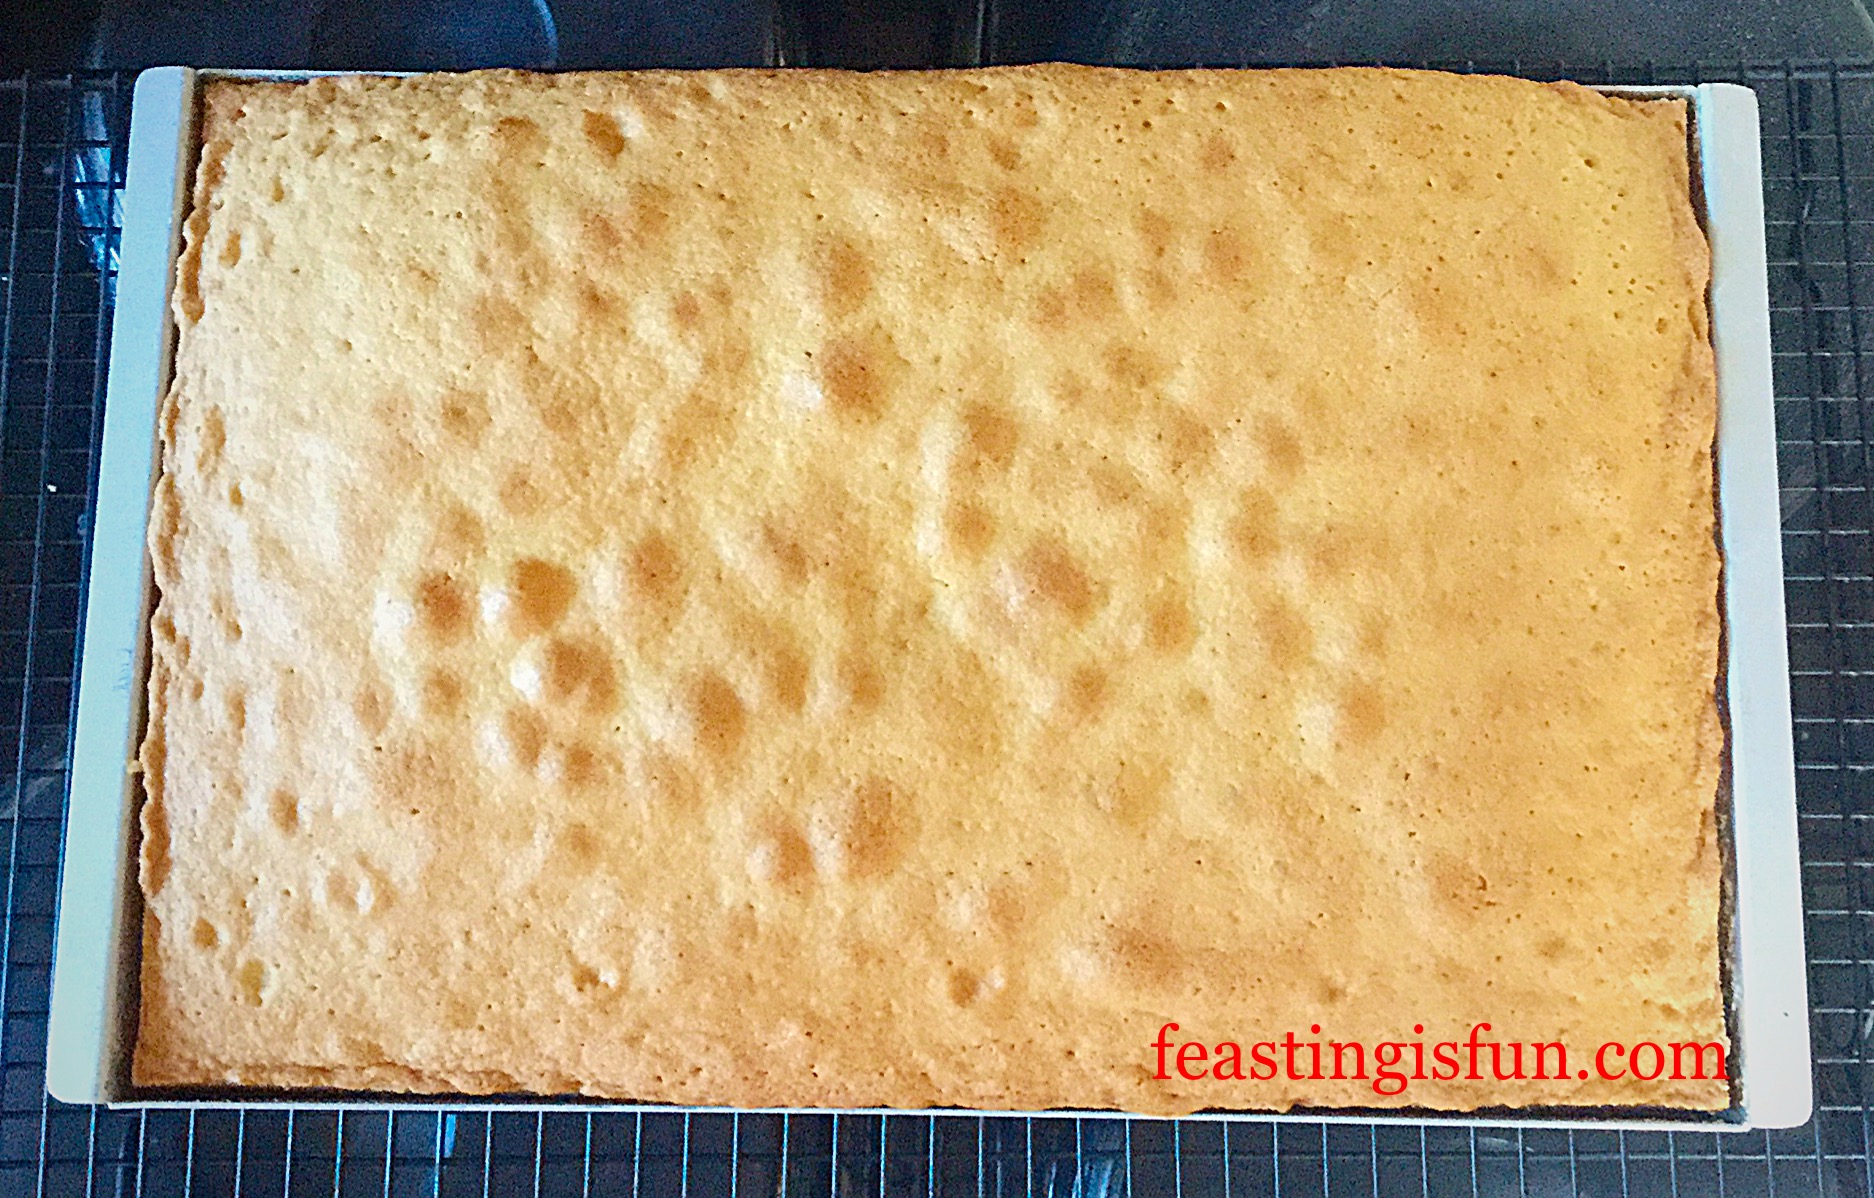
  • Run a palette knife around the edge of the cake and then tip the sponge out on to a cooling rack.
  • Allow the sponge to cool completely before decorating.
  • Since I don’t have a board large enough for this cake, I placed it on to some baking parchment and then back on to the cooling rack to decorate.

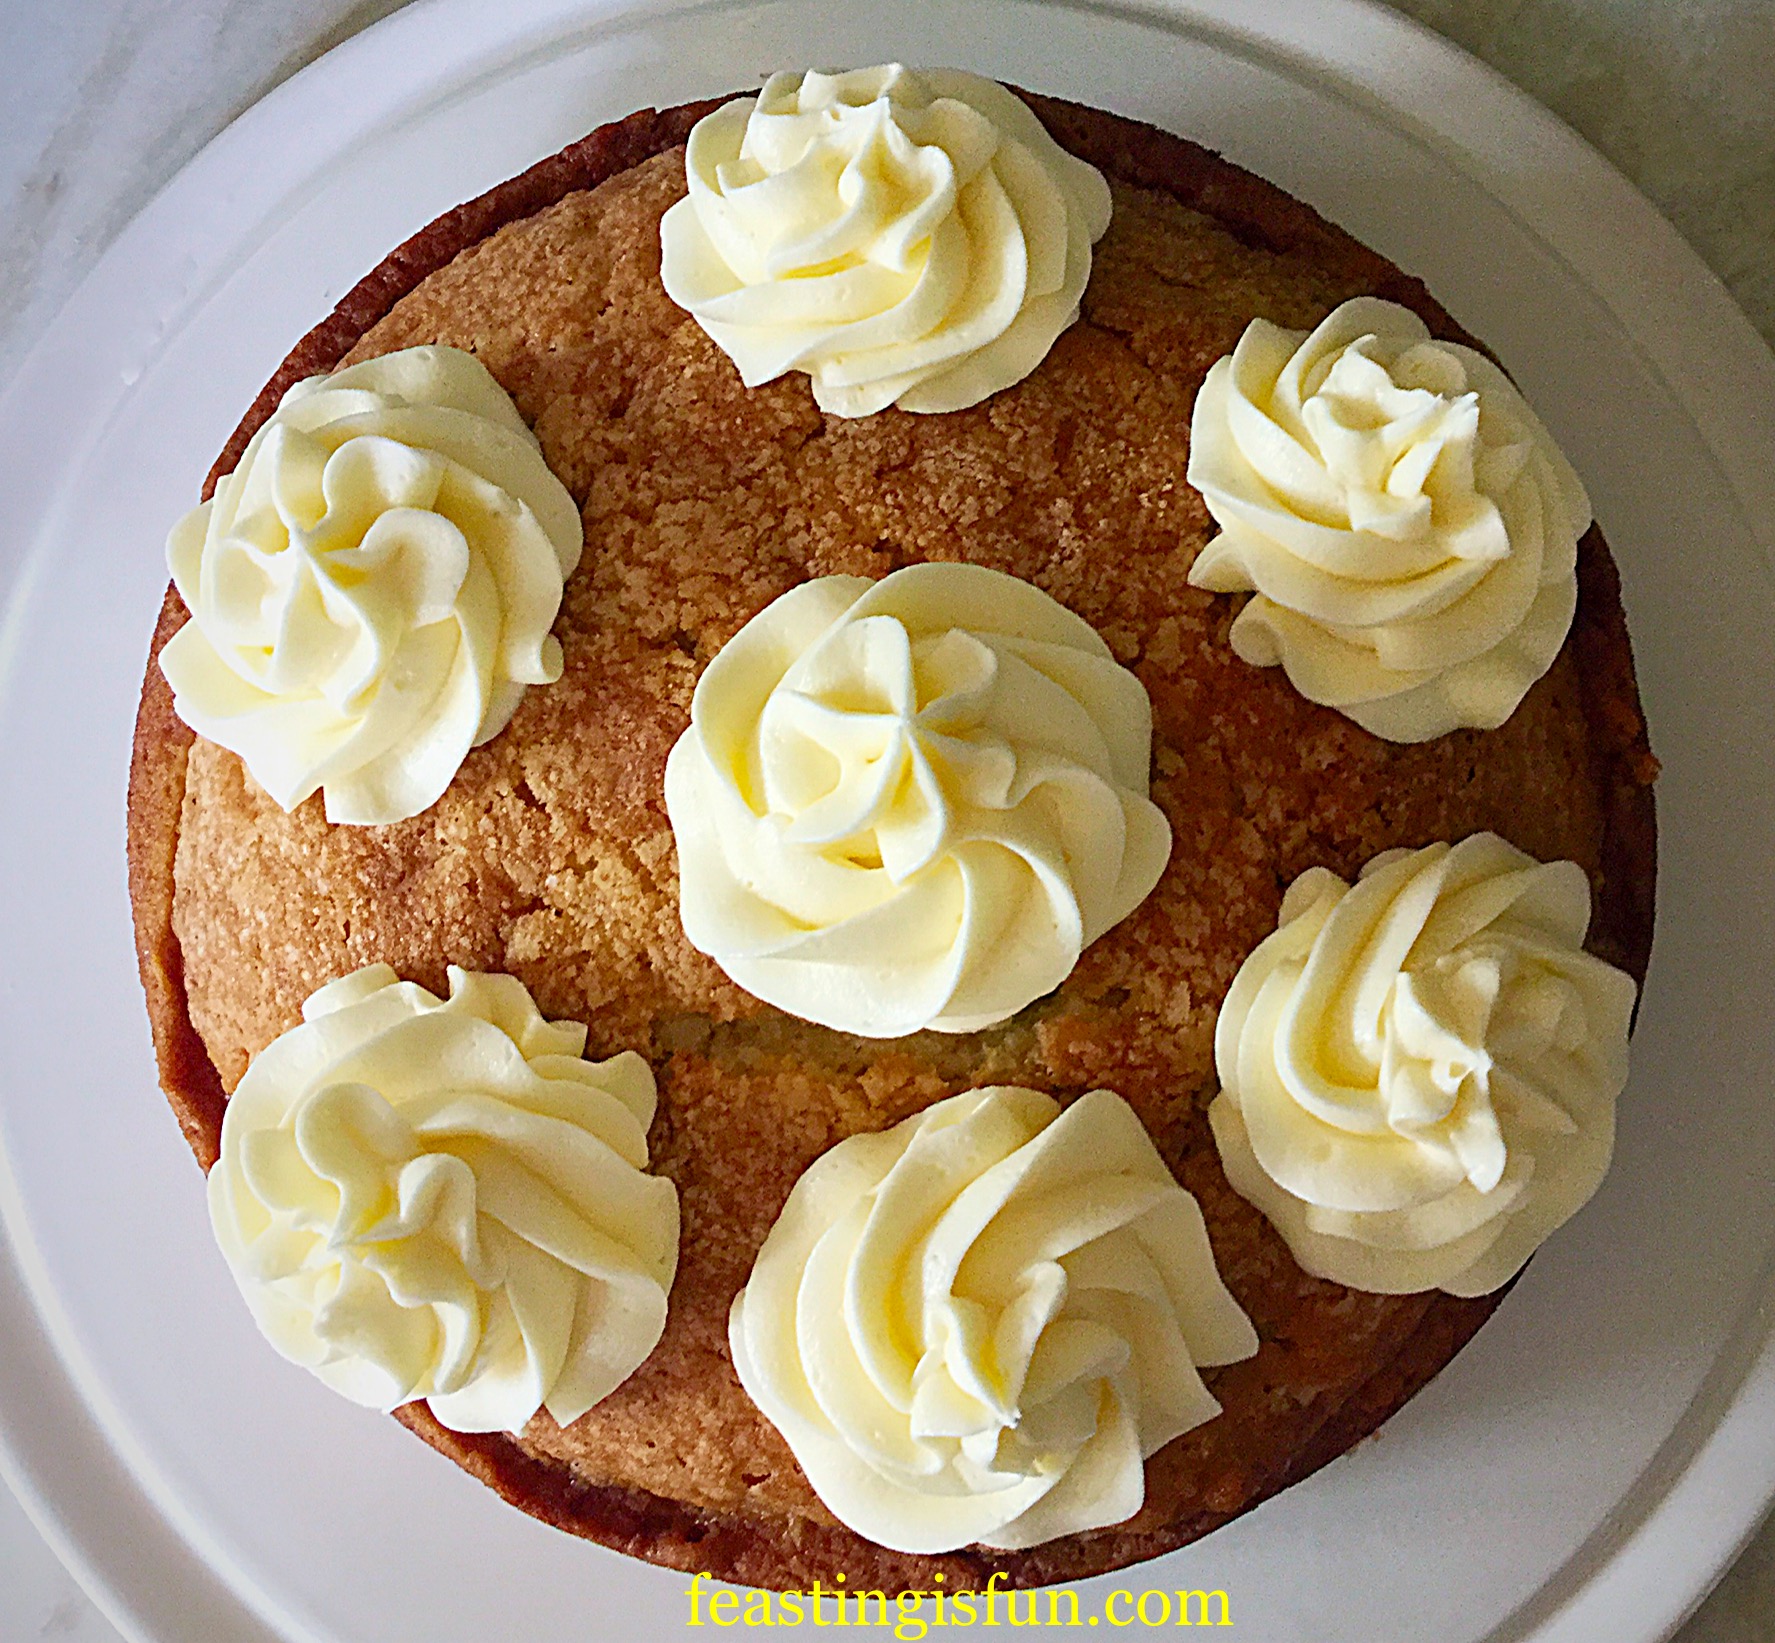
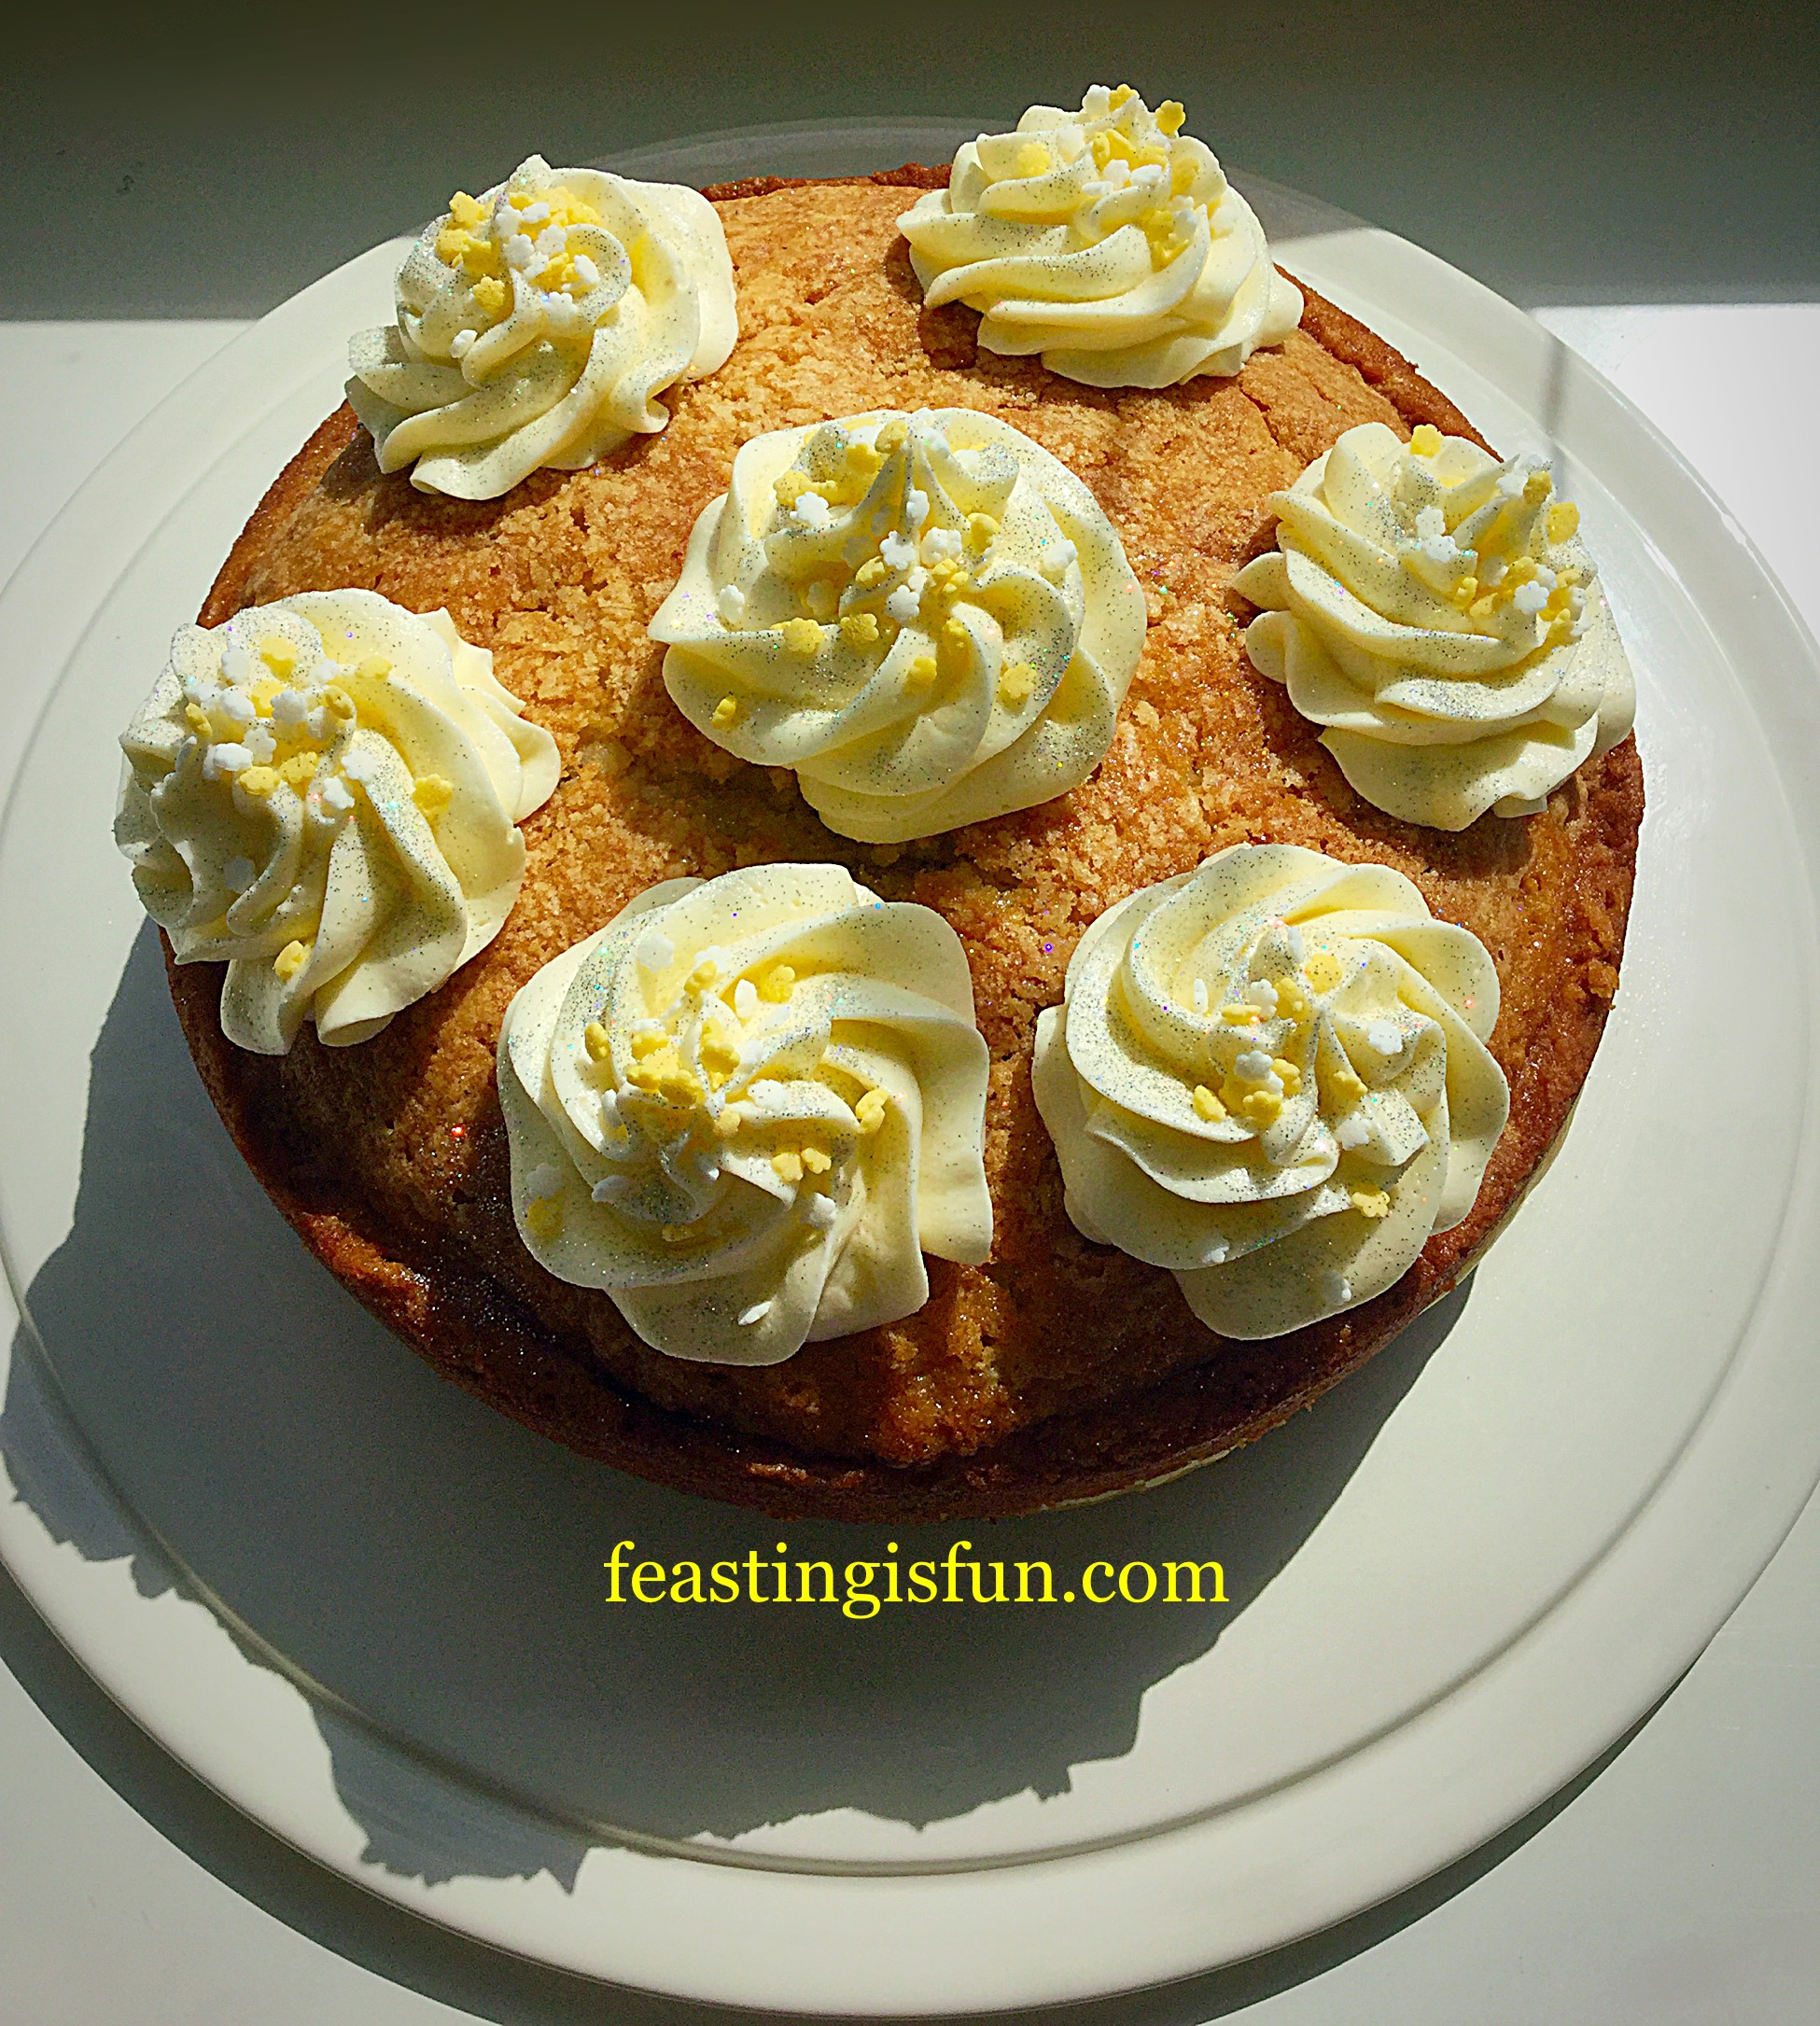
Decorating the Union Jack Sponge Cake

  • Place the cold fresh cream, 1tsp of caster sugar and 1tsp of vanilla bean paste into a bowl.
  • Whisk until the cream just holds a stiff peak.
  • Place half of the whipped cream into a piping bag fitted with a large star tip. Secure the bag and place in the fridge. It was an extremely hot summer’s day when I made this cake, so I had to work quickly.
  • Spread the other half of the whipped cream on to the surface of the cake, using a palette knife to achieve a flat even finish. You DO NOT need to cover the sides in cream.
  • Hull and slice the strawberries. Wash and dry the blueberries, sorting through them as you dry them to remove any stalks or over ripe berries.
  • Have a picture of the Union Jack flag in front of you. While you can use my cake as a reference, a picture is more accurate.
  • Start by forming the central red cross using sliced strawberries.
  • Cut some of the strawberry slices in half. Angle these into the cream to create the X shaped cross.
FF Union Jack Sponge Cake
The Union Jack Sponge Cake is starting to take shape.
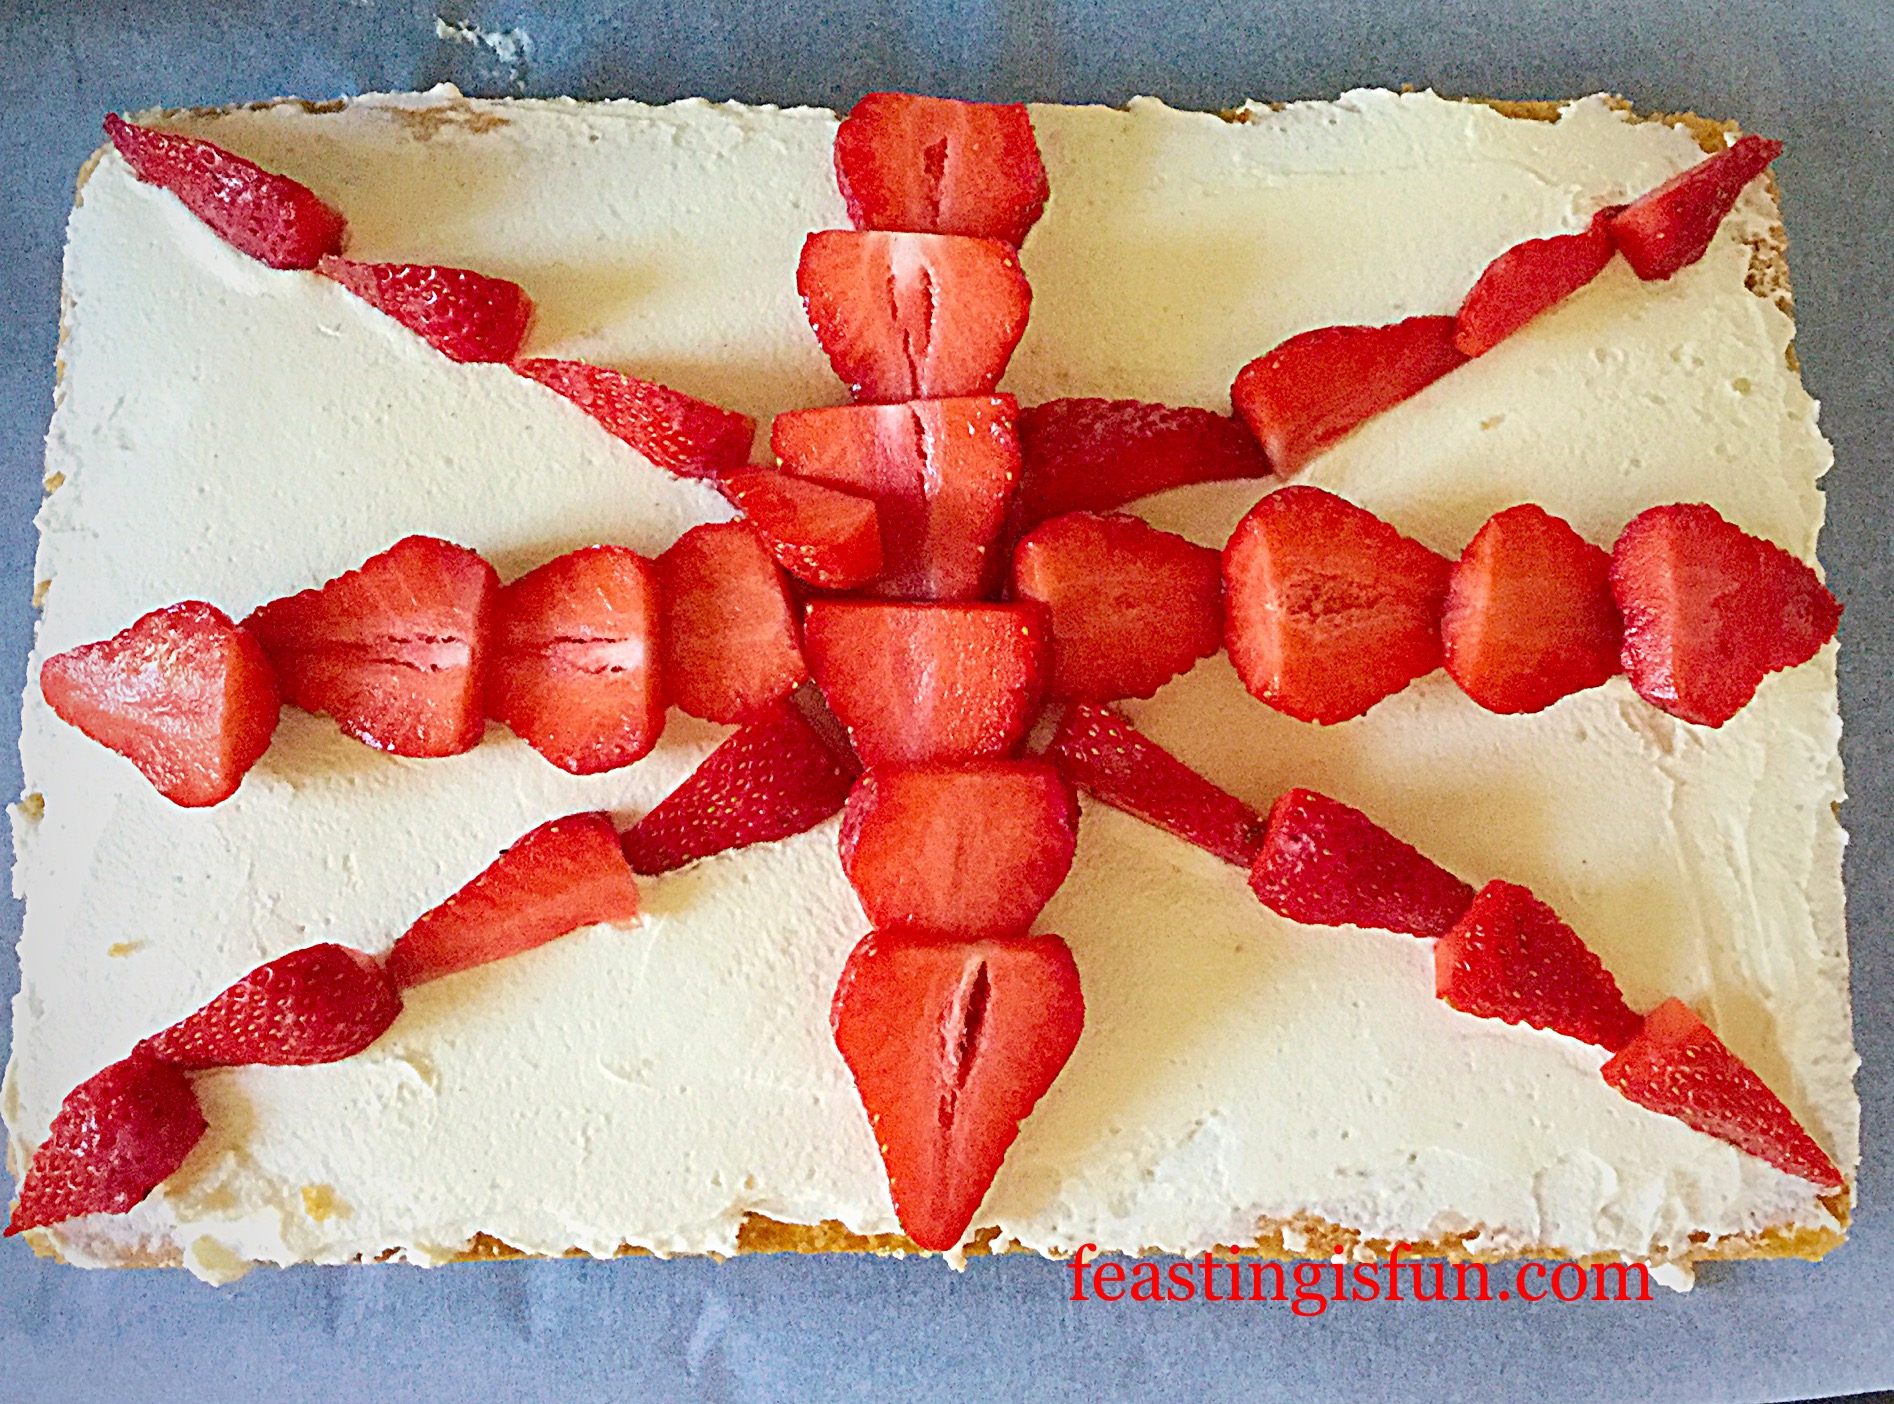
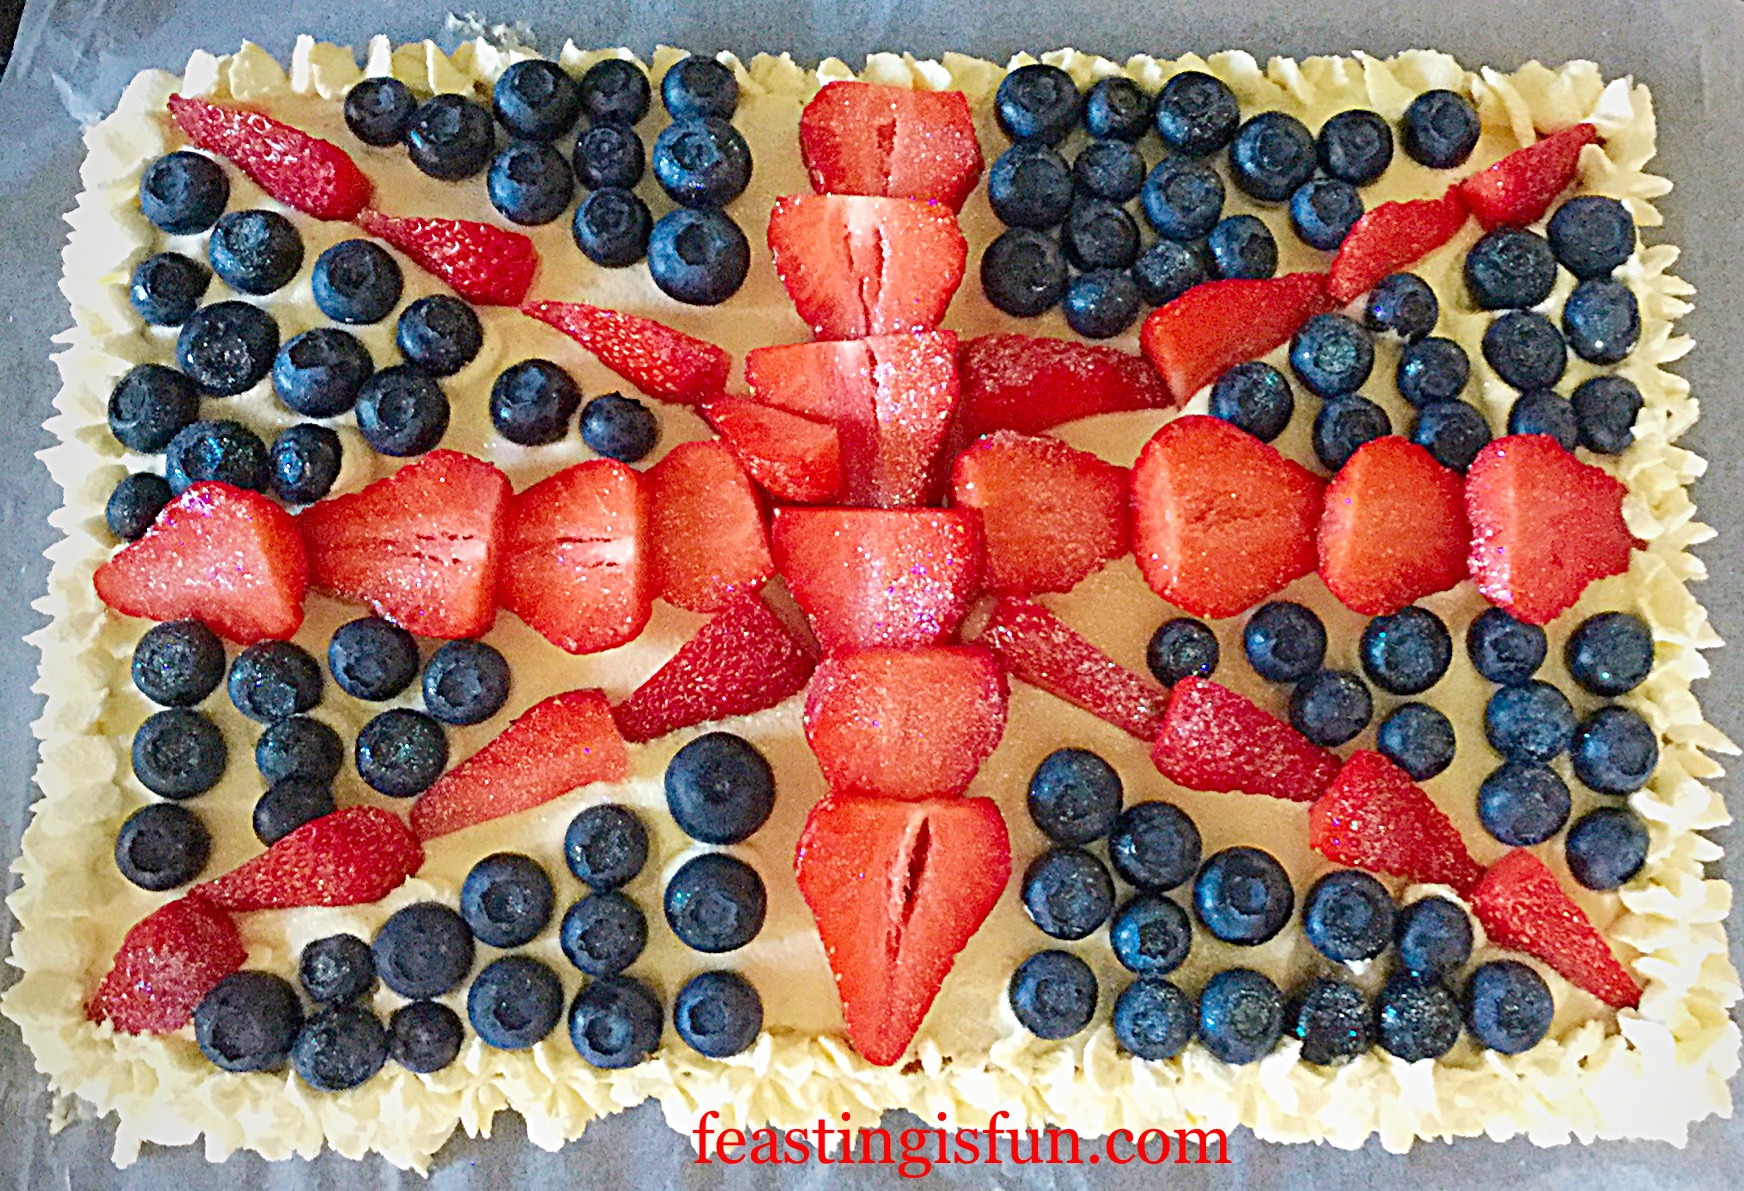
  • Use blueberries to fill in the triangles ensuring there is a gap of plain cream to represent the white lines of the flag.
  • Now pipe stars around the outside. I first piped around the bottom edge of the cake and then again around the top edge. It gives the cake a beautiful finish.
  • If, like me you like a few sparkles, sprinkle over some edible glitter or caster sugar to complete your Union Jack Sponge Cake.
FF Union Jack Sponge Cake
Union Jack Sponge Cake perfectly pretty and very tasty.

Chilling And Serving The Cake

I popped the whole cake, uncovered, into the bottom of the fridge for an hour before serving. It helps the cream set and cools the cake down. As I mentioned I baked and decorated this cake on a very, very hot day.

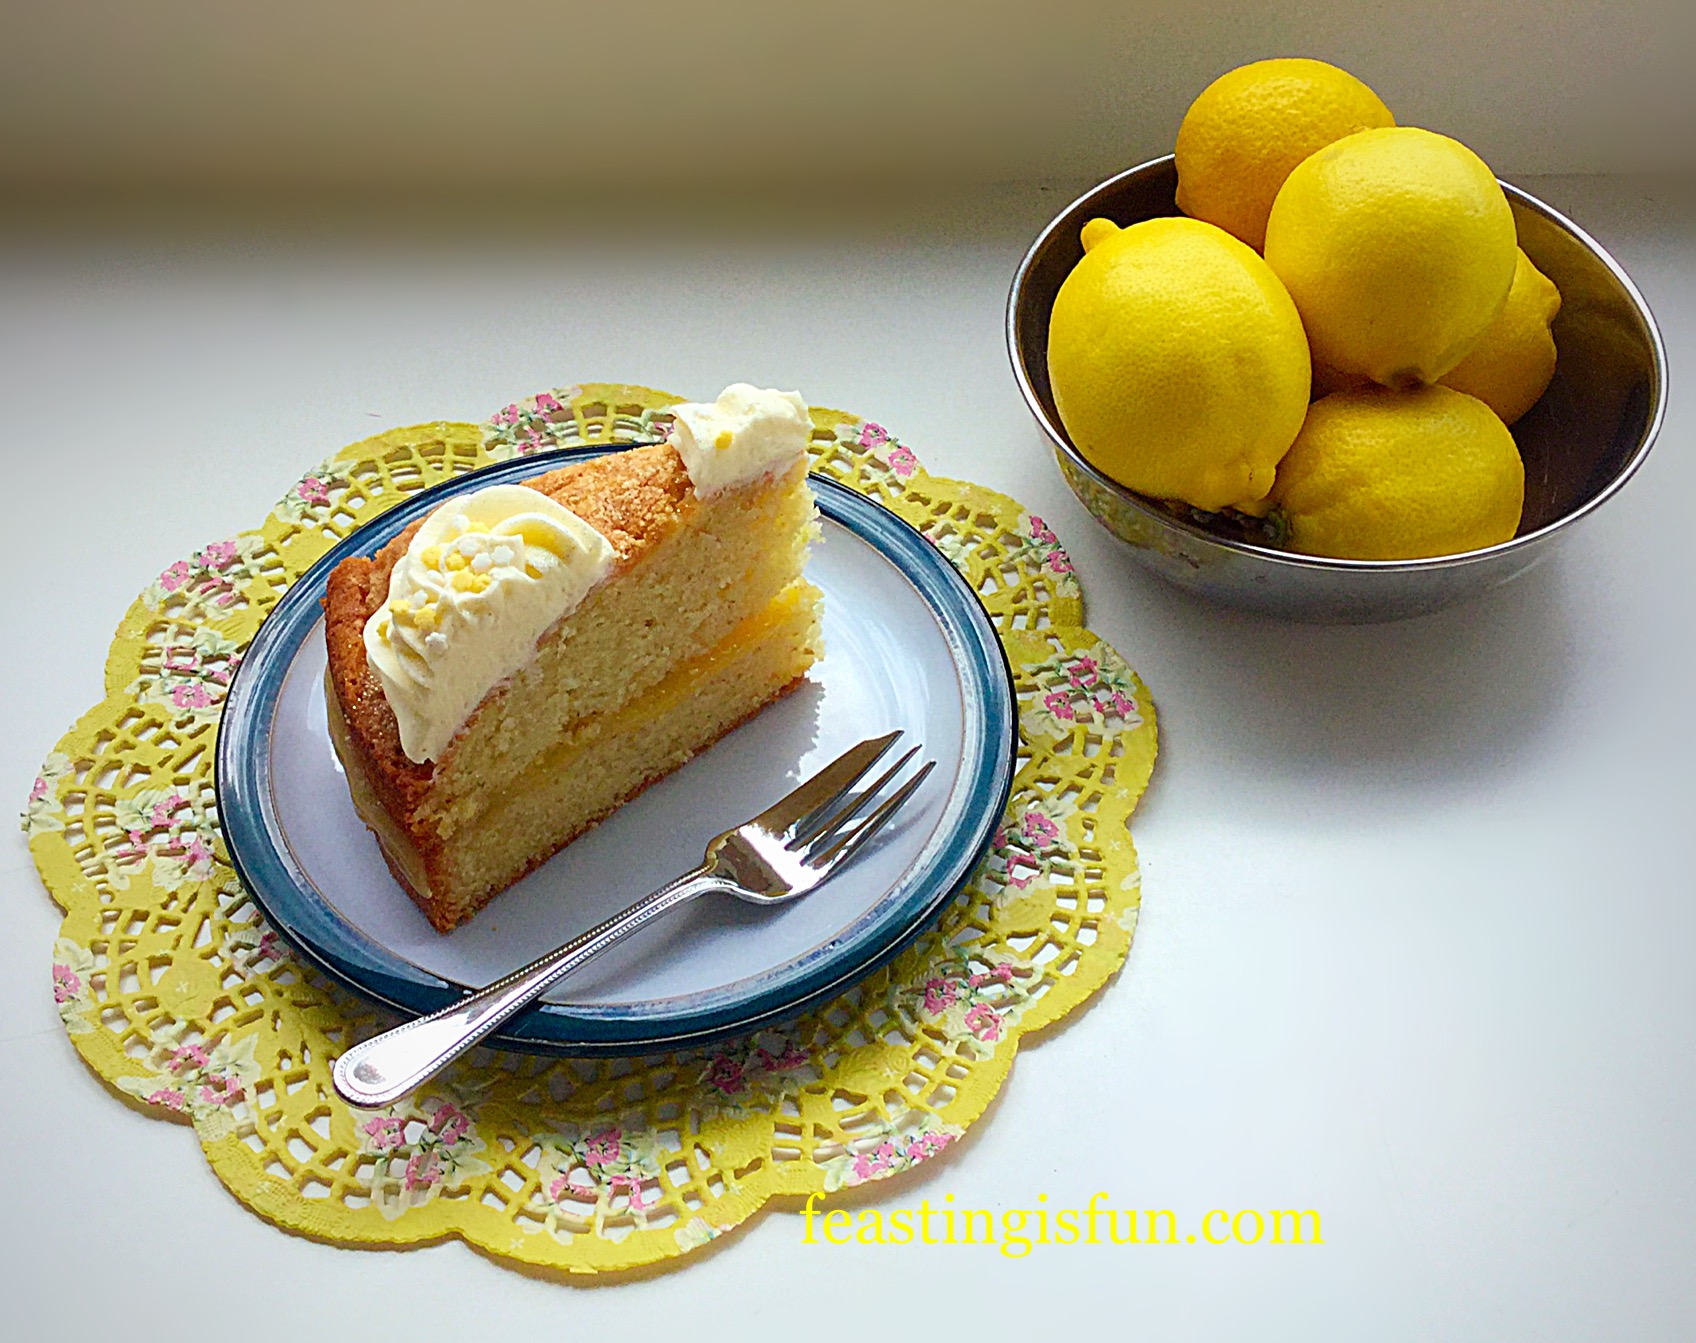
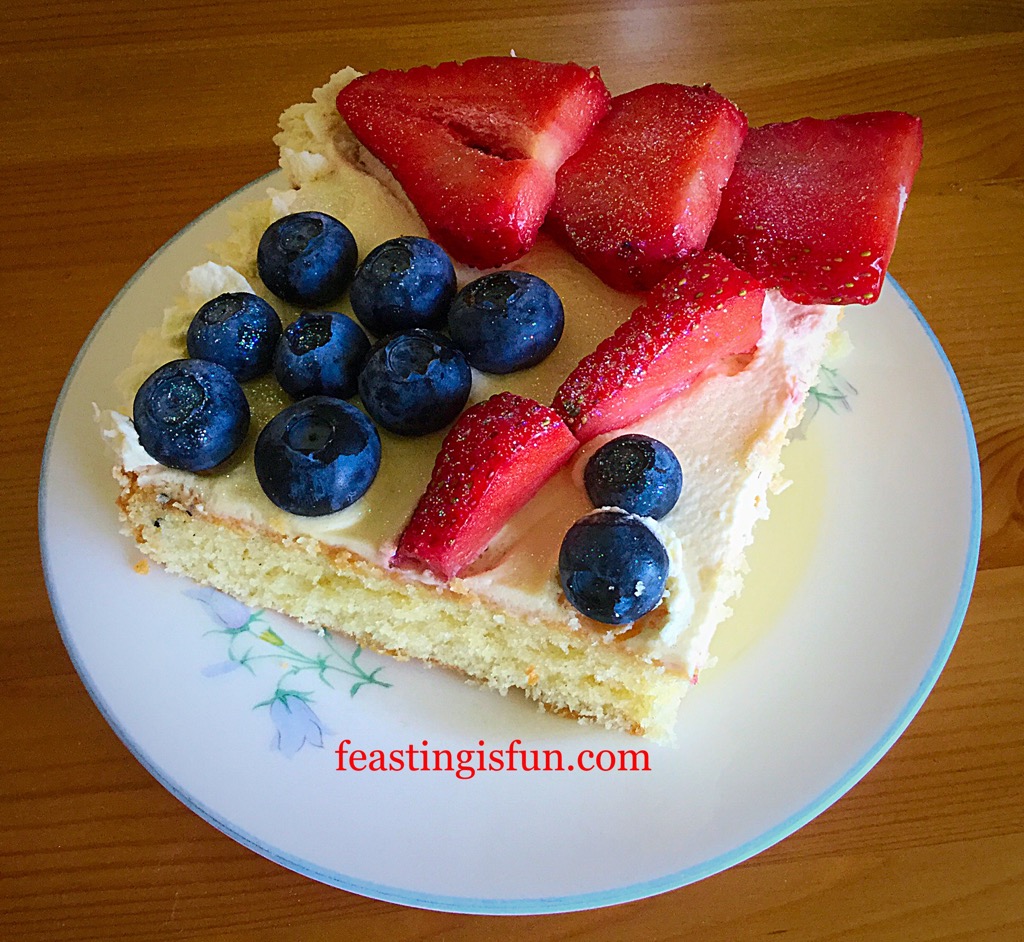
If the temperature isn’t melting everything in sight this Union Jack Sponge Cake is fine to serve as soon as it has been decorated. Cut into squares, or slice down the centre and serve as slices.

This cake keeps exceptionally well, in an airtight tin for 5 days in the fridge. It remained light and fresh and is simply one of the best cakes to enjoy with a cup of tea!

If you have enjoyed this Union Jack Sponge Cake recipe, here are some others you may like:

Raspberry Almond Cream Cake

FF Union Jack Sponge Cake
Raspberry Almond Cream Cake simply delicious.

Loveliest Lemon Curd Cake

FF Union Jack Sponge Cake
Lemon Curd Cake so tangy and refreshing.

Black Forest Giant Doughnut

FF Union Jack Sponge Cake
Black Forest Giant Doughnut with a hint of kirsch.

The baking community on Twitter are very encouraging and supportive, as well as a constant source of inspiration for me. Everyone shares and seeing as how I’m that kind of person, I fit in well!

Whatever time of year you make this cake, use whatever seasonal berries are available. I bet it would taste wonderful with raspberries and blackberries!

Thank you for all of your comments both here, on Twitter and Instagram. Hearing and seeing your creative, culinary makes is a constant source of encouragement and inspiration to me.

So, whatever you are making, baking and creating in your kitchens, have fun preparing and sharing your feast.

Sammie xx

No part of this post may be reproduced or duplicated without the written permission of the owner. Please see my Disclosure Policy.

Note: Since this year, 2020, is the 75th anniversary of V.E. Day, this cake is an easy and beautiful way to bake and celebrate with those you live with, during this unusual time of Covid-19 lockdown. Why not get creative and create the flag decoration with whatever berries, dried fruit and sprinkles you have in your kitchens? Most of all, stay safe and well during this challenging time. X


Fresh berry decorated flag bake dessert.


Share
Facebooktwitterpinterestlinkedintumblr

Sun Dried Tomato Bread Pizza

Share
Facebooktwitterpinterestlinkedintumblr

Over the past couple of days Summer has asserted itself with a vengeance. Temperatures above 30C, blisteringly hot sunshine and clear blue skies. I love Summer and sunshine, but even this has been a little too hot for me. Cooking becomes a chore, rather than its usual relaxing pleasure. So you can imagine how relieved I was to be able to prepare a meal in under 10 minutes. Grabbing a packet of  Wright’s Baking cheddar and sun dried tomato bread mix, I came up with this easy Sun Dried Tomato Bread Pizza.

FF Sun Dried Tomato Base Pizza
Sun Dried Tomato Bread Pizza a delicious twist on a regular pizza base.

Also I have a recipe for Sun Dried Tomato Bread, which I’m sure would work just as well. However, I needed an easy, quick prep meal. So thank you Wright’s Baking for yet again coming to my rescue.

FF Sun Dried Tomato Base Pizza
Delicious Sun Dried Tomato Bread Pizza served with crunchy homemade coleslaw.

Pizza – So Much More Than The Toppings

The beauty of using the sun dried tomato bread mix, is that while it is mixing, in the stand mixer, I can make my Crunchy Homemade Coleslaw. I always keep lemons in the kitchen and I love the way they not only thin the mayonnaise, but also remove the acrid taste from the onions in this coleslaw, which is, in my opinion one of the best accompaniments to homemade pizza.

What’s great about making your own pizza, is that you can top it with whatever you like. I had an antipasto meat selection in the fridge that went beautifully with the delicious sun dried tomato base. In fact as well as lemons I generally have mozerella and at least one packet of cured meat in the fridge. Pizza makes a quick, delicious and nutritious meal, providing it is served with a healthy pile of salad of coleslaw!

FF Sun Dried Tomato Bread Pizza
Sun Dried Tomato Bread Pizza what would you top yours with?

It’s All About The Base

I have to mention just how completely delicious the base of this Sun Dried Tomato Bread Pizza is. The crust doesn’t turn jaw breakingly hard, but remains slightly soft with a delicious salty parmesan and herb tomato flavour all of its own. I wouldn’t recommend overloading this pizza with topping as the base is just as delicious, if not more so, than what you top it with.

Make this Sun Dried Tomato Bread Pizza with toppings that will work with the tasty bread base. In fact this pizza would be wonderful with a little sauce, mozerella and some basil leaves. The sun dried tomato bread base really is that good.

Recipe: Makes 2 Large Sun Dried Tomato Bread Pizza  – makes 20 slices

1 Packet Cheddar and Sun Dried Tomato Bread Mix by Wright’s Baking  – alternatively use my Sun Dried Tomato Bread  recipe – although I would recommend adding 1/2tsp of dried oregano to the flour

4tbsp Tomato Purée

2tbsp Olive Oil plus a little extra for greasing the baking trays – I use Filippo Berio

400g Block of Mozzerella

Selection of cured meats for topping

2 handfuls fresh basil leaves

Method:

Making The Pizza Dough

  • Make the Cheddar and Sun Dried Tomato Bread Mix according to the instructions on the packet.
  • TIP – while the bread is mixing make the coleslaw or salad!
  • Grease 2 large baking trays with a little olive oil.
  • Turn the kneaded bread dough on to one baking tray and divide in half.
FF Sun Dried Tomato Bread Pizza
Divide the sun dried tomato bread dough in half.
  • Place one half of the bread dough on each of the oiled baking trays.
  • Rub your hands in a little oil and then gently pat the dough until it is flat and fills the baking sheet. Do the same for the other half of the dough.

Adding The Pizza Toppings

  • Add 1 tablespoon of olive oil and 2 tablespoons of tomato purée to the top of each pizza base.
  • Using your hand smoosh the tomato purée and olive oil together so that they cover the pizza base – yes smoosh is a technical term in the Feasting kitchen!
FF Sun Dried Tomato Bread Pizza
Sun Dried Tomato Bread Pizza
  • Slice or tear the mozerella and lay on top of the pizza base.
  • Add thin slices of cured meat and scatter a handful of basil leaves over each pizza.
FF Sun Dried Tomato Bread Pizza
Sun Dried Tomato Bread Pizza
  • Cover both pizza’s with cling film, or do as I did on such a hot day, pop them into an unheated oven, uncovered, for 30 minutes. This will give them time to rise.
  • Turn the oven heat to 220C/200C fan, gas mark 7, 425F.

    Baking The Sun Dried Tomato Bread Pizza
  • Remove the cling film and place the pizza’s in the oven, if they are not already in there.
  • Bake for 20-30 minutes. The pizzas are cooked when the base is firm underneath. I use a large palette knife to slide under the pizza and lift it. If it’s not quite firm pop it back into the oven for another 5 minutes.
  • Once baked remove from the oven.
FF Sun Dried Tomato Bread Pizza
Baked Sun Dried Tomato Bread Pizza with melting cheese and crisp prosciutto ham.

To serve, remove the pizza from the tray – I slide it on to a board – and cut into slices or triangles.

Sun Dried Tomato Bread Pizza is ideal for feeding a crowd, as part of a buffet, or served with homemade coleslaw for an easy meal.

I really do recommend trying the Wright’s Baking range of bread mixes. Having a couple in the cupboard, even though I make almost all of our bread from scratch, is really handy on hot, busy days!

If you enjoyed this Sun Dried Tomato Bread Pizza you may also like these recipes:

Homemade Ciabatta Base Pizza

FF Sun Dried Tomato Bread Pizza
Homemade Ciabatta Base Pizza

Better Than Take Out Pizza

FF Sun Dried Tomato Bread Pizza
Better Than Take Out Pizza for when you have a little more time.

Asparagus Prosciutto Ham Tart

Sun Dried Tomato Bread Pizza
Asparagus Prosciutto Ham Tart easily made with puff pastry.


We all need a few quick prep. meals that we can draw on when we either don’t have the time, energy or both to create a nutritious and tasty meal. All of my pizza recipes contain less fat that delivery pizzas. That said, sometimes that really is the only option!

While in a perfect world I would have a freezer full of homemade pasta bakes, casseroles and the like, sometimes it’s nice to have a treat. Homemade pizza always feels like a treat simply because it takes so little effort to make and our children are always ready to help.

As the weather cools and we rediscover the urge to cook and bake again, enjoy it. Have fun in your kitchens creating your own very special feasts.

Since #NationalPizzaWeek is from 5th – 11th January, it simply shows how versatile pizza is. Summer or Winter, any day is a good day to make, bake and share pizza!

Sammie xx

Wright’s Baking sent me the parmesan and sun dried tomato bread mix to try. All opinions, views, content and recipes are my own. Please see my Disclosure Policy.

Share
Facebooktwitterpinterestlinkedintumblr

Thanking Teacher Cupcakes

Share
Facebooktwitterpinterestlinkedintumblr

Thanking people is important to me. I am very thankful for you, my wonderful readers who stop by and take time to read my posts. As a parent with three children, all now in their teen years, I am very grateful to all the teachers who have taught and nurtured them over the years. As the Summer term comes to a close I have created this Thanking Teacher Cupcakes recipe as a way to say thank you for all of their dedicated work.

FF Thanking Teacher Cupcakes
Thanking Teacher Cupcakes a delicious way to show your appreciation.

Thanking Teacher Cupcakes a delicious light vanilla sponge, with added chocolate chips. Chocolate buttercream is then swirled on top and they are decorated with  Elizabeth Shaw  wrapped mint milk chocolate crisps!

FF Thanking Teacher Cupcakes
Thanking Teacher Cupcakes easy to make.

I know that for most of the country, these past few days have been extremely hot. You will be relieved to know that these Thanking Teacher Cupcakes are very easy and quick to make, so the oven won’t be on for too long!

FF Thanking Teacher Cupcakes
Thanking Teacher Cupcakes so pretty, yet ideal for both male and female teachers.

Making these Thanking Teacher Cupcakes is something you can do with your children and they make a unique homemade gift.

I have friends and family that are teachers and while they all really appreciate the gifts they are given, sometimes they receive enough bubble bath to see them through the year.

So send in a batch of these delicious cupcakes and everyone in the staff room can have a treat with their morning cuppa at break time.

Recipe: Makes 15-18 Thanking Teacher Cupcakes

175g/6oz Unsalted Butter at room temperature

175g/6oz Caster Sugar

1/4tsp Salt

1tsp Vanilla Extract – I use Nielsen-Massey

3 Free Range Large Eggs

175g/6oz Plain Flour

1.5tsp Baking Powder

2tbsp Milk – Whole or Semi Skimmed

100g/4oz Milk Chocolate Chips or Chunks

For the buttercream:

200g/7oz Unsalted Butter at room temperature

350g/12oz Plain Icing Sugar – sifted

50g/2oz Cocoa Powder – sifted

2tbsp Very Hot Water

1 box Elizabeth Shaw Mint Chocolate Crisps

Method: Preheat the oven to 160C/140C fan, gas mark 3

  • First of all, line 2 deep 12 hole cupcake/muffin tins with 18 cupcake cases.
  • Into a large bowl add the sugar, salt and butter.
  • Whisk/beat until pale and creamy.
  • Add the vanilla, eggs, milk and sift in the flour and baking powder.
  • Whisk/beat on a low speed until all the ingredients have just combined.
  • Add the chocolate chips/chunks and fold into the cake batter using a spoon.
  • Divide the cake batter evenly between the cupcake cases, so that the cases are half full. My cases are very deep, you may easily get 18 cupcakes from the batter.
FF Thanking Teacher Cupcakes
Thanking Teacher Cupcakes ready for the oven.
  • Place the trays in the middle and lower half of the oven and bake for 25-30minutes. Mine took 30 minutes exactly.
  • The cupcakes are baked when they are a light golden brown and spring back when pressed lightly.
  • Once baked remove the cupcakes from the oven.
FF Thanking Teacher Cupcakes
Thanking Teacher Cupcakes beautifully baked with flat tops.
  •  Leave the cupcakes to cool for 5 minutes in the tin, so that you don’t burn yourself and then remove and place on a cooling rack.

Making the buttercream:

  • In the bowl containing the sifted icing sugar and cocoa add the butter and hot water.
  • Slowly whisk until all of the ingredients are combined and then increase the whisk speed to high. Continue whisking for 5 minutes, the buttercream will have doubled in size and be lighter in colour.
  • You can spoon some chocolate buttercream on to the cupcakes, or for a pretty finish, fit a piping bag with a large star tip.
  • Fill the piping bag with the chocolate buttercream and pipe swirls and roses on to the top of the cupcakes.
FF Thanking Teacher Cupcakes
Thanking Teacher Cupcakes with delicious chocolate buttercream frosting.
  • Now all you need to do is adorn them with the chocs! I think the beautiful blue colour looks so pretty against the chocolate background.
FF Thanking Teacher Cupcakes
Thanking Teacher Cupcakes elegant and delicious, the perfect thank you.

Pack the cupcakes into specially designed cupcake boxes, available from good cake decorating shops and online, or pack them into saved Christmas sweet/biscuit tins. You could even decorate the tins with tissue paper and ribbon. I’ll leave that to you though. Arts and crafts are definitely not my gifts!!!

FF Thanking Teacher Cupcakes
Thanking Teacher Cupcakes a pretty, perfect, treat!

These Thanking Teacher Cupcakes are a wonderful way to say thank you to all the teachers that dedicate so much of their time and energy whilst educating our children.

They would also make a great gift for nurses and doctors, who have looked after a loved one whilst in hosptial, the vetinary surgery who have cared for your pets. Whoever you want to thank, these cupcakes really do make a wonderful gift.

Thank you teachers and all the support staff that work so hard in our schools.

If you have enjoyed these Thanking Teacher Cupcakes here are some other recipes you might like:

Vanilla Bean Cupcakes

FF Thanking Teacher Cupcakes
Vanilla Bean Cupcakes topped with edible pearls.

Springtime Vanilla Cupcakes

FF Thanking Teacher Cupcakes
Springtime Vanilla Cupcakes almost too pretty to eat.

Raspberry Ripple Almond Cupcakes

FF Thanking Teacher Cupcakes
Raspberry Ripple Almond Cupcakes so delicious.

Marshmallow Frosted Mango Cupcakes – Gluten Free

FF Thanking Teacher Cupcakes
Marshmallow Frosted Mango Cupcakes 100% Gluten Free

Only a couple of days until the school summer holidays. I don’t know about you, but I love having my children – now in their teens – at home.

They seem to spend such a lot of time at school/college and then working on homework in the evenings. It’s a great opportunity to chill out, throw the rules out of the window, fill the huge inflatable pool and enjoy feasting and having fun as a family.

Whatever the summer holds for you, enjoy the longer days, open windows and bird song. Take time to watch the butterflies and bees fly and flutter about their buisiness. Enjoy this beautiful world that we live in.

Sammie xx

Elizabeth Shaw provided the chocolates for this recipe. All content, photographs, opinions and views are my own. Please see my Disclosure Policy.


Share
Facebooktwitterpinterestlinkedintumblr

Beauvale Cheese Walnut Scones

Share
Facebooktwitterpinterestlinkedintumblr

For someone who genuinely did not like scones, I have been baking rather a lot of them recently. And I have concluded that homemade, or well made bakery scones, are a million miles away from the prepackaged, heavy, scones of my past. During my recent scone bake-a-thon I adapted my Super Light Scones recipe to create an all butter version, which makes the most delicious savoury scones. Welcome my Beauvale Cheese Walnut Scones.

FF Beauvale Cheese Walnut Scones
Beauvale Cheese Walnut Scones fabulous served warm.

These Beauvale Cheese Walnut Scones are incredibly tasty and two out of our three children loved them. Let me add that they would not eat blue cheese on a cracker. A massive win for me as a mum!

FF Beauvale Cheese Walnut Scones
Beauvale Cheese Walnut Scones perfect for lunch, picnics or just because they are so good!

Flavour Alchemy

Truly though, their taste is a reflection of just how much delicious flavour is packed into these scones. The salty melted Beauvale Cheese, against an all butter scone, with the crunch of toasted walnuts and balanced with just a hint of honey.

And I bet you didn’t see that last ingredient coming?

Because blue cheese and honey pair beautifully together, I was going to caramelise the toasted walnuts in honey. Finally though, I decided that I wanted the sweet honey to be no more than a kiss on our tastebuds.

FF Beauvale Cheese Walnut Scones
Beauvale Cheese Walnut Scones a buttery cheesy scone with added crunch.

Beauvale Cheese is a soft blue cheese, that doesn’t have the intensity of Stilton. Beautiful eaten with bread or crackers and served on a cheese board, this cheese comes alive when baked in the scones. Warm and melted, it has a rounder, salty and buttery flavour that blends nicely with the toasted walnuts and that little hint of honey.

So, I urge you to try these Beauvale Cheese Walnut Scones, they are incredibly simple to make and are perfect for using up leftover cheese.

Recipe: Makes 12-14 Beauvale Cheese Walnut Scones

50g/2oz Walnut Pieces or Halves

450g/1lb Plain White Flour

3tsp Baking Powder

75g/3oz Very Cold Unsalted Butter

125g/4.5oz Beauvale Cheese – mine was from Pong Cheese

250mls/9fl oz Milk – Whole or Semi Skimmed

3tbsp Milk for glazing the tops of the scones

3tsp Runny Honey

1/4tsp Sea Salt – I use Maldon

1/4tsp Freshly Ground Black Pepper

Method: Preheat the oven to 220C/200C fan, gas mark 7

Making The Scone Dough

  • First of all, in a dry iron skillet or frying pan add the walnut pieces and place over a medium until lightly toasted. You will just be able to start smelling the wonderful walnut oils. Remove from the heat and set to one side to cool.
  • Into a large bowl sift the flour and baking powder.
  • Add the sea salt and pepper.
  • Using the large grating side of a box grater, grate the very cold cheese straight onto the flour – I find it easier to have my bowl on digital scales.
  • Cover the butter with flour, use a butter knife to separate any clumps, so that the butter is evenly distributed.
FF Beauvale Cheese Walnut Scones
Grated cold butter covered in seasoned flour.
  • Next break off chunks of the Beauvale Cheese and drop them into the bowl.
FF Beauvale Cheese Scones
Golden Beauvale Cheese with a ripple of blue.
  • Using a butter knife flick the flour over the cheese so that it is covered. This will stop it from clumping together.
  • Chop the walnuts roughly and add to the bowl. Stir with the butter knife to distribute evenly.
  • In a jug add 2 teaspoons of honey to the milk. Whisk briefly to disolve the honey.
  • Make a well in the centre of the bowl and pour the milk/honey mixture in.
  • Use the butter knife to briefly stir the ingredients and then use your hand to bring them together into a rough dough.
  • The trick to creating the lightest scones is to handle them as little as possible and only very lightly flour the worktop on which you roll and cut them out.

Shaping The Dough And Portioning The Scones

  • On a lightly flour dusted worktop tip out your scone dough and flatten with your hands so that it is 5cm/2″ deep.
  • Use a rolling pin to gently roll the dough to 2.5cm/1″ thickness.
FF Beauvale Cheese Walnut Scones
Gently roll the scone dough out.
  • Line a large baking tray with baking parchment or a silicone baking mat.
  • Using a 7cm/3″ cutter press straight down and cut out the scones. If you twist the cutter as you cut the scones it can cause uneven rising.
  • Add the last teaspoon of honey to the milk, stir and then brush the tops of the scones.
FF Beauvale Cheese Walnut Scones
Beauvale Cheese Walnut Scones ready to be baked.

Baking The Cheese And Nut Scones

  • Place the scones in the top of the preheated oven and bake for 20-25minutes, until they are risen and golden brown in colour.
  • As soon as the scones are baked remove from the oven and place on a cooling rack – be careful as they will be hot!
FF Beauvale Cheese Walnut Scones
Beauvale Cheese Walnut Scones inhale their wonderful aroma as they come out of the oven.

Enjoying These Beauvale Cheese Walnut Scones

These utterly delicious Beauvale Cheese Walnut Scones are perfect served warm, split with butter, a little extra cheese (the contrast between the cold and baked cheese is delicious), or just on their own. Also they taste great cold and so are perfect for packed lunches, picnics and afternoon tea.

Since these scones have higher fat content, they will last 3-4 days in an airtight container. Also, I have successfully frozen similar scones for up to one month. To refresh, defrost and place in a warm oven for 5-10 minutes and they’ll taste as though they’ve been freshly baked.

FF Beauvale Cheese Walnut Scones
Beauvale Cheese Walnut Scones a delicious savoury treat!


If you have enjoyed this Beauvale Cheese Walnut Scones recipe here are some others you may also like:

Asparagus Proscuitto Ham Tart

FF Beauvale Cheese Walnut Scones
Asparagus Prosciutto Ham Tart with Goddess Cheese

Feta Red Onion Marmalade Quiche

FF Beauvale Cheese Walnut Scones
Feta Red Onion Marmalade Quiche

Goddess Cheese Pine Nut Muffins

FF Beauvale Cheese Walnut Scones
Goddess Cheese Pine Nut Muffins

There are so many wonderful ways of using cheese in cooking and baking. And during the next few months we will discover together, wonderful sauces, dinners, recipes and bakes.

Pong Cheese has a wonderful selection of cheeses on their website. I look forward to widening my cheese palette and creating recipes with all the different cheeses.

I hope that you will join me on this creative journey and together we can have fun discovering new ways to make and bake with cheese in our kitchens? Having fun along the way as we cook up some cracking feasts.

Sammie xx

Pong Cheese provided the cheese for this recipe. All opinions, views, content and photographs are my own. This is not a sponsored post. Please see my Disclosure Policy.

Share
Facebooktwitterpinterestlinkedintumblr

Loveliest Lemon Curd Cake

Share
Facebooktwitterpinterestlinkedintumblr

For for those of you who have visited Feasting is Fun before, you will be very aware of my love affair with lemons. I absolutely adore not only their tart, intense flavour, but also their ability to transform a sweet or savoury dish. After using lemon curd to create my Lemon Ripple Ice Cream, I decided to use it in a bake. Specifically this delightful Loveliest Lemon Curd Cake.

FF Lemon Curd Cake
Loveliest Lemon Curd Cake perfect for afternoon tea.

A wonderfully moist, damp cake, the lemon curd injects a wonderful tartness in the centre that is balanced by the lemon swirled buttercream on top.

If you love lemons, then I’ll guarantee this Loveliest Lemon Curd Cake will delight you!

FF Lemon Curd Cake
Loveliest Lemon Curd Cake whatever time of year brings the sunshine indoors.

Baked as a whole cake, that is then cut in two, this refreshingly flavoured cake is simple to make and decorate.

FF Lemon Curd Cake

    Loveliest Lemon Curd Cake with an added sprinkle of glitter.

I was sent a new cake tin to try out, so I decided on this Loveliest Lemon Curd Cake. The cake batter has both finely grated lemon zest and lemon extract oil in it. I’ve given an alternative for the oil in the recipe, although I do recommend buying some if you can. It brings another level of lemonyness to the cake and unlike fresh lemon juice, does not cause any curdling of the cake batter or buttercream.

FF Lemon Curd Cake
Loveliest Lemon Curd Cake look at how the light shines through the lemony yellow of the cake?

Lemons have such a sunny yellow colour that they really do bring the sunshine indoors whatever the weather!

Recipe: Loveliest Lemon Curd Cake serves 8-10

You will need an 8″/20cm diameter cake tin that is 3″/7.5cm deep

275g/10oz Unsalted Butter – plus a little extra for greasing

275g/10oz Caster Sugar

1tsp Lemon Oil – I use Nielsen-Massey

6 Large Free Range Eggs

275g/10oz Self Raising Flour (if using plain add 2tsp baking powder)

1/4tsp Salt – I use Maldon Sea Salt

Grated Zest of 1 Whole Lemon

4-5tbsp Lemon Curd – I use Waitrose luxury lemon curd – make sure you pick a tart one

For the icing:

100g/4oz Unsalted Butter

200g/7oz Sifted Icing Sugar

1/2tsp Lemon Oil – or 1tbsp Lemon Curd

2tbsp Very Hot Water from a kettle

Optional – Sprinkles and edible glitter

Method: Preheat the oven to 160C/140C fan, gas mark 3

  • Grease with butter and line the base of the cake tin with baking parchment. I was  testing a new PushPan. I still greased and lined the tin.
  • Into a large bowl add the butter, salt and sugar.
  • Whisk/beat until pale and creamy.
  • Add all 6 eggs (I crack mine into a separate bowl first) and the lemon oil/substitute with 1tbsp of lemon curd if no lemon oil is available.
  • Sift in the self raising flour.
  • Mix on a low speed until just combined.
  • Add the finely grated zest of one whole lemon.
  • Mix the cake batter until just smooth – I do this by hand using a spoon.
  • Spoon the Loveliest Lemon Curd Cake batter into the cake tin and smooth the top.

FF Lemon Curd Cake

    Loveliest Lemon Curd Cake ready for the oven.
  • Place the cake tin into the centre of the oven and bake for 1 hour – 1 hour 15 minutes. The cake is baked when an inserted skewer comes out clean. My cake took 1 hour 15 minutes to bake.
  • Once the cake is baked remove from the oven and allow to cool completely in the cake tin.
FF Lemon Curd Cake
Baked Loveliest Lemon Curd Cake cooling in the tin.
  • When the cake is cold remove from the tin.
  • With the PushPan tin I used, I simply popped the pan on to a tin of beans and pressed the sides down. The cake released from the tin very easily.
FF Lemon Curd Cake
Loveliest Lemon Curd Cake easily released from the PushPan

Making the lemon buttercream:

  • Into a large bowl add the softened butter, sifted icing sugar, lemon oil or curd and 2 tablespoons of hot water.
  • Whisk slowly at first, increasing in speed as the icing sugar is absorbed. Continue whisking on high for a couple more minutes until you have a pale, creamy, light buttercream.
  • Scoop the buttercream into a disposable piping bag fitted with a large closed star tip.
  • Carefully cut the cake in half horizontally, so that it becomes a sandwich cake.
  • Spoon enough lemon curd on to the bottom layer to cover it generously.
FF Lemon Curd Cake
Add a generous layer of lemon curd.
  • Place the top of the cake back on and pipe six buttercream swirls around the edge and one in the centre of the cake.
FF Lemon Curd Cake
Loveliest Lemon Curd Cake so pretty but there’s room for a finishing touch.
  • Add sprinkles and edible glitter (if using) and your Loveliest Lemon Curd Cake is ready to be sliced and served.
FF Lemon Curd Cake
Loveliest Lemon Curd Cake sparkling deliciousness.

I do love a slice of cake for Sunday afternoon tea, or any day of the week afternoon tea, when the cake is this good!

FF Lemon Curd Cake
Loveliest Lemon Curd Cake perfect for any occasion, but especially afternoon tea.

I honestly think the pictures in this post speak for themselves. This Loveliest Lemon Curd Cake bursts with lemony yellowness once cut and tastes absolutely perfect. The soft buttercream and tart lemon curd, with a deliciously moist lemon cake.

Today will not be the only time I make this cake!!

If you have enjoyed the recipe for this Loveliest Lemon Curd Cake here are some others you may also enjoy:

Glazed Lemon Bundt Cake

FF Lemon Curd Cake
Glazed Lemon Bundt Cake

Lemony Strawberry Pavlova

FF Lemon Curd Cake
Lemony Strawberry Pavlova

Lemon Drizzle Cake Bars


FF Lemon Curd Cake
Lemon Drizzle Cake Bars

Whilst this Loveliest Lemon Curd Cake looks pretty with the buttercream swirls, it really is the layers of lemon flavour that make this cake so enticing.

Whatever you are making and baking in your kitchen this weekend I hope that you are having fun. As I popped a couple of slices of this yummy cake over the back fence to our neighbours, almost blinded by the glitter sparkling in the sunlight, I was reminded of how much I simply enjoy sharing.

Baking for my family, friends, neighbours, postman and postlady, random delivery drivers, makes me feel good. Why?? Because it puts a smile on someones face. The heart of this blog is to share, enjoy feasting with people and have fun whilst doing so.

There is no price to making someone smile.

Who will you make smile this week?

Sammie xx

Share
Facebooktwitterpinterestlinkedintumblr

Goddess Cheese Pine Nut Muffins

Share
Facebooktwitterpinterestlinkedintumblr

Goddess Cheese Pine Nut Muffins vibrant strips of aromatic basil run through these delicious buttery cheese, pine nut studded muffins.

FF Goddess Cheese Pine Nut Muffins
Goddess Cheese Pine Nut Muffins a delightful flavour combination.

Also these delightful muffins are so easy to make, quick to bake and perfect for breakfast, packed lunches, picnics……

FF Goddess Cheese Pine Nut Muffins
Goddess Cheese Pine Nut Muffins perfect for picnics.

Whenever we have friends and family round, I always provide a cheese board. Since I have more of a savoury palette, I generally choose cheese and crackers over dessert on most occasions. While I adore all cheeses, this Goddess Cheese, sent to me to try by Pong Cheese is beautifully buttery and creamy.

A cider washed edible rind conceals the most gorgeous, gooey, buttery cheese, perfect for spreading on crackers, with a glass of something chilled to go alongside. The initial buttery flavour is layered with a nutty taste that is perfectly  paired with the pine nuts in these Goddess Cheese Pine Nut Muffins.

FF Goddess Cheese Pine Nut Muffins
Goddess Cheese Pine Nut Muffins a great way to use up left over cheese.

Whilst spreading this cheese on crackers is a perfectly acceptable way to indulge your senses, my creative side knew that it would taste so good baked in a muffin. After a party or family gathering I am quite often left with cheese and other delectables. I avoid waste as much as I can, so incorporating this beautiful cheese into a bake gives it a second life in these delicious muffins.

Goddess Cheese Pine Nut Muffins are incredibly easy to whip up and bake. In fact these took less than 30 minutes from start to eating!

Oh boy, these muffins are fabulous warm out of the oven.

Recipe: Makes 12 Goddess Cheese Pine Nut Muffins

50g/2oz Pine Nuts

300g/11oz Plain White Flour (self raising can be substituted – leave out the baking powder)

2tsp Baking Powder

2 Whole Free Range Eggs

200ml Semi-Skimmed or Whole Milk

4tbsp Vegetable/Sunflower Oil

Goddess Cheese 150g/5oz – mine was from Pong Cheese

6 basil leaves

1/4tsp Sea Salt – I use Maldon

1/4tsp Freshly Ground Black Pepper

Method: Preheat the oven to 200C/180C fan, gas mark 6

  • First of all place the pine nuts into a dry skillet or frying pan and toast over a medium heat until golden. Remove from the pan and place on to a plate to cool. Reseve some pine nuts for topping the muffins.
  • Sift the flour and baking powder into a large bowl.
  • Pile the basil leaves on top of each other and cut into fine strips.
  • Add the cooled pine nuts, basil, and seasonings to the bowl.
  • Stir with a fork to incorporate.
  • Break the Goddess Cheese into lumps and add half to the flour mixture – I found it easier to have the bowl on the scales.
FF Goddess Cheese Pine Nut Muffins
Gorgeously gooey Goddess Cheese.
  • Cover the cheese in the bowl with the flour mixture. This will stop it clumping together.
  • Add the other half of the cheese, again pinching off gooey lumps and dropping them into the bowl. Cover in the flour mixture as before – dry mixture.
  • Into a jug add the milk, oil and eggs. Lightly mix with a fork – wet mixture.
  • Make a well in the centre of the dry mixture and pour in the wet mixture.
  • Stir with a fork approximately 10-12 times until the ingredients are just mixed.
FF Goddess Cheese Pine Nut Muffins
A few flour streaks are fine.
  • Note: Over mixed muffins will be tough!
  • Place muffin liners in a muffin tin – I didn’t but would advise you to as it does make the muffins easier to remove.
  • Divide the muffin mix between the 12 cases.
  • Top with the reserved pine nuts – if you have forgotten to reserve any don’t worry they will still look and taste delicious.
FF Goddess Cheese Pine Nut Muffins
Goddess Cheese Pine Nut Muffins ready for the oven.
  • Place the tin in the top of the oven and bake for approximately 15 minutes.
  • The muffins are cooked when they are just firm to touch and golden brown.
  • As soon as the muffins are baked remove from the oven.
  • FF Goddess Cheese Pine Nut Muffins

      Beautifully golden Goddess Cheese Pine Nut Muffins.

    Transfer the Goddess Cheese Pine Nut Muffins to a cooling rack until warm and then devour!

    Enjoy these muffins at their absolute best, warm straight from the oven. While the cheese is still slightly melted and the flavours of the toasted pine nuts and basil come through.

FF Goddess Cheese Pine Nut Muffins
Look how moist and delicious these muffins are.

Having had to split a muffin for the photographs, I also really enjoyed them cold. All the buttery, nutty cheese, pine nut and basil flavours are still present which I am really pleased with. This makes the Goddess Cheese Pine Nut Muffins perfect as portable food.

I will definitely be making more of these for picnics, packed lunches and just for eating warm from the oven!

Muffins are always best on the day made, however, stored in an airtight container they are good for 3 days, or frozen for up to a month. To refresh just pop in a moderate oven for 10 minutes and they’ll taste like they’ve just been baked.

If you have enjoyed this recipe for Goddess Cheese Pine Nut Muffins you may also like these:

Feta Cheese Herb Muffins

FF Goddess Cheese Pine Nut Muffins
Feta Cheese Herb Muffins delicious and light.

Cheese Bacon Breakfast Muffins

FF Goddess Cheese Pine Nut Muffins
Cheese Bacon Breakfast Muffins a great way to start the day.

Chorizo Goats Cheese Muffins

FF Goddess Cheese Pine Nut Muffins
Chorizo Goats Cheese Muffins a fantastic blend of flavours.

No longer do you need to look at an oozing, gooey leftover Goddess Cheese and wonder what to do with it. Instead you can make Goddess Cheese Pine Nut Muffins and as they don’t use a whole packet of cheese, leave you enough for your cheese and crackers.

This recipe started in my mind with the intent of using up leftover cheese. Oh no! These are so good I would happily buy the cheese to make them.

Whatever you are making and baking in your kitchens, have fun and enjoy sharing the feast you are preparing.

Sammie xx

Pong Cheese provided me with the cheese to make this recipe. All content, views, opinions, recipes and photographs are my own. Please see my Disclosure Policy.

Share
Facebooktwitterpinterestlinkedintumblr

Muesli Flapjack Squares

Share
Facebooktwitterpinterestlinkedintumblr

Muesli Flapjack Squares are THE answer to rushed mornings and missed breakfasts. Make these at the weekend and you’ve got brekkie covered for the whole week. Ooh and did I mention they’re gluten free too!

Muesli Flapjack Squares

Most people I know don’t have hours of time to spare in the mornings, during the week. They know breakfast is THE most important meal of the day, so in a bid to give their body something they grab a latte and coffee shop choccie muffin on the way to work. Then wonder why they are starving again by 10am if not sooner.

One of these Muesli Flapjack Squares will keep you going until lunchtime!

Breakfast – The Most Important Meal

Now eating one of these delicious Muesli Flapjack Squares isn’t the same as sitting down with a bowl of muesli, or a plate of wholemeal toast and homemade jam and a cup of coffee. But, they are a whole lot better both for your body and you wallet, than the take out option.

Muesli Flapjack Squares

Flapjacks do contain both sugar and butter, as do the take out muffins. I have tried to reduce both and even tried to switch to honey, but, unfortunately I haven’t cracked that recipe code yet.

What I have done is taken a fabulous gluten free, muesli mix made by Delicious Alchemy and turned it into the gluten free Muesli Flapjack Squares. So yes you’ll get the initial sugar hit and a wee bit of caffeine from the dark chocolate, but instead of the post sugar slump, the oats, seeds and dried fruit will start slowly releasing their energy – sustaining you until lunch.

Too good not to take a bite!

With everything made in one bowl, a little mixing, 20 minutes in the oven, cool then swirl on some chocolate, these can easily made by anyone.

If buying a different muesli from the one suggested ensure that it has no added sugar, salt or fat and of course, that it’s gluten free if you have dietary intolerances.

Recipe: Makes 12 Muesli Flapjack Squares

225g/8oz Unsalted Butter

100g/4oz Light Soft Brown Sugar

1/4tsp Sea Salt – I use Maldon

100g/4oz Golden Syrup – light corn syrup

425g/15oz Muesli – I used Delicious Alchemy

100g/4oz Chopped Dried Fruit – I used mango and apricots (dried)

Method: Preheat the oven to 180C/160C fan, gas mark 4, 350F

Making The Muesli Flapjack Mixture

  • First of all, line a 8″ x 11″  20cm x 28cm Swiss roll, or 2″ deep baking tin with baking parchment. I have found it unnecessary to grease my tin prior to lining, however, using a little butter in the corners, should help the parchment to stick without fully greasing the tin.
  • In a large heatproof and microwaveable bowl add the butter and then sugar.
  • Place in the microwave a heat on low until the butter is just melted.
  • Once melted remove from the microwave and add the golden syrup. Stir with a wooden spoon until everything is well mixed.
  • Add the muesli, salt and chopped, dried fruit.
FF Muesli Flapjack Squares
Now to get mixing!
  • Next stir everything together until it is all covered in the glossy butter mixture.
  • Tip the mixture into the prepared pan and press flat and even using the back of a dessert spoon.
FF Muesli Flapjack Squares
Pressed evenly into the tin, ready for the oven.

Baking The Flapjacks

  • Place in the centre of the oven and bake for exactly 20 minutes.
  • As soon as the baking time is up remove from the oven and allow to cool completely in the tin.
FF Muesli Flapjack Squares
Muesli Flapjack Squares beautifully baked and golden.
  • When cooled lift the flapjack slab from the tin on to a board.
  • Cut into 12 even squares (if you look mine aren’t that even – oops)!
  • Melt the dark chocolate in a heatproof, microwaveable bowl until almost melted. Remove and stir until completely melted.
  • Drizzle over the squares, or fill a small piping bag and pipe hearts on each square.
Muesli Flapjack Squares
Beautifully decorated with a heart.

During hot weather it might be worth popping the Muesli Flapjack Squares into the fridge for an hour. This will set the chocolate and really firm up the bars.

I like to wrap them in baking parchment for packed lunches, cling film and foil work well too.

Store them in an airtight container. I use an old biscuit tin and separate layers with baking parchment.

FF Muesli Flapjack Squares
Muesli Flapjack Squares a great solution to breakfast.

Give yourself a pat on the back knowing you have breakfast sorted for the week!!

If you have enjoyed these Muesli Flapjack Squares you may also like these:

Double Cherry Drizzle Oat Bars

FF Muesli Flapjack Squares
Double Cherry Drizzle Oat Bars a delicious oat biscuit base topped with cherry sponge.

Macacdamia Apricot Flapjacks

FF Muesli Flapjack Squares
Macadamia Apricot Flapjacks another delicious flapjack bar.

Lemon Drizzle Cake Bars

FF Muesli Flapjack Squares
Lemon Drizzle Cake Bars with a layer of lemon curd on top of an oat biscuit base.

All of the recipes above are easy to make and are fabulous food on the go. Ideal for packed lunches, picnics, or simply having something on hand at home that easily fits in a tin.

I deliberately left nuts out of this recipe so that more people on a restricted diet can enjoy it. I’ve also successfully switched butter for coconut oil in my Coconut Almond Date Flapjacks, which would make this recipe suitable for those with lactose intolerance.

It is my intention to make as many recipes as possible versatile, so that those with dietary restrictions can also have fun feasting!

Sammie xx

Delicious Alchemy provided the muesli mix for me to try. All opinions, views, content and photographs are my own. Please see my Disclosure Policy.

Share
Facebooktwitterpinterestlinkedintumblr

Toffee Cookie Cups

Share
Facebooktwitterpinterestlinkedintumblr

Toffee Cookie Cups easily made from Wright’sBaking new cookie mix. Tasty toffee flavoured cookies, with pieces of real toffee in the dough, shaped into cups for you to add a scoop of your favourite ice cream!

FF Toffee Cookie Cups
Toffee Cookie Cups great with Chocolate Honeycomb Ice Cream.

It is a well established fact here on Feasting is Fun that there are two things I am passionate about. Sharing is integral to who I am as a person and I genuinely believe that food really does taste better when shared. Also I love cookies. Not just – oh ok I’ll bake a batch – I really love cookies. I start almost everyday with a cup of tea and a cookie or two, so when Wright’s sent me their new Toffee Cookie Mix, well I was ridiculously excited!

FF Toffee Cookie Cups
Toffee Cookie Cups – what will you fill yours with 😉

After a little discussion with Deb-the-bread, Wright’s very own jewel in their crown, I decided to have a go at making the new cookie mix into cookie cups. Let’s just be clear on something, I had never baked these cookies before. Never having attempted to bake cookie cups before this was a first. Since I had never baked a Wright’s cookie mix before – because I couldn’t, this IS their first cookie mix.

Due to the Toffee Cookie Mix only just having been released, stocks were super low and there wasn’t a spare mix for me to practise with! Ok so we all know I love a challenge. Time to put my trust in Wright’s reputation for making fabulous mixes and my ability to ‘wing it’! I mean I have baked a fair few thousand cookies in my lifetime.

FF Toffee Cookie Cups
Toffee Cookie Cups – a resounding success.

As you can see from the photos, I not only managed to make Toffee Cookie Cups, using Wright’s new Toffee Cookie Mix, they are also the perfect size for one scoop of ice cream. Easy to pick up with your hands and eat. Similar to an ice cream cone, except if the ice cream drips it is caught in the cup shape.

I cannot begin to explain how thrilled I was that I’d made cookie cups. Ridiculously so. More than that though, they taste ooh so good. I filled ours with Chocolate Honeycomb Ice Cream. 

However, you could use coffee, caramel, chocolate, banoffee, in fact any flavour that pairs well with toffee would work well in these gorgeous cookie cups.

Enough waffling you want to know how they’re made and I’m desperate to share how I made them with you!

Recipe: Makes 10 Toffee Cookie Cups 

1 Packet of Wright’s Baking new Toffee Cookie Mix – Note if you cannot get hold of the mix use my Caramac Caramel Cookies recipe.

Vegetable Oil or Butter – I used butter & would recommend it for making the cookies into cups, simply because it firms up on coolinf, helping to give the cups rigidity,

Cake release spray, oil or butter for greasing the bun tin.

Method: Preheat the oven to the temperature recommended on the packet.

To make these Toffee Cookie Cups you will need a regular 12 hole fairy cake – NOT MUFFIN – tin.

FF Toffee Cookie Cups
I find it is always better to have everything I need to hand before I start baking.
  • Make up the Toffee Cookie Mix according to the packet instructions – I actually melted the butter.
  • Stir to combine the cookie mixture.
FF Toffee Cookie Cups
The Toffee Cookie dough.
  • Grease all of your fairy cake tin, not just the holes – I used cake release spray as I wanted to be sure these wouldn’t stick, I would advise brushing the whole tin lightly with vegetable oil.
  • Divide the cookie dough into 10 equal-ish sized balls.
FF Toffee Cookie Cups
The dough ball size and pressed out cookie cups.
  • Place a cookie dough ball into one of the fairy tin holes. Gently with your fingers press it into the hole and sides so that it is equal thickness all the way around. Ensure that you press the dough into the bottom of the tin so that it has a definite base.
  • Continue for the remaining cookie dough balls.
  • When all the cookie cups have been moulded place the tin in the middle of the oven and bake for 12-14 minutes. Mine took 14 minutes.
  • The Cookie Cups will puff up whist cooking DON’T PANIC!!
  • When golden brown and baked remove the tin from the oven.
FF Toffee Cookie Cups
Beautifully golden with a wonderful toffee smell, Toffee Cookie Cups.
  • Place the tin on a cooling rack and allow the cookie cups to cool in the tin as the cookies/cookie cups harden on cooling.
  • As the cookie cups cool slightly, very gently press the slightly puffed up base down.
  • Once the cookie cups are cooled remove them from the pan – mine came away easily, if yours are proving stubborn use a small palette knife to run between the top of the cookie cup and where it lays flat on the tin, this should loosen them.

Congratulations you have made 10 fantastic Toffee Cookie Cups!

To serve, add a scoop of your favourite ice cream, share and enjoy.

FF Toffee Cookie Cups
Toffee Cookie Cups already tasted by me!!!

Such an easy yet fantastic way to enjoy Wright’s new Toffee Cookie Mix. I have a couple more ideas but I will have to wait for more stock.

The Toffee Cookie Cups keep for up to 5 days in an airtight container.

If you have enjoyed this recipe for Toffee Cookie Cups you may also like these:

Chocolate Honeycomb Ice Cream

FF Toffee Cookie Cups
Chocolate Honeycomb Ice Cream

Very Vanilla Ice Cream

FF Toffee Cookie Cups
Very Vanilla Ice Cream

Chocolate Orange Ice Cream

FF Toffee Cookie Cups
Chocolate Orange Ice Cream

These Toffee Cookie Cups are a fun and delicious way to eat ice cream anytime of the year, but especially when it’s hot and we all need a little cooling down.

Whatever you are making and baking in your kitchens I hope you are having fun and remember to stash a couple of packets of Wright’s Toffee Cookie Mix in the cupboard. They take under 20 minutes to make and bake and are perfect for unexpected guests, or for when the urge for great cookies hits!

Sammie xx

Wright’s Baking  sent me a packet of their new Toffee Cookie Mix to try. I was not paid, or even asked to write this post. All opinions, views, content and photographs are my own. Please see my Disclosure Policy.

Share
Facebooktwitterpinterestlinkedintumblr

Red Onion Sausage Plait

Share
Facebooktwitterpinterestlinkedintumblr

This week happens to be National Picnic Week and as you’ve probably realised by now, I’m a big fan of outdoor eating. So, my Red Onion Sausage Plait is not only perfect for picnics, it’s also delicious served for dinner too! Great quality sausage meat mixed with red onion marmalade, encased in golden, all butter puff pastry. Utterly delicious.

FF Red Onion Sausage Plait
Red Onion Sausage Plait full of flavour and texture.

Using Condiments As Ingredients

The lovely people at Hawkshead Relish sent me some savoury relishes and marmalade to try out. I am a huge chutney fan, everything from jellies, to chutneys, relishes and marmalades. However, with this review, I wanted to use them as ingredients and see just how well they worked being in a dish. While also serving alongside as accompaniments.

I made this Red Onion Sausage Plait twice, as unfortunately I wasn’t able to get good pictures the first time round. Although, nobody in our house complained that I had to make this again. Since we all enjoyed the flavour and added texture from the red onion marmalade that contains raisins and crunchy pine kernels.

FF Red Onion Sausage Plait
Red Onion Sausage Plait, juicy, crispy with incredible flavour.

So, I set about making another Red Onion Sausage Plait, with great enthusiasm. Because, I love, I mean absolutely, completely, adore this Red Onion Marmalade and I knew this would use the last of it. Still I cheered myself with the fact that it makes such a knockout recipe and that I’d be eating it for dinner!

FF Red Onion Sausage Plait
Red Onion Sausage Plait also great as a mid week meal with salad and potato wedges.

Not Only For Picnics!

Warmed and served with a huge pile of salad and some potato wedges that I had in the freezer, this Red Onion Sausage Plait really does make a tasty, weekday meal. Also, it’s easily made ahead, left uncooked, wrapped in cling film and kept in the fridge until dinner time. Since it only takes 40 minutes to cook, which is why, seeing as the oven was already on I whacked in some potato wedges from the freezer.

FF Red Onion Sausage Plait
The huge bowl of salad I made to accompany the meal also had thinly sliced red onions in it which echoed the flavours in the sausage plait.

The caramelised onion flavour works so well with the meaty pork sausage. This is definitely a firm, family favourite now and is made frequently. I always look forward to eating this Red Onion Sausage Plait, whether on picnics and for dinner many times in future.

Recipe: Makes one Red Onion Sausage Plait serves 4 – 6 people

450g/1lb Good Quality Pork Sausagemeat – free range or organic for preference

3 heaped tablespoons of Red Onion Marmalade from Hawkshead Relish

320g Ready Rolled All Butter Pastry Sheet – I used JusRoll

1 Medium Free Range Egg

Pinch of Sea Salt – I use Maldon

Making The Sausage Plait

Preheat the oven to 220C/200C fan, gas mark 7, 425F.

  • First of all, line a large baking tray with baking parchment.
  • Place the sausage meat in a bowl with the red onion marmalade.
FF Red Onion Sausage Plait.
I enjoyed smooshing the mixture together with my hands!
  • Using clean hands smoosh the mixture together, through your fingers, until it is fully combined (a tack I particularly enjoy)! Set to one side and wash your hands.
  • On a clean work top unwrap the pastry sheet.
  • Place the sausage meat mixture down one side of the pastry, rather like a huge sausage roll, leaving a gap at each end and the side of at least 2.5cm.
F Red Onion Sausage Plait.
The right side of the pastry will fold over the sausage meat.
  • Crack the egg into a small bowl and whisk with a fork until well mixed. This is known as an egg wash.
  • Dip a pastry brushing into the egg wash and brush all of the visible pastry (not the sausage meat) with egg wash.
  • Bring the right side of the pastry over the sausage meat so that both side edges are together.
  • Crimp with a fork or twist all the pastry layers together, where they overlap to seal them.
  • Transfer the Red Onion Sausage Plait to the baking tray. Mine fits only when placed at an angle!
  • Brush over the entire outside of the sausage plait with egg wash. Finally sprinkle with a little sea salt.
FF Red Onion Sausage Plait
Red onion Sausage Plait with diagonal slits.
  • Using a sharp knife cut light diagonal slits through the pastry. This allows steam to escape and enhances the look of the finished bake.

Baking The Sausage Plait

  • If not baking straight away, wrap the entire tray and sausage plait in cling film and store in the fridge. For best results, bake within 24 hours.
  • When baking immediately, place the baking tray in the middle of a hot, preheated oven and bake for 40-45 minutes. The sausage plait should be a deep golden colour and any juices must run clear. If there is any doubt slice a portion of the plait off of the end and check. There should be absolutely no pinkness to the sausage meat, if there is pop back into the oven for 15 minutes and reduce the heat by 20C.
  • As soon as Red Onion Sausage Plait is baked, remove from the oven and leave to cool slightly on the tray.

To serve, allow the Red Onion Sausage Plait to cool for at least 15 minutes, longer if possible. Slice into portions and serve with salad, or my Crunchy Homemade Coleslaw, new potatoes, or for ease potato wedges. Serving with my Tangy Lemon Potato Salad also compliments the sausage plait well.

FF Red Onion Sausage Plait
Golden pastry and sausage meat with caremelised red onion.

To store and for packing up for a picnic, allow the sausage plait to cool. Cut into slices, I find a serrated knife is best when it’s cold. Pack the slices into an airtight container, or wrap in cling film. Store in the fridge for up to 3 days.

Delighfully savoury and full of texture, slices of this Red Onion Sausage Plait also make a welcome change to packed lunches!

If you have enjoyed this recipe for Red Onion Sausage Plait then here are some others you may also want to try:

Feta Red Onion Marmalade Quiche

Feta Red Onion Marmalade Quiche

Spicy Sausage Rolls

Spicy Sausage Rolls

Sausage Plait With A Twist

Sausage Plait With A Twist

Using the Red Onion Marmalade as an ingredient, rather than just as a condiment has opened up a whole world full of flavours. I have so many more idea, from pasta dishes to soups, stews and many more.

Do you ever use condiments in your cooking? Let me know in the comments section. I’m always interested to here and learn about new recipes and cooking methods.

So, whatever you are making, baking and creating in your kitchens, have fun preparing and sharing your feast.

Sammie xx

Hawkshead Relish provided me with a sample jar of their red onion marmalade. All views and opinions are my own. All content, recipes and photographs are my own and covered by copyright law of the land. Please see my Disclosure Policy.

Share
Facebooktwitterpinterestlinkedintumblr

Twisted Fruity Jam Tarts

Share
Facebooktwitterpinterestlinkedintumblr

Who loves the idea of eating jam tarts for breakfast? I certainly do. My Twisted Fruity Jam Tarts are a fun way to start the day.

Since being inspired yesterday by a conversation on Twitter and with a spare packet of ready rolled, all butter pastry in the fridge, I challenged myself to come up with a twist on the regular jam tart. Literally! So I set about creating a tart that as well as being easy to pick up and eat, also has the filling covered.

Resulting in these Twisted Fruity Jam Tarts, that taste rather like a Danish pastry. While being easy to make, the golden pastry hides an apricot half and strawberry jam. Follow with a final sprinkling of demerara sugar over the egg washed pastry, a quick bake and the result is a delicious, fruity, flaky pastry delight!

FF Twisted Fruity Jam Tarts
Twisted Fruity Jam Tarts so easy to make and easier to eat 😉

Having never tried to bake something like this before, I was unsure how they would turn out. I couldn’t have been more thrilled. Each twist is strong enough to hold the entire tart by, which makes them ideal as picnic and finger food.

Also, the demerara sugar caramelises on the pastry, nudging each twist into a sweeter flavour sensation. Combining apricots with strawberry jam was utter flavour heaven. While the bake softened, tart apricots are offset by the sweet strawberry jam. Most importantly, for the very best flavour, use all butter puff pastry when making these tarts.

Unusual shaped fruit pastry on a plate with a mug of tea to one side.
Twisted Fruity Jam Tarts

Making these Twisted Fruity Jam Tarts was one of those moments in the kitchen when everything goes to plan and turns out better than I could of ever hoped for. And if I can make these, then so can you!

Recipe: Makes 6 Twisted Fruity Jam Tarts

320g Ready Rolled All Butter Puff Pastry – I used Just Rol

6 Apricot halves – I used tinned ones from Waitrose

2-3tbsp Good Quality Strawberry Jam- I used Hartleys Best Strawberry Jam

1-2tbsp Demerara Sugar -I used Billingtons

1 Medium Free Range Egg

Method: Preheat the oven to 210C/190C fan, gas mark 6, 425F.

Assembling The Fruit Tarts

  • Unroll the puff pastry ensuring that you have a baking tray that fits the size of the pastry. Trim the paper that the pastry has been wrapped up in so that it fits within the tray, as you will be using it to bake the tarts on.
  • Use a sharp knife to cut the pastry into 6 equal squares.

FF Twisted Fruity Jam Tarts

    This photo shows how to cut the squares.
  • Cut diagonally from each corner towards the centre two thirds of the way. See the photograph above.
  • Crack the egg into a small bowl and whisk. This is the egg wash.
  • Brush each of the squares with the egg wash.
  • Place a scant teaspoon of strawberry jam in the centre of each tart.
  • Put half an apricot, flat side down, over the top of the jam.
FF Twisted Fruity Jam Tarts
Twisted Fruity Jam Tarts 
  • Take the right hand point of the triangle at the front and place it over the apricot. Pressing down to secure the fold.
  • Next take the left hand point of the opposite triangle and do the same.

FF Twisted Fruity Jam Tarts

  • Continue for each tart, placing a cocktail stick through the pastry and apricot in the centre to secure it while baking.
  • Next take the top right hand point of the triangle on the right of the tart and fold it so it is on top of the other point of the triangle.
  • Work in the opposite direction for the left hand triangle.
FF Twisted Fruity Jam Tarts
Each tart has an X type shape.
  • Brush the tarts with egg wash again and sprinkle over liberally with demerara sugar.

Baking The Tarts

  • Place the Twisted Fruity Jam Tarts in the preheated oven for 25-30 minutes and bake until they are puffed and golden.
  • As soon as the tarts are baked remove from the oven and transfer to a cooling rack.

The portion size of these fun and delicious tarts is perfect. And not having to transfer the tarts from a floured board to baking parchment really does make these so easy to whip up. Although I haven’t tried it, I suspect these Twisted Fruity Jam Tarts would also freeze well, for up to one month. Defrost overnight in the refrigerator and then refresh by reheating in a moderate oven for 10 minutes.

Twisted Fruity Jam Tarts

In future I will definitely make a double batch, as these tart have proved very popular here at home.

Also, I need to make these again soon as I am sure they would be delicious served warm with a scoop of my Very Vanilla Ice Cream

So there you go easy peasy jam tarts, with a twist!

If you have enjoyed this recipe for Twisted Fruity Jam Tarts you may also like these:

Blackberry Nectarine Tart

FF Twisted Fruity Jam Tarts
Blackberry Nectarine Tart 

Spicy Sausage Rolls

FF Twisted Fruity Jam Tarts
Spicy Sausage Rolls 

Perfect All Butter Shortcrust Pastry

FF Twisted Fruity Jam Tarts
Perfect All Butter Shortcrust Pastry 

Pastry is such a wonderfully versatile baking medium. I always have a stash of all butter puff pastry in the freezer. Because it is so handy when a quick meal, dessert, or even a decision to go out for the day tomorrow, as the weather looks good picnic!

If you try these Twisted Fruity Jam Tarts please let me know how you get on? I love reading your comments and appreciate you taking time to write them. Also, I love seeing your makes and bakes on Twitter and Instagram. And if you tag me in and I will be sure to give you a shout out and retweet.

So, whatever you are making, baking and creating in your kitchens, have fun preparing and sharing your feast.

Sammie xx

No part of this post may be reproduced or duplicated without the written permission of the owner. Please see my Disclosure Policy.


Share
Facebooktwitterpinterestlinkedintumblr