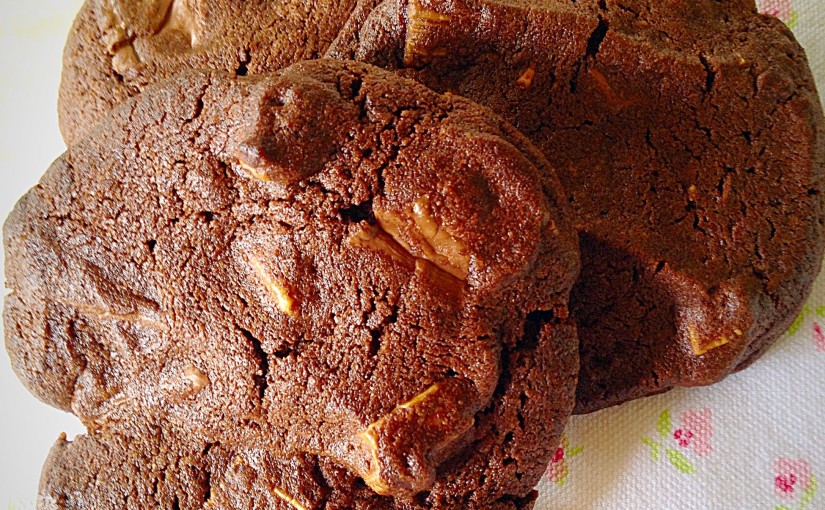
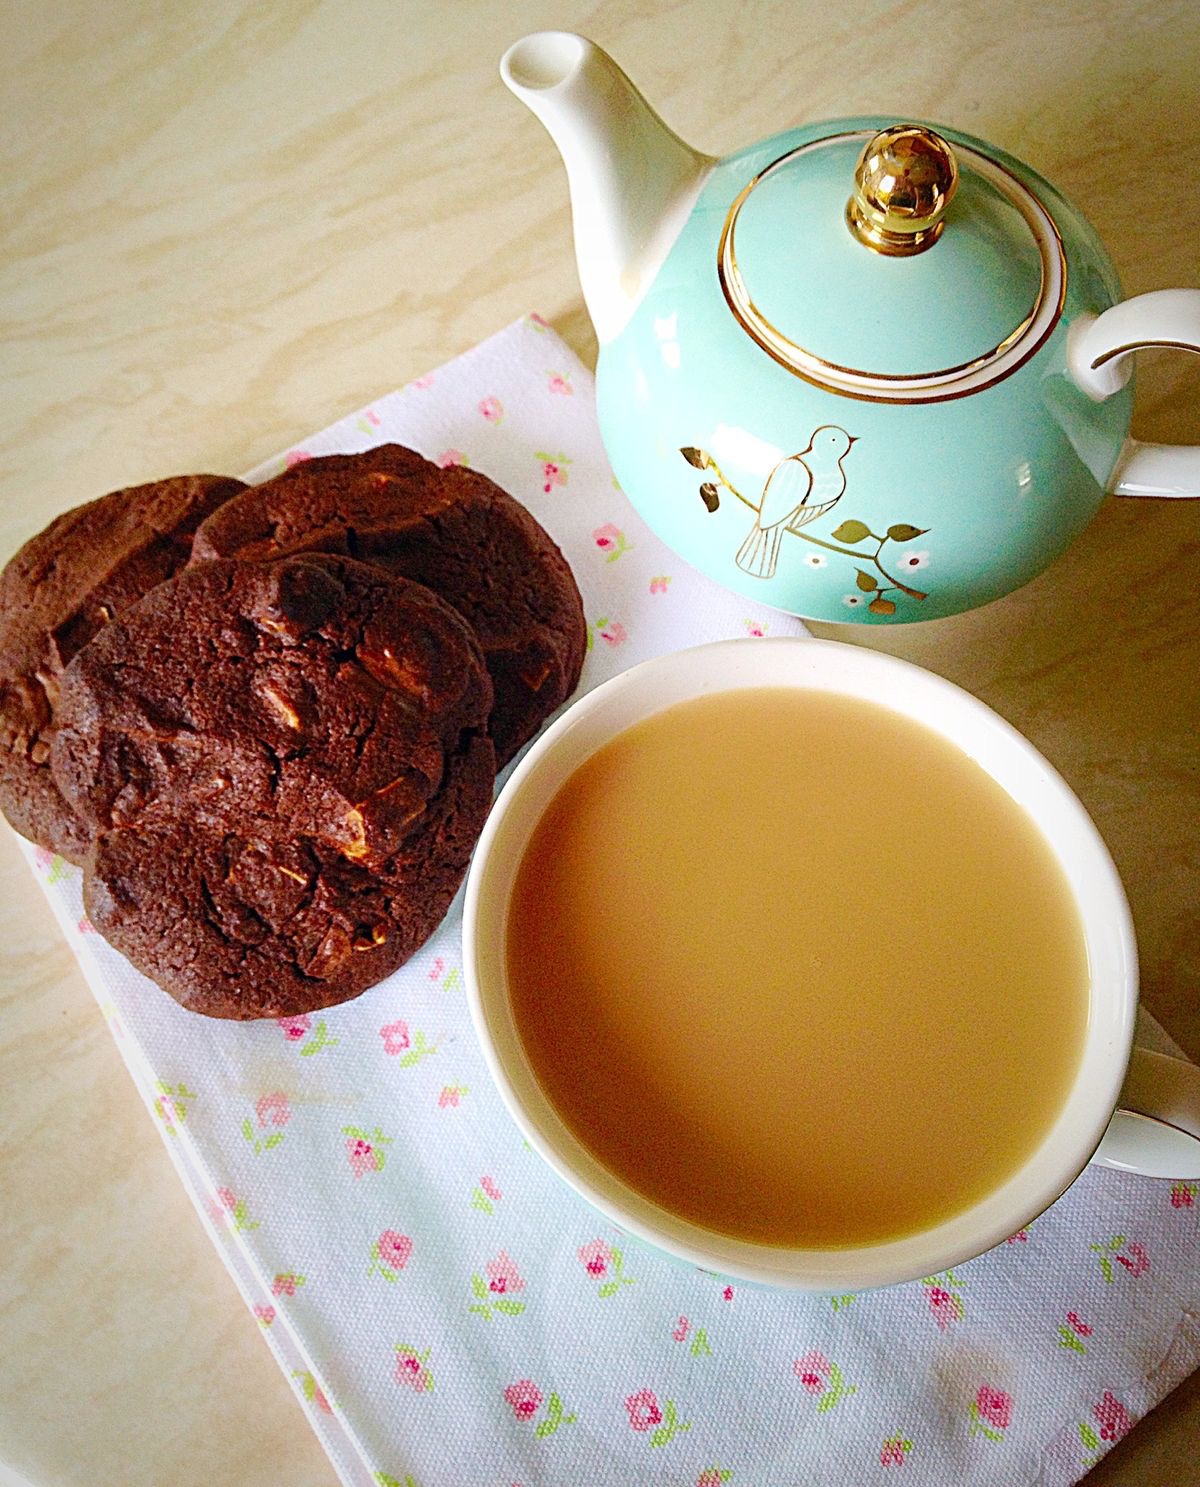
Hi, have I got a treat for you today – Extreme Chocolate Cookies. Also if you love cookies and need a chocolate fix then these babies are definitely for you!
Extreme Chocolate Cookies
I’ve been unwell lately, including a 2 week stay in hospital (I’ll save that for another post). Since having been home for 2-3 weeks now, today was the first day I really had the energy to bake. So, unashamedly I decided to make these Extreme Chocolate Cookies for our gorgeous children and my wonderful hubby, who has taken THE BEST care of me. I really do love that man.
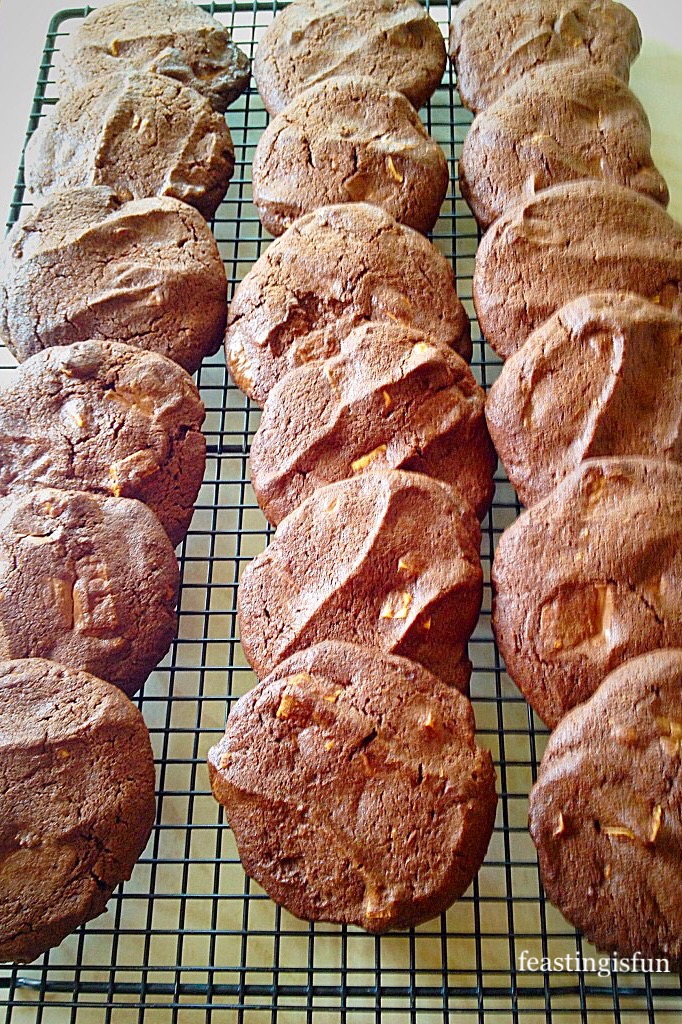
Rows of Extreme Chocolate Cookies. Is there a better sight?
I know that I’ve said it before, but baking or cooking for others, especially my family, is one of the ways I like to show my love for them. While chocolate is not my go-to favourite Cookie. Since I favour nutty, fruity, oat cookies. Yet I obviously had to try one of these and they are my favourite chocolate cookies to date!
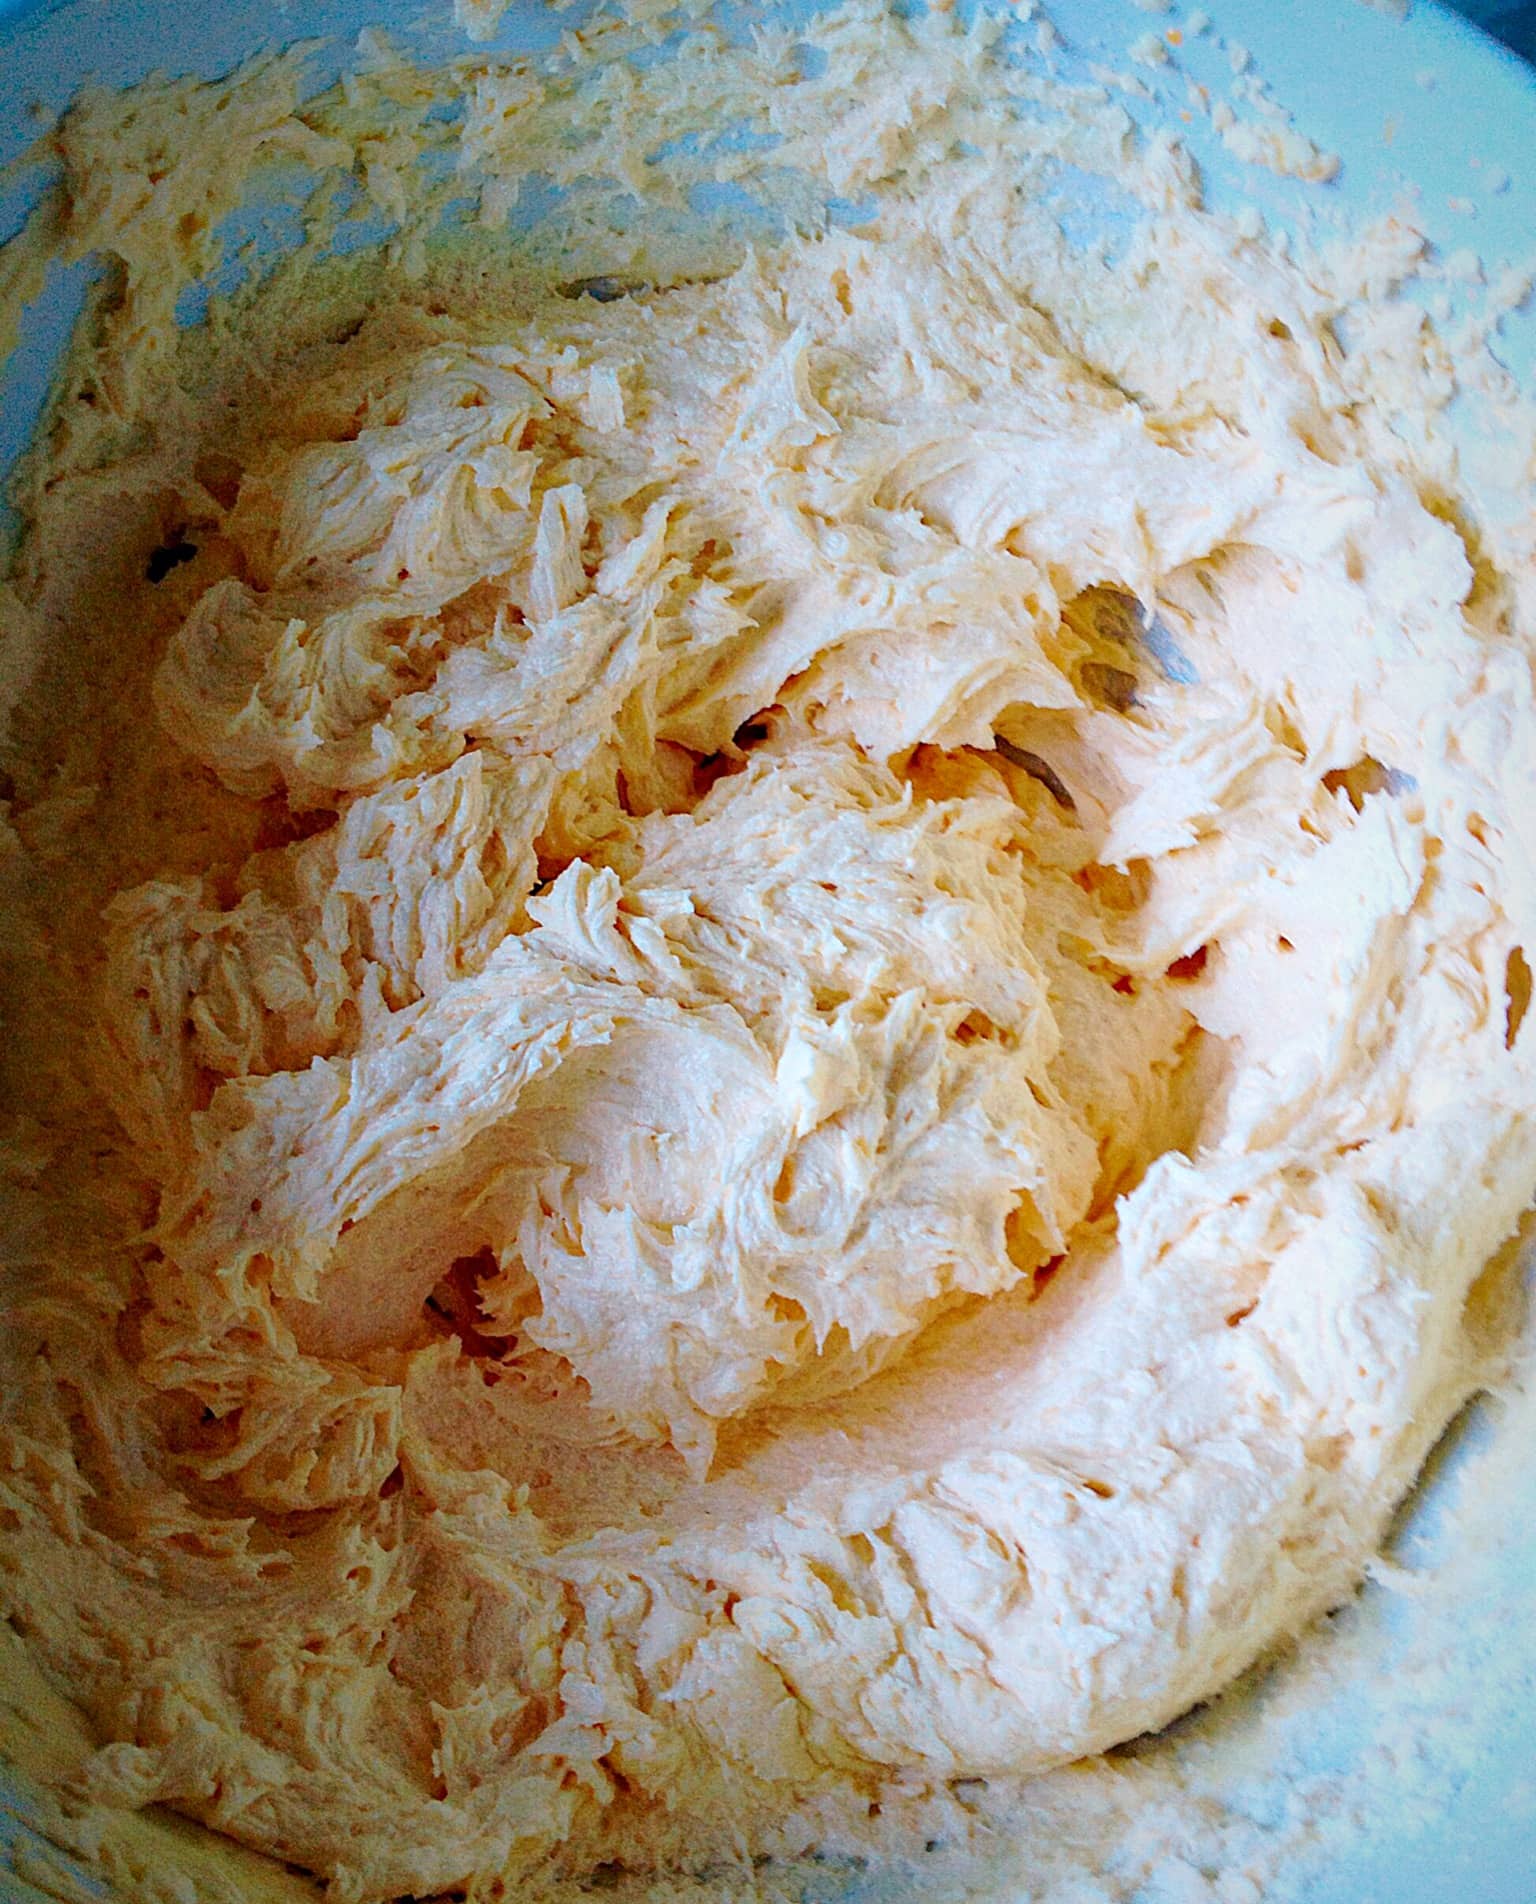
First of all, in a large bowl add the butter, sugar and salt. Whisk until well combined and fluffy.
Add in the egg and vanilla extract to the whisked butter/sugar.
Add the egg and vanilla extract and whisk until combined.
Next, chop up the white and milk chocolate into chunks.
These chocolate chunks are what make the cookies EXTREME!!!
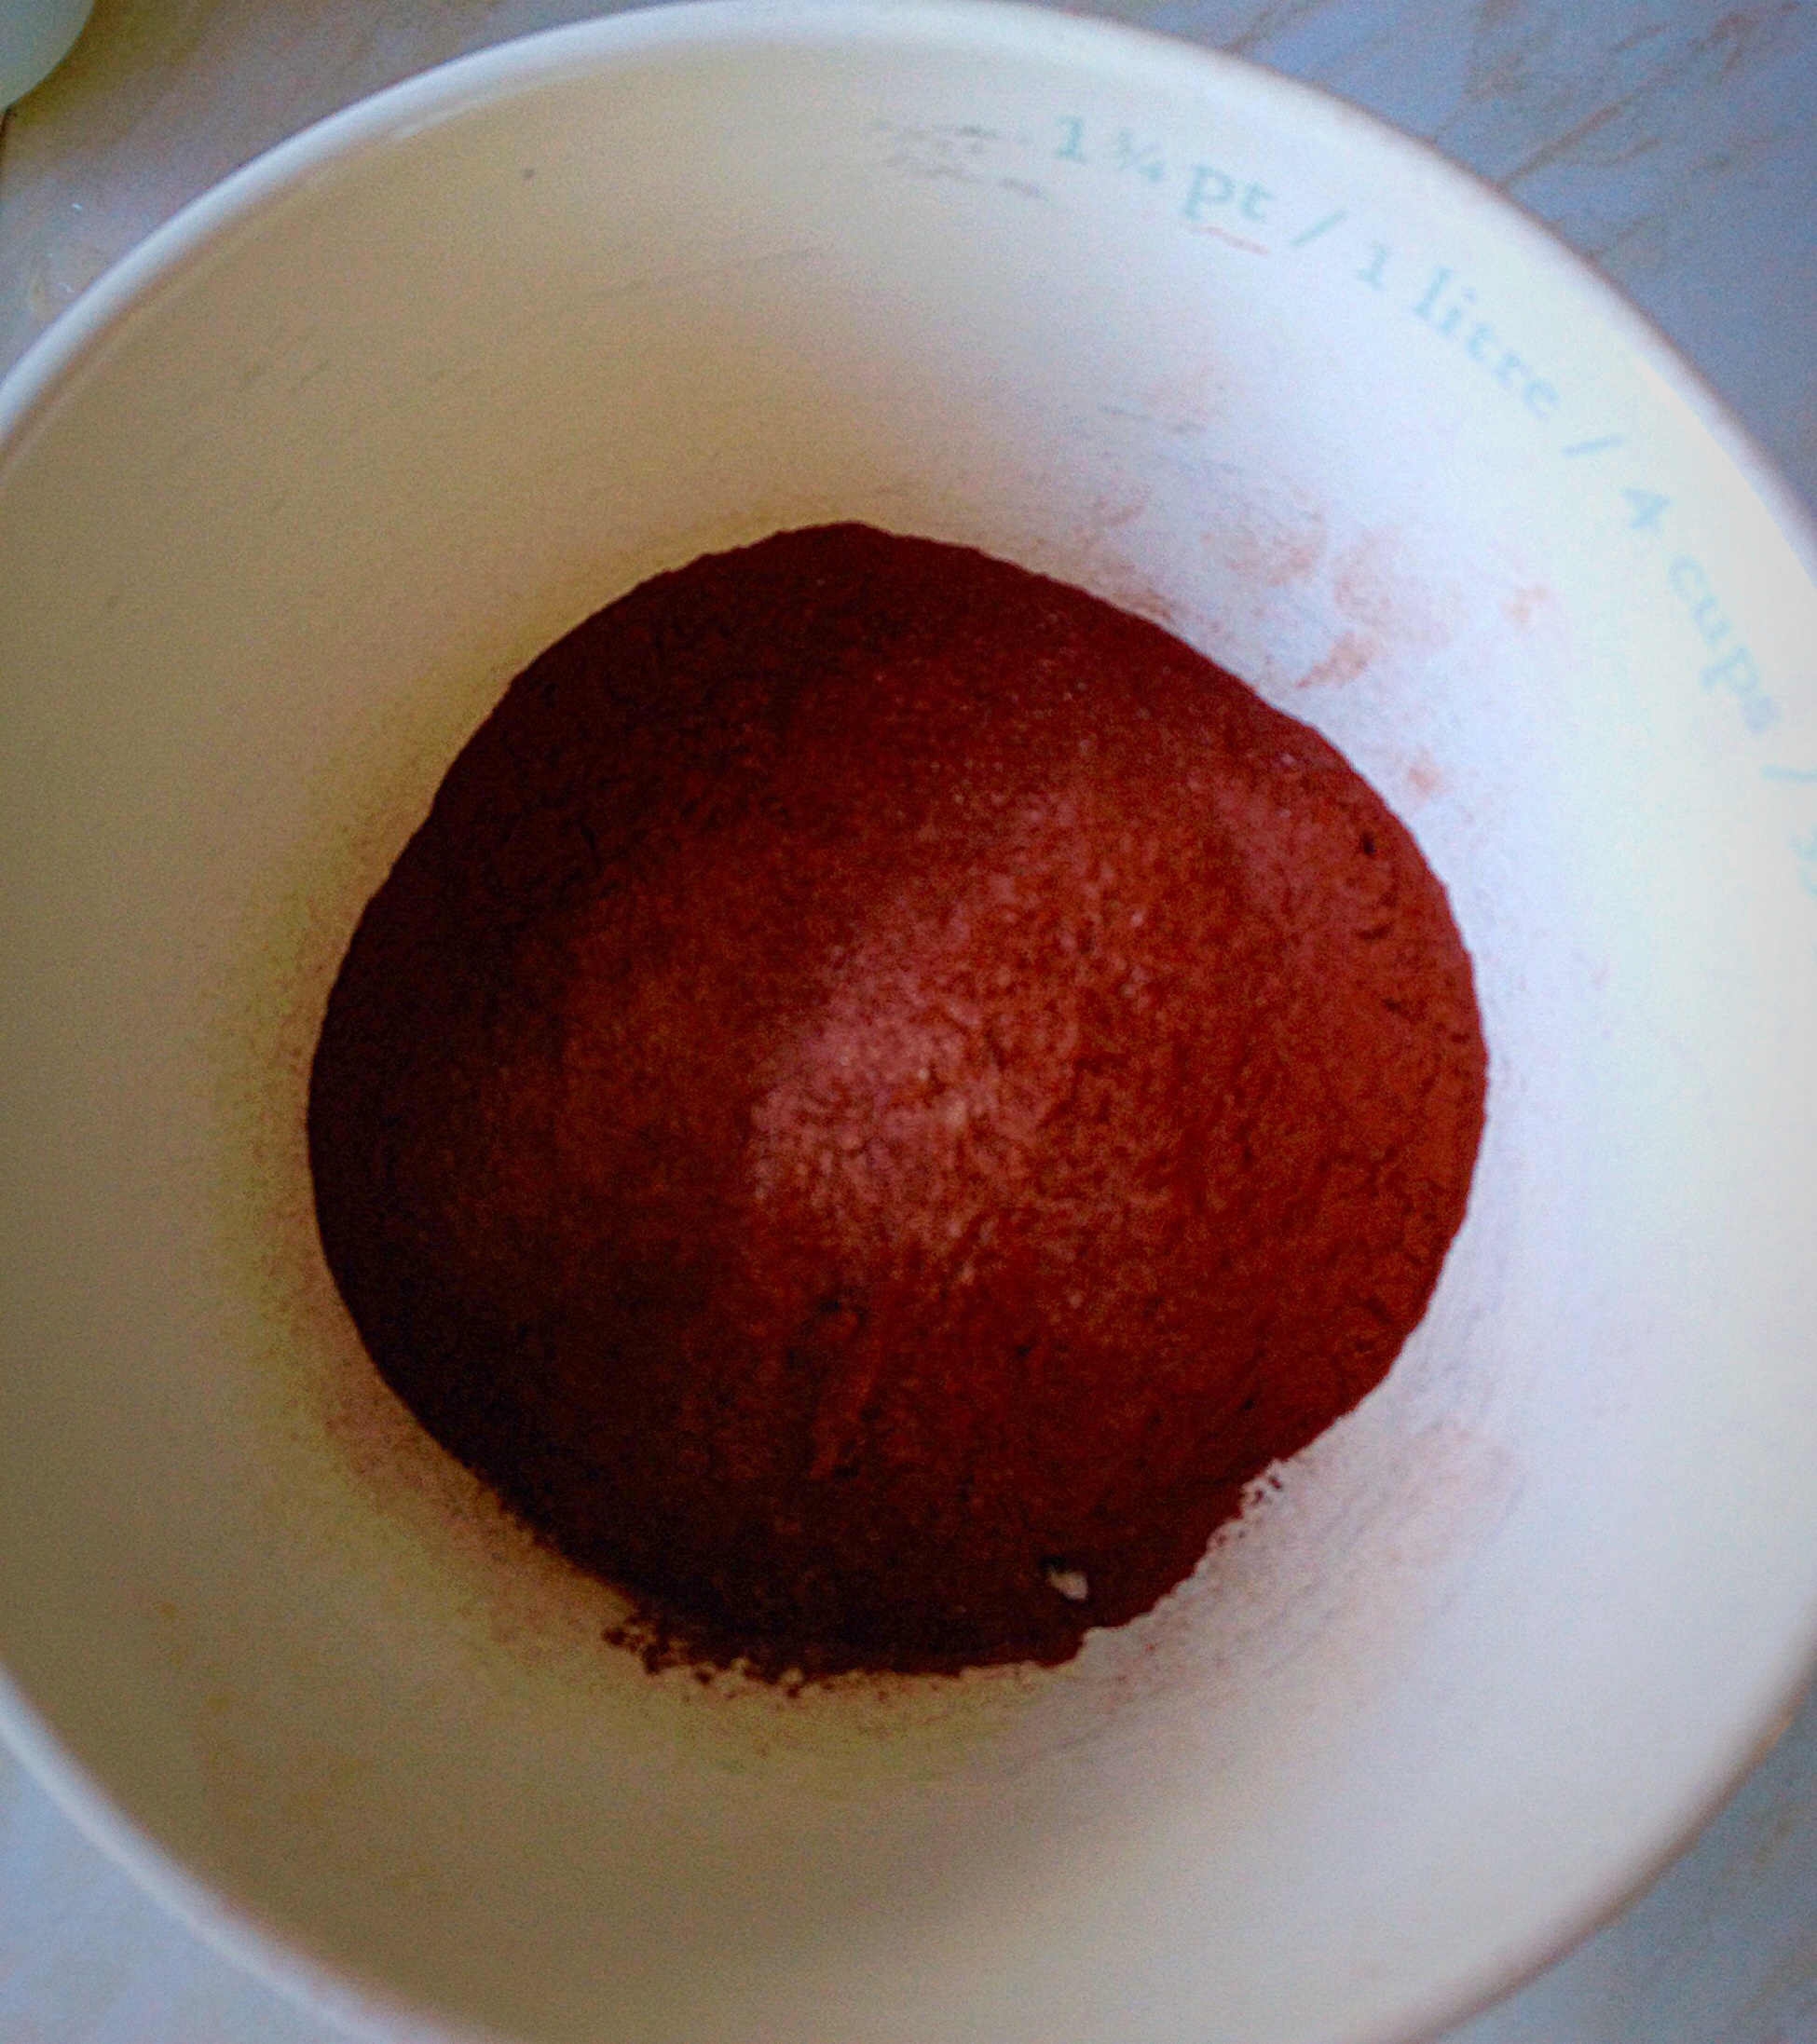
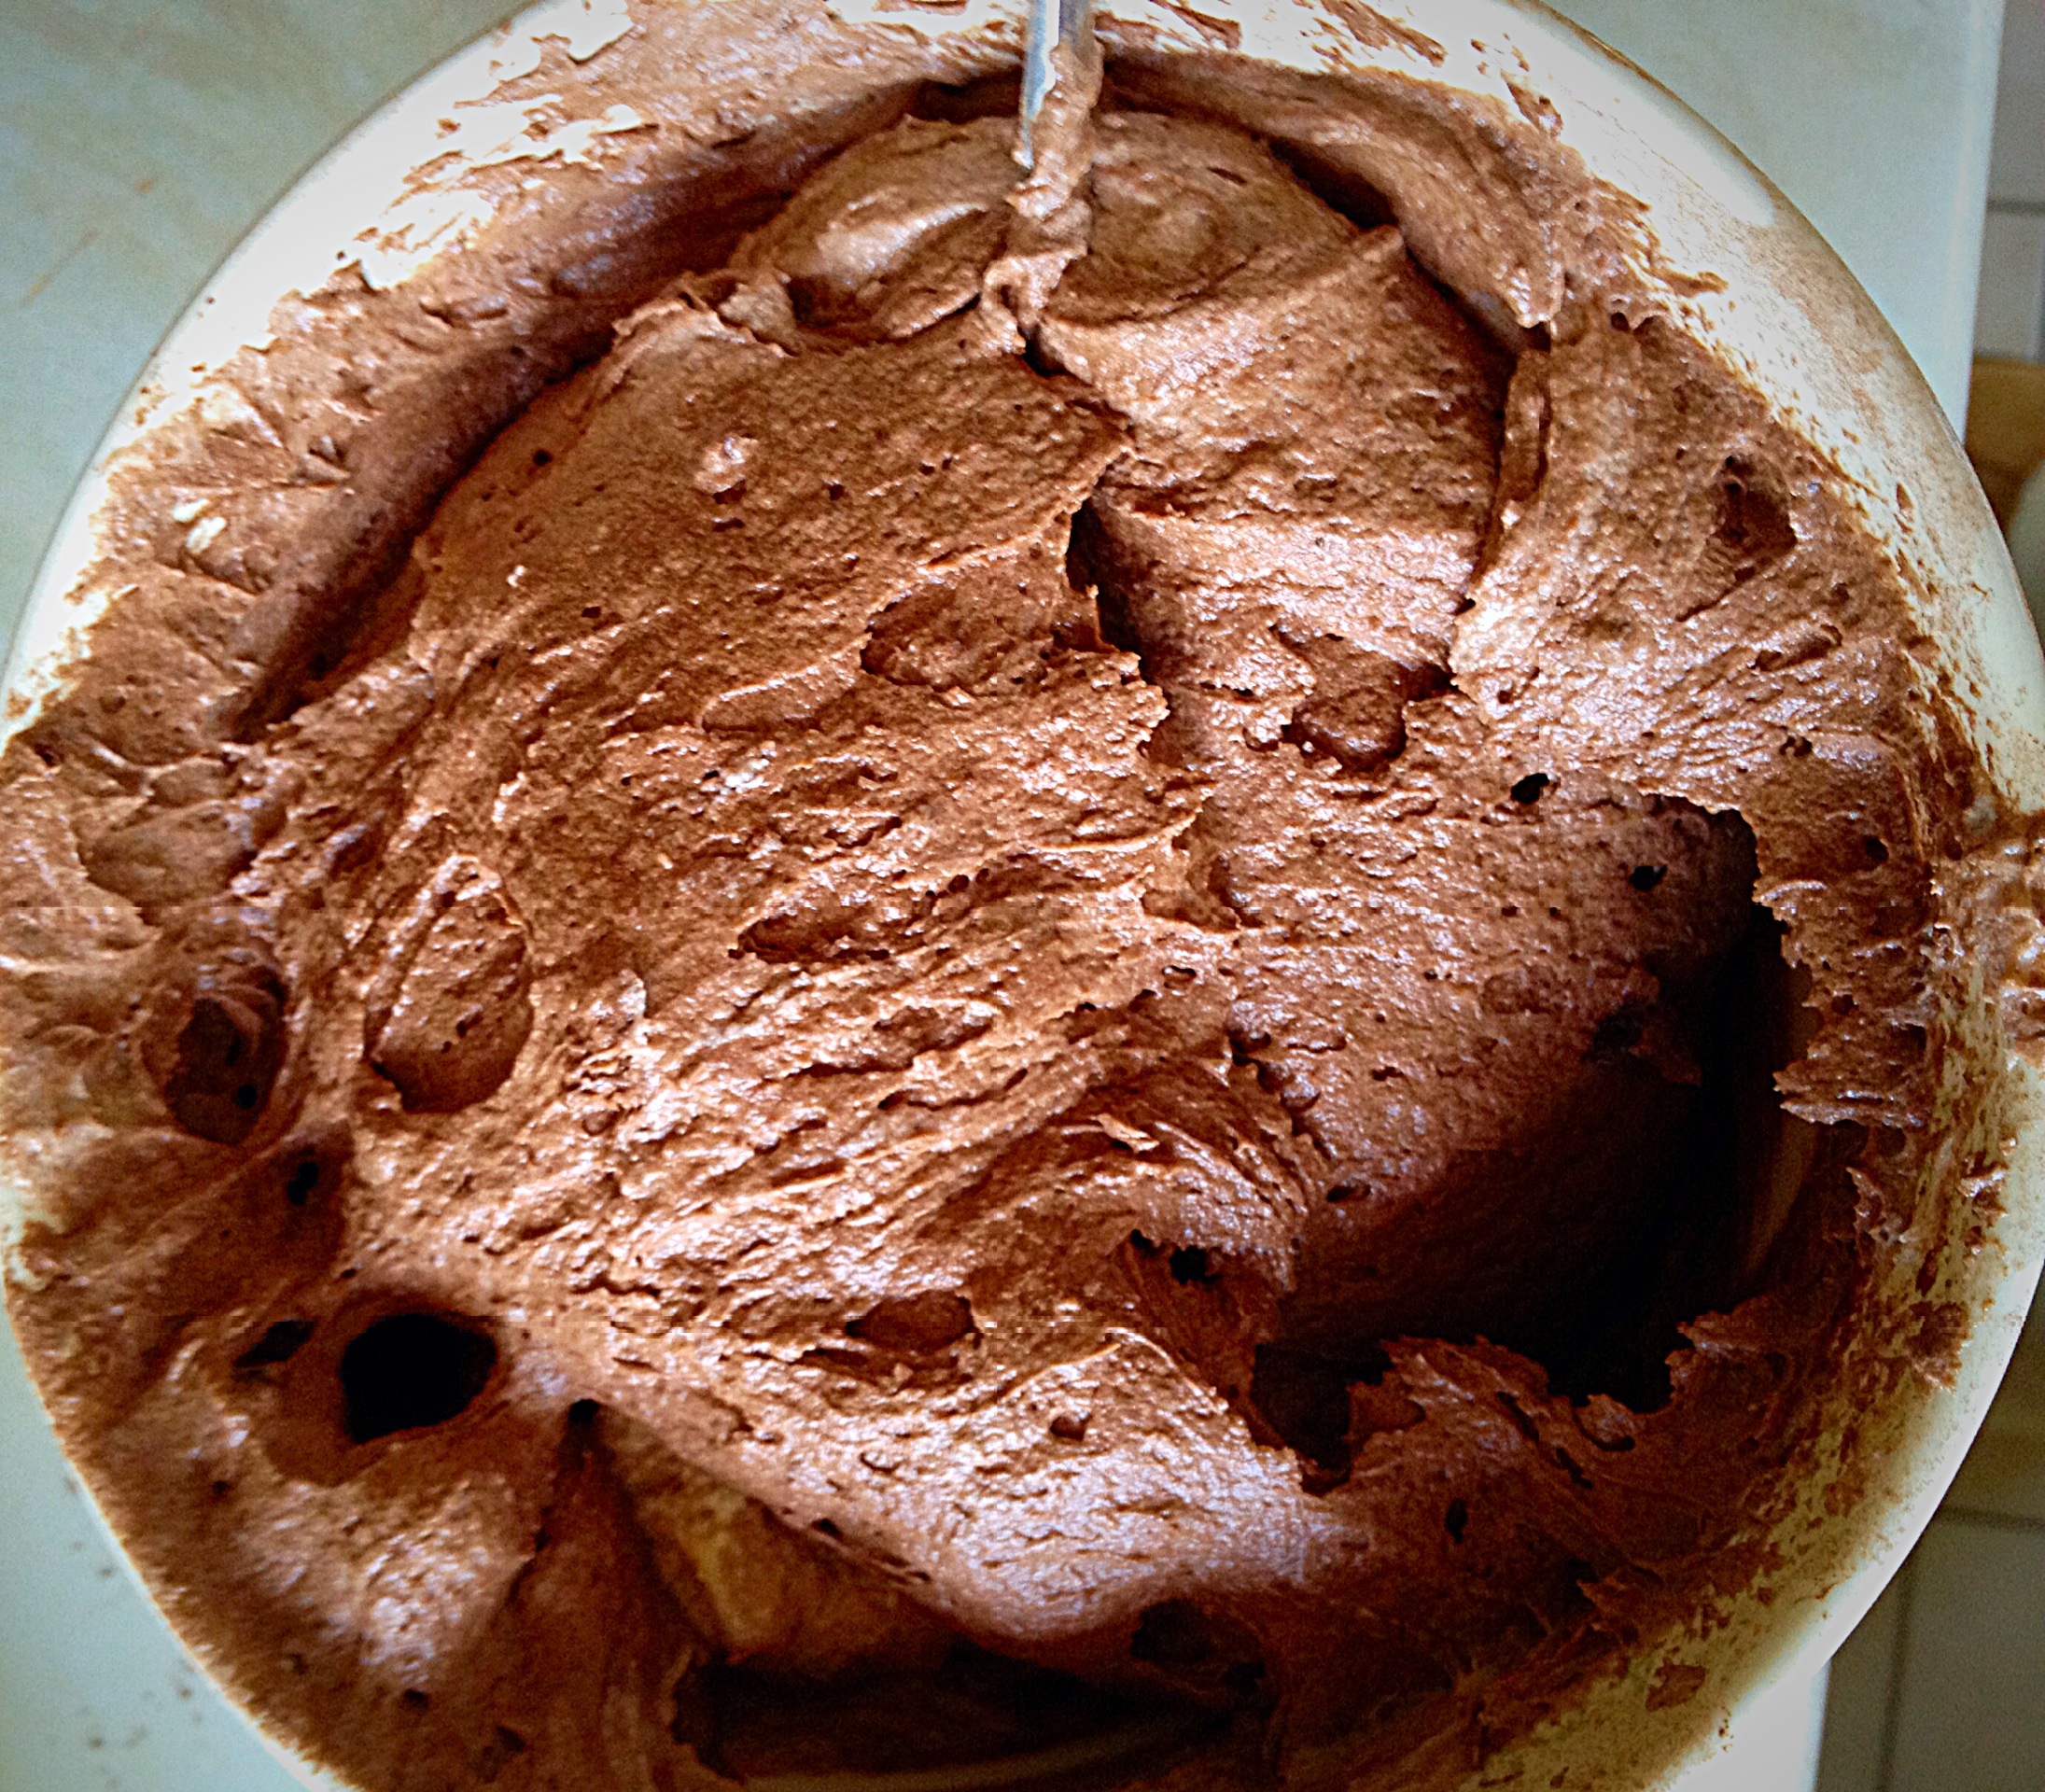
Add the flour, cocoa, bicarbonate of soda and chocolate chunks to the bowl.
Once combined these ingredients make Extreme Chocolate Cookies!
Mix all of the ingredients together until just combined.
Shaping and baking the cookies
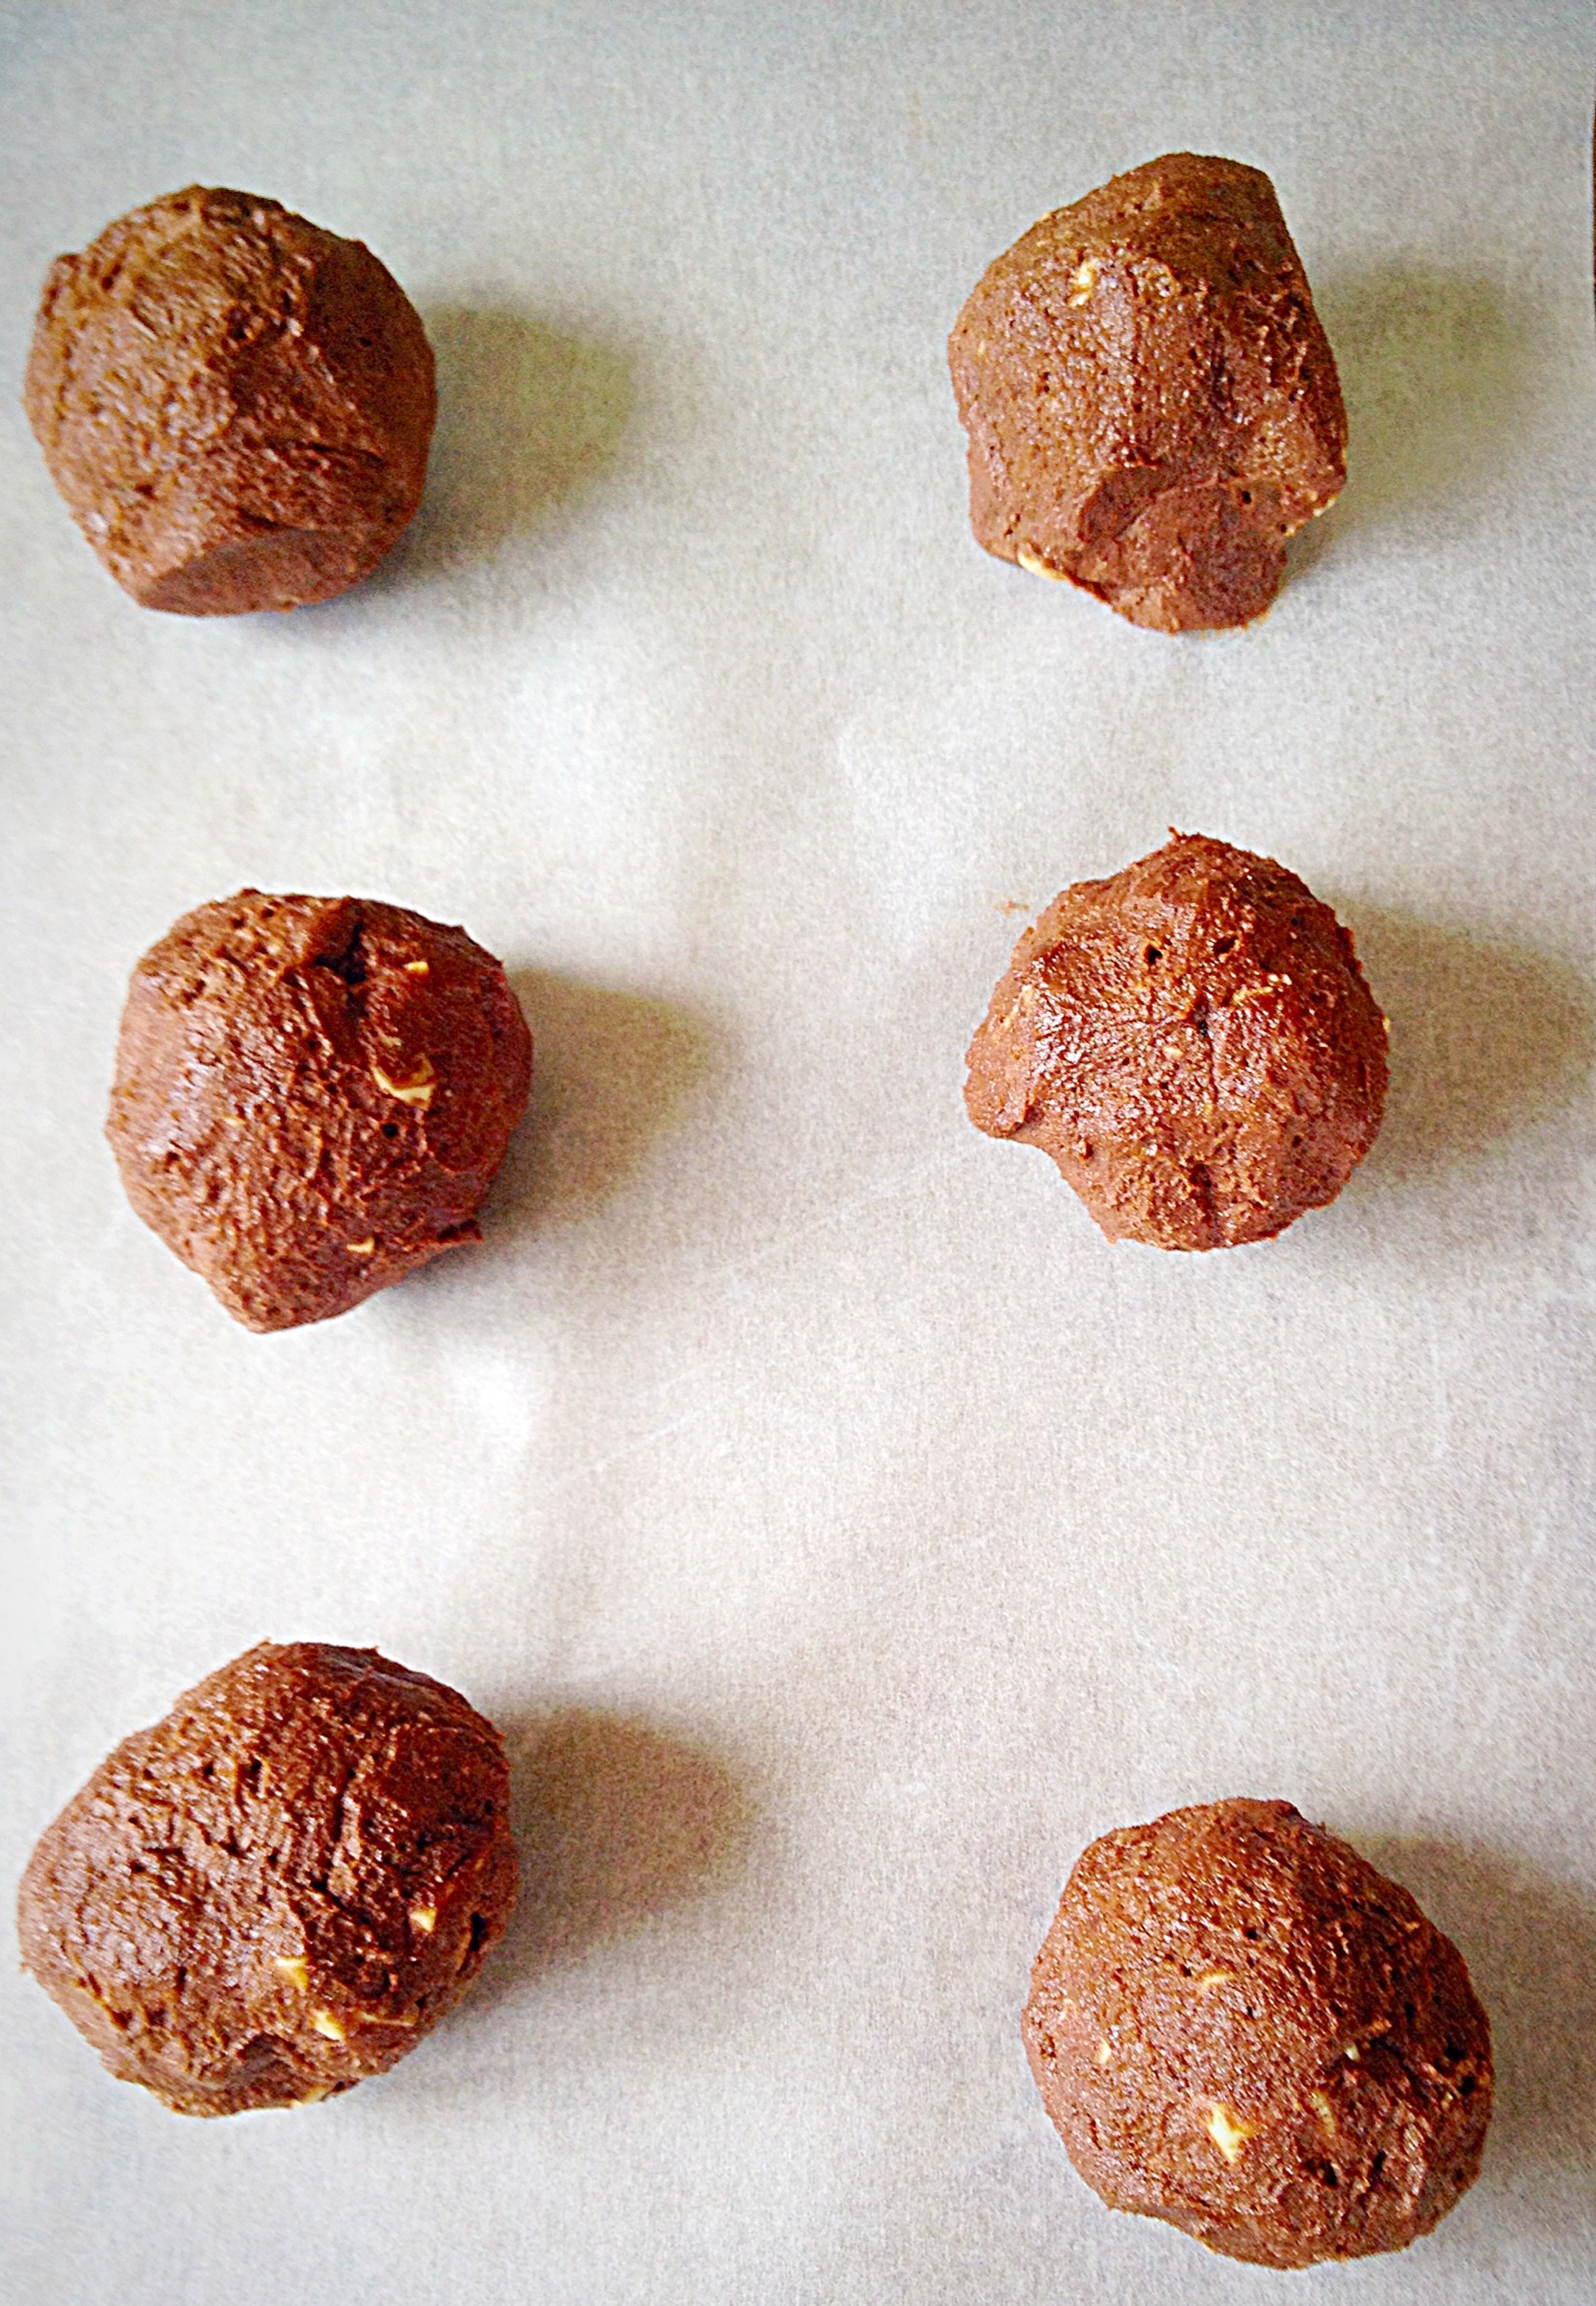
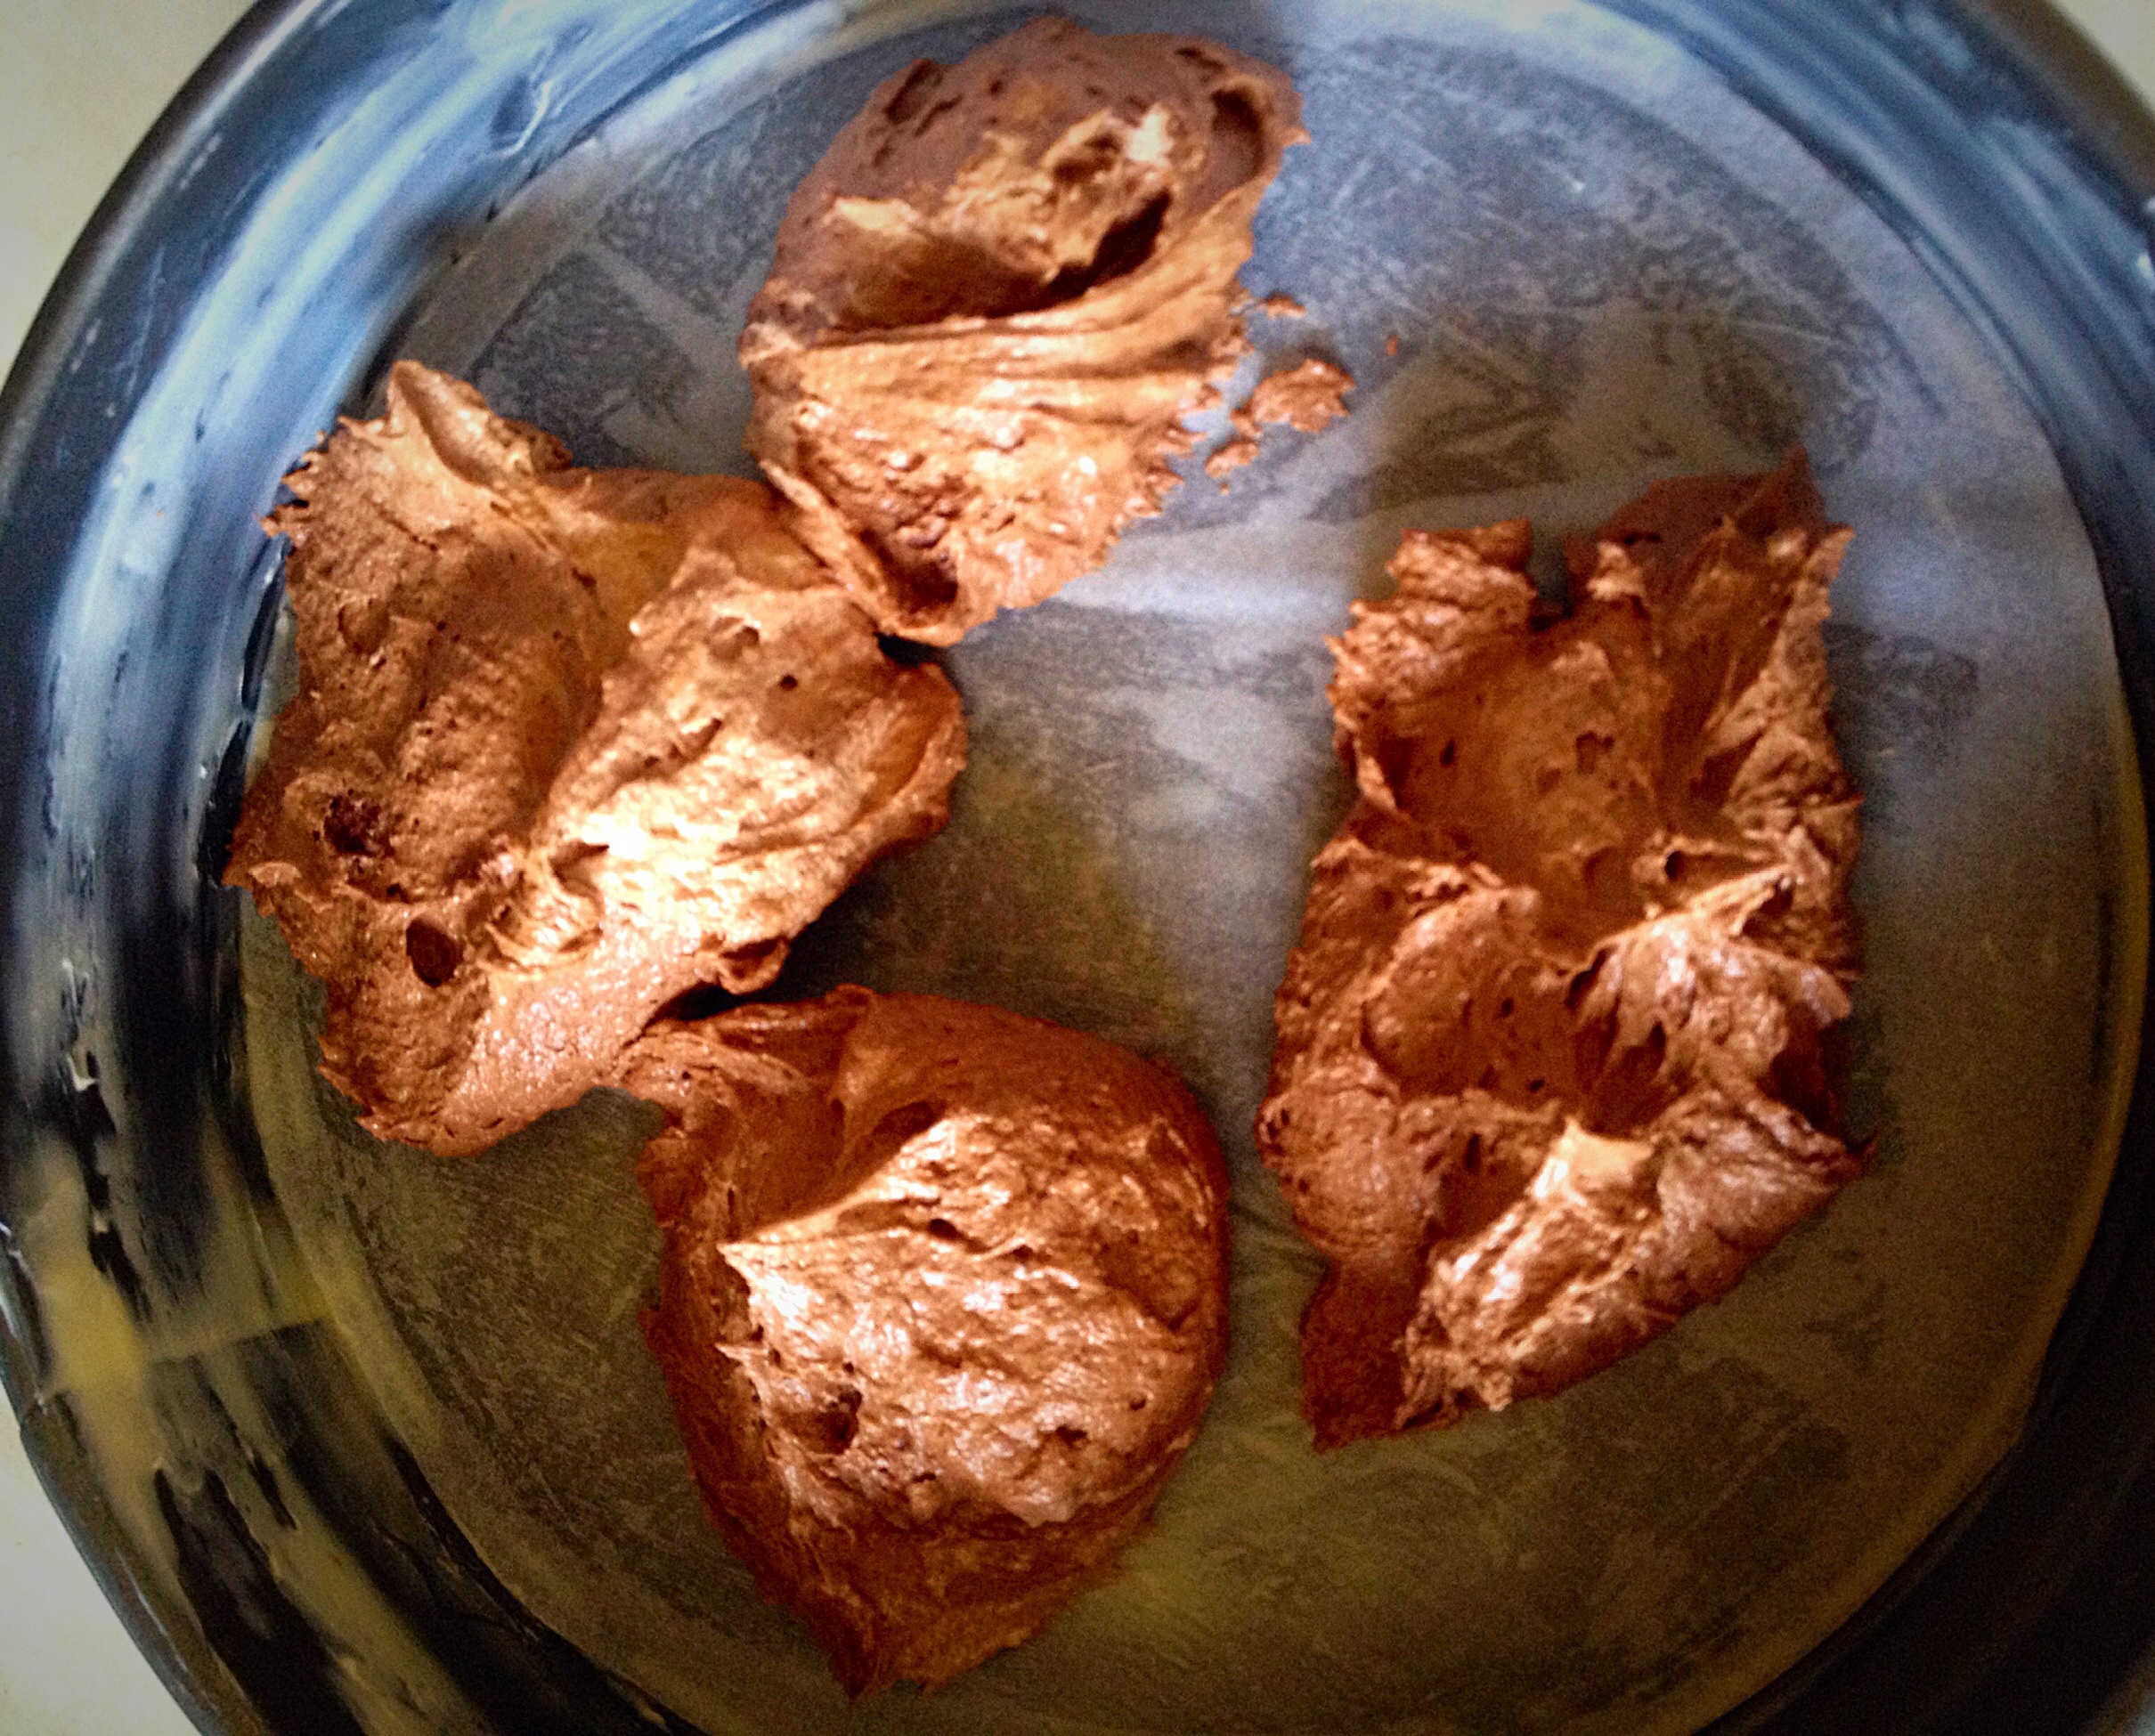
Take approximately a tablespoon of mixture, roll into a ball shape and place onto a parchment lined baking sheet.
Repeat until all the mixture is used.
These cookie dough balls are about to be squished!!!
Wash your hands, they WILL look like you’ve been making mud pies! Now using your fingers squish the cookie balls, they will still spread a bit whilst cooking.
The finger marks leave a pretty pattern even once baked!
Finally place the baking sheets in the oven and bake for 15-20 mins. I rotated my baking sheets halfway through the cooking process so that the cookies baked evenly. This is fine with cookies NOT cupcakes!
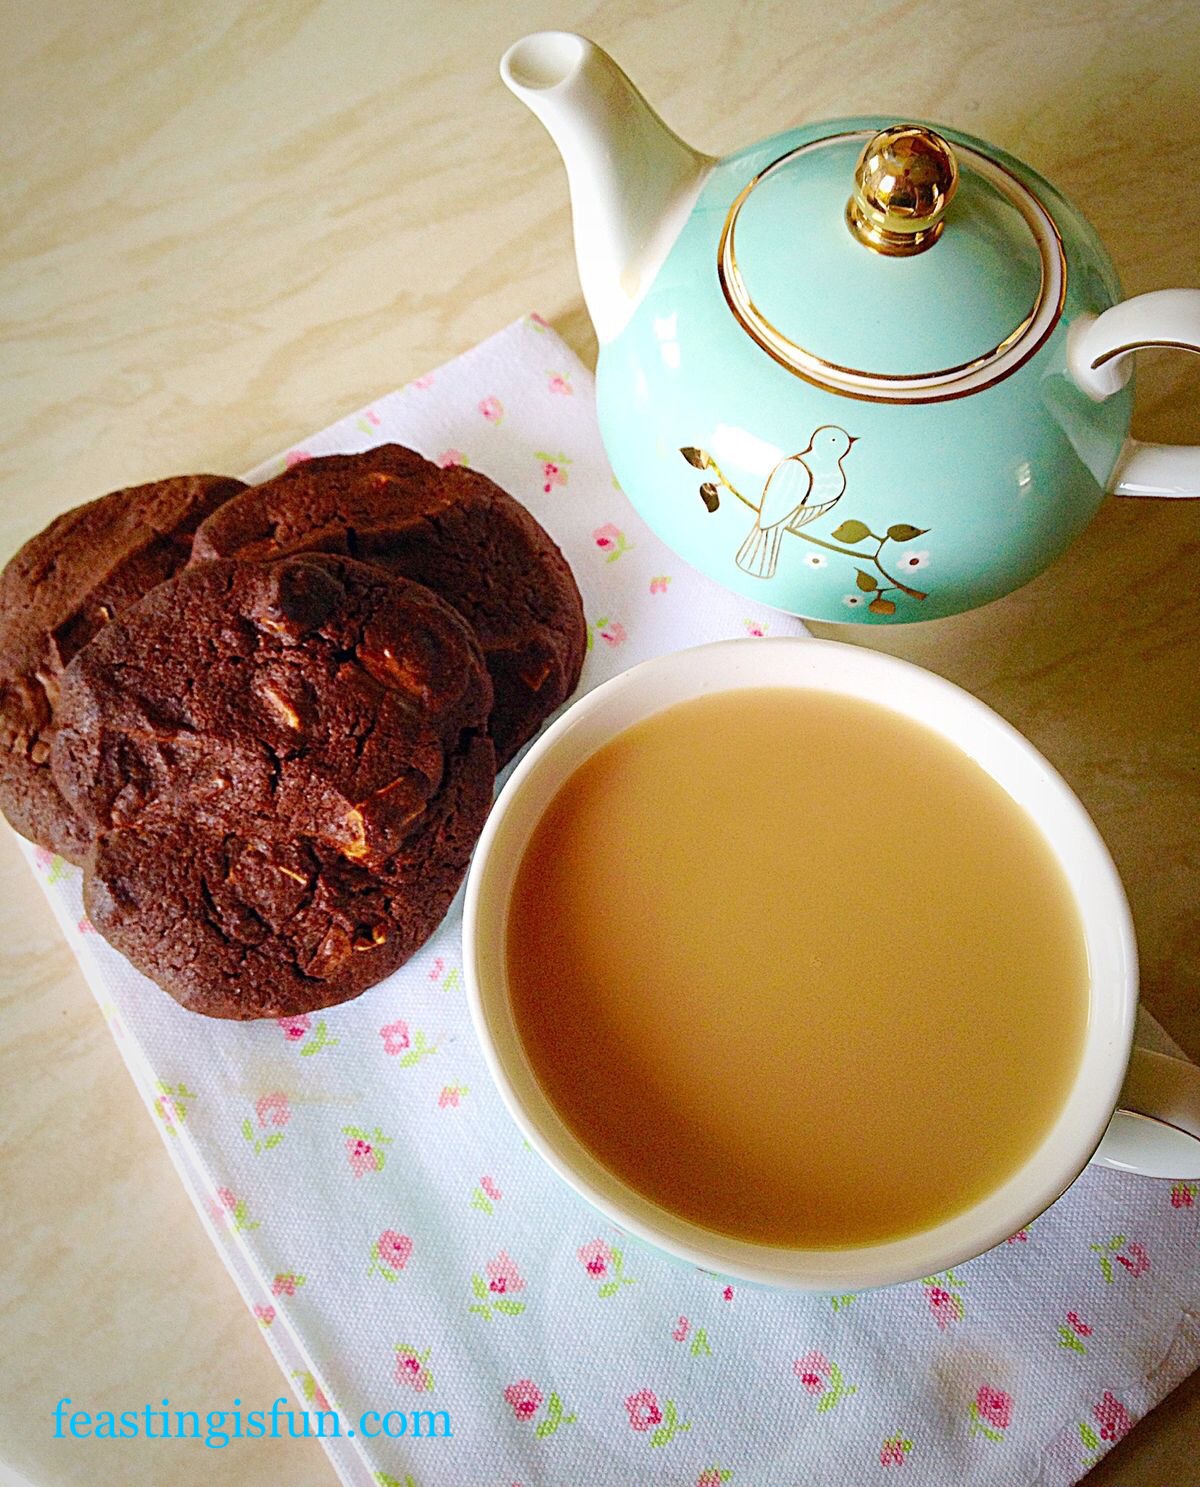
As soon as the cookies are baked remove from the oven and allow the Extreme Chocolate Cookies to cool on the trays for 5 mins, then transfer the cookies to a cooling rack.
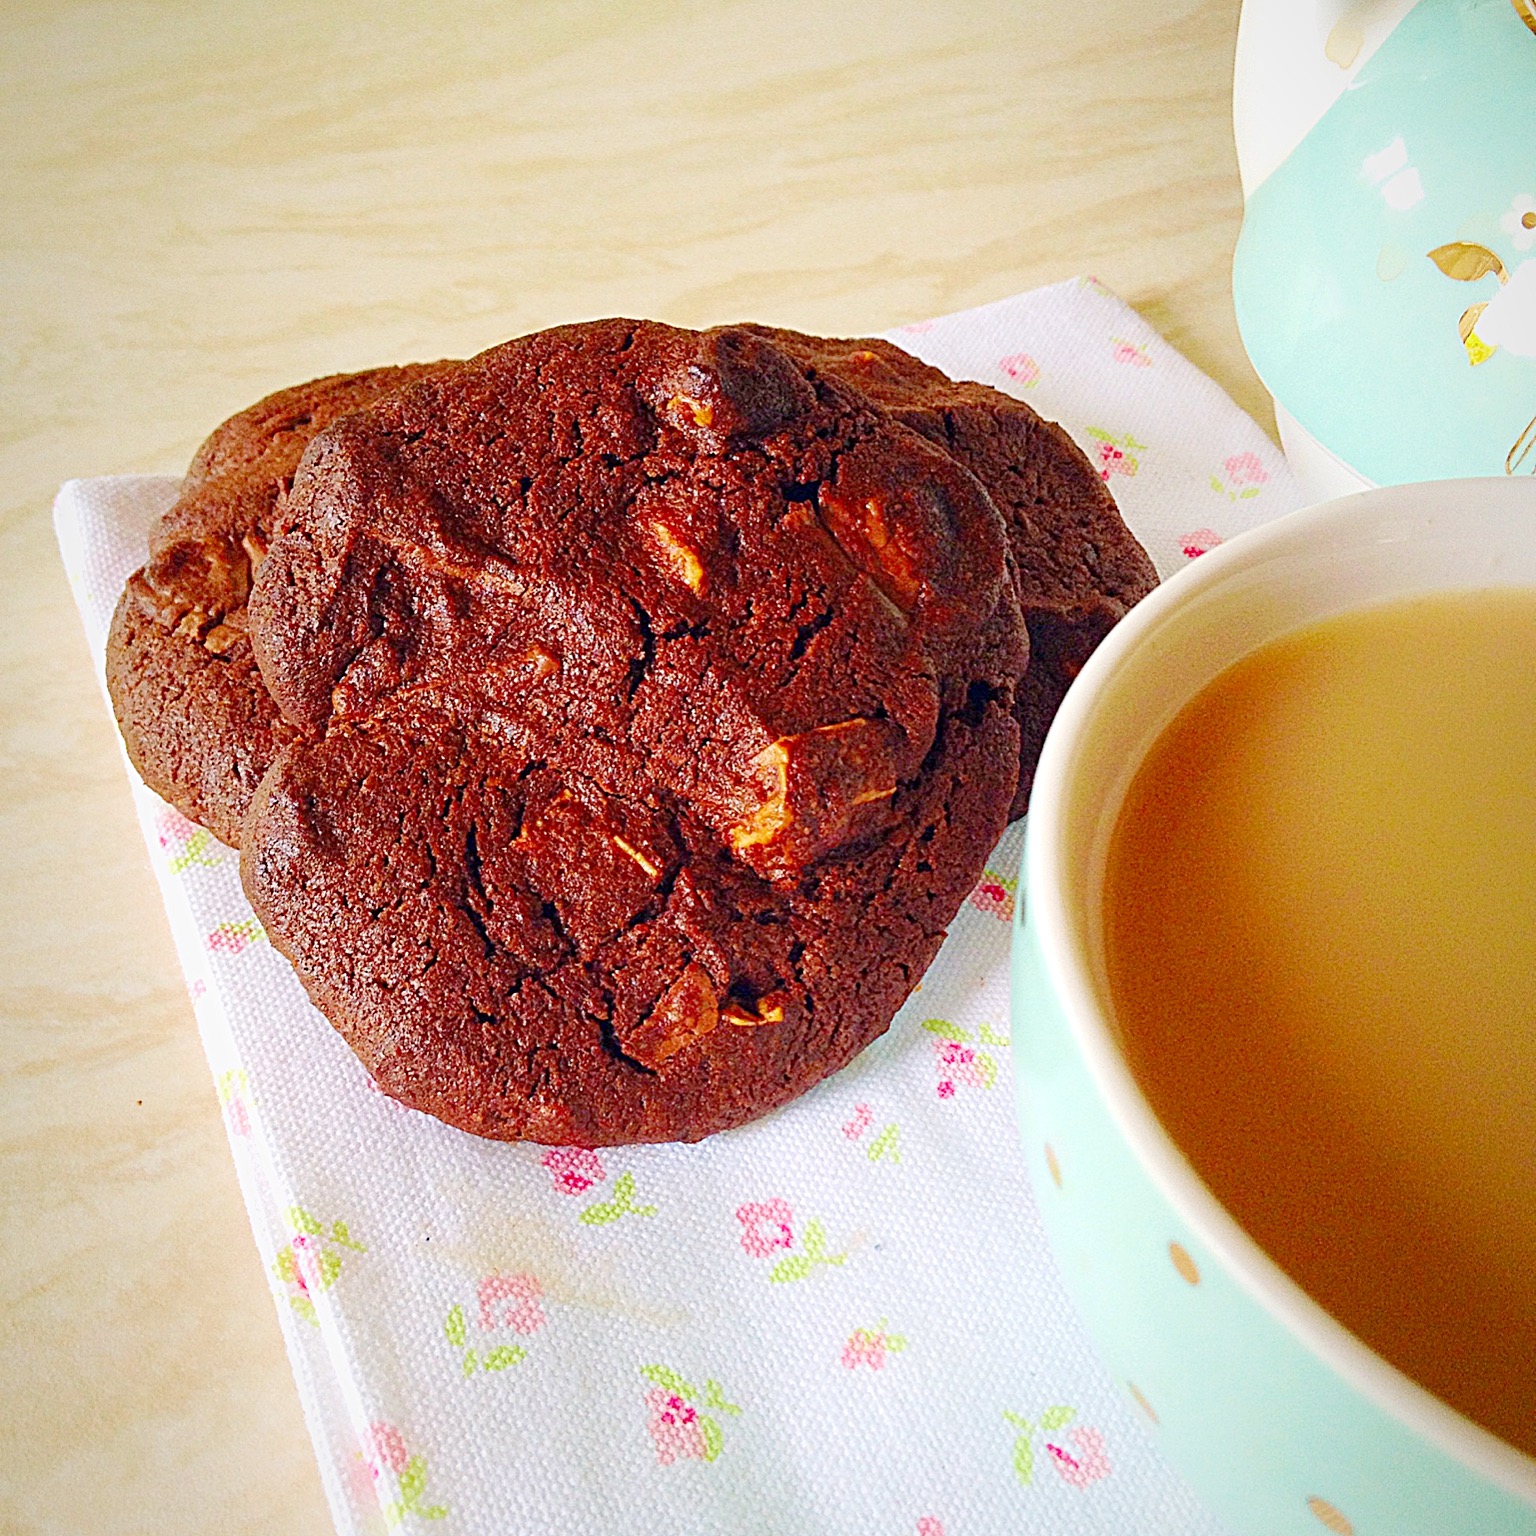
Extreme Chocolate Cookies
While the cookies cooled I sent the children a text (at school – rebel mummy!!!) and put the kettle on for a lovely cuppa!!
Finally I can’t tell you how good it feels knowing I’m getting back to being me. Sooo good.
If you have enjoyed this recipe for Extreme Chocolate Cookies you may also like these:
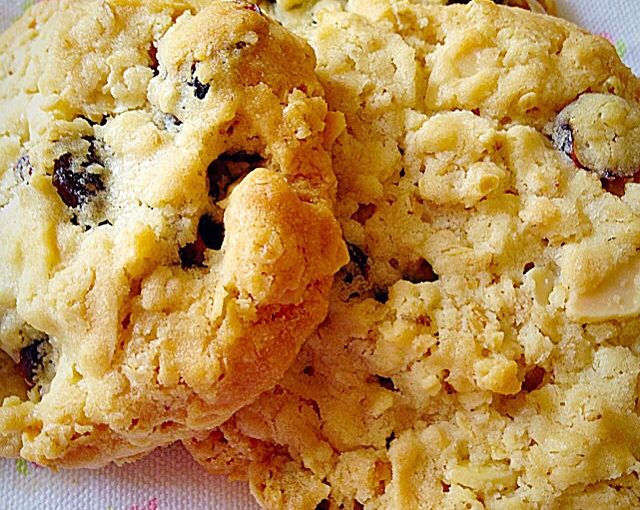
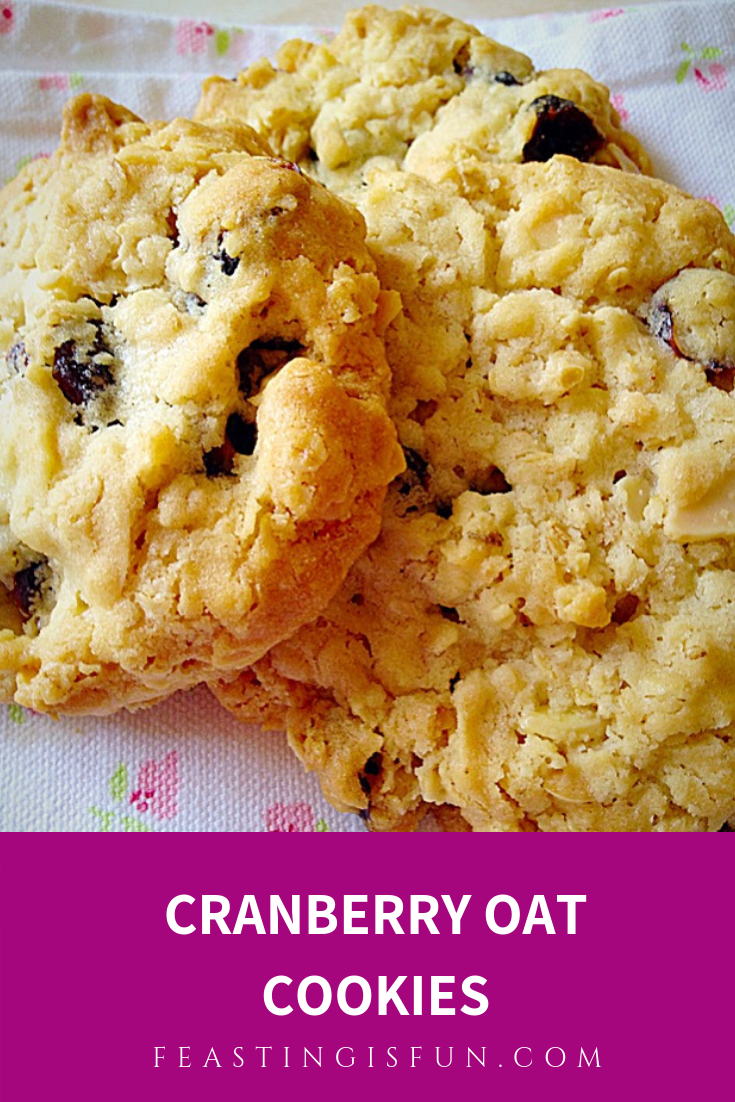
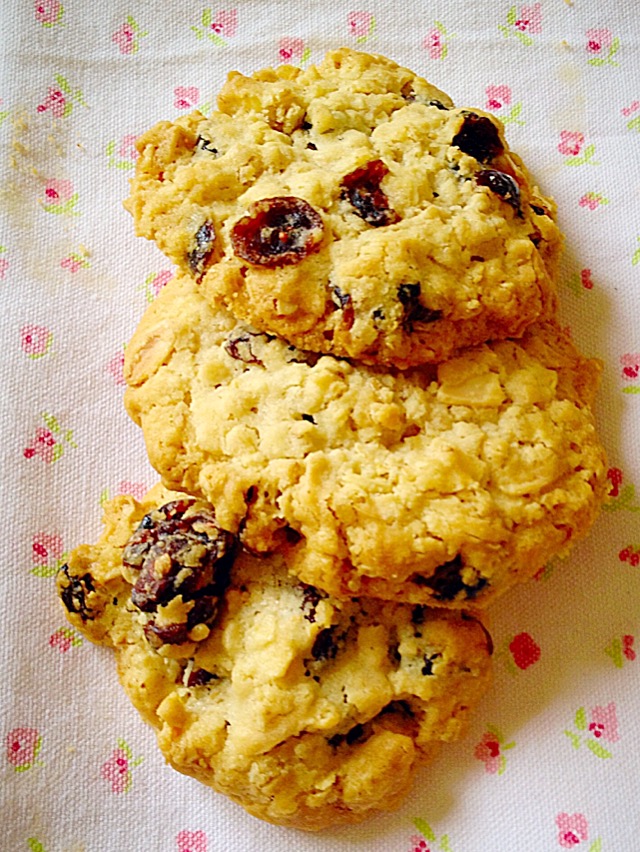
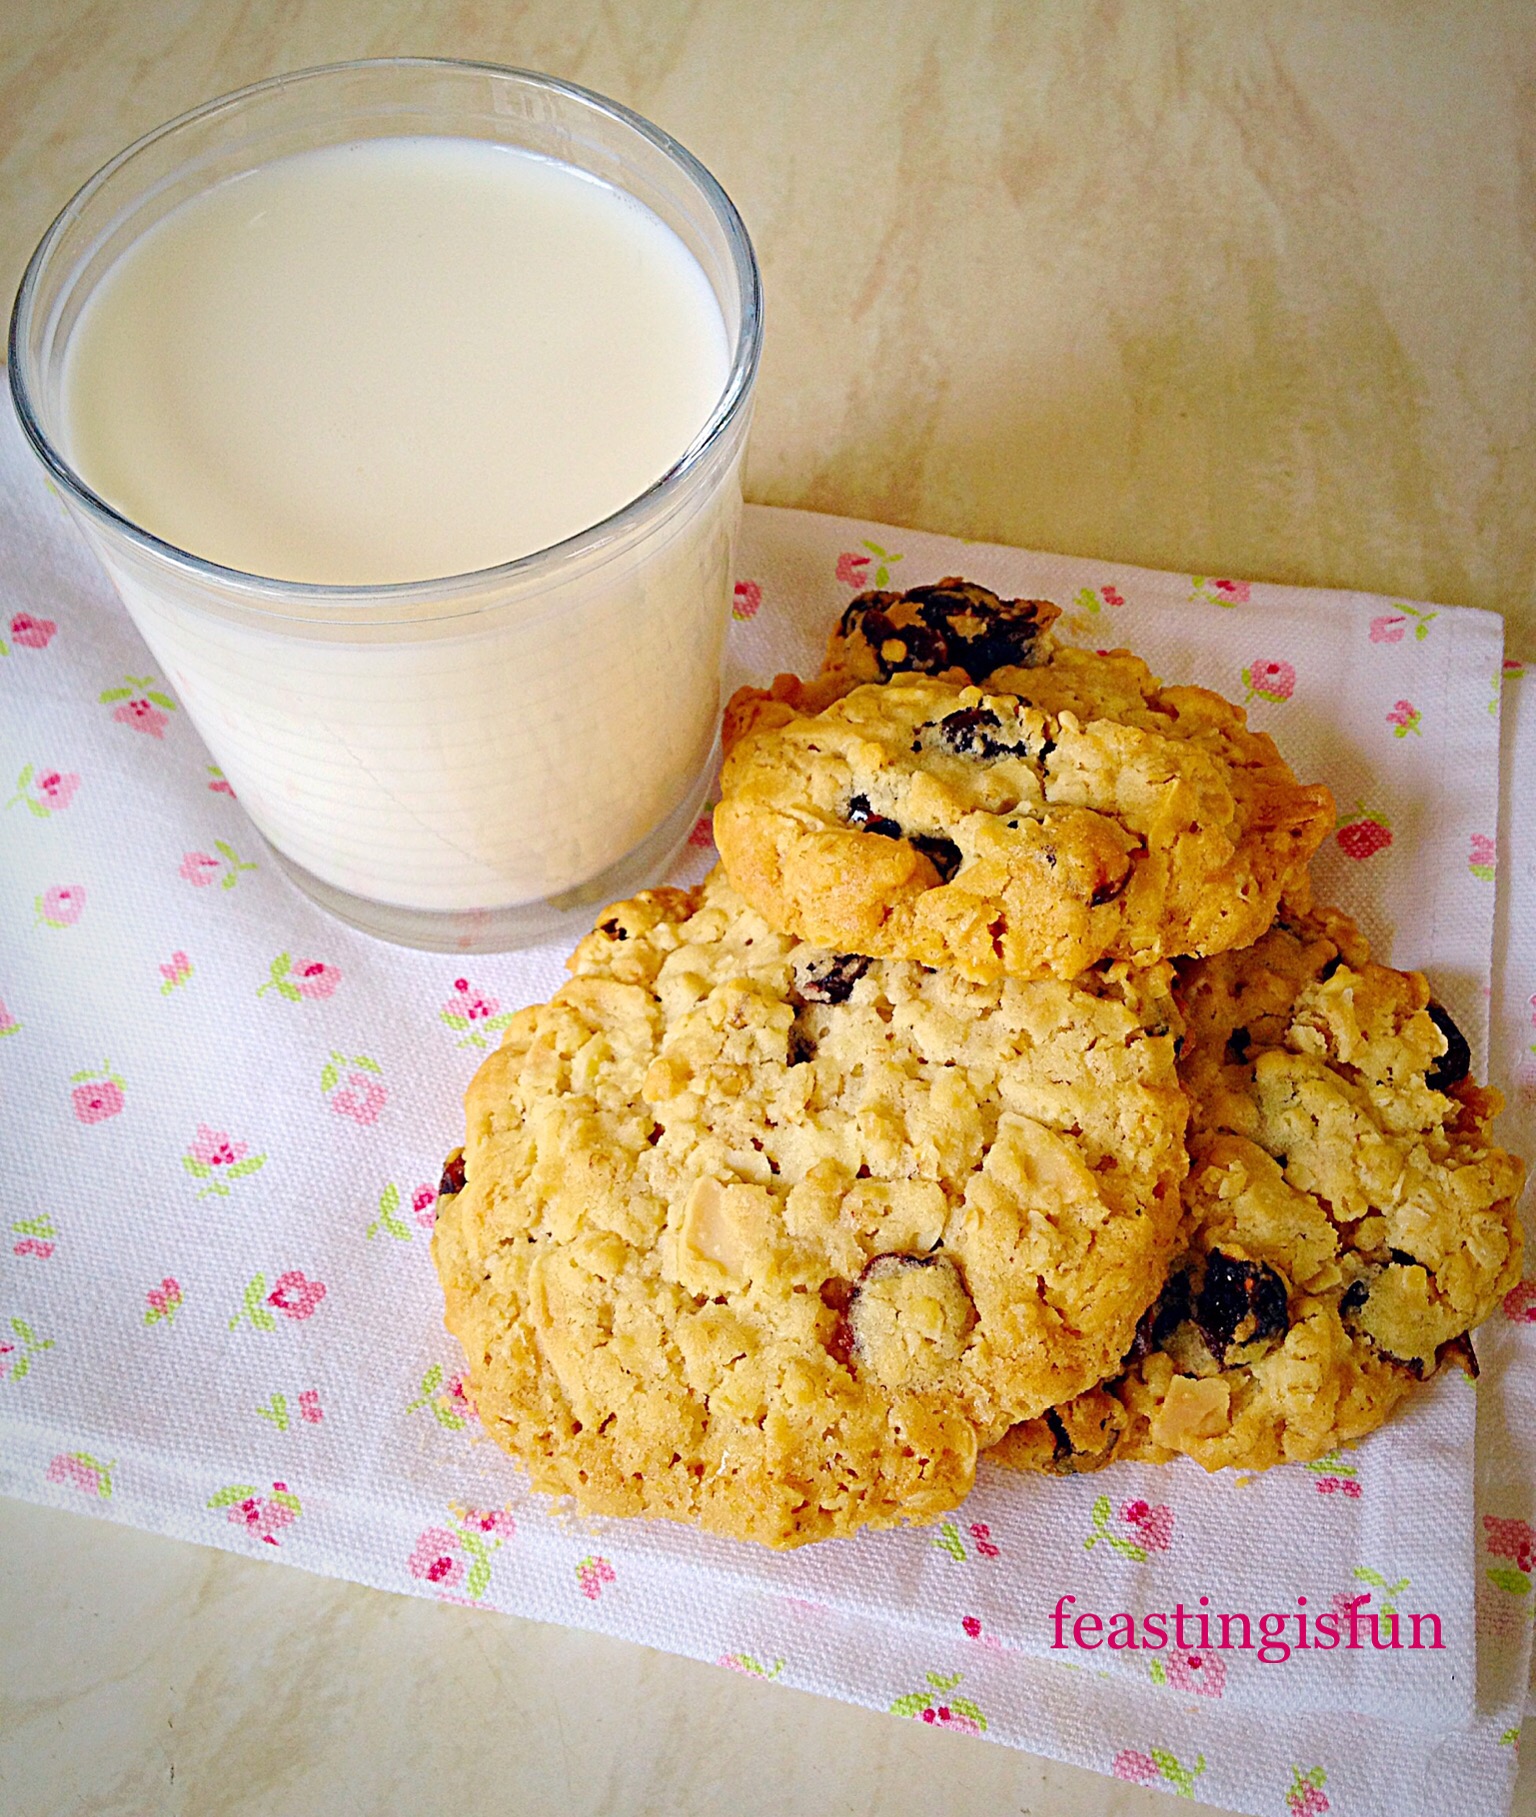
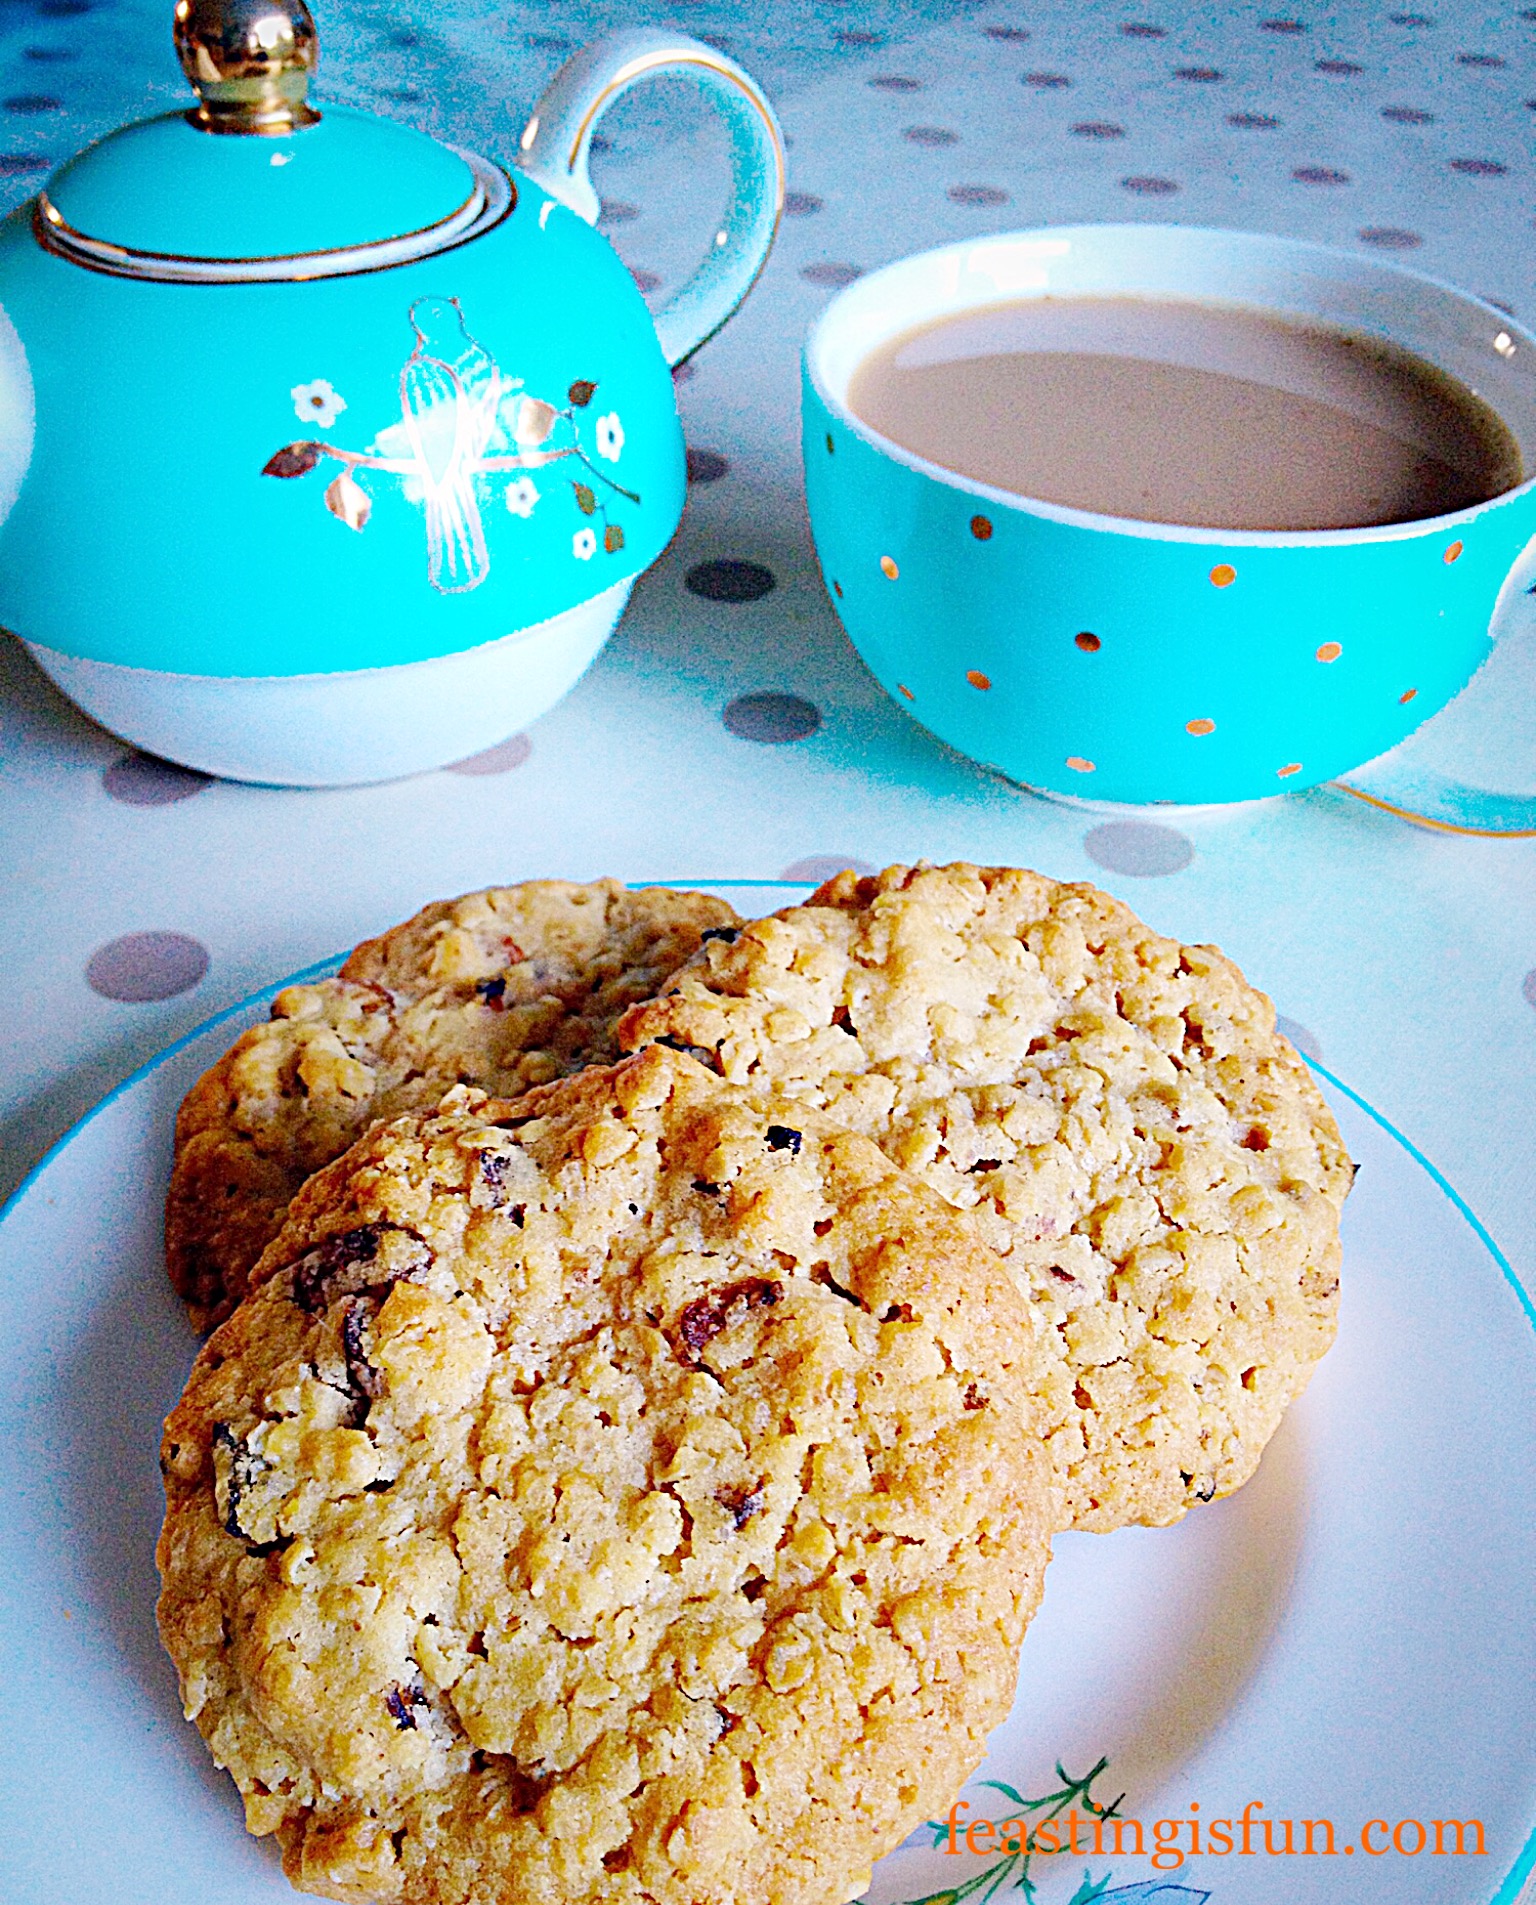
Hi, there. How are you today? I woke up and felt the need to bake – it’s been too long. As soon as I checked my blog posts I realised it’s been ages since I have posted a cookie recipe. So, today I bring you my Cranberry Oat Cookies.
Although I haven’t posted a new recipe since my last Cookie post, that doesn’t mean I have abstained from baking cookies. Rather it means I’ve baked Cookies I’ve already posted. Confused yet? So I baked a batch of Cranberry Oat Cookies. I think these may be my favourite Cookies today!
Since I really fancied Cranberries, Oats and Almonds I made these new cookies, throwing in all the ingredients hoping they would turn out ok. Oooh they are so much more than ok they are scrumptious.
Preheat the oven to 180C/160C fan oven, has mark 4, 350F
Making And Shaping The Cookies:
First of all, unless using non stick, line 2 baking trays with baking parchment.
Into a large bowl add the butter, sugar and salt. Beat together until pale and fluffy – I used an electric whisk, a stand mixer with the paddle attachment fixed is fine.
Add the egg yolk and vanilla/almond extracts and thoroughly mix in.
Next add the flour, oats, cranberries and flaked almonds. Mix until just combined.
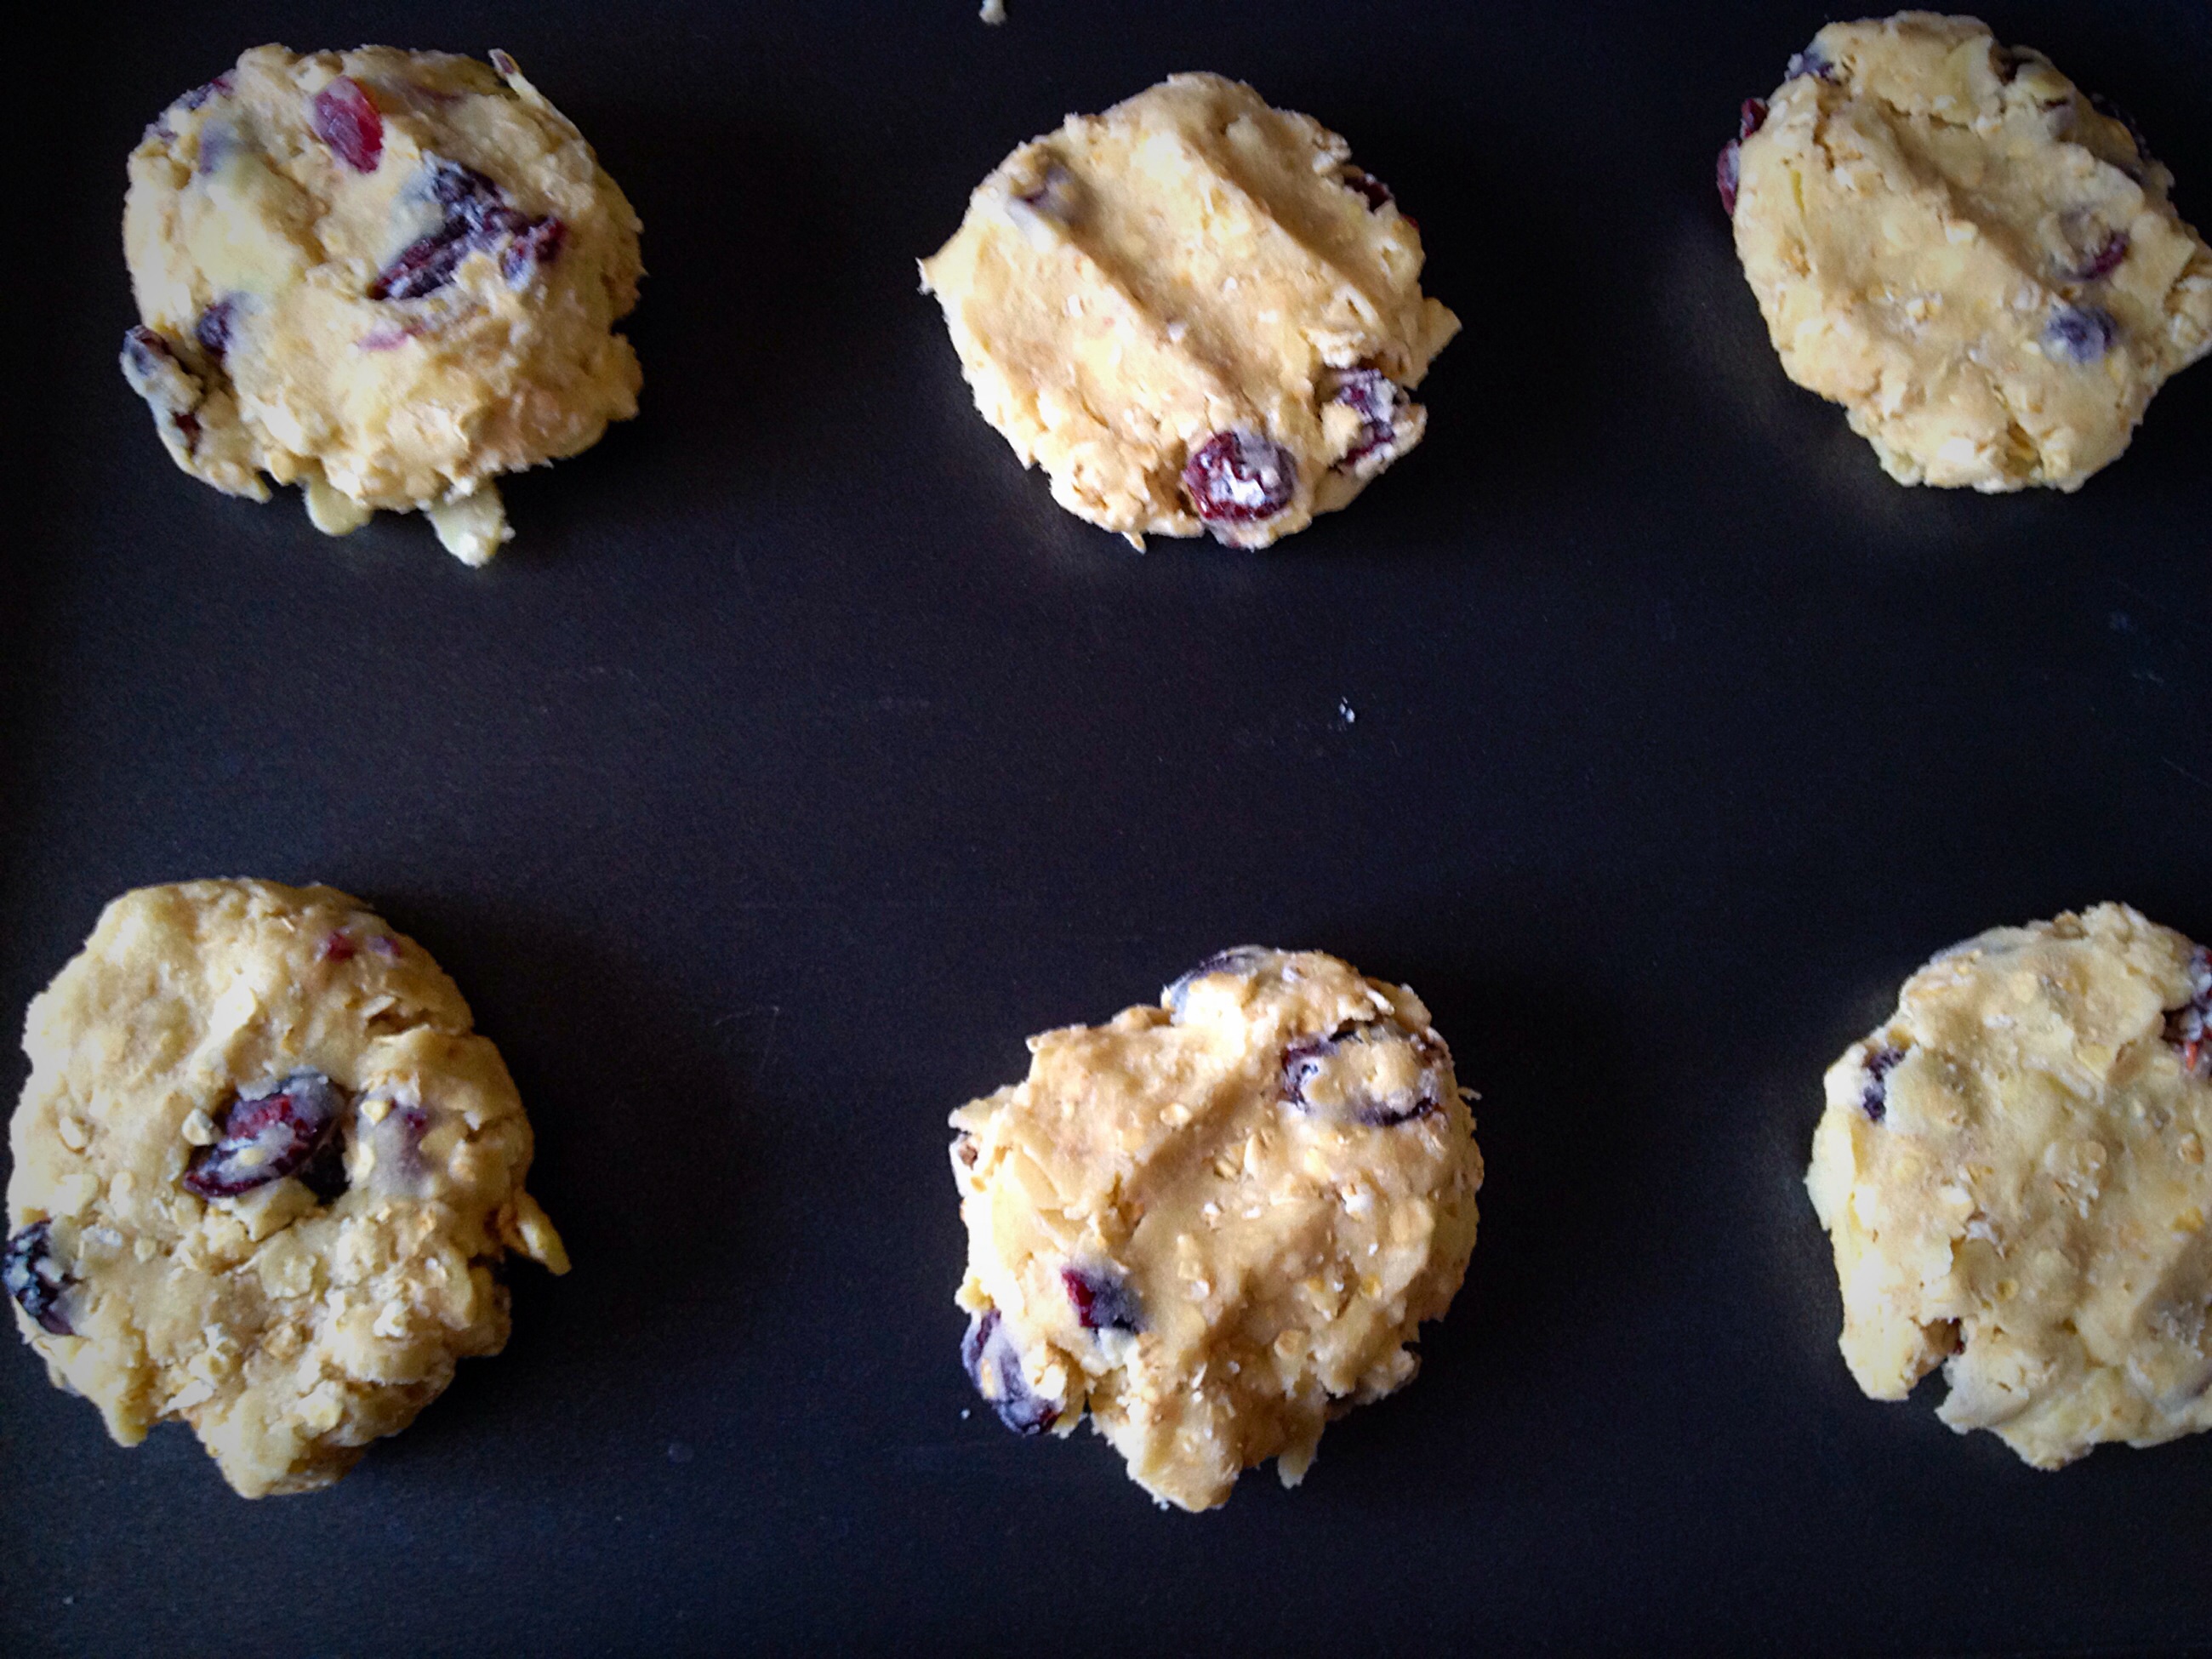
Take about a heaped tablespoon of the Cookie dough and roll into a ball using your hands.
Place the Cranberry OatCookie dough balls onto the baking tray.
Cranberry Oat Cookie Dough Balls
Using your fingers gently press down to lightly flatten them.
Baking The Cookies
Place the cookies into the middle and lower part of the oven.
Bake for 25-30 minutes until golden brown.
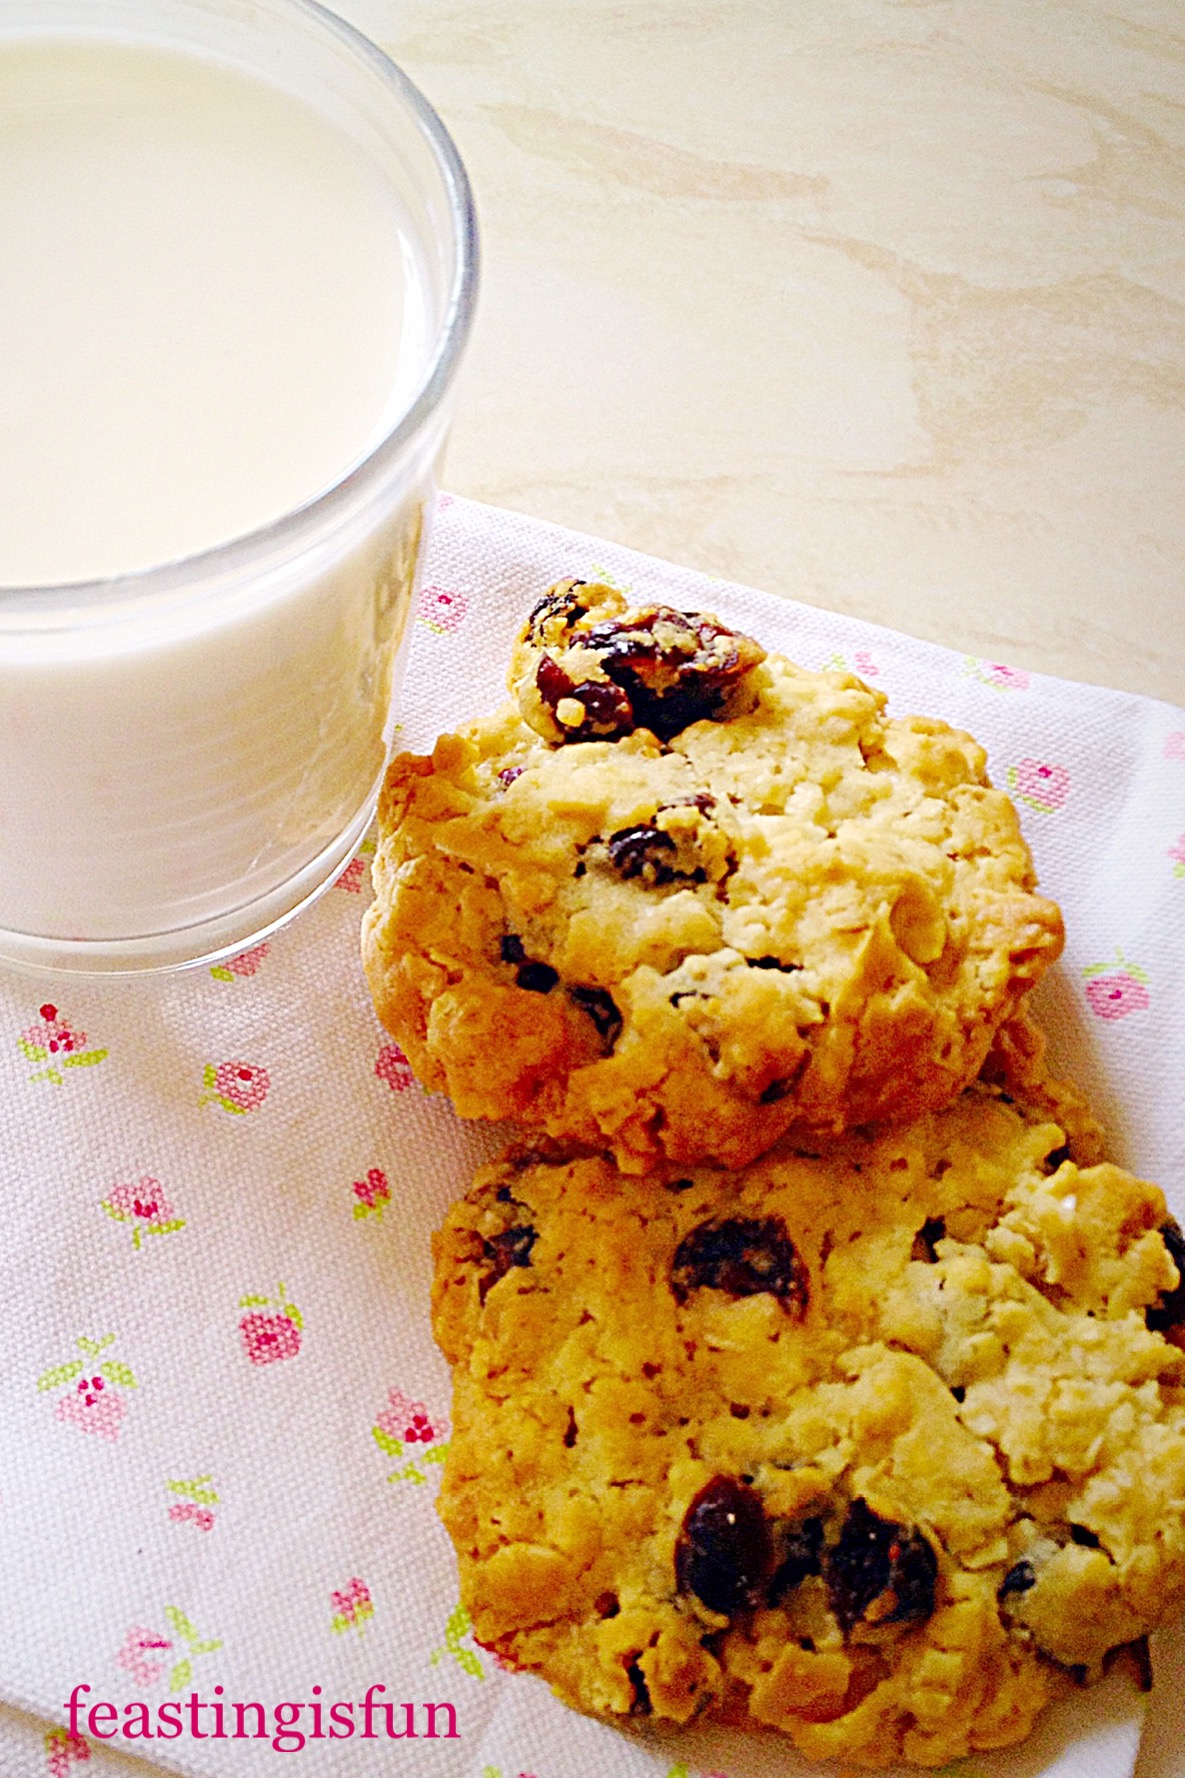
As soon as the cookies are golden, remove from oven and allow to fully cool on the baking sheets. This allows the Cranberry Oat Cookies to firm up.
Cranberry Oat Cookies
Store the cold cookies in an airtight container and eat within a week.
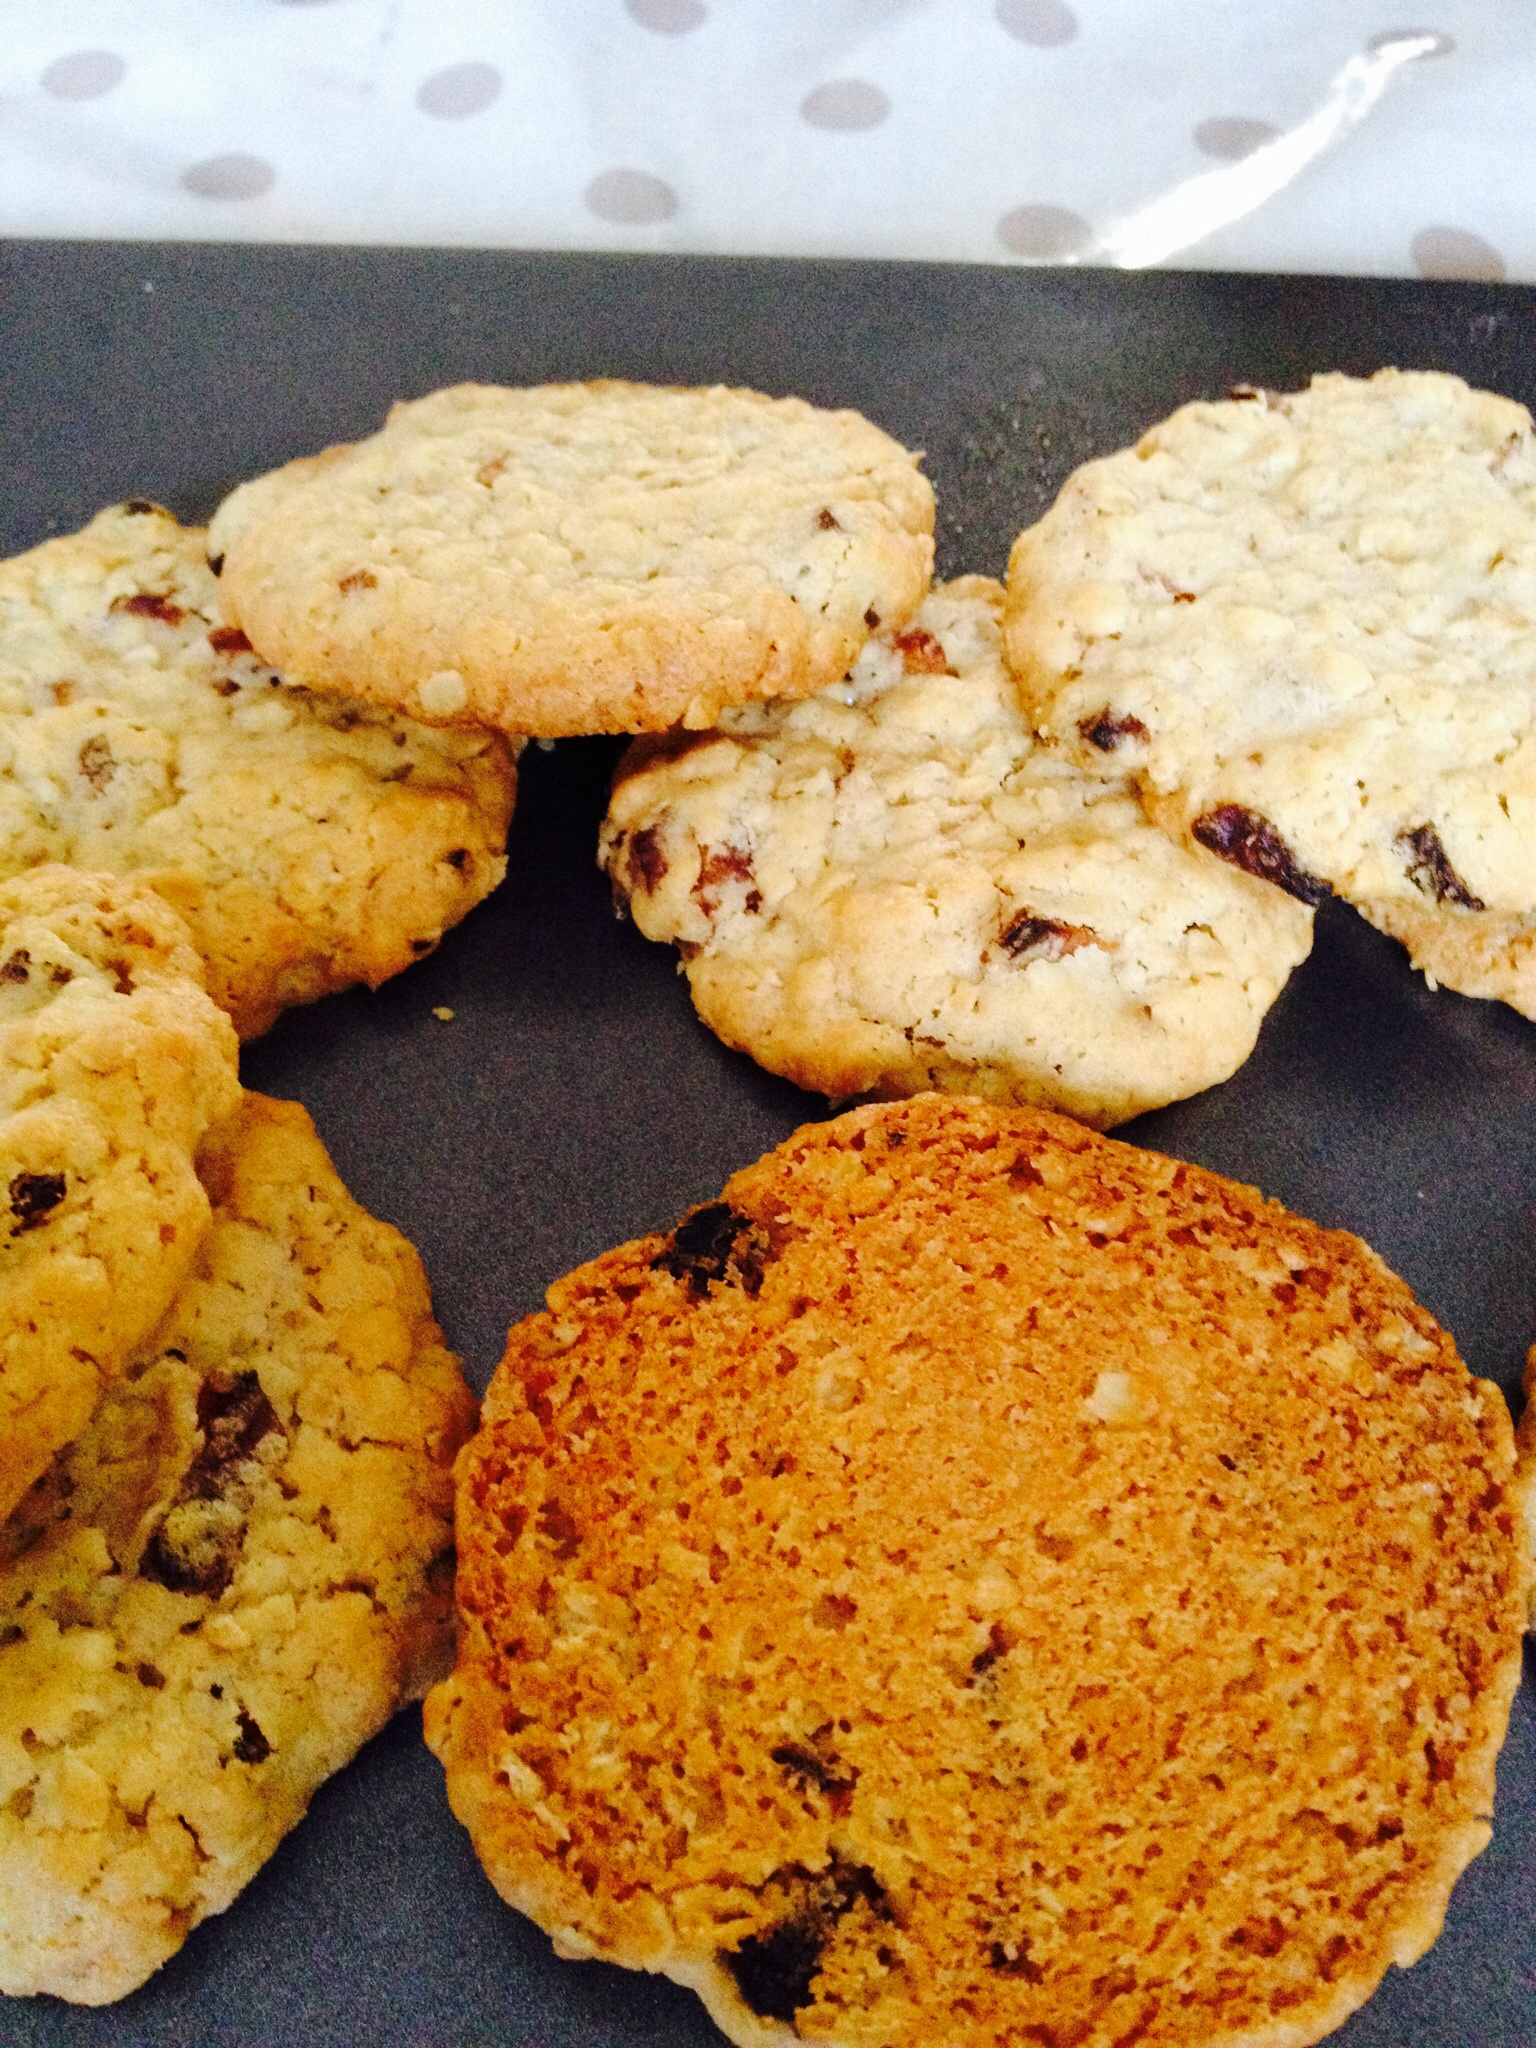
If You Have Enjoyed This Recipe For Cranberry Oat Cookies You May Also Like These:
Since one of my best friends has been unwell recently, a fresh delivery of Cookies will be just the boost she needs. As a dear friend, who also has a sweet tooth I know she will enjoy these. So I can stop by for a cuppa and chat while sharing these cookies. Because food always tastes better when it’s shared! Who will you share your Cookies with?
So, whatever you are making, baking and creating in your kitchens, have fun preparing and sharing your feast.
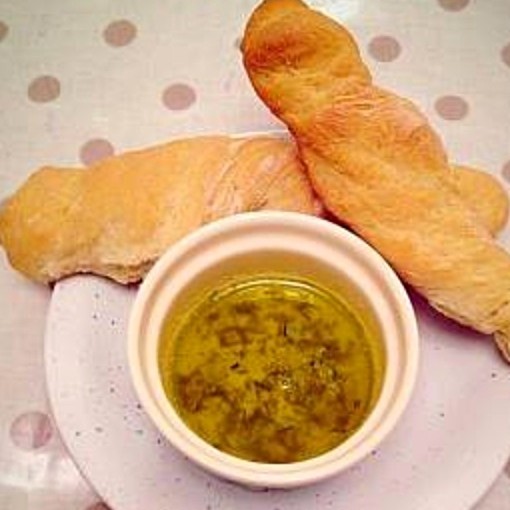
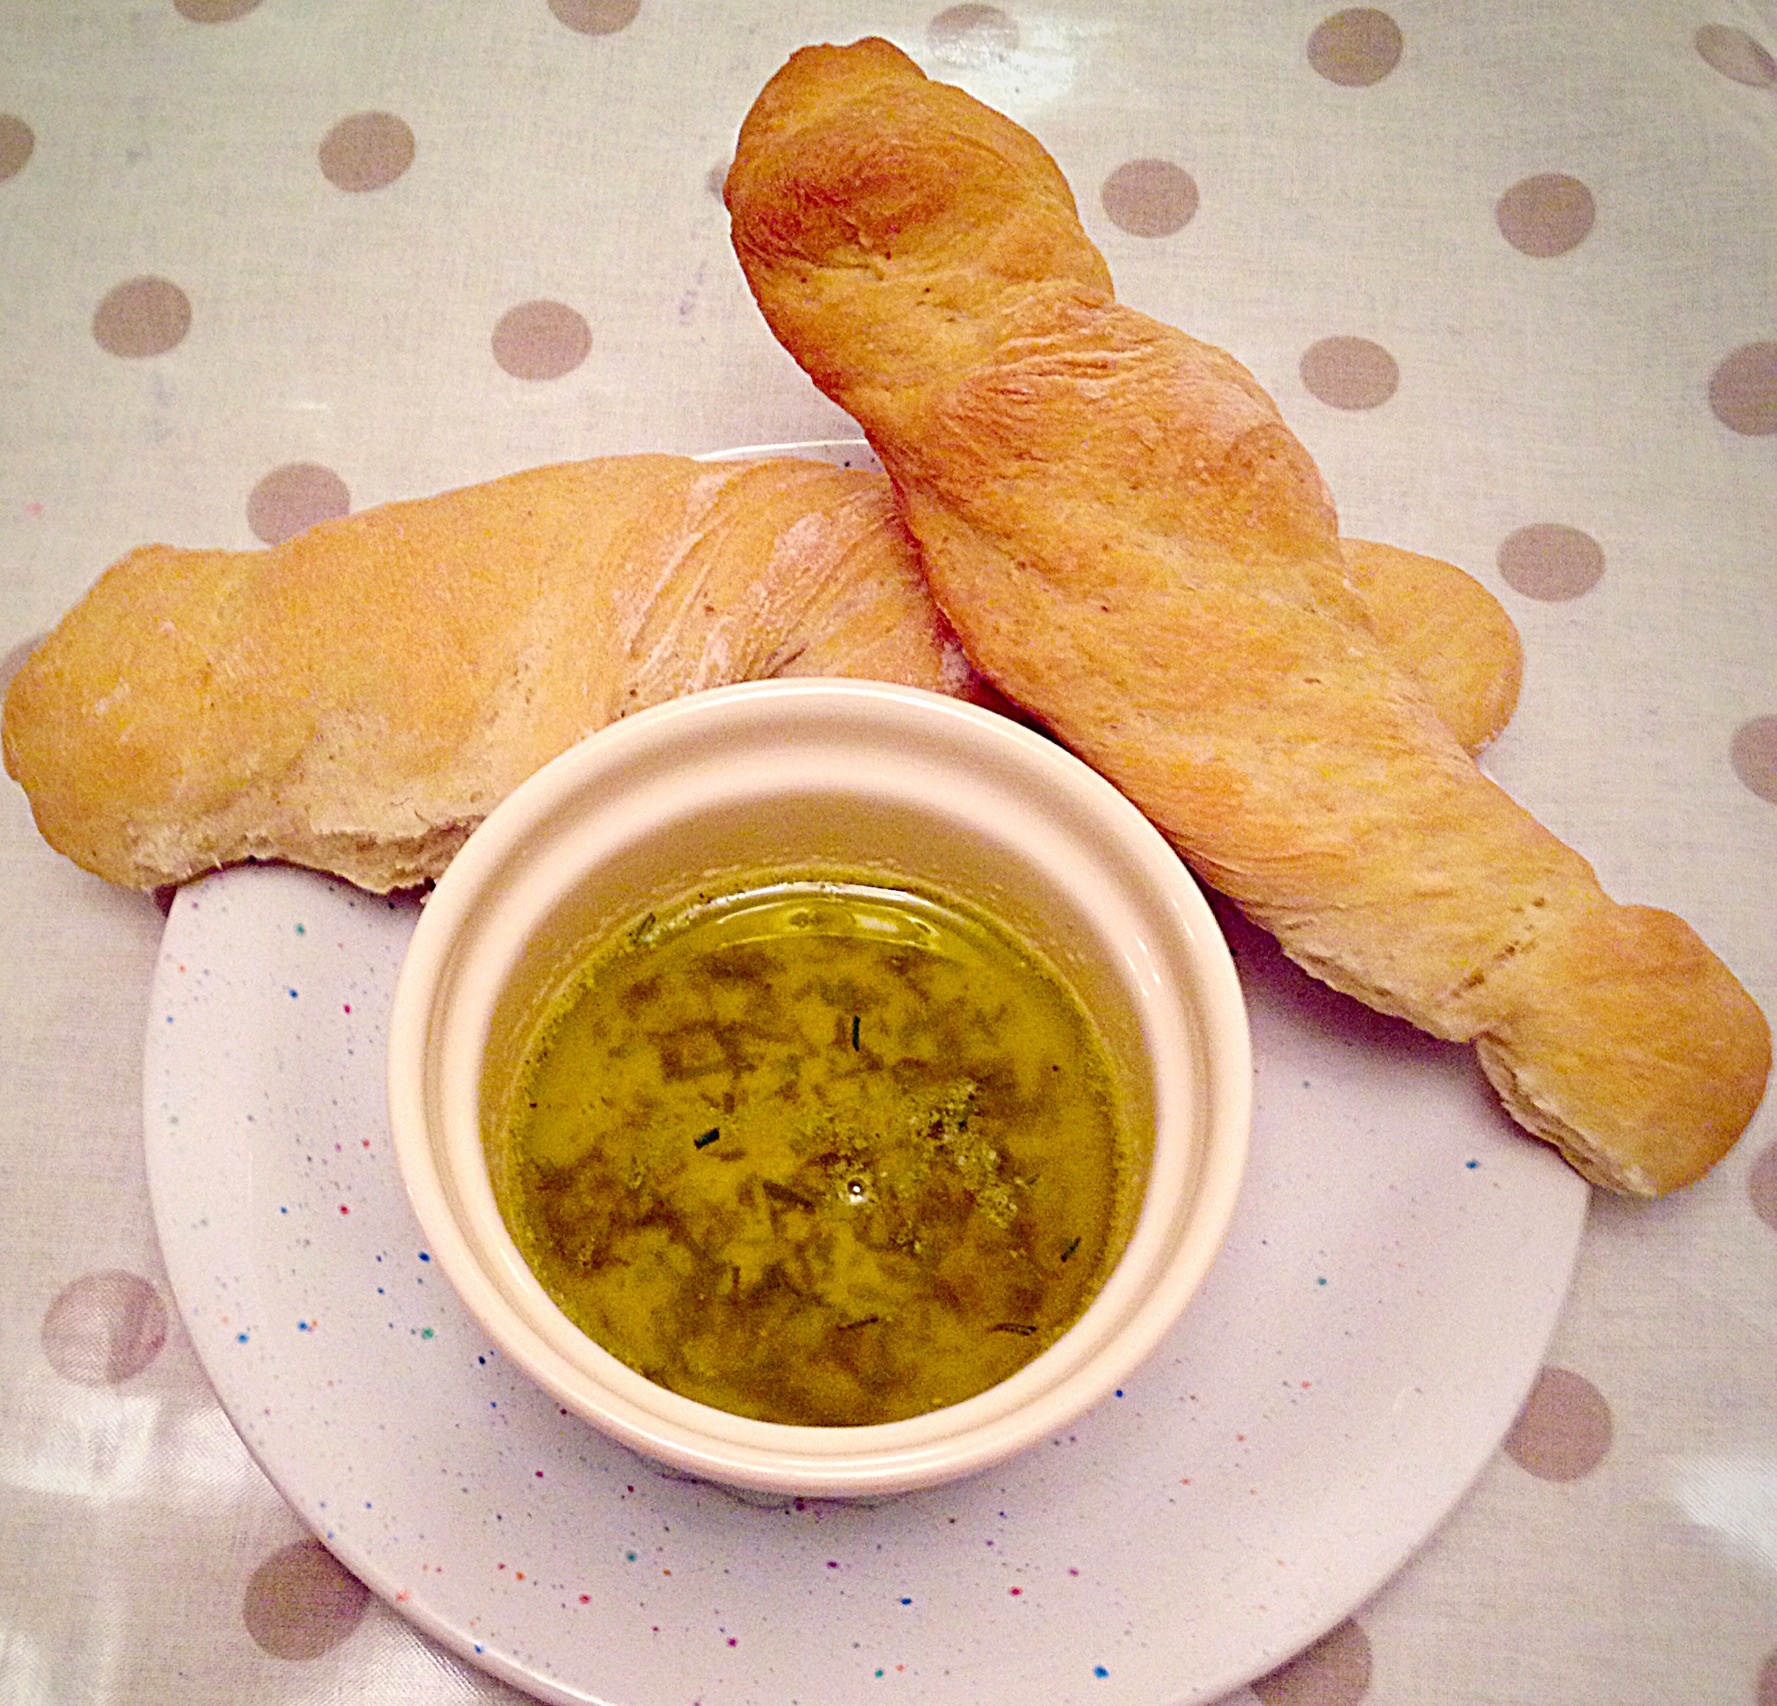
Hello there, have I got a new take on Garlic Bread for you today? Oh yes I have. Homemade BreadstickGarlic Herb Dipping Oil – deeeelish!! A fab recipe to make with the kids any day, but especially this week, during half term, here in the UK. Just like at Cafe Rouge except everyone has their own pot of dipping oil!
Crunchy Breadsticks with Garlic and Herb Dipping Oil
We first had a version of these at Cafe Rouge a few years ago and we all thought they were yummy. So my mind started whirring, thinking that these couldn’t be ‘that hard’ to make at home – and guess what, they’re not!! And, dare I say, they taste better!
THE perfect sharing food. Perfect with pasta.
Usually, when I’m feeding a crowd, I double up on the recipe and two people share one plate. But last night, with our Spag Bol we each had our own bowl of Garlic and Herb Dipping Oil and Breadsticks (some of us are getting over colds – so thought individual was best!!).
Crunchy Breadsticks, perfect for dunking in the Garlic and Herb Oil.
Firstly to make the breadsticks, for me it really is easier to have a bread maker or stand mixer. There is no way I could do all that kneading by myself, but if you’re happy to make the dough by hand, feel free.
Recipe :Breadsticks Makes 10
1lb/450g Strong White Bread Flour
2tsp Dried Fast Acting Yeast
300ml Water – Approx 37C Body Temp
2tbsp Olive Oil
3/4 tsp Sea Salt Flakes – I used Maldon
Method : see below for hand kneading
Place the warm water into the bowl of your bread maker or stand mixer with the dough hook attached. Add the dried yeast and mix with your fingers. Place the flour on top of the water/yeast. Pour the oil on top of the flour and sprinkle over the salt.
* For bread maker set cycle to knead and prove.
* For the stand mixer, mix the ingredients for 10 minutes. When the dough is soft and elastic remove to an oiled bowl, turn once, so the sides and top are slicked in oil, cover with cling film and place in a warm place to double in size (1-2 hours).
* For hand kneading, place all the ingredients into a large bowl, as per the other methods. Bring together with your hand, in the bowl, until a complete lump of dough is formed. Place the dough on a lightly floured worktop and knead by hand until the dough is smooth and elastic – proceed as for stand mixer.
Once the dough has doubled in size knock back – gently punch down into the bowl to knock out the air (in a bread maker set to mix and allow 30 seconds of slow rotating to knock back your dough).
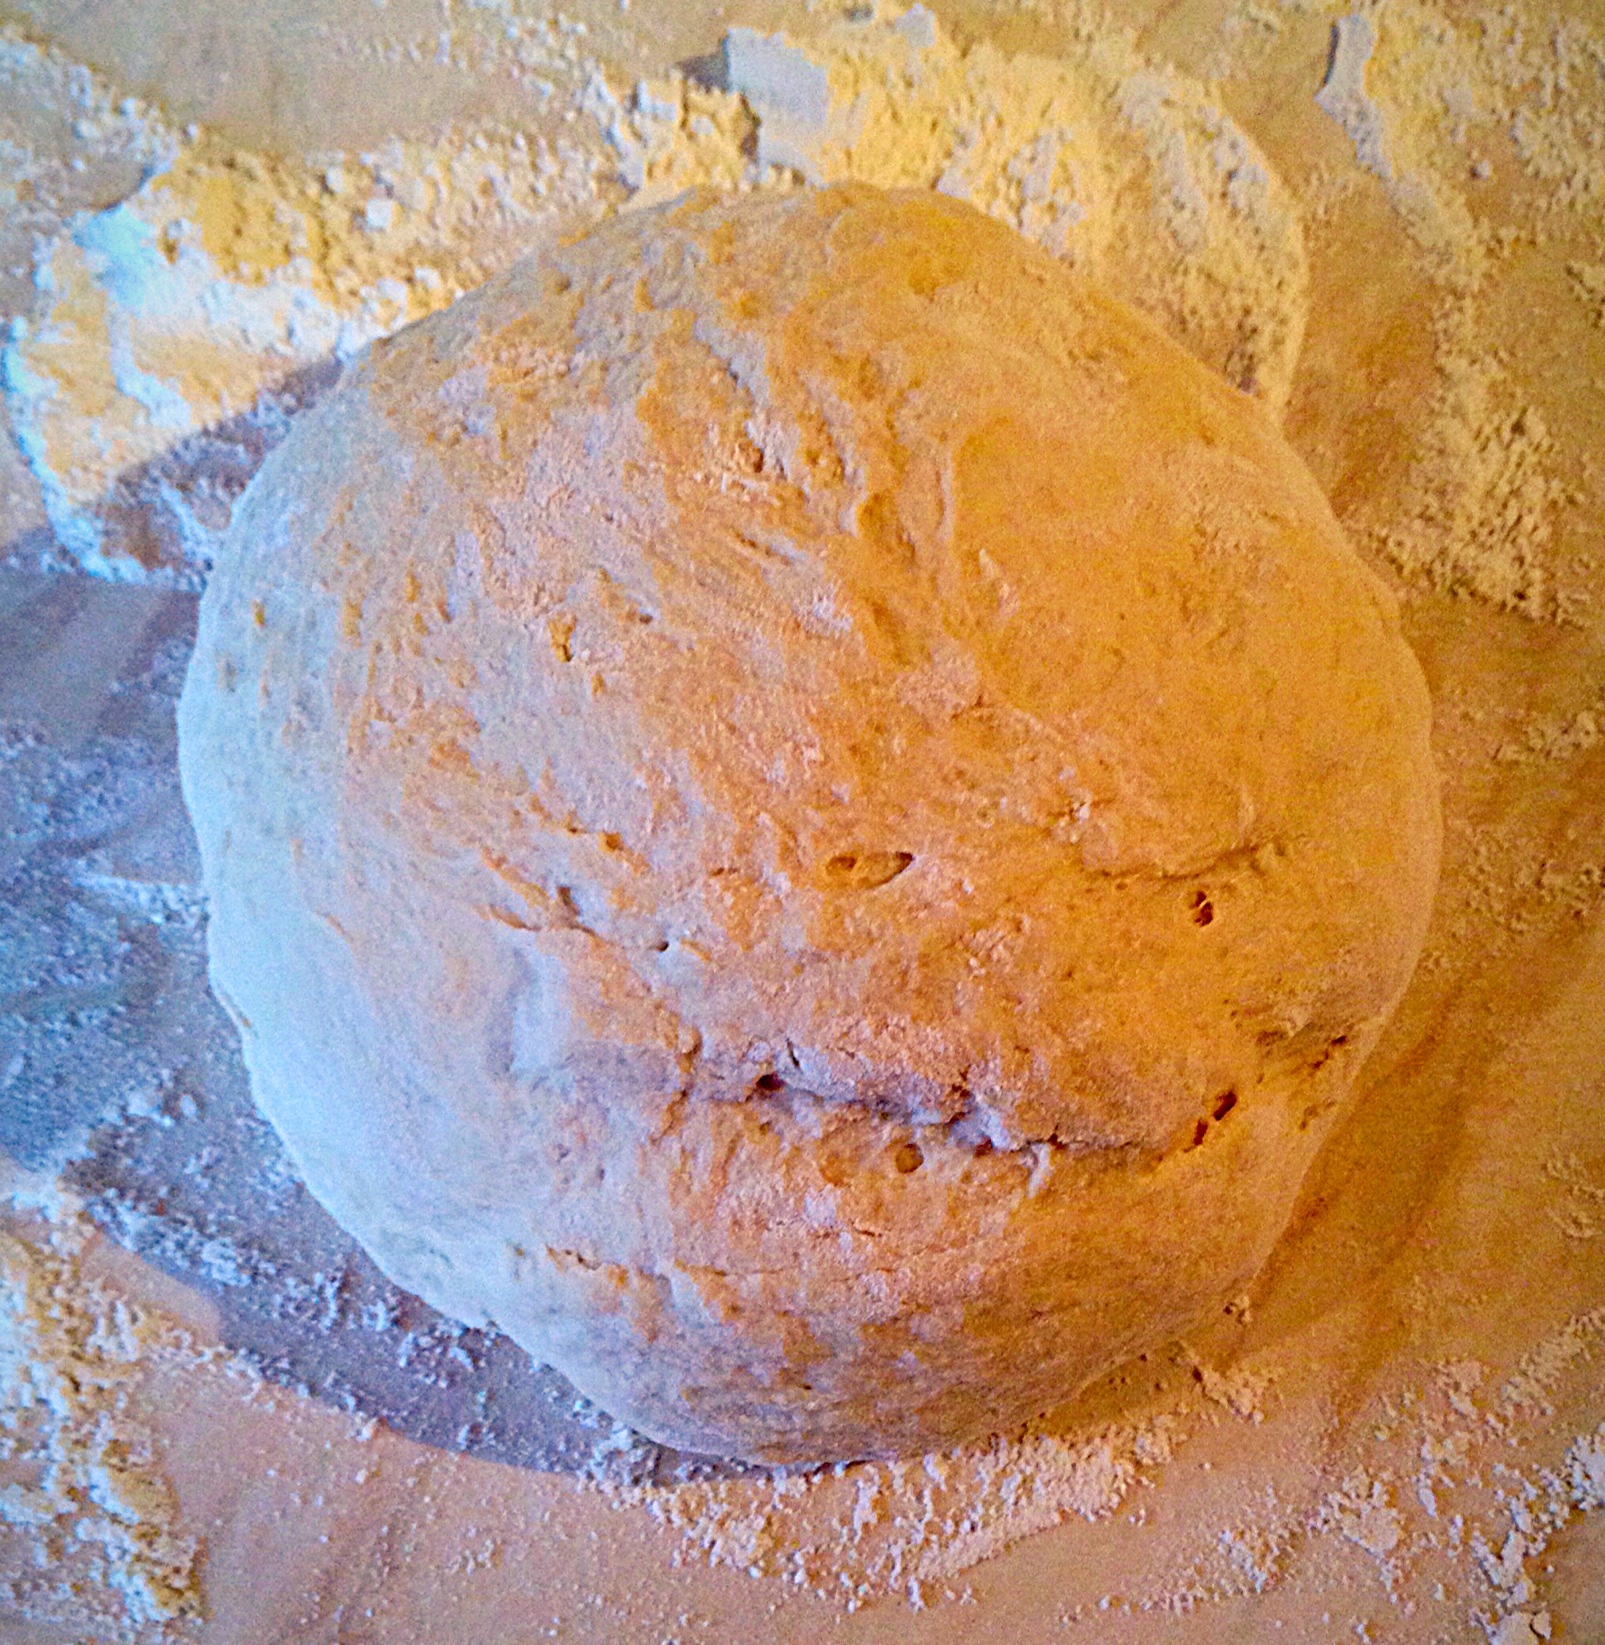
Tip your dough out onto a floured worktop.
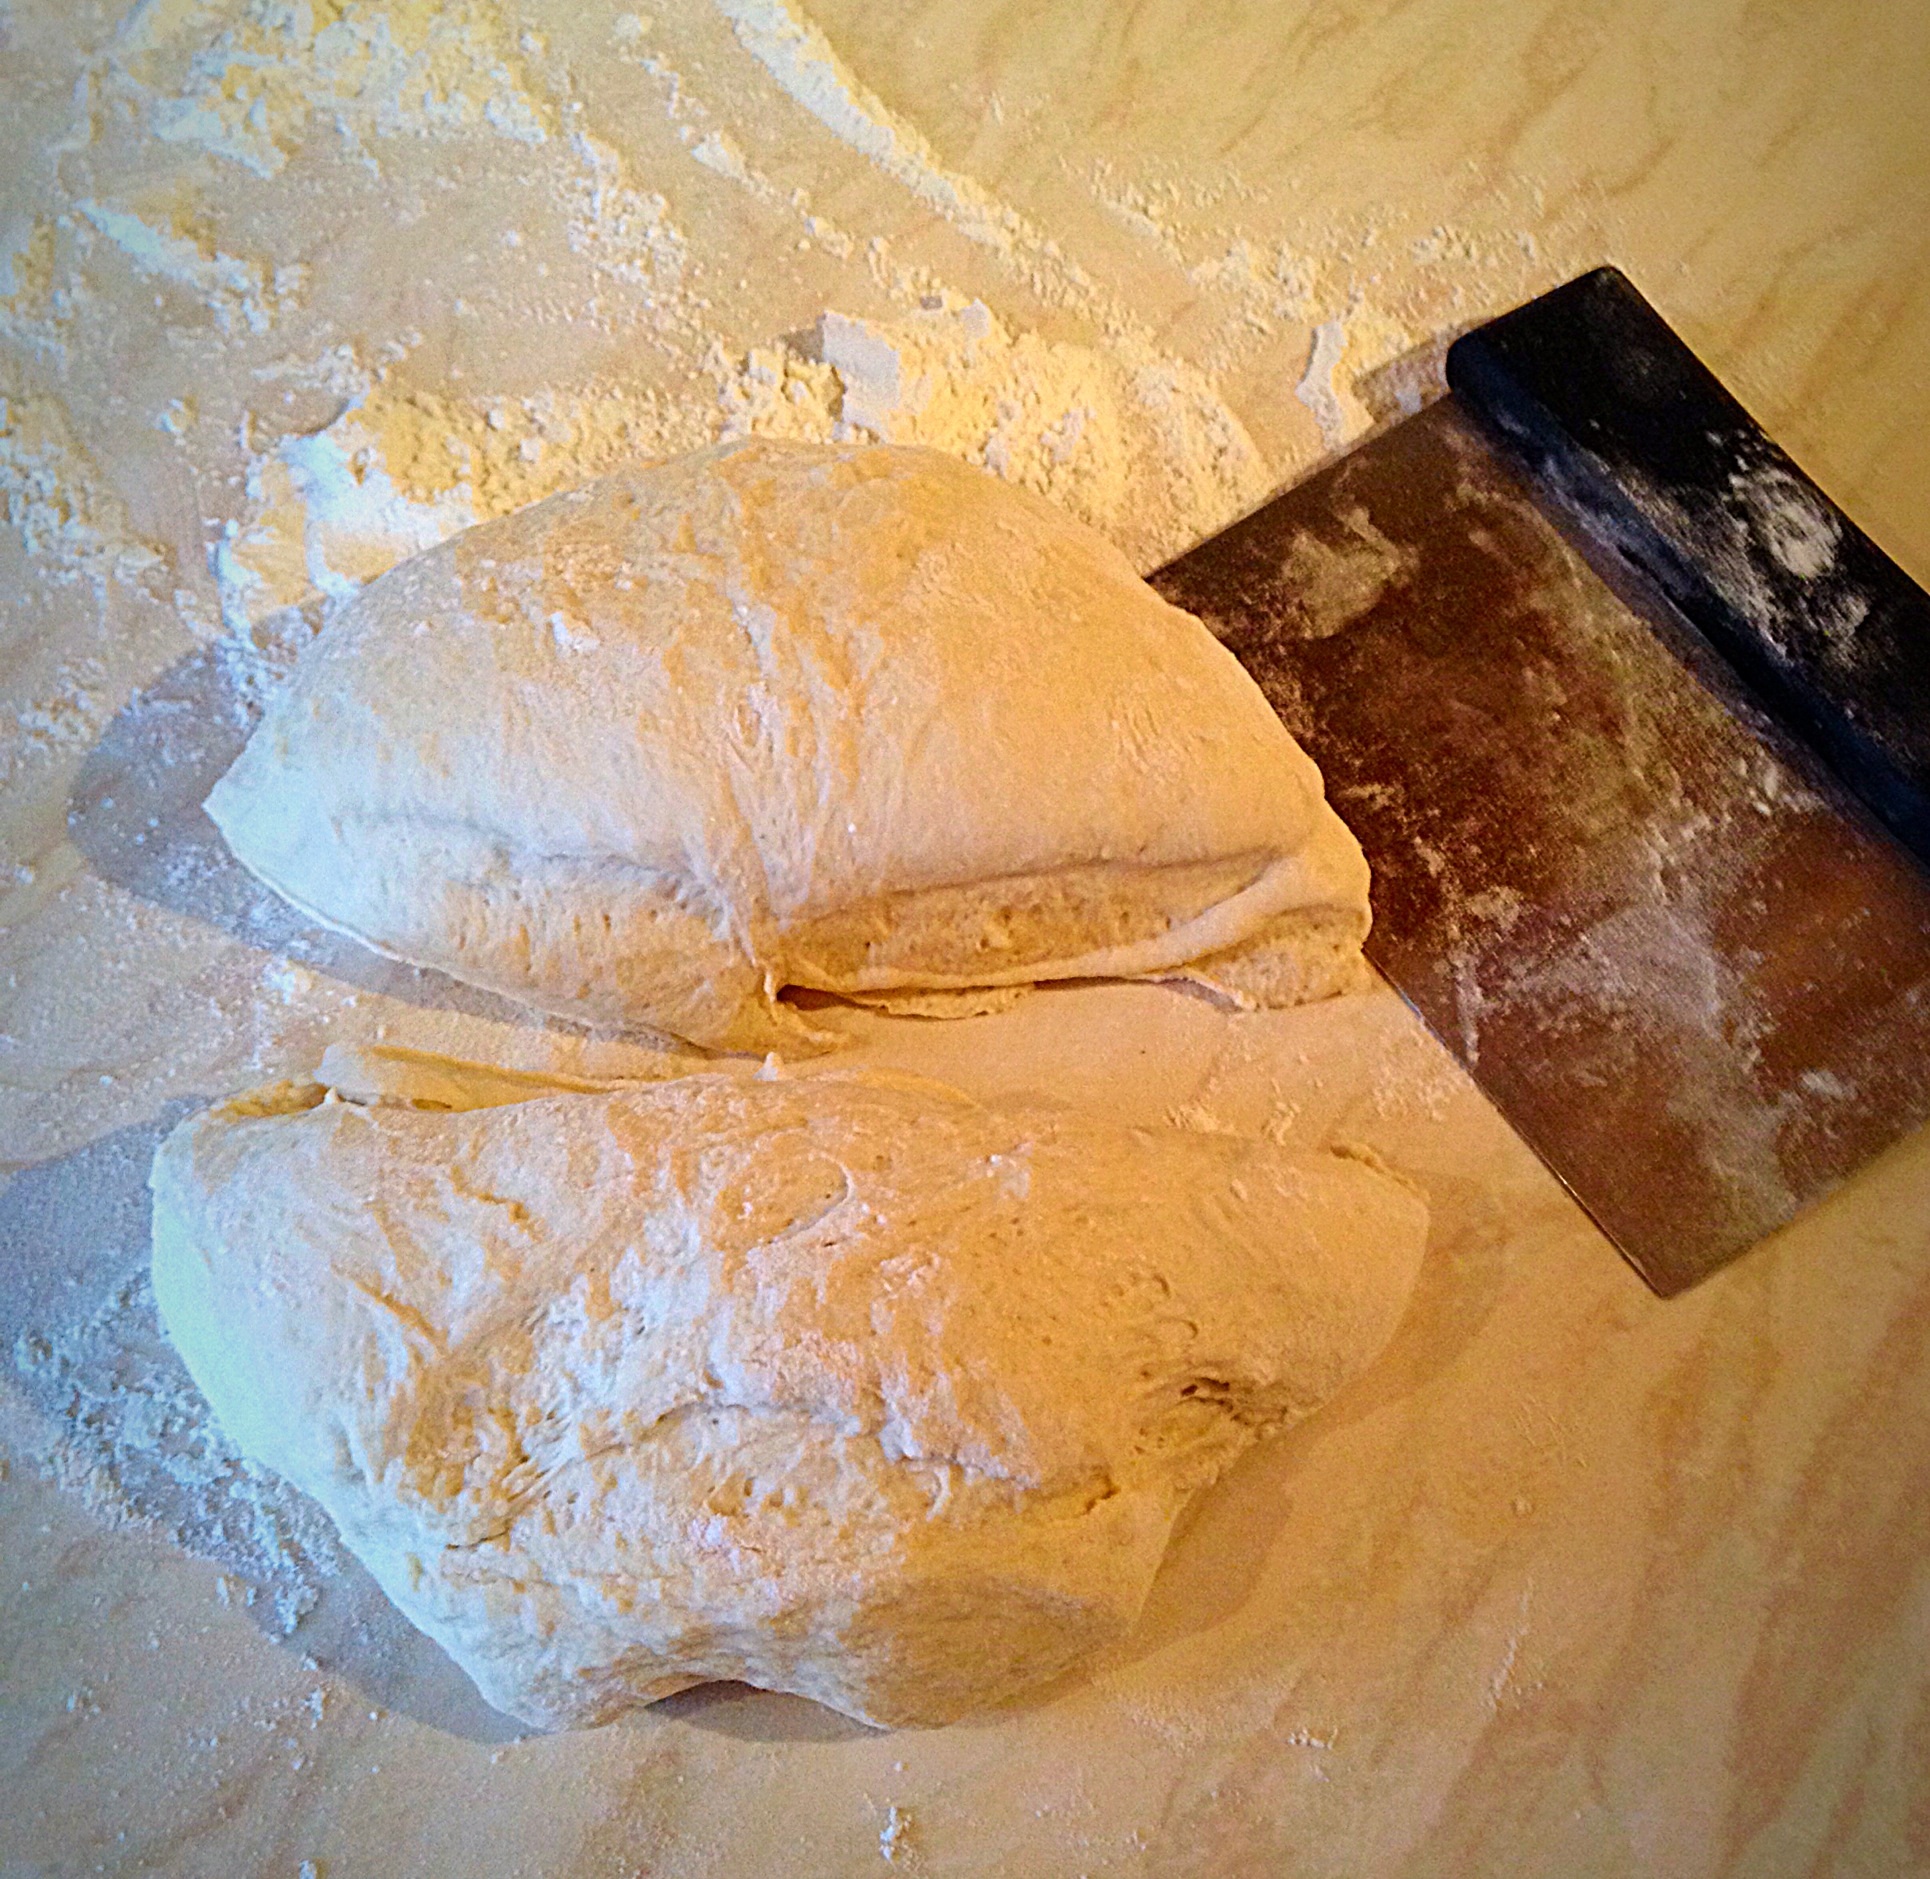
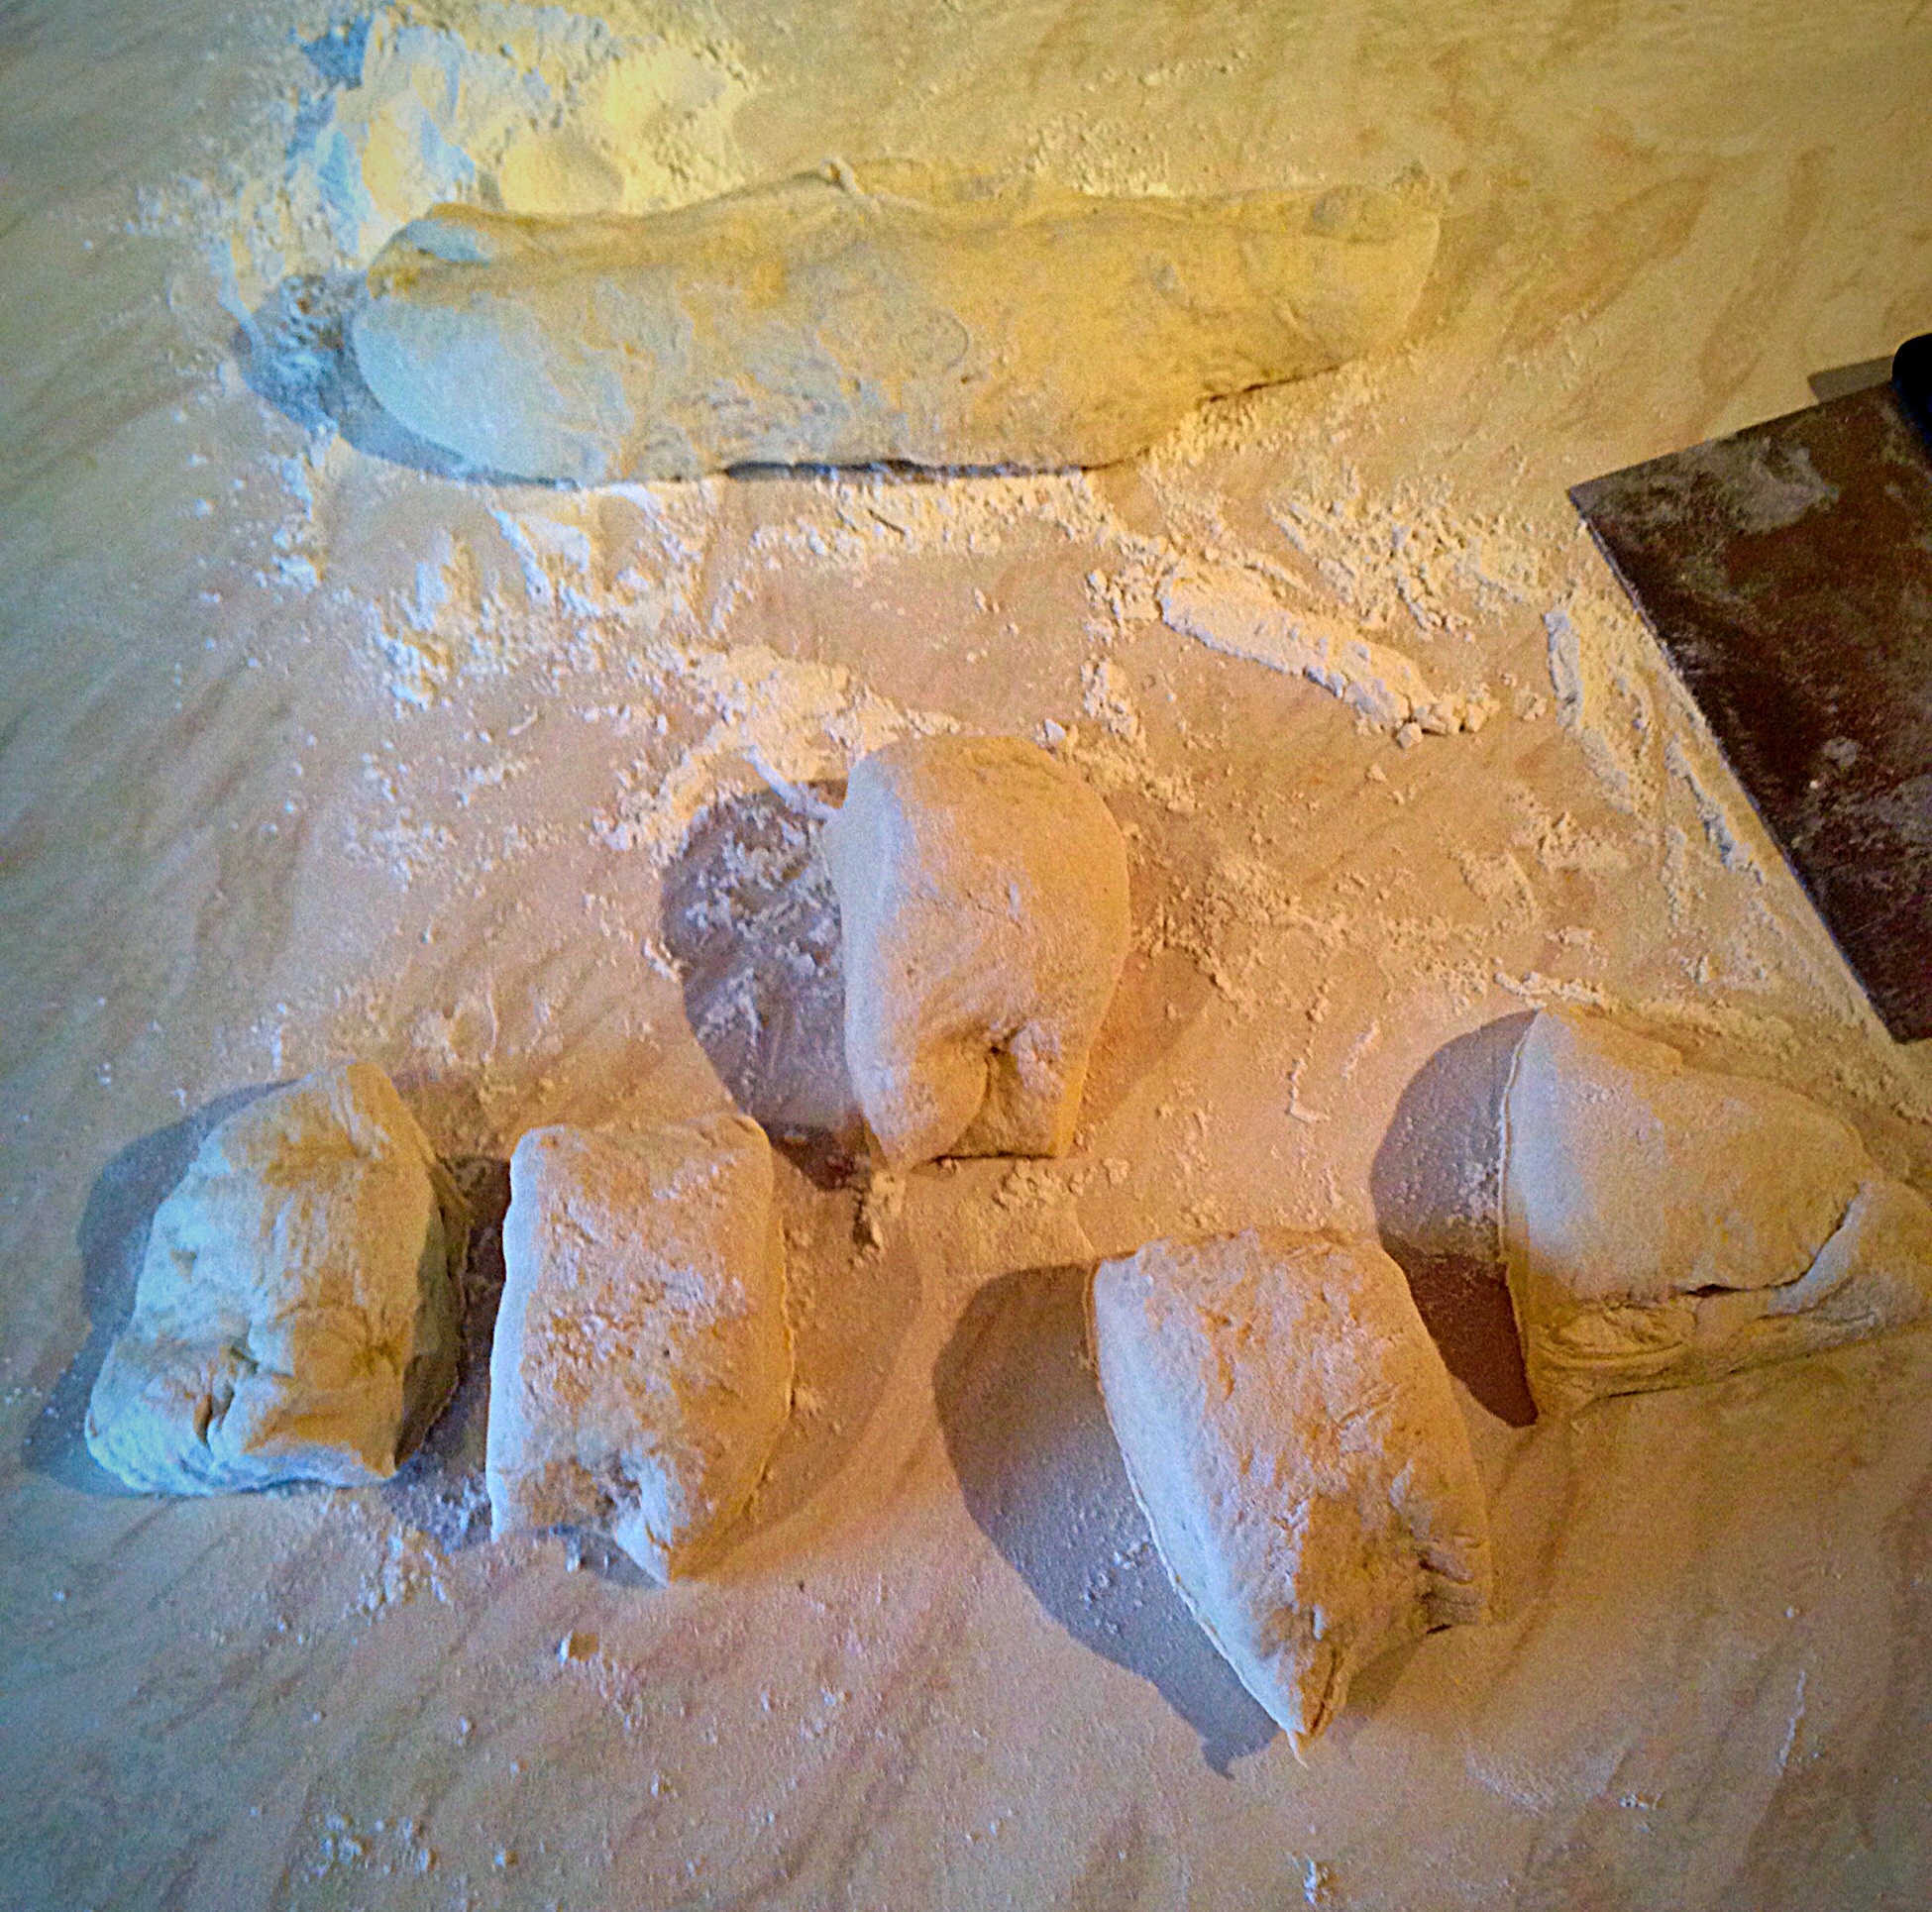
Form the dough into a flat, dome shape.Divide the dough into half – using a dough cutter or knife.Divide the first half into 5 equal pieces of dough.Pull each piece into a length.Twist each length of dough, pulling as you do so, to make a long twisted, uncooked bread stick and place on an oiled baking sheet.
Repeat the same process for the other half of the dough. Cover with a clean tea towel and leave to rise in a warm draught free place until doubled in size.
Preheat the oven to 215C (200C fan).
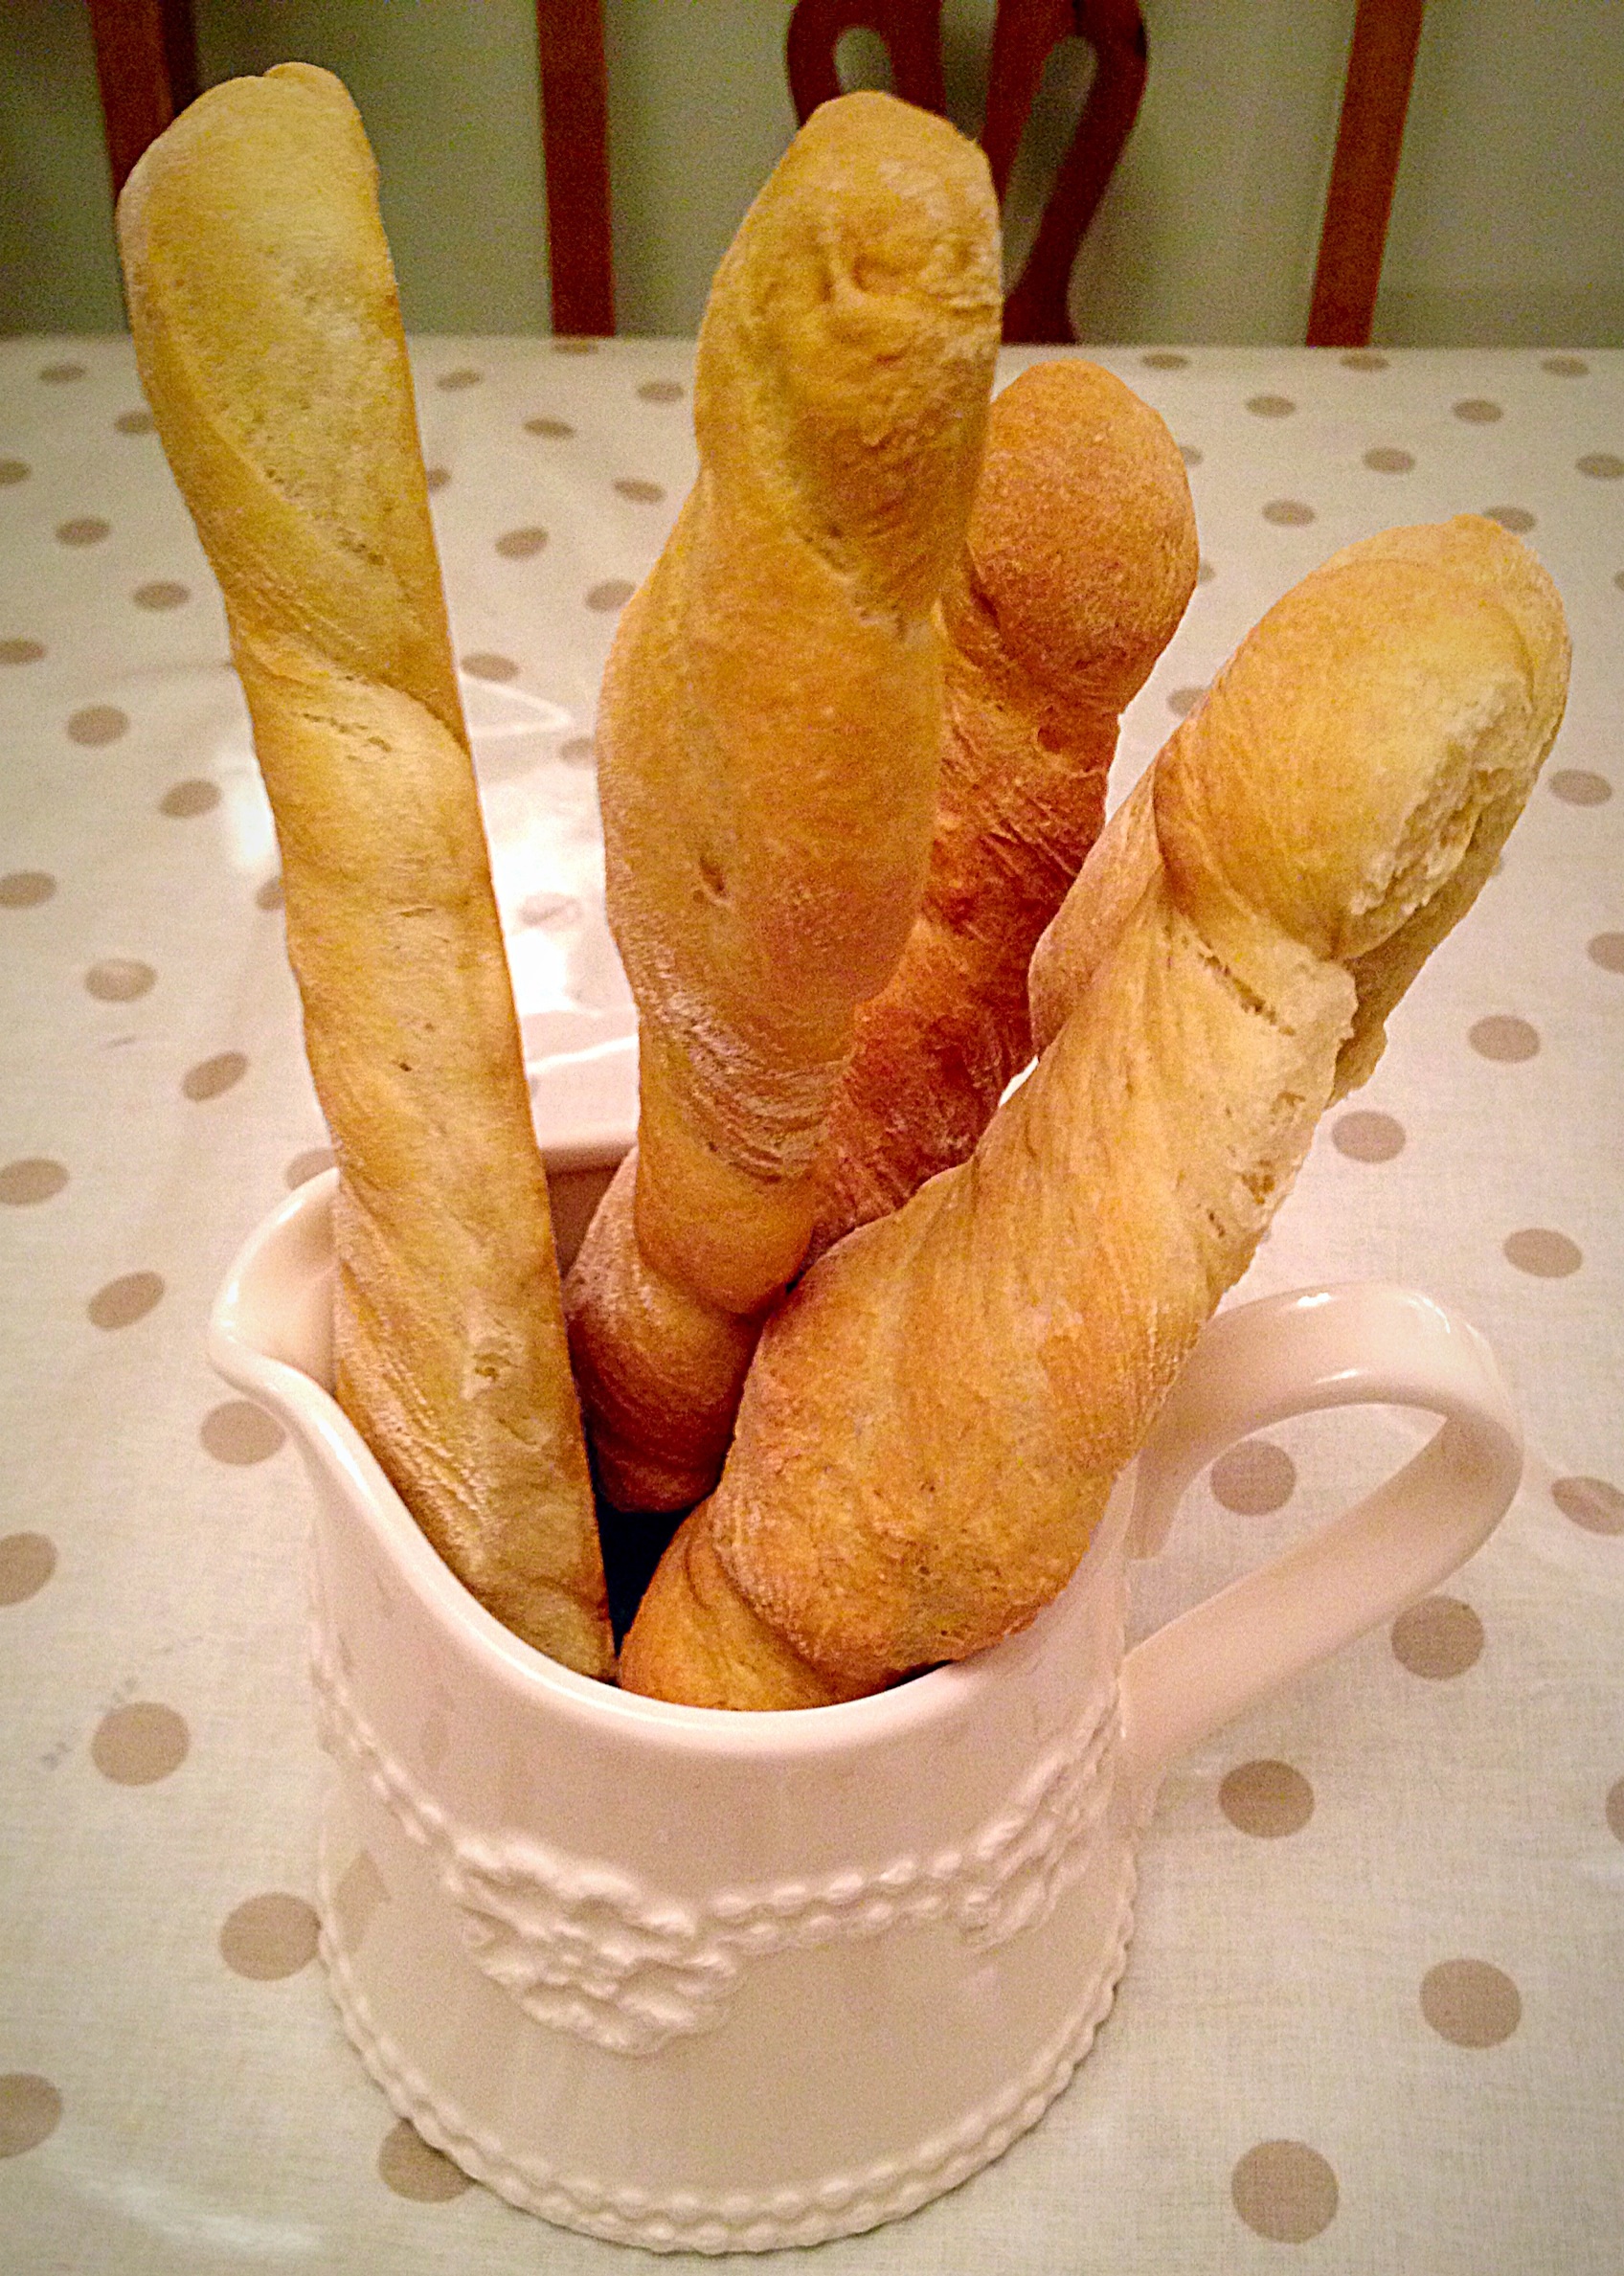
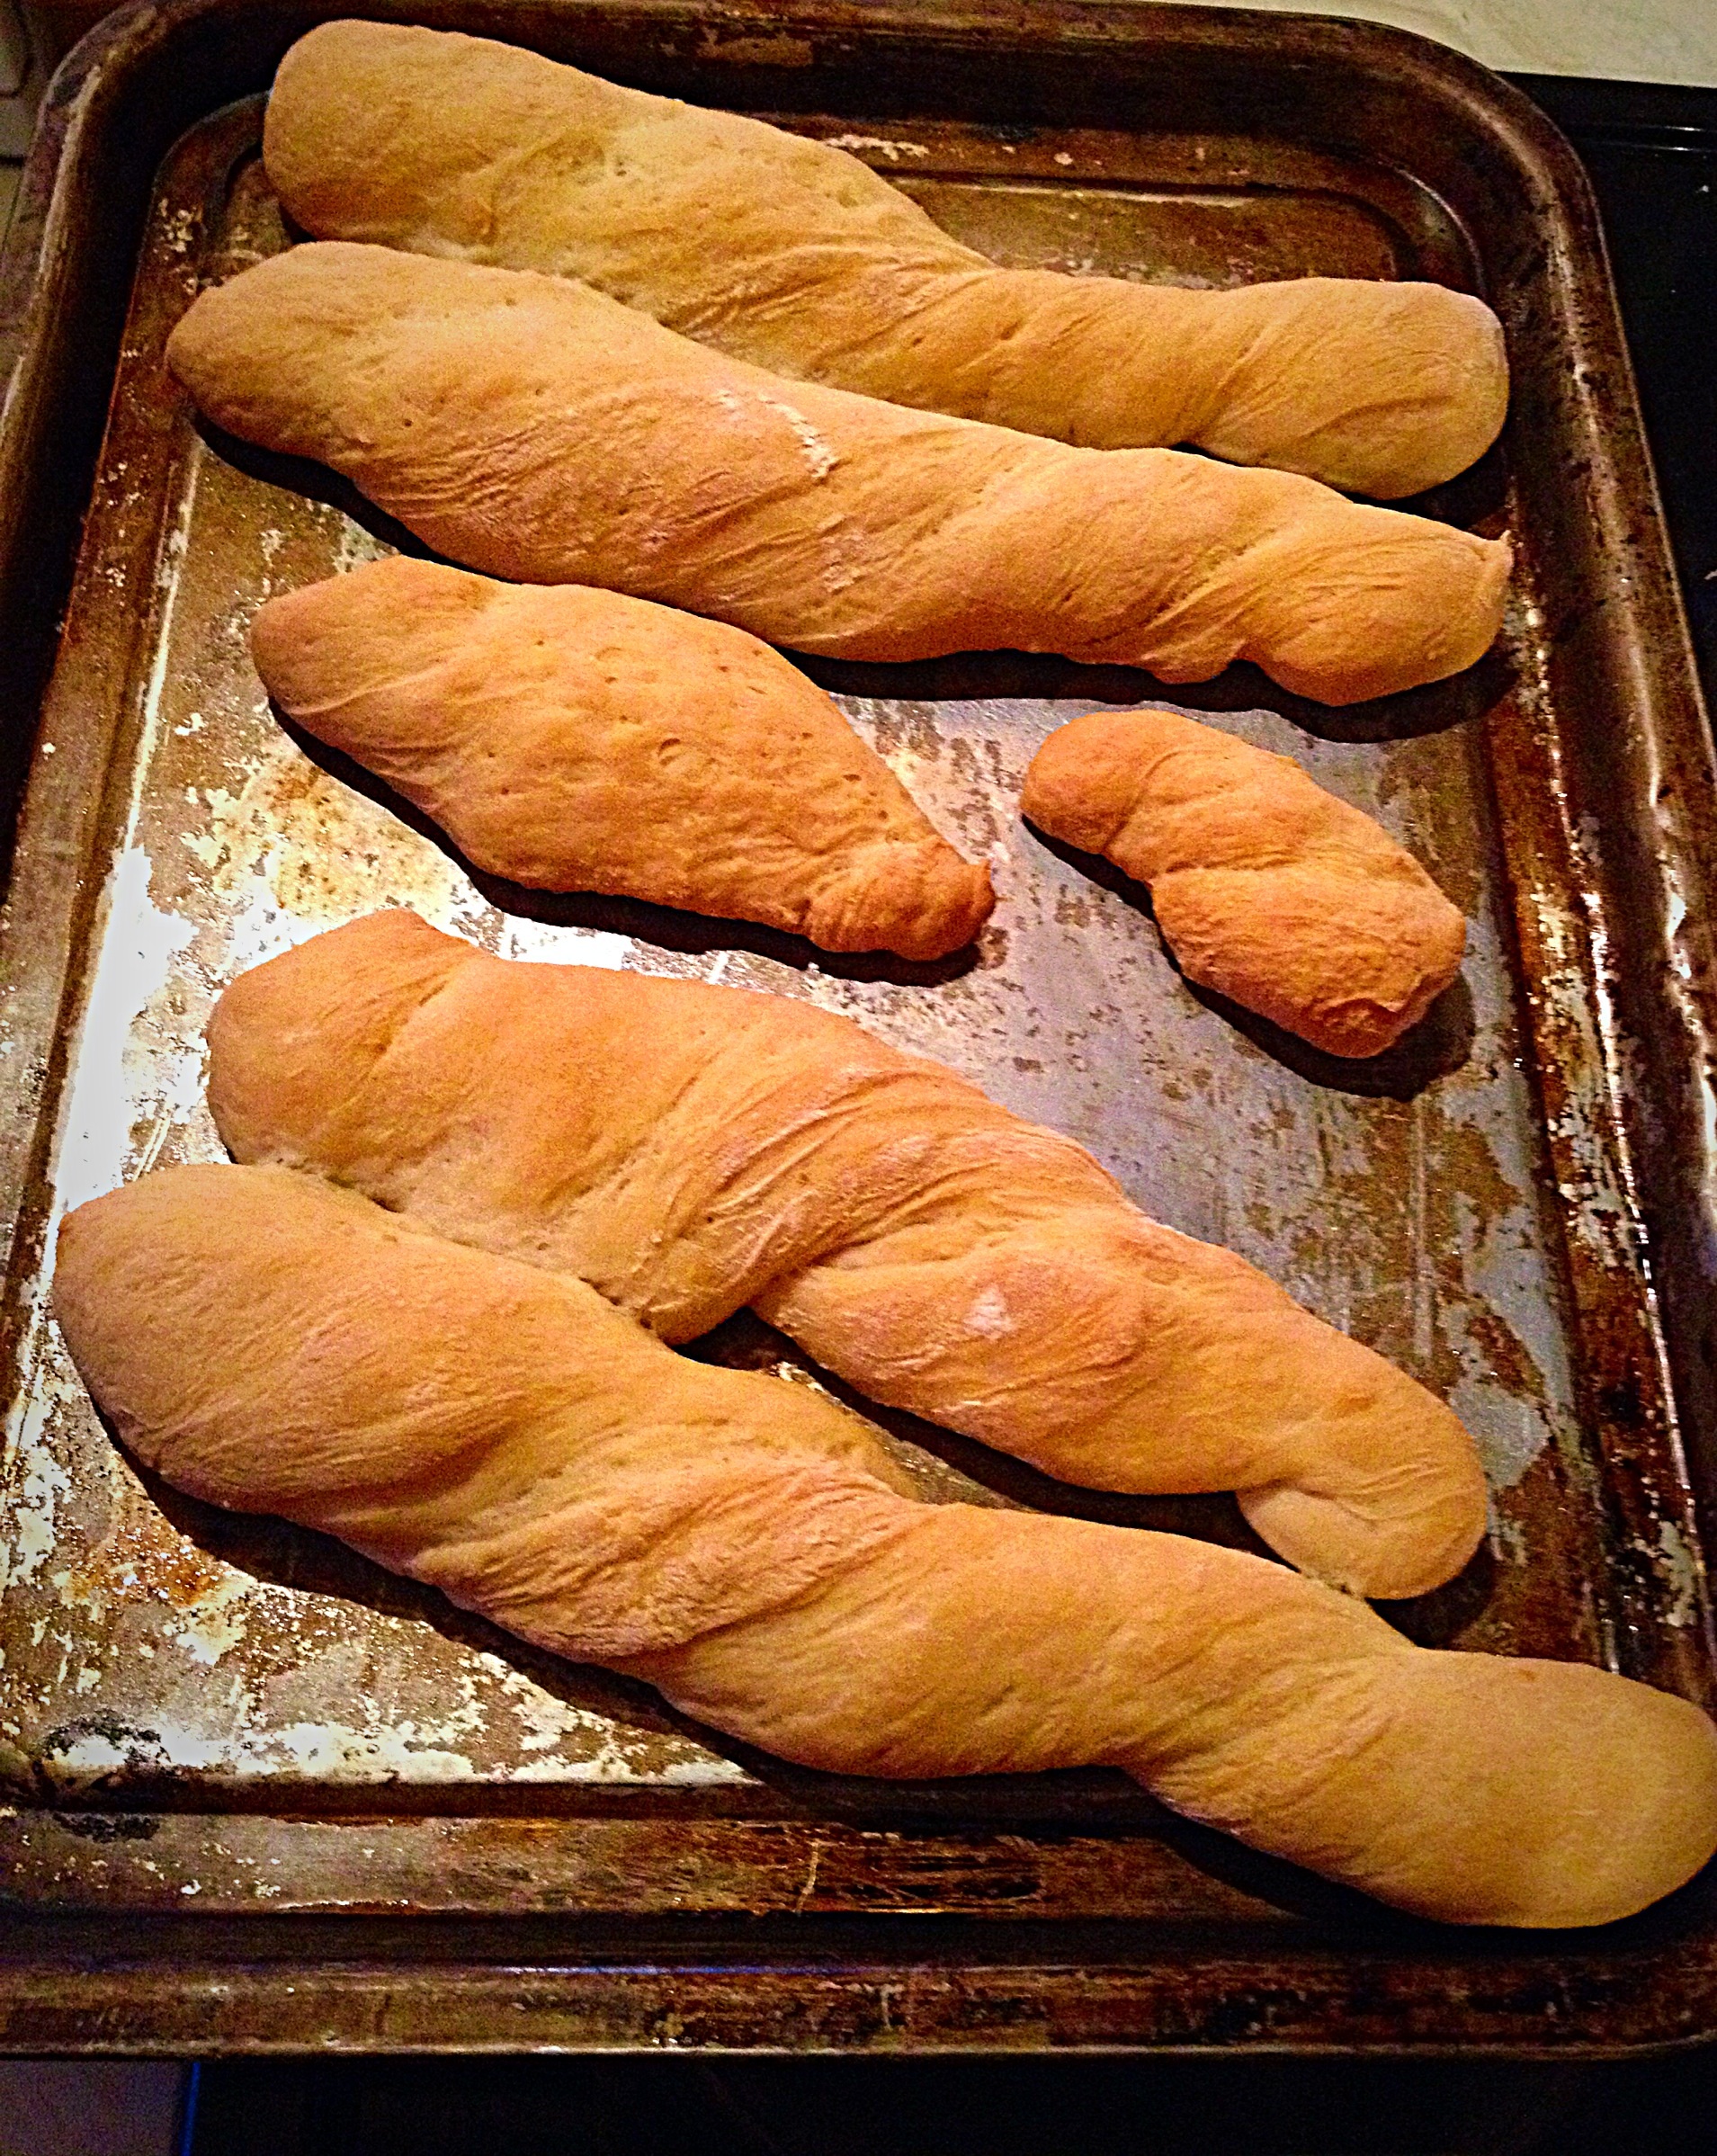
Place the baking sheets into the hot oven and bake the breadsticks for 20-25 minutes until golden brown. Remove from the oven.
Crunchy, golden breadsticks.
Place the cooked breadsticks on a cooling rack to cool.
Recipe : Garlic and Herb Dipping Oil
4tbsp Virgin Olive Oil
4tbsp Butter
3 Fat Garlic Bulbs
1tbsp Fresh Finely Chopped Herbs – I used Thyme and Rosemary – or 1tsp Mixed Dried Herbs
1/2 tsp Flaky Sea Salt
1/2 tsp Freshly Ground Black Pepper
Method :
Firstly I have to admit I didn’t actually measure the butter or olive oil when I made this!! But you are aiming for a 50:50 mix of Olive oil and butter! My laziness is your gain, as you can add more oil/butter if you want to stretch this recipe out for more servings!!! And I get called Cheeky – can’t think why?????
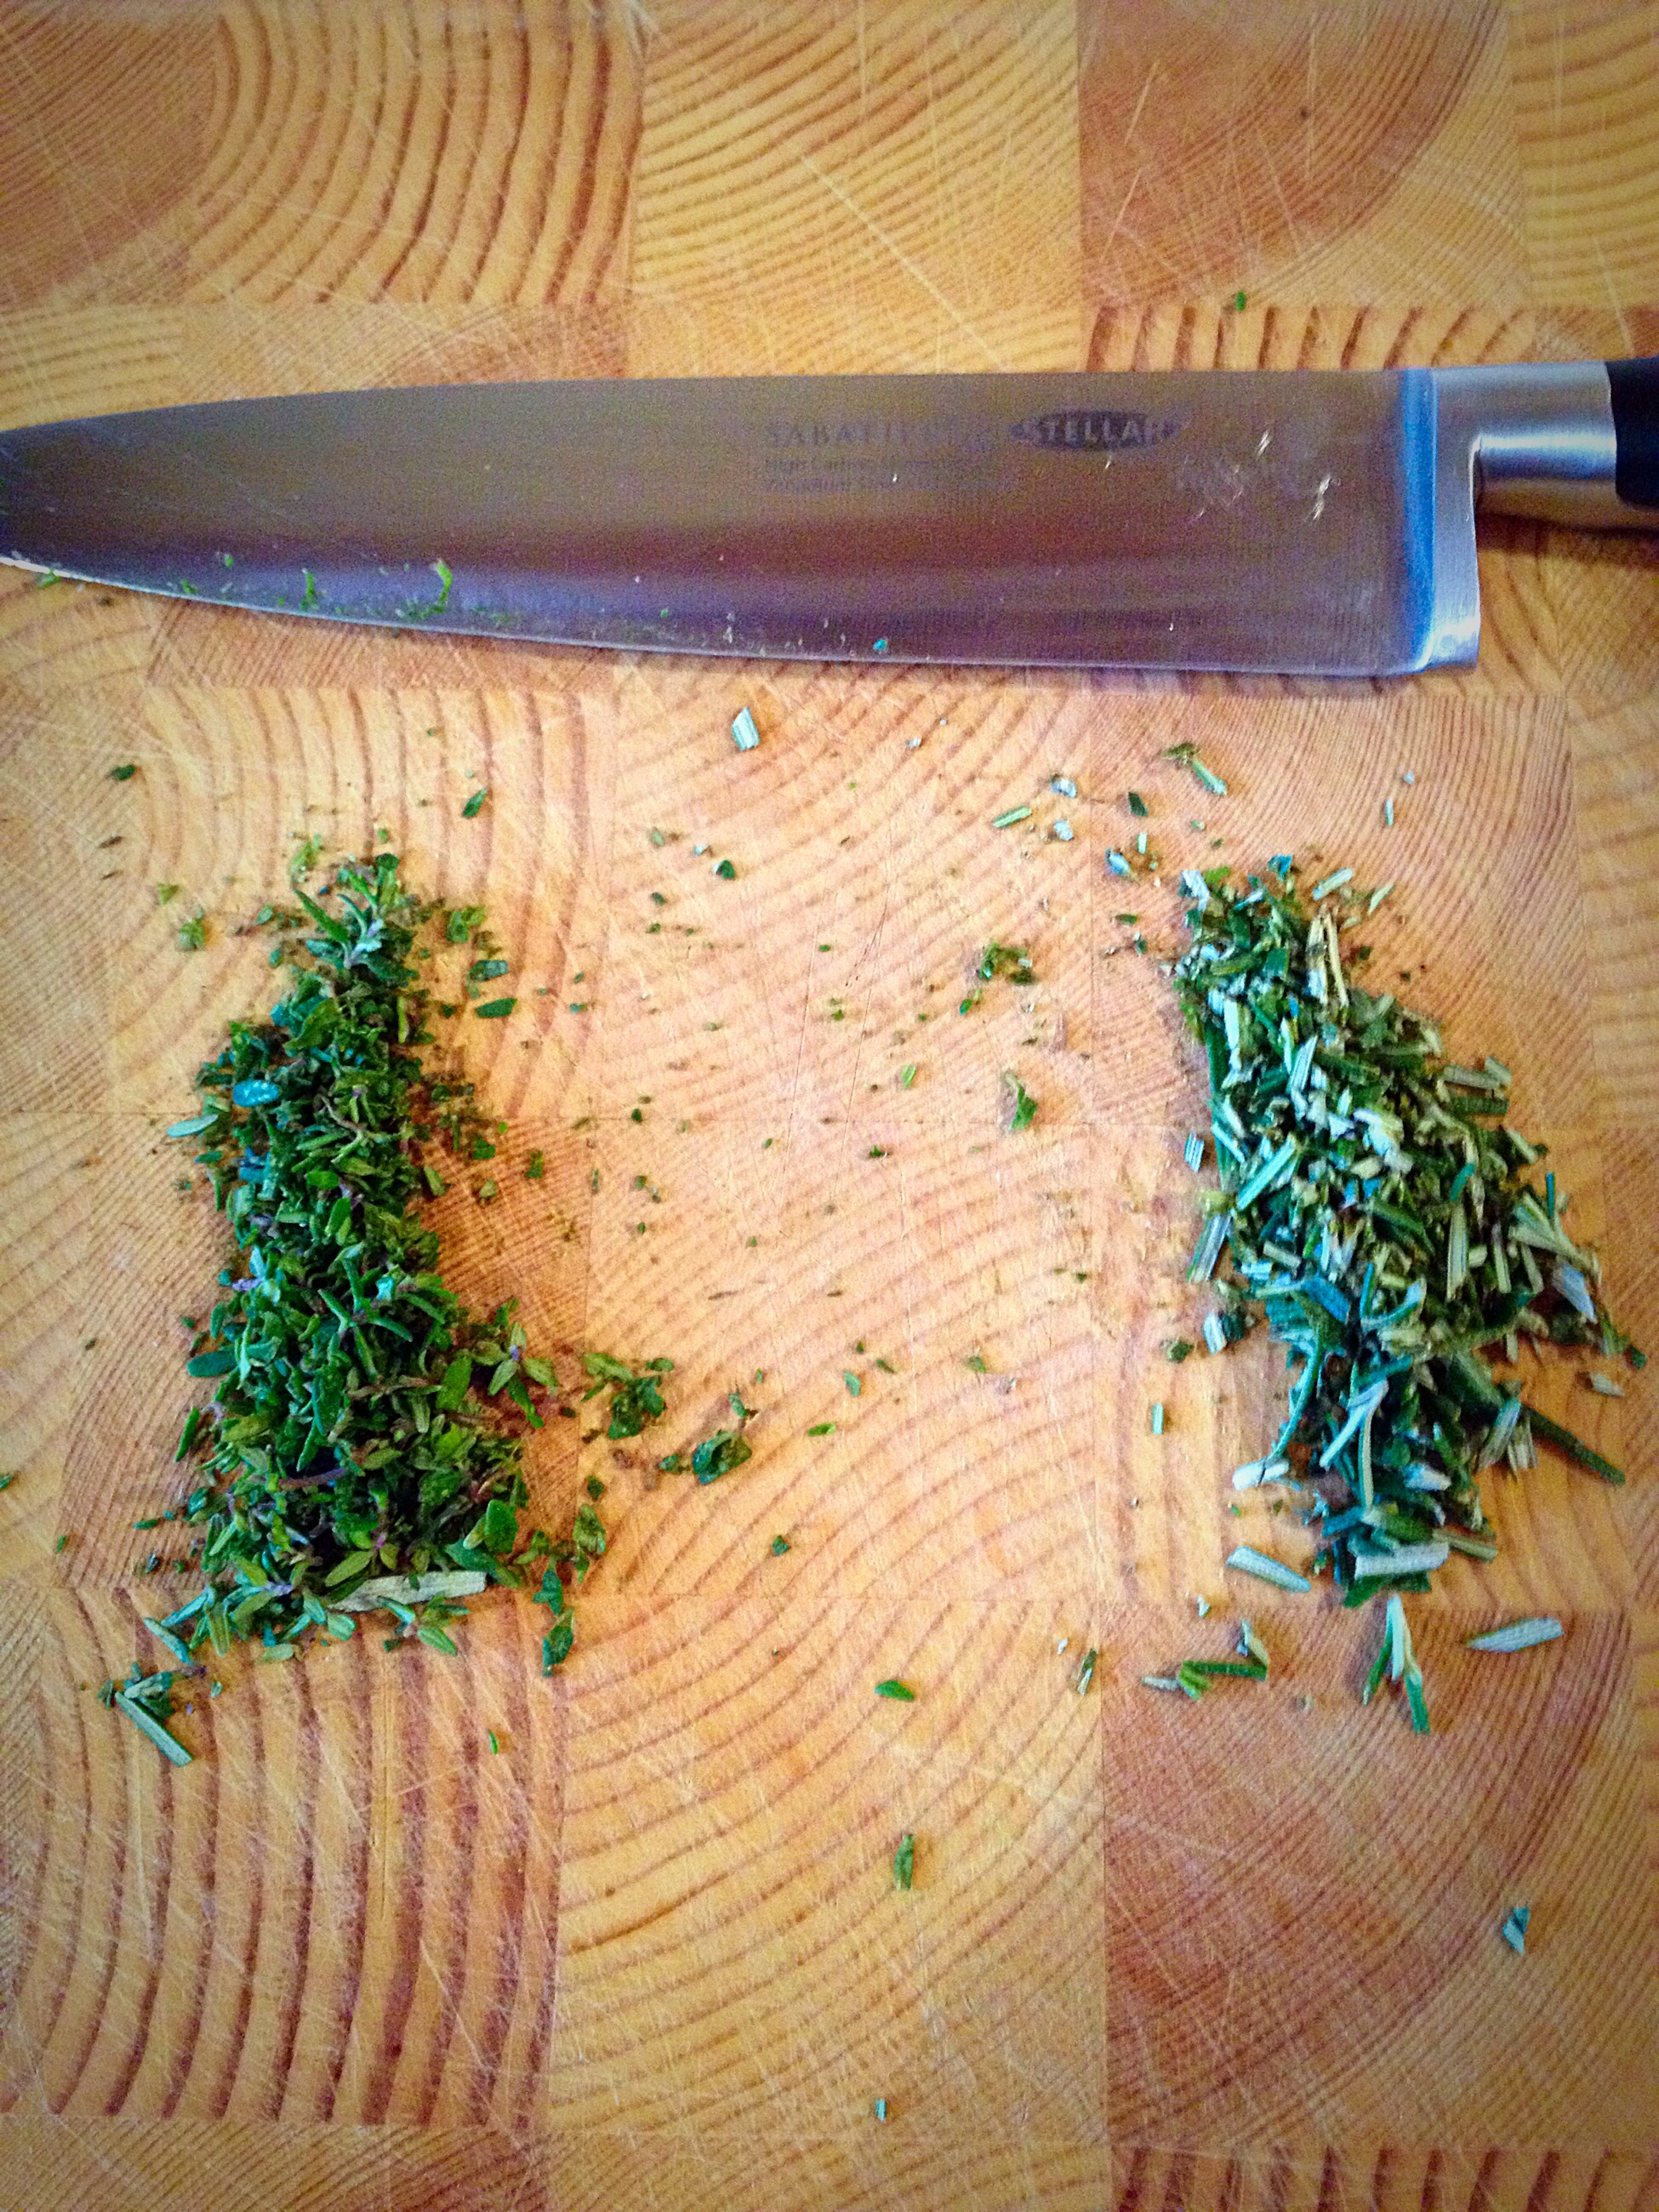
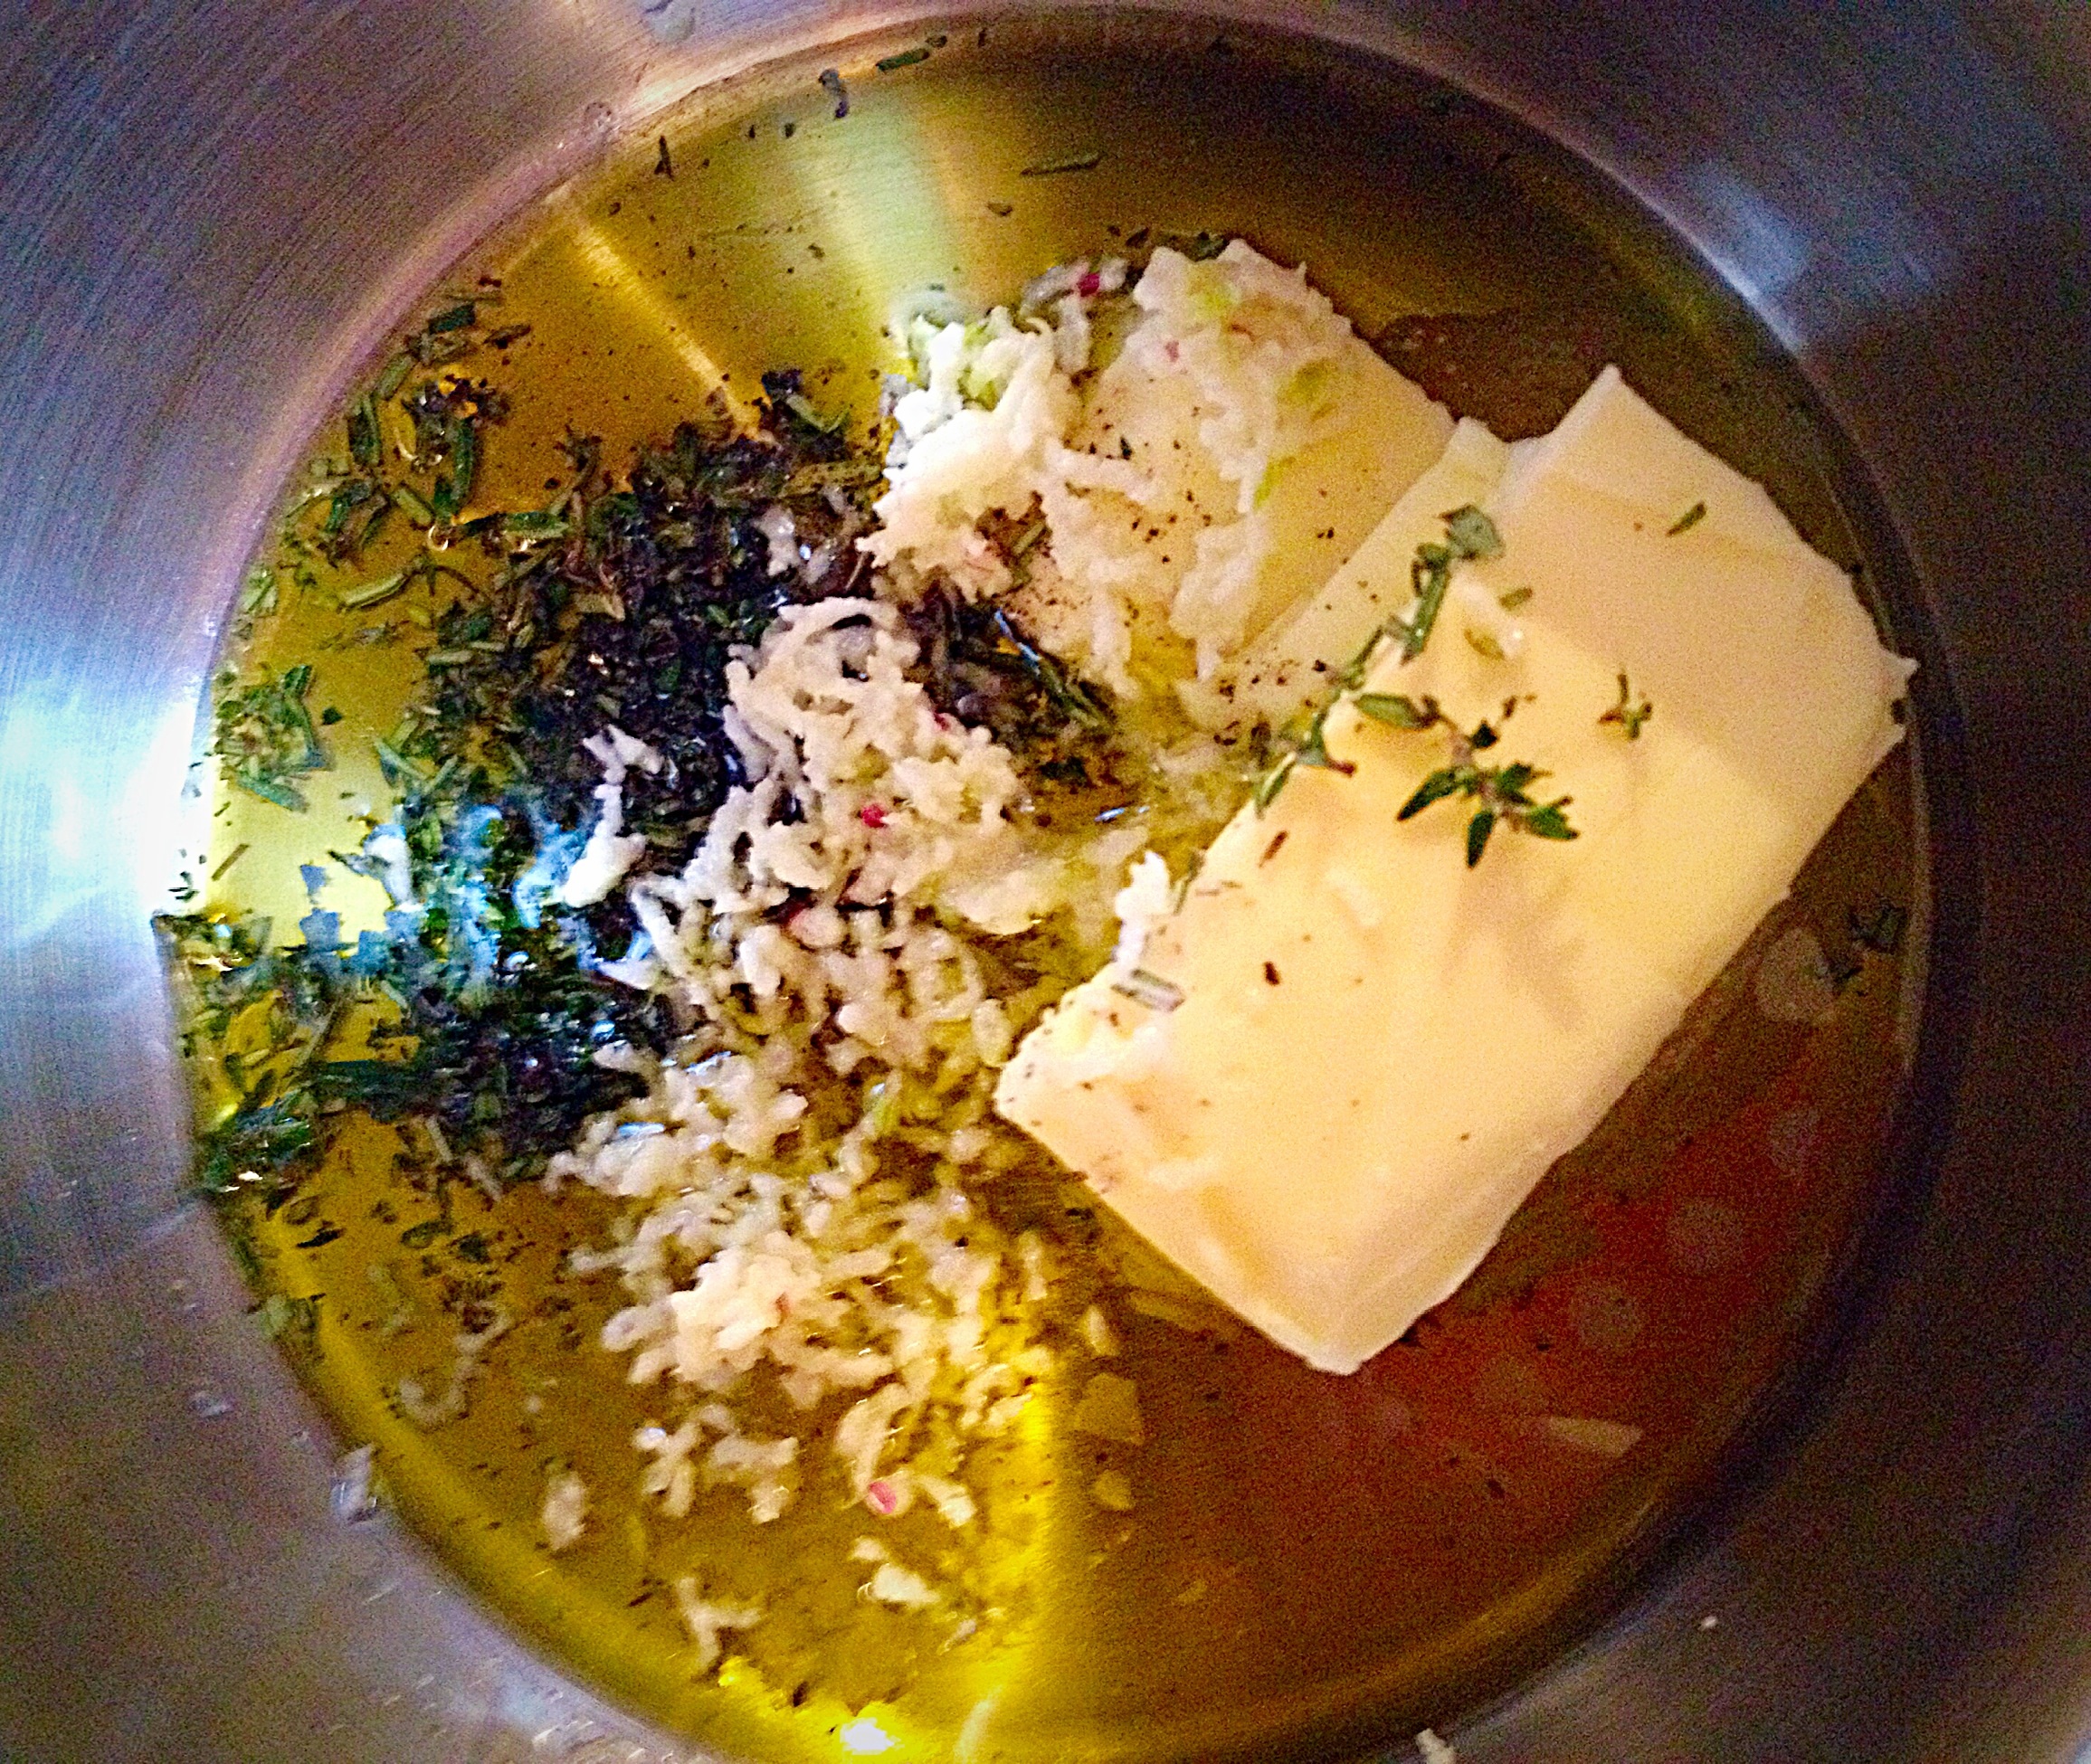
Anyway back to the dipping oil for the breadsticks! Put the Olive oil and butter into a small pan. Chop the herbs finely and add to the cold oil/butter.
Finely chopped Thyme (left) and Rosemary (right).
Either mince finely, or use a garlic press to chop/squish the garlic bulbs and add to the pan. Finally add the salt and pepper – you can add less salt if you’ve used salted butter – too little salt however, will result in this dipping oil having a very bland flavour (sorry Cafe Rouge, but it’s the seasoning in your dipping oil that let’s it down!).
Ooh a little heat, a little time and this will become the MOST delish Garlic and Herb Dipping Oil x x x
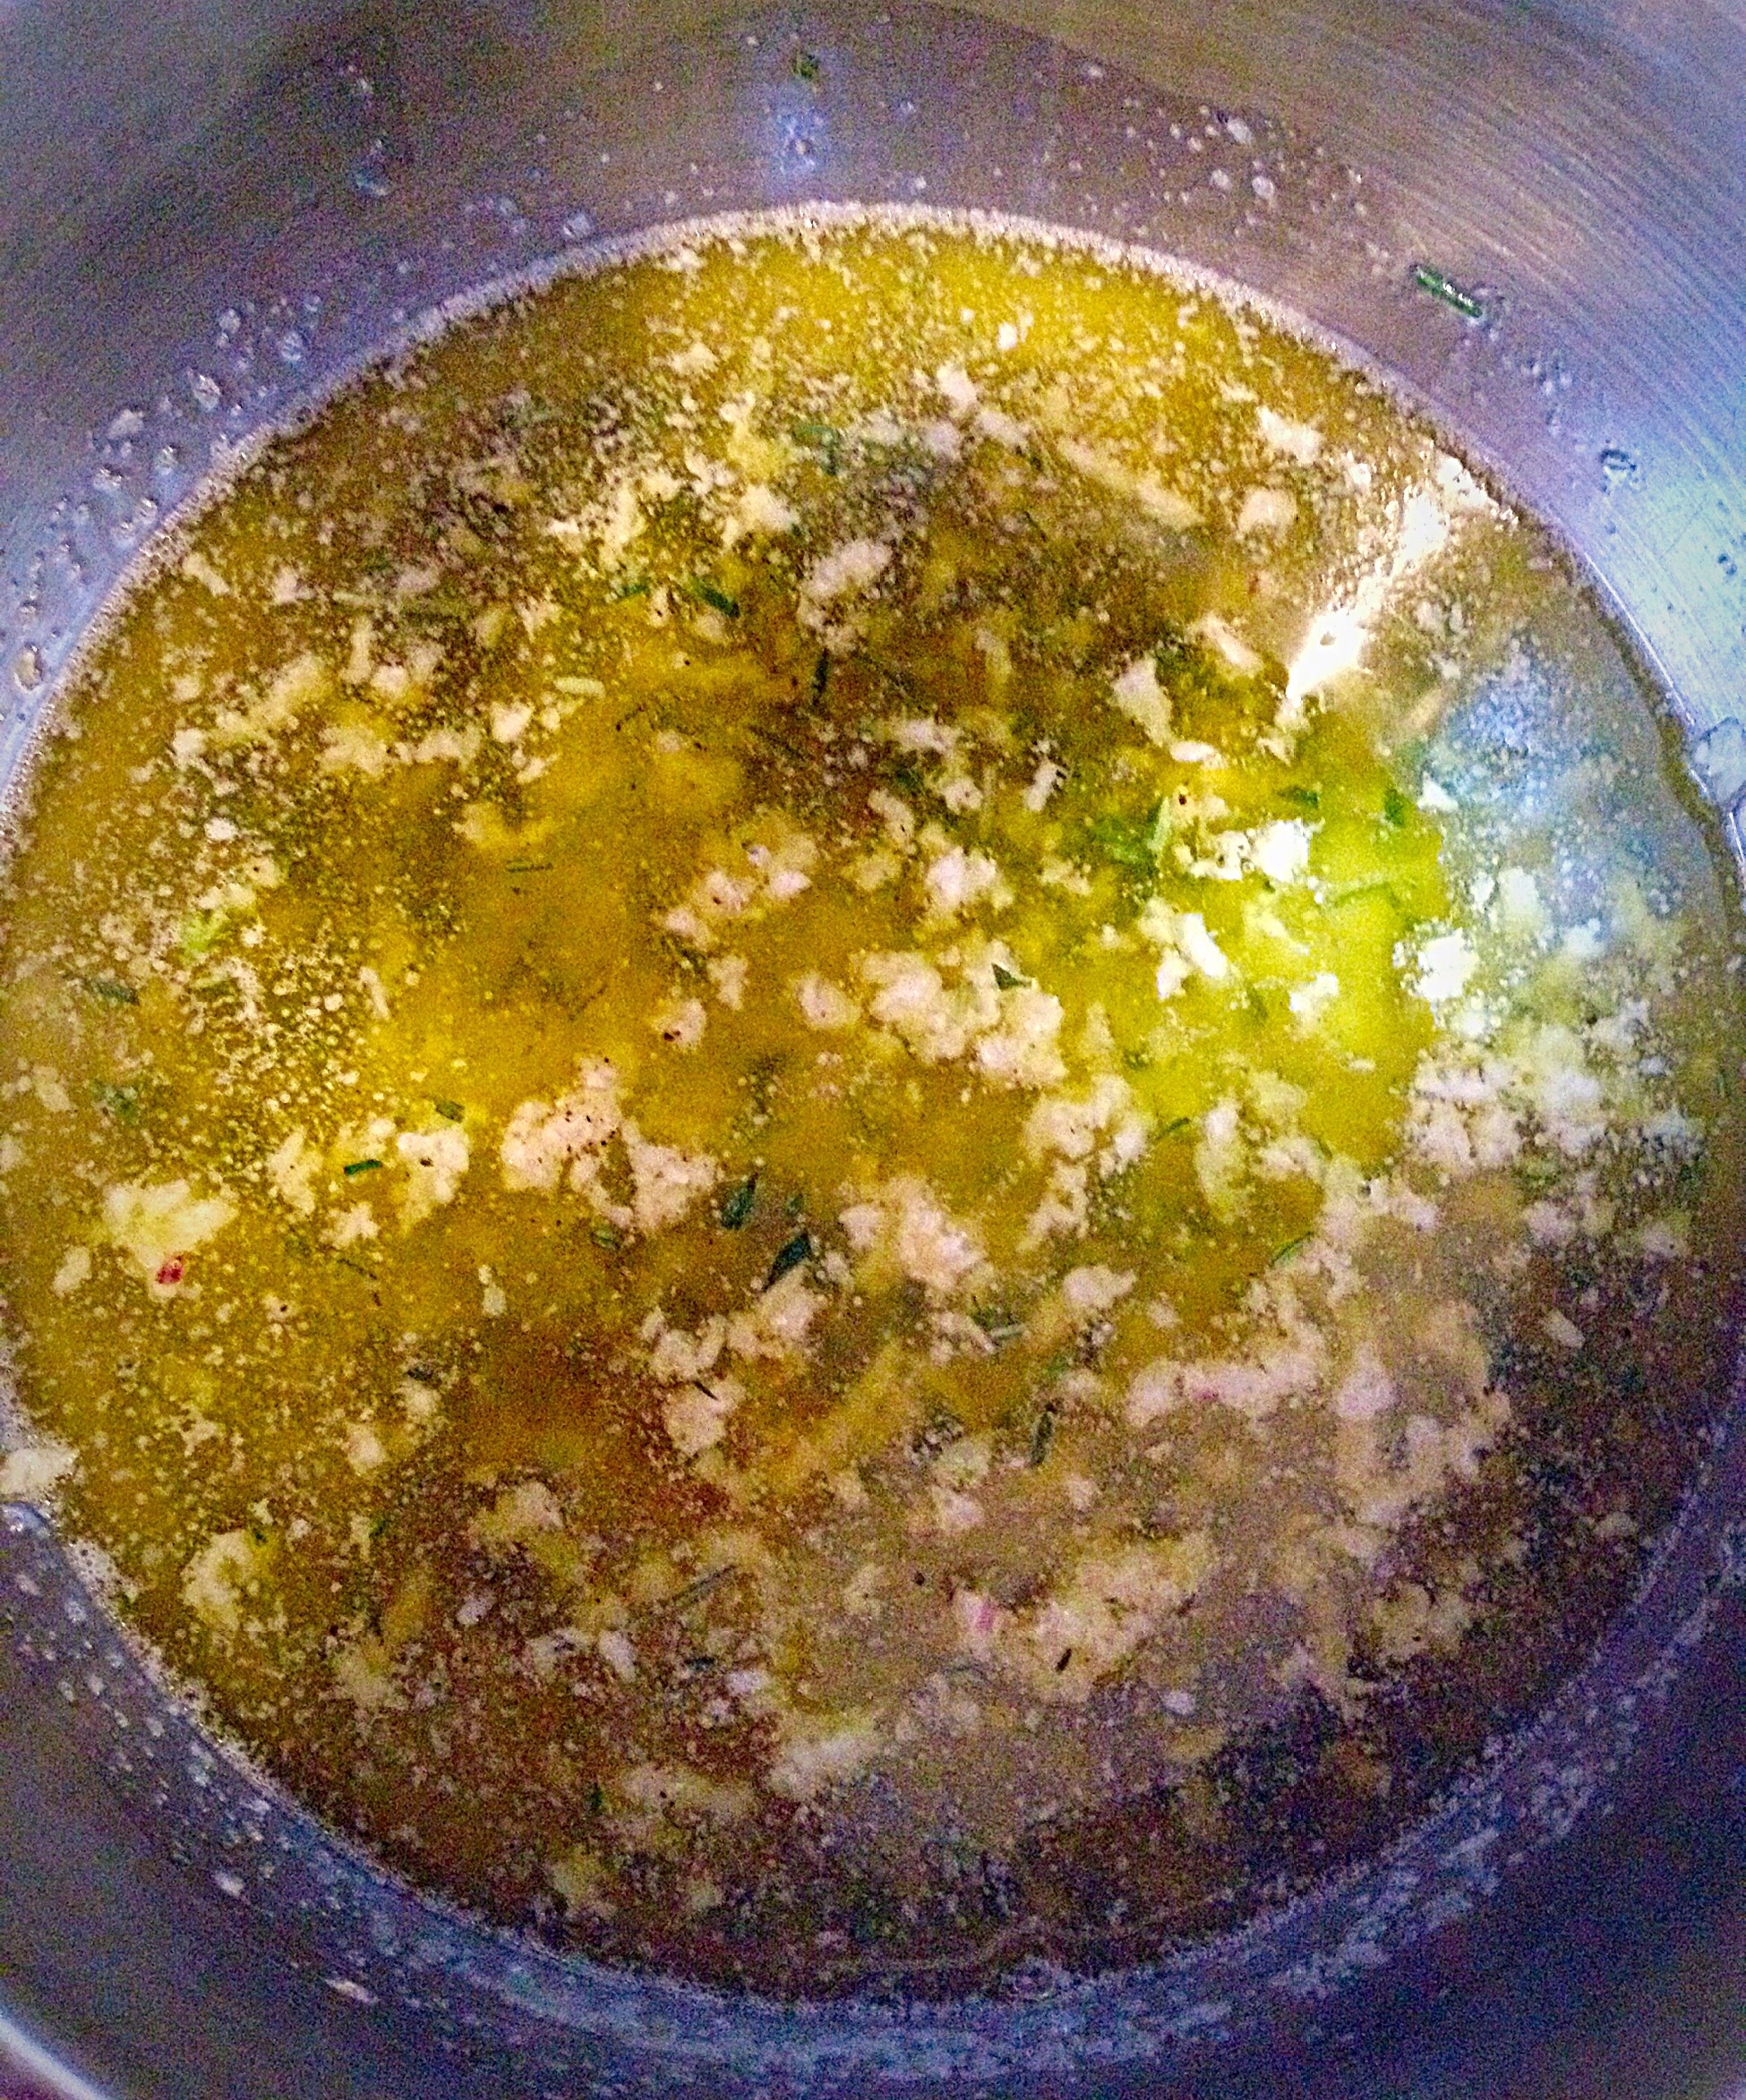
Place the pan over a very low heat. The idea is to melt the butter, infuse the oil/butter with the garlic and herbs and of course NOT BURN THE GARLIC!!!!
As soon as the butter is melted take the pan off the heat.
Leave the pan off the heat to sit and infuse with the Garlic and Herb flavours. Even a few minutes makes a big difference to the final oil. I made the oil whilst the Breadsticks were baking. 10 minutes before serving place the pan over a medium heat. As soon as the oil is bubbling and the Garlic is sizzling, remove from the heat and decant into individual serving bowls – I used ramekins.
THE perfect food for sharing. Perfect with pasta.
Breaking into the crunchy Breadsticks and dipping into the Garlic and Herb Oil is a taste explosion in your mouth!! It’s a fun change from the usual Garlic Bread. As always these Breadsticks go amazingly well with all pasta dishes.
NOTE: The Garlic and Herb Oil can also be spooned over Ciabatta or Baguette for a more traditional style Garlic Bread.
The Breadsticks can be made smaller (this will stretch out the number of servings), just remember to reduce the baking time – I’d start checking at 15 minutes.
Any leftover breadsticks can be frozen, in a freezer bag, for up to a month.
If you do try this recipe I’d love to hear how you get on?
Have fun making these and most of all sharing them!
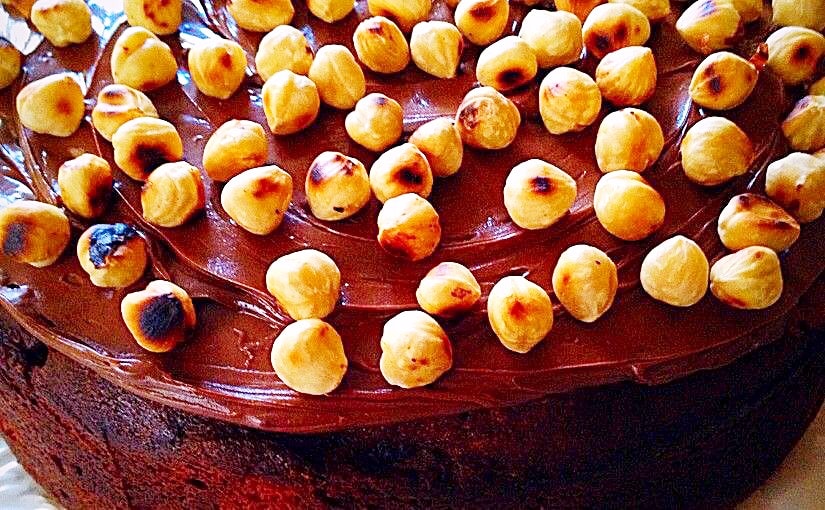
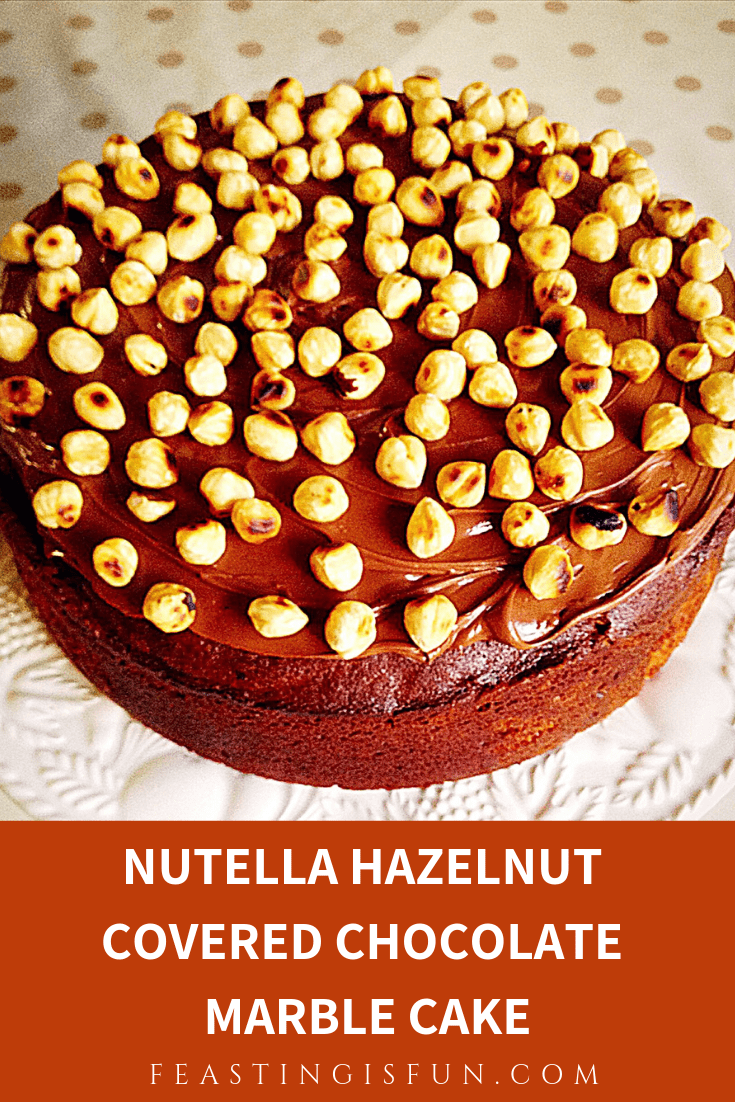
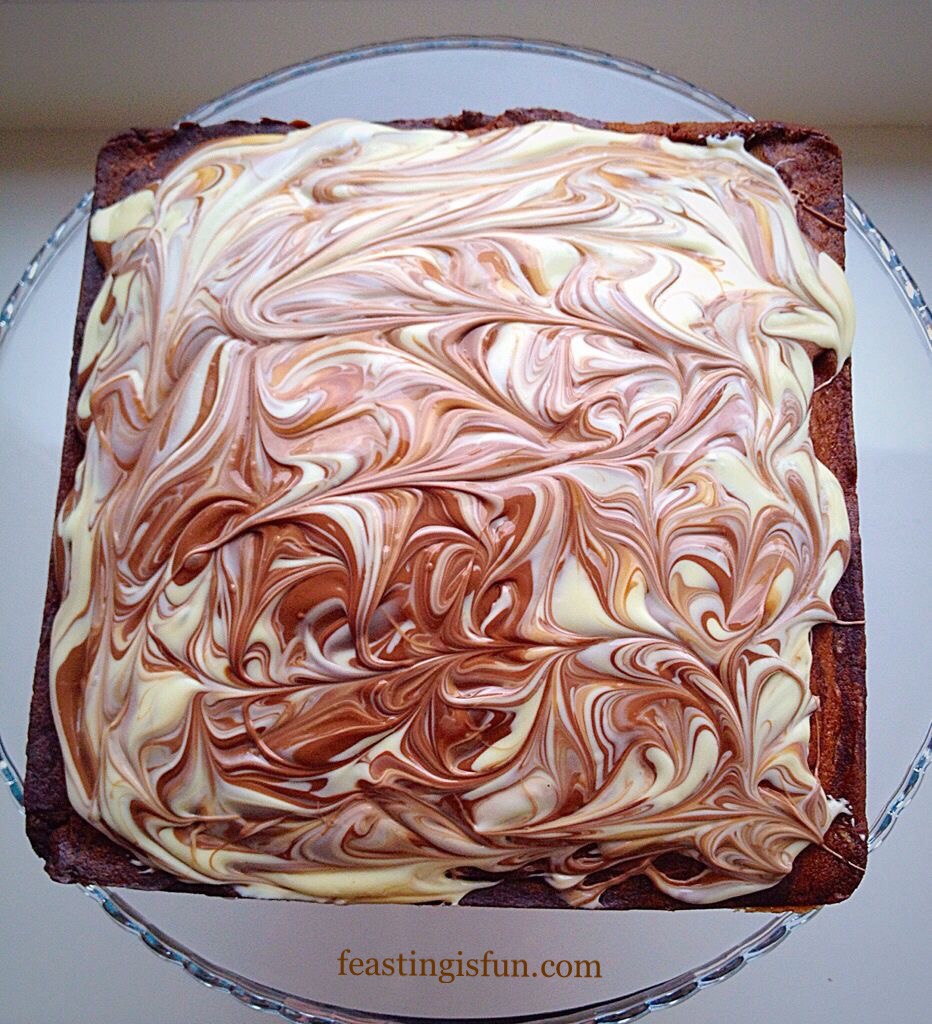
Hi there, I hope there is something in your day today that makes you smile. I’m definitely smiling because I’ve made this luscious, moist Nutella Hazelnut Covered Chocolate Marble Cake. Chocolate and vanilla sponge swirled together, baked and then topped with a generous slather of Nutella and whole, toasted hazelnuts.
Yep I’m back to baking, after being out of action for a few weeks with horrid Migraines, see here. Frustrating, painful and boring, however today I did it. I finally got to remake the cake that I teased you about and as Nutella has been on special offer, I won’t get blasted by the children, for depleting their Nutella supply.
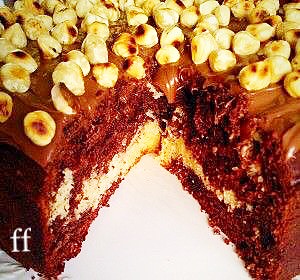
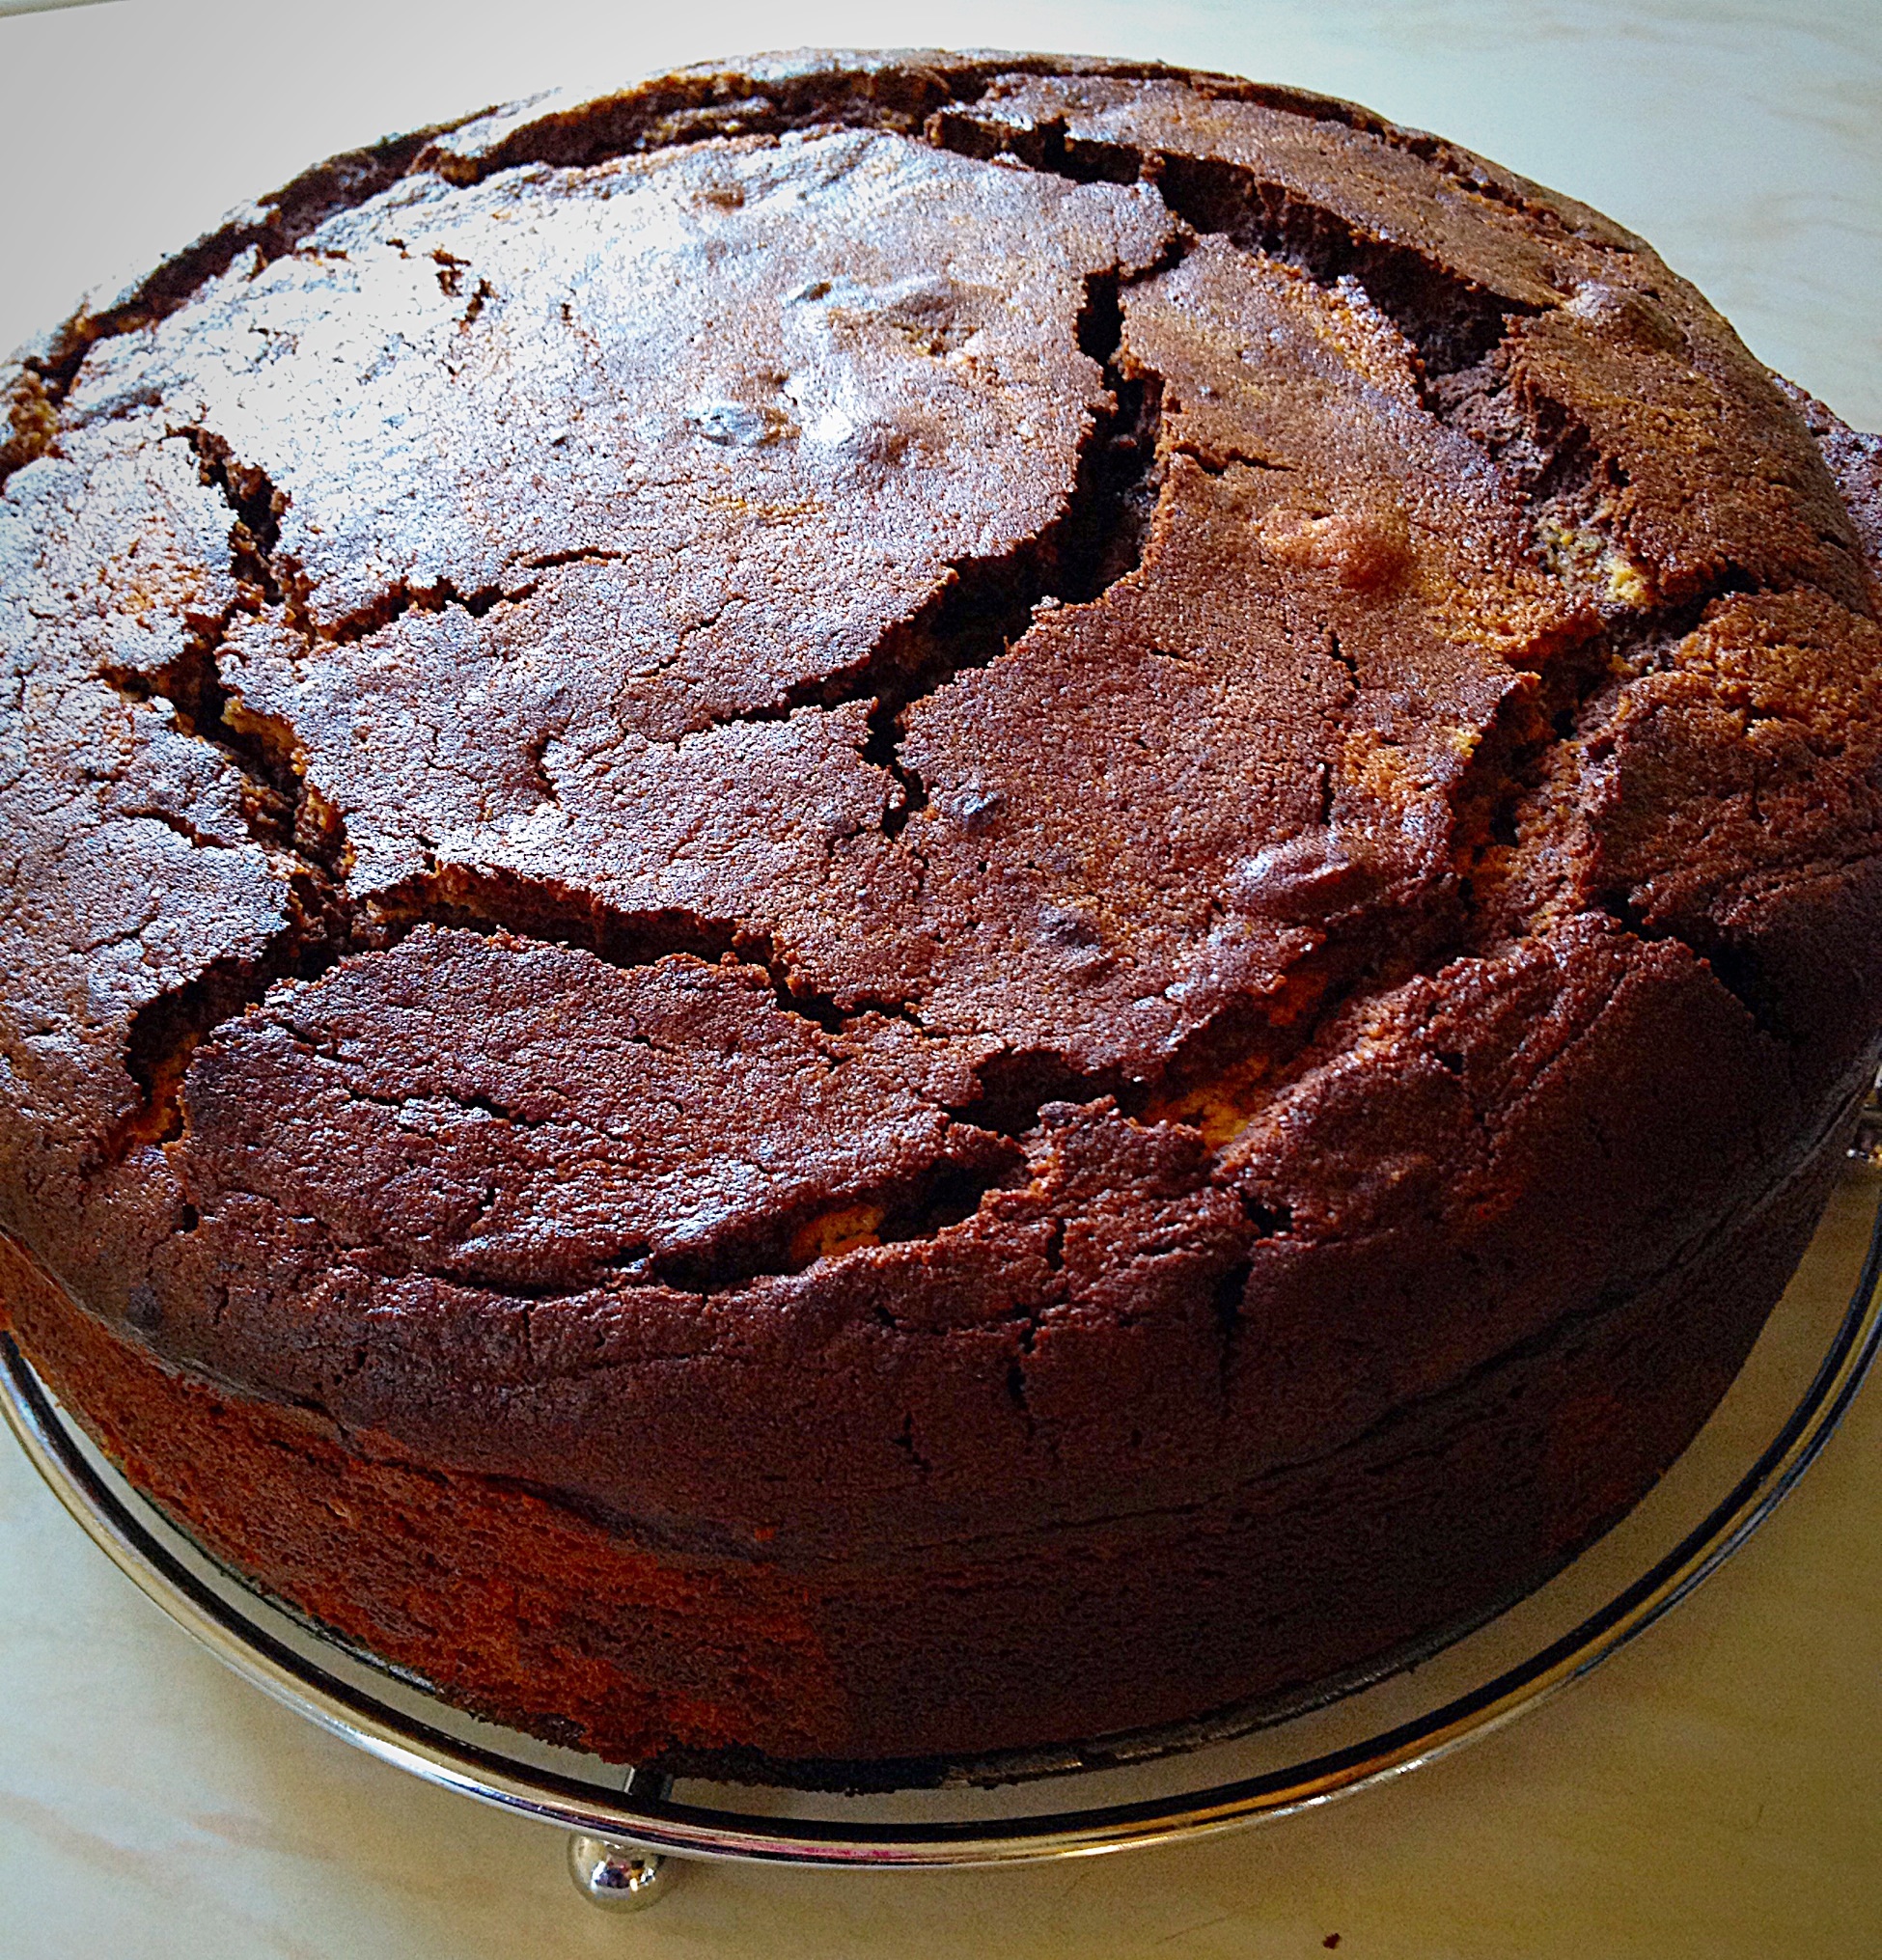
See the marbling effect inside the cake.
I should mention, given the number of times I’ve mentioned Nutella, that this is not a paid promotion. It’s just Nutella is such an easy frosting for a cake and this particular combo is especially yummy.
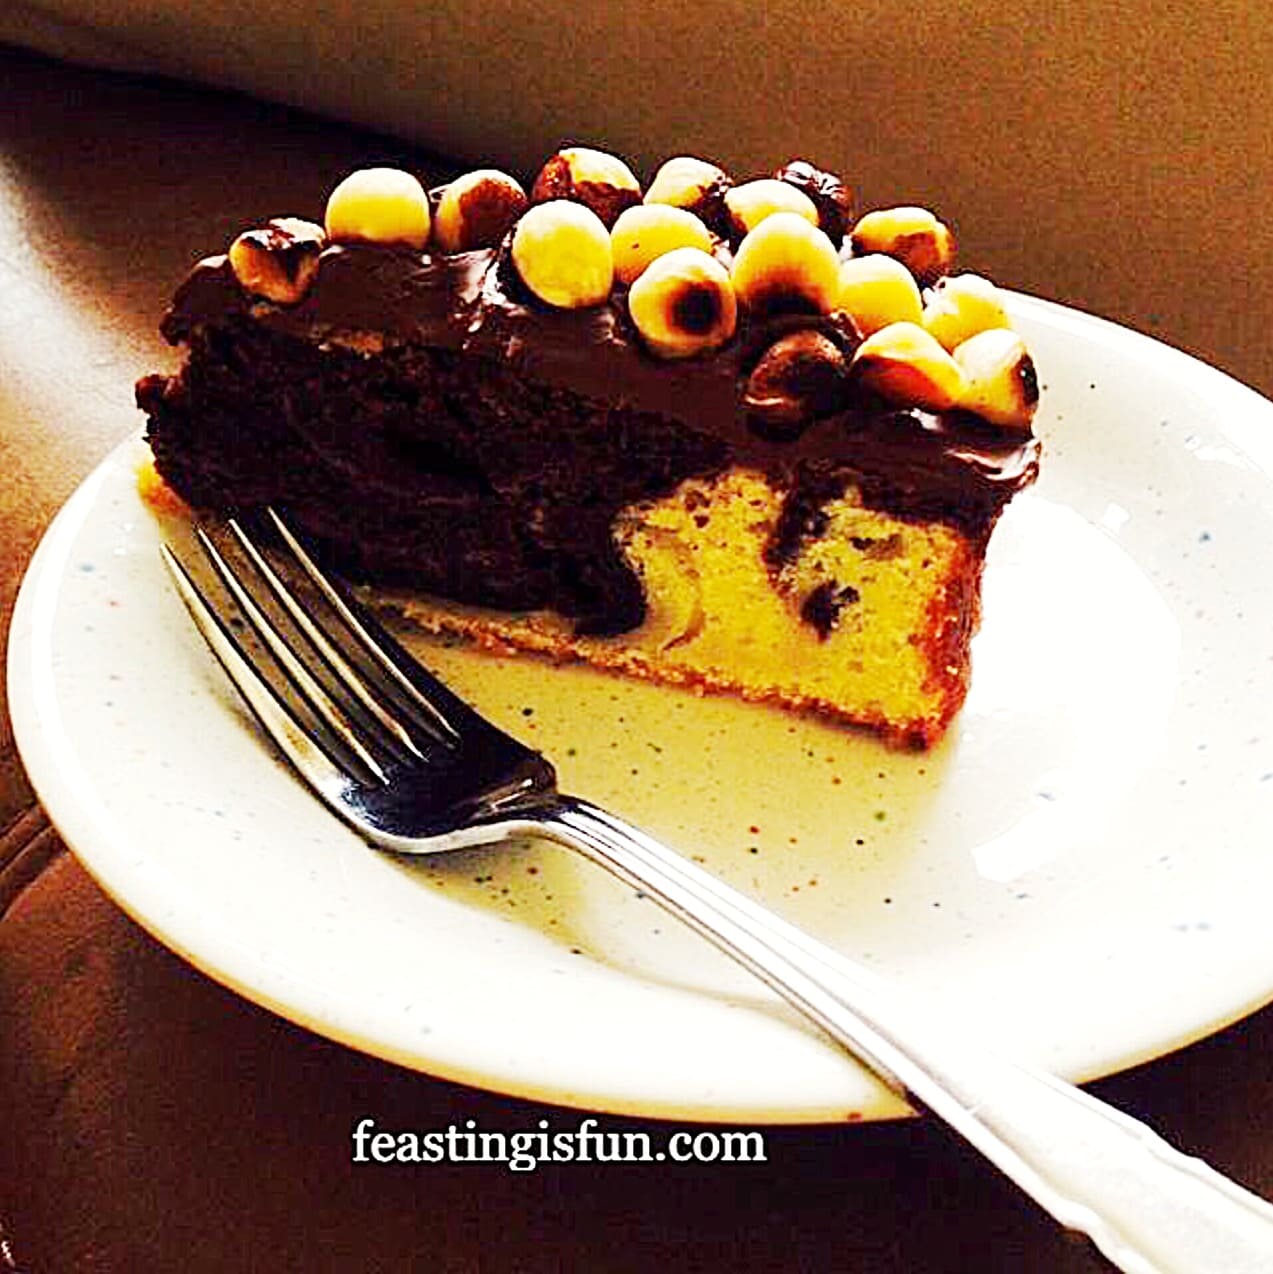
A slice of Nutella Hazelnut Covered Chocolate Marble Cake
Because, being completely honest, I’ll admit to eating a slice of this cake for lunch, three days in a row. It really is that tempting.
Method: Preheat the oven to 170C/150C fan, gas mark 2, 300F
Making The Chocolate And Vanilla Cake Batter
First of all grease thoroughly with butter a 9 inch/22.5cm springform cake pan and line the base with baking parchment.
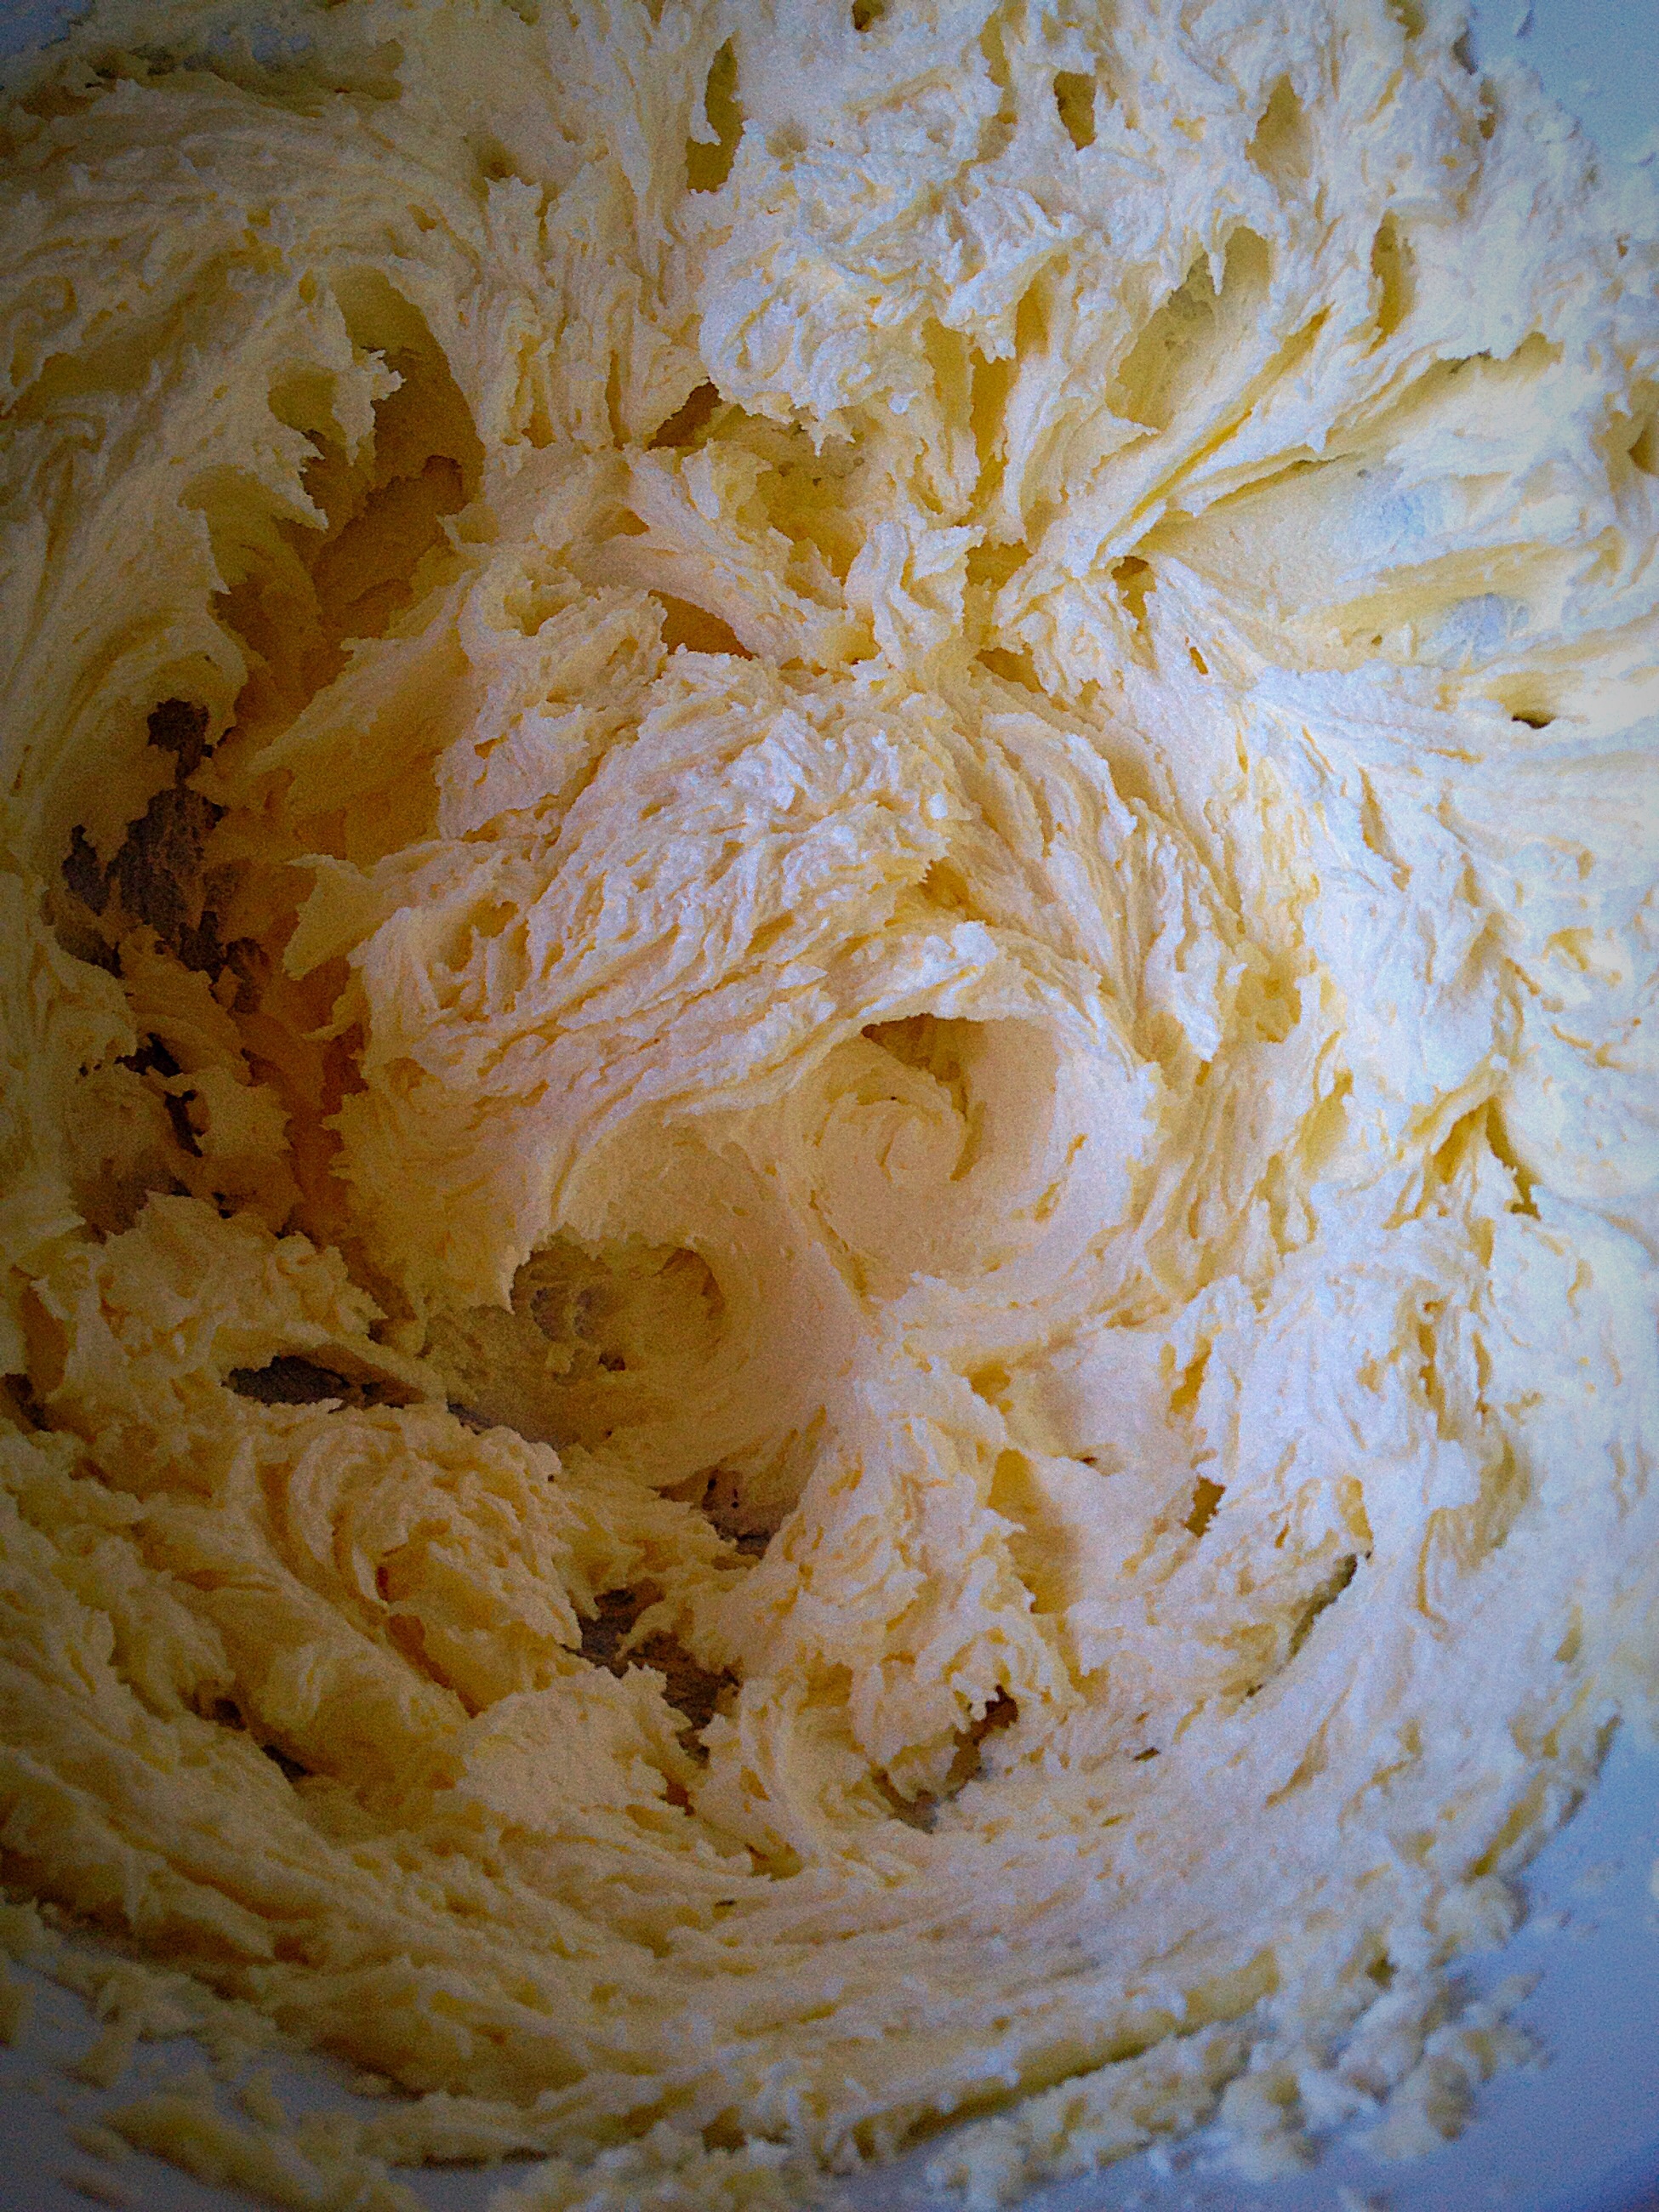
Add the butter, sugar and salt to a large bowl and cream together using an electric whisk (or stand mixer with paddle attachment). This actually takes a good 5 mins to get a really pale, light and fluffy mixture (so unless you want a thorough workout I don’t suggest you do this by hand!).
Pale and fluffy!!
Next add the vanilla extract, and 1 egg. Whisk until combined. While continuing to whisk gradually add the rest of the eggs, slowly, one at a time, until they have all been added. If it looks like your mixture is going to curdle add one tablespoon of Self Raising Flour and the mixture will come back together.
Making the vanilla cake batter.
All eggs added and no curdling – I added a tablespoon of flour, just in case!
Add the remaining flour and partly fold in. Now add the buttermilk (it’s worth giving the container a good shake, as the buttermilk can settle). Complete the mixing, by folding in the part blended flour mixture and the buttercream. Watch in amazement as the batter takes on a mousse like consistency.
This St Ivel buttermilk is the only one I could find!Buttermilk added to the cake batter.
If my batter looks a bit pinky/orange, it’s because the eggs that I used had very orange yolks.
In a separate bowl (I suggest that you use a larger one than I did) add the cocoa powder.
Place half of your vanilla cake batter on top of the cocoa and whisk until blended. I did try mixing by hand, but it was hopeless as the bowl was too small!
Cocoa.Place half the batter mixture on top.And whisk!!!
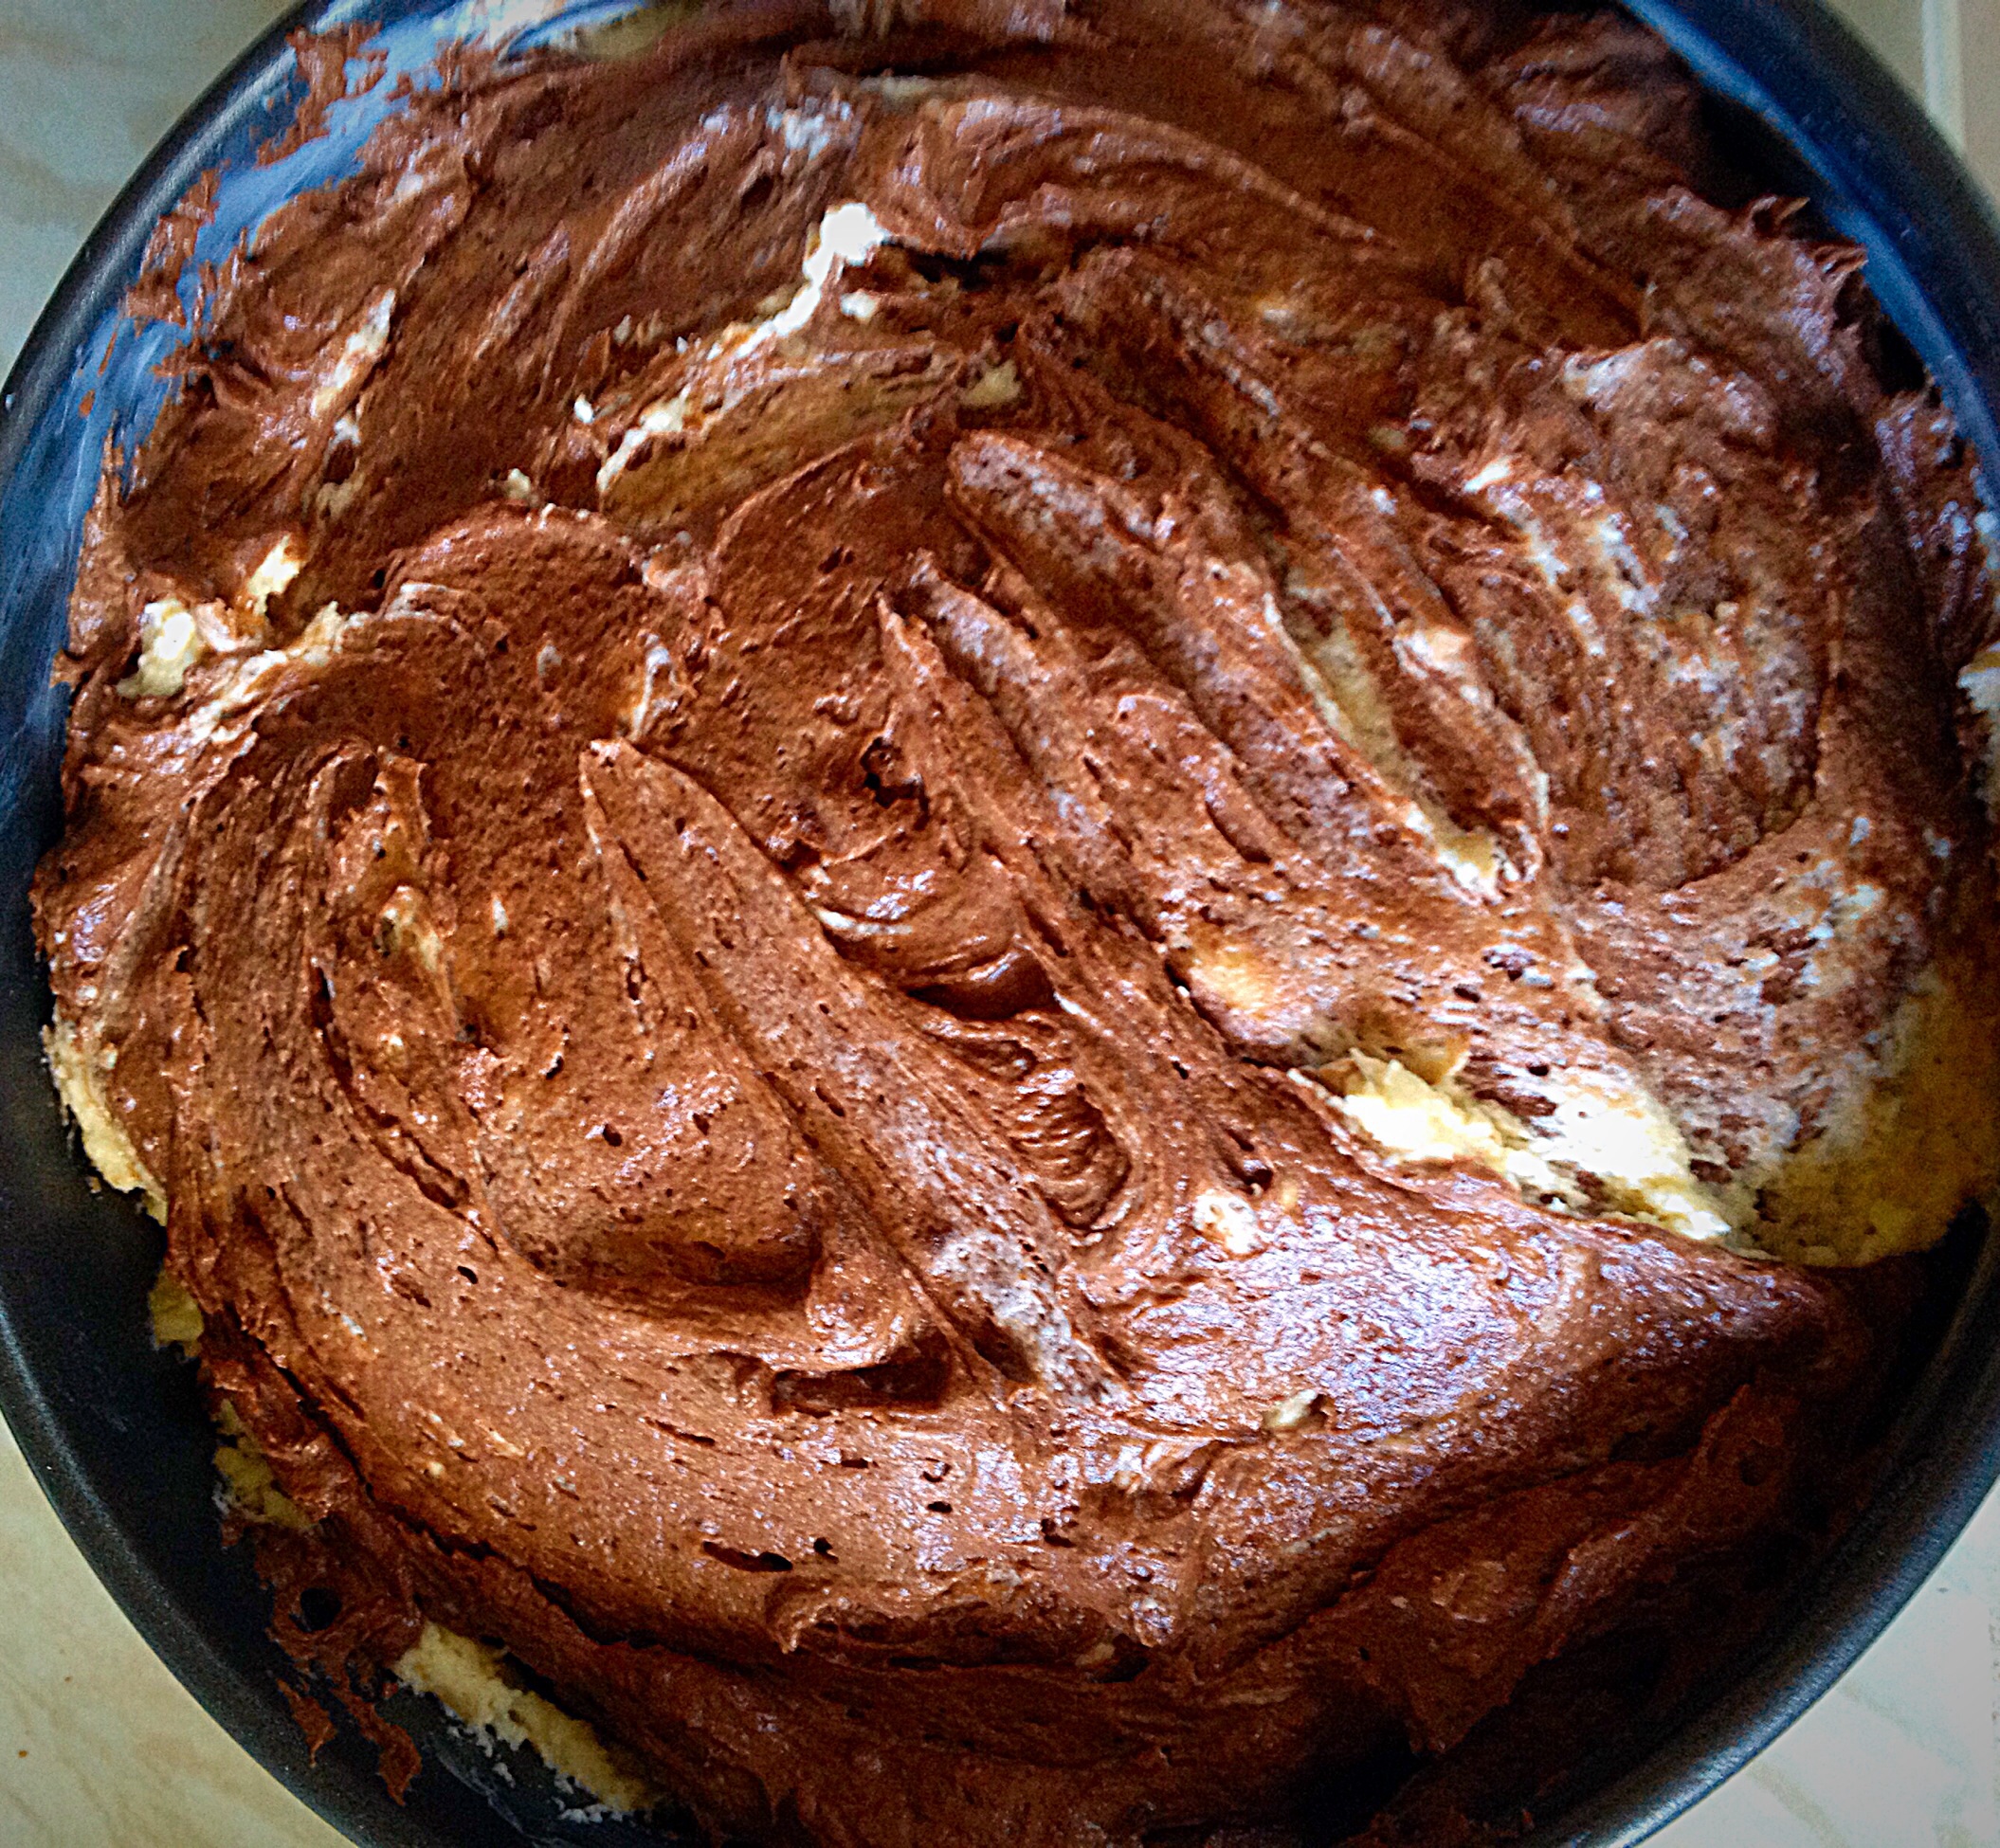
Creating The Marble Effect Of The Cake
Spoon in large dollops of the chocolate cake batter.
Follow with vanilla cake batter dropped in between the chocolate.
Now add chocolate batter on top of the vanilla.
Likewise repeat with vanilla and then chocolate batter until it is all in the cake tin.
First I dolloped chocolate cake batter.Then I added vanilla..,Finishing with the rest of the chocolate.
Using a butter knife swirl the two batters together. What you’re aiming for is a rippled effect. Since there is no precision to this method, swirl a few times, but not so many that the result is both cake batters completely mixed together.
Swirling finished, now level off the cake top.
Baking The Chocolate Marble Cake
Place the cake in the centre of a preheated oven and bake for an hour. The cake is cooked when it is firm to touch and does not wobble underneath the set top. Also an inserted skewer will come out clean.
As soon as the cake is cooked remove from the oven.
Place the cooked cake, still in it’s tin onto a baking rack and leave to cool, for 15 minutes.
After 15 minuntes unclip the springform tin and remove the tin, leaving the cake on the tin base to cool.
Don’t worry if there are a few cracks on the top. These will close as the cake cools.
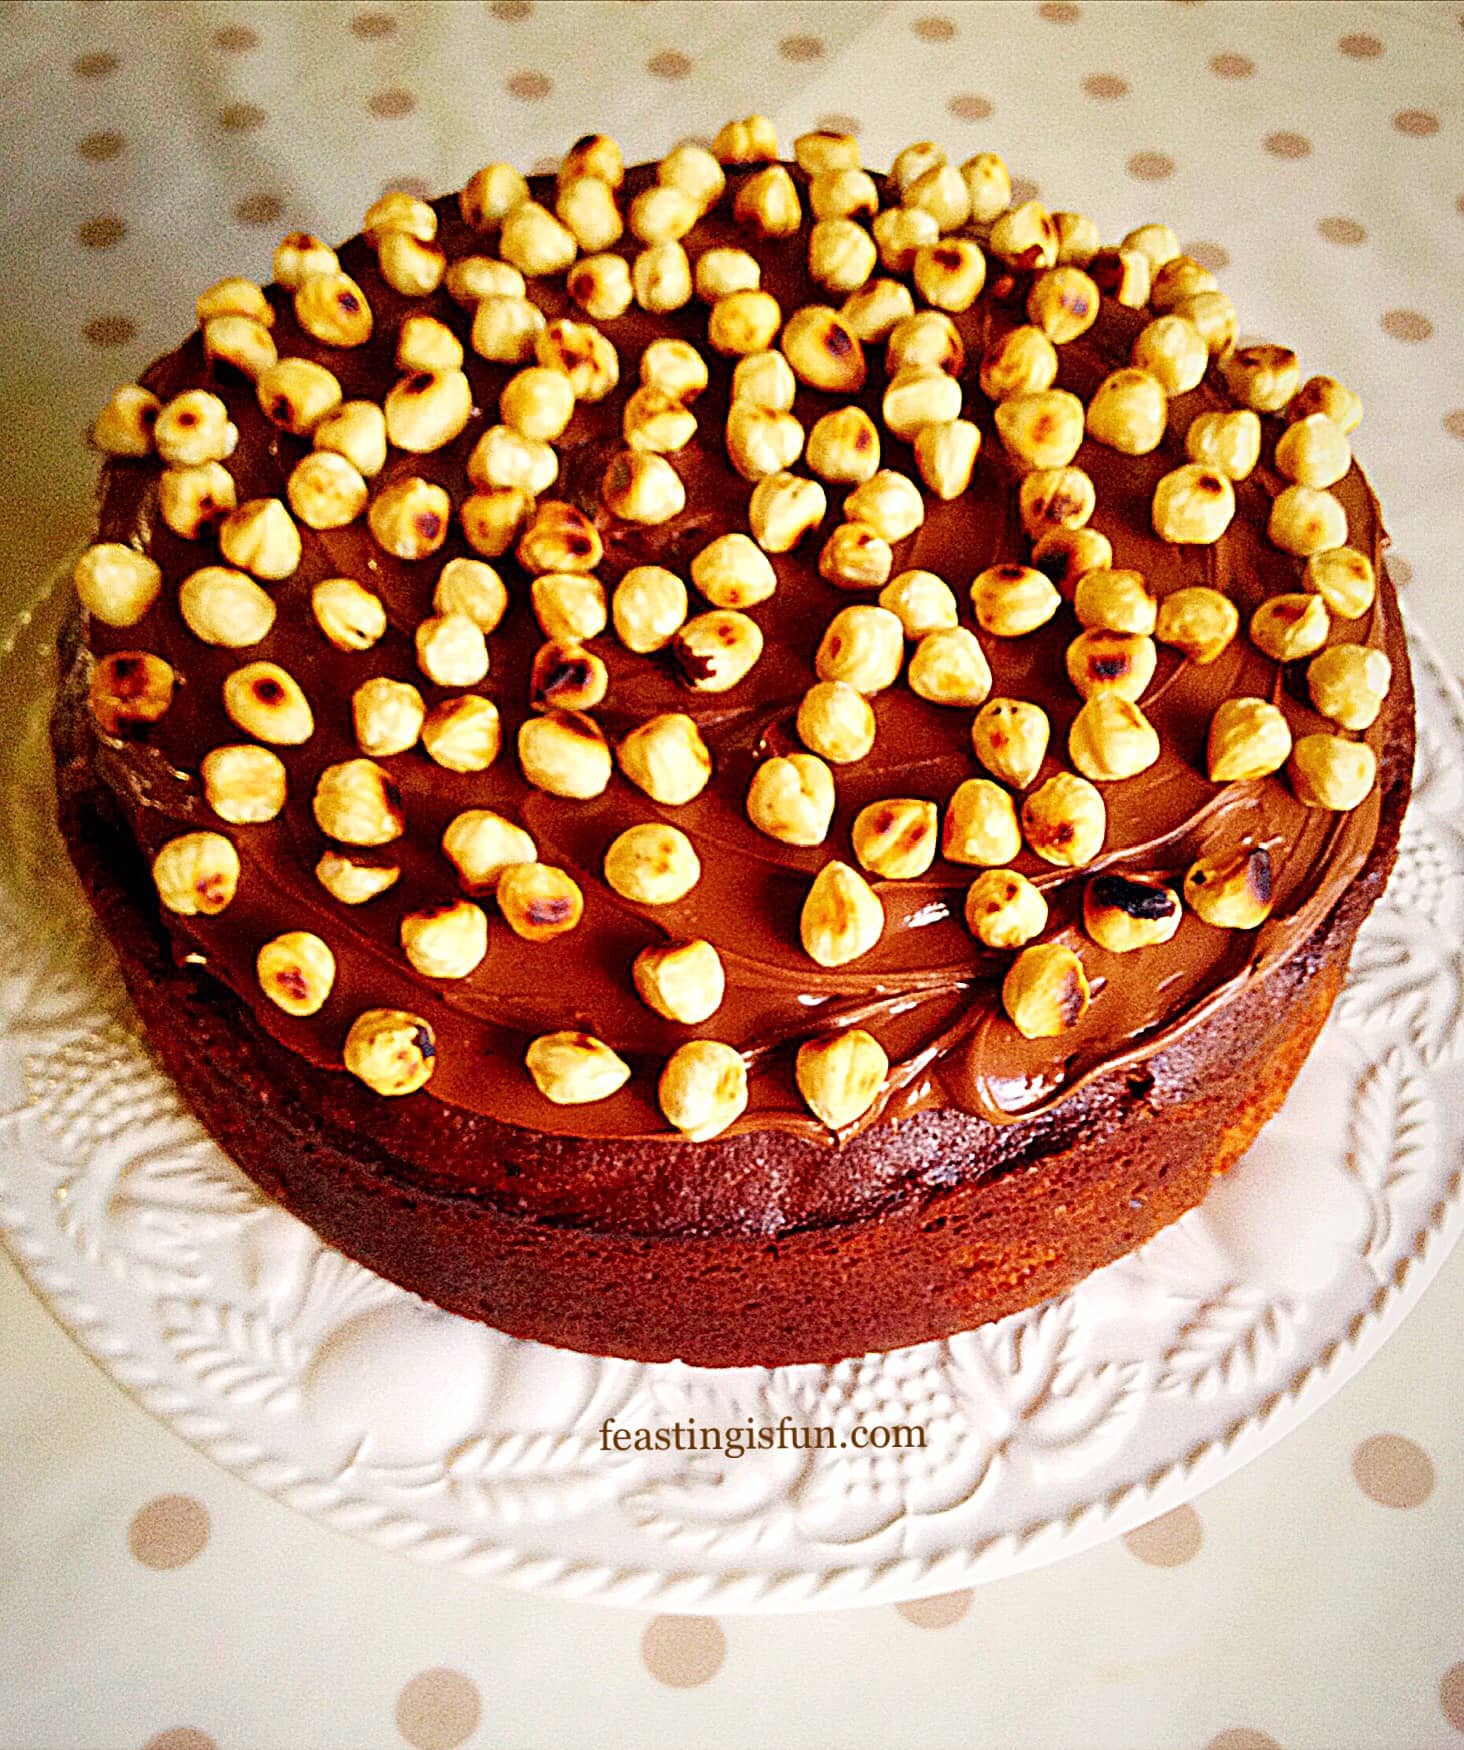
Decorating The Cake With Toasted Hazelnuts And Nutella
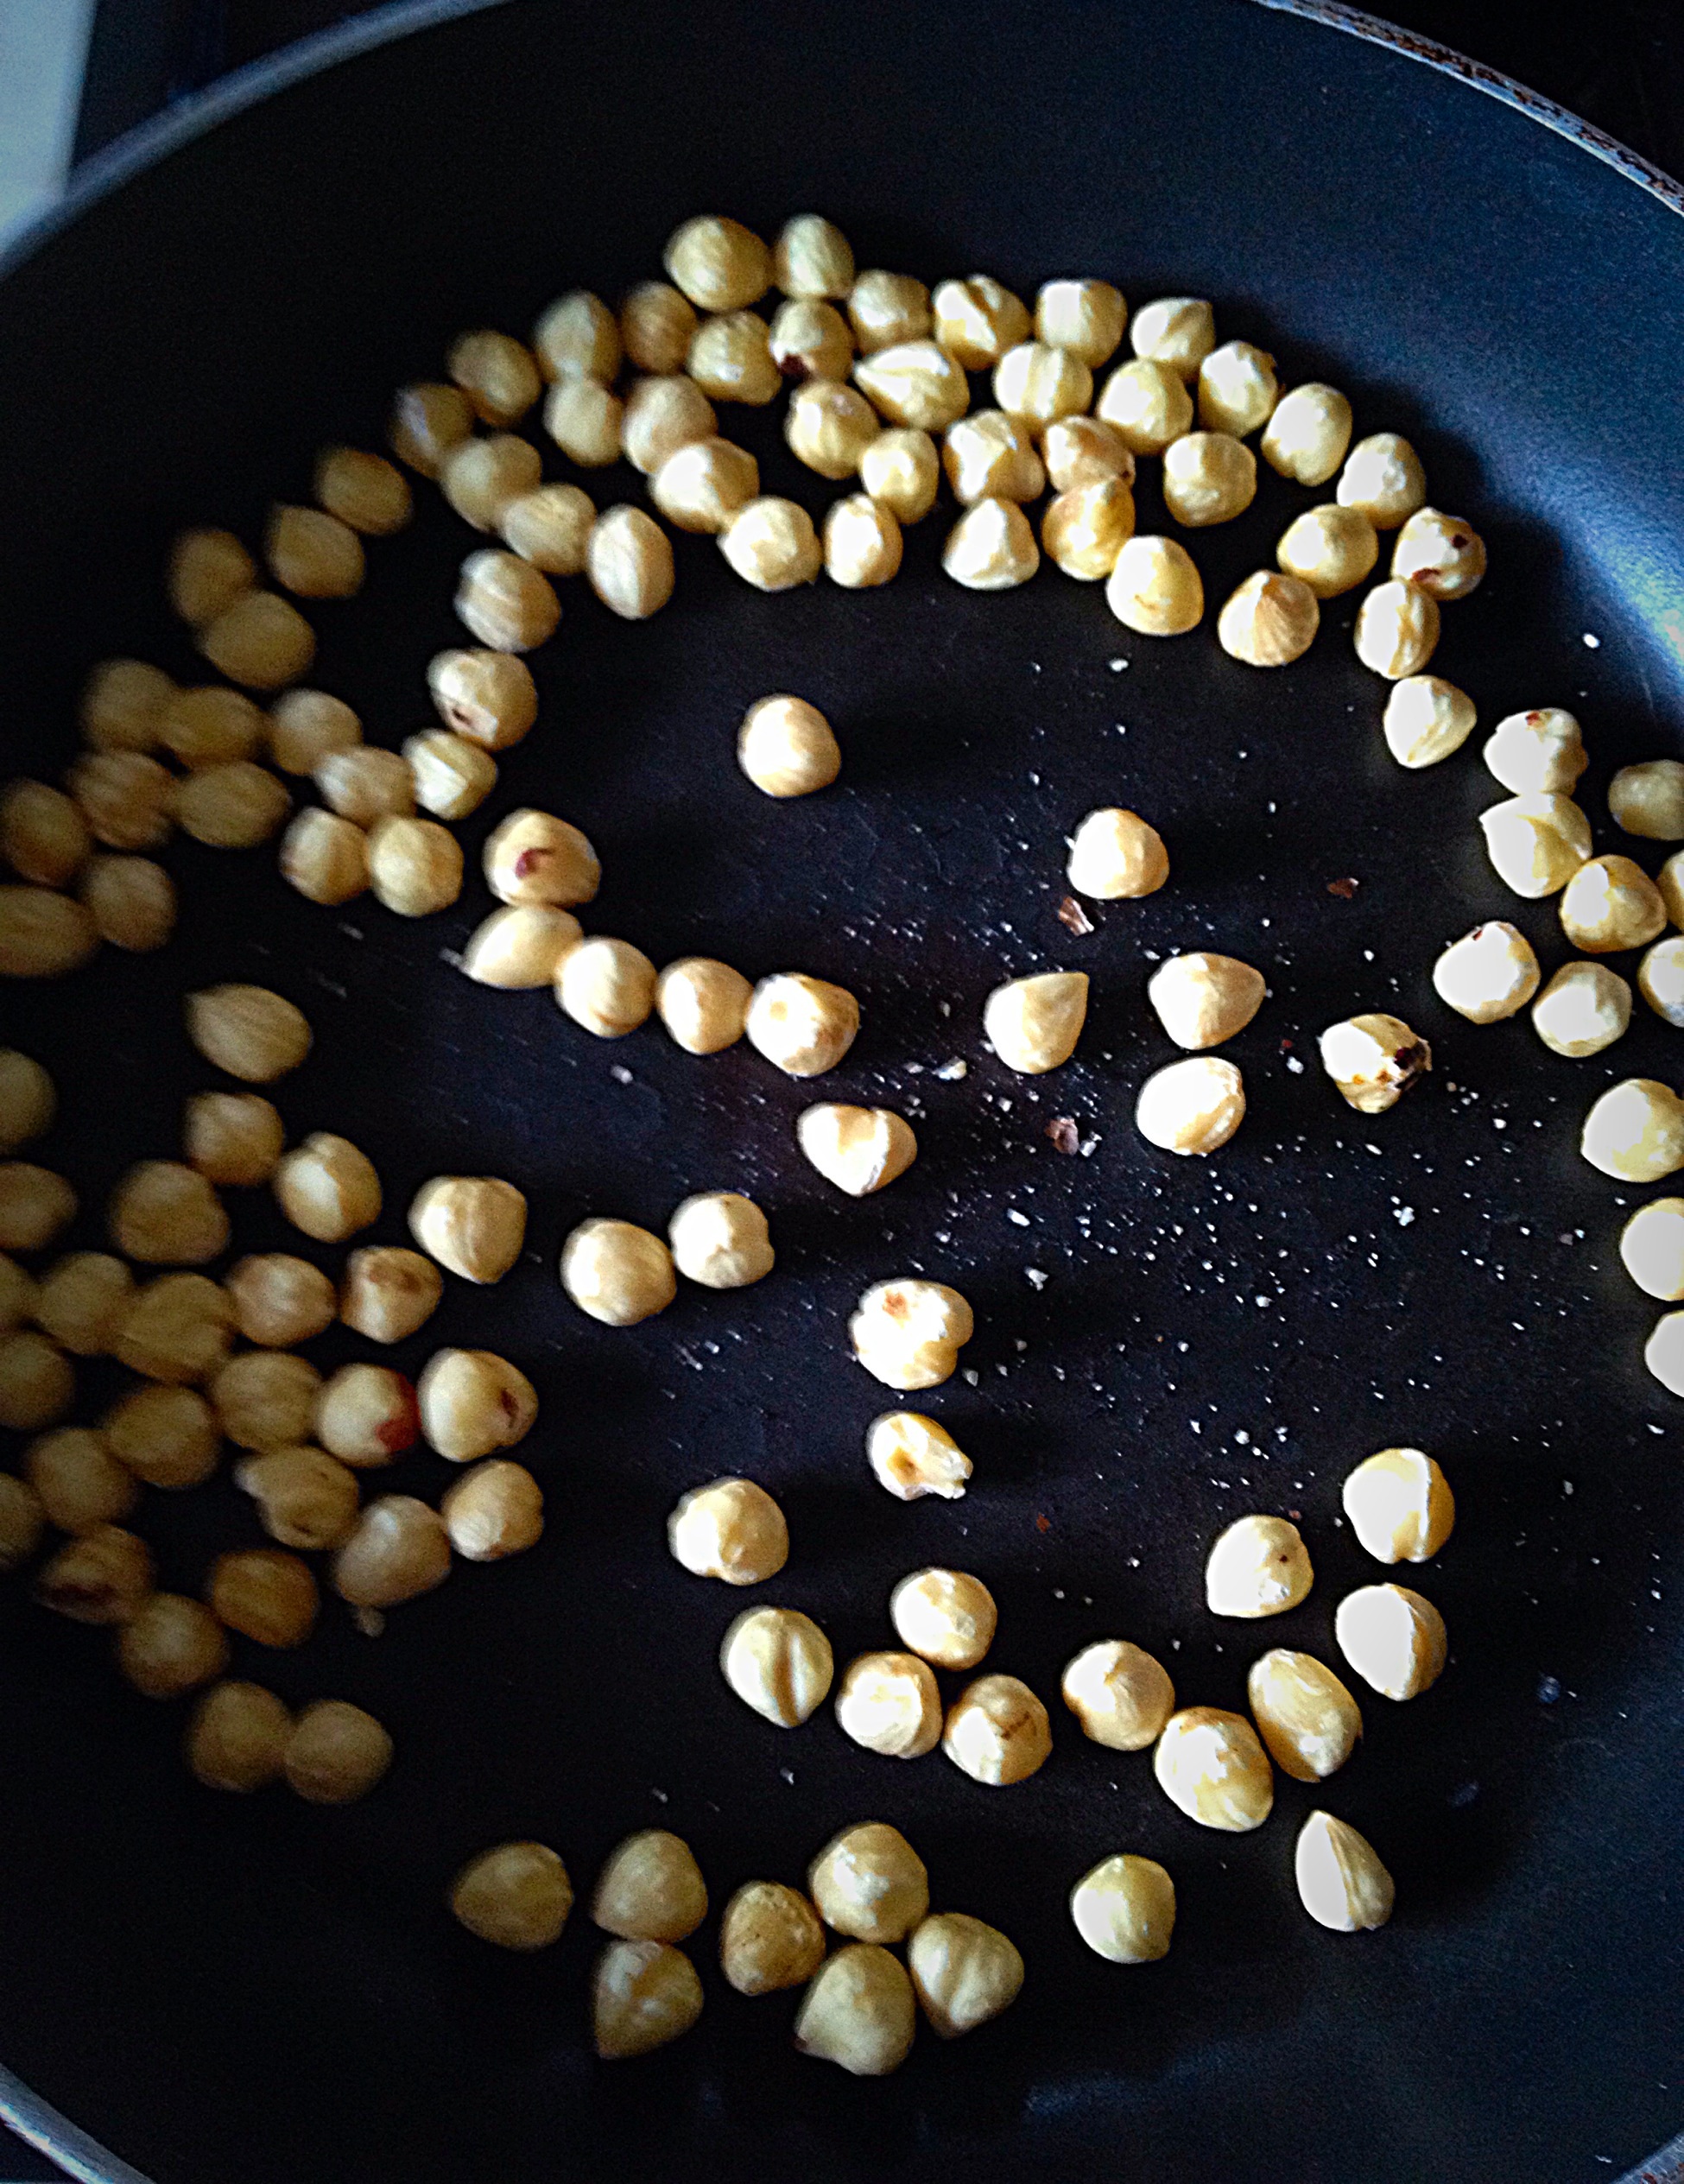
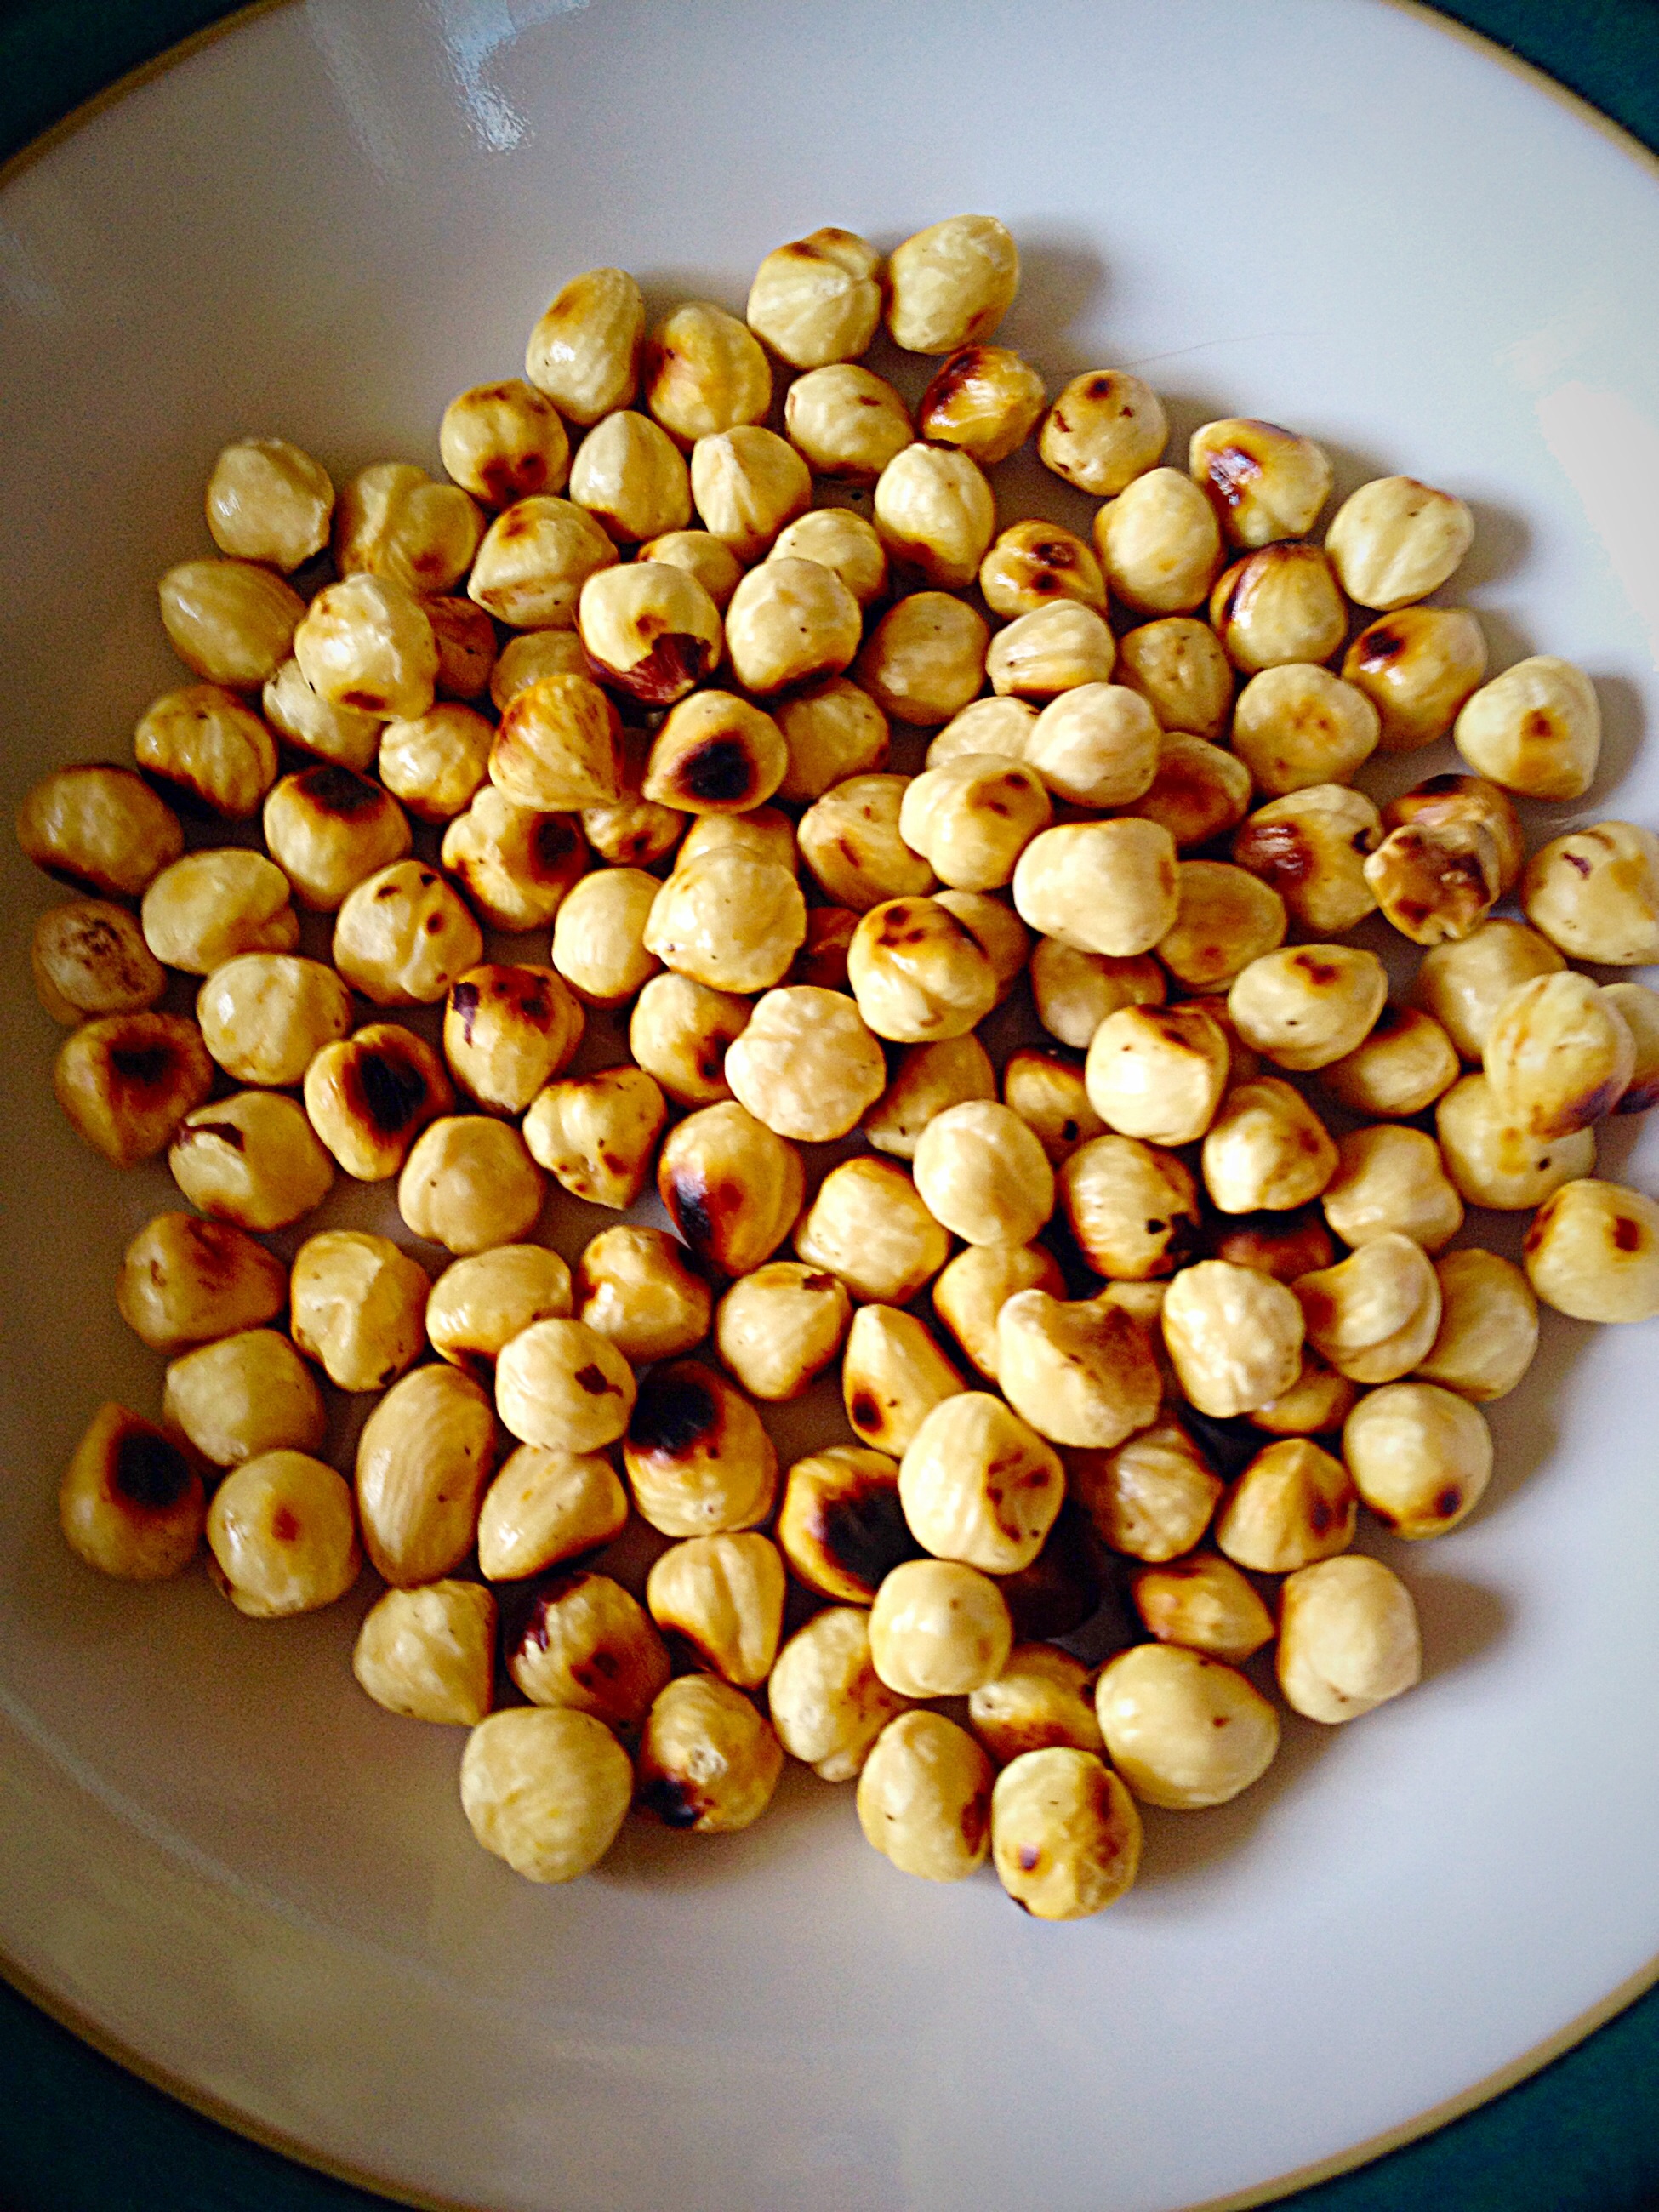
While the cake is cooling, lightly toast the hazelnuts.
Place the hazelnuts into a dry frying pan and toast over a high heat for approximately 5 minutes. Toasting the hazelnuts brings out the wonderful oils and flavour. As soon as the hazelnuts are toasted remove from the pan and place in a bowl to cool.
Toast the hazelnuts in a dry pan over a high heat.Once toasted the hazelnuts turn a gorgeous golden colour.
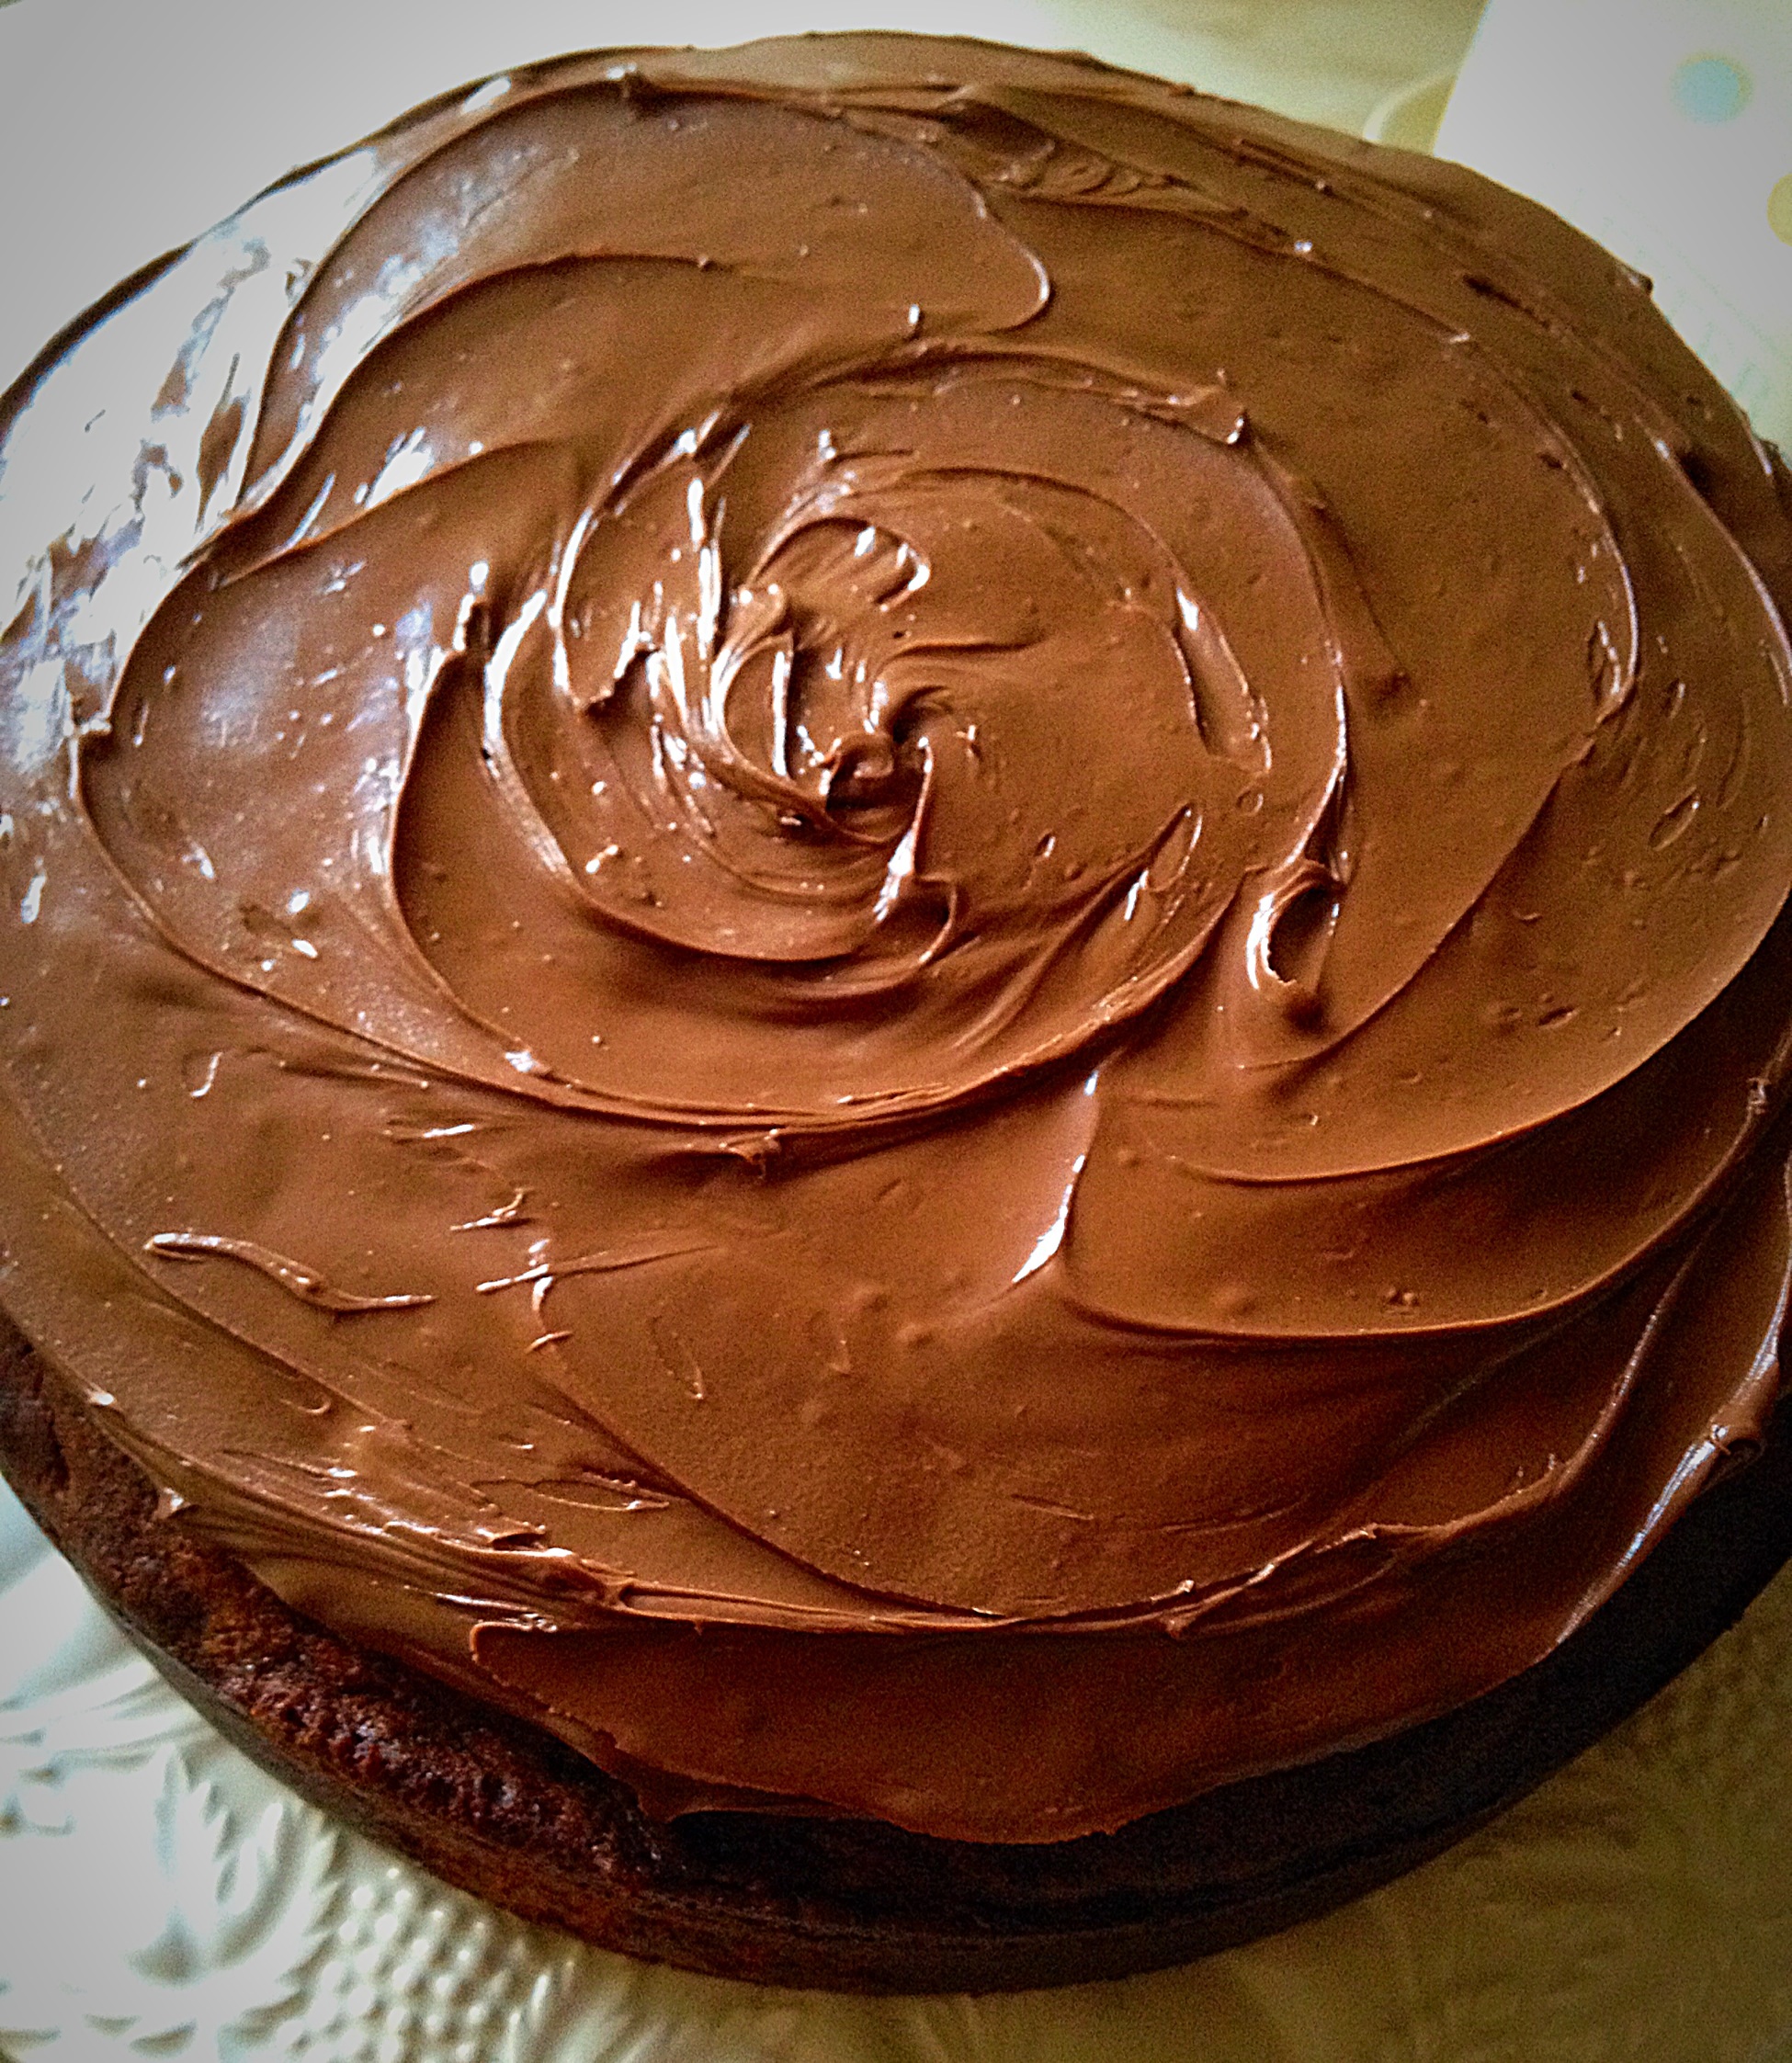
As I mentioned, any cracks in the top of the cake will close on cooling, but don’t worry, the top is going to be covered in Nutella.
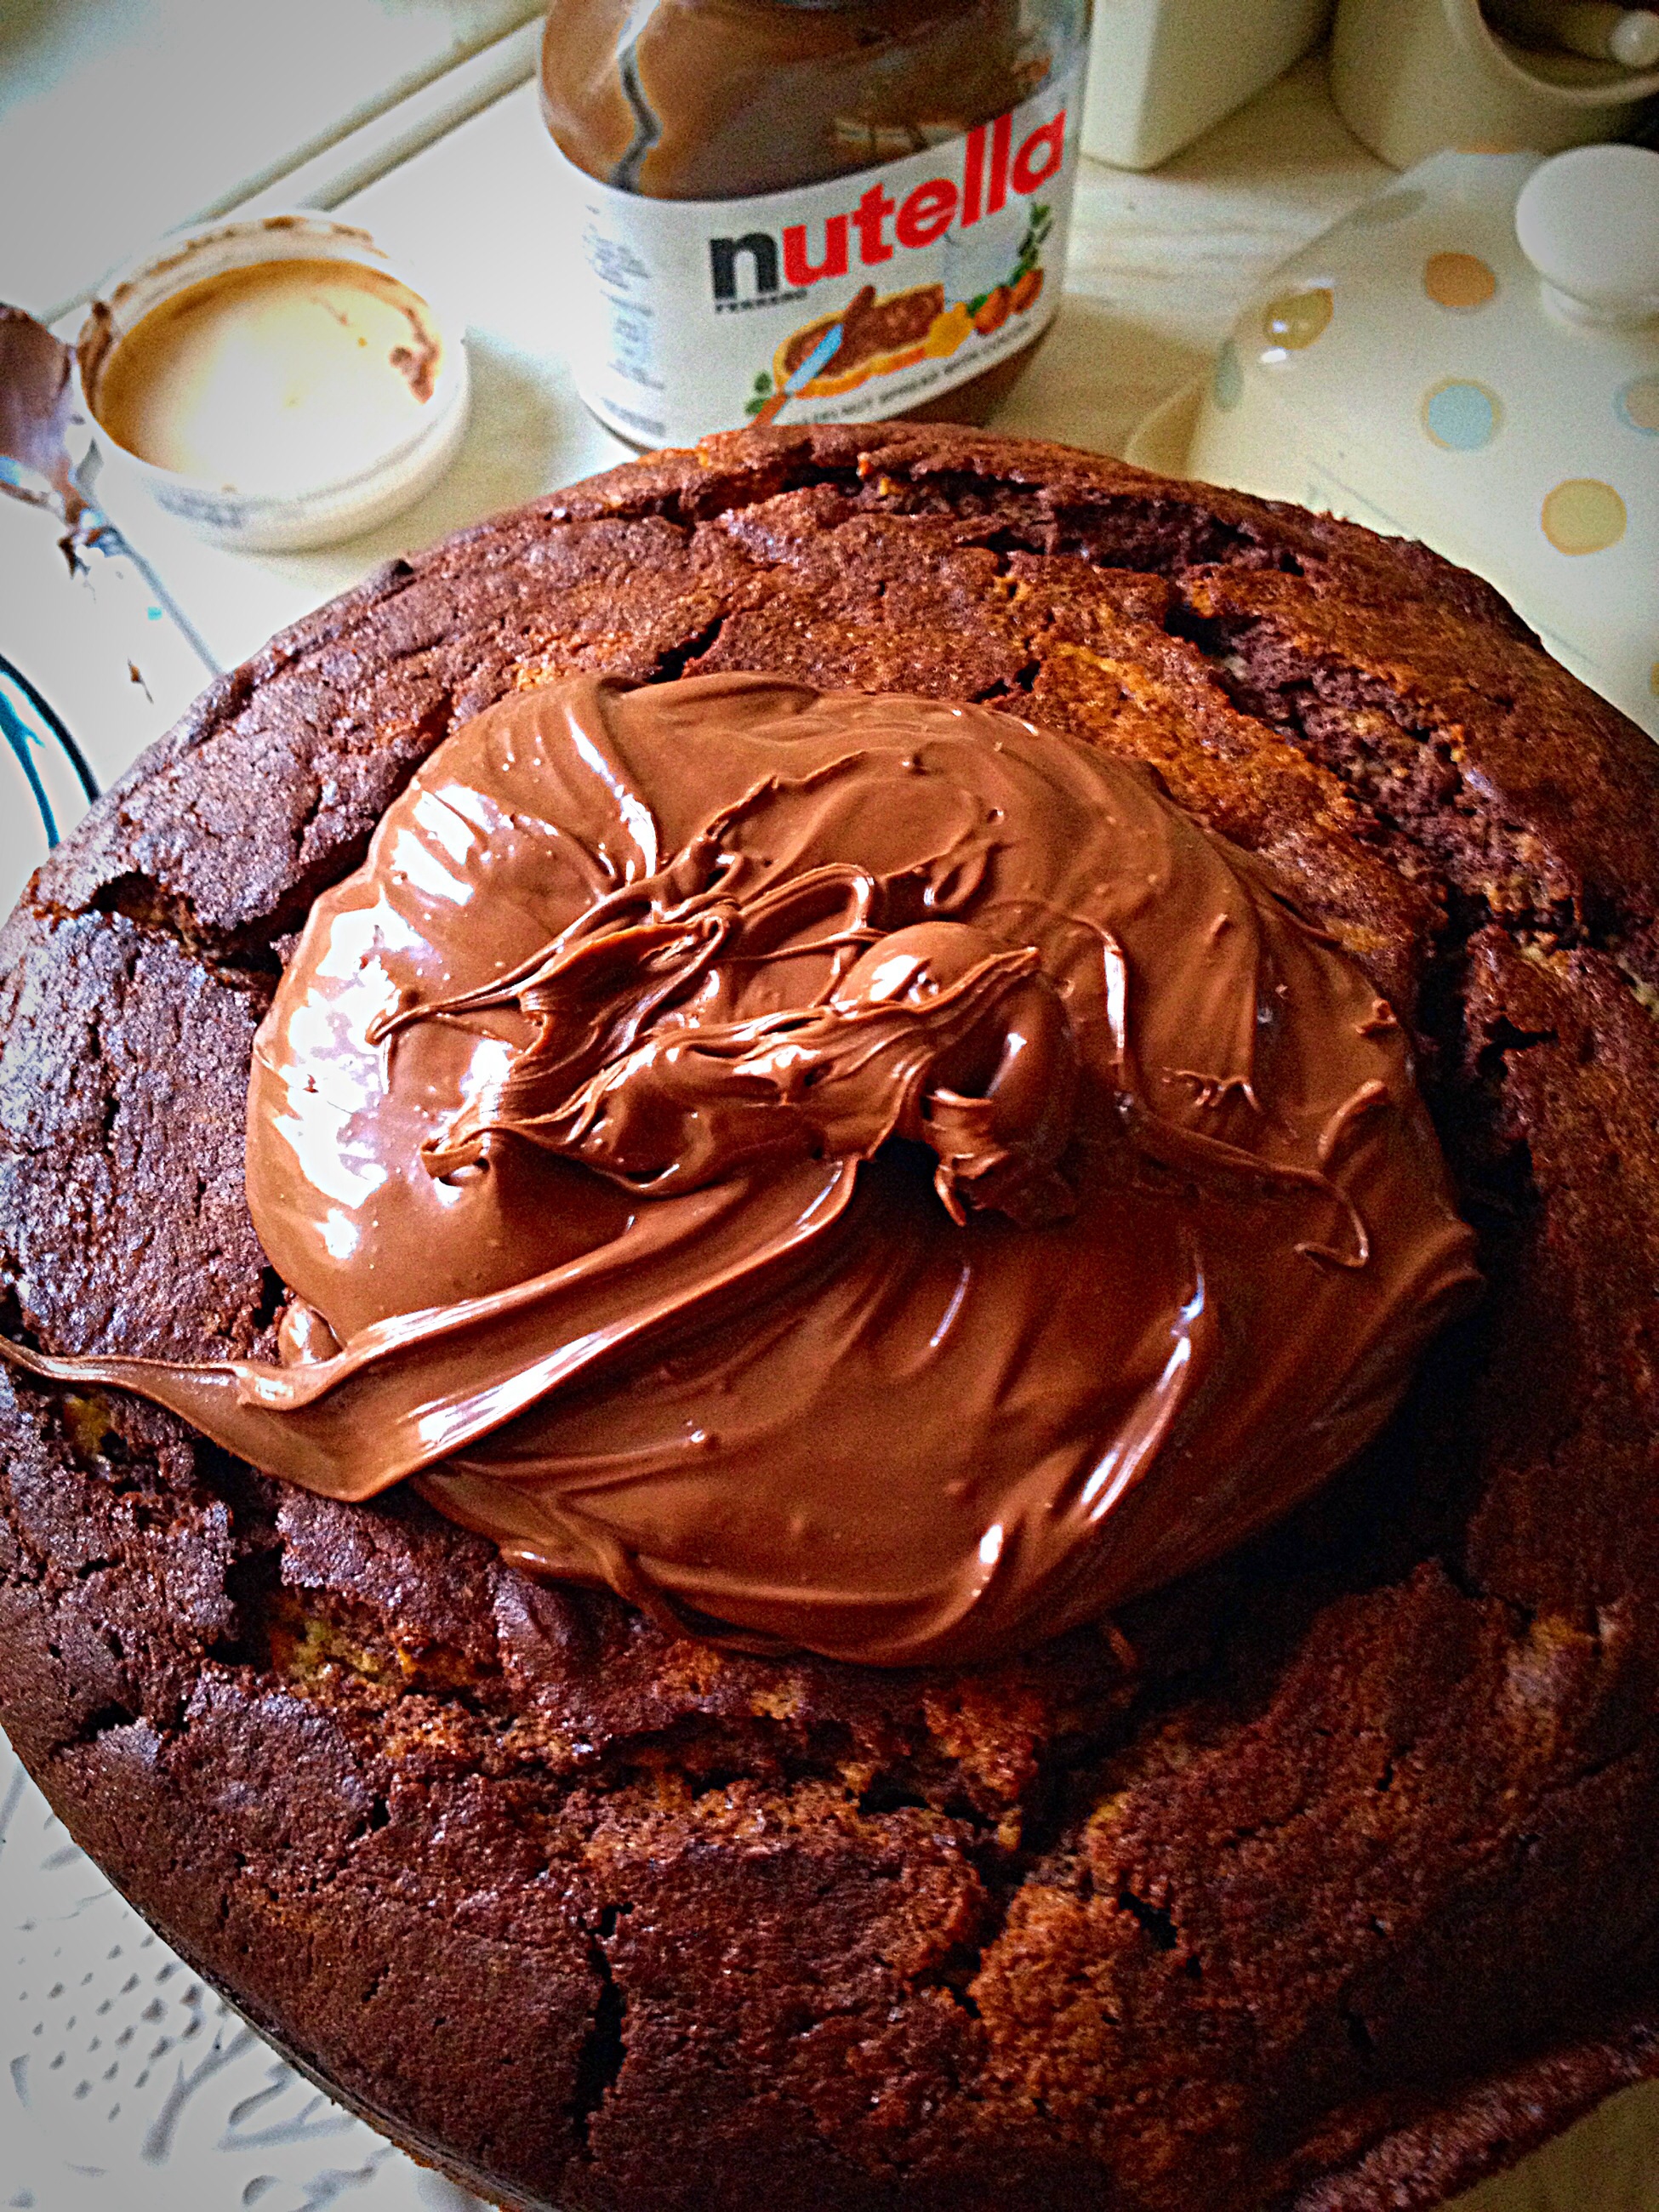
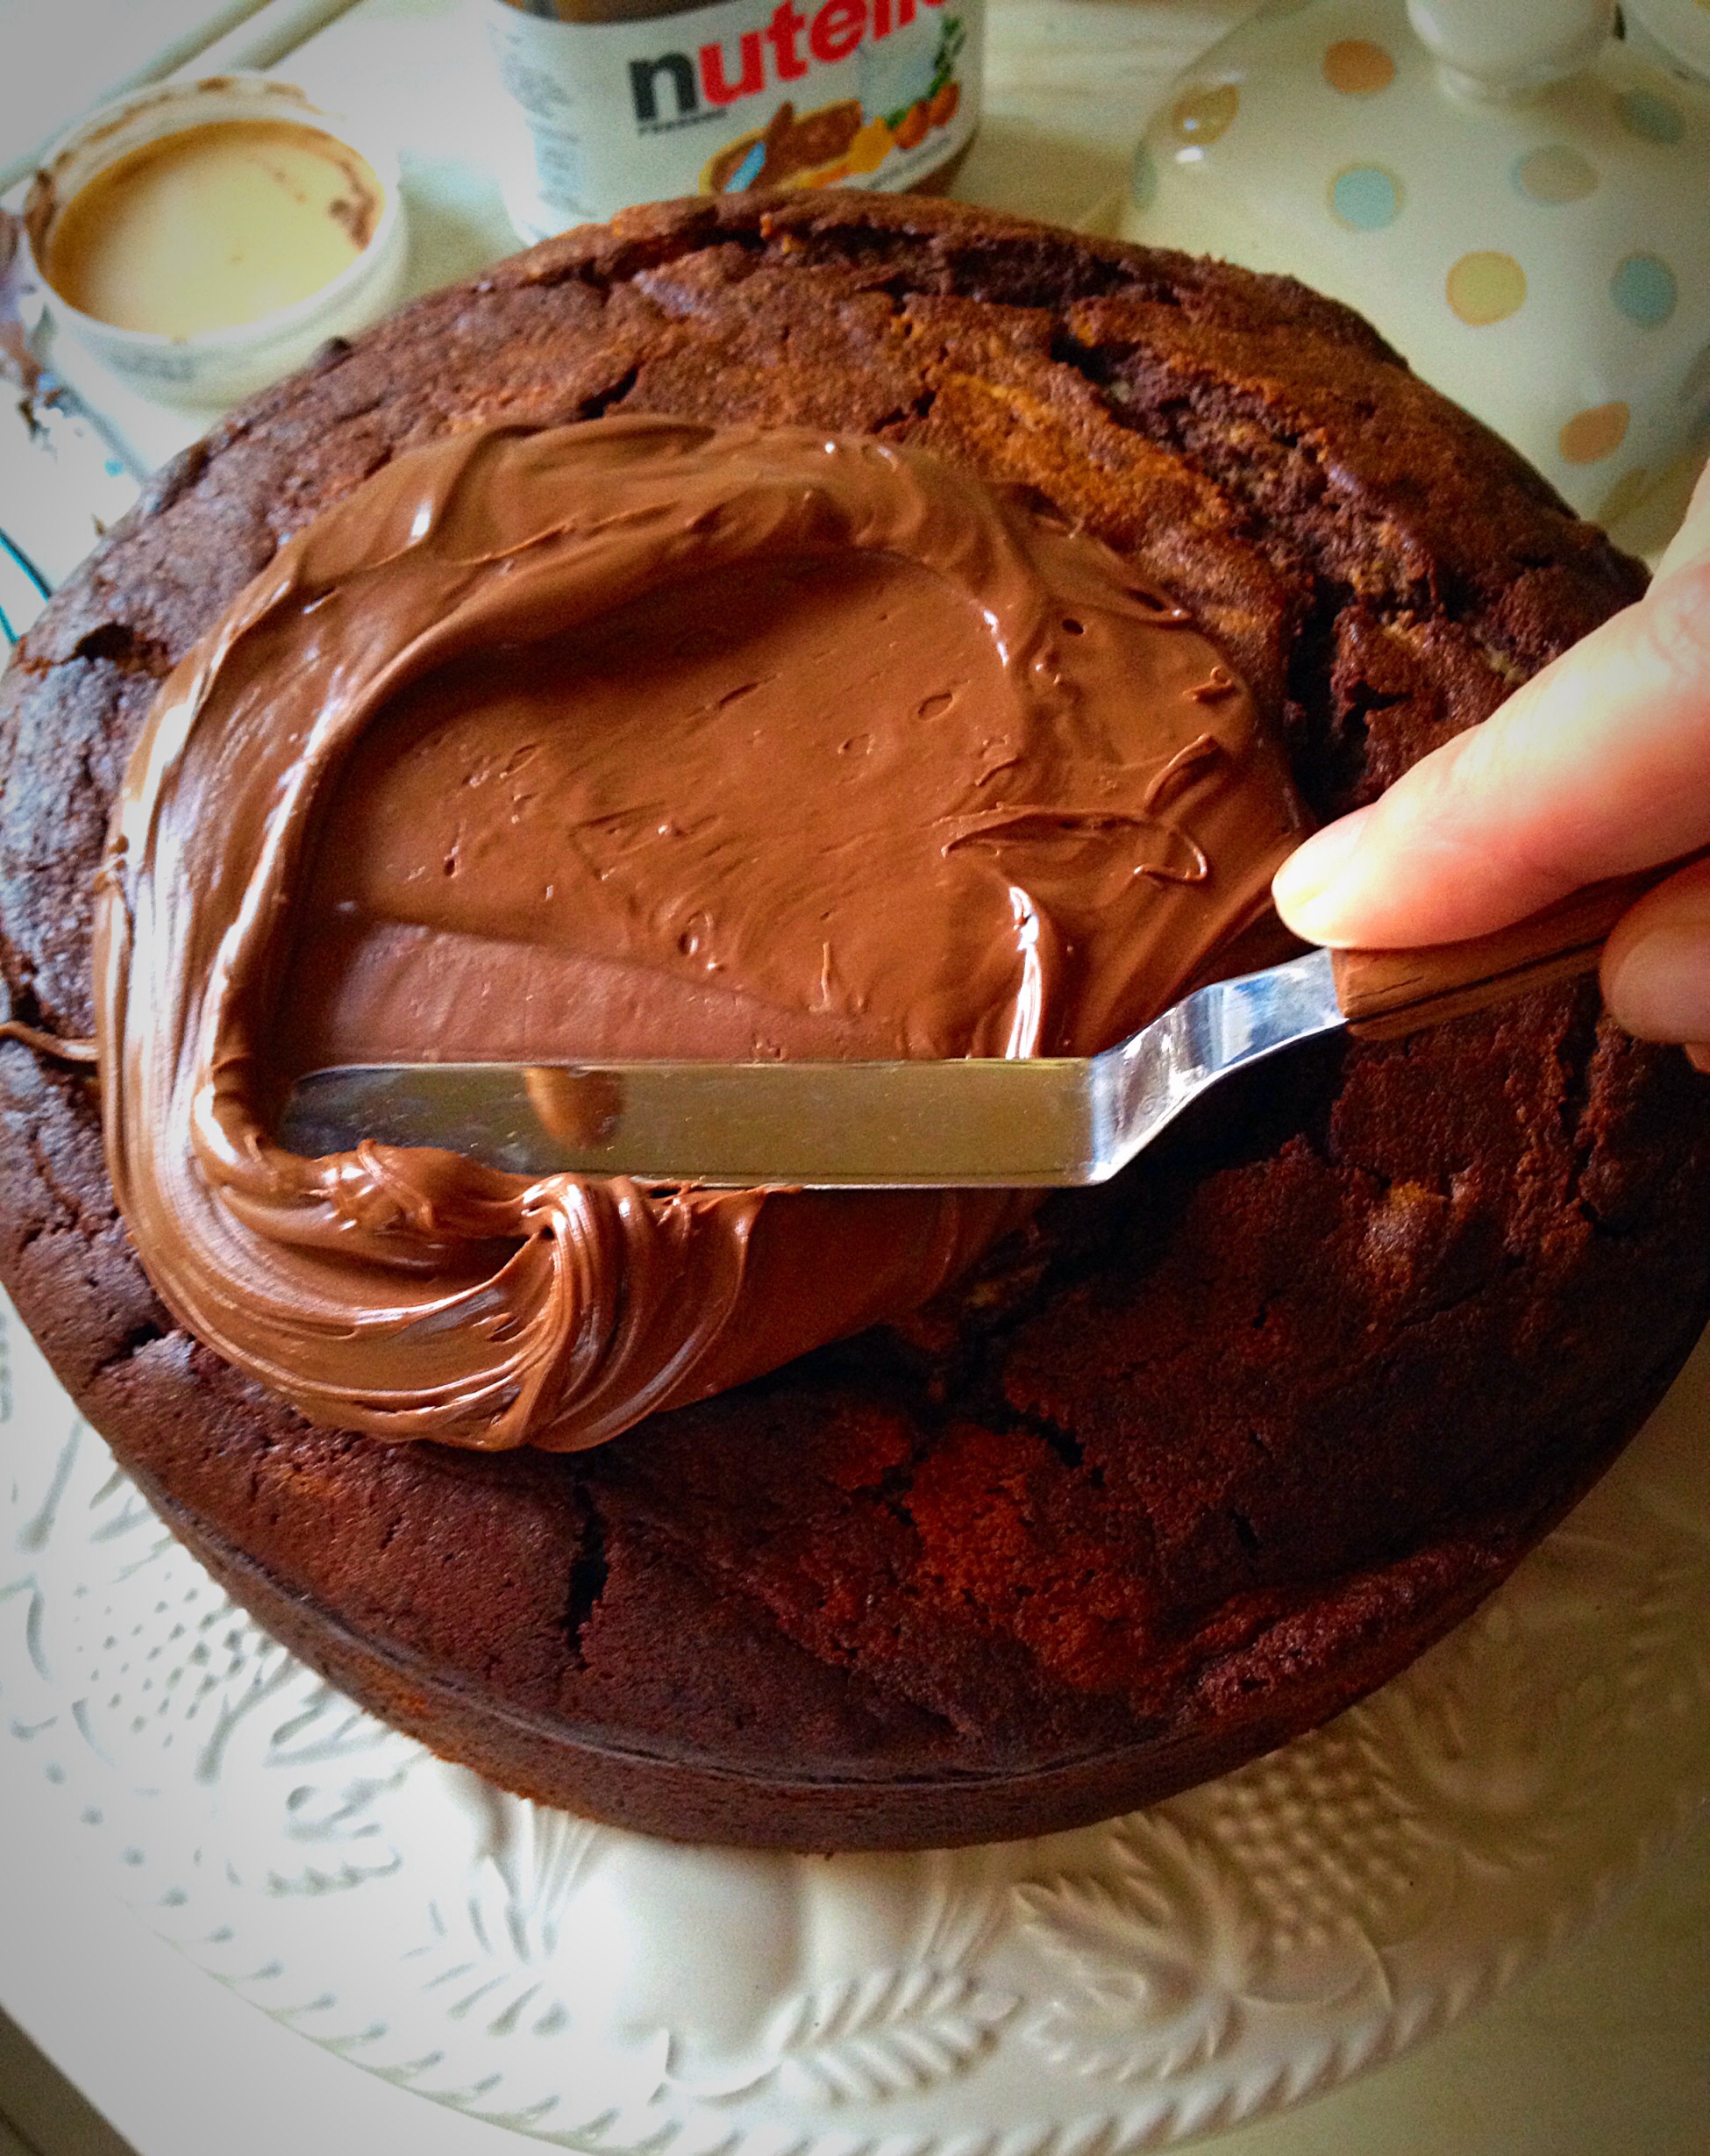
Place the cake on a cake stand/board or plate. Place 5-6 tablespoons of Nutella on to the top of the cake. Spread the Nutella over the top of the cake right up to the edge. An off set spatula is ideal for spreading.
Sorry, you do have to spread the Nutella as it doesn’t set.Nutella is so easy to spread!Oooh scrummy, this Nutella covered cake looks ready to eat – but we can add a final touch!
Time to get creative with the toasted hazelnuts. You can place them randomly or in a pattern on top of the Nutella. Once finished you finally have a Nutella Hazelnut Covered Chocolate Marble Cake.
Nutella Hazelnut Covered Chocolate Marble Cake
So scrumptious looking and the perfect cake for sharing. Also the Nutella doesn’t set so invite a friend/neighbour round, or the whole family and pop the kettle on. This cake is ready for slicing, so enjoy.
Store in an airtight container and eat within 5 days.
If you have enjoyed this recipe for Nutella Hazelnut Covered Chocolate Marble Cake you may also like these:
While it is nice to bake a cake, just to have in the cupboard. So that family members can cut a slice and enjoy with a cup of tea, there are other reasons to bake. For example, to give as a gift to a new family, or take round to welcome new neighbours. If you think bout it there are plenty of reasons to bake and share cake. Since an unexpected gift has a double feel good factor. Not only do the recipients receive a delicious gift, they also know that they’ve been thought about. What other reason do we need that that?
So, whatever you are making, baking and creating in your kitchens, have fun preparing your feast.
Sammie xx
No part of this post may be reproduced or duplicated without the written permission of the owner. Please see my Disclosure Policy.
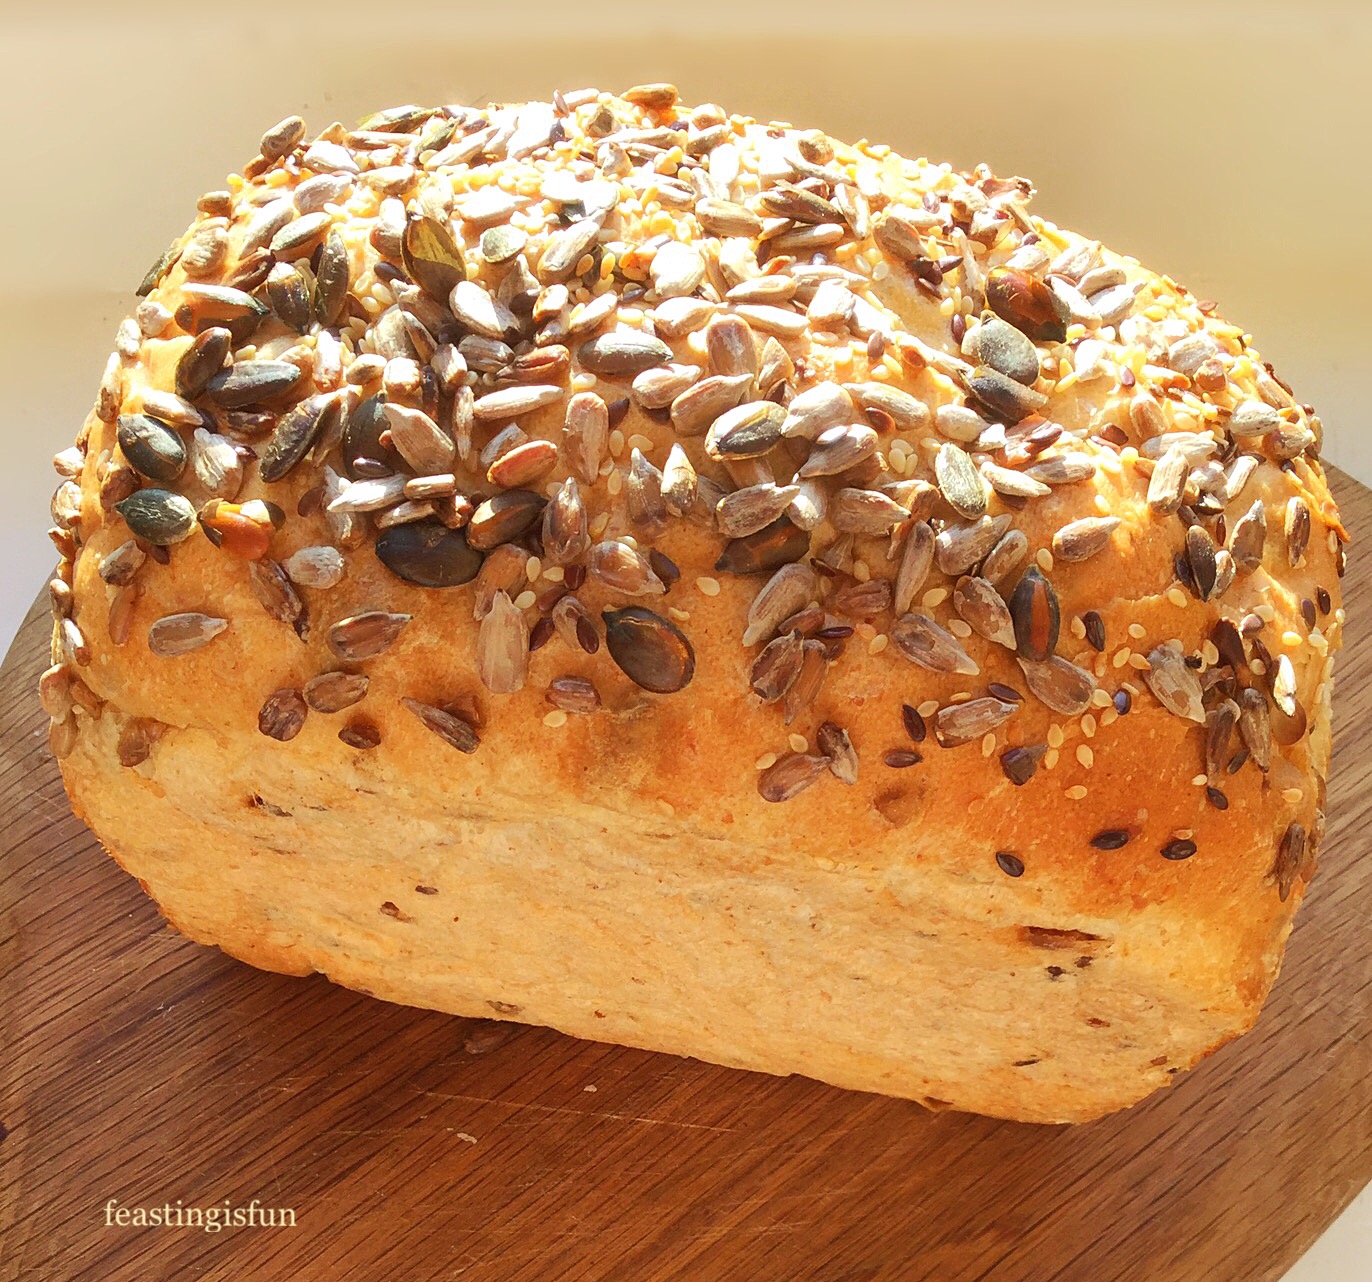
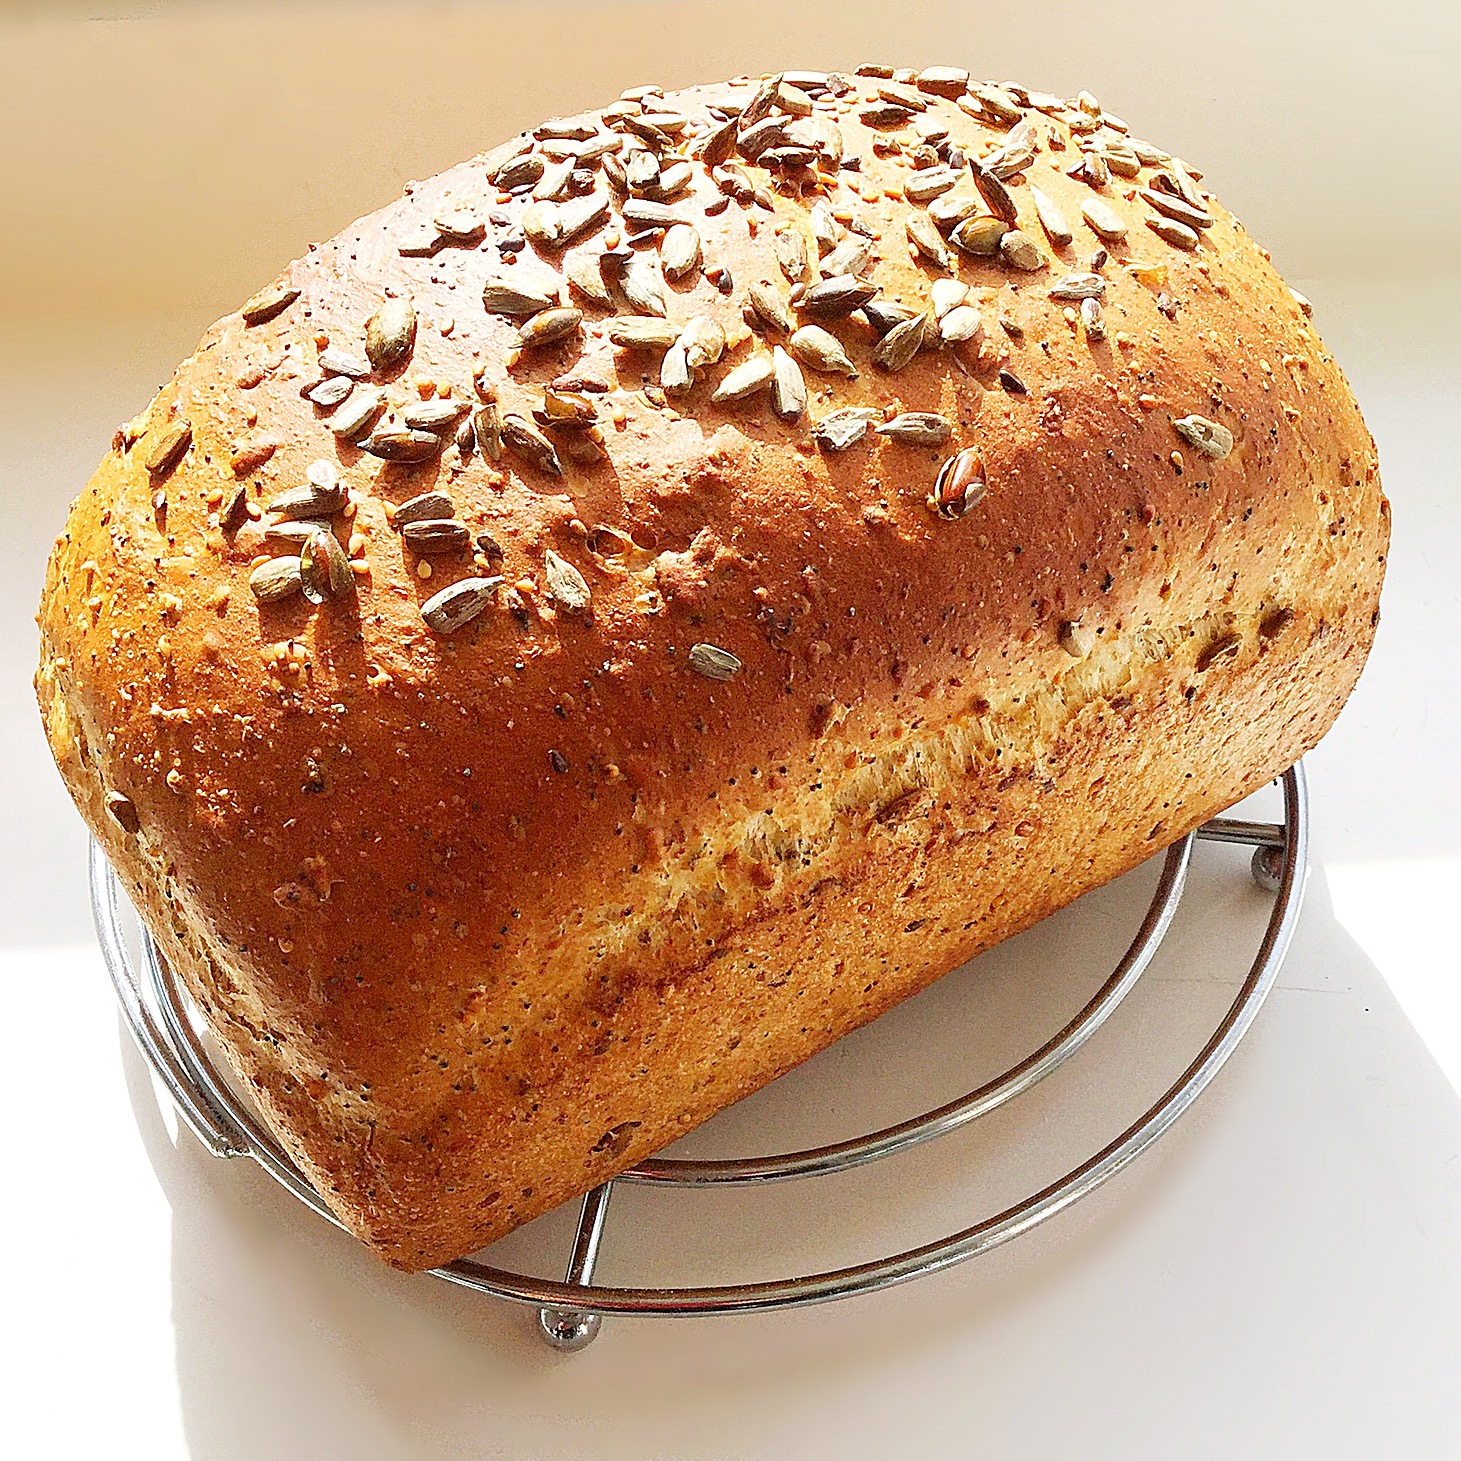
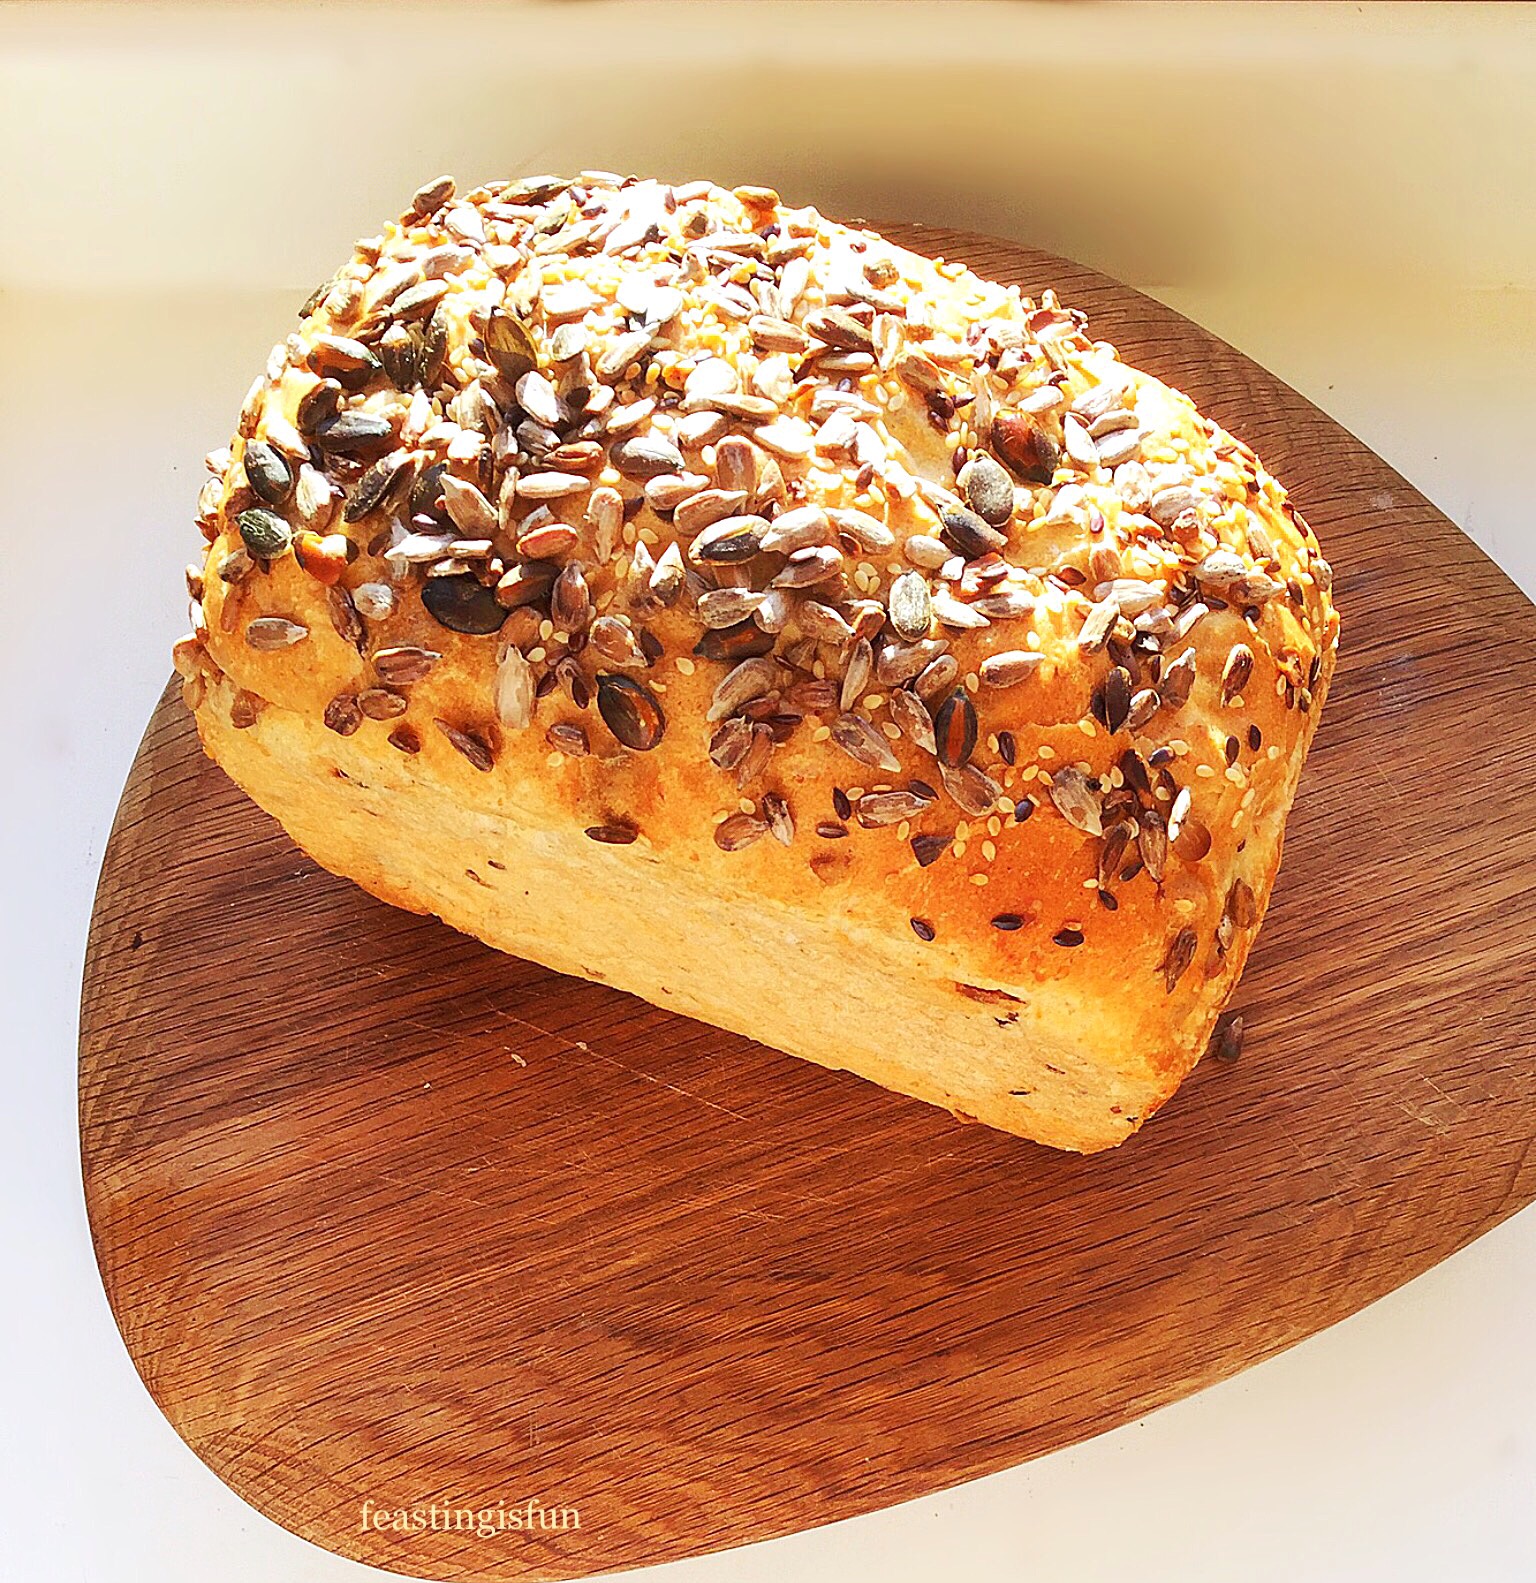
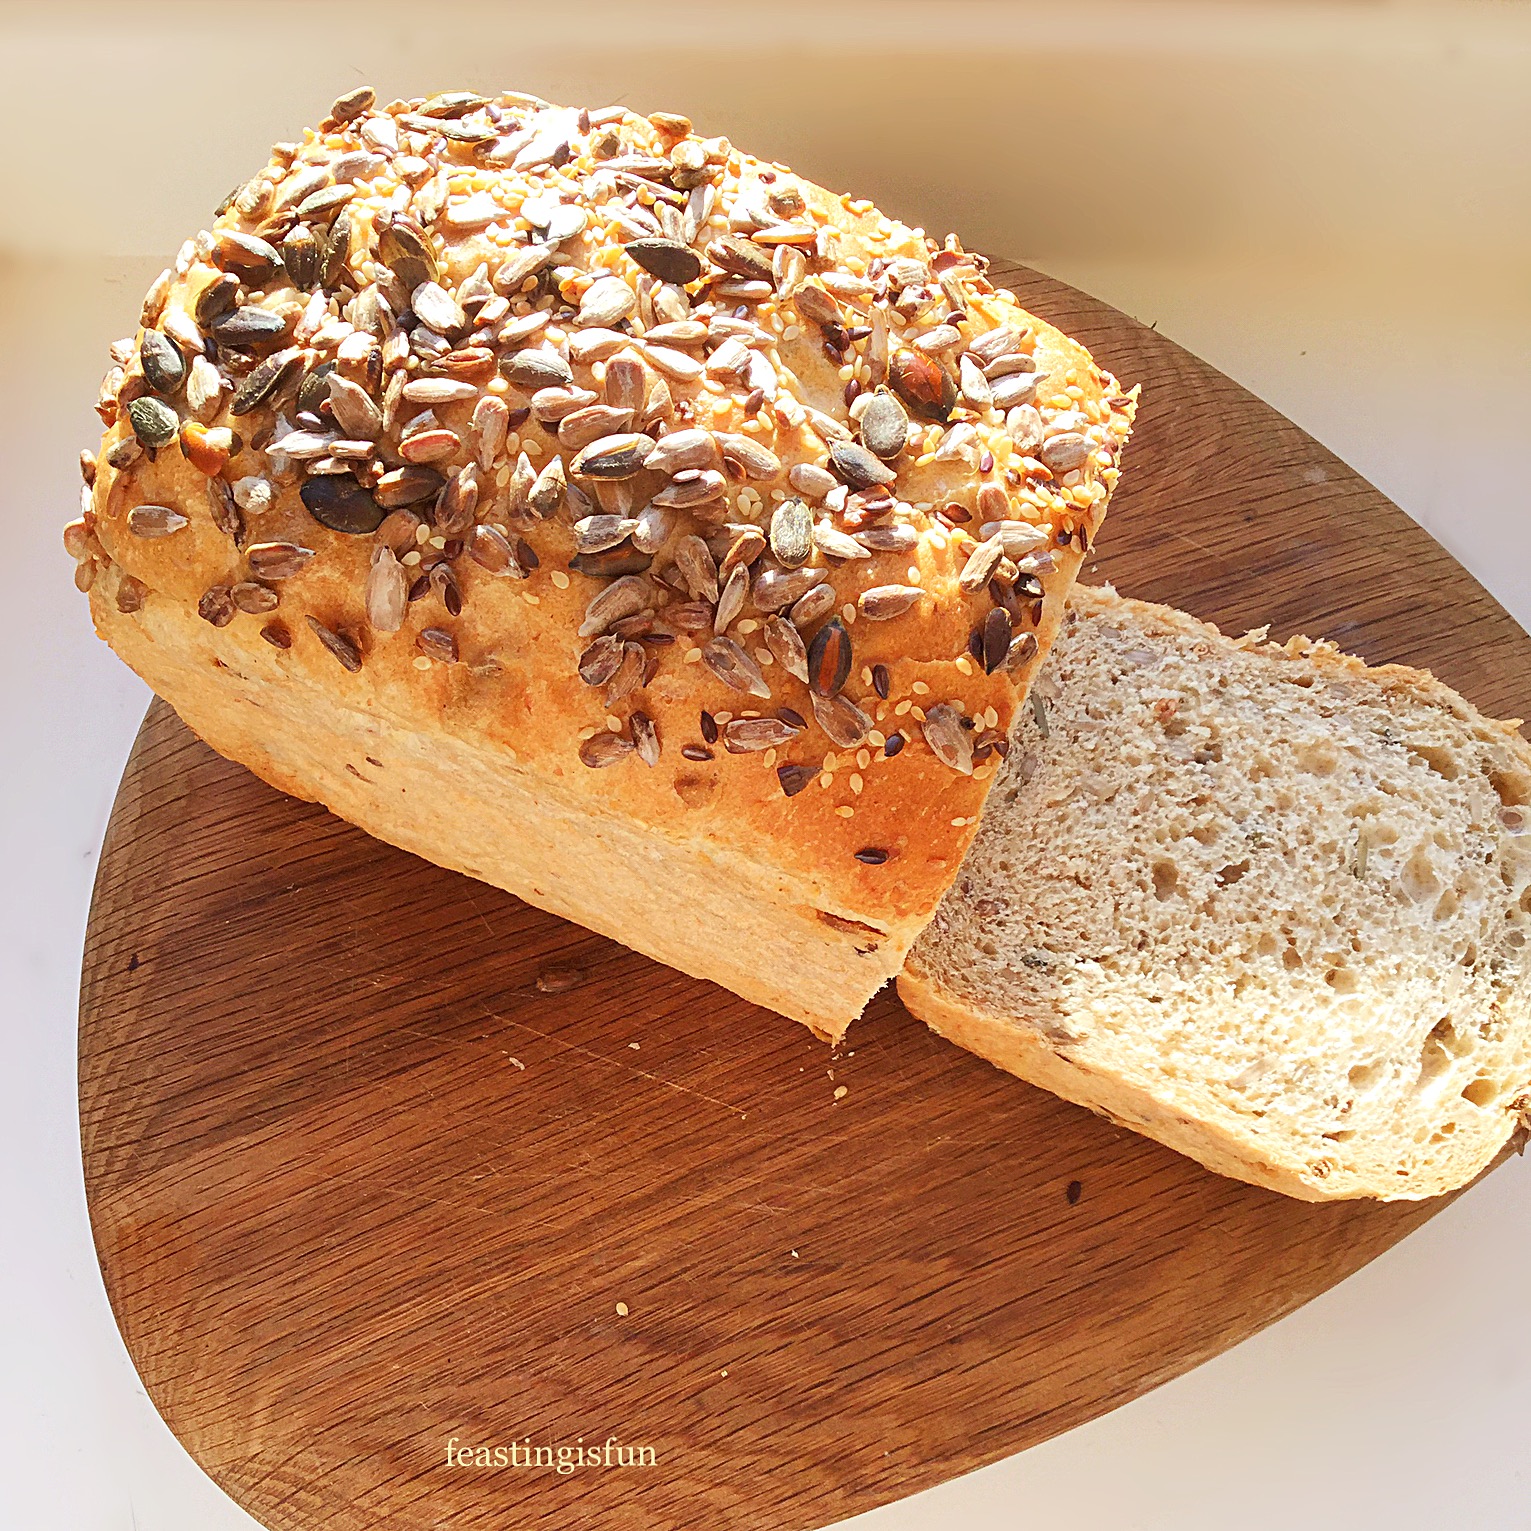
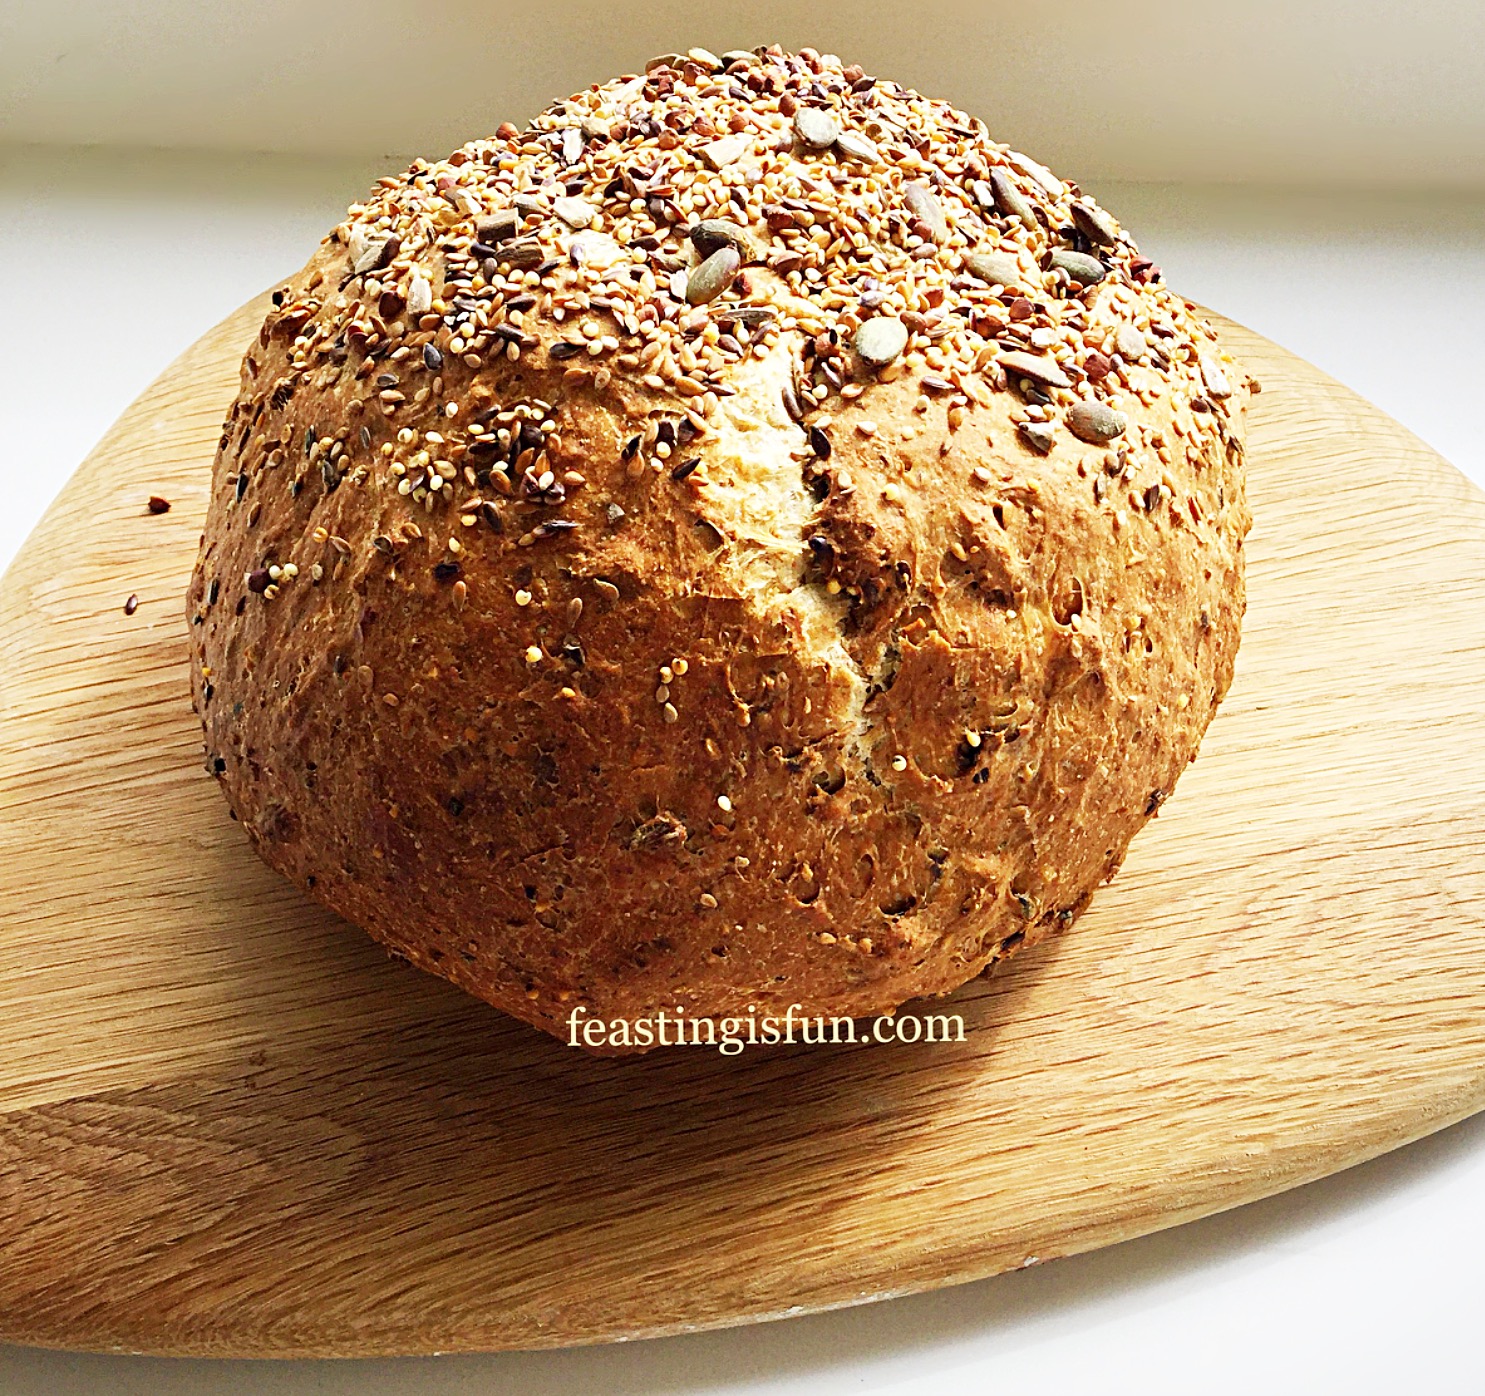
Hi there, thank you for stopping by. So today I have this Crunchy Seeded Bread recipe to share with you. And it tastes utterly amazing. Because each mouthful is filled with the taste of freshly baked bread and nutty, mixed seeds, including; poppy, sunflower, sesame and pumpkin seeds. So easy to make, either by hand, bread maker or stand mixer with dough hook attachment.
Crunchy Seeded Bread
Making this bread using my bread maker, stand mixer and by hand. Especially as each method is rigorously tested and gives consistently delicious results. While the seeds give this bread incredible crunch and flavour, especially good when toasted.
Crunchy seeded bread with added fibre
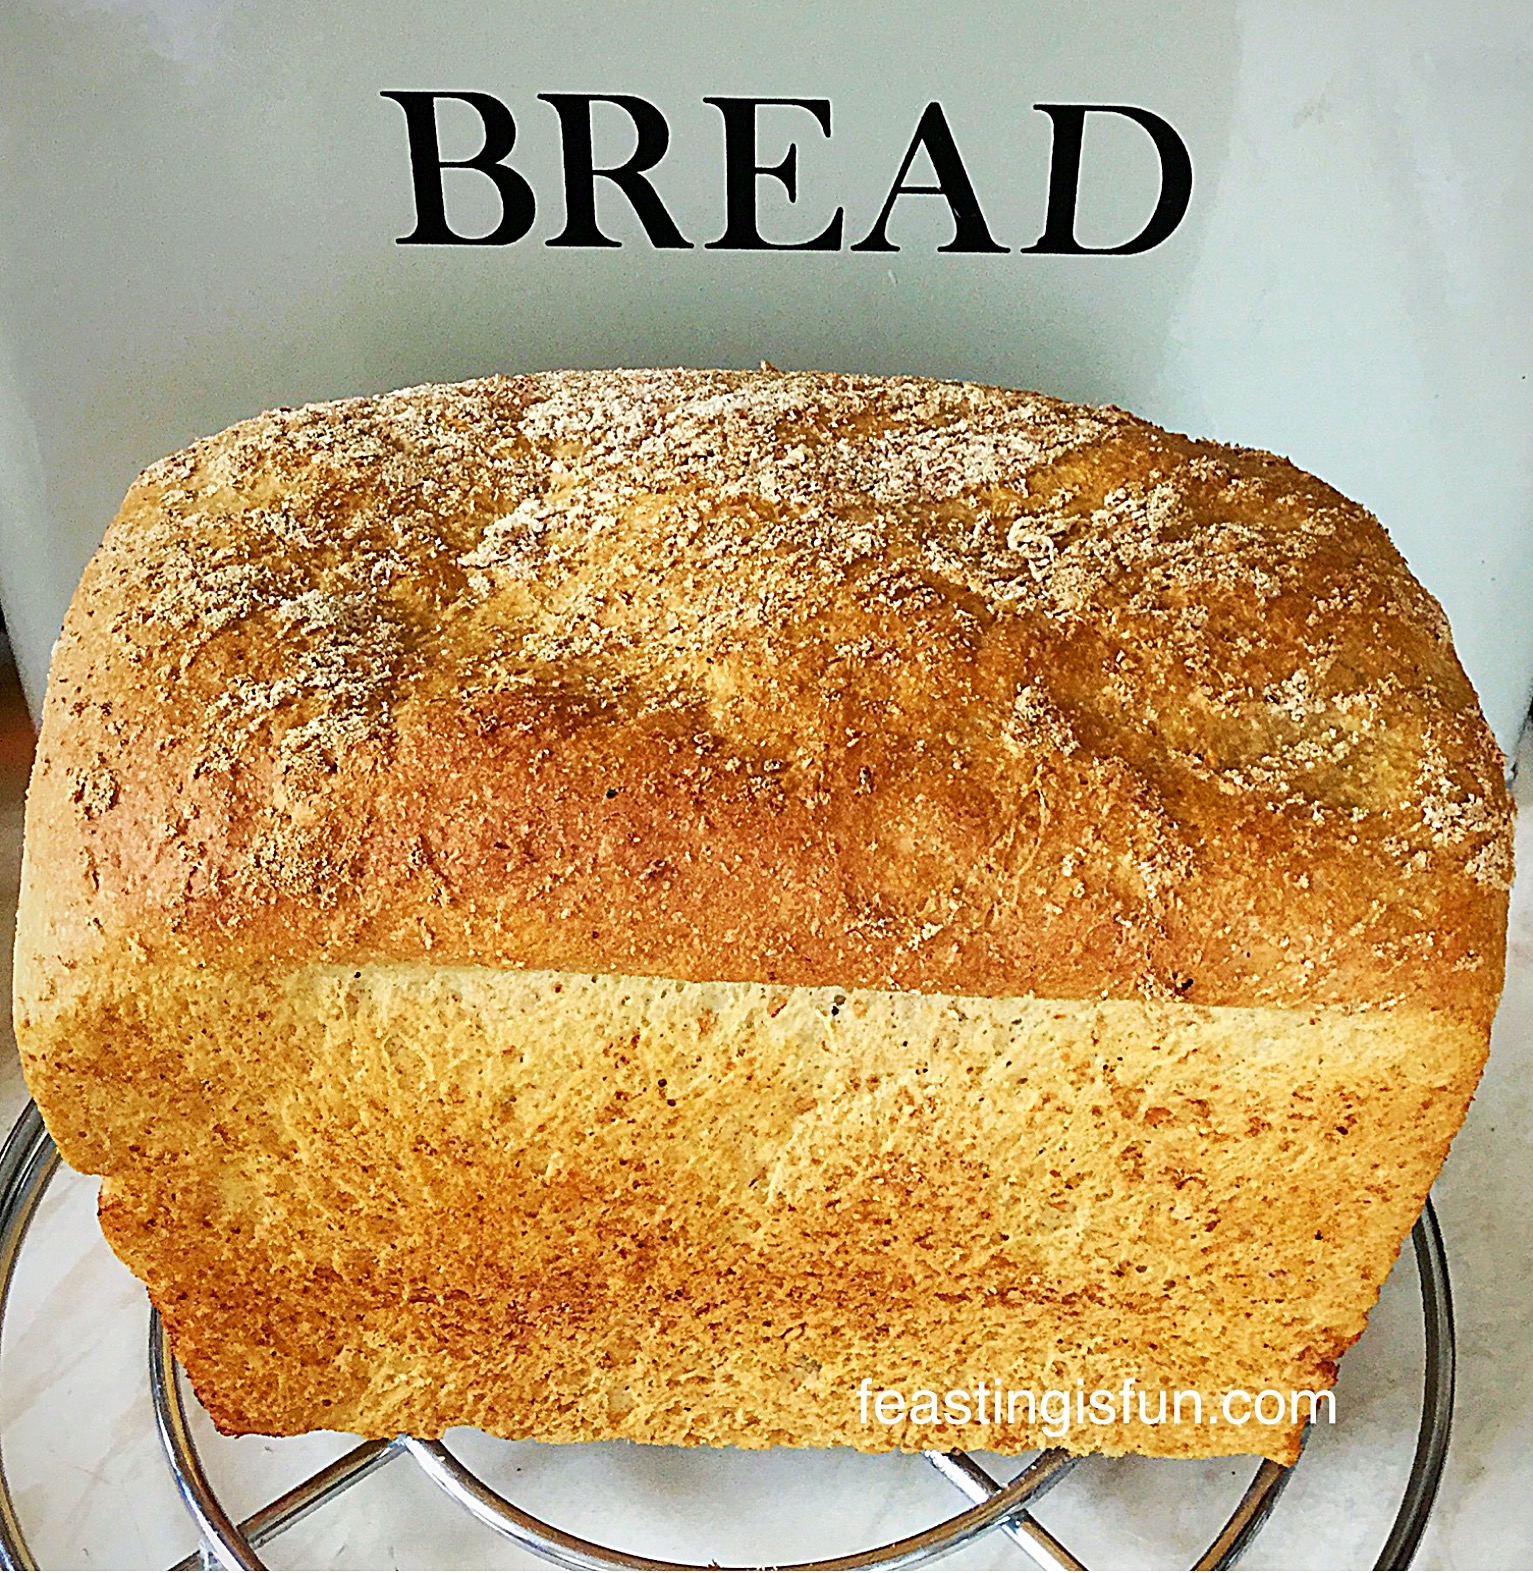
Alternatively, for a higher fibre bread loaf, as seen above, use 90g of strong wholemeal flour and 360g of strong white flour. All other ingredients and method stay unchanged.
Bowl – refers to bread maker tin, stand mixer bowl or large bowl for hand mixing.
Making The Bread Dough
First of all, place the water, yeast and honey into the bowl. Swish around with clean fingers to mix. Add the flour, butter and salt. Do not add any seeds yet.
If using a bread maker set to mix and prove. Add 3 tablespoons of mixed seeds when prompted by your machine during the mixing process.
When using a stand mixer, attach a dough hook, mix for 8 minutes. Now add 3 tablespoons of mixed seeds and continue to mix for a further 2-3 minutes. Remove dough and place in a buttered bowl cover in cling film and leave until doubled in size (1-2 hours).
And if hand mixing, bring all the ingredients together with your hand. Place on a very lightly floured worktop. Knead for a good 10 minutes. If the dough gets sticky, keep kneading and working it, because if you add extra flour the finished bread will be dry. After a good 10 minutes kneading, the dough should have a smooth elasticity. Add 3 tablespoons of mixed seeds and knead into the dough until evenly dispersed. Place the kneaded dough into a buttered bowl, cover in cling film and leave until doubled in size, 1-2 hours.
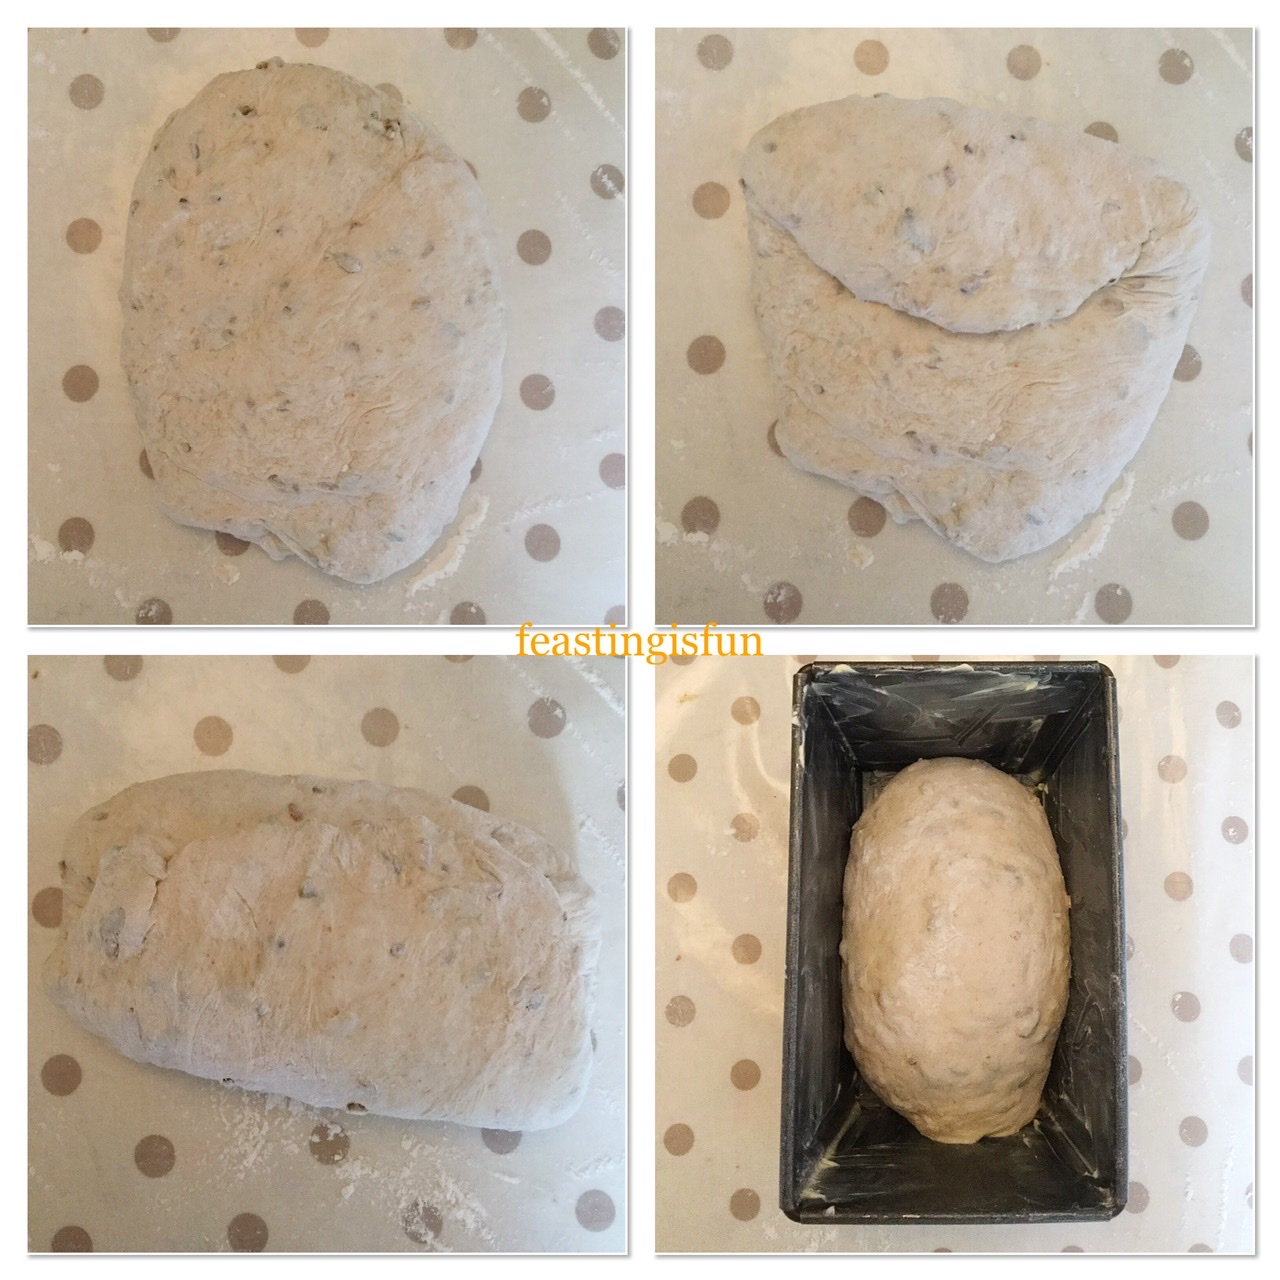
Shaping The Dough Into A Loaf
Turn the seeded bread dough out onto a lightly floured work top. Stretch the dough out and fold each end (a third of the dough) back into the centre. Turn the dough by a quarter and repeat. Turn and repeat the folding twice more (4 times in total). Doing so builds structure into your loaf.
Next, place the dough into a buttered 2lb place your shaped loaf.
Cover with a clean cotton tea towel and put in a draught free place until doubled in size – 1-2 hours.
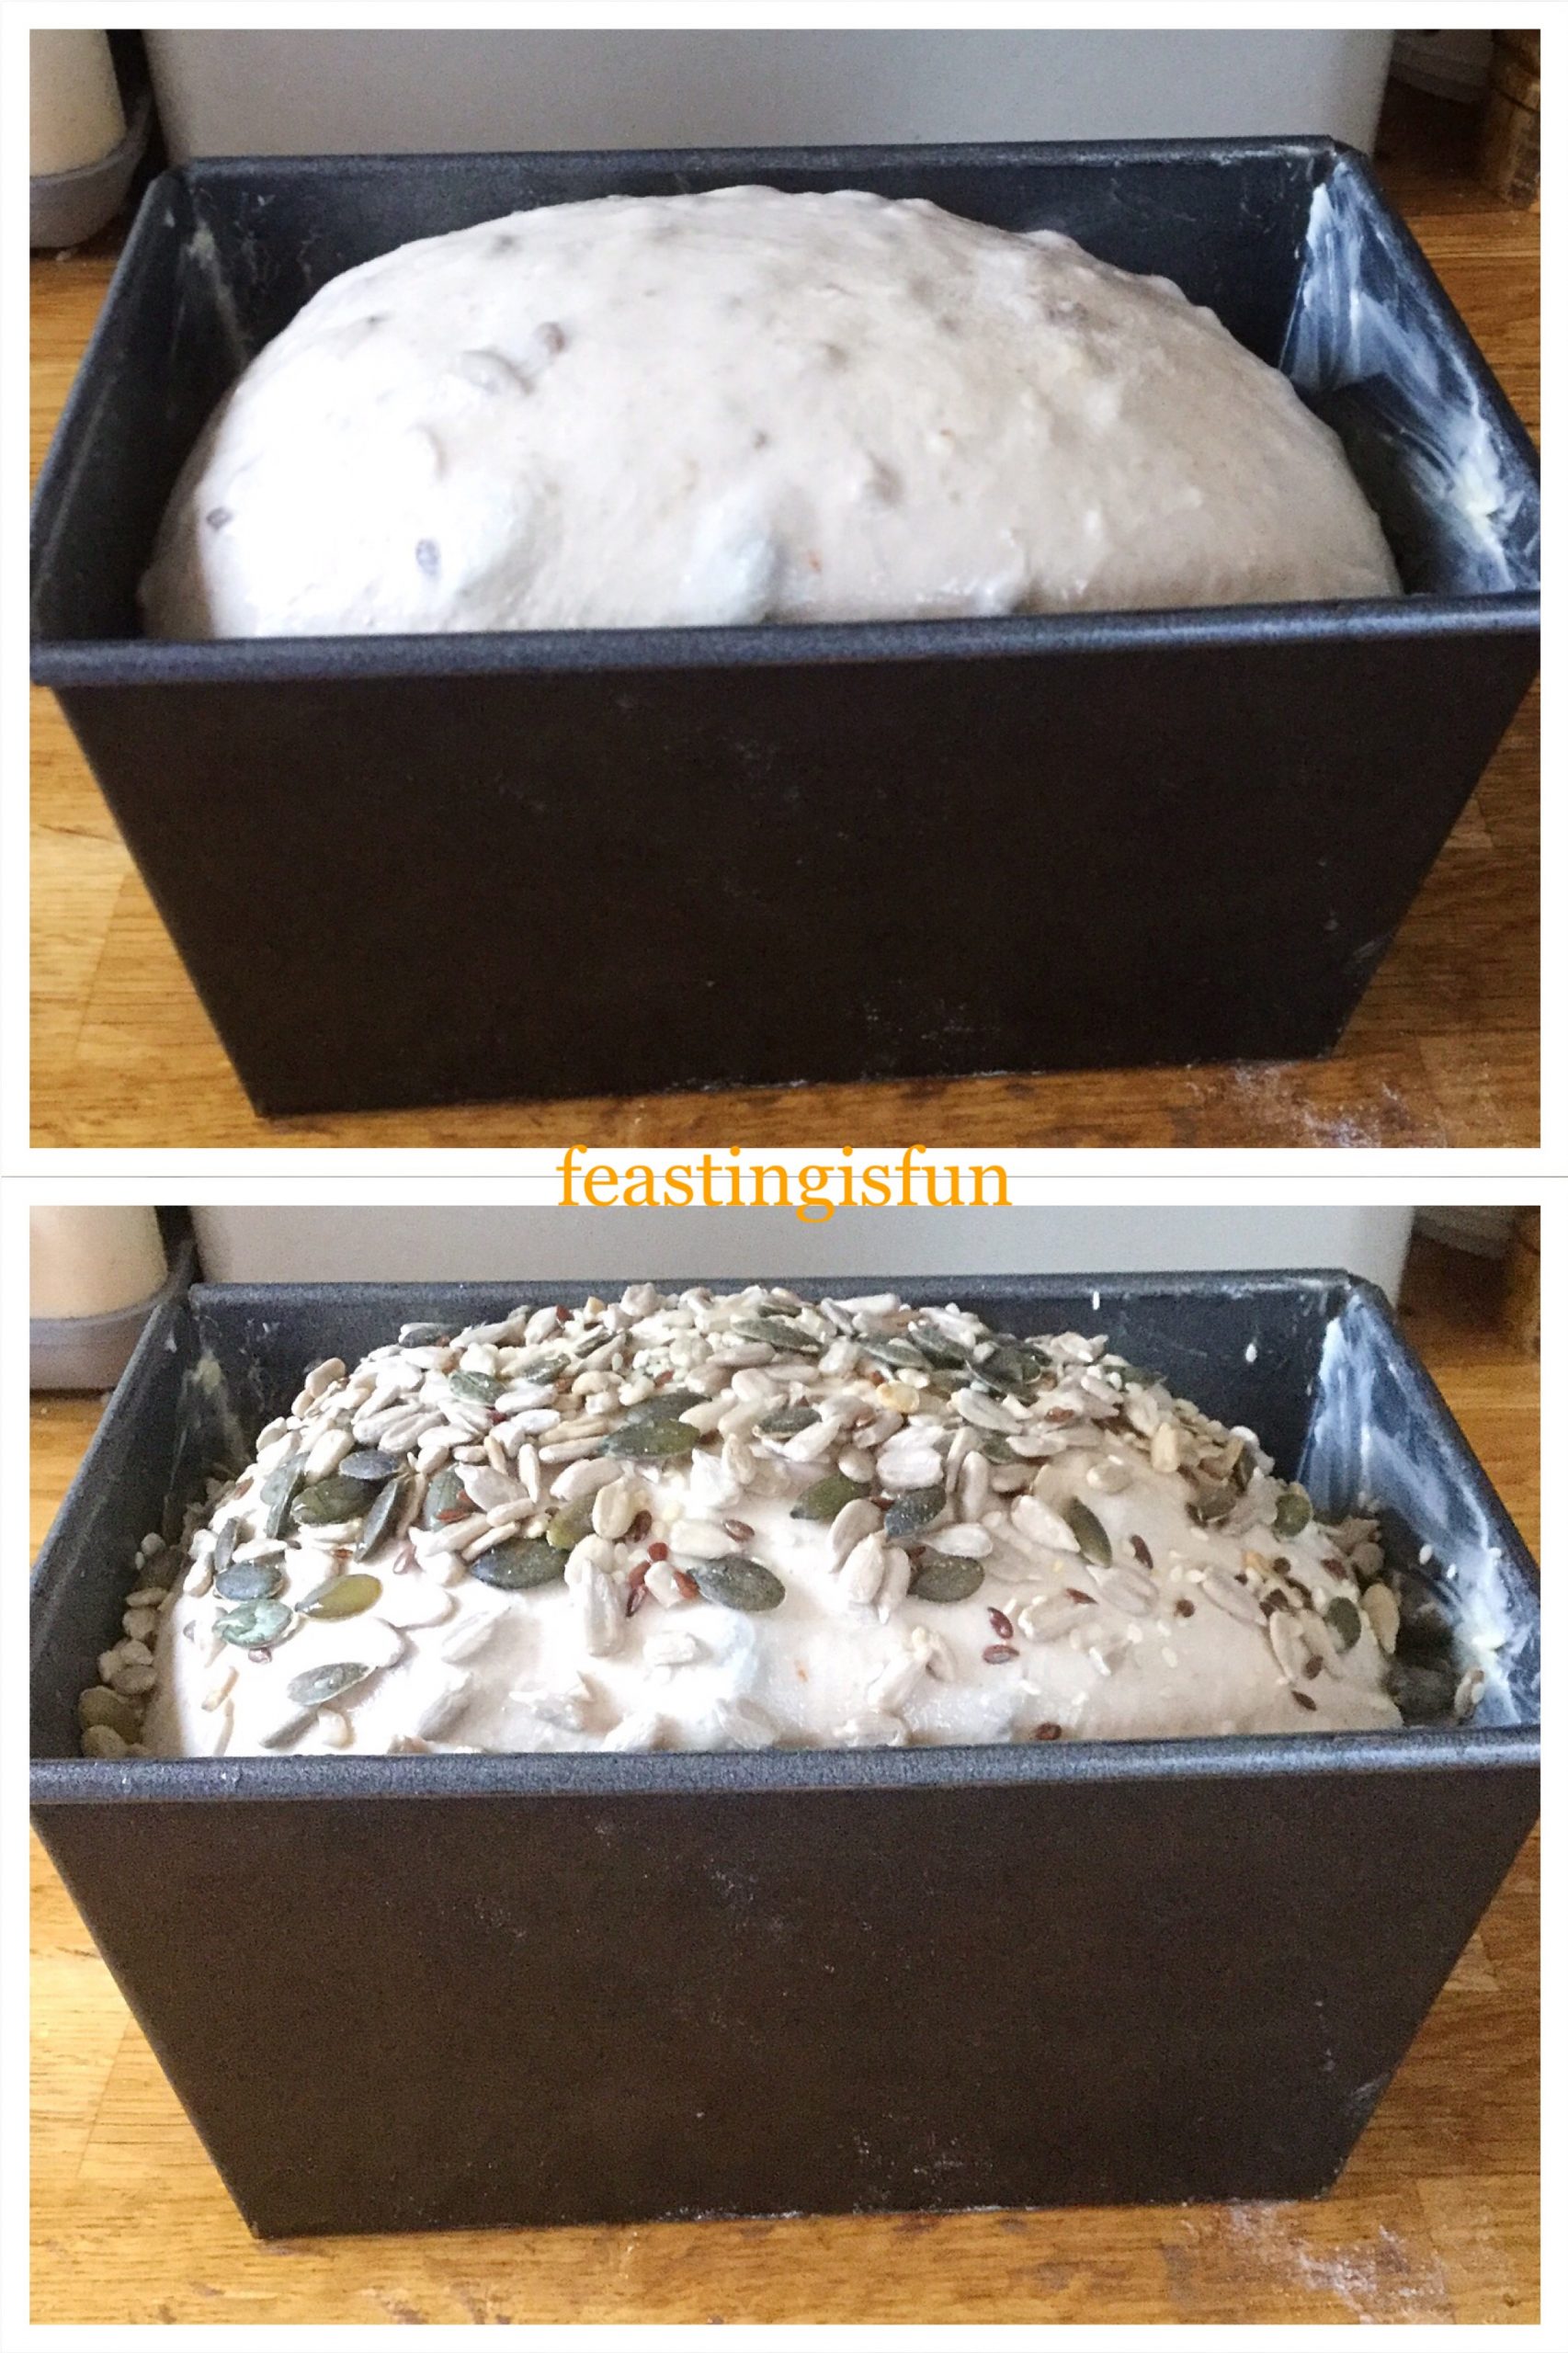
Adding The Crunchy Seeded Topping
Lightly brush the surface with water, or spray with water and sprinkle over the remaining tablespoon of mixed seeds, pressing them lightly into the top of the dough.
Preheat the oven to 220C/200C fan, gas mark 7, 425F.
Baking The Seeded Bread
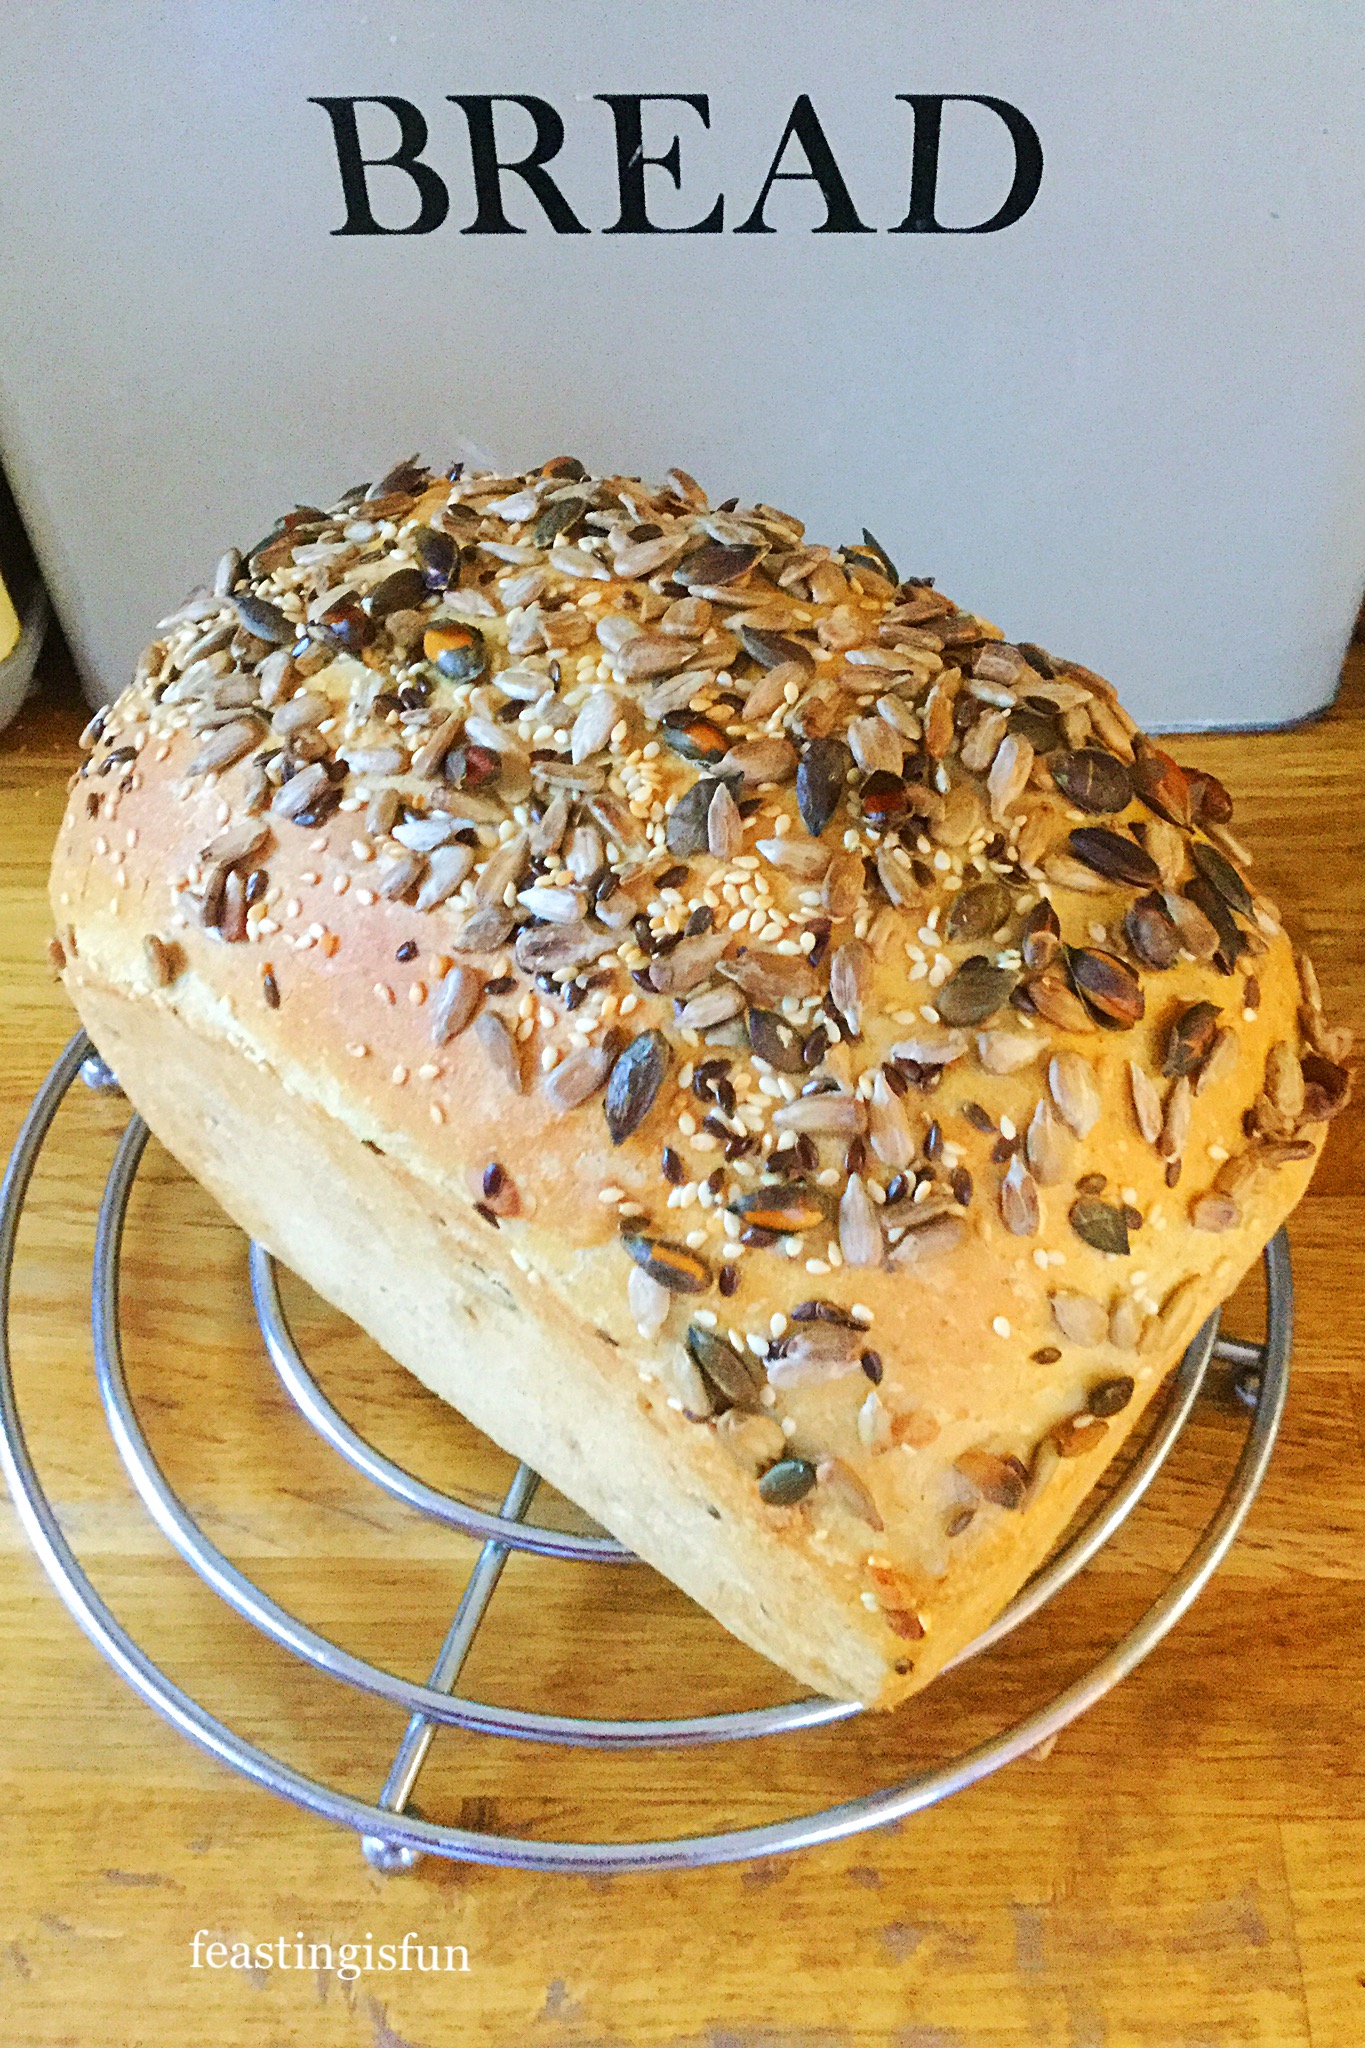
Place the proofed dough into the oven and bake for 20-25 minutes. The bread should be a golden brown and sound hollow when knocked with your knuckle on the base. For an extra crunchy crust, I turn my loaf straight out onto the oven rack to crisp up the base for a few minutes, while I quickly wash the loaf tin up. CAREFUL THE TIN IS VERY HOT!!
As soon as the CrunchySeeded Bread is baked remove from the oven. Turn out of the tin, if not already done and place on a cooling rack. Leave to cool completely.
Breathe in deeply. It doesn’t matter how many times I bake bread, the smell is amazing!!
Most importantly you should wait until the loaf is cooled, or only just warm. Otherwise, cutting through the bread when it’s hot will result in a squished loaf! It’s worth the wait, I promise.
Also, allowing the bread to cool makes the crumb lighter, helps the loaf keep it’s shape and is more easily digested.
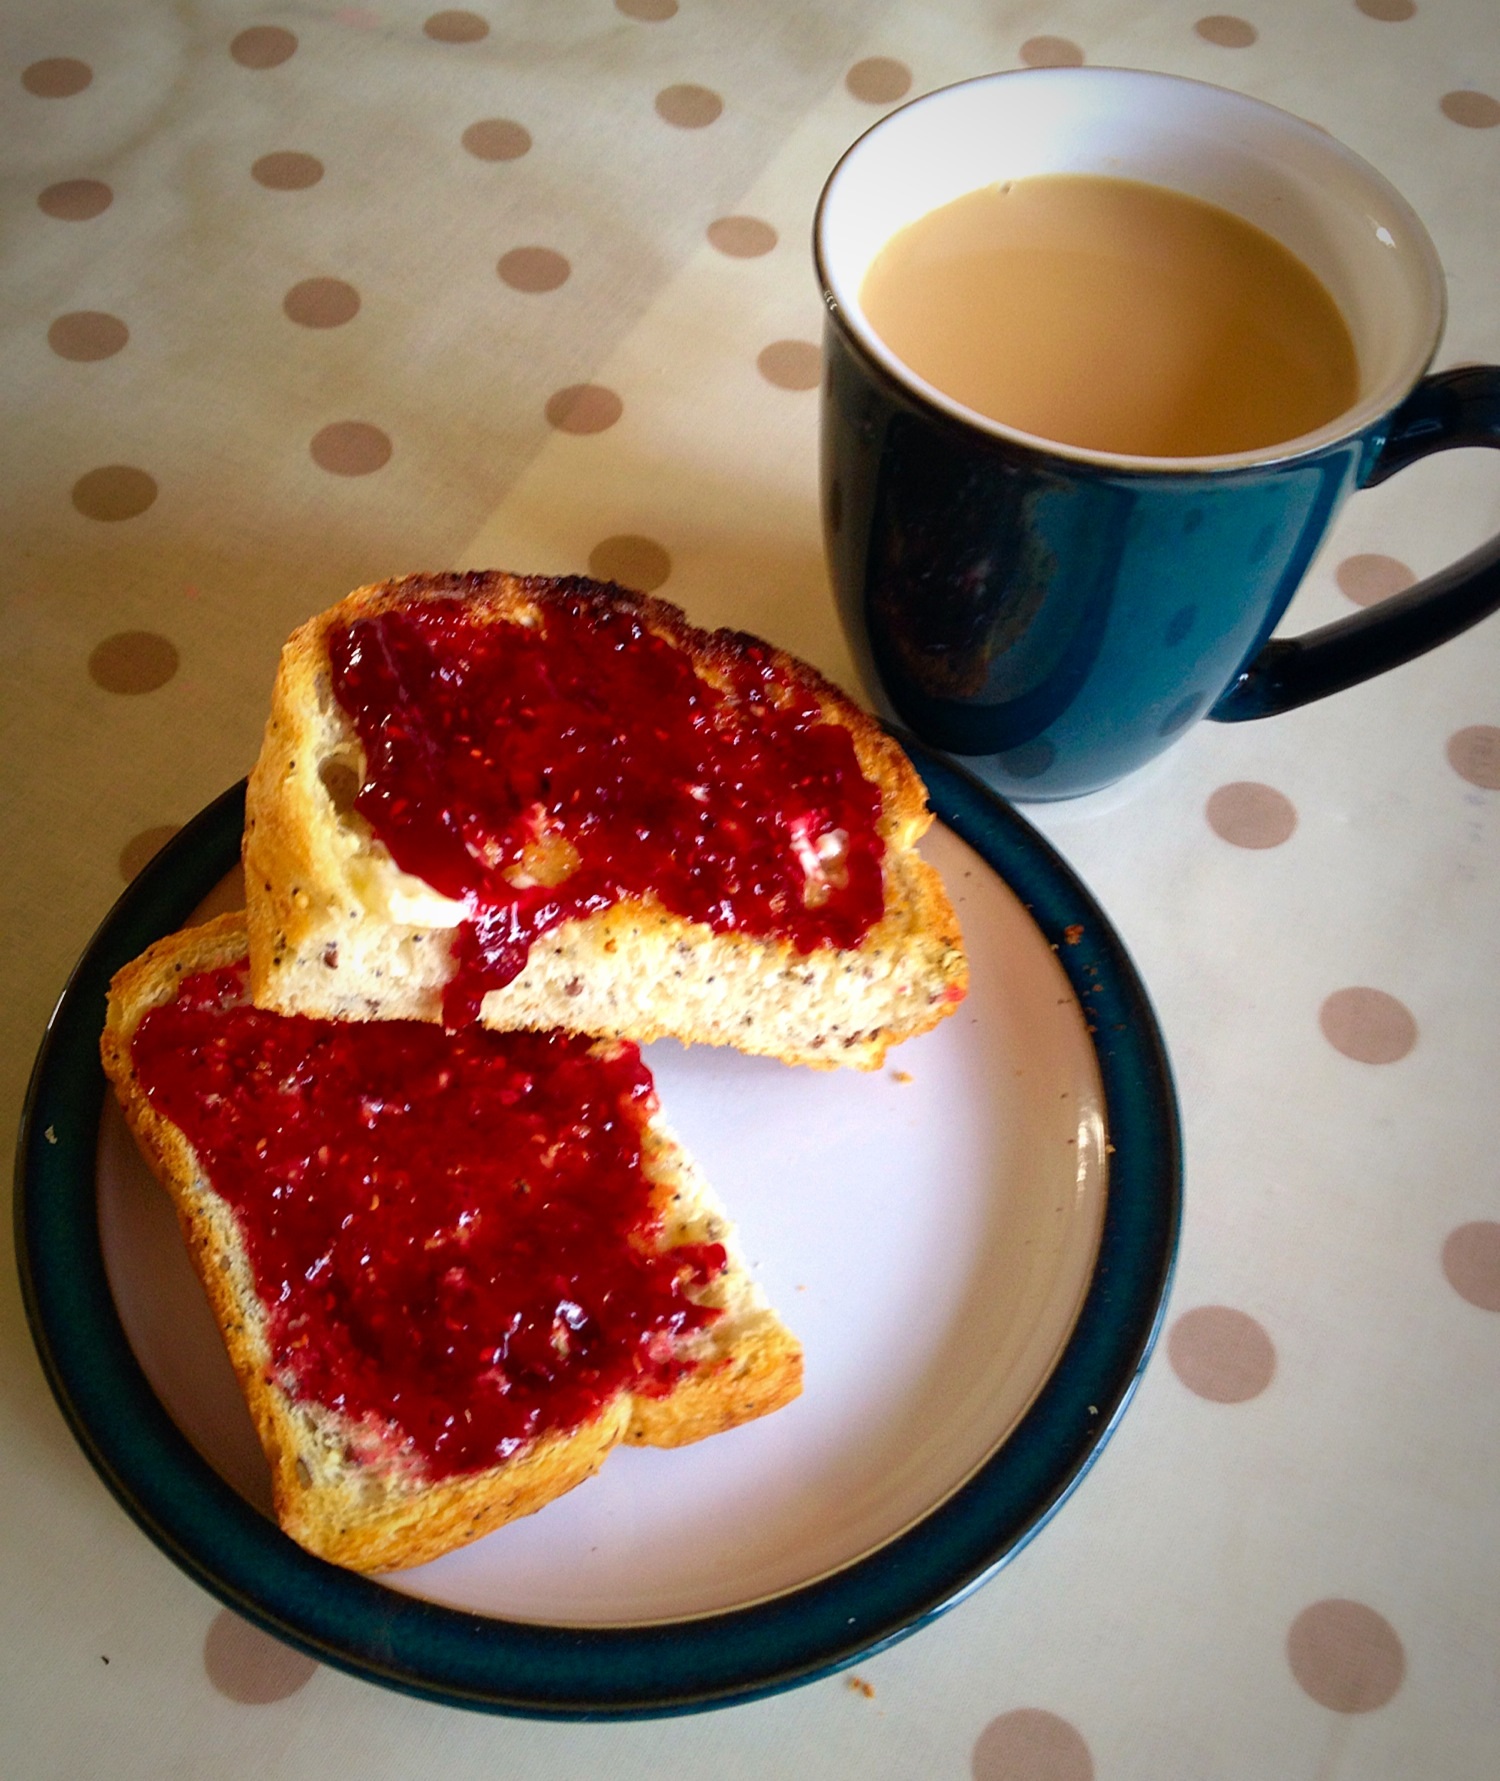
Toasting takes this bread to another level!!
Yummy, scrummy a big bite for my rumbly tummy!
You have to taste this to believe it!
I love eating this Crunchy Seeded Bread sliced and toasted ( I know I’ve also said that about myOat Bran White Bread – I can have two favourites?!). Also it is ideal for dunking in soup, eating withchilli – in fact this bread is perfect for any occasion which requires bread! So I guess you could call this an easy, everyday loaf, perfect for feasting and sharing!
If you have enjoyed this recipe for Crunchy Seeded Bread you may also like these:
Baking bread at home is such a rewarding experience and a great way to get children involved in the kitchen. Since it is very difficult to over work bread made by hand, dough is the perfect medium for them to practice with. Also, I find when they have had a hand in making something, such as my Better Than Takeout Pizza they are much more inclined to eat what they’ve made and also try new flavours. And this can work for adults too!
So, whatever you are making, baking and creating in your kitchens, have fun preparing and sharing your feast.
Sammie x
No part of this post may be reproduced or duplicated without the written permission of the owner. Please see my Disclosure Policy.
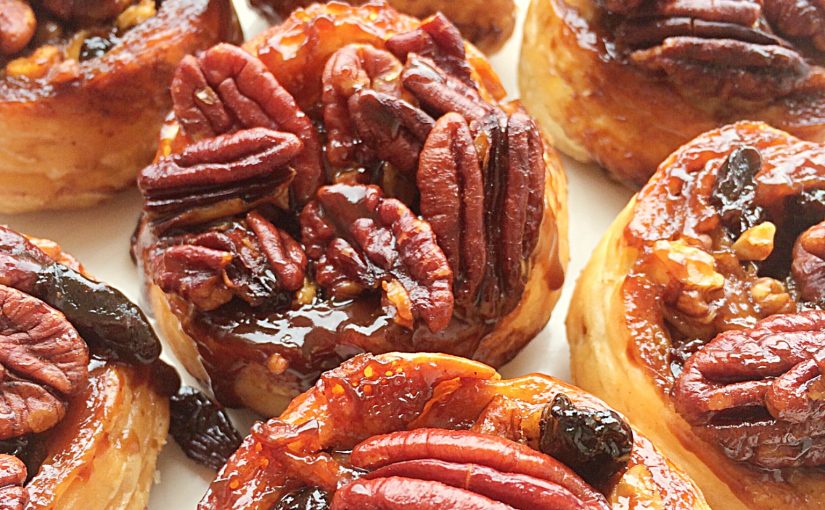
Hi there, how are you today? These Sticky Pecan Sultana Buns are so easy to make and are perfect for weekend breakfast with a large mug of Coffee! They truly define the meaning of Lazy Weekend Breakfast Feasting.
Sticky Pecan Sultana Buns
Obviously, you don’t have to restrict eating these at breakfast time or just at the weekend – although, as scrummy as they are, I wouldn’t recommend having them everyday! These Sticky Pecan Sultana Buns are treats, in fact I had them for my birthday brekkie last year (& that was mid week!).
This recipe was inspired by Ina Garten, the Barefoot Contessa herself. After following her recipe a few times I fiddled with it a bit. The buns were scrummy, but I wanted Pecan nuts inside my buns and preferred the use of Sultanas. I also changed the ratio of ingredients, as I changed from American cup measures to Metric weight. I was extremely pleased with the results, I hope you will be to and this easy recipe will inspire you to have a go at making these buns!
Pecan Sultana Sticky Buns www.feastingisfun.com
Upside down buns
Firstly, I should say that these Sticky Sultana Pecan Buns are made upside down! That is, they are very similar, in method, to an upside down cake – meaning that you place a brown sugar/butter mixture along with Pecan nuts into the bottom of a deep muffin/cupcake tin, place the buns in top and then when cooked turn the buns out so the bottom of the bun becomes the top!
Don’t worry! It’s not as confusing as it sounds and I am ALWAYS amazed that the buns turn out perfectly, they never stick and always look so impressive for such little effort. In fact it really is a Ta Dah moment (I imagine a drumroll in my head!) that never ceases to amaze me and I always end up with a huge smile on my face!
Just aquick note : A proper deep muffin/cupcake tin must be used for this recipe. A bun/fairy cake tin is too shallow, not only will it be too small for your buns, but you’ll also end up with butter dripping all over your oven. I also place a baking sheet, a little larger than my cupcake tin, on the rack below, just in case any butter bubbles up and drips over – soo much easier to clean than the whole oven!!
Preheat the oven to 200C (180C fan), 400F, gas mark 6
Making The Sticky Bun Topping
Firstly, for the topping of the buns mix the softened butter, sugar and salt until well combined.
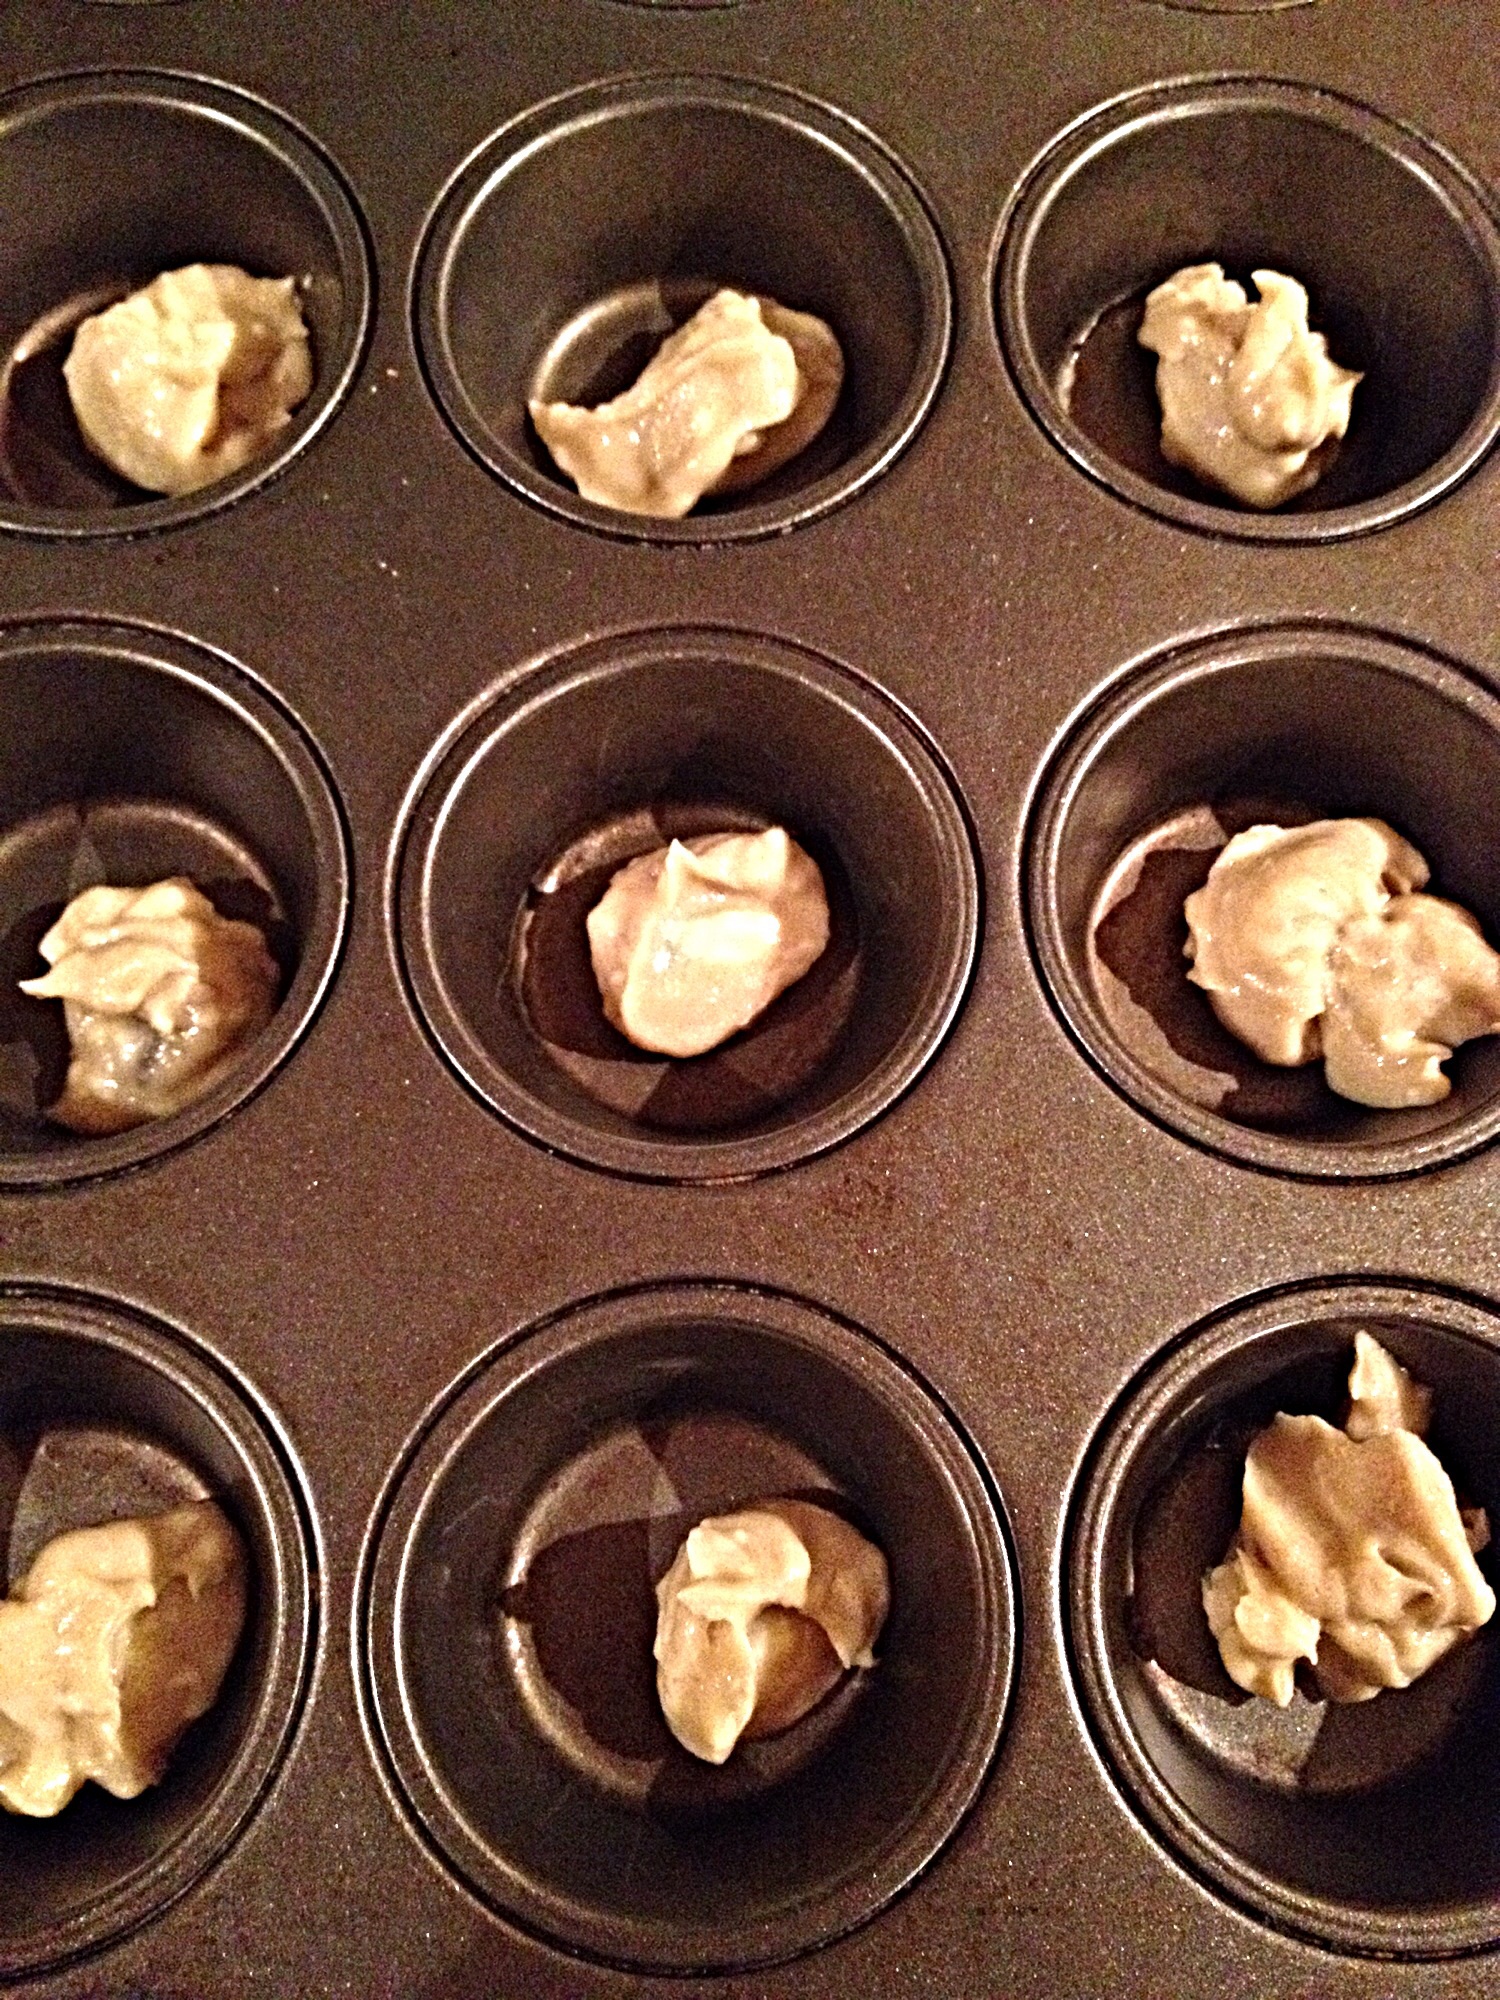
Using a teaspoon (not a teaspoon measure) scoop 1/2 a teaspoon of the butter/sugar mixture and place into the bottom of the muffin tin, repeating 11 more times.
1/2 a teaspoon is just enough!Each muffin cup has a dollop of the sugar/butter mixture!
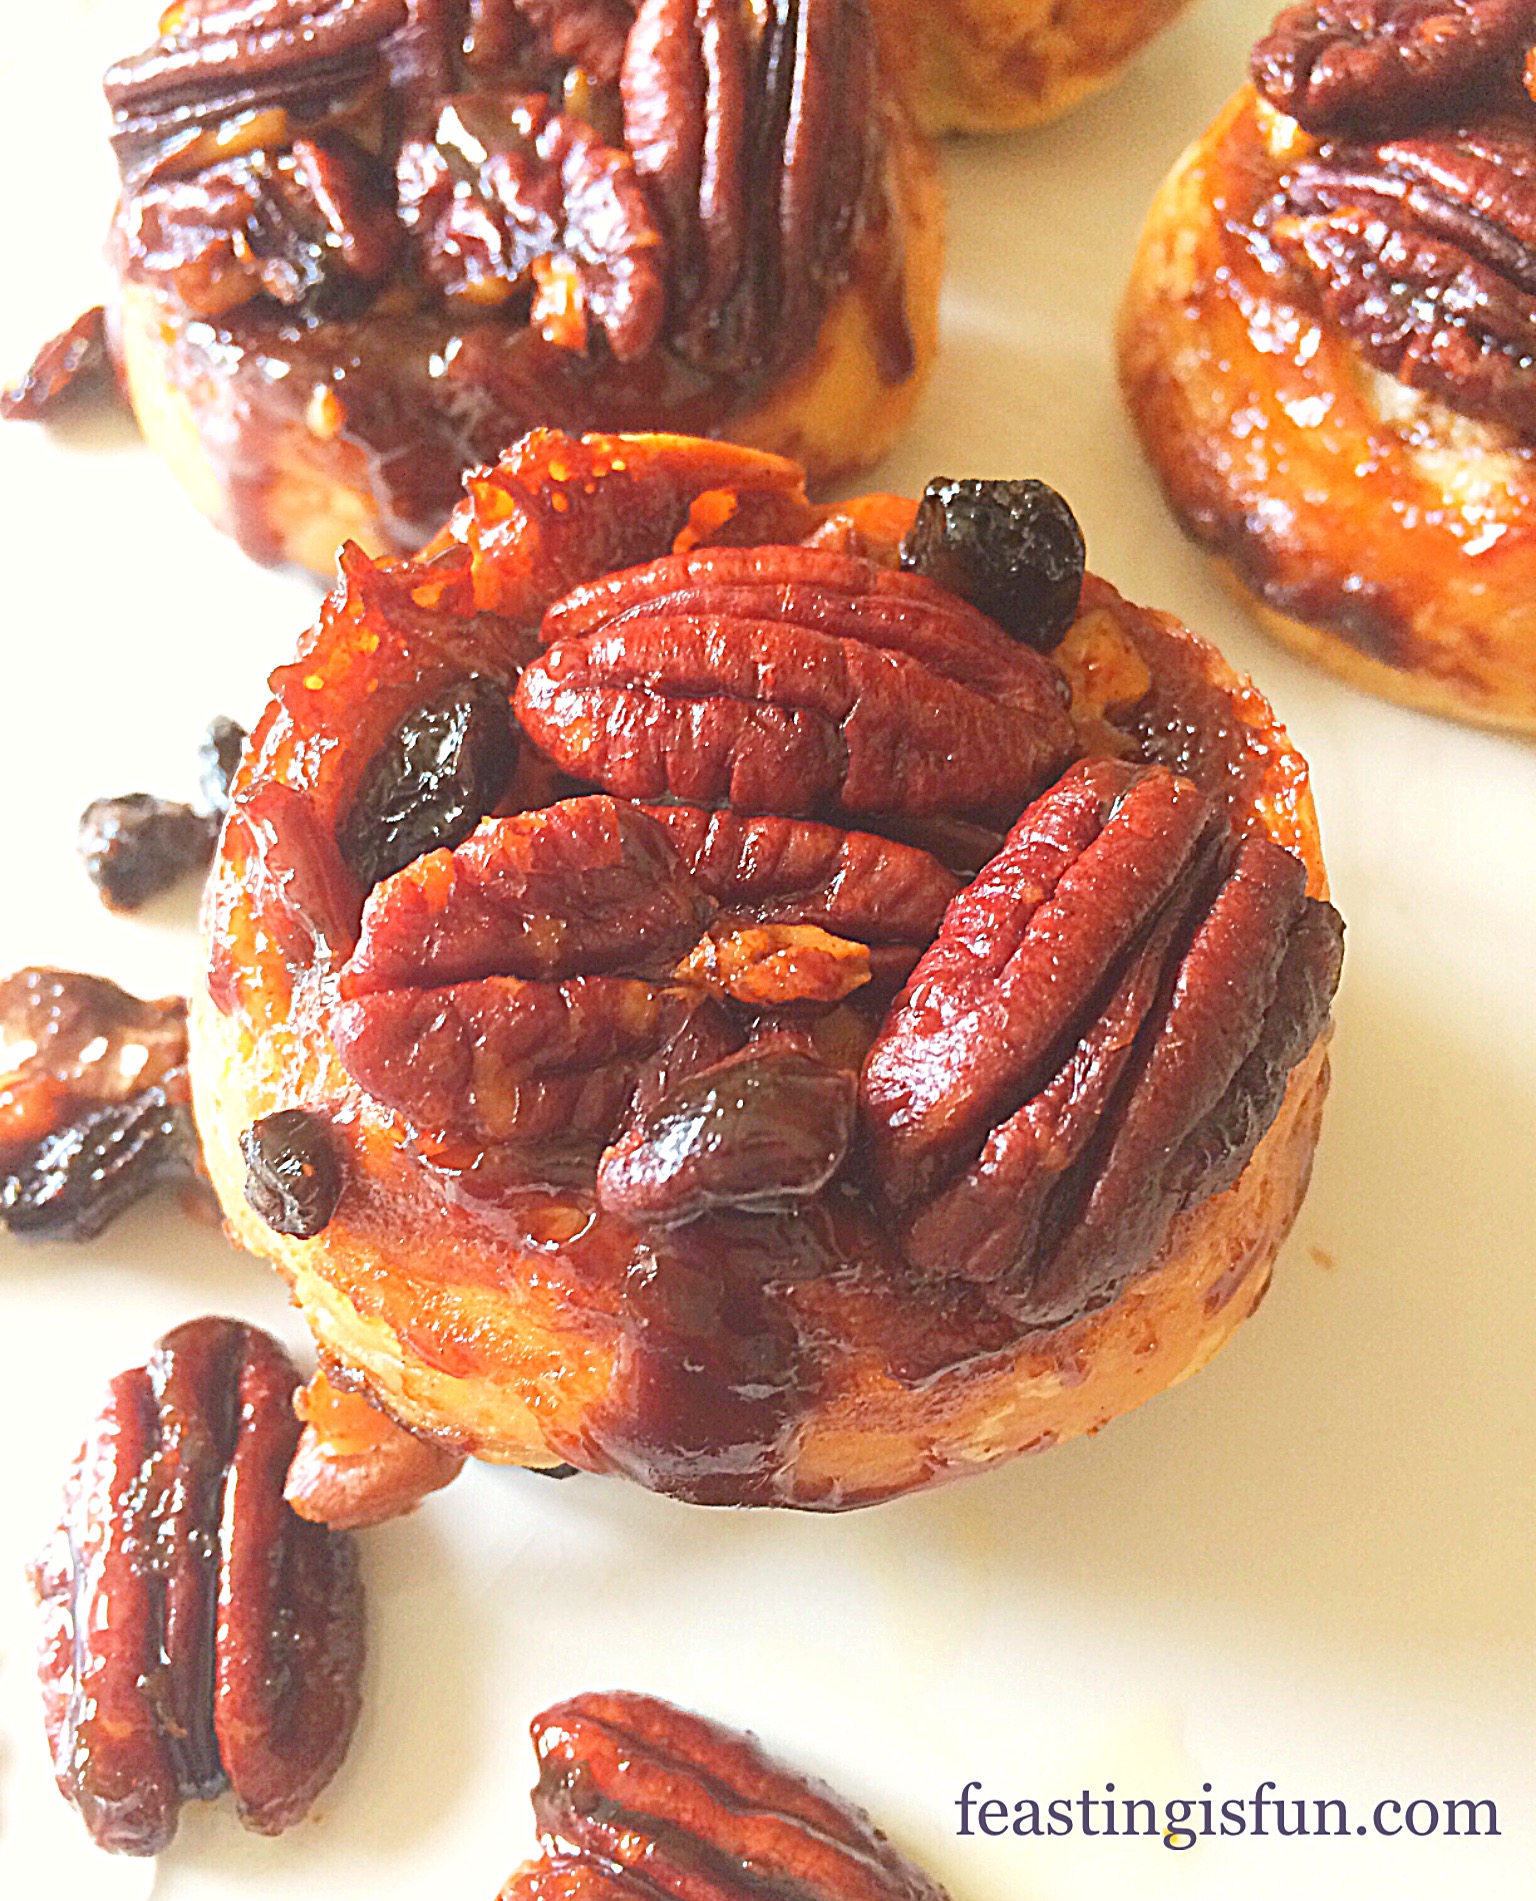
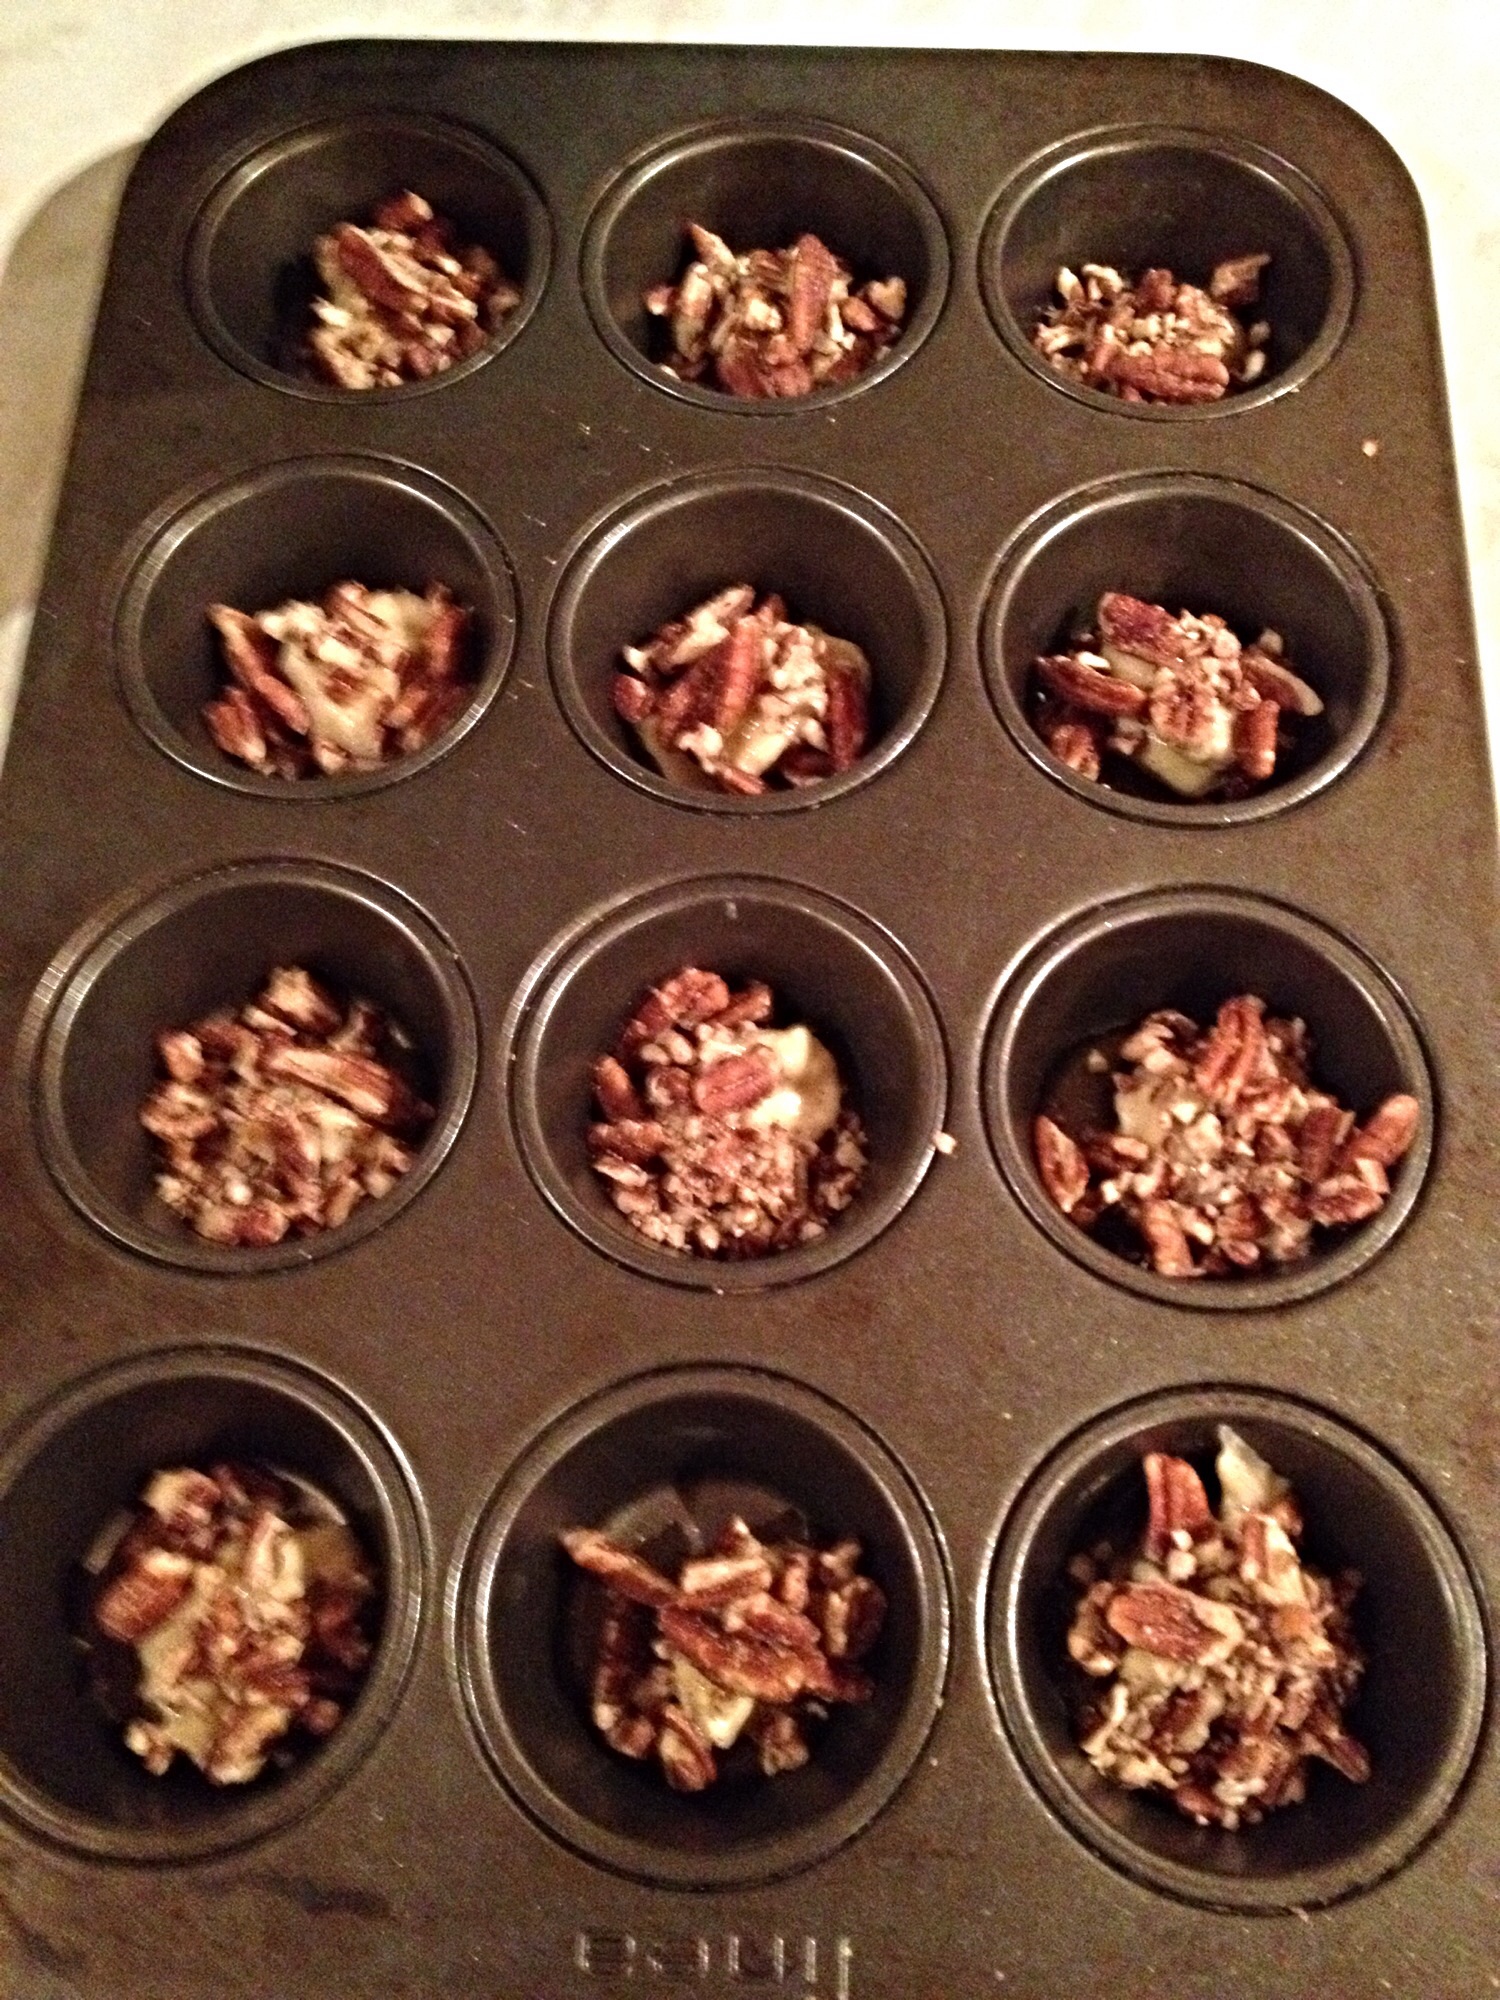
Next, divide the 100g of Pecan nuts between each of the muffin cups, placing them on top of the sugar/butter mixture. Remember, although this is going into the bottom of the tin, when turned out this will become the topping of the Sticky Pecan Sultana Buns!
The Pecan nuts become caramelised, golden and sticky during cooking. Yummy!!
Assembling The Buns
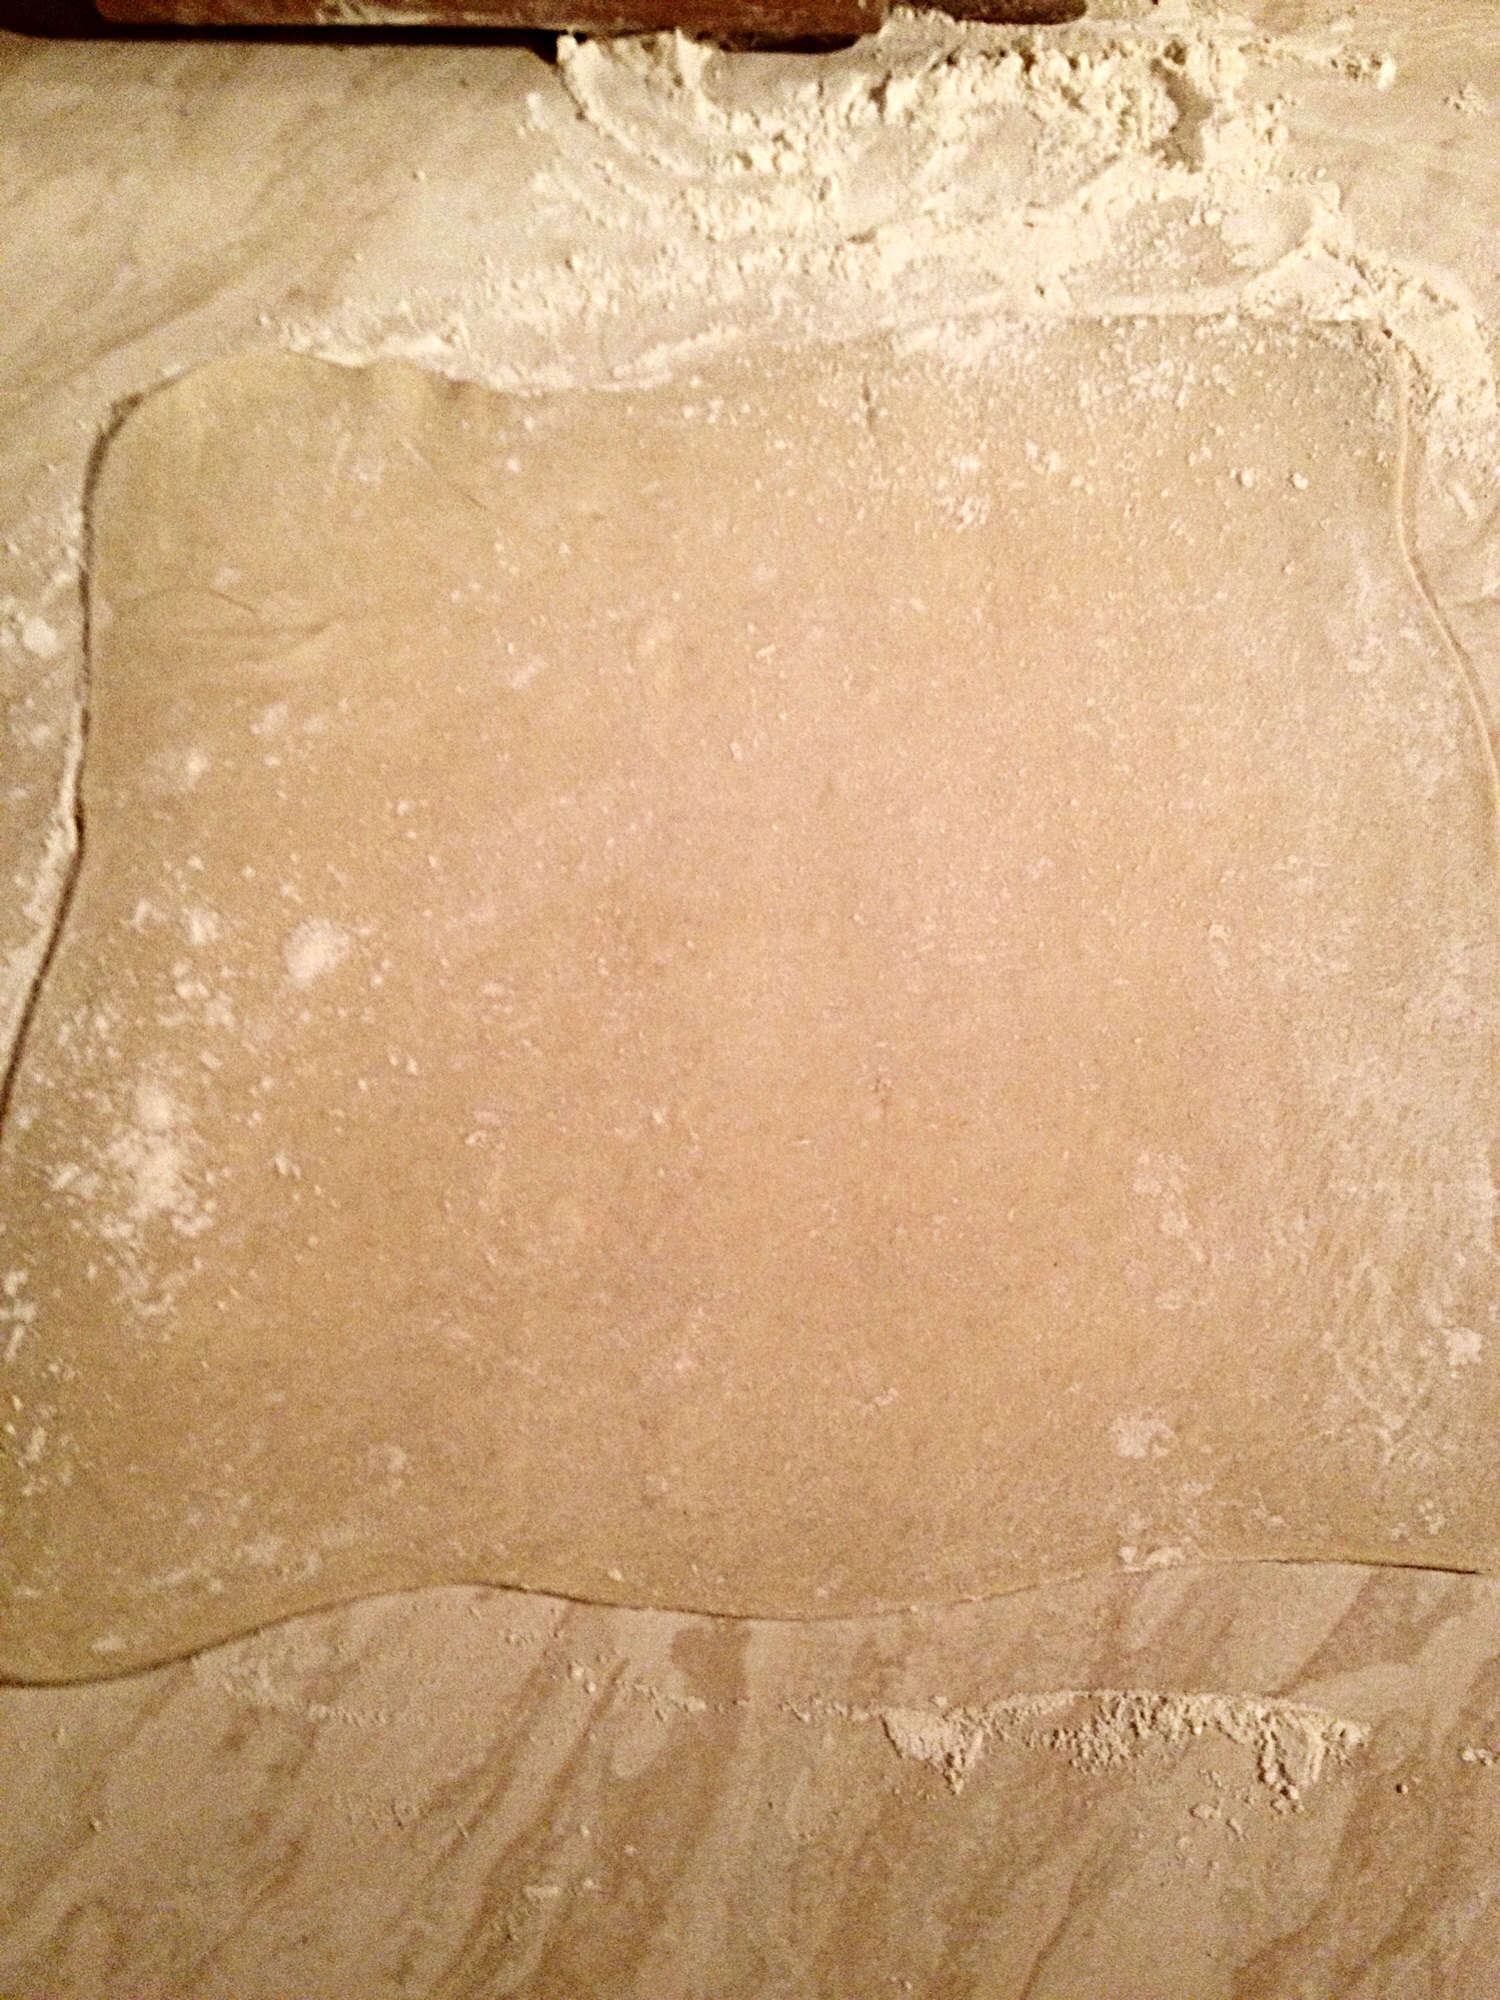
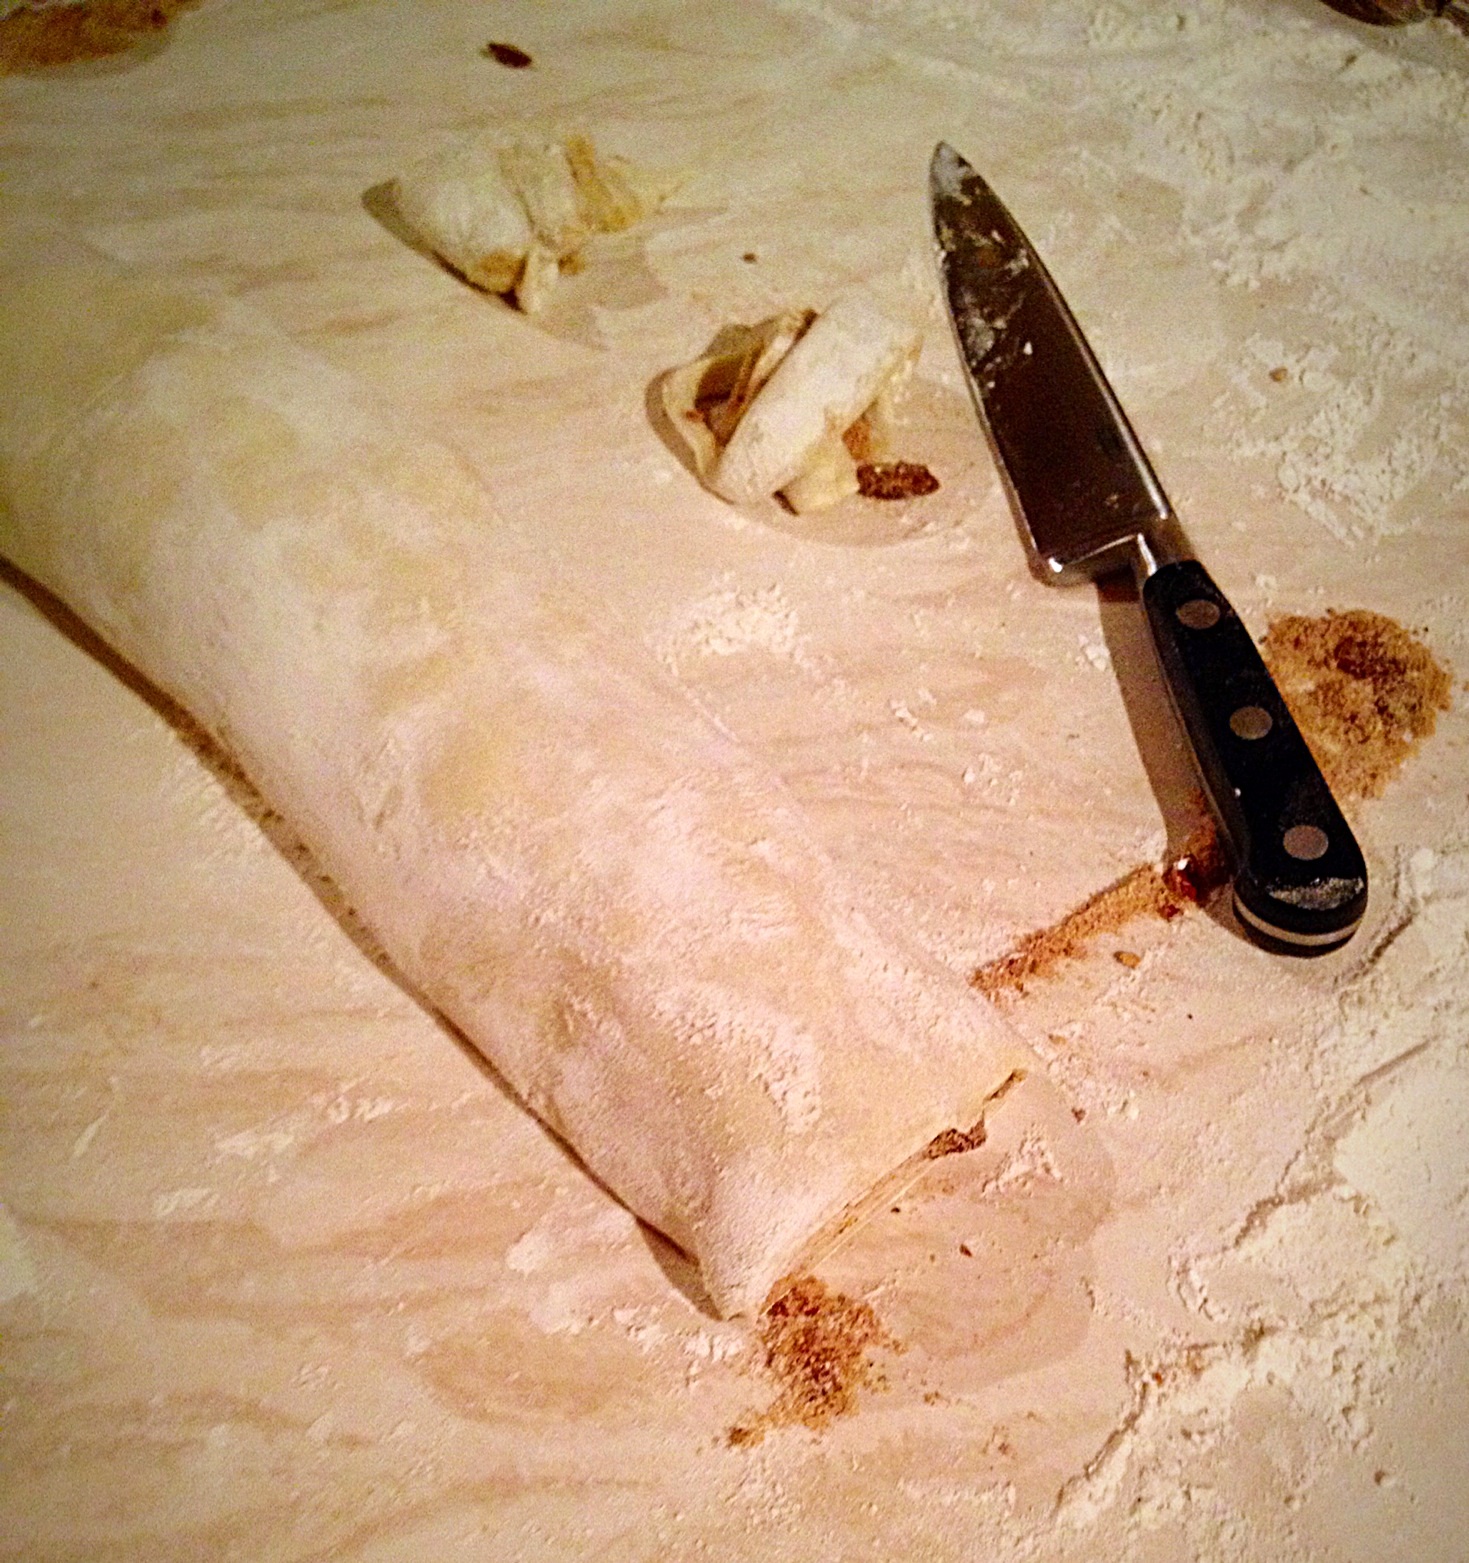
Lightly dust the worktop with plain, white flour. Roll out the all butter puff pastry, with a floured rolling pin. You need a square shape that is approx 34 x 34cm.
All butter pastry really is essential as it adds to the flaky, buttery flavour of the buns.
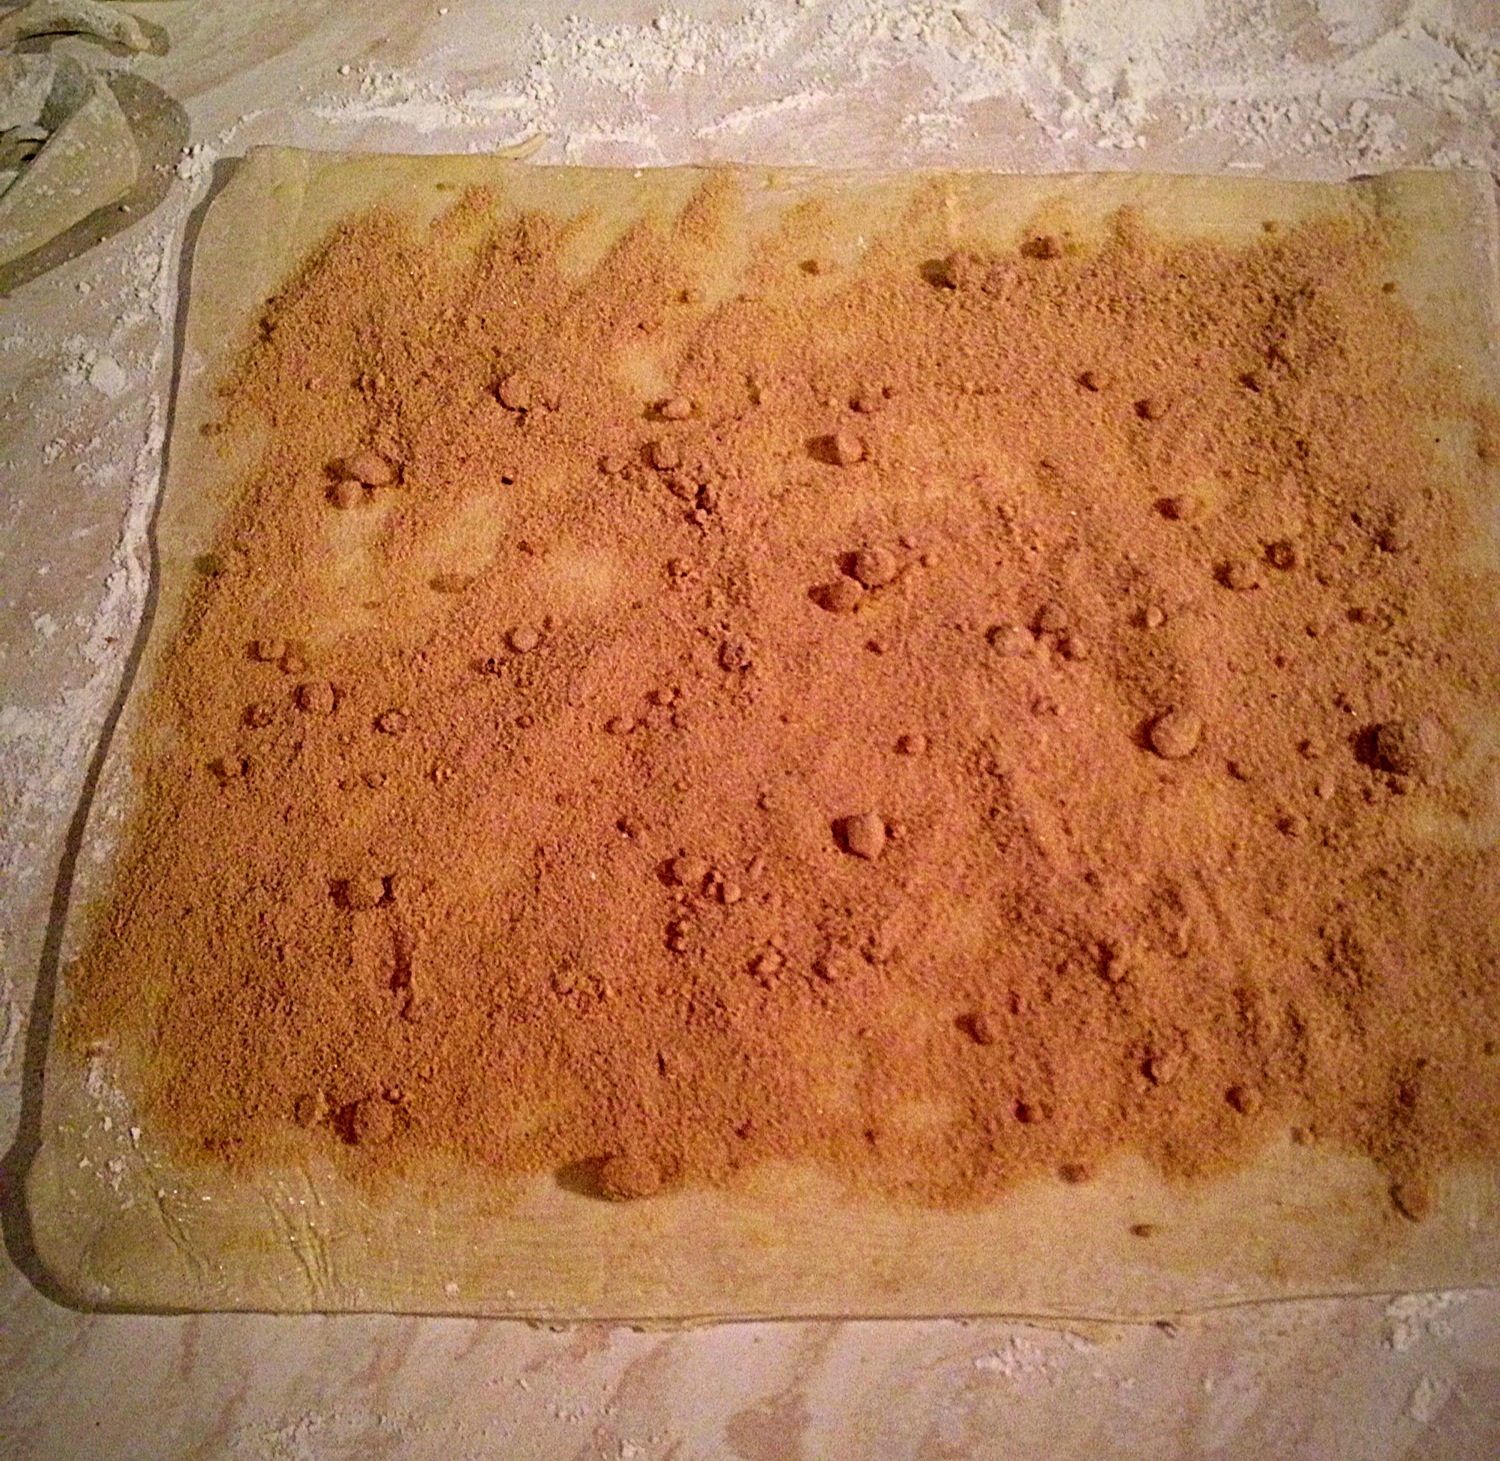
Next, trim the top and bottom of the pastry square and brush with the melted butter. Then sprinkle the sugar evenly over the whole of the square.
Don’t worry about the odd few lumps in the sugar, they’ll just add to the stickiness of the buns!!
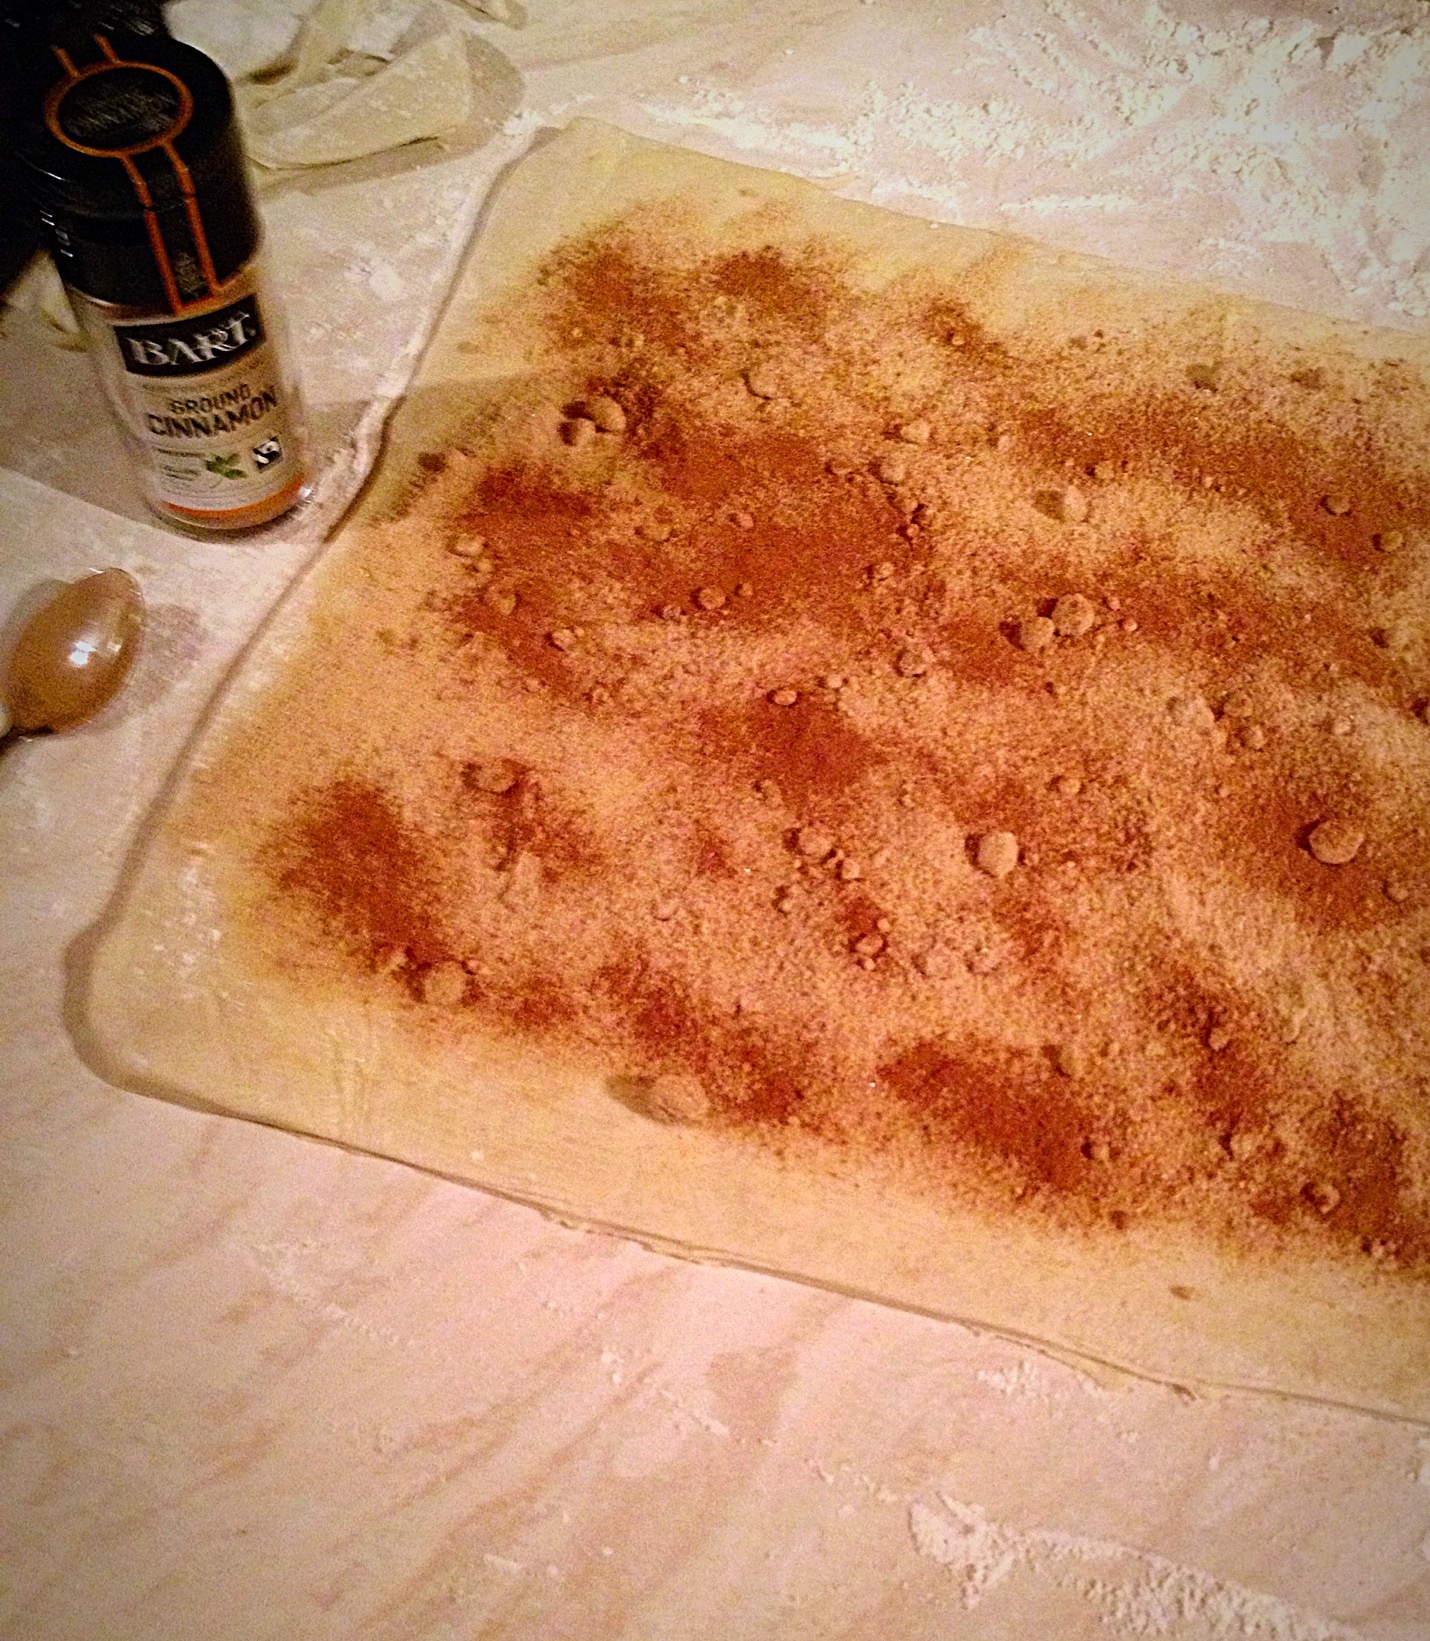
Sprinkle the cinnamon evenly over the sugar layer.
The smell of cinnamon fills the house when these buns are baking.
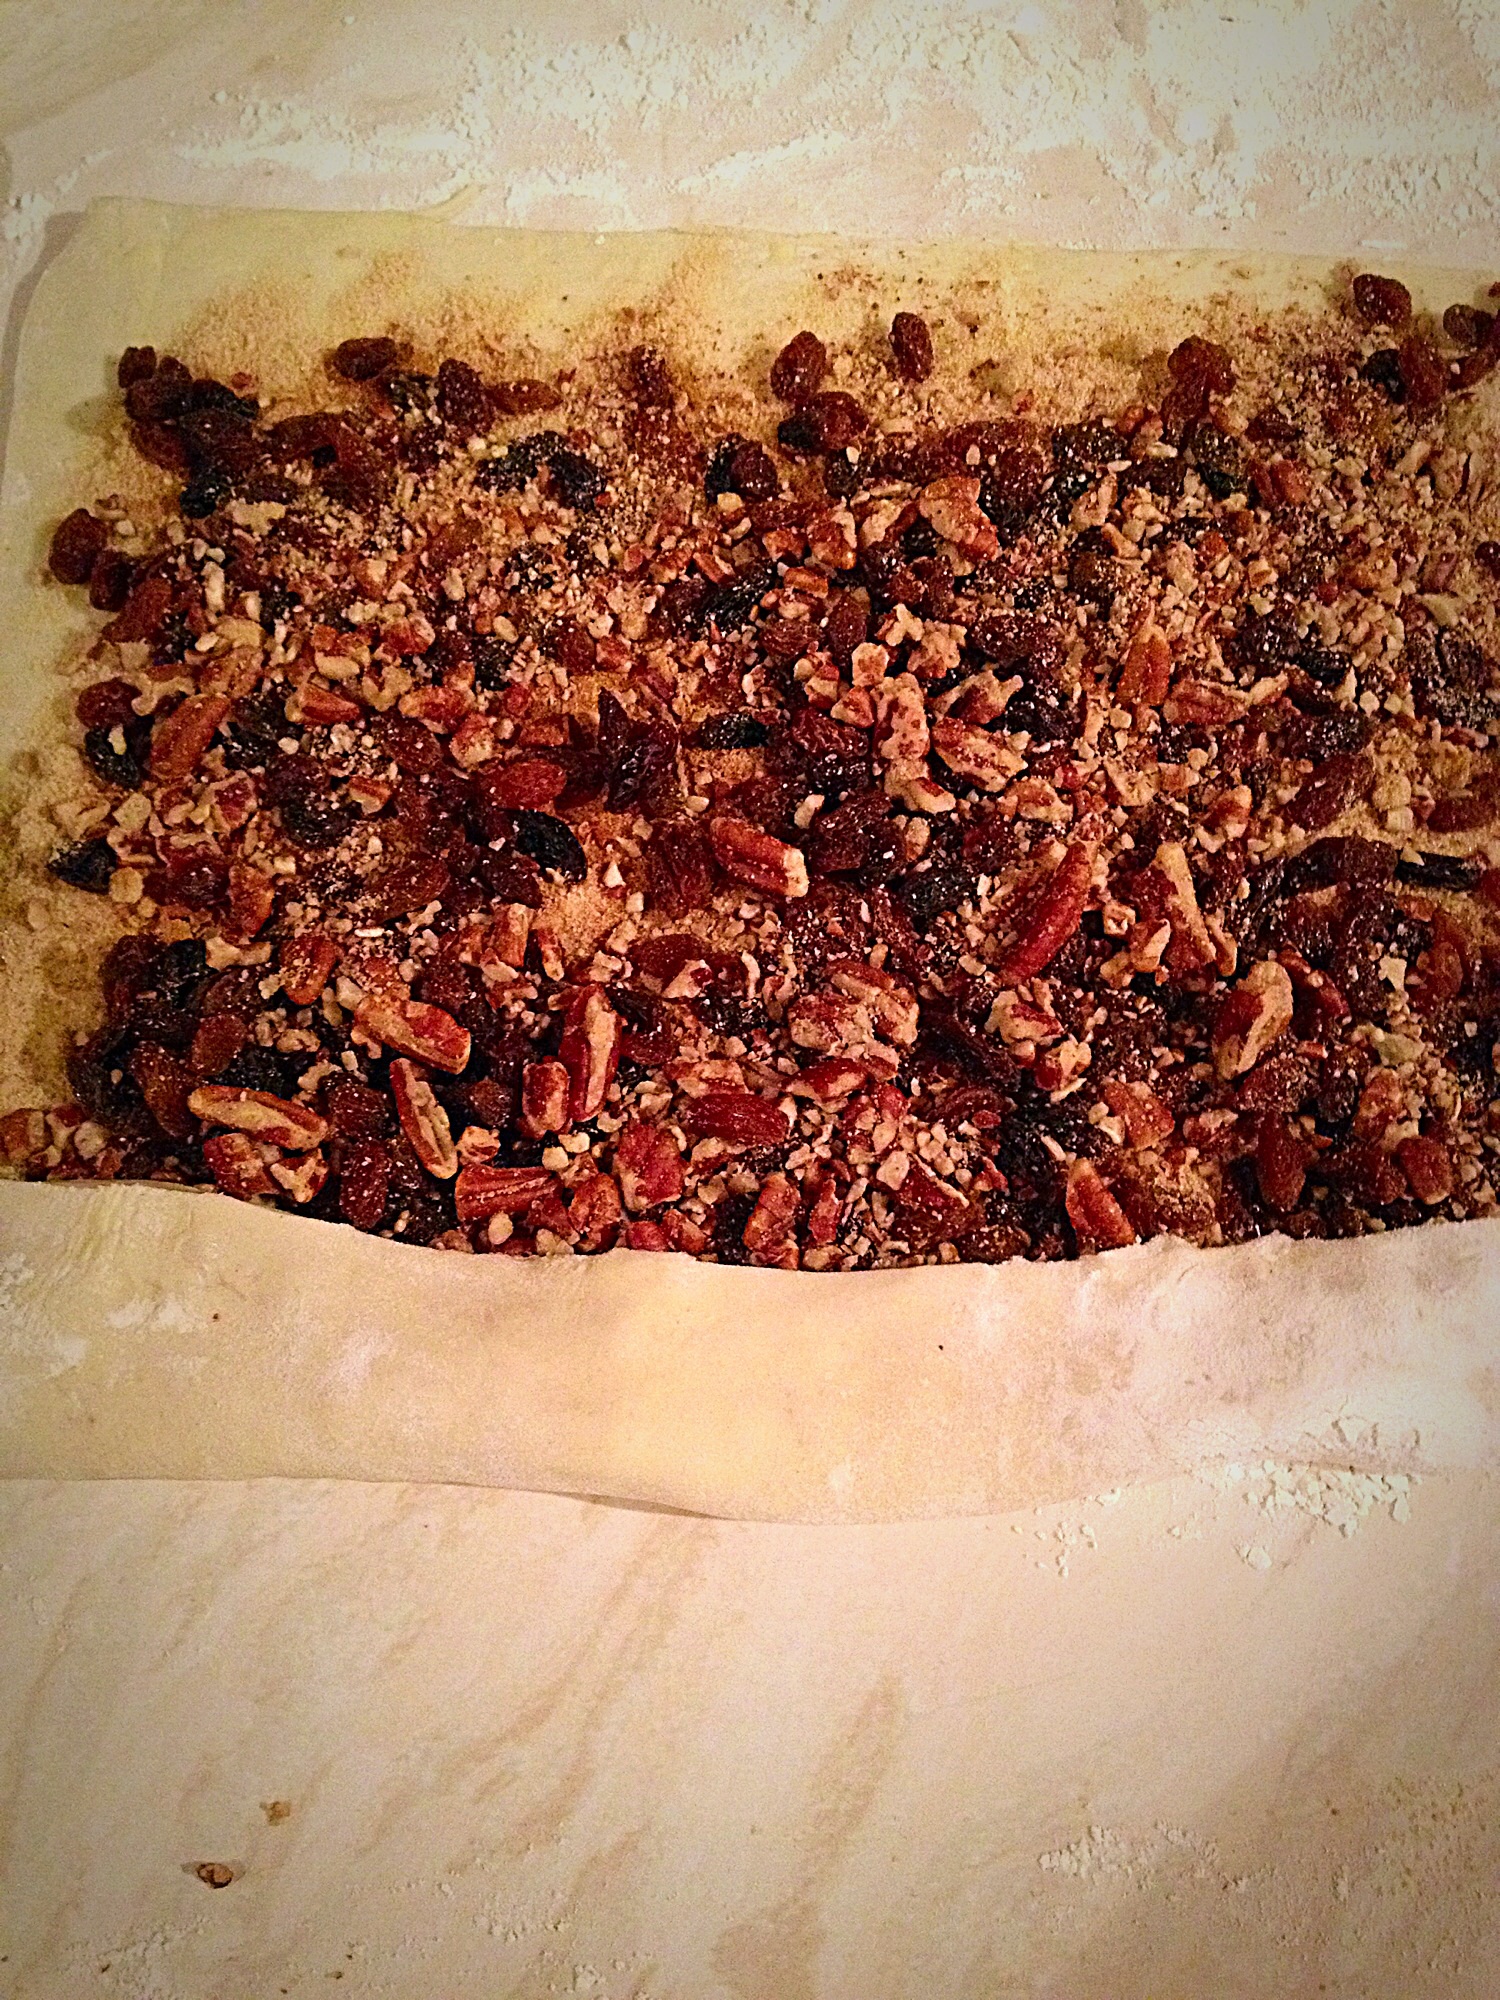
Now you can sprinkle firstly the Sultanas and the the chopped Pecan nuts, so they cover the pastry evenly.
Nice and evenly spread, now it’s time to get a-rolling!!!
Starting at the front edge of the pastry, evenly roll over the edge of the pastry, tucking it under itself ( not too tightly). Then proceed to roll until you have a log shape, with the join underneath.
A nice even roll along the front edge of the pastry.Keep rolling so the pastry is an even log shape.Trim the side edges of the log.
Shaping the buns
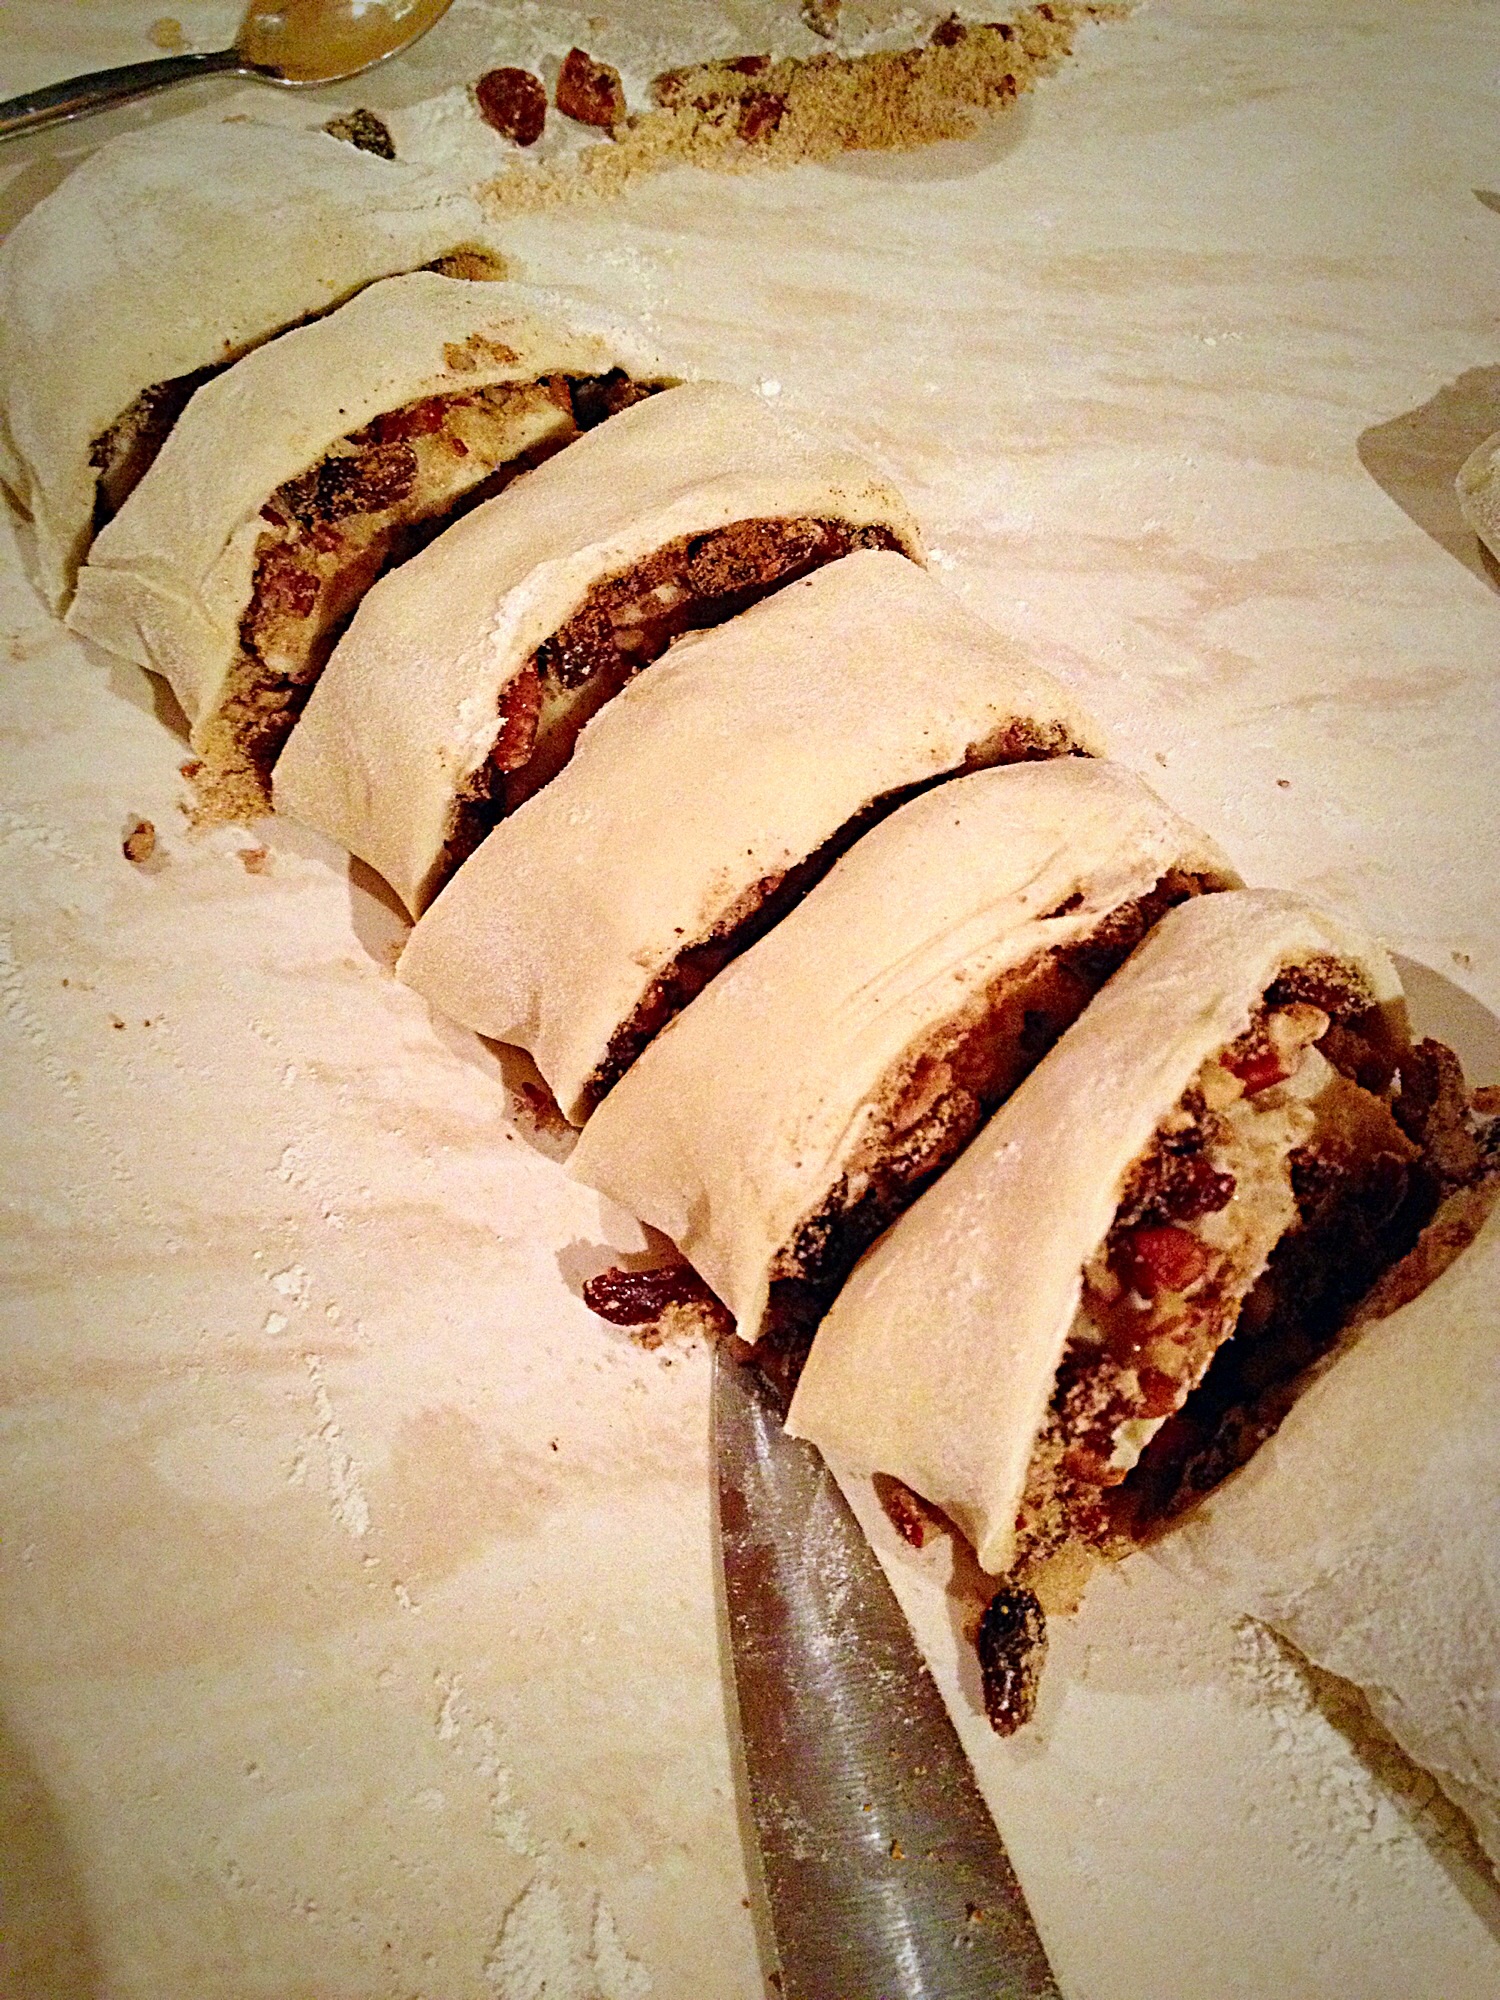
Next, using a sharp knife, mark the middle of the log. Then mark each half of the log in the middle. Now divide each marked section into 3 separate pieces. You should now have 12 buns!
Use a very sharp knife to slice through each section – so you get a nice clean edge to each bun.
Carefully place each bun, cut side up, on top of the butter/sugar/Pecan mixture in the muffin tin. Squish a little bit if needed and don’t worry if a little of the filling falls out in transit, you can always pop errant Pecans and Sultanas into any gaps once all the buns are in the muffin tin!
All ready to be popped into the preheated oven.
Baking the Sticky Pecan Sultana Buns
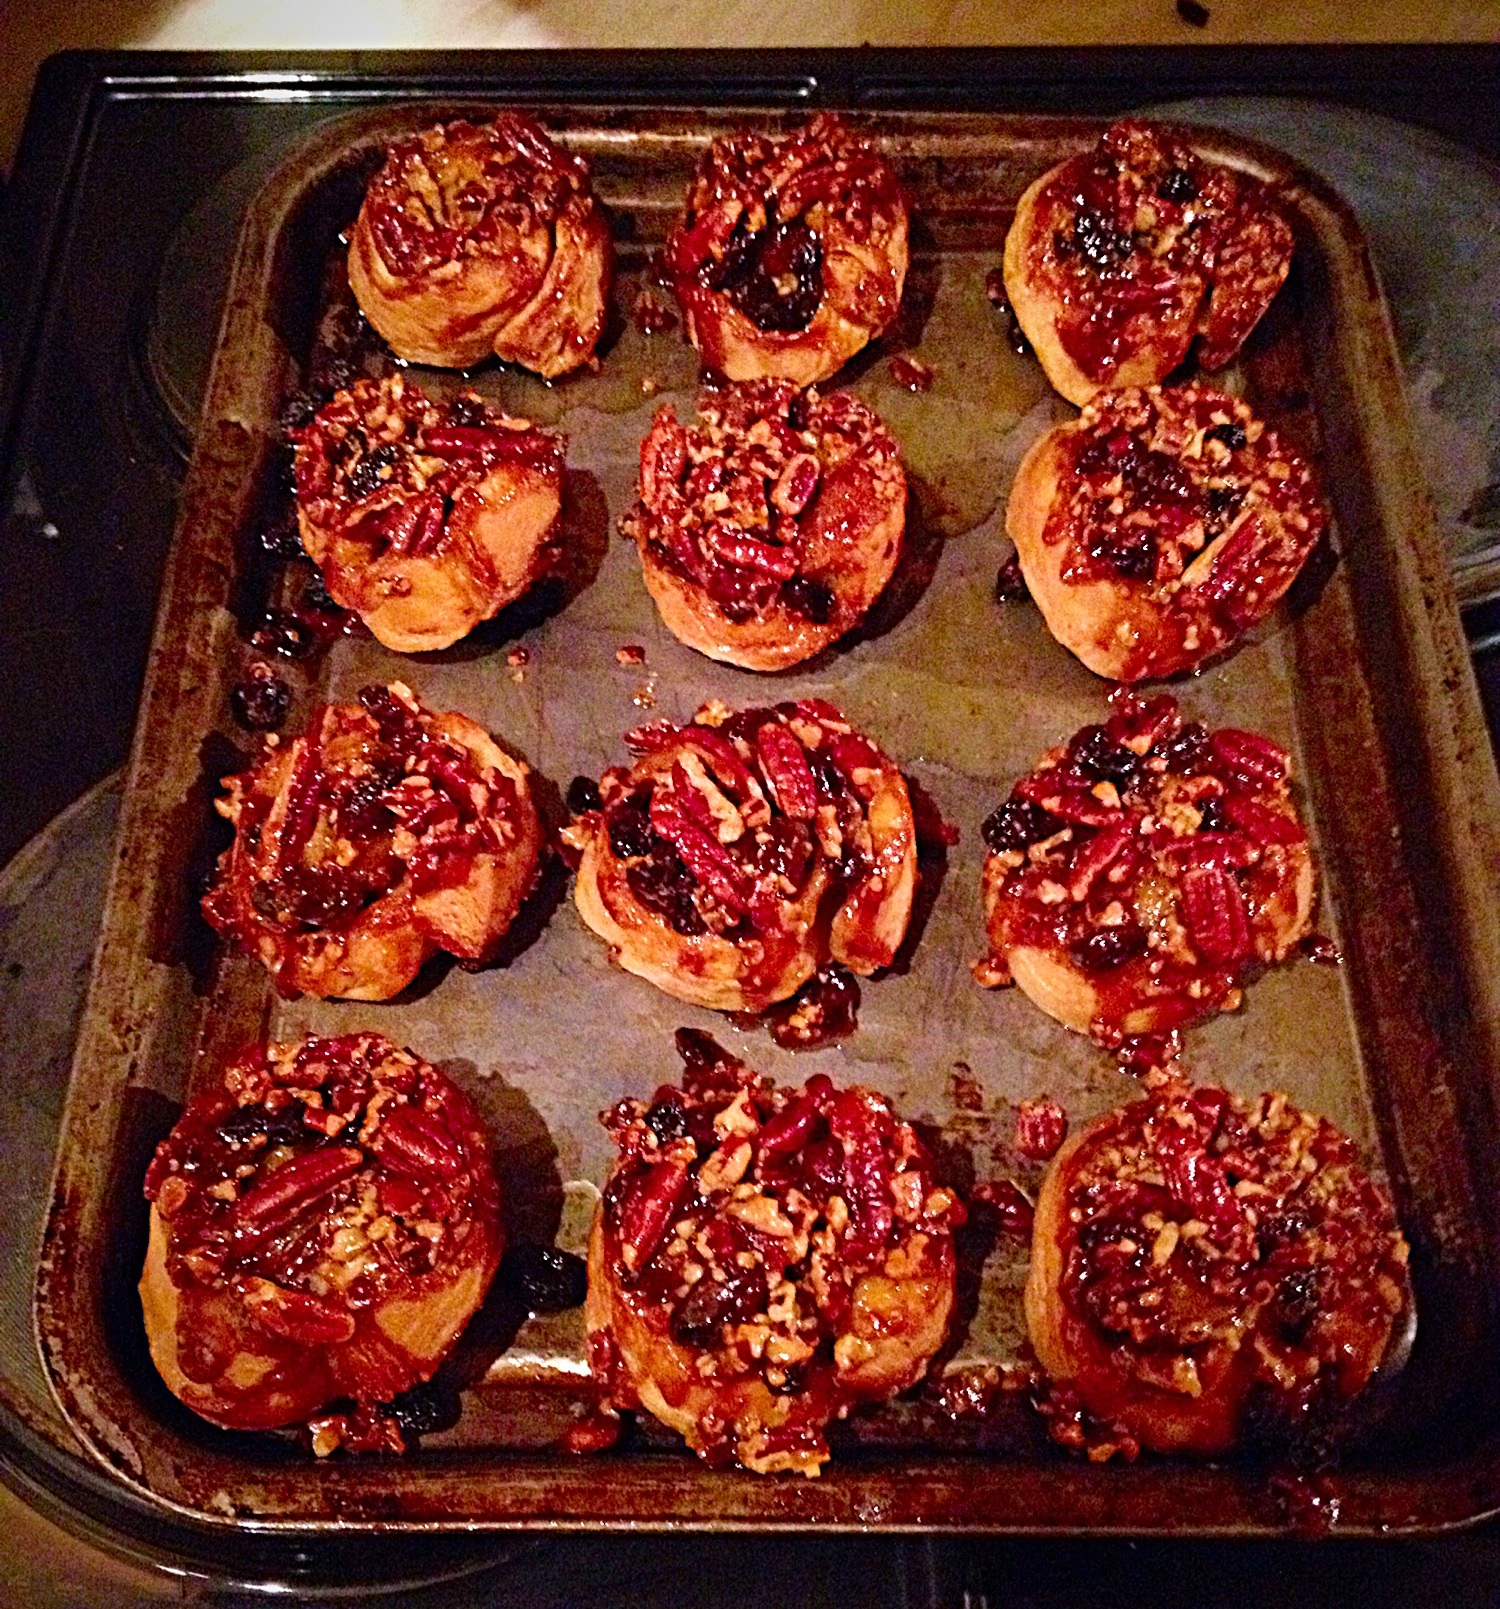
Place the tin into a preheated oven and bake for 30 minutes. The Sticky Pecan Sultana Buns are cooked when the pastry is golden and puffed.
Ooh yummy! But be careful, they will come out of oven very hot.
I just love to watch them bubbling and breath in their cinnamon scent when they first come out of the oven – it’s the little things in life that give me most pleasure!!!!!
Turning The Sticky Pecan Sultana Buns Out
Wait a few (3 ish but no longer than 5) minutes, then wearing oven gloves place a baking sheet (that is at least the same size as your muffin tin) over the top of the muffin tin and turn over. I promise the buns will drop out! Remove the muffin tin and stare in amazement at your gorgeous Sticky Pecan Sultana Buns– all 12 of them!! See I told you, they really are easy and they turn out every single time.
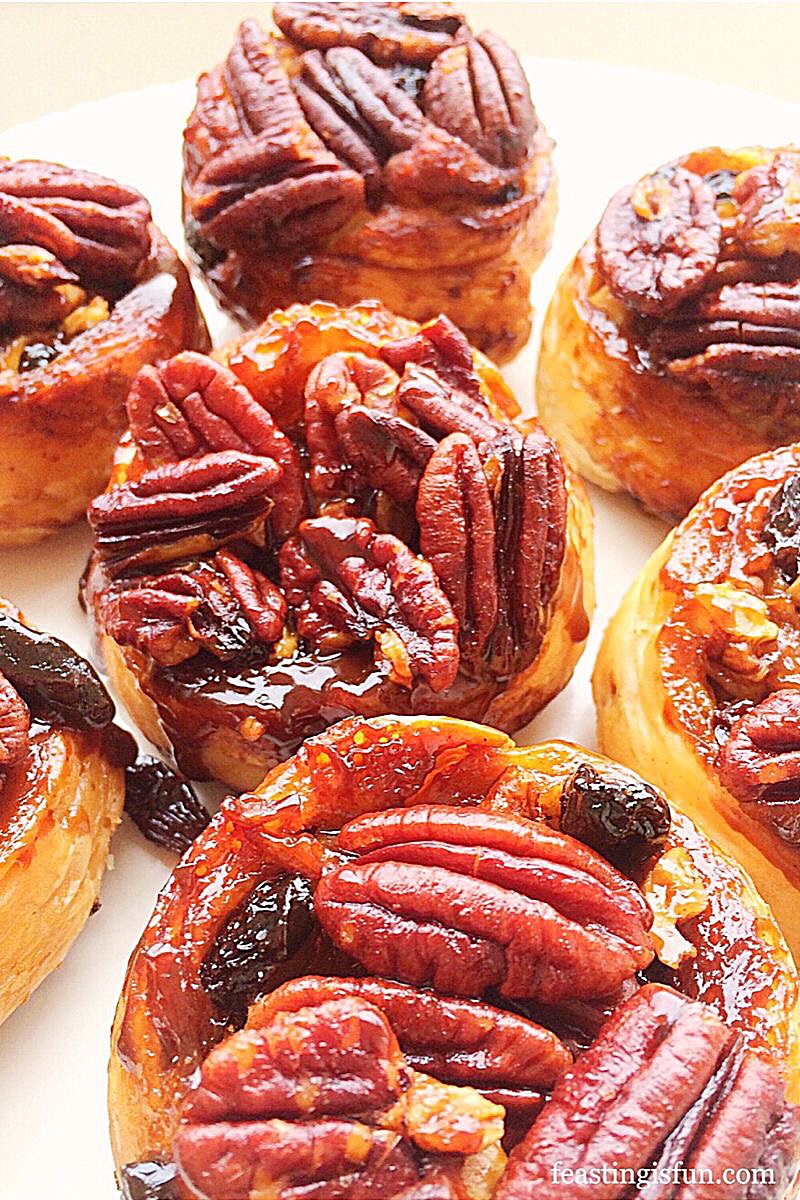
Perfectly turned out Sticky Pecan and Sultana Buns.
Leave to cool – remember all that bubbling and sizzling was butter and sugar boiling very hot!!
Serve warm with nothing but a hot drink of your choice, sit back, relax and smile!
Made for sharing
These Sticky Pecan Sultana Buns are perfect for breakfast, brunch, mid afternoon coffee. I think these are at their most delicious shared with friends and family who unexpectedly pop round! These are best served warm, so pop in a 140C oven whilst the kettle boils and serve with a steaming cup of coffee and a smile!
These scrummy Sticky Pecan Sultana Buns keep well in an airtight container for up to 5 days. They can also be frozen for up to 1 month. When needed, remove from freezer, place on a baking sheet and allow to defrost (this doesn’t take long 1-2 hrs depending on the room temperature), refresh and warm in a 180C oven for 5 minutes and serve.
Sticky Pecan Sultana Buns
I really hope that you give the Sticky Pecan Sultana Buns a try as not only are they easy to make, they are scrumptious and everyone who tries them has a big smile on their face!!!
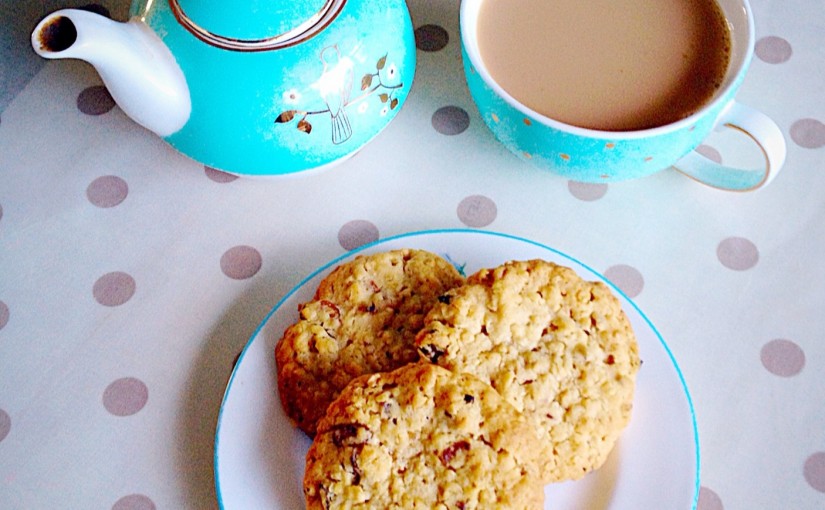
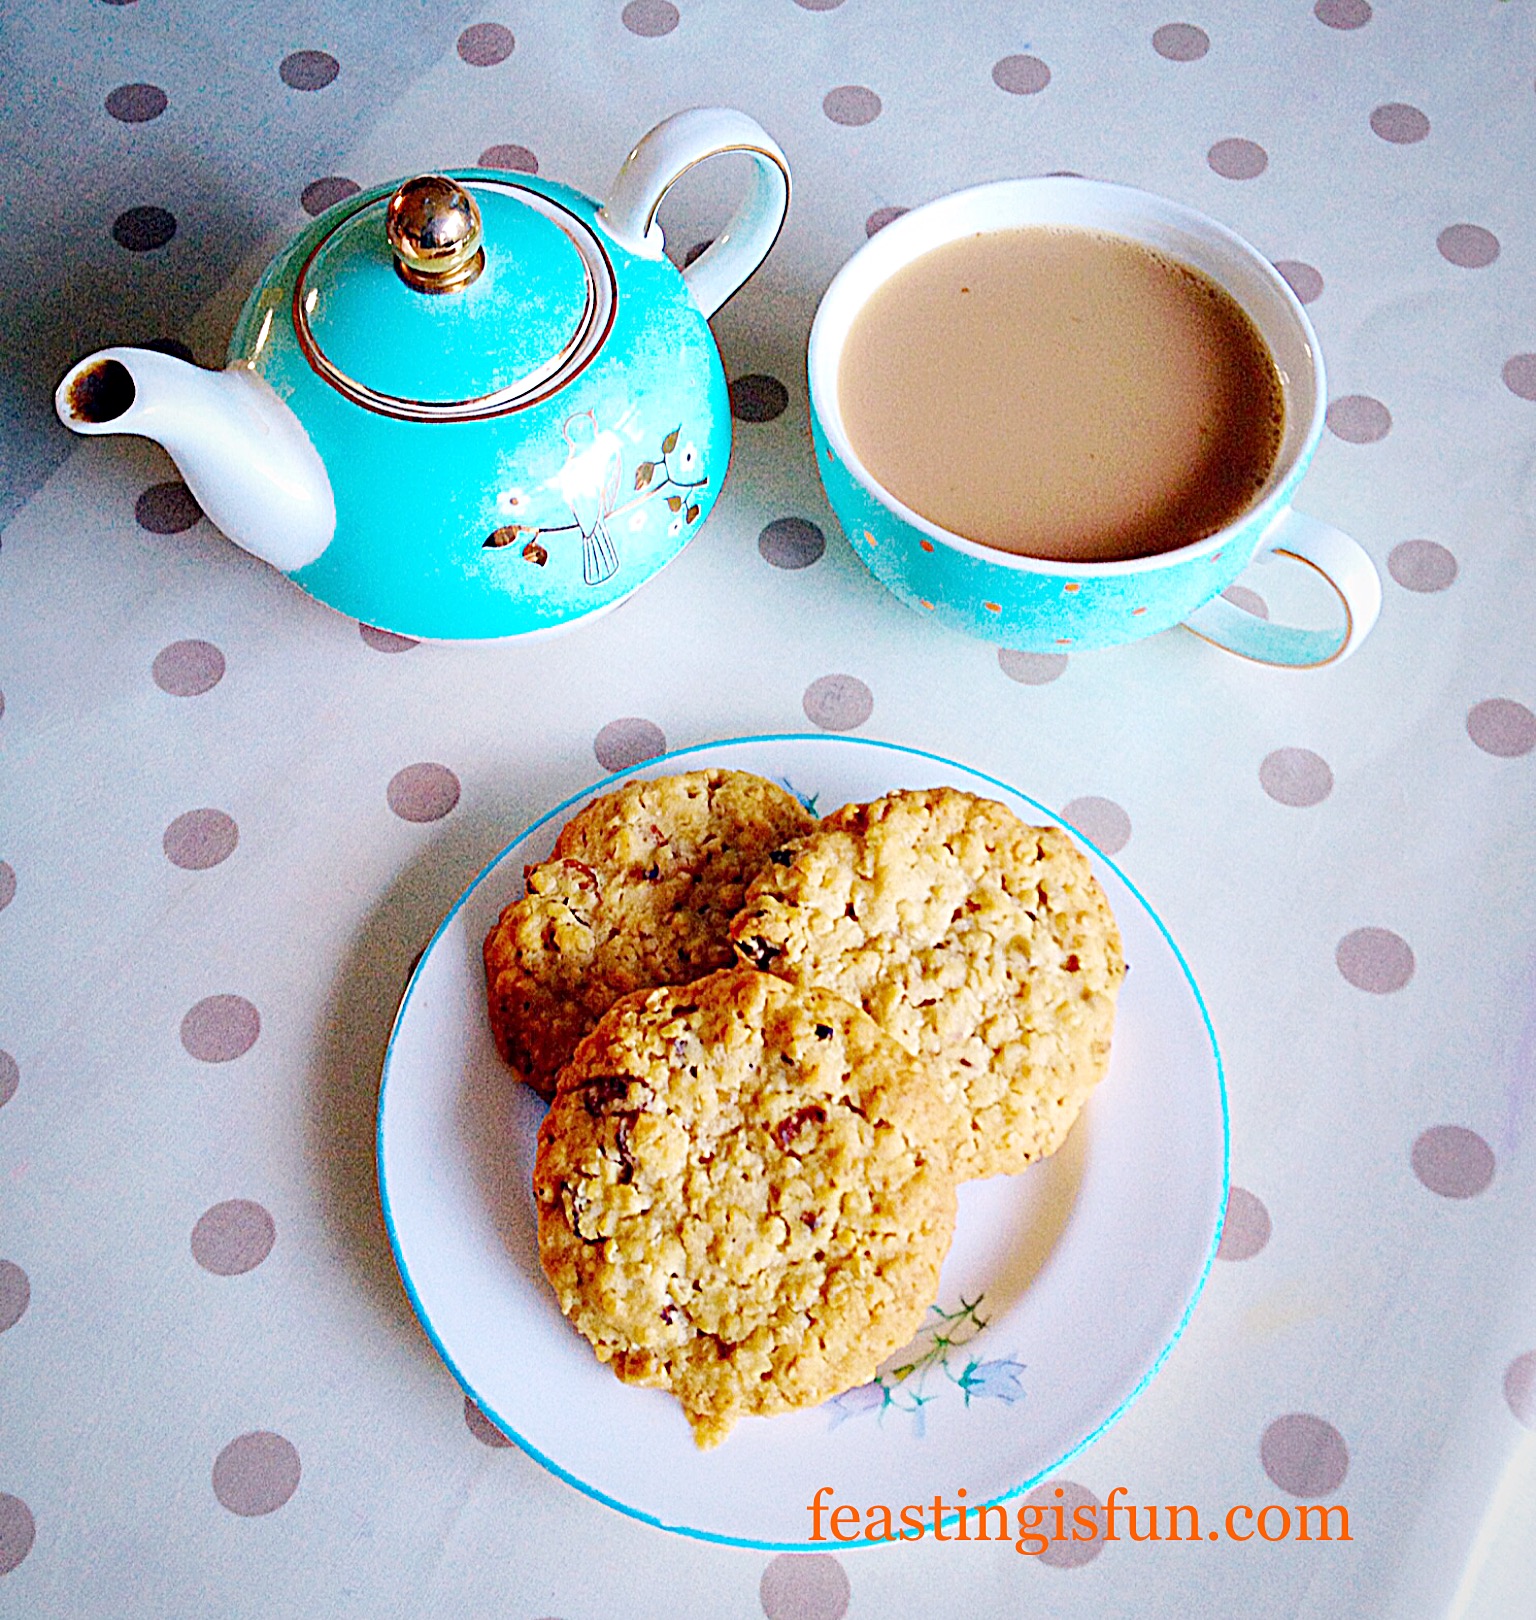
Hello, how are you today? If you’ve taken a look at my blog before, you might have noticed that I rather like Cookies, ooh and Biscuits (is there a difference?)! Although this recipe for Apricot Oat Crumble Cookies started forming in my brain last week, it had to wait as I out of oats. So, I am very glad I ordered some with my shopping because these Cookies are scrumptiously delicious.
Apricot Oat Crumble Cookies
Because I like to play around with textures as well as tastes, these Crumbly Oat Cookies have yummy nuggets of dried Apricot which have a lovely chewy texture. While the addition of Demerera sugar also adds a very slight toffee taste and extra crunch. So all good then!
So, the first batch of Apricot Oat Crumble Cookies were made and baked. And my special friend and chief taste tester could not wait to try them. The result was a big thumbs up! Obviously I had to try one as well and they are scrummy, plus with fruit and oats in them they must be good for you. Well that’s my theory anyhow!
Recipe: Apricot Oat Crumble Cookies make approximately 20
Method : Preheat the oven to 180C/160C fan, 350F, gas mark 4
Making the cookie batter:
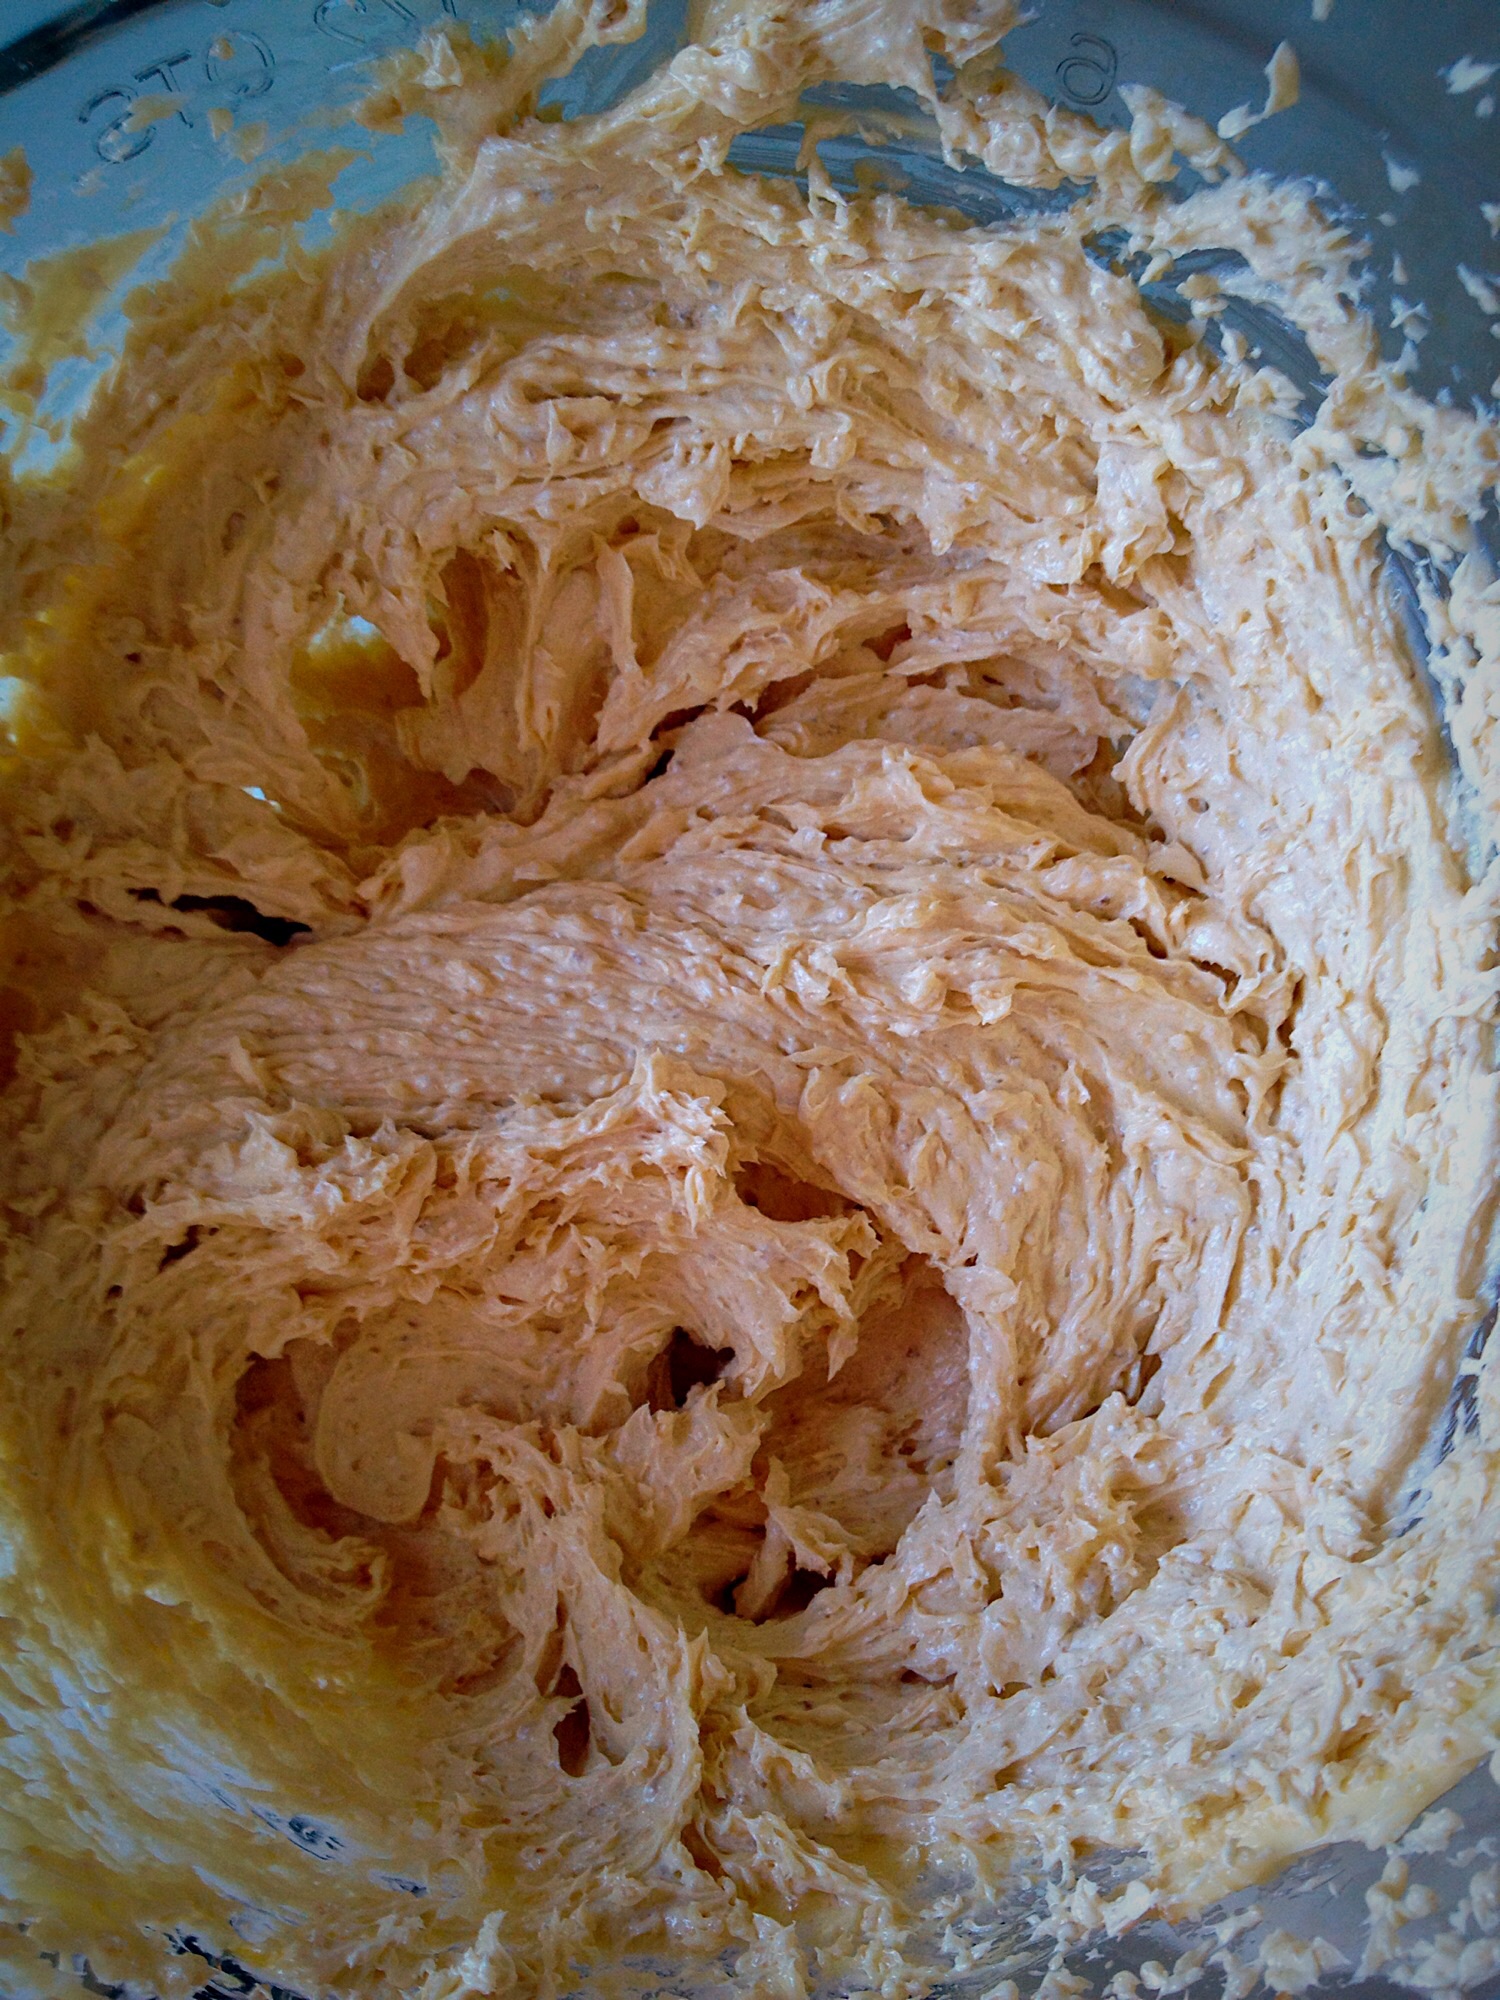
First of all, in a bowl cream the butter and sugars together, ideally with an electric whisk (by hand with a wooden spoon is fine, just ensure the mixture is well beaten).
The whisked butter and sugars. The Demerara sugar gives the mixture more colour.
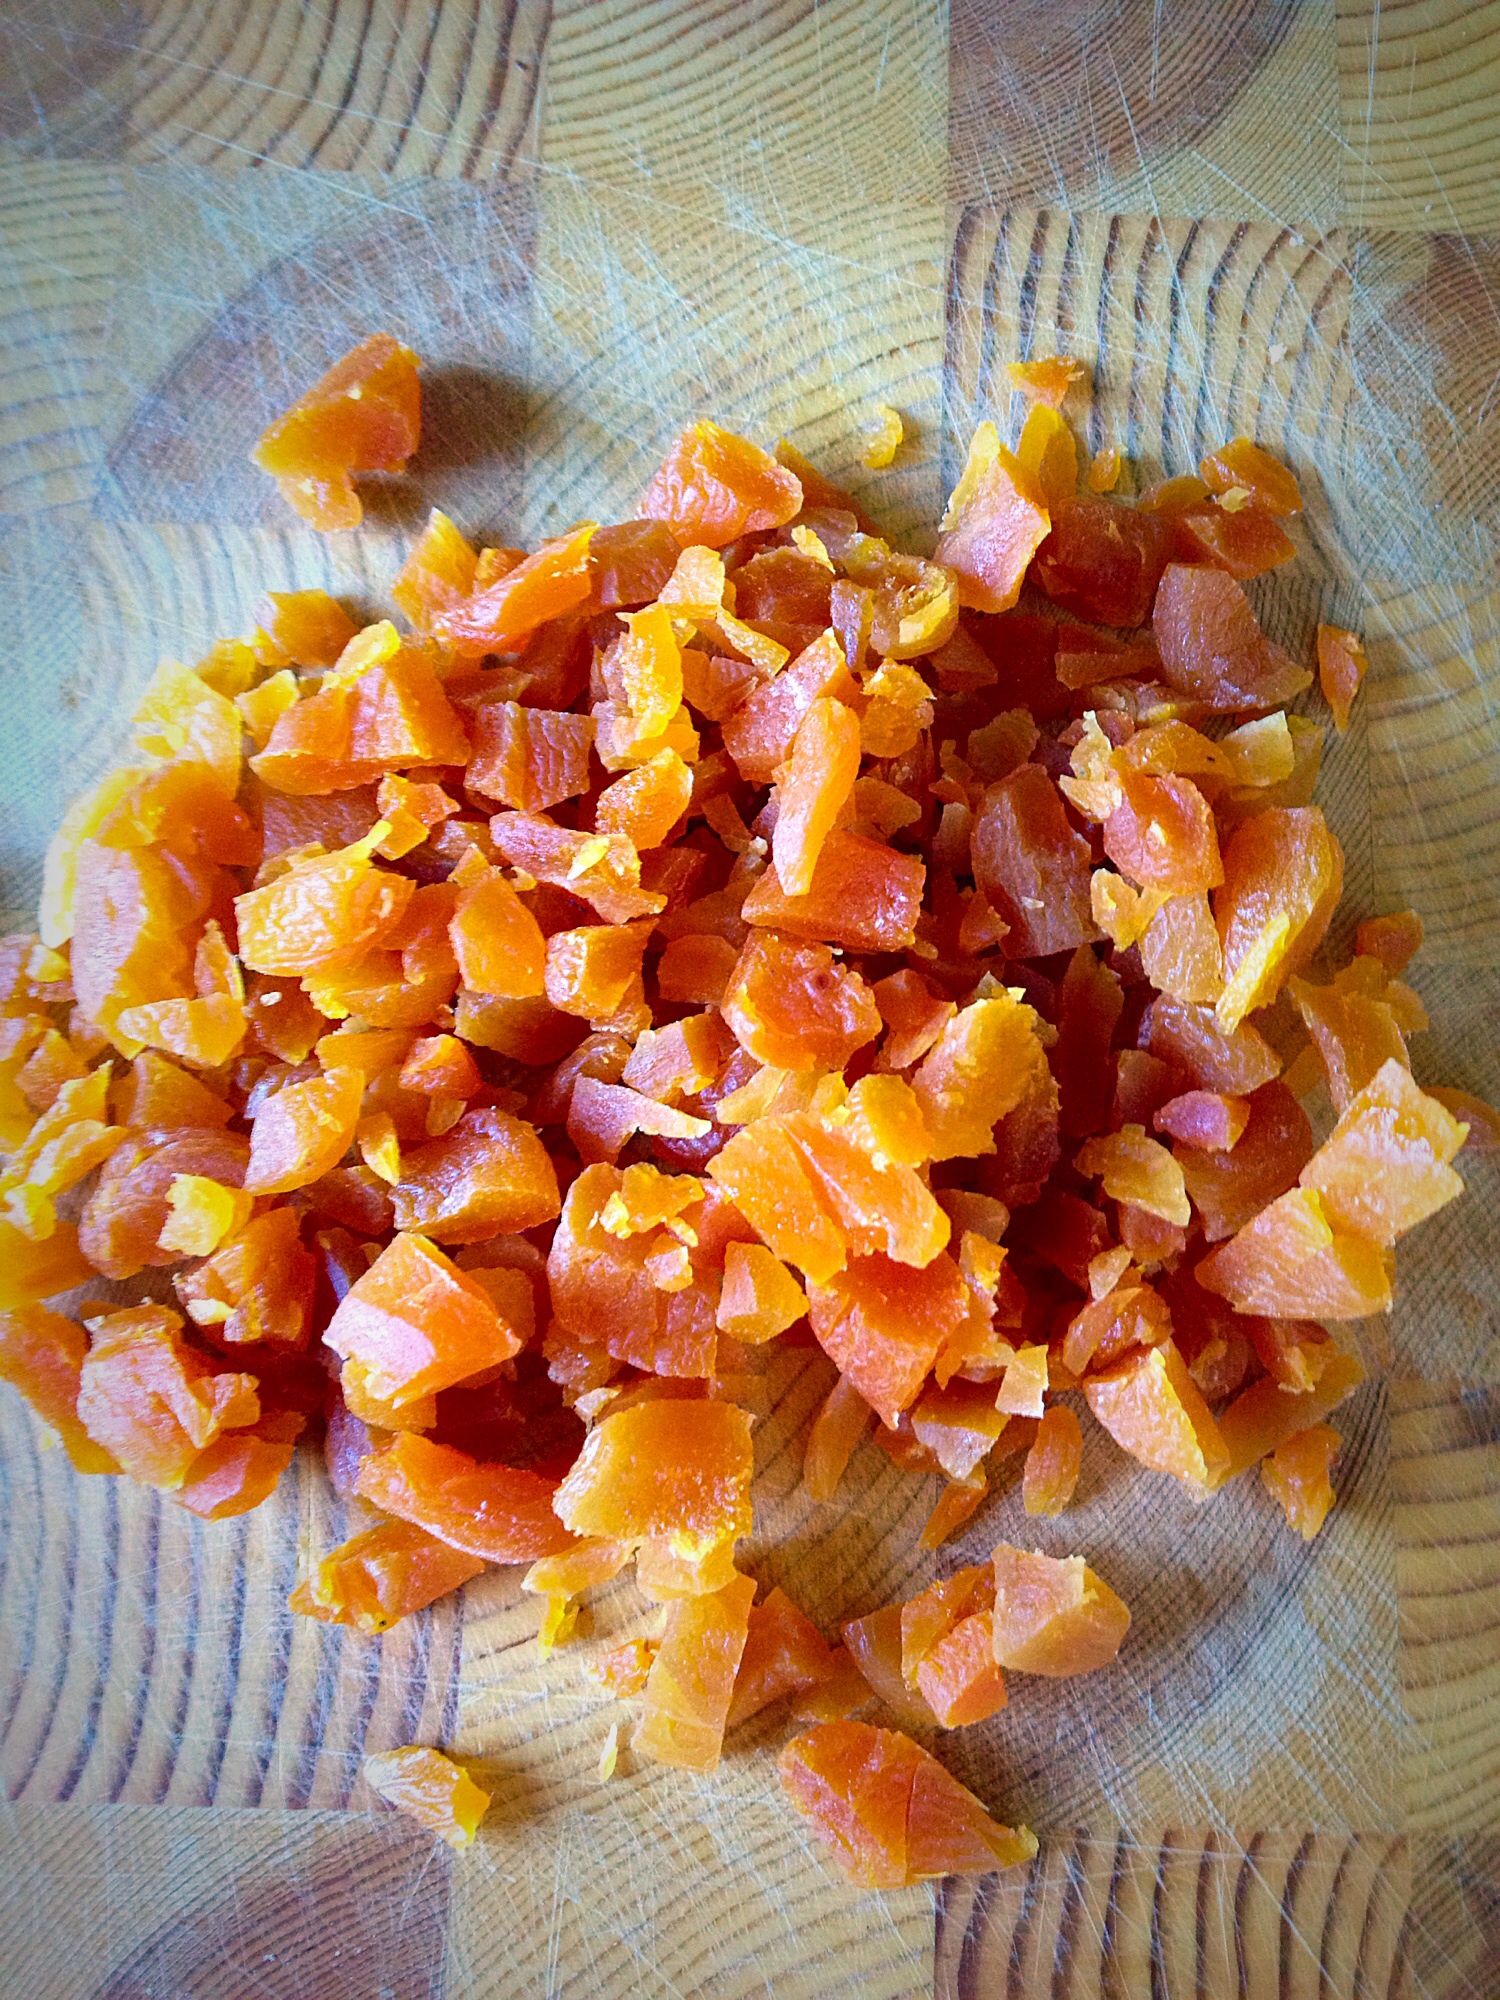
Add the egg yolk, vanilla extract and salt to the mixture and beat in well. Take the dried Apricots and chop them roughly into small 1/2cm pieces. You want the pieces of Apricot small enough so that they distribute evenly throughout the cookie dough, but big enough to be golden nuggets of chewy fruit that contrast with the crumbly cookie texture.
Here’s a pic of how I chopped the apricots!
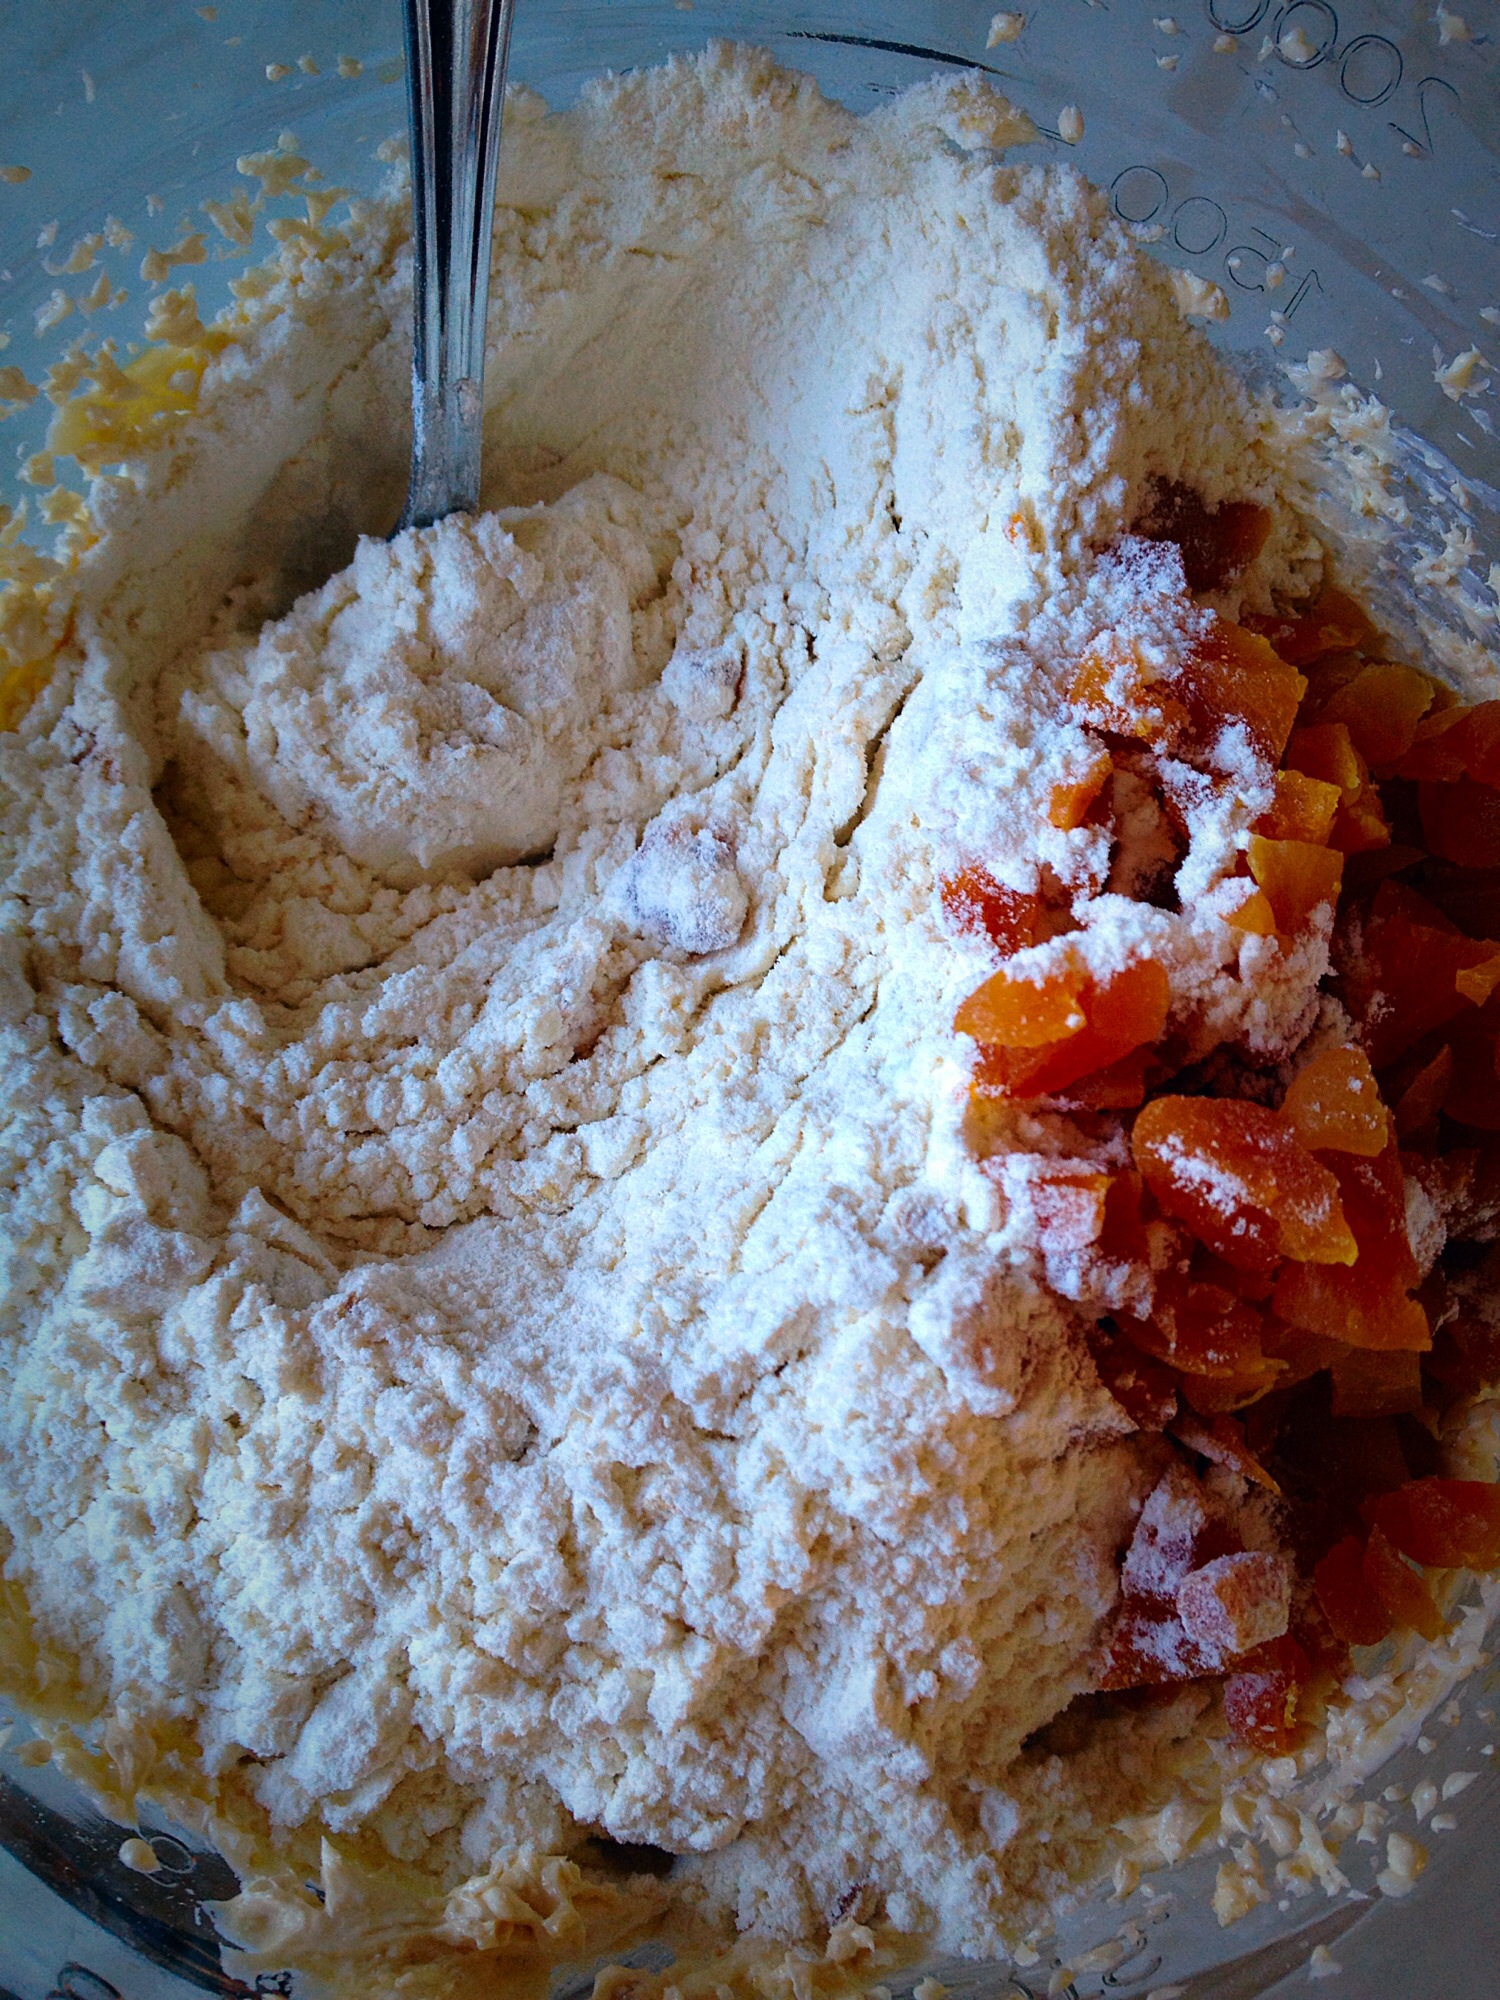
Into the bowl add the oats, flour and place the chopped apricots on top. Mix together until just combined.
Placing the chopped apricots in top of the flour helps to stop them all clumping together.
Shaping the cookies:
Scoop a desert spoonful of the cookie dough and shape into a ball using your hands. I placed 6 cookie dough balls on both of the baking trays I used. Obviously the bigger the ball, the larger the cooked cookie will be!
Note : Unless you are confident that your baking trays are non stick, it’s best to line them with baking parchment paper.
Lightly press down on the dough balls, to flatten them into an even round shape.
Baking the cookies:
Finally, place the baking trays into the preheated oven and bake for 15-25 minutes until golden brown on the bottom (see photo). Again the cooking time will depend on the size and thickness of your cookies.
Note the underside is much deeper in colour than the top.
If the bottom is not golden (as above) return your cookies to the oven for an extra couple of minutes. The first tray I got out of the oven looked fine, however, when I tried to turn the cookie over to check the underneath, it completely fell apart – I put the tray bake in the oven for an extra 5 minutes and the photo above shows the result!
When cooked properly, even whilst still warm, the cookie will hold it’s shape, allowing you to check the underside. Leave the cookies to cool completely on the baking tray.
Apricot Oat Crumble Cookies
While cooling, ring a friend, or your mum, or someone you’ve been meaning to invite round for ages. Pop the kettle on, quickly clean up (vacuum, throw some bleach down the loo, anti bac wipe the cat…..). No, no, no!! Whoever you’ve invited round doesn’t want to see you (and the cat!) frazzled to within an inch of your life. Relax. Put on some whale music if necessary (although if you need that you might want to invite so and so tomorrow – just saying!!!).
If you have enjoyed this recipe for Apricot Oat Crumble Cookies you may also like these:
Finally, enjoy feasting and having a good natter, with a friend, over Apricot Oat Crumble Cookies. Have fun catching up and sharing in each other’s news. Because one of the most precious gifts you can give is your time. We all feel loved and valued when others take time out of their busy schedules to share part of their day with us!
I know, because my sister – who is the best sis in the world – took time out of her day for me today. Thanks babes, love you with all my heart xx.
Sammie x
No part of this post may be reproduced or duplicated without the owners written permission. Please see my Disclosure Policy.
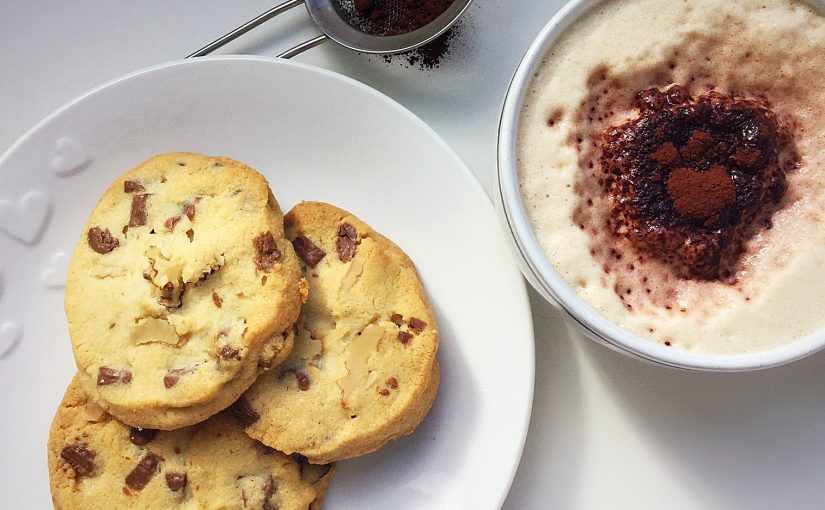
Hi there, thank you for stopping by to read my blog. Cookies are always a welcome treat, whether eaten here at home, or shared amongst fiends. Today, both our Post Lady and shopping delivery man both took parcels of the cookies away with them. I hope it inspires you to try this recipe for Walnut Chocolate Chunk Cookies, have fun and share your feasting with others.
Walnut Chocolate Chunk Cookies.
Walnuts are healthy?
So walnuts? Just done a little bit of research and it seems they are very good for you. The BBC report I read claimed that, out of the most commonly eaten nuts, Walnuts had twice the number of antioxidants in them compared to the other nuts tested. Well I’m not going to argue with the Beeb. Also, in truth, I don’t really know what antioxidants are, or what they do. Yet it seems they are good to have in your body.
Walnut Chocolate Chunk Cookies
Now some, could say these cookiesare a ‘health food’ based on this evidence. Although I couldn’t possibly make such a claim! What I do believe and feel quite strongly about is this: As part of a healthy balanced diet, a couple of homemade cookies are better for you than eating lots of processed,especially low fat, low calorie, so called diet food products. Containing a myriad of stabilisers, hidden sugars, mould growth inhibitors etc, all so they can have a longer shelf life in the shops.
Anyway enough of my opinions on food. Because what really counts and makes it worthwhile baking is taste and texture. And yes these cookies hit the spot on both counts! The recipe came about as I had run out of normal plain white flour, so I had to improvise. Fortunately for me it worked, with both variations of the recipe being equally tasty.
Recipe: Walnut Chocolate Chunk Cookies makes 30 approximately
225g/8oz Unsalted Butter softened to room temperature
225g/8oz Plain White Flour, or alternatively 175g/6oz 00 White Flour plus 50g/2oz Corn Flour
6oz Milk Chocolate Chunks or Chips – I use Callebaut
Method: Prior to baking preheat the oven to 180C/160C fan, gas mark 4, 350F.
Making the cookie dough:
First of all add the butter, sugar and salt to a large bowl.
Using an electric whisk, or wooden spoon, cream the butter, sugar and salt together until pale and fluffy. The usual check can be applied, which is to rub a small amount of the creamed mixture between your forefinger and thumb, if no grittiness is felt the sugar is completely combined with the butter.
TIP: This is an important part of creating a Cookie with fab texture. When I first started baking, I would mix the butter and sugar together until combined. My cookies were okay. Then one day when following a Nigella recipe, that I’d made before I actually whisked the butter and sugar (as stated in the recipe – sorry Nigella for neglecting that bit before) and not only did the Cookies turn out much better, but the mixture made any extra 4 Cookies!
Next whisk/beat in the egg yolk and Vanilla Extract until fully incorporated.
Take 50g/2oz of walnuts and process in a food processor (or alternatively a mini chopper) to a similar consistency as ground almonds.
Add the processed walnutsand either plain white flour, orcorn flour and 00 white flour to the creamed mixture.
Now add the chocolate chunks and the remaining 100g/4oz roughly chopped walnuts.
Use a spoon gently mix until all the ingredients are combined.
Lay some cling film on top of a damp work top – see Super Easy Shortbread Cookies for detailed photos. Place half the mixture on to it and form a log shape. Wrap in the cling film and refrigerate. Repeat with the other half of the dough.
Finally, chill in the fridge for at least an hour, however the wrapped dough log can be kept in the fridge for up to 5 days.
Baking the cookies:
When ready to bake remove the dough log from the fridge and leave at room temp for 10-15mins to warm up slightly.
While the dough is warming preheat the oven
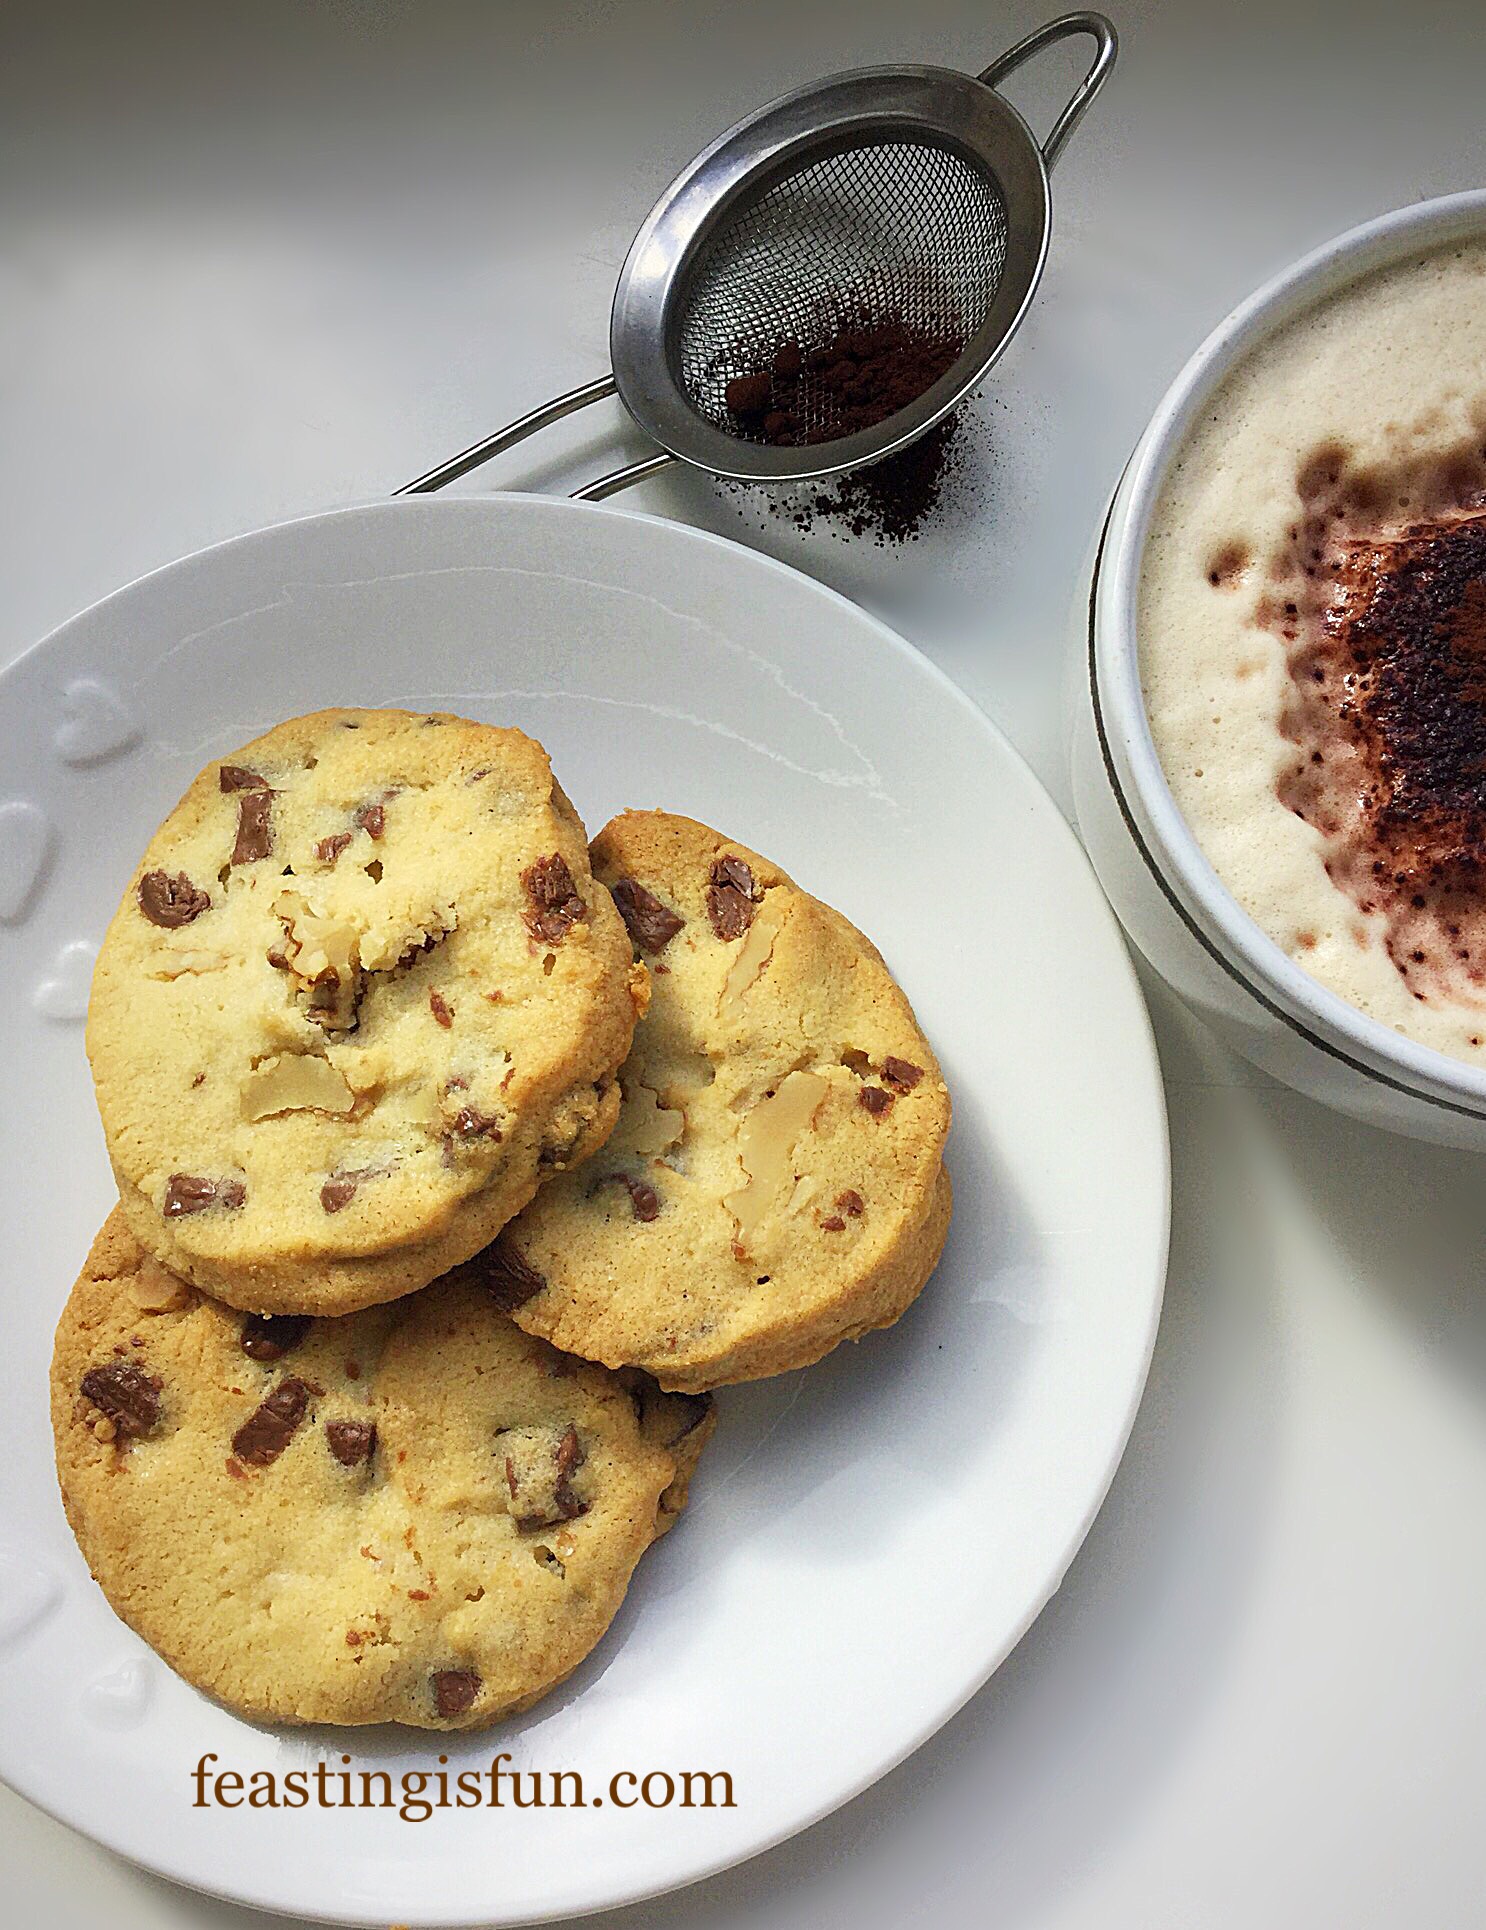
Use a sharp knife slice the dough log into 3/4cm discs – each log should yield 10-15 Cookies.
Place the cookie discs on to the baking sheet spaced evenly apart.
Walnut Chocolate Chunk Cookies ready for the oven.
Place the baking trays, spaced evenly apart, into the preheated oven.
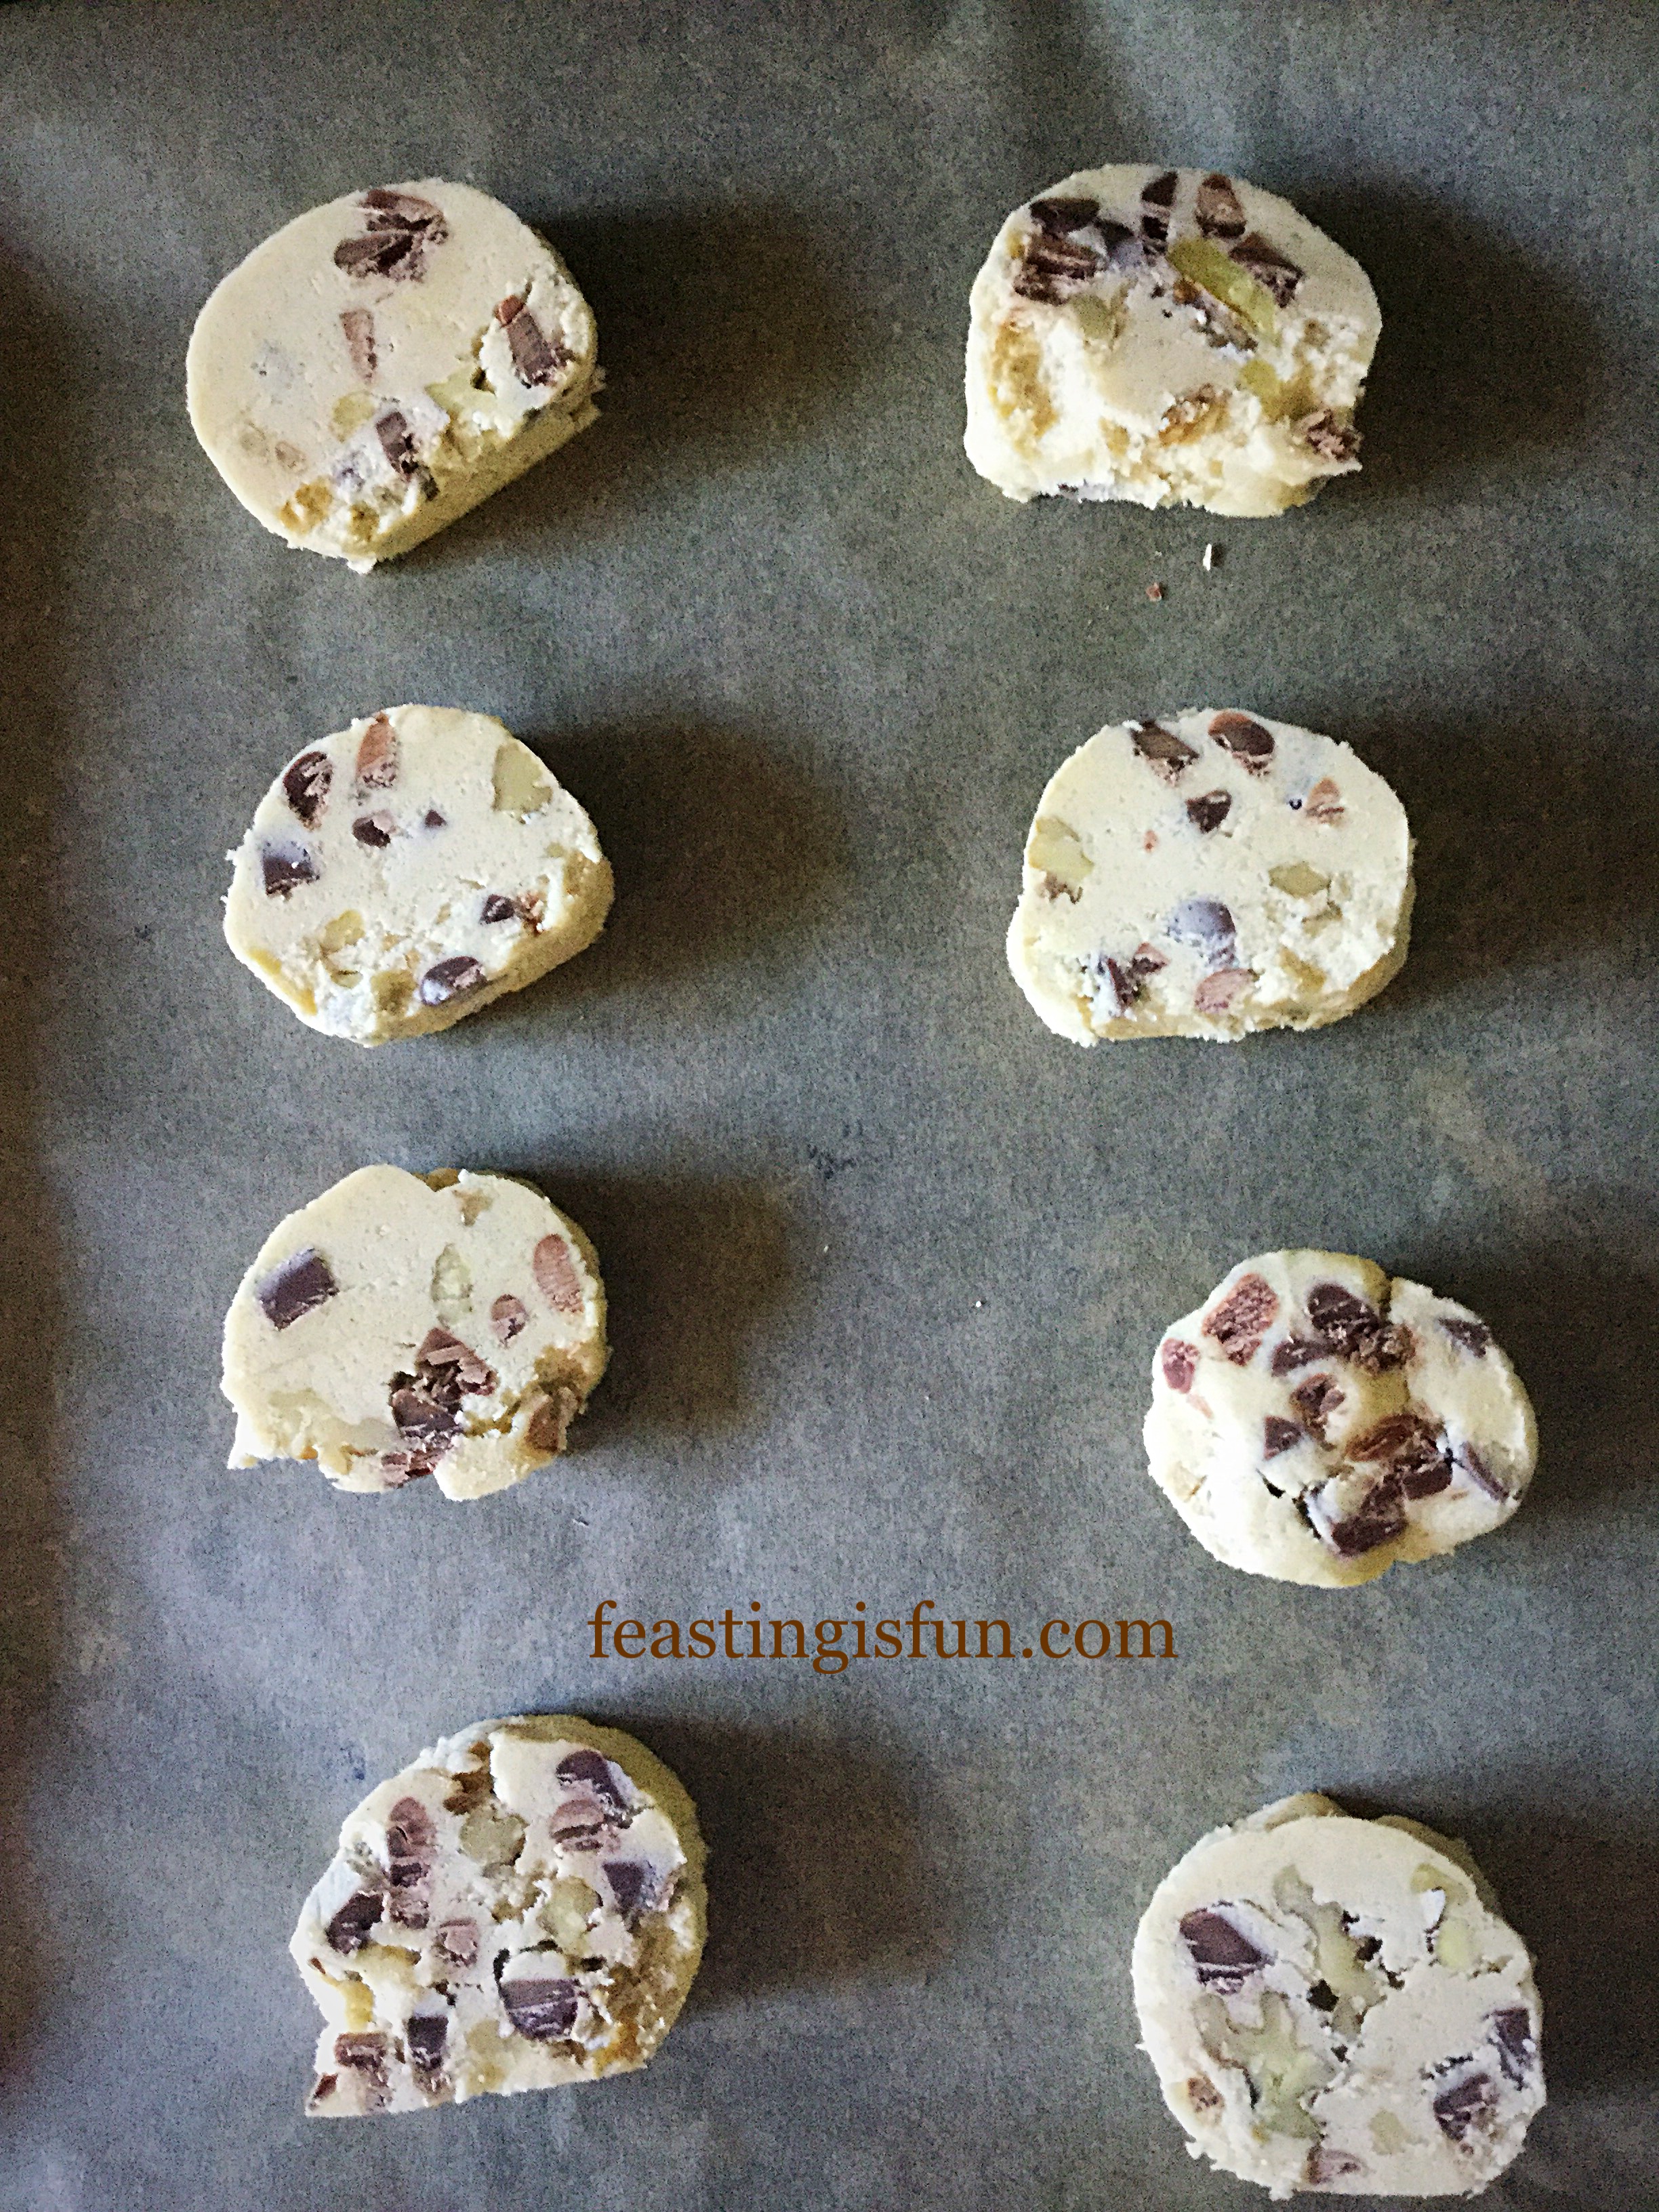
Bake for 20-25 minutes, rotating and turning the baking trays halfway through baking.
When baked the cookies are a golden colour.
As soon as the cookies are baked remove from the oven.
Perfectly baked Walnut Chocolate Chunk Cookies.
Allow to cool on the baking trays until completely cooled.
Walnut Chocolate Chunk Cookies great with a cappuccino.
Serve with a smile and you favourite drink.
Keep baked cookies in an airtight container for up to 5 days.
If you have enjoyed this recipe for Walnut Chocolate Chunk Cookies then you may also enjoy these:
If you know someone who’s nuts about nuts, especially walnuts, now is the time to share. Stack a few cookies in cellophane bags, tie with a pretty ribbon or some raffia and give as a gift. Alternatively, pack a tin full of cookies as a gift to family, friends or new neighbours. Whatever you do, sharing these cookies is an absolute must.
Whatever you are making, baking and creating in your kitchens, have fun creating your feast.
Sammie xx
No part of this post may be copied or replicated without the written permission of the owner. Please see my Disclosure Policy.
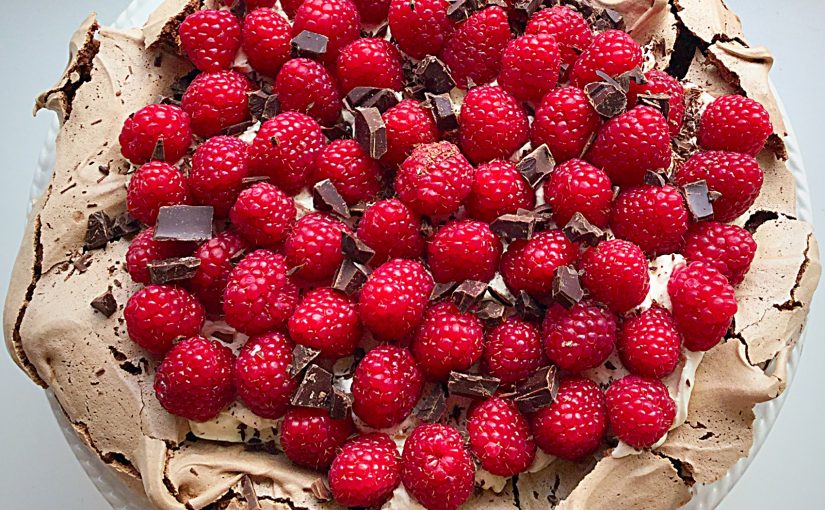
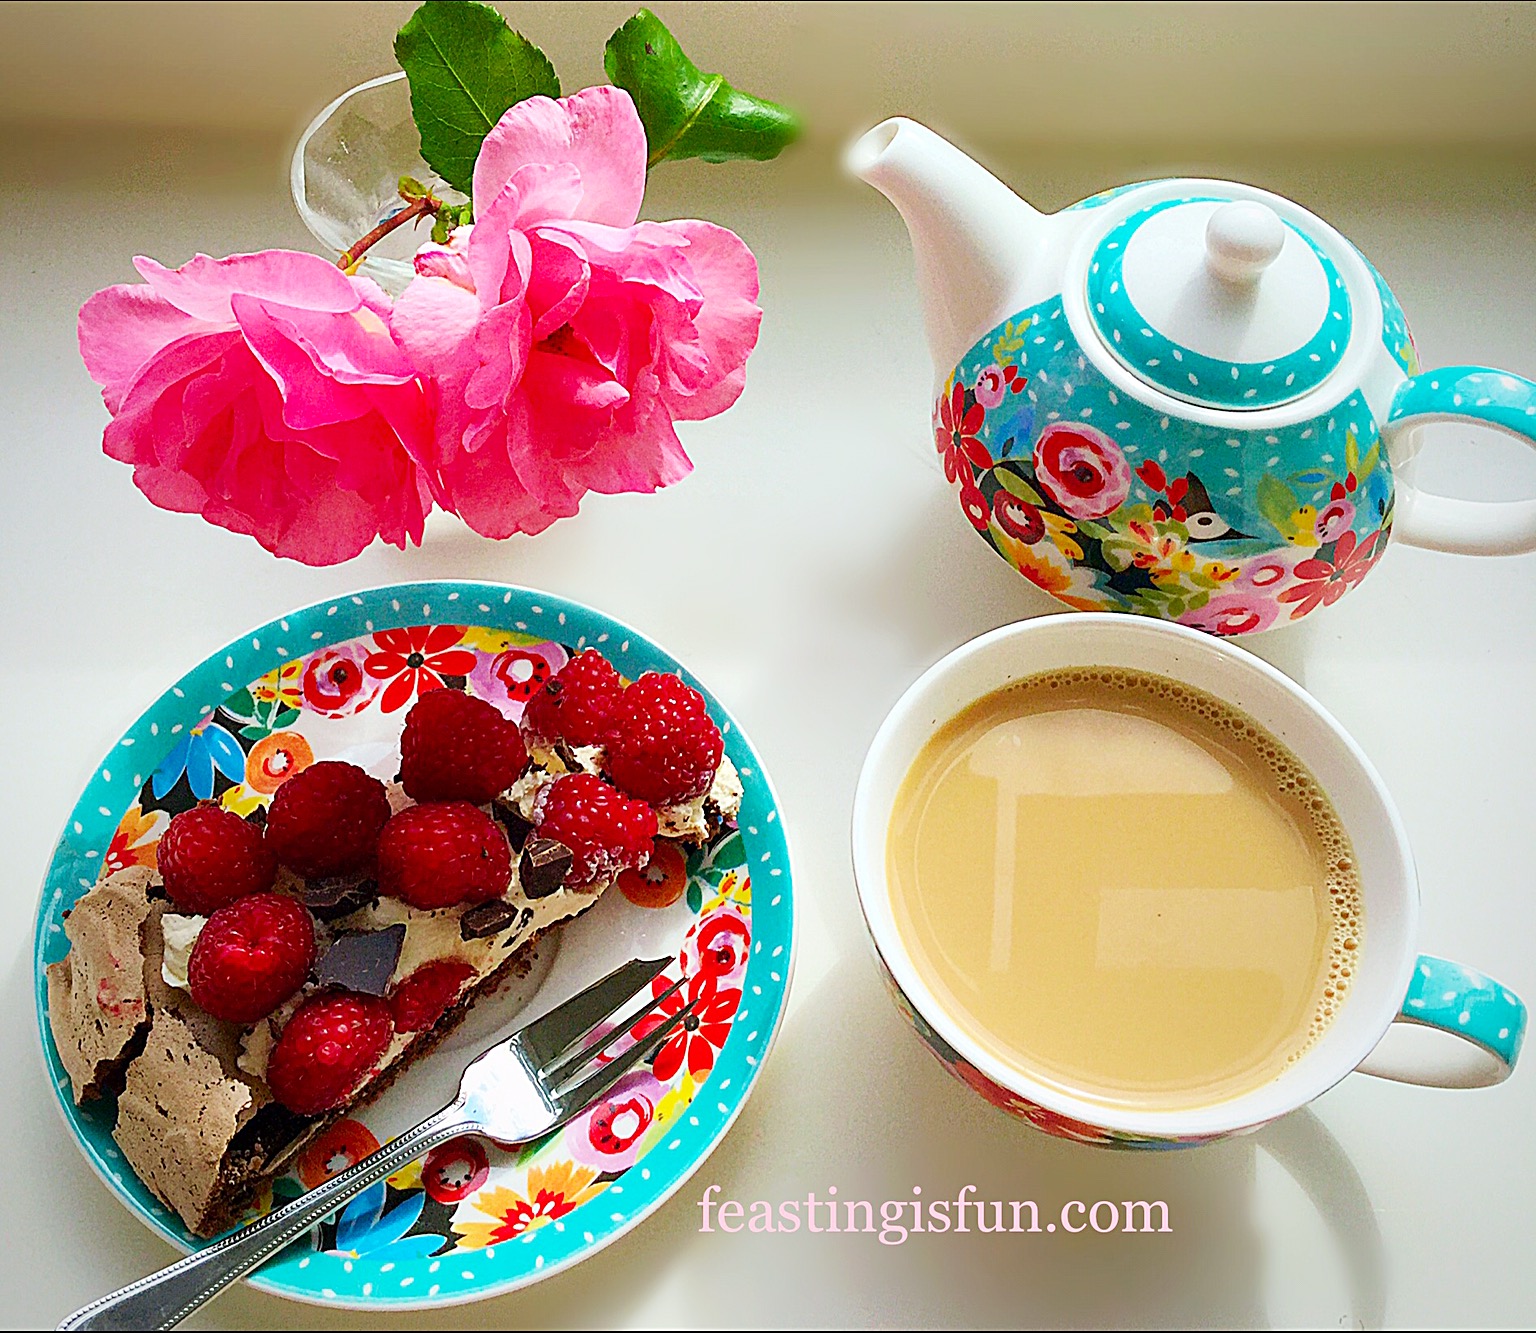
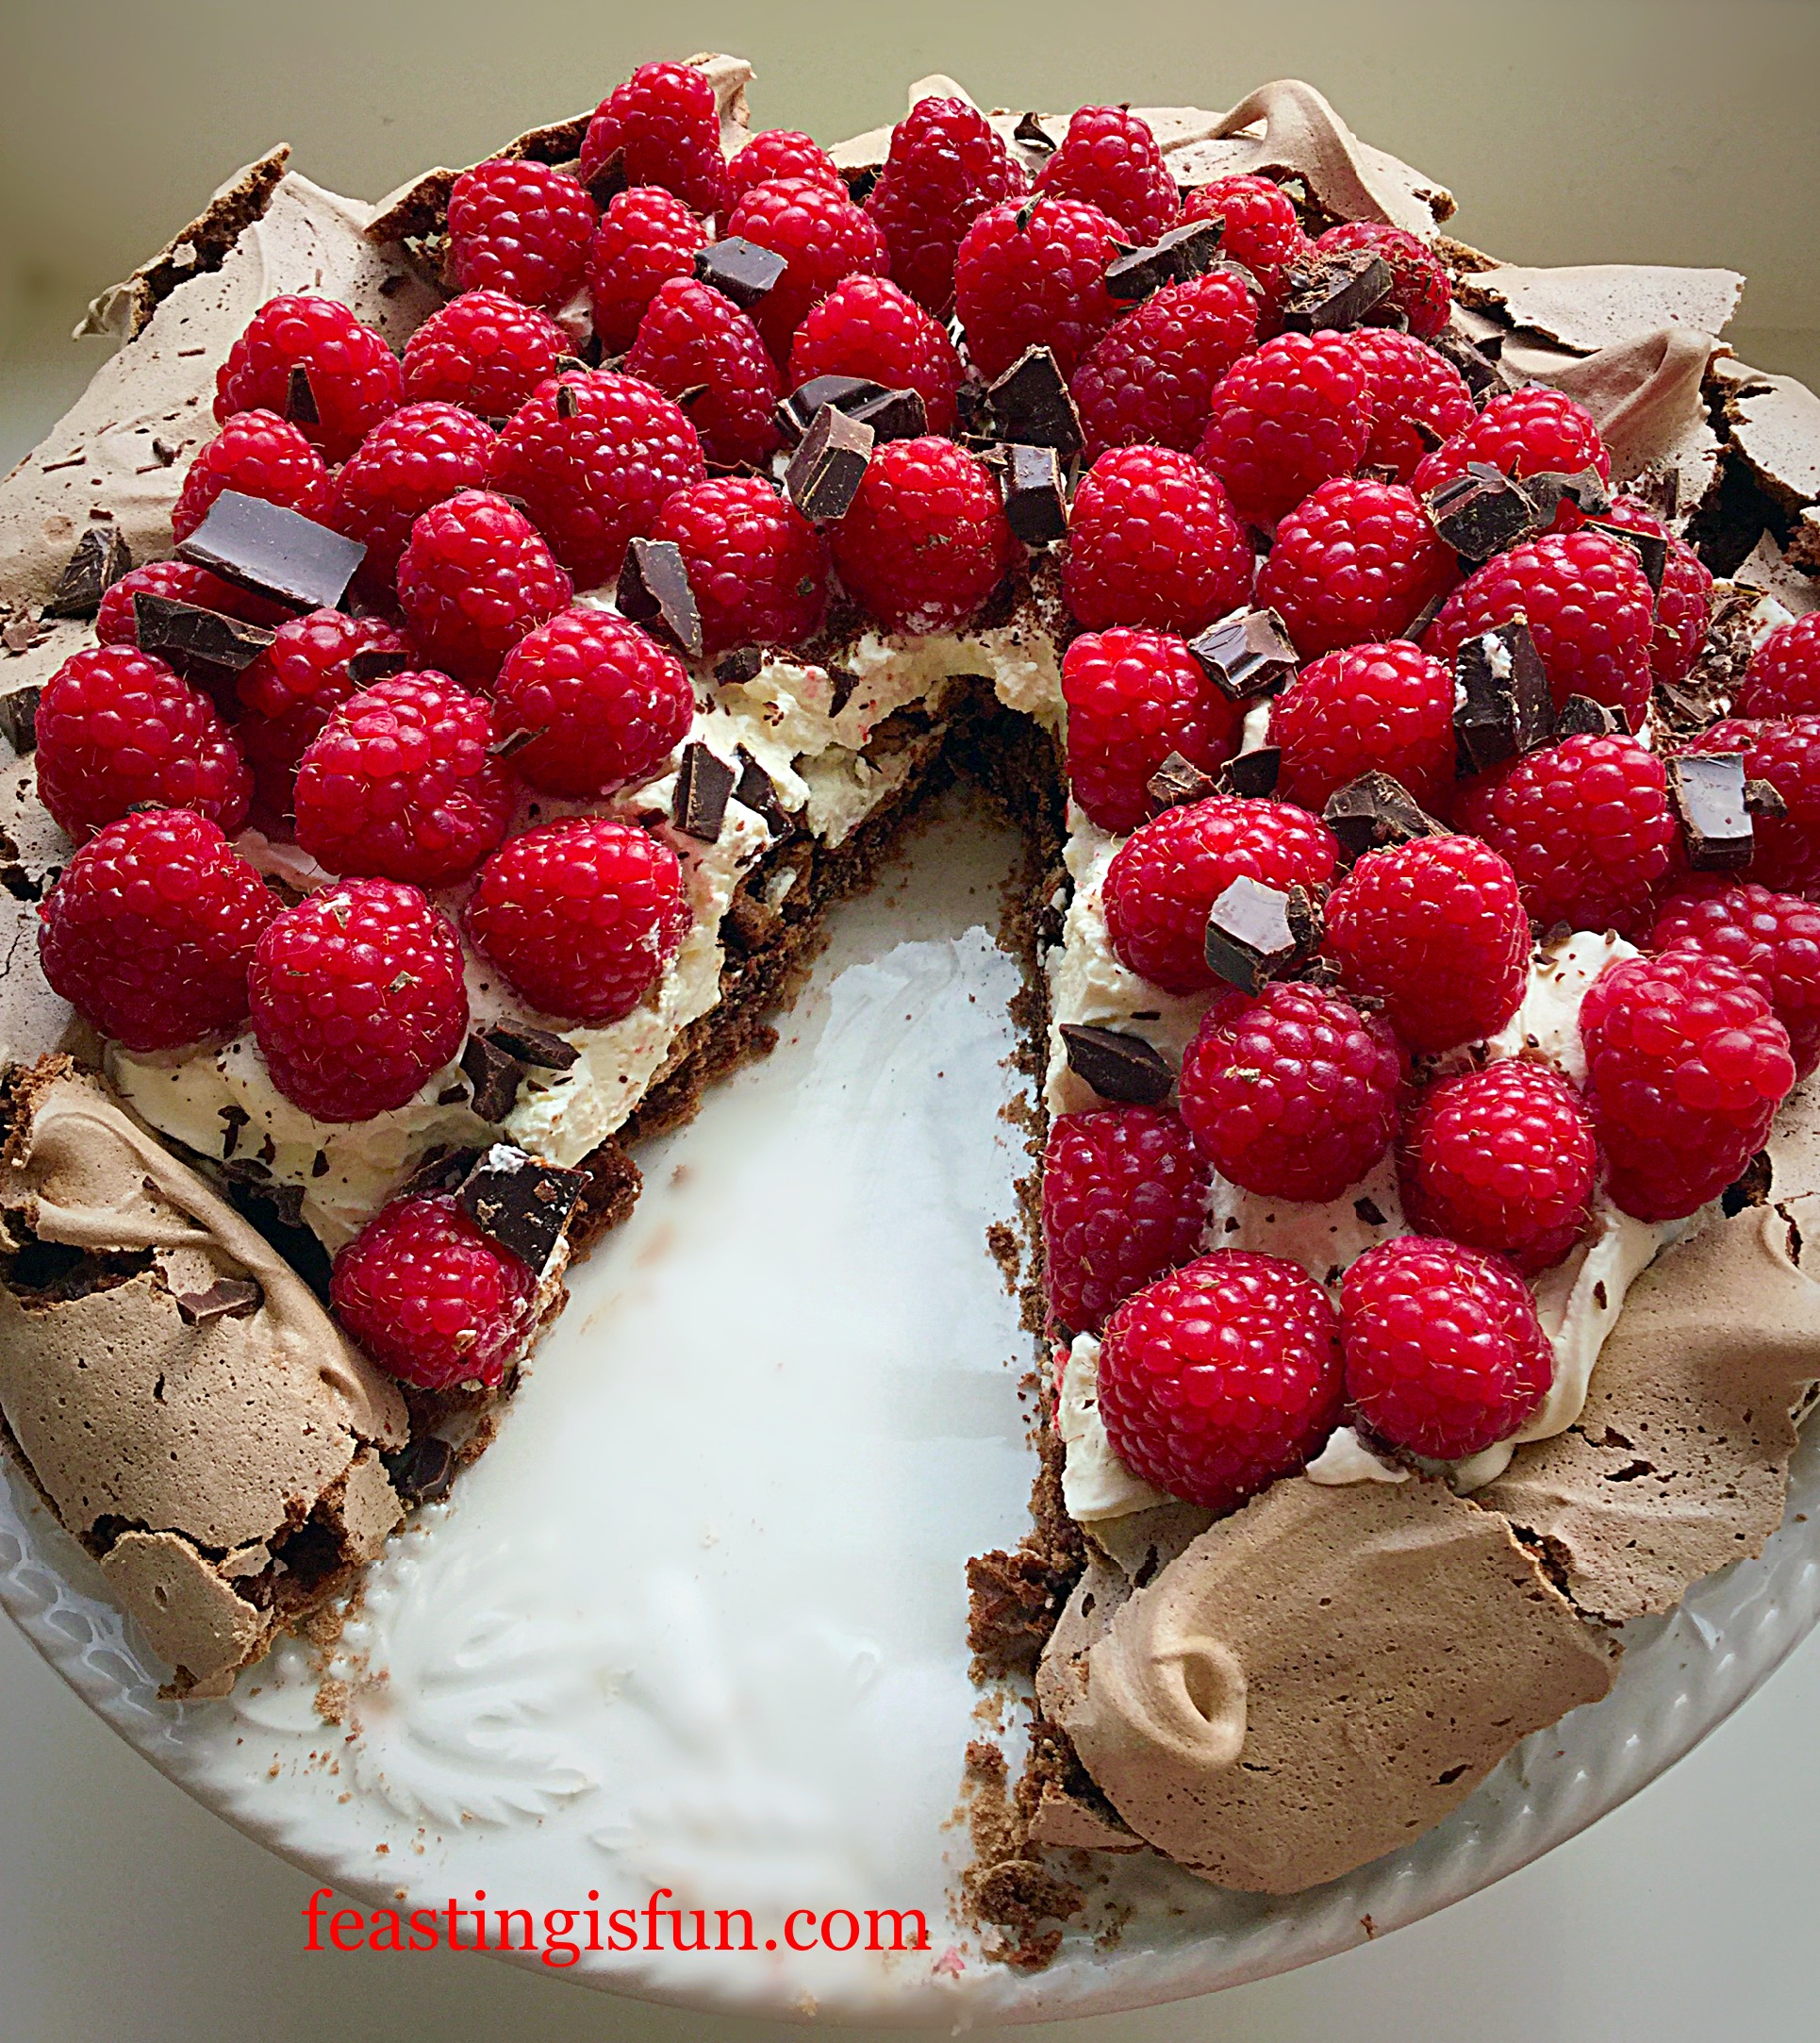
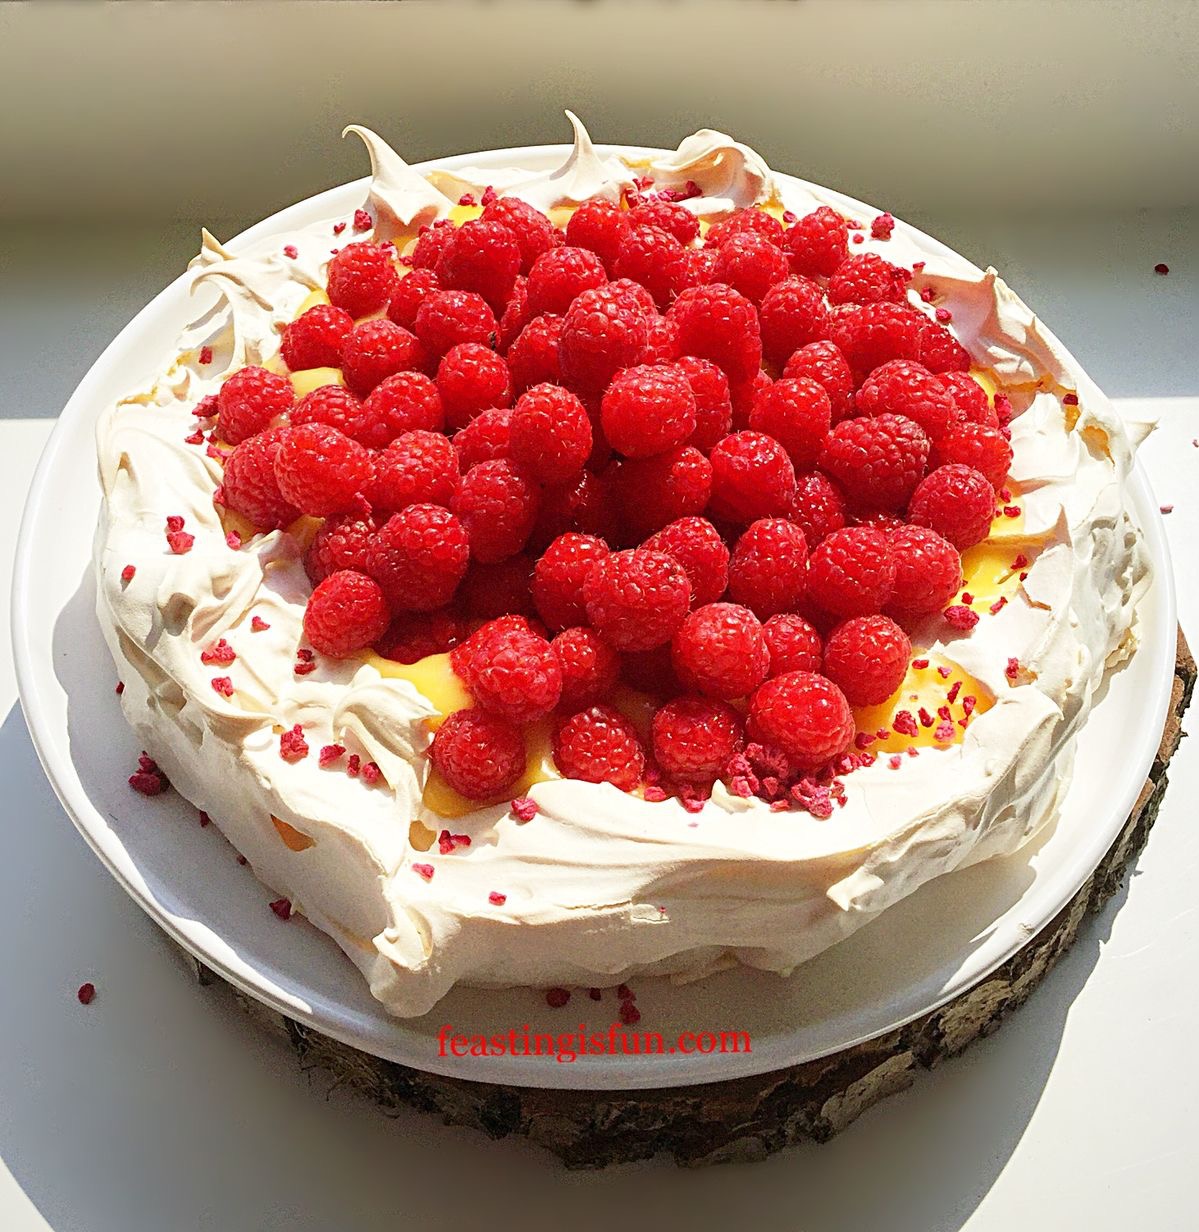
Hello, I’m writing this blog with fond memories of our week spent in the heart of Devon during half term. This Raspberry Chocolate Pavlova was made, at the barn, with minimal equipment and only my memory for the recipe! And I’d certainly call that a challenge!!
Raspberry Chocolate Pavlova
Holiday Baking:
Physically it was a bit of a struggle for me, but that was more than compensated by the time we spent as a family. Hanging out together, all 5 of us on a trampoline ( trust me I wasn’t jumping!) that I thought was going to collapse at any second. Taking turns to row around the pond. Discovering semi-wild farm cats and their kittens in the hay barn – sooo cute. And spending time with our Devon families, both in church and on the farm. Yet most of all being together Feastingand Having Fun!!!!!
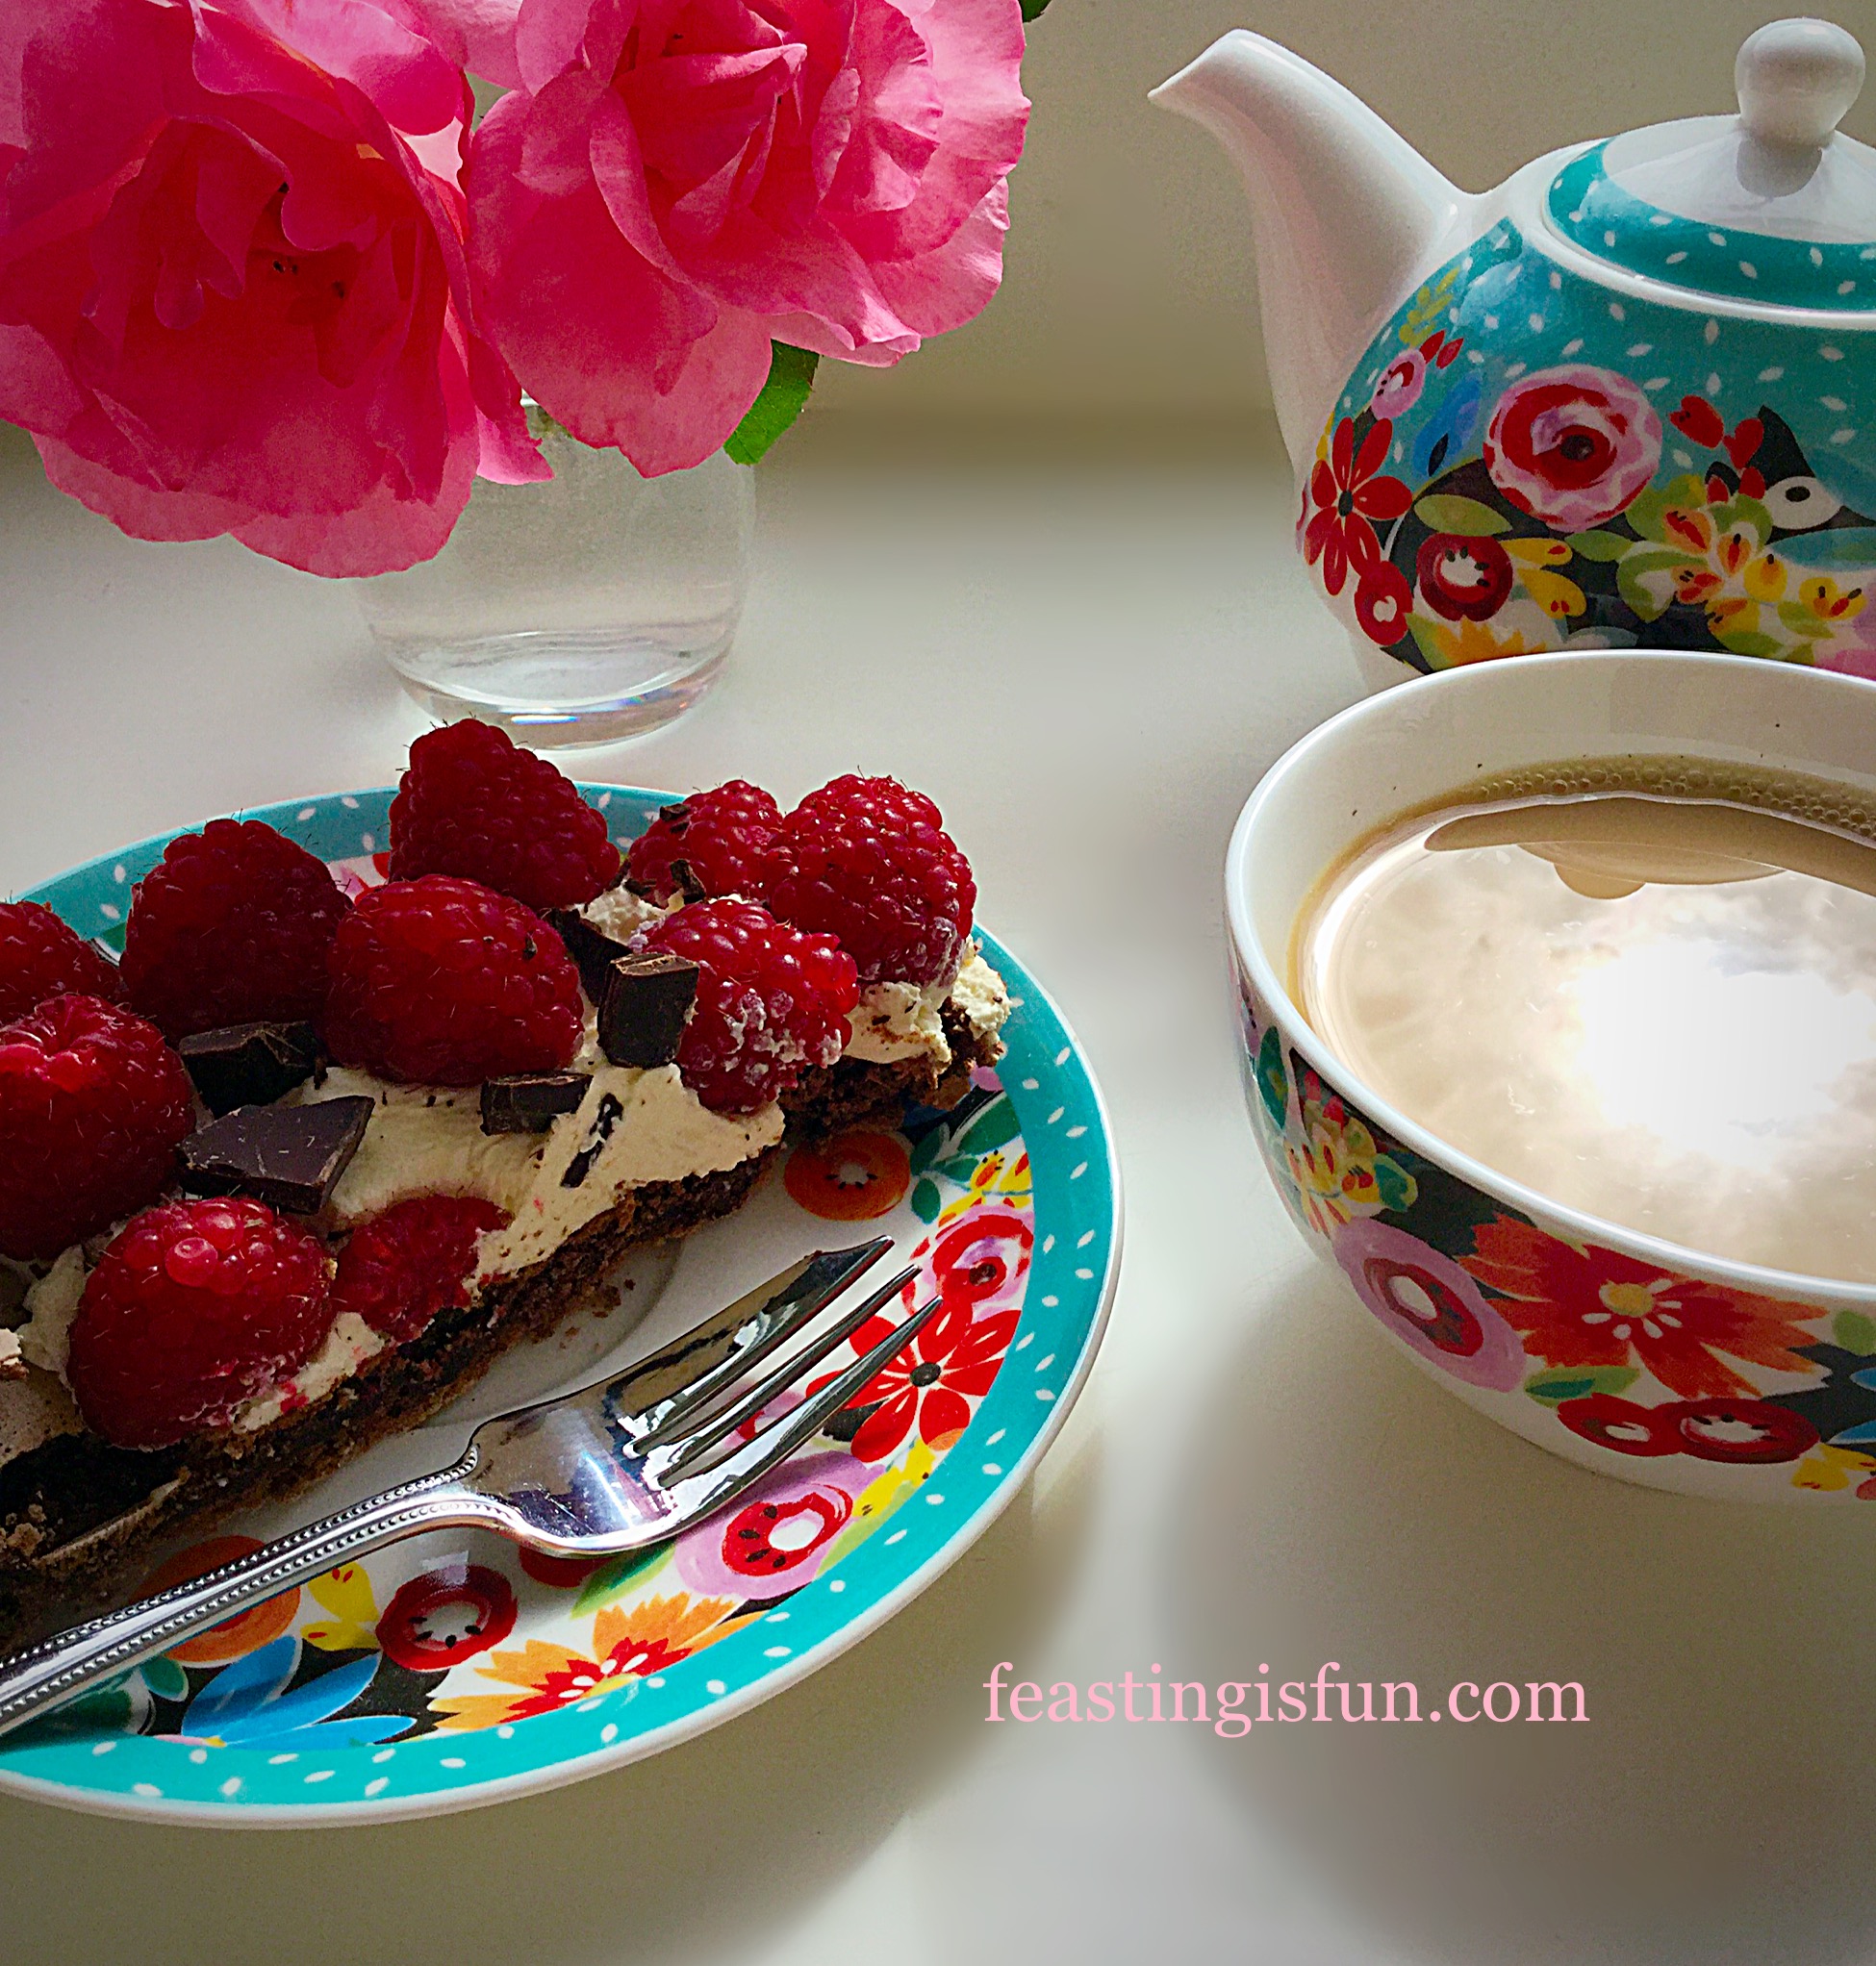
A slice of Raspberry Chocolate Pavlova.
Firstly I have to give complete credit to Nigella for inspiring this scrumptious Raspberry Chocolate Pavlova.
While staying in our gorgeous Barn in the middle of nowhere Pip had invited us to share a meal with her and her wonderful hubby Sailor Man and their daughter Leggy Lou!
Pip would be cooking Lasagne and I offered to do pudding!!
We’ve been staying on the same farm, in the same barn at least 10 years. I was pretty confident, given the restricted equipment available in the barn, that I could ‘easily’ whip up a Raspberry Chocolate Pavlova!!
This is one of those puds that not only has the WOW factor visually but tastes even better than it looks. So simple to do then?
Raspberry Chocolate Pavlova a delicious combination of flavours.
While out shopping I remembered ALL the ingredients (I may have made this a few dozen times before!). Although I couldn’t remember the quantities!
Back at the farm, in a rare moment of actually being able to get a signal, I successfully popped onto Nigella’s website and got the recipe. Fortunately I had not forgotten anything – boy was I relieved!!
Recipe: Raspberry Chocolate Pavlova serves 8
You will need a good sized baking sheet that can take a 30cm diameter circle of meringue, lined with parchment paper.
6 Egg whites. (Preferably free range) at room temp
1 tsp Balsamic vinegar (your just gonna have to trust me on this one???!!)
50g Chopped Dark (70%) Chocolate + an extra 25g Dark (70%) Chocolate chopped very fine, for sprinkling over before serving
450ml Double Cream
300g – 500g Raspberries – Fresh if possible. I have used decent thawed frozen ones in the midst of winter and it worked – Waitrose sell good quality frozen berries
Method: Preheat the your oven to 200C/180C fan (350F, gas mark 4).
Making The Chocolate Pavlova:
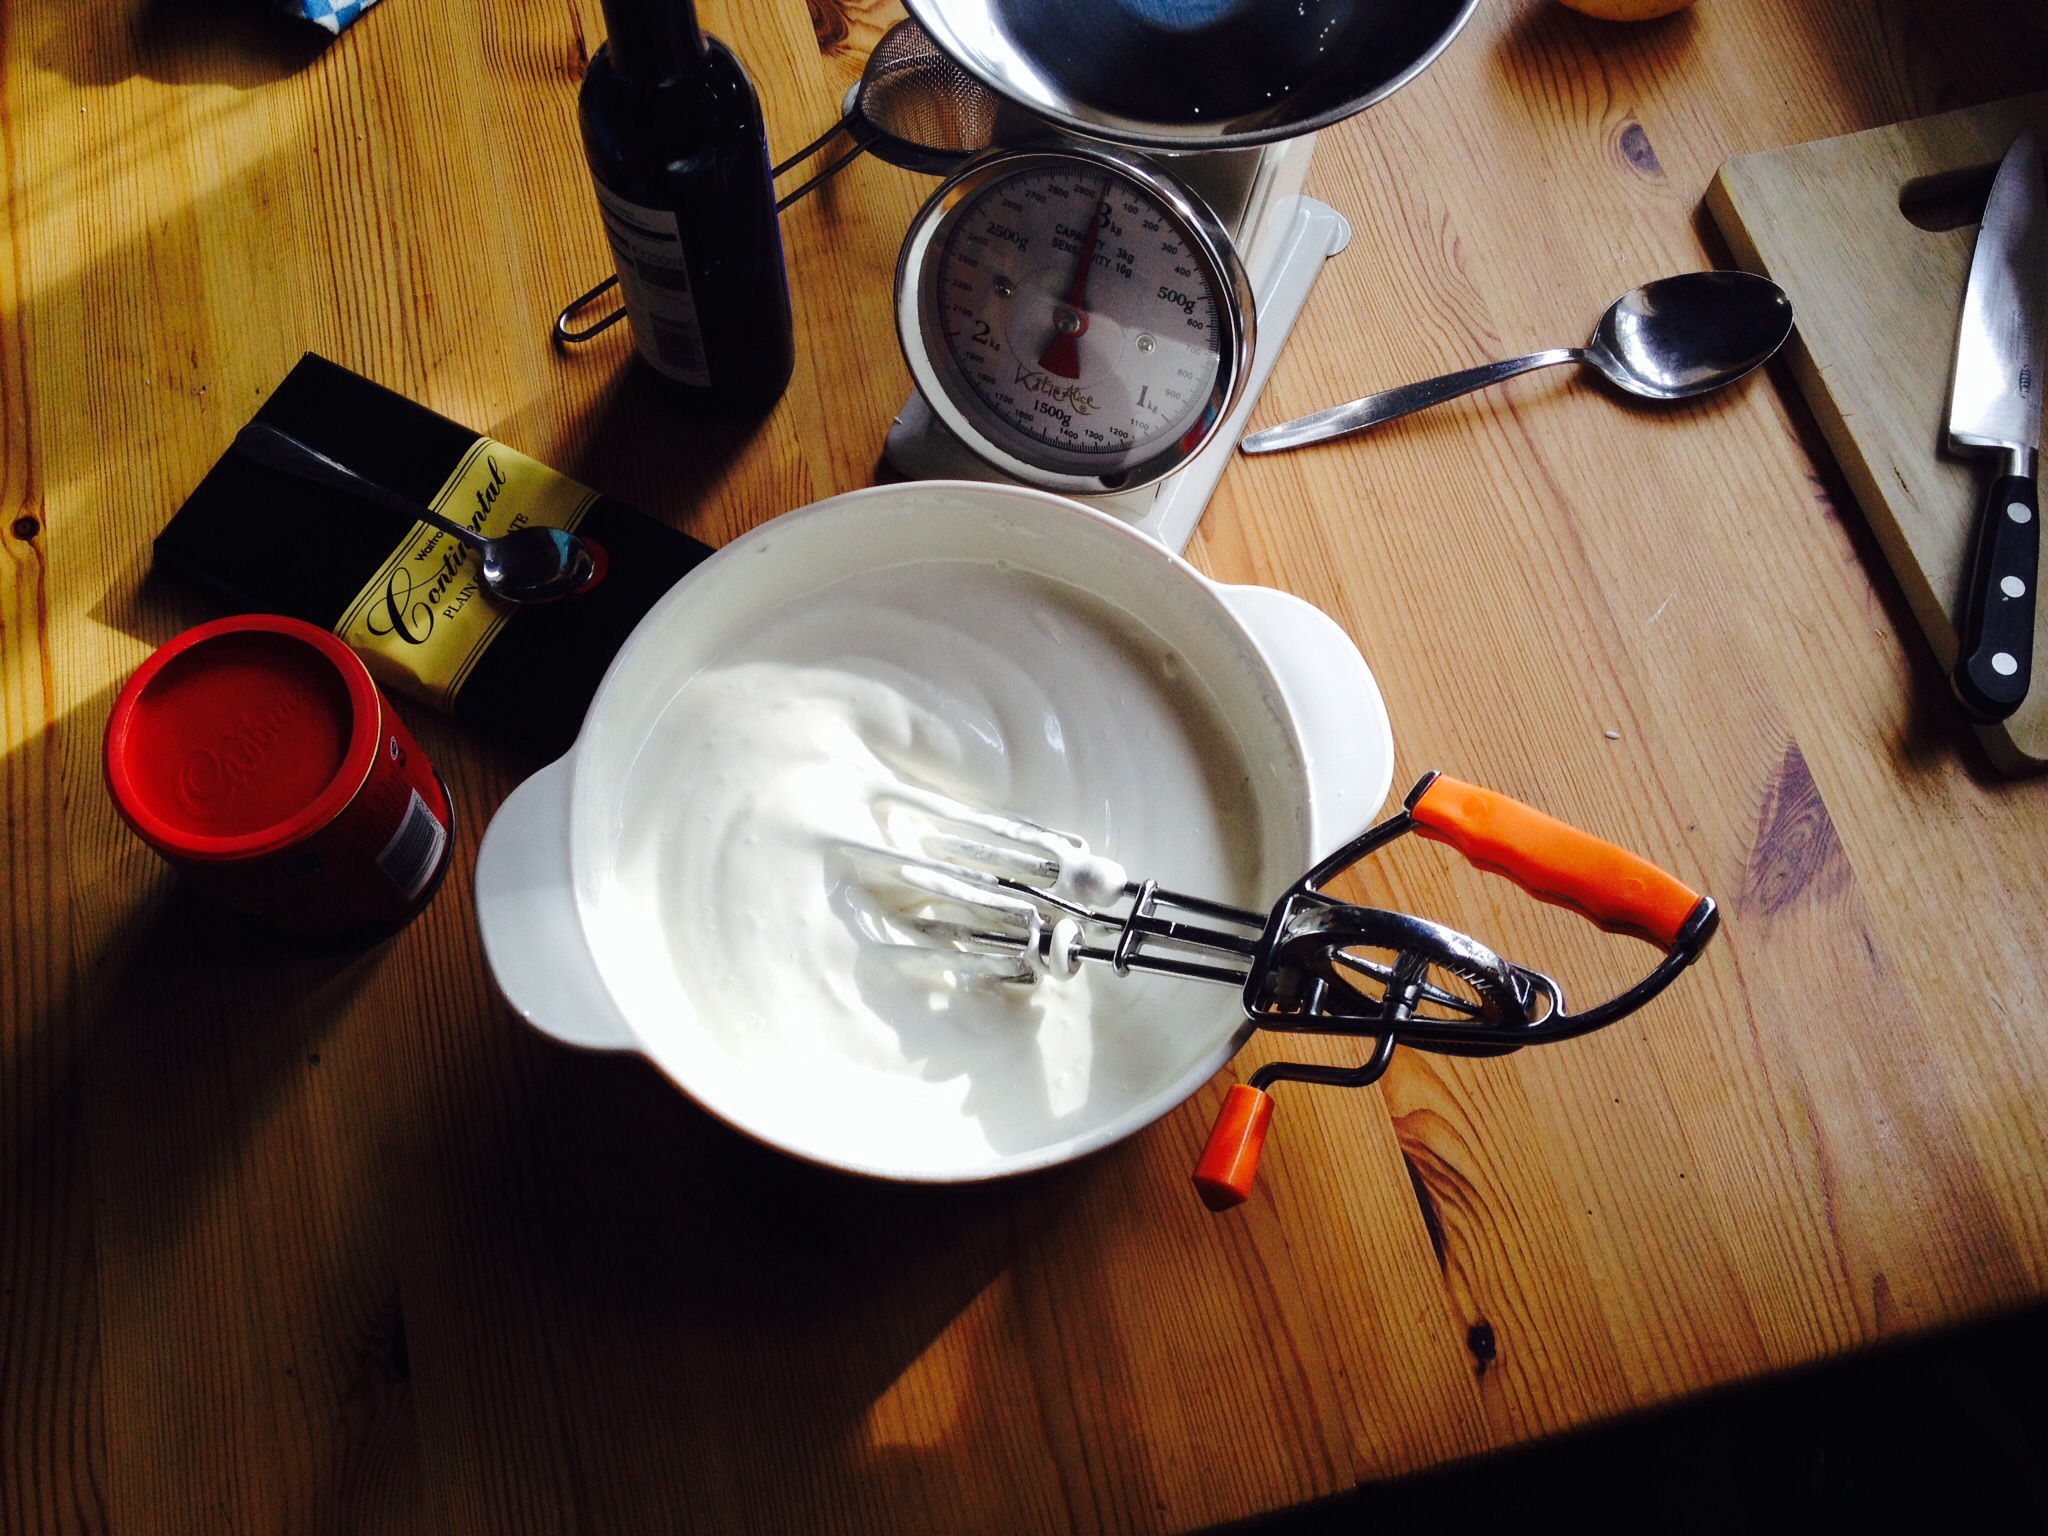
First of all, if you have any kind of electric whisk PLEASE use it. You can see from the photo below that I did not have one and it was VERY HARD WORK!!!
Oh yes – I whisked 6 egg whites using a rotary whisk!!! Gone are the bingo wings!!!
Once the egg whites form stiff, satin peaks slowly add the caster sugar and keep whisking. Oh the joy, what was already a hard job became much more difficult as the sugar mixed into the whites. The mixture will become much thicker.
Once all the sugar is fully incorporated whisk until the meringue mixture is glossy, satiny and holds a stiff peak!
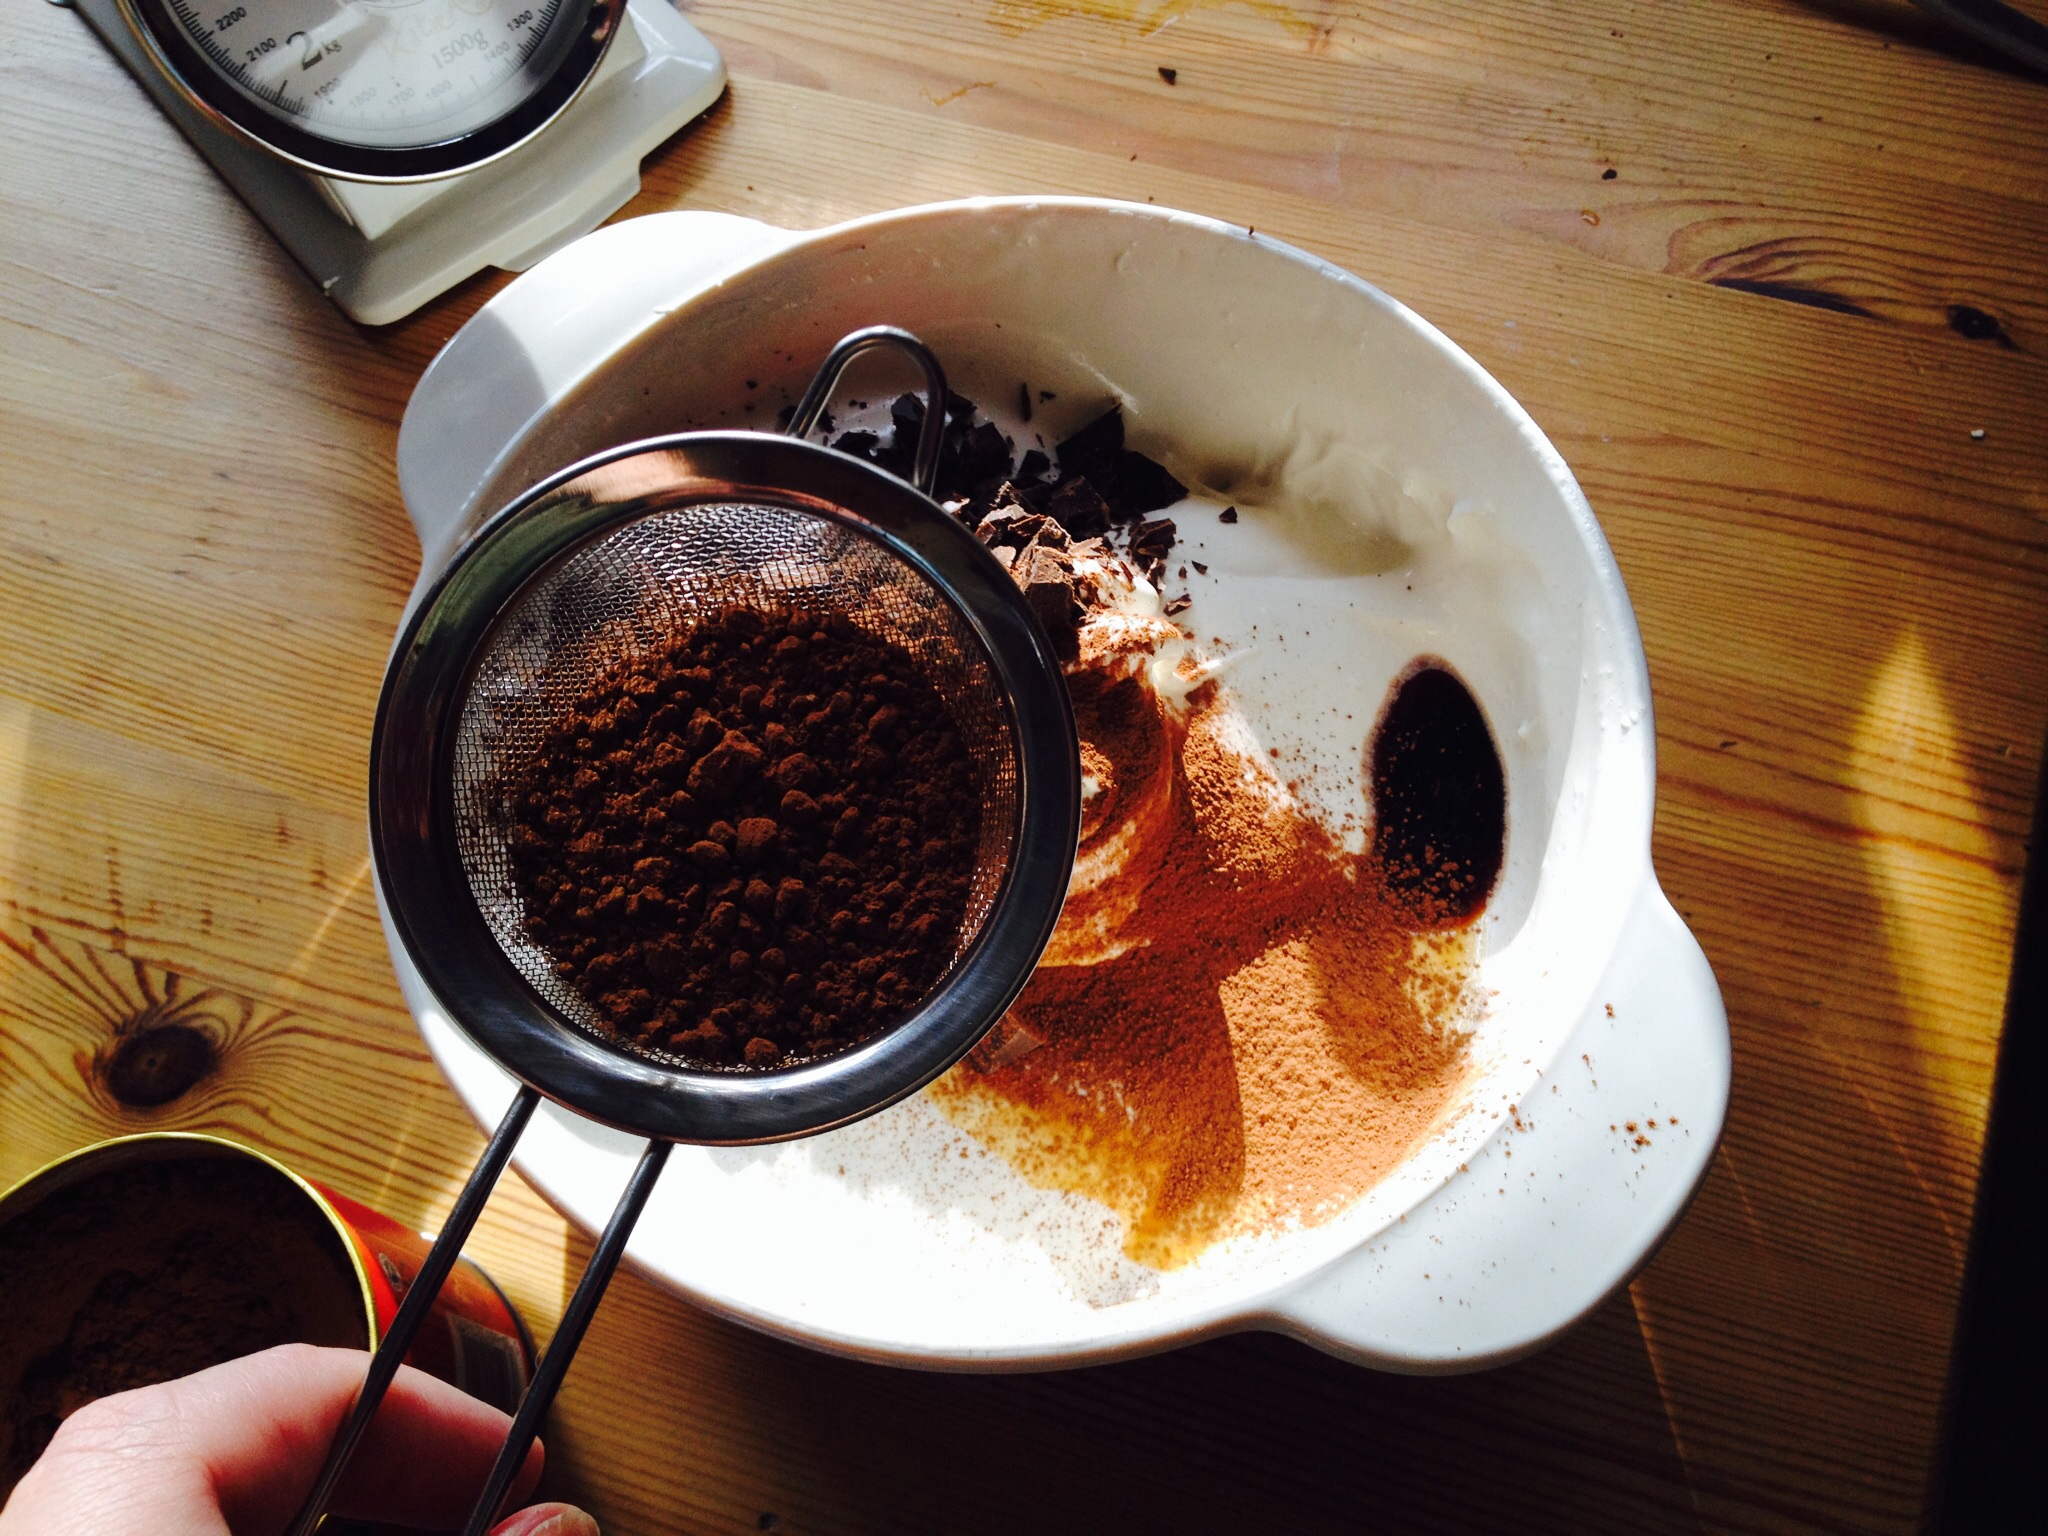
Next add the sieved cocoa, chopped chocolate and balsamic vinegar (stay with my guys it’s really worth it in the end!!!)
I’m not a big sifter?(I am a big sister!!!!!), but cocoa really does need a god old sift to remove any lumps!!
Using a metal spoon gently fold in the chocolate, cocoa and balsamic vinegar until the ingredients are fully combined. This was challenging for me, as you can see from the photos I’d used a straight sided, flat bottomed casserole dish as a mixing bowl!
Still I’m nothing if not adaptable!
Shaping The Pavlova
When at home I draw round a 12″ (30cm) round cake tin, with pencil, on to parchment paper. On holiday I had to ‘guesstimate’!
Flip the paper over, so that the pencil marking is on the underside. At this point, you can attach the parchment to the baking sheet with little dobs of meringue mixture. These act like glue and stop the paper moving around.
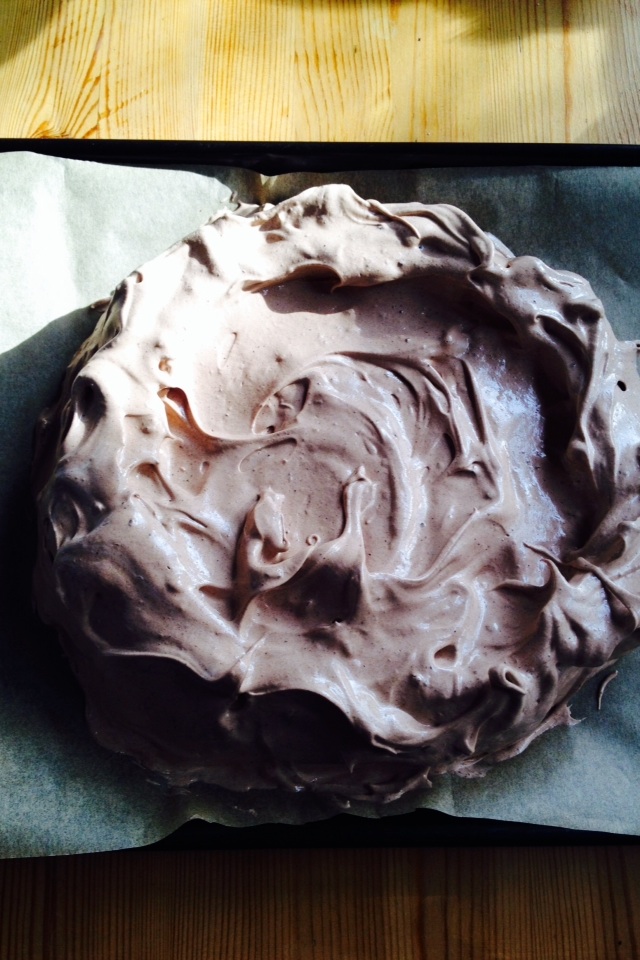
Using the drawn circle as a guide, gently pile on the meringue mixture into the centre using a metal spoon. Use a palette knife (or butter knife if on hols!!!) to gently spread the mixture into an even circle shape approx 30cm across.
I’ve found it helps the cooked Pavlova not to crack if you build the sides up slightly so the centre is approx 1-2cm lower than the edge. It doesn’t matter if it does crack as later on you will be smothering it in whipped cream and raspberries! Using your knife smooth out the centre and create swirls around the outside of the Pavlova. Let your creative, fun side run free!! It’s soo much fun and you can swirl to your hearts content!
The lighting was beautiful in the barn and it makes the Pavlova look sooo pretty x
Making The Chocolate Pavlova
Place the beautiful Pavlova on the middle shelf of the preheated oven (180C – 350F or gas mark 4), immediately turn the oven temperature down to 150C (300F gas mark 2) and bake for 1, 1/4 – 1, 1/2 hours.
If you are confident about the eggs you have used, gather the children around the bowl and let them lick the bowl clean. Make sure you have a little taste too. It’s GORGEOUS. I think it tastes like the lightest chocolate mousse. You are eating raw egg so please do not taste if you are pregnant, unwell or elderly. Also I wouldn’t let my children taste it when they were very young. Our youngest is 12 now so he was allowed to try some!
The Pavlova is cooked when the outside looks lovely and crisp and you can see the dark, fudgey inside through the natural small cracks in the surface.
Turn the oven off and leave to cool completely in the oven.
Decorating The Pavlova
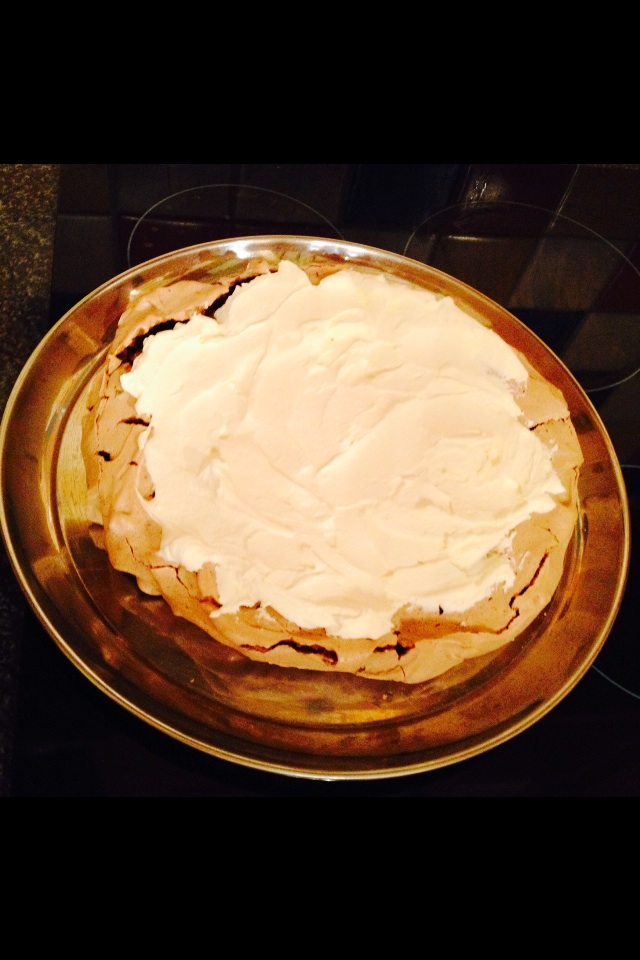
As soon as the Pavlova is completely cool remove from the oven and peel off the Parchment paper (I’ve never yet had one stick using Parchment, if you use greaseproof paper I can’t guarantee it will peel off as easily).
Place the Pavlova on a flat cake stand, cake board or metal tray if that’s all you have to hand!
Whip the cream until thickened but still floppy (adding a teaspoon of caster sugar if you prefer to sweeten the cream) and smother the top of the Pavlova with it leaving a cream free edge.
Just waiting to be adorned.
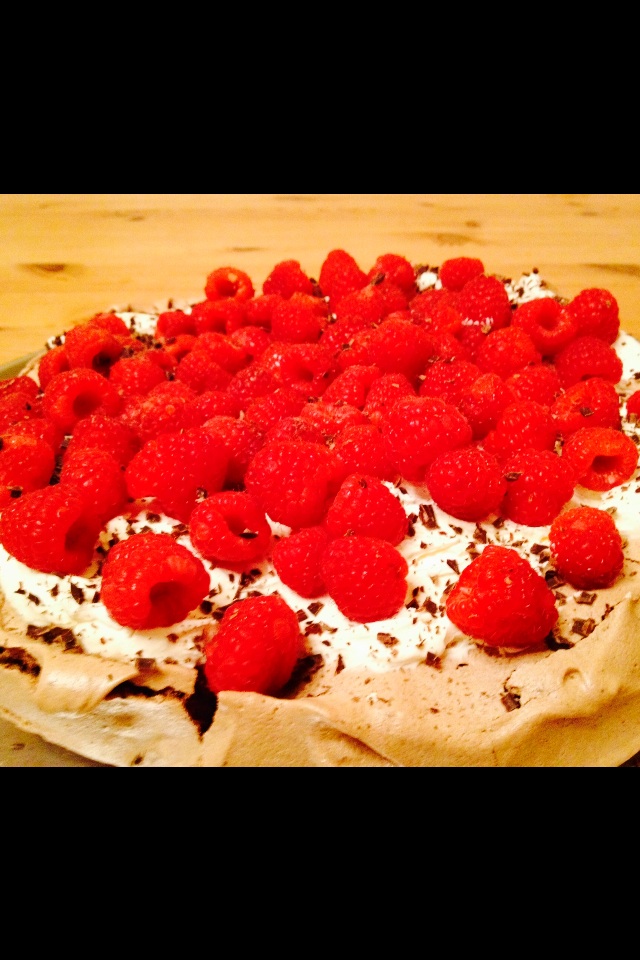
Tumble (or carefully place it’s your choice!) the raspberries over the cream topped Pavlova.
Now finally sprinkle over the remaining 25g (about a tablespoon) of finely chopped dark chocolate.
Soo beautiful,Raspberry Chocolate Pavlova. the proof of the pudding is in the eating!!!
Serving Dessert
We shared this with our dinner hosts who were extremely complimentary about the combination of flavours, but mostly the hidden, almost brownie like middle of the Pavlova. The contrast between the crunchy outer layer, the sublime tartness of raspberry enveloped in velvety whipped cream and then the surprise, almost fudgey centre with nubs of chocolate work to create a TASTE SENSATION! Thank you Nigella for inspiring this recipe.
Raspberry Chocolate Pavlova the perfect sweet treat to take to take to someone’s house.
If you have enjoyed this recipe for Raspberry Chocolate Pavlova you may also like these:
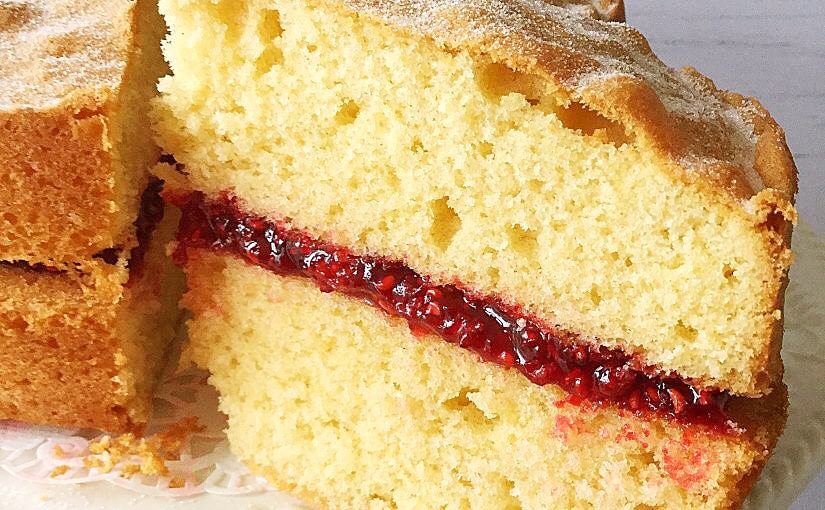
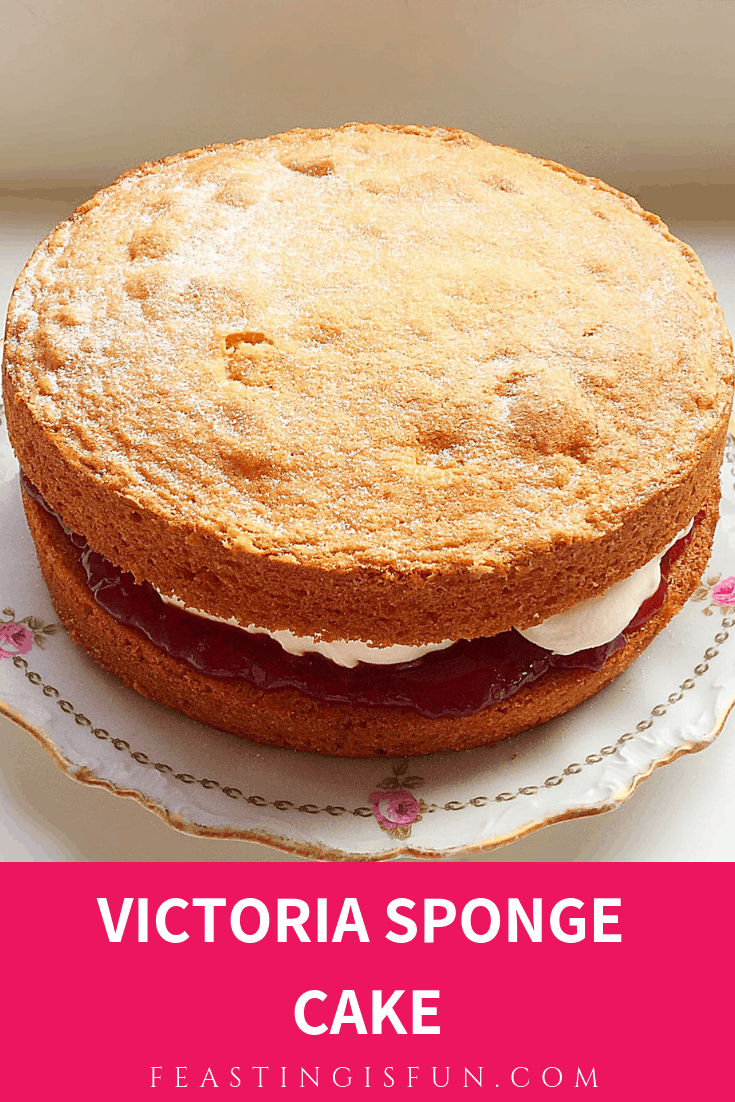
Victoria Sponge Cake, light, buttery, golden sponges sandwiched together with homemade raspberry jam. A simple recipe that yields a completely knockout cake both in flavour and looks. And as you master this recipe, you will forever be asked to “bring THAT cake” when gathering with friends and family. Because, put simply, this is a cake for feasting.
Since a Victoria Sponge Cake is two identical sponge cakes put together with a slather of jam (and whipped cream if desired) in the middle, it is a great starting point for any baking journey. Because there are no complicated decorating techniques, or steps in the method, the finished cake is all about two things. First of all taste; good quality ingredients are key, butter should not be substituted with margarine. Also, texture; a light sponge is a direct result of not over mixing the cake batter.
Victoria Sponge Cake
Raspberry jam lends a sweet, slightly tart, intense fruit flavour against the buttery, vanilla sponge. While a good quality bought jam is fine to use, making fresh jam adds an additional edge. Since it requires very little time to make I really urge you to try it. Finally, with a light touch and using great quality ingredients the finished result is the Queen of all cakes. I say Queen as this cake is named after Queen Victoria herself.
Victoria Sponge Cake
Recipe: Victoria Sponge Cake serves 8-10
2 x 20cm (8in) greased loose bottom cake tins, the base of each lined with baking parchment.
225g/8oz Caster Sugar plus 1/2 tsp for dusting the finished cake
Fresh Raspberry Jam use 5 tablespoons of good quality jam if not making from scratch
Juice of 1 Lemon approximately 30mls
225g/8oz Fresh or Frozen Raspberries – I used frozen from Waitrose
225g/8oz Sugar
Optional – 300ml Whipped Cream (double or heavy cream)
Method: Preheat the oven to 180C/160C fan oven, gas mark 4, 350F.
Making the cake sponges
First of all thoroughly grease with butter, both cake tins and line the base with baking parchment.
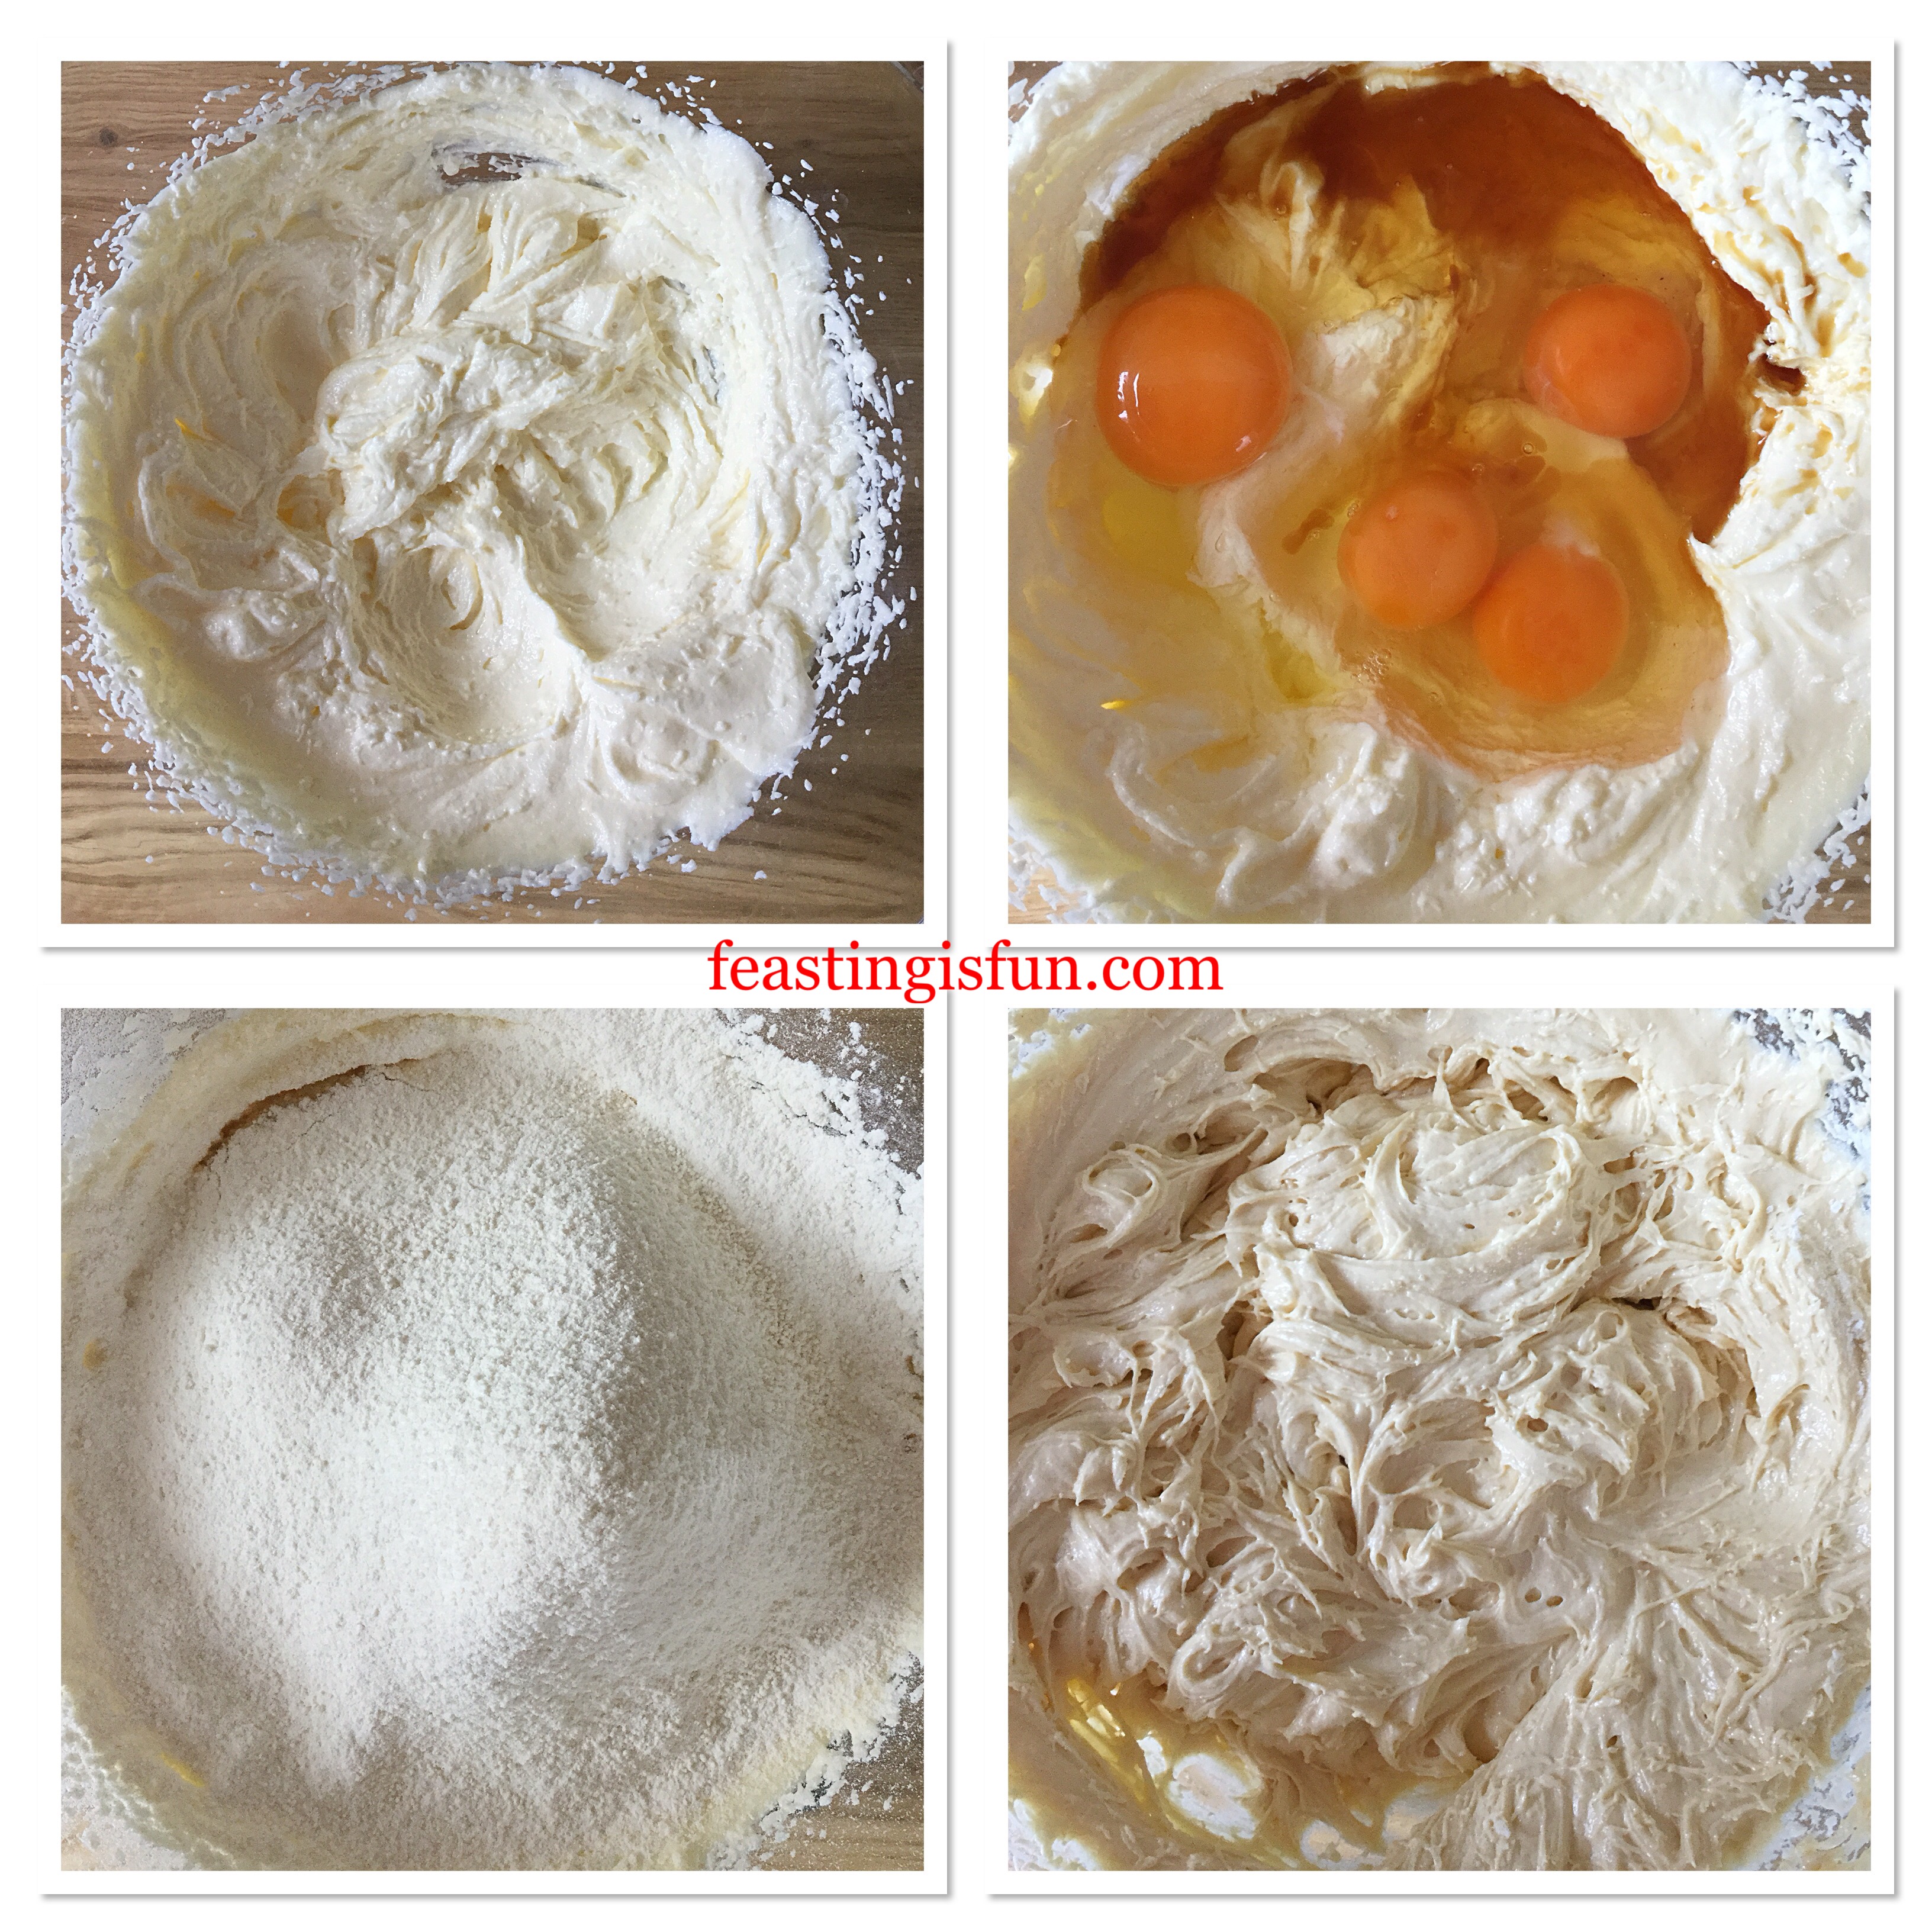
Place the sugar, butter and salt into a large bowl. Whisk the ingredients together until pale and fluffy – if using a stand mixer use the paddle attachment.
Rub a little of the mixture between your fore finger and thumb. If no grittiness is felt the sugar is well mixed into the butter.
Next add the eggs and vanilla extract. Add 1 tablespoon of the flour and whisk together for 30 seconds to combine.
Sift the flour (and baking powder if required) into the bowl.
Whisk the ingredients together until just combined. Over whisking, or beating will develop the flour’s gluten, resulting in a tough, baked cake.
Making the cake batter.
Spoon the cake batter into the prepared tins, dividing evenly between the two. If wanted weigh equal quantities of cake batter into the tins.
Smooth the top of the batter with a spoon.
Prepared cake batter in the tins, ready to be baked.
Place the tins into the centre of the oven (centre and lower shelf if they cannot fit on one shelf).
Bake for 35-45 minutes until golden in colour. The cakes are baked when the top springs back when lightly pressed.
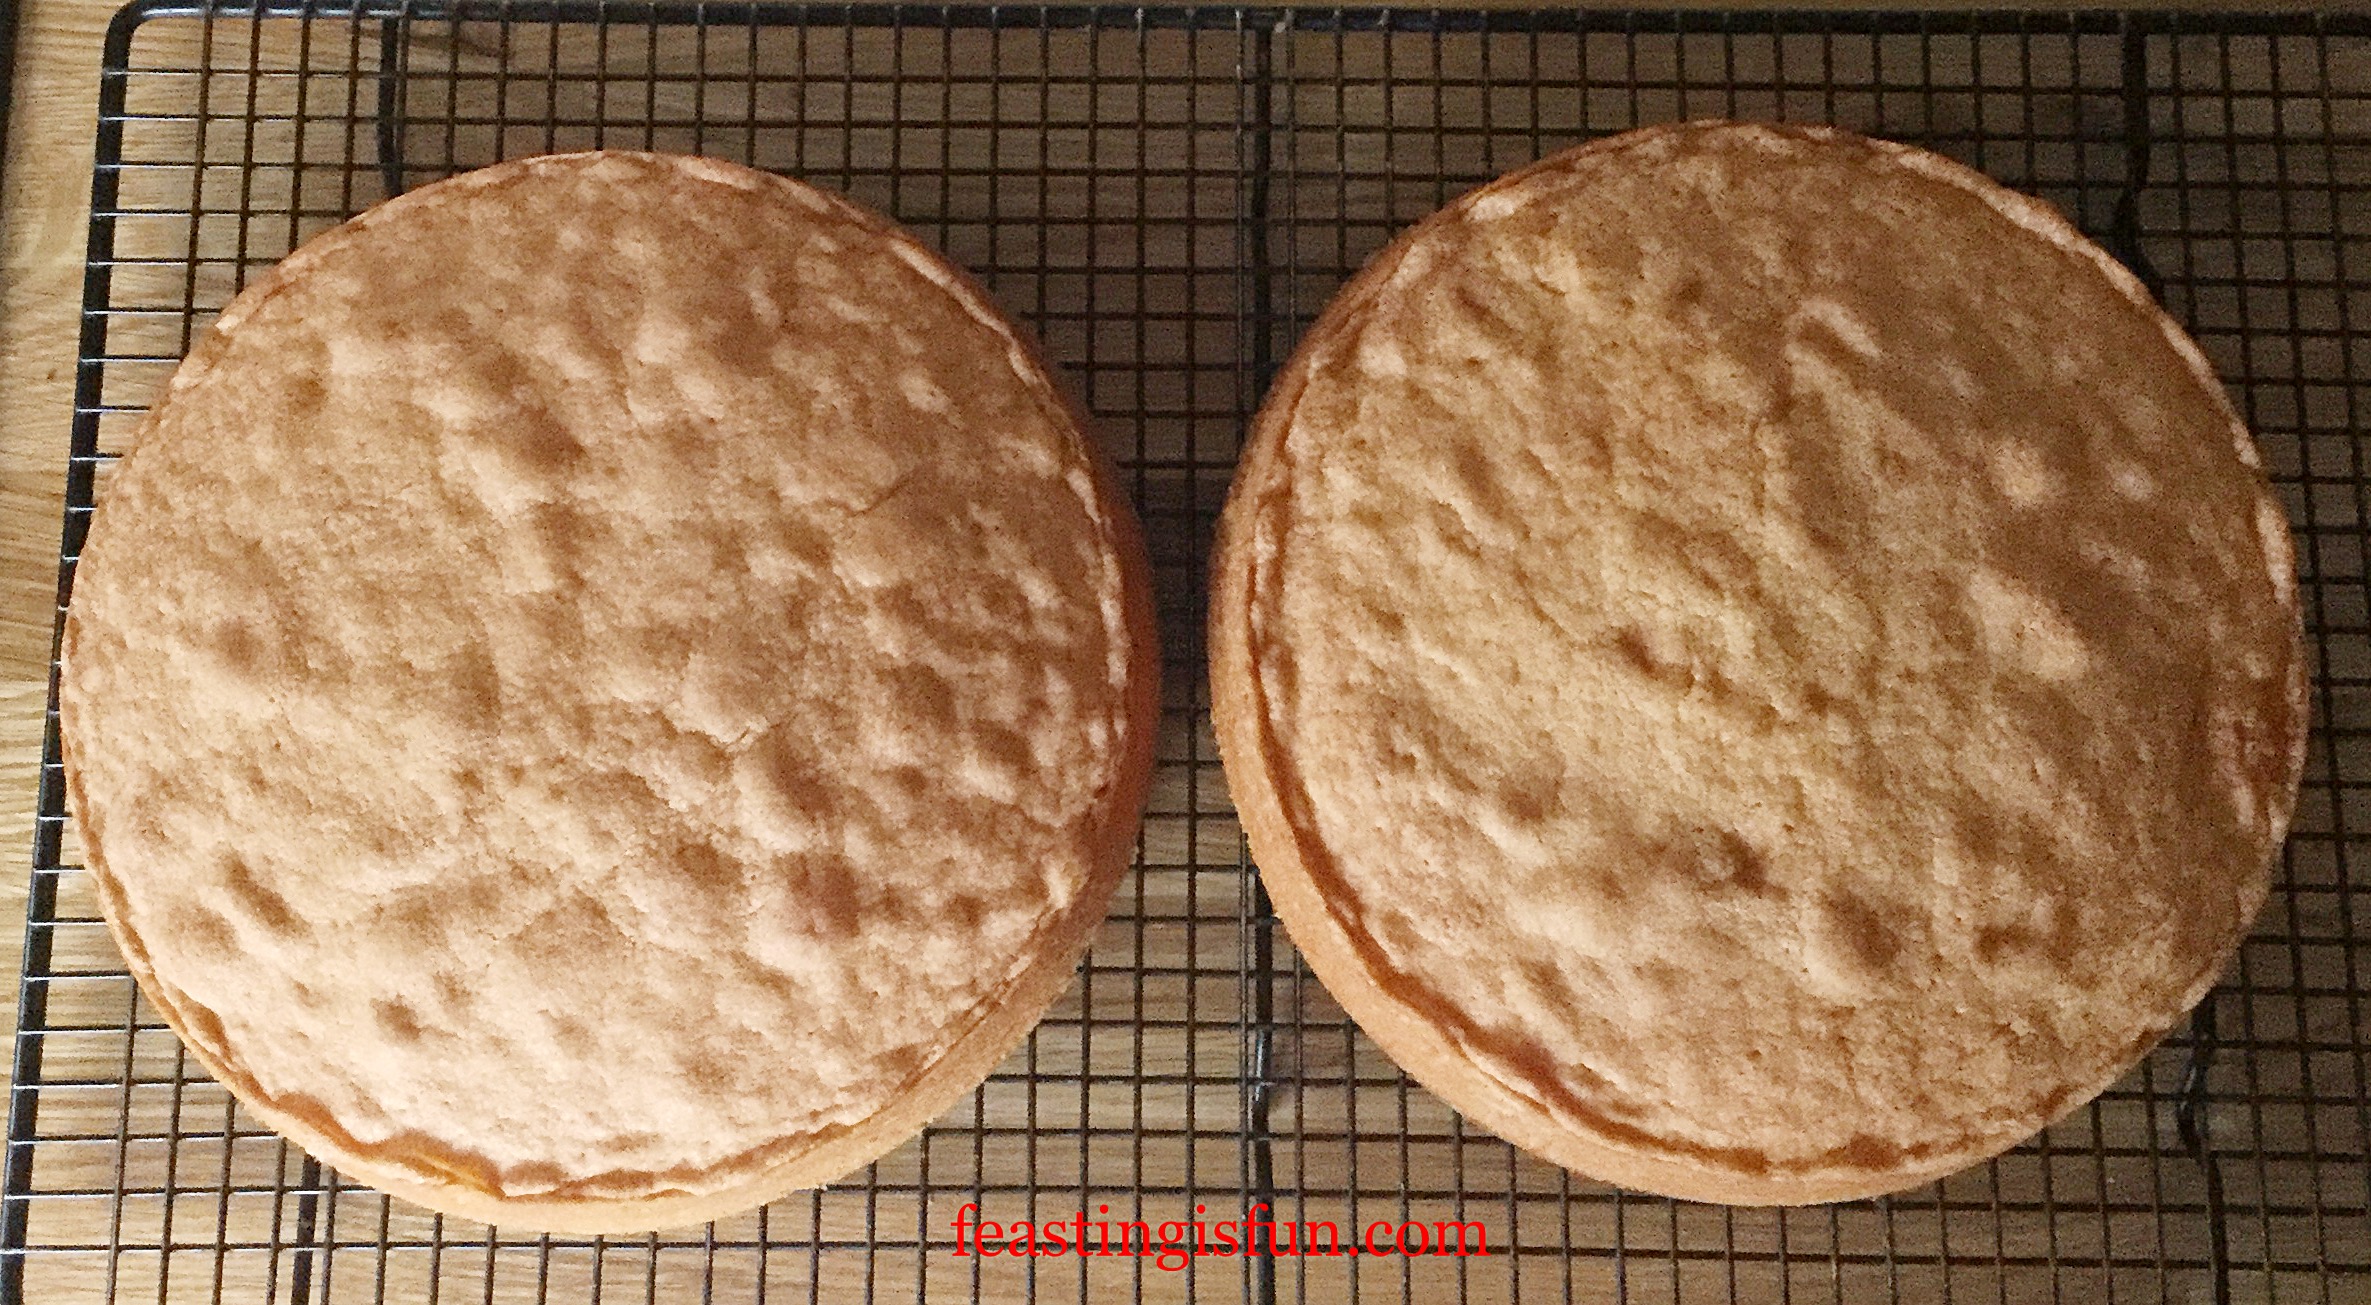
As soon as the cakes are baked remove from the oven and place the tins on a cooling rack.
Allow each cake to cool in the tin for 15 minutesbefore turning out, top of the cake uppermost and placing directly on to a cooling rack.
Golden sponges cooling.
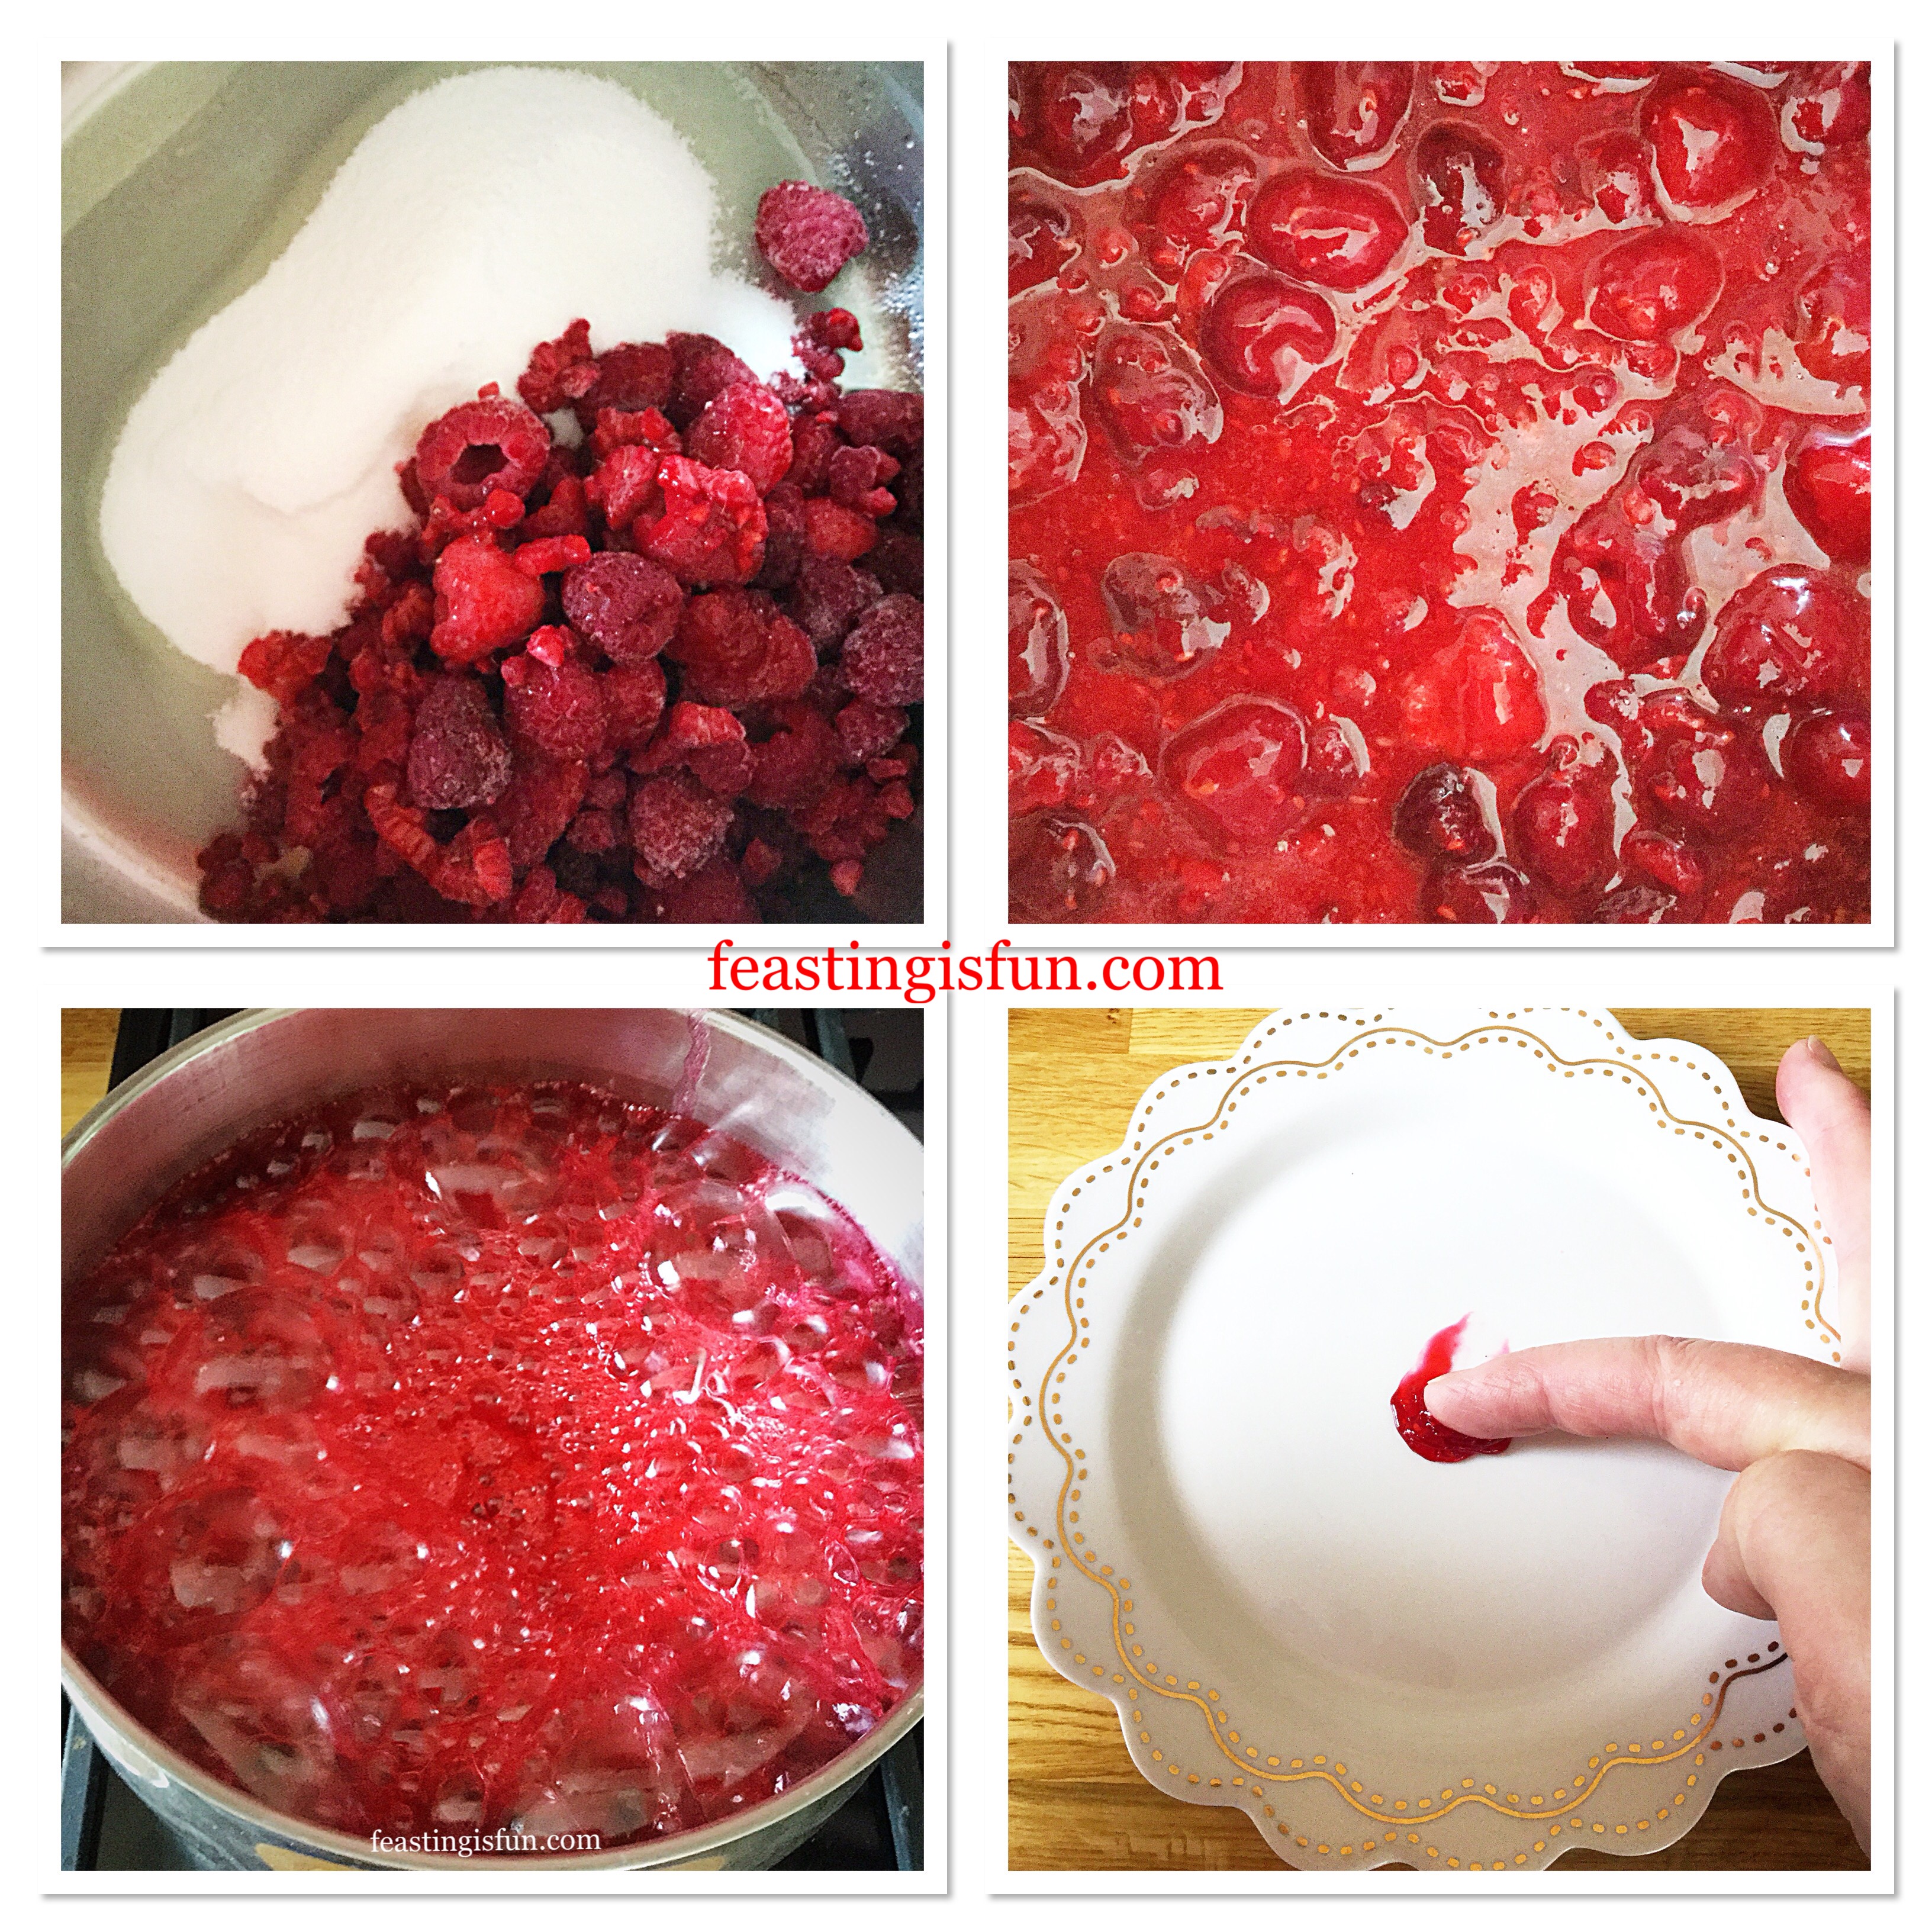
Making the fresh raspberry jam
While the cakes are cooking make the raspberry jam:
Into a large, heavy bottomed saucepan add the lemon juice, raspberries and sugar.
Also place 2 small plates or saucers into the fridge to chill.
Stir the ingredients together with a wooden spoon and bring up to a simmer on a low heat.
As soon as the sugar is dissolved increase the heat to bring the jam up to a rolling boil – bubbling vigorously but not over the sides of the pan.
Stir to ensure the jam does not stick. Take care as the jam will be very HOT.
After 5 minutes at a rolling boil spoon a few drops of hot jam on to one of the chilled plates. Allow to cool for a minute. Using your finger, push one side of the jam, if it wrinkles up the jam is ready; it has reached setting point. Should the jam not wrinkle continue cooking for a further 2 minutes and test again.
Freshly made Raspberry Jam for the Victoria Sponge Cake.
As soon as the jam has reached setting point remove the pan from the heat.
Pour the very hot jam into a heatproof bowl and set aside to cool.
Freshly made raspberry jam.
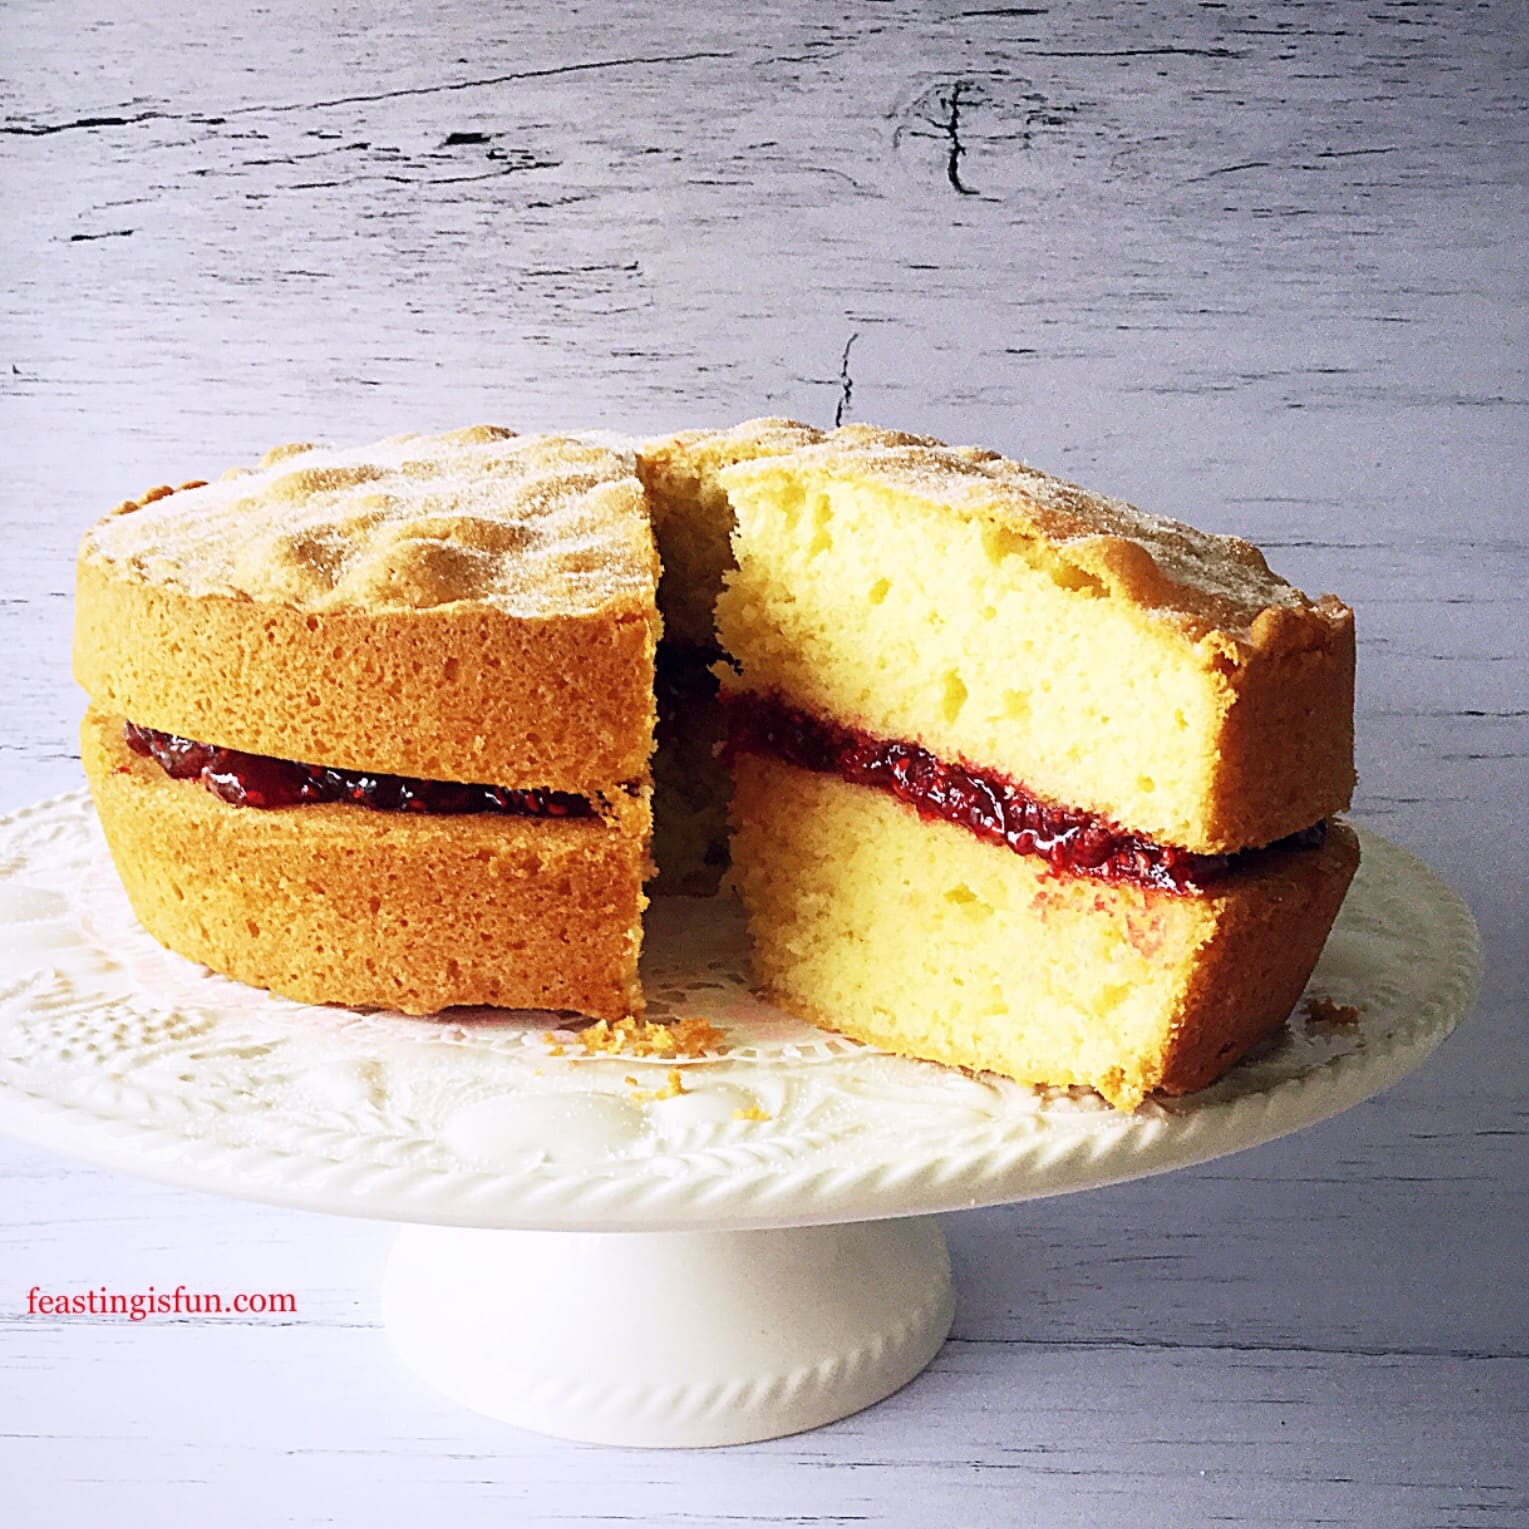
Assembling the cake
To assemble the Victoria Sponge Cake ensure both sponges and the raspberry jam are cold.
Carefully peel the baking parchment away from both sponges.
Place a sponge, flat side up on to a plate or board.
Spoon all of the jam on to the flat sponge and spread almost to the edge. Also, add a layer of whipped cream if desired.
Place the second sponge, flat side down, on top of the jam covered bottom sponge.
Finish with a light dusting of caster sugar on the top of the cake.
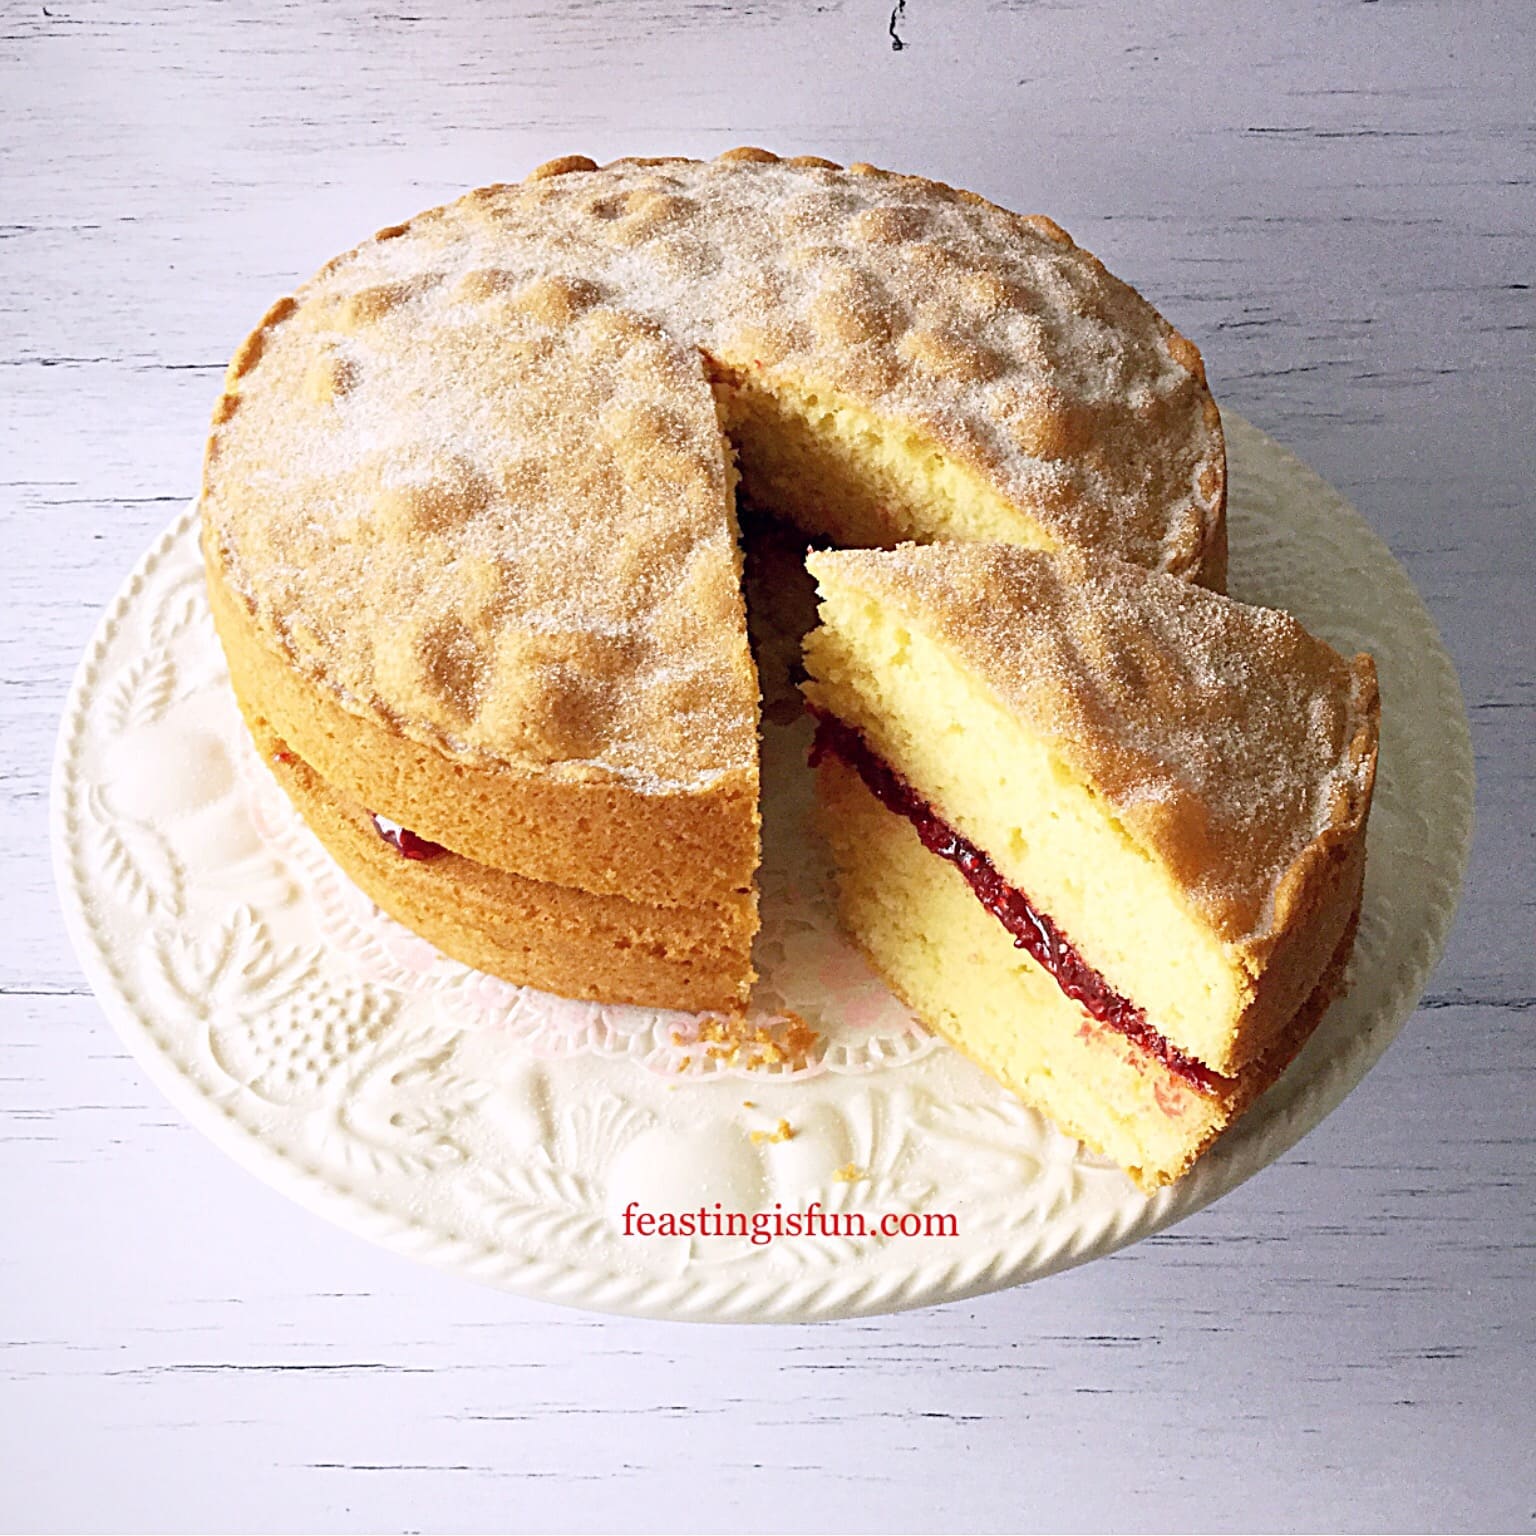
Victoria Sponge Cake filled with freshly made raspberry jam.
Serve this cake sliced with a good quality, fresh made cup of tea. Alternatively a glass of champagne for a special occasion compliments both the event and cake.
Store in an airtight container and eat within 5 days. Always refrigerate the cake when adding cream and also during warm weather.
Alternatively, for a heart shaped cake, bake all of the cake batter in a greased and lined, heart shape tin. As soon as the cake is cool cut the cake in half across its width. Fill with whipped cream and strawberry jam. Finally pipe cream onto the top of the cake and decorate with strawberries.
Heart Shaped Victoria Sponge Cake
If you have enjoyed this recipe for Victoria Sponge Cake with fresh raspberry jam filling you may also like these:
While this cake may be easy to make, learning to master a simple recipe and make it well is the foundation to becoming a great cook and baker. Since cake decorating and presentation are of no importance if the product being served and shared does not taste appealing. And flavour always comes first in any feast. Never more so than when the feast is marking a special occasion. Because, friends and family bring out the flavour even further, as my long held belief shows that food shared always tastes better.
So, whatever you are making, baking and creating in your kitchens, have fun preparing and sharing your feast.
Sammie xx
No part of this post may be reproduced or duplicated without the written permission of the owner. Please see my Disclosure Policy.